MORE HANDBOOKS ARE ON THEIR WAY! We will let you know when they get here.
×


Brucealanevans
-
Posts
450 -
Joined
-
Last visited
Content Type
Profiles
Forums
Gallery
Events
Everything posted by Brucealanevans
-
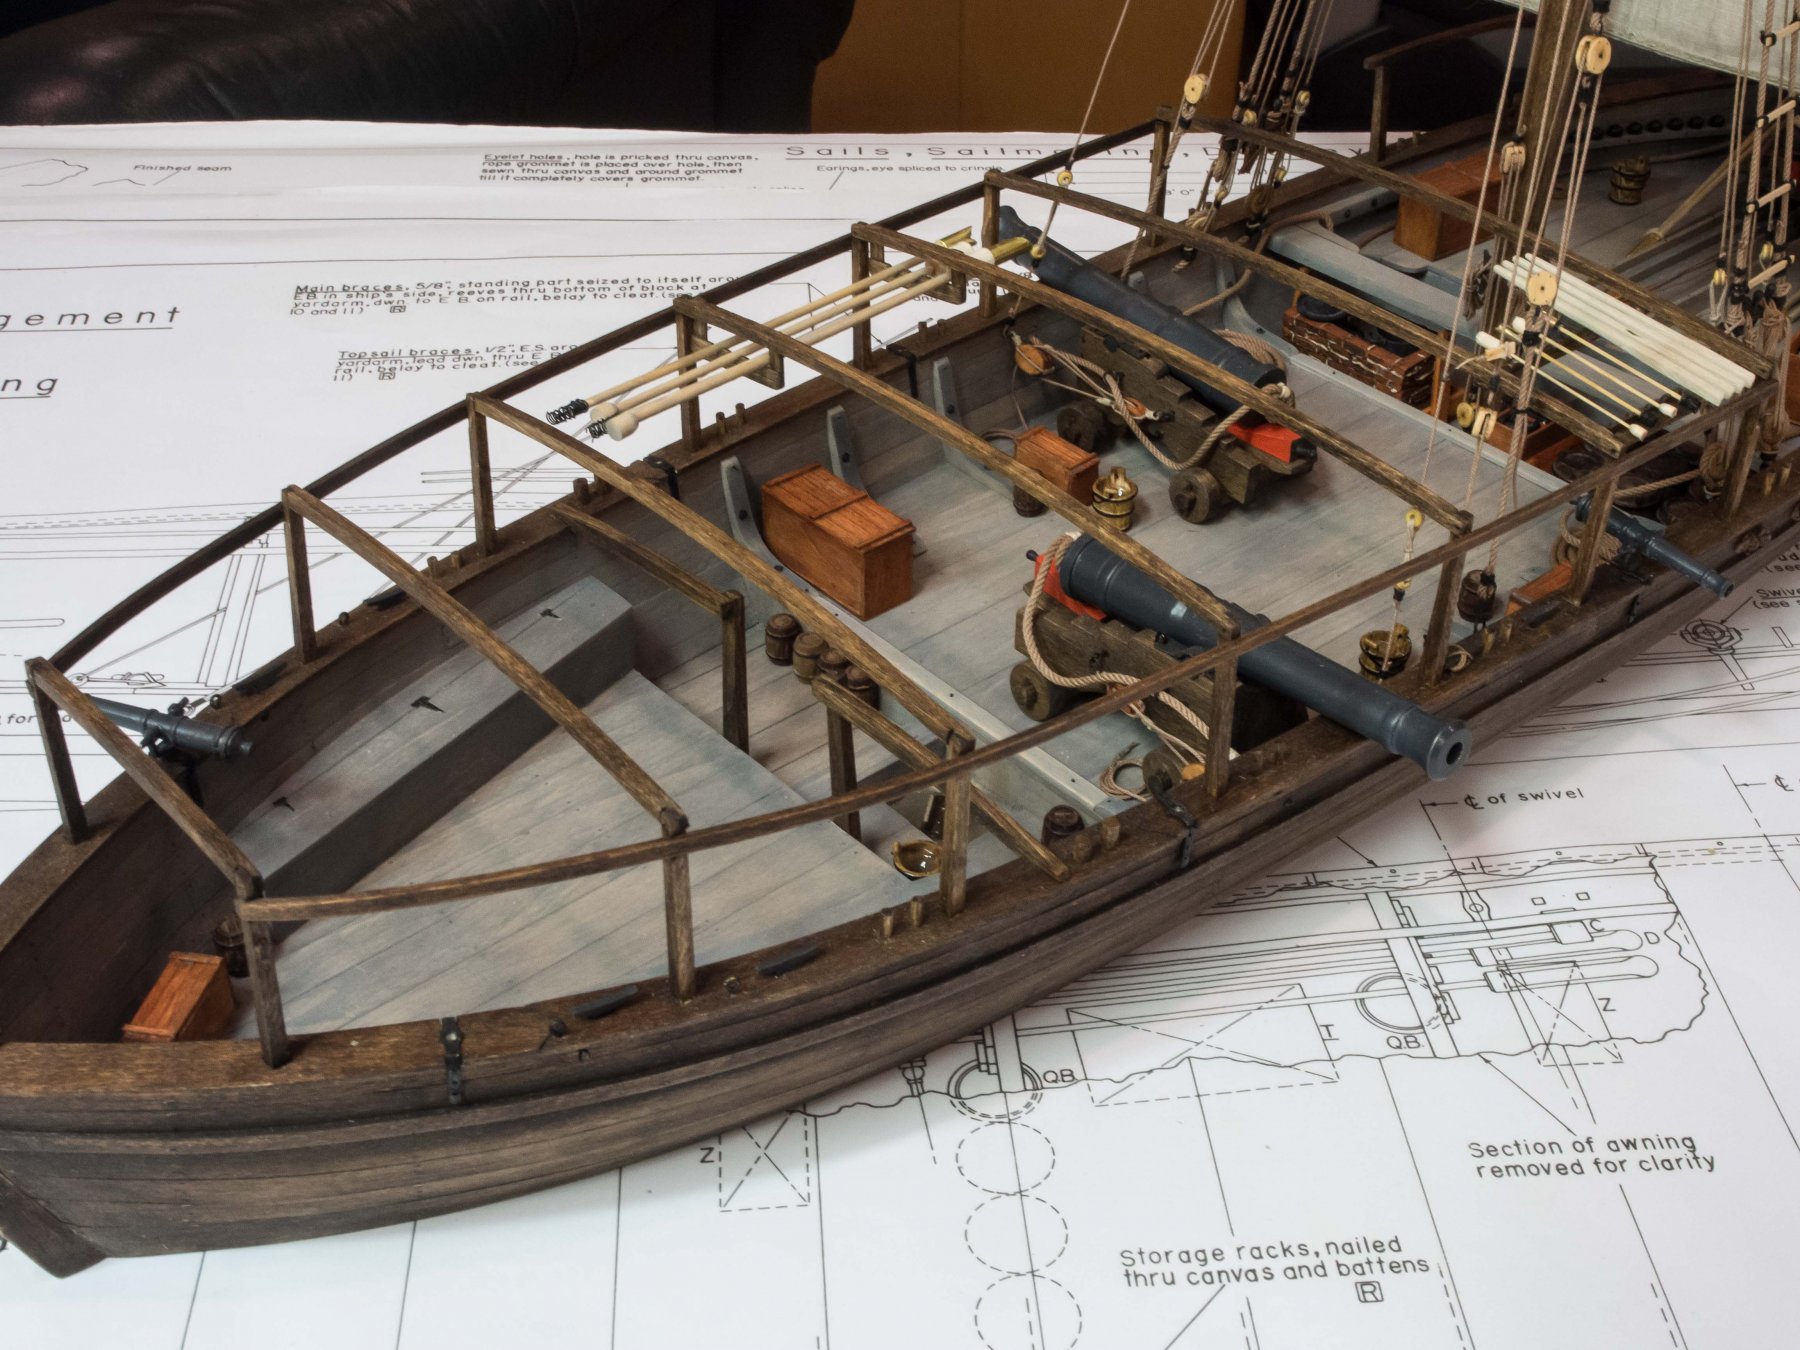
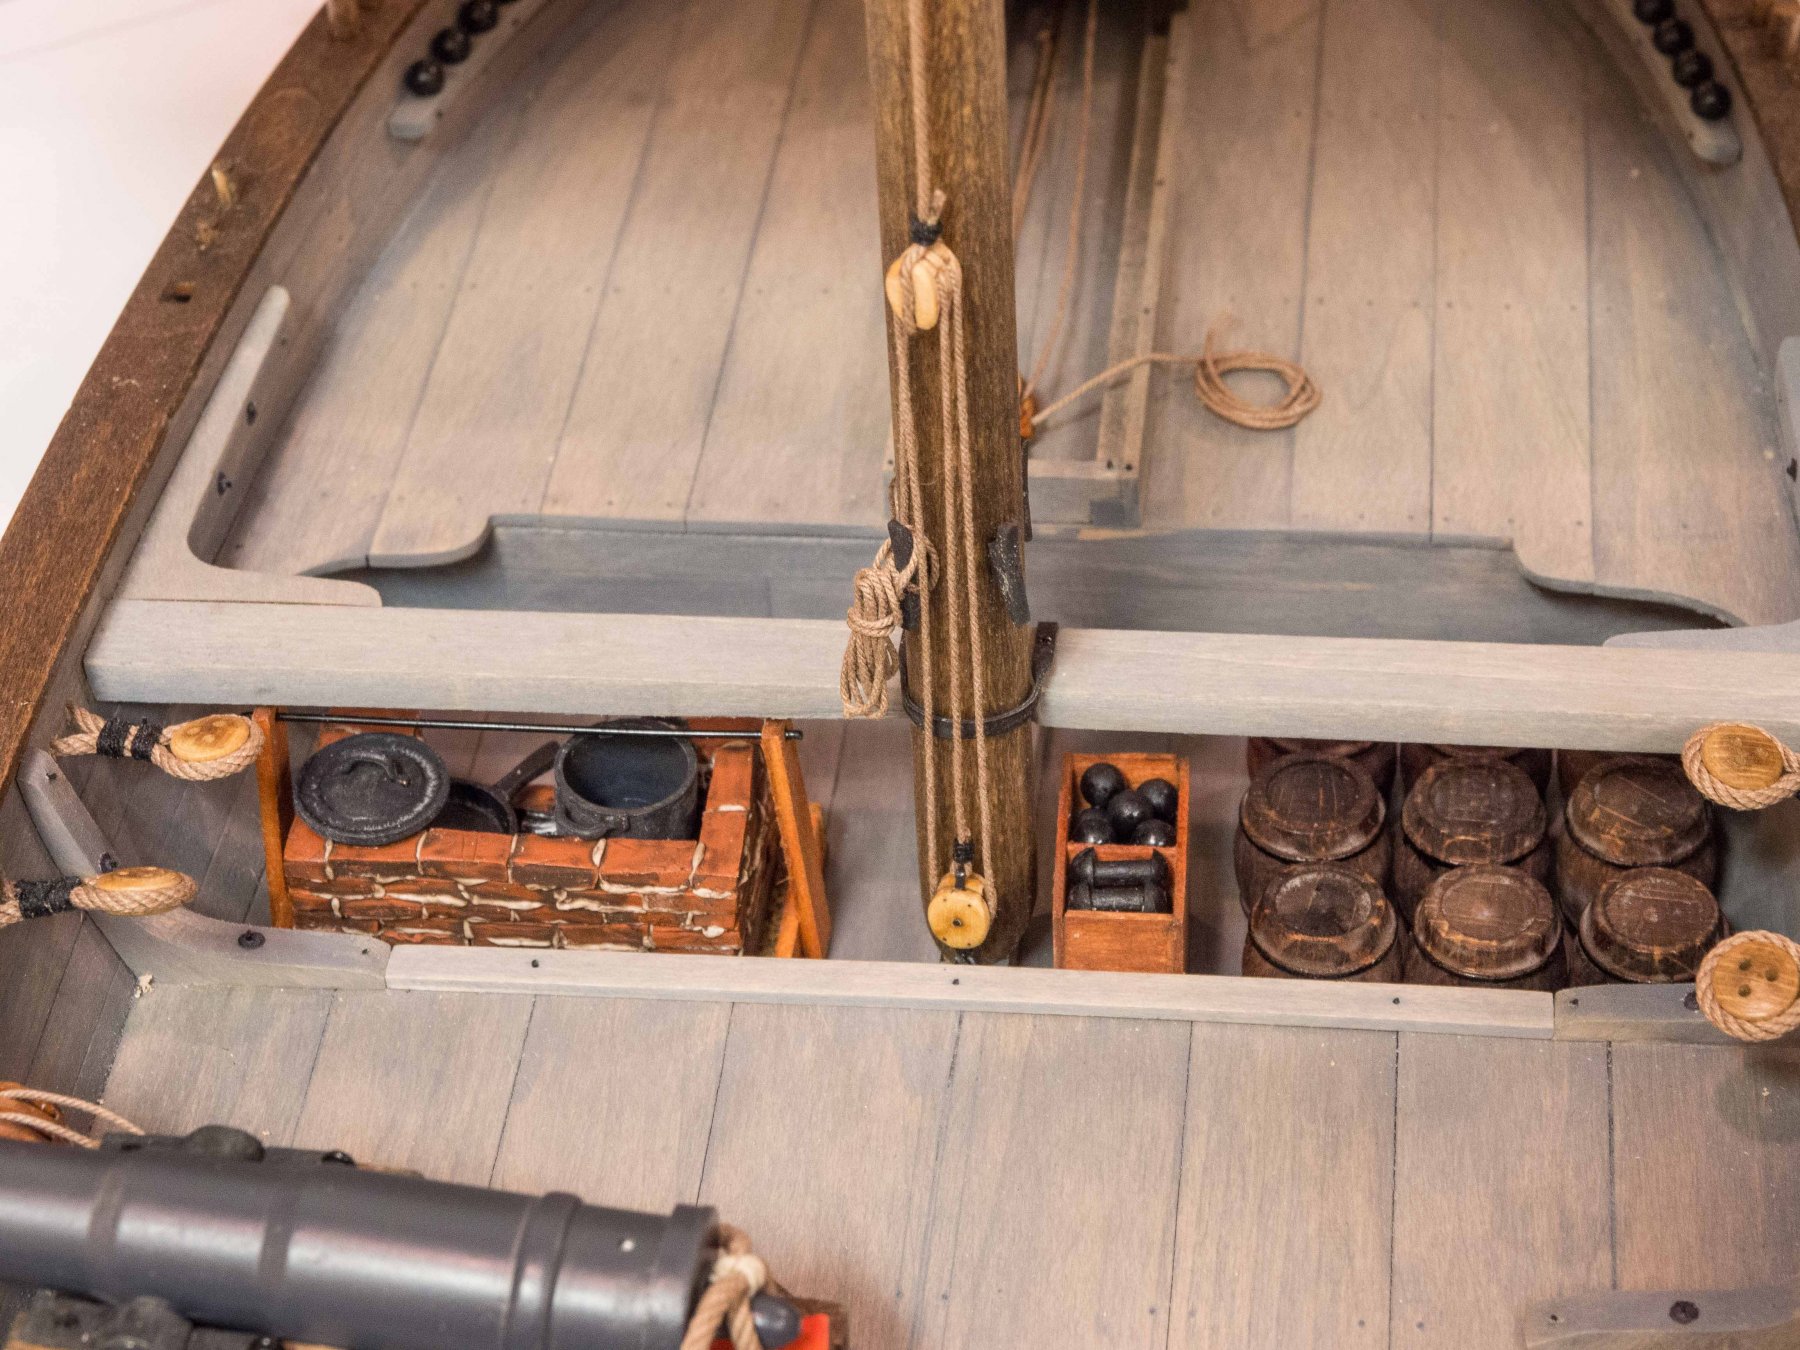
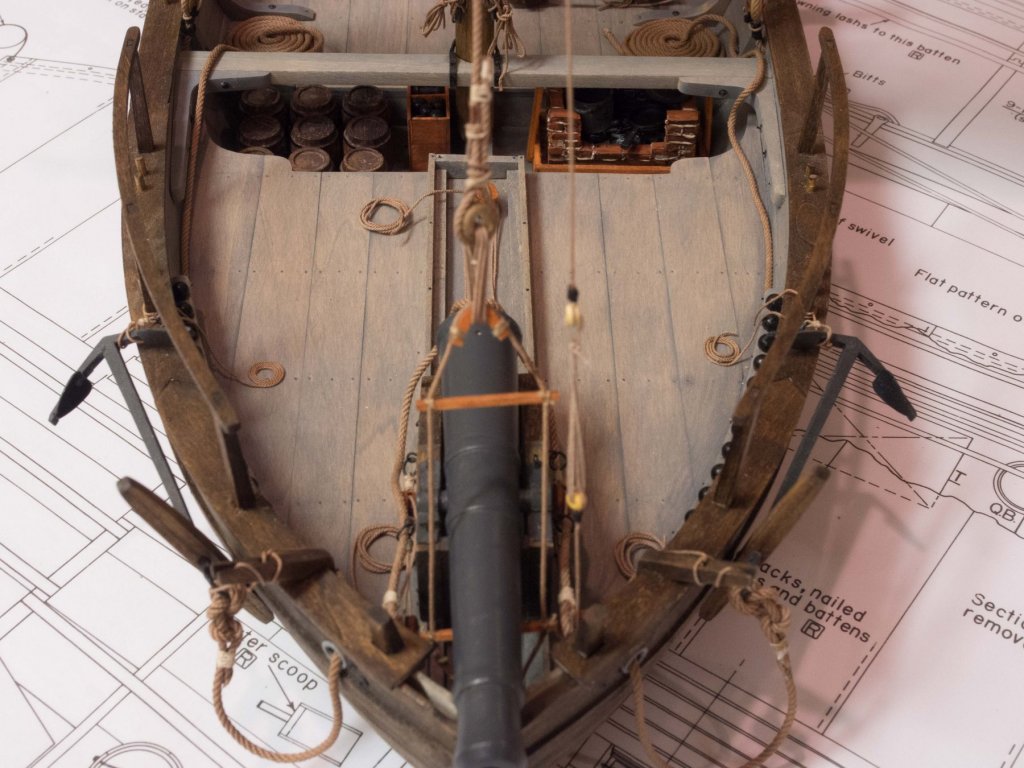
 I have finished all the deck detail now. Playing with placement - will fasten things down tomorrow and start on the fascines. Making powder bags and hollowing out a third party barrel to accept them was the most tedious part of this. I did use some third party boxwood buckets, but had to thin them down from the inside to get the thickness to some approximation of scale. Turns out a black sharpie works great on the elevated "hoops" of commercial barrels, after "aging" them with a vinegar soak which removed the shiny finish. I wish the barrels were slightly bigger as they are a bit too small for quarter and half barrels at this scale, but just acceptable.

- 67 replies
-
- 5
-

-
- philadelphia
- model shipways
- (and 1 more)
-
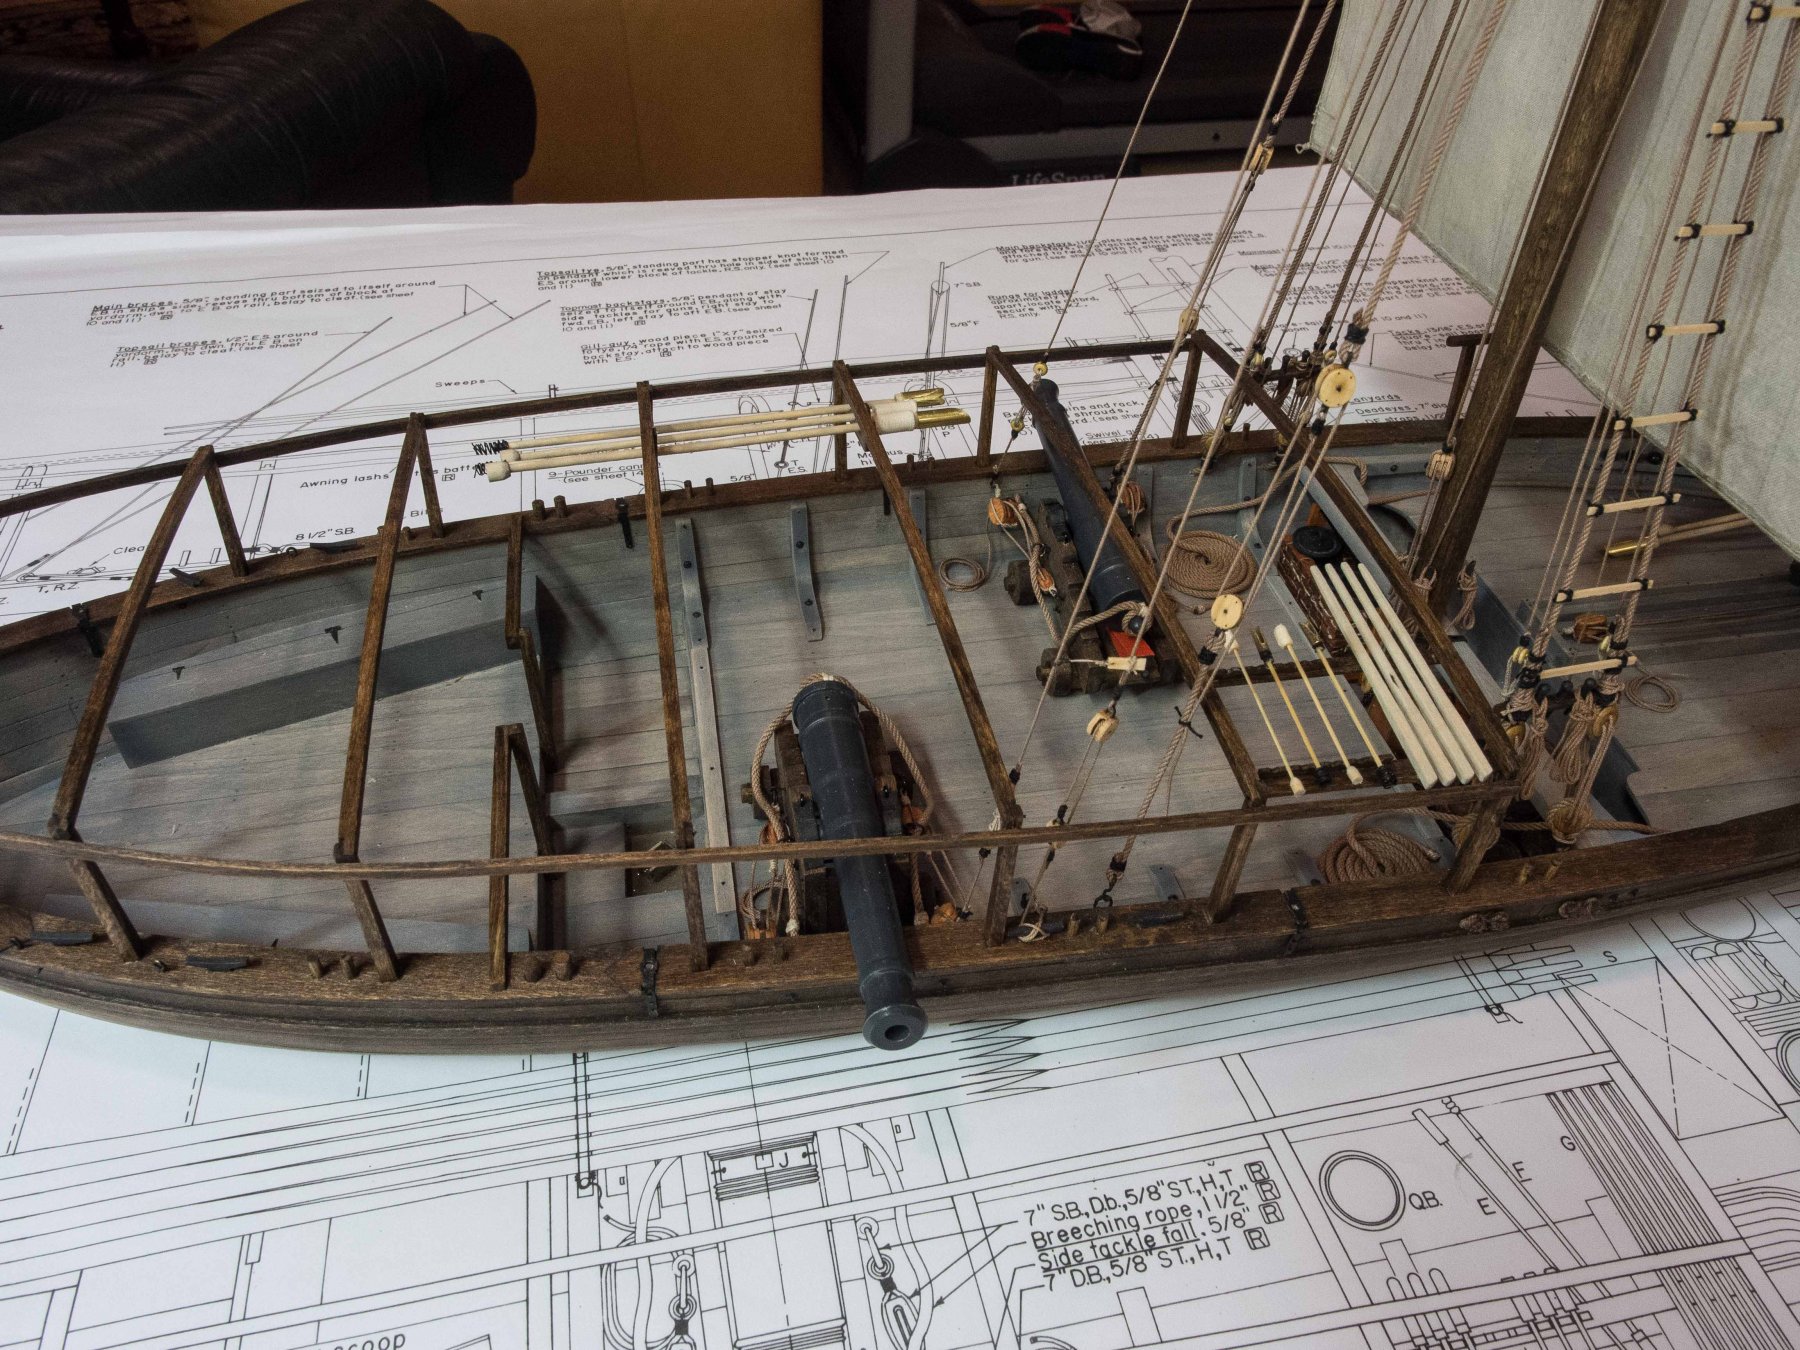
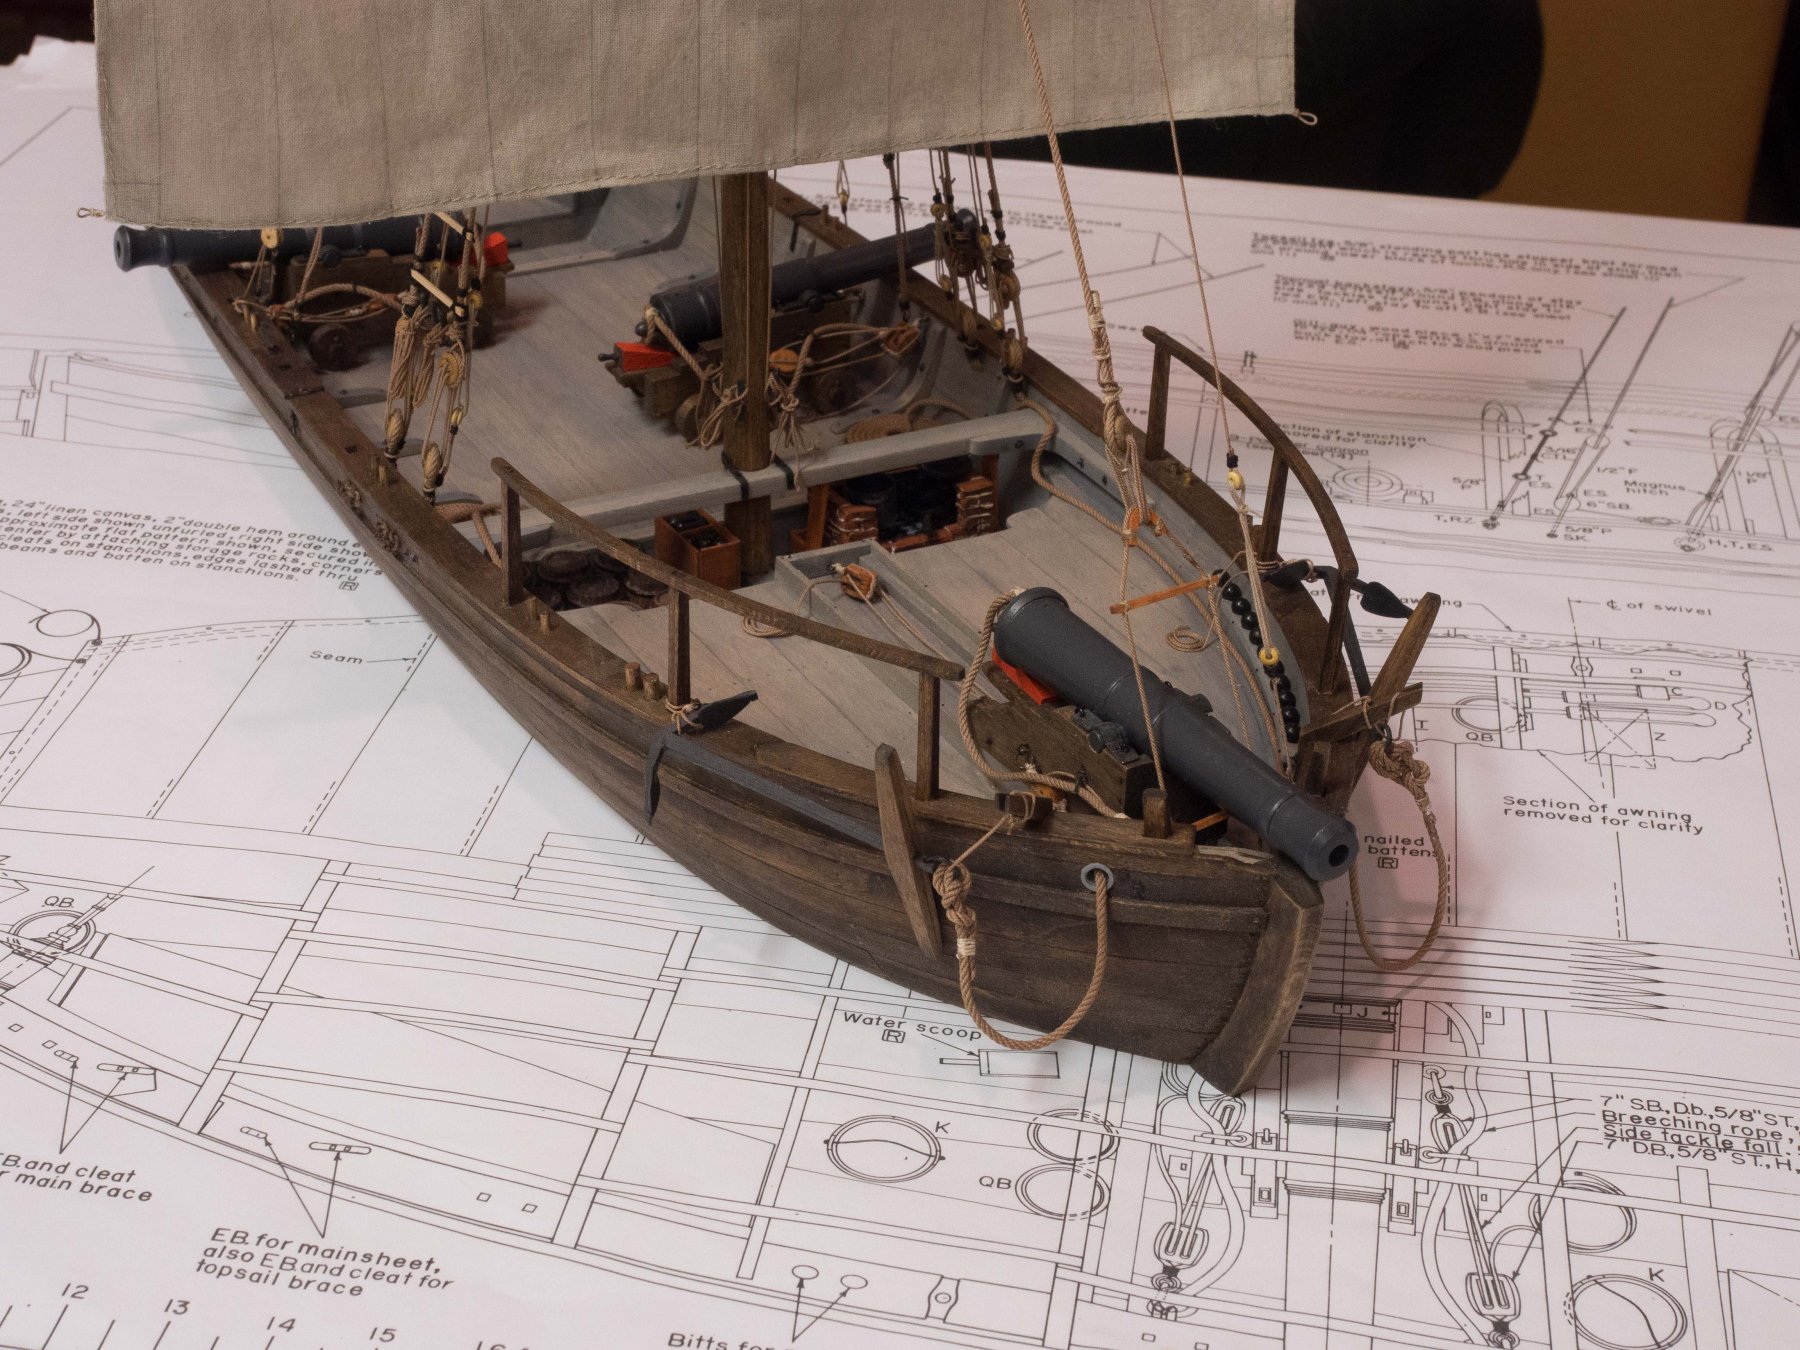
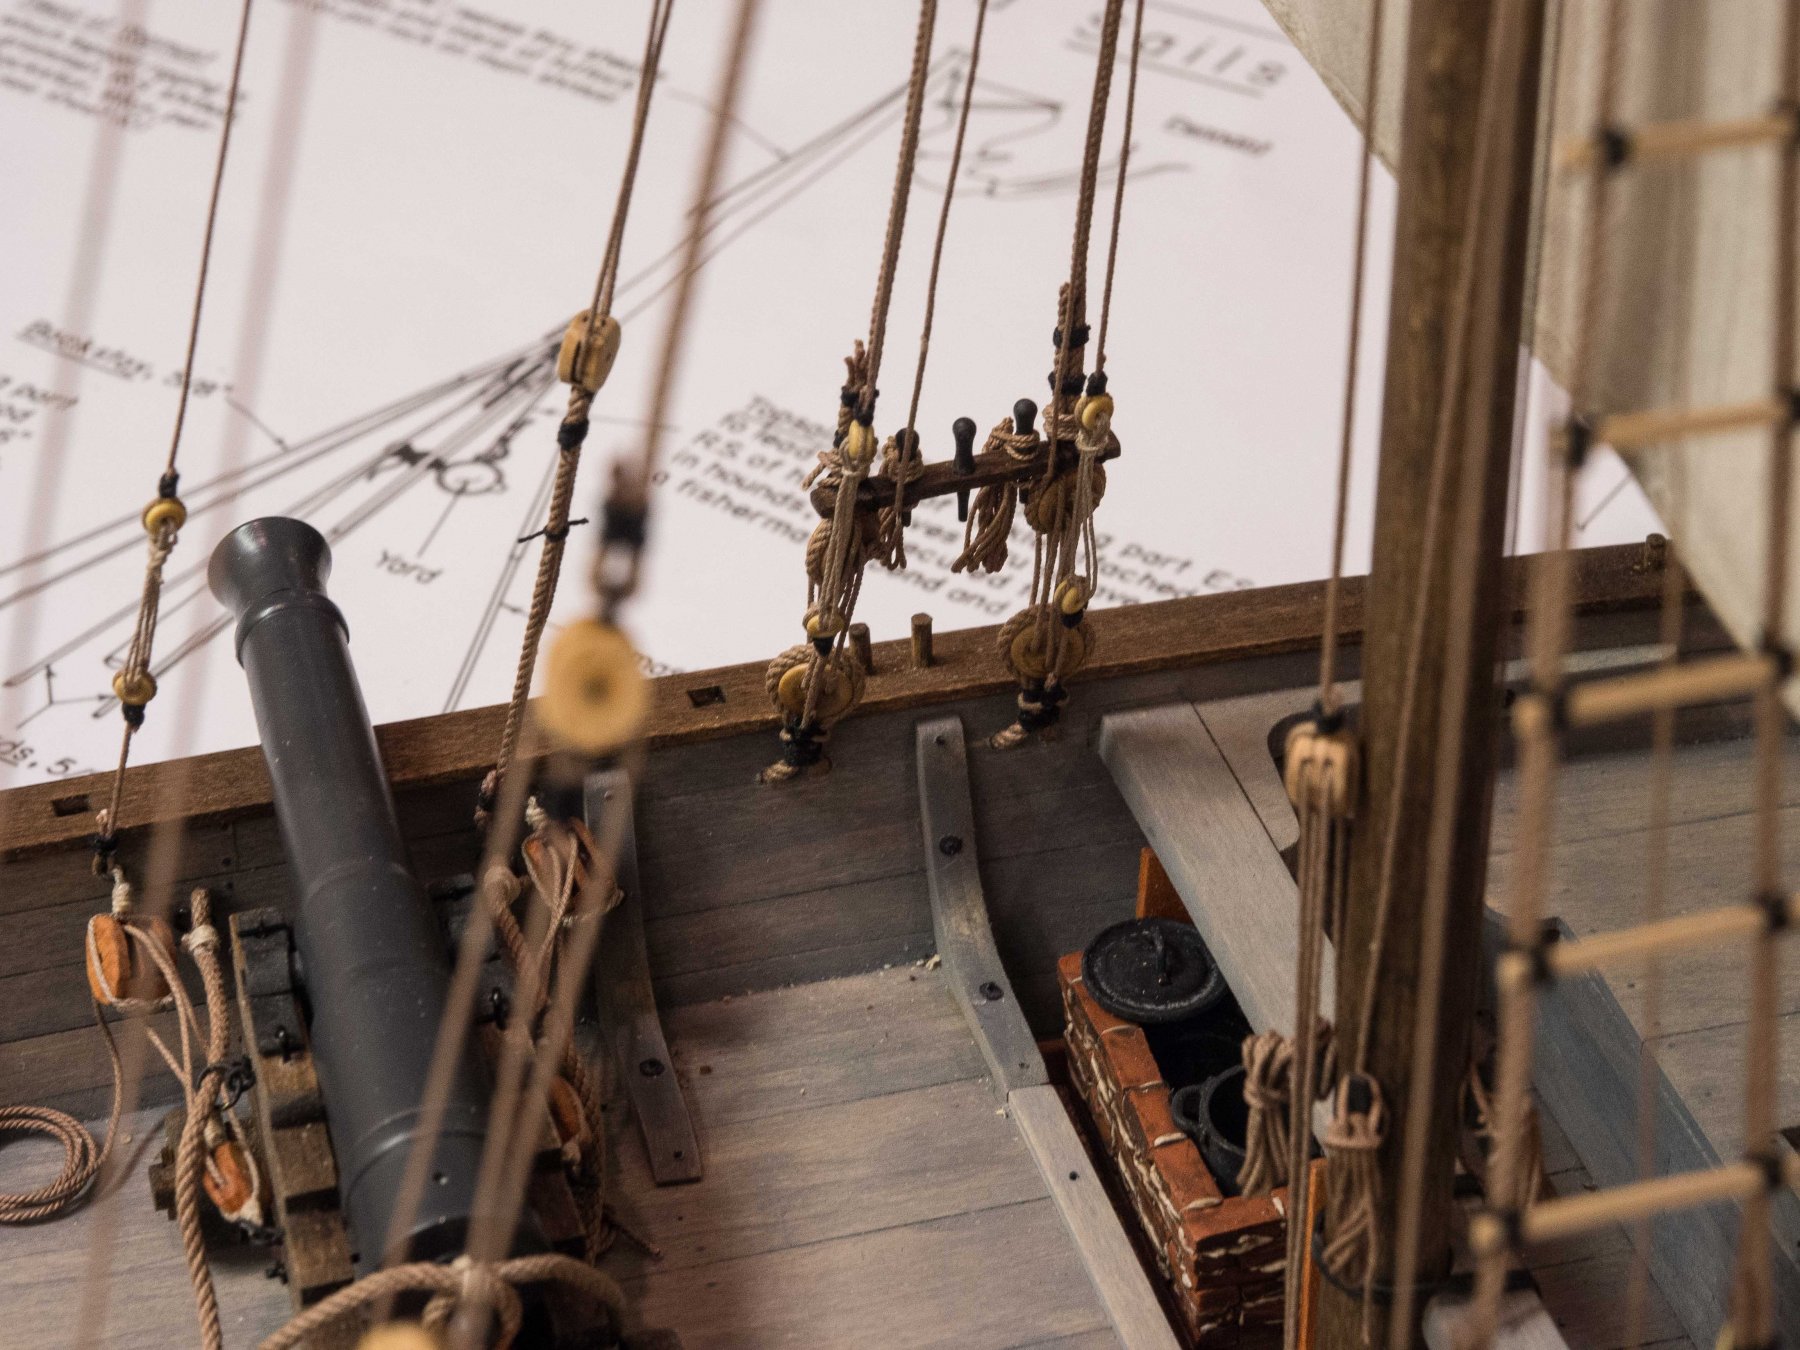
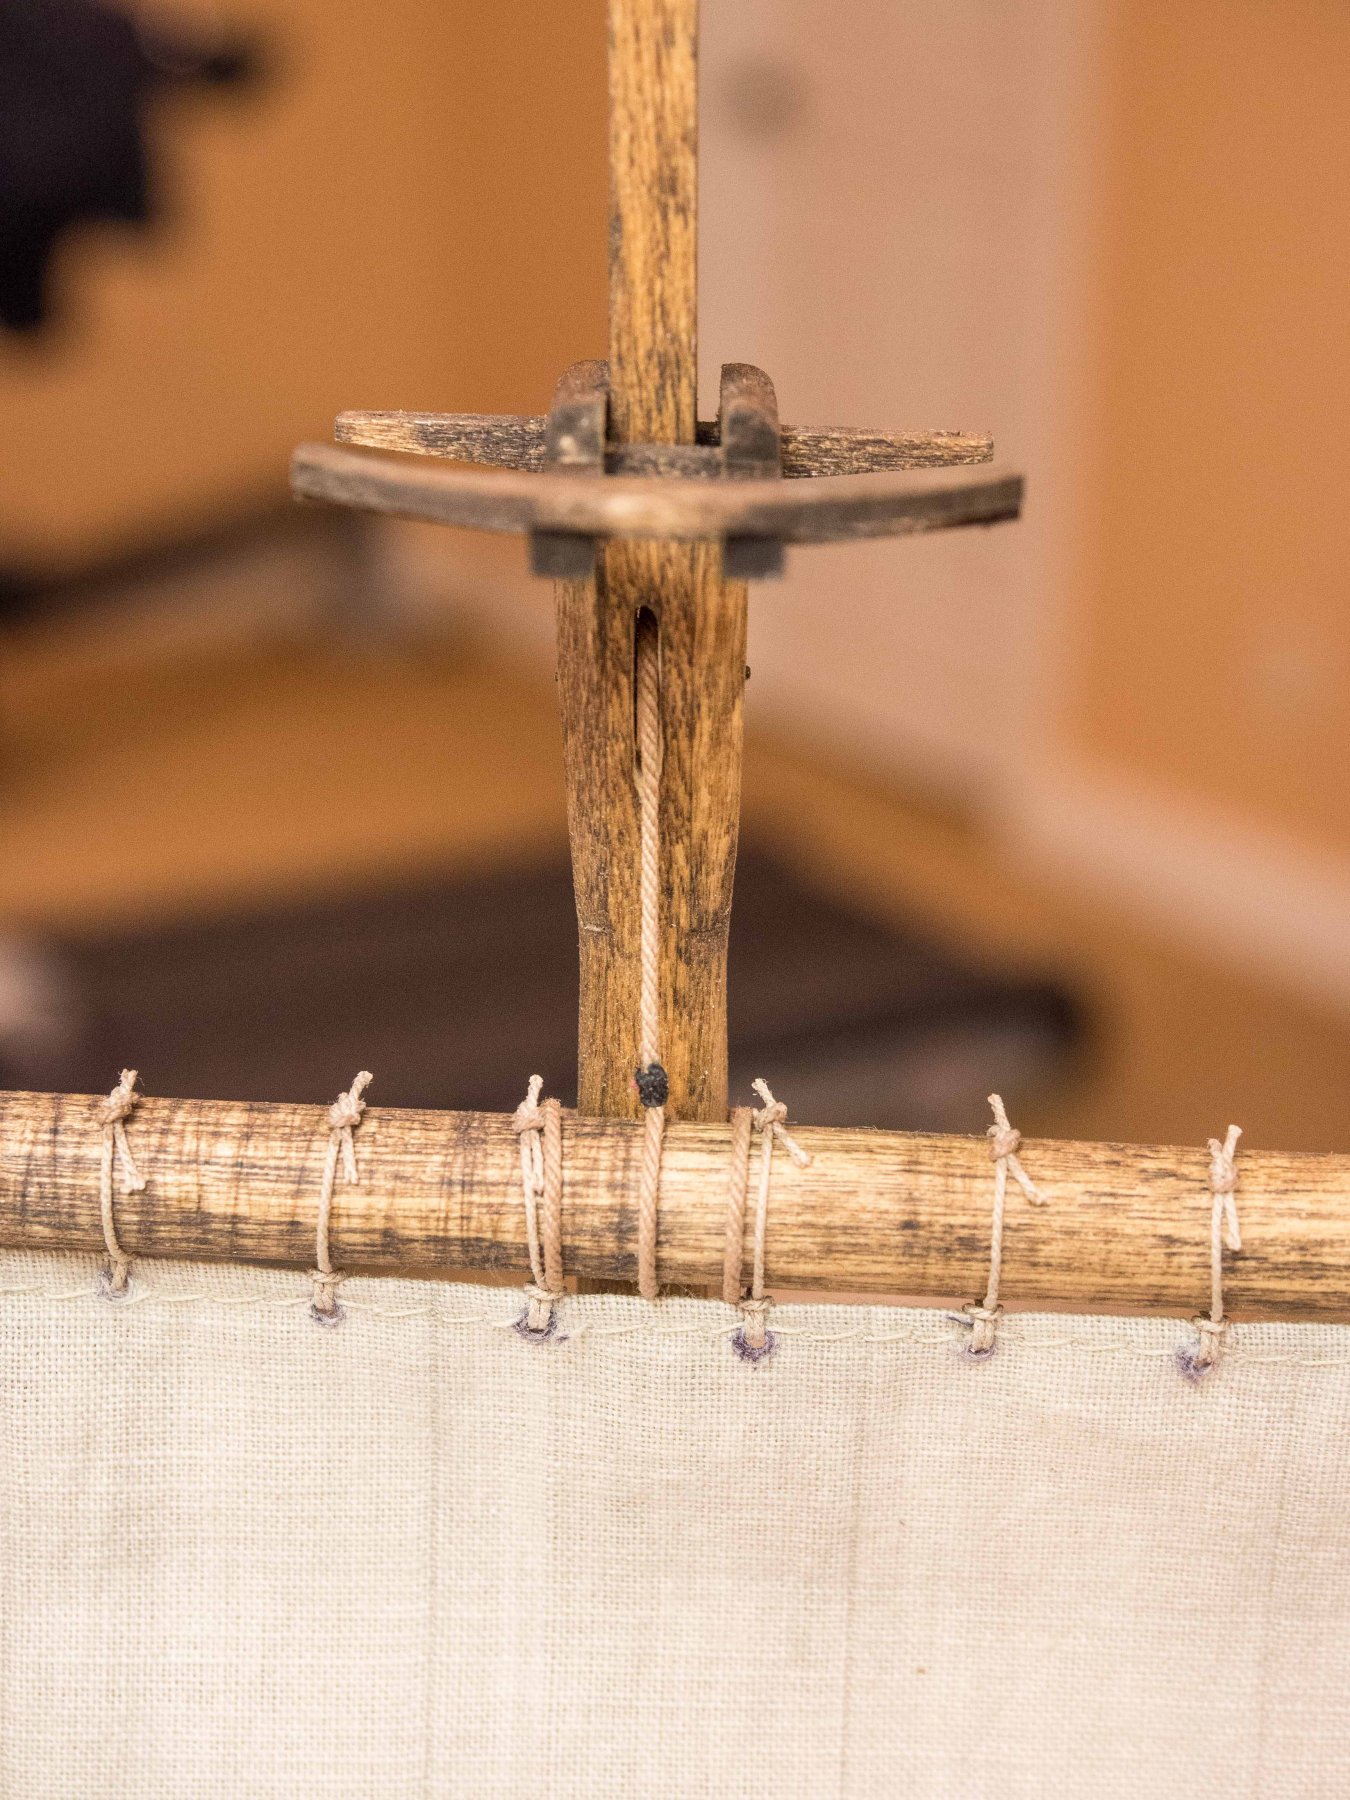
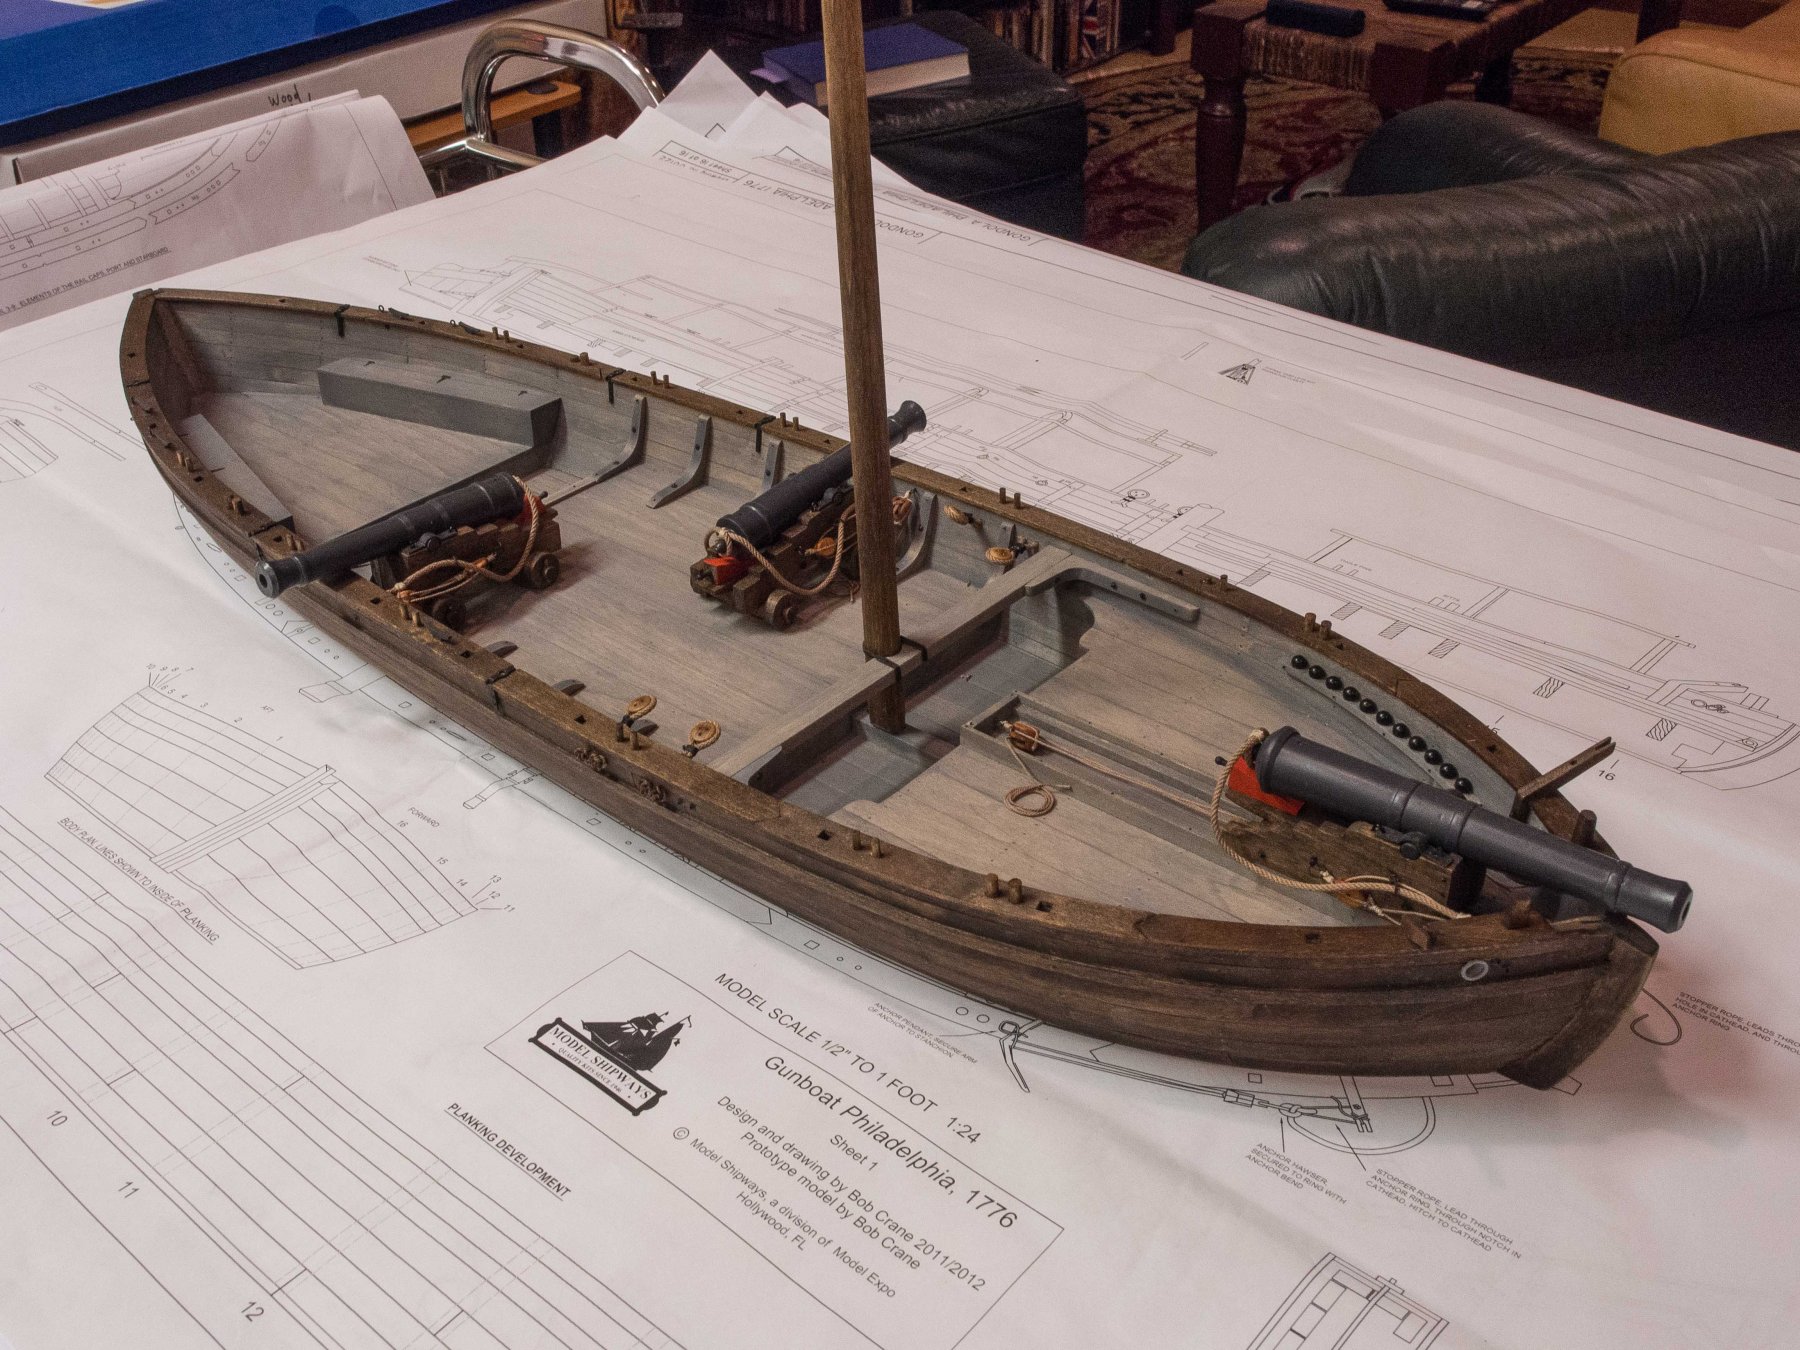
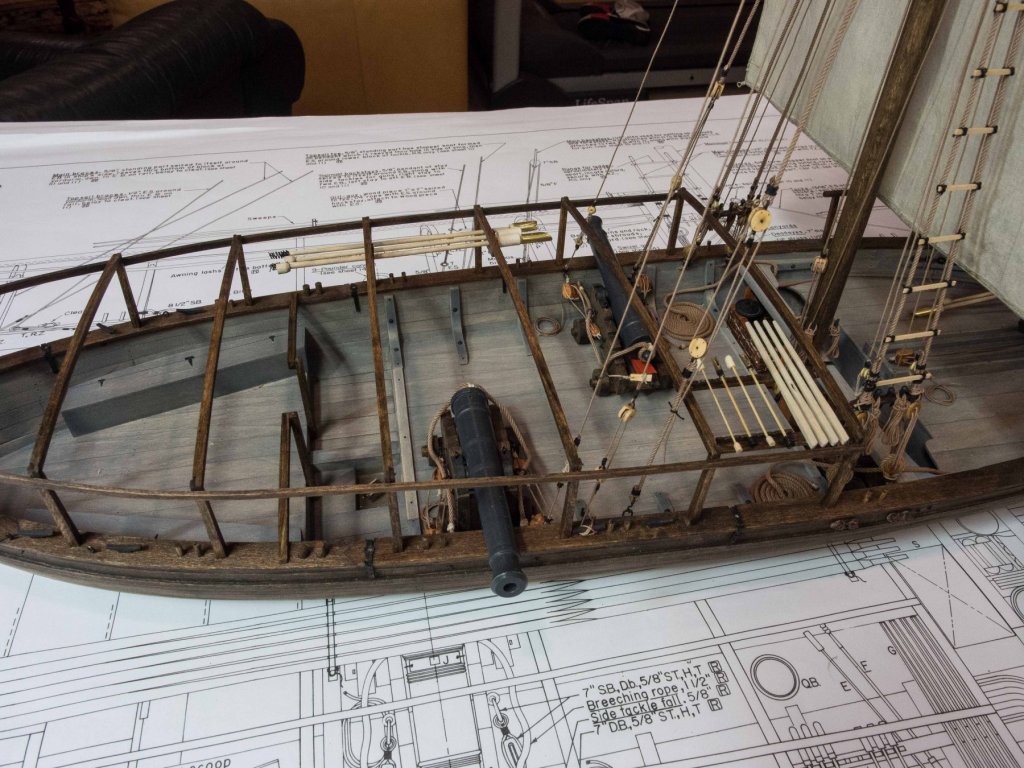
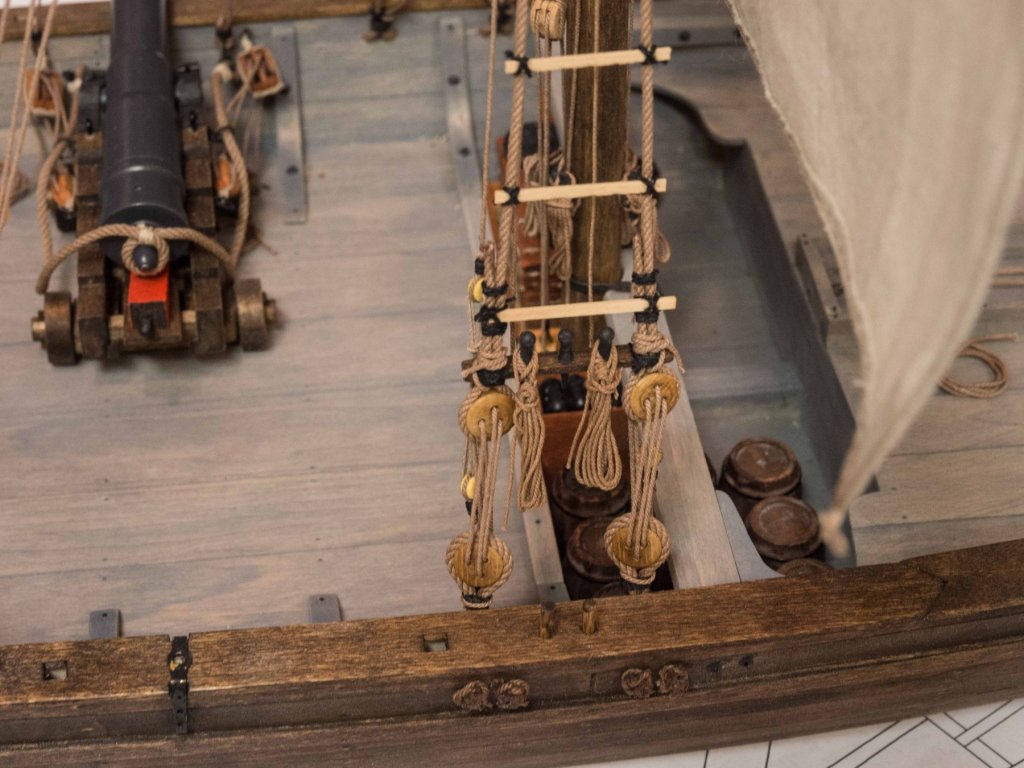
Put up the canopy frames and the racks for gunnery equipment for the swivels and the 9 pounders. The former rack was indicated on the Smithsonian plans but not the kit plans. Making the gunnery equipment took as long as making and installing the canopy frames, but with the racks staring me in the face I went ahead with that equipment and installed them in the racks. I also put (not yet glued) a rammer/sponge and ladle/worm in the foredeck for the 12 pounder while I was in that production mode. I have some detail (mainly chests, buckets, and barrels) to add to the deck that will be under the battens/rolled canopty/sweep rack and sweeps so will do that before moving on to the battens over the canopy frames. I think I will want to install the fascines prior to that as well to facilitate their lashings to the frames without obstruction. All of the significant construction is now done - I can see the end in sight. Making the fascines will, however, be a real PITA. 160 1/32 x 1/32 strips await rounding with a drawplate and cutting, gathering, and binding into the fascines, several of which will need to be bent into curves prior to installation. Thankfully these are all specified well in the Smithsonian plans as well as how they are fastened. I have humbly added a "kit bash" tag to this build log given the addition of sails and detailing.

- 67 replies
-
- 5
-
-
- philadelphia
- model shipways
- (and 1 more)
-
Minwax classic Grey stain wiped on, sanded unevenly harder in traffic areas then another very light coat. I like the look too. In this case, since this is not a “pretty” boat, basswood’s tendency to take stain unevenly enhances the look for the deck and the hull. It gives a nice beat up look which is what I’m going for.
- 67 replies
-
- 1
-
-
- philadelphia
- model shipways
- (and 1 more)
-
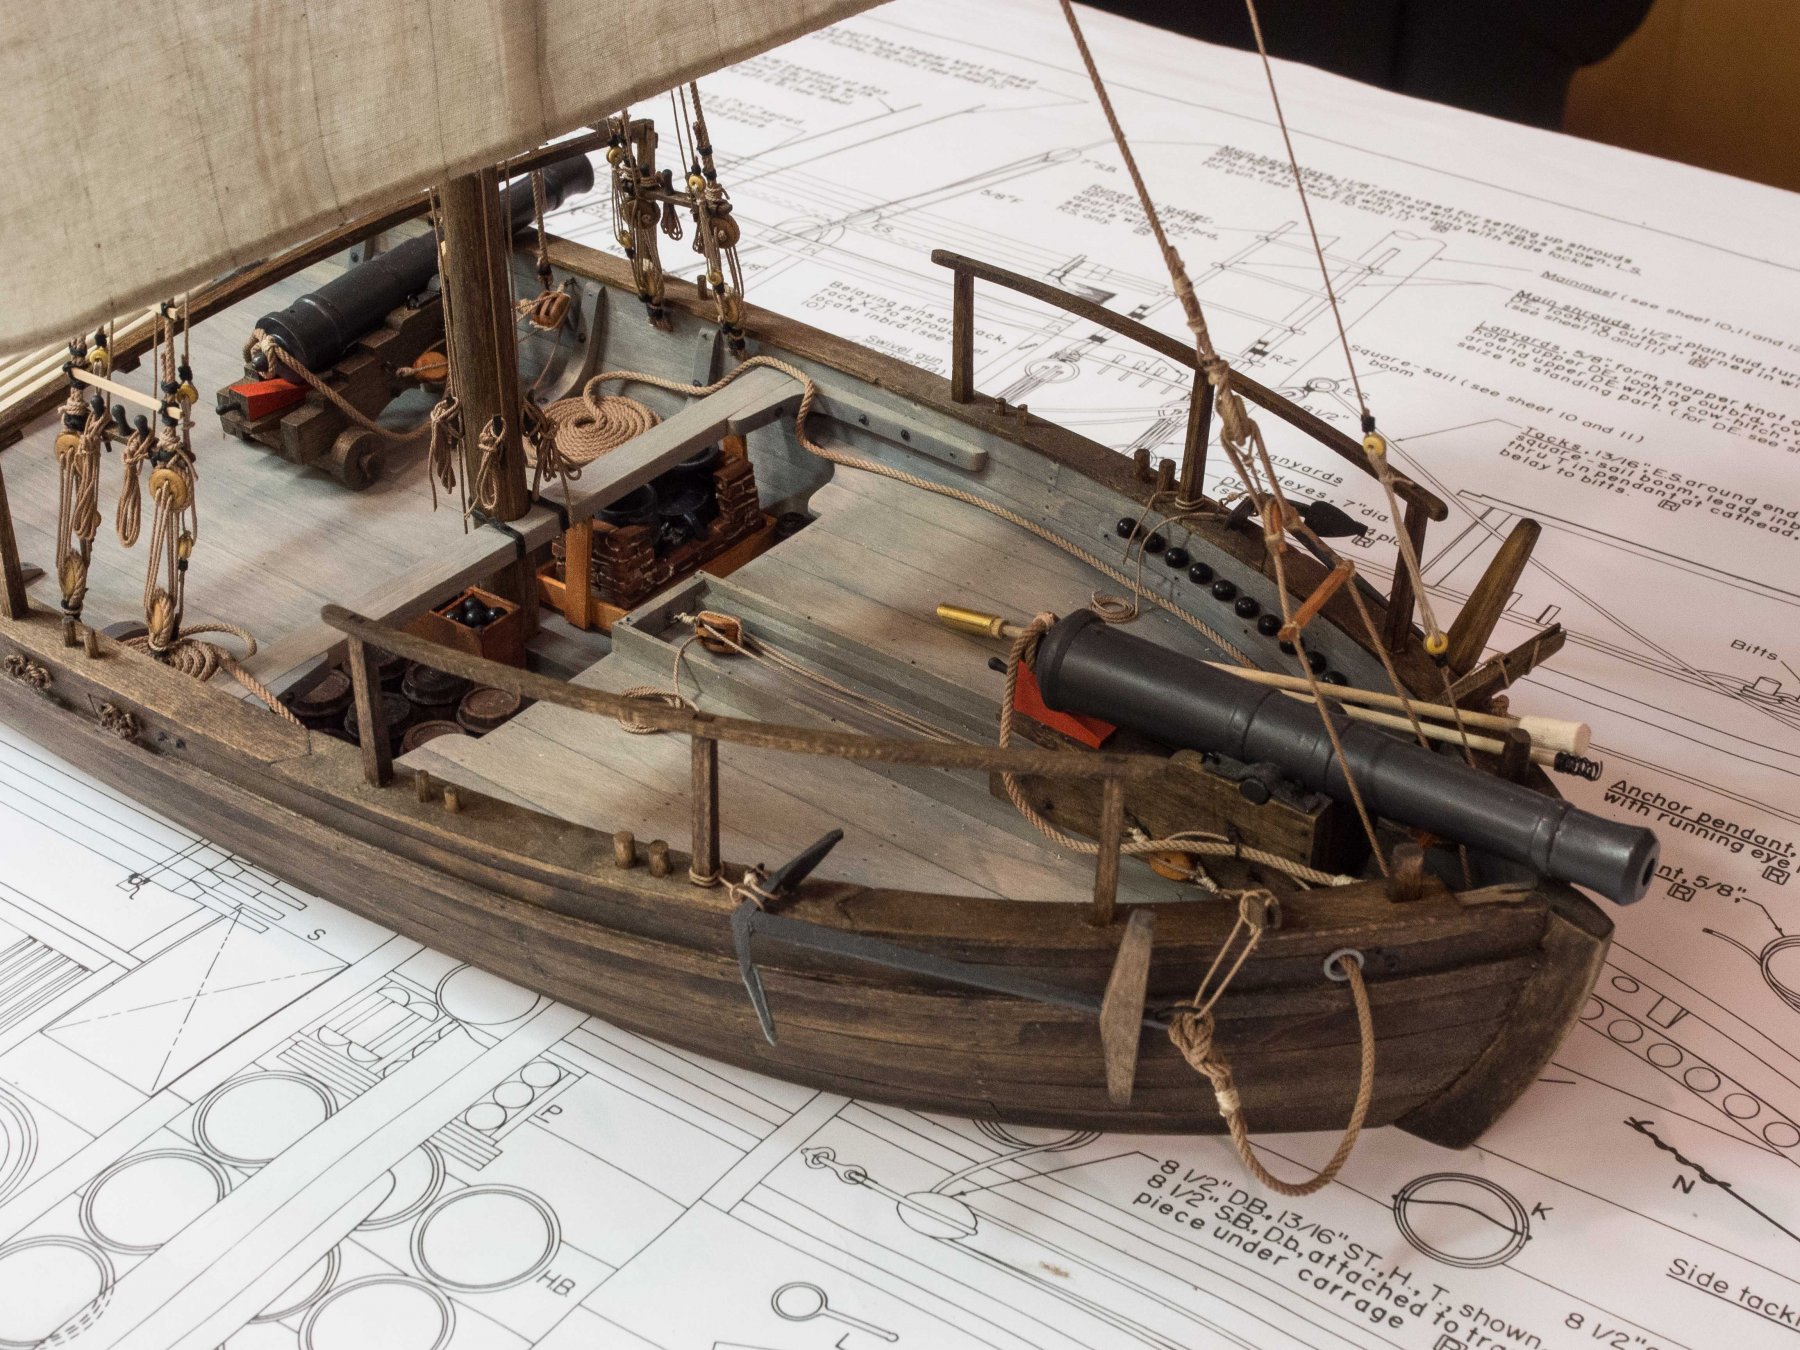
Fore Rails up and anchors rigged with hawser, stop rope, lashing pendant and fish line. The stop rope should have been larger diameter but I was out of .025 and was impatient. Bad model builder!
- 67 replies
-
- 4
-
-
- philadelphia
- model shipways
- (and 1 more)
-
Steve yes the light brown rope. I like it better than the tan.
- 67 replies
-
- 1
-
-
- philadelphia
- model shipways
- (and 1 more)
-
Elijah thick CA will work well, but it takes a while to set. Hold it in place for a minute or more, then carefully let go. After a minute more nudge it if it has moved and hold carefully a bit more. Once it’s in place don’t touch it for an hour. Don’t ask how I know. It fils gaps. Don’t put them on until you’ve stained the hull. That’s what I used for that piece, as well as gluing the ends on the cannons. For those make sure you have the barrels vertical so gravity doesn’t upset things. Medium CA doesn’t work near as well. Epoxy will also work if you already have that.
- 228 replies
-
- 4
-
-
- gunboat
- model shipways
- (and 1 more)
-
There is a flashing piece in the brass bits that goes on the outside to simulate the flared and turned edge of the original lead pipe.
- 228 replies
-
- 3
-
-
- gunboat
- model shipways
- (and 1 more)
-
Thanks John, I appreciate that. One of the bits of fun working in this scale is the ability to push the envelope with detailing. Downside: those Smithsonian plans were expensive, but I could not have done much of this without them and their wealth of detail. Not enough detail in the two books about the Philadelphia I got.
- 67 replies
-
- 2
-
-
- philadelphia
- model shipways
- (and 1 more)
-
Chuck:
How and on what do you print your flags. If you've discussed it in a post I can't find it.
-
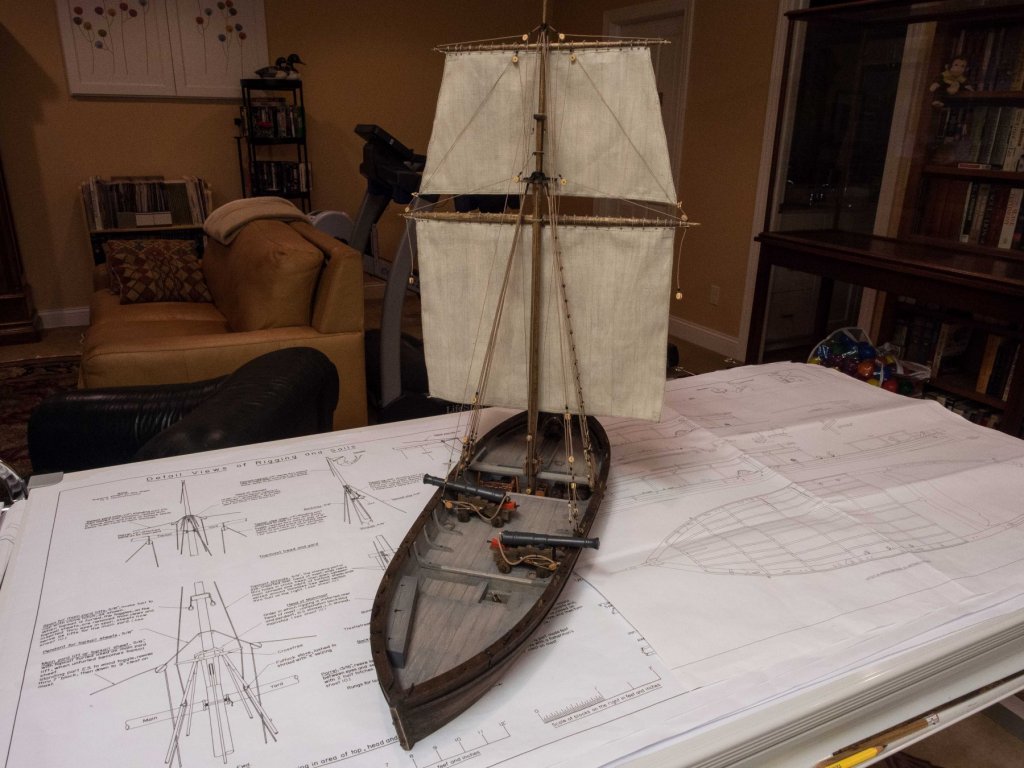
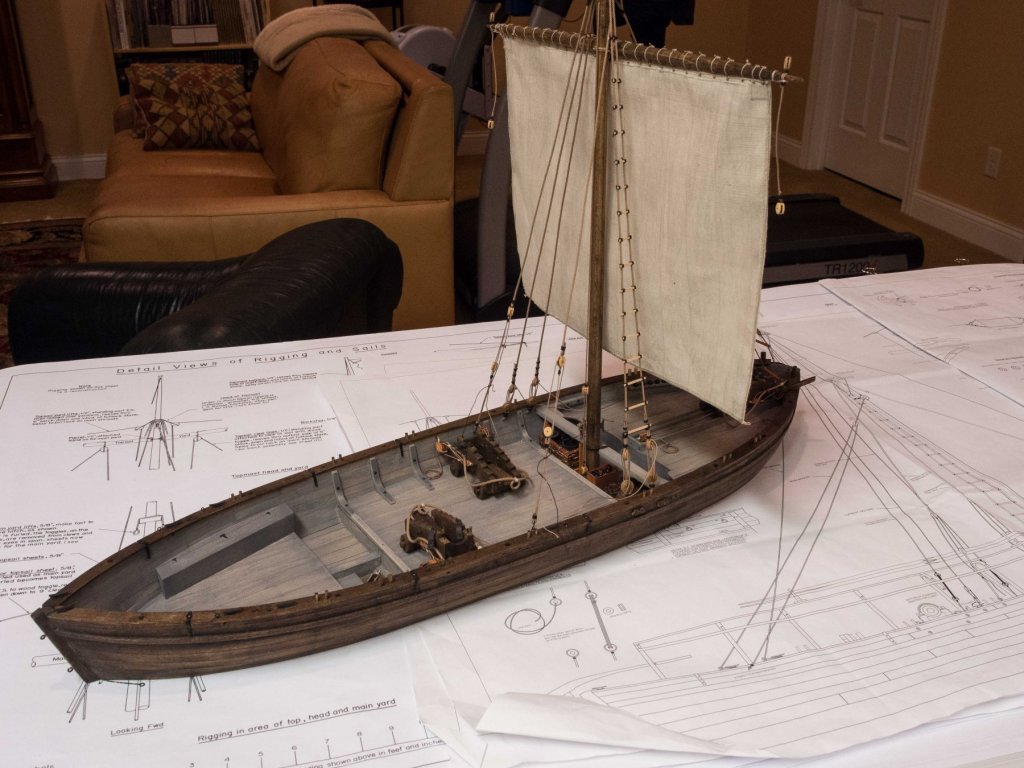
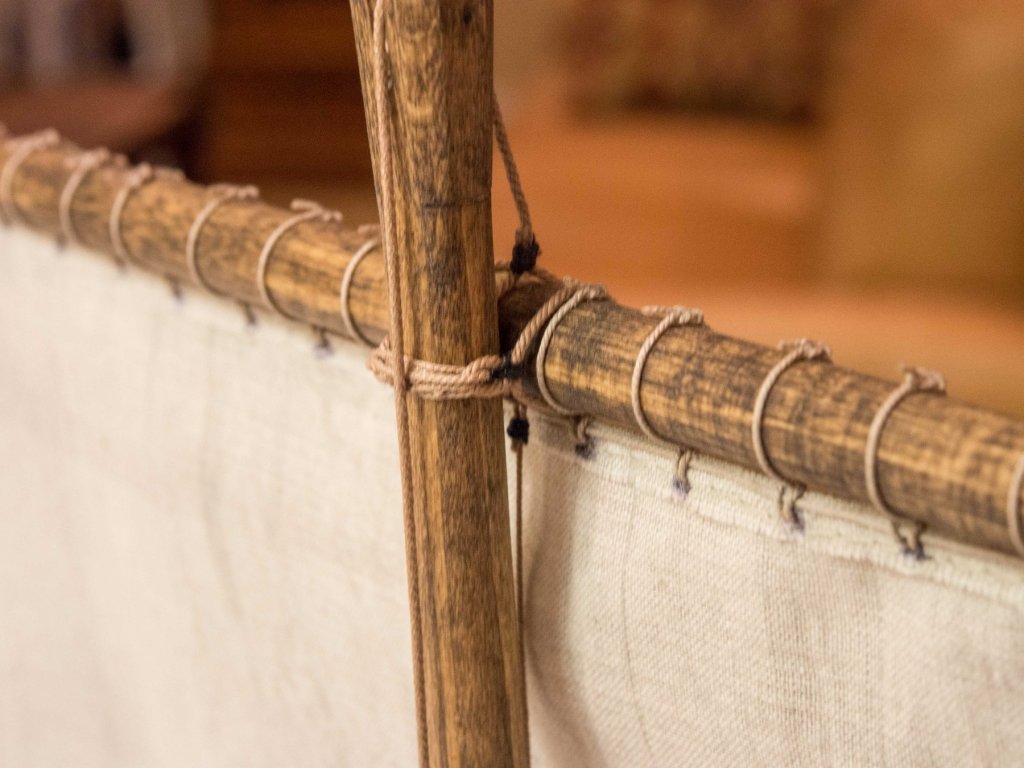
I've finished the rigging, except for the yard braces and the mainsail boom, which will be added at the very end. The rigging varies from the kit instructions. Firstly, due to what is necessary to handle the sails. I have used the Smithsonian plans for that. Secondly, those plans also show the topmast shrouds passing down to deck level and fastening through bullseyes tethered to the lower deadeye strops. So I did that. I might add parenthetically that this rigging job was made much easier than my previous jobs due to equipment overload: 1. Michael Mott's third hand, and especially the wood clamp arms that are perfect for holding line tightly for seizing without damaging the line 2. TWO very good tweezers to hand small line 3. Chuck's seizing method - in my hands, a series of closely spaced overhand knots alternating above and below, pulled tight. At the end (4-5 loops in this case) these can be slid down snugly with careful use of a tweezer. followed by some dilute white glue and when dry trimming the ends and compressing the loops. 4. Small electrical clips (the plastic kind with a retractable hook) to hold lines together when seizing if necessary. Will be moving on the the fore stanchions and rail and rigging the (already constructed) anchors next.


- 67 replies
-
- 9
-
-
- philadelphia
- model shipways
- (and 1 more)
-
Standing rigging for mainmast completed. On to the topmast. Lines (except forestay) not snugged down. Once topmast standing rigging in place will tighten everything down (Learned my lesson from my last rigging job).
- 67 replies
-
- 6
-
-
- philadelphia
- model shipways
- (and 1 more)
-
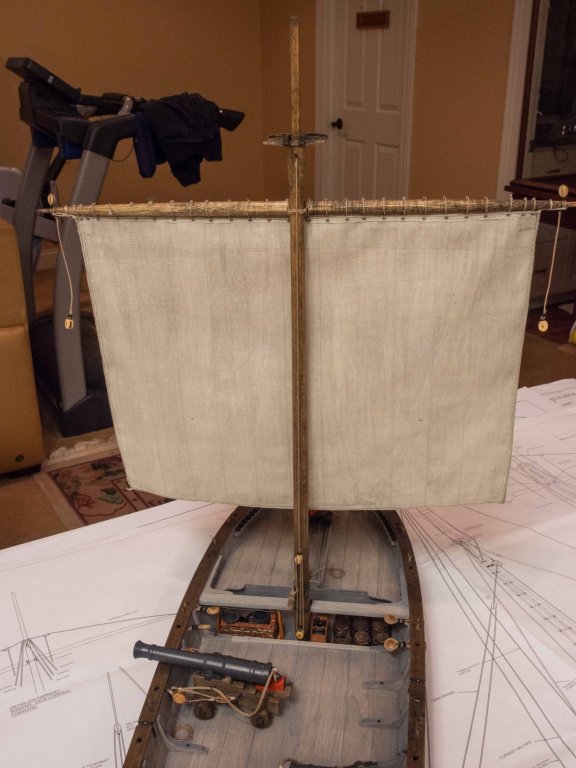
Rigged and stepped the mainmast. It will have a boom at the bottom, but as this attaches only through toggles in the lower cringles and both the boom and its rigging protrude from the side a considerable distance likely to make the work to come difficult, I will be adding that last.


- 67 replies
-
- 4
-
-
- philadelphia
- model shipways
- (and 1 more)
-
Daniel: I will be buying La Real in the near future, as soon as I finish my current build. Will be making a few changes to approximate a Knights of St. John galley. Is this kit going to also be upgraded to Pear? If so, at what time would that happen, as I would prefer that option if/when available. Thanks
-
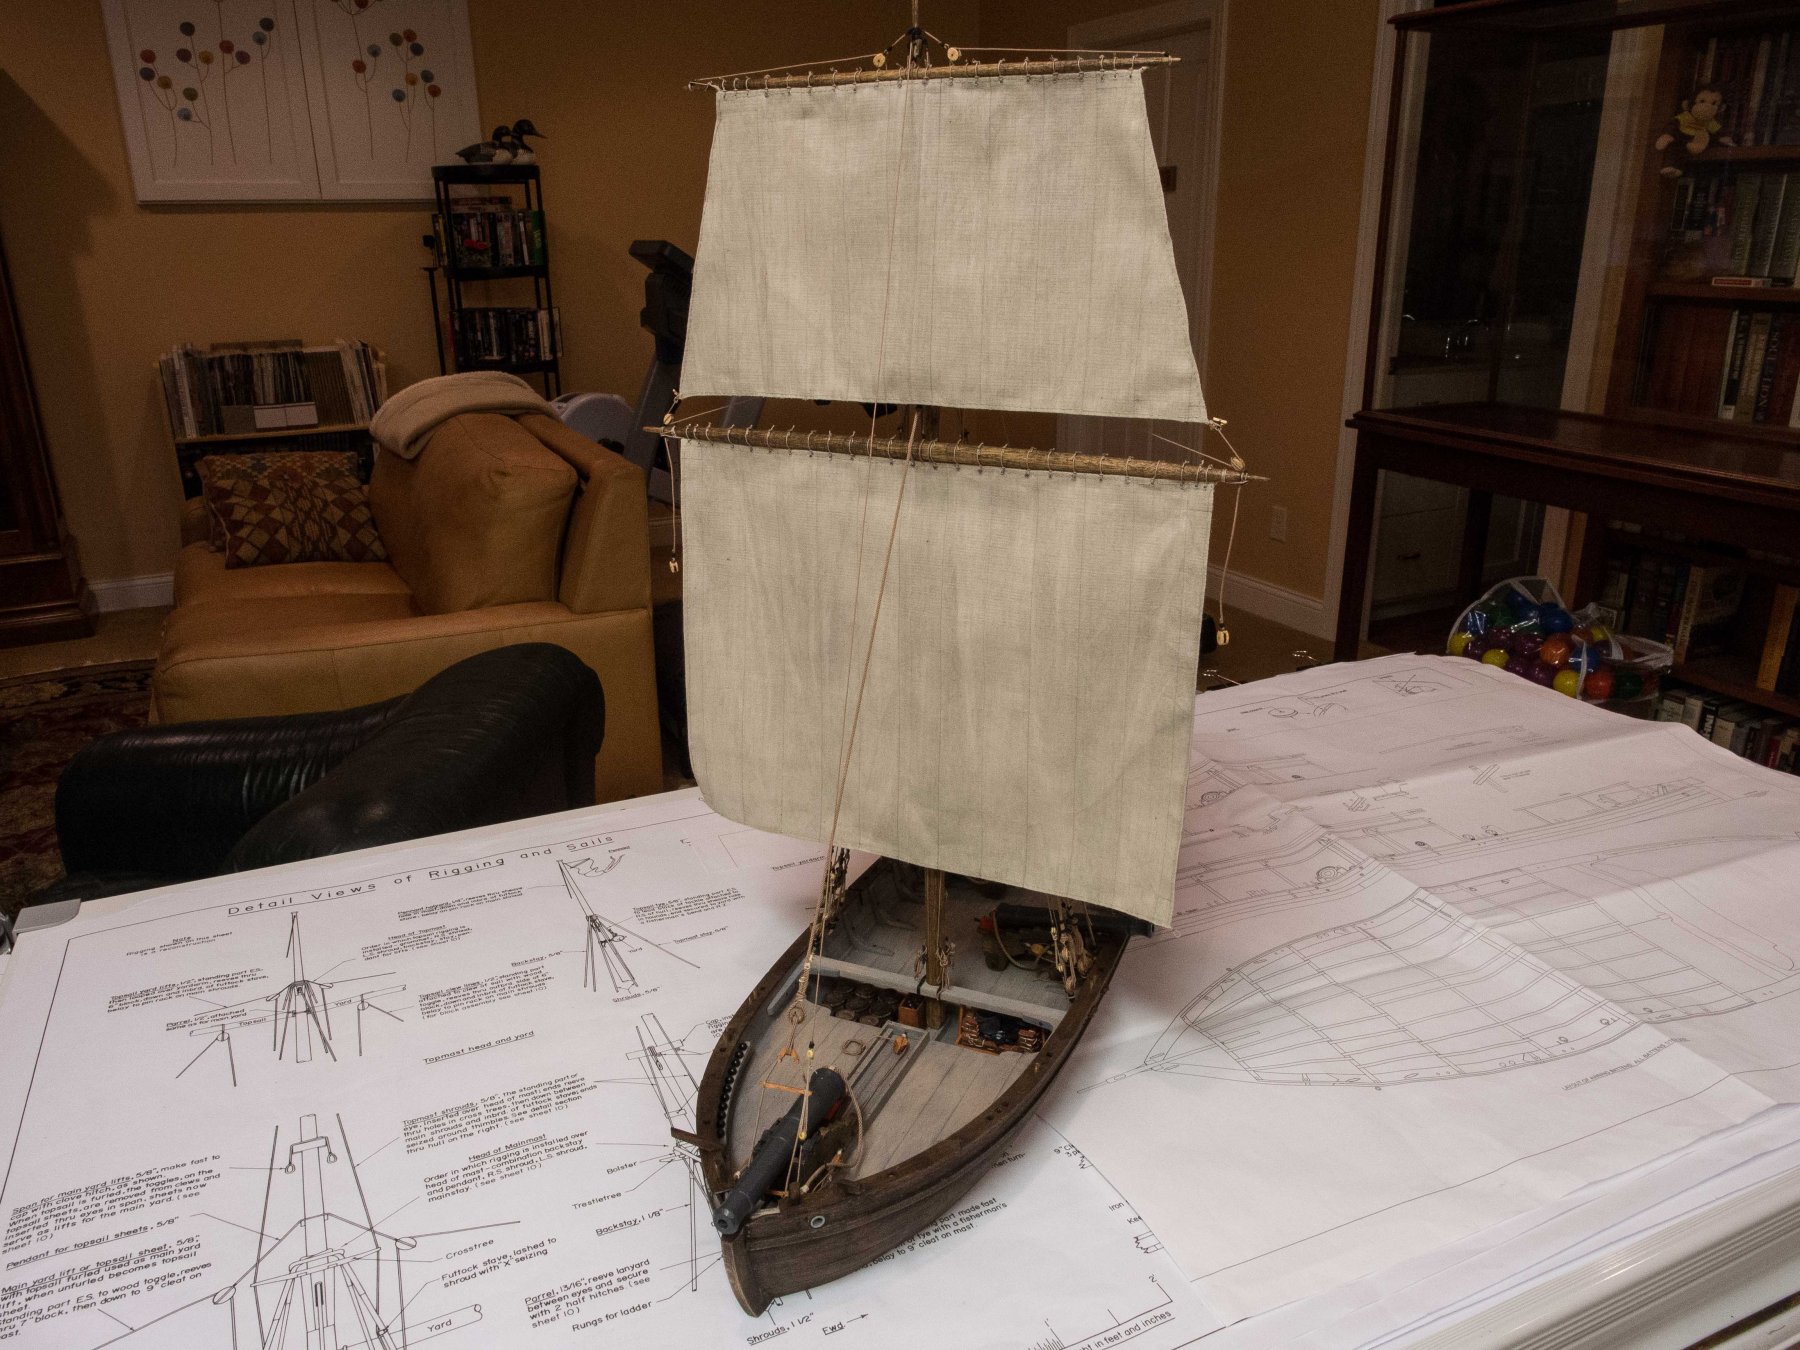
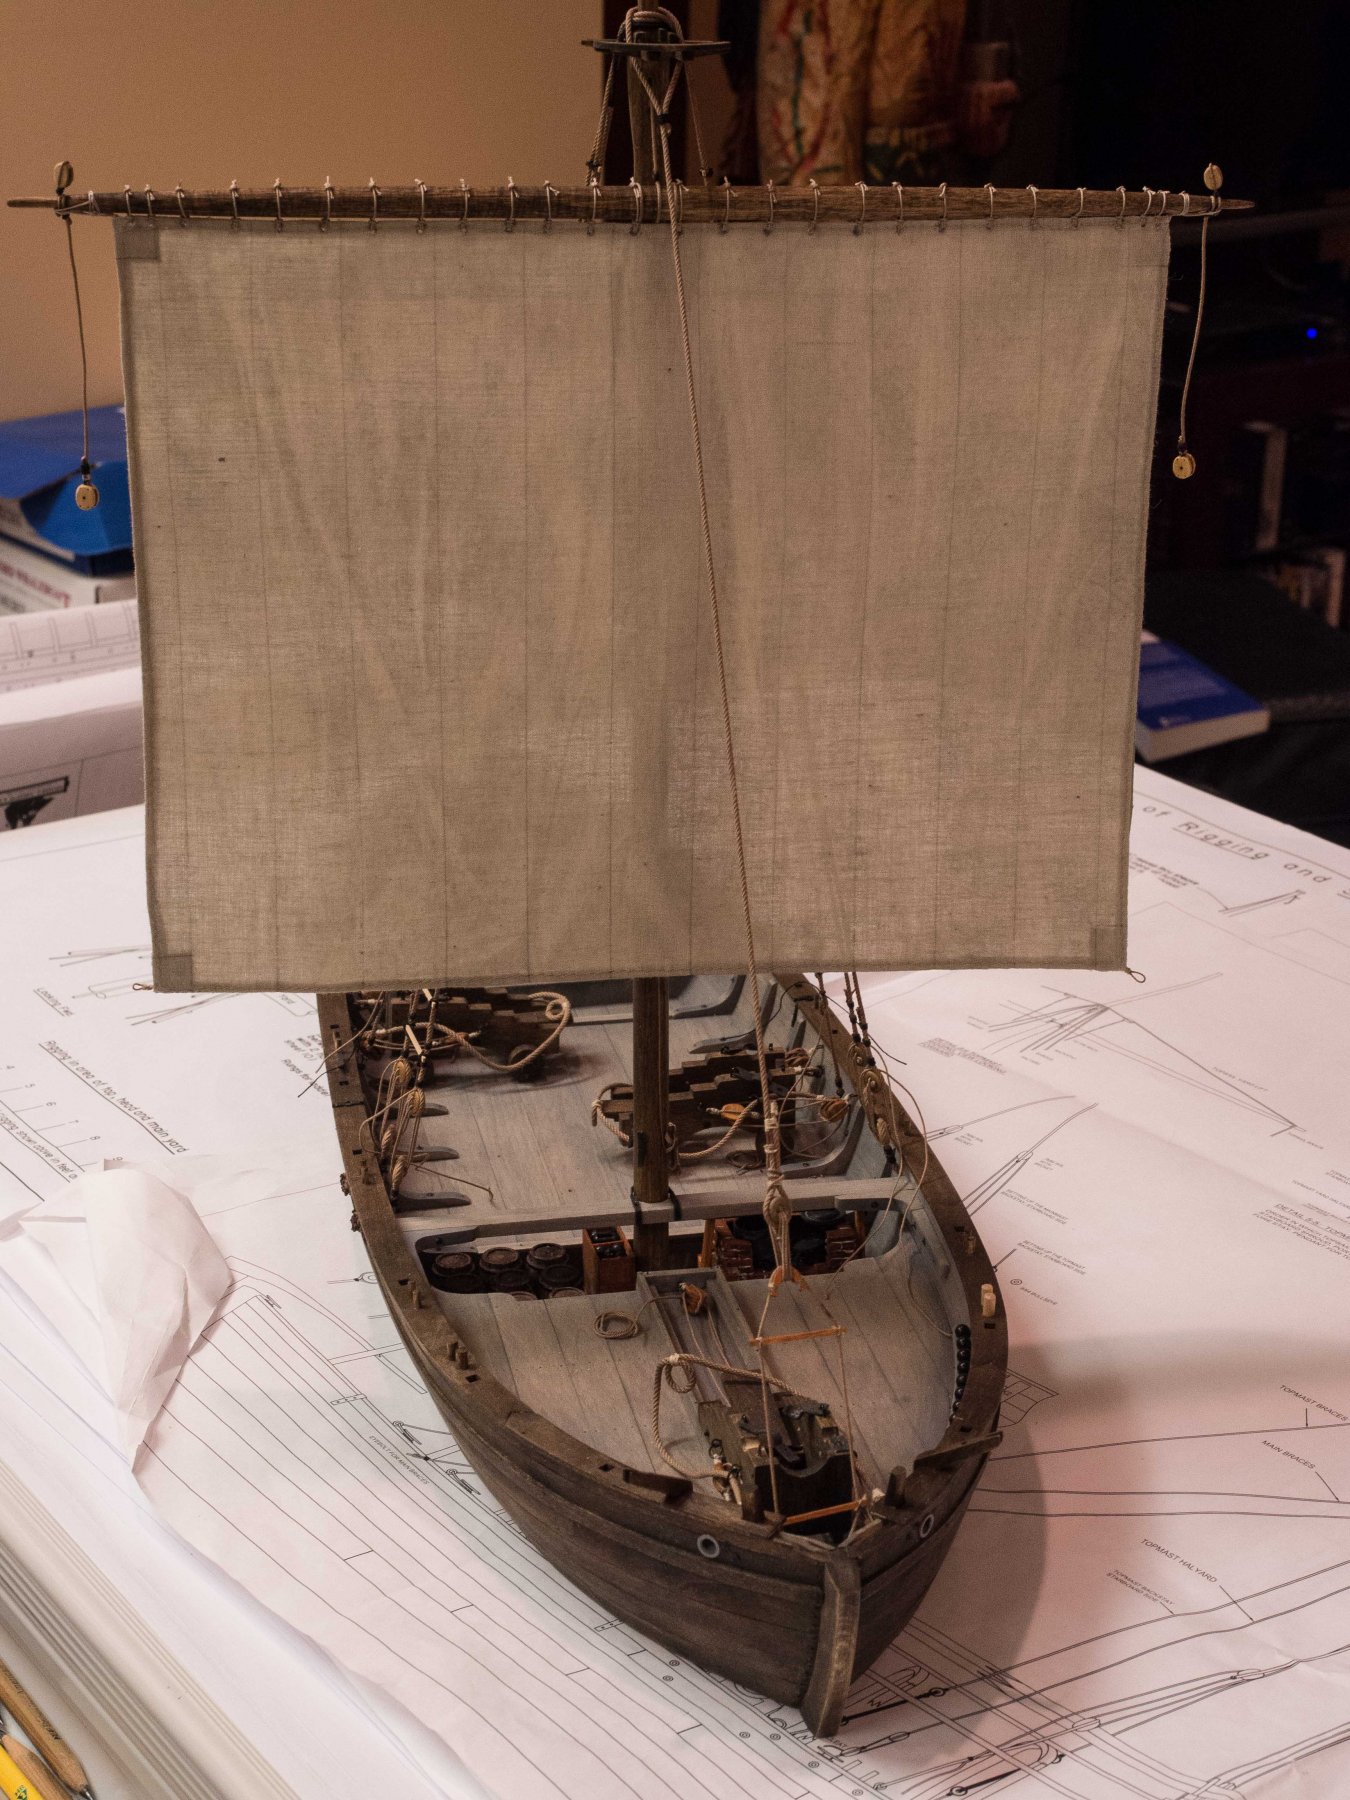
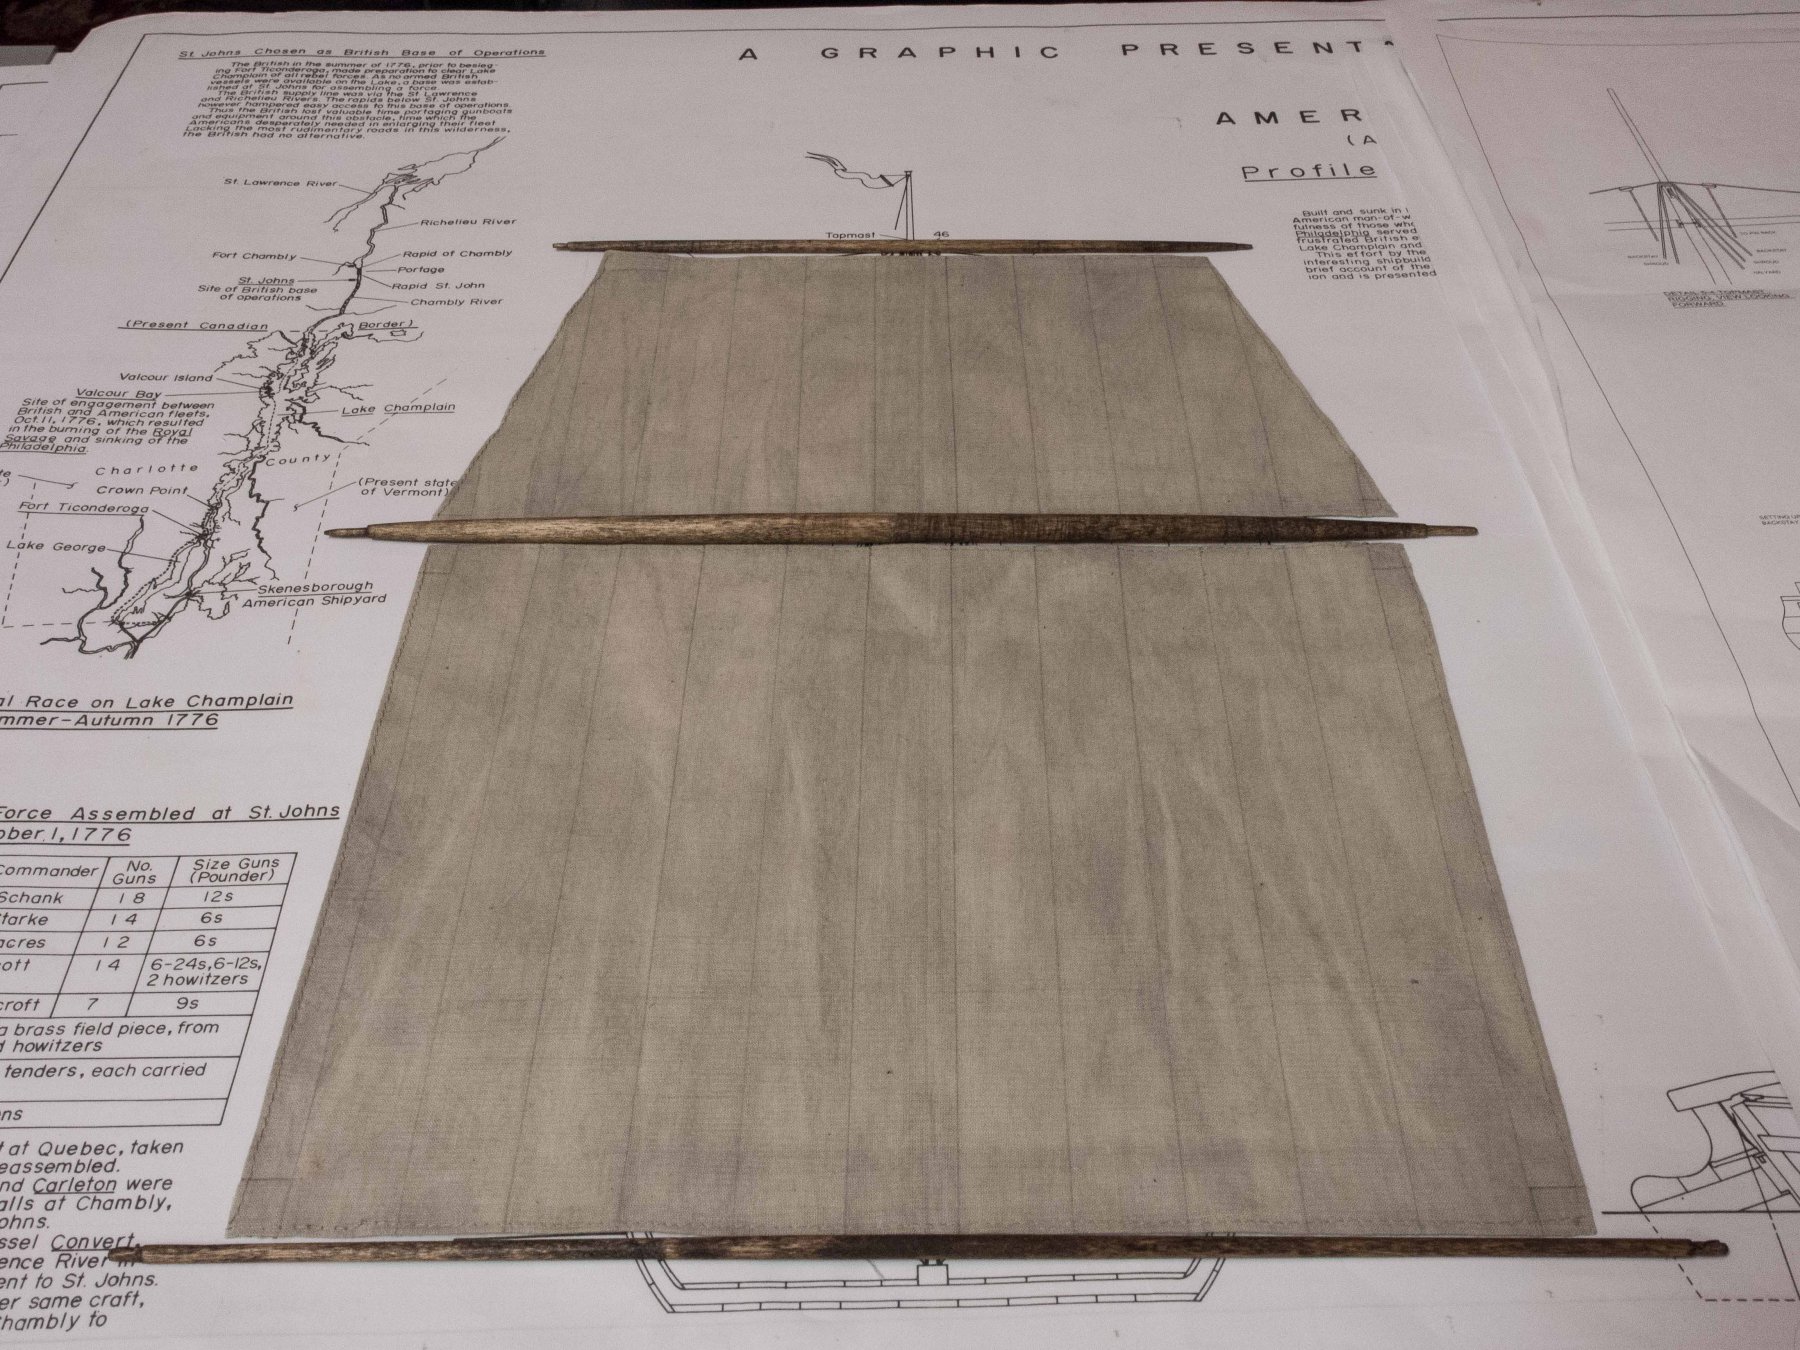
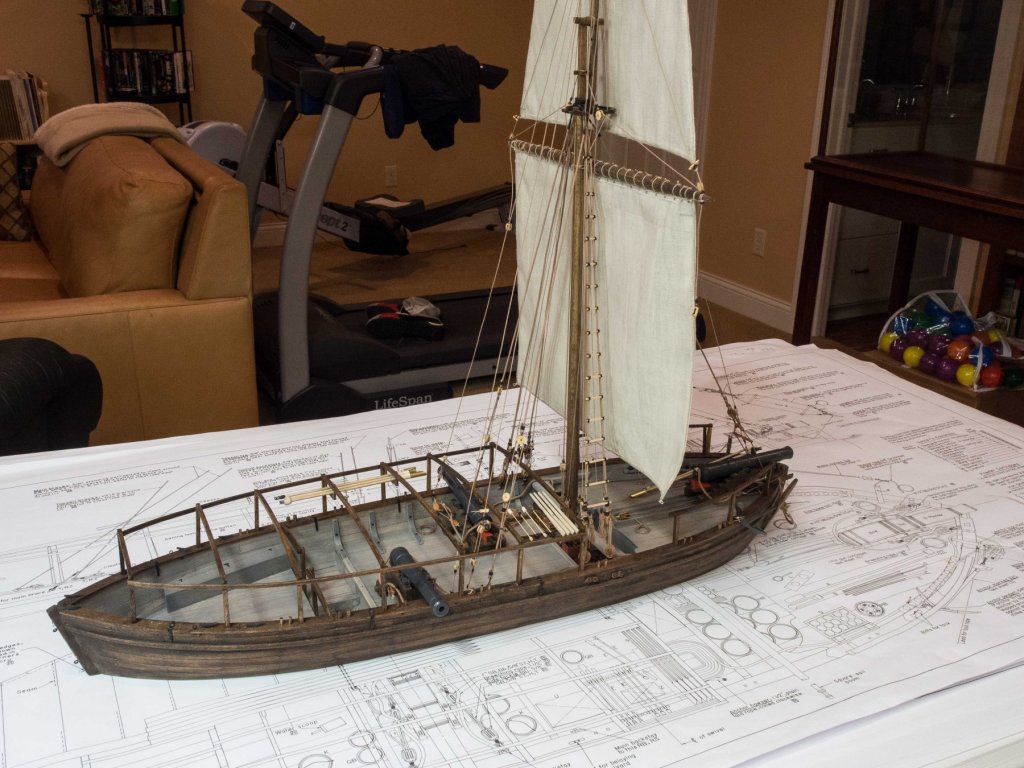
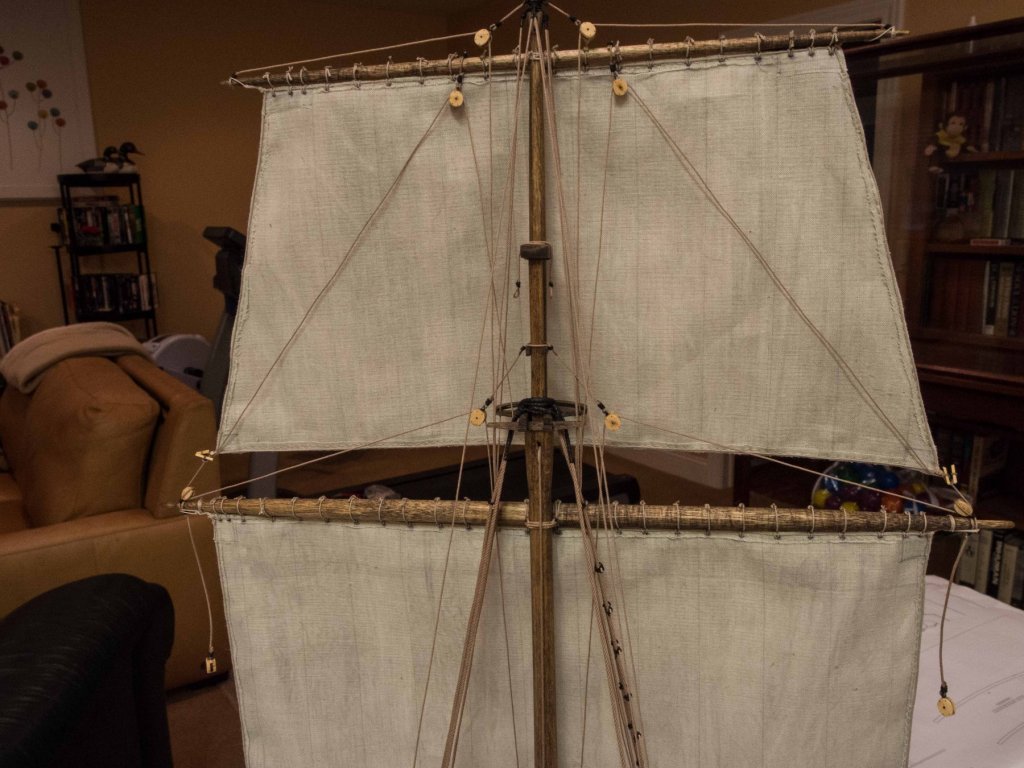
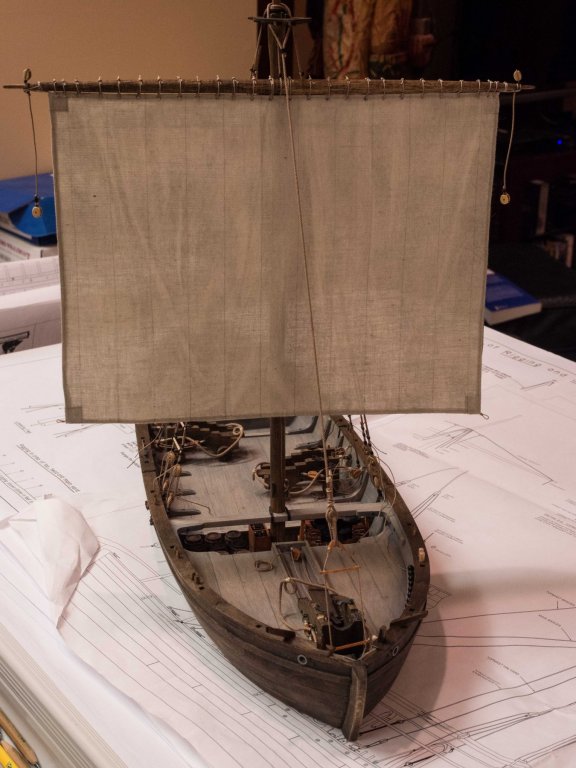
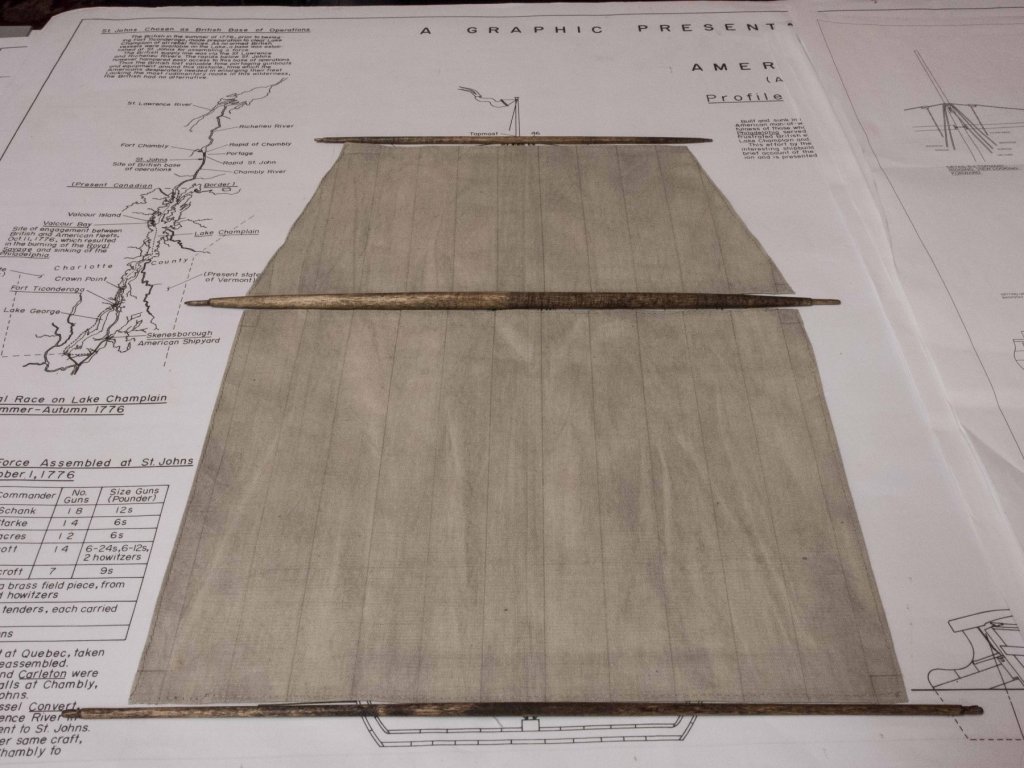
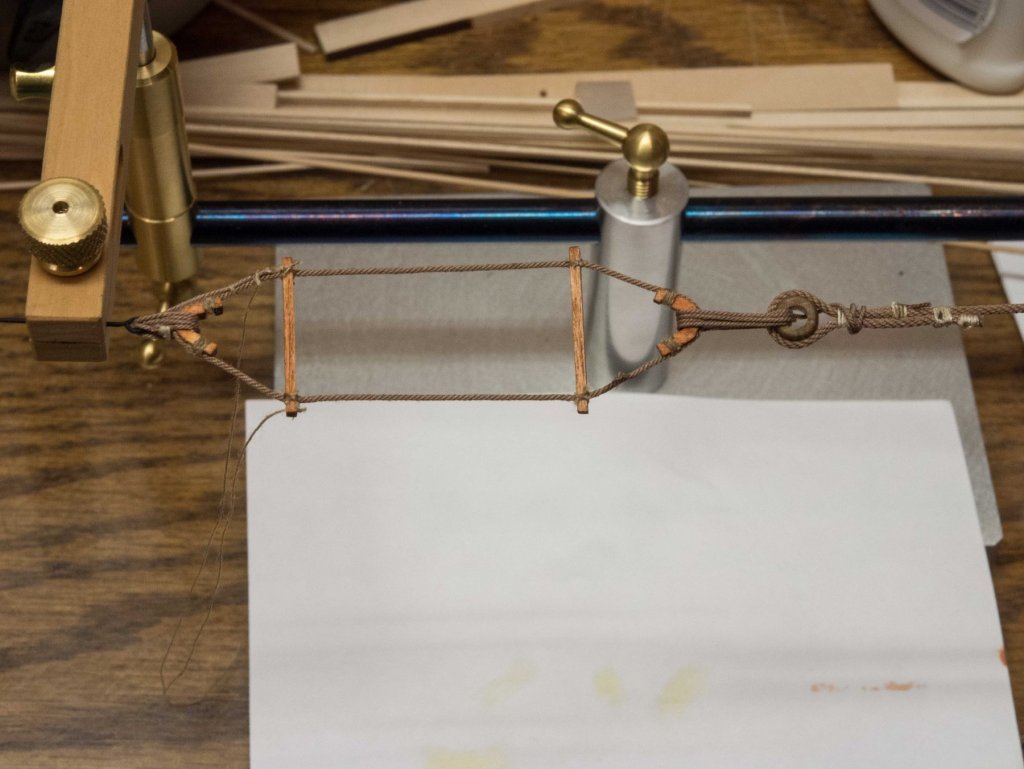
I have made two sails, which are complete except for the boltropes. I don't like the look of sewing them on, as even at this scale the stitches would be out of scale. I have experimented with gluing them on with fabric glue, and will likely do that with a few stitches with very fine fly-tying thread to tack down at least the ends at the cringle. Experimented with white ink pen and pencil line to simulate panels in the sails and ended up opting for the latter. Corner reinforcements were cut out of dyed sail fabric and put on with fabric glue with pencil lines added. The sails utilized some kit fabric I had from earlier kits, dyed with diluted coffee with a bit of black acrylic to get the greyish tinge as suggested by a build log on this site. I can't emphasize enough how this site and its wonderful contributing craftspersons enable erstwhile beginners like me to progress. Note the mainsail boom below the mainsail. This is not to be attached to the mast but only to the corners of the sail. I wasn't going to add the sails if I couldn't produce reasonable looking sails, but I believe I'm happy with these and will go ahead. While I was waiting for the admiral to get back from a trip to sew the sail hems, I put the forestay spreader together. Unfortunately it's very slightly asymmetric, but I can live with it. From this point on there is no major construction, just rigging, canopy, and deck detail things. Once I get the boltropes on I can bend the sails to the yards and attach all the block pendants, etc, mount the yards to the mast(s) with their rope parrels, and them stick the mast in. Then on to the rigging. I've been struggling with how to construct the fascines (bundles of wood used to provide more protection for the crew) at an appropriate scale. The 1/16 inch dowels I bought were actually closer to 3/32 and are simply too big (darn!). I experimented with 1/32 x 1/32 strips rounded through a drawplate, and discovered that a bundle of 40 (!) gave me the correct scale size for a bundle of 9" diameter with 1/2 - 1" sticks. I think I will be making fascines during boring parts of long winter nights (I live in Minnesota and it's acting like winter early this year.

- 67 replies
-
- 5
-
-
- philadelphia
- model shipways
- (and 1 more)
-
A detour to make sails, which I've decided to add. The oars will be stored. Need to address this before beginning the rigging, as the sails will need to be rigged to the yards prior to erecting the mast and adding the standing rigging. Will also need to order a few more blocks and more line as the model is not equipped for sails. Also noted on the Smithsonian plans there is a boom to which the lower end of the mainsail is attached, so need to make that. At this scale going to use cloth instead of silkspan. Dyed appropriate cloth with coffee and a few drops of black paint, and cut them out. Will be doing some experimenting with the admiral on hemming them - she has a sewing machine foot that rolls and stitches a small seam, but we're not sure it will handle this thickness without fraying the edge. If the experiment fails, will turn and iron a 1/8 inch seam and likely sew it rather than use fabric glue like I did on the Morgan sails.
- 67 replies
-
- 2
-
-
- philadelphia
- model shipways
- (and 1 more)
-
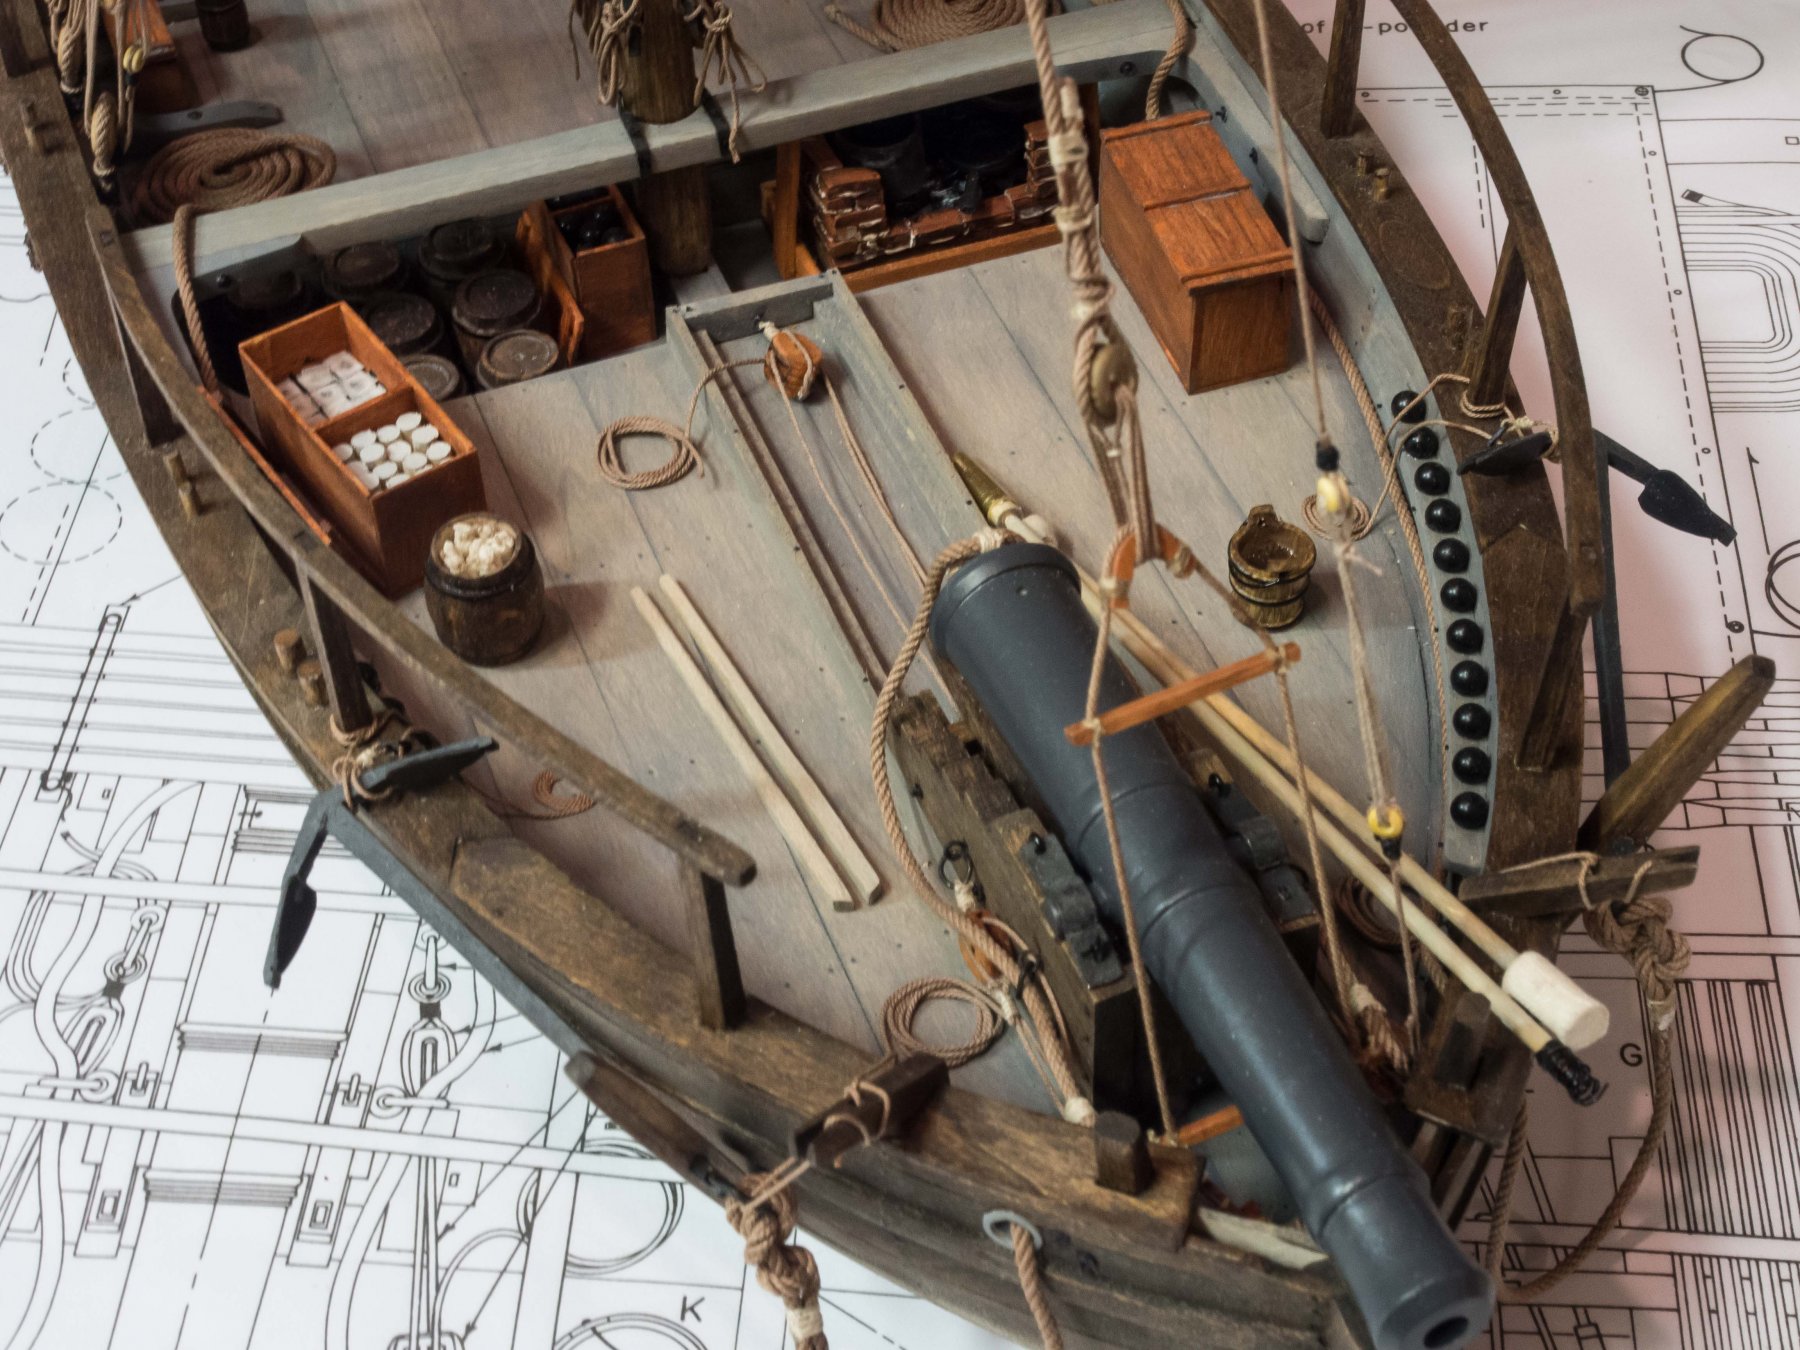
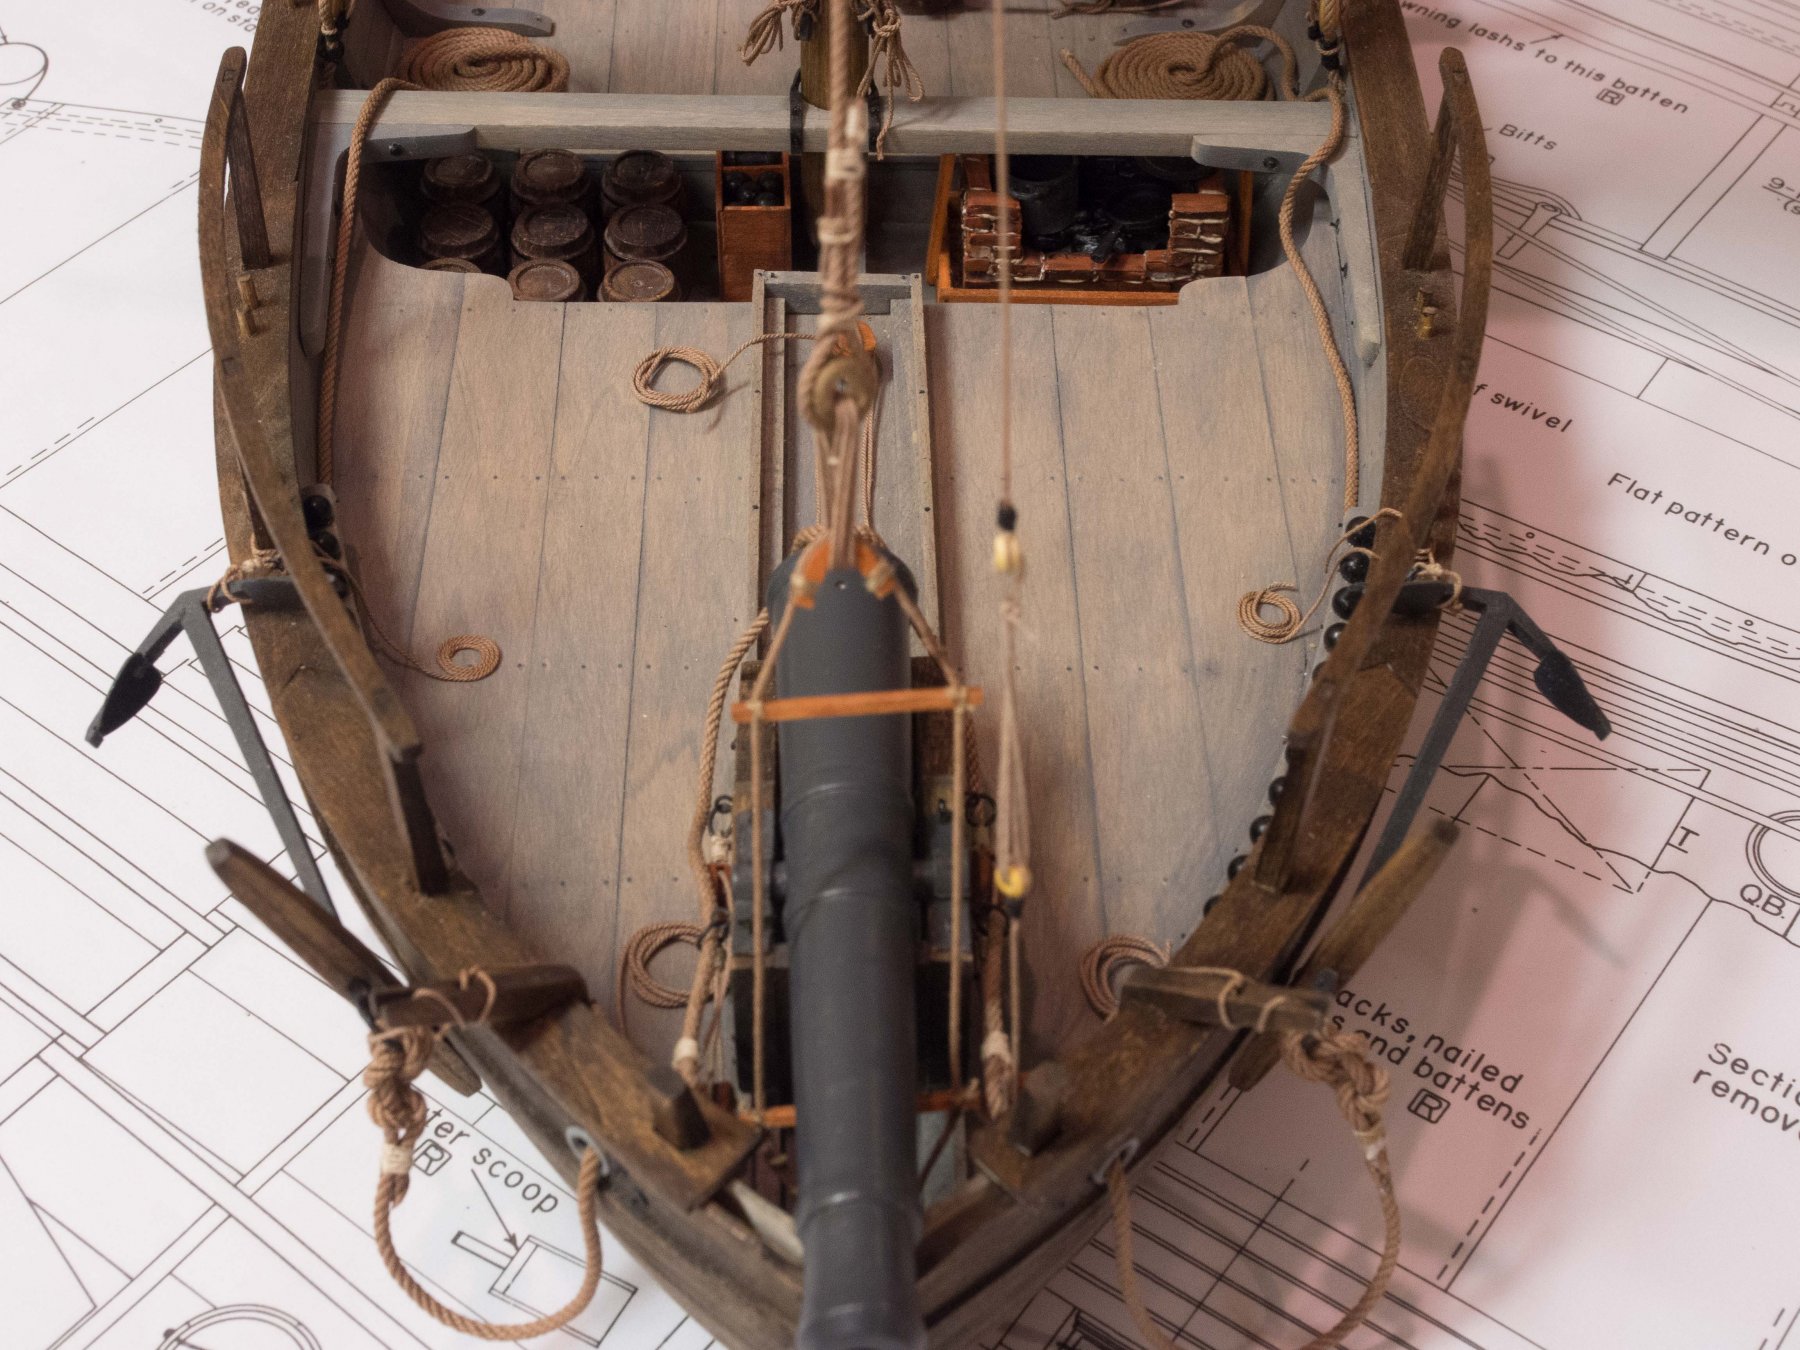
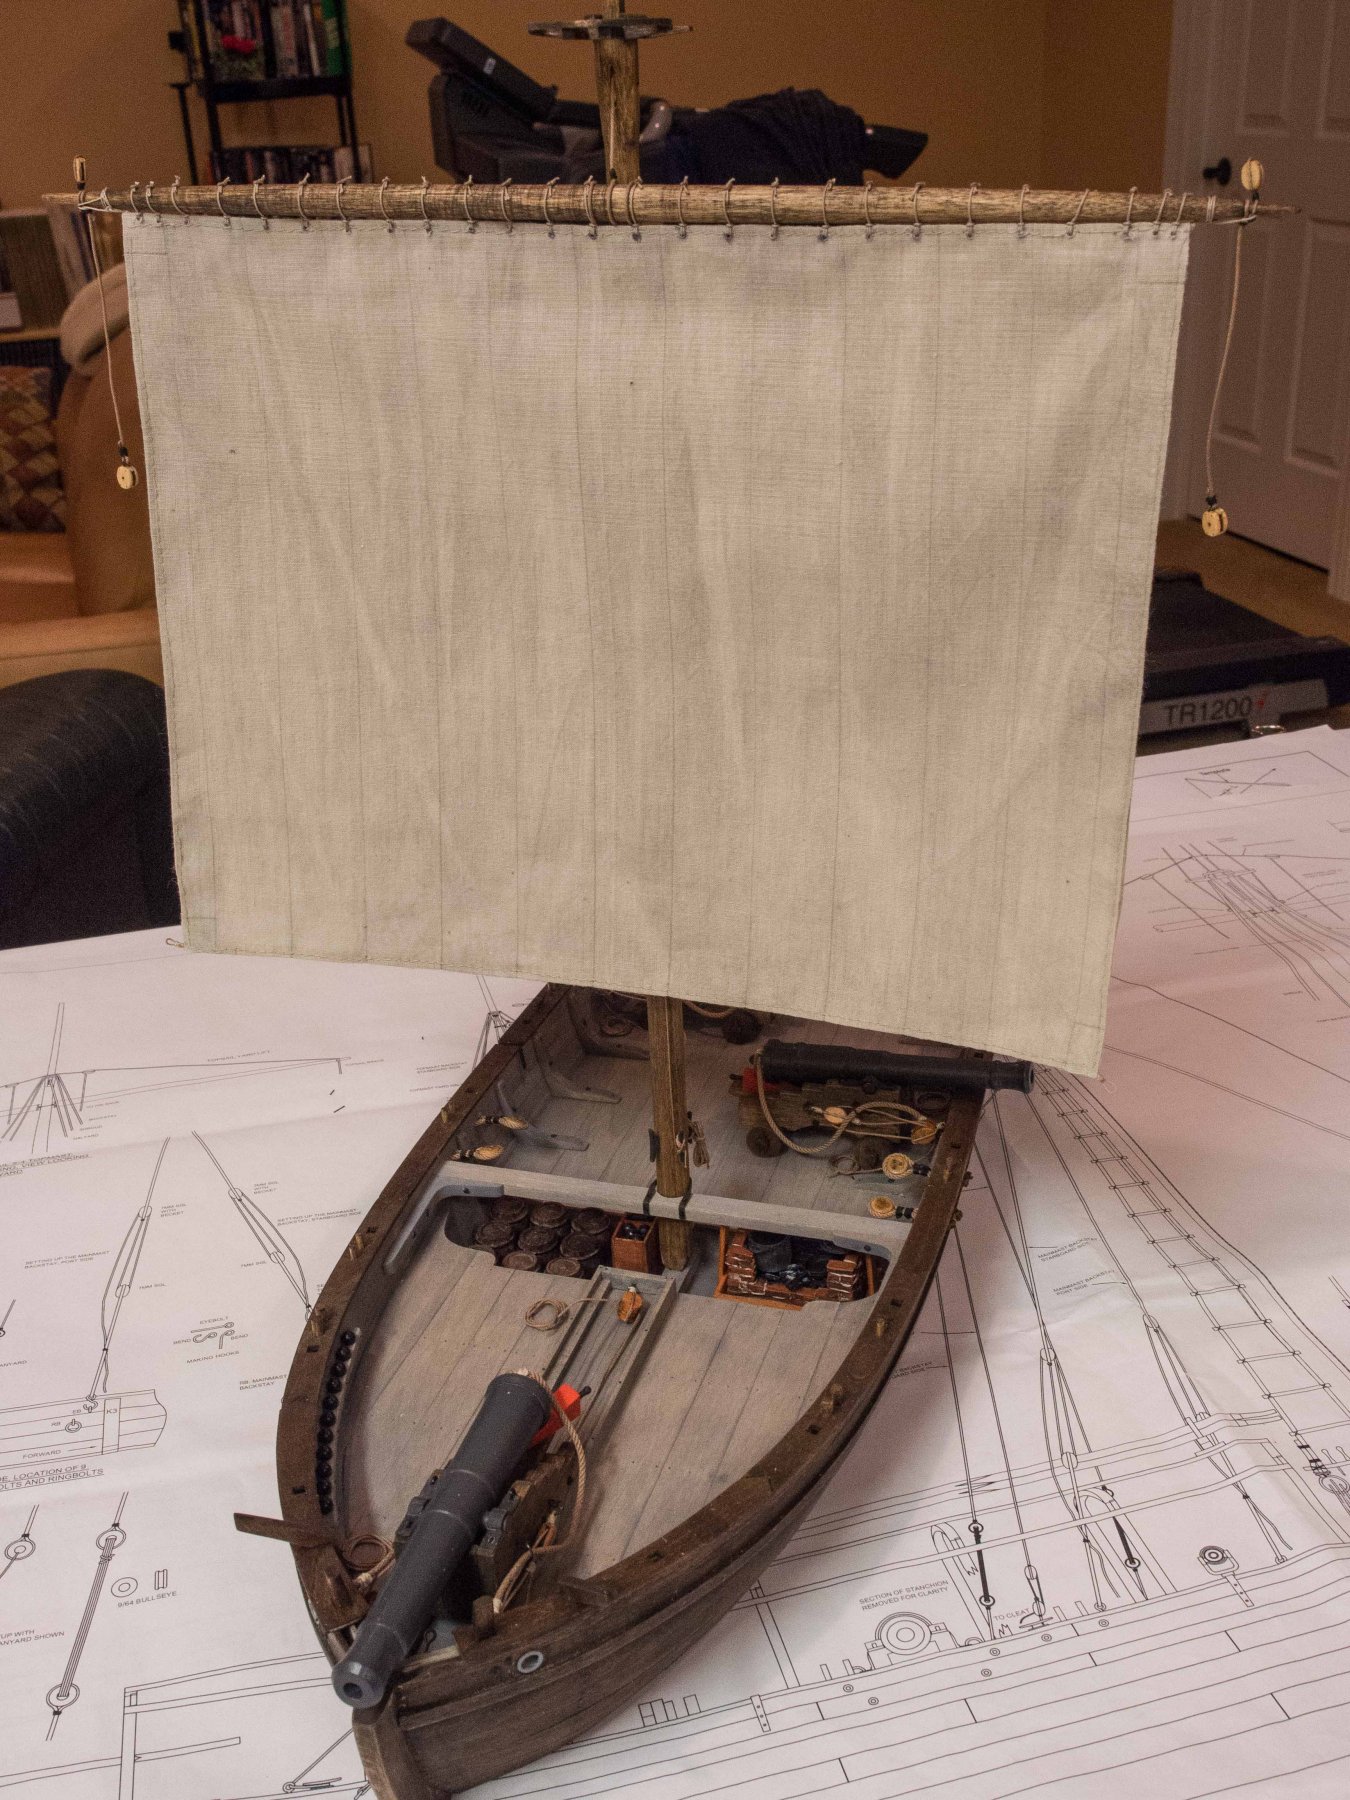
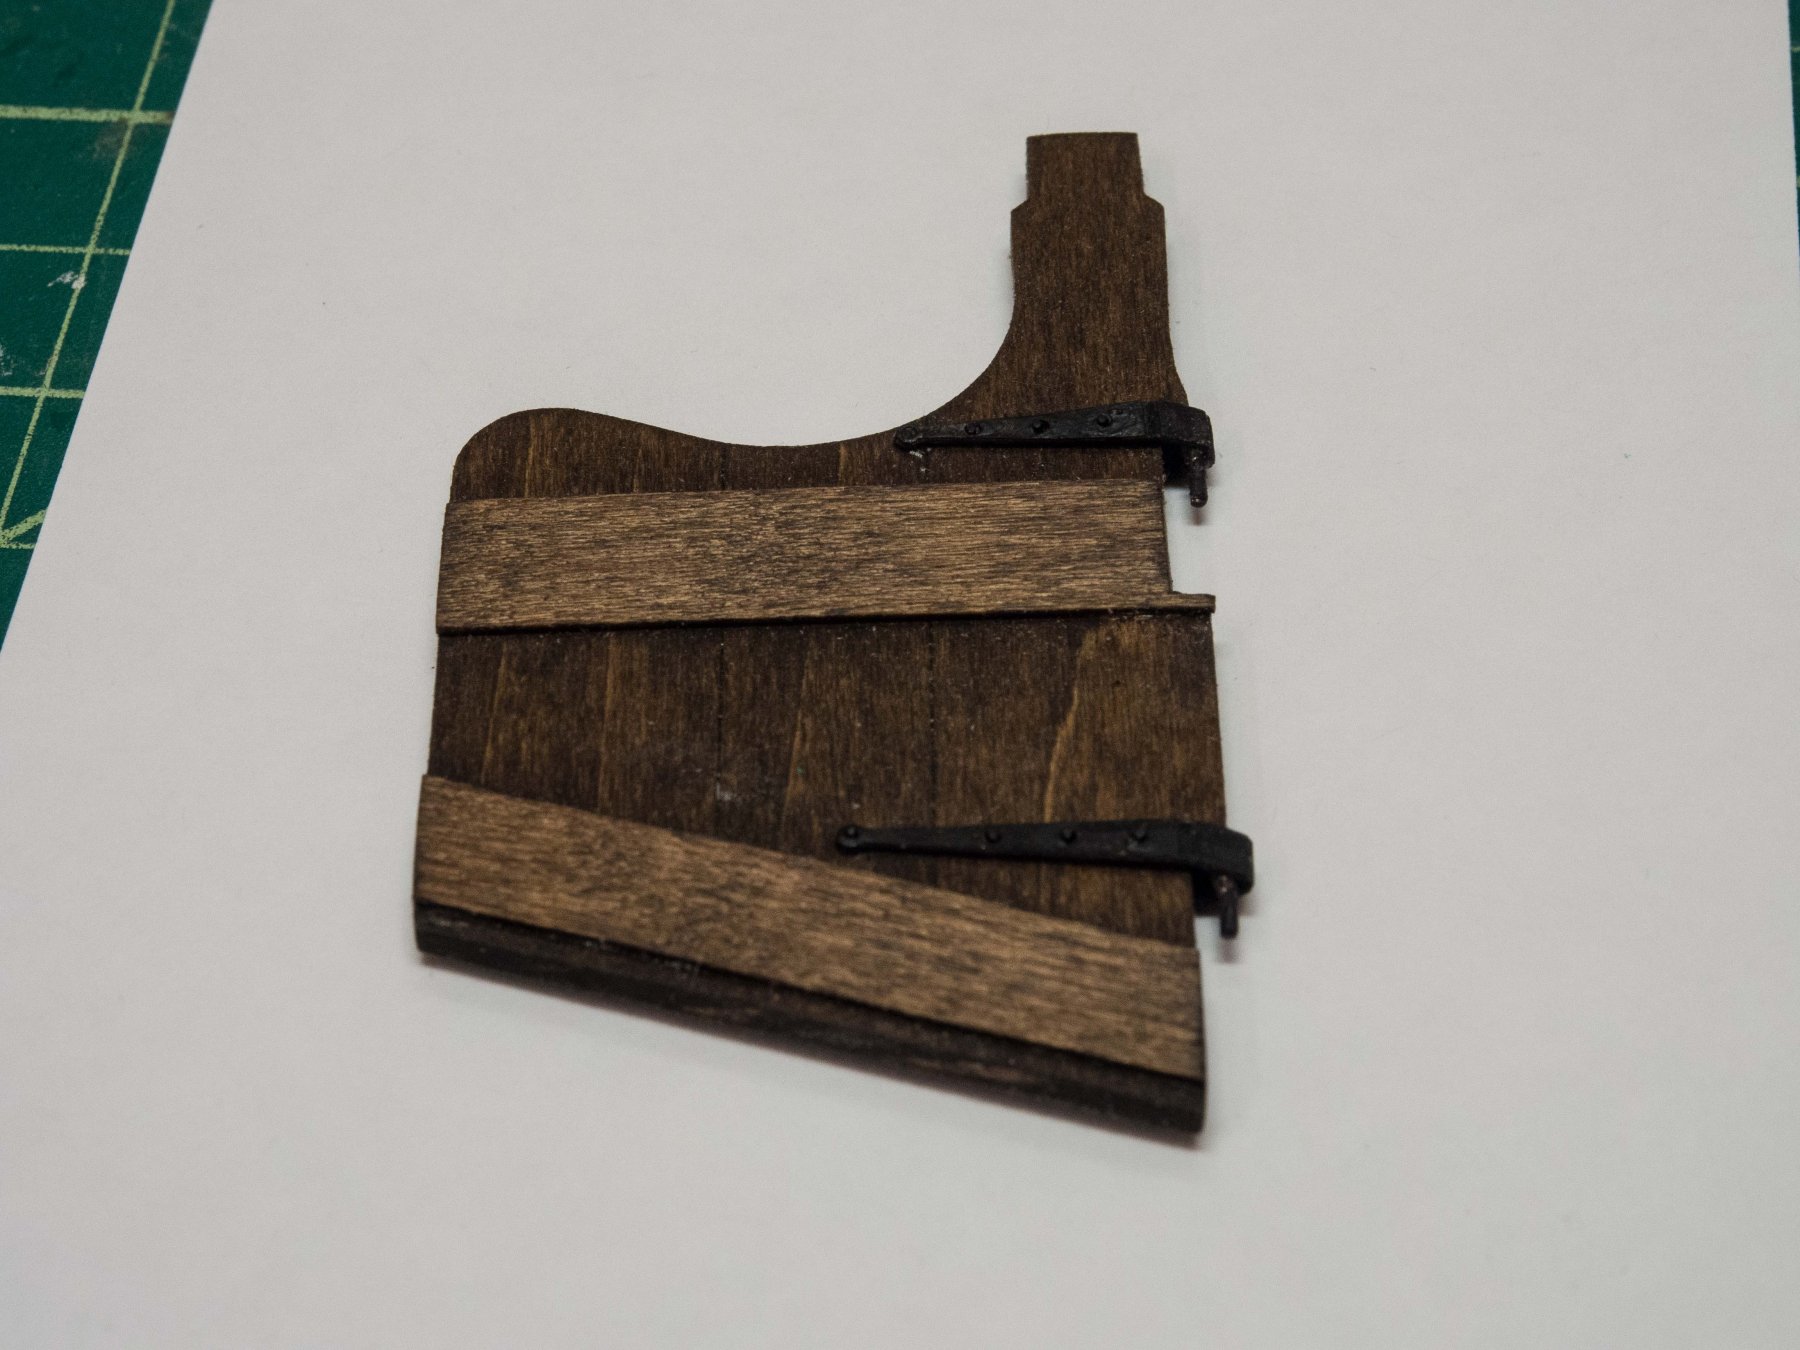
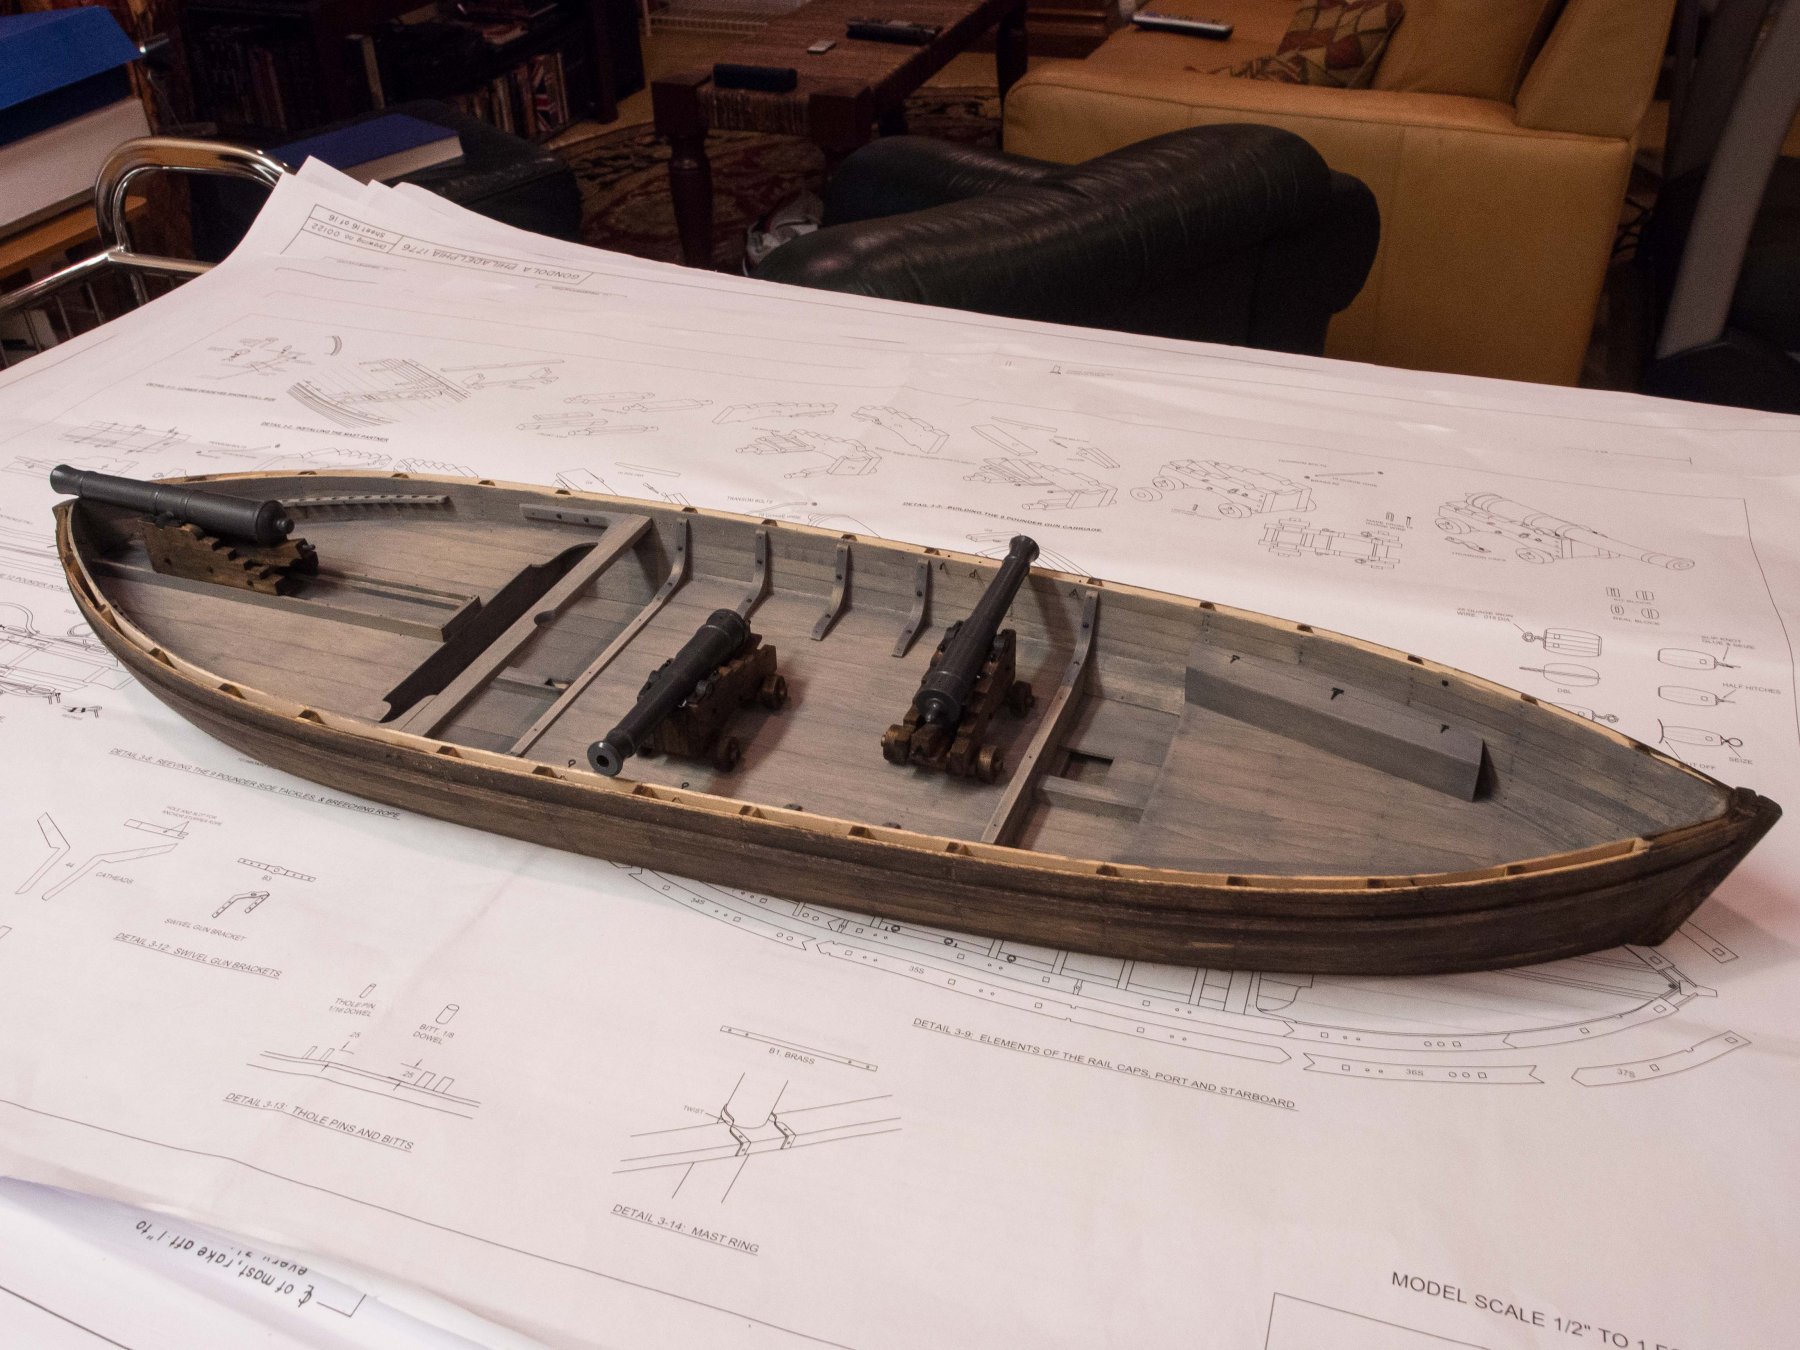
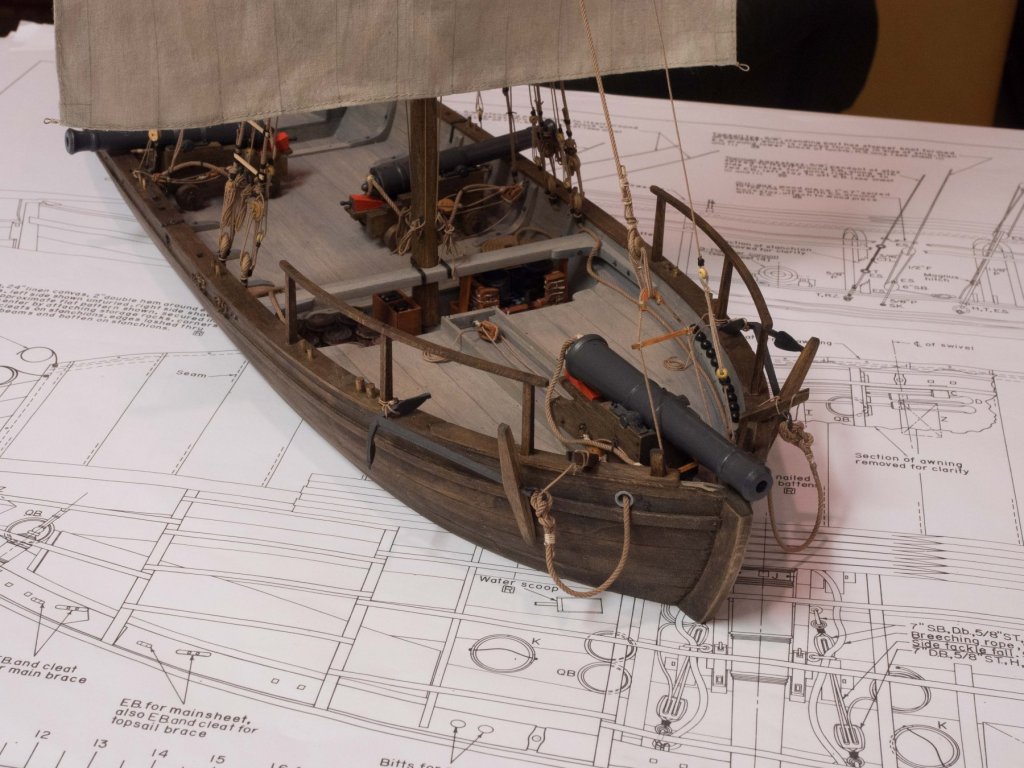
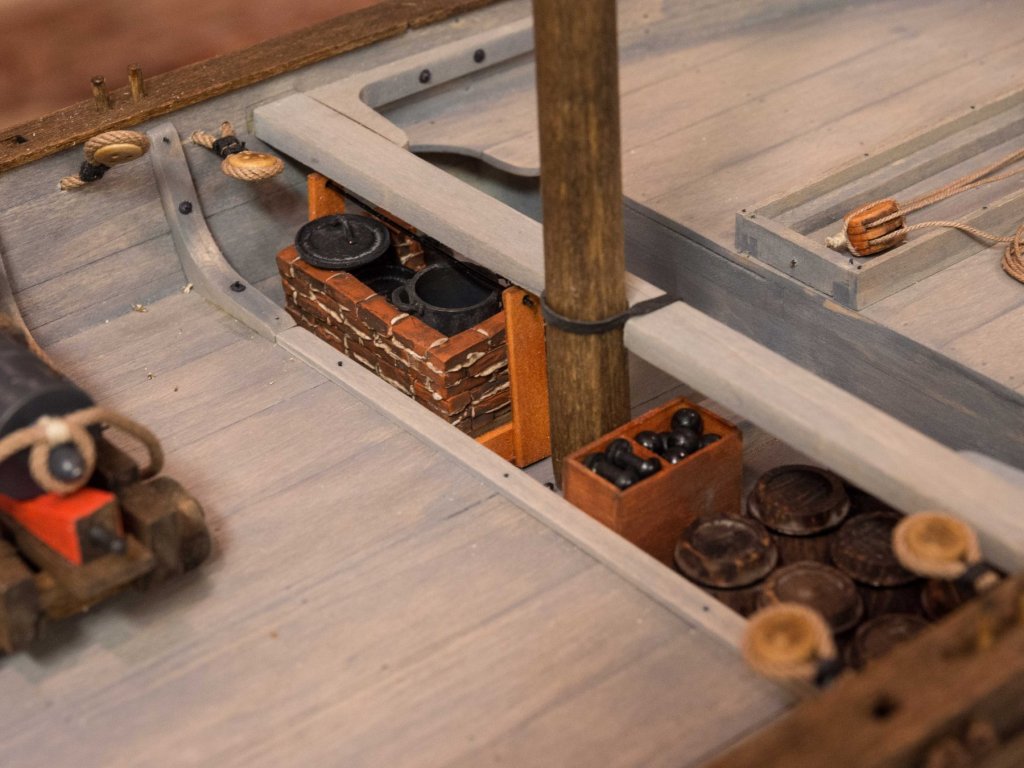
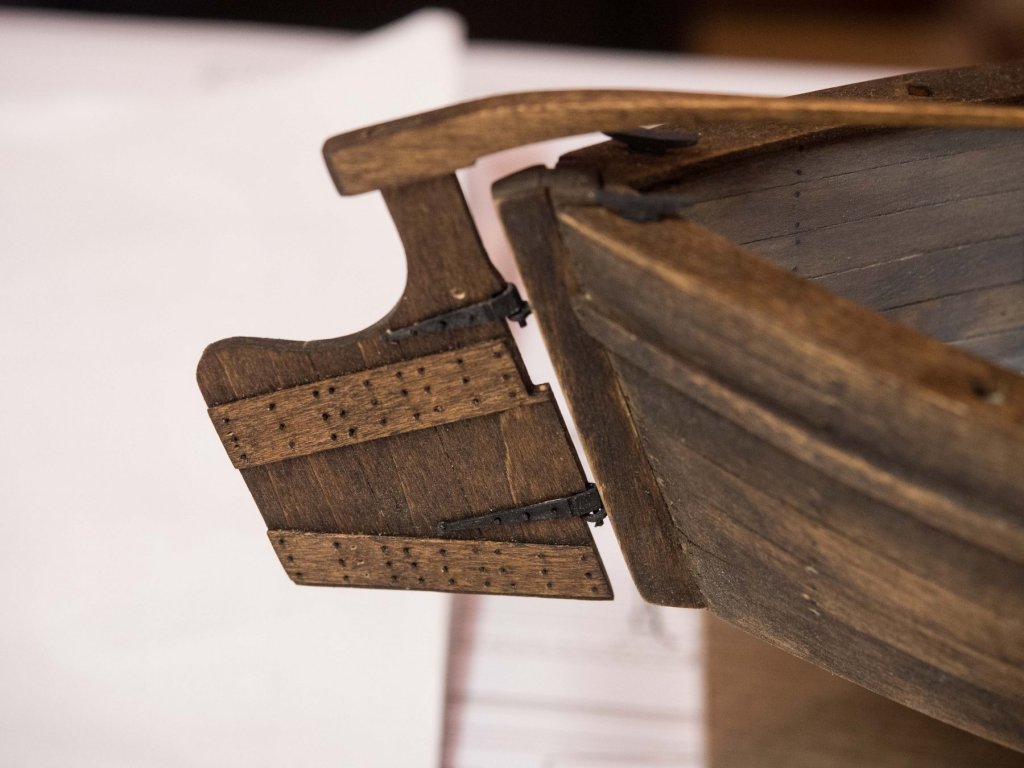
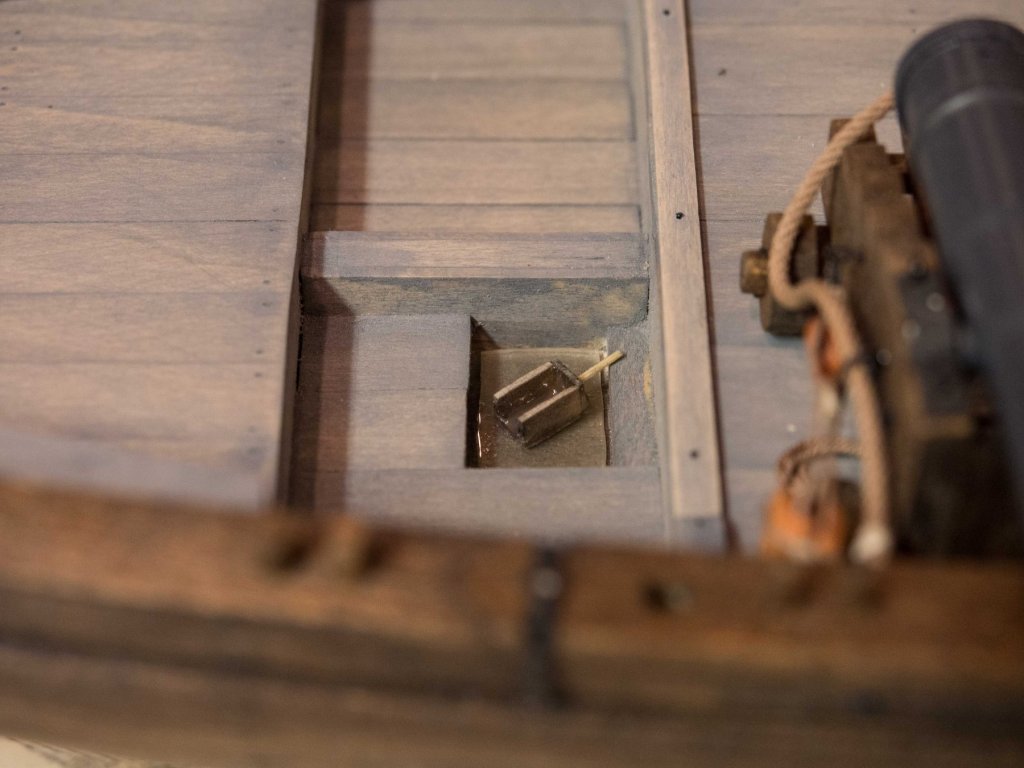
Finished and (temporarily) mounted the rudder with the tiller. Almost forgot to add the nails. That was a bit of a pain. Added details to the forward cockpit which I felt might not be terribly accessible once I start the rigging. Glued the stove in place with a couple of implements, and added a number of half barrels and a box containing bar shot and balls, as shown on the Smithsonian plans. For fun, added some fake water in the bailing well along with the water scoop also shown in the Smithsonian plans (which apparently were drawn to guide the construction of the replica). Now, on to the rigging.

- 67 replies
-
- 7
-
-
- philadelphia
- model shipways
- (and 1 more)
-
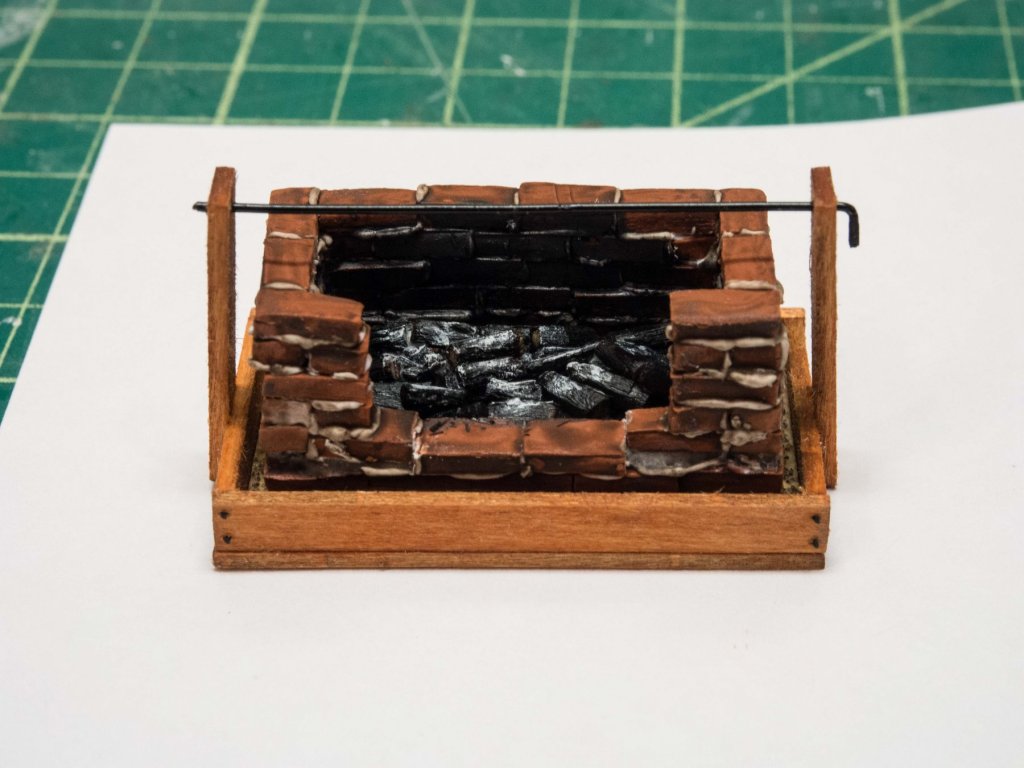
Back from a great Mediterranean cruise on the worlds largest ship with sails. Back in the shipyard today - Finished the stove. Bricks made with sculpy formed in the sheet the kit "bricks" of basswood were in. Modeling paste for mortar. Set up a charcoal fire in the stove. Suitably sloppy brick work! Also added the pintels to the rudder.

- 67 replies
-
- 7
-
-
- philadelphia
- model shipways
- (and 1 more)
-
Noel, the stain was a mixture of 2 Minwax stains - Gunstock 1/3 and something darker 2/3. Can't find the can at the moment. Stains were suggested in the Ships in Scale series, and I liked how they looked. He was trying to match the look of the reproduction Philadelphia. Art, to this point most of my additions have been cosmetic - I have added nails (fake, see above) to all planking and fake bolts (see above) to everything attached to the hull, such as the knees, the cathead, and so on. None of this is necessary for the build - I went into this looking to detail alot. The deck in the kit is in several large pieces which I cut into planks and (due to subsequent material loss for each cut) had to fabricate some extra material along the edges. Again, not necessary to the build and requires a precision saw. Also, as has become my practice, I replaced all the blocks and line with material from Chuck's Syren Ship Modelling. Not necessary but I like the look. I spend so much time building these that I don't mind spending extra to dress them up, but the stock model material would make a perfectly adequate model. Added some cannon balls (not in the kit) and some small plastic hinges for the lockers (not in the kit). I'll be fabricating stuff, such as making bricks for the stove from modelling material rather than the wood pieces the kit provides, as well as bailing scoop in the aft well, and equipment for the guns. Got some barrels too. All of this is eye candy and not necessary for a good looking model at your stage. That was my stage when I started with Picket Boat #1 and then the CW Morgan. I fell off the wagon when I made the Morgan's blubber rendering stove out of 2x3mm individual bricks with spacers for mortar. The main thing is to have fun!
- 67 replies
-
- 2
-
-
- philadelphia
- model shipways
- (and 1 more)
-
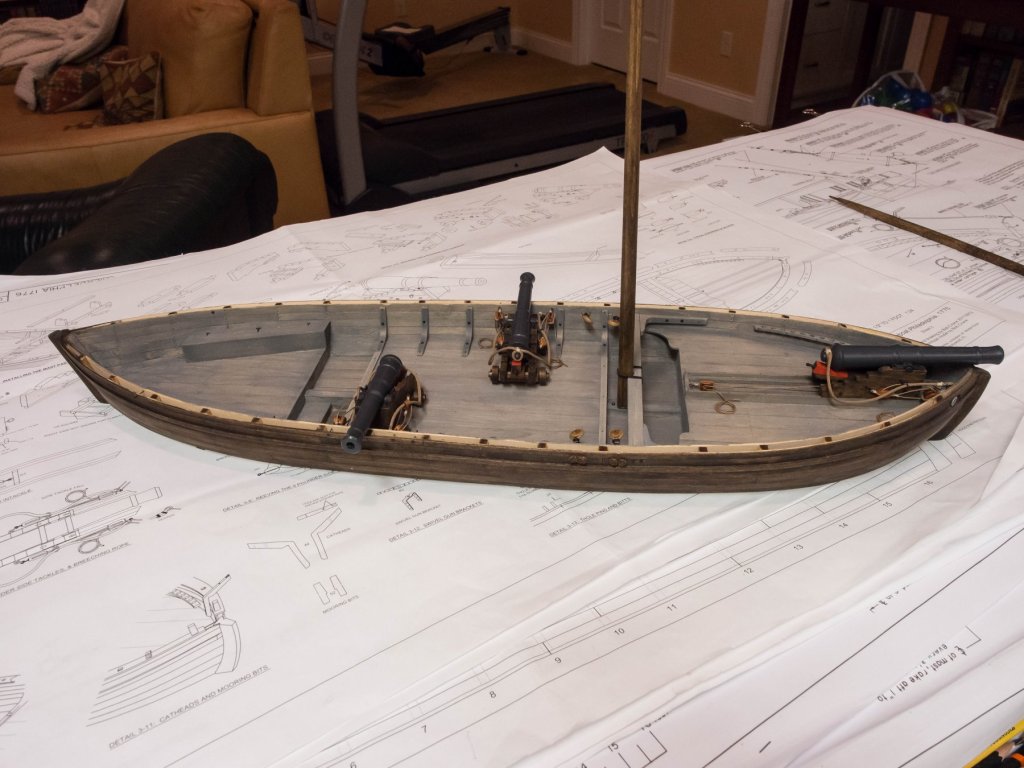
Finished up the cap rail, the catheads, and the tholes, bits, and mooring bit. Put the cleats on the cap rail as well. The forward facing 12 pounder sits a bit crooked in its carriage as you can see - I'll be fixing that later. I'm going to depart from the instruction book sequence because I mean to do some detailing on deck supplies and equipment visible on the original Smithsonian plans, and that will be easier without working around the rigging and the canopy supports. So next will be the rudder hardware, the stove, and some other deck stuff. Meanwhile tho I've tidied everything up and put the tools away as we are leaving on a 2 week vacation. Nice place to pause, as I've finished 5 of the 7 parts of the Ships in Scale series on this build. Thanks for all the likes. Does anyone have a favorite very thin cotton material for sails? Silkspan is not appropriate for this scale. Will probably use the same material for the awning - I don't like the stuff that came with the kit.

- 67 replies
-
- 3
-
-
- philadelphia
- model shipways
- (and 1 more)
-
No had some plastic hinges lying around. That's why they're 2 different sizes 😀
- 67 replies
-
- 1
-
-
- philadelphia
- model shipways
- (and 1 more)
-
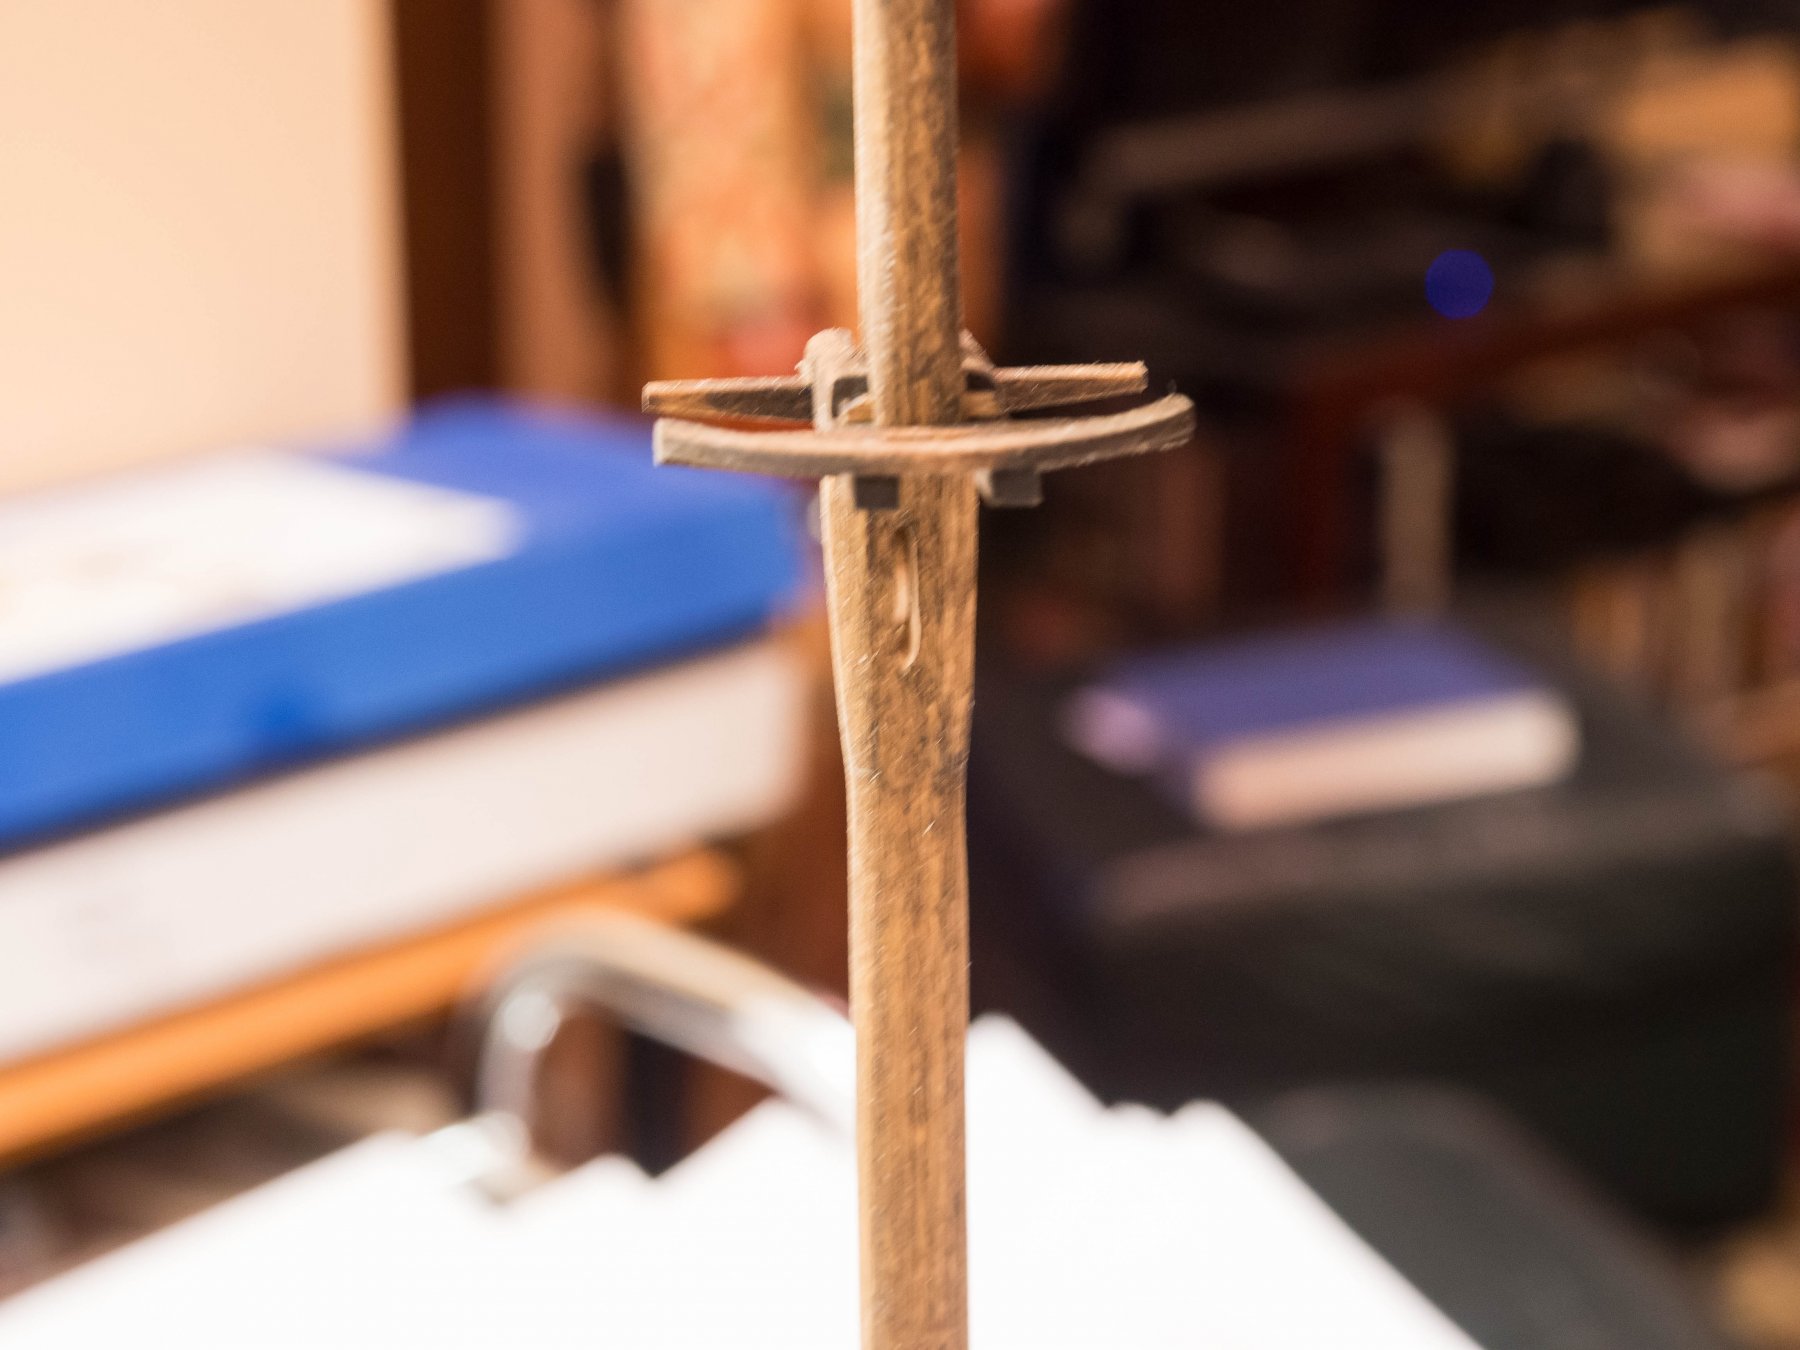
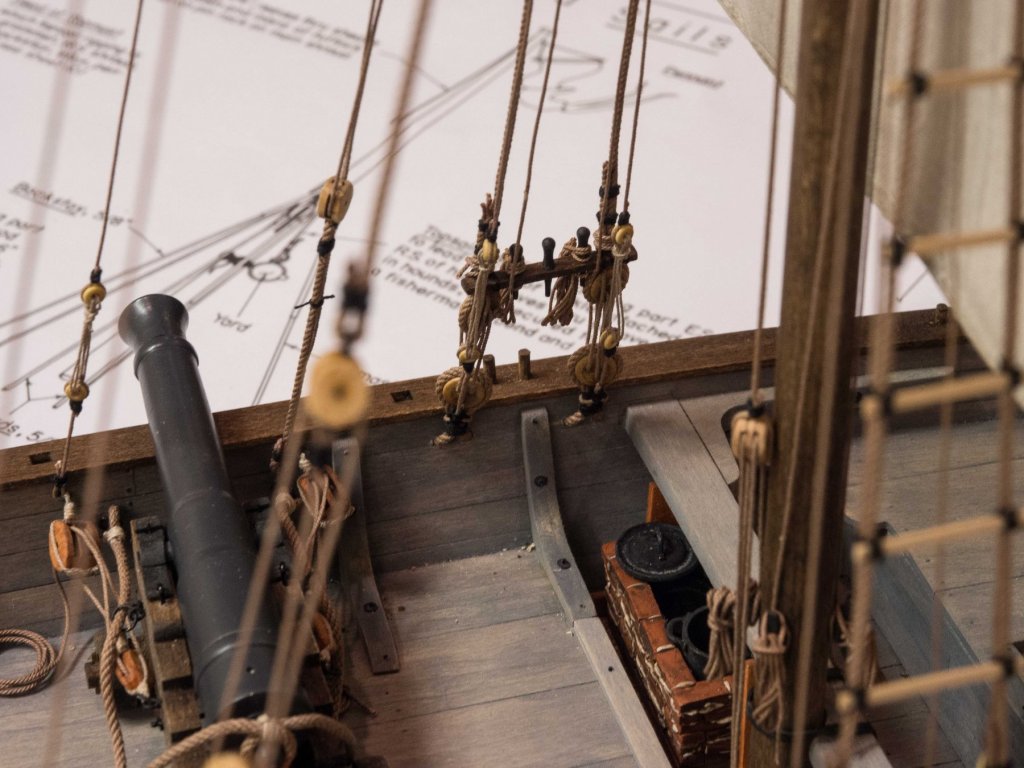
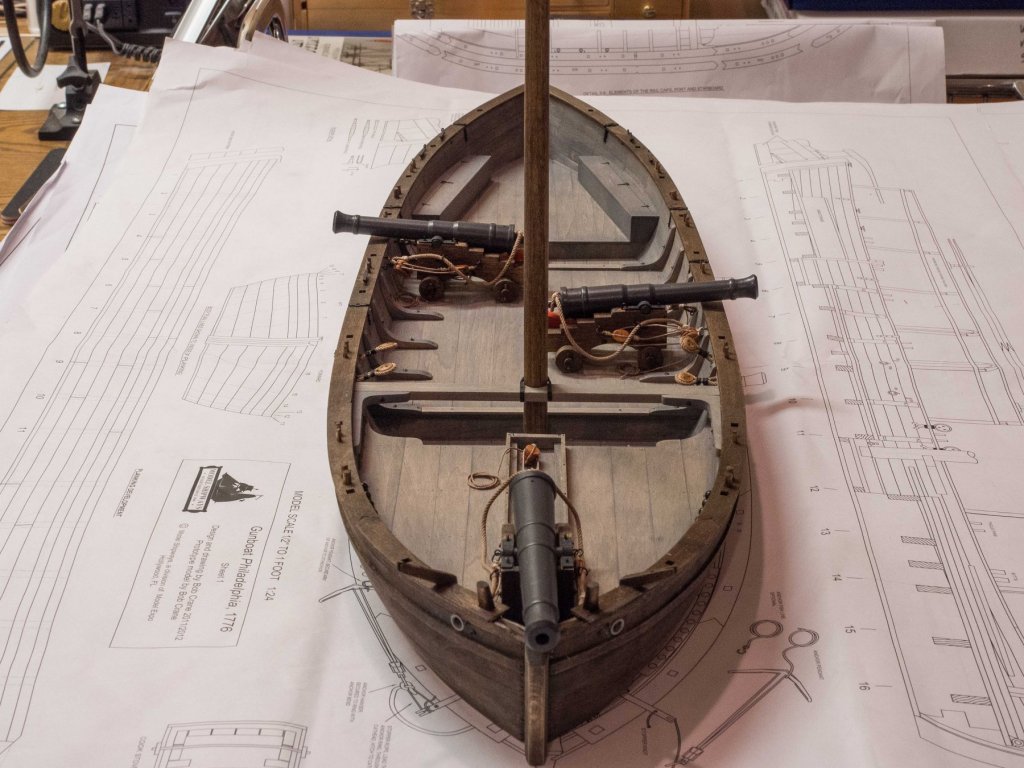
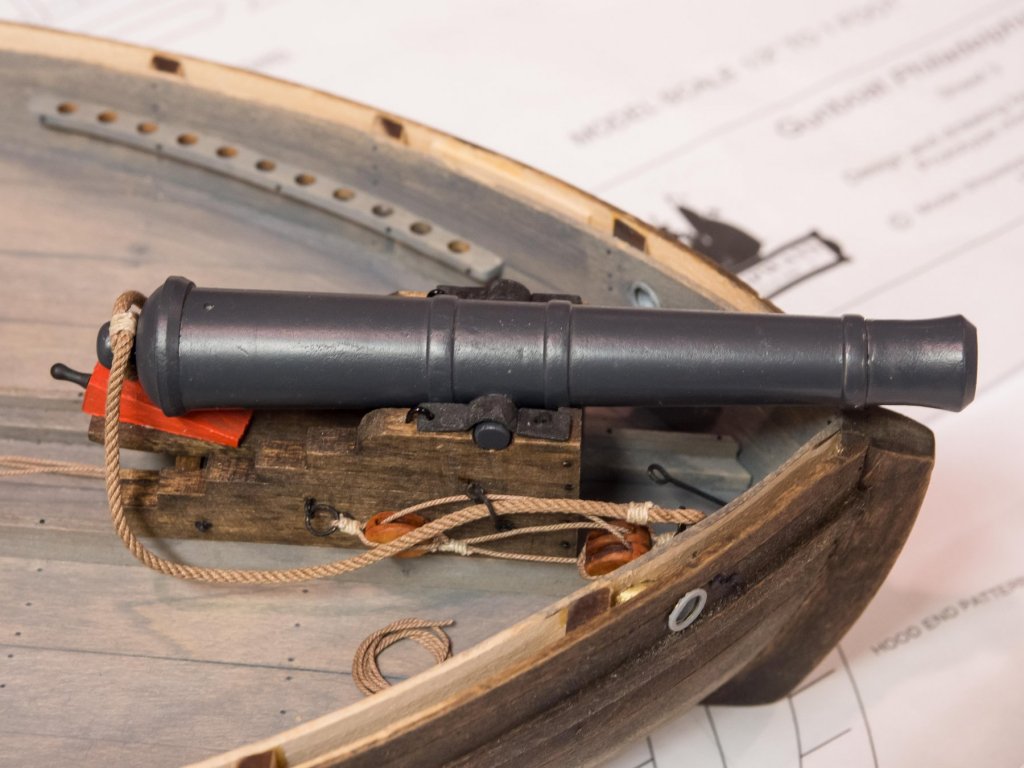
I've rigged the guns, using blocks from Syren (Chuck) and rope from the same source. Chose to strop with line rather than wire. Appreciate advice in one of Chuck's posts about seizing with a series of carefully placed tight overhand knots rather than wrapping line, with a drop or two of dilute white glue and some compression/shaping as it dries - much easier and looks good to my eye. Constructed and set up the mast and mast band to the mast partner. At this scale I thought it would be fun to put actual sheaves in the main and topmast, and did so using discs cut off of appropriate sized dowels and mono-filament line as axles. Lower deadeyes also placed; in this ship they are anchored with rope place through the ceiling planks and hull with stop knots on the exterior. Will work on the cap rail today, but the shipyard will be closed soon for two weeks as the admiral and I take a vacation (on a five masted sail ship!). I'm pleased with how it's looking so far.

- 67 replies
-
- 7
-
-
- philadelphia
- model shipways
- (and 1 more)
-
By the way, I think I made the separator character with an integral sign and strikethrough and italic styles applied. Can't recall for sure.
-
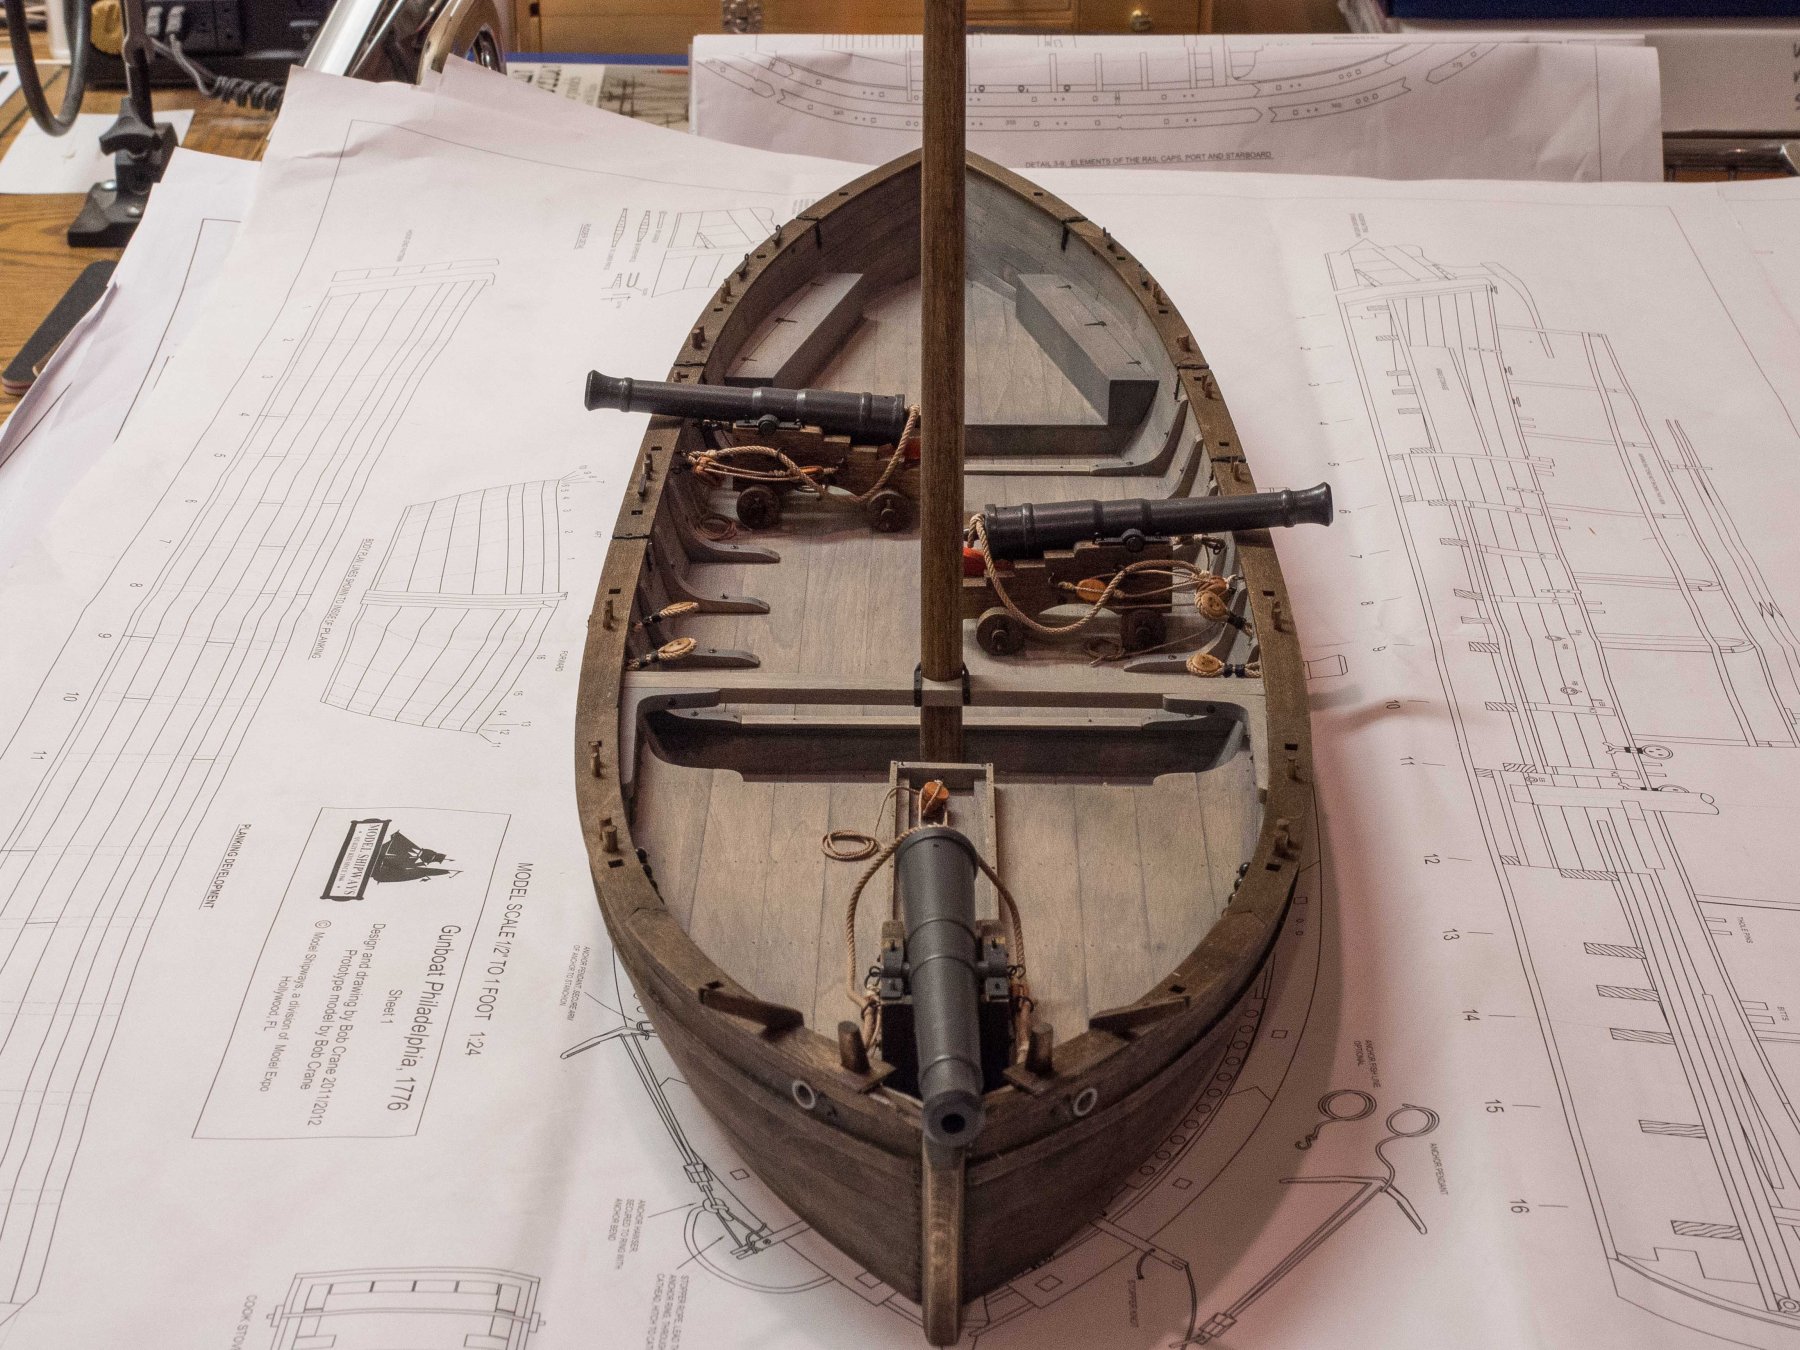
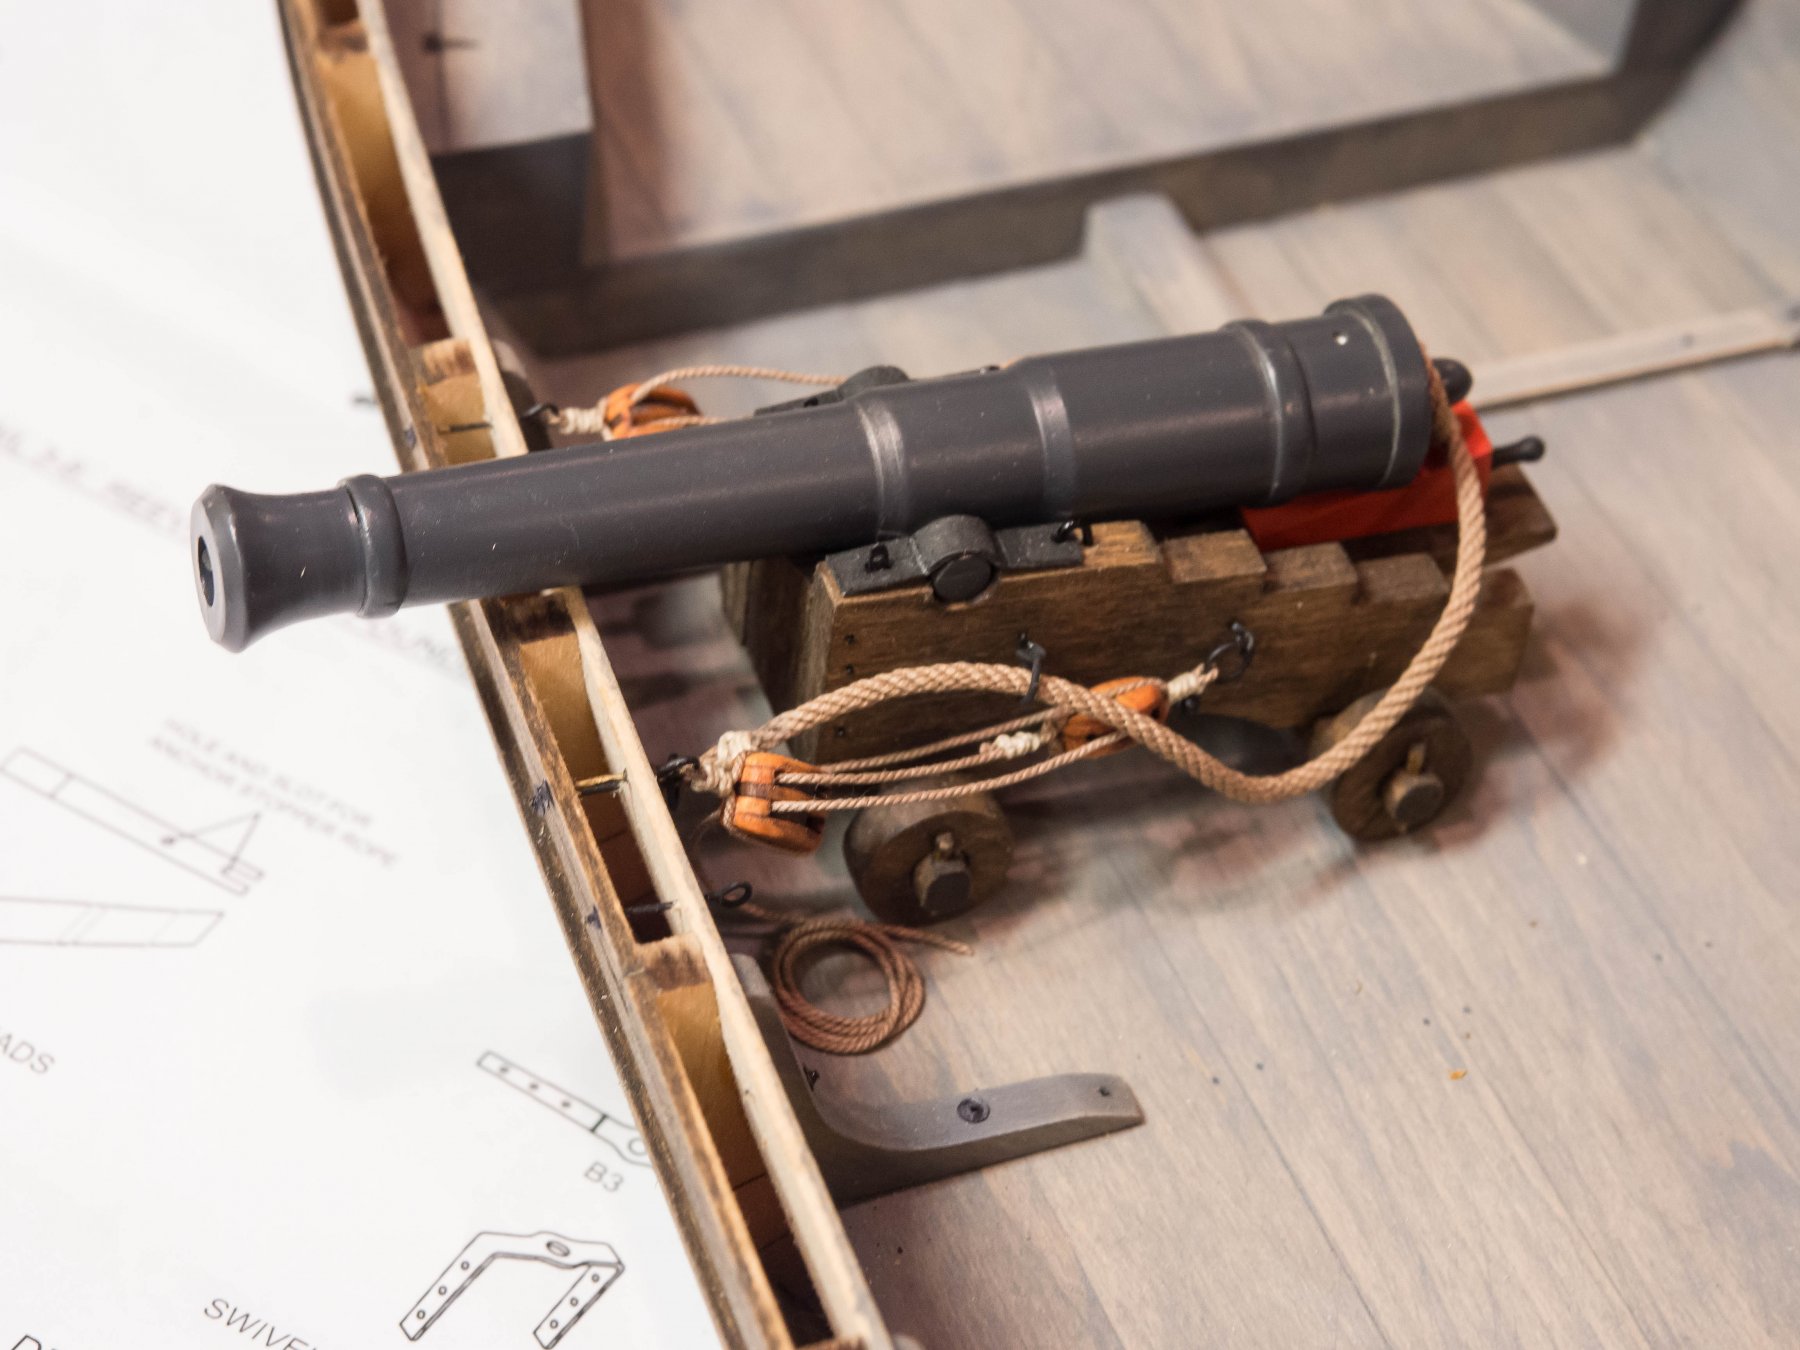
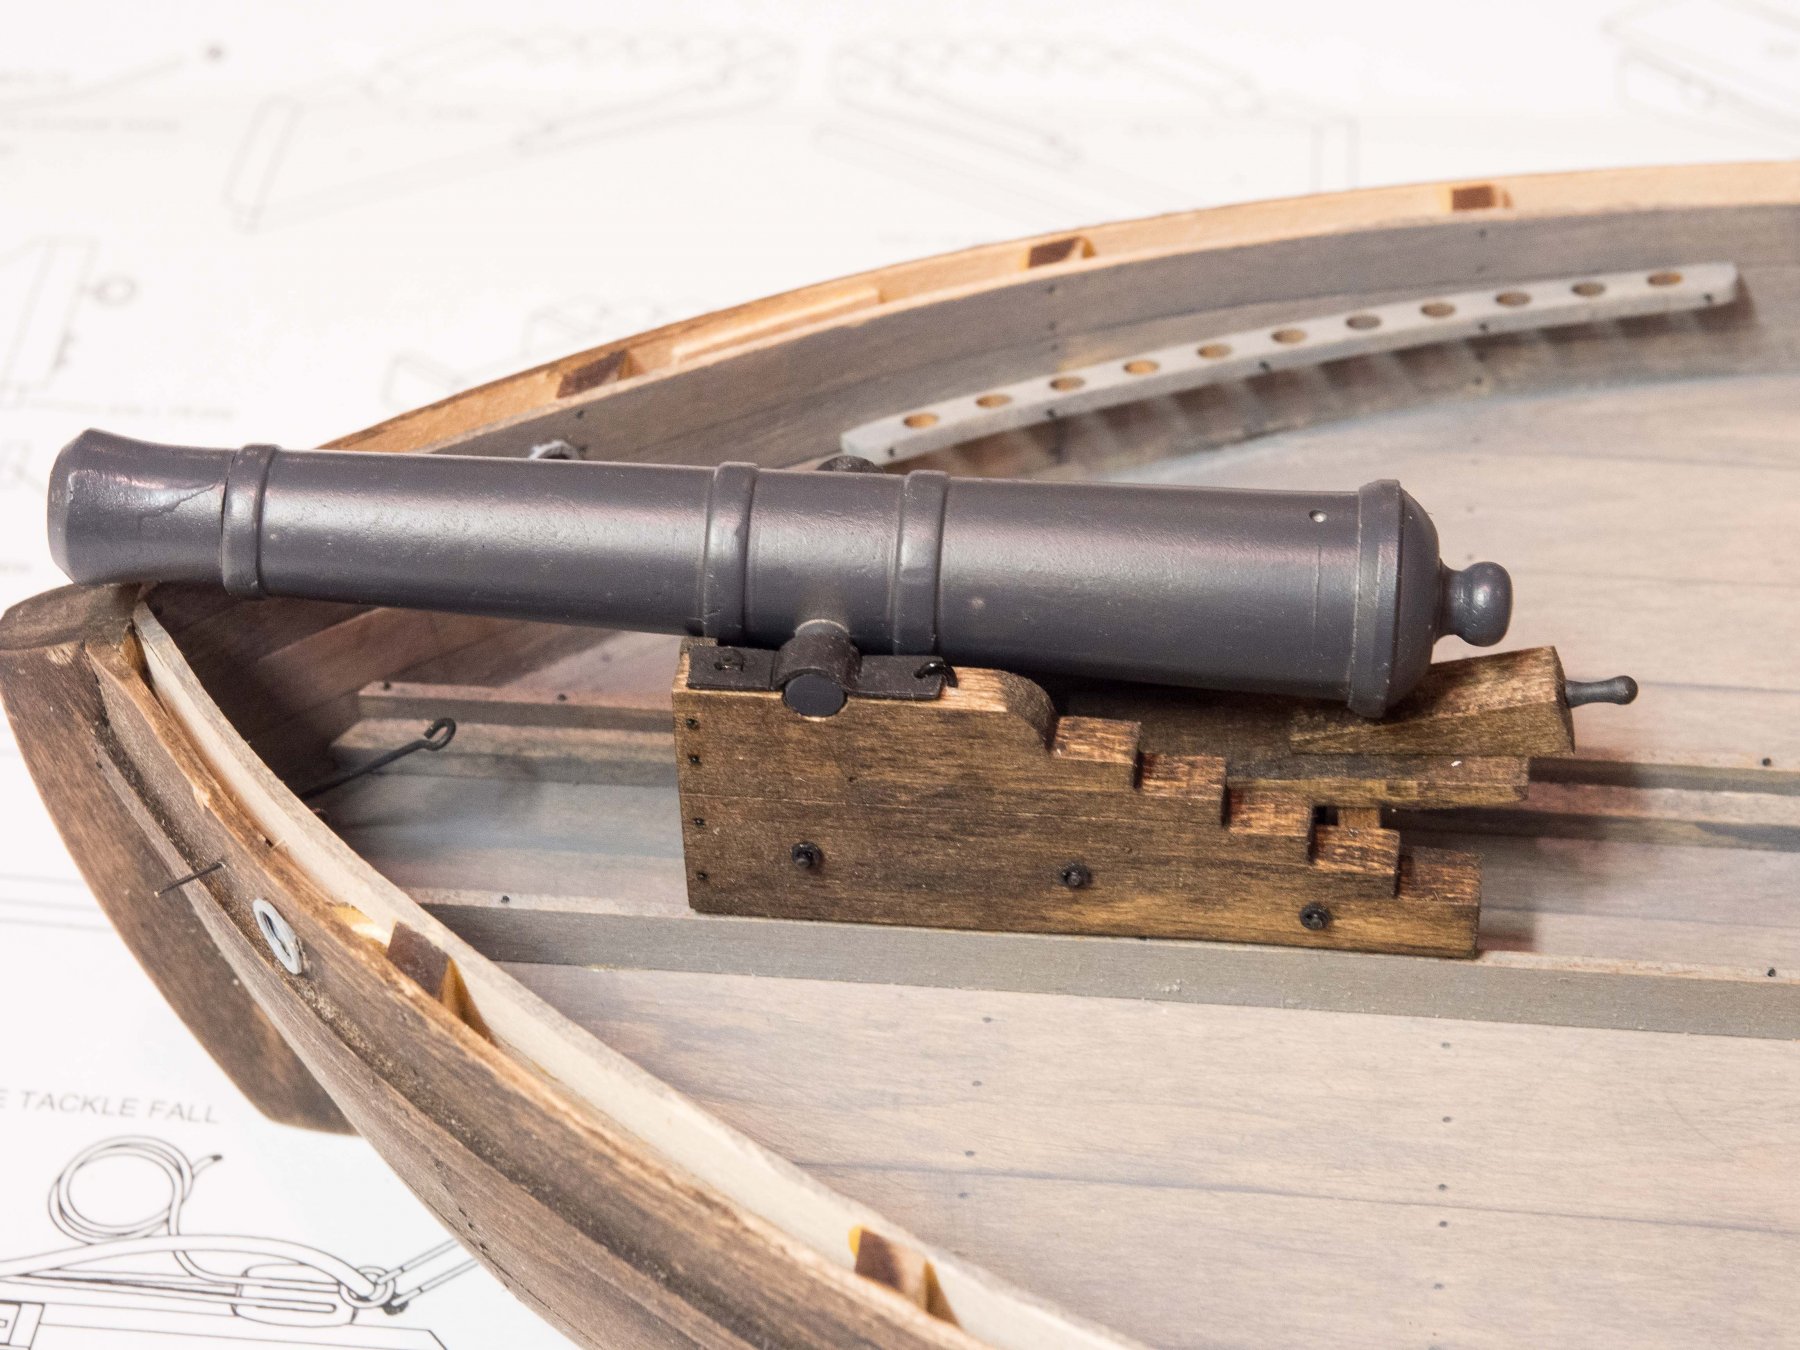
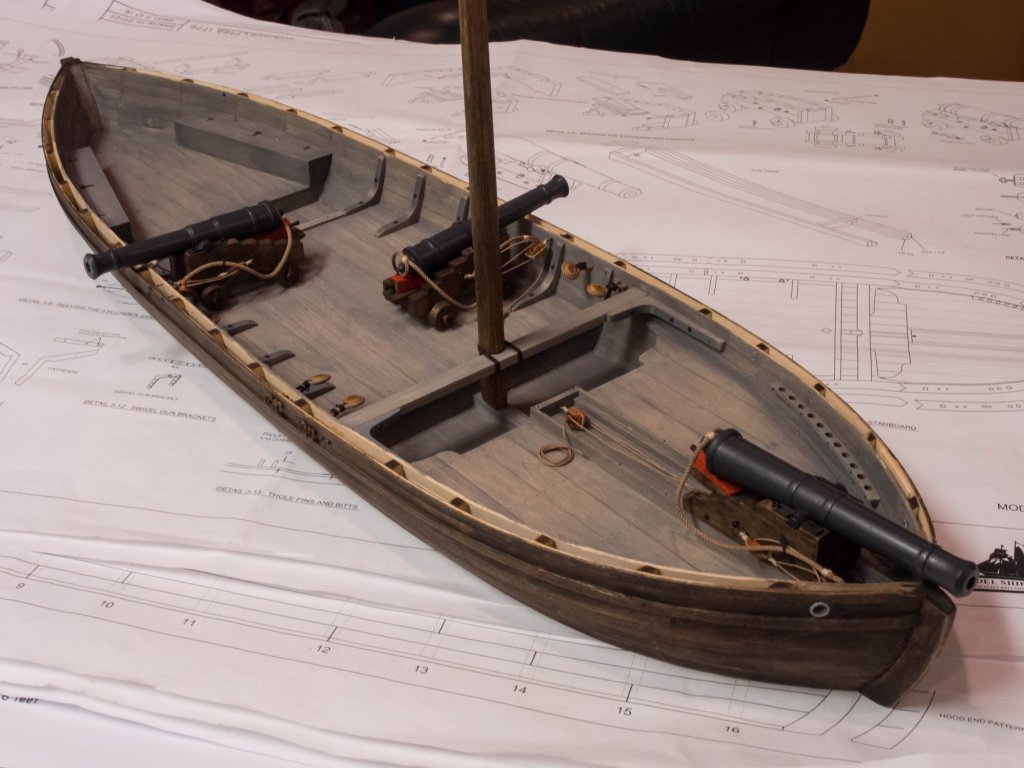
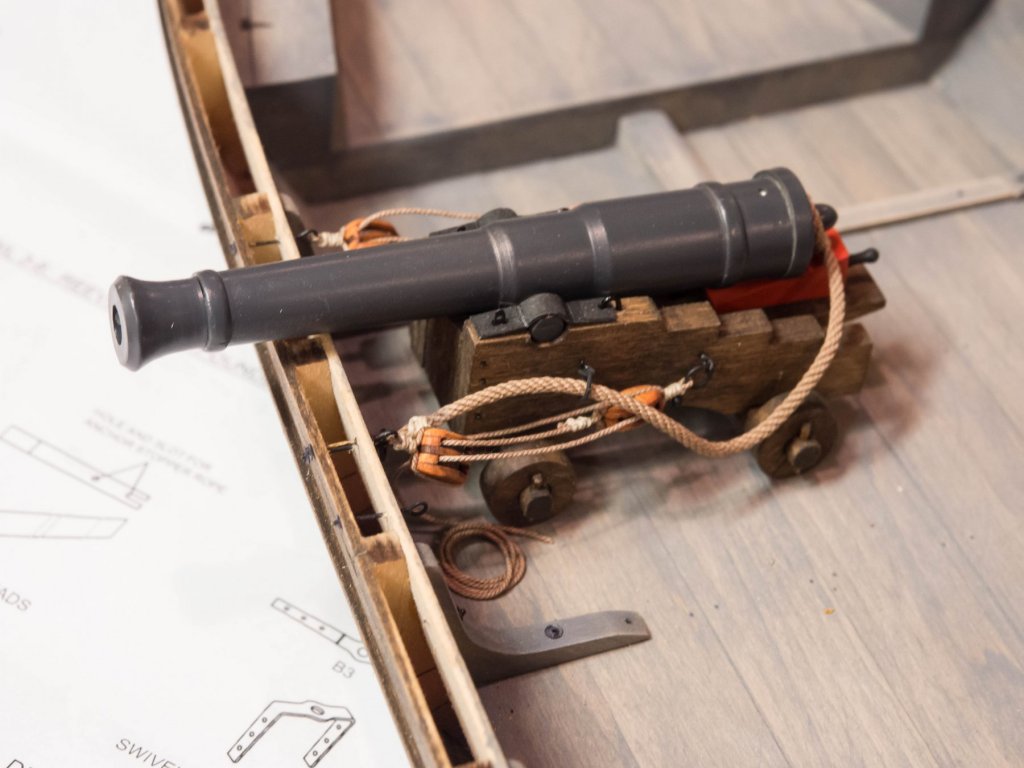
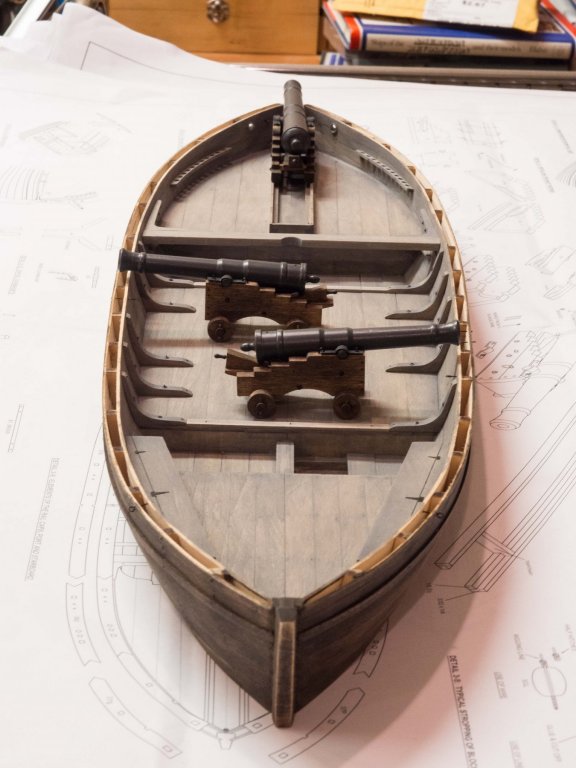
Interior structurally done, and exterior stained. I made hauser pipes from brass tubing and glued the kit-supplied end pieces over the ends after the staining (as per the Ships in Scale series on this build, which I have found enormously helpful). Then built the carriages, glued the cannon tubes together, stained the carriages to match the exterior stain, airbrushed the cannon tubes, and blackened the various bits including the washers for the transverse bolts (I used black covered 19 gauge wire for those) and the trunion caps (used Bluejacket pewter blackener for those as brass blackener won't work on brittania metal), and put everything together. Fasteners for the trunion caps made from a loop of black wire on one end, and brass wire flattened on one end with a hole drilled for the fastening bolt. Nails again simulated with inserted and trimmed monofilament line. I did not glue the trunion caps down; they can be removed as I will want to remove the cannon tubes during further construction.


- 67 replies
-
- 8
-
-
- philadelphia
- model shipways
- (and 1 more)
-
Just a comment on the lettering. I used a word cell with black background and white or gold letters and put it on with modge-podge stuff, then flat clear over. One advantage is the choice of fonts to match the real Morgan. A styilized italic "s" with strikethru style added gives you that divider character on the transom. You can see the result in my build. If your ebony is true black it should work. Got the idea from John's Morgan build log.