Brucealanevans
-
Posts
450 -
Joined
-
Last visited
Content Type
Profiles
Forums
Gallery
Events
Everything posted by Brucealanevans
-
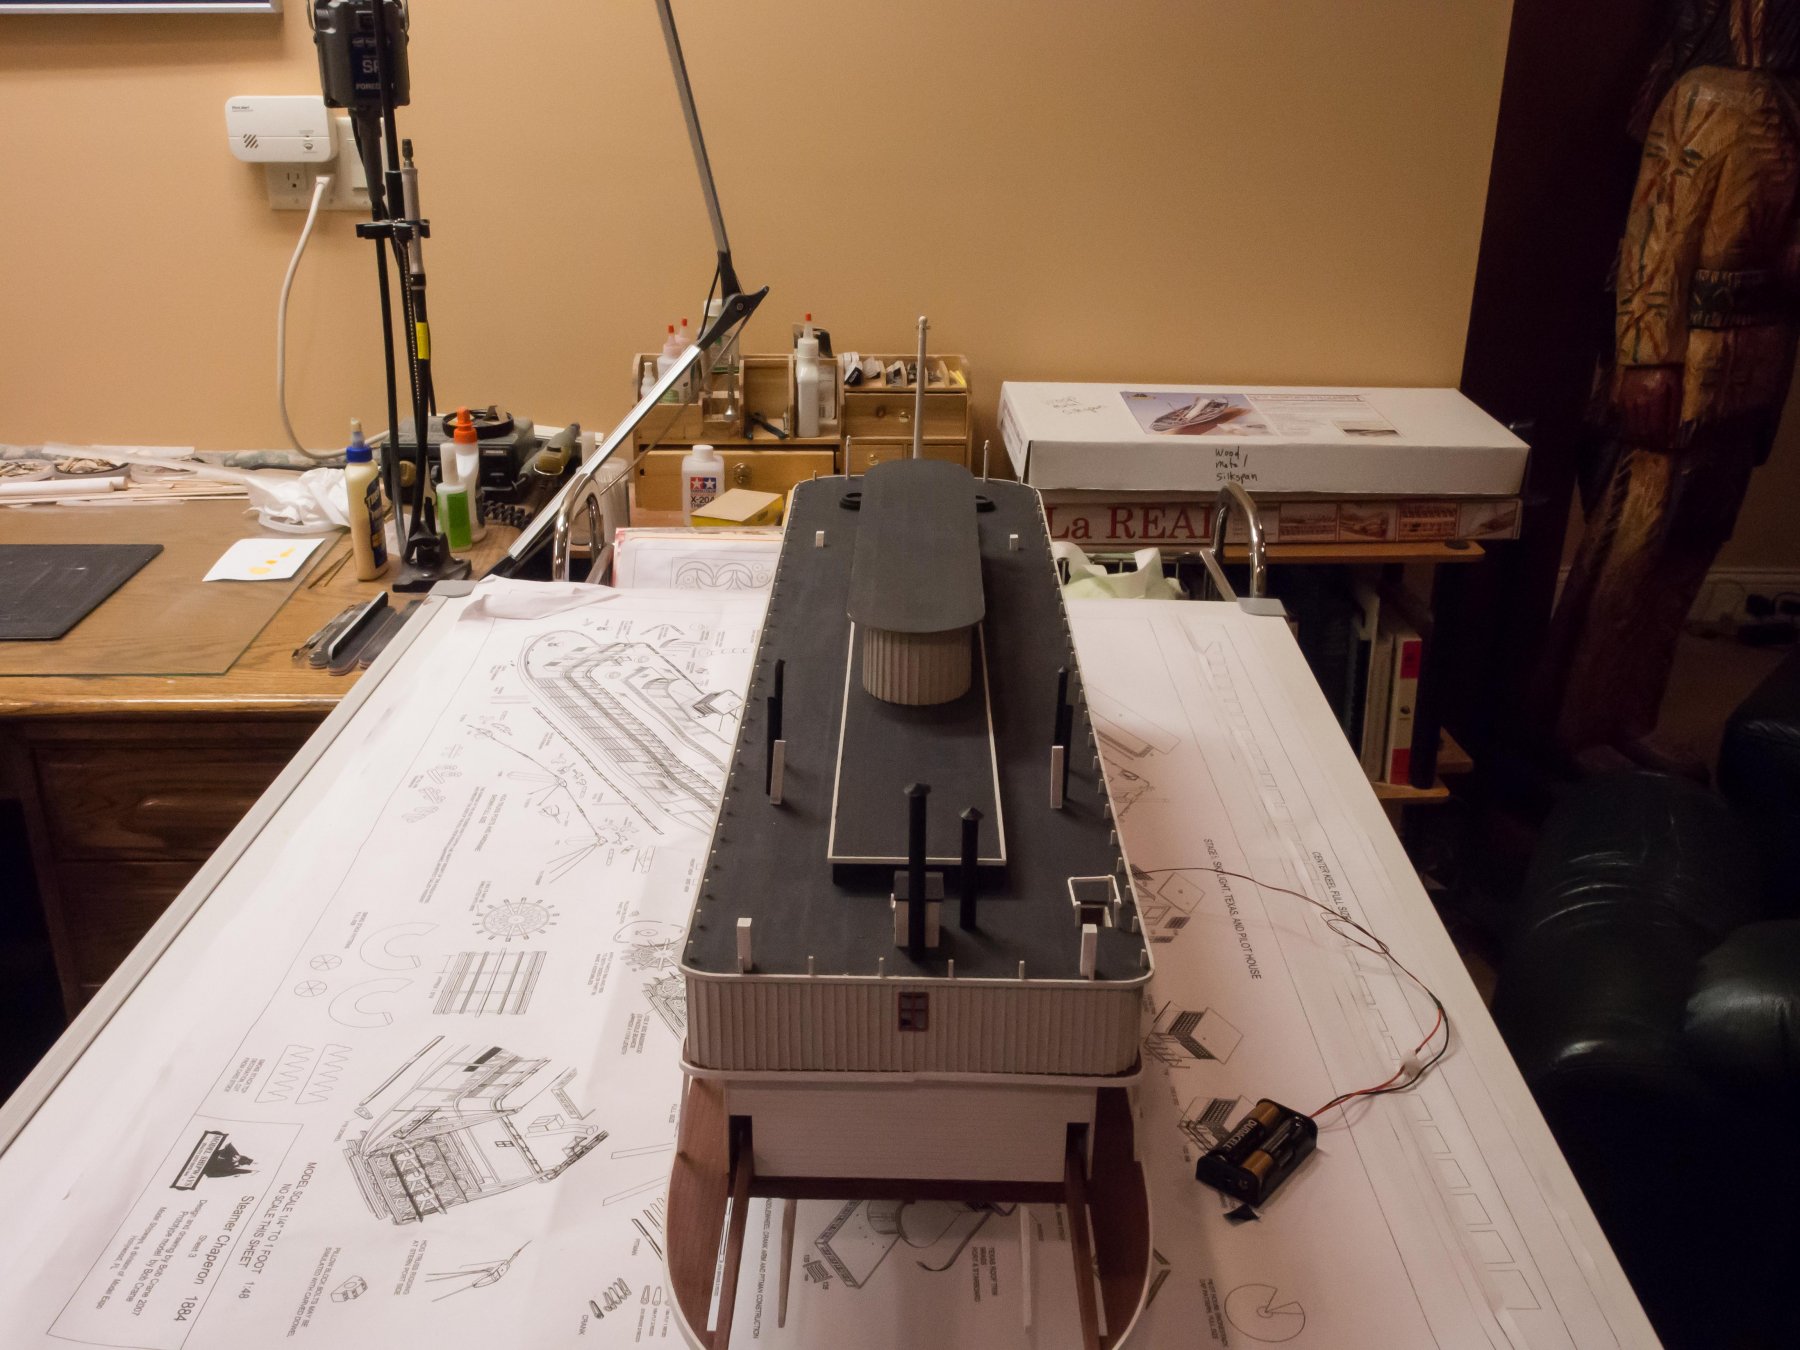
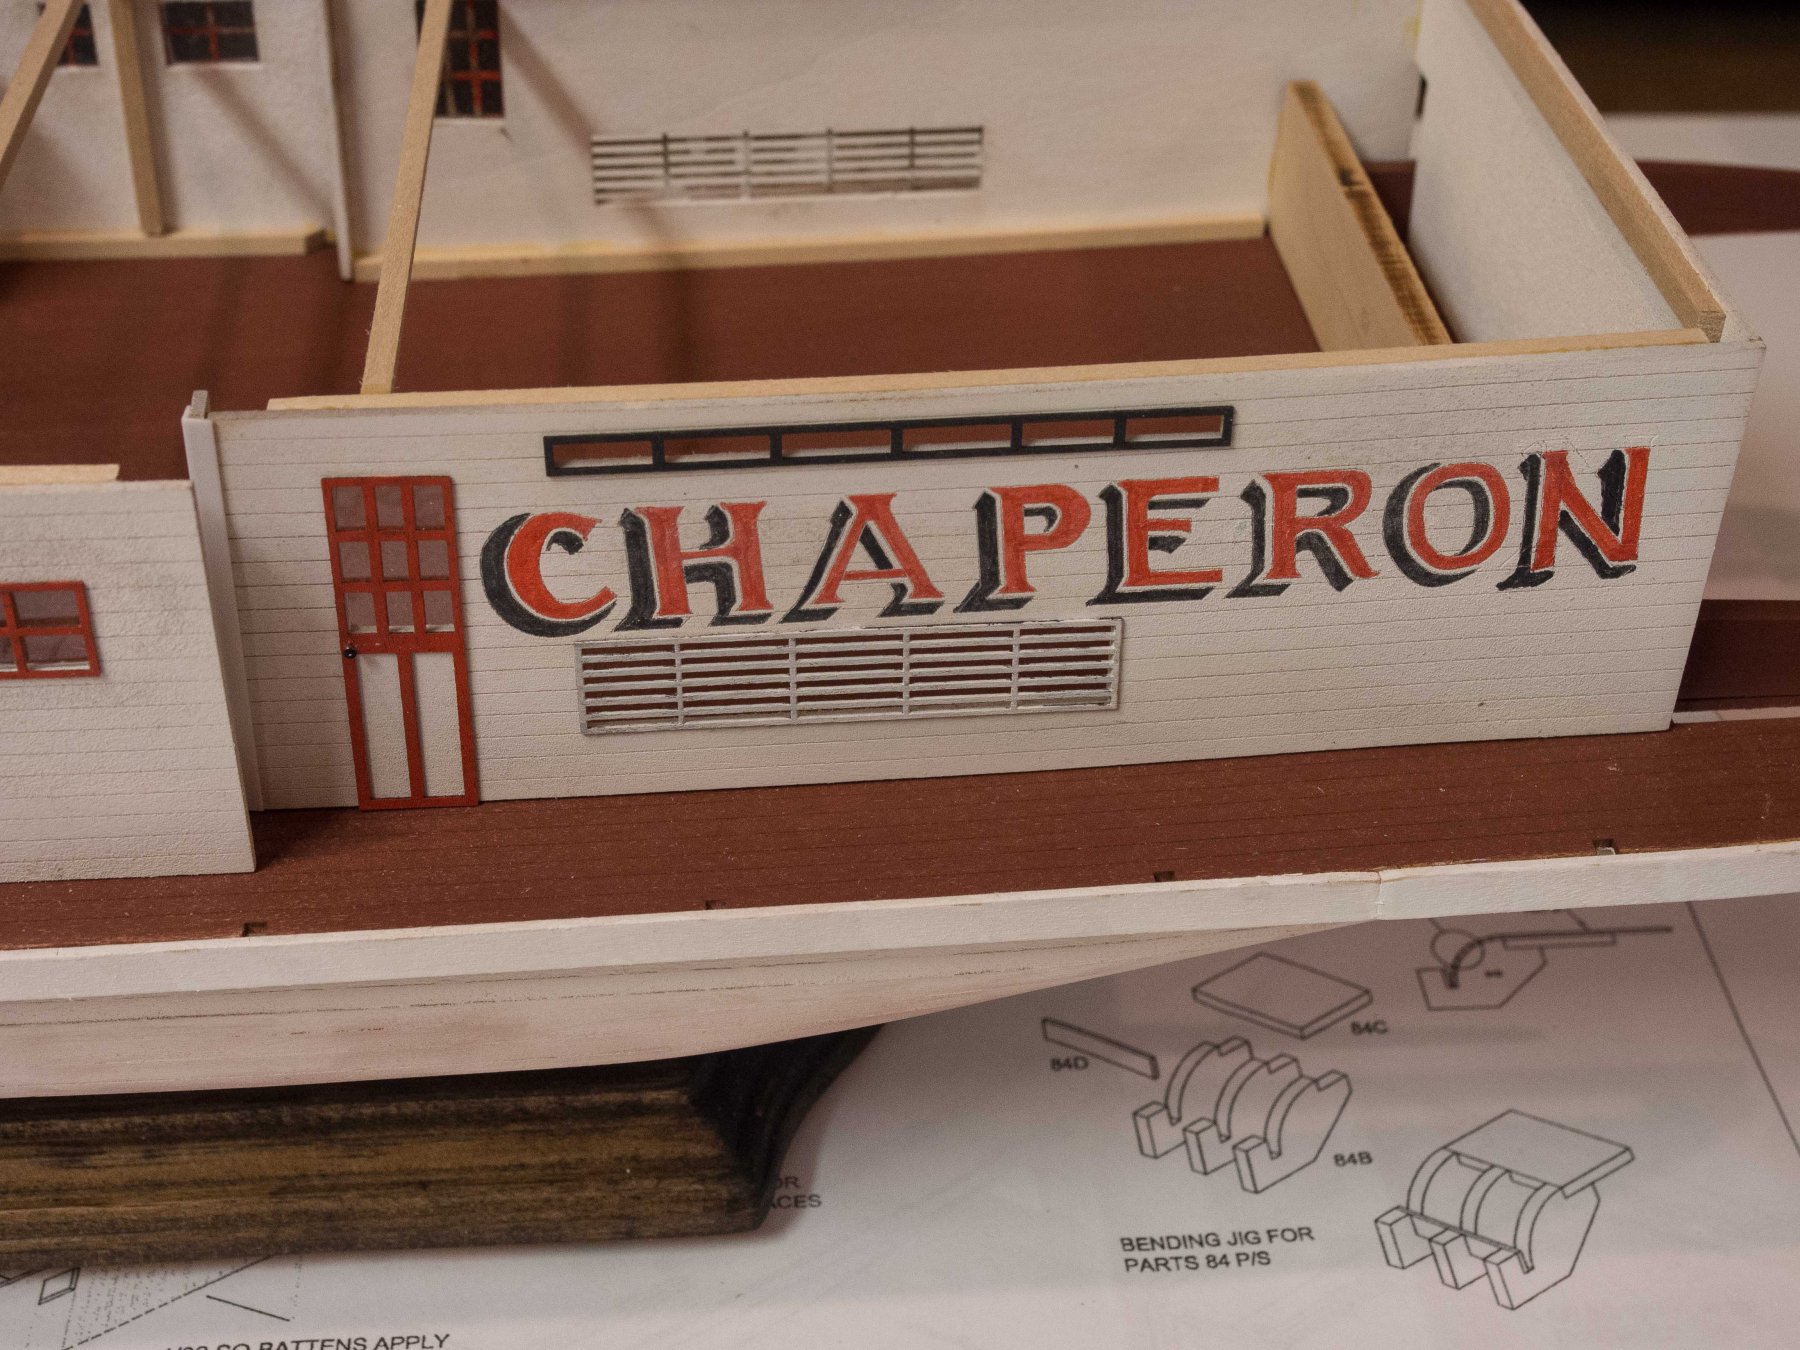
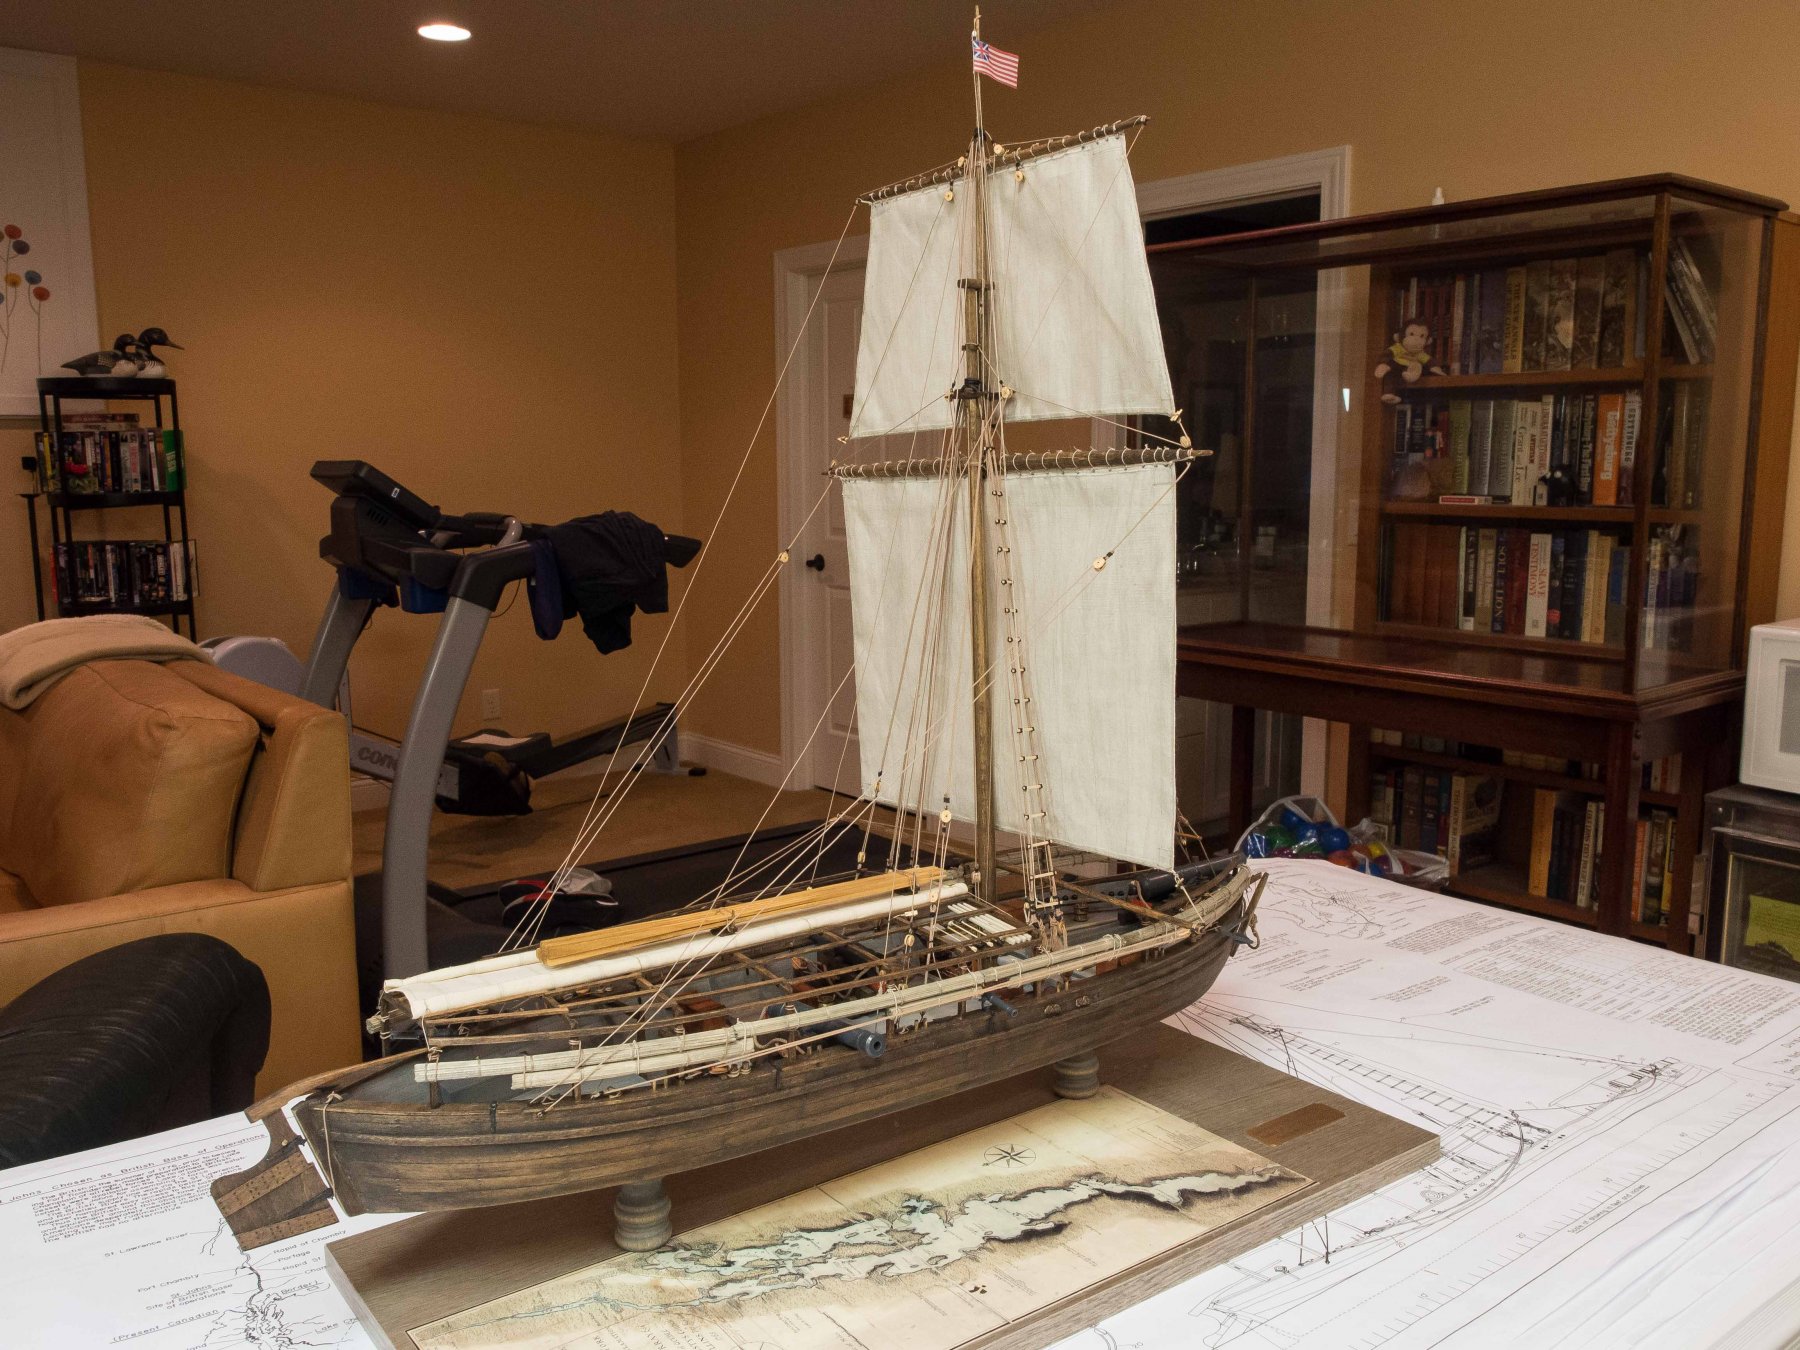
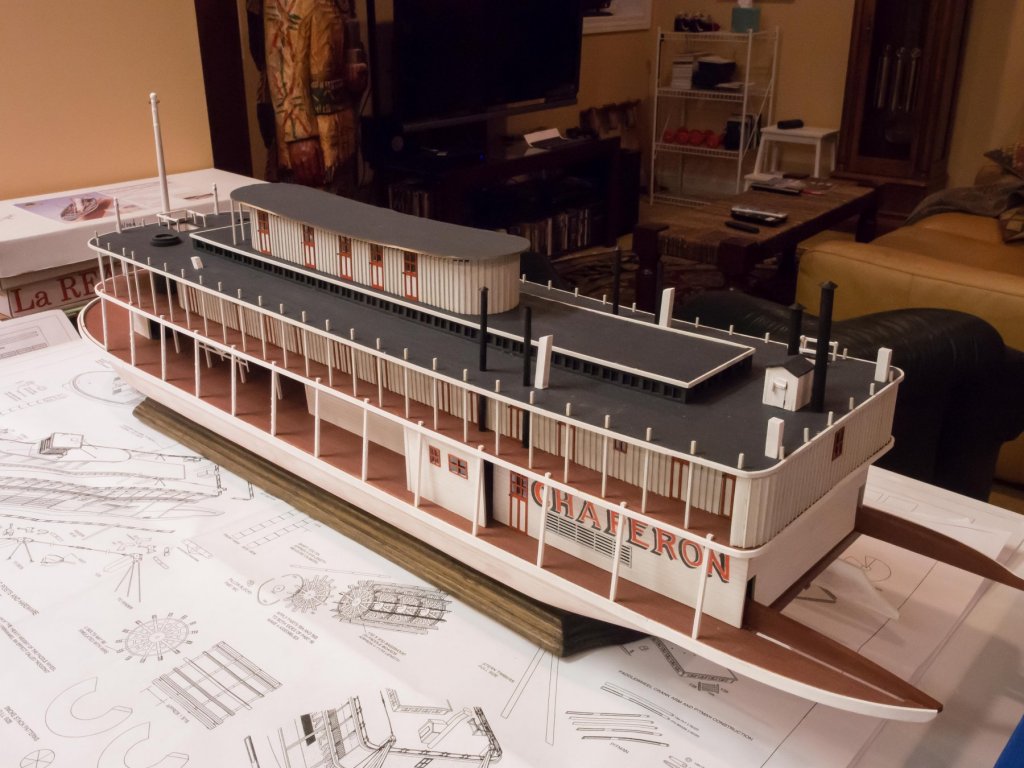
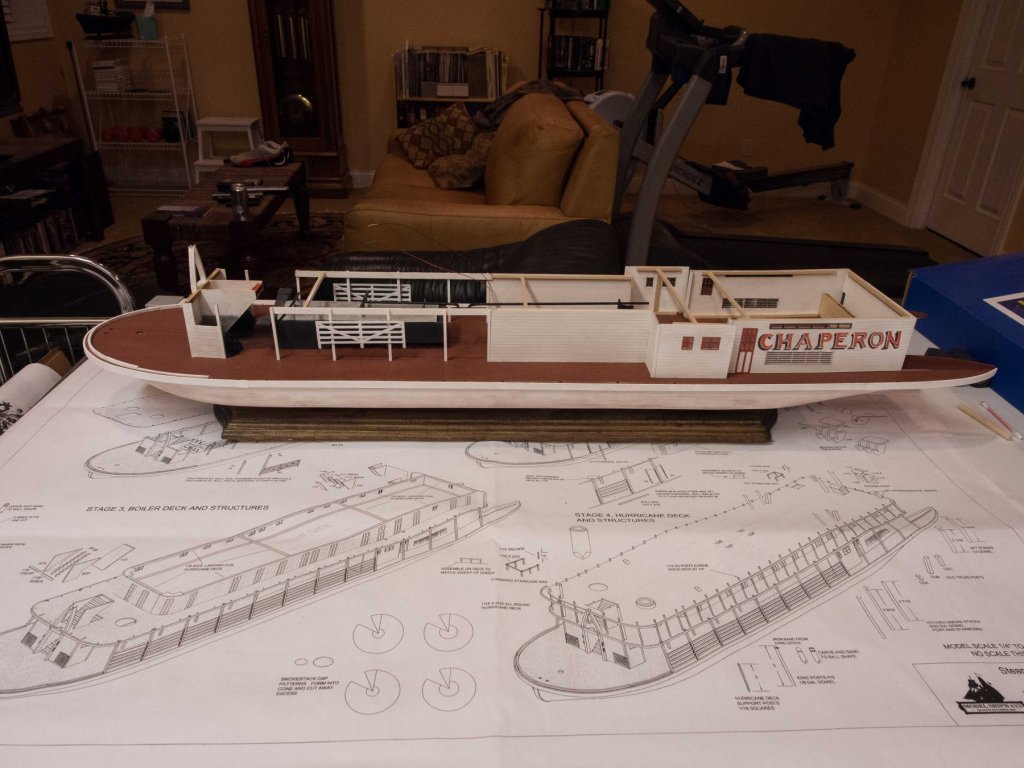
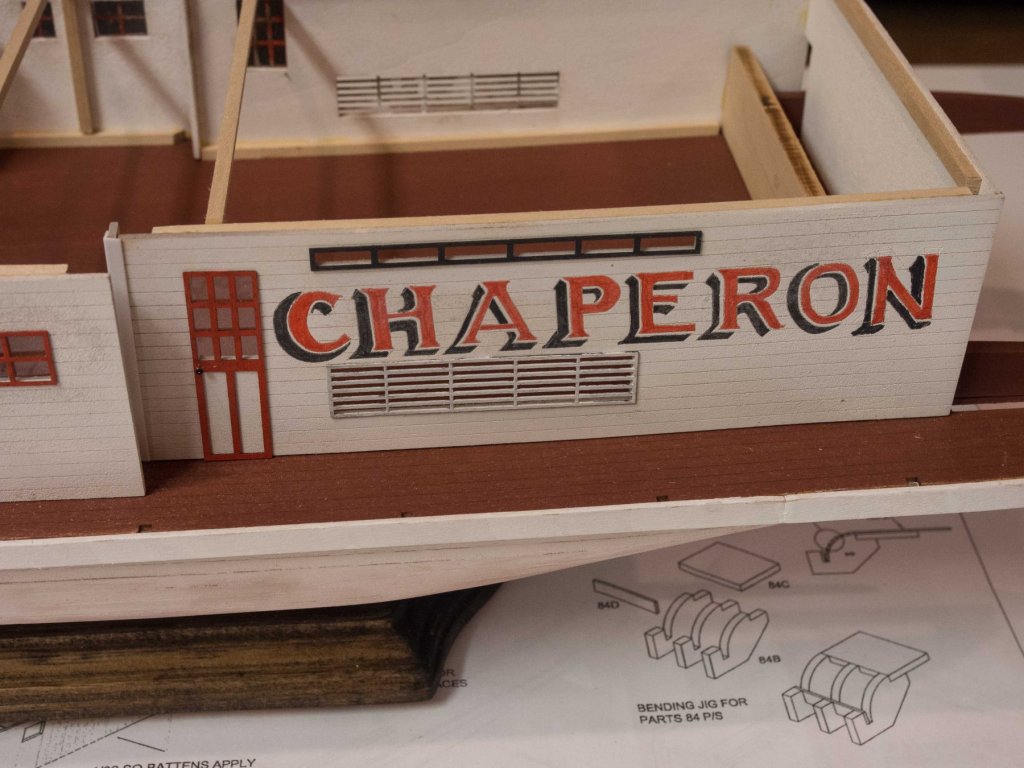
 Now have added the Texas cabin and glued it down after finishing the LED lighting. No real problems with this phase of the construction. Now I put the ship aside to work first on the pilot house. With the modifications to the front and side exposures and the subsequent exposure of the interior there will be a fair amount of detailing work to do. I have a scale stove, one of Syren's ships wheel kits, and a figure that will do for the pilot to add. Also need to figure out the best way to reproduce the small "Chaperon" label - likely will use what I did on the Morgan printing in Word on a color-filled background and applying with Maj-Paj paste covered with dull-coat.

- 76 replies
-
- 10
-

-
- model shipways
- chaperon
- (and 1 more)
-
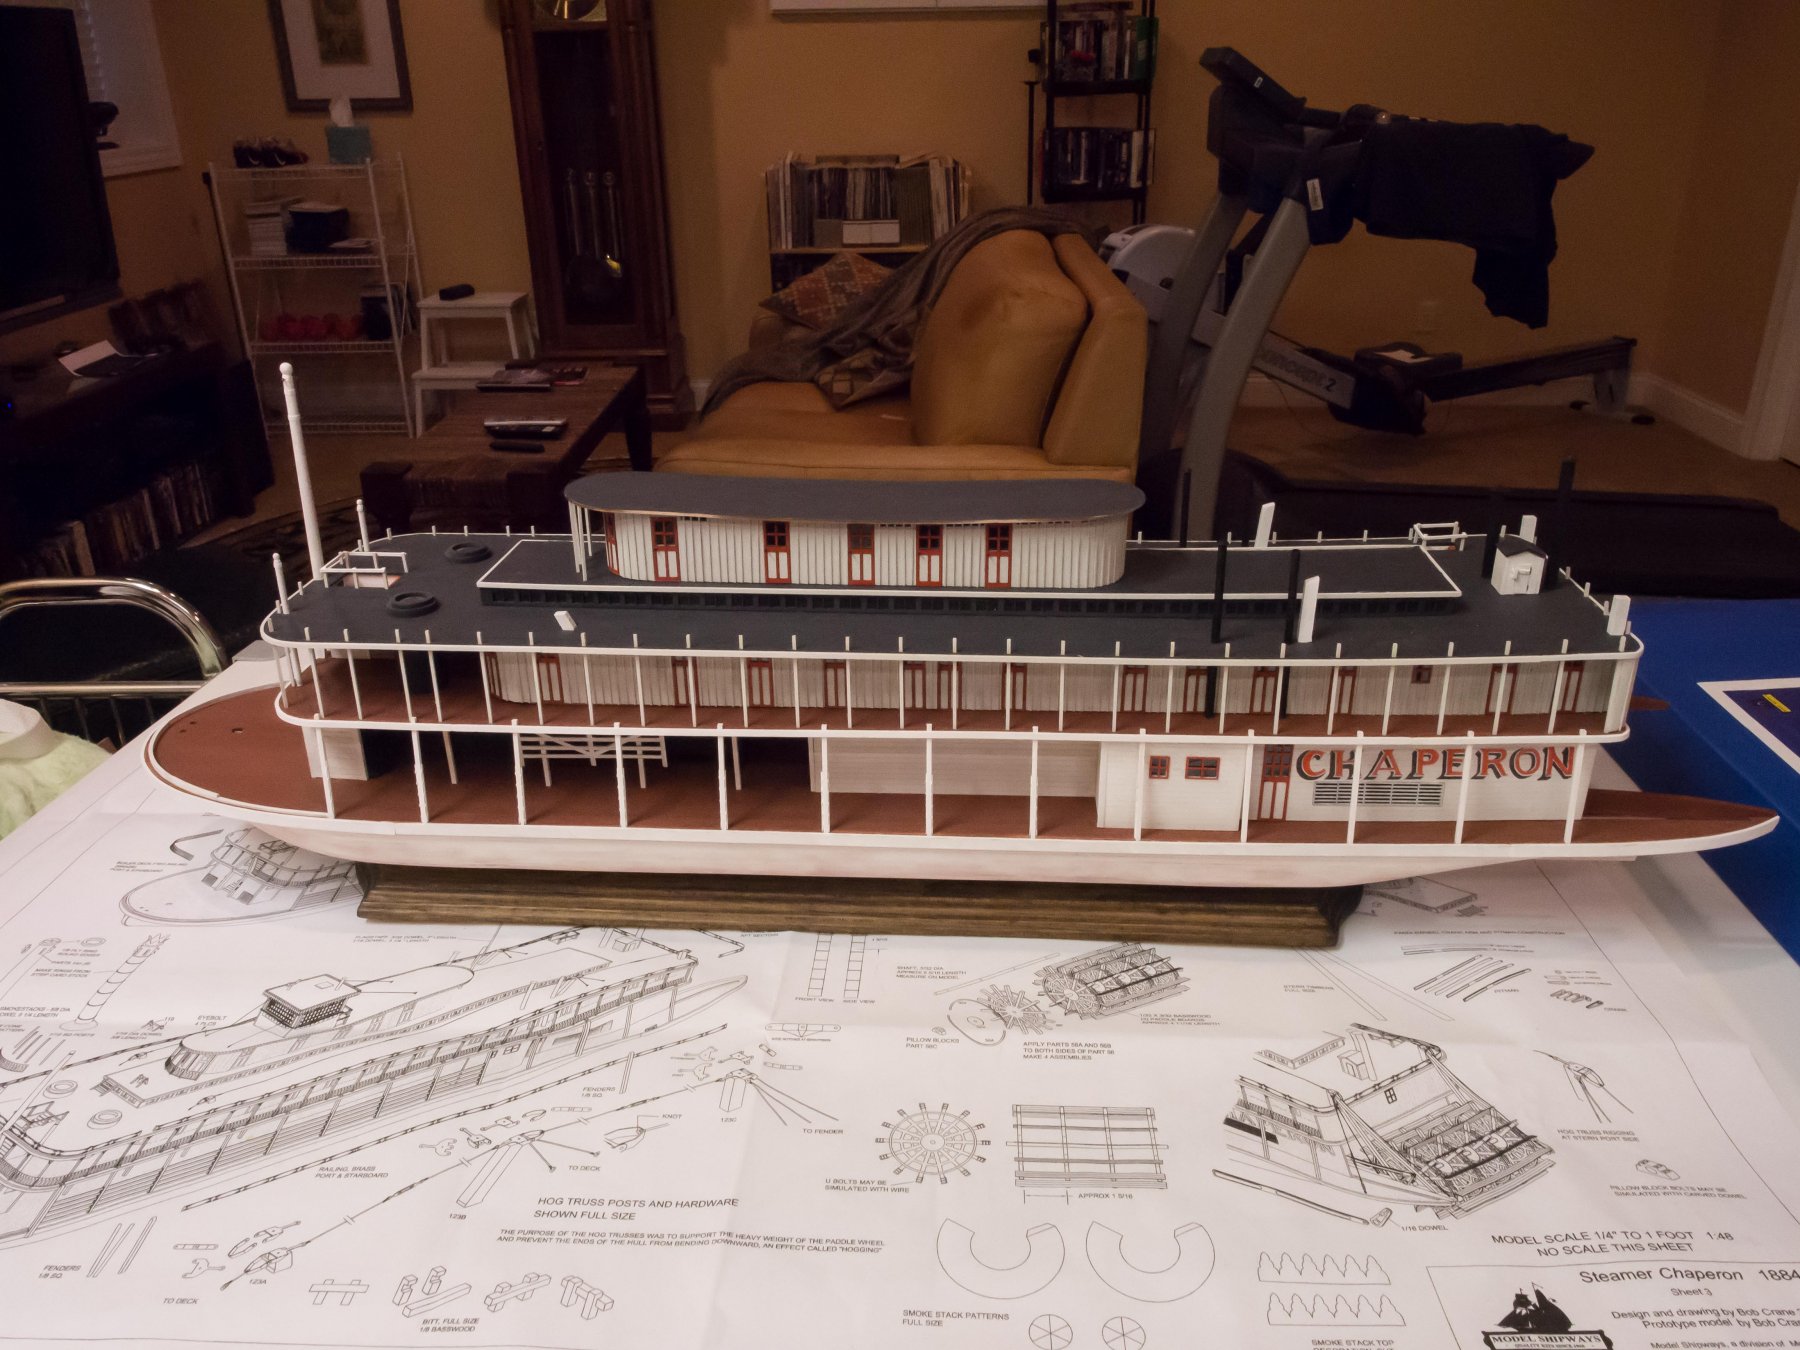
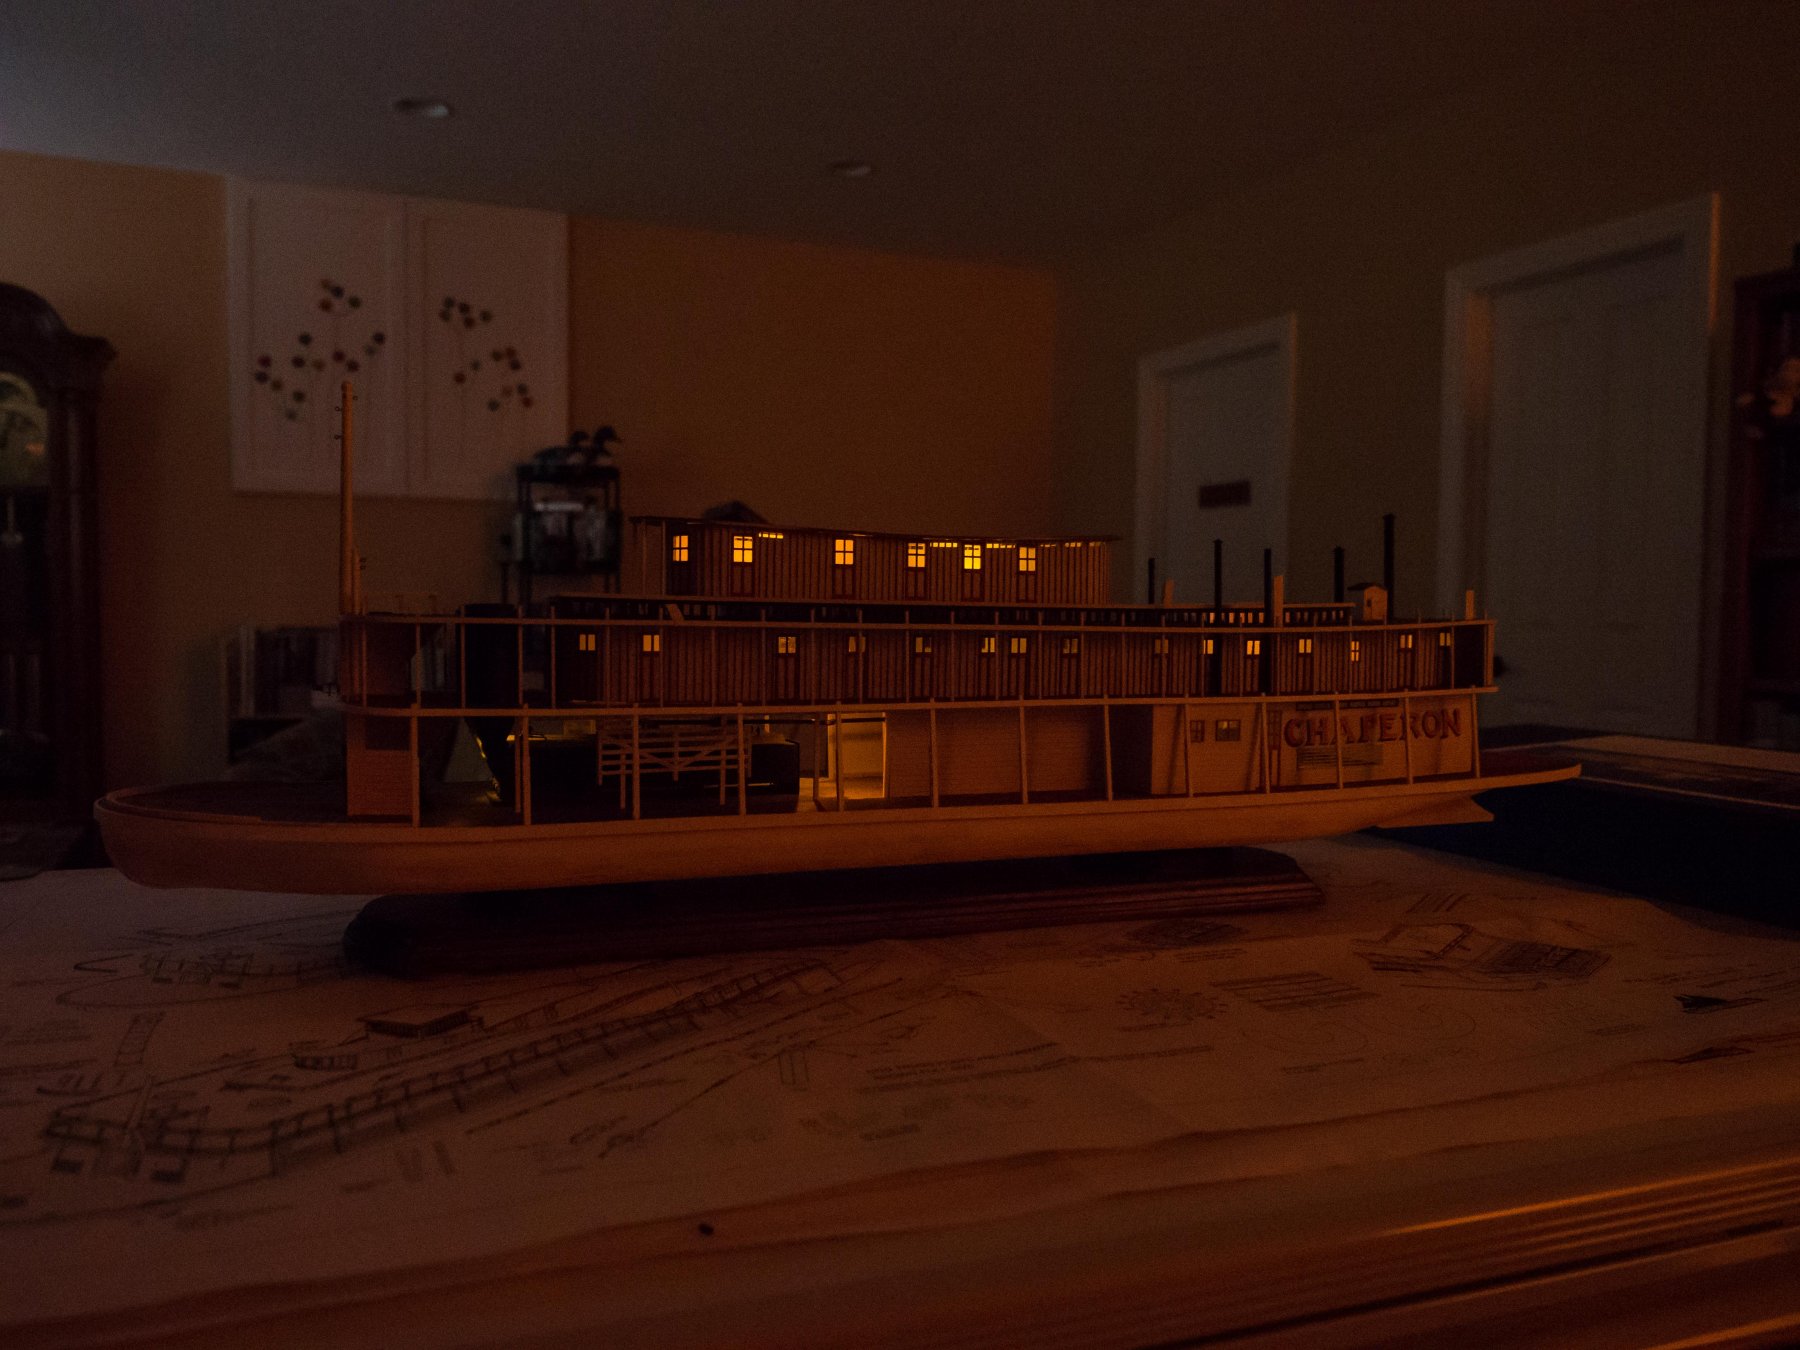
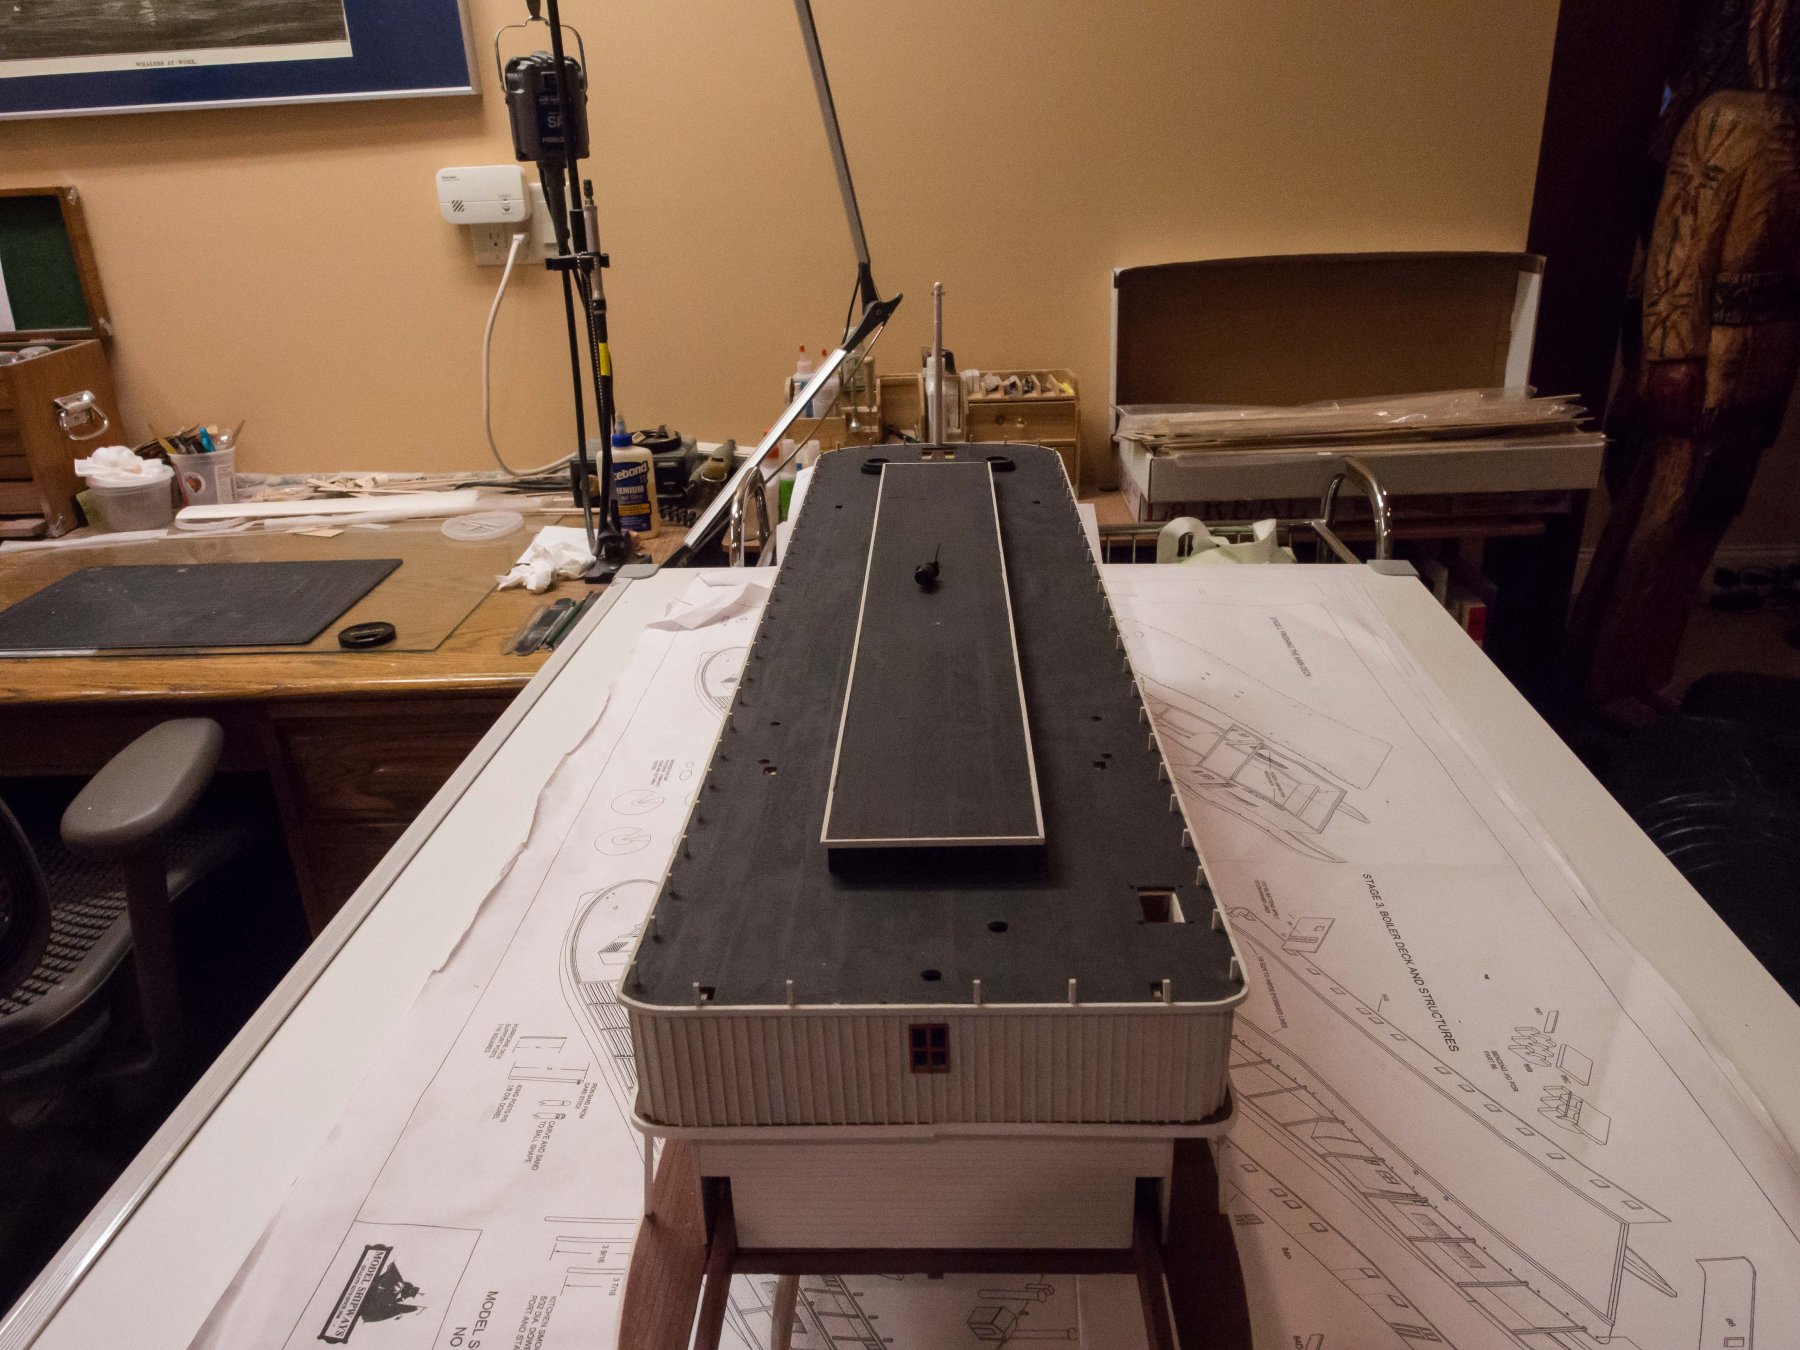
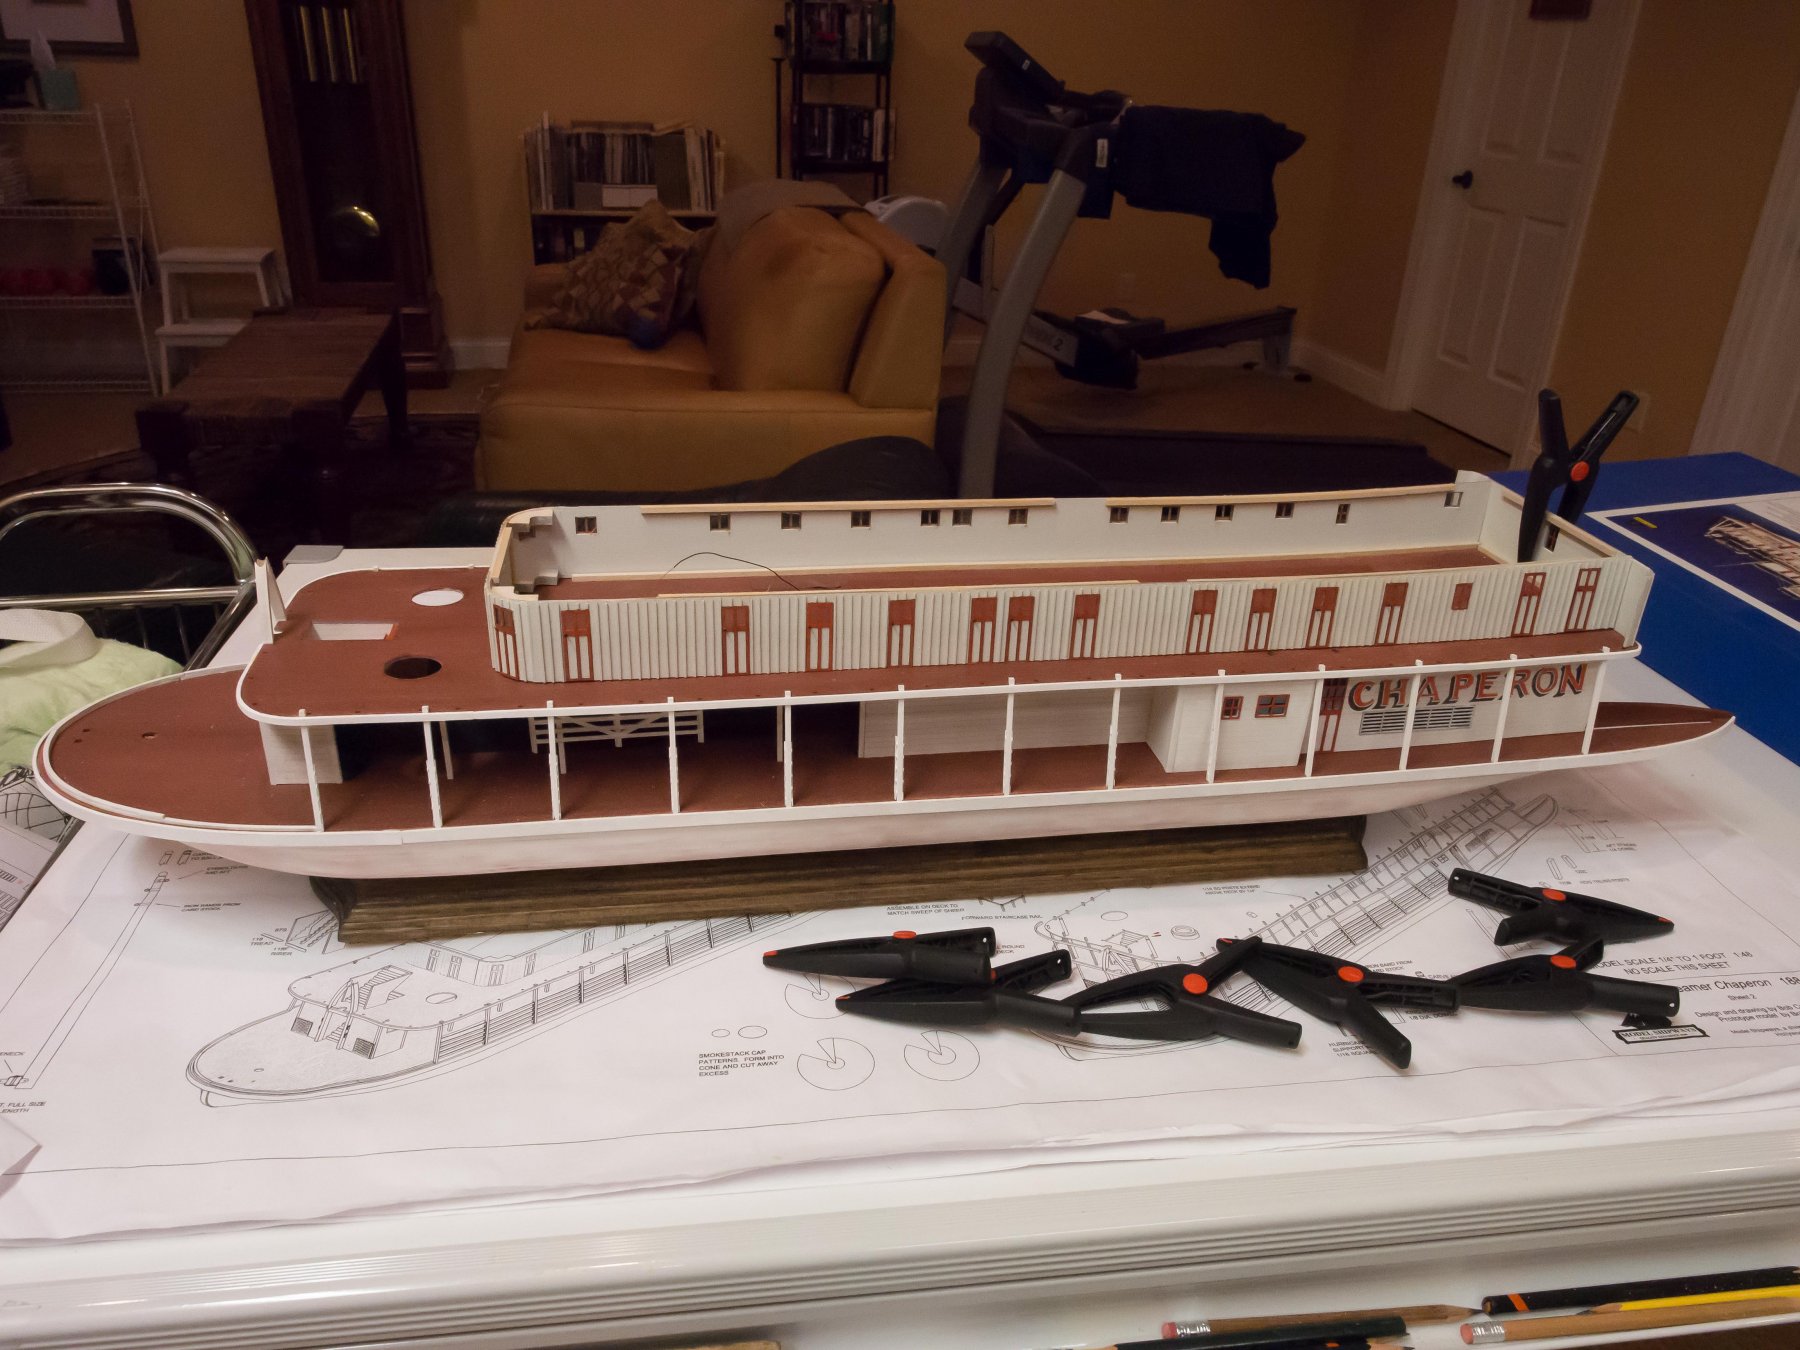
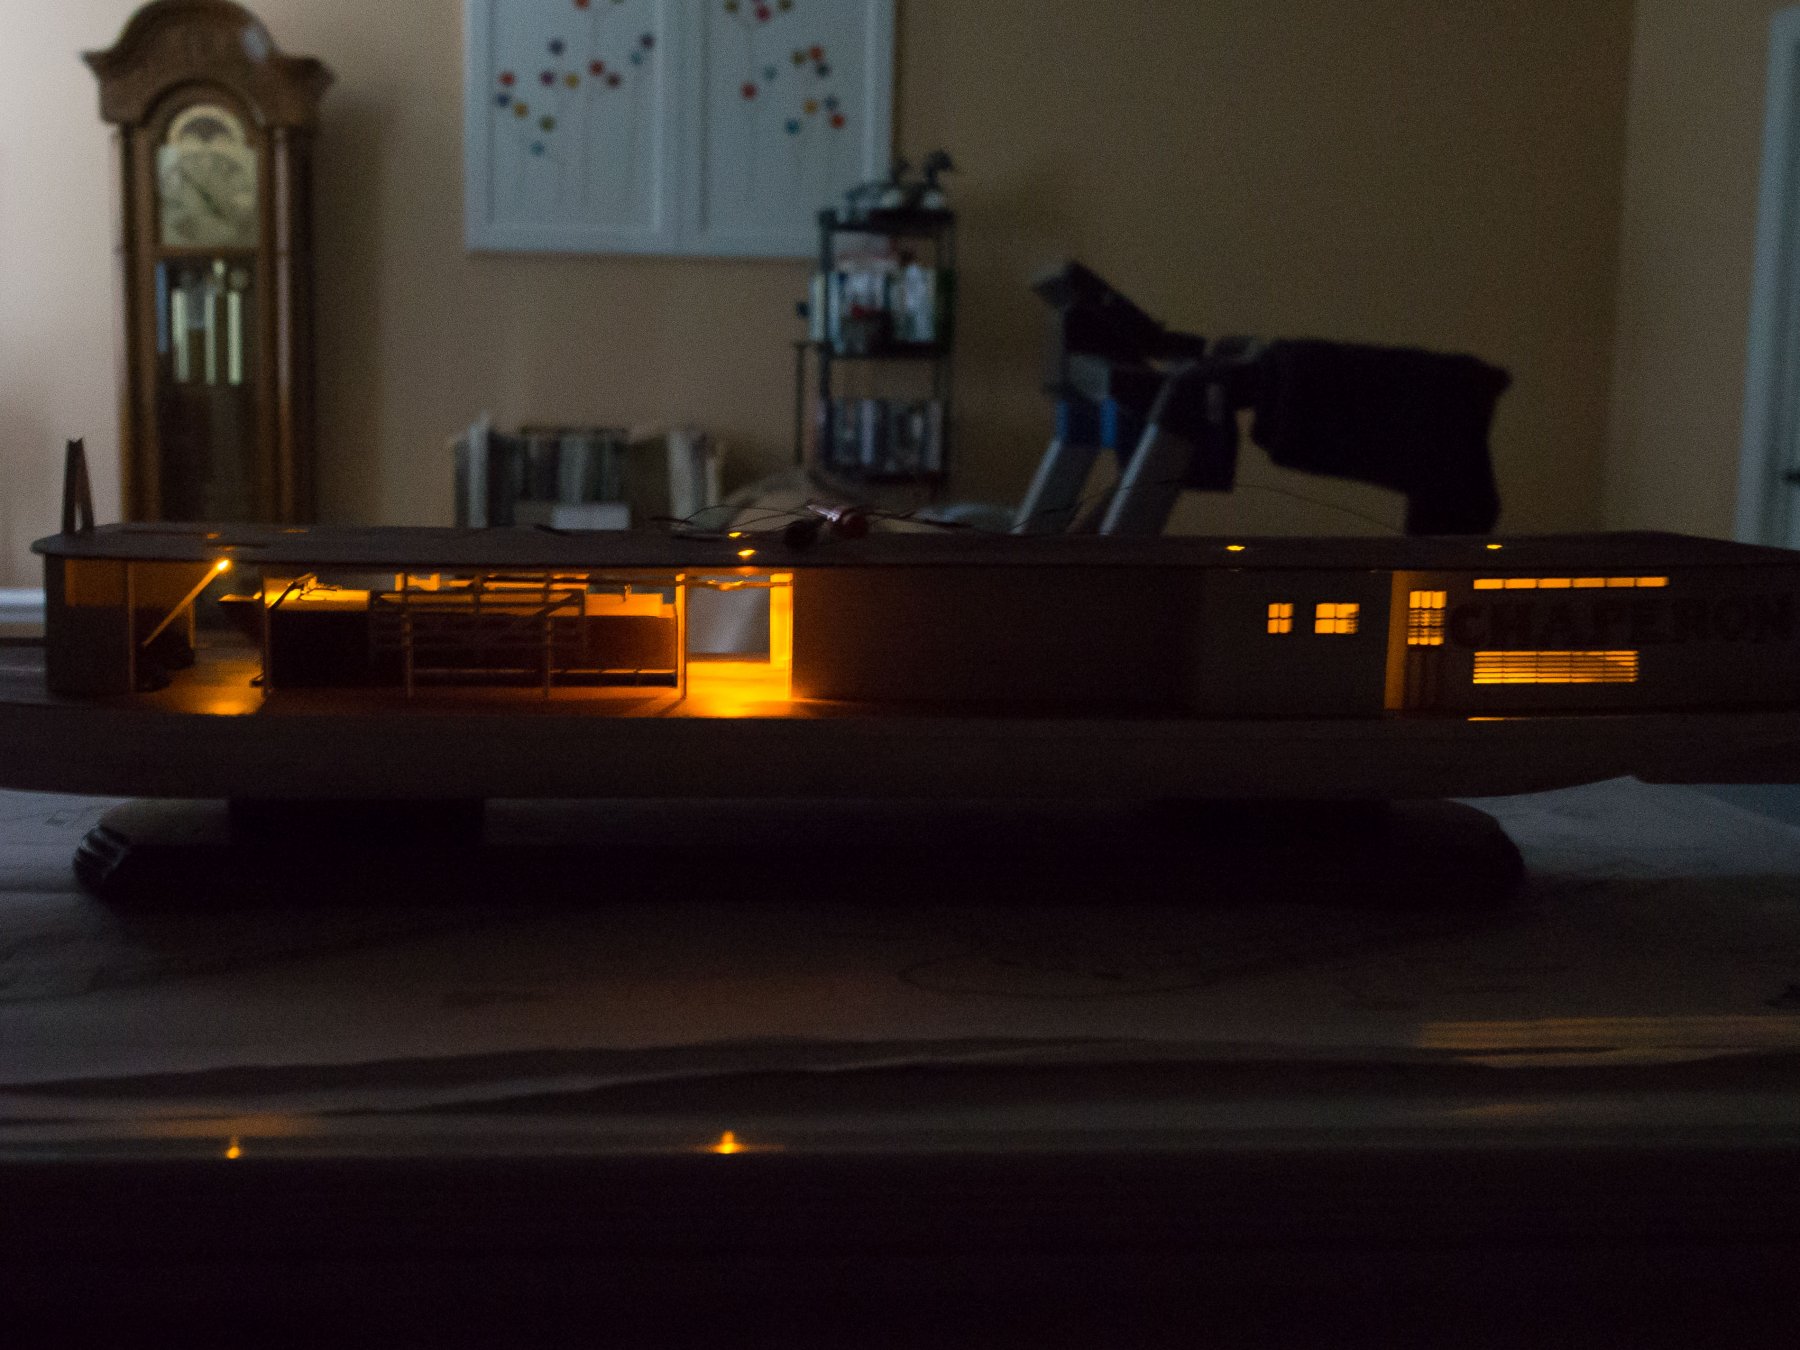
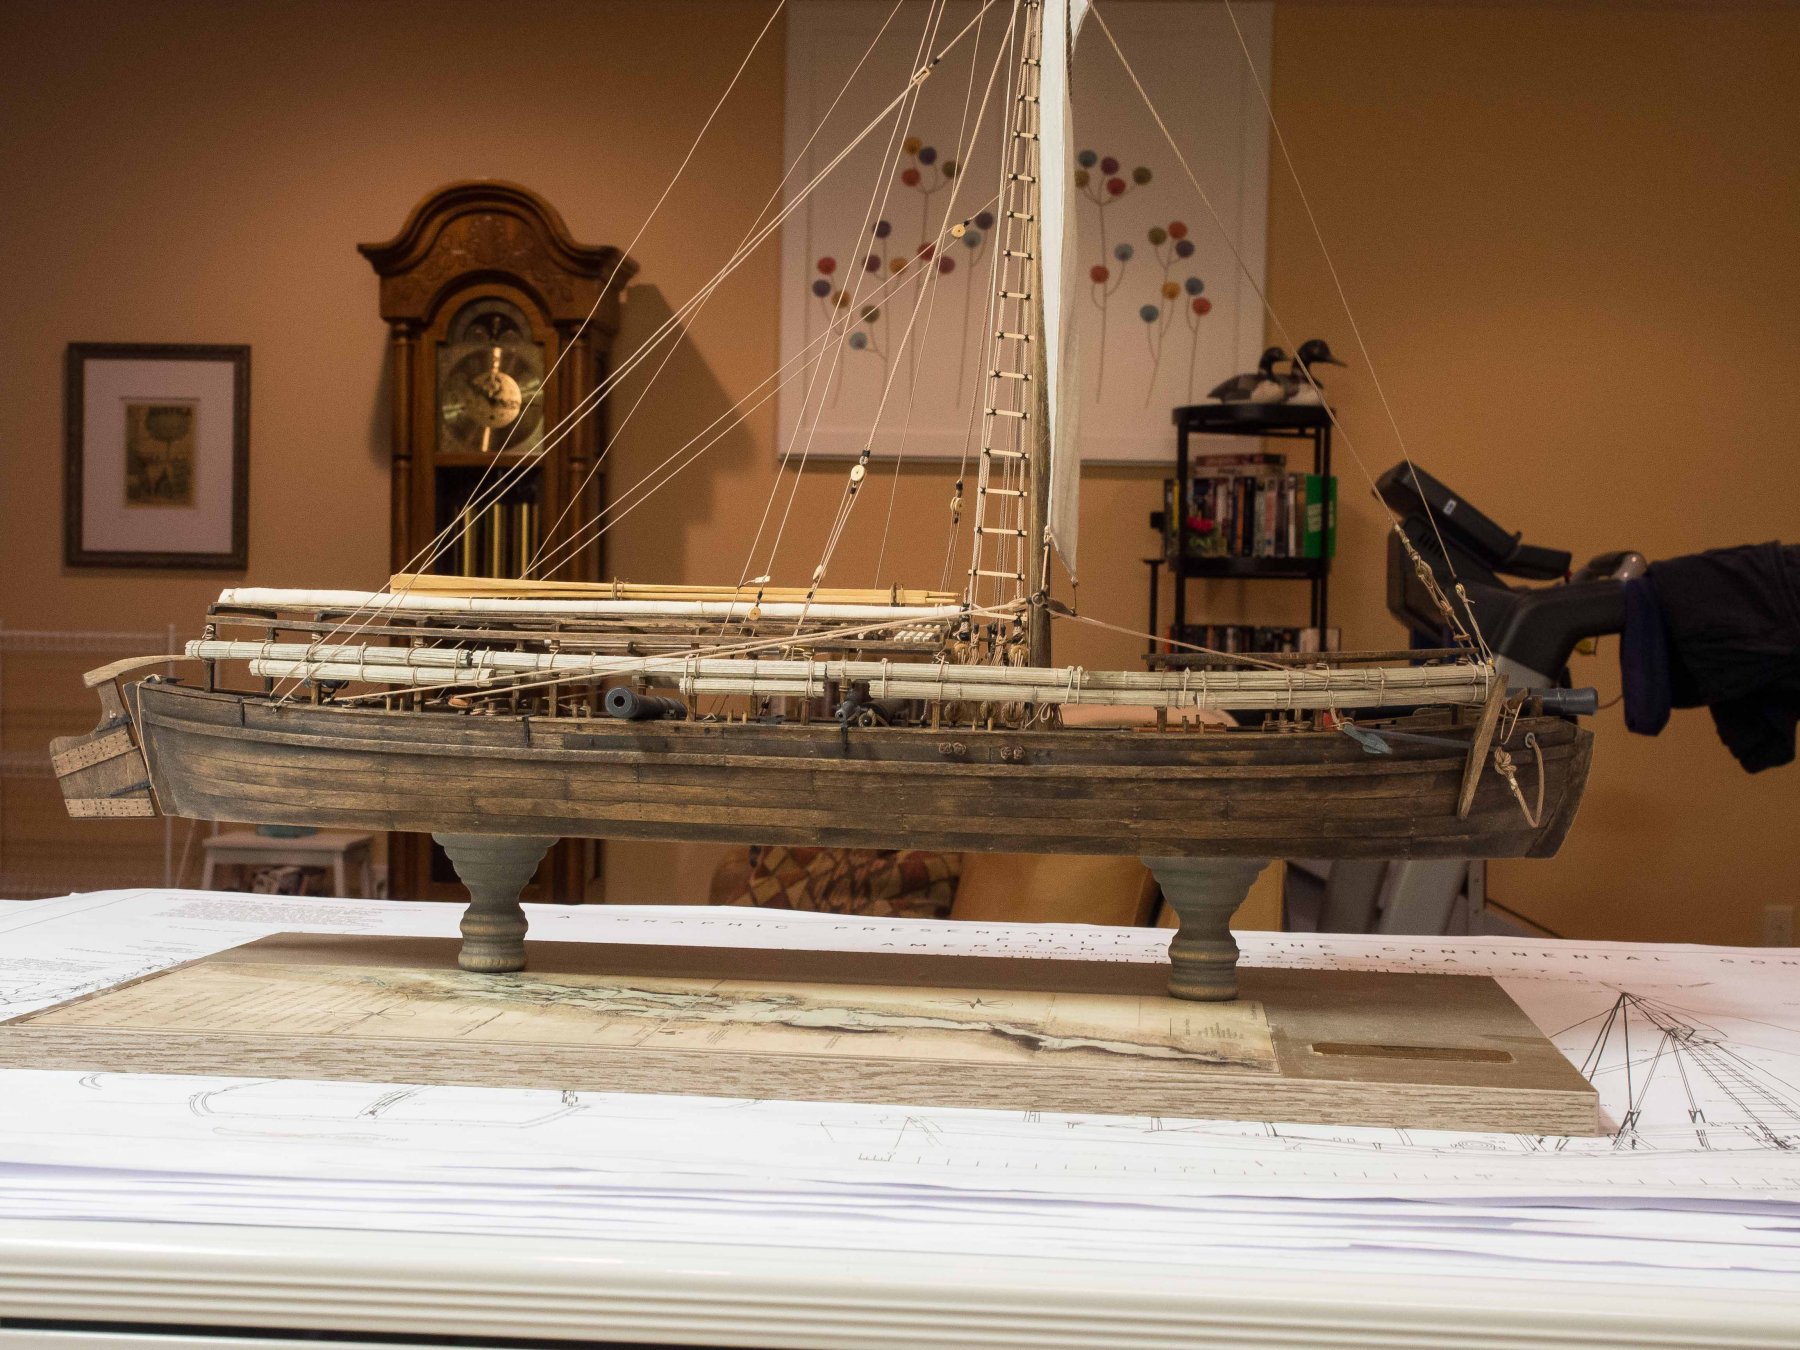
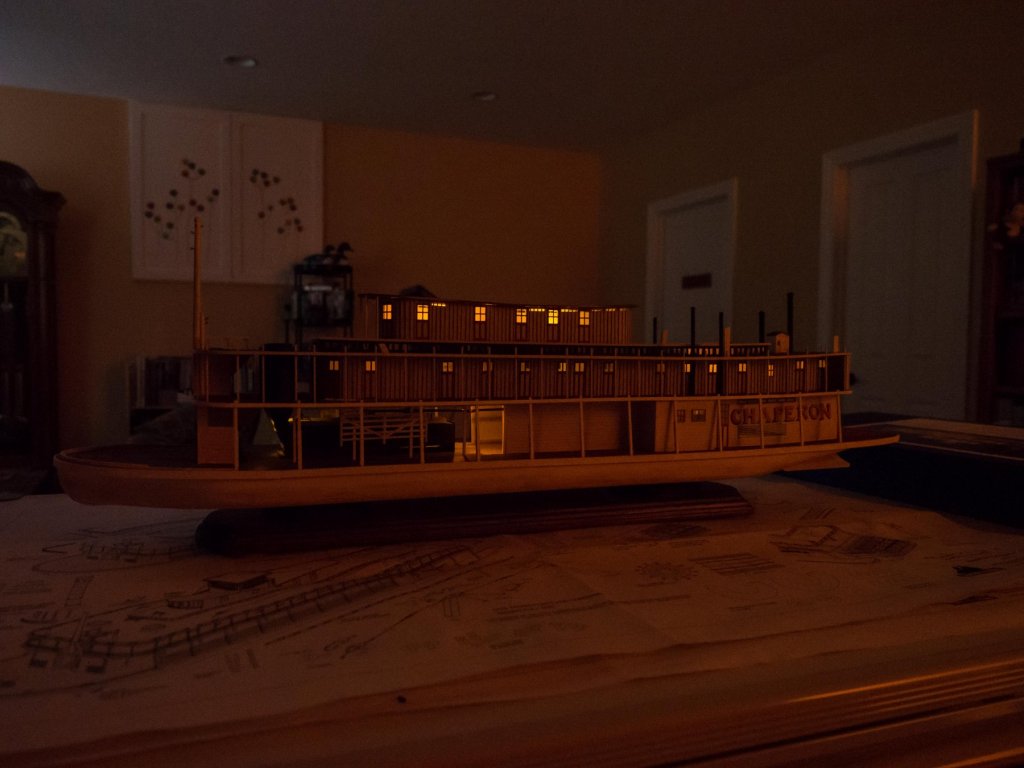
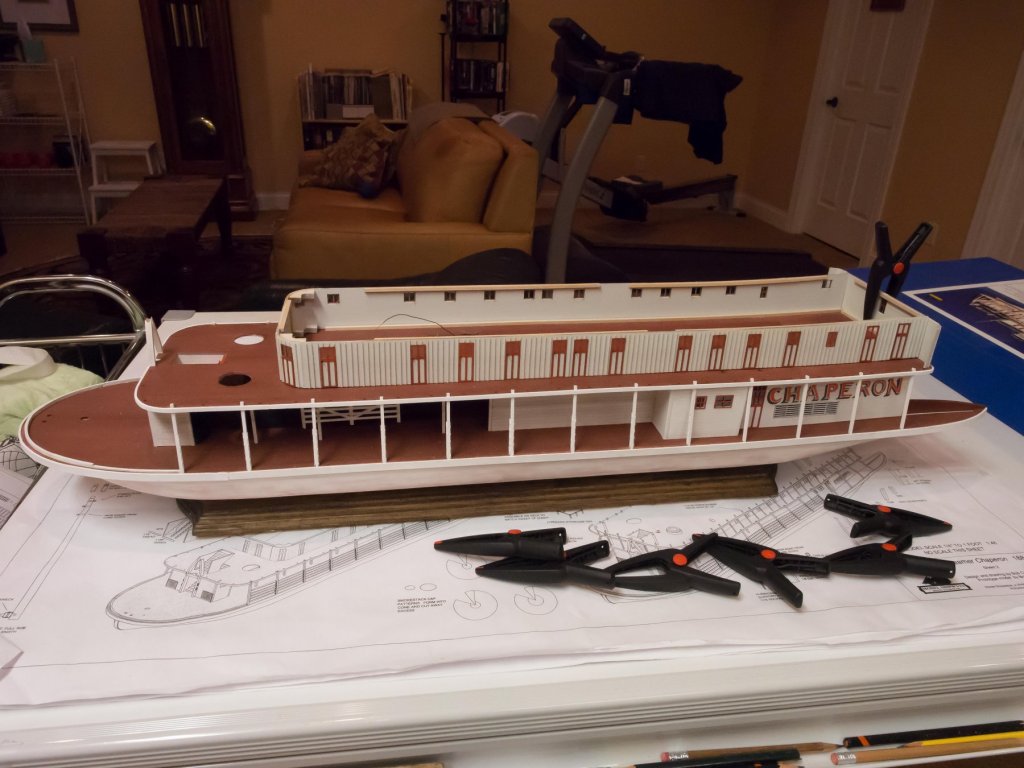
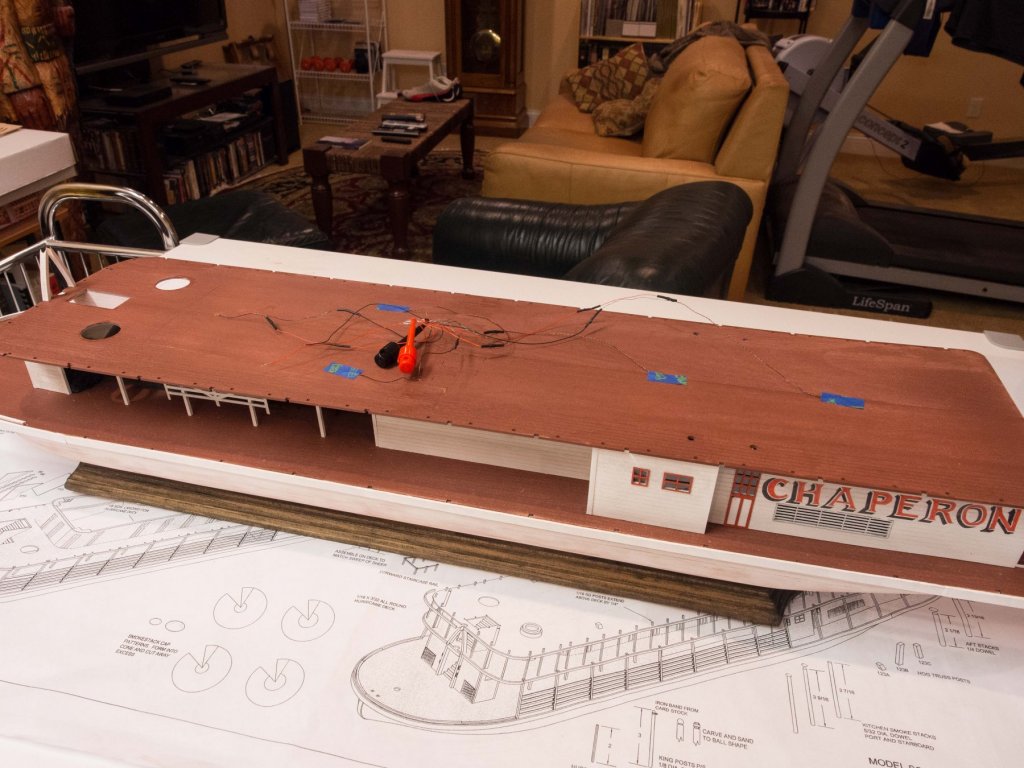
Added the hurricane deck. Followed the instructions in Kurt's Ships in Scale article to simulate tar paper covering with silkspan strips. Put in all of the hurricane deck supports. Before adding the skylight structure I put in 3 LEDs leading to holes in the deck within where the skylight would go to provide some lighting to the main cabin structure. It's not bright - good simulation of several kerosene lamps being lit I think. Tested the lights - all levels working so far. The skylight structure was next. A lot of windows but easy to glaze with strips of clear Lucite on the inside after painting. I like to glaze the windows rather than leave them open because the reflection off of them with ambient light adds to the realism. I'll put 3 lights on the deck within the hurricane cabin outline since access to the roof in an unobtrusive manner - with only the pilot house on top of it - prevents easy running of the wires via the roof. The silkspan "tar paper" will not hide them as I determined with an experiment. Those will be the last lights. The small black "grabber" is holding the wires those LEDs will attach to. OOps - I just noticed looking at the pictures that I lost one of the aft hurricane deck posts for the railing. Better fix that now.


- 76 replies
-
- 9
-
-
- model shipways
- chaperon
- (and 1 more)
-
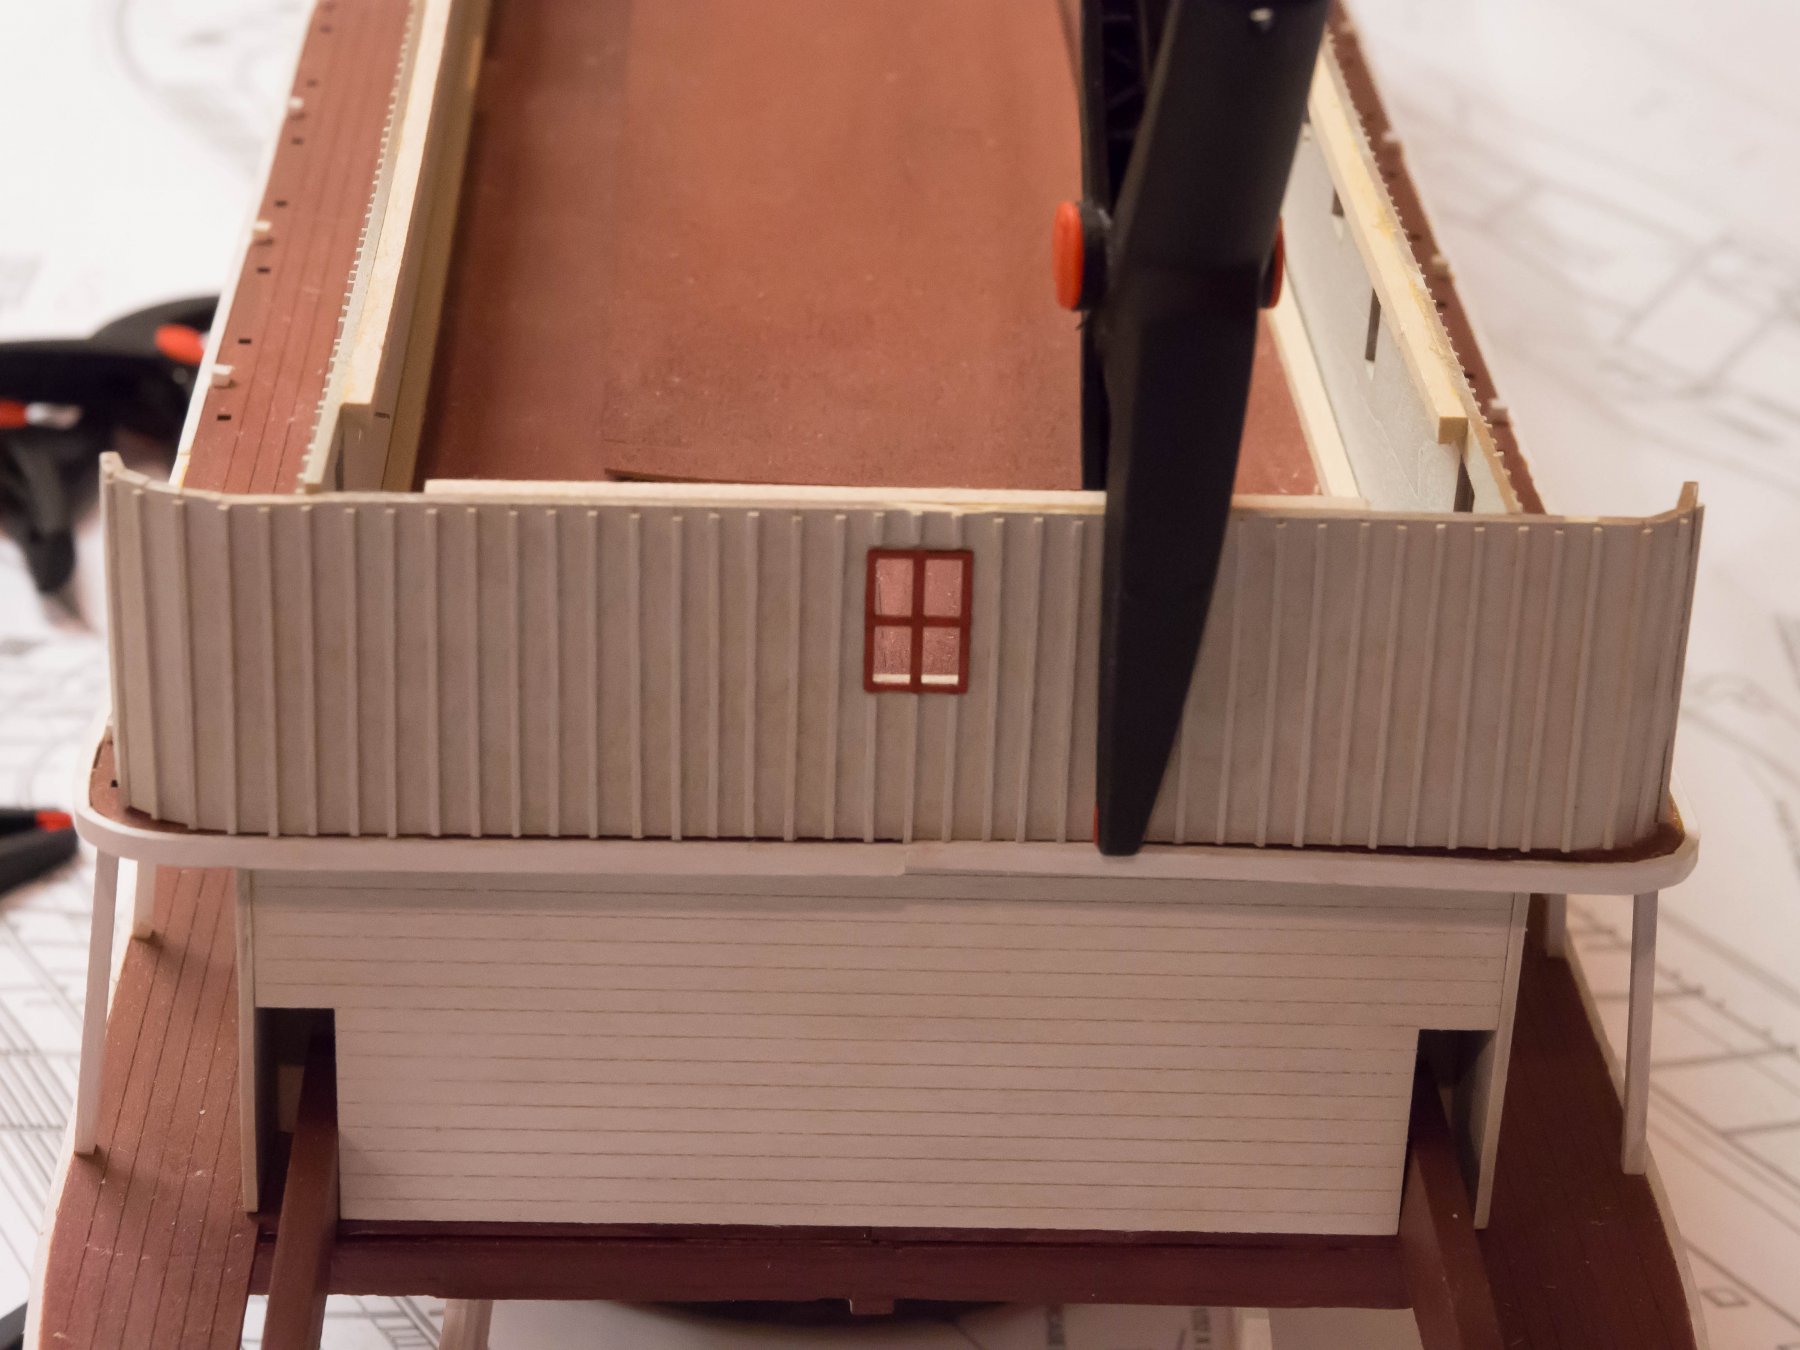
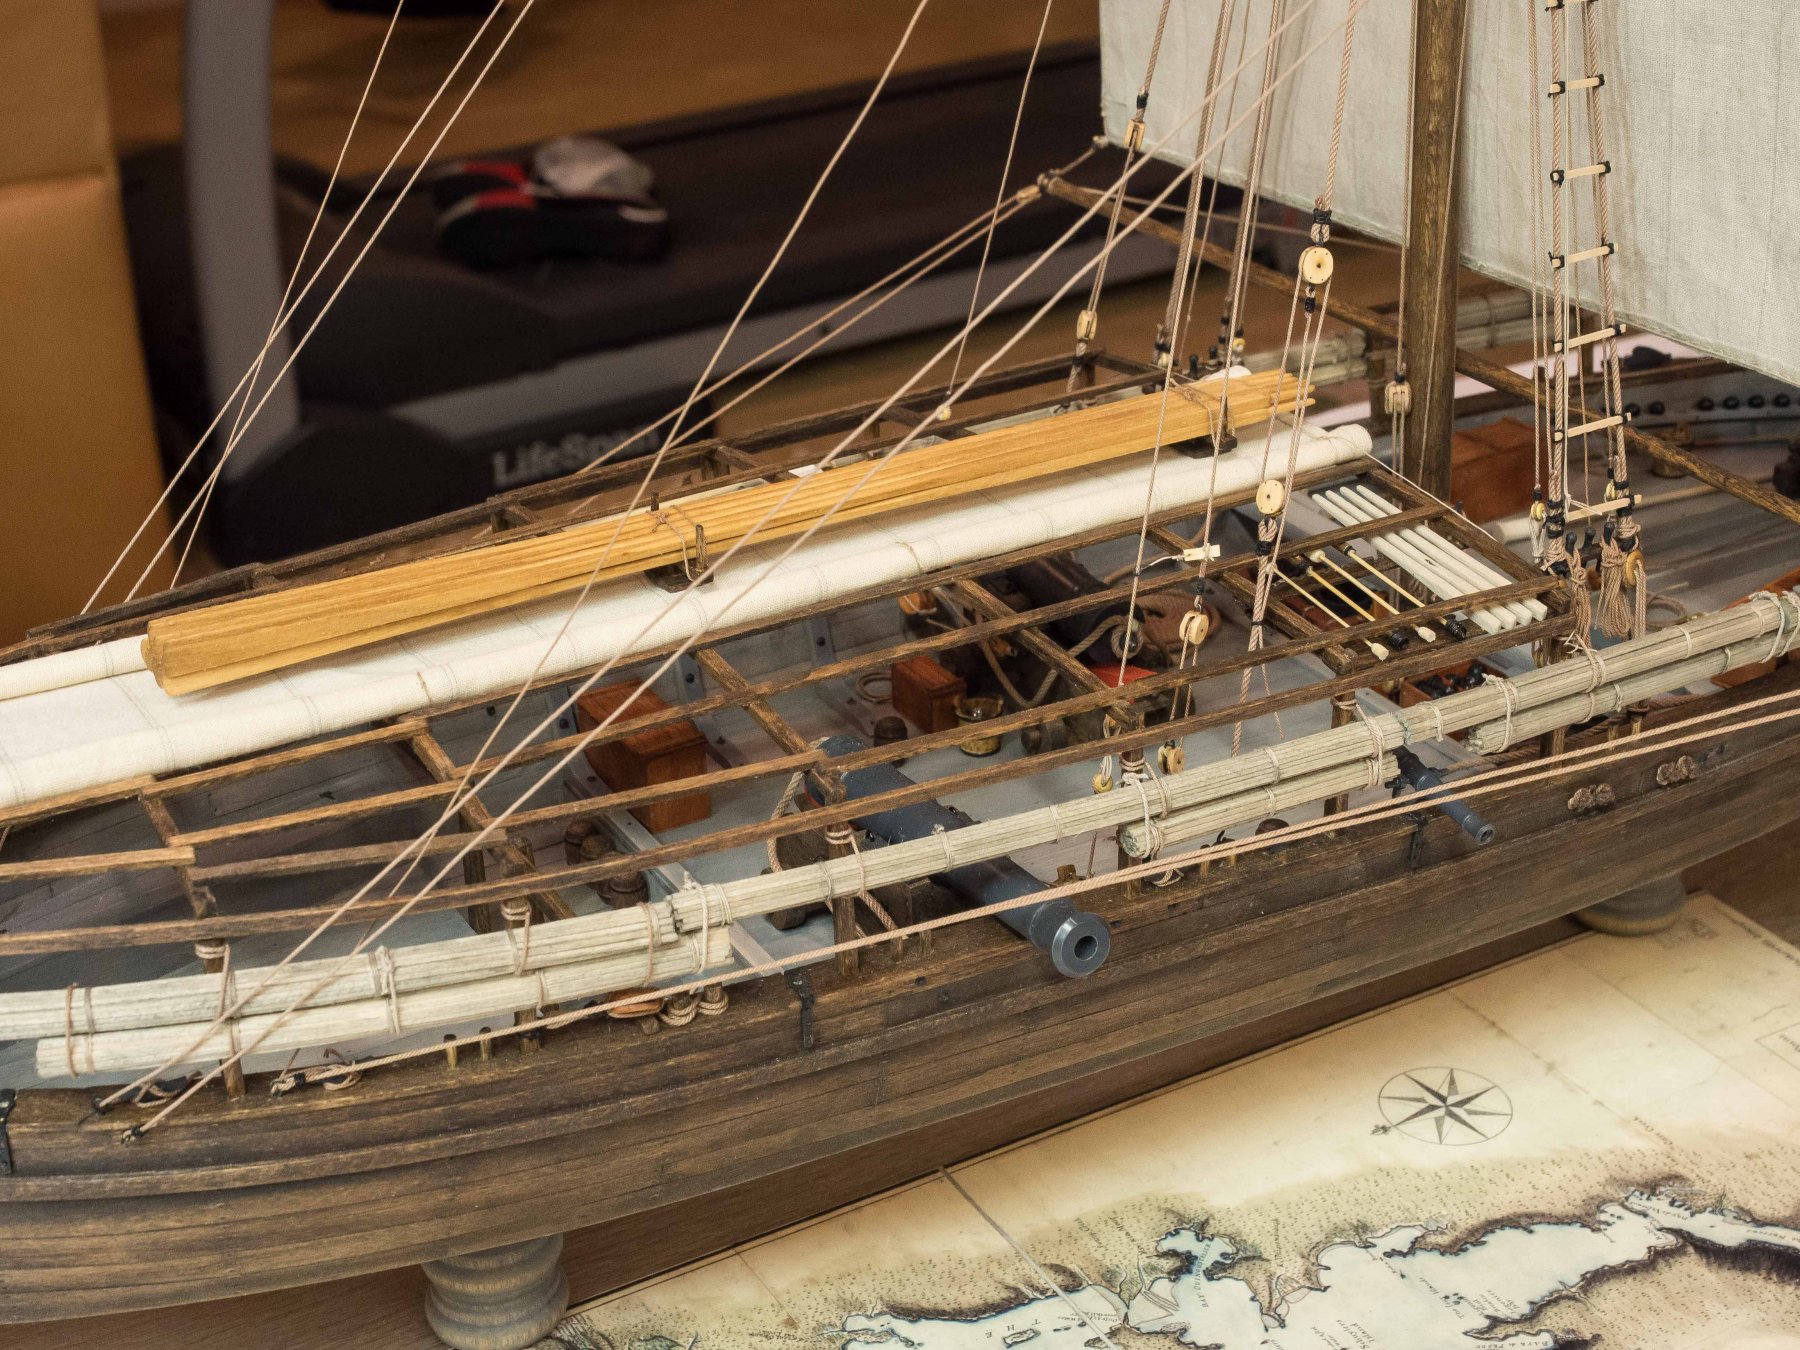
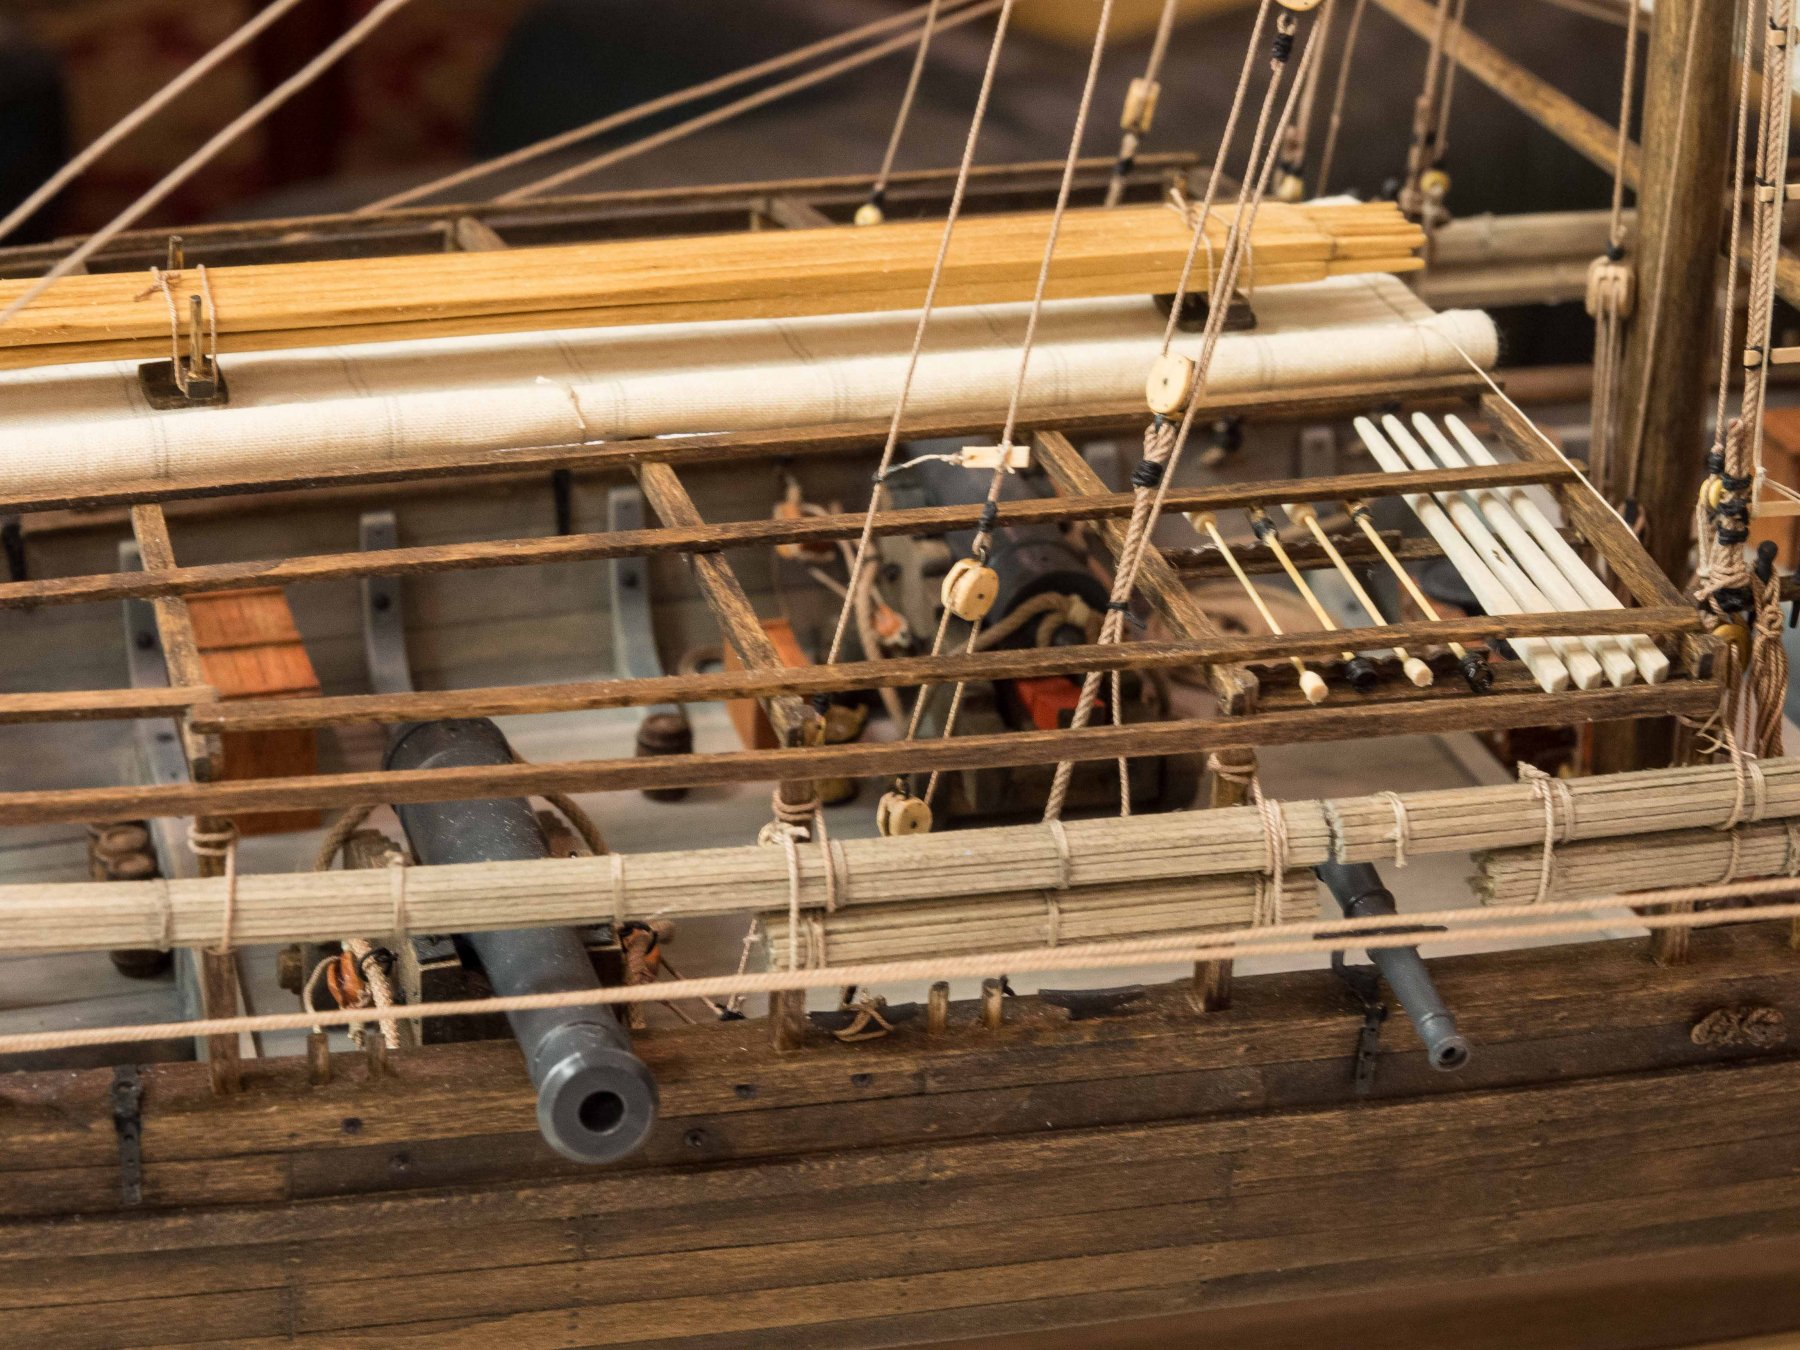
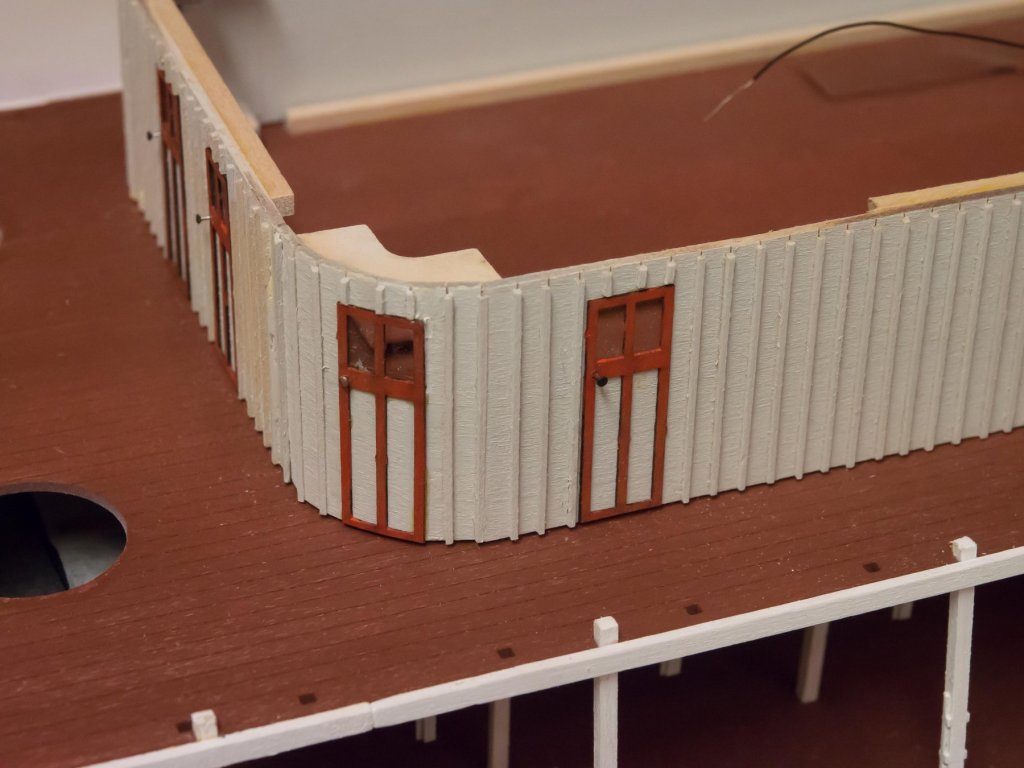
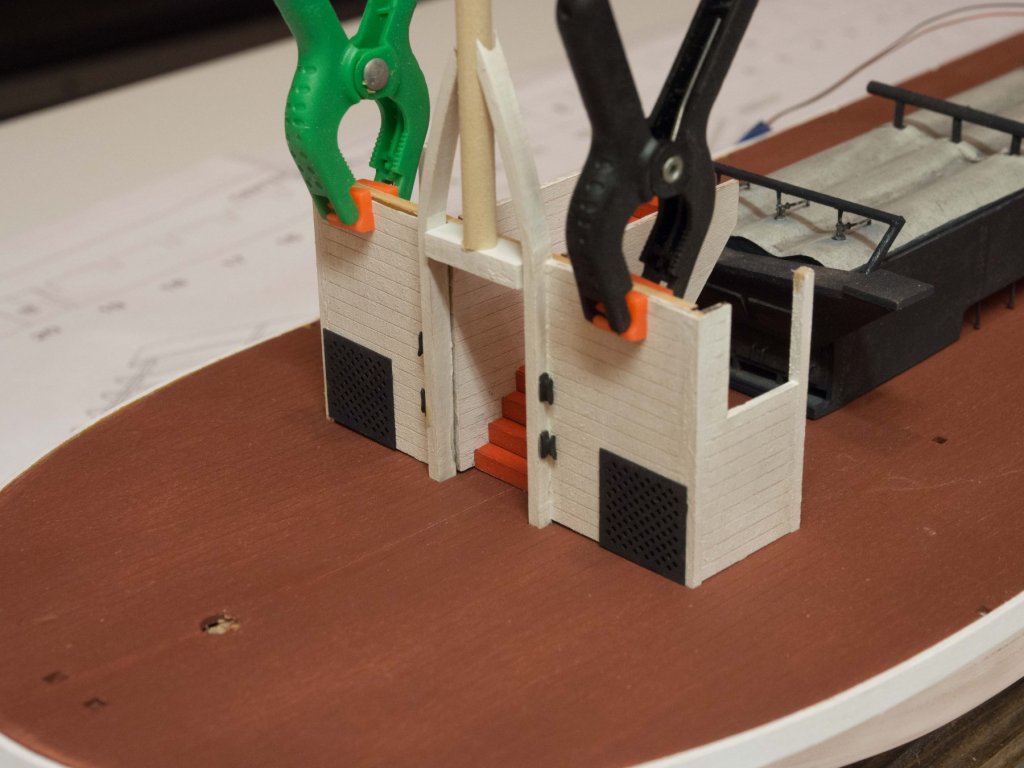
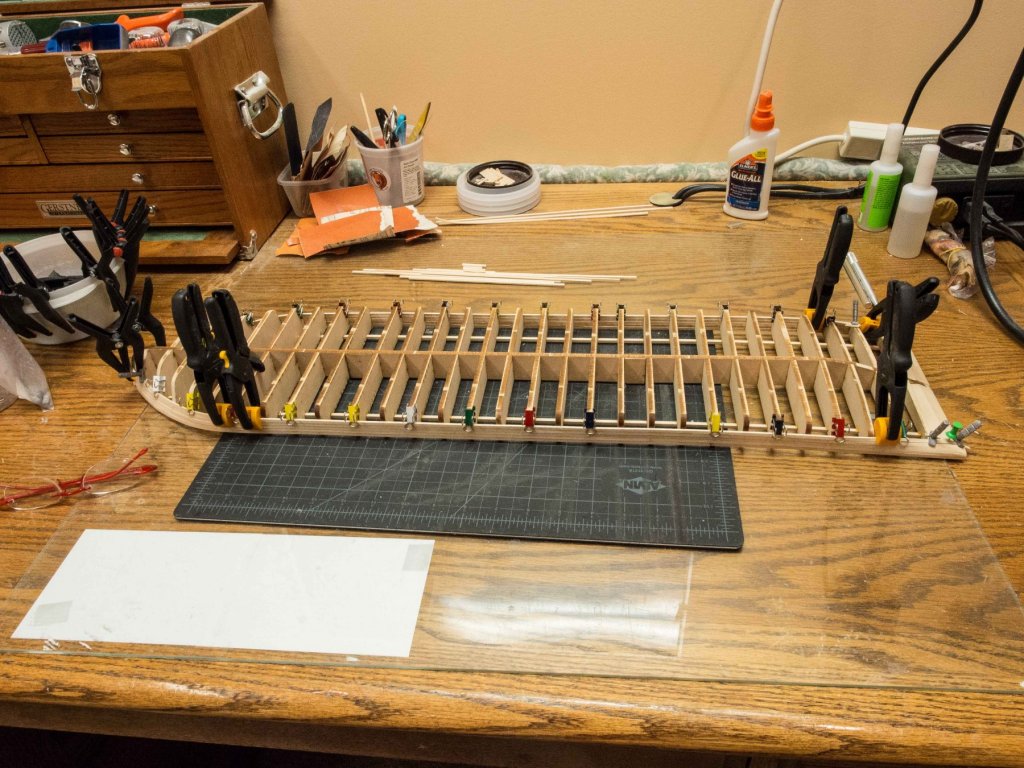
Added the stationaries and the supports for the bull rails on the main deck, but will hold off the bull rails till later to make adding some cargo and figures easier. The boiler deck cabin was definitely a lot of work! Firstly, the deck shear was a bit off, so I had to do some selective sanding of the cabin sides on the bottom. This also necessitated shortening some of the doors in the sanded area. The there were the scores of battens to add. I found the round bends at the corners difficult. Thankfully I came across the hint of gluing some card to the inside of the areas to be bent which made the occasional fracture along the bend lines tolerable instead of a disaster. I really would call the process more of a series of controlled fractures than a bend. After painting, added the door frames in red, glazed all the windows with clear plastic, and added pin heads to simulate door handles on each door. I opted not to wet, dry, and sand the cabin sides prior to painting which gave them a more aged and shabby look. Here are the cabin pieces dry fitted. Will add some gray pastel aging before gluing. Then on to the two staircases and the hurricane deck. I will wire the lights for the boiler deck cabin on top of the deck within the skylight structure.

- 76 replies
-
- 6
-
-
- model shipways
- chaperon
- (and 1 more)
-
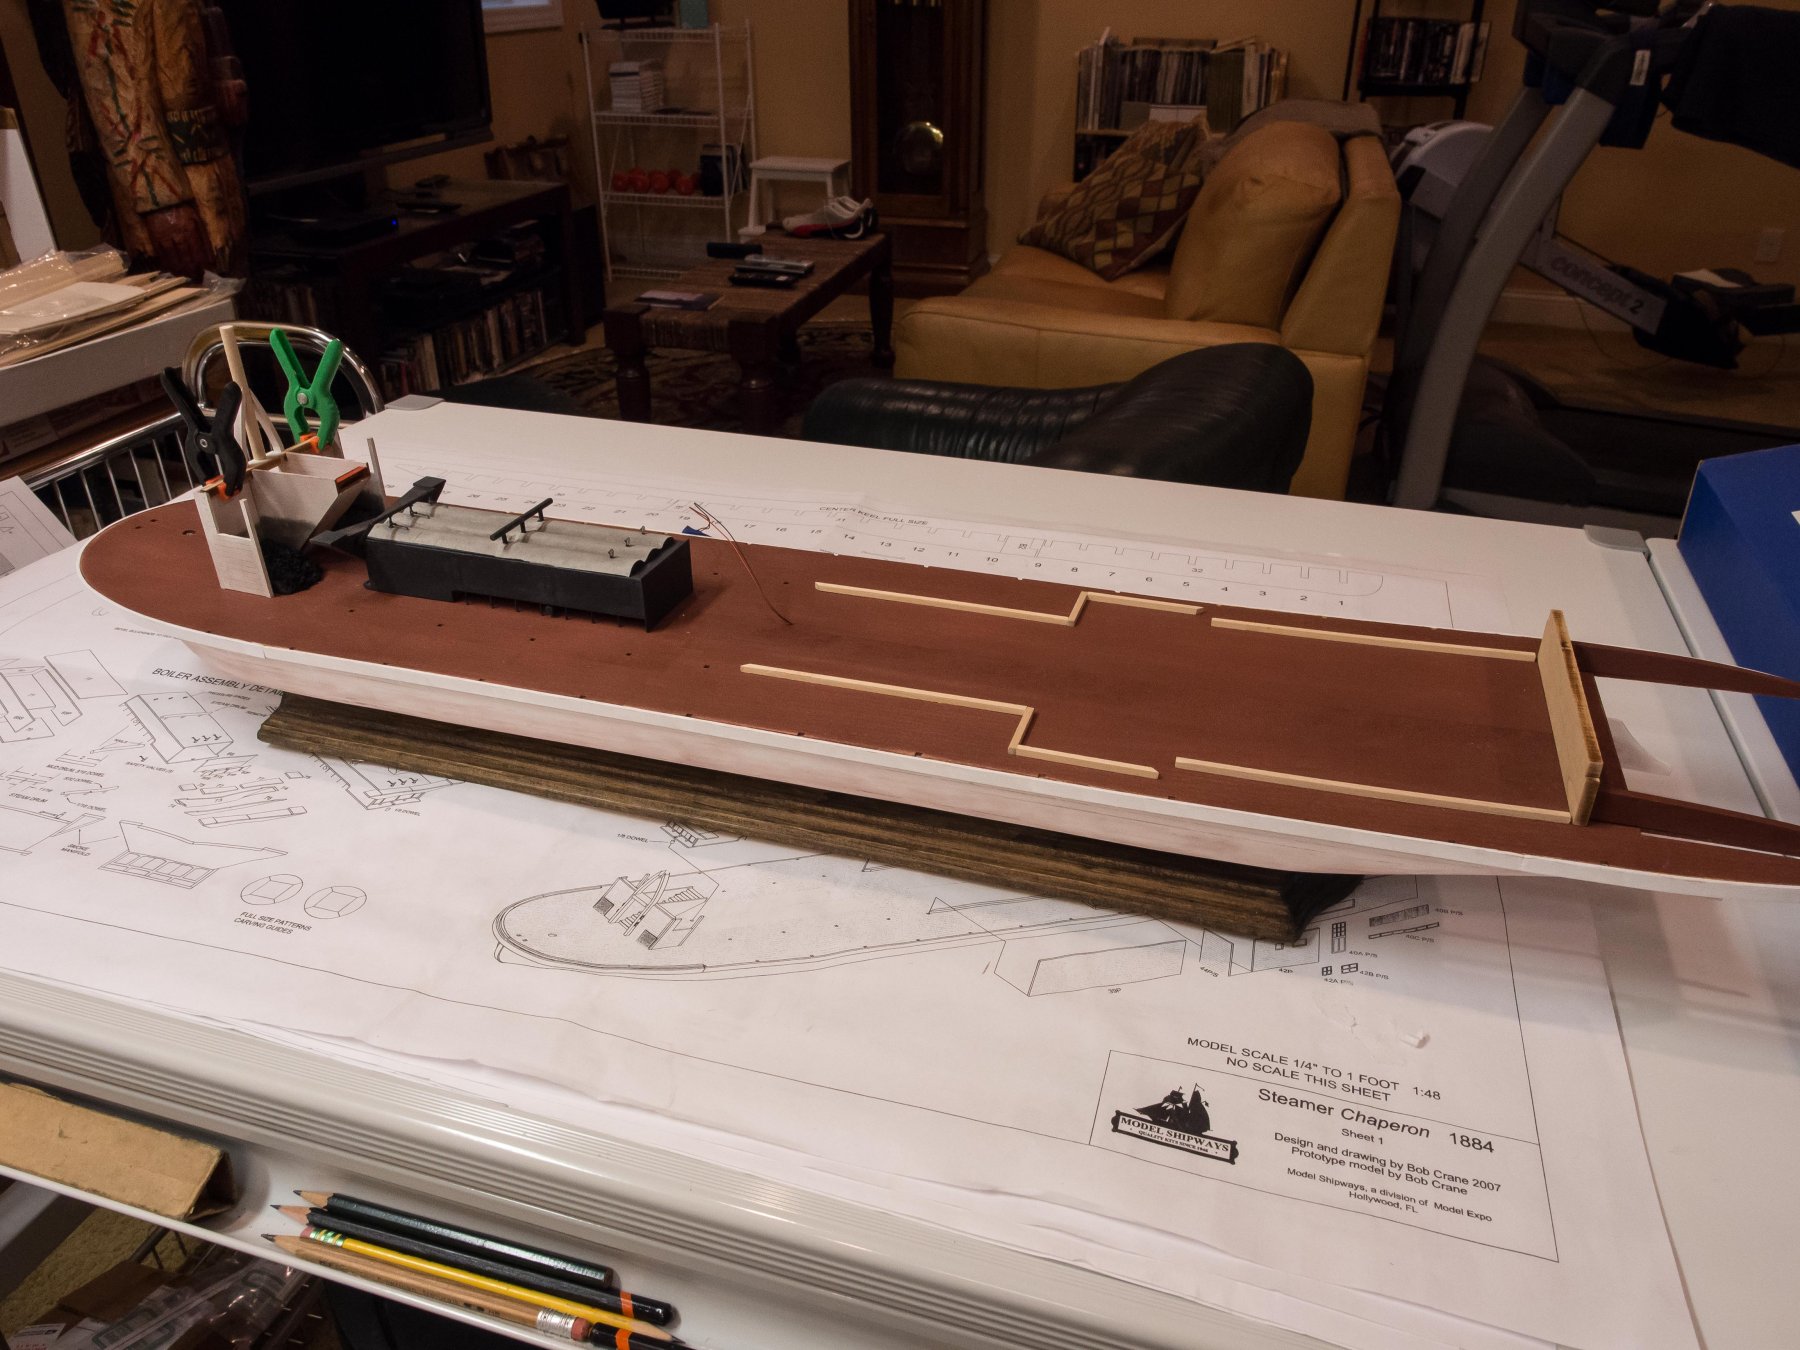
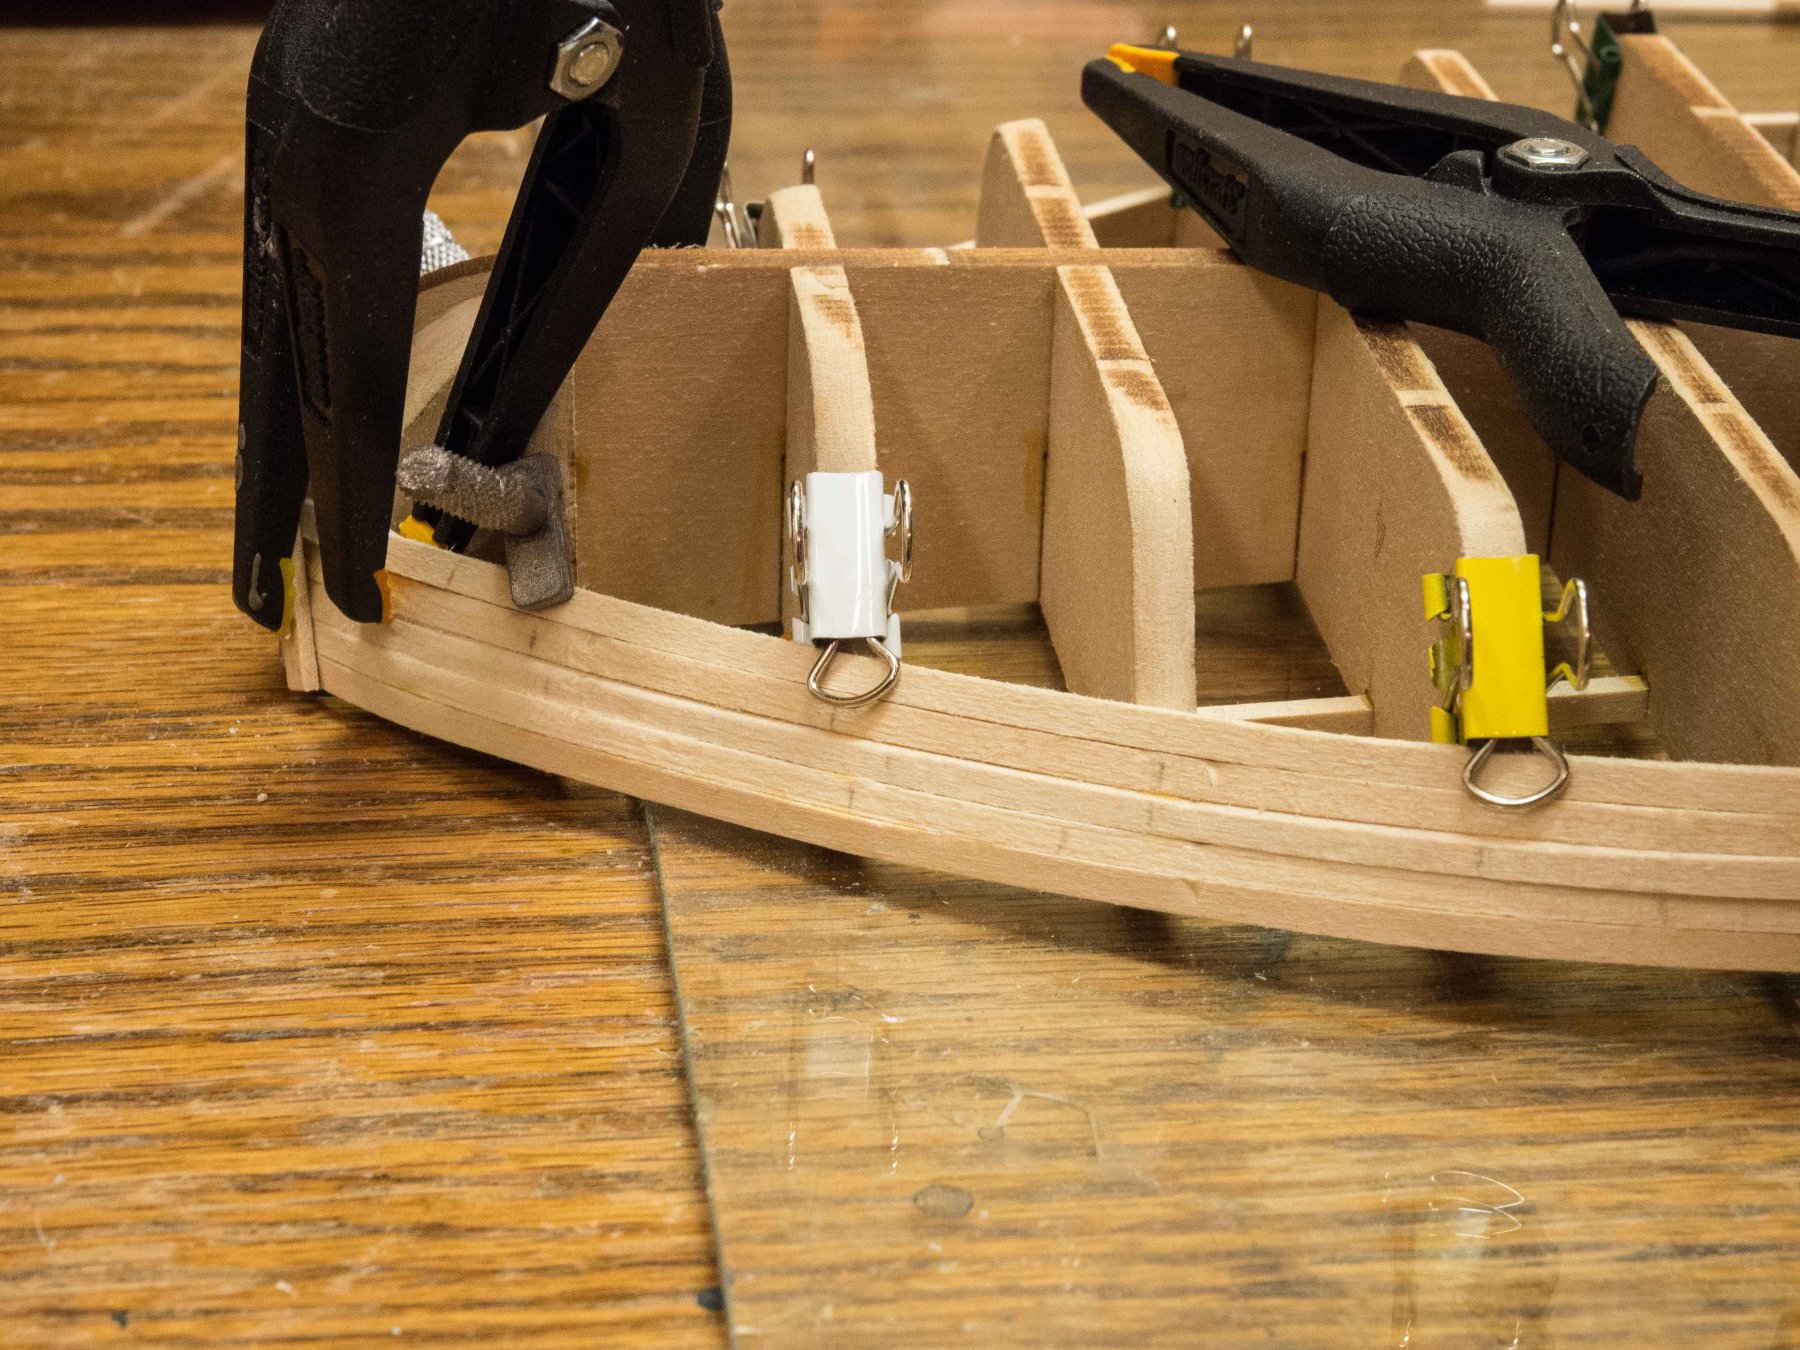
I have installed lighting LEDs for the main deck. Testing to make sure everything works from my external power connector to the individual lights prior to finalizing with shrink tubes on the main power lines where the five lights connect - temporarily held together with the visible red and black clips - and neatinizing the wiring, all of which will be covered by the deck structure. The main power line will go up to the next deck to provide stateroom lighting. I may put a small light in the floor of the pilot house, but I wonder if that was done since it might affect the night vision of the pilot. Anyone know?

- 76 replies
-
- 4
-
-
- model shipways
- chaperon
- (and 1 more)
-
Finished the main deck (and instruction sheet 1) No real problems. Now onto the boiler deck.


- 76 replies
-
- 8
-
-
- model shipways
- chaperon
- (and 1 more)
-
I'm going with a somewhat used look rather than full-bore grunge. Using a light grey pastel rub over the white cabin walls. Light rust on the smoke hood and boiler ends where the heat would have blistered the paint.
-
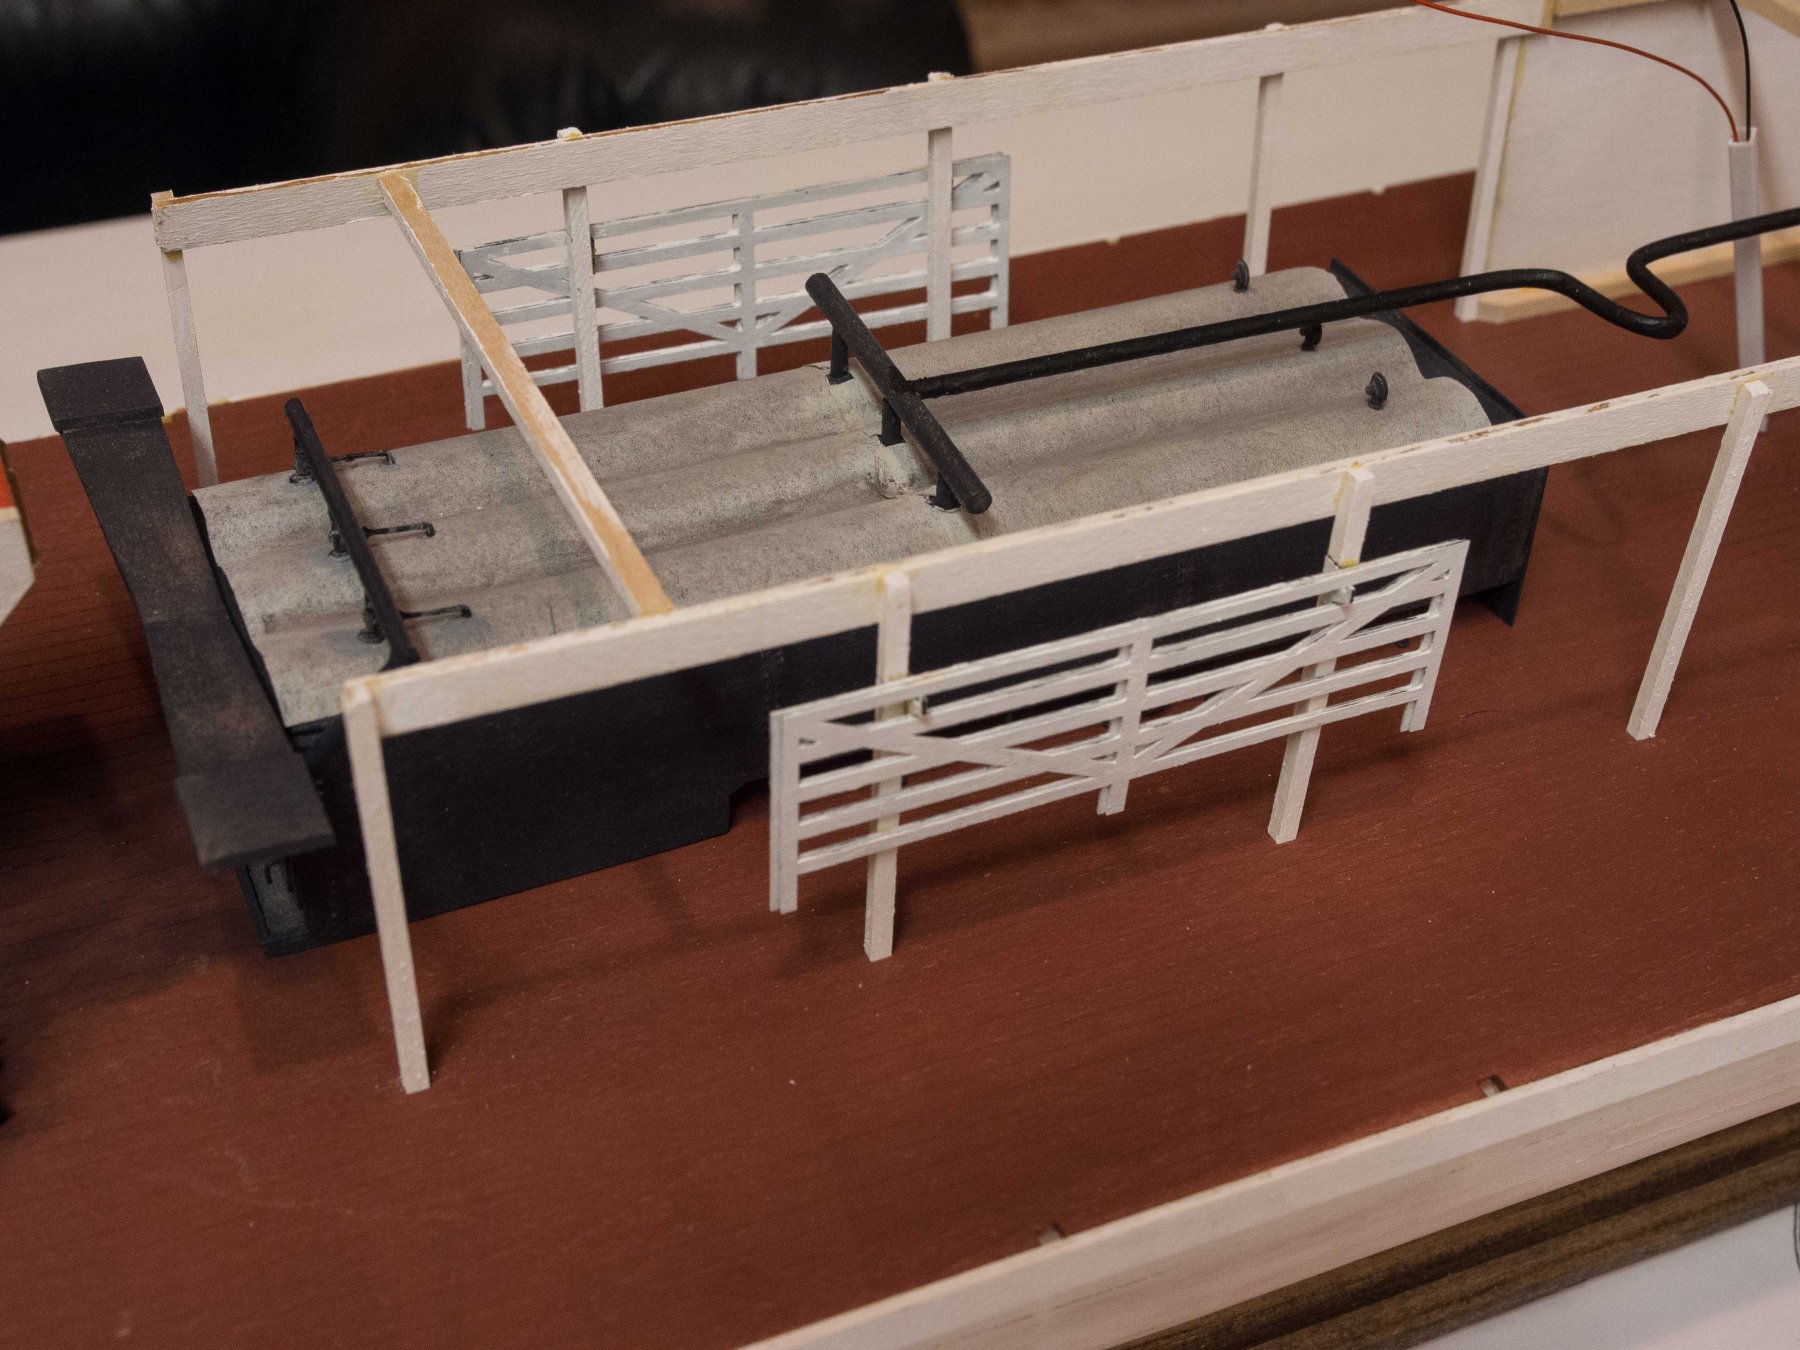
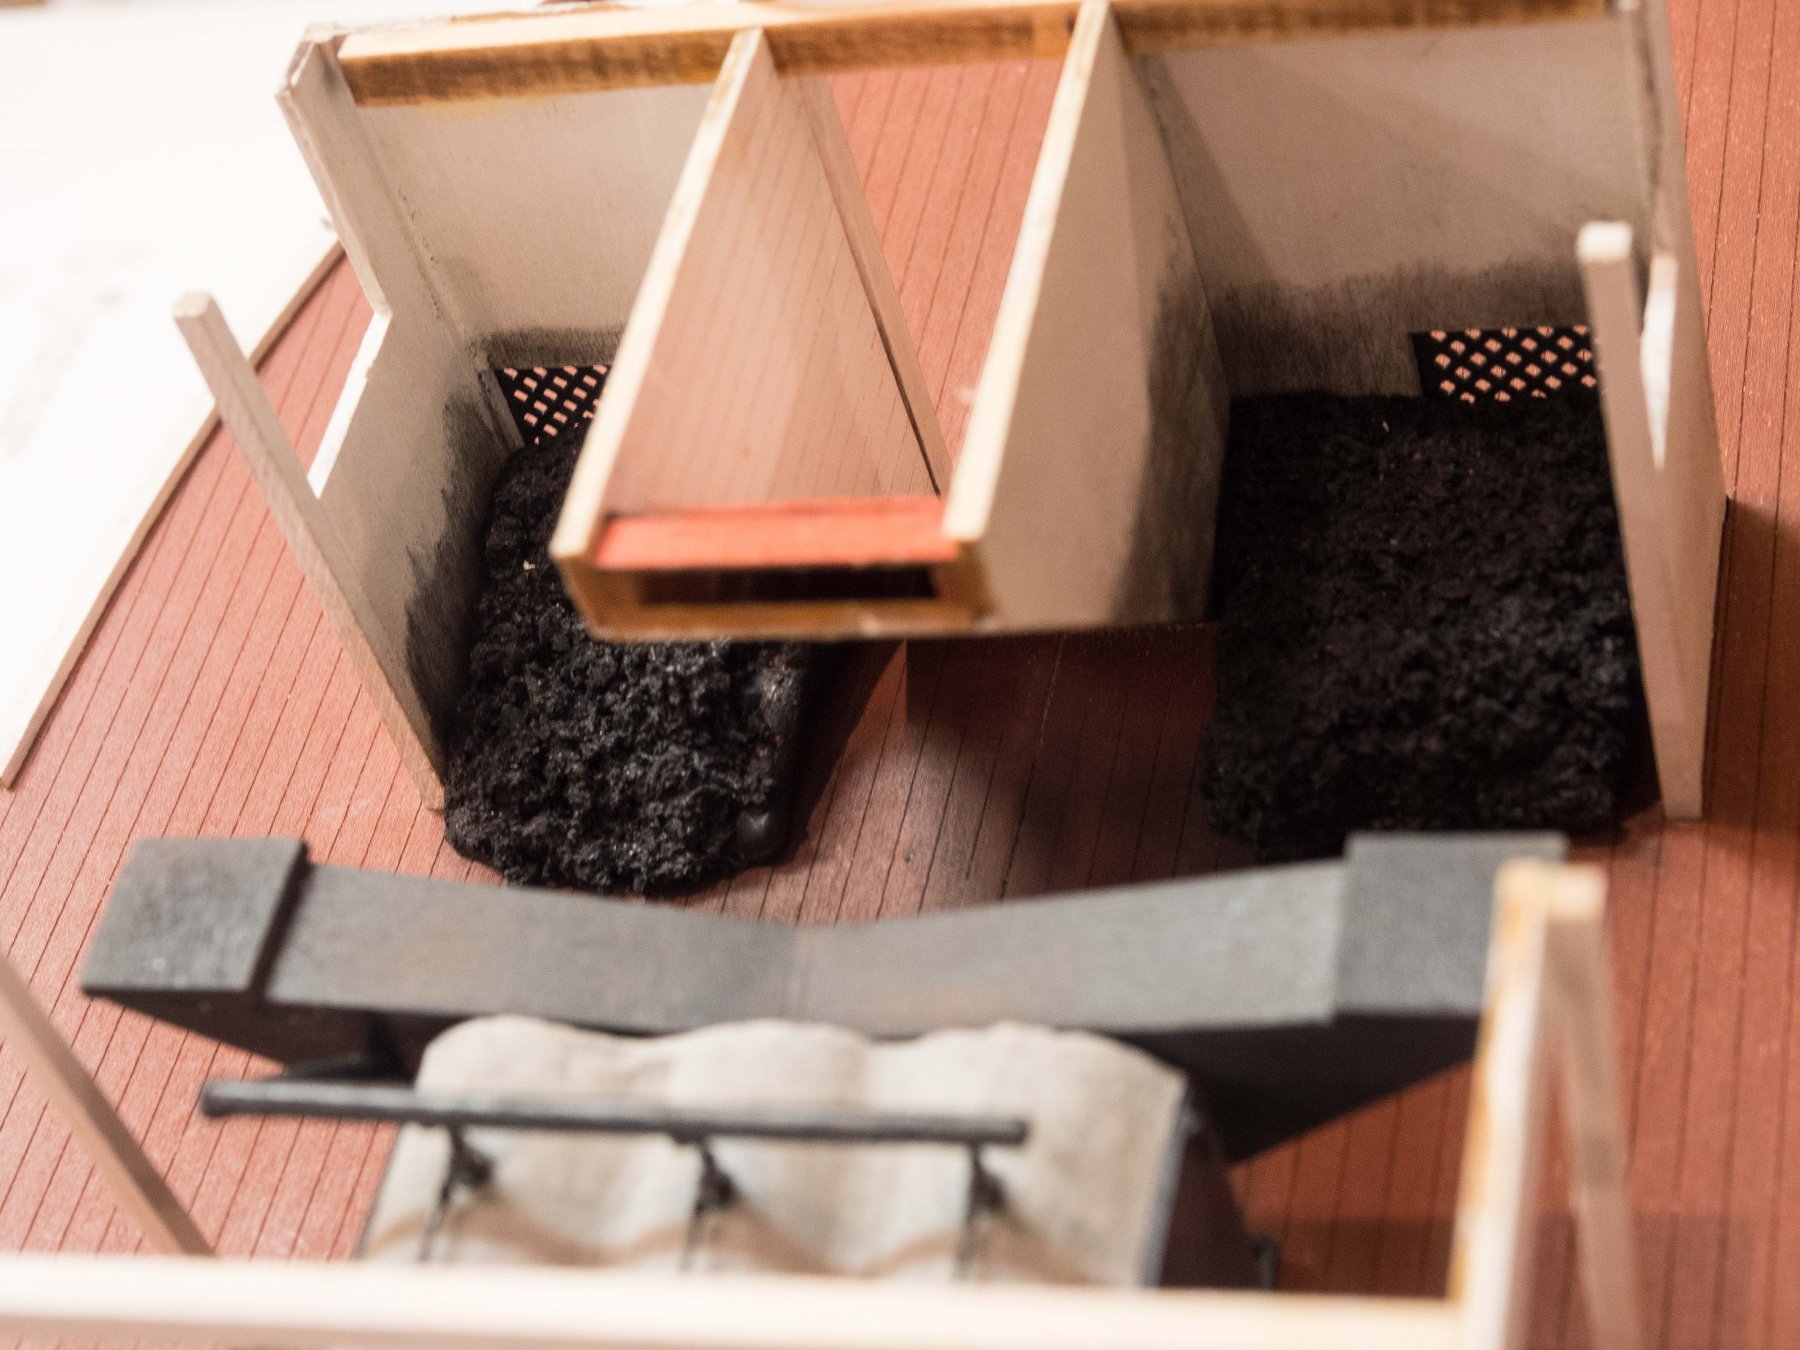
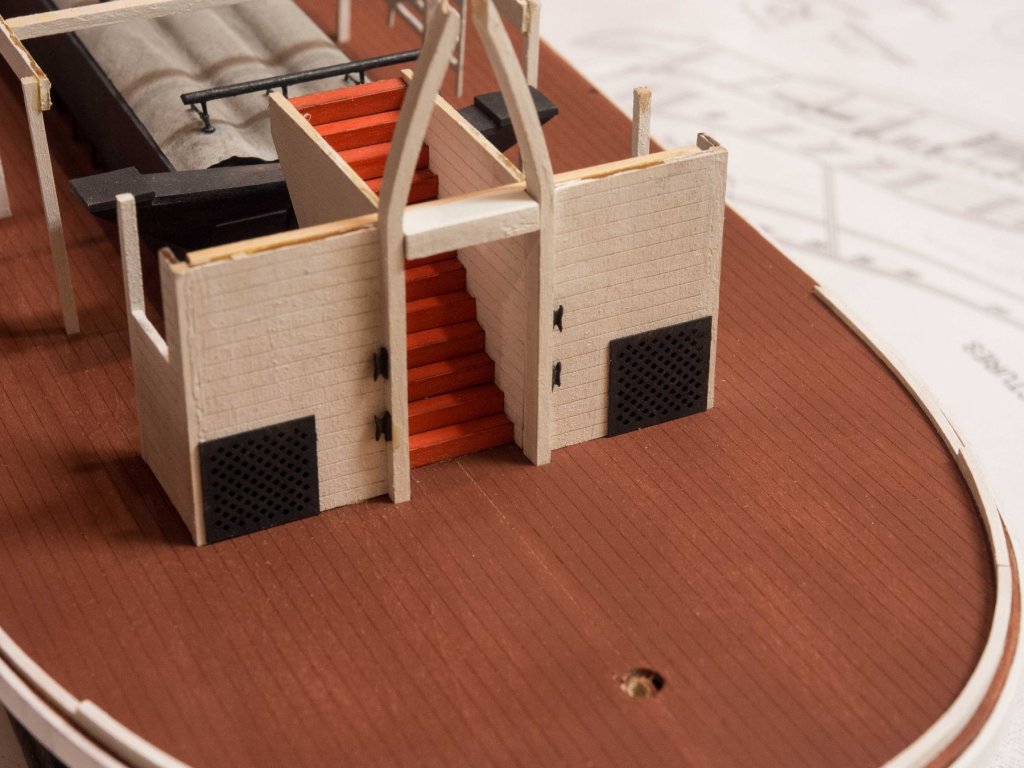
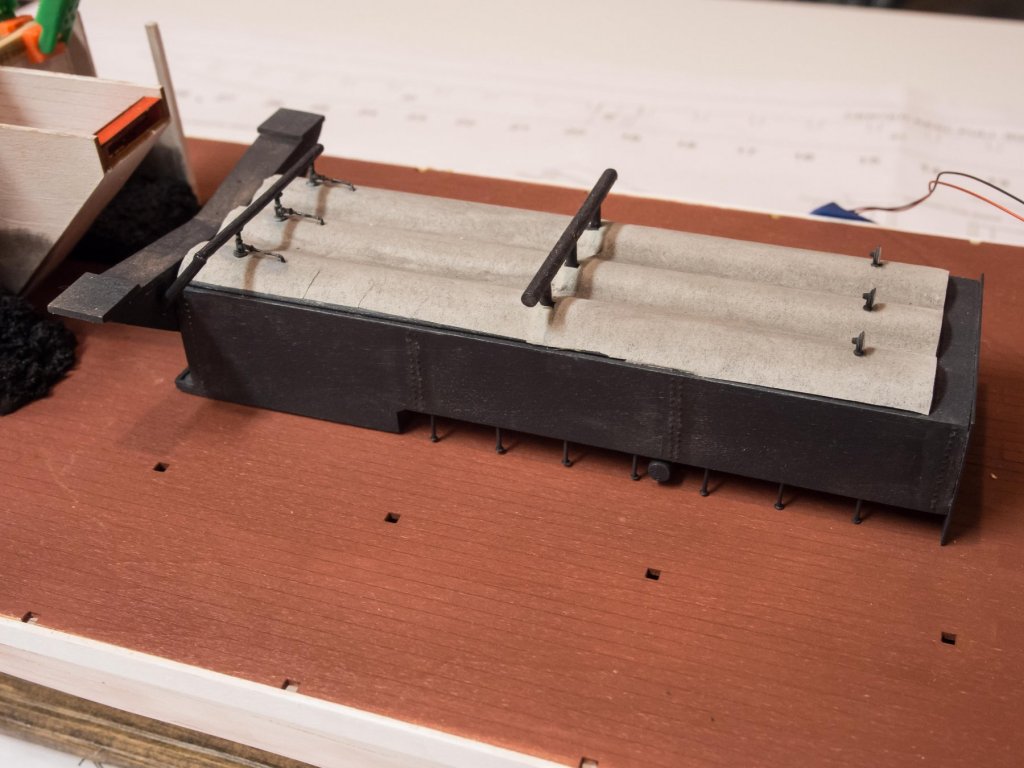
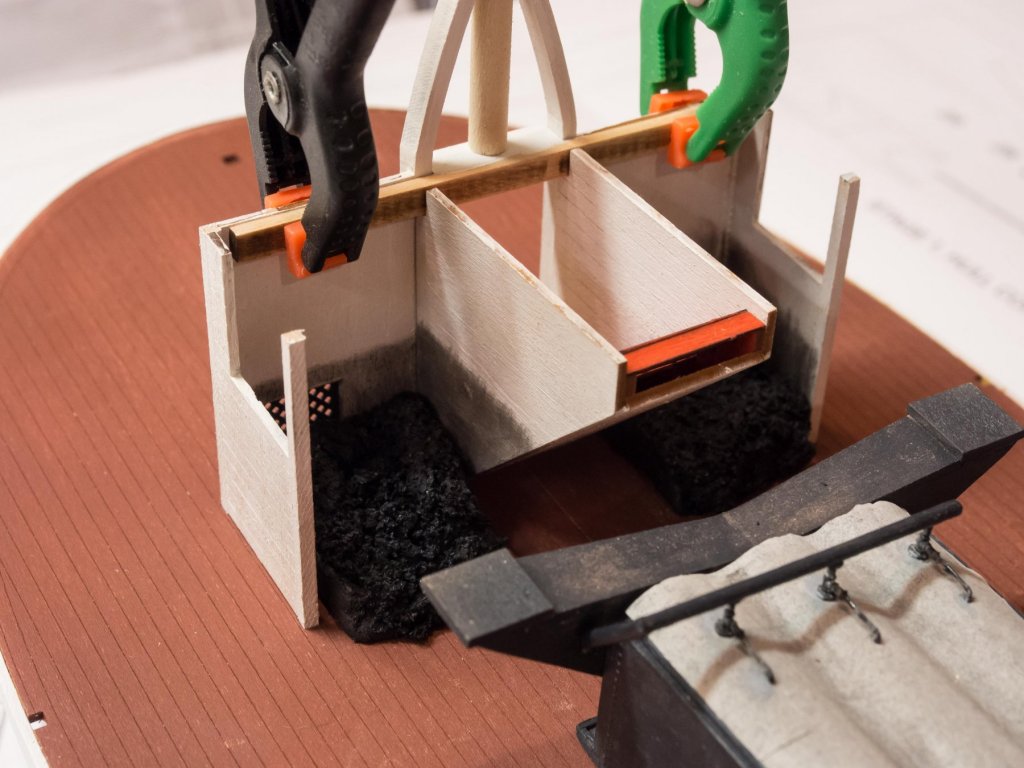
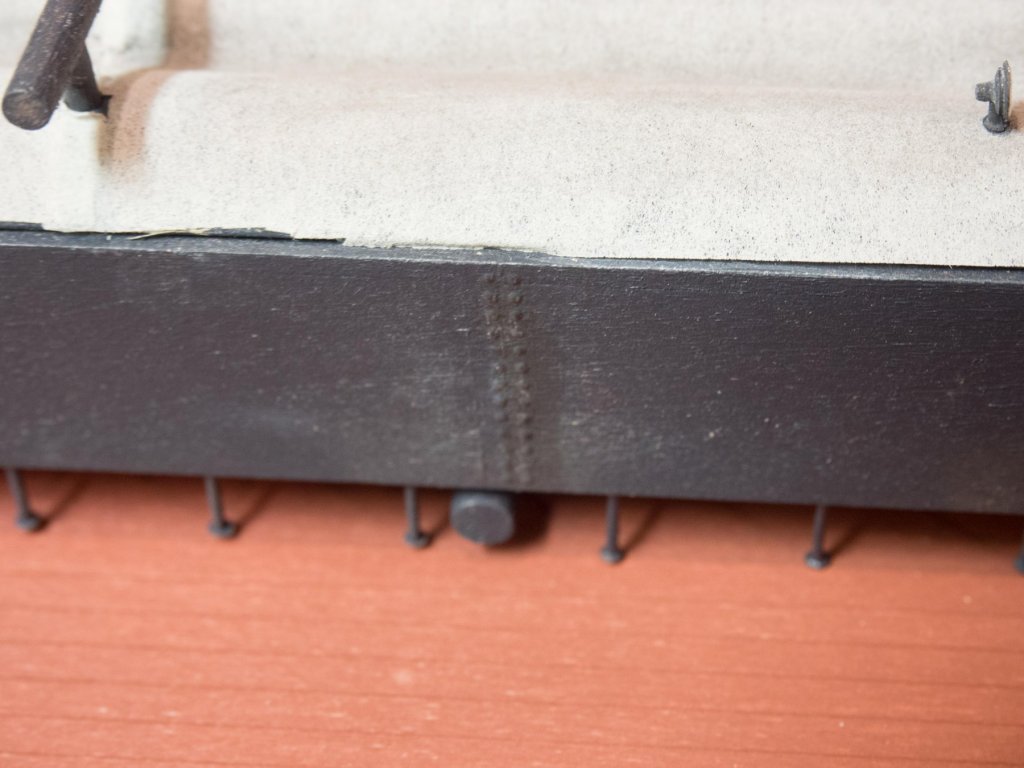
My computer is back, so here is an update on my Chaperon build. Been gone for 9 days, so this is the progress to date. Finished and painted the deck; with careful filling the "finger" interlocking area is not very visible. The wire visible will provide power to the LED lighting unless I screw it up. The exit from the hull is on the bottom with a small plug that will attach to a plug-in converter. Built the boiler with a few changes suggested by both Kurt's build series and some material on such boats that included a fair amount of detail. I added some dowel sections to represent the tops of the boilers within the enclosure, and added a silkspan plus pastel rub blanket to simulate the asbestos blanket covering often used (!). Added some detail to the fire doors and added the heat shields, most of which isn't very visible. I decided to try the Micro Mark rivet decals and am fairly satisfied with the look, although the blend with the surrounding black isn't perfect.. Entryway was straightforward, altho I added coal piles as suggested by previous build log here (I'm a shameless borrower!). I'll add some black shmutz on the deck between the piles and the fire doors None of that stuff yet glued to deck as i wanted to be able to cross clamp the entire deck for the rubbing strip. I had 4 plastic clamps that JUST reached far enough to do the job. Next is painting the pieces to assemble the aft cabin.

- 76 replies
-
- 5
-
-
- model shipways
- chaperon
- (and 1 more)
-
No the longest ones have to be spliced. I did it at a bulkhead. Worked ok. Been working away. Deck on and painted. Stand completed. Did mud stripe with pastels on hull and rudders. Finished boiler and working on forward companionway now. Computer is borked and only partially fixed so no pics yet. Maybe next week
- 76 replies
-
- 1
-
-
- model shipways
- chaperon
- (and 1 more)
-
Moving along but my computer with my photo software is at the “doctor” with an uncertain prognosis. Hull painted white and rudders completed and shaft holes drilled. Waiting for deck paint so may add mud stripe to hull and rudders next after some experiments on painted scrap. Also need to decide if I’m lighting this puppy since I’ll want the wiring to come out the bottom to external battery and switch. No deck gluing until then.
- 76 replies
-
- 1
-
-
- model shipways
- chaperon
- (and 1 more)
-
I got 5 back issues from Ships in Scale just before they quit, and someone kindly sent me a PDF of the one that was not so available.
- 76 replies
-
- 1
-
-
- model shipways
- chaperon
- (and 1 more)
-
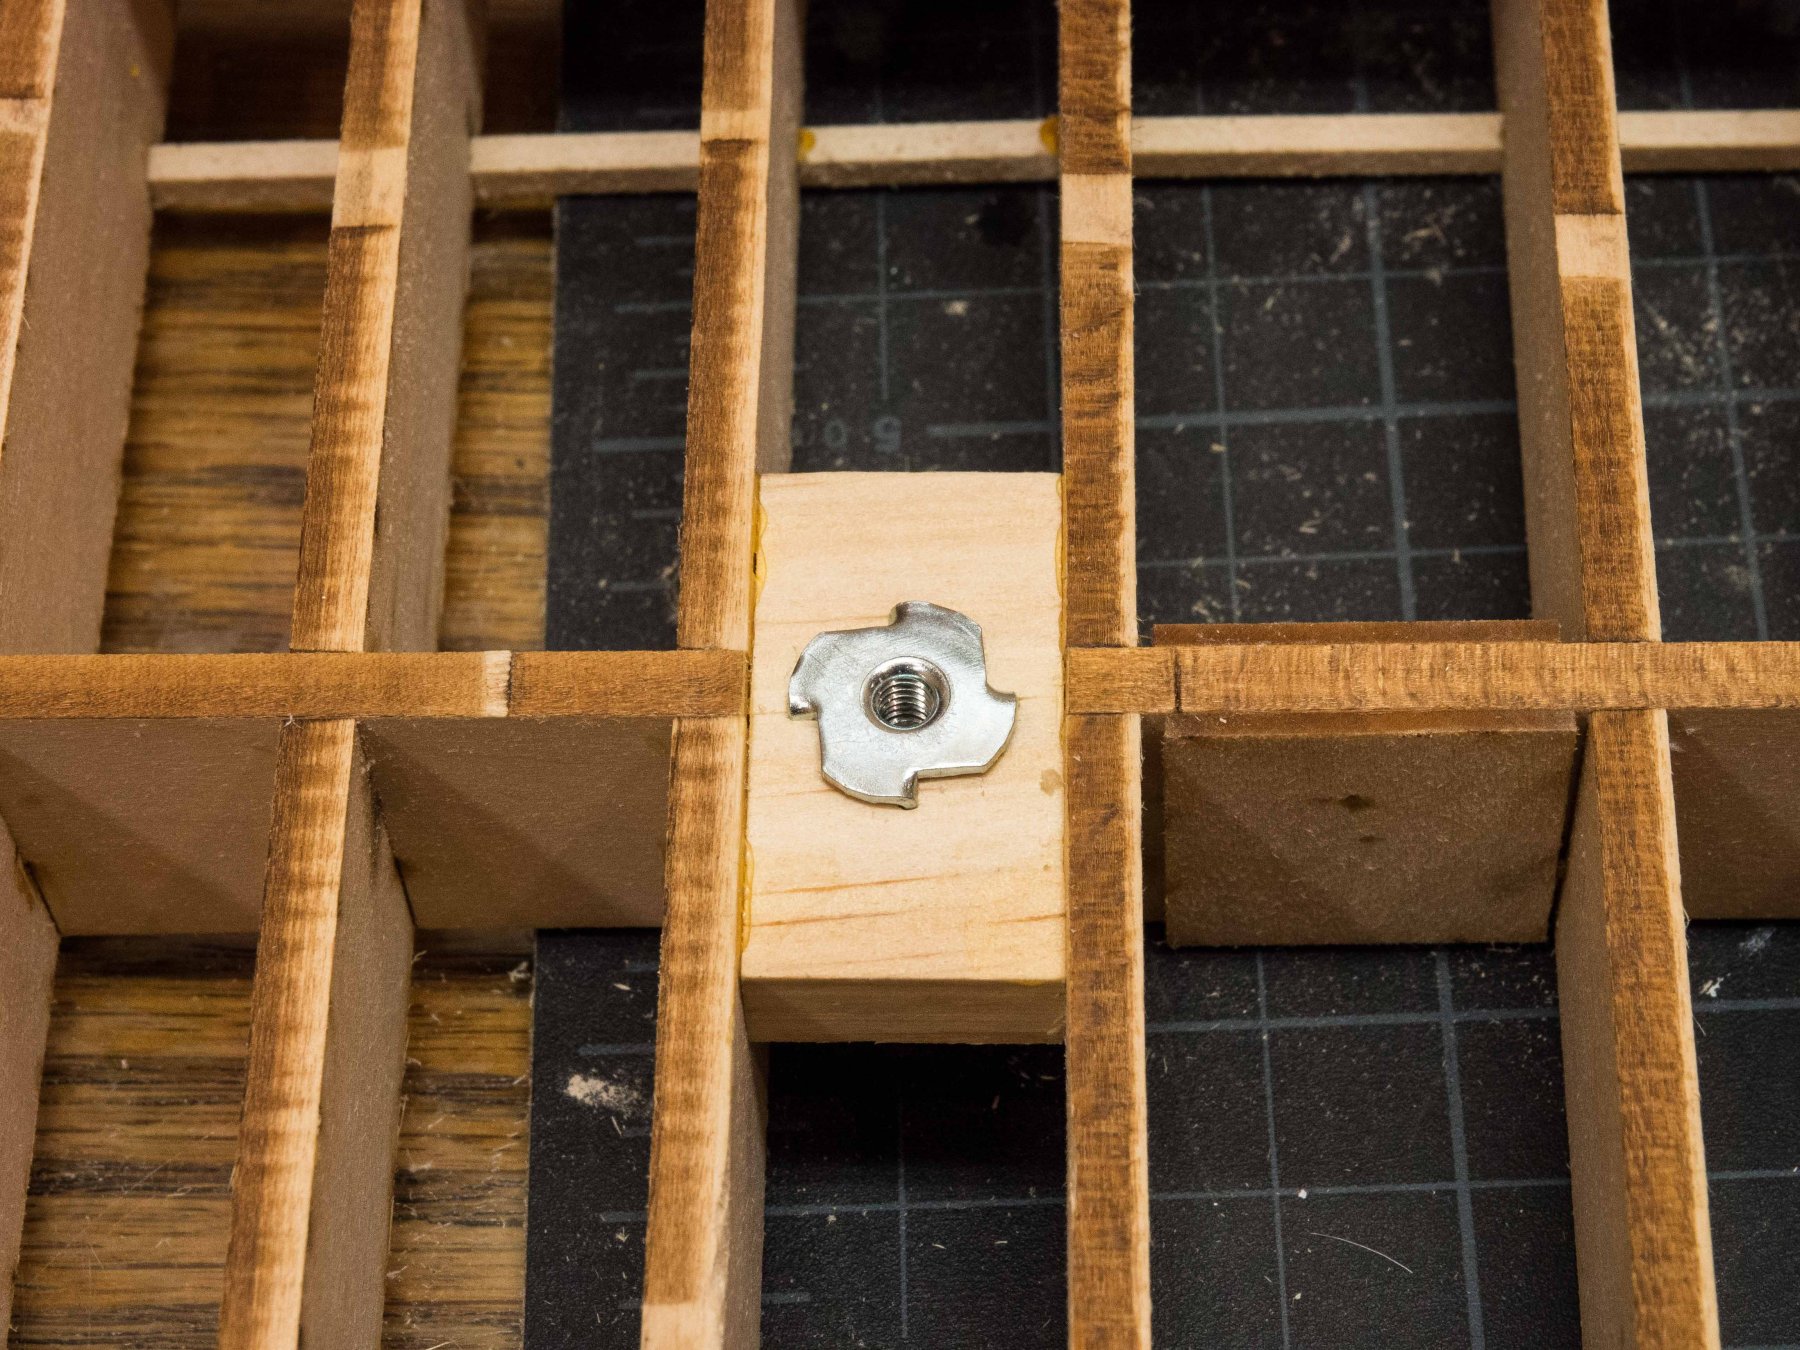
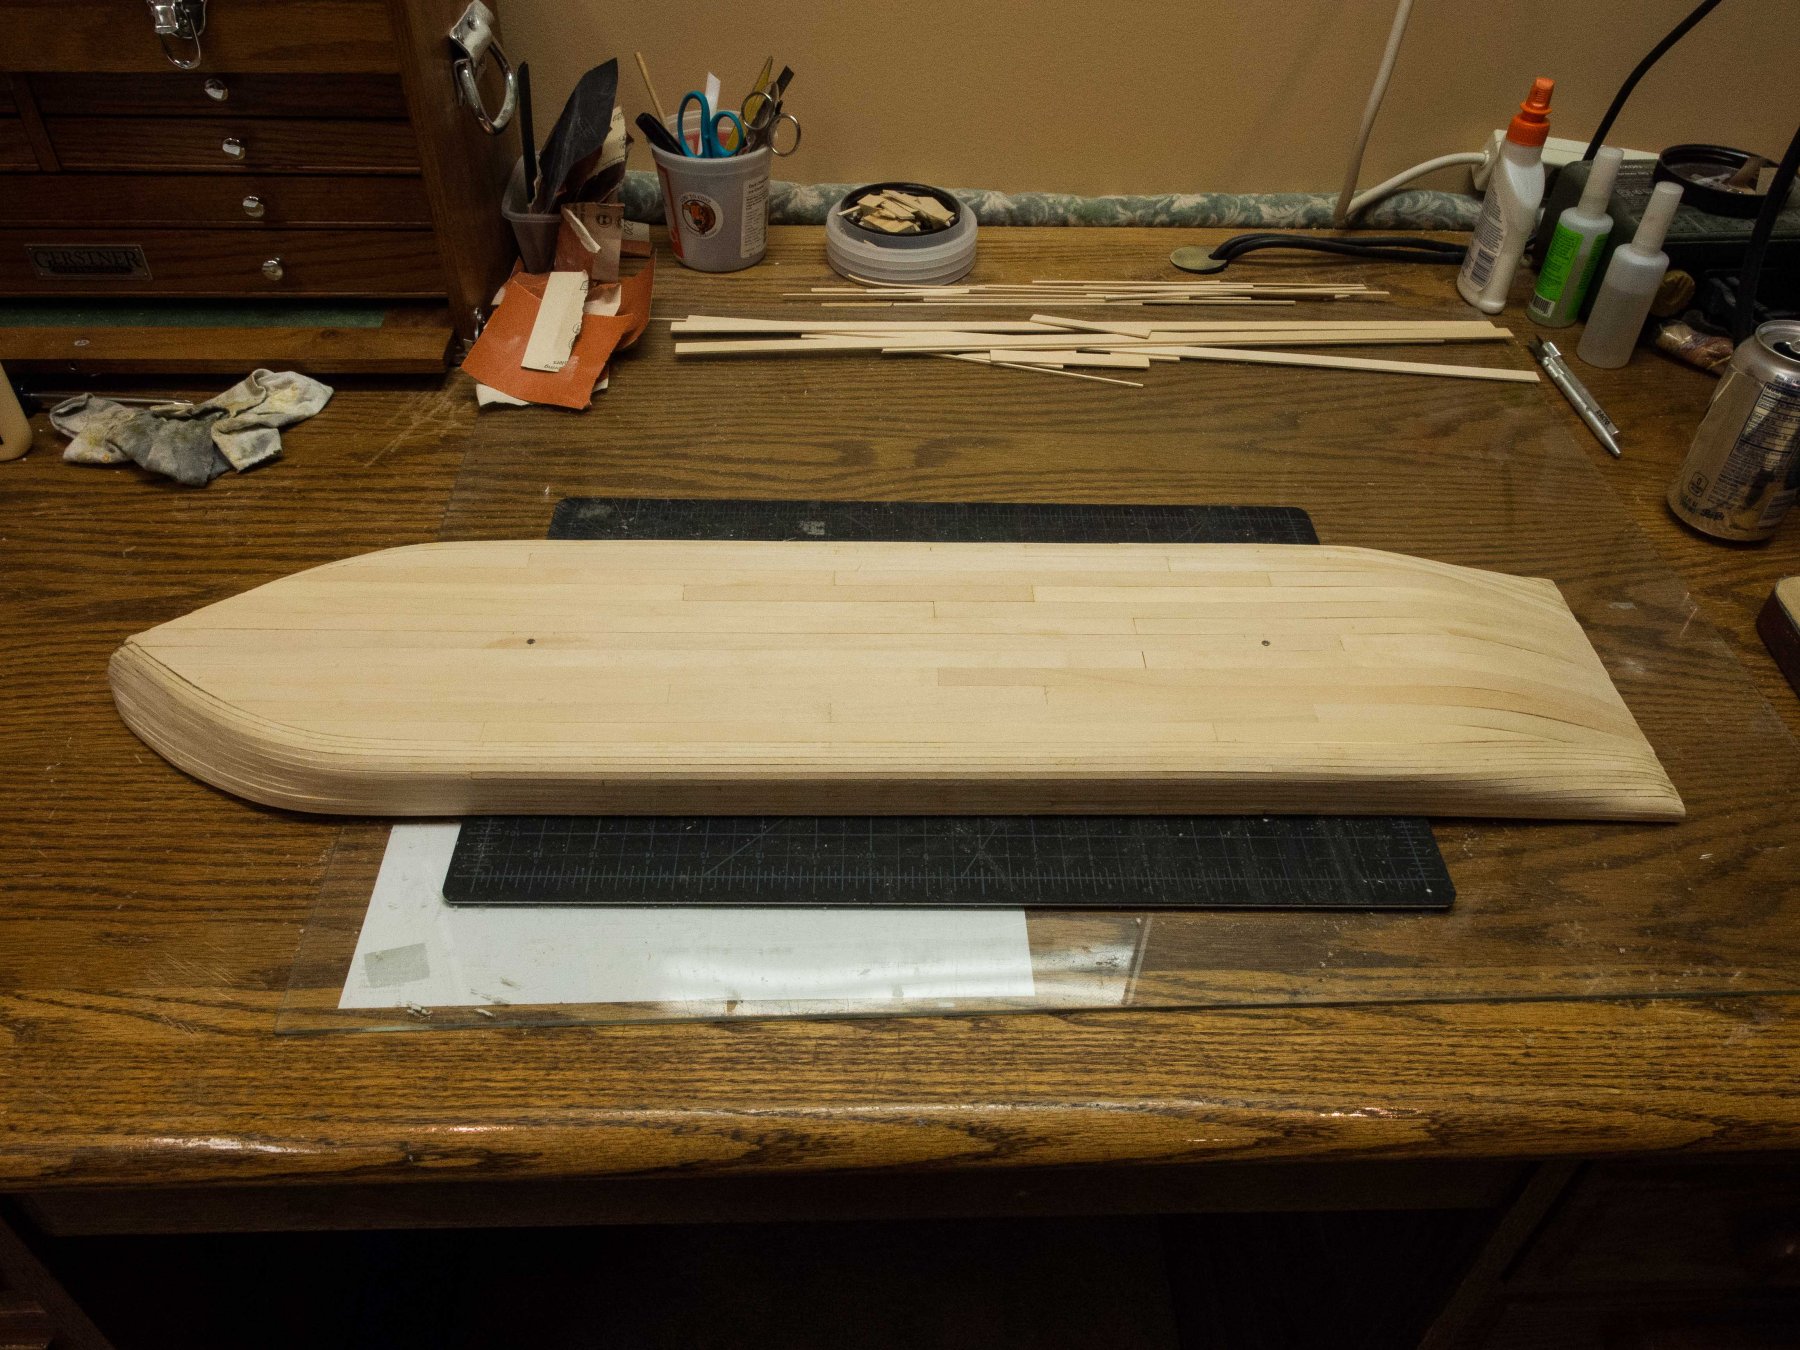
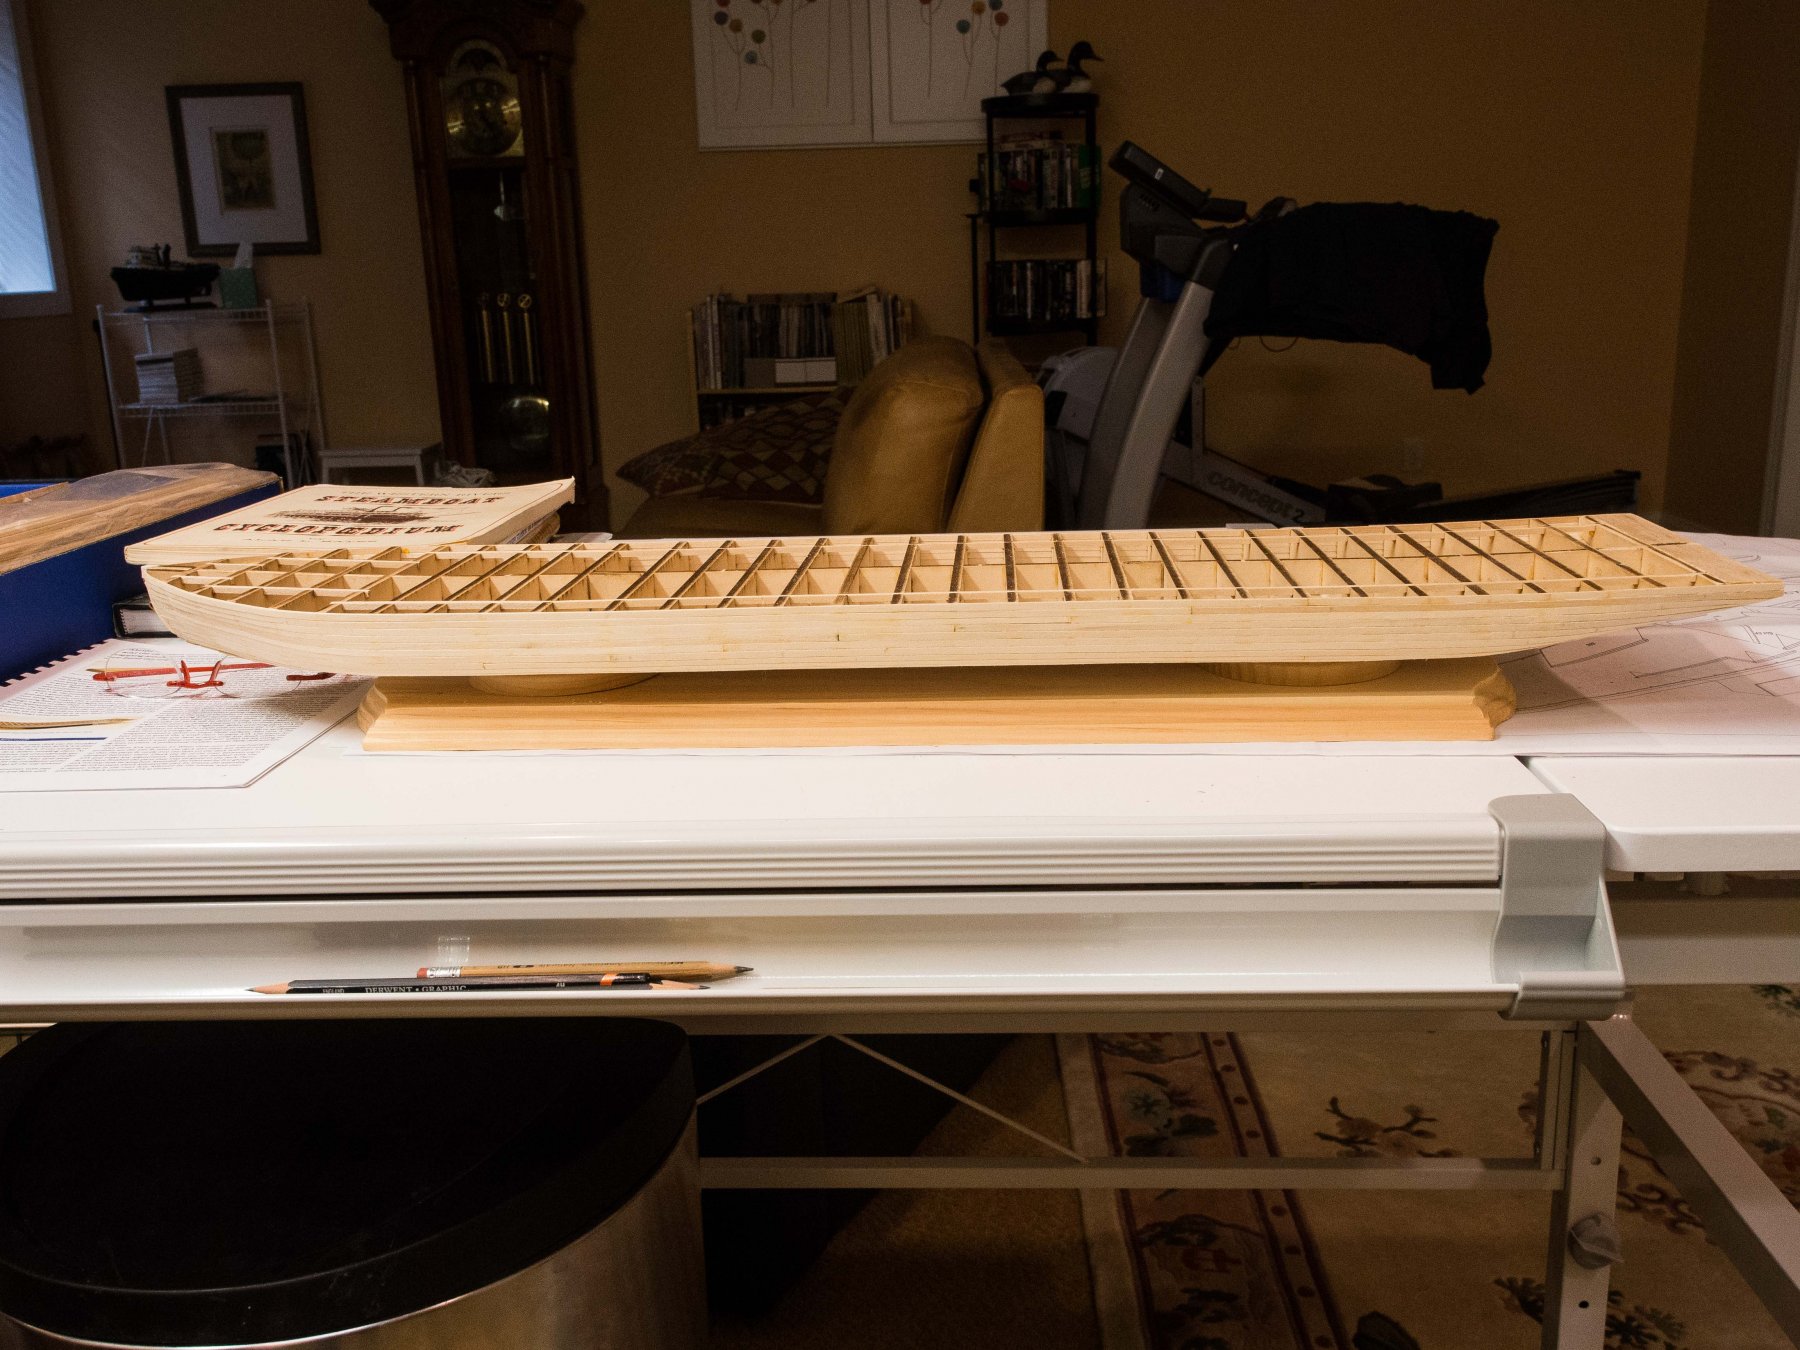
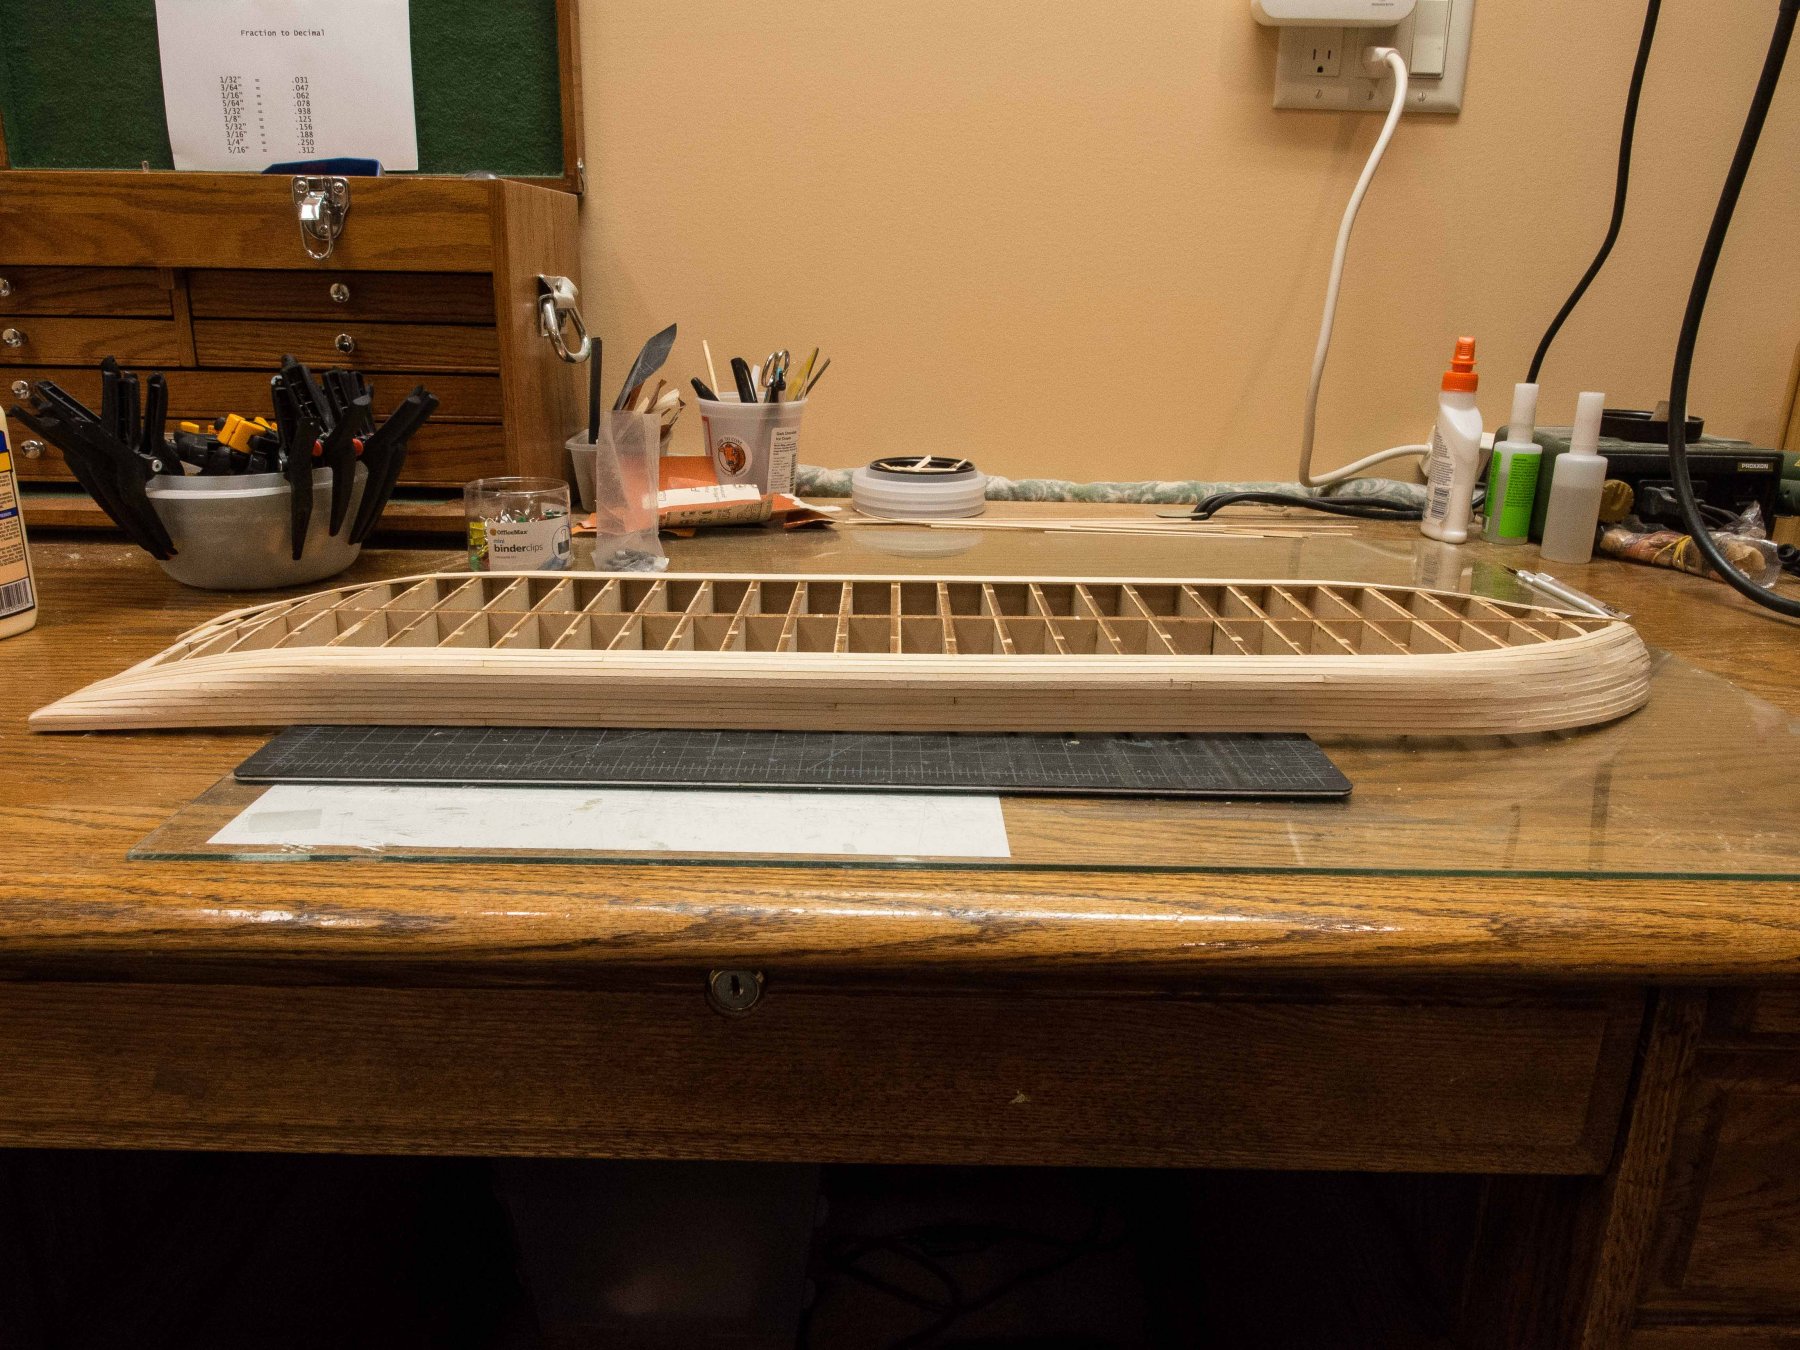
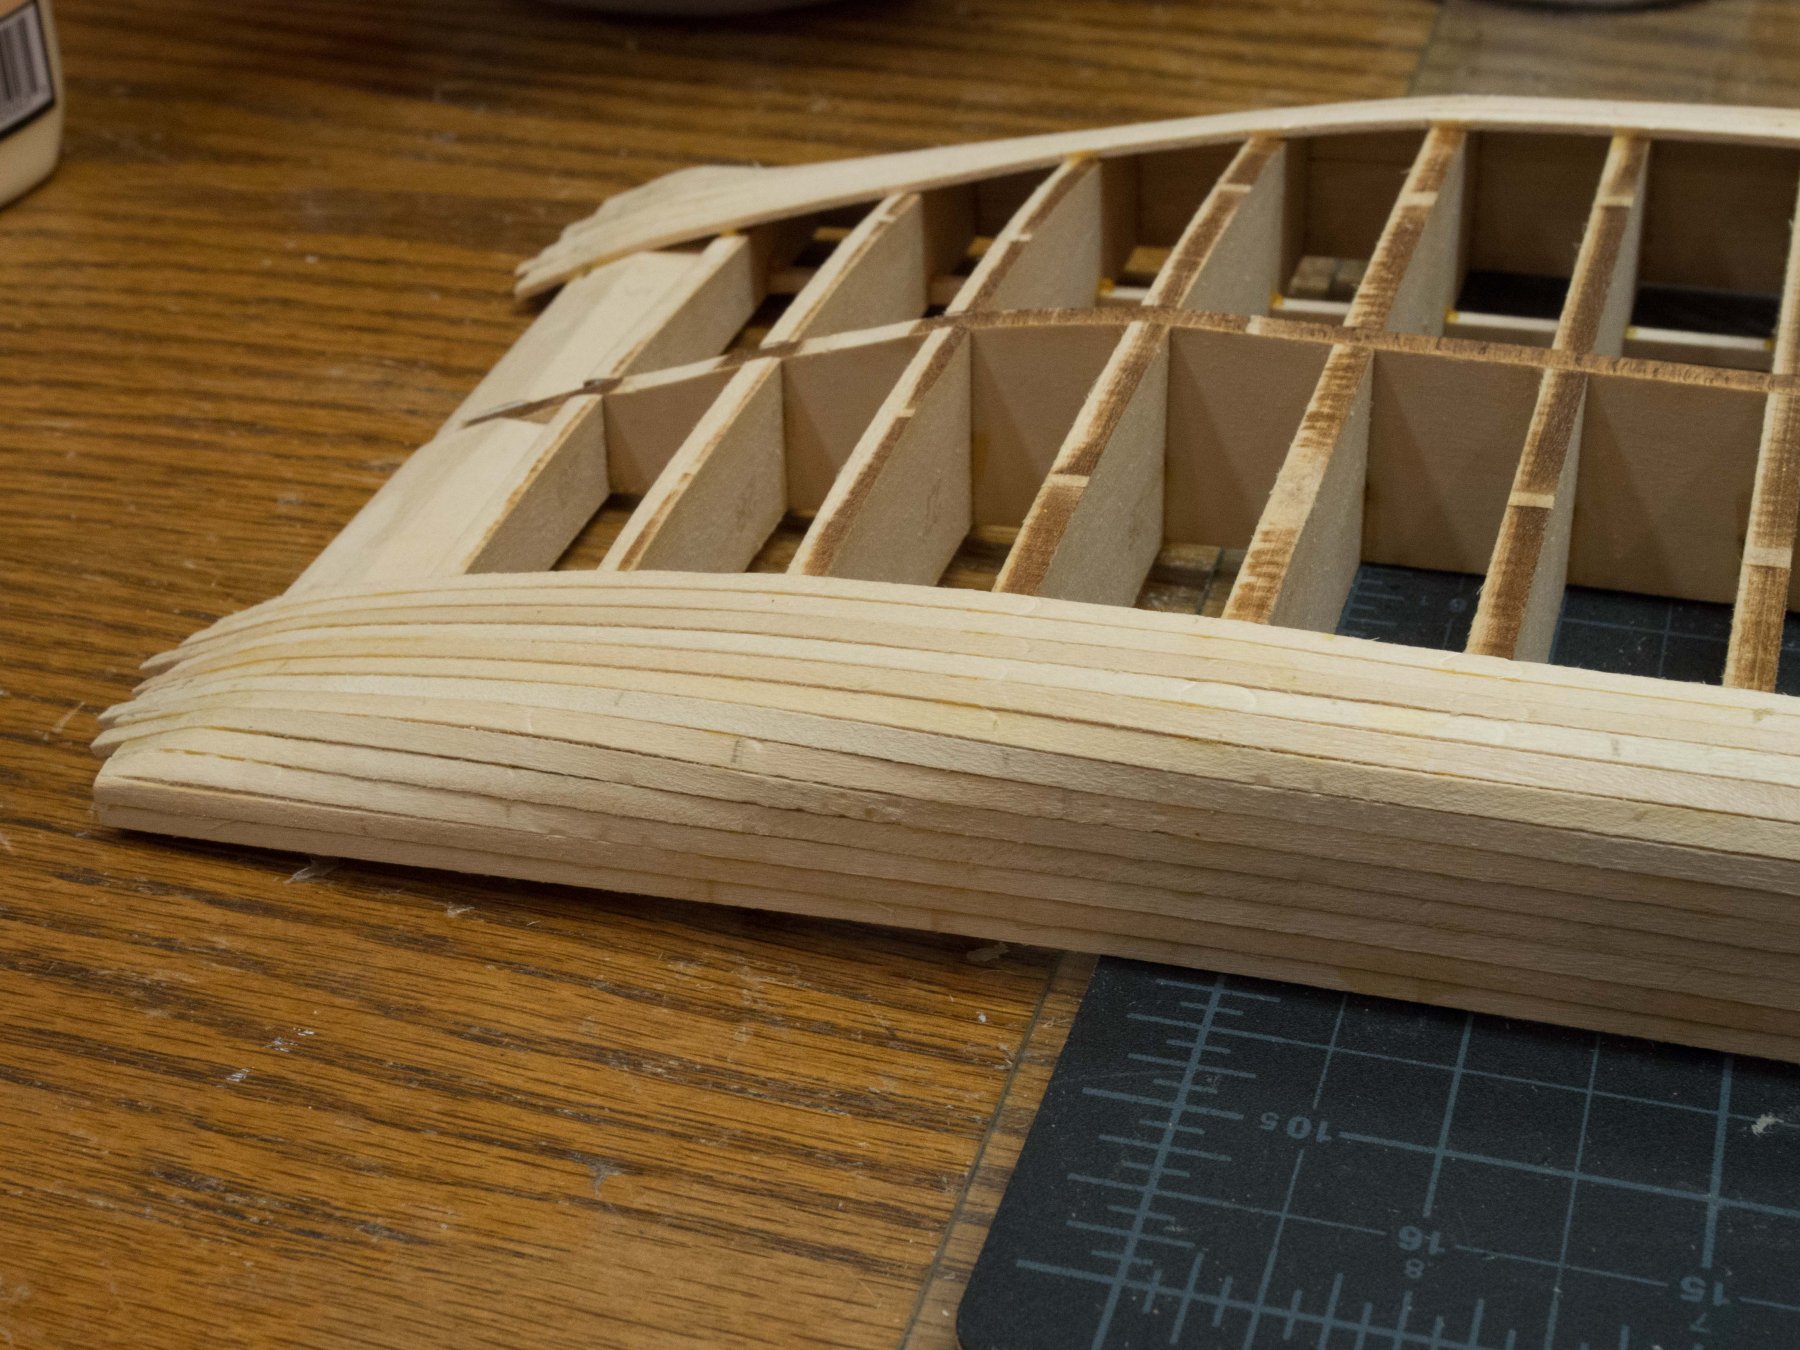
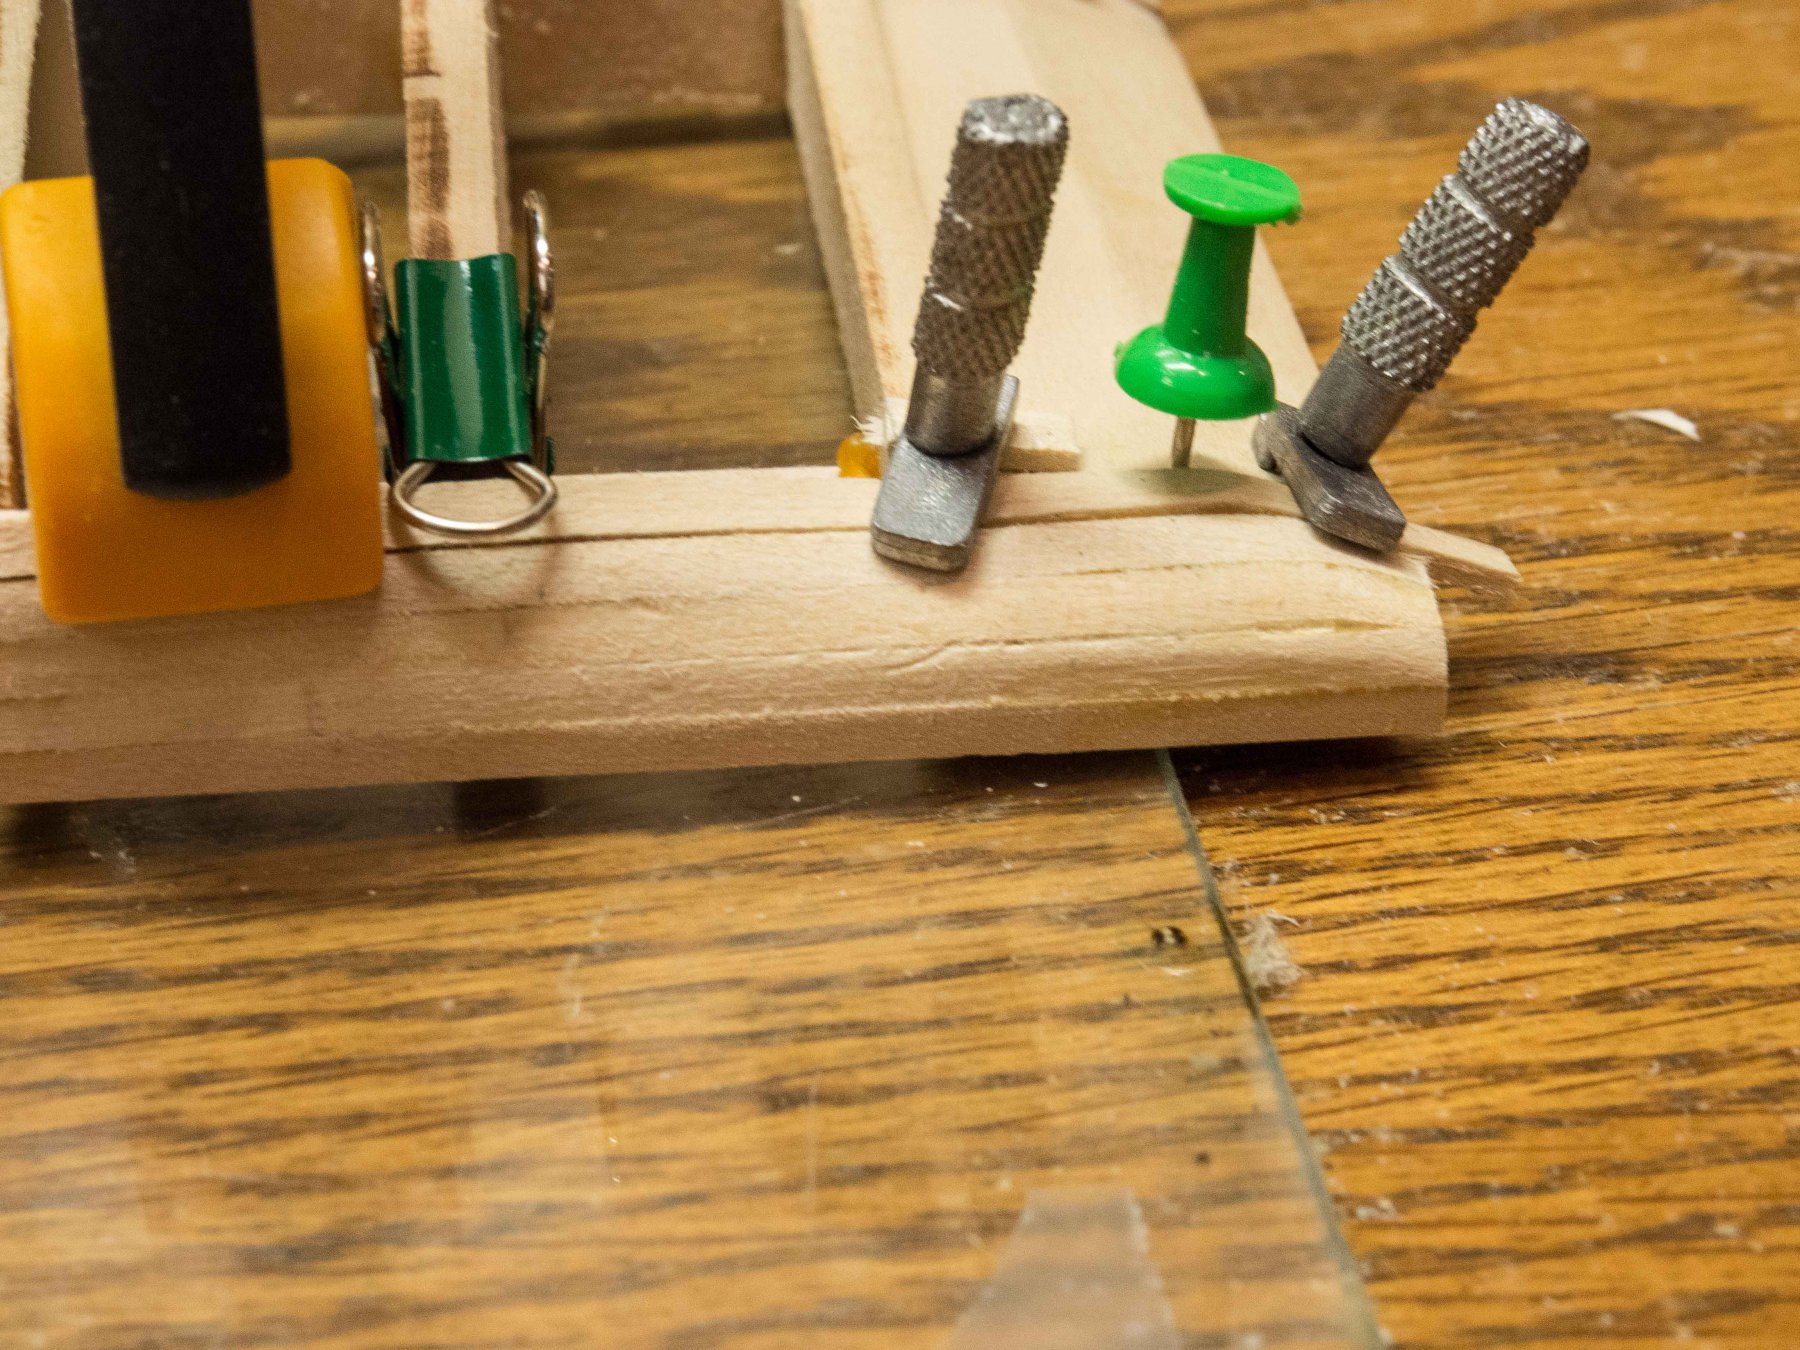
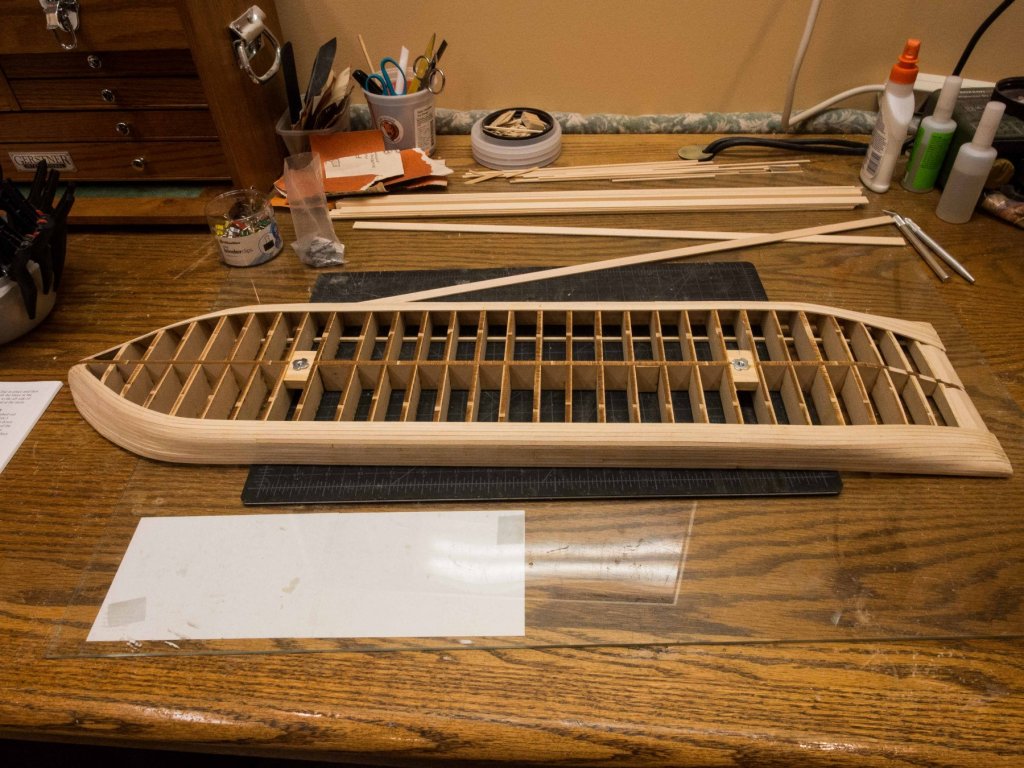
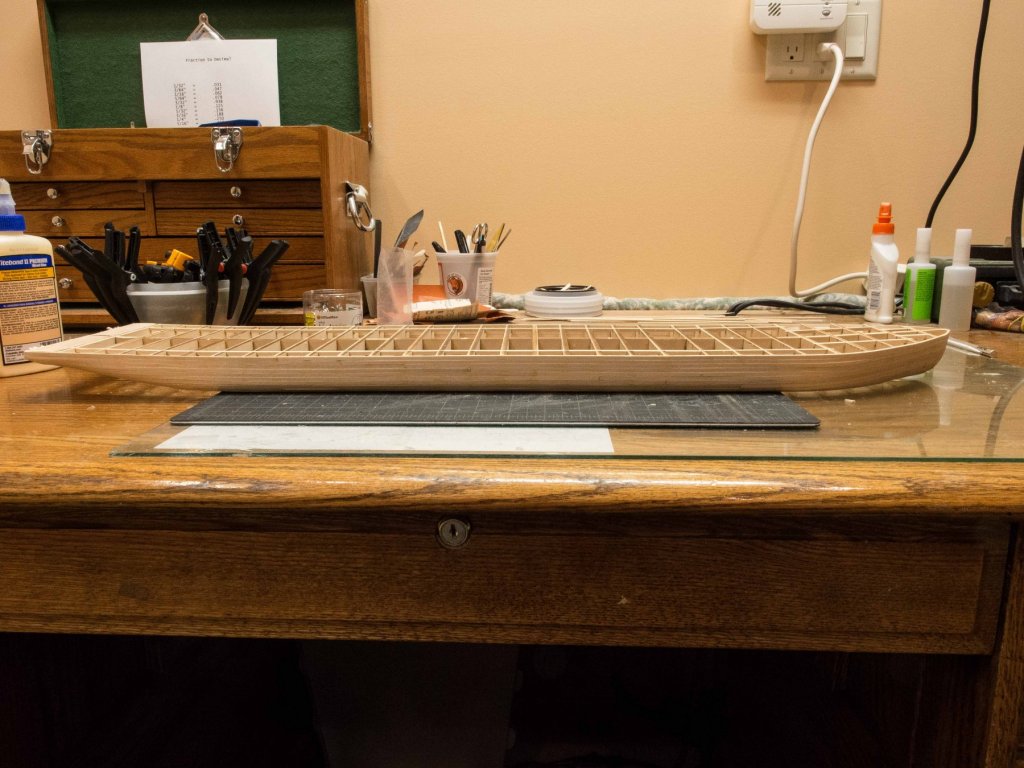
Finished the planking and added t-nuts to the inside to anchor screws to fasten to the base allowing easy removal and remounting. I put a base together, but won't finish it until the hull and first deck is complete and painted. Now I'm making sawdust with first rough sanding completed. Some filler here and there, then progressively finer sanding. Will paint the hull white after adding the keel strip. Researching the best way to add some dirt in the form of a mud stripe. Also, before adding the deck I'll need to decide on whether or not to add lighting. Suggested approaches?


- 76 replies
-
- 10
-
-
- model shipways
- chaperon
- (and 1 more)
-
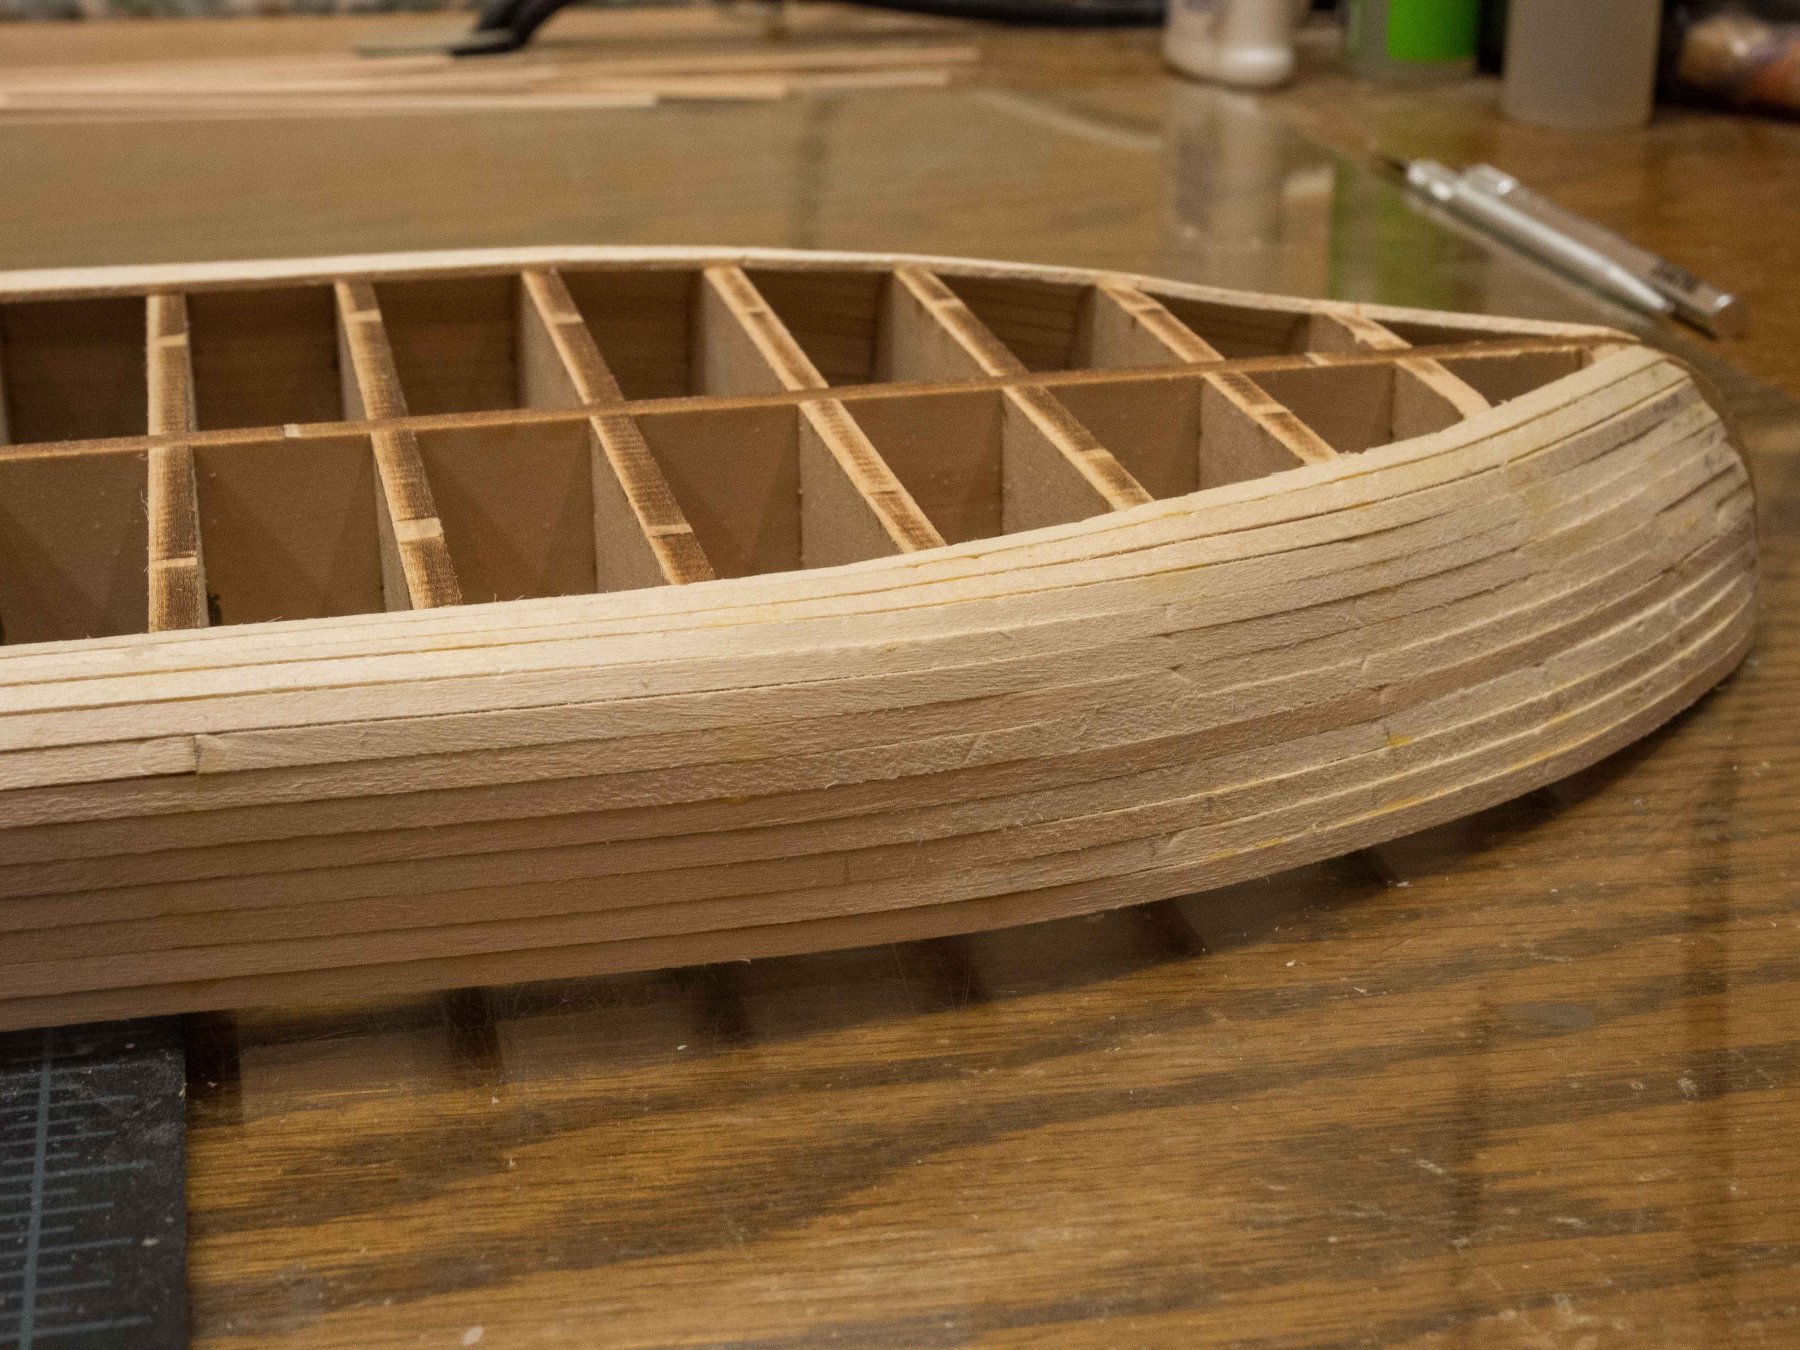
I have added all 13 (P & S) 1/8 inch wide strakes to the Chaperon, which brings me up (or down) to the flat bottom which will be finished with 3/8 inch planks. Here is the planking to date prior to any sanding. Minimal filler will be needed, mainly at the very front of the bow where the planks meet the stem, for clamping related dings, and one short area of slight separation of adjacent planks. The rest should sand smooth. I'm quite pleased with the planking job thus far. Will paint white, but I would like the planking to be subtly visible. Likely will add a "mud line" if I can do it well.


- 76 replies
-
- 6
-
-
- model shipways
- chaperon
- (and 1 more)
-
Thanks and welcome aboard. I plan on some weathering although not as much as your well-used example. Really enjoyed your log!
-
I decided to forgo the boring pictures of gluing the false keel, faring and mounting the bulkheads, etc. The planking is straightforward only in that no tapering is required, but in order to have the (initial 13 1/8x1/16 planks lie flat against the bulkheads, careful beveling and clamping is required (as I learned to my cost in a brief and currently in hiatus build attempt of the English Pinnace, now awaiting a calmer mind and removal of a number of planks). I have fallen back on my original planking method - bevel, soak in hot water for 15-20 minutes, add any significant curves with a bending iron, and carefully clamp until dry. As I am blissfully retired and have a number of "projects" underway, Chaperon gets 2-3 hours per day. I am clamping 2 strakes to dry overnight (P/S), gluing them in the morning, and fashioning another 2 in the afternoon - so 2 planks per day. The picture is just after gluing plank 5. My goal is to have no gaps that require filler. So far, so good. This will be a slow build, so be patient with me.


- 76 replies
-
- 8
-
-
- model shipways
- chaperon
- (and 1 more)
-
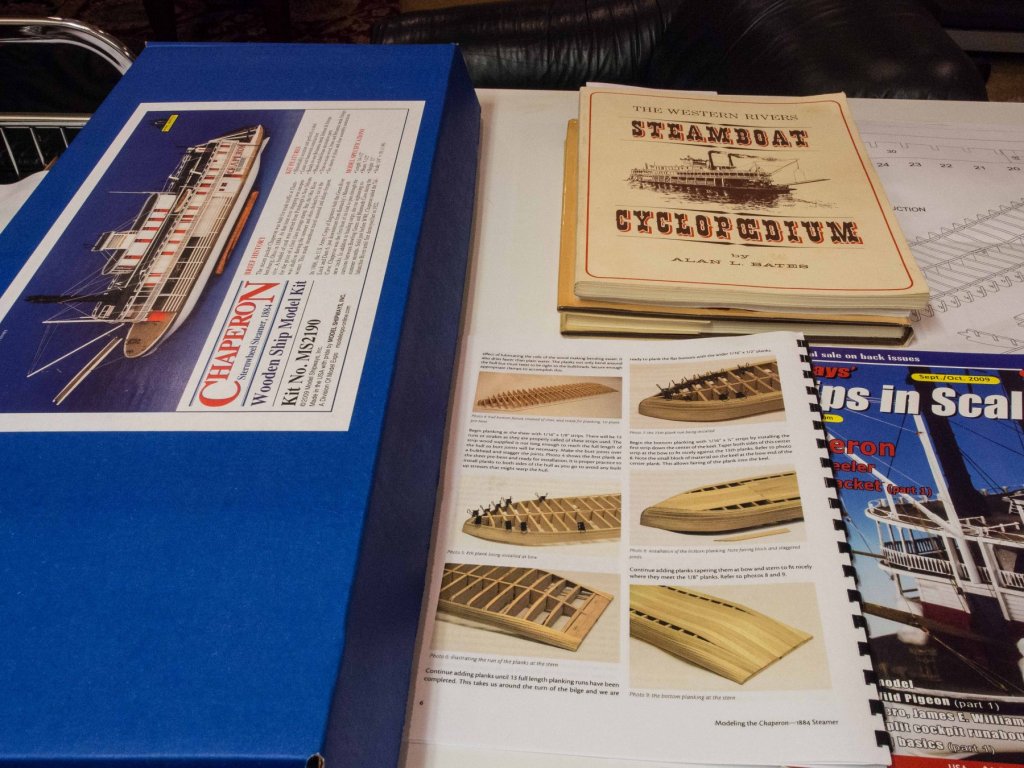
I was planning on a galley next (La Real by Dusek) but got diverted from that diversion by steamboats. Decided to proceed with Chaperon by Model Shipways. In addition to the plans and instruction book, I managed to locate Kurt's 6 part article in Ships in Scale and at least one of the references mentioned which has some fantastic ideas for super-detailing a steamship build - right up my alley!
- 76 replies
-
- 5
-
-
- model shipways
- chaperon
- (and 1 more)
-
I would definitely buy the boeier kit. I have the admiralty model and wood kit on my shelf but the prospect of free cutting all those frame pieces is still intimidating for me and I find other things to do instead. So might well buy the cross section in addition! Bruce
-
Thanks for the kind words I like the idea of fully loading one boat on the "show side" of the model partially lowered. Without a centerboard those boats must have made a lot of leeway in a wind!
- 109 replies
-
- 1
-
-
- model shipways
- kate cory
- (and 1 more)
-
Harpoons and other implements, line tubs, water barrel, etc.. probably not stored in the boats until launching. Suggest ribs, ceiling planks, fore and aft details, oars and mast with furled sail lashed to the seats, detailed seats, rudder in stored and hoisted position will give good level of detail. Wrestled with this on my Morgan build (5 whaleboats!) and was pleased with the result - see link to build below (whaleboats at the end of the log). . Bruce
- 109 replies
-
- 2
-
-
- model shipways
- kate cory
- (and 1 more)
-
Hi Rossi: Really glad to see you doing La Real. This will be my next build, somewhat modified to represent a Maltese Knights of St. John war galley. I’m pulling up a chair to watch and learn. I haven’t opened the box yet as I need to plan the modifications but will extract the plans soon to compare to my "target" vessel. Great to have one to watch. Bruce
-
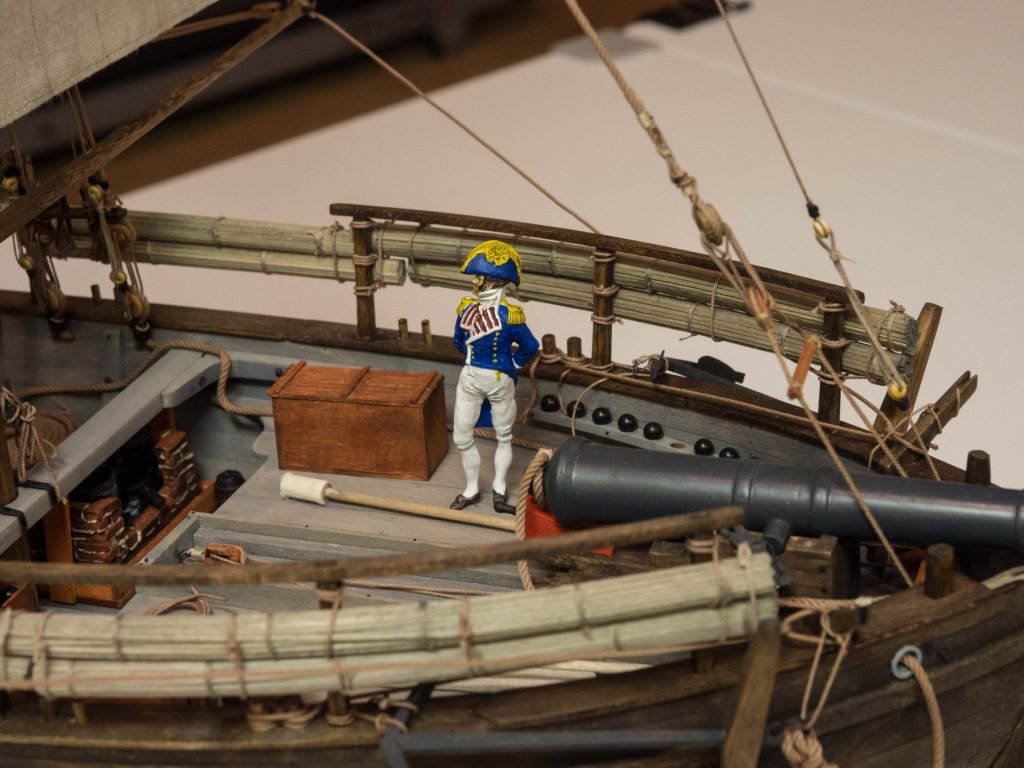
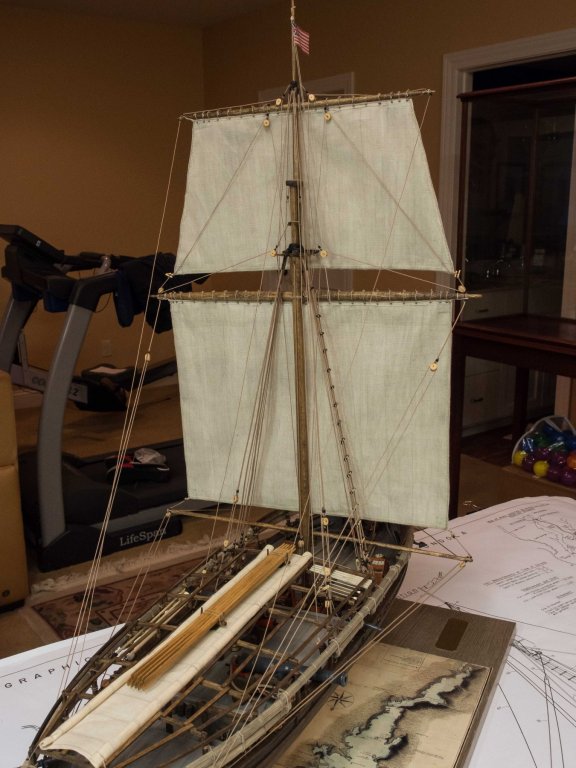
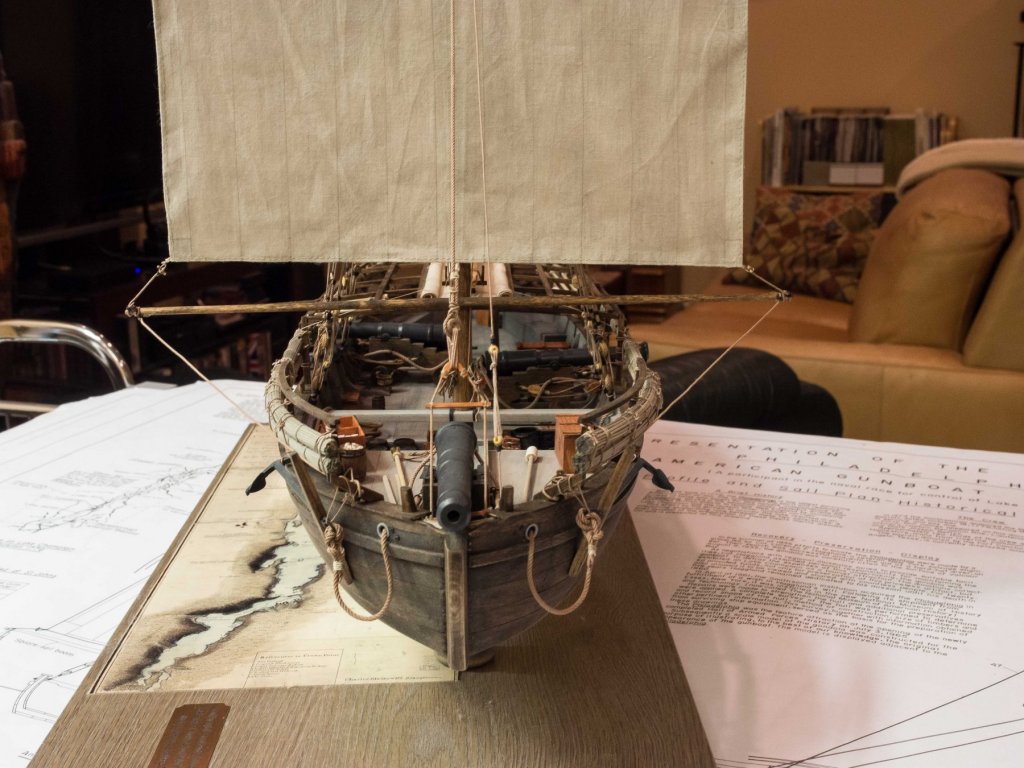
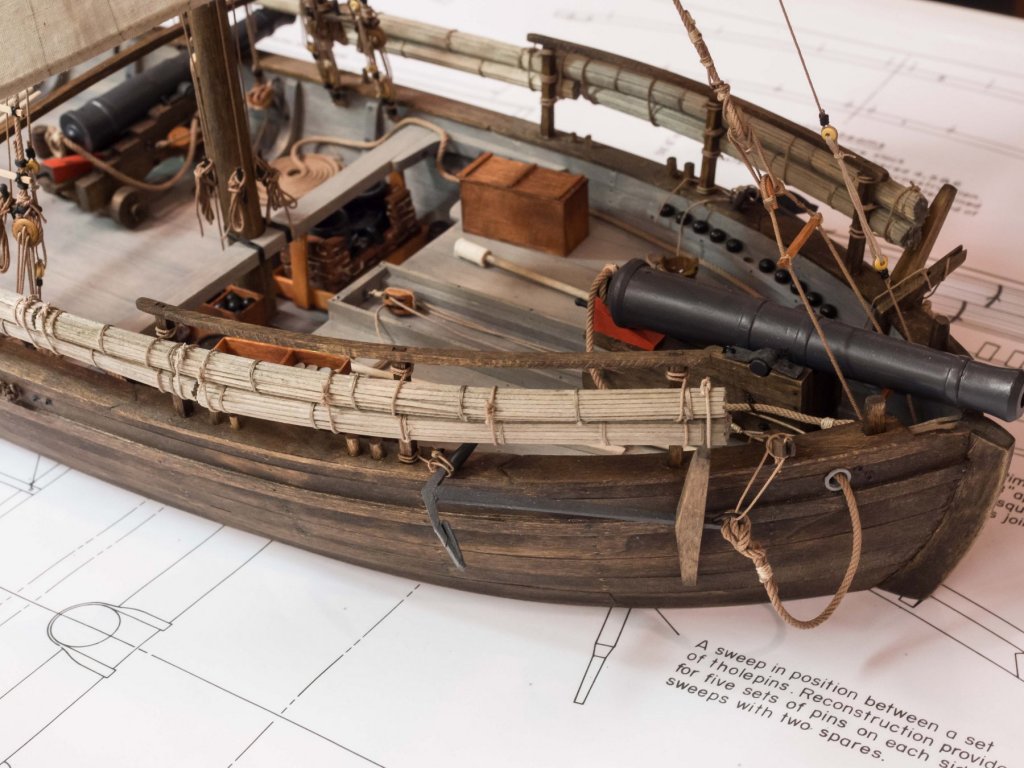
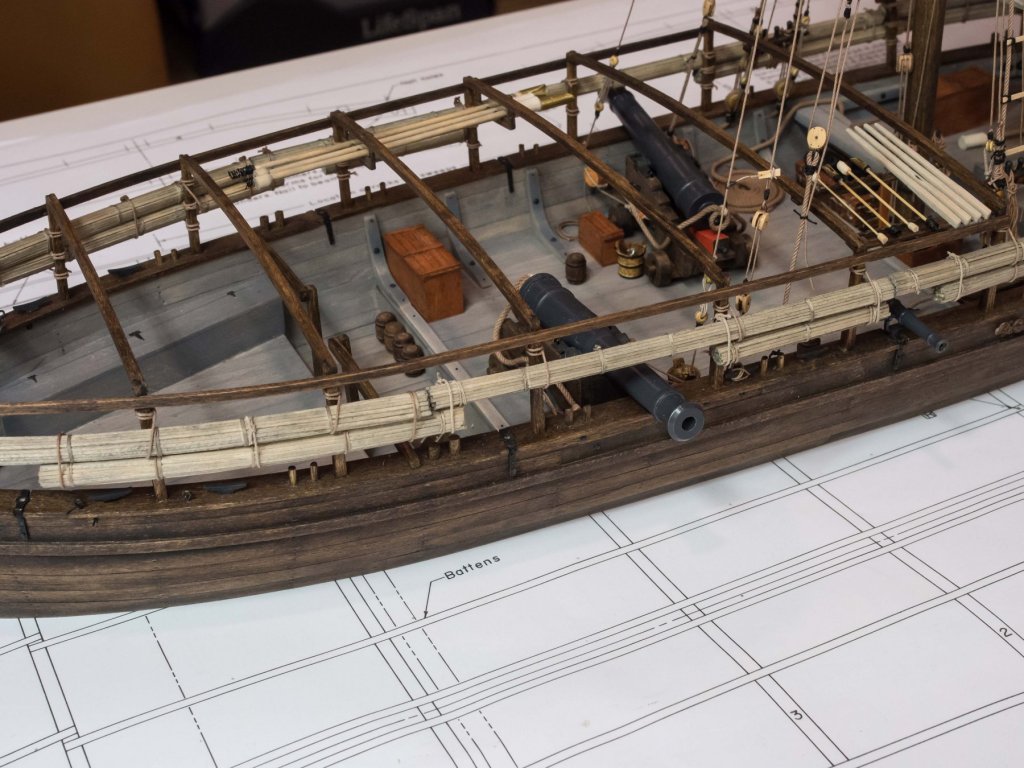
The general is aboard for a final inspection, and declares this build log finished to his satisfaction. (I think he just came from a ball or some other occasion) Thank you for your likes and comments. The shipyard is cleaned up and awaiting next year's project. Happy Holidays to all.
- 67 replies
-
- 9
-
-
- philadelphia
- model shipways
- (and 1 more)
-
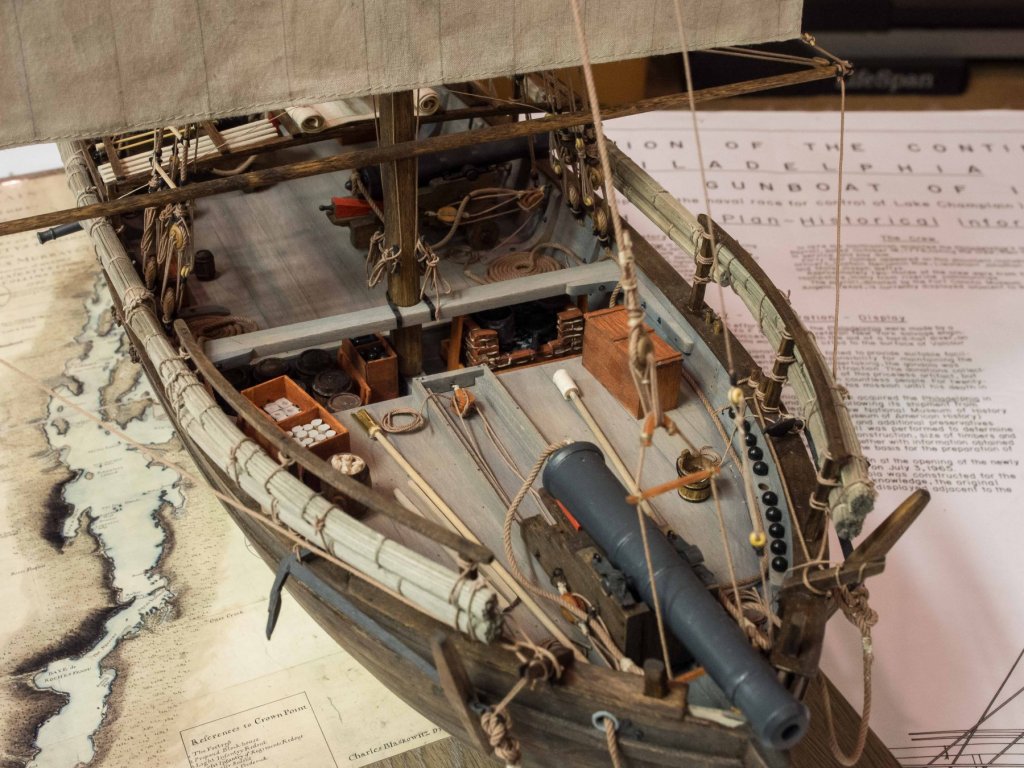
Thanks all. I'm painting a figure meant to represent General Arnold inspecting the ship. If it's acceptable I'll add it; if not I won't. Figure painting is not my forte. The uniform isn't quite right but I can live with that. Elijah: the knee doesn't matter to me, water under the bridge. I had already decided I'm not enough of a stickler to rip it out. This was a fun build. I like this scale. I had previously done Picket Boat 1 also designed by same designer.
- 67 replies
-
- 3
-
-
- philadelphia
- model shipways
- (and 1 more)
-
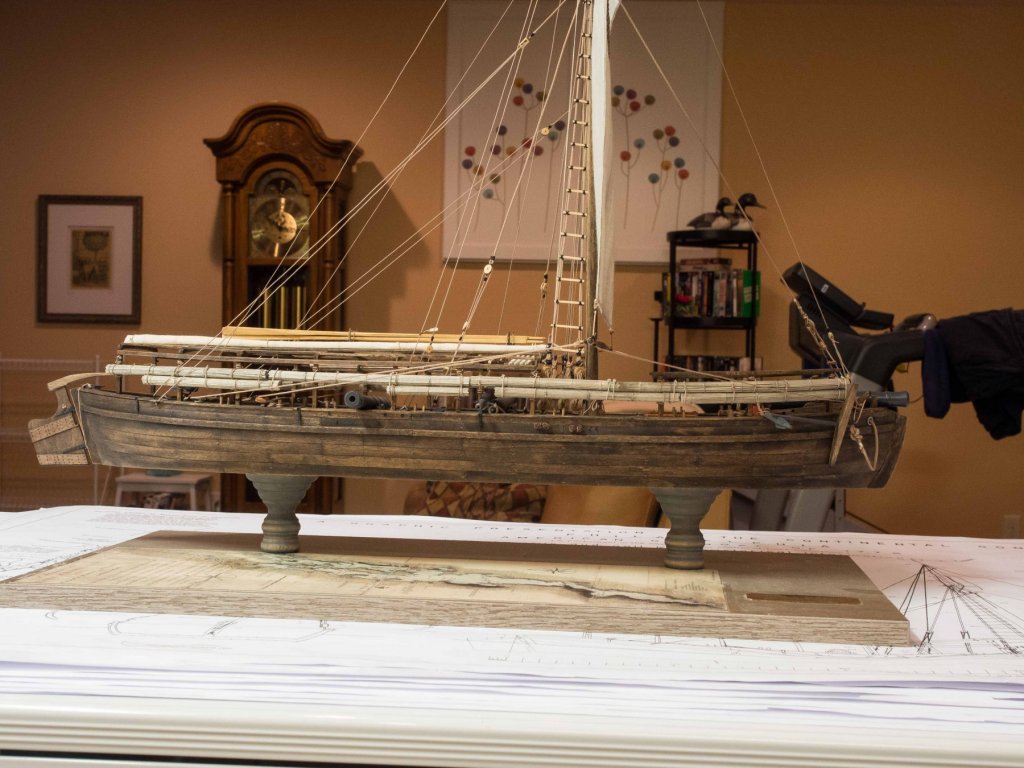
Chuck: just in time for me to bow out of this topic .... I think I'm done. Going to spend a couple of days just looking to make certain I'm happy with everything (everything that's modifiable at this point anyway) before she goes in the case and into the living room, and I officially mark this topic Finished. My wife has been gone for 3 weeks helping a daughter with a newborn halfway across the country so I've been working on this more than planned and finished "early". I appreciate the followers and likes and hope this "something different" build was enjoyable to watch. I'll take a break from the shipyard for a bit and work on some other things before beginning the Renaissance War Galley I just received from Daniel Dusek. Here's a final set of pictures.

- 67 replies
-
- 14
-
-
- philadelphia
- model shipways
- (and 1 more)
-
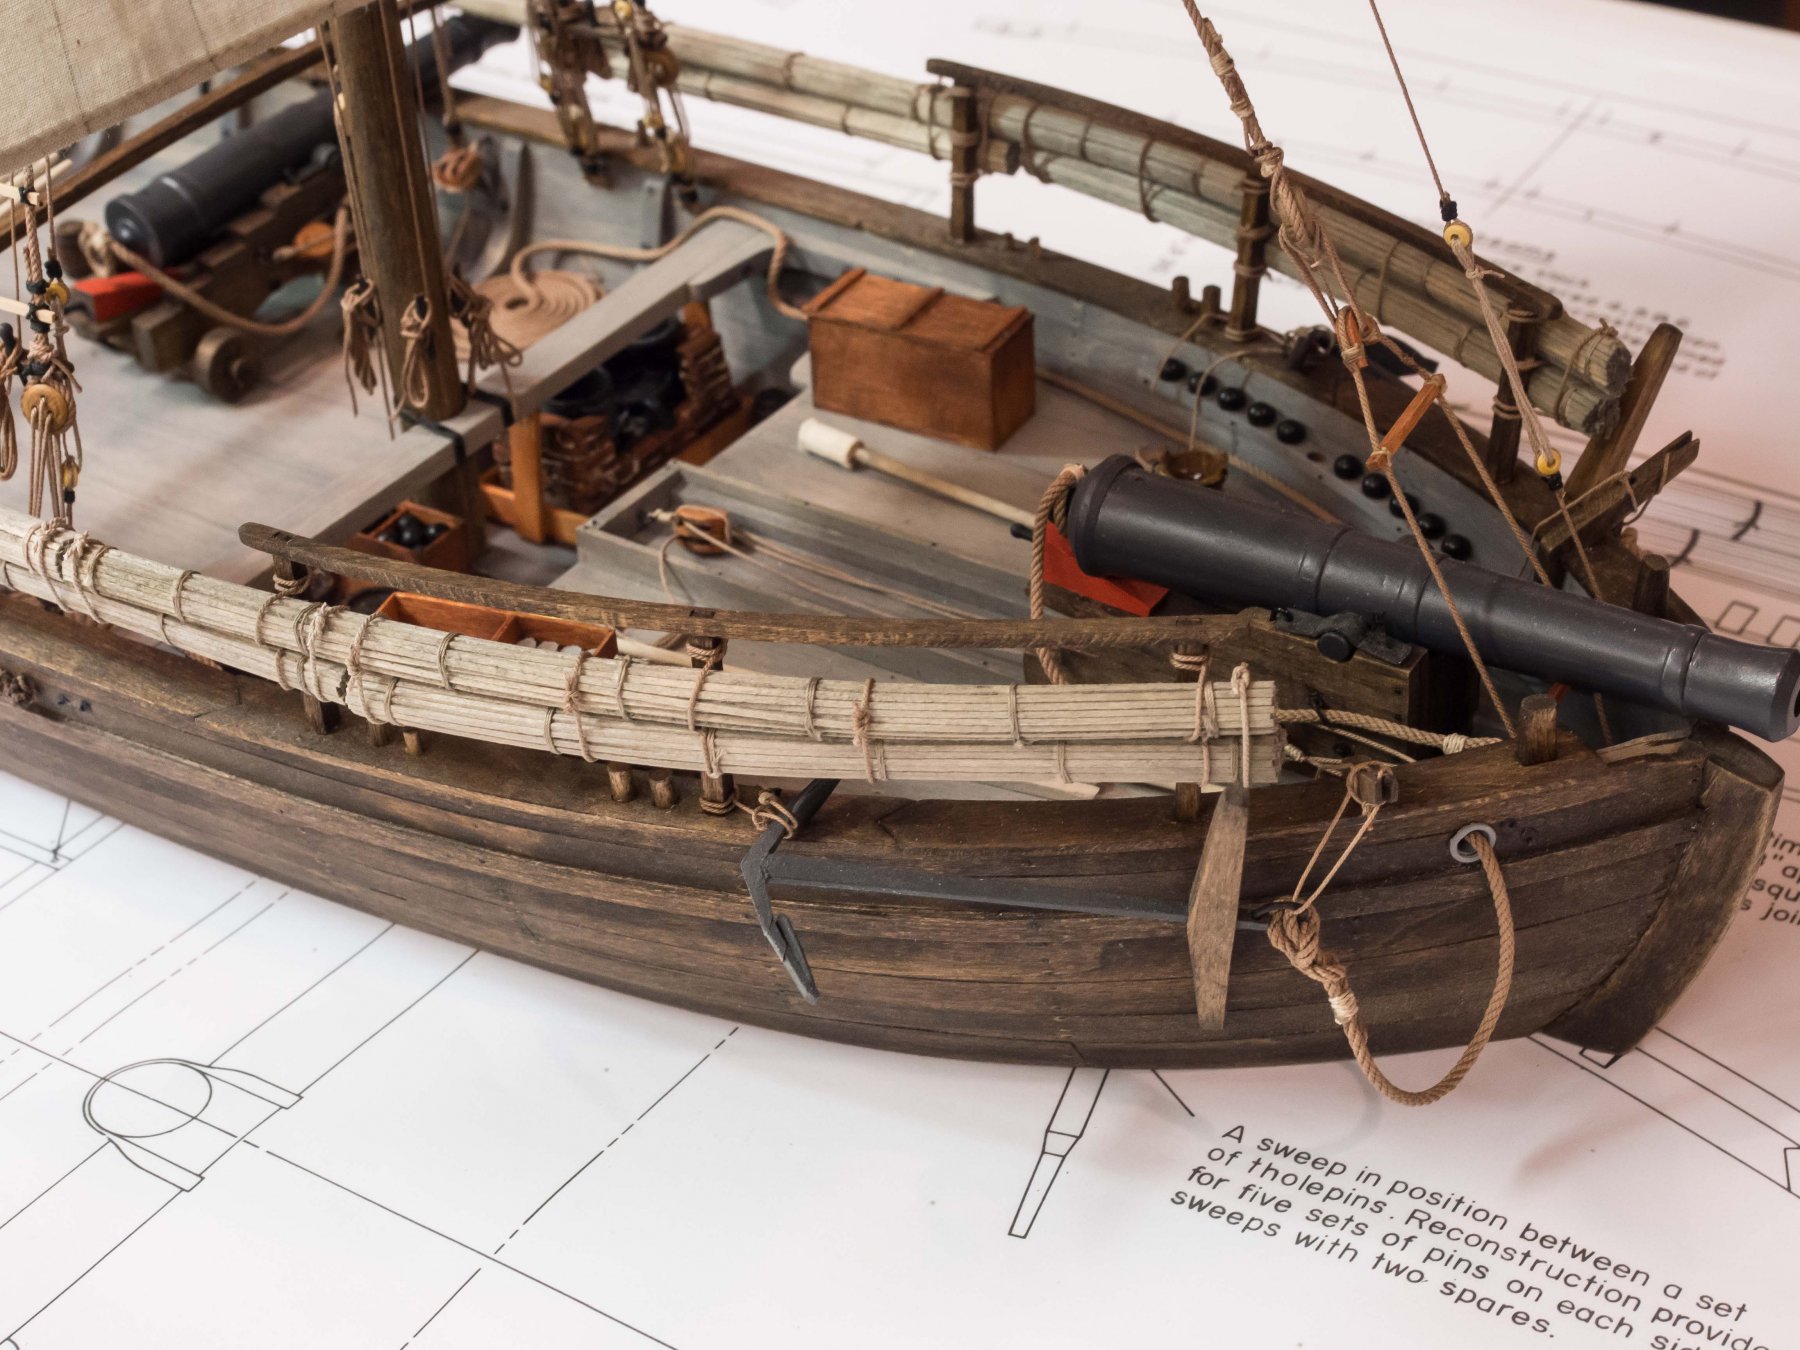
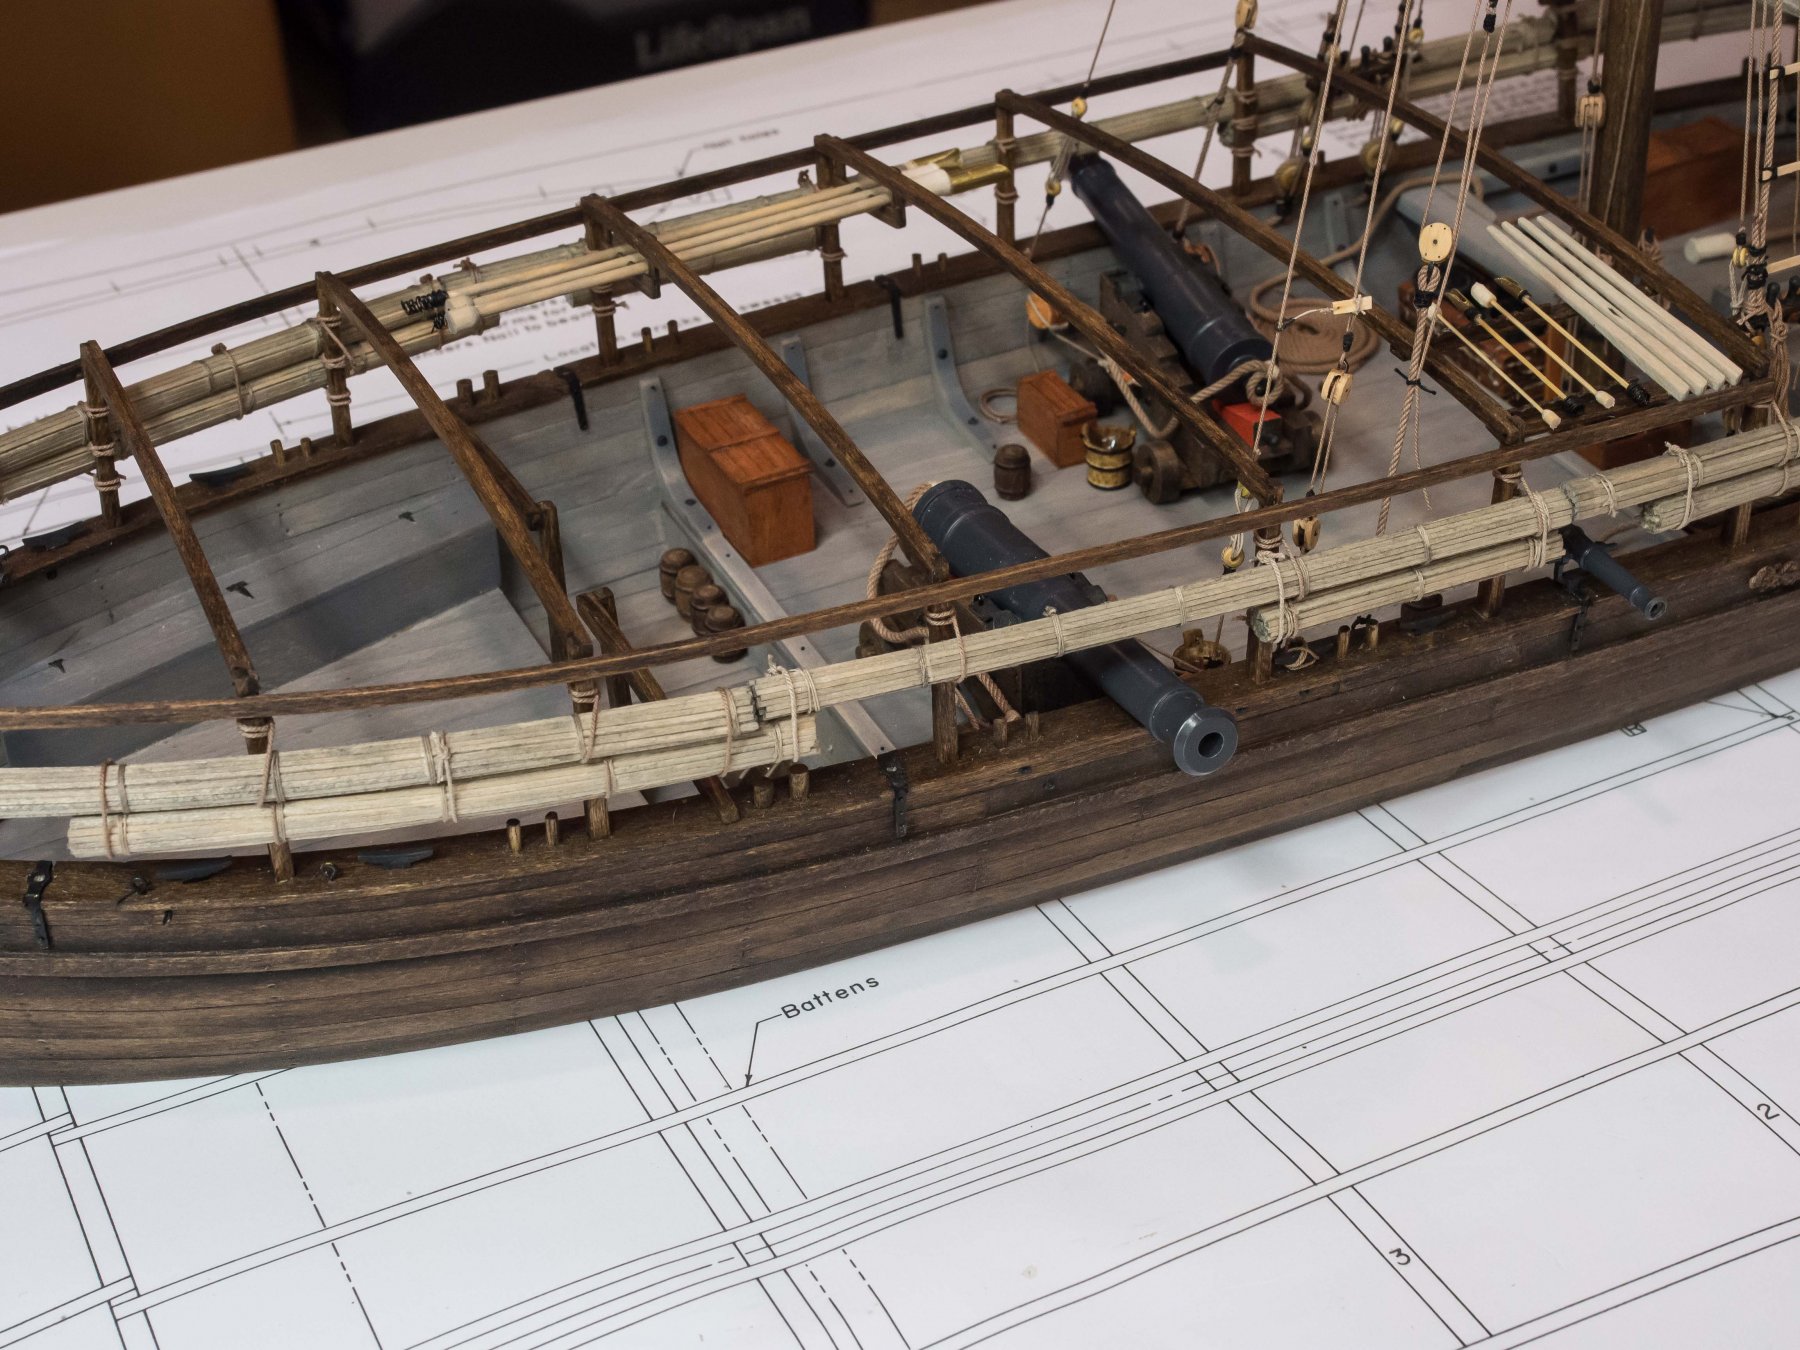
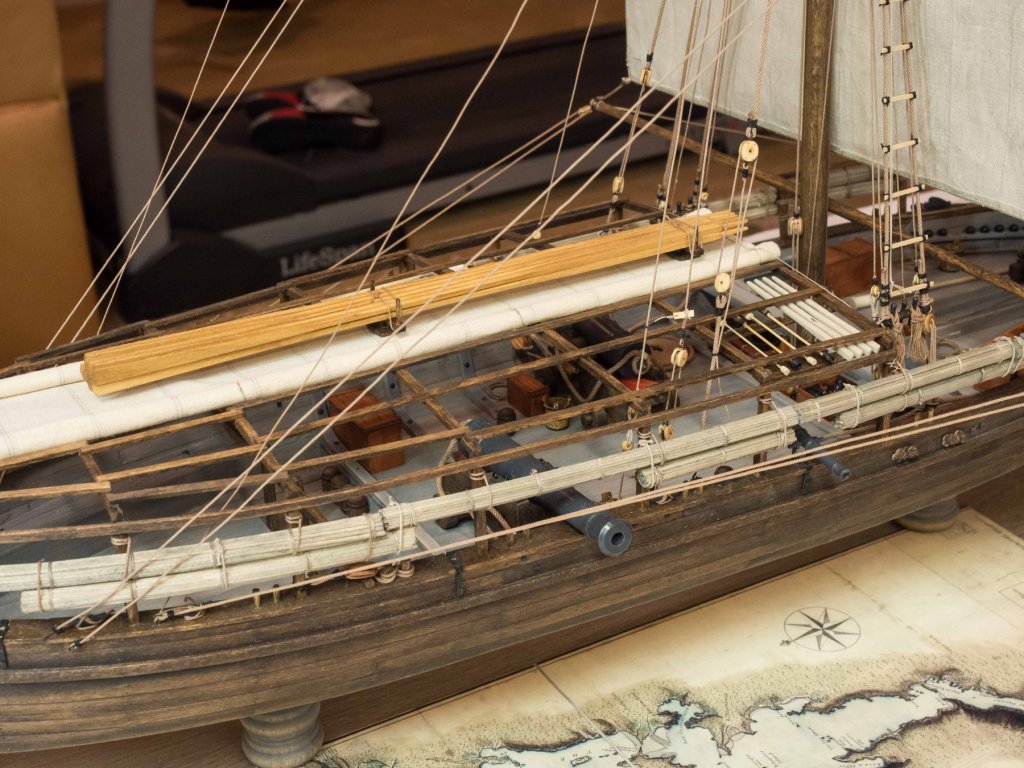
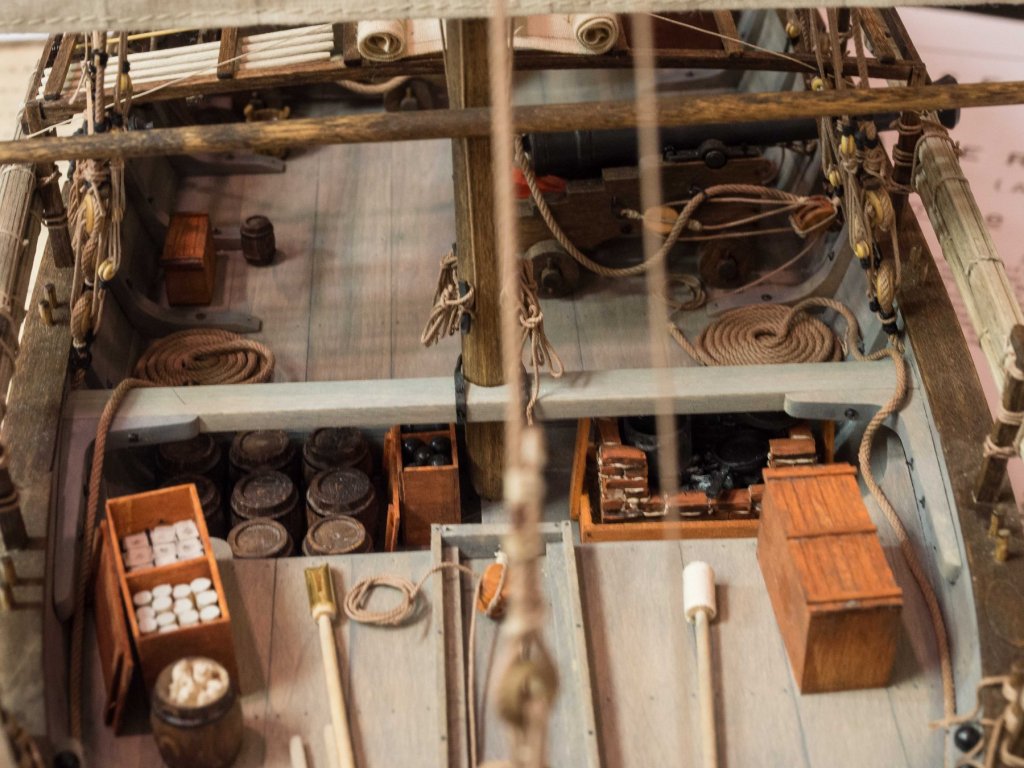
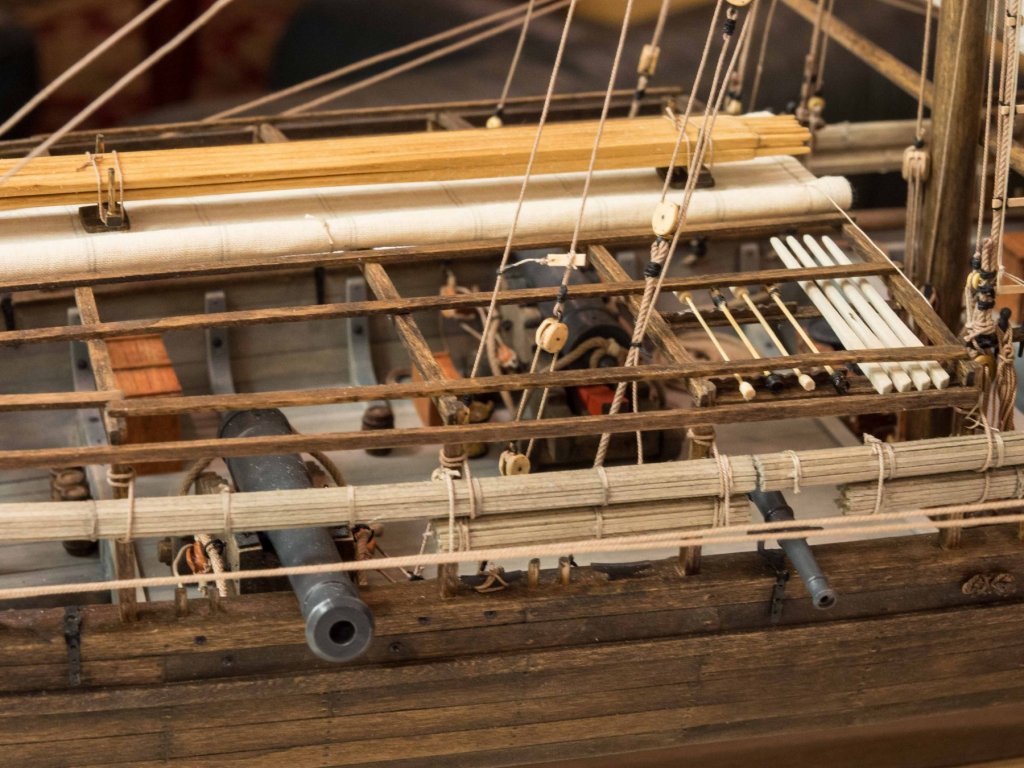
Fascines (ad hoc additional protection for the crew) done and tied in place. A big step which took 3 days of work. When all was said and done I used the 1/32 square strips without rounding each one (of 160) off with a drawplate. The difference in appearance was minimal and I had just enough strips (each fascine contains 40) so breakage would have been problematic. Aged them with Micro Mark "Weather-It". Tomorrow the top battens for the canopy frame go on.
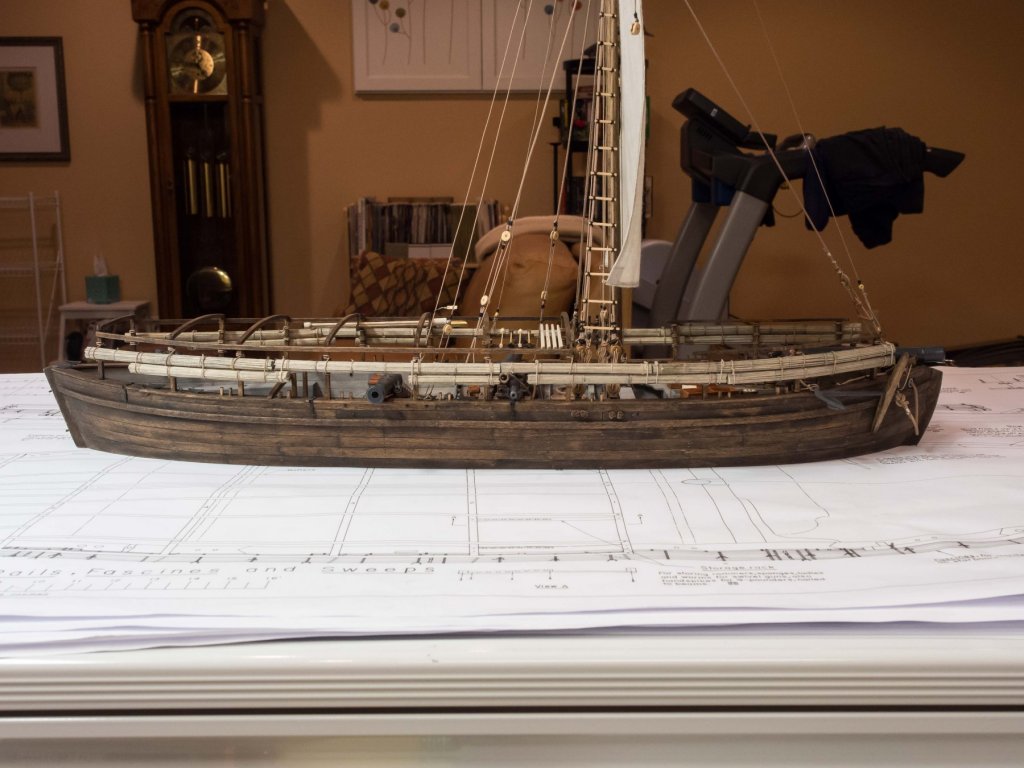
- 67 replies
-
- 7
-
-
- philadelphia
- model shipways
- (and 1 more)
-
Since I'm approaching the end of this build, I've begun arranging the next. Confederacy and Granado still on the shelf, but my head was turned after a trip to Malta. I've read a lot about "The Grand Siege" in the 16th century and decided I wanted to build a war galley as sailed by the Knights of St. John of Malta. I've ordered Daniel Dusek's model of La Real and will modify it accordingly. I found some plan views and illustrations online to help. As best I can tell at this point some changes to the fore and aft superstructure (and a change of flags) should do the trick to a reasonable if not totally accurate degree. That will be a long and complicated build. Looking forward to the kit's arrival to check it out.
- 67 replies
-
- 1
-
-
- philadelphia
- model shipways
- (and 1 more)
-
Kurt Thanks for your comments. Your articles were invaluable to me in this build. No more to say than that. Sam's model is an inspiration - his craftsmanship is a cut above mine, but (waxing philosophical) there are always those a bit or more than a bit better than one at any endeavor, and so my goal is for each successive build (this is my fourth) to be better and cleaner with fewer boo-boos and more eye candy detail. I'm pleased with this build and suspect it will be done within the next couple of weeks if my plans for the fascines work out. One comment on your article: you noted the failure of blackening solution for the guns. I suspect you know by now that britannia metal (and pewter) can't be blackened with that stuff. The only thing I've found is a pewter/britannia blackener from BlueJacket. But frankly, the airbrushing worked so well on the cannons that I prefer that.
- 67 replies
-
- 1
-
-
- philadelphia
- model shipways
- (and 1 more)