


aliluke
-
Posts
1,320 -
Joined
-
Last visited
Content Type
Profiles
Forums
Gallery
Events
Posts posted by aliluke
-
-
I definitely would not glue the hatches down before planking the deck. It would make cleaning up the deck after planking very difficult. I did the deck planking before even making the hatches and then made them fractionally over sized allowing a light sanding of the coamings to lead to a very tight fit.
- Landlubber Mike and Martin W
-
 2
2
-
Mike
You sure are taking this to another level! I just used boxwood for the frames and the kit supplied gratings. Both served me well but I sense your mission is more intense. I'm looking forward to the results. I can't argue for one stain or another - that is balancing act for your vision of the completed model.
- Martin W, mtaylor and Landlubber Mike
-
3
-
Like your haul from Reno - amazing. And nice to see a pass it forward from that.
Your planking looks just fine to me. Nothing to die in a ditch about at all. Remember there are sanders and fillers to come followed by another layer. A good line with that first planking is to use it as practice for the second layer but not lose any real sleep over it. I swear it is already much better laid than mine was at the same stage. Carry on, stay calm and enjoy.
-
Hey Jesse
Well fixed. I smacked the stern of my Fly against the wall the other day. Fortunately only paint came off. You just forget sometimes and do in a second what takes hours to fix. We all belong to this club!
-
Hi Jay
Tried to send you a PM but it says you can't receive any new messages - message box too full?. Just wanted to catch-up so thought I'd indicate this here. Sending you a "Like" to signal.
-
Wish that gentleman well! Tell him someone from New Zealand said that and that they have been to Reno (many years ago)..
Great work too by the way.
-
Big time! Now we can give you a really hard time about your work
 . Brian thsi should be pinned somewhere.
 -
Hi Bob
I use Photoshop to resize my images, I also use it to saturate the images until they are more like the real colours that I see. Generally they are at 4000 x whatever and click in at 2.5 MB. By resizing them down to 1900 x whatever I just get under the limit and produce big images on the forum. Photoshop is expensive but I have it for other uses. There are other free programmes that perform the same function - Google away!
I'm often frustrated by how small some images are here. I want to zoom in. At the same time my images give me moments where - "Hey that can't be seen by the naked eye!"
-
-
Hi Mike - I won't start a conversation with B.E in your log but he is your (our) man for better information and understanding than I have! I'm also going to show the bridle port closed. It is meant to be narrower than the other ports but the kit pattern makes it the same. I haven't made it narrower - a ship spotter will notice...but what the hell.
As B.E says, photograph what you can't see later, 'tis the only proof of your efforts
 .
.Spyglass's advice is very good but from what I've seen of your previous work you'll be on to that any way.
-
I can only wish you luck Mike. The curvature of the planks will disappear under the upper decks. I curved the forecastle and quarter deck planks with variable success - these at least can be seen. Curving them and then losing sight of them sees a bit mad...but it is your groove to follow. There is a whole discussion here - making things that can't be seen later.
The bulkheads were break-out pieces. So if the bulkhead is in place the guns would be run-in and the ports closed. If you leave the bulkheads out then add the cants on the deck, it is a nice little detail but I reckon the cannon should be run-out in that configuration. I left off the aft most cannons and put in a bulkhead forward of this post to justify that. Why? I didn't want to rig more cannons than I could get in packs of 4. So doing 16 cannons was a good idea rather than rigging 18 and paying for 20! Cheap...yep but I bet the commanders of these ships thought the same way. Also making a closed port lid is an interesting little model challenge...Conclusion - if the bulkhead is in place the cannon fore or aft of that, under the upper decks, would be stowed and the lid closed. If you like bulkheads or cannons becomes the question. I don't think you can have both.
- Martin W and Landlubber Mike
-
2
-
Sharp as mate. With this foundation yours is going to be a great AVS! Sleep well and keep it coming.
-
Echo the above Nils. Fantastic work. But please promise not to add more detail to that sailor on the seat of ease
 .
. -
-
Hi Ryland
This is a part of the forum that I've never really looked at. Now I'm here I've found your log of your stunning longboat. A fascinating project and beautifully rendered by you - no surprise there! I'll keep following.
-
Hi Hamilton
I'm bemused that no one seems to want to try my technique! Not only easy but effective.
Since I finished it I gave the copper at least 5 coats of Testors Dullcote and no further aging has occurred. I would guess that a sealing coat will slow aging as it will stop oxygen getting at the copper. But that is a guess.
Any way your coppering looks very fine.
-
Looking really sharp to me Brian. You are in total control as far as I can see. Remember to drill the upper counter for the rudder - easier done earlier than later.
So many makers of this kit talk about snapping the bulkhead extensions - it was never an issue for me...I'm now thanking luck for that.
-
Looks great Rusty.
Although spilling maybe an OMG moment I'm sure it still takes a lot of skill. It is certainly a skill that I wish to attain on my next build!
-
-
Yep time for bed! I think you are whacking yourself around the head too much. More annoying things are coming - sleep on them and no one will notice...I sanded right through the deck at one stage and then had to rip it up and replace that section. Why? Because a huge moth landed in my just painted varnish! I was so annoyed I sanded the thing right through to the ply. Shoud have slept on it!!
Your work is looking really good. Way better than mine at the same stage. Rock on and roll with the punches - she'll sort herself out, believe me.
- smokepole and themadchemist
-
2
-
-
Looks great Hamilton - very precise and crisp and great lines.
I'm going to pick you up on one thing though...are those central gratings fixed down? If they are the aft one has the upper comb running fore/aft which is correct but the forward one has the upper comb running starboard/port which is incorrect. Correct or incorrect they should at least be the same. Probably teaching you to suck eggs but that is what we are here for
. -
Hi
Brian asked me to send him a photo of the finished stern of my AVS. I was never very happy with this aspect of the model and we had a little saga with P.M's about it. Oh well, here is my stern...if it helps Brian or others to do a better job of it I'd be happy!
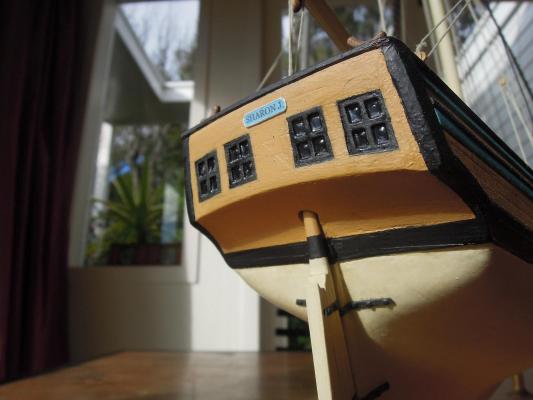
- themadchemist, GuntherMT, riverboat and 1 other
-
4
-
Brian - It is difficult little piece - go for it. It looks fine to me.
I'll delete my two pictures of my AVS stern from your log as I think your log should be clean of other photos. Might re-post them in my own log.

Armed Virginia Sloop by GuntherMT - FINISHED - Model Shipways - scale 1:48
in - Kit build logs for subjects built from 1751 - 1800
Posted
You're hard on yourself Brian. Looks really good to me. I took the painted hull route as I liked it better (and still do) so I guess I had more scope for planking gaffes. I did have stealers at the stern but think I got through to the bow without joggling. Any way a few layers of paint sorted everything out!!! If you are going for a natural finish it is a bit more of challenge but you seem to perfectly positioned to be up for it.