


aliluke
-
Posts
1,320 -
Joined
-
Last visited
Content Type
Profiles
Forums
Gallery
Events
Posts posted by aliluke
-
-
I'd vote for A as well - more by intuition than knowledge. I would have thought the lashing would only go between the eyes and not over the bowsprit (I can't even figure how that would work). Intuition again though but that is how I did it on my AVS.
Cheers
Alistair
-
Look forward to this Ron. It is great ship but a challenge to plank from what I've seen here. From your work to date I'm sure that won't be a problem for you though. I see from the box the scale is 1:54 - that seems an unusual scale. Do you have the AOTS book for Endeavour? Well worth it I'd suggest and easy to get.
Cheers
Alistair
-
Your progress is great Dave and the base board jig is a very cool.
For the mounting pedestals there is a simpler way...
- Recess the raised base of the pedestal into the mounting board and epoxy glue it in there. I got a wood joiner to do the recess in the base for me. The flare at the base of the pedestal ends up flush with the base board but you could set it higher.
- The recessed pedestal when epoxy glued in place on the base is very rigid - immovable.
- Epoxy glue the keel into the pedestal and then, when it is dry, reinforce the connection with a wood screw or just a nail (I used a nail with some more epoxy for luck).
Your ship can never, ever be removed from the base after this but it saves a whole lot of fussing around early on and it is extremely rigid. It also means you don't have to predict mounting positions. Plus I think the recessed pedestal is more elegant than a placed pedestal.
I lost all of my pictures of this method but here is one from my AVS log. You can see that the pedestal is recessed into the base board.
I'm looking forward to your future work on Granado - I'm tossing up whether this will be my next ship model but that is years away!
Cheers
Alistair
-
Looks really good Ken. A trick for aligning the nails is to lay masking tape across the deck (port/starboard)along the beam lines/nailing lines and use an awl or pin to make a pilot hole before drilling. Dirk showed this to me at about the same time that I figured it out for myself - see my Fly log. Once you get going with the method and trust it, it is very quick. I keep my treenail drill bit in a special place, stuck to the wall with masking tape, so that I always get the same size hole.
I look forward to seeing the results when it is all drilled, filled and cleaned up.
Cheers
Alistair
-
Hi
You have obviously had some struggles with the hull but your deck work and fittings look good. If I was you I'd look to paint the hull between the waterline and the wale, there are plenty of examples here of that. I'd also re-fill and re-paint the hull below the waterline. I'd focus all my attention on getting those two bits right and the let the rest be as easy as it can be. To me the lower hull is letting the model down and it is very fixable. Everything above the wale looks great.
Hope that doesn't sound too harsh, it is just an opinion and with so much more work to go, a hull you feel bad about at the finish will irritate you.
I'm not sure how you are gluing your planks. I use CA for the second planking but apply it in small increments. I glue down each plank at its most stressed points - bow/stern - in very small measures - maybe 5 to 10mm glued length. Then I work away from the stressed points in longer glued lengths but always in increments. There is no way to work a plank with CA along its full length by a continuous strip of glue. It also useful to bevel the plank to the one above or below it. This makes for a tighter joint. Another method is to cut the planks into shorter lengths and butt those together - I'm just learning this. Anyway these are thoughts for your next model. In planking techniques Greg has recently posted a good guide on his Vanguard - worth reading.
Your Granado looks good and I look forward to your progress - your upper works look great and I think your model will pan out well when all the other detail is added.
Cheers
Alistair
-
-
Hi Jason
Beautiful work - very crisp, clean and precise. Nice to see hand tools can do this - inspires me to keep my credit card away from milling machines and the like.
Base of mast - round in my opinion. Have had a look at some of the great models and all are round (this includes the models in the FFM series which are hard to dispute). The mast was chocked, as you say, and then clad in leather? or tarred canvas?. The number of chocks would tend towards round at scale where an octagon would be too few chocks to do the job. I also wrapped the mast to base junction with thin rope on my AVS to hide some gaps but that look is consistent with a tied wrapping to the chocks. I'm no expert though!
Cheers
Alistair
-
Holly is great for a deck and boxwood for a hull. I'm using both on Fly and can testify for their qualities. Rafine's stunning builds here also use that combo - have a look at his Fair American and, more recently, his Essex. I have also heard that ebony is very difficult to use and has very nasty dust.
Cheers
Alistair
-
Congratulations Ron!!! A great model - the patina of being already aged really sets it off. Your furled sails are a great addition. Brilliant work and hats off to you!
Interested too, to hear what's next? Seems to me you are up for anything!
Great stuff!
Cheers
Alistair
-
Best wishes Andy, I'm blessed with a family who have not yet had such a difficult surprise. My condolences. Take care and get home safely.
Alistair
-
Thanks Gerty, Rowan has dragged my log back from the sludge of former things. I must say your Willie L. Bennett looks very fine, so a good link arises from Rowan's dredging!
Cheers
Alistair
-
$80!!!! That is incredibly cheap. The MS paints might not be so good...I used Admiralty Paints, Floquil and Testors. $80!!! I'm spitting. Good deal Rowan - I just might make another AVS! Even if the paint is dodgy that is still an amazing bargain.
Look forward to your log and there are plenty of AVS veterans here to help - me included.
Cheers
Alistair
-
I'm not worried that my Fly may be a Pegasus/Fly hybrid with respect to the quarter badge but absolute historical accuracy is not my thing. If you look at the TFFM volumes you will see many variations from the kit, some I'll adopt, some I'll ignore. Andy is correct, one central opening only and the TFFM indicates it was rectangular without an arch at the head. I've arched my opening as it feels better to me.
Your carving so far looks great and I'm sure you are up to detailing it further.
Cheers
Alistair
-
Hi Pygothian
It is not basic at all, quite difficult in some respects but it must be easier than the Syren. The Syren looks like a great kit but I know the AVS is too. If you can get through the AVS you are ready for most things. Many builders here began with the AVS and are now masters - Greg Barlow a great example amongst many others. I'm well short of that class but would certainly prefer the AVS as a starter to the Syren. It is up to you...the AVS covers all the skills - cannons, cannon rigging, ladders, gratings, masts, yards, ratlines, rigging ...but in much less profusion than a Syren. You are much more likely to finish it and finish it sooner. That is always refreshing. Plus it is a great looking ship on completion. I've gone from the AVS to the Fly and find Fly much more difficult (I've also become more fussy). When I look at the Syren instructions it is as difficult as Fly if not more so.
Best bet is tackle something you can finish. As many modellers here will say - there are 10 times as many models bought than a single model finished. Getting one under the belt is a good feeling and gives you the confidence to overcome the difficulties and frustrations of a harder model. The AVS is my champion and it still looks damn fine on the shelf. The AVS also has the same model characteristics of Syren which is completely different from the European models. So, again a good learner.
Mate - up to you. The AVS is a sweety and plenty of support here but massive support for the Syren too. If the AVS is already under your bench, I'd start there otherwise, next time, you'll feel like you are going backwards.
My ten cents worth,
Alistair
P.S. If you go with the AVS:
- upgrade the rope to Chuck's or Morope (I'd go for Chuck's but he wasn't doing rope when I did the AVS)
- upgrade the blocks - Chuck's
- upgrade the decking - anything - I found mine in a local hobby shop....but Jeff Hayes is a great source too.
-
Hi Vitus
Have measured my badge and reckon the maximum projection from the hull will be about 5mm at the centre, perhaps less when I shape the junction between the two. That feels about right to me but this is just guessing...
Cheers
Alistair
-
Exceptional work Robert - very crisp and clean. I have Chucks carriages which are great but by avoiding the laser cutting char yours are a step up. Thankfully, without your skills and tools, I have Chucks skills and tools to fall back on.
Cheers
Alistair
-
That looks pretty good to me Vitus. Perhaps protrudes a little far from the hull though? You can get the PE brass window frames from Pegasus - I ordered mine through Chris Watton. They would be very fiddly to make in wood strip but it looks like you have the skills required.
Cheers
Alistair
-
Hi Ken
Definitely let the glue dry before removing by scraping. Your damp cloth is probably working the glue/graphite mix into the plank. I used holly on my Fly deck and no matter how messy it looked I didn't touch any glue residue until it was completely dry. I used white glue and it is very easy to scrape off when it is dry.
I'd also suggest taking off the stained planks as they will annoy you forever.
Cheers
Alistair
-
-
-
-
Very crisp work Vitus - great. The alignment of your nails looks spot on. The black is an interesting choice but looks really sharp. Look forward to more.
Cheers
Alistair
-
Good to see you underway Rowan. I remember you were tossing up a while back on which ship to tackle. The Syren is a great choice - a very fine ship with lots of detail from what I've seen. Looks like you are very organised too with tools etc. One good starting mission is to sort and separate the planks by their size, label them and then check they match the parts list. Wish I'd done this on my AVS as the planks provided didn't match the parts list at all - many sizes provided that weren't needed and many needed sizes not provided - and I didn't discover this until well into the build!
I look forward to your progress.
Cheers
Alsitair
-
Hi Mike
Before you blacken how are you cleaning the barrel? I use Spirits of Salt. I haven't tried it with Chuck's barrels but it worked on previous brass blackening that I've done. Also have seen people use lacquer thinner and have heard of vinegar being used too.
I'm going to have a go at Chuck's barrels this week - we'll see if I share your problem...
Cheers
Alistair


HMS Snake by Beef Wellington - FINISHED - Caldercraft - Scale 1: 64 - First wooden ship build
in - Kit build logs for subjects built from 1751 - 1800
Posted · Edited by aliluke
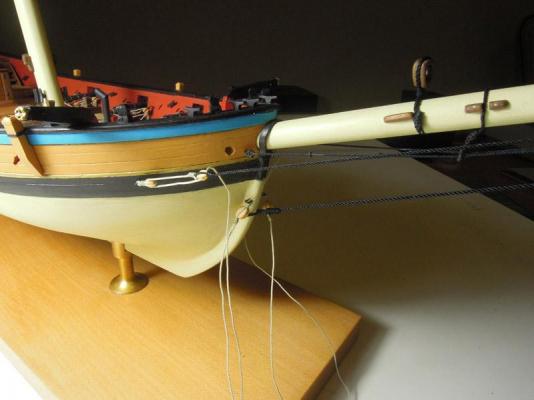
I just had a look at my AVS Jason. As the lashing is on the underside of the bowsprit it is impossible to see it without a dental mirror. You'd also need a magnifying glass and that is at 1:48 scale. Not that I didn't try to get it right but I wouldn't die in a ditch over it.
Another little tip from that model - I found that using the Amati keel clamp (if you have one) to lock the masts and spars while working on them was a brilliant tool. I think there is a picture of that on my AVS log.
Good luck and I look forward to your results.
Cheers
Alistair
P.S. Yes the Amati keel clamp for working masts + bowsprit + the same type of lashing as you are doing is on my AVS log.