


garyshipwright
-
Posts
901 -
Joined
-
Last visited
Reputation Activity
-

 garyshipwright reacted to Freebird in New to ship modelling? But what do you build first?
Here’s my story. I have been building plastic and balsa airplanes as far back as I can remember. My father was a true craftsman building R/C planes and I learned a lot from him. Over the years though, I yearned to build a wooden POB or POF ship. Back in the mid 70’s I bought a Cutty Sark (I forget the manufacturer), anyways with my meager and limited skills I tried to build this ship and failed miserably. So I shelved the idea of wood ship models and concentrated on R/C planes. Fast forward to 2020 and I was having a conversation with Nic of Bluejacket fame (he’s been a good friend for quite a few years), and he turned me on to this site. To say I was blown away is an understatement! There are so many talented builders and information and how-to’s, it was mind numbing. After reading so many inspiring build logs, I honed in on Chuck’s offerings (I also have 3 Model Shipways kits, which are Chuck’s designs). After reading about his Medway Longboat, I decided this was the place to start, and I’m not disappointed. I loved the lines and the support that is offered by those who went before me, which is truly amazing and appreciated!
So some 40 years later, I started on my desire to build a wooden boat/ship. I’m currently on/off working on a Syren Medway Longboat and I’m just amazed with the results. While I know some skills are needed and more need to be developed, the design also contributes greatly to success. So while I believe there are many very good kits out there, I love Chuck’s approach to make modelers develop skills that greatly improves building skills. I’ve built a lot of kits in my time, but ship modeling building is on a different level that I’m enjoying to the max. So my experiences so far is with Syren Ship Models (I have Cheerful waiting in the wings), and has been my to go source. I also look forward to building my Model Shipways kits. Those are the only 2 vendors at this time I’ve gotten items from, but I’m eyeballing some from Vanguard Models as Chris’s approach are very unique.
Attached are a few Medway pictures.
Best Regards …. Rick
-
garyshipwright reacted to Freebird in Medway Longboat 1742 by Freebird - FINISHED - Syren Ship Model Company - 1/2” Scale
This morning I wanted to do something a little different, so I cleaned up the pedestals and glued them to the cross braces. I also taped some sandpaper to the hull and tapered the arms to match the bottom of the hull.
Best Regards …. Rick
-
garyshipwright reacted to Freebird in Medway Longboat 1742 by Freebird - FINISHED - Syren Ship Model Company - 1/2” Scale
Haven’t had much time to work on the longboat. I added the frieze, added some filler to fill the gap in the cockpit and added a few more coats of paint. The knees for the thwarts have been fitted and are being painted, several more coats are needed. I really like Chuck’s technique of applying many coats of thinned paint, results are really nice. The transom frieze was very difficult to size, I’m not really happy with it. I may redo it.
Best Regards …. Rick
-
garyshipwright reacted to Freebird in Medway Longboat 1742 by Freebird - FINISHED - Syren Ship Model Company - 1/2” Scale
Started to add some color! Very happy with the shade of red, but not happy with the texture, it’s too flat and needs just a little gloss. BTW - I’m using Chuck’s painting technique, this is only 2 coats. The aft thwart and cockpit seats are just posed for the pictures.
Cheers …. Rick
-
garyshipwright reacted to Freebird in Medway Longboat 1742 by Freebird - FINISHED - Syren Ship Model Company - 1/2” Scale
Here’s a couple of pictures, still have to fix the gaps on the seat. I’m way out of practice, I couldn’t for the life of me make the slots tight around the frames.
Cheers …. Rick
-
garyshipwright reacted to Kurtis in 74 Gun | Ship of the Line - 3rd Rate | Blender
I've gone ahead and put some of the boats on the waist beams! I'm thinking of naming her "Gorgo" (often known as Medusa) from the Greek mythology which will have a matching figurehead. I'm still not too sure what the paint-job will be - the classic black/yellow, black/white, or simply Bellona colours.
-
garyshipwright reacted to Kurtis in 74 Gun | Ship of the Line - 3rd Rate | Blender
I have installed some gun ports! Some of the rim rails needs a little tweaking in places and the line holes will need to be better positioned, but the main fixtures are pretty much ready. I decided to shrink the thickness of the wale a bit cos it looked a bit too thick, but the top one does get a bit washed out with these raw renders. Some proper colors and textures should hopefully make it stand out a bit again.
The rudder has some clamps, the helm has been installed, I've reshaped the belfry a little (I'd say that's the one piece I'm not happy with - I'm probably going to rebuild it,) and I've also reworked the skylight a little bit. I've added the ensign staff but it looks a tad odd being the only part of the rigging visible at present
-
 garyshipwright got a reaction from rybakov in HMS Bellona 1760 by SJSoane - Scale 1:64 - English 74-gun - as designed
Hi Mark. Here is a couple of photo's of the cheeks and they items made for them. Its been awhile since I made them but believe I used a piece of curved wood to get the right curve on them using a heat gun after putting water on them. Hope it help's Gary
-
 garyshipwright got a reaction from jansmiss in HMS Montague 1779 bygaryshipwright - 74-gun Alfred-class
Merry Christmas every one and a Happy New year. Hope that every one get's what that want and lot's of it. Gary
-
 garyshipwright got a reaction from druxey in HMS Montague 1779 bygaryshipwright - 74-gun Alfred-class
Hi Christain. We are doing ok and every body stayed home so the deep freeze isn't affecting us to much. We are all getting together Monday to celebrate Chistmas. Figure the roads will be cleared by then. Hope every one is doing great and Happy New year.
-
 garyshipwright got a reaction from Gabek in HMS Montague 1779 bygaryshipwright - 74-gun Alfred-class
Merry Christmas every one and a Happy New year. Hope that every one get's what that want and lot's of it. Gary
-
 garyshipwright got a reaction from Siggi52 in HMS Montague 1779 bygaryshipwright - 74-gun Alfred-class
Merry Christmas every one and a Happy New year. Hope that every one get's what that want and lot's of it. Gary
-
garyshipwright reacted to stuglo in Swan-Class Sloop by Stuglo - FINISHED - 1:48
Planksheer of Forecastle
TFFM suggests making it in 2 parallel pieces as the Breast Rails, but as I have not yet made the Timberheads, this isn’t necessary.
The Planksheer is 1.33mm thick. It overlaps the combined width of the hull wall.
Using a card pattern taken directly from the model. The length is divided by 2 or 3 scarph joints.
I found it easier to fit the aftmost section. This covers a Hance. I subdivided the piece- hollowing a square piece to cover the Hance, shaping the outer surface after gluing in place. A short straight piece, before shaping the next curve in a similar fashion. The rest fitted and shaped.
As before, the wood didn’t lend itself to shaping a molding, so I simply chamfered it.
For the scrolled Terminal, I added a 2mm cylinder-shape.
The Planksheer should extend to cover the Bowsprit Cross Chock, but mine is too high - or rather the Bulwark is too low. I decided to leave this as is.
(Personal note. I’ve been on holiday and haven’t worked on the boat for a month. Brain and hands feel “rusty”. Do others find this?)
-
garyshipwright reacted to stuglo in Swan-Class Sloop by Stuglo - FINISHED - 1:48
Seats of Ease
Just the forward pair.
The Discharge Tube fits in the space of the Gratings of the Head, made for that purpose. The shape is a parallelogram.
The walls are 0.53 mm thick. Each face is given as 4.77 across, but I made it “to fit”.
The inner wall rests on the Lower Rail-the outer face shorter to allow the outflow. The two other sides of height allow the whole assembly above the Gratings to be 7.95mm.
I made them in situ, stucking them separately into the Gratings gap, and sanded the top combined surfaces to be horizontal.
The Seats, also 0.53 thick, are 7.42 sq. with a hole 3.71mm diam.
The seat shape is also a parallelogram.
The False Rail and the parts of the decorative Rails of the Bow previously removed, are now cut to length and replaced.
-
 garyshipwright got a reaction from mtaylor in HMS Montague 1779 bygaryshipwright - 74-gun Alfred-class
Merry Christmas every one and a Happy New year. Hope that every one get's what that want and lot's of it. Gary
-

 garyshipwright got a reaction from Hubac's Historian in HMS Montague 1779 bygaryshipwright - 74-gun Alfred-class
Merry Christmas every one and a Happy New year. Hope that every one get's what that want and lot's of it. Gary
-
 garyshipwright got a reaction from AON in HMS Montague 1779 bygaryshipwright - 74-gun Alfred-class
Merry Christmas every one and a Happy New year. Hope that every one get's what that want and lot's of it. Gary
-
garyshipwright reacted to mbp521 in USS Cairo 1862 by MPB521 – FINISHED - Scale 1:48 - American Civil War Ironclad - First Scratch Build
Hello everyone,
Looking for an opinion here. I painted up the cutaway edge with the reddish-brown I used for the hull. I’m liking the color and think it provides a nice separation from the black paint and the natural wood color of the frames. I just thought I’d throw this out there to see what everyone else’s thought.
Please feel free to chime in, I always welcome constructive criticism.
-Brian
-
garyshipwright reacted to mbp521 in USS Cairo 1862 by MPB521 – FINISHED - Scale 1:48 - American Civil War Ironclad - First Scratch Build
Thank you all for the kind words and condolences.
I realized that today marks the one year anniversary since I started this build. I just wanted to show the overall progress after the first year.
Day 1.
Day 365.
Coming along, and more to come. Thanks for sticking with me this past year.
-Brian
-
garyshipwright reacted to mbp521 in USS Cairo 1862 by MPB521 – FINISHED - Scale 1:48 - American Civil War Ironclad - First Scratch Build
Hello again Everyone,
I have returned with a brief update. We have been dealing with the loss of my father-in-law a couple of weeks ago and have been out of town getting funeral arrangements and other things straightened out so there has not been a whole lot done lately, but I wanted to get something out there to keep the build log rolling.
For this update I was able to get the hull painted with another coat of red oxide and a touch of black. I needed a third or fourth (I forget how many coats I previously put on it) red to hide some minor blemishes that occurred moving the model around on my bench. No major damage, just a few nicks. Once the red was dry, I sprayed on three coats of satin clear to give it a good finish. The clear coat also allows for a cleaner, crisper line when taping and painting the overlapping color.
Once all of that had dried, it was time to mark the waterline. Since there is no clear documentation on what color the hull actually was, I was also not able to determine where the actual waterline would have been. So once again, I took my builders liberties and decided that the waterline would be just below the armor plating that sits below the knuckle on the casemates.
First coat of black applied. When I was uploading these, I realized once again that I forgot to take pictures of the progression. Sometimes I just get so involved with what I am doing that I totally space on the pictures.
Three coats of black and another three of clear satin.
Starboard side painted.
Overview of the hull bottom. The two holes just aft of the center keel are the pickup tubes for the Doctor pump. A little detail that I thought would be neat to add.
Bow bottom.
Stern bottom.
And finally the rudders painted in the same manner. These were a little trickier since I had to get the tape down in the plank grooves to prevent the black from bleeding over.
Next up was the railroad iron armor plating. I wrestled around with this feature for a while. I wanted to portray the irons as accurately as possible and had first thought about using actual HO scale railroad pieces. I had a few pieces from way back when that I managed to scrounge up, but not nearly enough to complete the job. I made a couple of test runs with it but the brass was to rigid to get it to form with the contour of the casemate. I also figured that I would have a difficult time getting the glue to hold the brass rails in place. The final straw was when I went online to see what the cost would be to find someone selling old pieces of track and found out that this was not a cheap alternative. I know you can't put a price on a quality build, but the line has to be drawn somewhere. So finally I decided that I would use Styrene plastic strips for the railroad irons instead. I settled on the 2mm x 2mm strips which were the measurements of the brass HO scale railroad tracks. Since these would be placed side by side and only the flat end of the iron shown on top and the ends visible, I decided to just shape each end of each iron to give the appearance of the I-shaped irons.
First row of irons going in on the port side.
Starboard side irons in place and marked up for the bolts.
Port side going in.
Port side installed. This armor plating was done as an after thought, and a brief history of why is in my previous post #247. Since they were added later on and according to records, most of the work was done by the crew, then they would have been done quick and cheap to get the boats back into action as soon as possible. Since this was the case, I would venture to say that not a lot of effort was put into looks and more into functionality, so care would probably not been take to make sure that all of the irons were laid perfectly flat and even. I tried to replicate this when placing each strip so that they were not perfect. This can also be seen on the actual boat display, albeit the Irons could have been misshapen during the salvage operation. Either way, I wanted to make them look like they were done in a hurry. I'm sure that they won't be as obvious once they have been painted.
The look that I was going for.
Next up was placing the bolts to hold the irons in place. For these I used tiny brass nails with their heads clipped and filed square to simulate the square bolts and plates used on the actual boat. First few as a test run.
The rest of the holes marked a drilling them out.
All of the bolts in place on both sides.
During the installation of the railroad irons I found a mistake that I made during the construction of the forward casemates. I didn't quite get the angle correct where the port and starboard sides meet up with the forward casemate at the top. According to the HSR plans, I do have the angle correct on the forward casemate, but somewhere I went wrong when I built out the sides. This caused me to have to trim some of the railroad irons at an angle instead of them being full runs from just forward of the first cannon on each side to the forward casemate. I do apologize now for my mistake, but I was not about to go and tear apart all of the work that has been done on this part for this minor detail. I figured that I would have to live with my mistake and learn from it. Please do not think lesser of me 🙄, but this would be a LOT of re-work, and I do think that I may be able to disguise some of this when the hurricane deck is installed and everything is painted. 😇
So that is all for now, I very much appreciate everyone stopping in and taking a look as well as all the likes and comments.
-Brian
-
garyshipwright reacted to mbp521 in USS Cairo 1862 by MPB521 – FINISHED - Scale 1:48 - American Civil War Ironclad - First Scratch Build
Hello again everyone,
Time for another update. Things have slowed down a bit since the weather has turned nice. Lot's of projects around the the property that need tending to before the Texas summer heat sets in.
With this update I was able to finish work on the aft bulwarks. I fashioned these out of one piece of poplar and carved out the fairleads in pretty much the same way that I did the forward ones.
Roughed out shape and pinned to a board to make it easier to work with.
Fairleads starting to take shape.
Final shaping and sanding.
Bulwarks installed on the hull and rollers in place (I did go back and set that right pin flush. I just didn't notice it until after the picture was taken).
and the finished install.
Next it was on to the preheaters and some of the plumbing.
I built the preheaters the same way that I did the boilers. These were made from a 3/4" dowel that I wrapped with aluminum tape with imprinted rivets. These did not survive the salvage so it was pretty much guesswork as to how they actually looked. I used the example from Adam L. Kane's The Western River Steamboat book as my template for these features along with the plumbing diagram in the HSR.
The finished preheaters.
For the plumbing I used different size styrene rods. To shape them I held the rods over a soldering iron to soften them up. Then I just bent them to shape. I used small rings of heat shrink to simulate the fitting collars to give it a little extra detail.
Once these were all built up, they were installed. I temporarily installed a roof beam to line up the pipes where I will eventually place the pipe hangers.
Then it was on to the armor casemate plating on the port and starboard sides.
According to the HSR, the armor plating was not only on the side casemates, but also extended 55" down the hull to protect it below the waterline. I'm not sure why, but this lower armor did not make to the display in Vicksburg.
Marking the 55" line on the hull (this equated to 29mm) below the knuckle.
Since the actual plates were shiplap, they did not butt up against each other and there was a slight gap in between each plate. I made up a little jig with a .5mm shim to give it the equal spacing.
Next it was on to the upper armor plates.
On the actual boat, the armor plates did not line up exactly with the gun ports so they placed a small filler piece on the sides of the gun port frame to give it full protection.
Once the plates were installed, I made up another jig to line up all of the bolt/rivet holes that held the plates in place.
Then it was time to experiment. I wasn't exactly sure how I was going to simulate the bolts/rivets until I got to playing around with the styrene on the plumbing. Before I used the soldering gun to soften the plastic I tried my heat gun. This spread the heat over too big of an area, but on my attempt I noticed that the heat gun made a nice mushroomed head on the end of the styrene rod. The light then came on and I though, hey what a perfect way to make rivet heads. So I proceeded to experiment with some smaller styrene rod. The bolts/rivets holding the plates in place were approximately 3/4" which translated to .040". So I drilled a piece of scrap wood with a .040" bit, placed a piece of styrene rod in the hole and heated the end of it. I experimented with several lengths extending out of the wood in order to get the right size head on the bolt/rivet and finally settled on the 1mm length. I think this worked perfectly.
Once I had found the length that I liked, it was on to filling all the holes.
Once the holes were all filled, I went back a trimmed them all to equal lengths. I glued a 1mm strip of scrap to each jaw of my flush cut pliers and trimmed the excess off of each rod.
Once they were all trimmed, next came the heat.
And viola, 540 bolts/rivets installed.
Once the starboard side was complete, it was on to the port side. This side was a little more challenging, since I had to cut out around the viewport.
Still no big deal, just a little extra patience and that side was done to.
Now all I have left is to mark and drill all the holes and finish this side.
Well, that is all for now. I'm going to finish up on the armor plating on the port side and start on the forward plates.
Until next time, thank you all for looking, the kind comments and likes.
Stay safe and well.
-Brian
-
garyshipwright reacted to mbp521 in USS Cairo 1862 by MPB521 – FINISHED - Scale 1:48 - American Civil War Ironclad - First Scratch Build
Greetings again all, hope everyone had a great New Years.
It's been a bit since my last update. Since Christmas things have been a little slow on the build and I have not had a whole lot of post worthy work to show.
I did however get a few things accomplished recently. One of them being completion of the forward casemates.
Also complete were the starboard side interior walls.
Next I started work on some of the forward deck features. First were the bollards.
Next were the forward bulwarks and fairleads.
I have found that spare deadeyes make perfect rollers on the fairleads.
Next up were the aft bollards.
After extensive research and several info requests, I came up empty on my search for hull color. I finally made the decision that I am going to take my builders liberties with this and paint the hull something other than black. During my research I came across build after build and model after model of Ironclads that had some type of red color on the hull below the waterline. Unfortunately no info exists on whether or not the Cairo had a painted hull, so my choice is to paint it. I tried several different colors before deciding on a reddish-brown red oxide color. I wanted something that would break up the mostly black paint scheme of the casemates and armor plating, but something that would not stick out like a sore thumb. Many of the examples that I ran across the builders used a bright red paint, much like many of the modern day anti fouling reds that are used today. I just felt this would not have been the case and went with a more subdued color that will separate the black, but still maintain some of the boats stealthy-ness.
Here is the color I came up with. As always, comments are definitely welcome. It may not look like much now, but as soon as I get the black paint on it, I think it will blend in nicely.
Next was the completion of the cannon carriages.
Here are the six large carriages. I had some leftover red from the hull, so I decided to use it on the carriages to. This way it transfers some of the color to the inside of the boat as well.
Large carriages completed
And all thirteen carriages completed.
I had started turning down the cannons, but I was having trouble getting them to come out looking the same. After several attempts I finally conceded defeat and decided to take a different approach. I was speaking with one of my uncles who used to be a machinist and still has some connections at his old shop that could 'hook me up" with some turned brass ones. All I need to do was to send him the dimensions and plans for them and he would take care of them for me. So this is the route that I am taking. Hopefully the truest out there won't look down on me for cheating a bit, but I just don't think that my skills on the lathe are there yet.
In the meantime, I built me a mockup of one of the gun ports for rigging the cannons and I set up my first attempted carriage and one of my failed turned wooden barrels in it. This will allow me to rig everything up with easy access and then all I have to do is transfer it to the model. Should provide me with a lot more room to work instead the close confines of the gun deck.
Everything is ready to go for the rigging, I'm just waiting on my order of blocks and rope from Chuck over at Syren Ship Company to come in and I'll make my first attempt at getting the cannons rigged up.
Well that is it for this update, hopefully it won't be so long before the next one.
Thanks again for the likes and for stopping by. Everyone please stay safe.
-Brian
-
garyshipwright reacted to AON in HMS Bellerophon 1786 by AON – scale 1:64 – 74-gun 3rd Rate Man of War - Arrogant-Class
Completed installing the last of the side quarter filler frames.
I will start sanding them to proper thickness (port/starboard) and height next week.
Then I cutout the door openings in the frame and install the cills.
And then finally the stern frames to close her up.
-
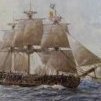
garyshipwright reacted to matiz in French 74-gun ship by matiz - scale 1:56 - Tiziano Mainardi
Hi, and merry Chistmass ☺️
-
garyshipwright reacted to stuglo in Swan-Class Sloop by Stuglo - FINISHED - 1:48
Fixed Gangway Newel Post and Railing
The Post:
From the corner of the Fixed Gangway, supporting the Rail which runs to the outer Stantion of the Quarterdeck Breastwork. .
The Post is 22.3mm high and made from 2.65mm sq. stock. It was a spare left over from a batch previously turned.
The Railing:
2.4 x 1.6mm thick.
The aft part forms a dog-leg or “crank”, to meet the outer Breastwork Stantion.
In section, shaped handrail-like, formed with a scraper.
Iron Strap:
1.6x0.53mm.
Hammered from 1mm copper wire.
As well as the crank, similar to the aft of the Railing, it has an upward curve so the aft end sits on the Breastwork Rail.
Used copper blackening solution.