


gsdpic
-
Posts
857 -
Joined
-
Last visited
Content Type
Profiles
Forums
Gallery
Events
Everything posted by gsdpic
-
Thanks, appreciate it. If I was better at this hobby I might include photos that have even more details As noted at the beginning of the build log, there are several other logs for this kit but they all seem to have been abandoned some time during or shortly after completing the planking. I am determined to log mine to the end.
- 90 replies
-
- 3
-

-
- Friendship Sloop
- bluejacket shipcrafters
- (and 1 more)
-
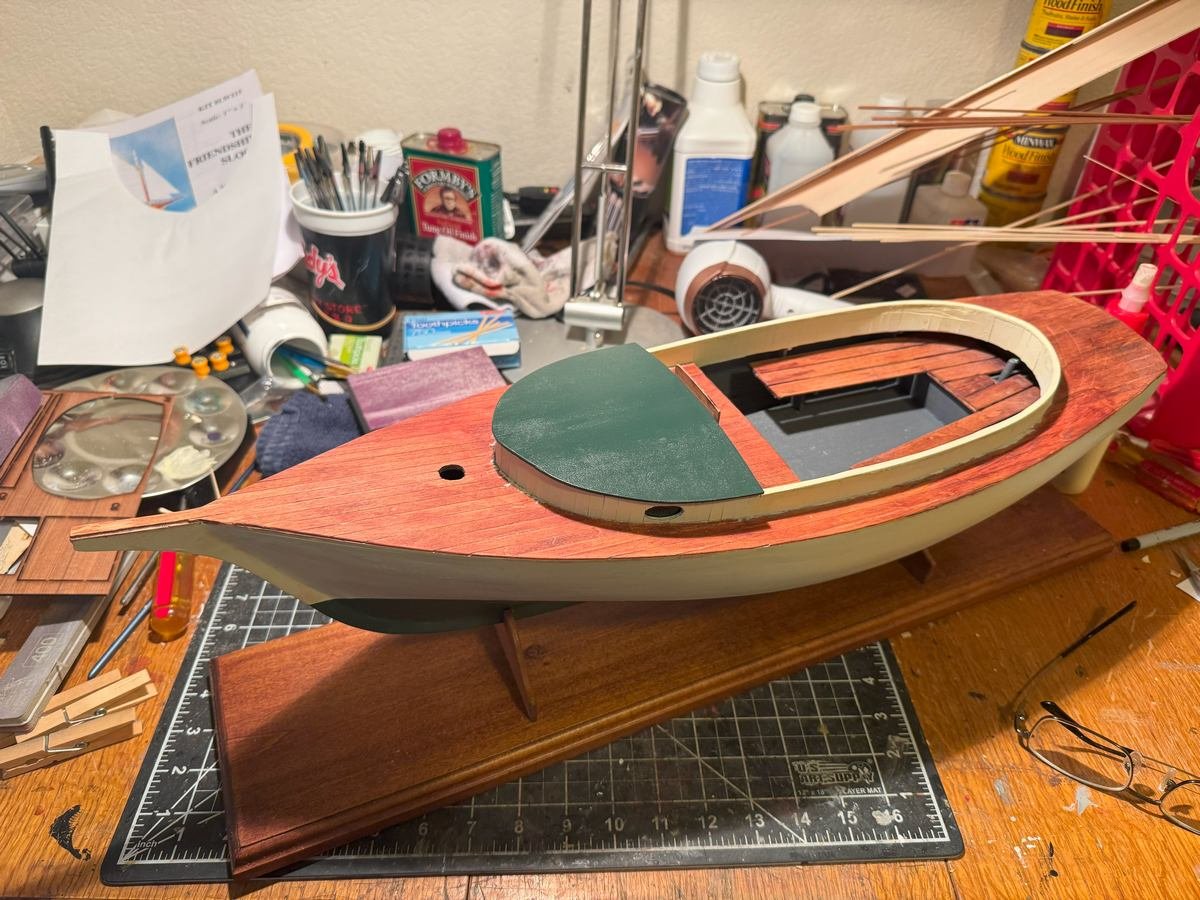
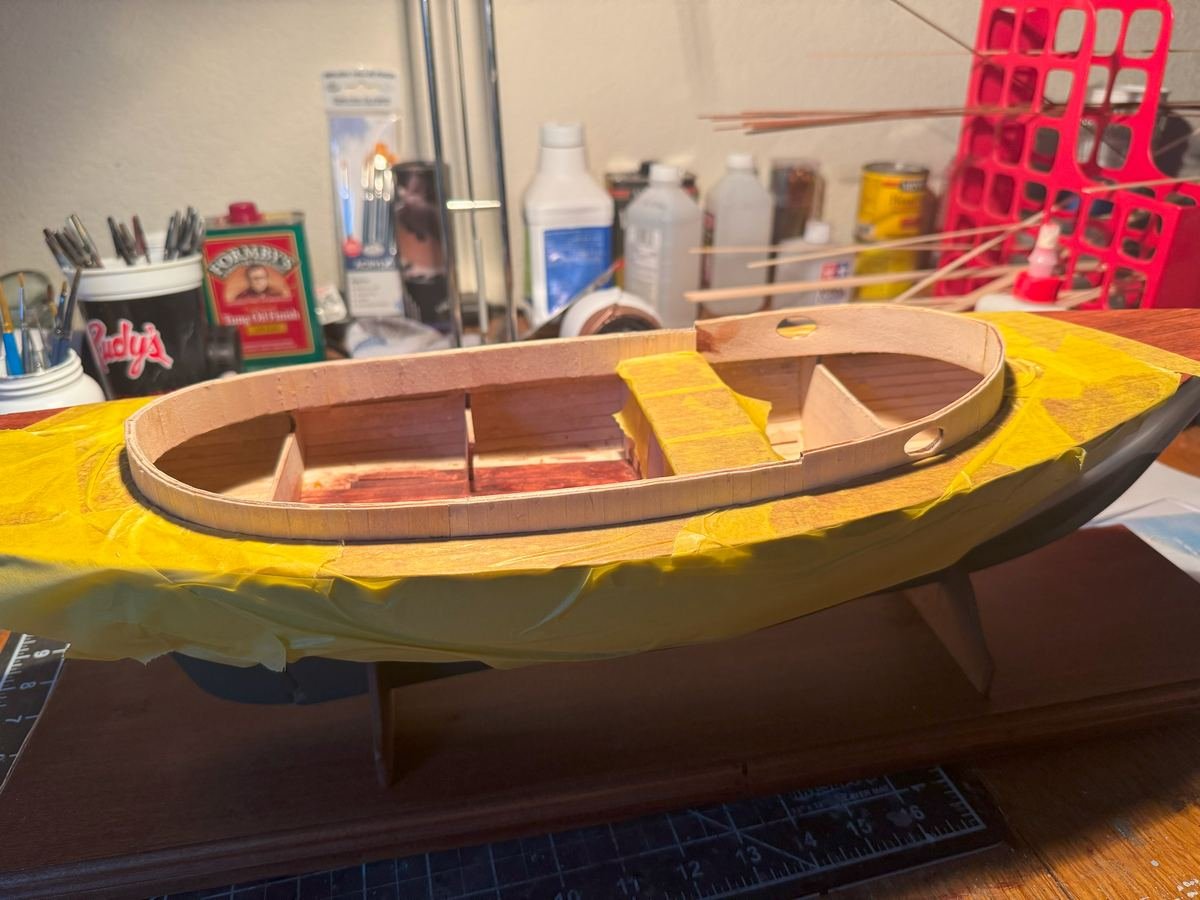
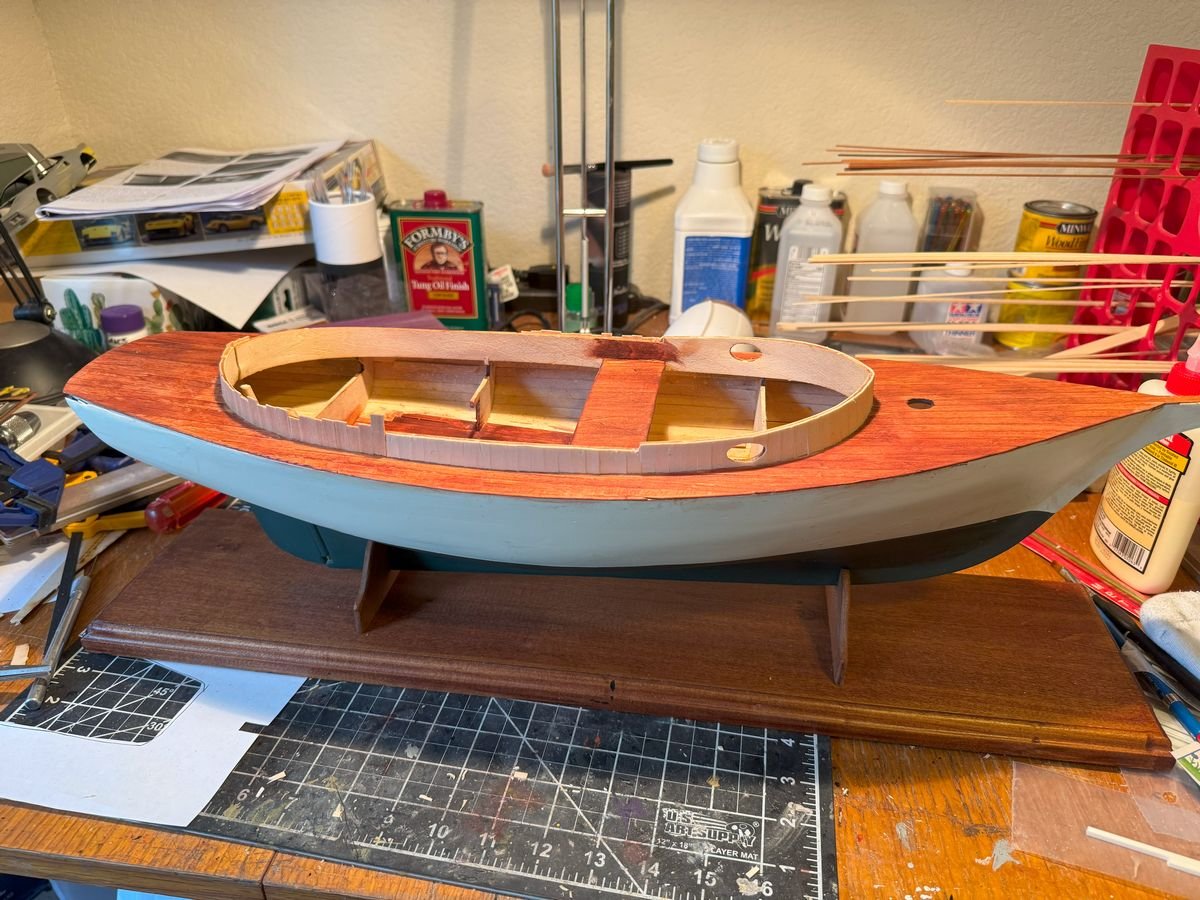
I've continued to work on the trailboards. I think I pretty much have them done now, perhaps save for a bit more paint touch up. I am in that cycle where I touch up with one color, causing the need for a touch up with color 2, causing the need for touch up with color 3, causing the need for touch up of color 1, and so on. Anyway, the pictures below show the overall model and a close up of the starboard side trailboard. Now I should be able to do that sheer trim, followed by the rail. Then just a few more bits on the hull before it is ready for masts, rigging, and sails. Oh, for the paint I used a mixture of Tamiya XF-9 Hull Red and XF-7 red, as well as X-12 Gold Leaf. Every time I use hull red I am disappointed how it just looks like brown to me and feel compelled to add some more red to it. Thanks for taking a look.


- 90 replies
-
- 6
-
-

-
- Friendship Sloop
- bluejacket shipcrafters
- (and 1 more)
-
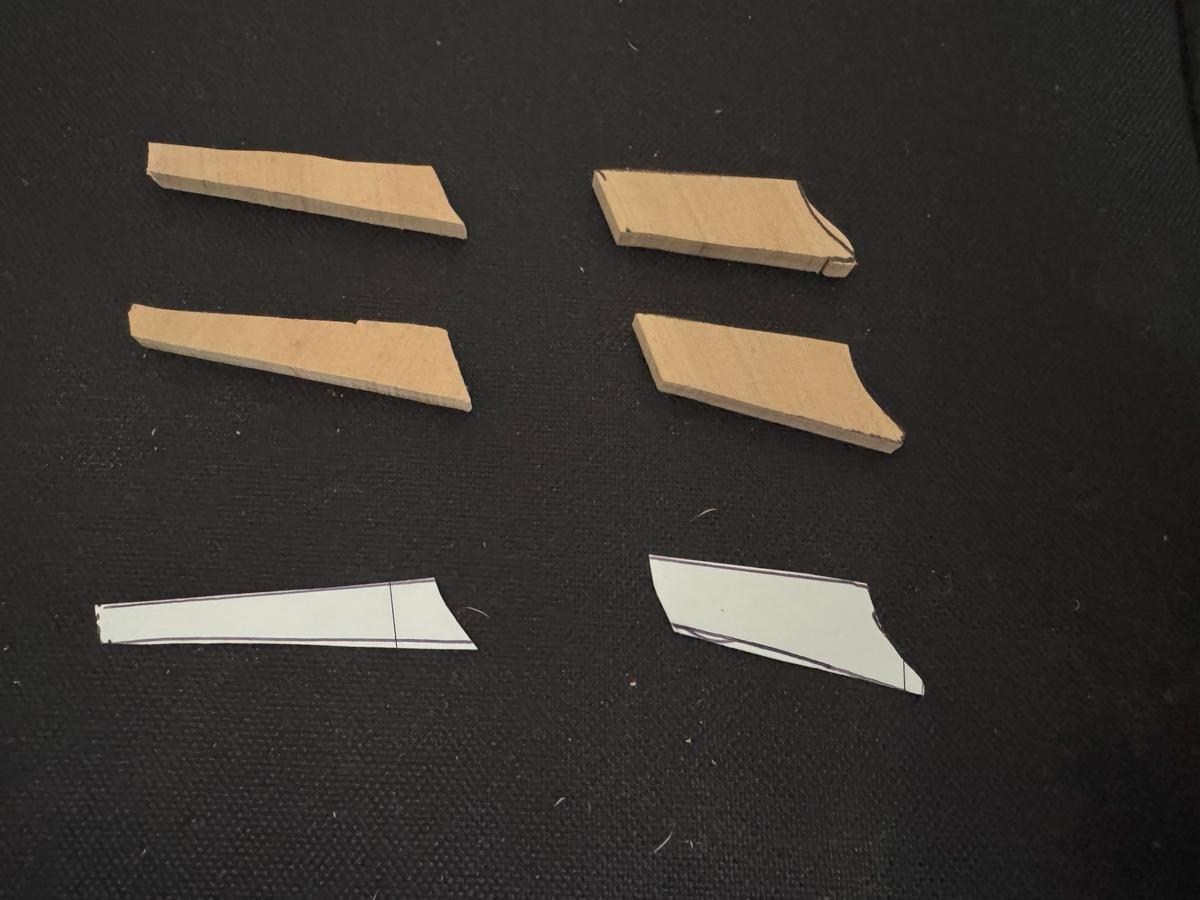
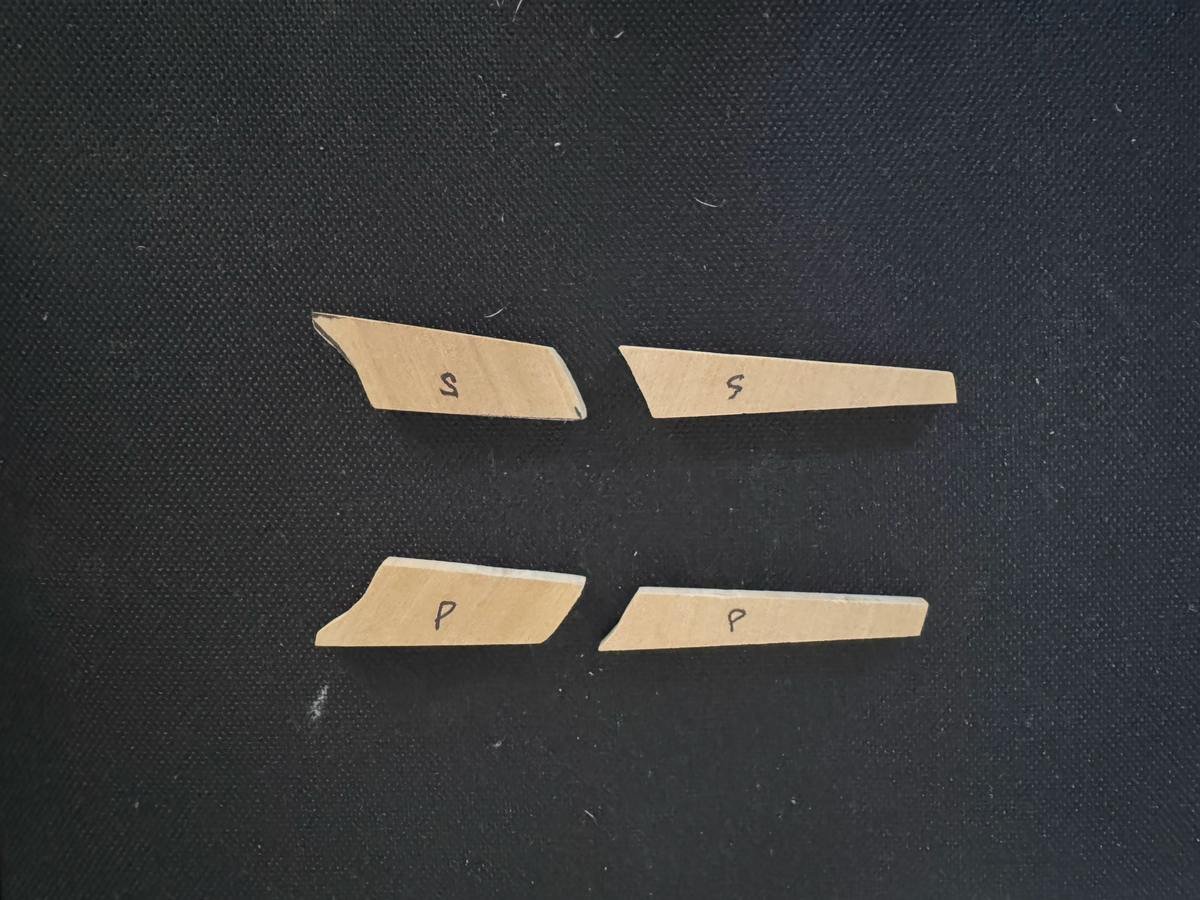
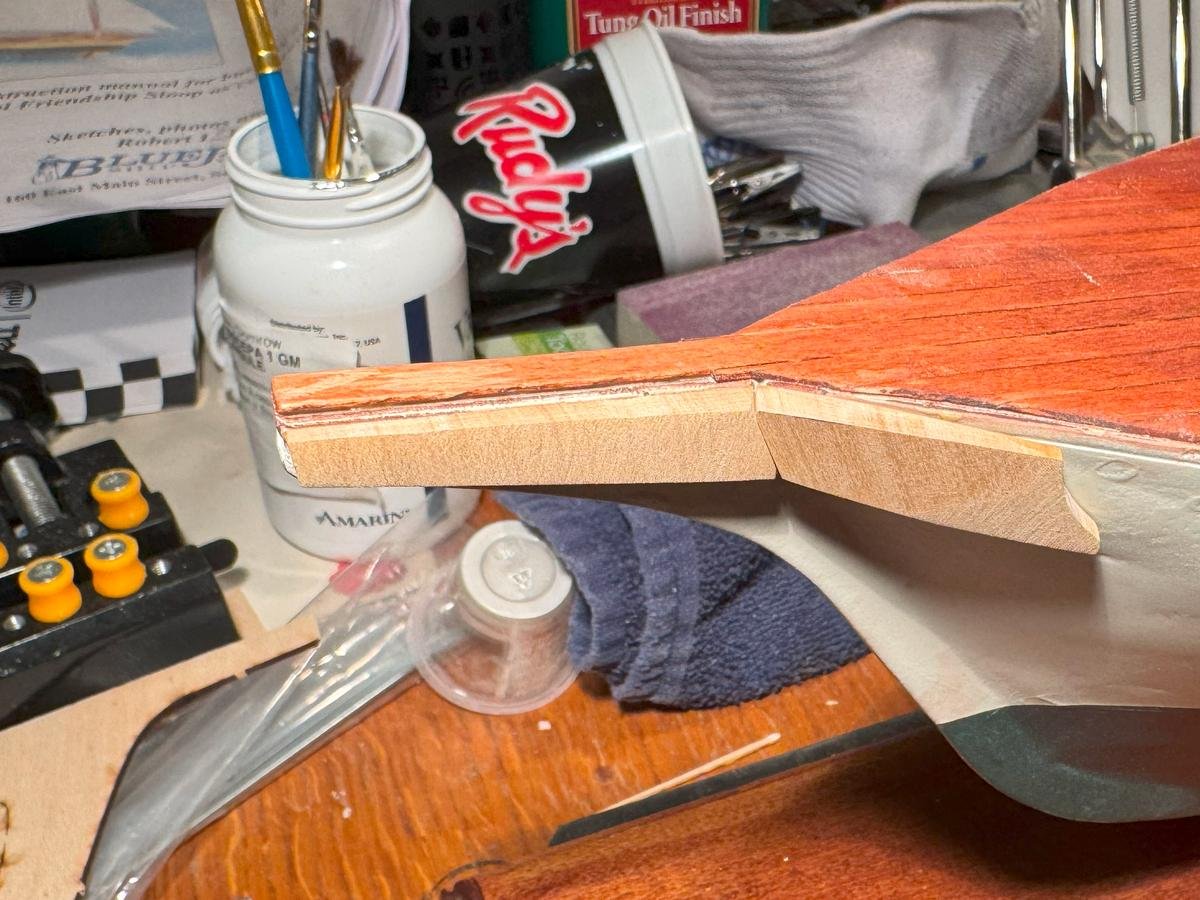
Thanks to those who have taken a look and to those who've hit the like button. I've taken a bit of a detour. As above, I was working on bending the strips for the rail around the edge of the deck. But before installing that rail, I decided that it might be best to install the sheer trim strip on the upper side of the hull first. It is likely that my only way to "clamp" that piece is with some tape and I'd prefer to do that before putting the rail on. But, before putting on the sheer trim strip I wanted to put on the trail boards because I envision the sheer trim butting against the aft end of the trail board. The kit indicates using some of the 1/16th basswood sheet to make the trail boards. I was hoping to carve some design into them and basswood is not the best for that. I had some other thicker sheet that I believe is Castello Boxwood and thought that might be a good alternative. But so far in working with it I am not sure. It seems very hard and difficult to carve, though I have not yet tried soaking it in water, which I have found to be helpful carving other hard woods. Anyway, the pictures below show my patterns and the original pieces I cut out (Though I made the rookie mistake of not considering orientation of the grain when laying out the pieces. Not sure if that will be a factor). The second picture shows the pieces with some initial sanding and marking for port/starboard. The third picture shows the port side pieces with additional fitting and shaping, but no carving yet, temporarily fitted using a bit of double sided tape. I'll probably continue a bit down this path though no guarantees I won't turn around.
- 90 replies
-
- 4
-
-
- Friendship Sloop
- bluejacket shipcrafters
- (and 1 more)
-
Ferrari 250 GTO by CDW - Model Factory Hiro - 1:12 Scale
gsdpic replied to CDW's topic in Non-ship/categorised builds
Craig, any idea about when you might start on this beauty? I just happened to notice that one of these kits recently sold in the US on ebay for $1525. -
I'm not a tank person, but I'll follow along. And yes the phrase "steam punk bat mobile" caused me to google "Romfell armored car"
-
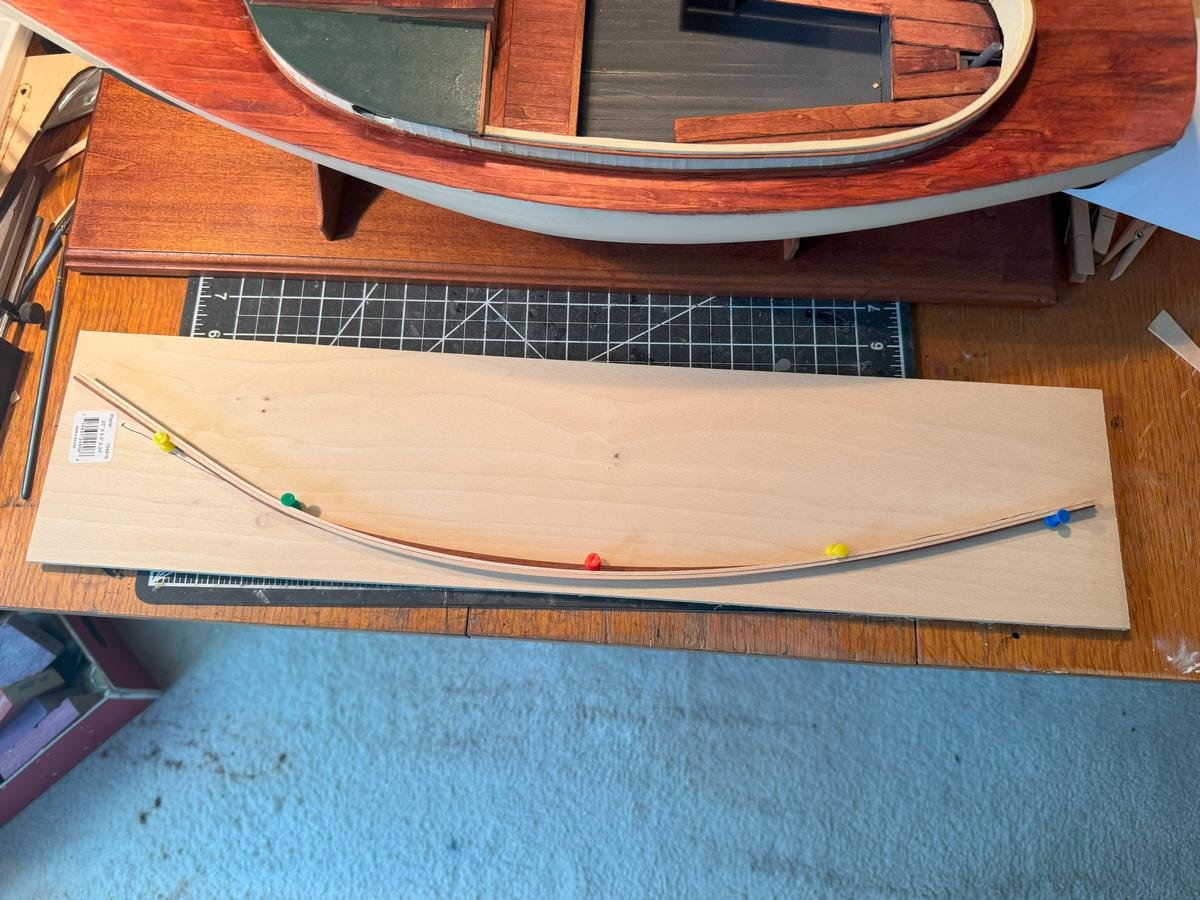
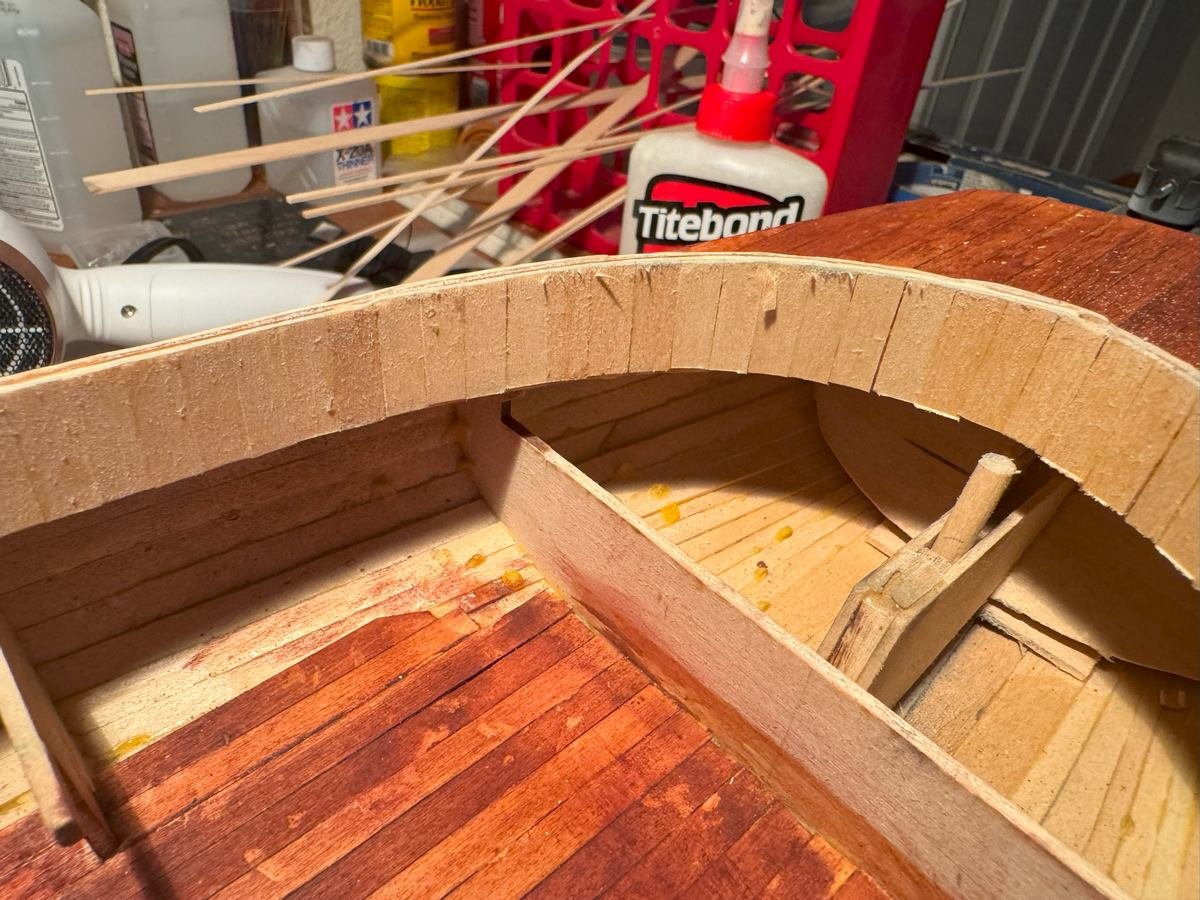
I took a few days off from the build, but have resumed, at least a tiny bit, today. Part of the reason for the pause was that I had trouble locating my supply of thumbtacks/push pins. 🙄 They were needed for the jig to help bend the strips for the rails. The rails consist of a basswood strip that is set on edge, at the perimeter of the deck and that is topped by a flat mahogany piece. Both strips are 1/16th by 1/8th. Bending the basswood is no issue but the mahogany is an edge bend. So I created the jig below. It is a little hard to tell but the mahogany is laid flat and held down by the flanges on the thumb tacks to create the edge bend. I soaked the strips in hot water and placed them in the jig and also applied some heat thanks to a hair dryer. I'll let them dry more and see how it turns out. Before installing, I will paint the bass wood the same off-white color but leave the mahogany bright.
- 90 replies
-
- 4
-
-
- Friendship Sloop
- bluejacket shipcrafters
- (and 1 more)
-
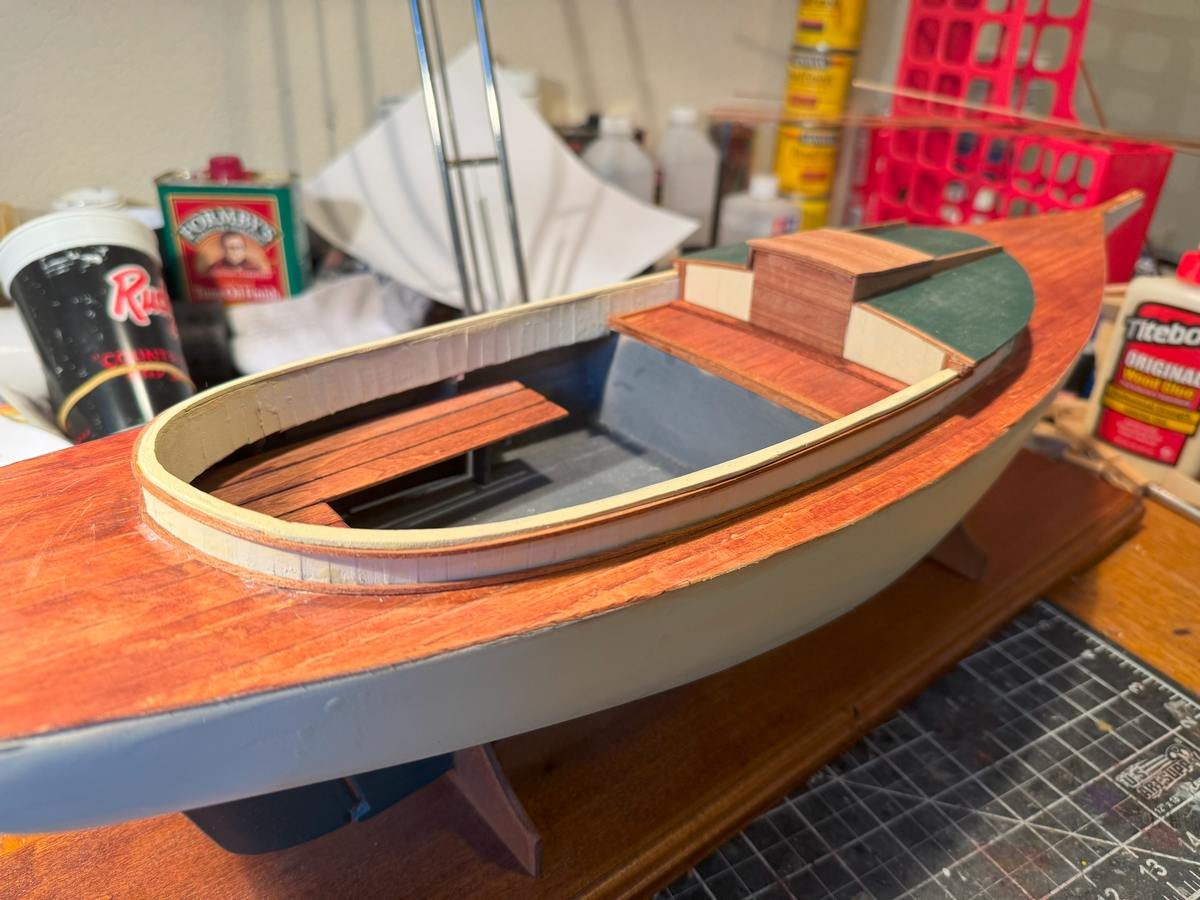
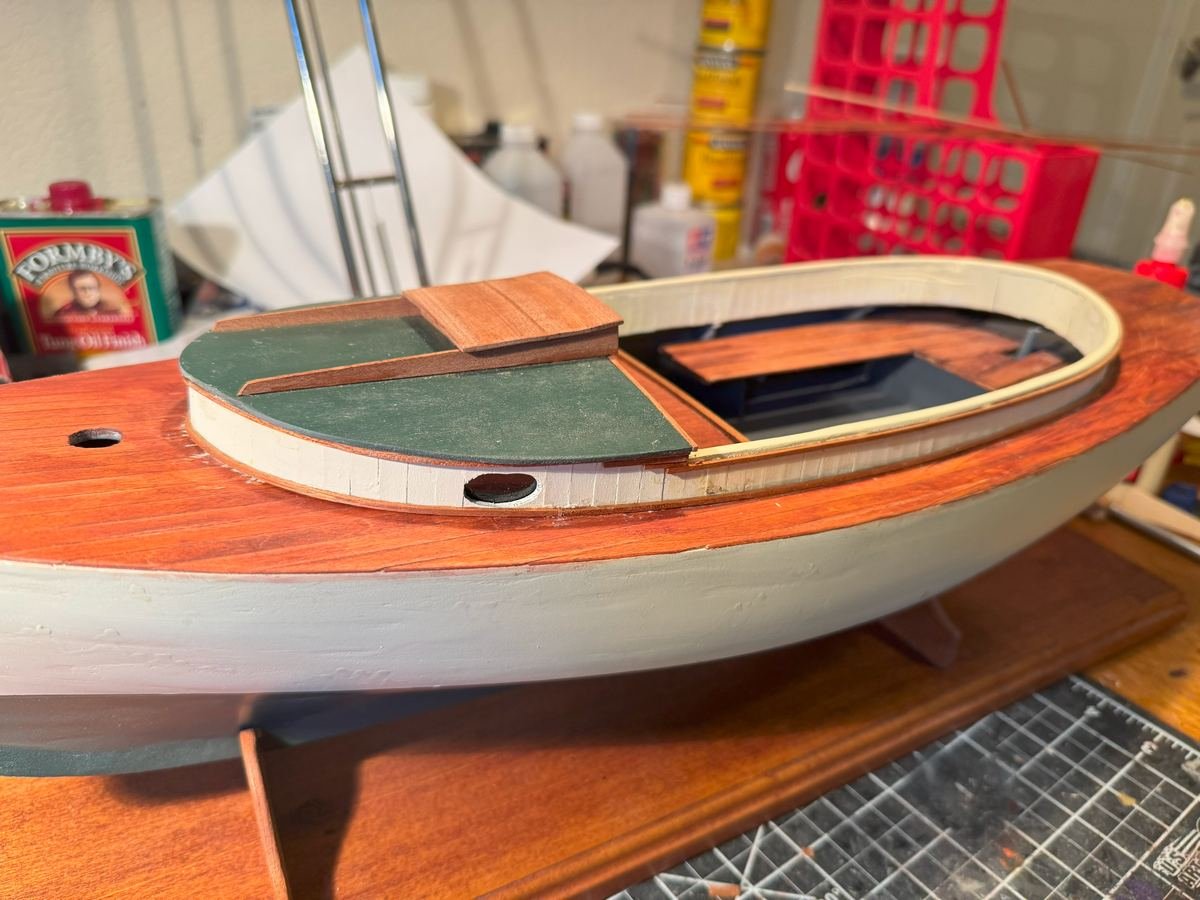
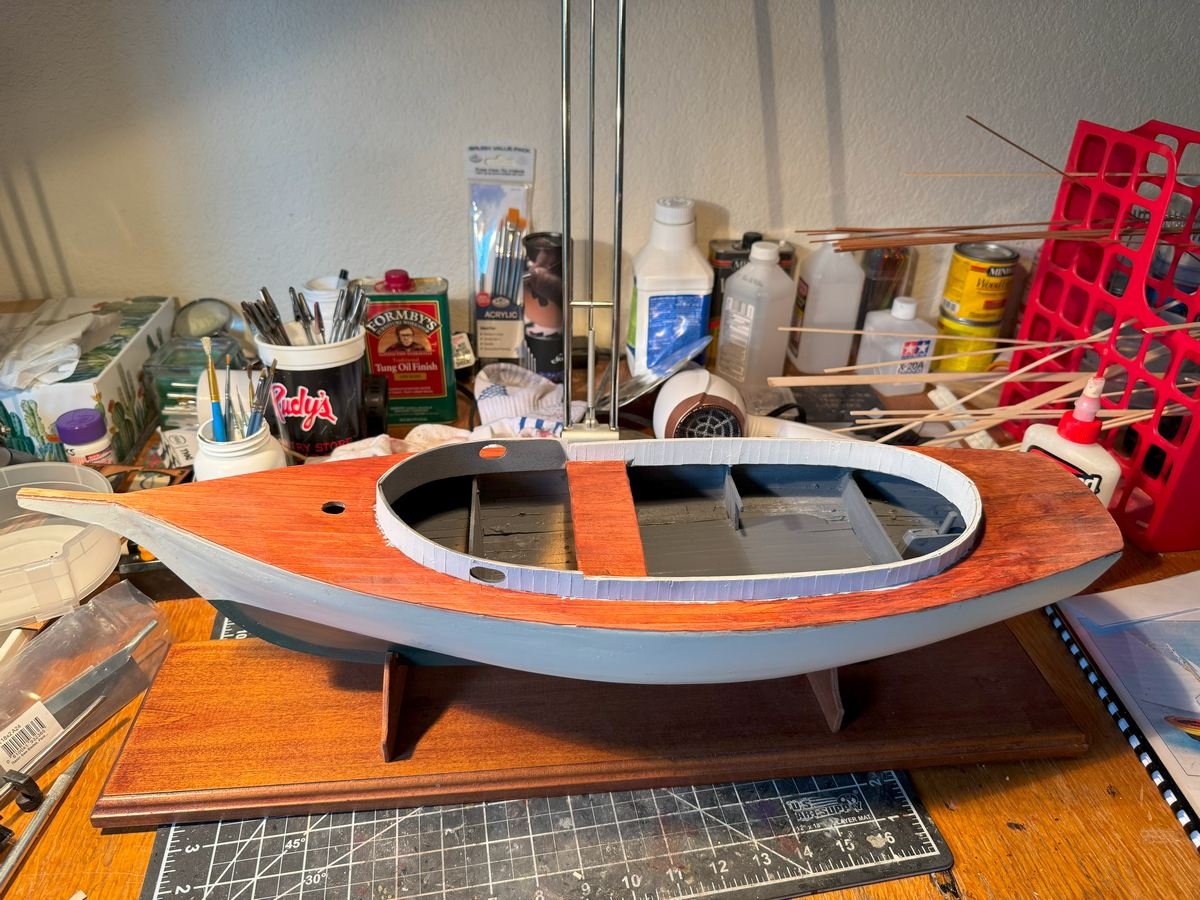
Thanks all for the likes and Jacques for the compliment. Work continues....I completed the cabin hatch and have been doing some trim work around the cabin and cockpit. The trim is primarily 1/16th square mahogany. I bend it by wrapping it in a paper towel, soaking it with water, sticking it in the microwave for a minute or two, letting it sit for a bit, then clamping it around the rim of an old kitchen sauce pan. That gave enough of a curve to put the pieces around the cockpit. I think I have that trim complete now. There is still some sheer trim where the deck meets the hull, some trim around the transom, then a rail all around the perimeter of the hull, then trailboards, bowsprit, cleats, etc. before moving on to masting, rigging, and sails.
- 90 replies
-
- 3
-
-
- Friendship Sloop
- bluejacket shipcrafters
- (and 1 more)
-
Thanks all for the likes or for just looking in. I've now completed most of the major parts of the hull. I opted to paint the top of the cabin the same green as the bottom of the hull. I still need to do the rest of the hatch assembly atop the cabin and then a lot of various trim work. For the latter, I feel a little bit on my own as the instructions and plans are not entirely clear or complete. The kit provides a couple different sizes of mahogany strips for most of the trim.
- 90 replies
-
- 3
-
-
- Friendship Sloop
- bluejacket shipcrafters
- (and 1 more)
-
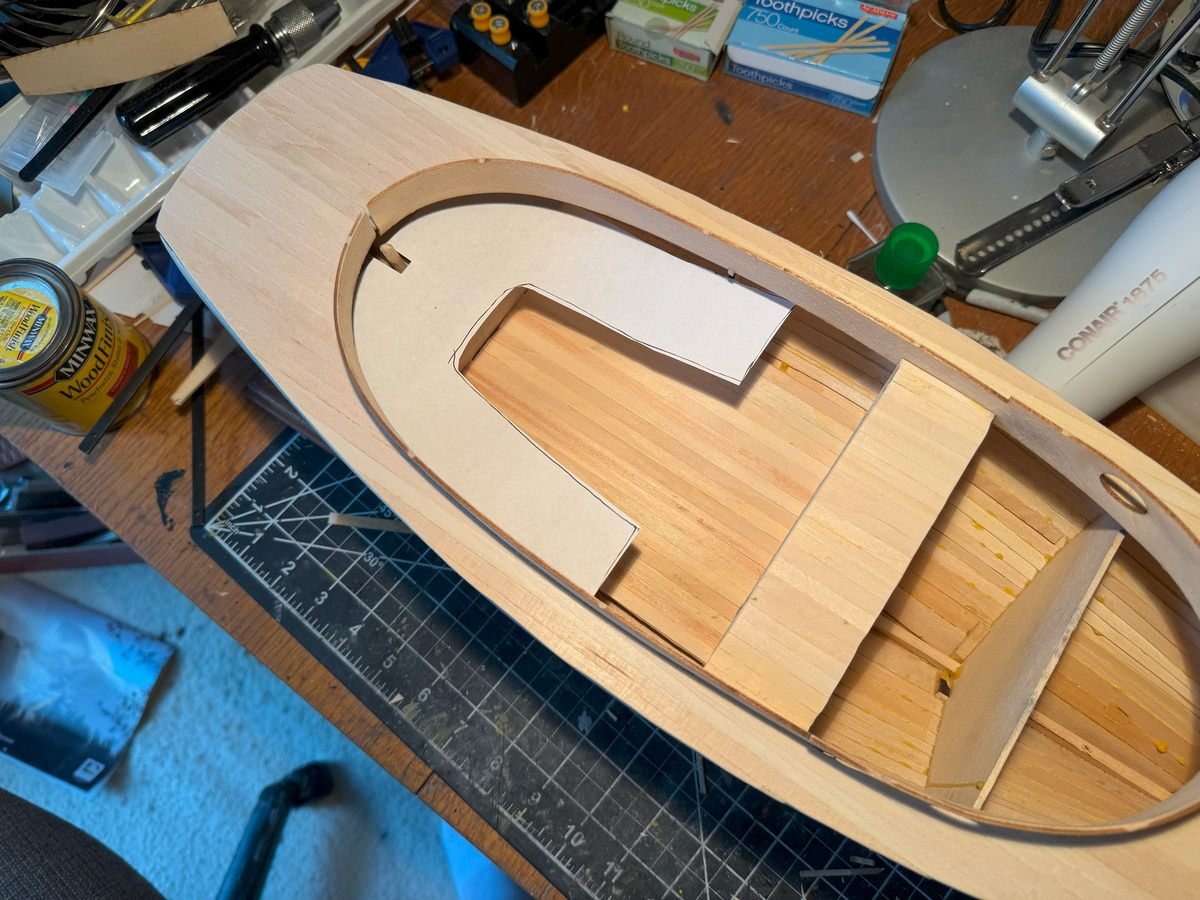
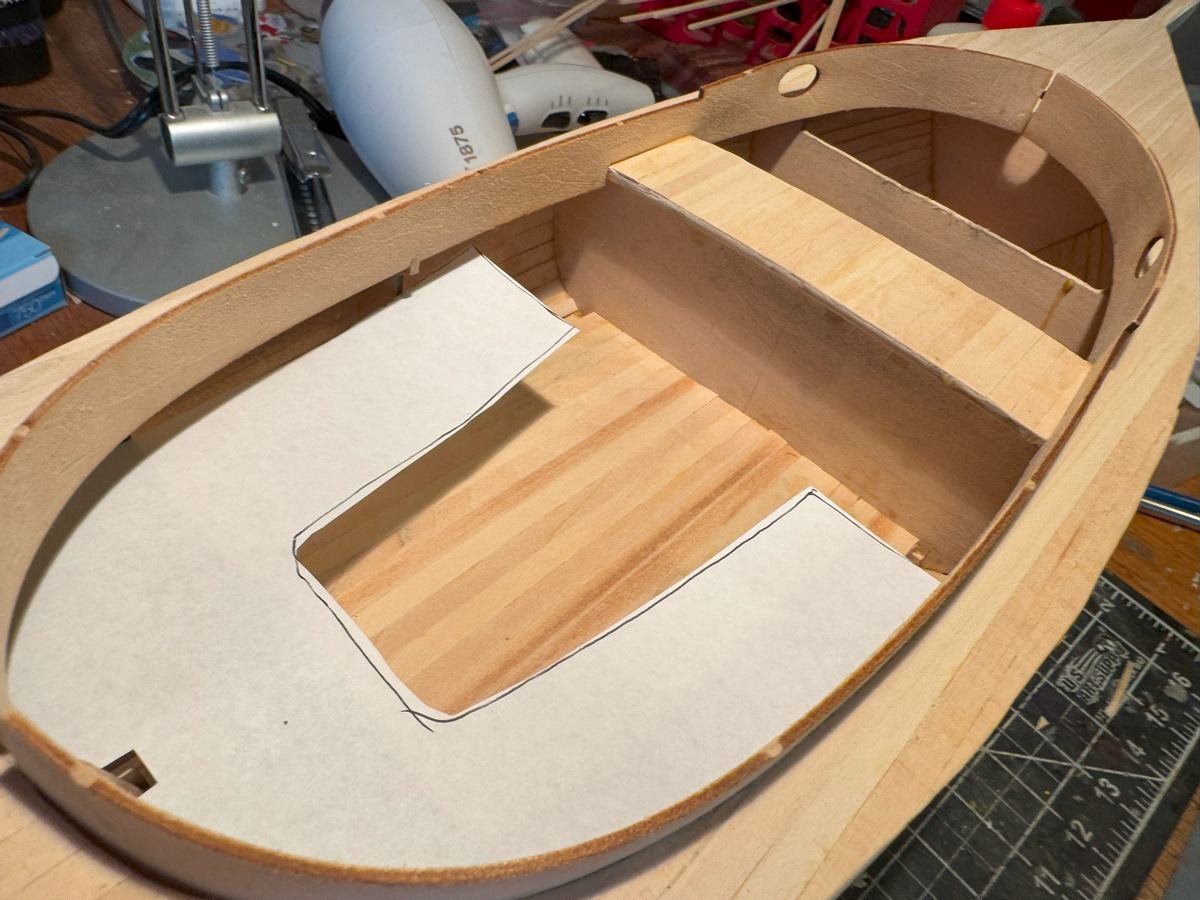
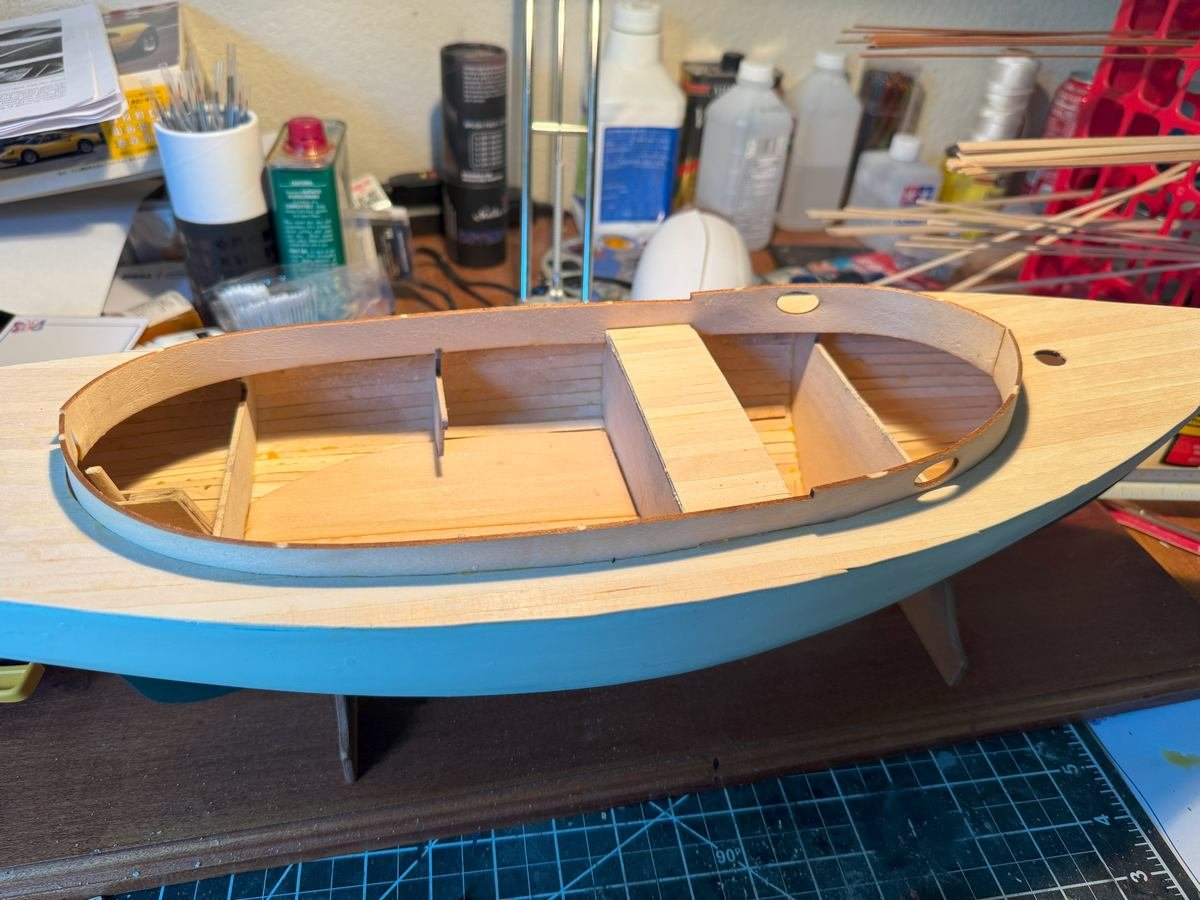
And another quick update..... I repainted the coaming with the same off white color as the top half of the hull. I think it looks much better. I then made the seat and installed it into the cockpit. I simply cut and laid out the strips over that paper template I showed a couple posts ago.
- 90 replies
-
- 4
-
-
- Friendship Sloop
- bluejacket shipcrafters
- (and 1 more)
-
It's not so noticeable in the picture, but I kind of do not like the white versus the off white on the topsides of the hull. I just might tape it back up and use the same off white on the coaming around the cabin and cockpit.
- 90 replies
-
- 3
-
-
- Friendship Sloop
- bluejacket shipcrafters
- (and 1 more)
-
Just a quick update....here she is with the coaming and cockpit painted. There will be a trim strip around the outside of the coaming so I was not too diligent about a perfect taping job. Next is the seat and tiller, then enclose the cabin.
- 90 replies
-
- 5
-
-
- Friendship Sloop
- bluejacket shipcrafters
- (and 1 more)
-
Thanks for the likes and the comments, and thanks for the patience. I am back to working some on the Friendship sloop after doing some traveling then finishing a side project which you can see here: On the sloop, I have done the vertical planking of the inside of the cockpit coaming, then I taped it up in preparation for paint (and yes I sanded it some after taking the first picture). I plan to paint the inside and outside of the coaming white, then I will tape over that and paint the inside of the cockpit gray. I plan to use the air brush for the white paint though it is a bit awkward as this model is too large for my little spray booth. I have some rattle can gray that I'll use for the inside of the cockpit and likely take the boat outside to do that.
- 90 replies
-
- 3
-
-
- Friendship Sloop
- bluejacket shipcrafters
- (and 1 more)
-
Hi All. I've completed my build of the Fujimi Ferrari 288 GTO. This is the same one built and logged by @CDW though I opted for the more traditional red instead of yellow. And extra thanks to Craig for his build log, pointing out all the potholes with this kit and supplying a bunch of photos of the prototype. I referenced both numerous times during my build. This was definitely a challenging kit with many small parts and parts that are tricky to attach and get lined up. But overall, I managed to include most of the parts in my build. The decals on my old kit were definitely fragile, and the instrument panel decals were poor....they were far too large for the circular gauges molded into the panel. Instead I just painted them. You may also notice that the side windows are open. Unfortunately that large clear piece was not completely molded so the passenger window was partially missing. I opted to cut off both side windows and actually like the effect and may do more of this on future builds to give better view of interiors. Every time I build a model car I think I am going to emulate the guys I see on youtube going nuts with clear coat and sanding and polishing and get that glass like finish. But then after applying several coats of clear, I think to myself that it is good enough and I fear doing any sanding or polishing is more likely to ruin things. That is especially true for a somewhat hard to find model like this one. So I just stopped after applying the clear. And yes, I went over to hobby lobby and bought a couple cheap, common models on their 40% off sale and I swear I will practice my highly polished, glass-like finish on those. Maybe. Anyway, here are pictures of my build. Overall it was a fun build despite some challenges and I am very pleased with the results.


- 2 replies
-
- 10
-
-
-
Welcome aboard! As for your question about uploading and posting pictures, first realize that it may depend on how you access the forum...browser on PC or MAC or phone or iPad. But, at least with a PC browser, when you reply to a post there is an area where you can drag or choose files. Just select your picture files there. Note that JPEGs are probably the best bet. If you have an iPhone and it is set to the default HEIC format, those pictures will not appear on the forum, and need to be converted to JPEG. For more help, check out the pinned posts both in this subforum and in the "Using the MSW forum" subforum.
-
Nice, I will follow along. I've been tempted to add this kit to my stash, or perhaps the non-race-car version of it that they sell. It will be interesting to see how it comes together.
-
Welcome aboard! It may vary based on how you are accessing the forum, but in the browser based interface there is a search field near the upper right corner. If you type something in the box it defaults to searching the current topic. If you click on the magnifier, it shows many options. If you select "topics" under content type, a drop down menu should appear that allows you to select the 1901 to present subforum. Click on "content titles only" and enter bluenose in the search box and you will see many topics for bluenose build logs.
-
Wow, beautiful build, take a bow. And pretty quickly done for such a complex kit. Glad it went together so well for you, and looking forward to what's next.
-
Hi Paul and welcome. I had a similar experience back in 2015 (I think), though I had built a few wooden boats/ships before. But on a trip to Maine I stumbled across the Bluejacket shop and made a u-turn just like you. I did not buy anything that day, but ordered the Swampscott Dory after I returned home.
-
Thanks for the patience of those following along. Likely there will be another gap before my next post. Meanwhile, I've stained the deck and cockpit floor. As usual, the stain is a bit splotchy on the basswood but I can live with that. I've also started doing the vertical planking of the outside of the cabin and cockpit coaming. As you can see, I glue on the rough cut pieces and then trim off the tops to get things even. I'll do similar planking on the inside of the cockpit coaming and add a cap rail on the coaming and a roof over the cabin. And all of that will be painted white (with the possible exception of the roof). Have not decided what to do with the rest of the inside of the cockpit yet., e.g. the inside of the hull planks. I might just paint that area gray. Much of it will be hidden when I add the seats.
- 90 replies
-
- 3
-
-
- Friendship Sloop
- bluejacket shipcrafters
- (and 1 more)
-
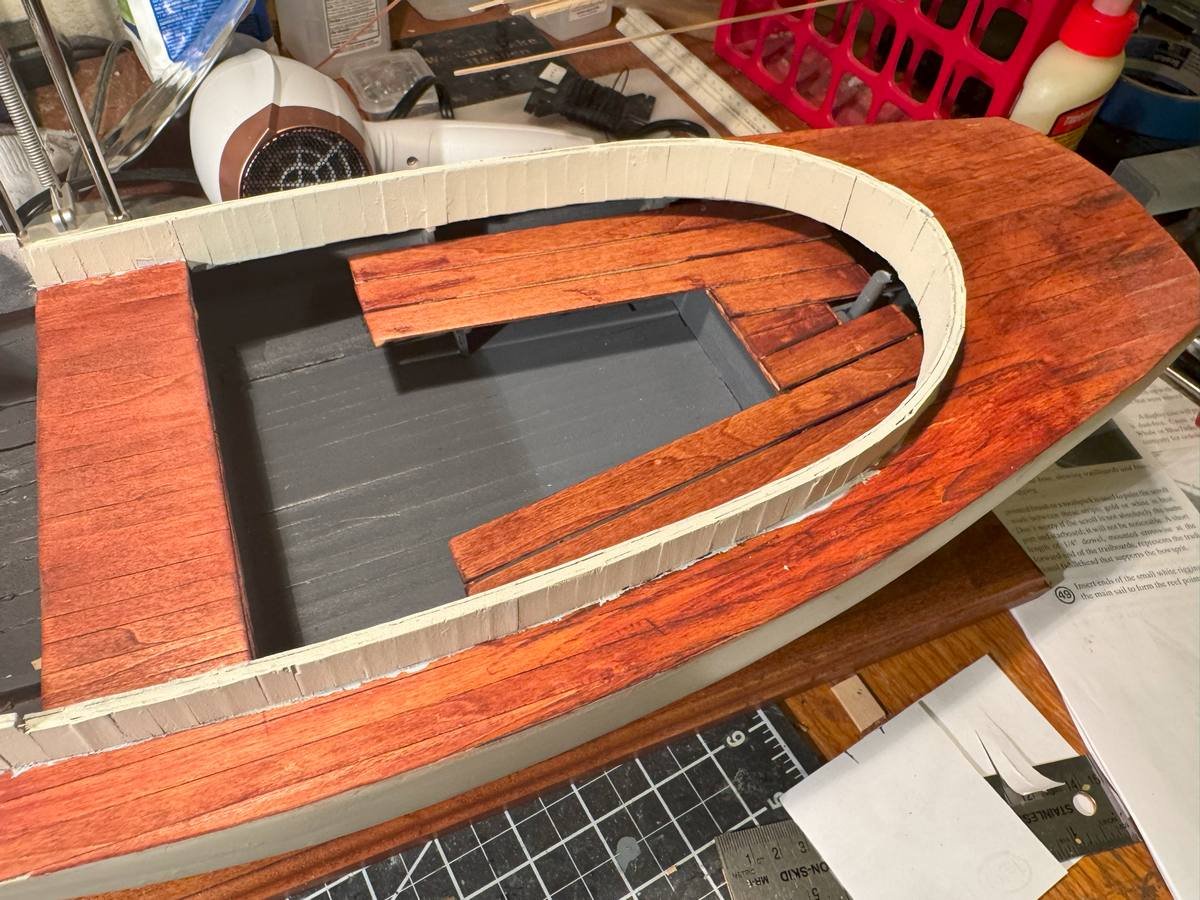
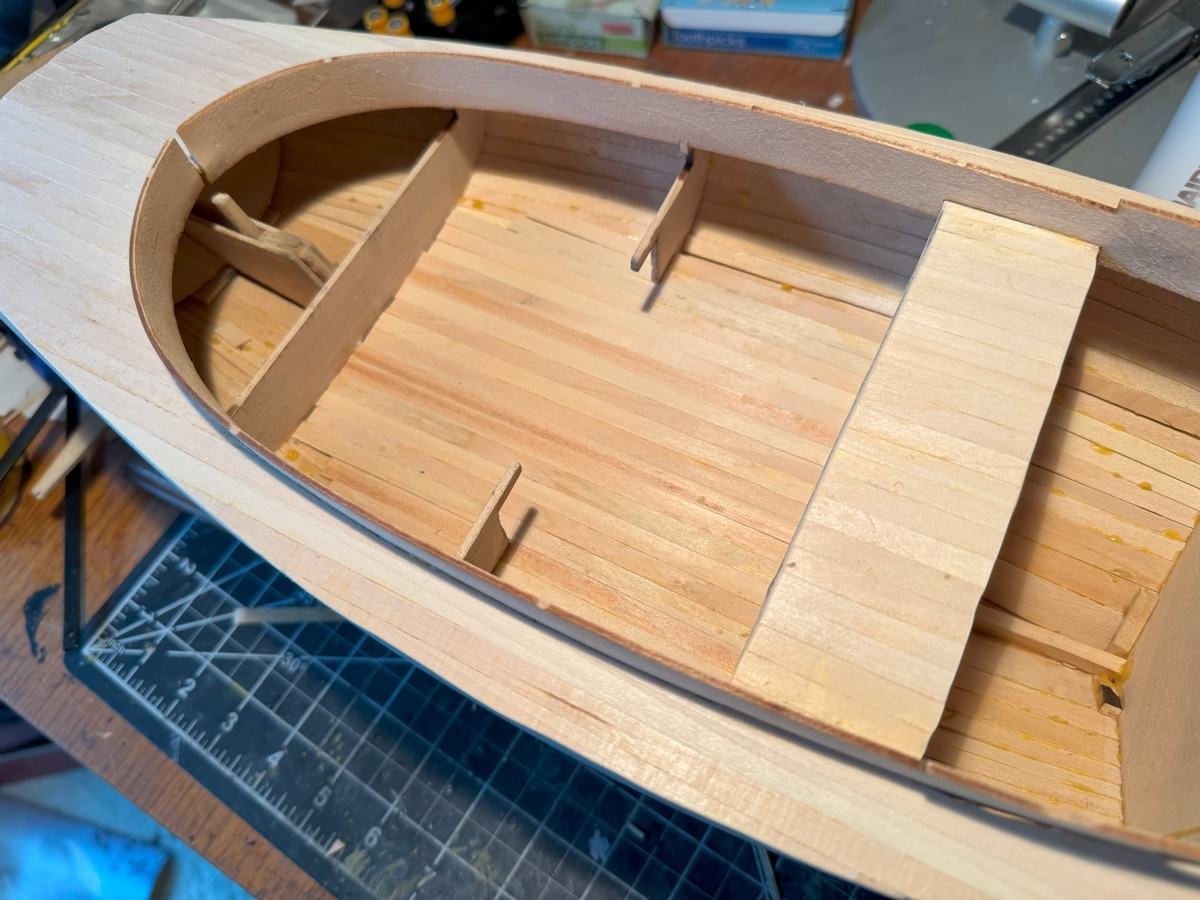
A little more progress.....I have planked the cockpit floor. I also did a paper template of the seat and test fit that. I have not decided what, if anything, to do with the bulkhead at the front of the cockpit. The kit instructions do not seem to address it....maybe plank it vertically or horizontally or just paint it. I've also dug out a couple old tins of stain and done a bit of testing to try to figure out which to use on the deck, cockpit floor, and seat. Though I am not yet sure.
- 90 replies
-
- 7
-
-
- Friendship Sloop
- bluejacket shipcrafters
- (and 1 more)
-
I had to react with the open-mouthed "wow" emoji because that is exactly what I did in real life when I scrolled down and saw the picture. The body and decals look flawless. Thanks for the warning about the MFH decals.
-
Sopwith Camel by Spiff - Model Airways - 1/16
gsdpic replied to Spiff's topic in Non-ship/categorised builds
Looks like you've done some excellent work on the engine, prop, and wings. I have this kit on my "shelf of doom". I built the engine and prop then completely switched gears and built the Artesania Latina Sopwith Camel instead. That is disappointing about the wing tips....I dug my kit out and compared the ones I have to the plan and they are very similar to what yours looked like. -
Cool. I have not seen that before either. I am not any sort of admin or anything....but if you go to the "ignored users" section of your own profile, it lists the account names for which you've hidden the signature and you can unhide it there. I did not try the "hide all" option, but this works for hiding and unhiding an individual.
-
I've now glued in the cockpit coaming/cabin sides on both sides, as shown below. The instructions say to "plank" both sides of the cockpit coaming with vertical pieces of the same wood used for the deck. However, many of the completed builds of this kit that I have seen online seem to have skipped that step. I guess I will go ahead and do that planking.....if nothing else that will allow me to cover the gap I accidentally left in the back between the two sides of the coaming, as I trimmed one of the laser cut pieces just a bit too much. Doh.

- 90 replies
-
- 3
-
-
- Friendship Sloop
- bluejacket shipcrafters
- (and 1 more)
-
Also seems like this should be in the build log section not in the group build section.....
