
DONATION DRIVE - SUPPORT MSW - DO YOUR PART TO KEEP THIS GREAT FORUM GOING!
×


gsdpic
-
Posts
831 -
Joined
-
Last visited
Content Type
Profiles
Forums
Gallery
Events
Everything posted by gsdpic
-
I think your sprayed on carbon fiber effect looks good and will look even better with a nice gloss coat. It is a little hard to tell the scale from the picture but I assume the little diamonds are pretty small. Certainly spraying it is likely to be much easier than decals, especially if there are no pre-cut decals available. It is interesting in the picture of the full size car that the carbon fiber on the main chassis pieces around the engine look quite different from the two carbon fiber pieces in the lower left and lower right corners of the picture. I wonder if the chassis CF is real and the other two pieces are more decorative instead of real carbon fiber.
-
Looking good. But yes, that is one of the disadvantages of building models of newer supercars.....the engine is mostly hidden and the underside will just be one big, mostly flat panel hiding most of the suspension, in addition to hiding the engine.
-
Lining help needed
gsdpic replied to Smok_Baltazar's topic in Building, Framing, Planking and plating a ships hull and deck
If you click on the "articles database" tab at the top and scroll down a bit, you will also see several articles about planking that may help. -
Wow, that looks great. The pictures with the flash really show it off. So it is not two decals on top of each other, it is one decal with a red stripe next to a black stripe and the black stripe is just over the black paint. What is the advantage of that? I guess just keeping it so there is no silver visible on the "wrong" side of the red stripe. Do you plan to slice the decal at the door panel gaps?
-
Very attractive prototype. Interesting that it is a train car but there are a bunch of wood strips like you are planking a ship. I'll follow along despite a general lack of knowledge or much interest in trains.
-
Edit: Oh duh, I just realized this thread was from 4 years ago. Nevermind. Welcome aboard from a long-ago resident of Raleigh and NC State grad. For the sails, you might look at this post from @John Ruy 's Bluenose build: He laid the model on its side and used some sort of fabric stiffener spray and a hair dryer to add some billow to his sails after they were already mounted. I guess that is basically option 1 from Mark's post above but gives a good example.
-
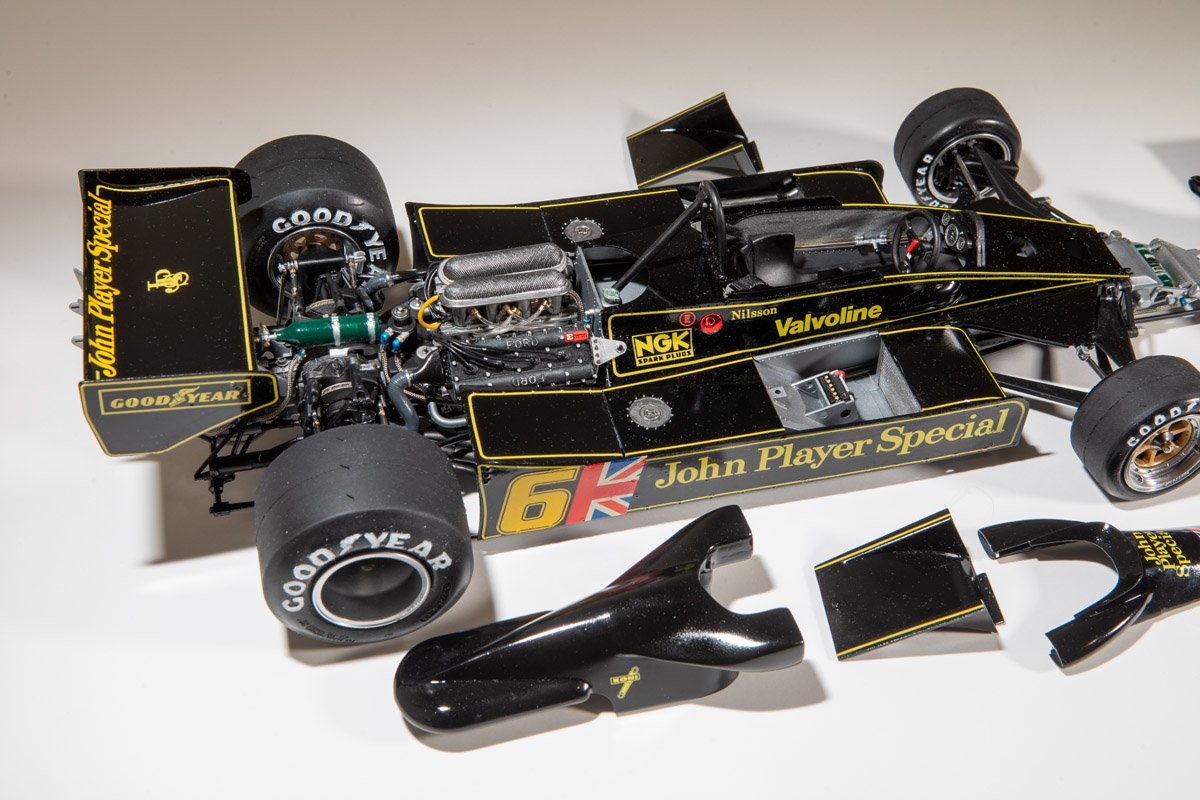
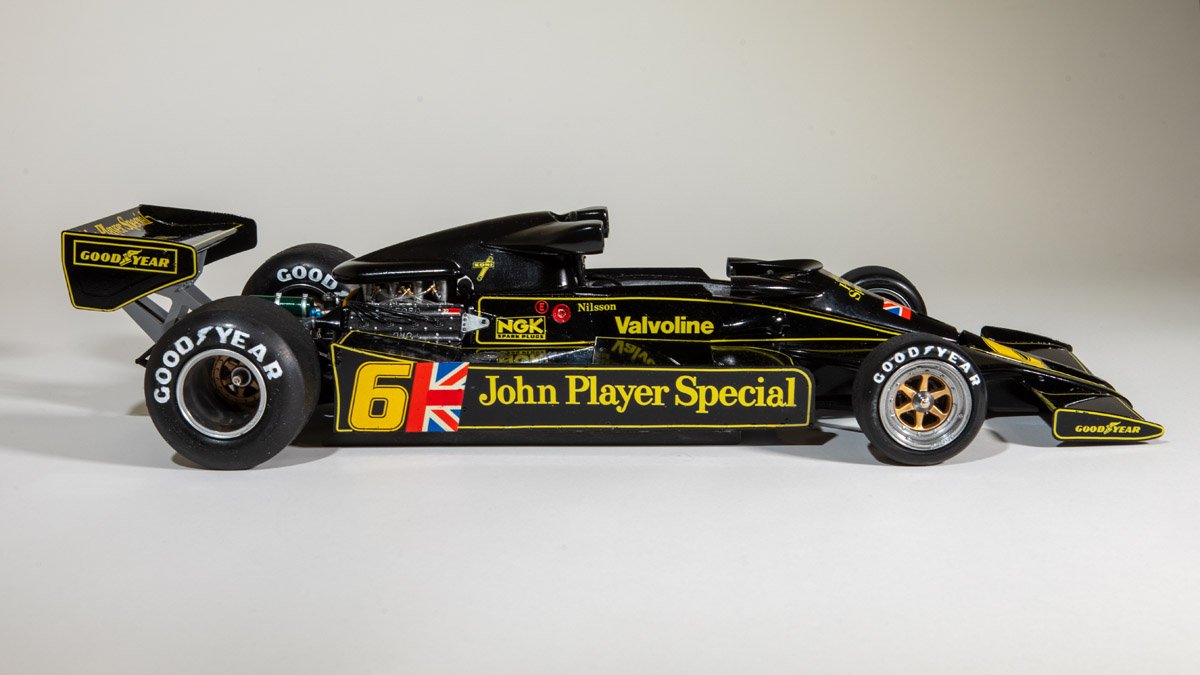
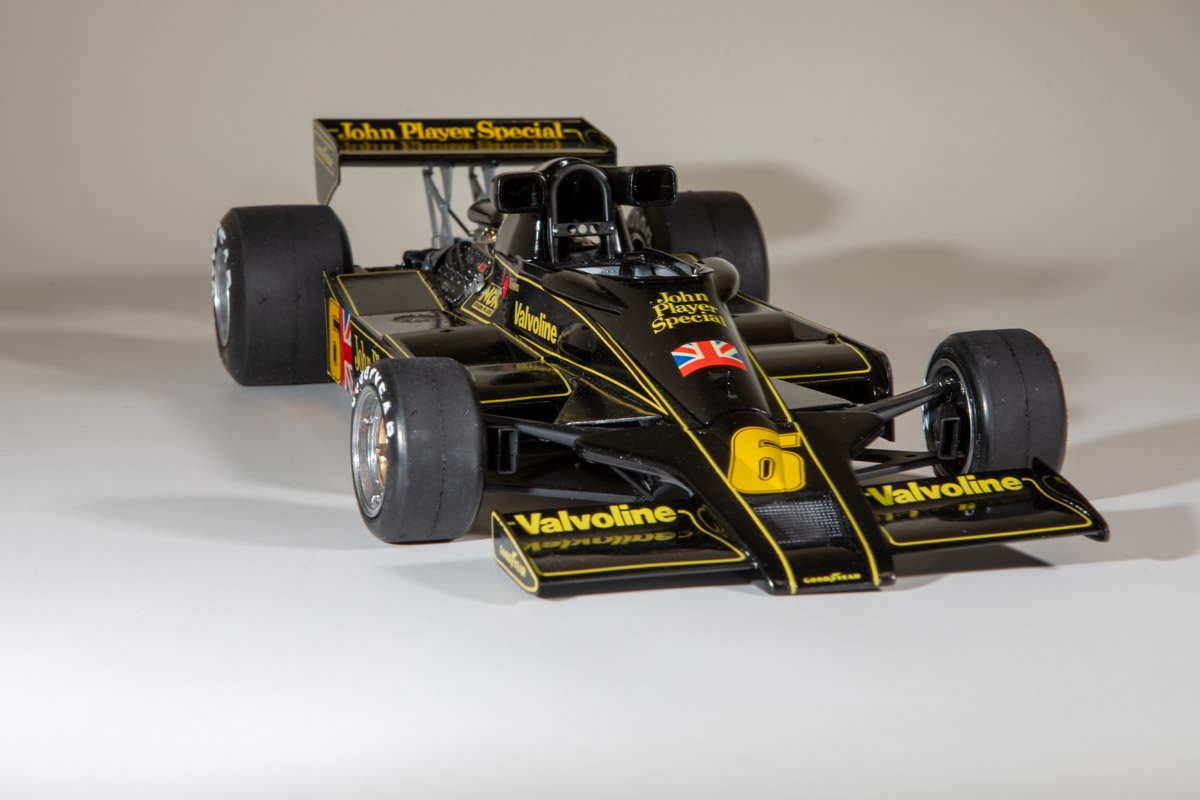
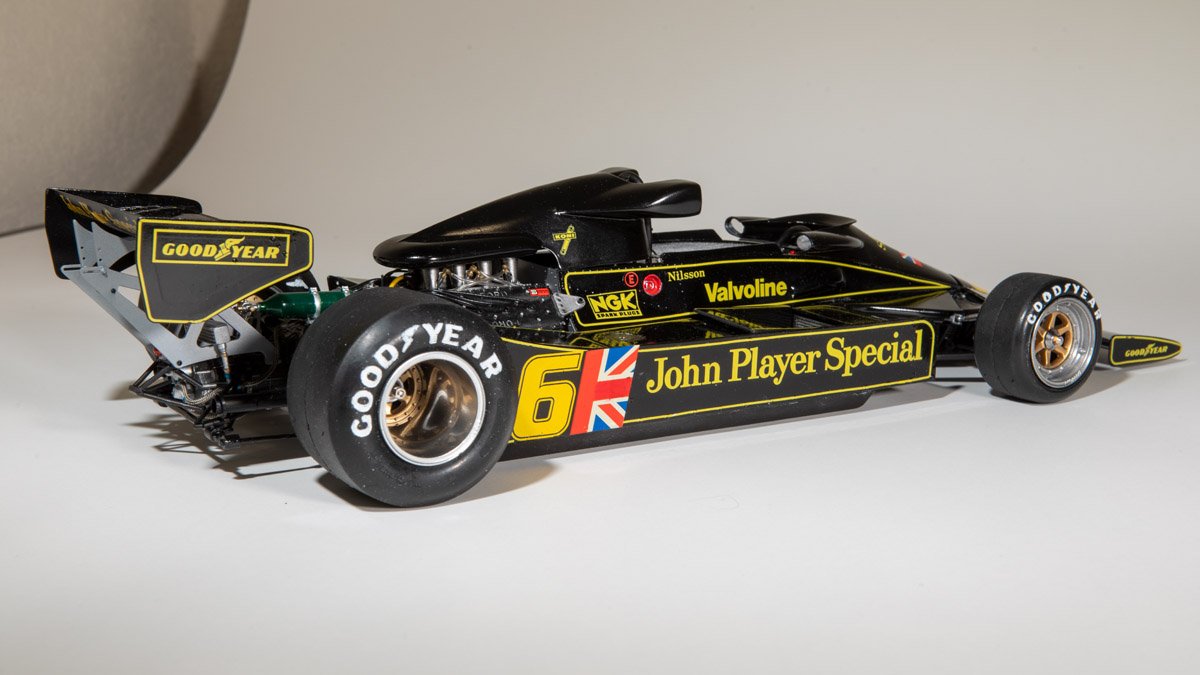
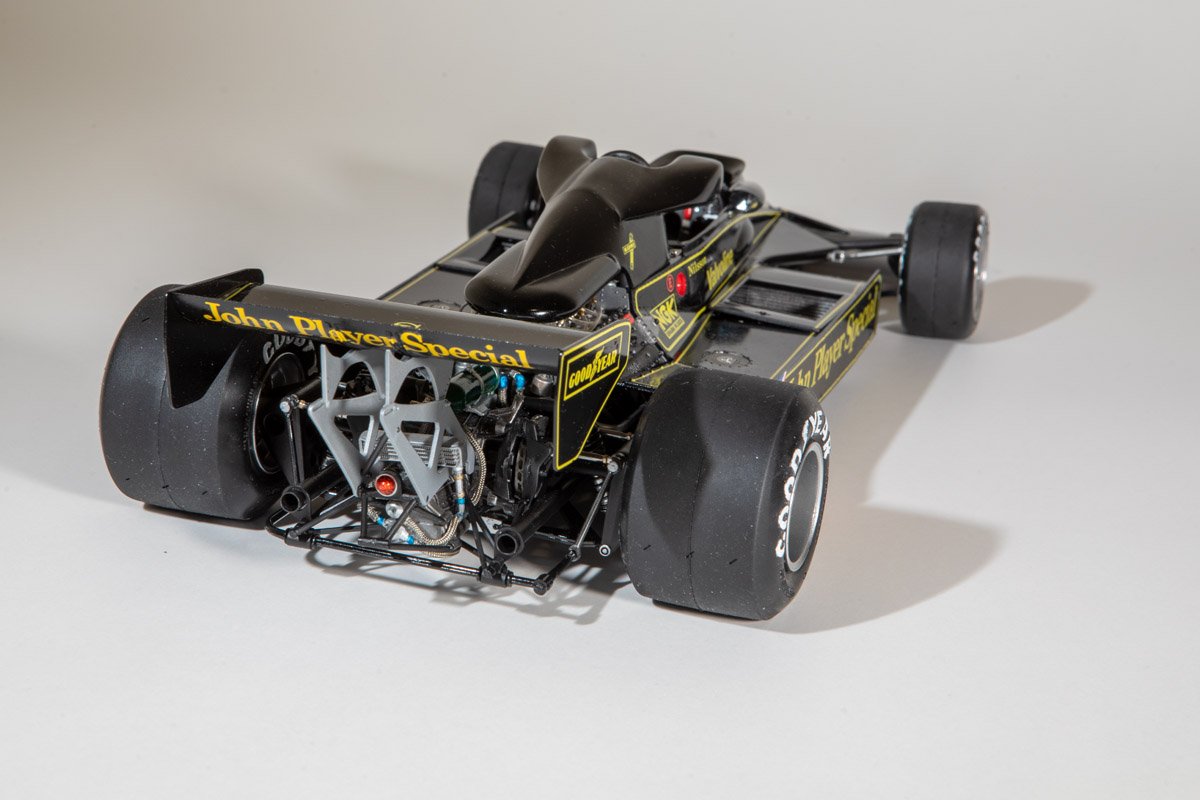
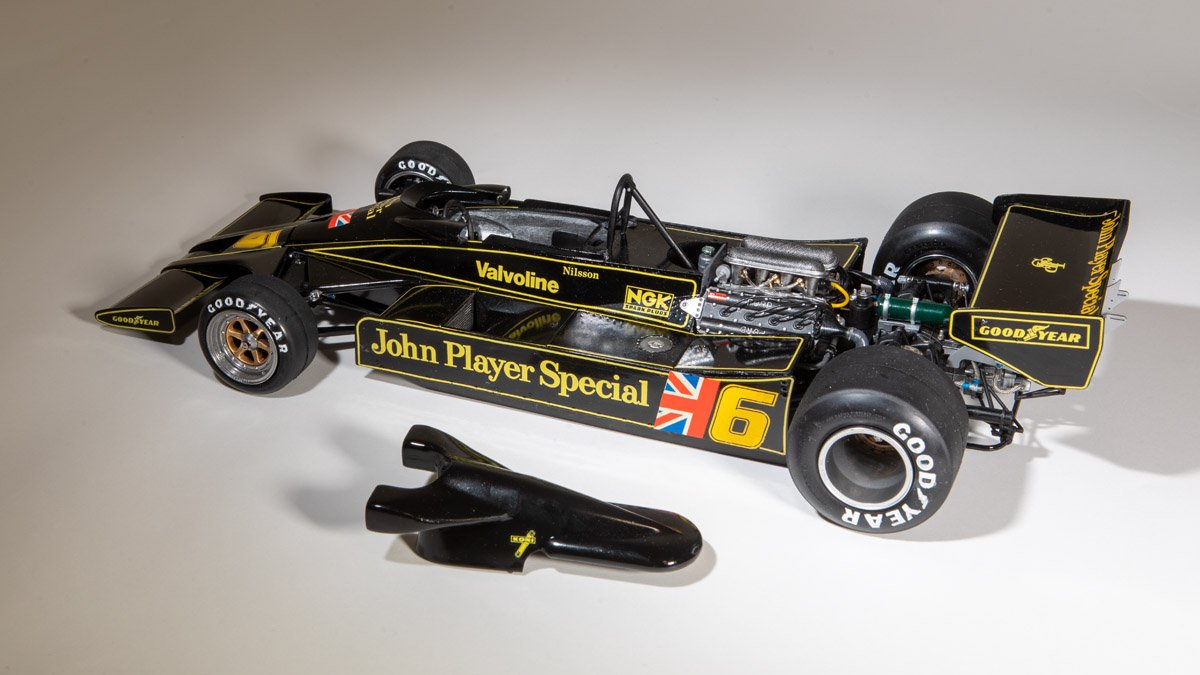
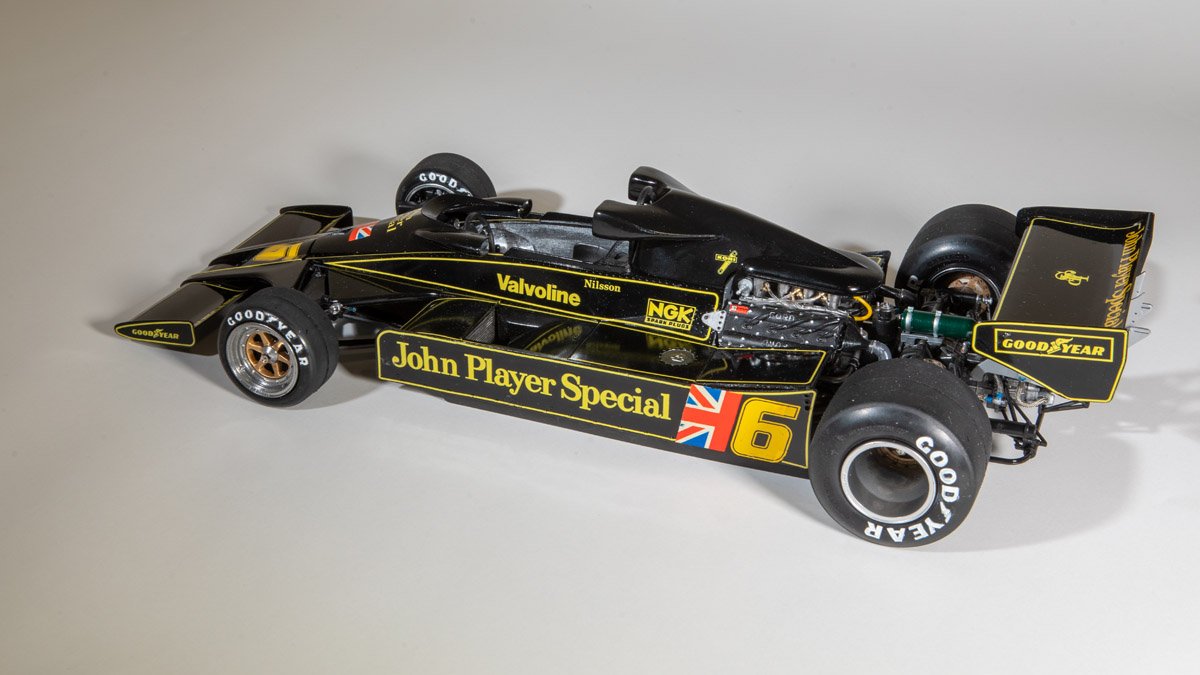
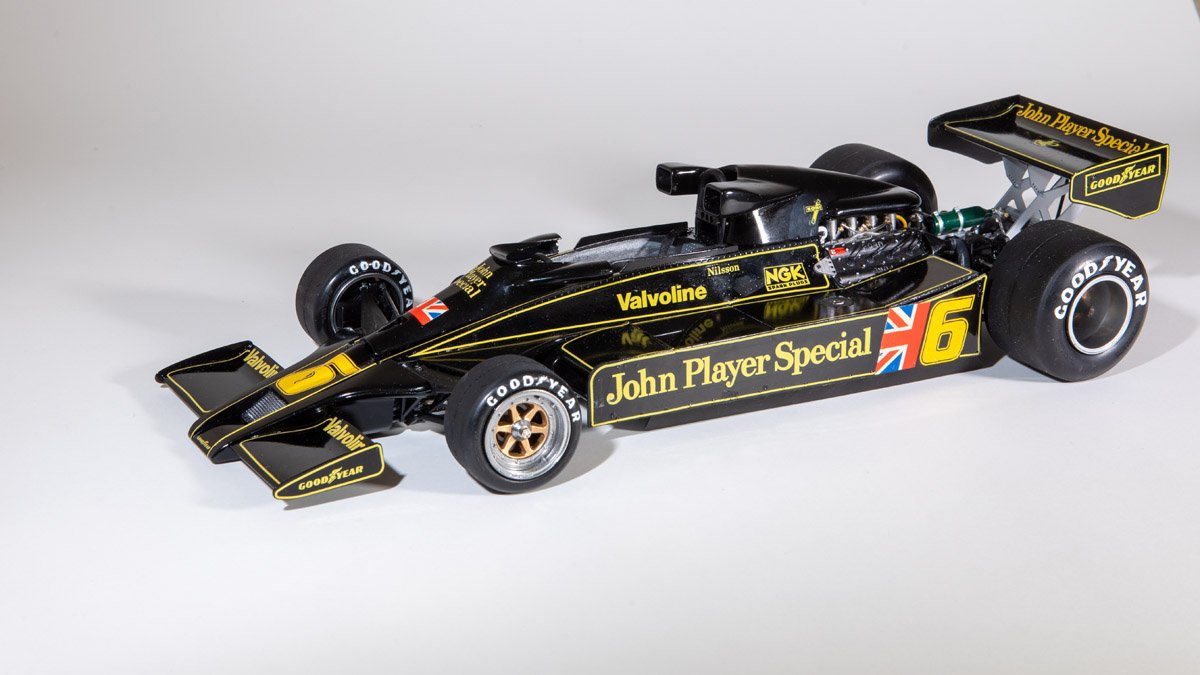
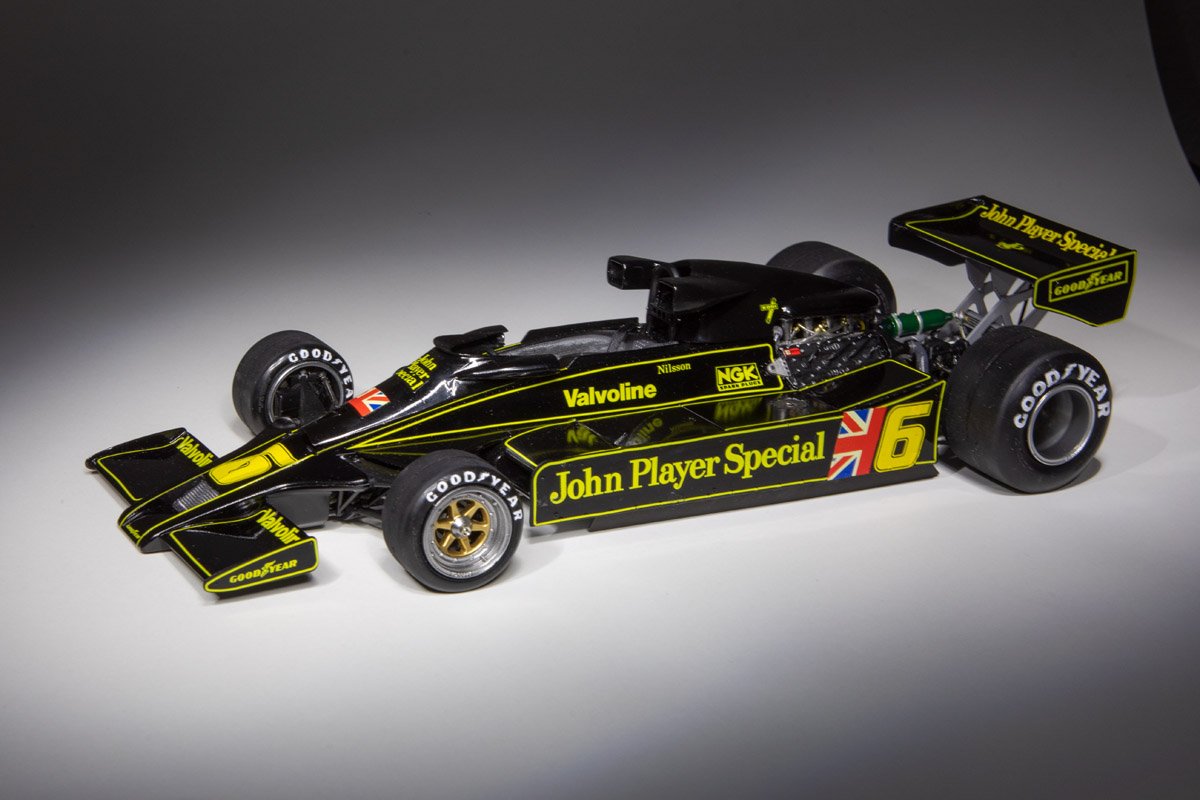
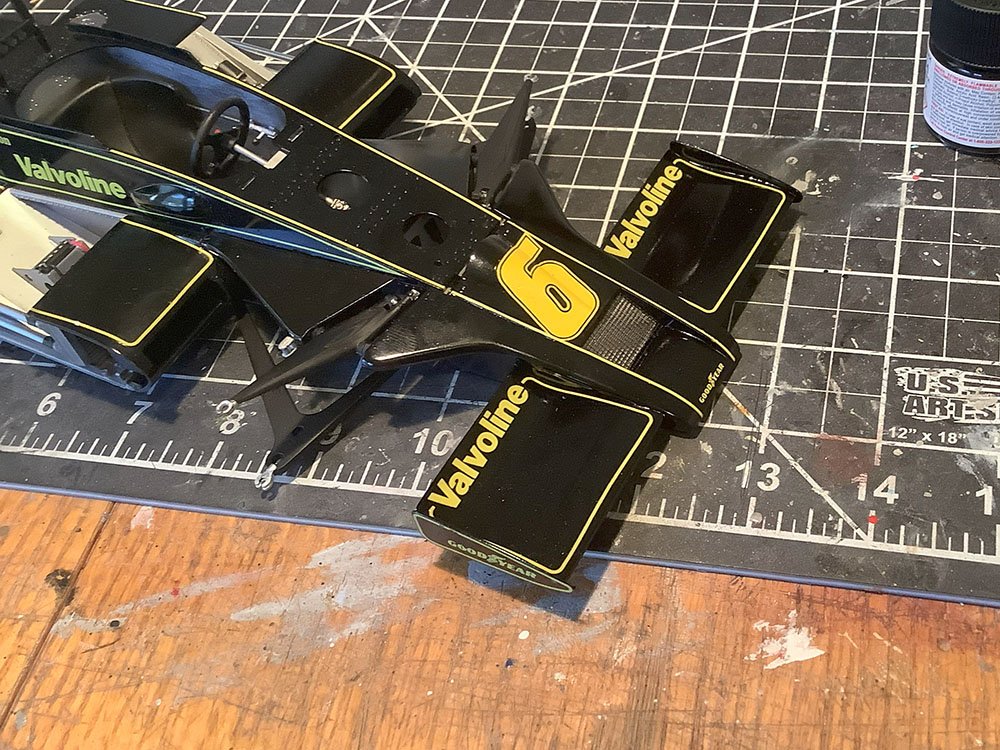
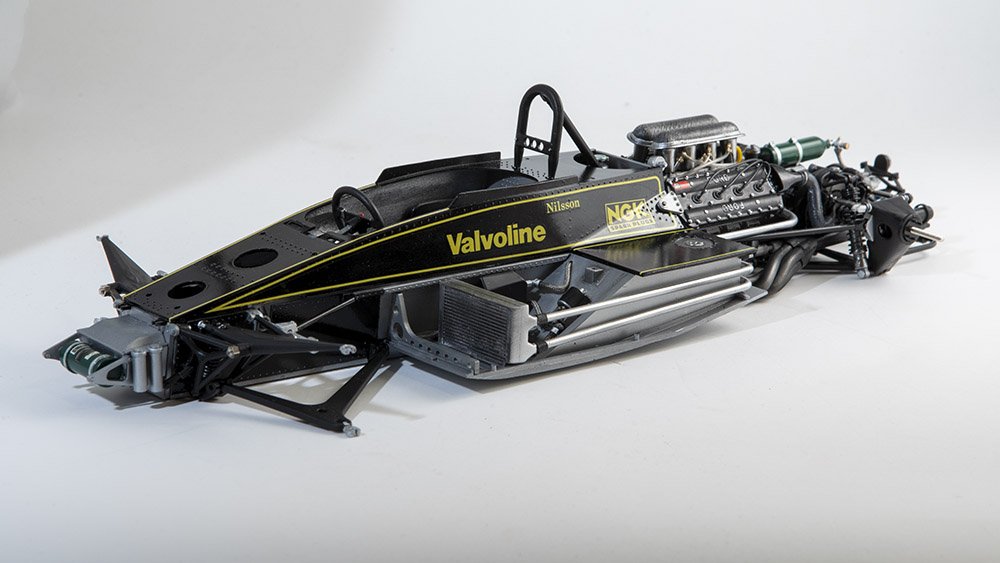
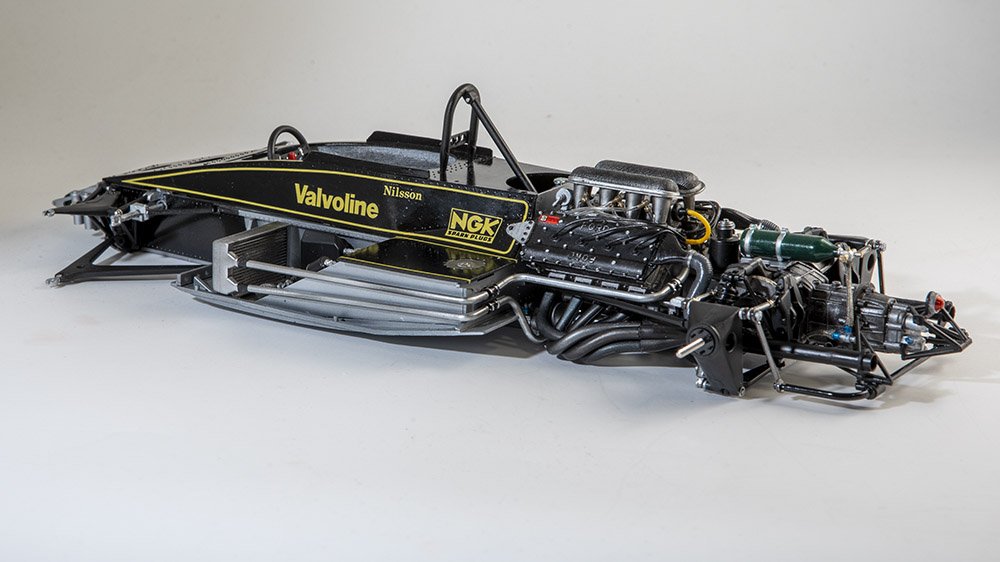
Ok, I am calling this one done! Thanks to everyone who has followed along or commented or hit the like/wow button. I appreciate it. It was a little bit of a struggle to wrap this one up. The outer panels of the side pods and the ground effects skirts hanging off of them put up a fight. It took several tries to get them securely glued in place and in fact, one of the ground effect skirts popped off yet again while I was taking the final pictures of the car. I also put in the MFH seat belts, which was more time consuming than I expected, though I guess I did not get any good pictures of them, nor did I get a close up of the cock pit. Anyway, here are the final pictures. Oh, note that it was also half way through the photo shoot that I managed to get those covers on the top of the side pods fully snapped into place so on some of the pictures, there are some gaps around those covers that are not present later. The first picture shows the various panels that are left removable.

- 62 replies
-
- 13
-

-

-
Oh man, I will definitely follow along with this one. I've built the Tamiya 1/24th scale Carrera GT twice and always wondered about the 1/12th scale version. I am sure you'll produce a stunning model.
-
Looks great, well worth the few struggles along the way.
-
Jaguar XK-E by CDW - Gunze Sangyo High Tech Model - 1:24 Scale
gsdpic replied to CDW's topic in Non-ship/categorised builds
Oh man, that is unfortunate that you have the incorrect part. Is that one also broken at the back? The top piece does not extend as far back as the one on the other side. Perhaps that is why the original build was abandoned. I guess that upright piece is probably the mounting point for the front suspension so a pretty critical part. Sounds to me like another case of needing 3d design skills and resin printing capability. -
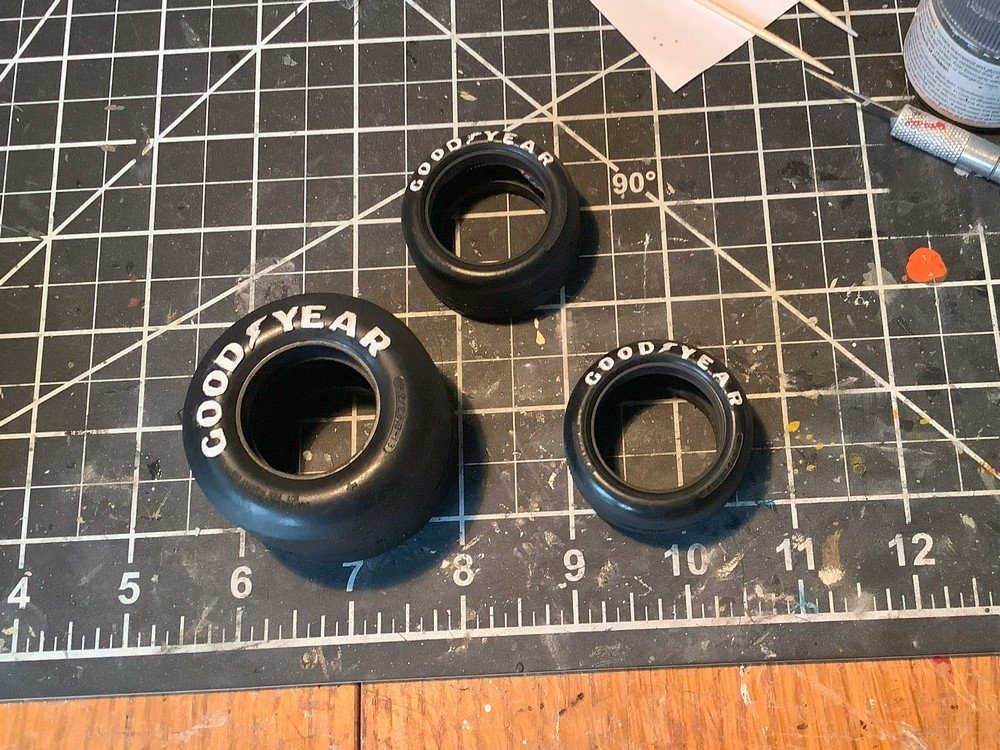
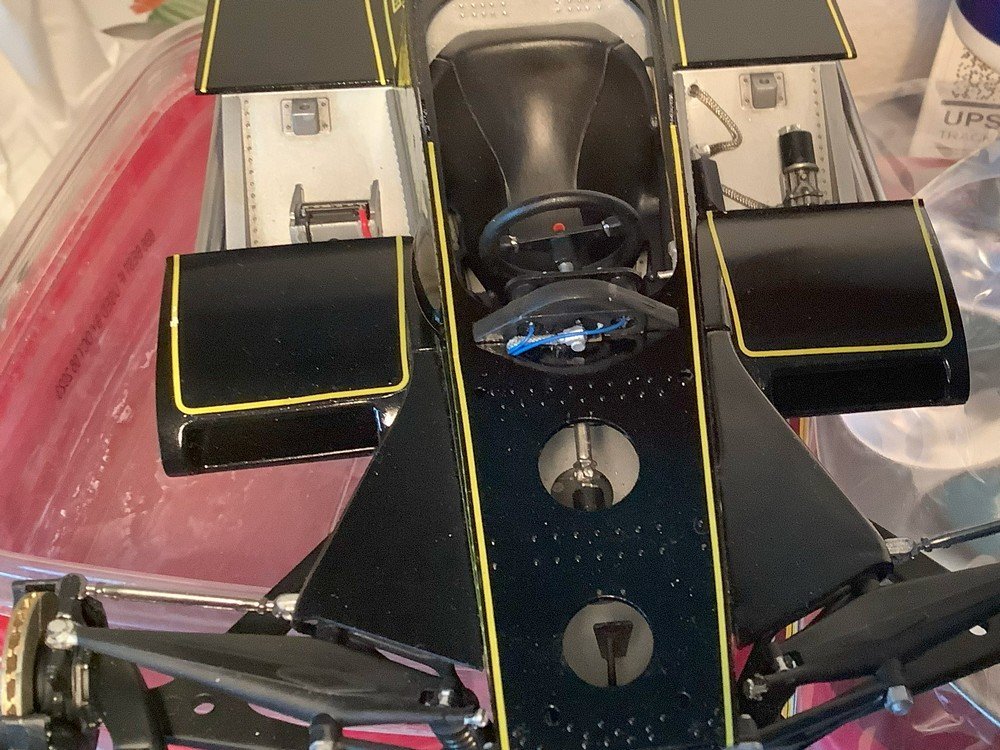
As always, thanks for the likes/wows/comments, or just looking in. I've done a few more details....in the front I added the instrument panel with some wires/tubes to the instruments added. In the rear, I added the oil cooler along with the supply lines. I also got some Tamiya XF-2 flat white paint and began hand painting the "good year" logos on the tires. I've been adding a tiny drop of dark gray paint to the white, just to make it not quite as bright. I've painted the logo on both sides of one front tire, and on one side of two other tires. So, I am half done...four out of 8 of the logos are painted. I still need to add that MFH seatbelt but otherwise I am very close to being done.
- 62 replies
-
- 14
-
-
-
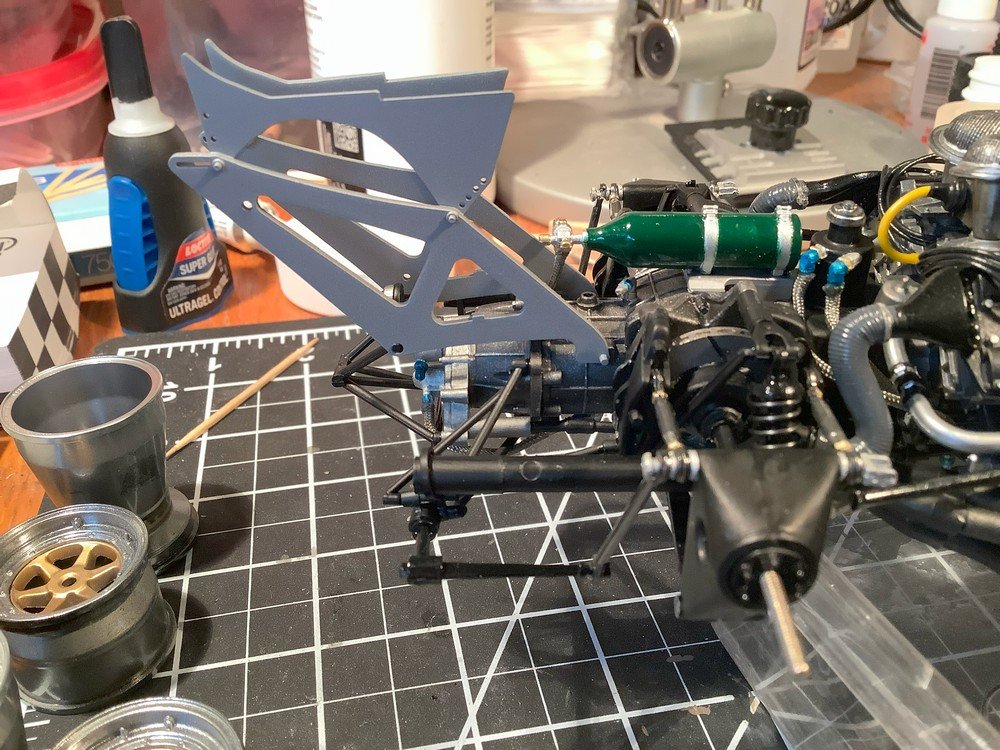
Thanks for the likes. I've completed and mounted the front hubs, as shown below, and also added the supports for the rear wing. I then decided to work on painting the wheels. The wheels were made of three pieces, an inner disk and then a front and back rim section. The rim sections were provided in chrome which I stripped off. I then repainted the rim sections first with Tamiya LP-1 lacquer gloss black, then alclad polished aluminum. Once that cured, I also lightly buffed the aluminum with a piece of cloth. The inner wheel disks were painted with alclad gold. I am quite pleased with the results. There is still a small oil cooler to be added to the wing support, along with several more oil lines (using the braided line). I have some other details as well, still have not done the instrument panel, for example, and I have an MFH seat belt that I intended to use but have not done yet. And there is one other hurdle....this kit does not provide any sort of decal for the Good Year logo on the tires. I intend to attempt to hand paint the logos but I just discovered I do not have any flat white paint. I either need to order some or wait a few more days until I feel ok going out in public again and hit the local hobby shop to see if they have any XF-2 in stock.

- 62 replies
-
- 15
-
-
-
Jaguar XK-E by CDW - Gunze Sangyo High Tech Model - 1:24 Scale
gsdpic replied to CDW's topic in Non-ship/categorised builds
Looks like an interesting rescue. I have to limit my looking at ebay It will be interesting to see how it comes together. -
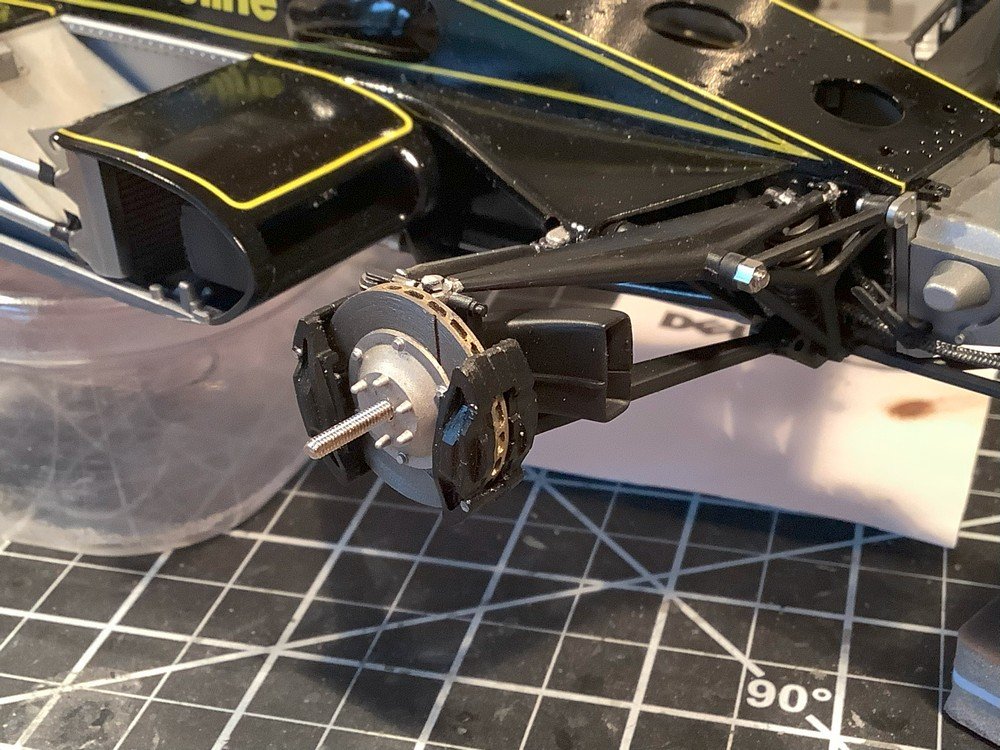
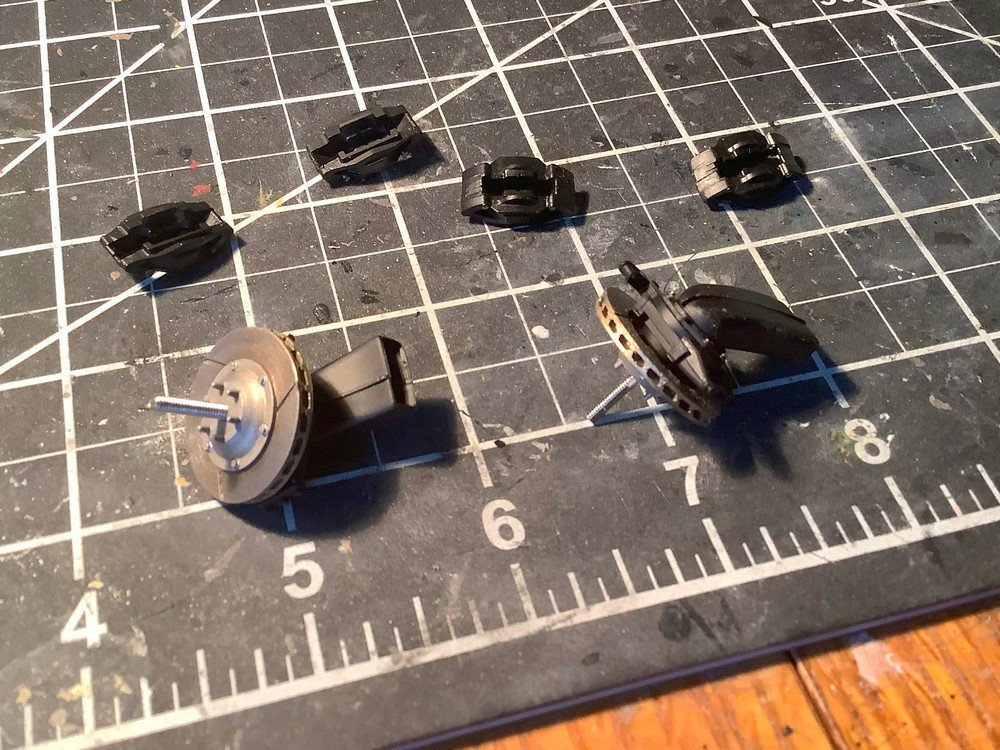
Thanks all for the well wishes. Fortunately I again had a fairly minor case. The only remaining symptoms are some coughing and some fatigue, though the nasal swab test still came back positive today, which was not a surprise since this is just the fifth day since symptoms started. Between naps and coughing fits, I have managed a little bit of work, painting and assembling the front hub assemblies and the brake calipers, though I still need to attach the latter to the former. All shown below. Both front and rear wheels have 2 calipers per wheel.
- 62 replies
-
- 11
-
-
And now....my second bout of COVID. That's what I get for climbing into a metal tube with ~200 of my "friends". At least it happened on the way back, not the way there. I'll probably take a few more days off. My symptoms are not too bad so far but I don't feel much like thinking and can just see having a coughing fit while manipulating some small, delicate parts.
-
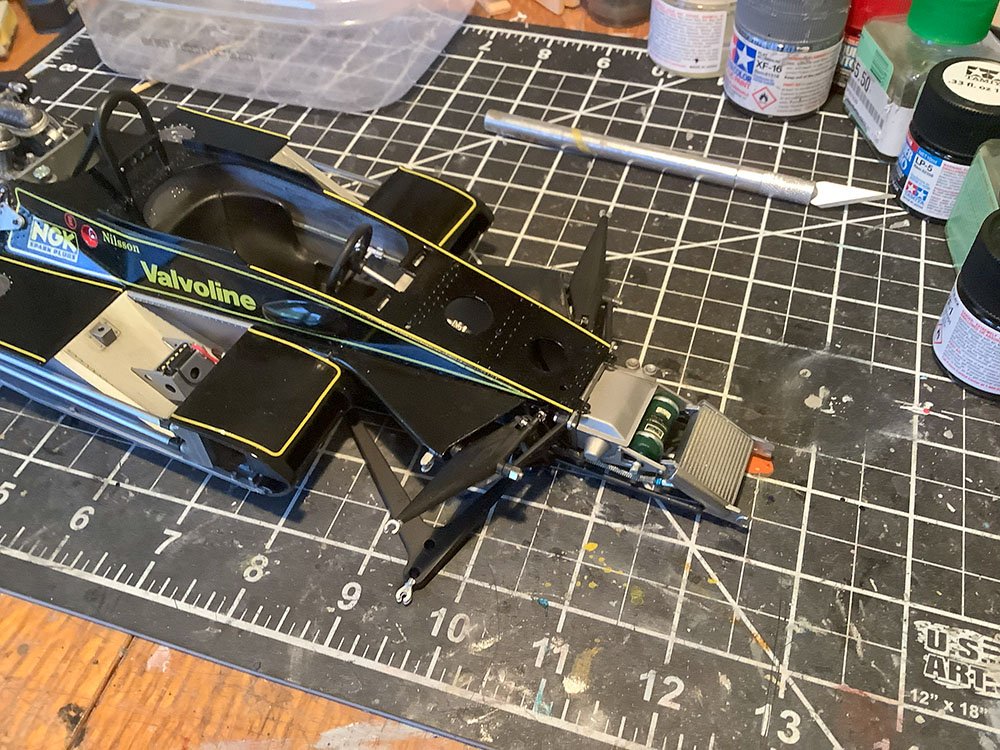
As mentioned, I have resumed work on this. The main thing I did was to put on the front pieces of the side pods and the faring behind the front suspension. You can see both in the pictures below. In the second picture, I put on the front wing to show how it hides the nuts discussed above. I still plan to paint those nuts though. I also realized while taking the pictures that I have yet to put the instrument panel on, as I want to do some additional detailing, as in some sort of wiring harness, for the instrument panel. And yes, after I complete the build I will wipe down the body to get rid of that big thumb print After this, I need to work on the front hub assemblies, with the brakes and brake ducts. After that, not much more to do. I still need to decide if I am going to dechrome the wheels and paint them with alclad. I probably will, as I did for the two previous Lotus F1 cars I built. But it is a little bit of a pain, especially the rear wheels. It is like trying to paint the inside of a pill bottle.
- 62 replies
-
- 12
-
-
Thanks, that is a good idea. They generally are not visible due to some faring around the suspension arms. But the front nose cone is intended to be removable, in which case at least the nuts in the front would be visible.
-
Thanks Mike for the compliment and all others for the likes and wows. I've been on a brief vacation but am back now so should resume work on the lotus this week.
-
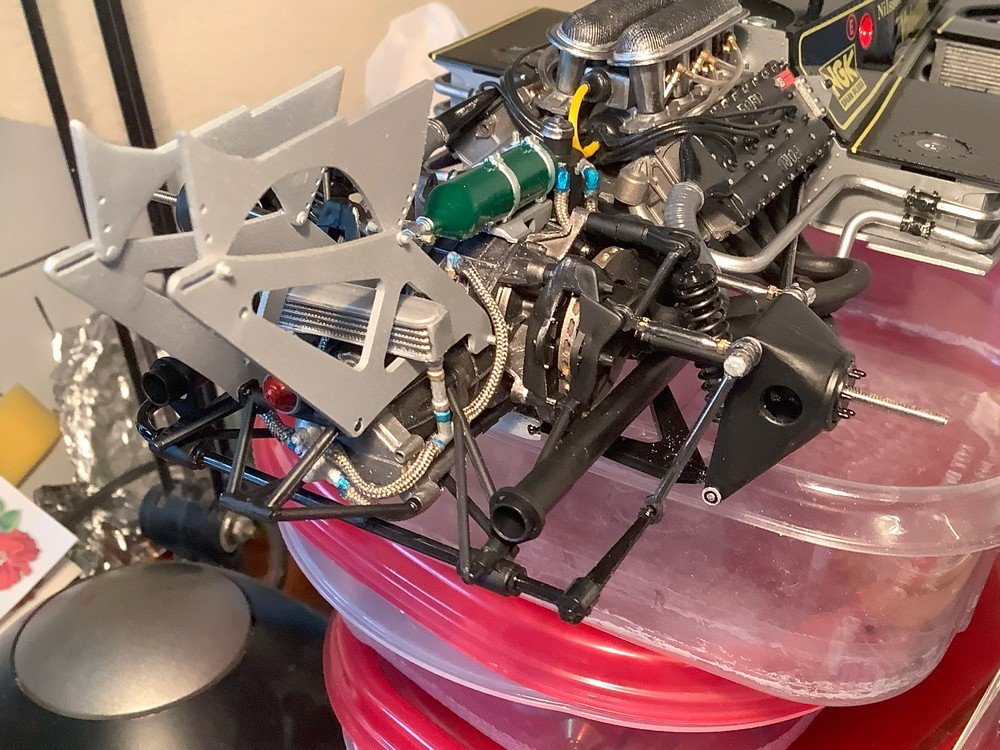
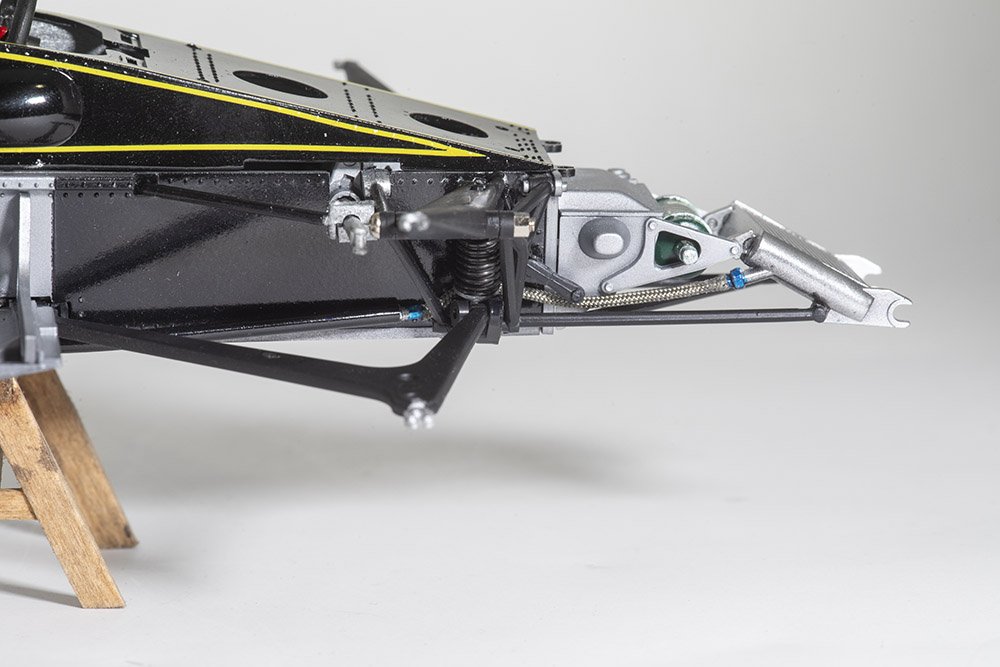
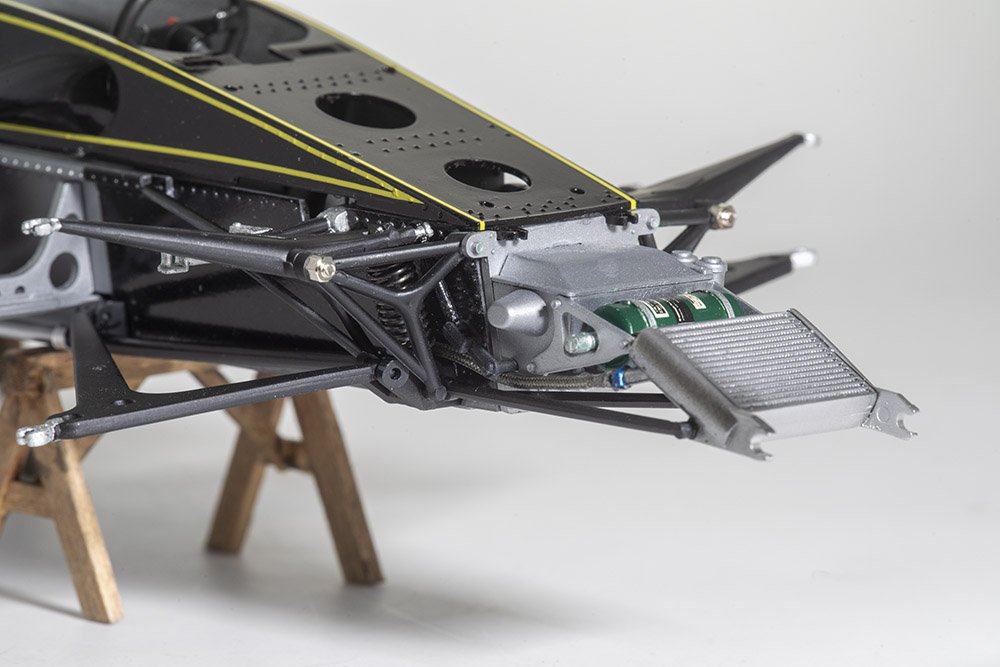
Thanks for the likes and comment. I thought I'd make another quick update, as I have made another addition/modification that I am quite happy with. The car has a radiator in the nose that serves as an oil cooler. Of course there needs to be a way for the oil to get between that radiator and the engine. The kit supplies black vinyl hose for this, though the instructions do not show many details about how it is routed, just the end points. I looked on the internet for relevant pictures, and I found what appeared to be a solid pipe, rather than a hose, for much of the run between the front and back of the car. However, I did not find too many pictures, especially of the under-the-car parts of this run, so still had to make some assumptions. I started by cutting two lengths of 3/32nd brass tube. I bent the tubes in two places to conform to the bottom of the car, put resin hose connectors in each end, painted the tube, black in the front and polished silver in the back, then used some CA to glue the tubes on to the car. I created some little brackets (out of wine cap foil) to hold those tubes, then used some braided line to connect the ends of the tubes to the proper locations on the radiator and on the engine. Excuse the background on the third picture below: this model is too large for my little DIY photo booth.
- 62 replies
-
- 14
-
-
-
Excellent progress as always! I also recall that the number of various types of blocks in the kit did not exactly match the plans. Fortunately I planned out ahead where I'd use which blocks and just substituted doubles for the throat halyards. The cap rail is looking great. I did far fewer segments. I am not sure though, I might have substituted some of my own wider wood strip so that I could do more with each piece. But your cap rail joinery is excellent. I assume you'll put tung oil on the cap rail like on the deck....that will really make it look nice.
-
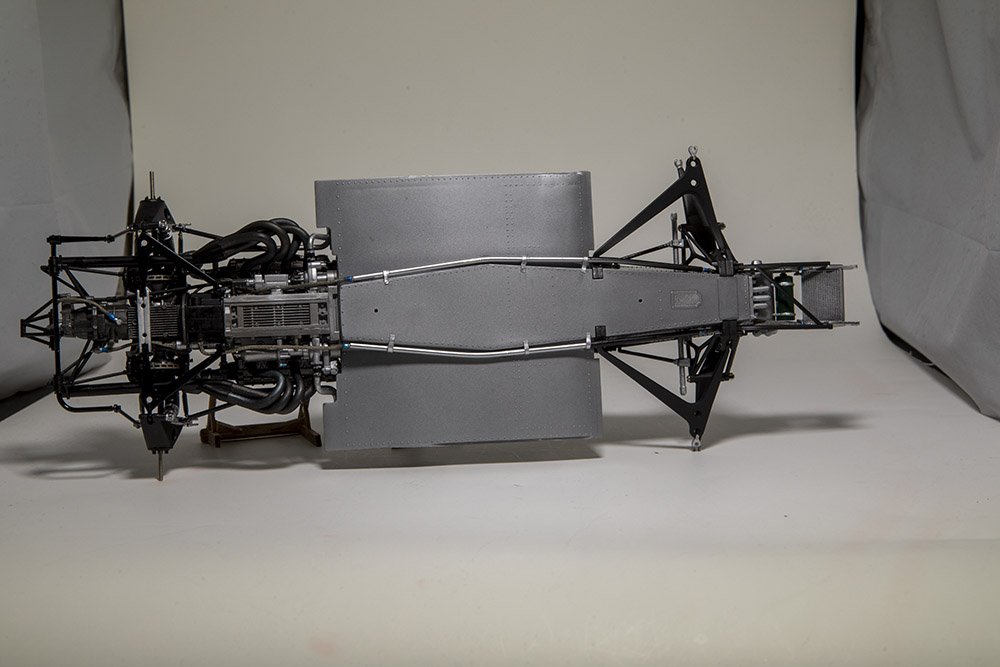
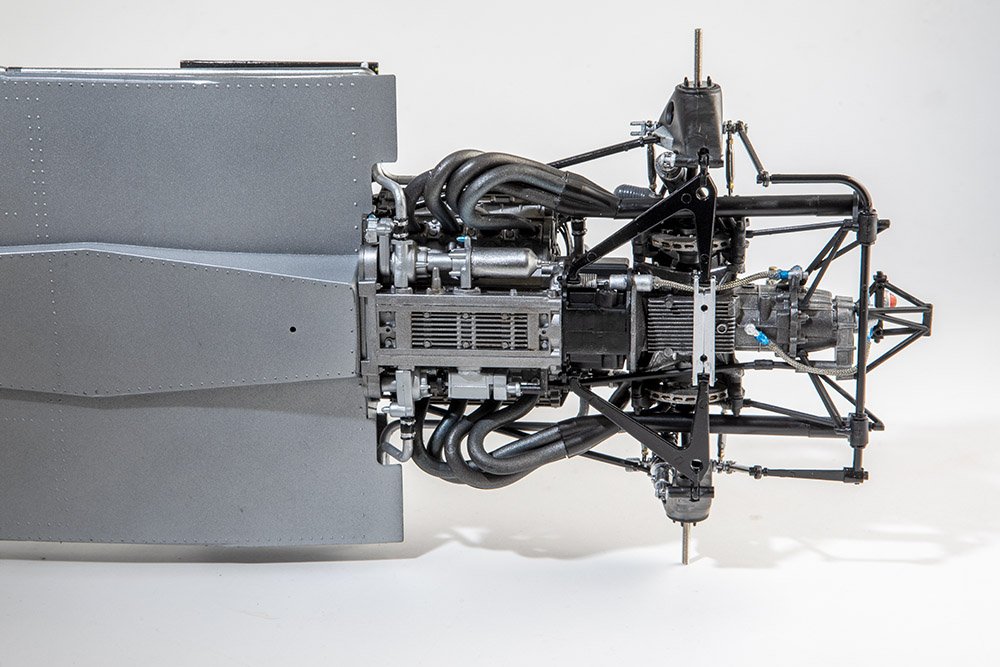
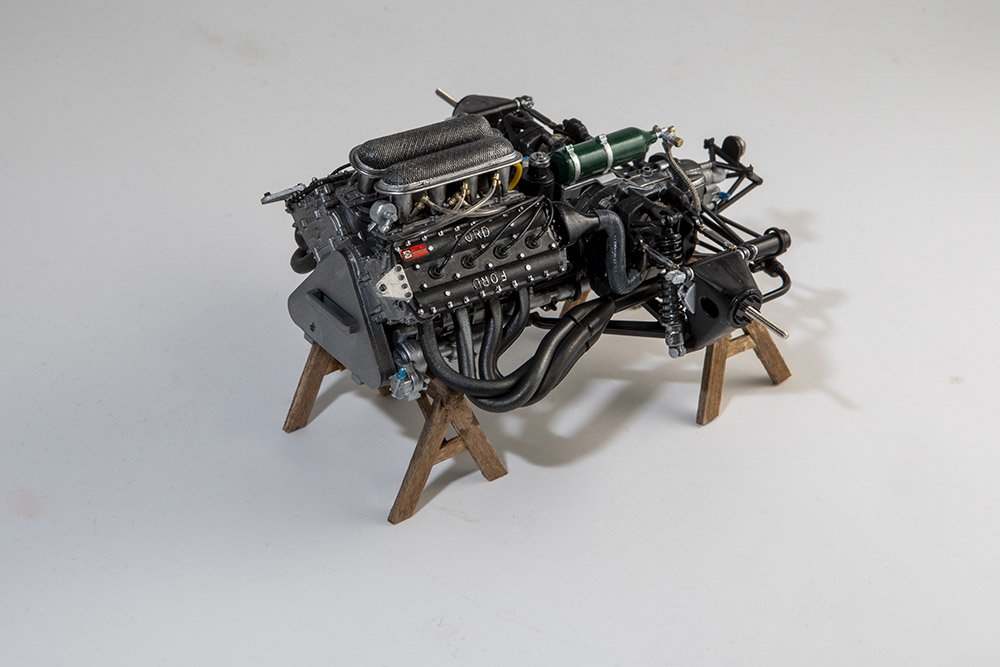
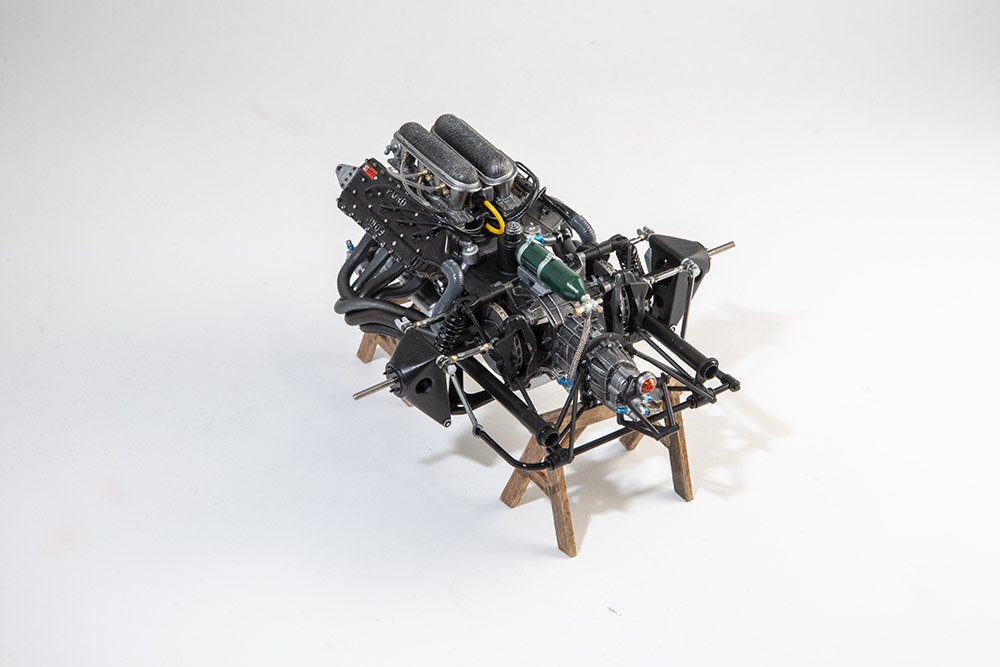
Thanks as always for the likes and comments or for just looking in. @DocRob I have the Ferrari 312B in my stash with its 12 cylinder engine. I imagine that exhaust will be more challenging....though maybe not since there are two collectors on each side, each with just 3 headers in them, so I'll be doing 4 sets of 3 pipes each instead of 2 sets of 4 pipes each on the DFV. I've now attached the engine to the tub. Once done, there were 4 coolant pipes to attach between the back of the tub and the engine and 2 suspension members from the back of the tub to the uprights. The latter were just a little bit tricky to get in place. You can see all of those pieces in the second picture below. I've also included below a picture of the under side of the car and engine. I meant to include a picture of the underside of the engine in the last post but failed to do so.
- 62 replies
-
- 17
-
-
-
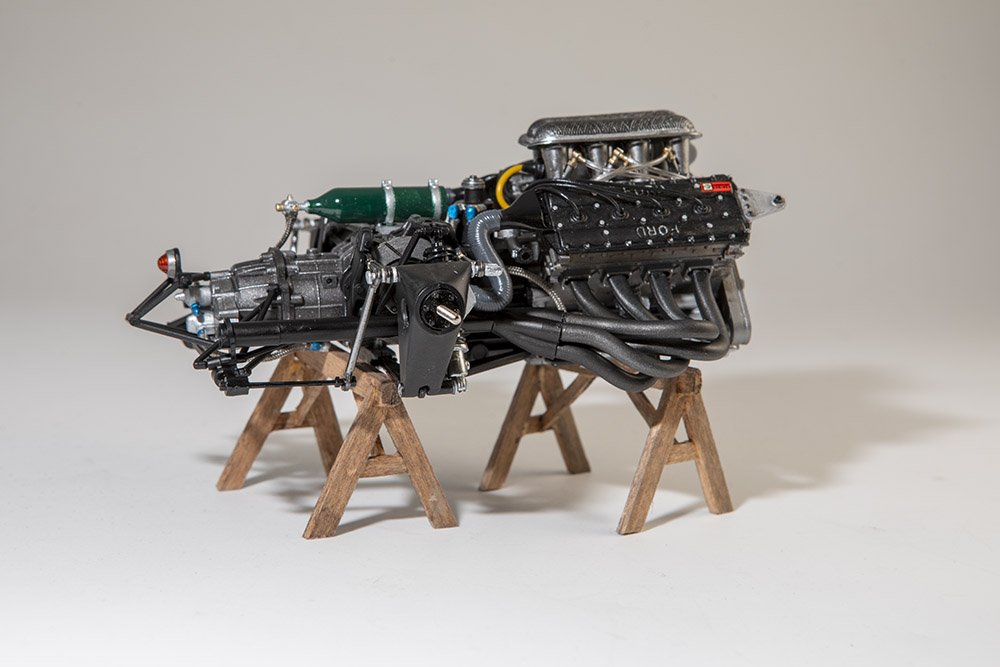
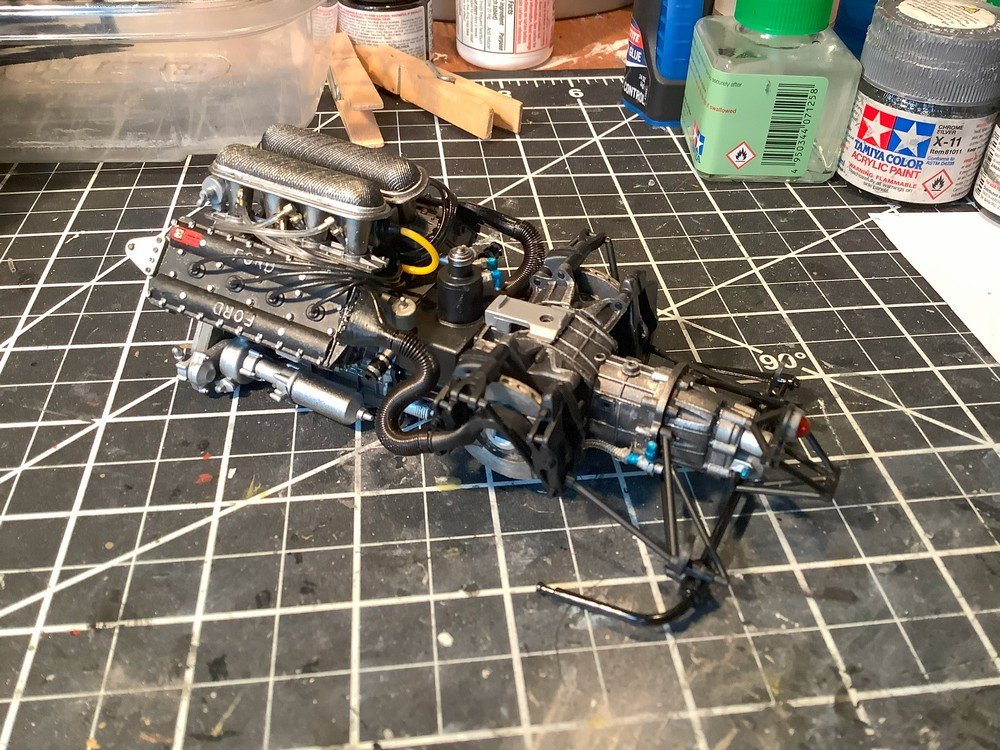
Thanks all for the likes and comments and especially @Egilman for the suggestion. I painted those springs with micro kristal clear and then with Tamiya XF-63 German Gray. The latter was supposed to be flat but over the kristal clear it still has some sheen. I tried a bit of micro flat on top but that did not change it much. Regardless, it looks much better than it did before in my opinion. Of course rereading his comment reminds me that I forgot to dig up the photo etch hose clamps I have to see if they could be added to good effect. I also added the exhausts and wrapped up the rest of the rear suspension, so with that the drive train is mostly done. There are a few more connections (both hard pipes and flexible braided lines) to be done when the engine is connected to the tub and there is an oil cooler with a few more braided lines that attaches to the supports for the rear wing. I may add a few more lines as well, such as some lines to the brake calipers. I've found some decent pictures of the back of this car so will look again at those for ideas. As usual, the exhaust was a bit tricky, though I tried a new trick that helped. I don't recall where I read/saw this trick. But I put just a small dot of white glue (actually the micro kristal clear again) on the 4-to-1 collector and in the engine block exhaust ports and let it get a bit tacky. I then put the exhaust headers in place and the kristal clear held them but still allowed a lot of maneuvering, which is needed for those exhausts. Oh, I guess I also used a dot or two of gel CA on the engine block port for a couple of the headers. Once all was in place, I added a droplet of the Tamiya extra thin cement to each of the gaps where the parts met, on both ends of the exhaust headers. But with this milestone I figured I would get out the "real" camera and the little photo booth and take some better pictures, instead of just the at-the-bench iPad pictures I've been uploading to this log thus far.
- 62 replies
-
- 16
-
-
-
1968 Pontiac Firebird by CDW - Revell - 1:25 Scale - PLASTIC
gsdpic replied to CDW's topic in Completed non-ship models
Beautiful! -
Thanks. I had thought about trying some PVA but had not thought of the micro kristal clear, which is very similar but a bit thicker. I have some of that stuff, used mostly for instrument panel gauges, so maybe I'll give it a try. I did shorten both springs by about an eighth of an inch and that also helped. Hmm, I also have some photo etch hose clamps that I could add to see if that looks good. Thanks, and yes on this model it is a solid part which I painted flat black then highlighted the screen texture by dry brushing some silver. I thought about trying to make a replacement out of some real metal screen material and also saw that MFH had some parts as well. But on this car, that screen ends up covered by the air scoop that is above/behind the cockpit so I did not bother.
-
Thanks, Gary, for the compliment and to everyone else for the likes. I continue to work on the drive train. I've attached the engine and gearbox, and done some of the bits that support the rear suspension, but there is more work to be done there. I am not crazy about the two springs that serve as the hoses between the air scopes and brake cooling duct. I might need to rethink that. I could at least shorten the spring and I think that would help but I am considering other options as well.
- 62 replies
-
- 14
-
-

