HOLIDAY DONATION DRIVE - SUPPORT MSW - DO YOUR PART TO KEEP THIS GREAT FORUM GOING! (Only 36 donations so far out of 49,000 members - C'mon guys!)
×


Gregor
-
Posts
225 -
Joined
-
Last visited
Content Type
Profiles
Forums
Gallery
Events
Everything posted by Gregor
-
Nigel, I'm sorry to see that your keel seems to have shrunk both in length and height (and the stern post seems to be a little too short). This was not the case in my kit, nor can I find anything about a shrunken keel in the other build logs. As a fellow beginner I can imagine how you feel, it's not something we like to fix just when we are about to start. In Sumners log you will find a better image how it should look like. What would I do? I would contact the producers directly, since I ordered my kit online. I remember postings here (and maybe in MSW 1.0, now lost) saying that jotika has an excellent customer service (a phone call should be more efficient as they are said to be overworked). Alternatively, you could replace the shrunken parts (but I think a polite feedback to the producer or seller of the kit is necessary). Since you will paint the hull anyway, it doesn't have to be walnut if you find a replacement locally where you are. But it should be hard enough to hold the nuts and bolts for the mounting of pedestals (something I forgot to do, see Tony's log and Sarge in Jay's log). Don't rush with the stern post, its upper part should be flush with the upper side of the stern counter. I found it easier to do the planking first and to fit in the stern post last. I hope other builders with more experience and better English can help you to find a more elegant solution. But most important: don't give up - the kit is a good start to a wonderful hobby. This is fixable! Cheers, Gregor
-
John, I'm really looking forward to see how a build in this small scale is done (there is even a revenue cutter, I'm tempted…). How do you prime such a model without destroying all the fine details? Cheers, Gregor
-
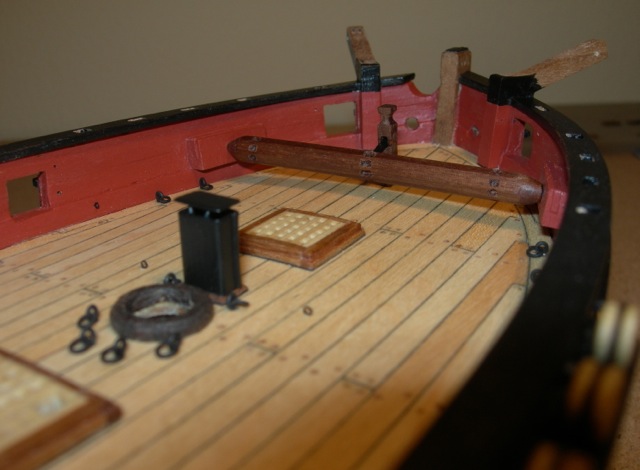
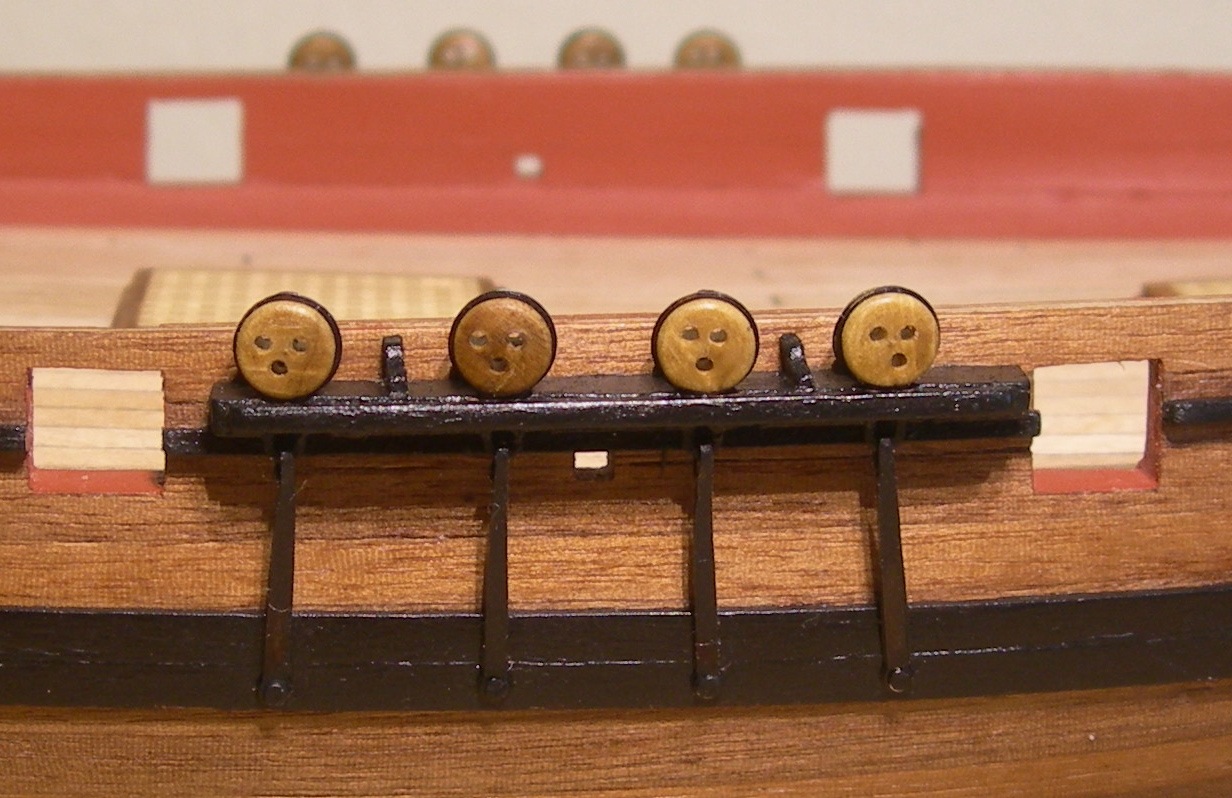
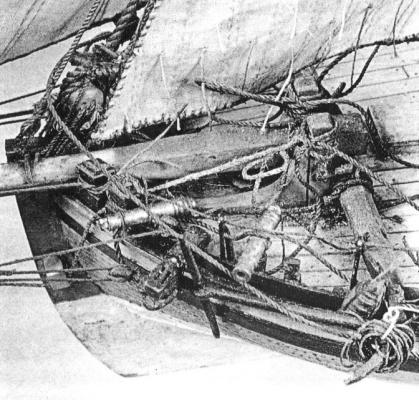
This weekend I finally managed to finish the windlass. The supports for the spindle are probably a bit too massive. I used the kit’s original pawl bit post, “repaired” it by filling the pre-cut slit and then carving out the room for the rod. I think this is a nice detail to have, as it is shown on several 1763 plans. There is also a picture of HMC Hawke in Peter Goodwin’s Alert book (thousand thanks to Tony for showing me this treasure), here a grainy picture taken from page 36. I fear I will miss two windlass bitts when I do the rigging… I made some other things: a chimney with a cover (from a brass sheet; super-glued, as I have not yet learned to solder) and a mast ring, covered with canvas (like the one on the rudder coat: paper tissue and pve diluted with walnut stain). The catheads are as yet unfinished; here I’m following gratefully again Tony’s tutorial. Gregor


- 210 replies
-
- 3
-

-
- Sherbourne
- Cutter
- (and 5 more)
-
Oh yes, Daniel, we live in a beautiful spot. I love hiking, too, but I usually prefer to go down the mountains, where they continue in the lake. That’s what our Kon-Tiki is for, when we don’t use her for work. But we all have daytime jobs, so lake-time is limited, sadly But here is what you can find under water: Traditional transport vessels, very modest crafts, over centuries virtually unchanged till the industrial revolution arrived (the paper is in german, but with a lot of pictures in low-res, sorry). My inability to make a model of the vessel we researched (early 19th century, 38 m under water, of a type you find far back in local medieval picture chronicles) finally brought me to this hobby. Cheers, Gregor
- 210 replies
-
- 1
-
-
- Sherbourne
- Cutter
- (and 5 more)
-
Thanks, Daniel; I will work on the windlass this weekend (the weather will be too bad to do much outdoors on or around our lake, where you might have seen my 1:1 diving ship cruising in front of your windows). Cheers, Gregor
- 210 replies
-
- 2
-
-
- Sherbourne
- Cutter
- (and 5 more)
-
I concur with Daniels observations about the plan's "reliability", we don't know their intended use (they were drawn after the building, not before), they could have served as case studies for training … Merging the plans with the kit offers problems in many details. In my enthusiasm I added the additional hawse holes without thinking of the catheads. They still fit in the space between the hawse hole and gun hole. I've not yet finishes the windlass and the catheads, but holding the parts together I have serious doubts about the usability of the second hawse hole, as a cable through the hole, leading to the windlass, would touch the cathead and chafe… How I love this discussion! Thanks Guys, Gregor
-
Maybe your beautiful Sherbourne should grow wings instead of sails; they are not on the original plans, so we have a little leeway here… Gregor
- 57 replies
-
- 1
-
-
- caldercraft
- cutter
- (and 4 more)
-
Yes, I also didn’t find cutters with side opening ports in the NMM collections (I made a short list of cutters with lids). But as Kester said, they all are younger than Sherbourne. If you want them to look like the one example on the NMM plan, IMHO you have to make the upper wales like Daniel made them; the wood strips provided in the kit are standing out too far so that wing doors would neither open more than 90 degrees nor lie flat to the hull, if you don’t build special hinges. I wish you luck with the planking, Gregor
- 57 replies
-
- 1
-
-
- caldercraft
- cutter
- (and 4 more)
-
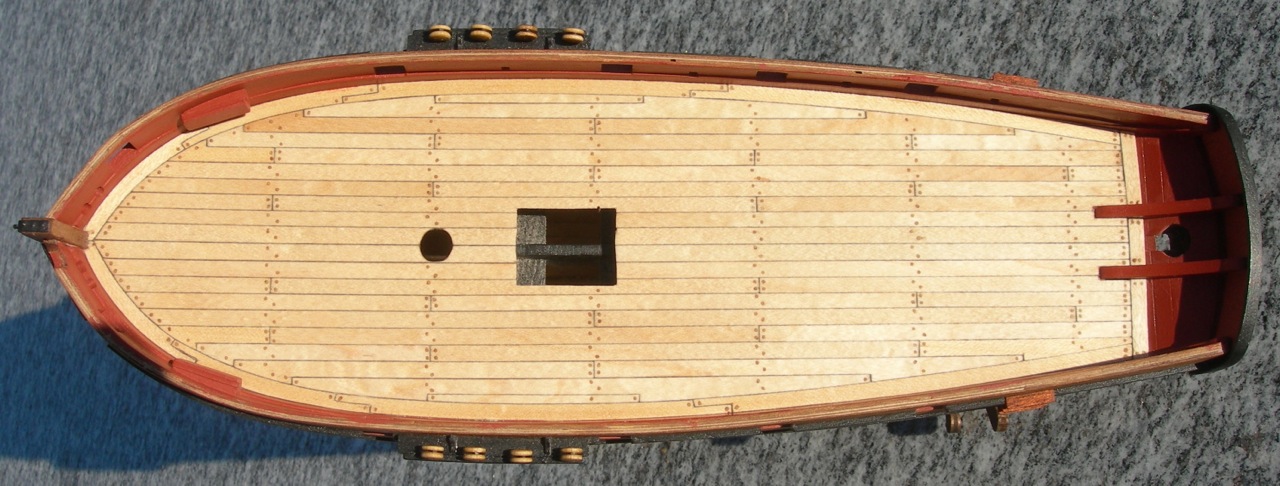
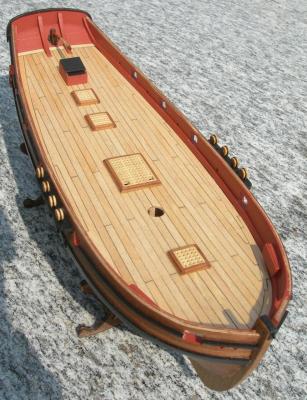
Phase two of deck planking also done: The healing process (no pictures of small burn holes, sorry) was quite successful. I drilled 0.5 mm holes and filled them with the points of toothpicks, snapped them off with pincers, scraped and sanded and then oiled the deck. Cheers, Gregor

- 210 replies
-
- 1
-
-
- Sherbourne
- Cutter
- (and 5 more)
-
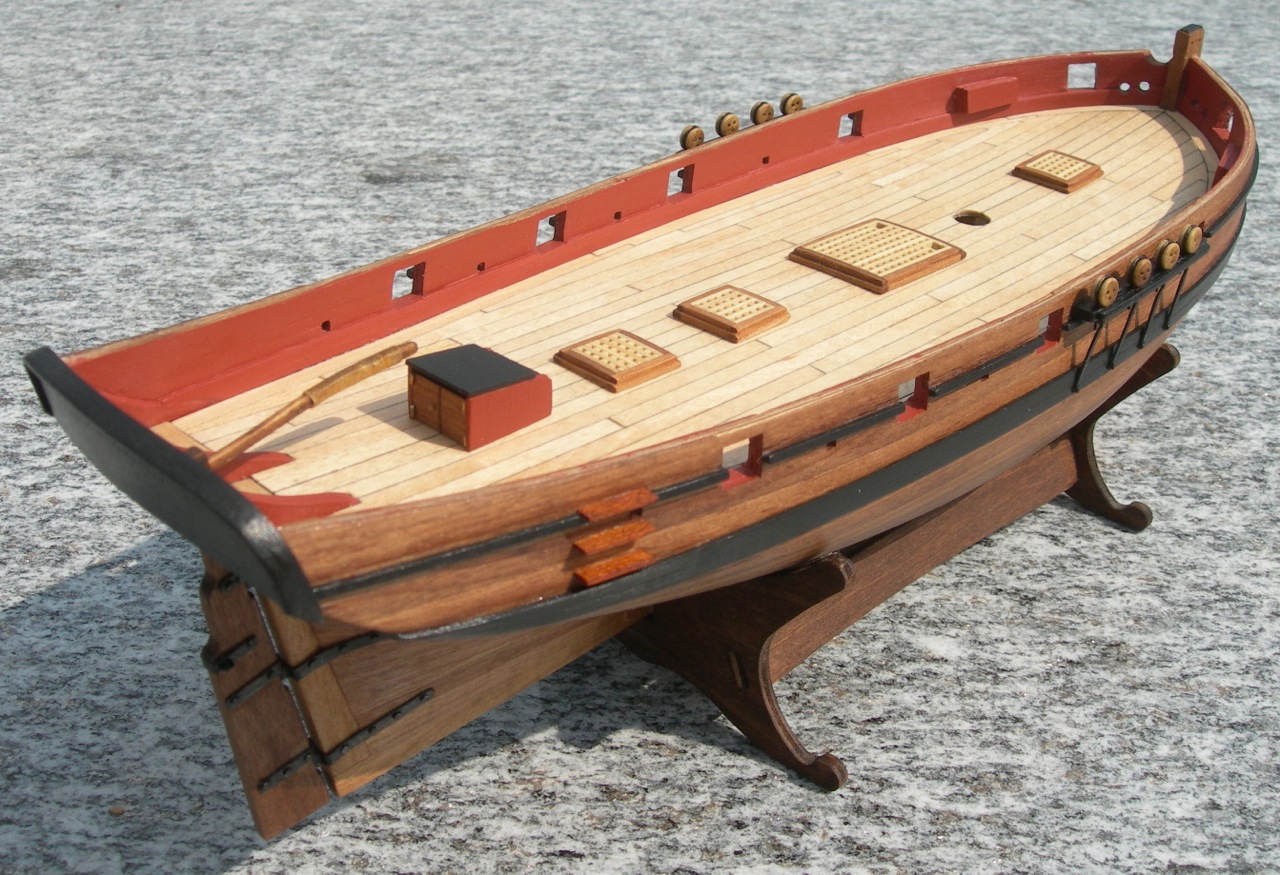
Phase one of deck planking done: After admiring many beautiful examples and experimenting on paper with various plank lengths and shifts I always came back to Tony’s 12 cm, 3 shift pattern. I think it’s adequate when using the 4 mm strips provided with the kit. Shorter planks and more than 3 shifts provided very strange patterns, not at all aesthetically pleasing. Learning from Tony’s experience, I struggled with the symmetry of my hull, which I neglected in the early days of enthusiastically gluing together bulkheads, keel and false deck. That’s why I didn’t cut out the holes for the scuttles behind the main hatch (I will have to paint the planks black under the gratings). I also had to bend the planks laterally to achieve the impression of a symmetry that is not there. One can hardly detect it, but it was a struggle, working with dividers, paper strips etc. For the caulking I used the black pencil method. The strips in the kit had to be sanded heavily; their edges were very rough. Because of my impatience the planks are not always of the same width … The finishing is not what I wanted to achieve: After scraping the planks with a sharp blade and sanding I used linseed oil again. It highlights the structure of wood, but here this effect was not what I wished for (it shows also pencil dust rubbed in while sanding). Again, as on the hull, I will have to learn to select the wooden strips very carefully or even be prepared to replace them. It seems my crew did not religiously holystone the deck and flogging it dry every day before sunrise, and my deck has the worn look of twenty years of honourable service. To console myself I finished the deckhouse. Now my CO has a place to hide when somebody makes unfriendly comments about the state of the deck. I will adapt the gratings to the deck and do other small things while thinking hard about treenailing methods. I already tested the hot syringe needle and nearly destroyed my deck (it looks exactly like it sounds: spots of burnt wood). I will try to “heal” it with the toothpick method. Gregor


- 210 replies
-
- 7
-
-
- Sherbourne
- Cutter
- (and 5 more)
-
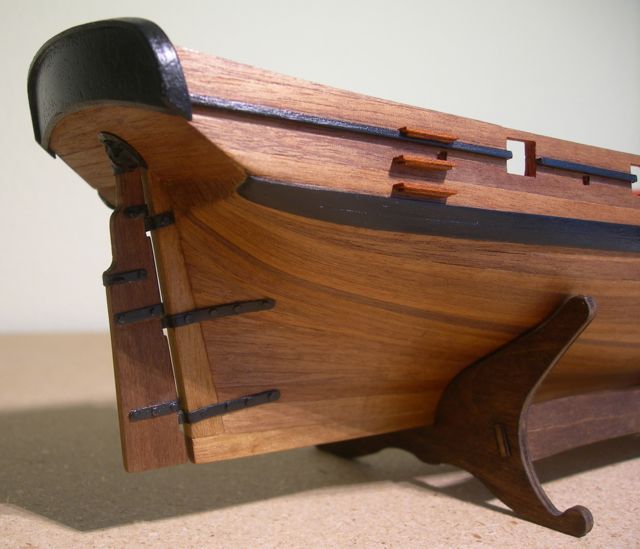
Oh, something I forgot to tell about the channels: The kit’s plan instructs to use a 1.5 mm square walnut strip as a cap edge of channels. But the channel pieces in the kit (No 39) are 2 mm thick (the plan is obviously not precisely drawn). When I see the result, I think I should have made the cap also 2 mm. I won’t take it down for fear of breaking off the whole thing…
-
Hi Tony, I’m planning to make my Sherbourne to look a little like the Cutter Fly (1779), with “real” gunport lids (and sometimes I’m thinking about painting mast and yards, too). On the plans there is only the one example of a gun-door. Being Swiss, an alpine hut came first to my mind… But that’s not the only reason I’m sceptical about side-opening doors: The wings just beside the channels could not be opened completely. If the guns were a little shorter than ours (we discussed that earlier), the muzzle would be dangerously near the wooden door. Then there is the upper wale in the kit. It’s standing out rather far, we would need special hinges do open the door-wings so that they could lie flat against the hull and not stand out parallel to the gun barrels. Gun port lids would avoid these problems - for sure in the model, and probably in a real cutter, too. I’m not an engineer, but I guess he would choose the simplest, most efficient solution to a problem. There are also several beautiful pictures of cutters to be found in the online collection of the NMM, all of them showing gun port lids: (1783) (1783) (1785) (1788) (1794) (1794) (1795) (1796) (1818) (1821) (1826) (1830) While browsing through the collection I’ve found not one example of a cutter with side-opening doors. So I think I will make gun port lids as shown in these pictures. Gregor
-
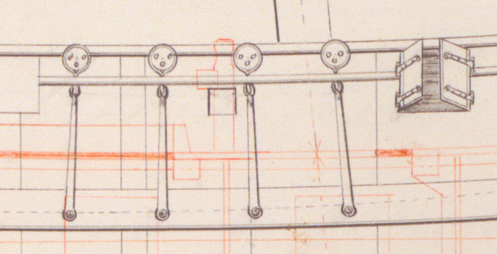
Just a small update: I finished the channels. Once I figured out how the deadeye strops should be inserted in the channels, it was easy to do (again, the Badgers plans available online were helpful: after destroying one of the spares I learnt that the ‘nubs’ are meant to anchor the strops in the channels). As shown in the NMM plans, I tapered the chain plates. I hope I got them right so they will align with the shrouds (I stepped the mast and used a thread to find the positions, as described in various postings in the forum). I also added small knees. They are not on the plan, but Badger has them, and Molfram zu Mondfeld almost insists that they should be made. I discarded the short-lived idea to position the channels according to the NMM plans (integrated in the upper wales). This would mean to make them wider, so that the shrouds don’t touch the capping rail. I always seem to feel the urge to do things that are out of my league… I also finished phase one of the deck planking, but have to wait for the sun to come back to make some pictures. Cheers, Gregor

- 210 replies
-
- 4
-
-
- Sherbourne
- Cutter
- (and 5 more)
-
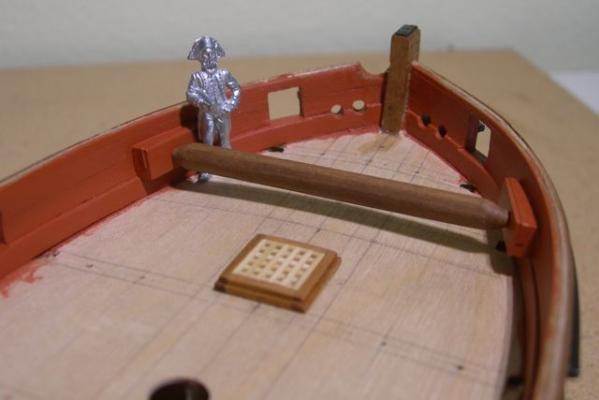
Sorry, Richard: Historex figures really only come in 54 mm, you didn't miss anything there. For 1/64 I'm working with a 28 mm Amati officer. 1.8 m might be a little too tall for the 18th century, but he's wearing a hat, and having passed for gentleman he's obviously better fed than most of his contemporaries. Gregor
-
I can only agree with you, Tony - I too would dearly love to see Daniels pictures again. Dreaming far ahead the last few days, in the vast collection of the NMM I've found several pictures of British cutters with gun port lids, the most beautiful was the oil painting of the cutter Fly (1779), bigger than our Sherbourne. They are all different from the one shown on the original plan, so I'm really curious to see which type of lid Daniel will choose. I'm looking forward to see his work - and yours, too, Tony! Thanks and greetings to both of you, Gregor
-
Here a link to the French maker "Historex" of excellent 54 mm plastic figurines (mostly Empire and late 18th century) - very easy to adapt, lots of accessories and spare parts, and even all the replacement parts you will ever need (heads with different facial expressions, torsos, arms ,legs etc.). Their Website is mostly in French, with parts in English. Enjoy Gregor
-
Most of the NNM’s many cutter plans of 1763 show a peculiar type of windlass; an octagonal boom (?) resting in heavy chunks of wood mounted on the bulwarks. My windlass is not finished yet, I’m still working on it. The hardest thing (morally) was to drill two additional hawseholes as shown on the plans. But it’s the easiest thing to bring my Sherbourne a little nearer to the plan of 1763. Cheers, Gregor
- 210 replies
-
- 3
-
-
- Sherbourne
- Cutter
- (and 5 more)
-
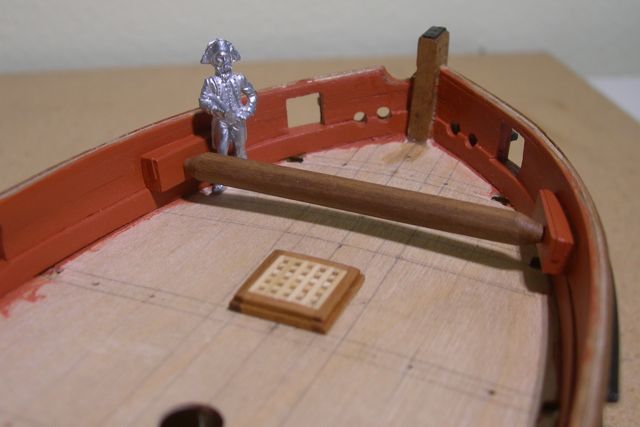
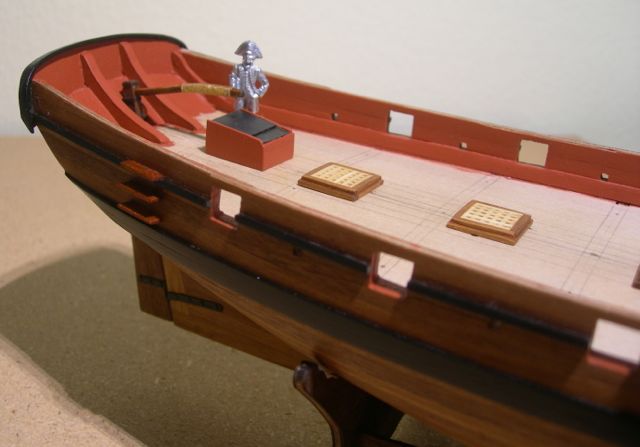
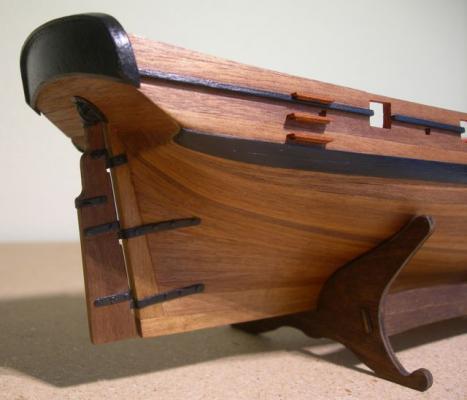
The plan helped to shape the new stern and its rail, and with the positioning if the steps. I’m still puzzled about the position of the hatch, and it’s form. The plan shows (in a fine red line) a structure like the one on Kesters Sherbourne, the deck plan suggests a sliding hatch, leading to stairs to the “Great Cabbin”. I made my hatch, covered with black painted “metal sheets”, as Tony discussed in one of his postings; it is lower than on the plan (where it is as high as the bulwarks) to avoid a conflict with the tiller (which I altered slightly). Sadly, the tiller is not shown on the Sherbourne plans. It is probably not the last version.

- 210 replies
-
- 3
-
-
- Sherbourne
- Cutter
- (and 5 more)
-
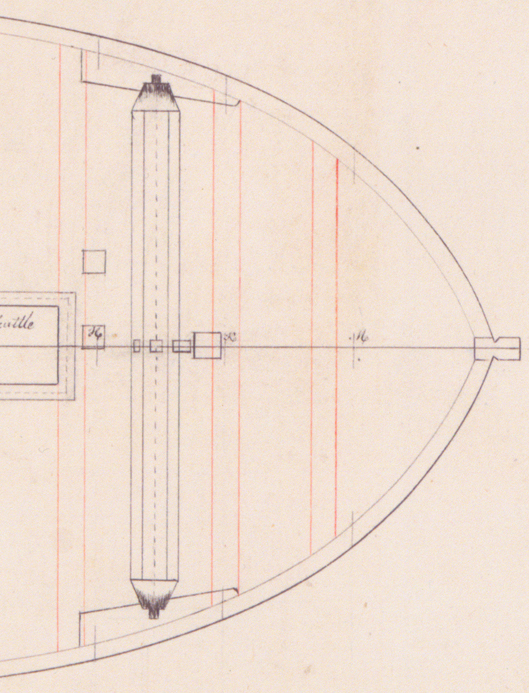
After a long vacation I found a good copy of a NMM plan in my mail: beautifully drawn, and with interesting details I couldn’t make out in the low-res picture on NMM’s website. As there are several almost identical Sherbourne plans, it looks like a class of young student shipwrights had to produce a “paper” (probably not, but a funny thought). The unknown artist of my copy added a small bit of information which he obviously found interesting: “She was not fitted with Hanging Cabbins on the Platform they lay in Hammocks?”. The “Platform” on the plan is the deck below the “Upper Deck” and has cabins (called “Bed Place”) along the hull (less than 1 m high, with sliding doors). I remember Patrick O’Brian’s description of small, oddly shaped cabins and hanging cots or beds for the privileged few … First I have to apologize for my previous statement about the chain plates; they are not incorrect or anachronistic in the kit. I’d like to quote the plan and show here a detail from it, but I’m totally ignorant about British copyright law (in Switzerland, where I’m an archivist, there would be no problem with that; historical documents of a certain age don’t have a copyright restriction, and a simple reproduction doesn’t create one. Does anyone know the rules here?). It is hard to see on the website but the drawing shows slightly tapered chain plates where the lower, rounded end (as provided in the kit) on the wales is broader than the top one. On second thoughts, here is the detail with the chainplates. I will take it down if anyone thinks this means a copyright infringement (I don't think so and I hope not). © NMM, Publisher code: J8467
- 210 replies
-
- 1
-
-
- Sherbourne
- Cutter
- (and 5 more)
-
Looking at your Sherbourne gives me quite boost of motivation – so many beautiful details to consider (the colours, the stern davits…). Thanks, Kester, for sharing your experience!
-
Better late than never I had a serious look at the plans of the Sherbourne displayed online by the NMM, which I had completely forgotten, although they were mentioned in several blogs… As a first result, I am rebuilding the stern (it will hopefully look a lot like Dirk's, although I see no capping rail on the plan. My stern fascia was way too large). Small details can be added easily; steps (as Dirk has done), and two more hawse holes. I will not touch the gunport pattern, which, if Sherbourne's plans are meant to be read literally, should be like in the Badger kit. It's interesting that all NMM's plans of cutters show a type of windlass connected to the bulwarks. 1763 must have been a great year for cutter building, there are so many of them. The deck plan is puzzling me: I see a sliding hatch under the tiller, shorter than the one I've already built. It would be difficult for the helmsman; Dirk's interpretation makes it definitely easier for him. On my deck it would look like this (nothing glued yet): A lot to think about - but now I really have to take a break Gregor

- 210 replies
-
- 2
-
-
- Sherbourne
- Cutter
- (and 5 more)
-
Tony, just a short question, since you are making these double blocks for the guns: I found here (http://modelshipworld.com/index.php?/topic/290-making-the-single-block-to-double-block-tackle-for-cannons-help/?hl=%2Bgun+%2Brigging+%2Bblocks#entry3583) that for smaller guns it might have been normal to use two single blocks (like on Badger's plan), or a double at the bulwark and a single at the carriage (pictures of Victory in the Forum). What's your plan? (The helmet I could use in the office at times. Under water a simple mask is enough, no sawdust there…) Gregor
-
There is nothing basic in explaining (in detail) a complete production line, in telling about the experience of learning and progress. It's awe-inspiring. Gregor
-
Well, who does not like compliments from a paragon modeller guide – seriously, since I know my failings, too, I thank you for your encouragements (I hope this sounds polite in english!). I’m looking forward to visiting your log again in a few weeks; I don’t expect to have access to the Internet regularly till then. Who knows, maybe you will already have built the channels (with cute tiny knees!) and correct chains – after reading this discussion and verifying with zu Mondfeld there’s no way I will use the chain plates supplied in the kit.
-
At Tony’s suggestion I checked out Blue Ensign’s beautiful Pegasus and found the rudder coat, done a bit differently than on Dan’s Vulture. After finding another detail in another forum (I just googled) I made my own version. It consists of a painted metal ring (a bent copper strip cut from a 0.3 mm sheet), bolted to the hull around the rudder hole. The tarred tarpaulin is made out of a paper tissue, formed in place with the help of the ring, and made durable with PVE diluted with walnut stain. It’s quite a good feeling for a beginner having done something that’s not in the kit! I will sadly miss my Sherbourne till August, when I can finally start with the deck (or delay that again with more furniture…)


- 210 replies
-
- 3
-
-
- Sherbourne
- Cutter
- (and 5 more)