flying_dutchman2
-
Posts
1,735 -
Joined
-
Last visited
Content Type
Profiles
Forums
Gallery
Events
Everything posted by flying_dutchman2
-

Can i live without a BYRNES TABLE SAW
flying_dutchman2 replied to shihawk's topic in Modeling tools and Workshop Equipment
Bob, Thanks for the information. Since reading this thread I have researched Japanese saws and I am seriously thinking of getting one or two. What I see around the NET there is so much you can do with it. Marc -
Can i live without a BYRNES TABLE SAW
flying_dutchman2 replied to shihawk's topic in Modeling tools and Workshop Equipment
Again, Thank you for this explanation. You are very knowledgeable on this subject. I know I will post more questions on this thread. Last paragraph. I have used a Scroll saw for about 4 years and I have done so much with it. I improvised on creating fences to get a straight cut. It works but have bin thinking and looking at band saws. I also need to research a milling machine. Need to understand all it can do. Marc -
Can i live without a BYRNES TABLE SAW
flying_dutchman2 replied to shihawk's topic in Modeling tools and Workshop Equipment
Now that is delicious fruit as well. Yesterday it was dry and cold (I do all this work outside as it gets rather dusty in the garage, even if the shop vac is attached to the tool) I followed your advice from sanding the edges of the scroll saw blade and it works like a charm. Did some fret work and purposely designed some tight corners and it came out clean. Thank You. Still researching a band saw and a table saw. This is what I want to do. Make straight cuts. Which is where both tools are good for but with a band saw you can do curves as well. I don't rip wood, I buy "ready made" and I have numerous sources for that and eBay is a great place to get that as well. I saw that rope making machine up close at one of our club meets and it does the job. Then I see Chuck at the conference using an off the shelf drill and does a great job as well. I purchase all my rigging material from him. Best choice I made. Marc -
Can i live without a BYRNES TABLE SAW
flying_dutchman2 replied to shihawk's topic in Modeling tools and Workshop Equipment
Yes, he does. At the NRG Conference in St. Louis he showed a proto type of one of those little tables that has a small sanding band sticking out. (I can google it, but I am lazy). He will probably sell the table and you can hook up your Dremel with a sanding bands attached in the vertical position. Only the newer Dremel Tools will work. My 10 yr old one will not. His tools are made of quality materials, does what you want it to do and aesthetically pleasing to the eye. No short cuts to make the tool. Marc -
That is so cool looking. The lines look good. This ship is going to be finished in no-time. Beautiful. Marc
-
Can i live without a BYRNES TABLE SAW
flying_dutchman2 replied to shihawk's topic in Modeling tools and Workshop Equipment
Today my daily mail from Woodcraft wants me to buy a Laguna 14-12 Band saw & get a FREE industrial floodlight for only about $1100.00. For that amount I can purchase a couple of Byrnes tools. :-) Marc -
Can i live without a BYRNES TABLE SAW
flying_dutchman2 replied to shihawk's topic in Modeling tools and Workshop Equipment
My wife used to do lots of woodwork and I inherited the router & router table & planer/jointer (both from SEARS and older models). I use the router all the time and over time have purchased all types of bits to see what the cuts look like and which ones will be useful for me. The planer/jointer is a scary machine. Long flat metal table with a big cylindrical cutting blade. I tried it outside after reading all the safety and instructions. Held the wood down hard with a 2 by 4, slowly fed it over the blade and when it came to the edge of the stock it shot forward into the yard. Tried it a couple of different ways but in the end there were pieces of stock in the yard. I do not get the jointer part. The instructions say little about that. Looked at all sides, can't figure it out. Something else. Was watching a YouTube vid on 3D ornaments (the end result was a very thin piece) and the person used a "Flying Dutchman blade - scroll revers FD-SR no 5" measured at: 5" x 0.037" x 0.015", 13 TPI , 7 Rev. Marc Very thin blade and cut very smooth. -
Can i live without a BYRNES TABLE SAW
flying_dutchman2 replied to shihawk's topic in Modeling tools and Workshop Equipment
I tend to do this and have to catch myself that I am in no rush. The other thing I read in a scroll saw magazine is that once you have attached your template to the wood is to use clear packing tape and cover the whole piece of wood. The tape lubricates the saw and I have noticed there is less sawdust. Blades I use most of the time are Skip Tooth-12.5 TPI, and Crown Tooth-16TPI. For fret work I use Spiral - 41TPI and Reverse Tooth-28TPI. All Olson blades. I will look for the Double Skip tooth blades. Will do the rounding of the blade and thank you Roman for the education. Marc To other readers on this thread, my apologies for going slightly off-topic. -
I have done this somewhat with the Utrecht. I took the main frames and they were to far apart so added some more and now all of them are 26 mm apart. I may just add some more where the bow is or make it a solid bow. Like Bill said, you decide. There is no exact way. Marc
-
Can i live without a BYRNES TABLE SAW
flying_dutchman2 replied to shihawk's topic in Modeling tools and Workshop Equipment
Twister; I checked out your built of your 1:28 Scale J class yacht 'Enterprise' (R/C). That is a slick boat. Love the lines. I'll be following that one. I purchased a Soling 1 meter R/C boat from one of my club members who was no longer able to build models. Is it scratch? Where did you get the plans? Marc -
Can i live without a BYRNES TABLE SAW
flying_dutchman2 replied to shihawk's topic in Modeling tools and Workshop Equipment
George; Thanks for the info. The limitations on the throat I can live with. I have a simple scroll saw from Skill (just under $100), use it for fret work, create puzzles, and always try new things. Have built a fence for it as well. I like the idea of what you can do with a 1/8 blade. Question: Are the blades for the band-saw, especially the 1/8th pretty rigid. Sometimes with the scroll saw the blade is on a slight angle if I push too hard so the edge is on an angle. I would like to research table top band-saws. Are they sturdy enough that they don't vibrate of the table or work bench? What other suggestions do you have if I invest in a bench-top band-saw? Any advice is appreciated. Thanks, Marc -
Can i live without a BYRNES TABLE SAW
flying_dutchman2 replied to shihawk's topic in Modeling tools and Workshop Equipment
This has got to be one of the best threads on tools I have ever read and that means not only MSW but everything on the NET. All suggestions made by members on different type, make and models I have written down and will research each of them thoroughly (except the Byrnes tools). I have learned a lot here and the different suggestions on why a band saw and not a circular saw. I use my scroll saw for just about everything. I do have a question about band saws. Can you do curves with a band saw (like with a scroll saw)? For example when you cut out frames? THANK YOU Marc -
Can i live without a BYRNES TABLE SAW
flying_dutchman2 replied to shihawk's topic in Modeling tools and Workshop Equipment
At the NRG conference in St. Louis, I drooled just by looking at the Byrnes tools, thinking, I gotta get that saw. Now I am home and building my first scratch boat, thinking I don't really need one...... yet. The scroll saw, dremel, router and router table and hand tools go a long way. Maybe next year. There is always being creative and improvising. I made a disc sander from my tool sharpener. I use the router to make grooves in the square dowels for the display case. Marc -
Hans; You may already checked these links but they have description of color themes. http://www.ancient.eu/trireme/ http://www.mlahanas.de/Greeks/war/Trireme.htm http://www.talismancoins.com/catalog/Greek_Trireme_Sailing_Ship_2.jpg https://www.google.com/search?q=colors+used+on+a+Trireme+480+bc&biw=1425&bih=738&tbm=isch&tbo=u&source=univ&sa=X&ei=dbaBVPXLFIO8yQSMqYDQBg&ved=0CDsQsAQ http://en.wikipedia.org/wiki/Fifth-century_Athens Marc
-
There is a movie by the name of 300:Rise of an empire http://en.wikipedia.org/wiki/300:_Rise_of_an_Empireand they use trireme's as well. One of the trailers they show how they built a model and the replica (in Greece) they used. Very interesting. In the movie they show lots of details of the ships. Marc
-
I am a bit late and I am sitting in the back row on this one, but did bring my binoculars. Beautiful built, well detailed and love the wood you are using. Marc
-
Beautiful carvings. I also like the background, so Dutch looking. Marc
-
Great link thanks and it is called "History".
-
That ship is coming along nicely. I can picture you behind the monitor with the plan in view, picking a part, sending it over to laser saw - have it cut out and use it for the ship. Marc
- 1,051 replies
-
- 1
-

-
- cheerful
- Syren Ship Model Company
- (and 1 more)
-
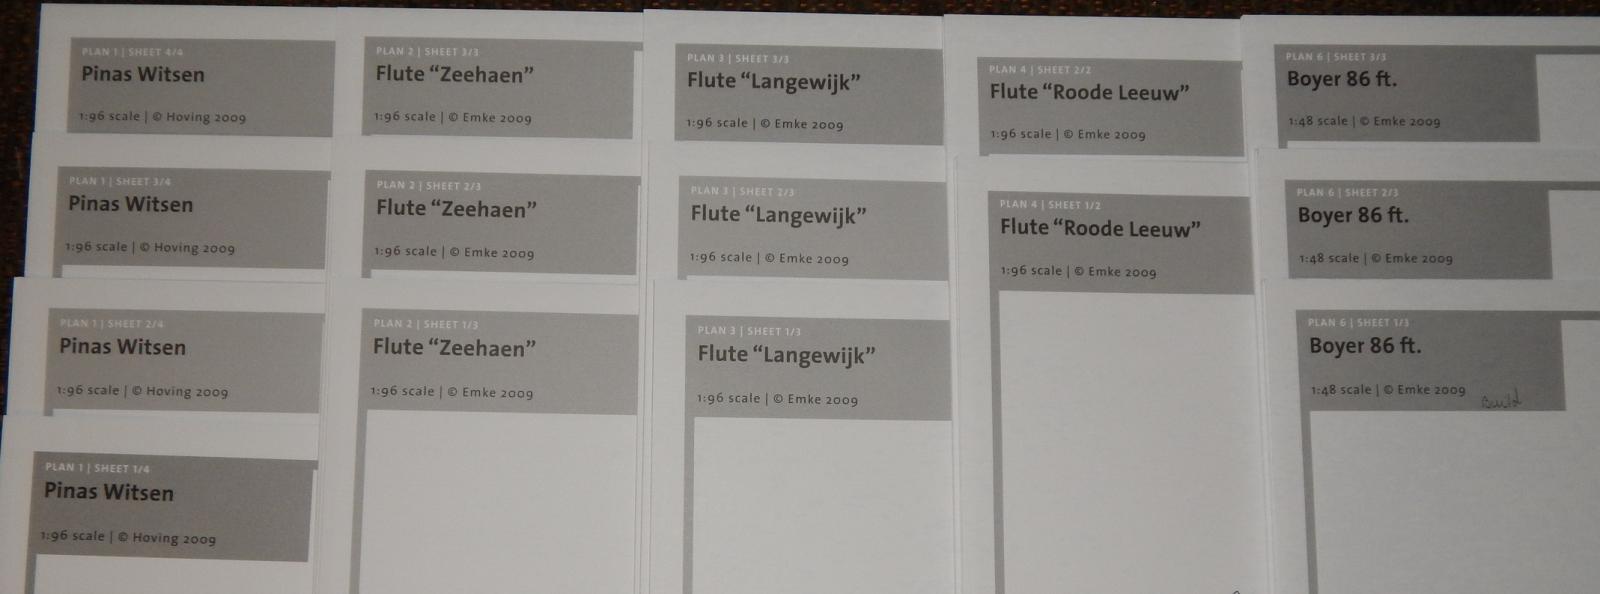
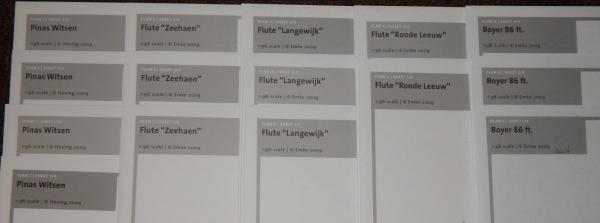
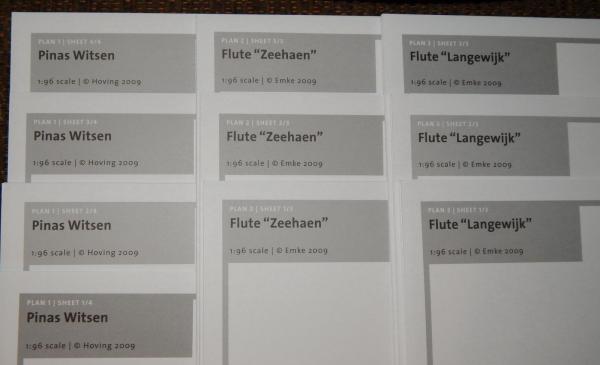
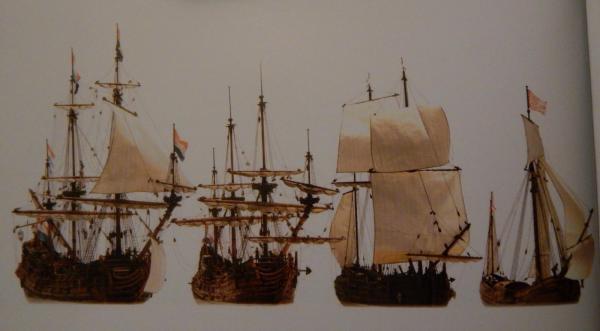
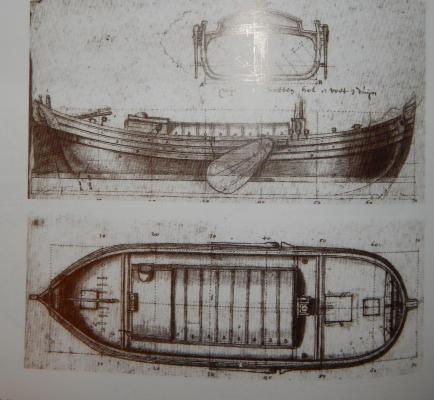
The bottom picture is what all the boats look like if you build them. Also, the three Fluits go from Large, medium and small. The largest being used for Oceans and the smaller ones for European waters. The Zeehaen - fluit (A. Tasman) which is also in the book of Abel Tasman has 16 plans. Very elaborate. The folder that holds the plans is about 3 times thicker than the book itself and the 1:48 plans make for a substantial size boat, so many details can be added. Marc

- 23 replies
-
- 14
-
-
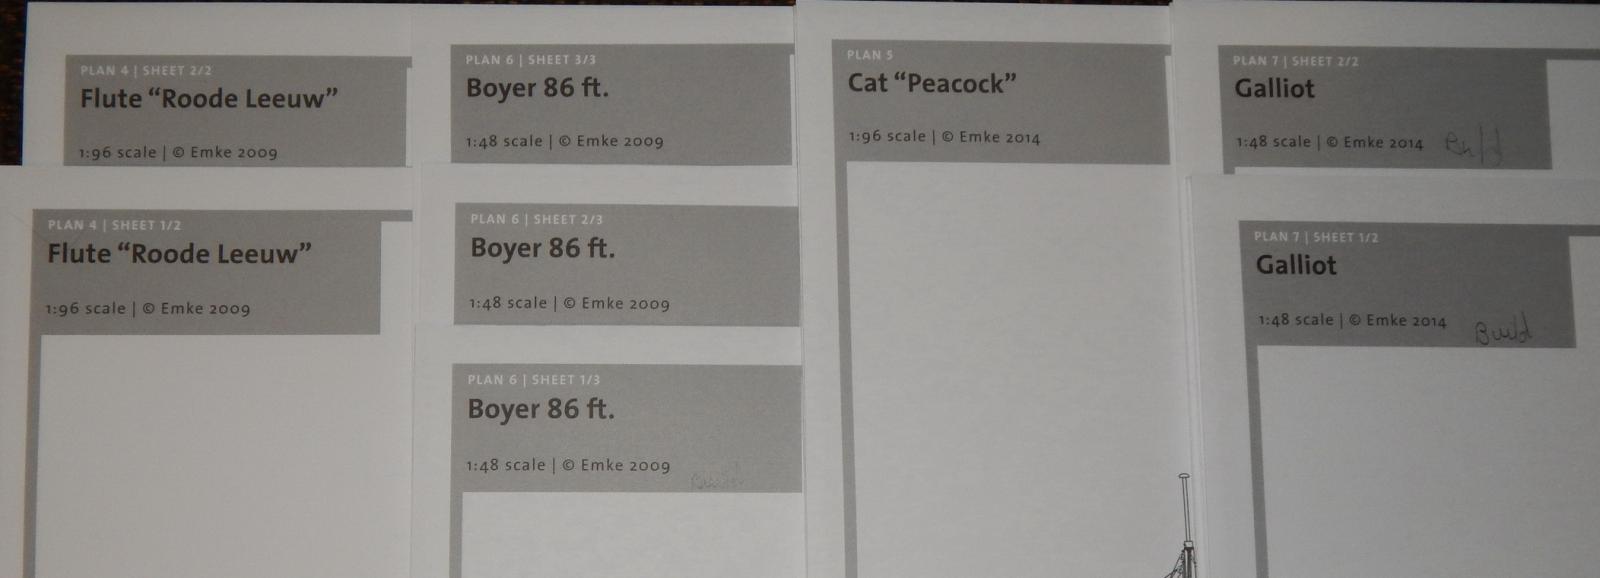
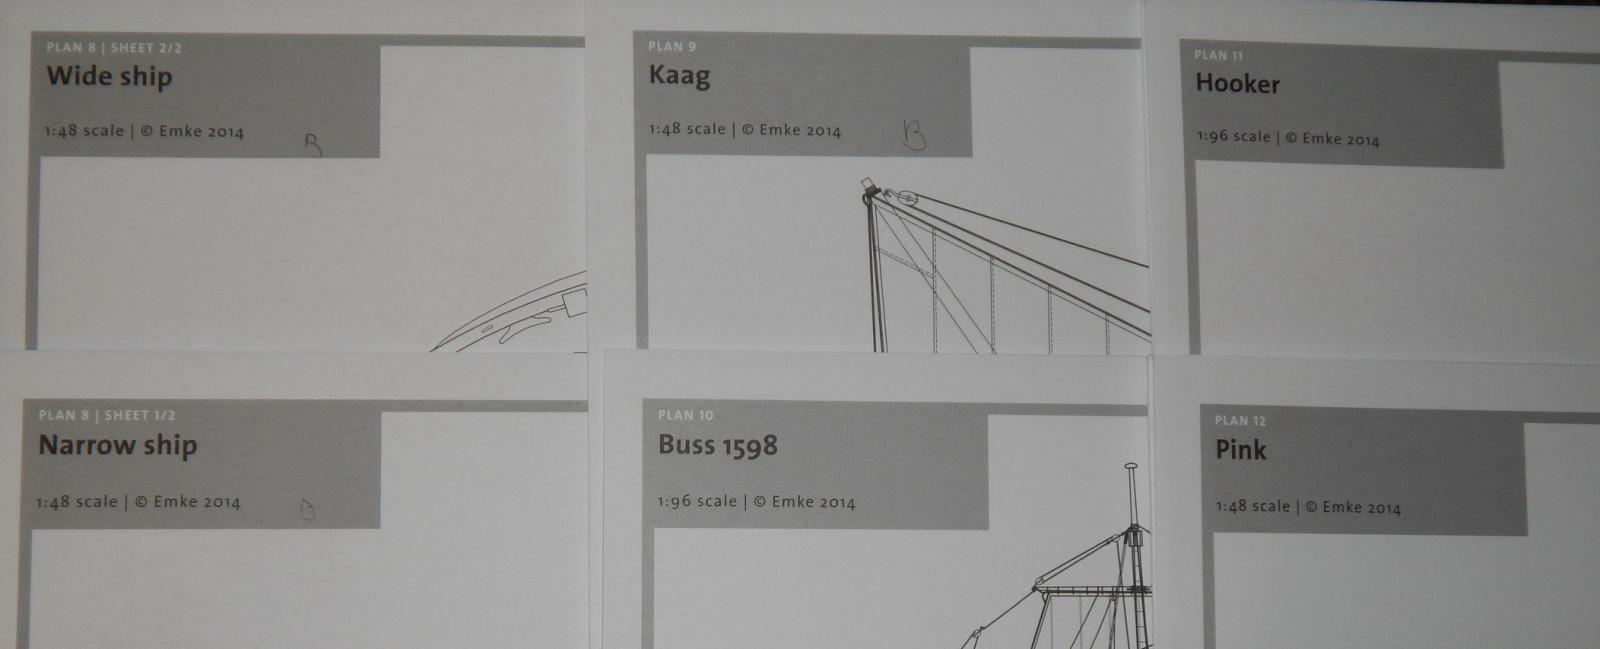
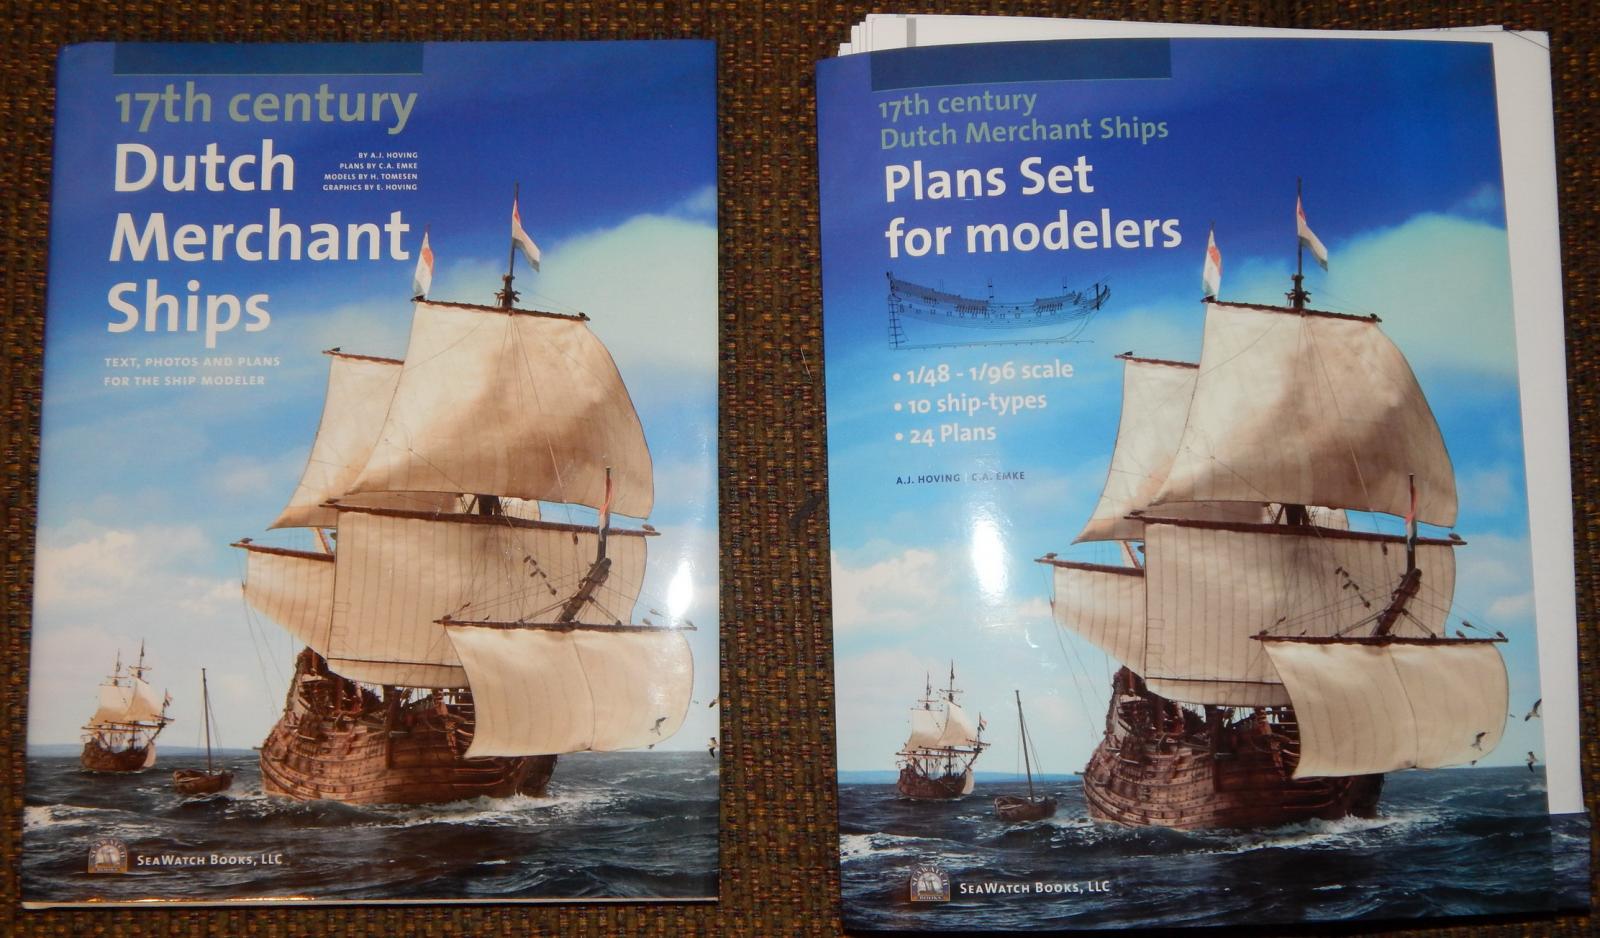
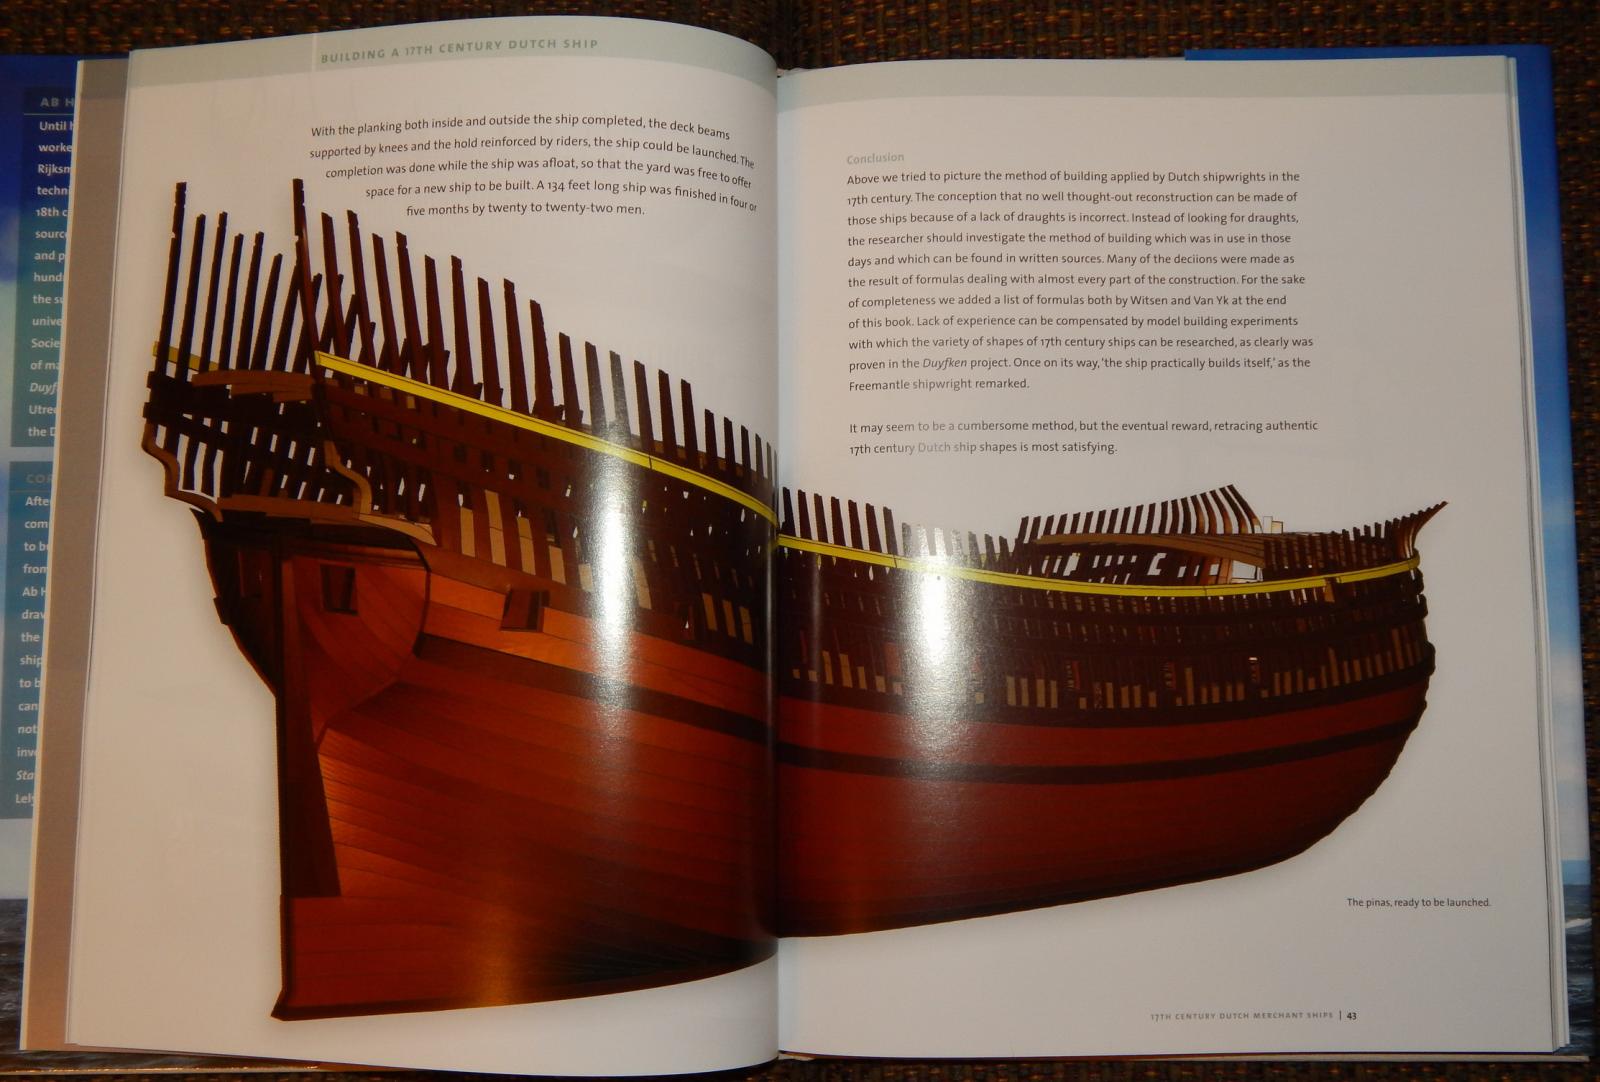
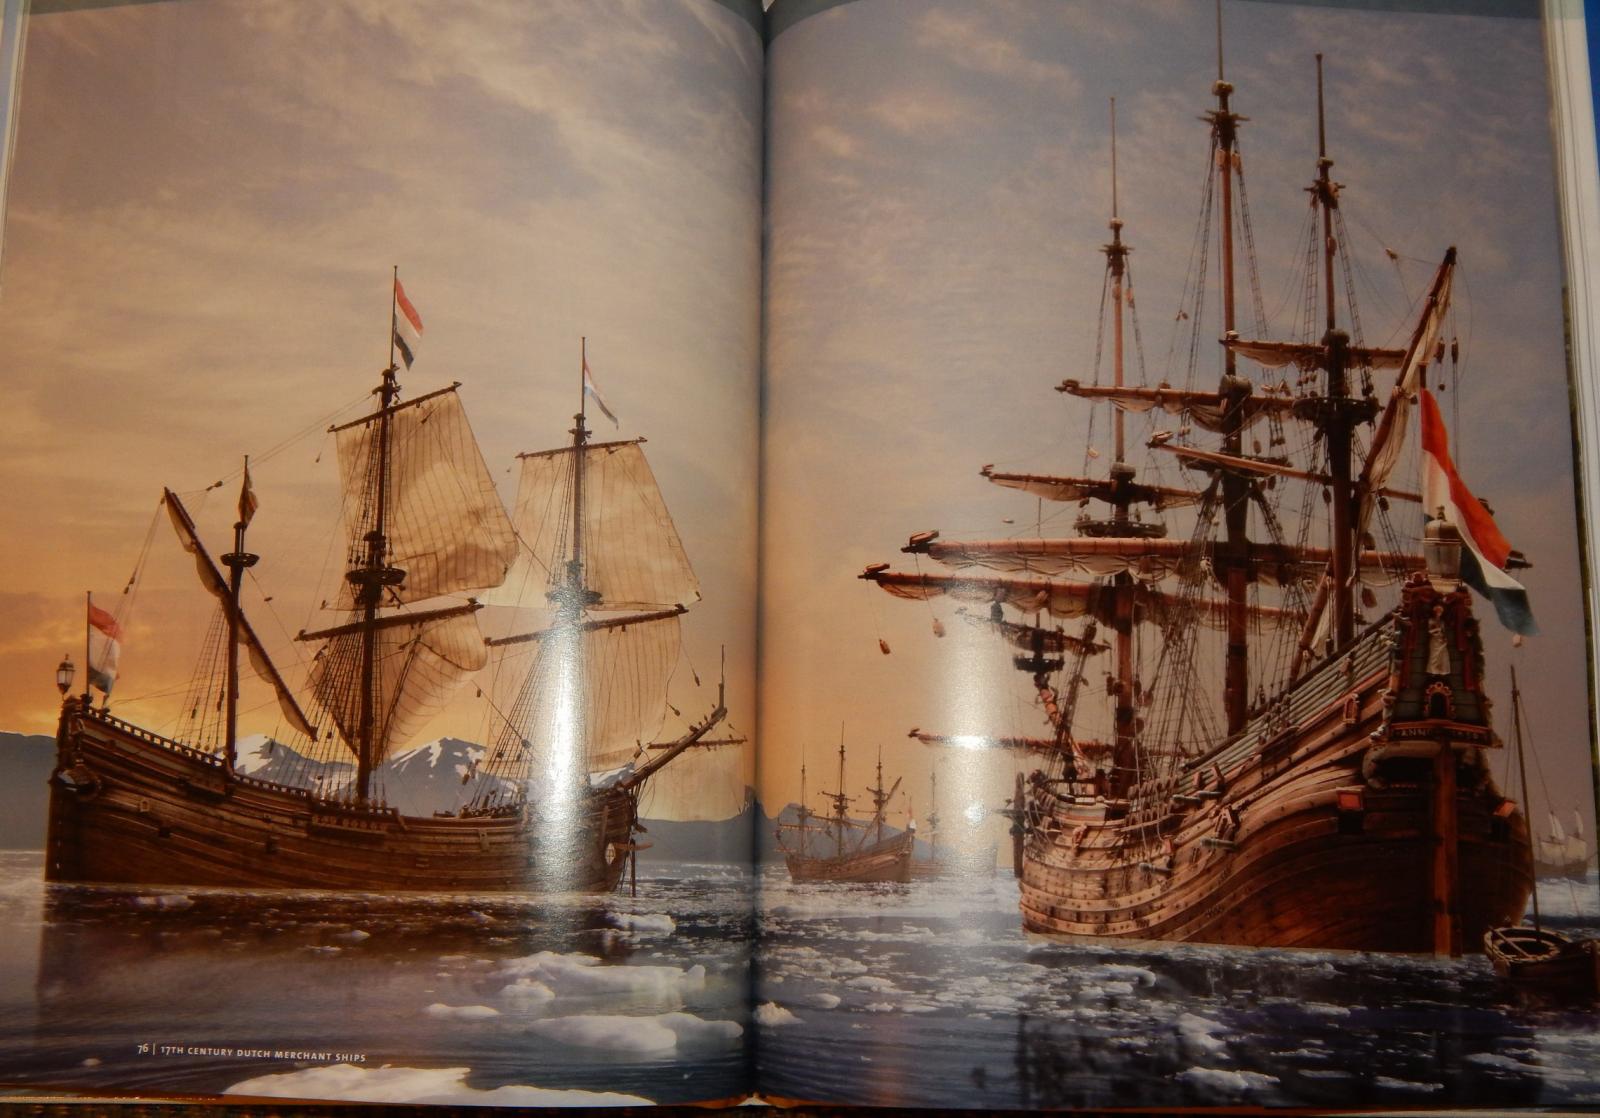
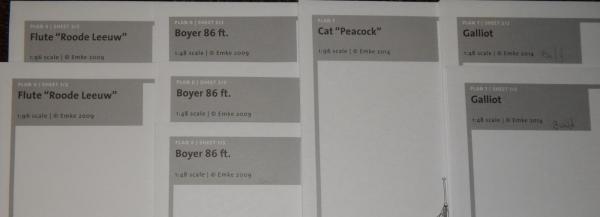
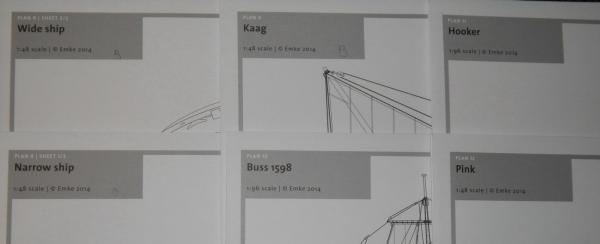
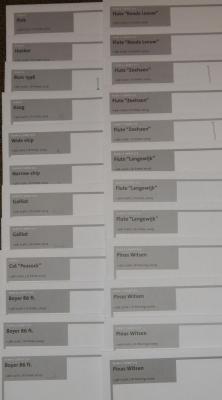
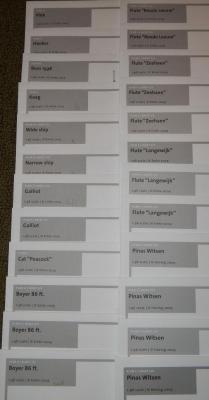
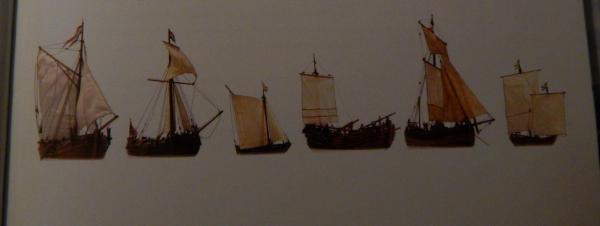
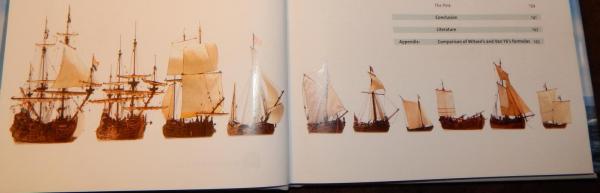
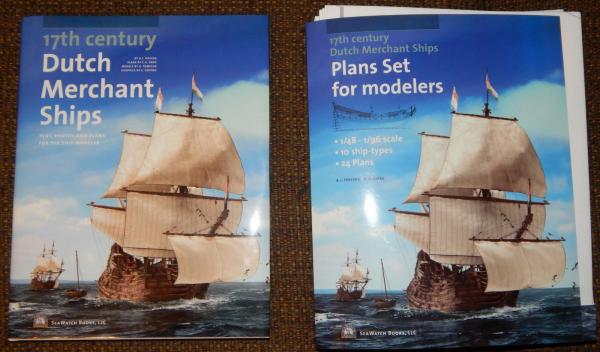
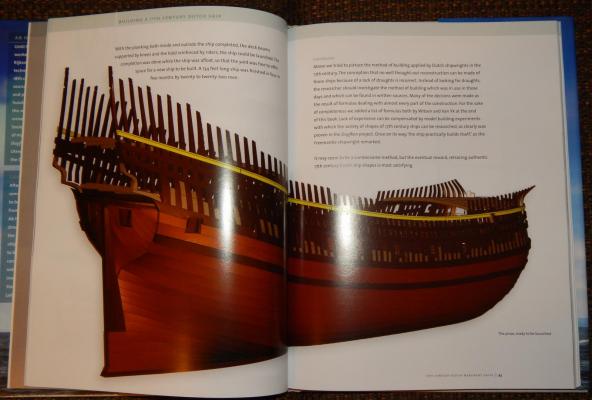
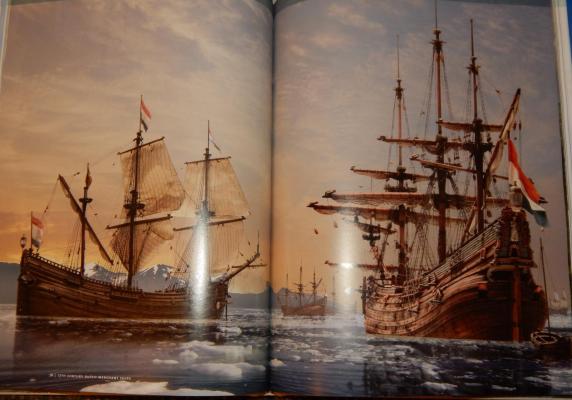
I have decided to do a serious review on this book and the plans and here it is. (avsjerome2003) just mentioned the book and nothing else. 17th century Dutch Merchant Ships Text, Photos and Plans for the Ship Modeler. By A. J. Hoving Plans by C. Emke Models by H. Tomesn Graphics by E. Hoving Publisher: SeaWatch Books, LLC Case Bound, Full Color, Dust Jacket Year: 2014 Large 8.5x11 format Pages: 152 and 24 sets of plans from 10 merchant ship types in the scale of 1-48 and 1-96. ISBN: 978-0-9904041-1-8 With this book all the plans modelers may need to recreate a whole range of vessels from the Dutch Golden Age. The plans are on thick stock (paper) and the ships areas follows” Seagoing Vessels: Pinas Witsen – scale 1-96 – 4 sheets of plans. Fluit “Langewijk” – scale 1-96 – 3 sheets of plans. Fluit “Zeehaen” (Able Tasman) – scale 1-96 – 3 sheets of plans. Fluit “Roode Leeuw” – scale 1-96 – 2 sheets of plans. Cat “Peacock” – scale 1-96 – 1 sheet of plans. Coastal Trade: Boyer 86ft – scale 1-48 – 3 sheets of plans. Galliot – scale 1-48 – 2 sheets of plans. Inshore: The Narrow- & Wide-ship – scale 1-48 – 2 sheets of plans. Kaag – scale- 1-48 – 1 sheet of plans. Fishermen as Traders: Buss 1598 – scale 1-96 – 1 sheets of plans. Hooker – scale 1-96 – 1 sheets of plans. Pink – scale 1-48 – 1 sheet of plans. ISBN: 978-0-9904041-2-5 Note: Three Fluits is one ship type. Summary of the people that created this book. Ab Hoving: Worked as the chief model restorer in the Rijksmuseum in Amsterdam. Studied the technique of Dutch ship building in the 17th and 18th century. He has written numerous books, articles in several magazines and given lectures. He has been involved in major replica building projects, such as Duyfken (West Australia, Statenjacht (Utrecht) and others. Cor Emke: After he retired as a manager from an American Co. in forklifts Cor dedicated his life in building ship models of Dutch vessels from the 17th century. In cooperation with Ab Hoving he produced many AutoCAD drawings of ships, thus filling the gap in the availability of such draughts. Together with Ab he has been involved in several replica projects, like the Statenjacht Utrecht and De 7 Provincien. Herbert Tomesen: Herbert runs a company in Amsterdam, Holland, Artitec (www.artitec.nl), which produces architectural models. He produced large scenery models of ancient cities in many museums in Holland. He built a huge diorama of Roadstead of Texel in the 17th century containing over a hundred ships. The models in this book are by him. Emiel Hoving: Ab’s son Emiel studied art in Groningen and has been a graphic designer for almost 20 years. He works for Artitec and did the design for Ab’s first book, Message in a model and Statenjacht Utrecht. For the pictures in this book he took photgraphs of Herberts models and used PhotShop to create images of what Dutch maritime world looked like in the 17th century. Summary: The book is well written with numerous pictures, beautiful maritime paintings, copies of old building plans, hull renderings and many ship models. Well documented historical information to give the reader a good picture of what type of ships were used in the 17th century Dutch trade. There is a detailed chapter of what items the Dutch traded in Europe and Russia and one can see that their wealth was first of all connected with their trading position Europe and that is what created their prosperity. The Dutch were Europe’s main freighters. Another detailed chapter discusses how the ships were built. What measurements and ratios were used to produce a type of ship. In the back of the book there is a comparison chart of Witsen and Van Yk’s shipbuilding Formula’s. Several detailed renderings how the Dutch build there ships, “shell first”. The chapters after that gives the reader detailed descriptions of the type of ship described which include close-ups from ship models, paintings and realistic Photoshop images. It is too bad the book does not include a CD-Rom with the plans on it like the book from Abel Tasman. The advantage of this would be that you could view, zoom and pan the drawings on the computer monitor and print them to scale different from those that are supplied with the book.

- 23 replies
-
- 15
-
-
I just got the book and the picture you have up there is not in the book. Marc
-
This book is not available in Holland? Wow. You would think that the market for Dutch speaking people would be there. Plus it is by a Dutch Author. I like the various ship drawings already. Plan to make a few of these. I'll wait with a fluit. Marc
-
I have ordered this book and can't wait to read about it. Thank you for publishing this. Marc
-
The book is available in English from Amazon Germany and another German site. The author Manfred Stein is German. ***//www.amazon.de/Prisoner-War-Models-Treasures-Napoleonic/dp/3782212053 ***//www.koehler-mittler-shop.de/Neuerscheinungen-Koehler---Mittler/Stein--Manfred--Prisoner-of-War---Bone-Ship-Models--Treasures-from-the-age-of-Napoleonic-Wars.html Then there is this German site that has many reference in English. ***//www.pow-boneships.de/ I went to many sites and there a lot of bone models available. It is not really a rare item, except the price. $25K to infinity. Marc