

Mike_In_RI
-
Posts
276 -
Joined
-
Last visited
Content Type
Profiles
Forums
Gallery
Events
Posts posted by Mike_In_RI
-
-
Quote
But I believe there were a series of articles By Dana McCalip on rigging her that were more accurate.
The article ... SOME THOUGHTS ON THE RIGGING OF COLONIAL SCHOONERS by McCalip (NRG 32:30-36) is the best single reference I have found. Next to that, William Avery Baker has some thoughts in "Seafaring in Colonial Massachusetts" (online, I think) regarding the Ashley Bowen painting of the BALTICK.
Randy's Hannah (45t) is much closer in size to the MS Sultana (53t) and therefore has better scalability for me than the Hahn Hannah (78t). Also, the spar sizes for the Sultana have really good sourcing. It looks like the newest MS Sultana plans include the Harold Puls update of the mast/spar information from the Public Records Office, London.
I haven't started rigging yet but I've finally got my head around the nomenclature of the lines. 'Still weak on the contemporary use/position the running rigging so more homework for me.
Thank you for checking in, Mike
- GrandpaPhil and JpR62
-
 2
2
-
I forget the next steps but the thwart risers will add a lot more stiffness to the hull. And, of course, the thwarts themselves. If you need a spreader, I'd just temporarily glue it in place in a spot that will not show when finished. Maybe just below the height of the ceiling plank.
-
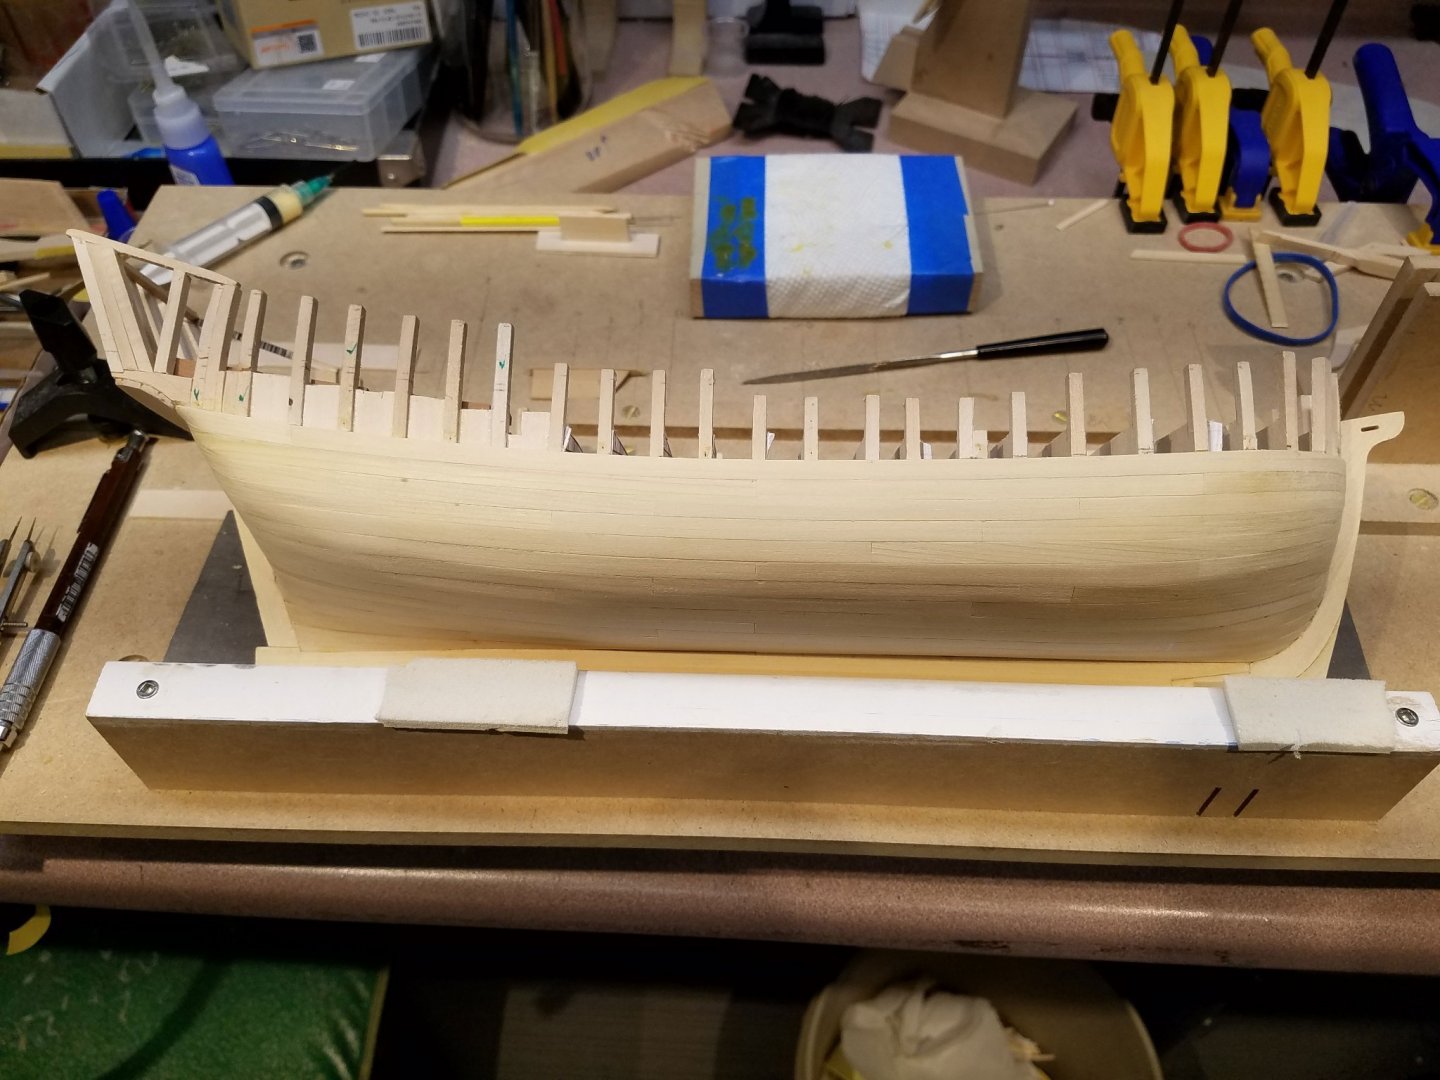
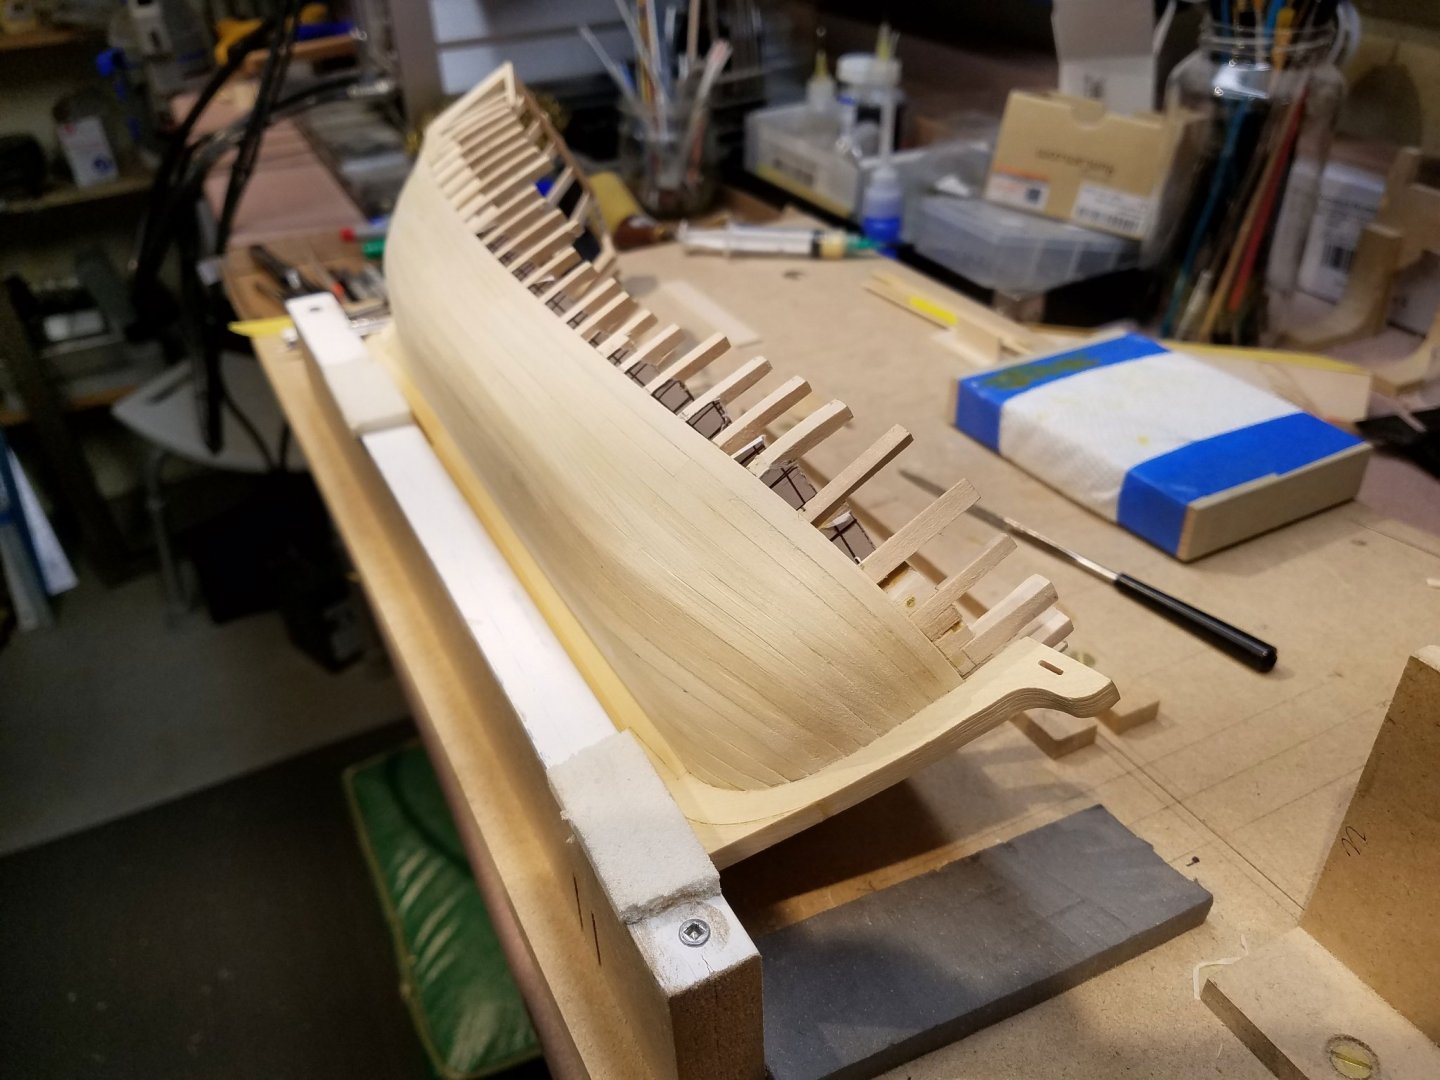
Hi Larry..... nice photo of the frames. The planks and frames look great! I remember how strong the model felt at this point. As mentioned, double check if the waist is any wider/narrower vs. the plans. Once the thwart risers go in, there will be little chance to adjust it. Keep it up..
Mike
-
-
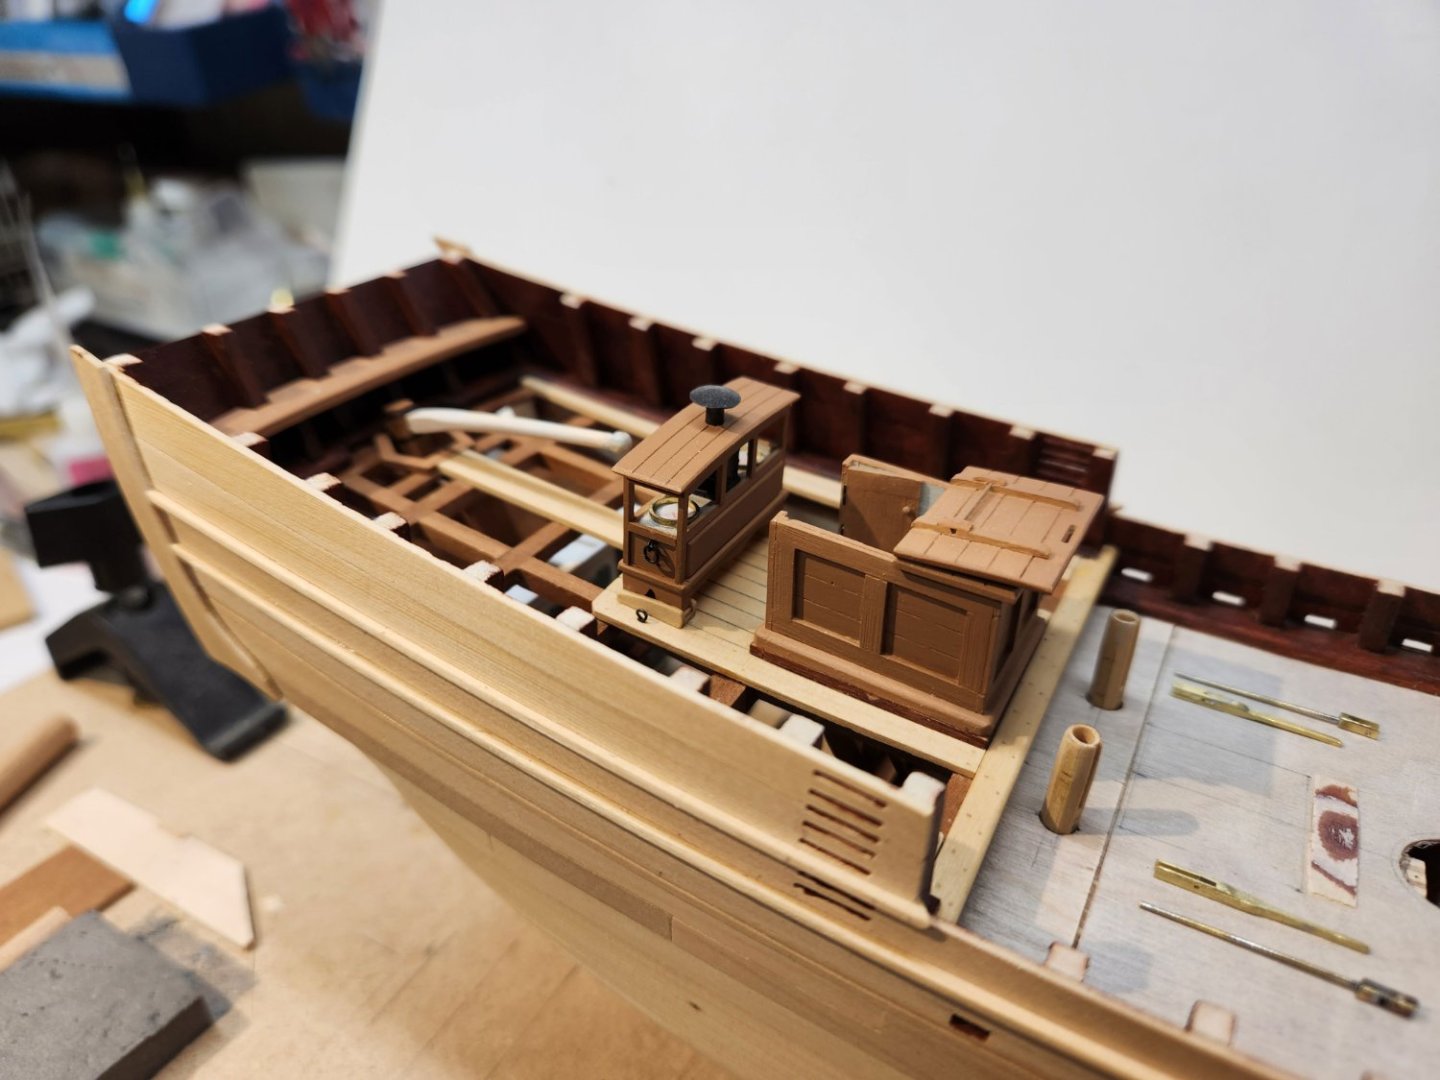
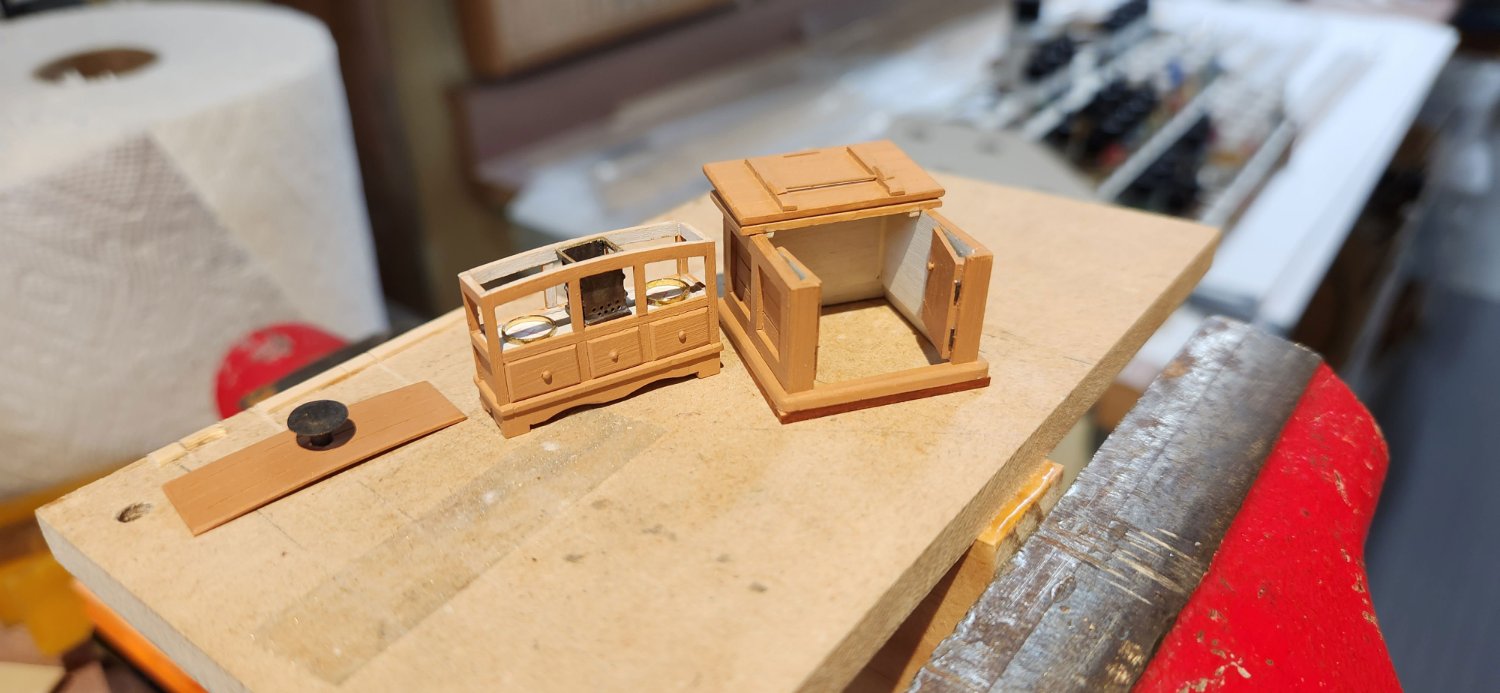
Another way overdue update... no really believable excuses. I continue to enjoy working on this Hannah (designed by Randy Biddle, below) and am putting time in on the scale details as much as I can, either researching them them or sensibly imagining them for the period. The next several shots show the deck furniture where boxwood is used for all the pieces needing fine detail and AYC used for thicker pieces.
The binnacle is stick built with one center lamp between two compasses and the lamp and stack are soldered brass. The companionway is also stick built with doors opening inwards to allow closer placement of the binnacle.


I want to allow the most open view of the main cabin as possible so the quarterdeck has a very minimal amount of decking... Just enough to support the binnacle, companionway and some rigging eyebolts. Barely visible faux treenails are made by mixing a drop of acrylic paint with thinned wood filler and dabbing that into scale sized holes. I found that too dark or too light filler made the treenails visible from too far away. The compasses are simply two thin brass rings with a barely visible rose.
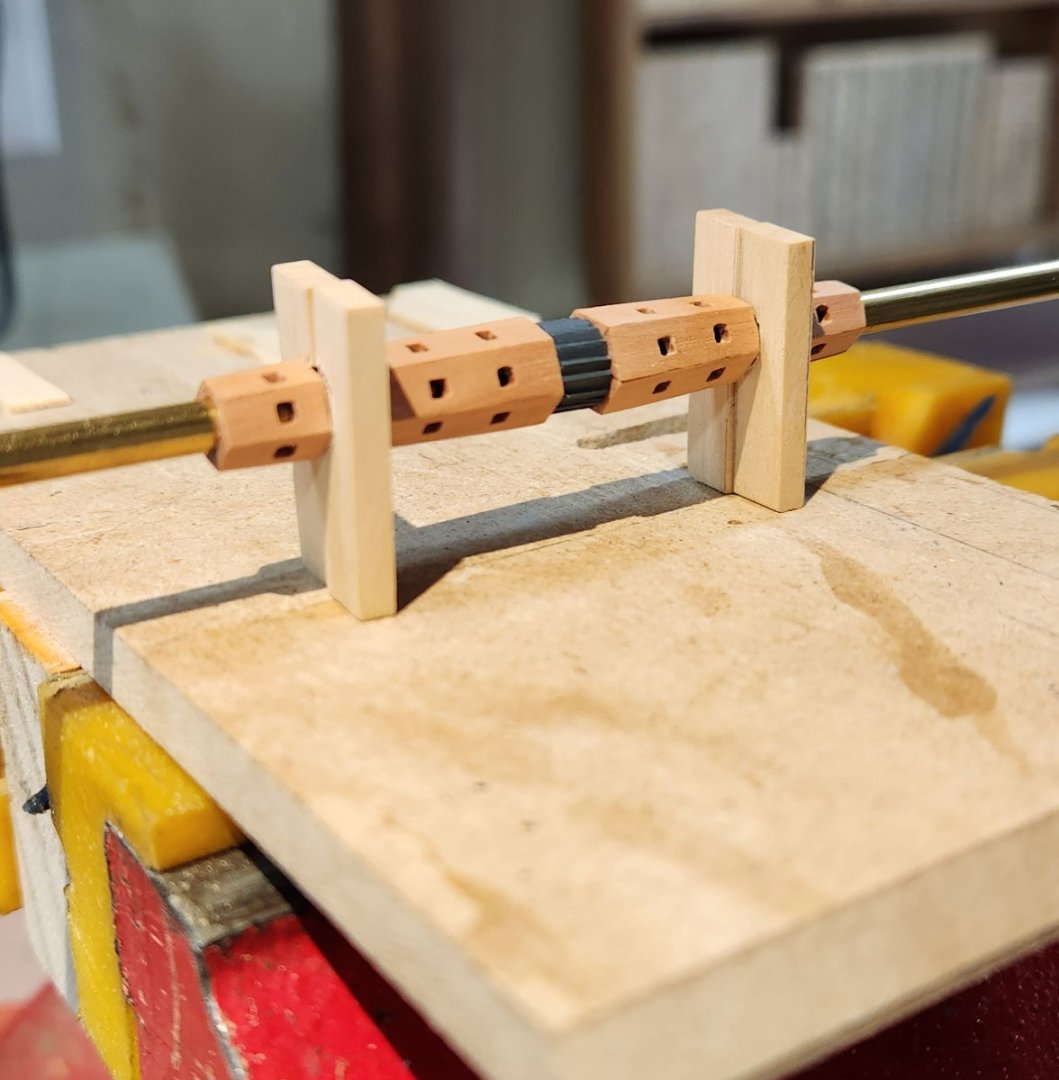
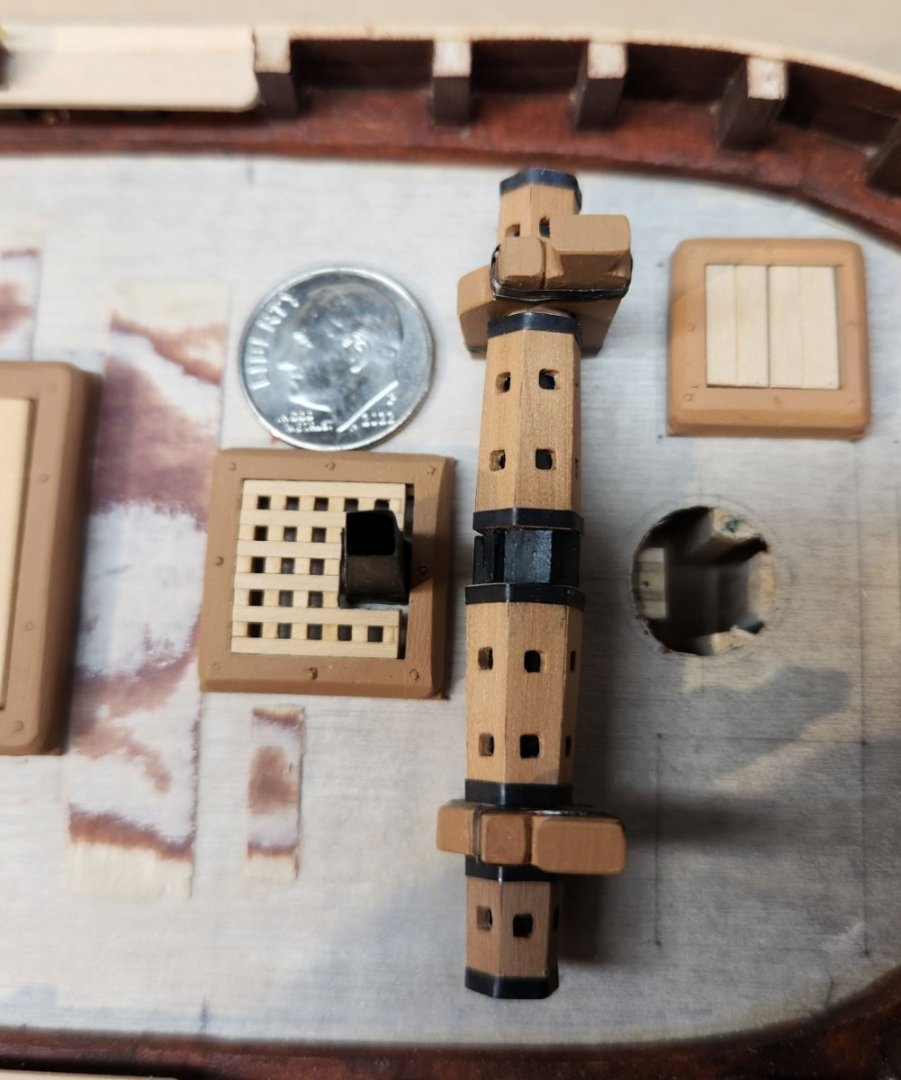
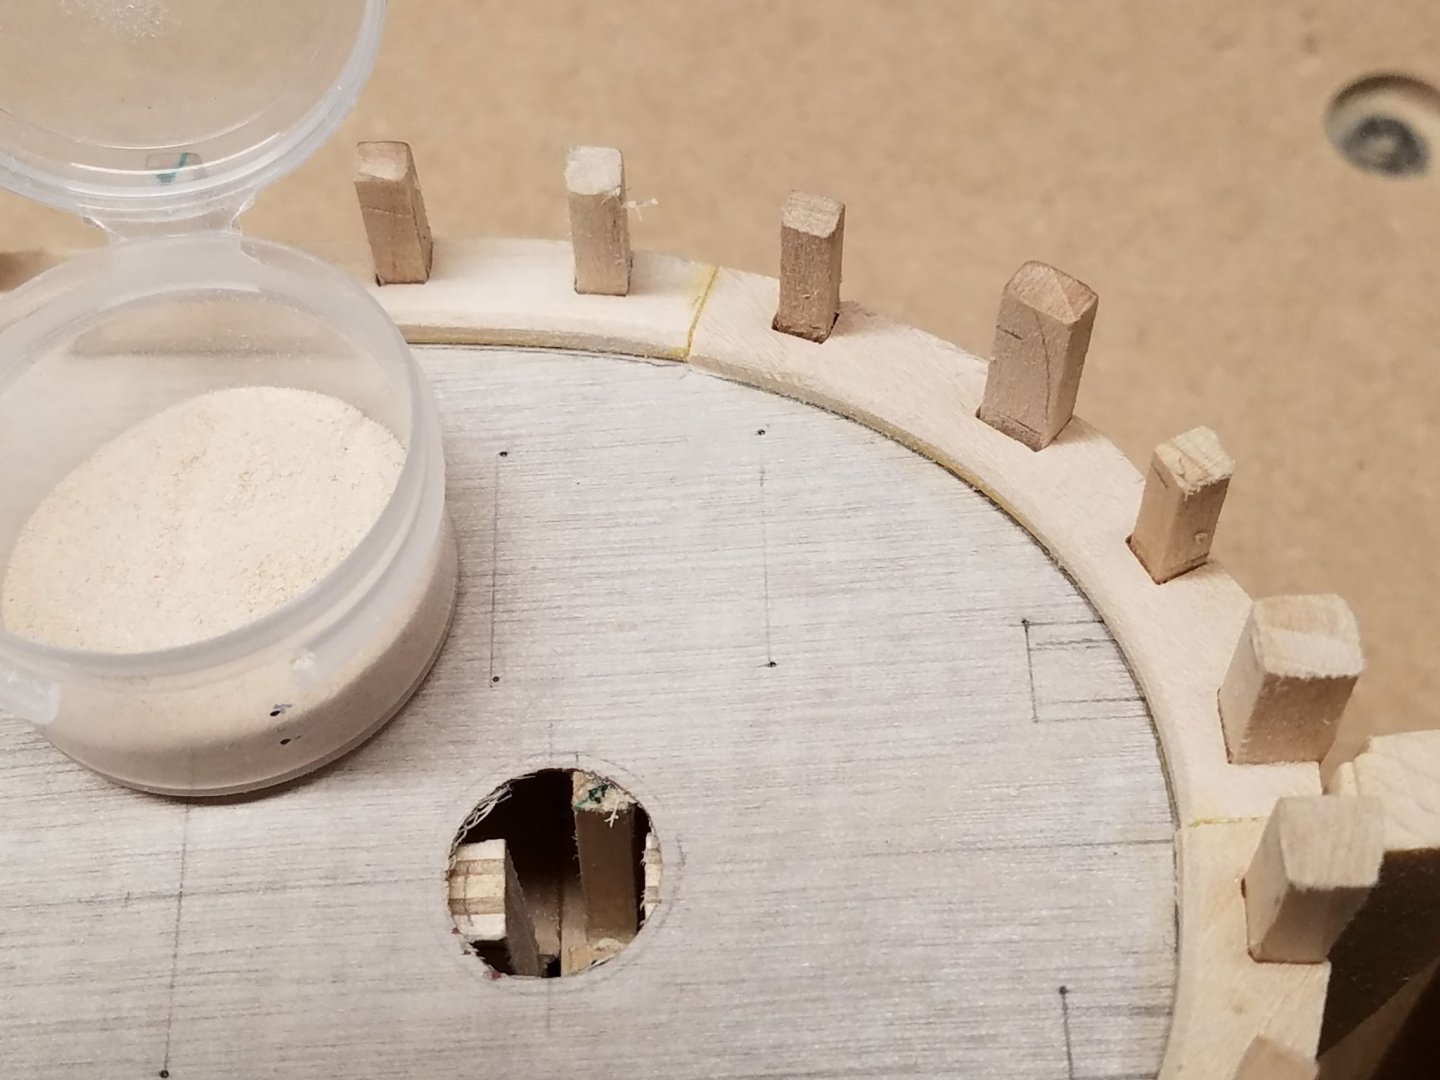
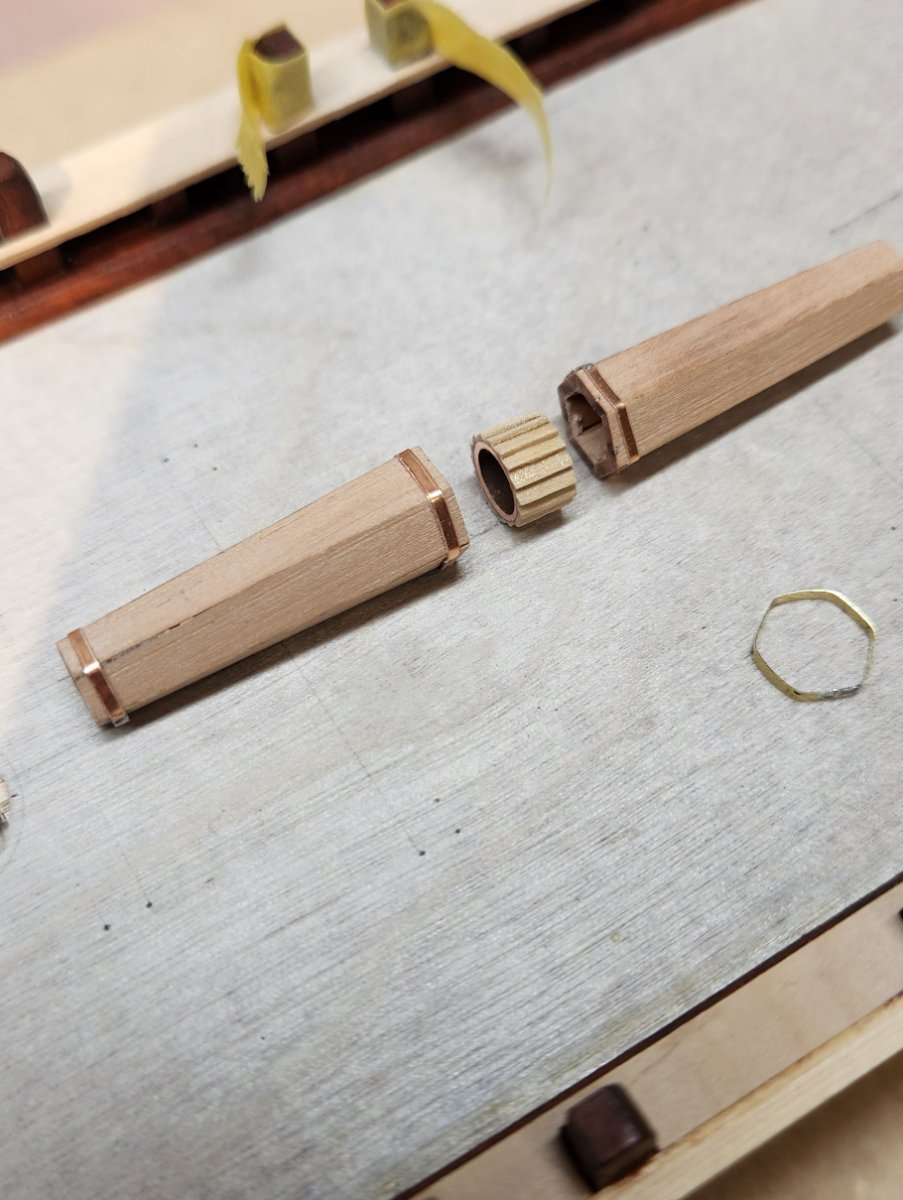
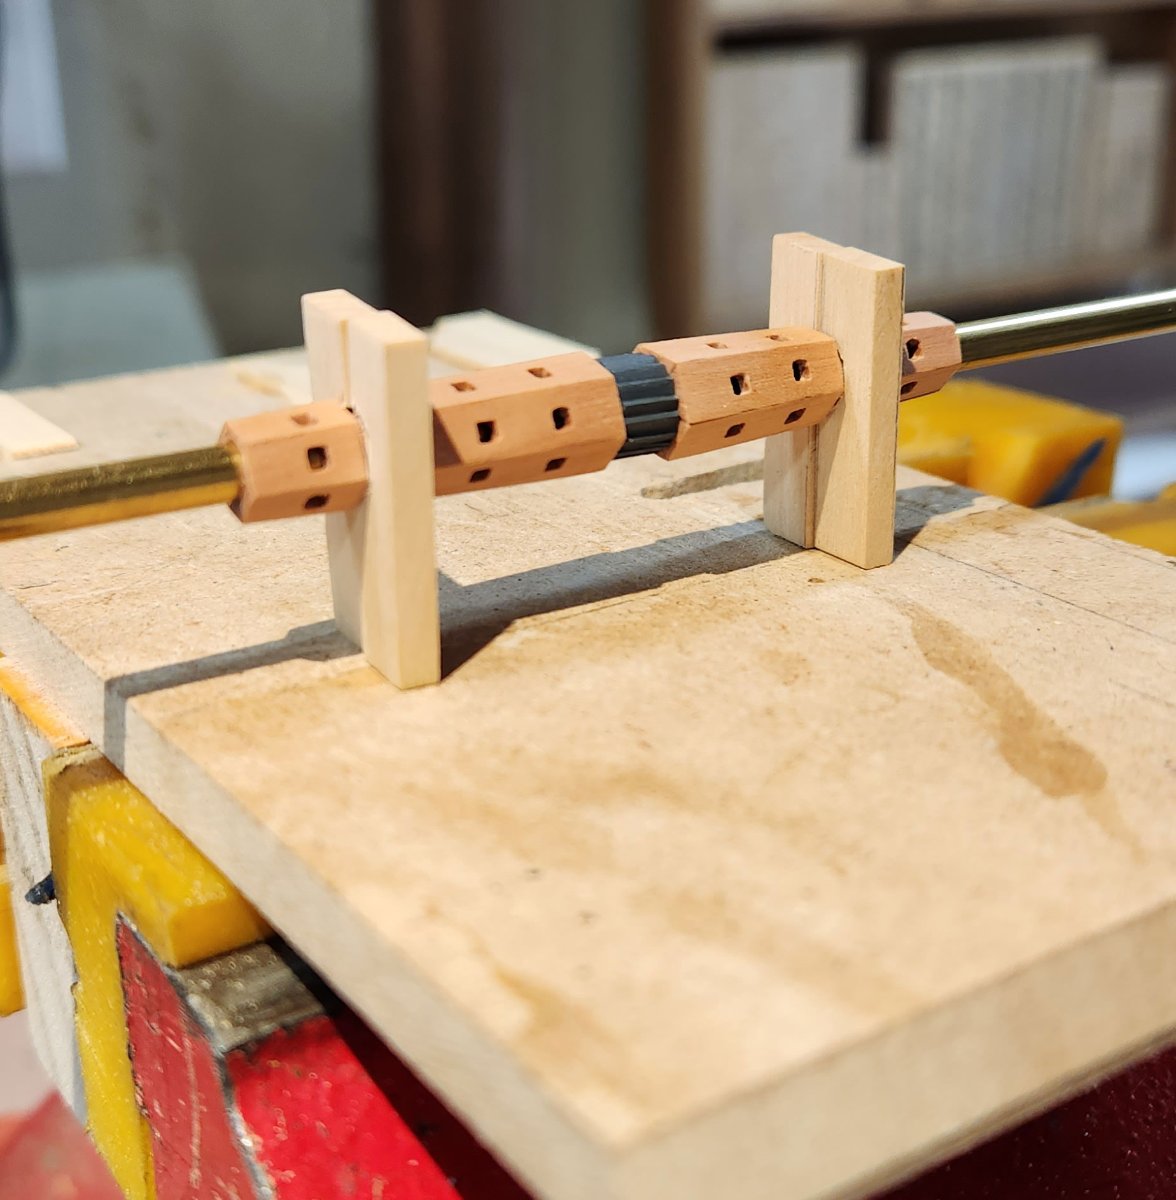
Here is an interesting patent from 1755 on Hathi Trust describing a windlass using a central steel spindle. #62 pg 22. I felt more comfortable making the octagon shape from individual parts than carving them from a "log". Similar to the stick built barrels I made for the whaleboat project, each plank is tapered and then the edges are chiseled to 45 degrees. The pawl shown is not the final version .. it has fewer detents.

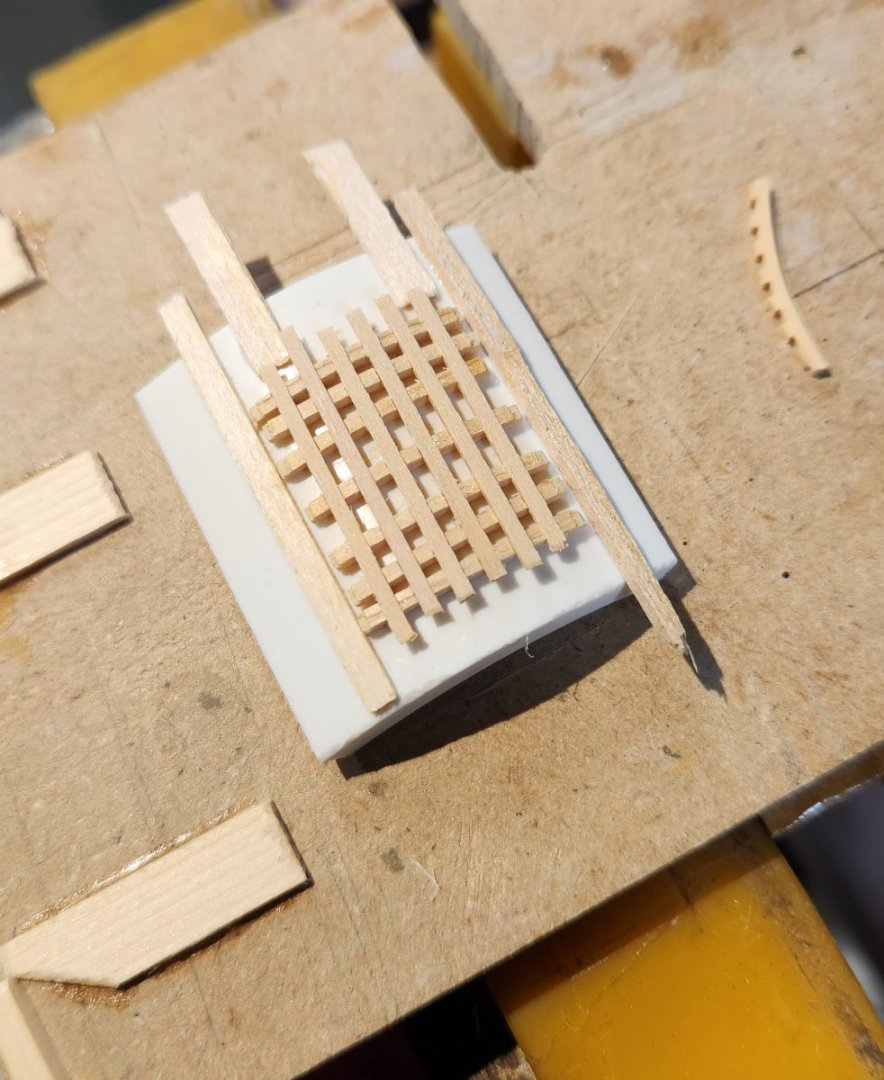
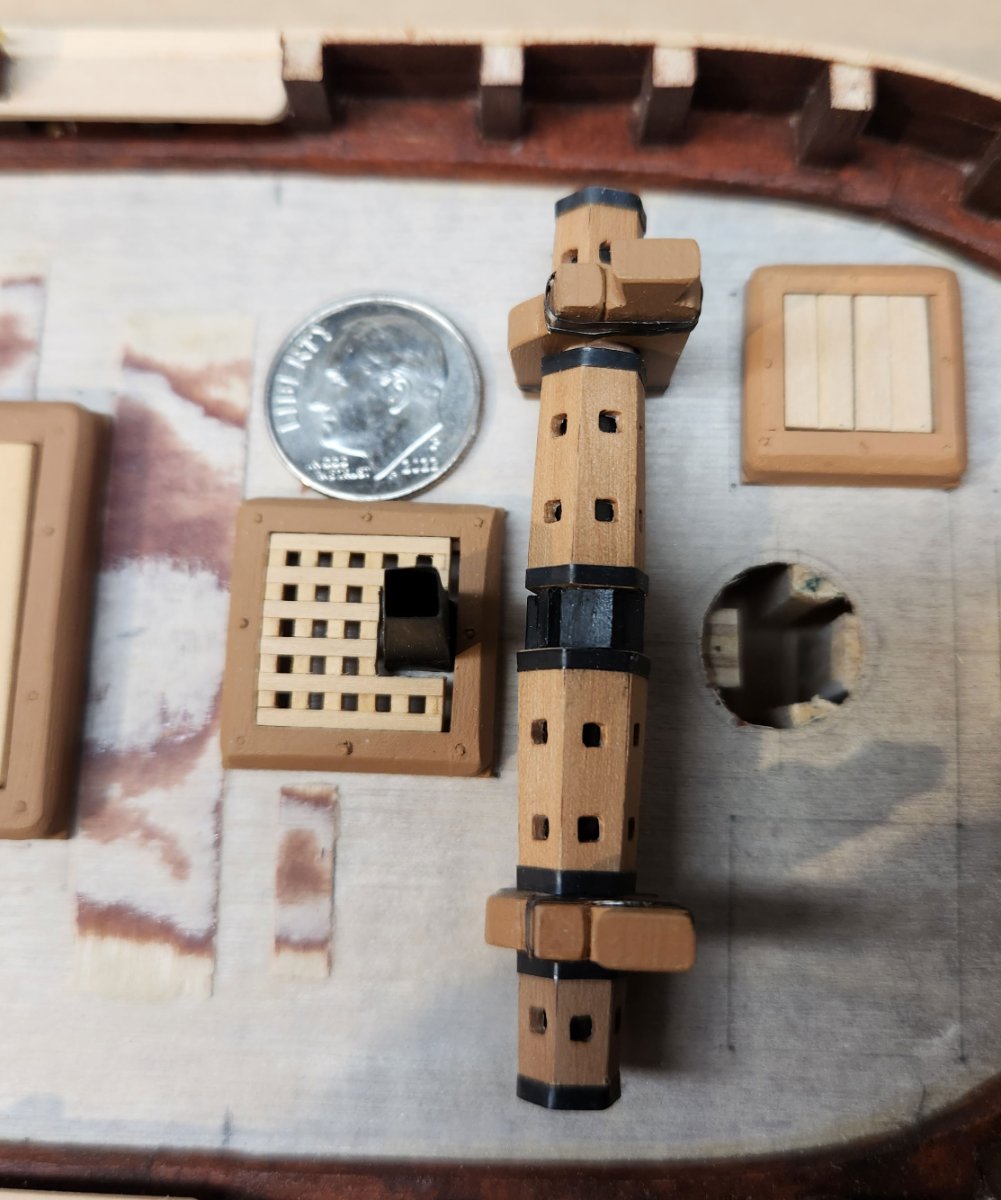
The steam vent is built following the TFFM where only the grating ledges are notched. A Proxxon MF70 was used to make the notches. The stack is .005" blackened copper. The ledges were bent and assembled over a cut out piece of PVC. The scuffed up look on the deck are small sanded pieces of 1/64" ply that I'm using to round up the deck in those areas before planking.
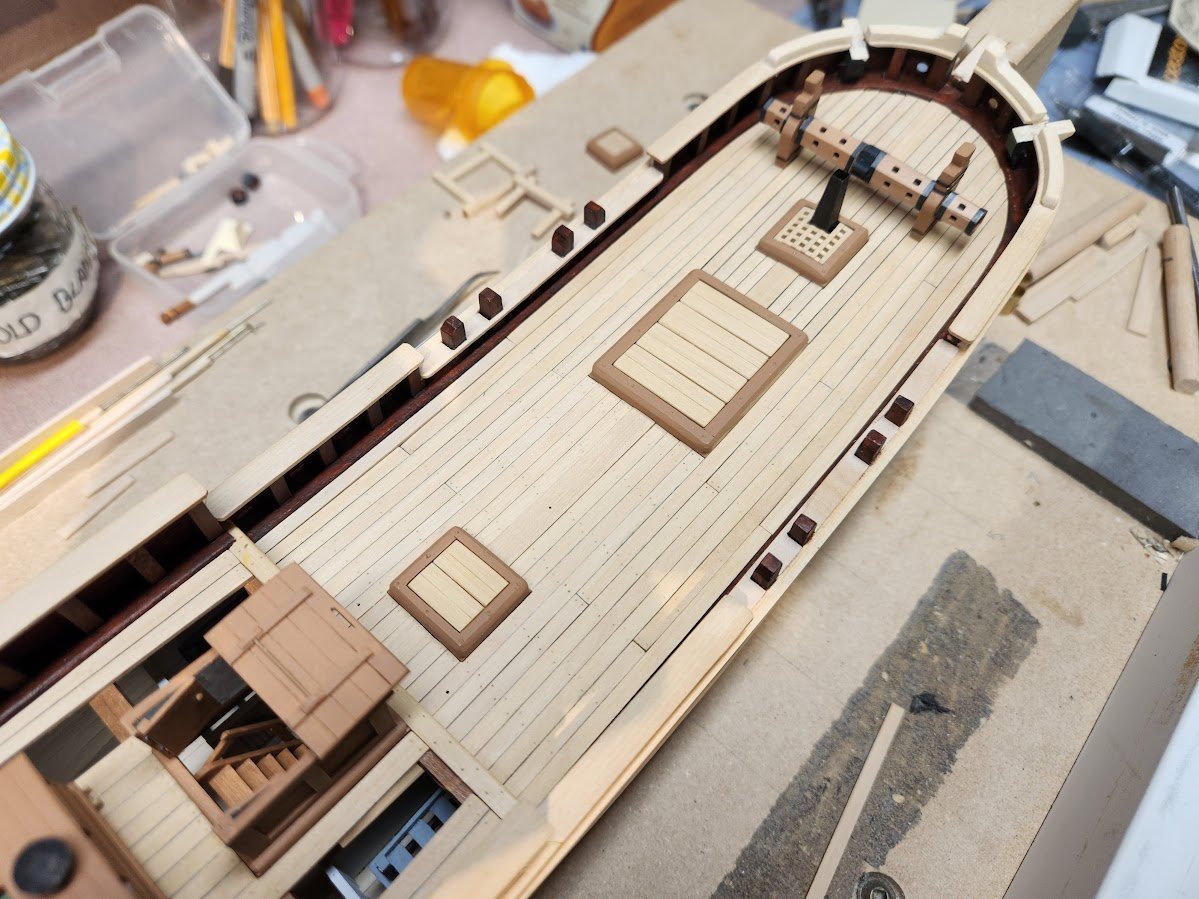
This is how she sits today. The furniture, hatches, masts and bowsprit are just dry fit in place for now. The pump parts are made up following the TFFM and are yet to be assembled.
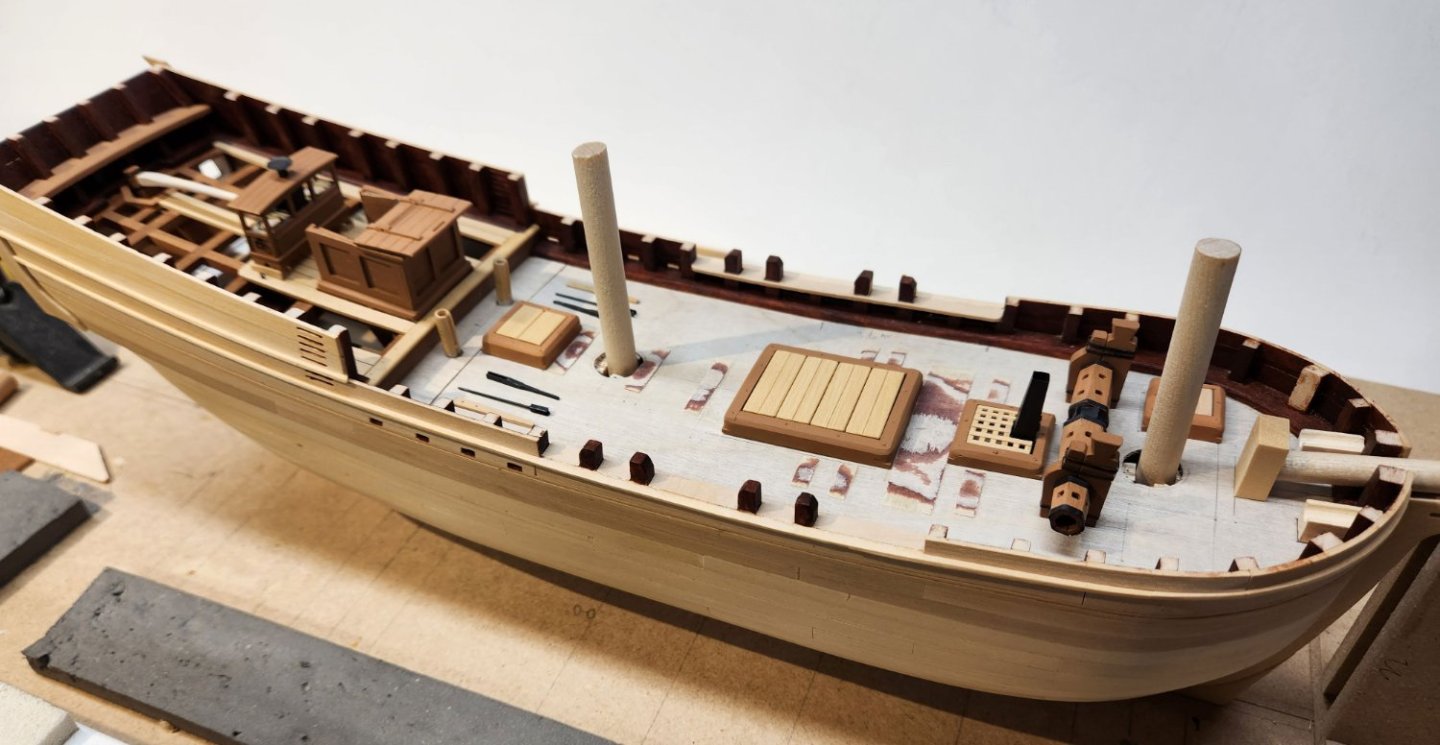
I'm looking forward to finishing the remaining deck pieces then it's a toss up of installing the planking or railing. (???) Thank you for looking in on my Hannah project and please pass along any critiques or comments. They are always appreciated.
Mike
Randy Biddle's plans for this Hannah are available at NRG online > Journal >> Extended Journal Content > Articles
Colonel John Glover’s Marblehead Schooner Hannah (1765 - 1775): Fishing for the Truth
-
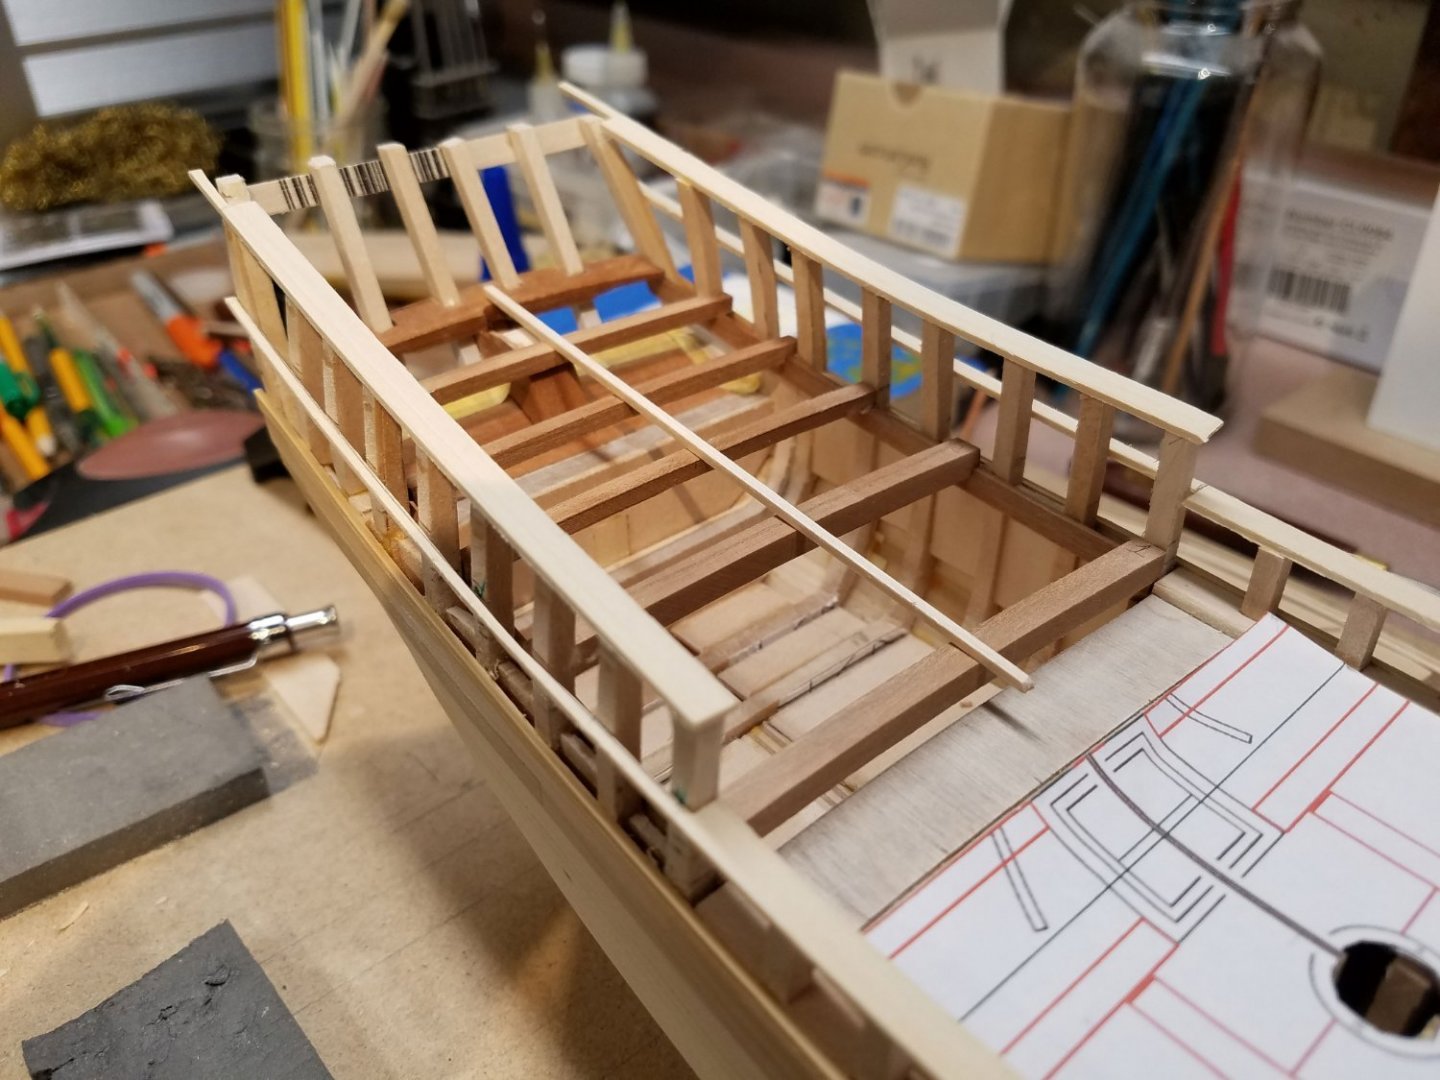
Here I am in the basement where it is nice and cool, avoiding the high temperature and dew point outside.
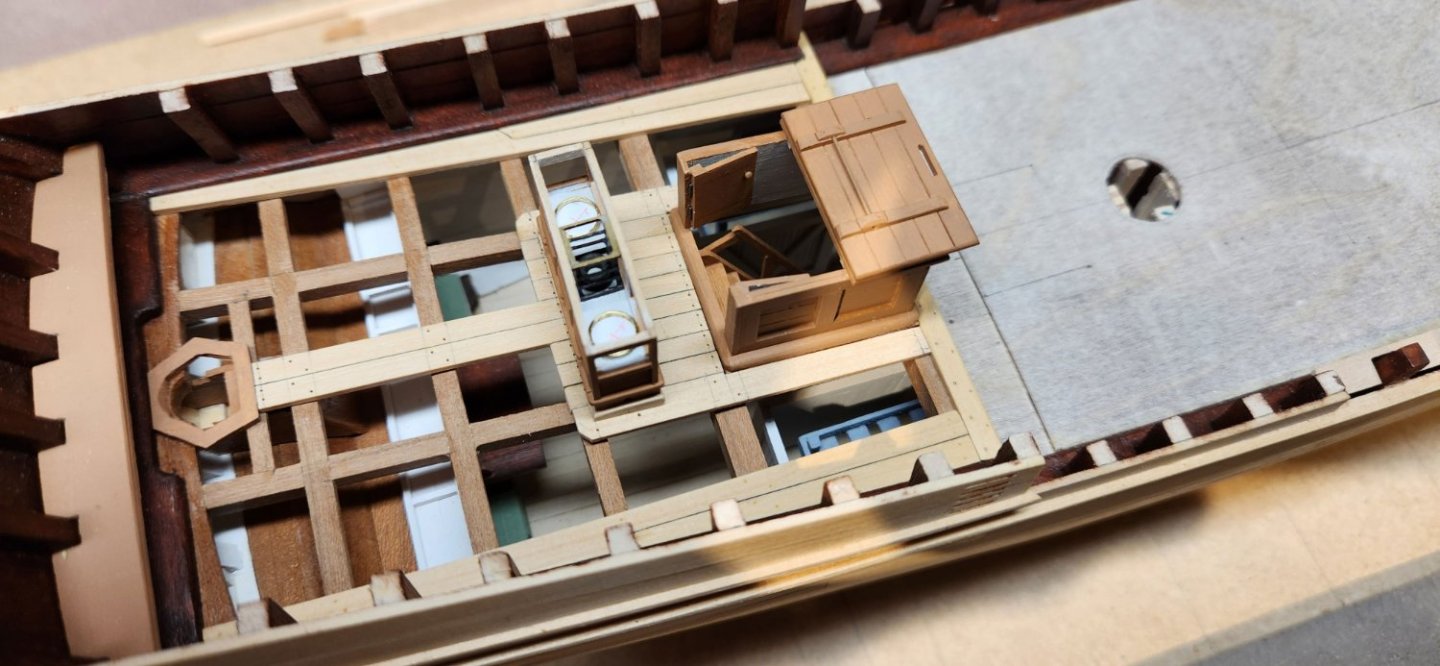
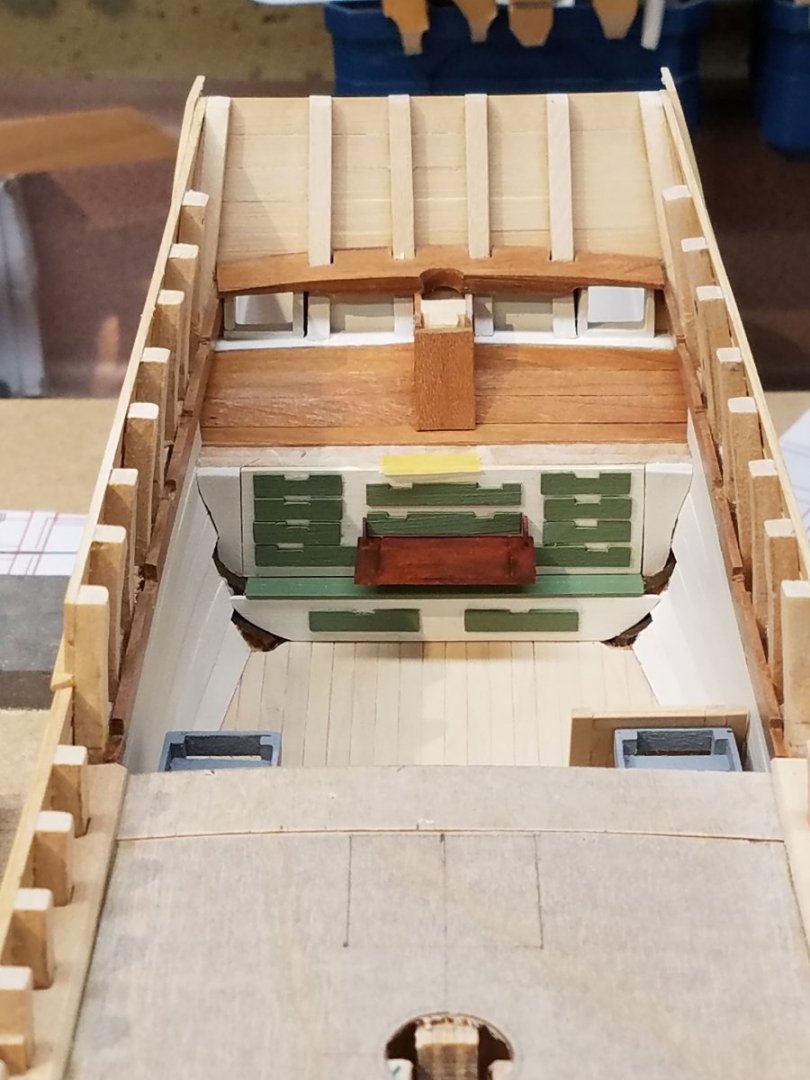
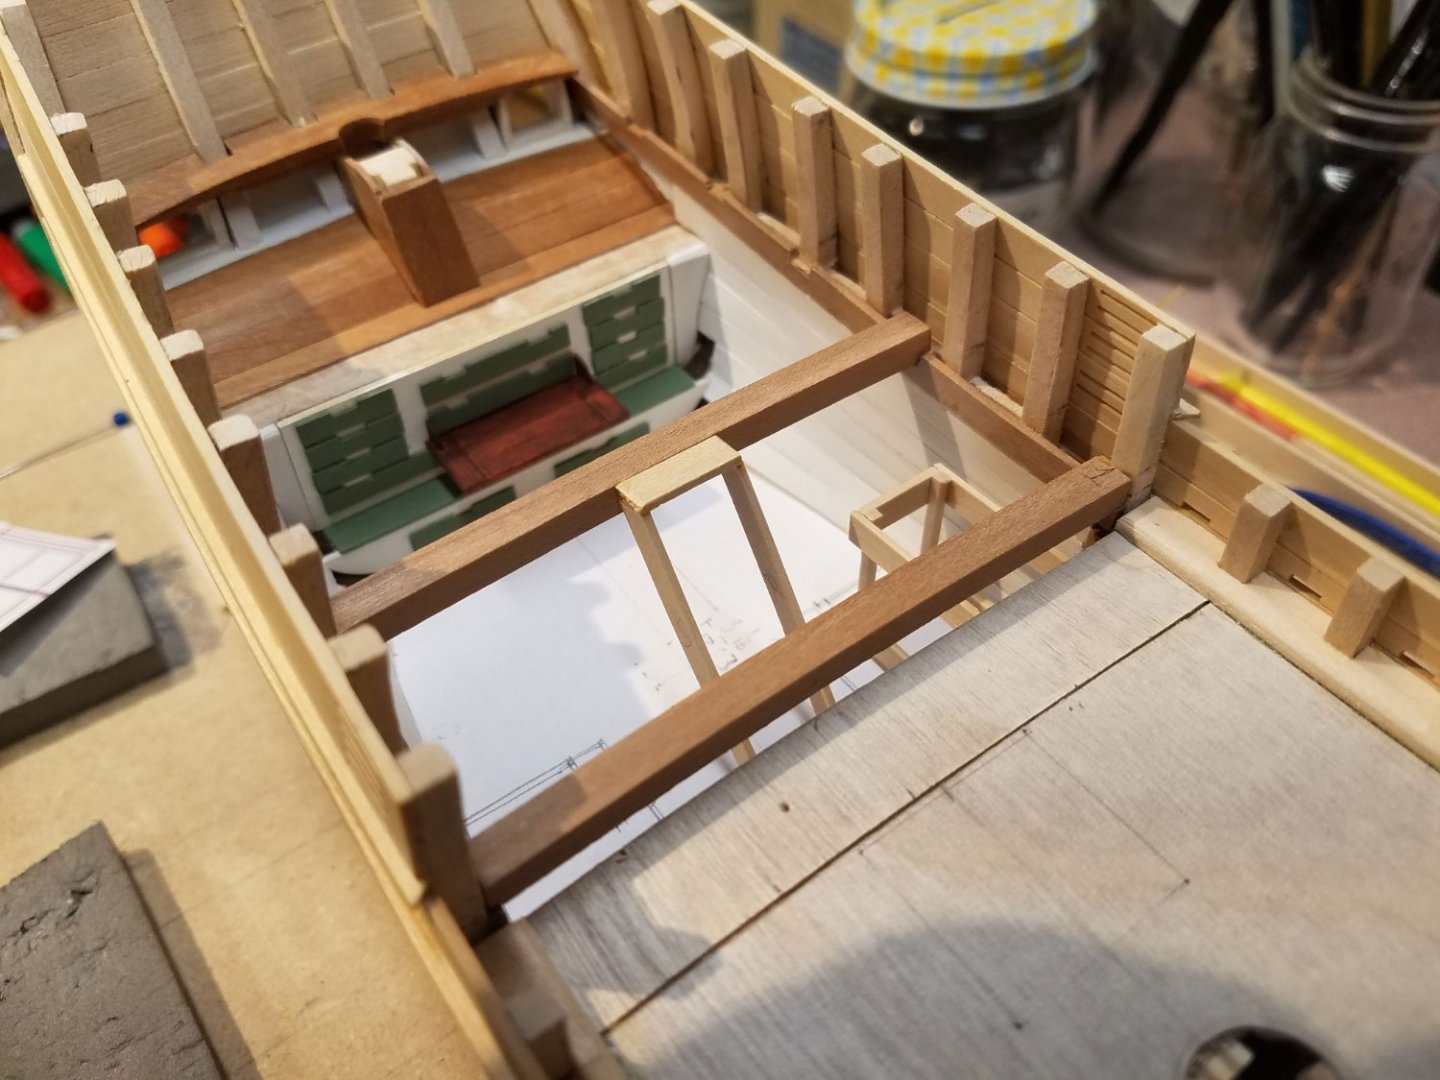
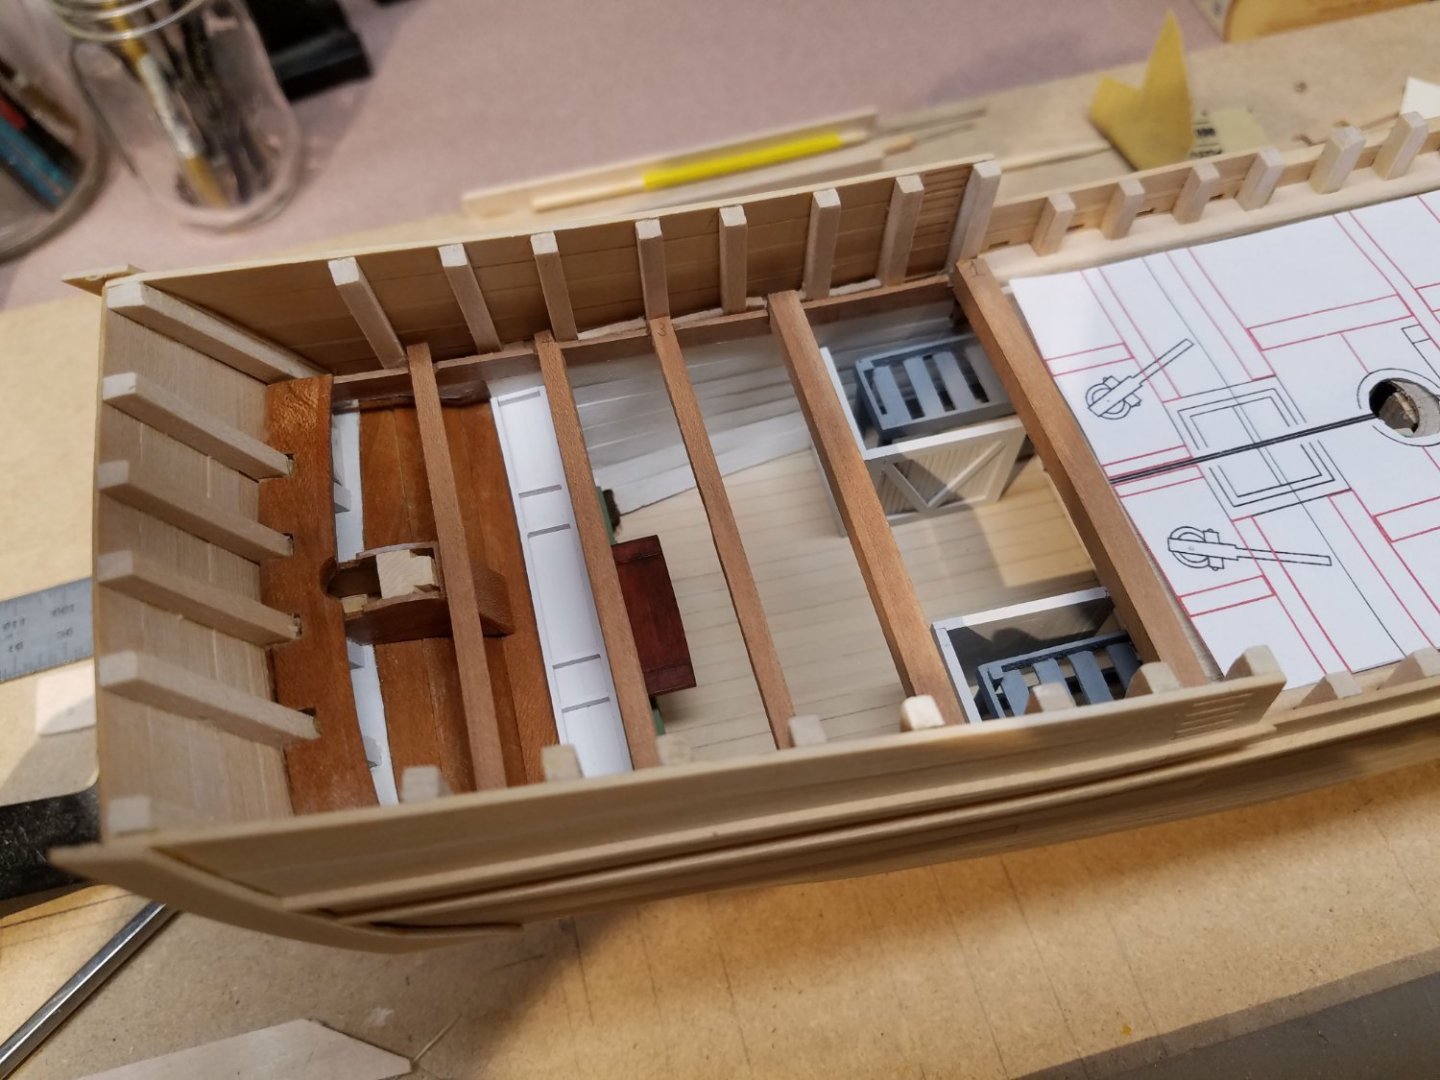
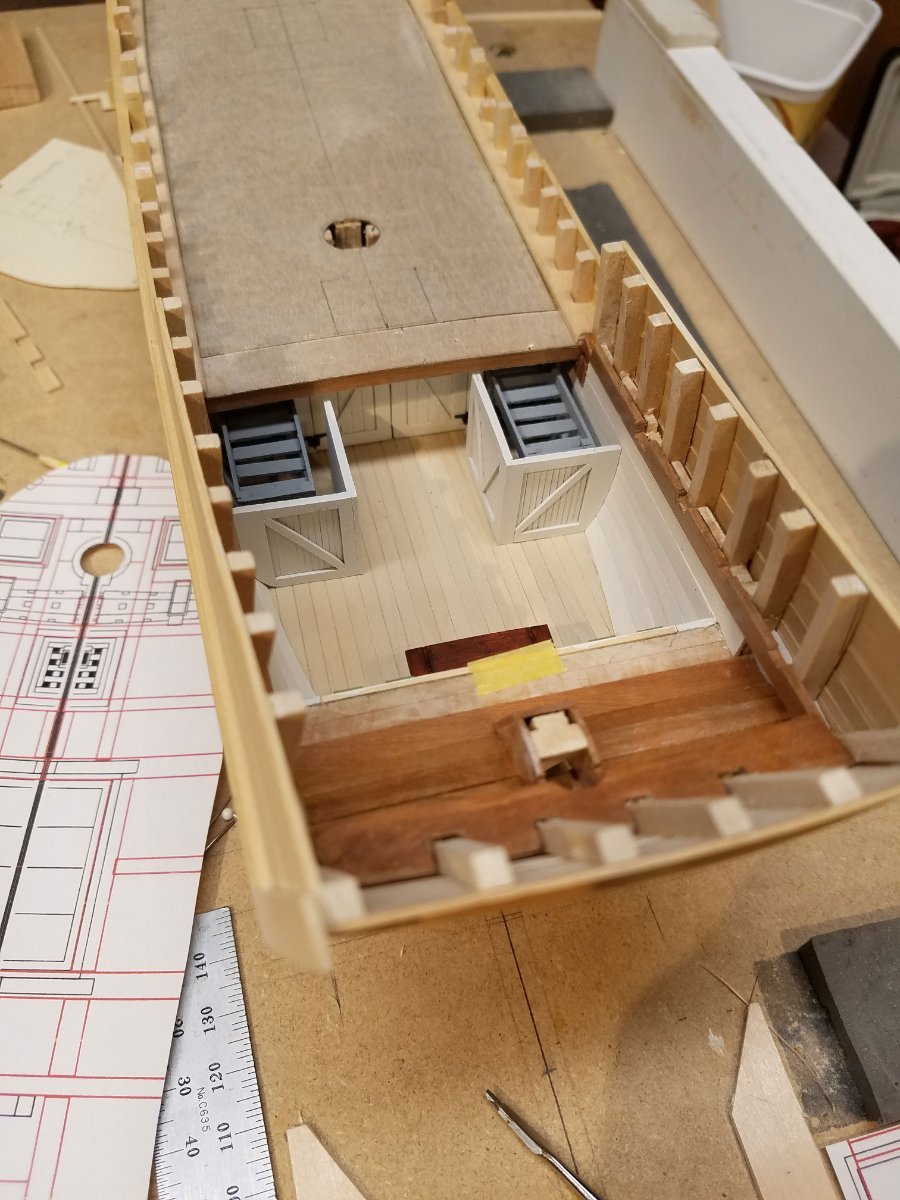
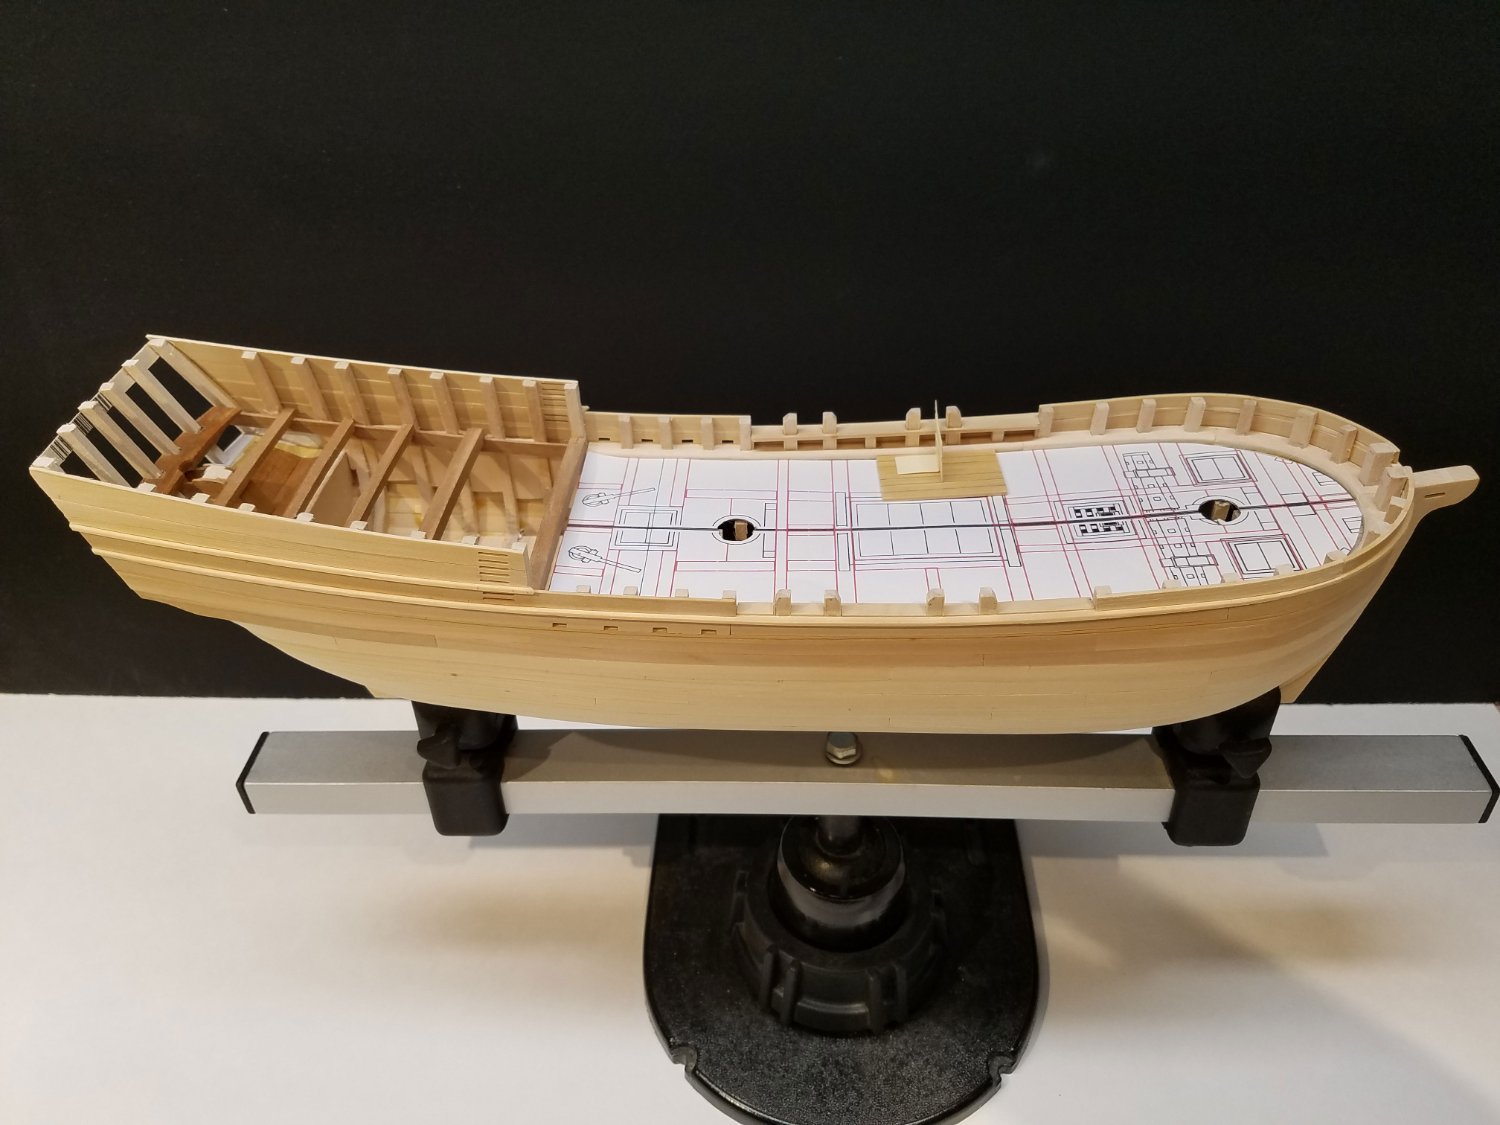
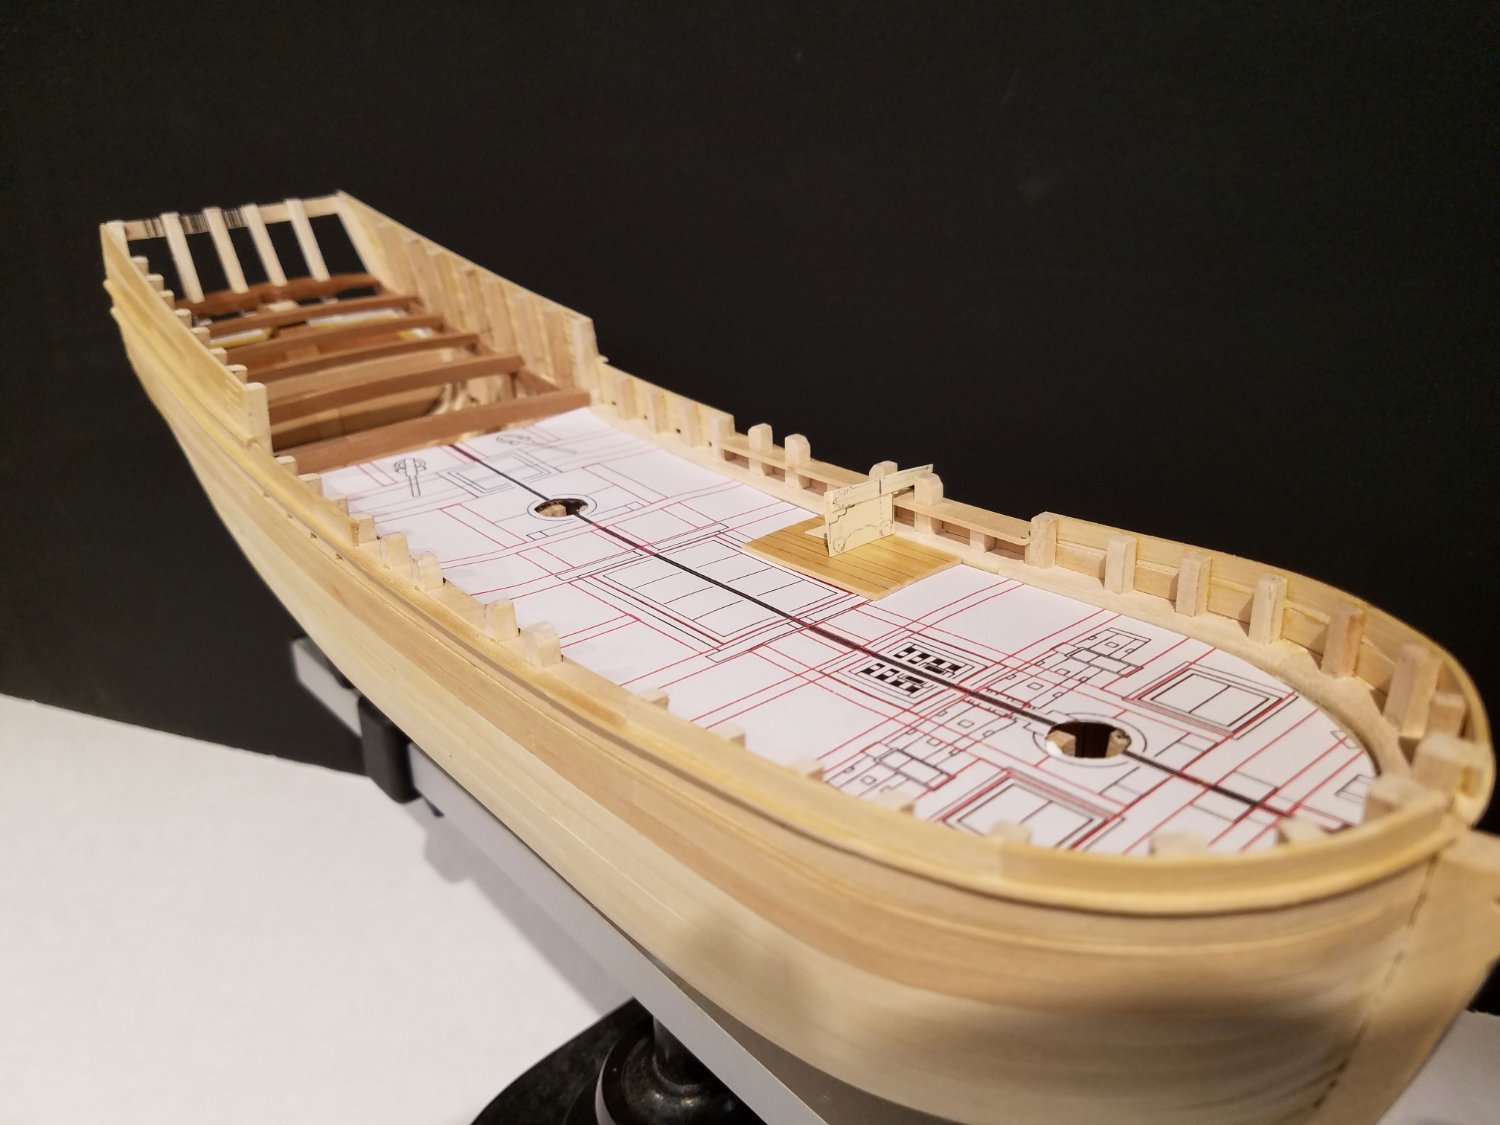
'Just a short update. Today's shots show the Randy Biddle Hannah with the cabin completed sans a rocking chair which I though might make the area look too busy. I had a lot of fun making the cabin but it sure took a while to get it done.
The quarterdeck beams are now fixed in place along with the connecting timbers. A rudder trunk rises from the inside counter to the aft-most beam and a sectioned shelf runs along the top of the storage wall... the idea coming from the Charles Morgan. The smaller 2 sections will hold lanterns.
The margin planks are also finished with the trickiest being the aft most plank with the 3D curves involved.
So, now on to the main parts of the deck area.
Thank-you for looking in and keep cool!
Mike
-
Hi Larry, I just now found your build site. The whaleboat is coming along nicely.
Regarding all the frames: Probably you know this already but just double check that a frame is not in the way of some other piece for future placement. I remember I had to belatedly shift a few frames one way or the other to avoid the centerboard case or a thwart(??).
One other planning issue: The temporary plank holding in the stem & stern pieces keep the width of the hull correct until the frames go in. Once that is out, the hull may or may not narrow. Mine narrowed about 1/8" which does not seem like much but the large line tub is a tight fit so I had to make it slightly undersized so it looked OK (not slanted).
Keep up the good work.
Mike
-
-
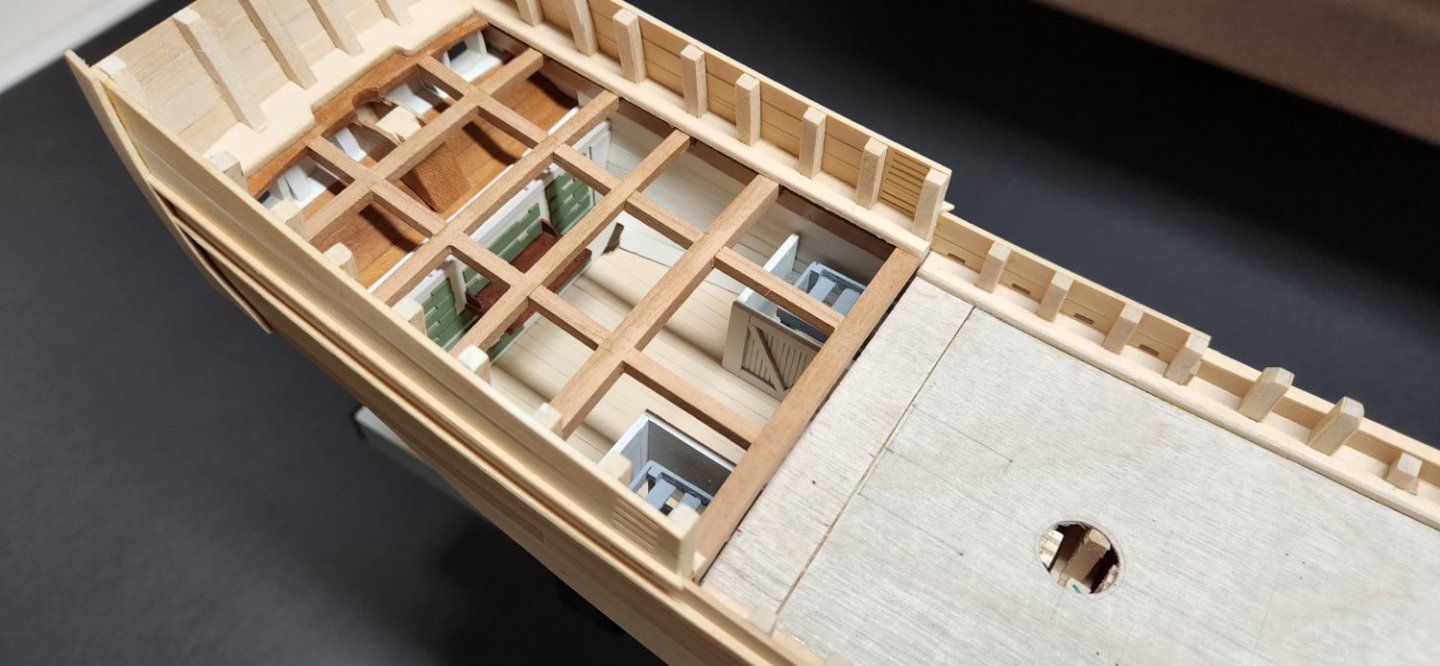
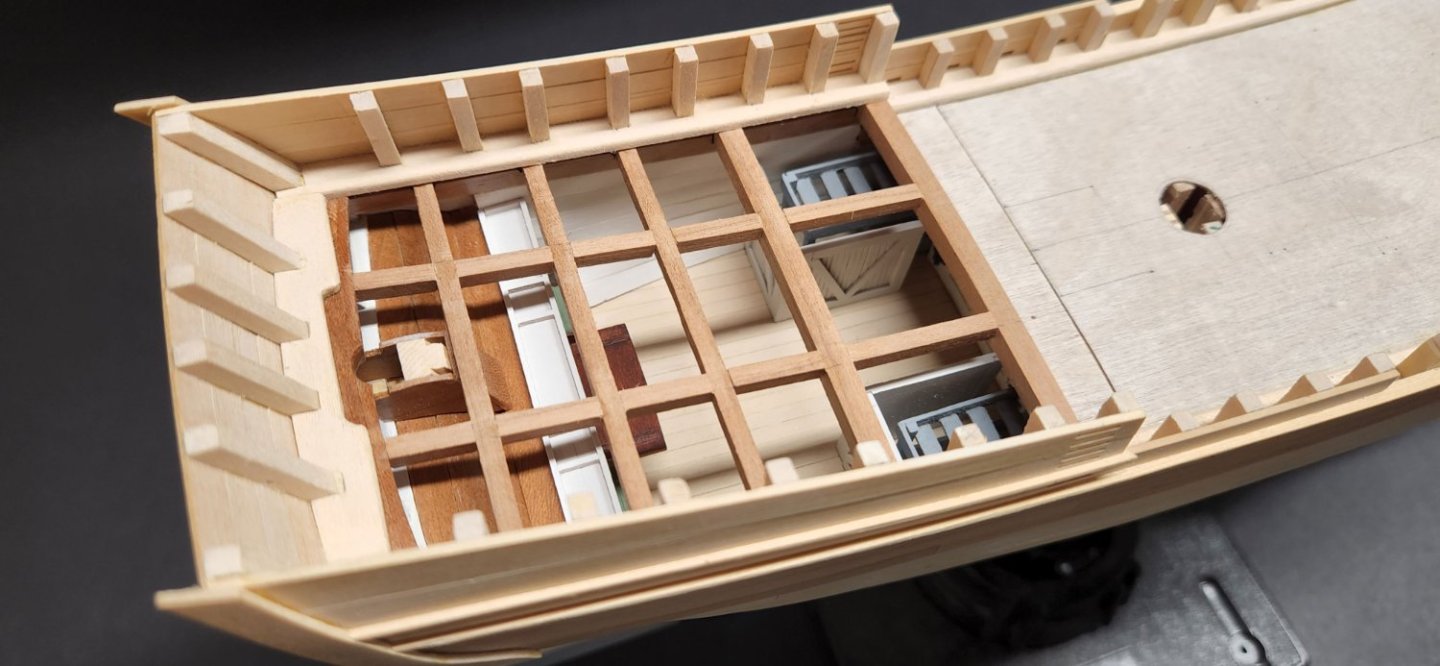
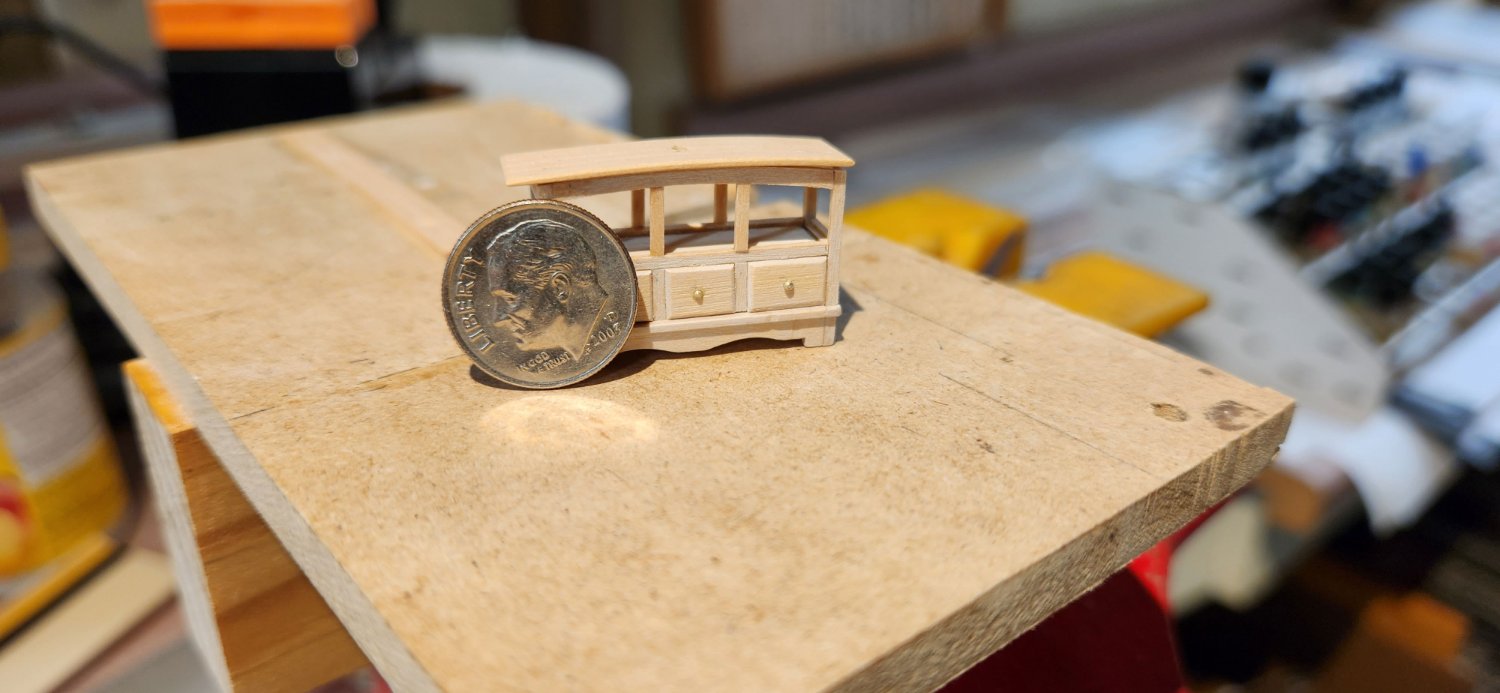
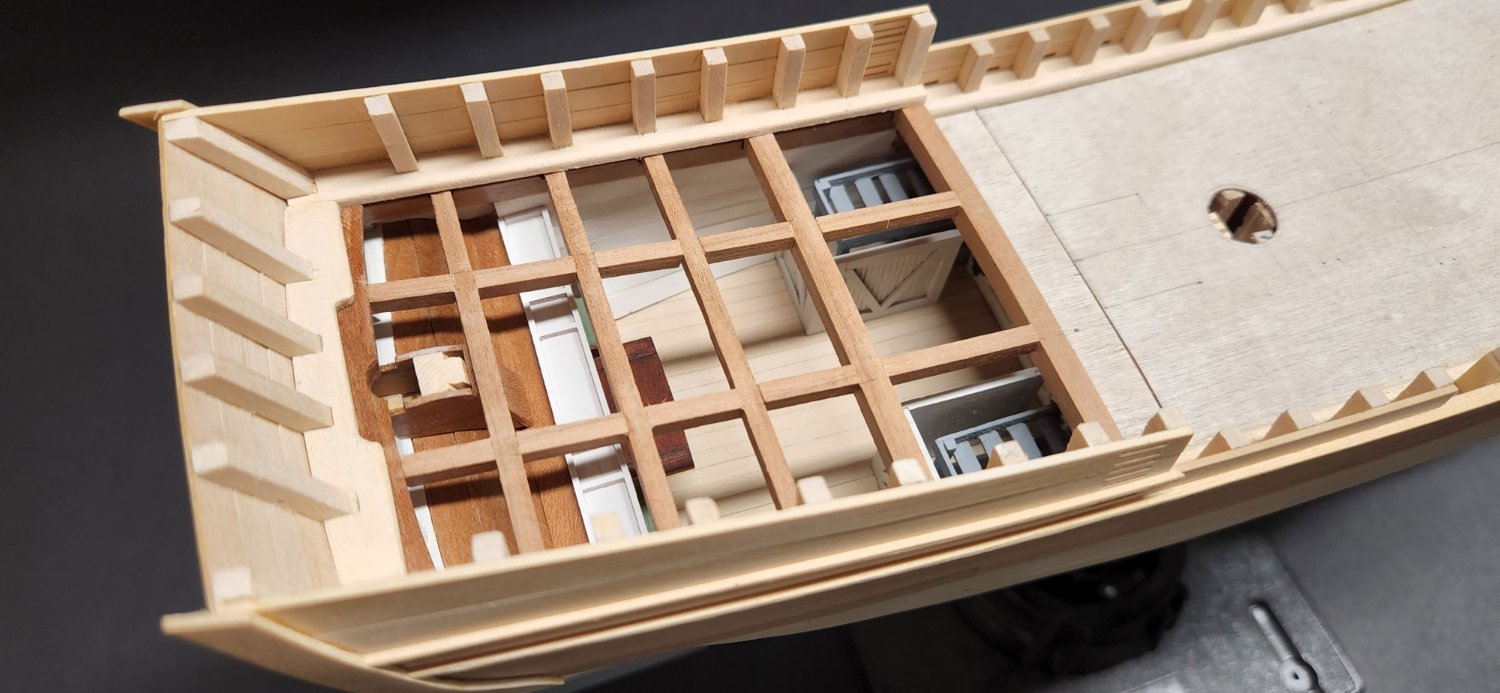
Time for an (overdue) update. The cabin area needs to be finished in order to follow through with the quarterdeck margin planks. I decided to change out the original dark cherry floor boards and replace them with thinner, white-washed boxwood. For the aft ceiling planks, very thin basswood was used to get enough twist. The lower part of the aft storage wall incorporates a step/seat with drawers. The dark areas on each side are frames that protrude in into the cabin area.
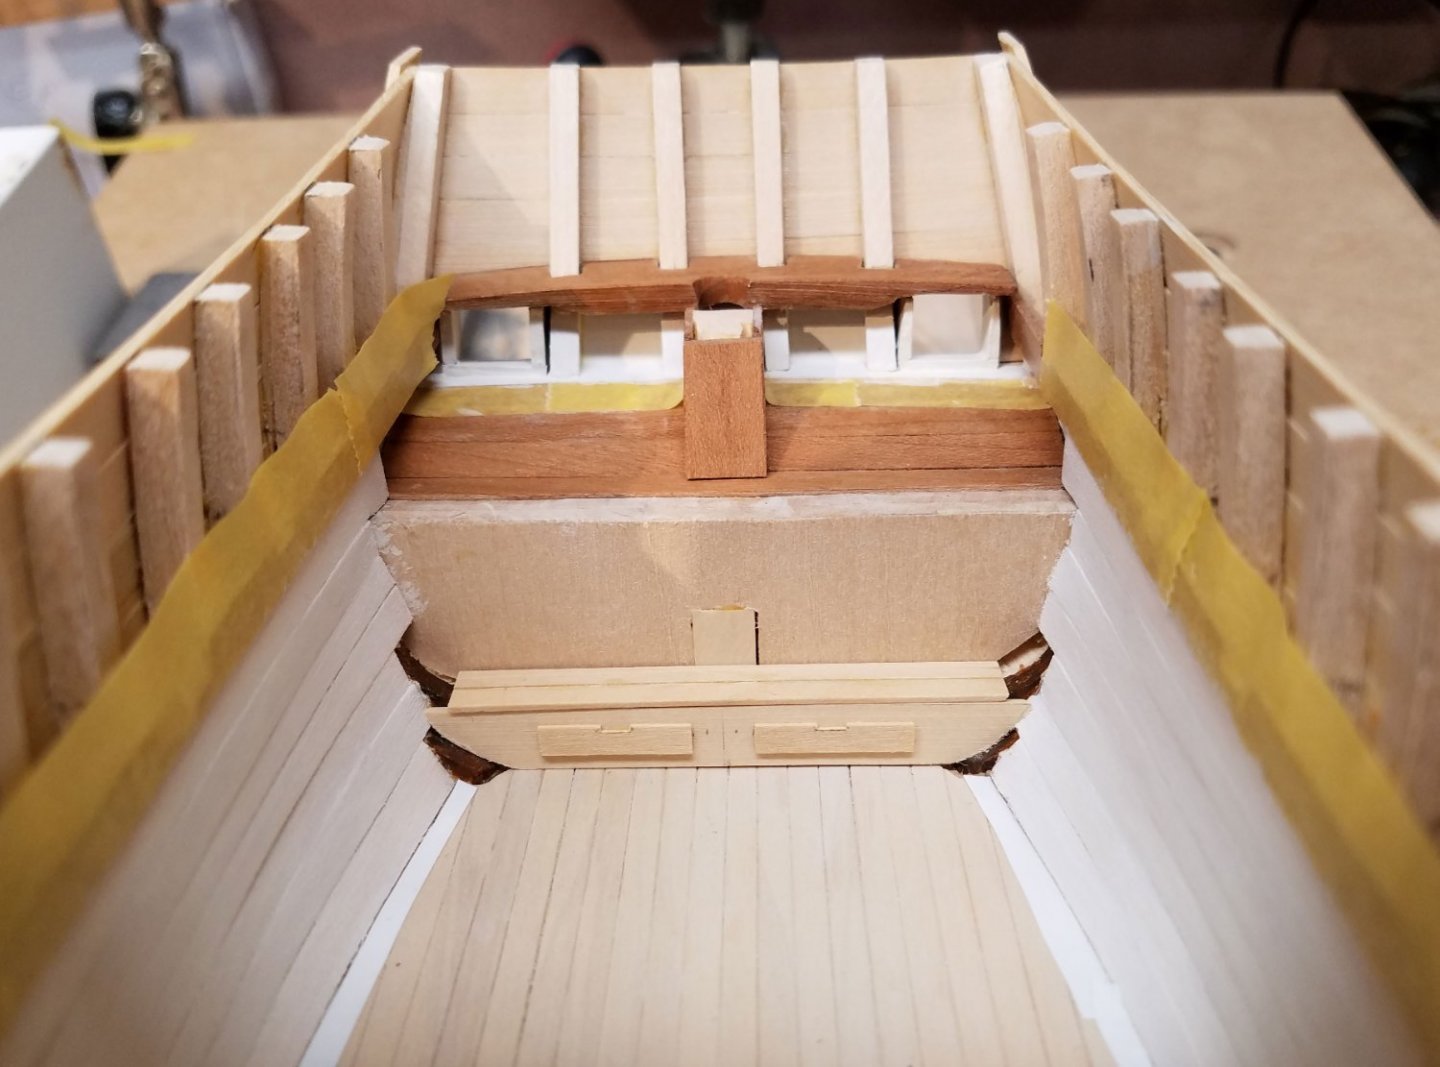
The wall has lots drawers for maps, etc. and a drop down table. The horizontal area between the inner counter boards and the storage will have a shelf for lamps and other odds & ends.
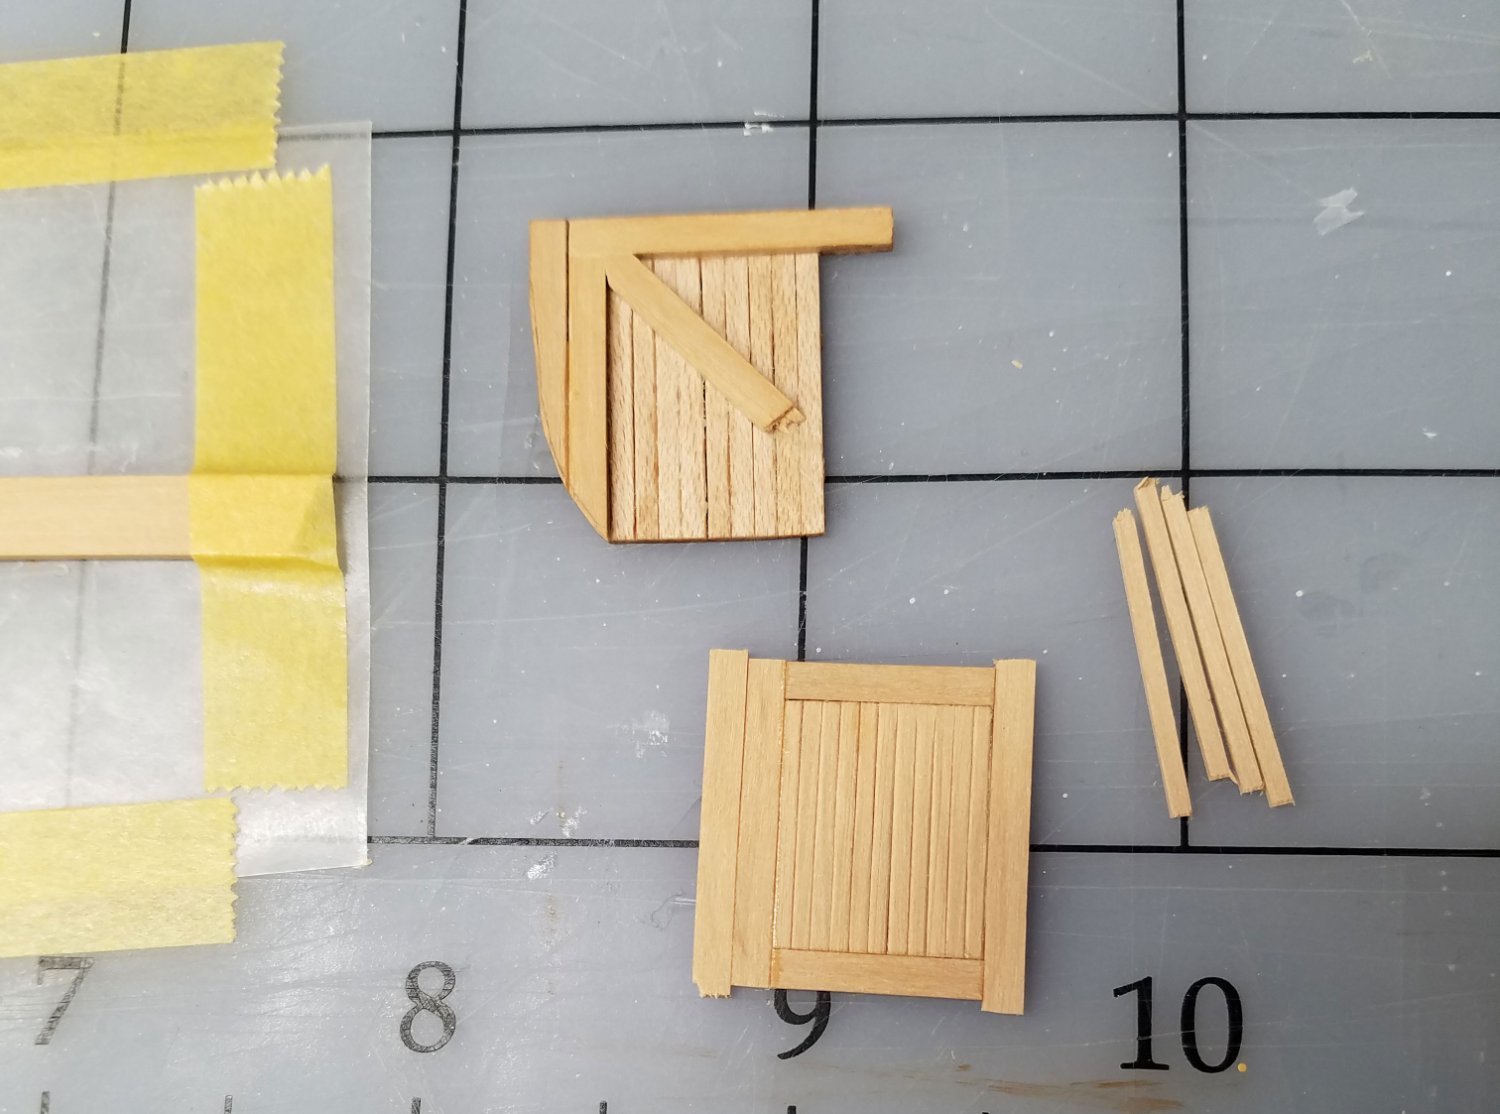
A barn door look seemed appropriate for the cabin access to the hull spaces. 1/32" x 3/64" box was edge glued with CA and the trim boards were built up to allow for the diagonal brace. The bunk beds are made up of scrap basswood.
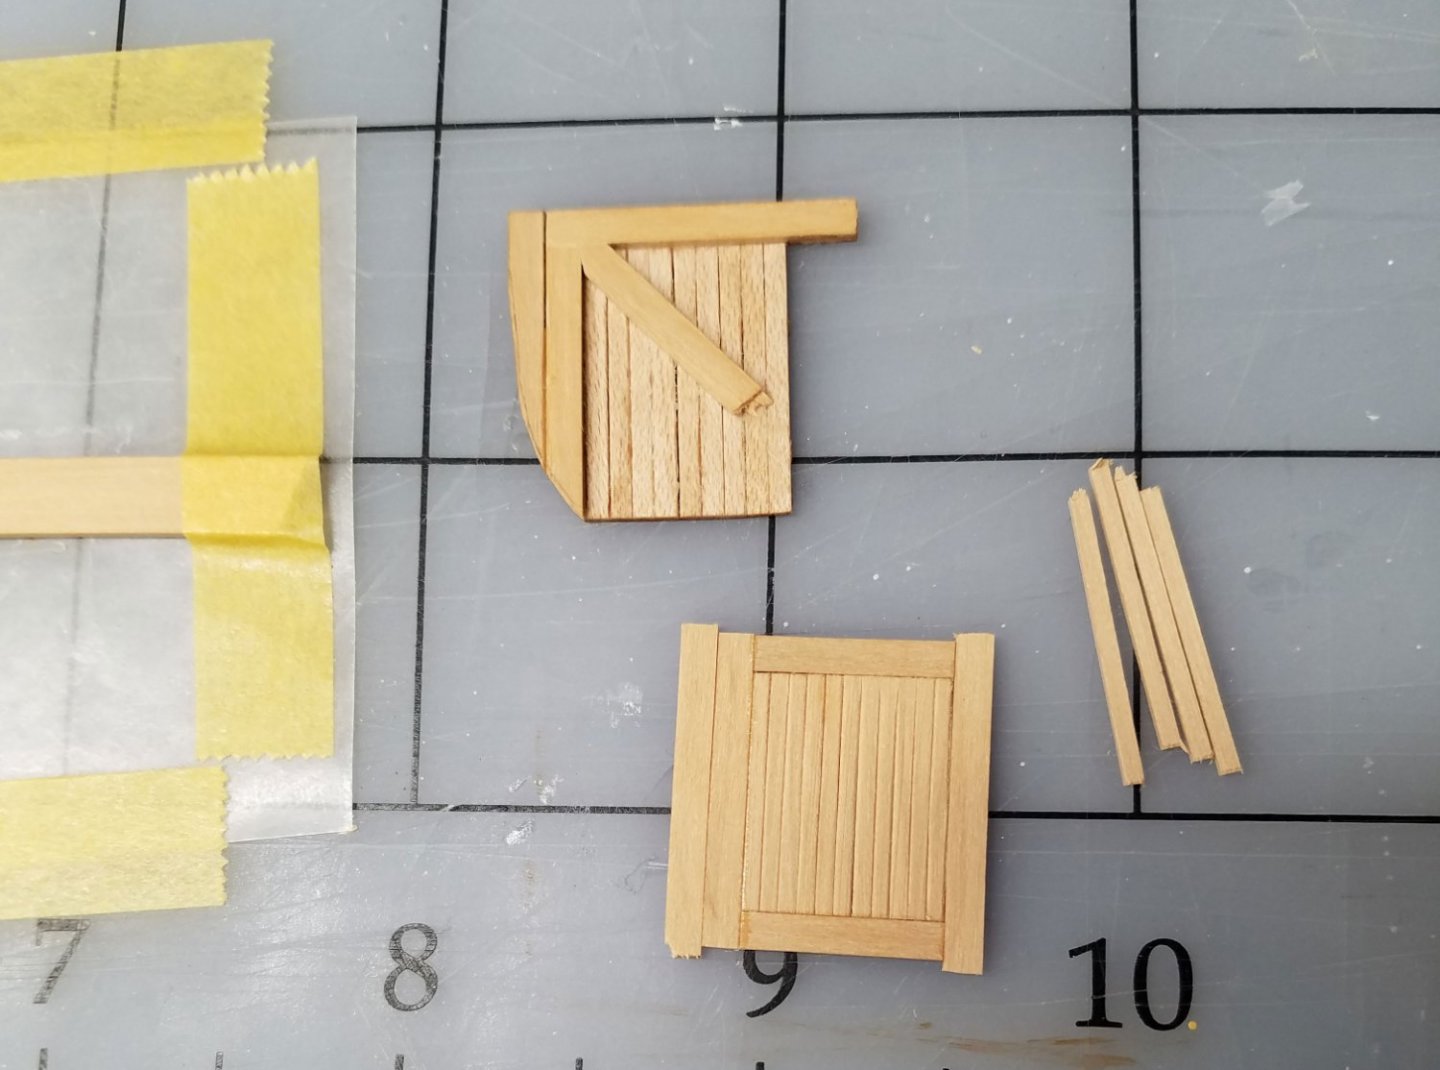
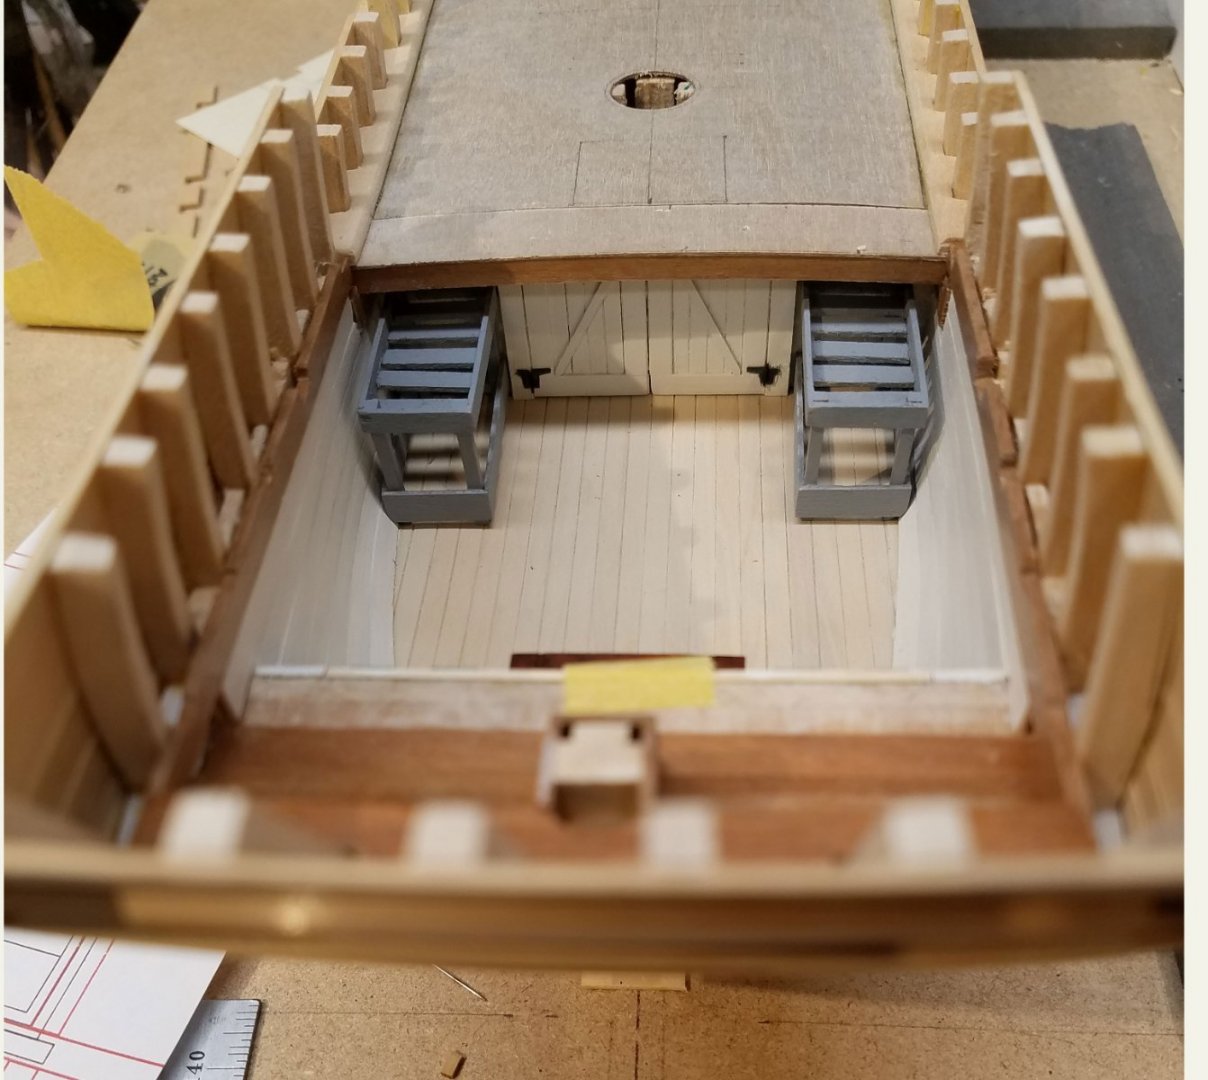
I stuck with the barn door look for the cut-away privacy walls.
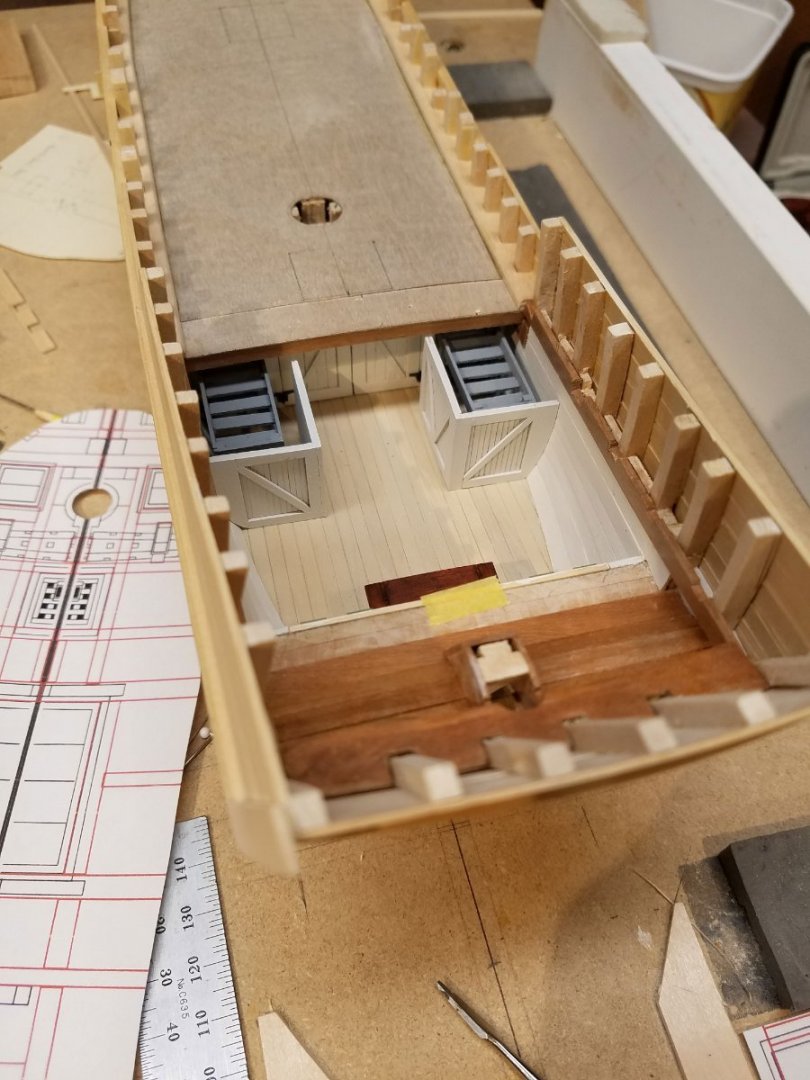
There is a small storage shelf just forward of the inner counter planks. At this point, the quarterdeck beams are only temporarily placed.
I decided not to add much more to the cabin. It's width is only 3" and I fear it would look overcrowded. OK, maybe a chair :).
So, on to the ladder, quarterdeck beams and margin planks. Thank you for checking in and I appreciate any comments.
Mike
-
Beautiful job Ken and something to be very proud of. You have gone the extra mile on all parts of the ship. I see you're showing the port sweeps in this shot. I like that... will you display it the same way?
Well done,
Mike
- mtaylor and FriedClams
-
2
-
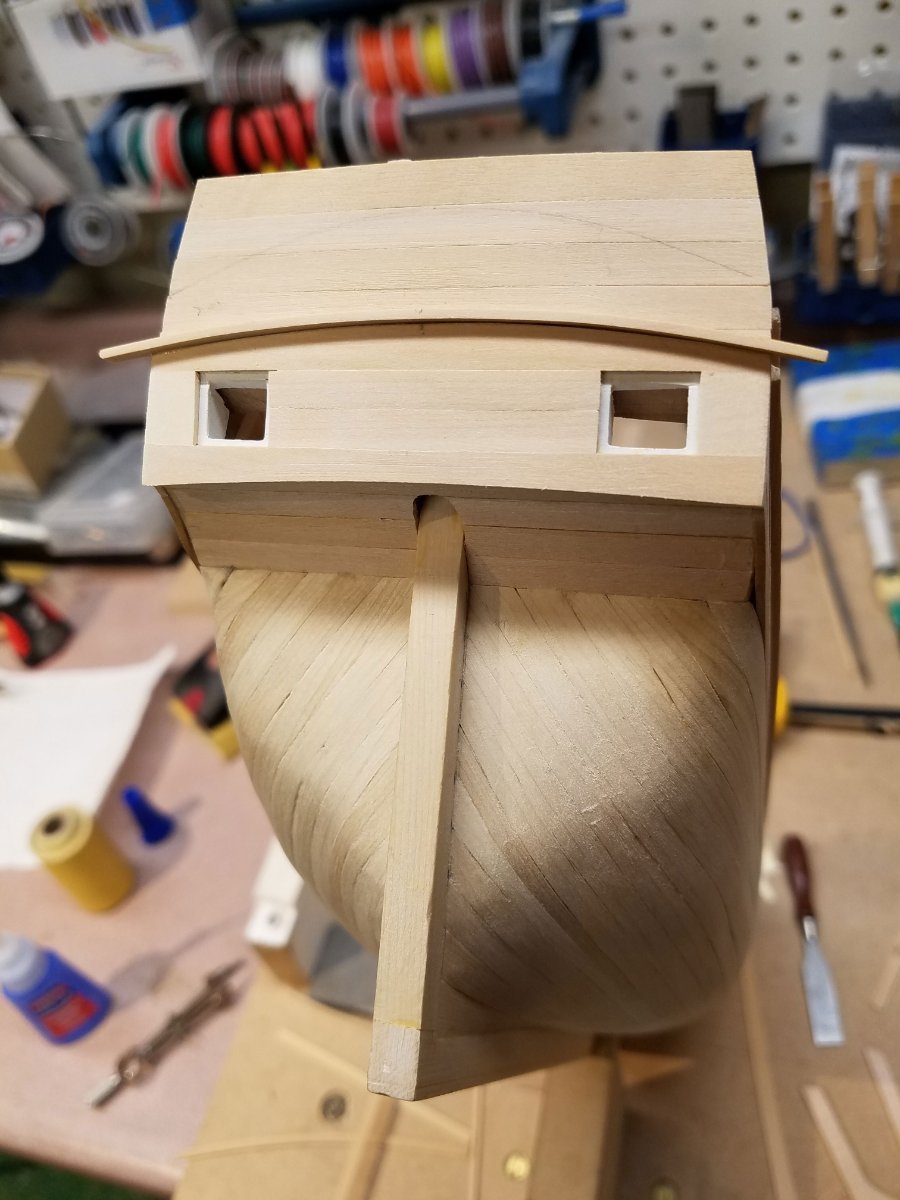
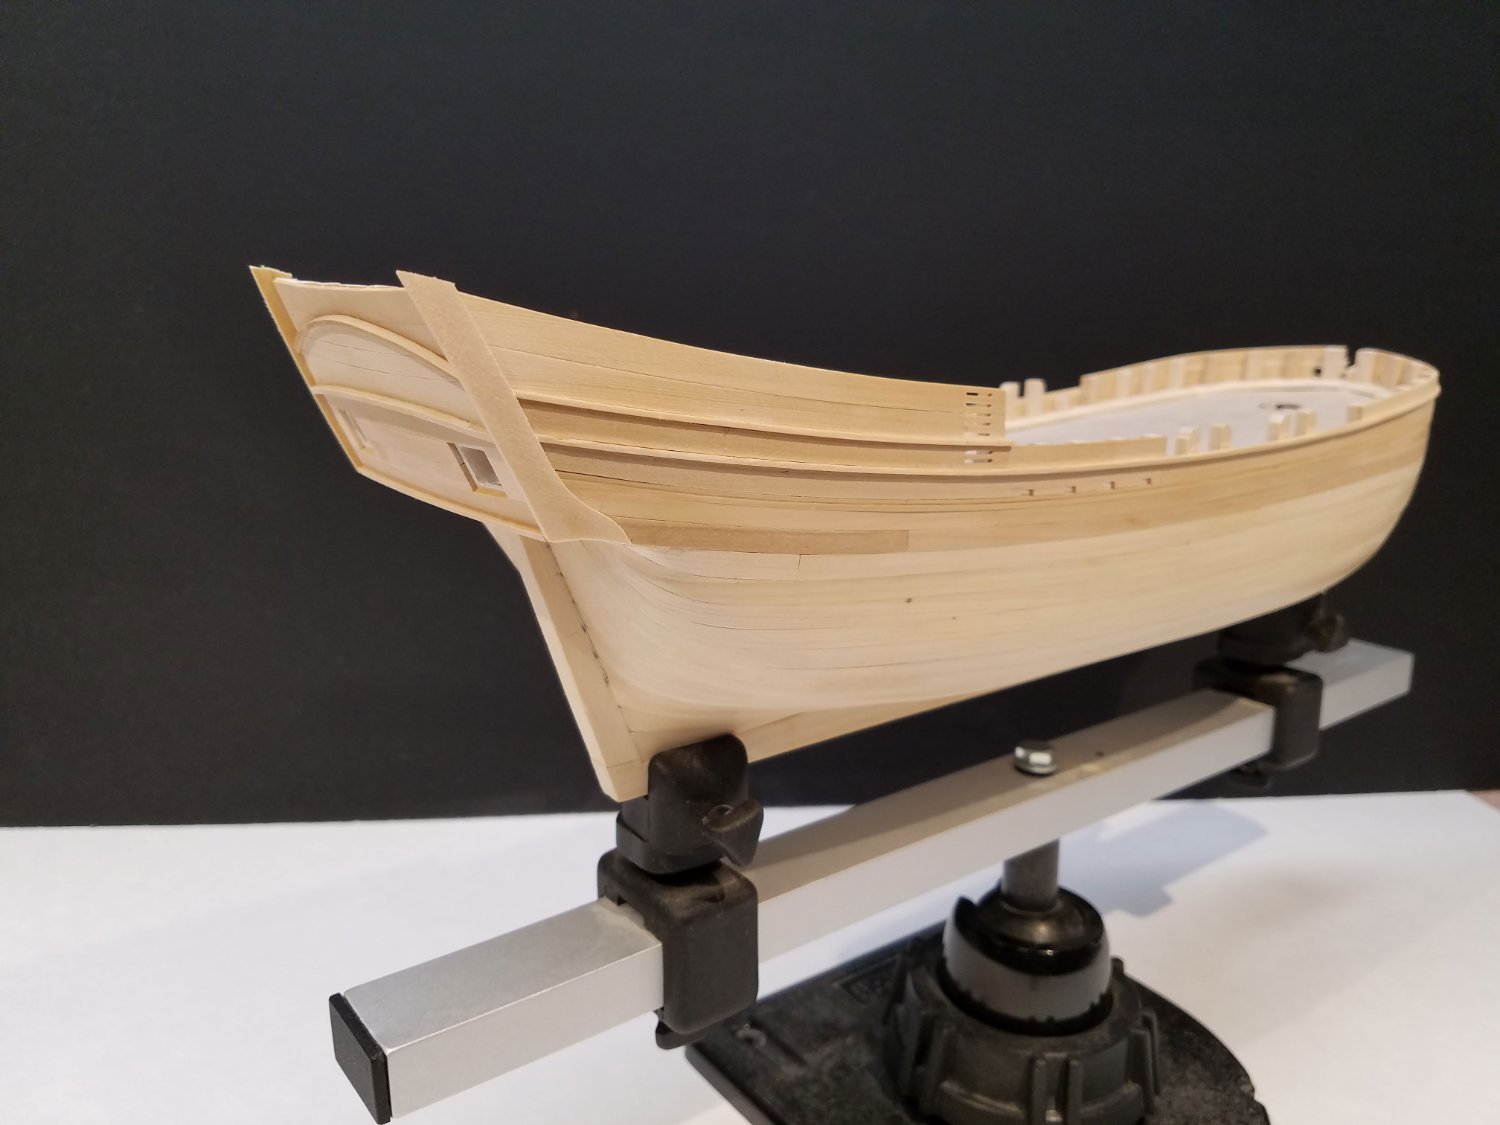
The sternboard and fashion pieces are finished. As usual, the forum is great for finding different approaches to a build. In this case, I emulated a neat way to make the jambs/sill pieces stay square while placing them in the ship structure. I have to apologize in that I lost the link to that site.
The port casing is built around a wooden shaft to the correct size, rough sanded to the angle of the stanchions then aligned and inserted into the frame. It protrudes enough to allow for the thickness of three layers of sternboard.
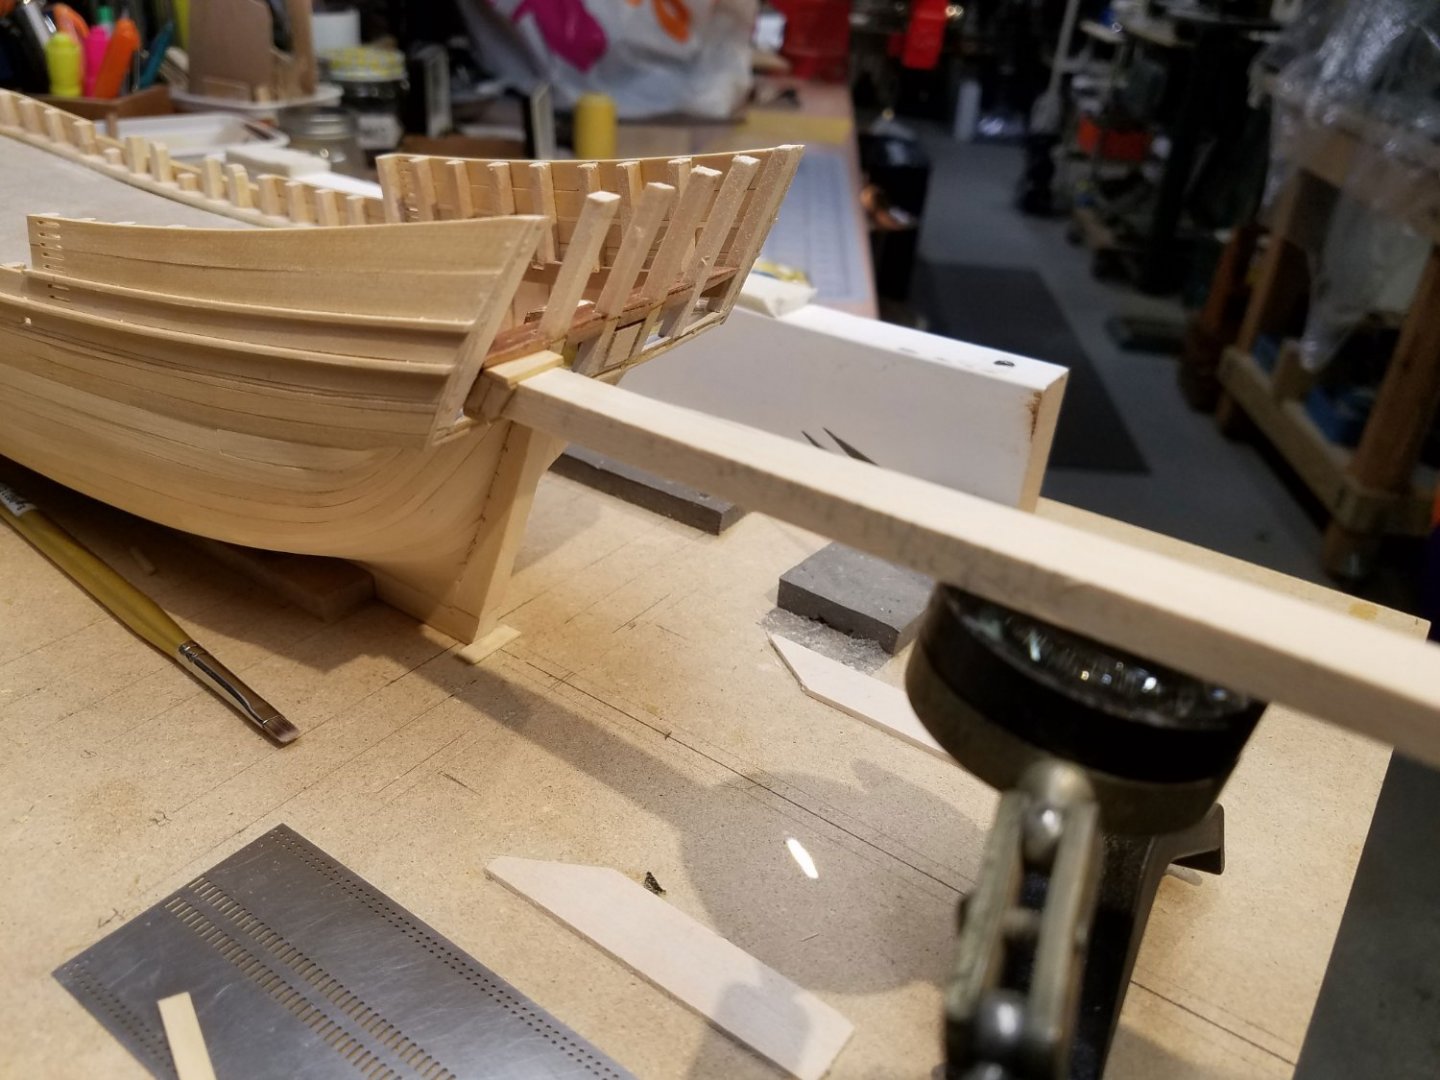
The first layer of planking is 1/32" boxwood and will be seen from the quarterdeck.

The port planks below the lower curved molding have 3 layers. The middle layer of the sternboard is sanded flush with the jambs. The top layer cases around the port. The plans call for three curved moldings.
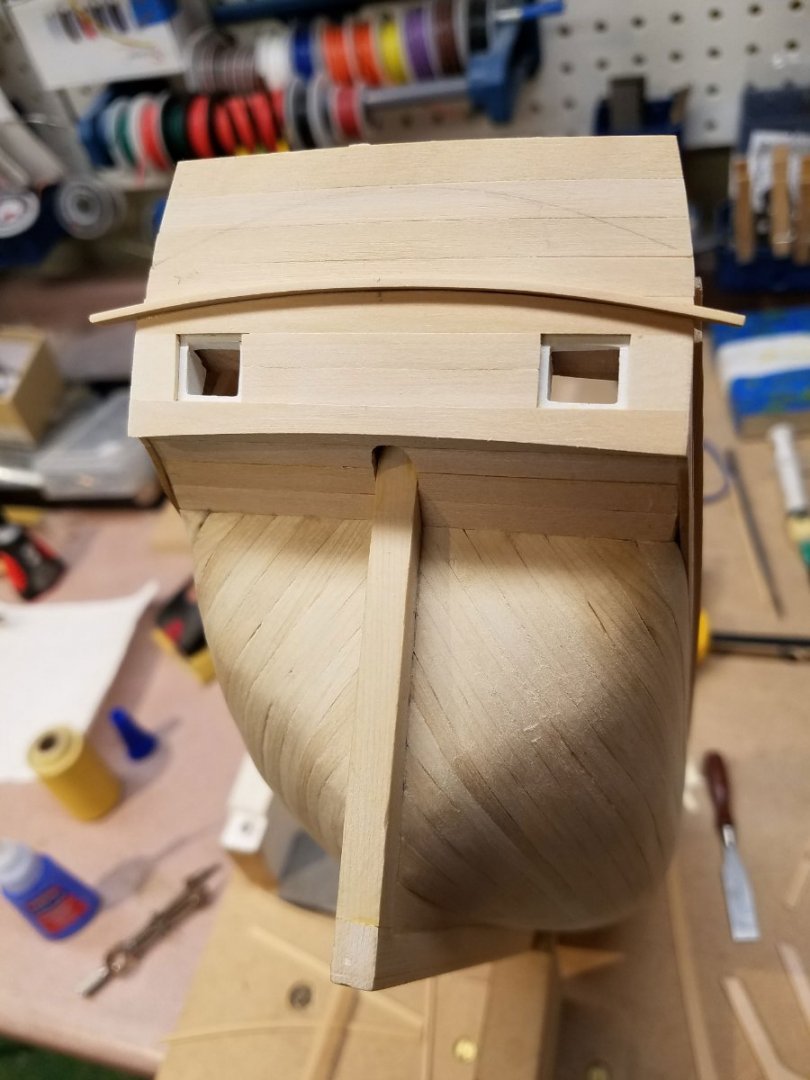
The jambs .... much smaller than a dime...look off center but are OK with a straight on view.
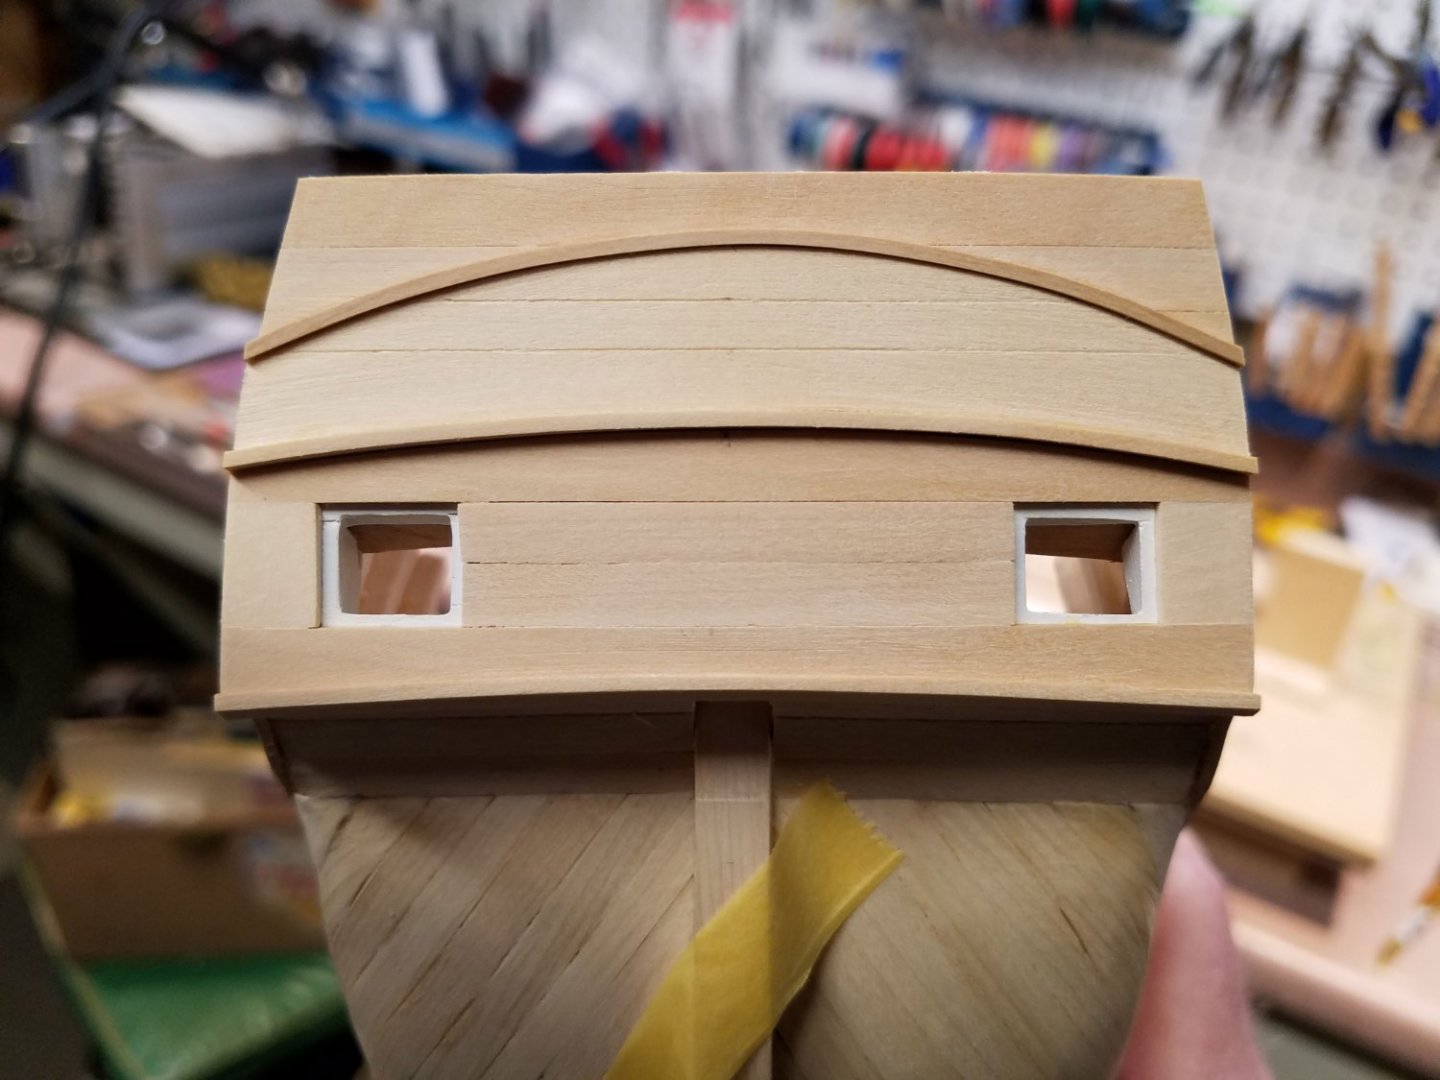
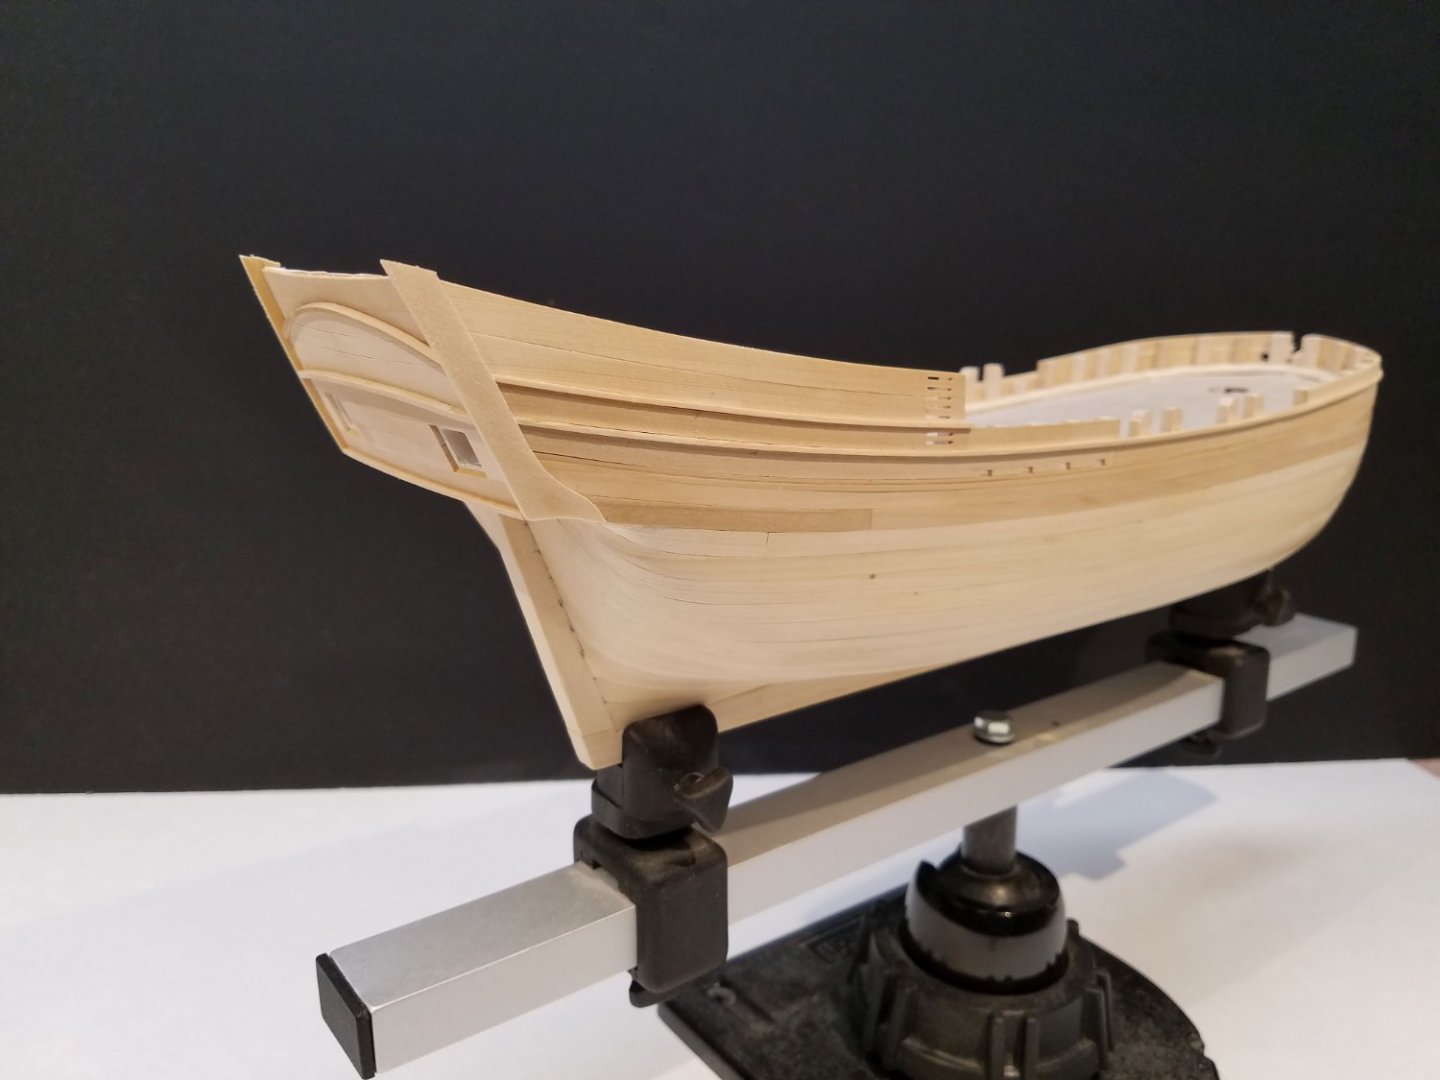
It's nice to see the ships lines come together with the fashion pieces, ports and molding. She's shaping up nicely... another complement to Randy.
Thank you again for the likes and comments.
Mike
-
The anchor looks great... I like the contrast of the iron vs the stock. Well done.
- FriedClams and mtaylor
-
2
-
On 2/21/2022 at 12:26 PM, Windships said:
If you have access to the Model Shipways drawings of Sultana, that is a good basis for beginning. Merritt A Edson Jr studied 18th-century vessel rigging extensively and his influence is seen in those drawings and for Earl of Egmont and Sir Edward Hawke. Just keep in mind, those were much sharper vessels with more drag in the keel, and so the rake of the masts is greater.
Thank you Randy for the tips. I'll check. Much appreciated.
Mike
-
The sails furled with the sweeps out is a very attractive, unique look. Those are great shots. Super job on your home made line as well.
Mike
- lmagna, mtaylor and FriedClams
-
3
-
Thank you guys for the comments.
Lou, the plans were perfectly fine for the build method I used ... plank on bulkhead... but can generally be applied to bread and butter or fully framed. It's up to the builder to decide their own amount of detail to be added. It does not include any extra detail regarding "how to" for each of the methods. For instance, I want to add cabin detail. There is no specificity in the plans for the shape of a cabin or counter so I fell back on the shape in my previous model... 18th Century Merchant half-hull for the counter and am looking through assorted references for the cabin. That caused me to find a non-typical way to build out the transom timbers. All of the is fun for me but does take extra time to keep the overall visible areas true the the era and/or design.
For sure there are "if I were to do it again" issues. At this scale, I would have used less wide lumber to allow for better bending. Or, more likely, I would go one step larger in scale.
On 2/19/2022 at 10:20 PM, Windships said:I don't recall whether you intend to mast and rig the model, but of course now we're all excited to see how that will look too.
It's likely that the model will be rigged. I need to do some research on rigging in that era. So far, I have the Harold Hahn plans and lots of photos of the William F. Wiseman Hannah model (based on the Hahn plans) at Mystic to check out. That being said,...
......I'm curious if this 45 ton schooner might be rigged more lightly than the Hahn 78 ton Hannah (???)
Comments always welcome.
Mike
-
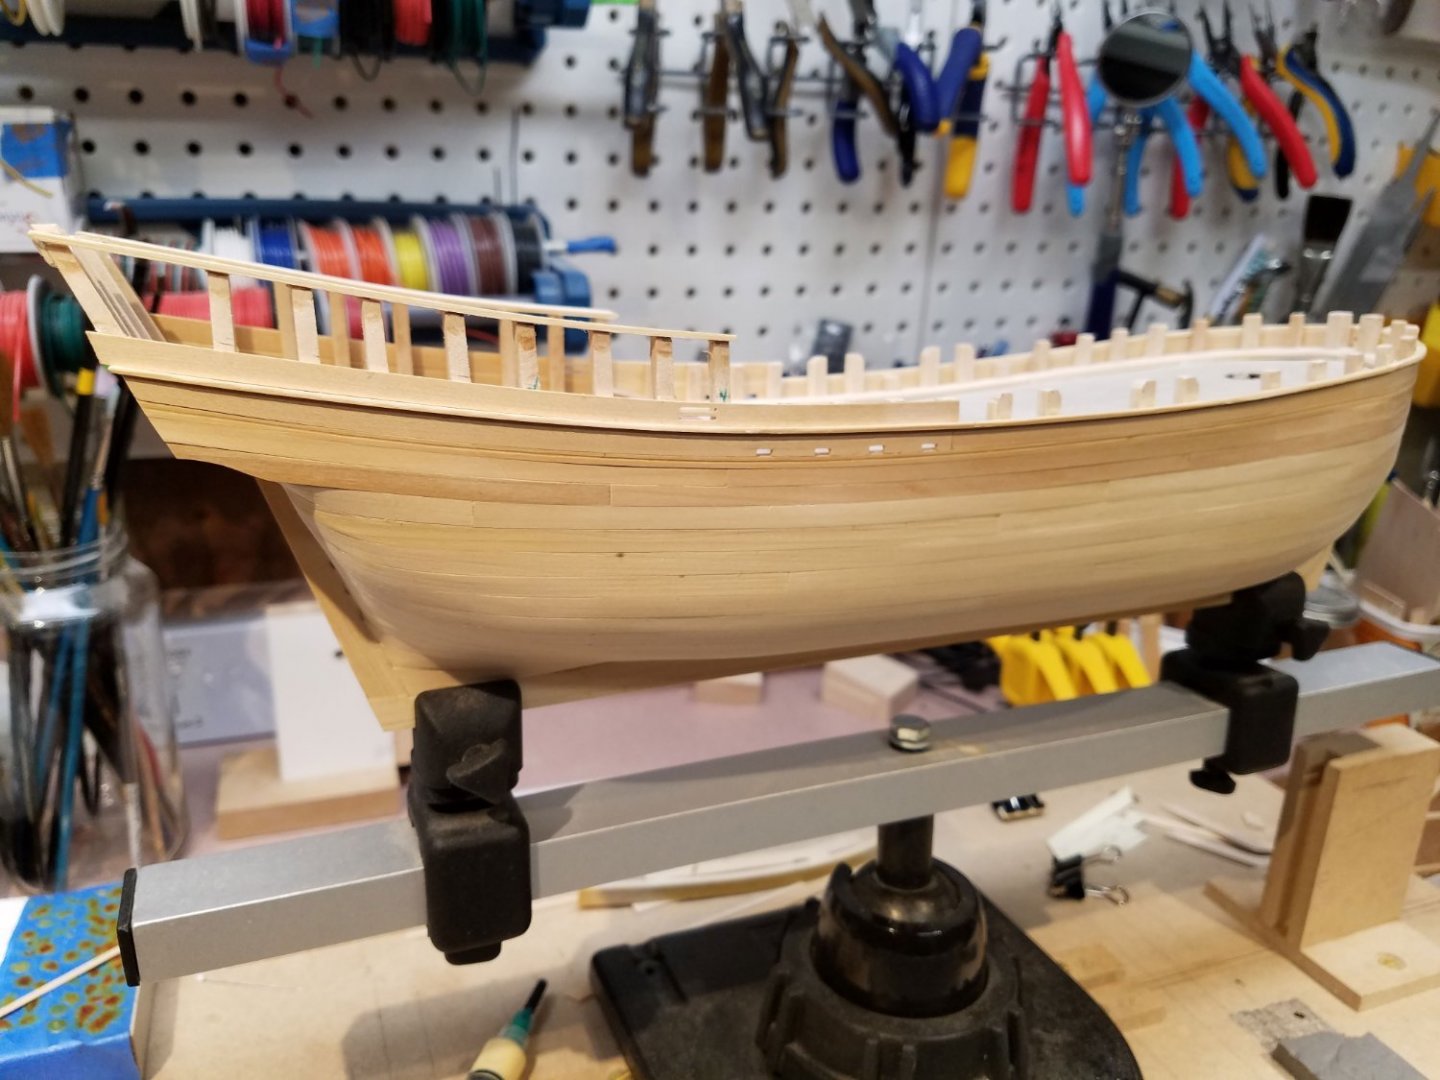
Two months certainly went by fast. 'Hope everyone has stayed healthy.
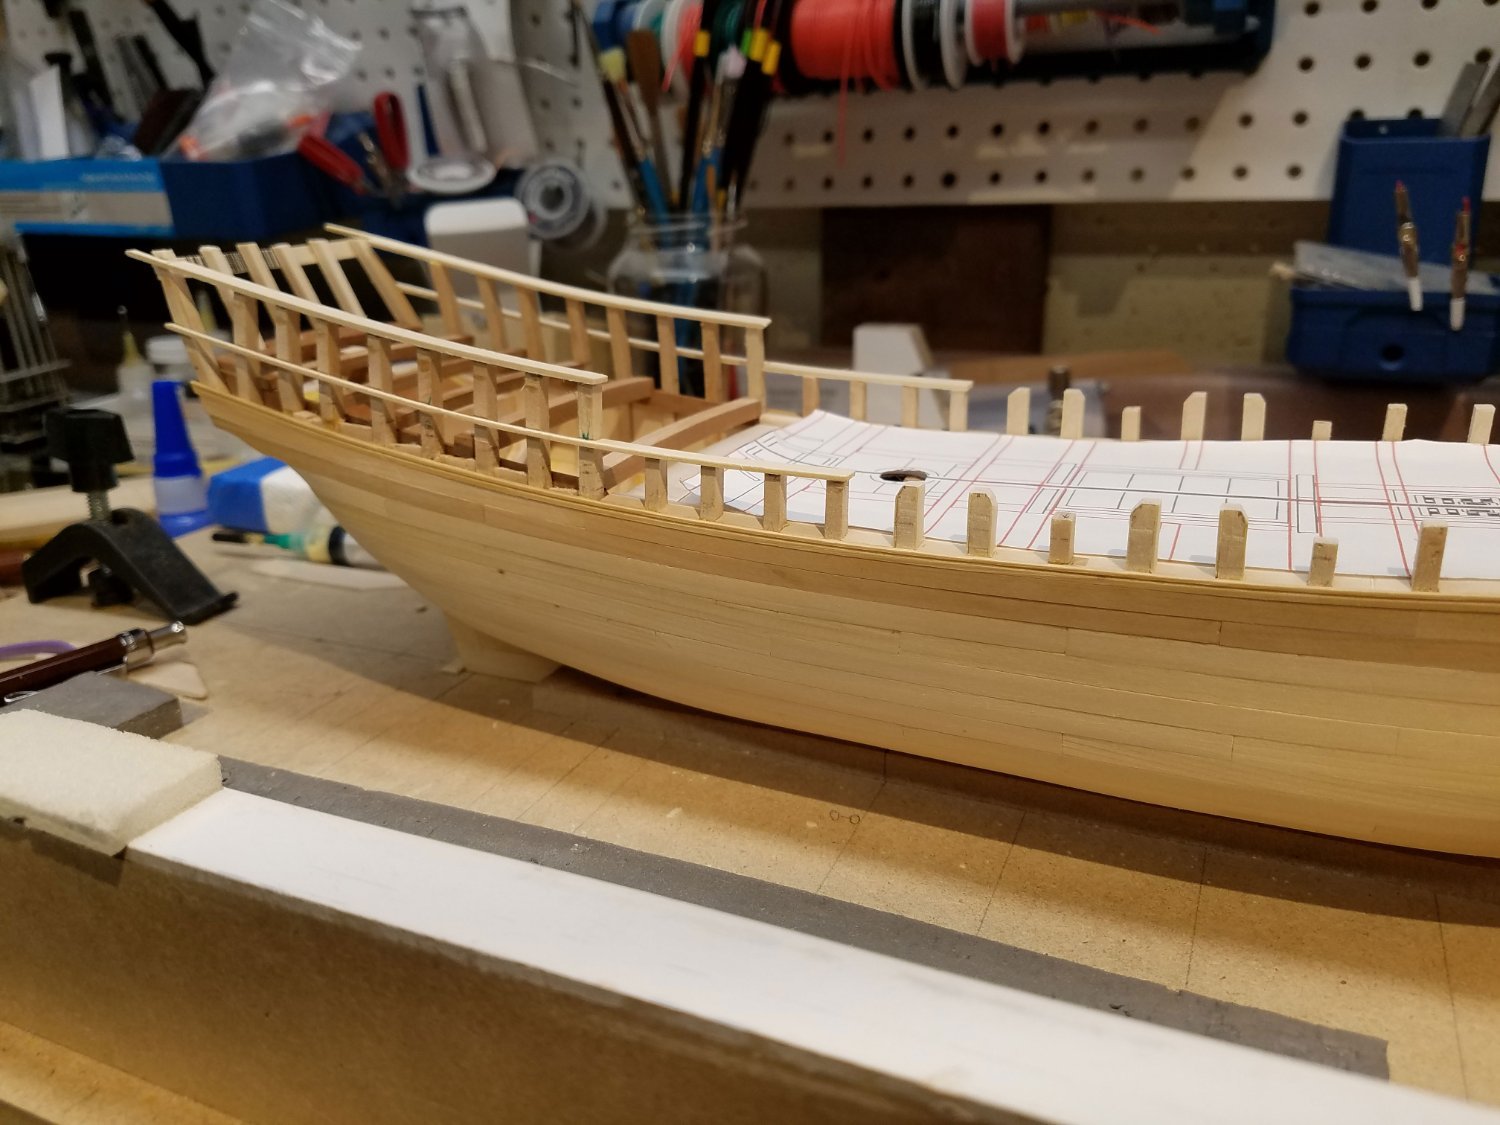
The planking is finished on the Hannah by Randy Biddle. The plans are published by the Nautical Research Journal and are available to NRG members for download. Now that the planking is done, the ship lines have come into view which I have been looking forward to for quite some time.
At first the quarterdeck beams were not at the correct level to match the quarterdeck sheer strake so the 1st level of planks had to be removed and the beam dropped down slightly. The rails are temporarily glued at this point. The beam area will be partially open to expose a view to the main cabin.
Boxwood is used from the main wale up. In this design, the main wale does not show as protruding. I made a slight groove in the sheer strake to give it a little shadow line.

This shot shows the outside portion of the main rail extending all the way around as well as the first quarterdeck plank.
Per the plan, the forward section of the quarterdeck planks have scuppers. They were cut in using Proxxon MF 70 with a .4 mm bit.
The inside sections of the waist rail are dry fit here. I'll likely wait putting on the rails until the stanchion area is painted.


The sternboard is next on the list along with some paint color testing.
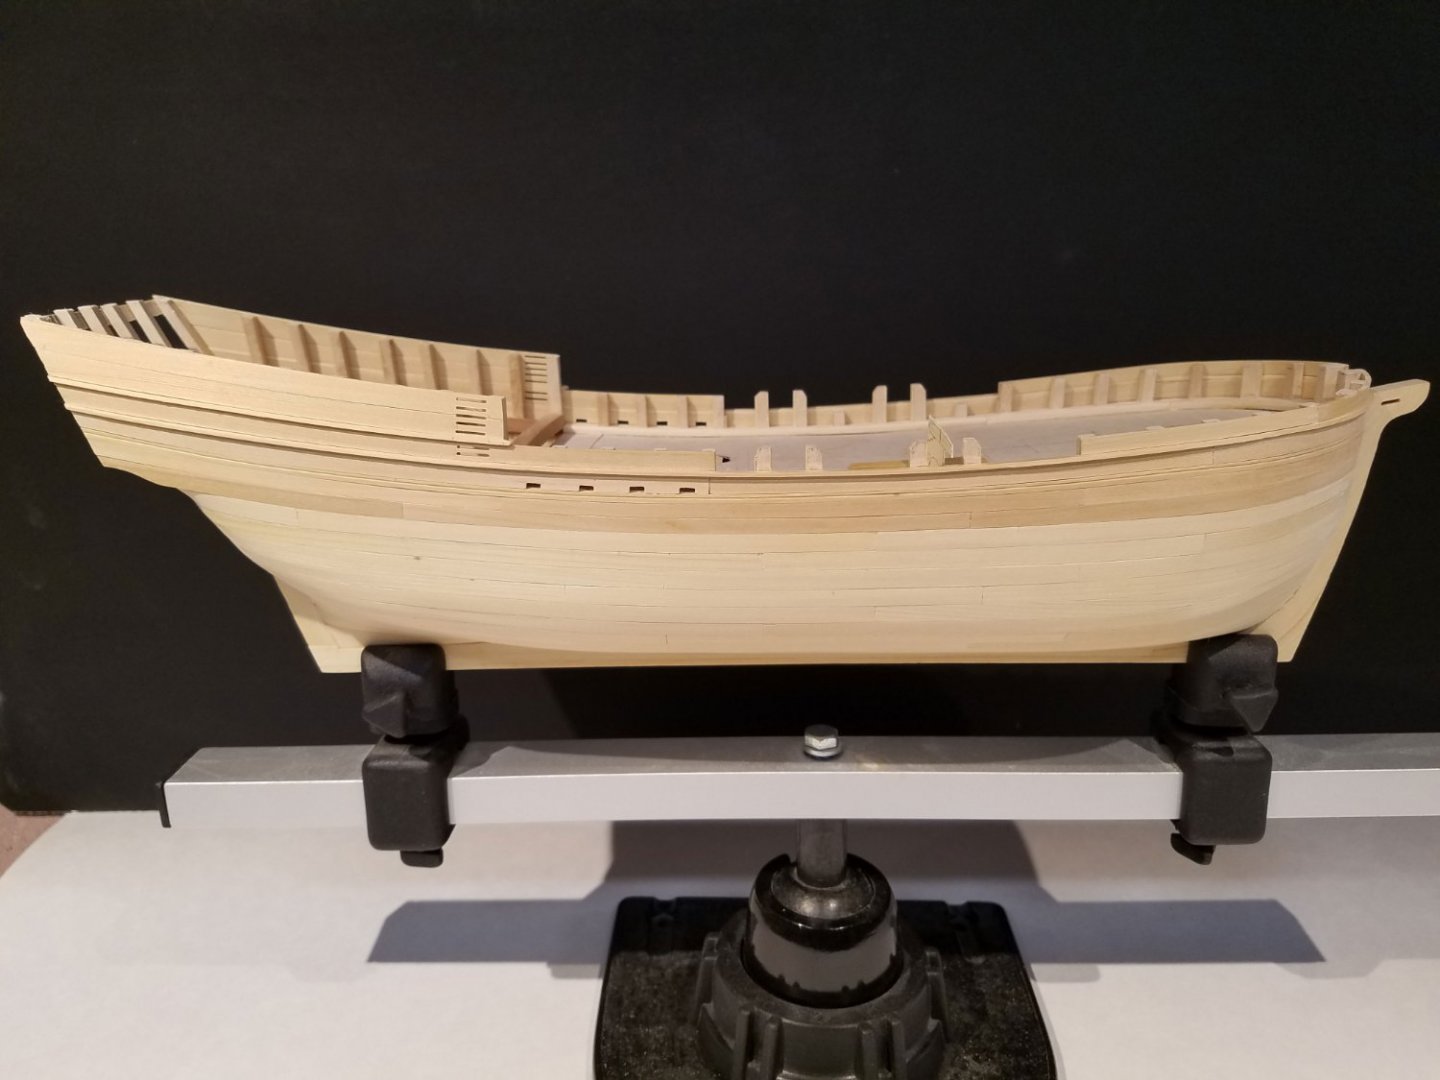
So I'm happy to say, this Hannah design shows as a beautifully fair merchant ship of the times! My complements to Randy.
Mike
- Paul Le Wol, KenW, druxey and 9 others
-
12
-
Hi Larry,
The Roonberg whaleboat is a great project.
This is p56 from the Ronnberg book (not a copy from the model box). Do you need p55? In the book, p55 is on the forward side of p56. My model came with a terrible copy in the box so I found the book online.

Good luck,
Mike
-
Great craftsmanship and methods on the companion and deck structures. The small stuff does take time. Well done.
Mike
- Saburo, FriedClams and JpR62
-
3
-
-
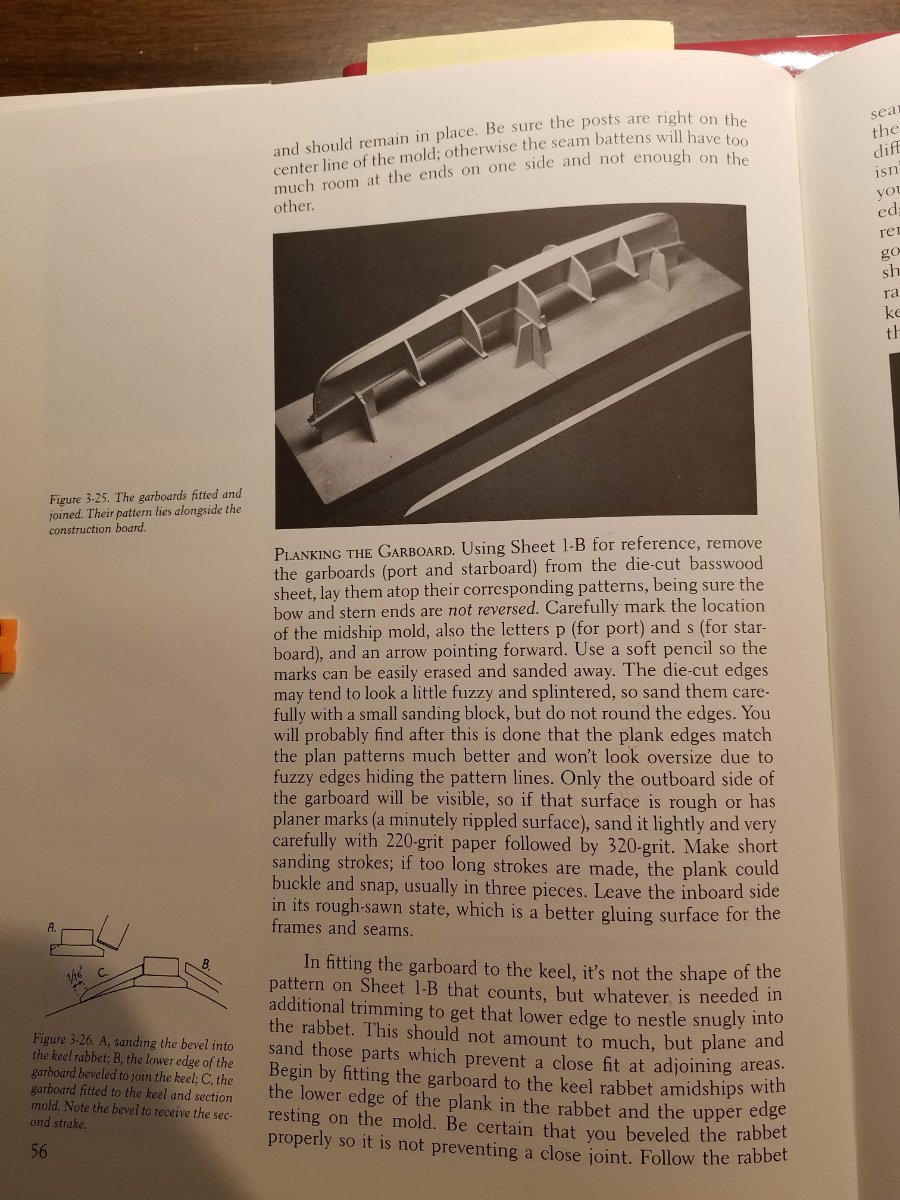
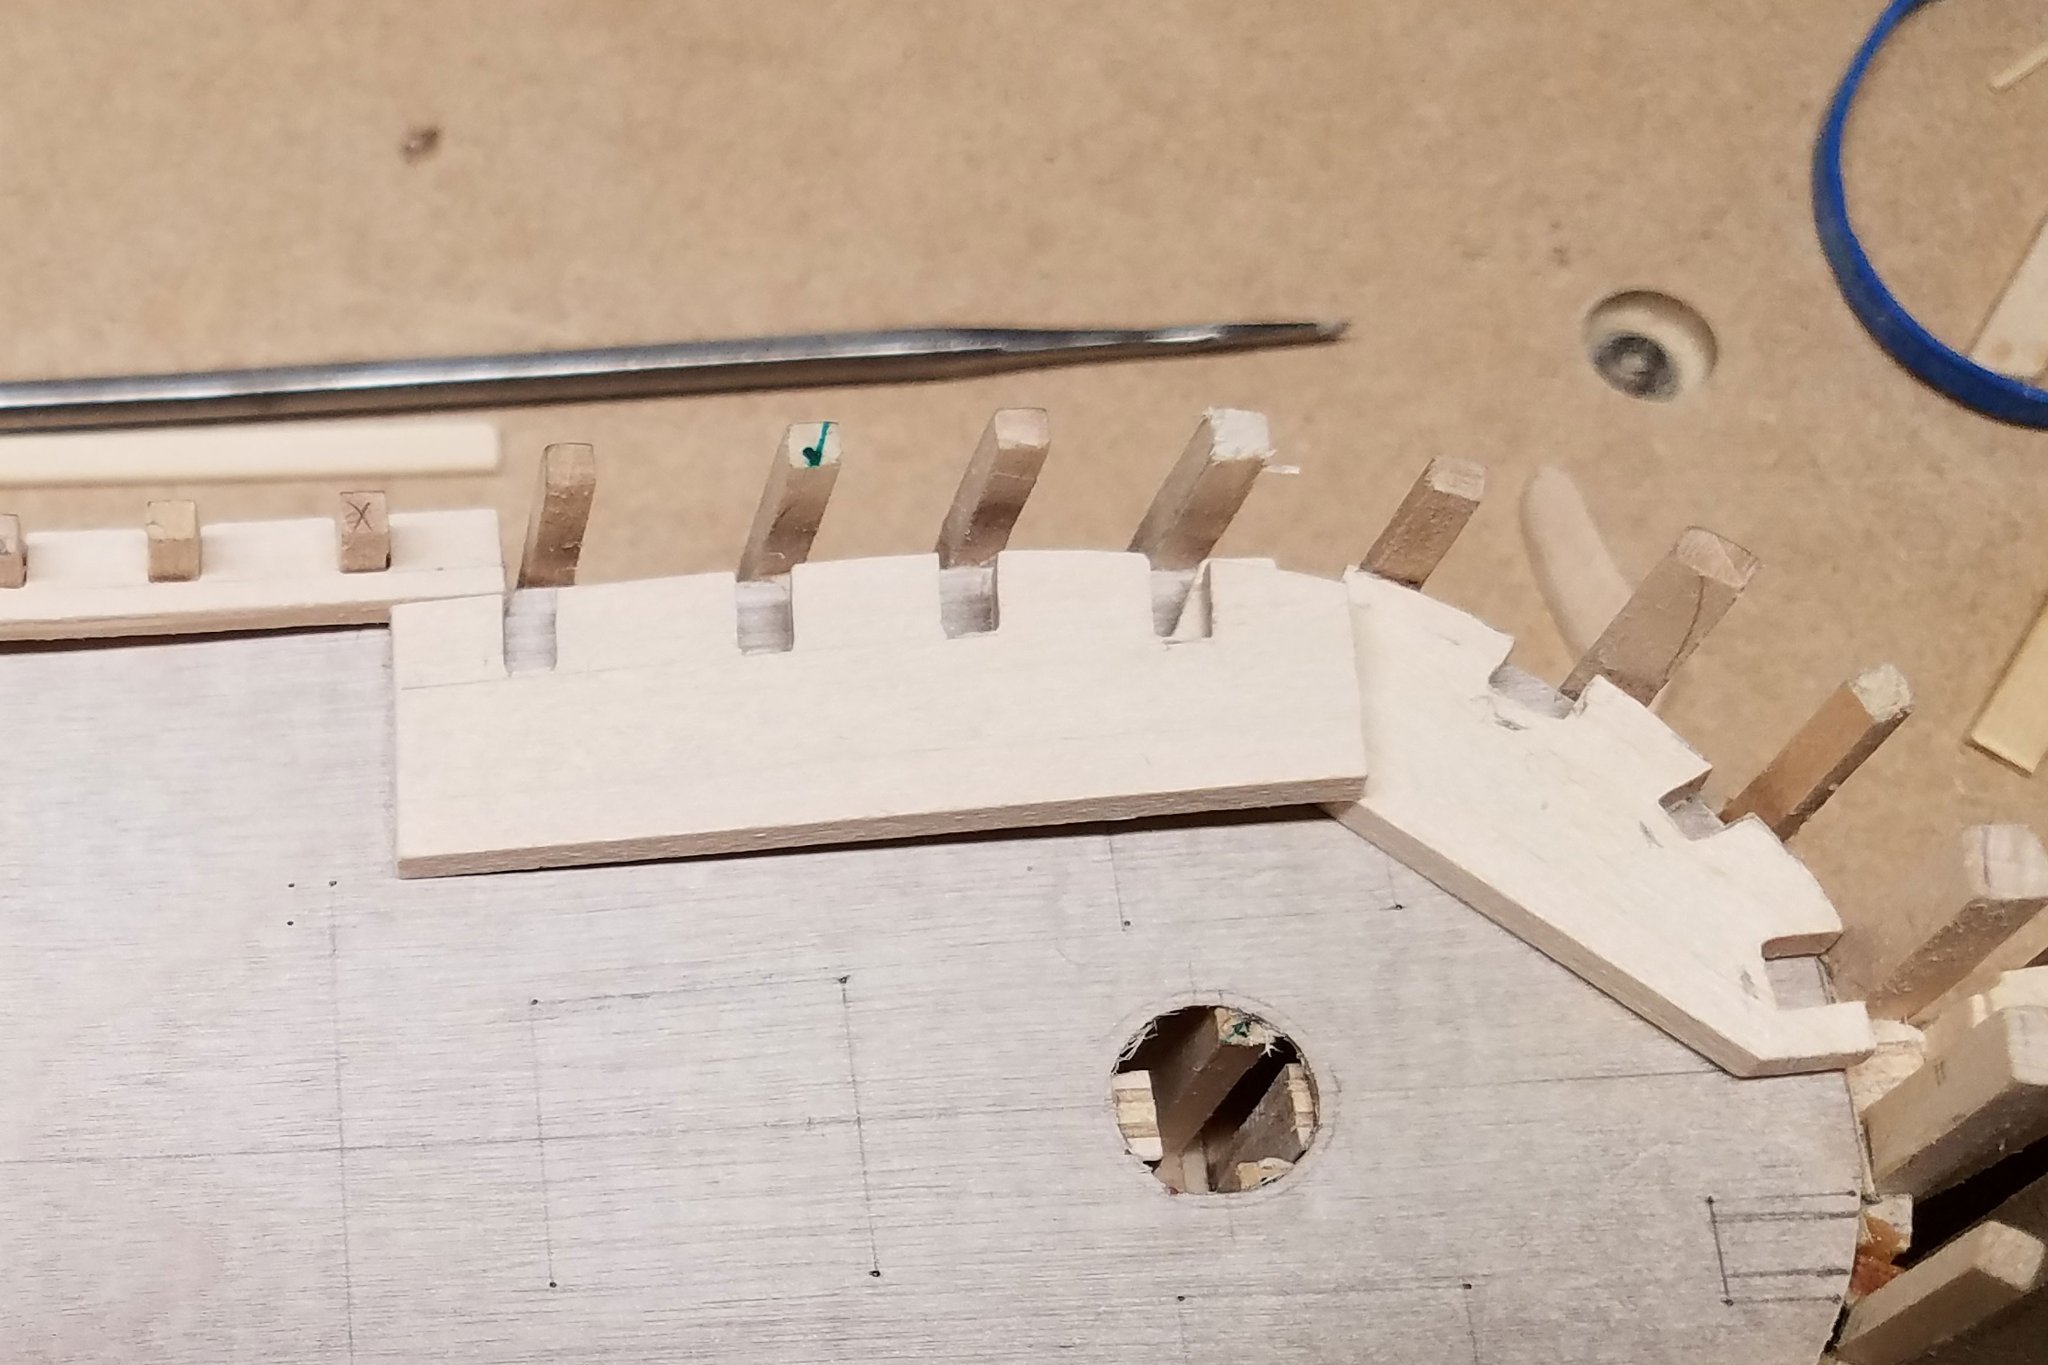
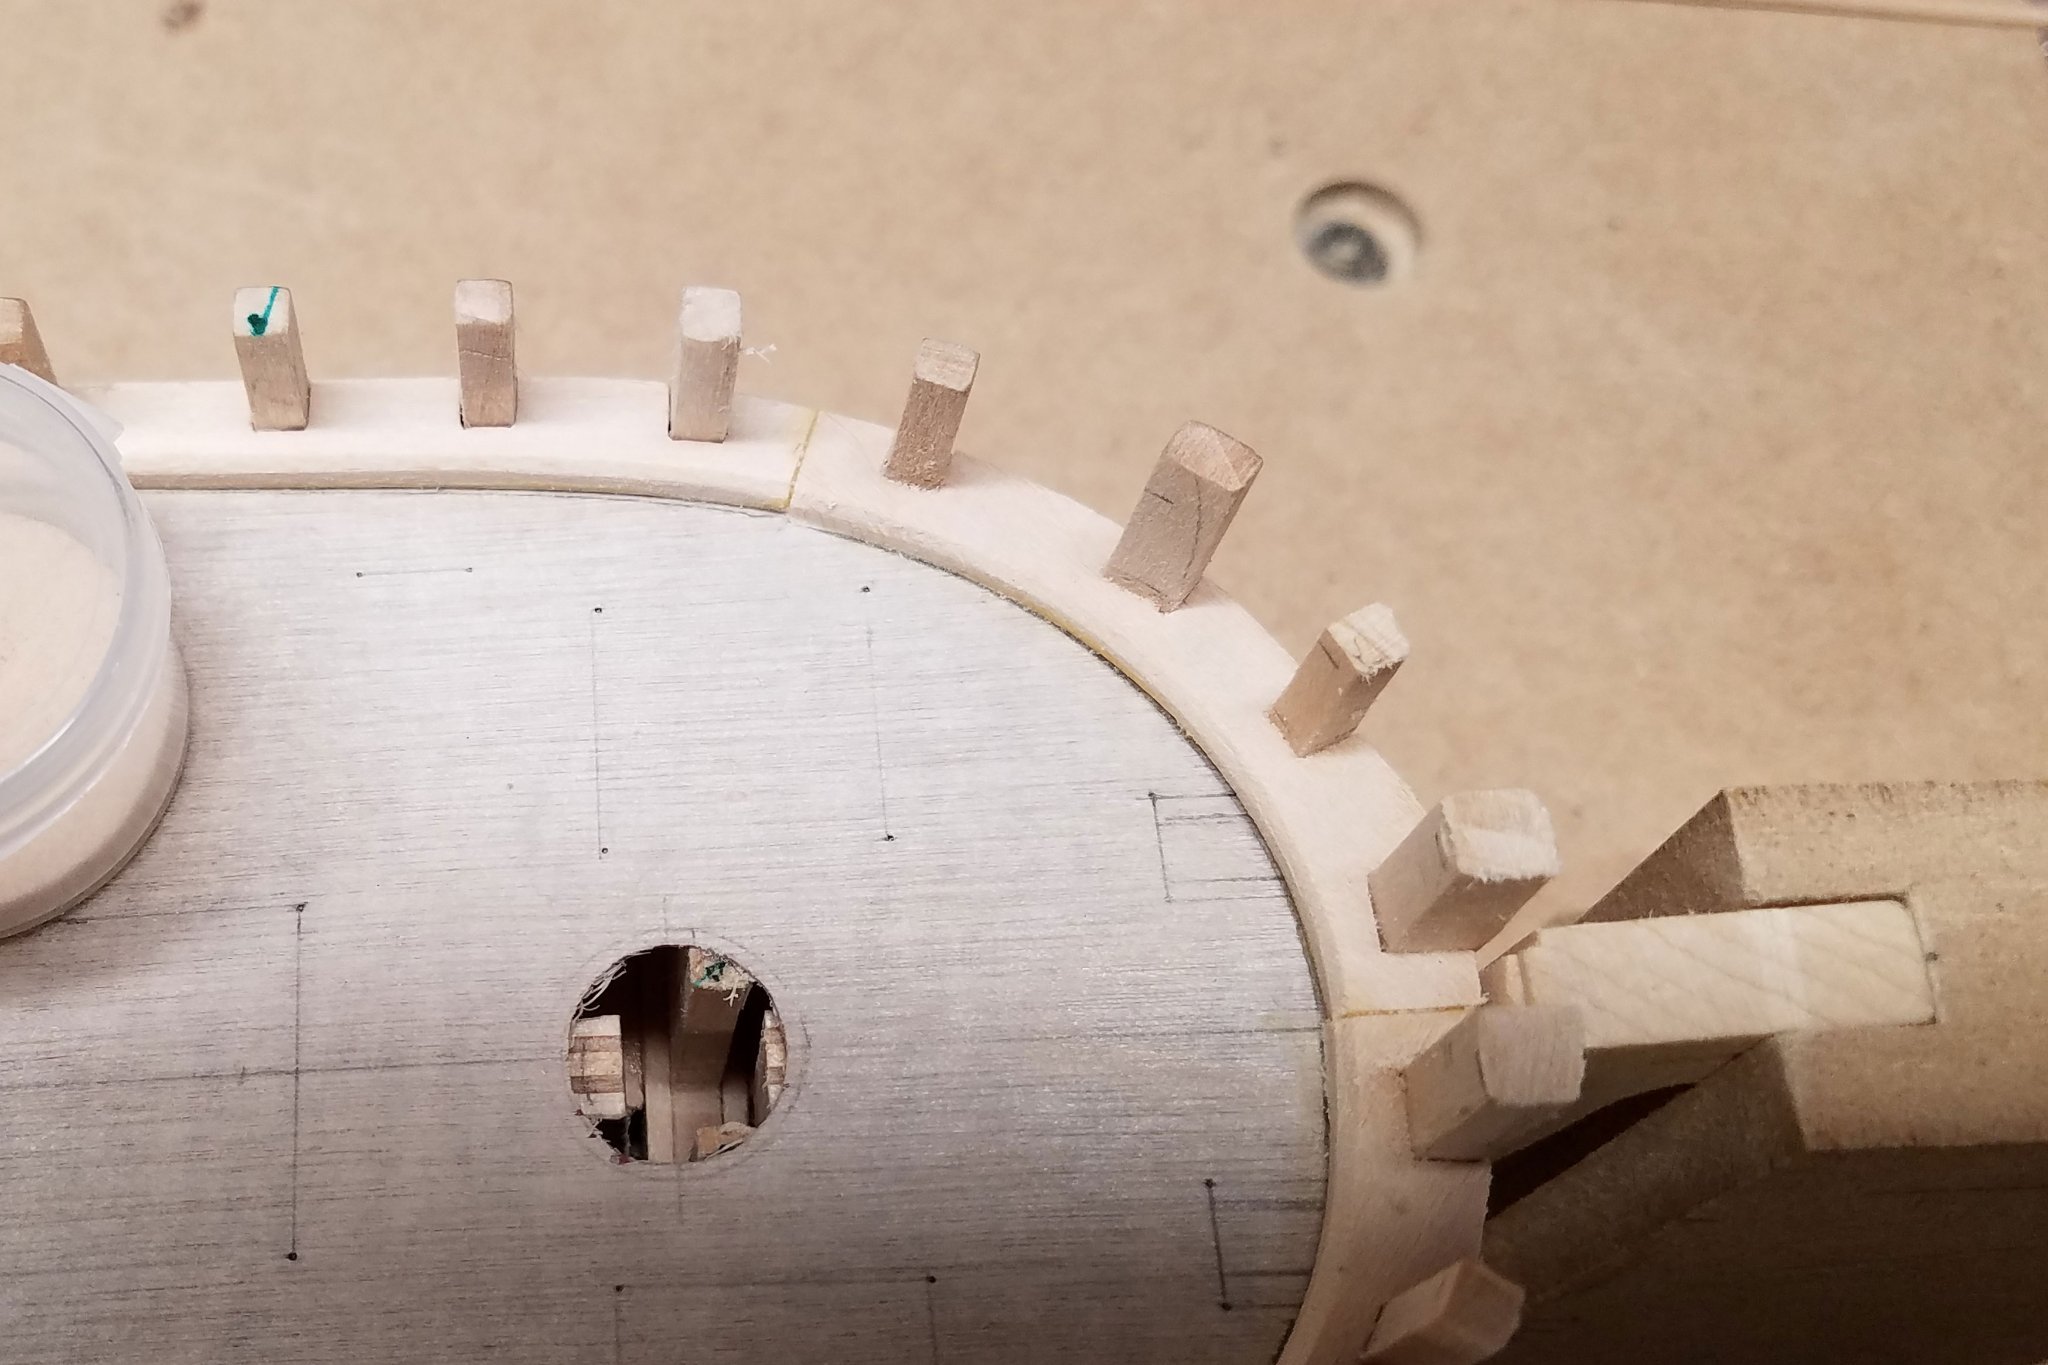
Before getting to the wales, the covering boards were next in line. There are three sections on each side and the width of two of the sections can be cut straight in with a razor saw, slightly undersized. The depth was cut in with a 1/8" file by lightly creeping in to the final depths.
The bow covering board sections can't be inserted horizontally. They must be fit from the top down while the timbers are slightly more bowed out at the top. Template #3 finally worked giving the best fit at the base. Yes, it's sad looking...but I'll take it. 🙄


At this point the widths of the covering boards are still oversized.
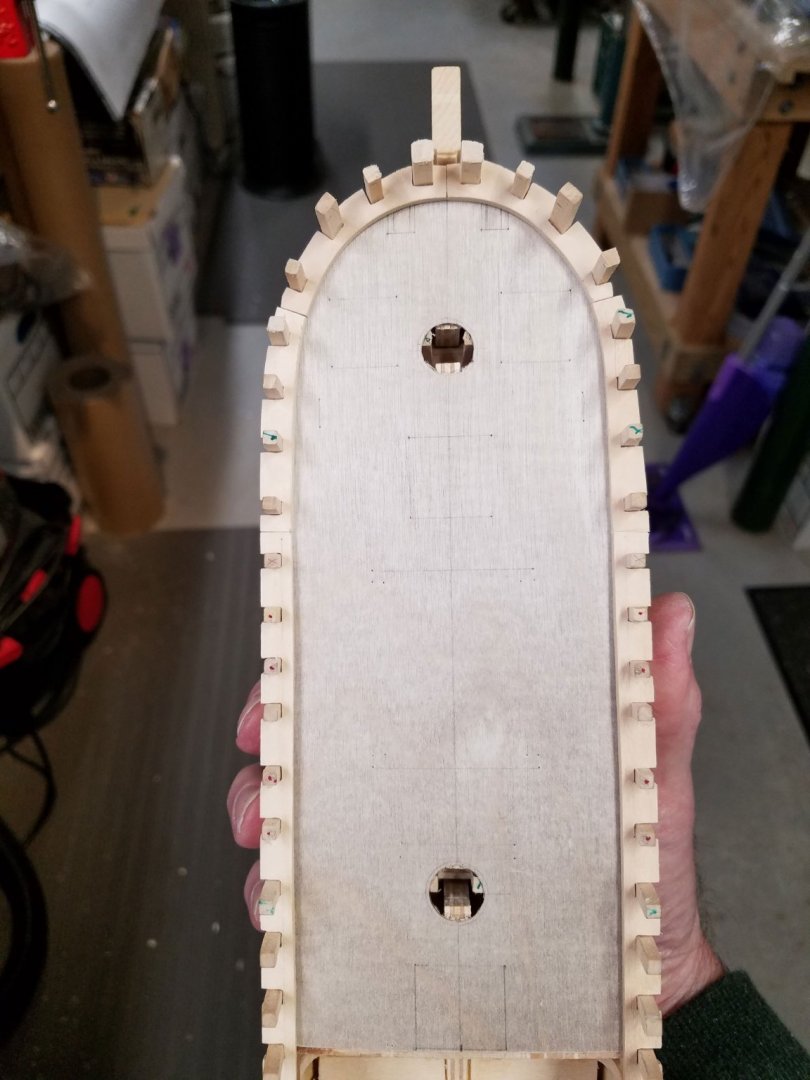
Some small gaps still remain between the covering board and the timbers. I will air brush as much as possible which I doubt will fill these gaps. After a few tries ... "home brew" wood filler V1.0 is made with "wood flour", which is more fine than regular saw dust, along with a 1:3 mixture of white glue and water. The mix uses the least amount of glue that can still stick two pieces of paper together. Too thin a mix will not bind the wood flower. For me, regular saw dust was too large to pack into the fine gaps.

Now, back to the wales. Thank you again for looking in and commenting.
Mike
-
-
Thank you guys for the comments and likes. Much appreciated.
Without the maximized cabin, the twist/curvature of the planks up to the counter would be more mellow as per the plans. That being said, fingers crossed, the cabin will be worth the effort.
If I were to repeat this (1/4") scale, I'd would go with 5/32" wide hull planking or 3/16" max to make bending easier. Even taking off a 1/64" in plank thickness in the aft planks made a difference bending around the tuck.
... back to the wales...
Mike
- GrandpaPhil and mtaylor
-
2
-
Slow but sure... Hannah's hull planking is now at the level just below the wales. Much of the time spent was working on bending the planks. The aft end of the two upper planks have a twist, a bend and a taper to mate with the counter boards (whew!).

Currently, I'm favoring white or a turpentine-ish brown color for this part of the hull. The wale planking will be natural boxwood.
I'm just now marking out the lines to have the top of the wales coincide with the top of the false deck. The way I envision the construction, the bottom of the deck planks and covering board should match the top of the wales. Please comment if I'm wrong here.
Best,
Mike
-


Finding authentic rope looking line for New Bedford Whale boat.
in Masting, rigging and sails
Posted
Hi,
It's a little while back, but one reference is from Page 120 of the Erik Ronnberg book. If you squint just the right amount you can count the spiral turns in the large tub and calculate an initial thickness. Then, after making up the line as close as I could to that, it fit within a few turns +/-). The color and shade I settled on most likely came from photos of at the New England Whaling Museum or Mystic Seaport.
A really enjoyable reference.... Check the You Tube movie (1922) "Down to the Sea in Ships" around 57 min, 18 sec. You can see the line is soft, right twisted and a very light shade.
Good Luck, Mike