


lmagna
-
Posts
5,876 -
Joined
-
Last visited
Content Type
Profiles
Forums
Gallery
Events
Everything posted by lmagna
-

size of people
lmagna replied to Snow's topic in Discussion for a Ship's Deck Furniture, Guns, boats and other Fittings
Chuck I was kind of wondering about the length of bed comment in the news article as well, but somewhat wrote it off as possibly news writer editorial rather than a researcher quote. I only used the article as it was short and somewhat already digested for the reader. I have visited period residences, in fact I kind of live in one as my house is about 120 years old. In the cases of visiting and staying in 200+ year old homes in New England I noted that the ceilings were much lower and the rooms smaller in the working class homes, (I assumed that was to conserve heat) while in the more wealthy homes the ceilings were much higher, had more windows, and in many cases the rooms were larger. In many respects they were really not all that different than the house I live in that was built about a hundred years later. I must admit that I did not pay much attention to the beds in the common homes I visited but I suspect most if not all of the furnishing in those homes were recreations anyway so may or may not have been historically accurate. In the more upper class homes that I did stay in, it was noted by the owners that the furniture was composed of historical antiques even though not necessarily native to the home where I was staying. In the case of the beds they were comfortable enough for even myself and I am somewhat tall, (Or at least I was at the time). They fit my wife even better. I would compare the size to what I will call a slightly wider modern day twin bed that was also very high off the floor or a slightly narrower and shorter Queen size bed.. Two people while not overly crowded had to be very good friends to be comfortable. I also have to agree with Wefalck in that this bed design does conserve body heat, especially when sharing a bed with another person. I believe this was also fairly common hundreds of years ago, at least in working class homes. Lou -
size of people
lmagna replied to Snow's topic in Discussion for a Ship's Deck Furniture, Guns, boats and other Fittings
I also agree with you on regional size. In my case it was when I arrived in country in Vietnam in the late sixties. I was 6'3", (190.5 cm) and the average male there seemed to be at least 12", (30.5 cm) shorter on the average. Women were even shorter! I again went though the same thing in reverse when I returned to the US almost overnight and not only was there a color change shock in the environment, but but all the people walking around were TALL! I think that as you indicate, the size of people on ships also was notable hundreds of years ago as the social order was much more stratified and officers in many cases probably came from upper class society and possibly tended to be somewhat taller and larger due better living conditions while growing up. Crewmen on the other hand, especially in European ships tended to come from lower classes of society resulting in somewhat smaller stature. I wonder if this was the case then did the harder working crewman have a huskier build on the average due to the physical nature of his life, or was he just "tougher"? Lou -
size of people
lmagna replied to Snow's topic in Discussion for a Ship's Deck Furniture, Guns, boats and other Fittings
I think that in some ways we are missing the point when it comes to the size of people in scale. First off we are trying to compare average peoples size hundreds of years ago to people today. We tend to use the figure of 6', (1828.8 mm) as a standard. Other people are saying that that is too tall for people of the time periods we are modeling in and we should be using heights more like 5', (1524 mm) as a standard. Looking at several published papers it appears that most researchers are of the opinion that prior to 1700 people tended to be smaller than people in proceeding ages due to diet, disease, climate, (Global warming/cooling) geographical location, and other factors). One site that cover this somewhat is: https://ourworldindata.org/human-height/#human-heights-in-early-europeans Another even more simplified commentary, (And more related to the time and location of my interest) is: http://www.nytimes.com/1982/04/15/garden/american-men-of-1776-said-to-have-stood-tall.html?mcubz=0 So taking those and other research discussions into account I decided to use the figures of 5'6", (168 cm) to 6', (183 cm) as my range of historic male height and came up with these numbers at 1/50 scale: 6' = 1 11/25" @ 1/50 scale, or 183 cm = 36.5 mm @ 1/50 scale 5'8"= 1 9/25" @ 1/50 scale, or 173 cm = 34.6 mm @ 1/50 scale. (This could be considered to be the average height for the time span being considered) 5'6"= 1 8/25" @ 1/50 scale, or 168 cm = 33.5 mm @ 1/50 scale All the above numbers are rounded out by me. So looking at the above numbers in the scale used, there is a difference of 3/25" or 3 mm from short to tall, and this is at one of the larger scales being used by builders on this forum. When you run the numbers for smaller scales the difference becomes even smaller of course. I also found it interesting that Englishmen were shorter on the average than American men of the same time period, and Frenchmen even shorter! Just thought I would throw this out for whatever it was worth, hopefully its useful to someone. Lou -
Sent
-
Hello Snow Chuck is a member of this forum and the National Research Guild. He is also the owner of Syren Ship Model Company, a sponsor of this forum. https://modelshipworld.com/?_fromLogin=1 He sells kits, mini kits, and fittings of very high quality. As an example he offers a model of the British Revenue Cutter Cheerful. This could be considered a beginners kit or you could just buy the plans and make it a scratch build. He also offers a complete list of fittings and furniture to support this vessel so you can buy as few or as many "Mini kits" as you wish to help complete the ship. By being in the form of mini kits this can spread the cost over the time of the build as not only is buying them an option but you can wait to buy them when it comes time to use them. His instructions of course are top quality, possibly the best offered anywhere. He is also the designer of the 18th Century Longboat, the USF Confederacy, Brig Syren, and the 21 foot English Pinnace, all sold by Model Shipways. He is also responsible for the eight page kit enhancement practicum for the Sultana kit, also offered by Model Shipways. All of his work involves historically accurate models and is of the highest quality. Searches here on the forum can provide much more detail than I can offer. Hope that helps. Lou
-
Patrick I have thought for some time that Chuck's practicum is probably the best thing that ever happened to this kit! For that matter to solid hull kits/builds in general and that Model Shipways is missing the boat so to speak by not modifying the kit to reflect the modified building method. I hate having to carve out the bulwarks and making them thin enough to be scale. They include his practicum on their website but have not made any alterations to the hull or included the additional material in the kit. In the case of taking one for the team, you can't win there because as the male half of team you are EXPECTED to take all the damage if there is any need. I suppose the best you can hope for is a pat on the head by your wife for doing a good boy. (Or more likely in my case get chewed out for being stupid!) Lou
- 449 replies
-
- 5
-

-
- sultana
- model shipways
- (and 2 more)
-
Hello Patrick Great job on your build. I have this kit in the Queue as well and I like looking in advance at how others do it right so that when my time comes I might have a chance! "Food poisoning"? Any chance you did, (Or didn't do) something that upset the Admiral? I'll leave now......... Lou
- 449 replies
-
- 2
-
-
- sultana
- model shipways
- (and 2 more)
-
How To Make Mini Cutting Machine Cut Popsicle Sticks
lmagna replied to RussR's topic in Modeling tools and Workshop Equipment
Hello Gregory A fence could just be another Popsicle stick cut to length and taped in place. A miter guide could almost be as simple even though I suppose you would need to cut a groove in the table and design a way to set the angle of the guide, all in miniature. I admit the higher cost of the higher quality motor and power source could run the cost up some but the rest of the build could be made from a sheet or two of 1/8" ply. About $6 per sheet at JOANNs for a 12' X 24". Kind of like a working model of a table saw. Another way would be to use a Dremel flexible shaft extension instead of the motor/power supply. http://www.ebay.com/itm/Extension-Cord-Flexible-Shaft-for-Rotary-Grinder-Tool-Dremel-Polishing-Chuck-/201654140221?_trksid=p2141725.m3641.l6368 Almost all of us already have a rotary tool of some type laying about and the extension would run you less than $8. Doing it that way would also make the mounting easier and less costly as it would just be a matter of of chucking it up and turning it on. If you also made it hinge mounted you could then adjust the height and by changing the saw blade for a sanding wheel could also plane the wood thickness. Yes, all of these modifications have made a departure from the quick hot melt glue and scrap plastic approach, but for about the same cost but why build a somewhat useless toy when with a little more care and work you could possibly end up with something very usable for this hobby? Lou -
How To Make Mini Cutting Machine Cut Popsicle Sticks
lmagna replied to RussR's topic in Modeling tools and Workshop Equipment
I think I would look into hobby supply motors designed for either model aircraft or cars. Preferably one with high torque abilities. Same for the power supply. I don't think 24 watts would quite be up to the job. You could also get quite a lot of work done just using battery packs. Keep a spair pack handy and you could be quick charging one set while using the other. I also agree that making a proper table/base would make a much more useful tool even though a 1/4" table might be a little thick considering the small diameter of the blade. I wonder just how refined one could make something like this for use in small stock cutting jobs and ripping planks from wider stock? Lou -
Hello wALTcON You might be able to get some useable ideas by looking at these while you are waiting for Jamie. http://modelexpo-online.com/assets/images/documents/MS2016-Sultana-Practicum-01.pdf (Look down to about page 4) http://modelexpo-online.com/assets/images/documents/MS2016-Sultana-Instruction_Manual-Complete.pdf (Page 6) Whoops, I didn't expect that! But anyway it still works the same, just click on it and Charlie's page should come up. If you follow his build log further down I think he has additional pictures and dialog on how he made an additional set of templates that he liked even better. Hope that helps and is what you were looking for. Should at least keep you entertained while you wait for more knowledgeable replies. Lou
-
But they will be SCALE sharks, so they shouldn't be able to take very big bites! Watch out though if you get enough of them they may nibble you to death! Me again
- 83 replies
-
- 2
-
-
- melvin
- blue devil
- (and 2 more)
-
hello glued Should be fairly simple................. Grab a log and cut away anything that doesn't look like the Blue Devil, throw it in the water and watch it capsize! (See your other posting in "a glutton for punishment") Hope that helps Lou
- 83 replies
-
- 2
-
-
- melvin
- blue devil
- (and 2 more)
-
Bill You have a better memory than I do! I could have not told you the year if my life depended on it, to say nothing of the price. 1967 seems about right though. That would have made me about 18 fresh out on my own with a little money to spend on toys now and then and still prior to getting to play in Hueys for Uncle in his tourist resort half way around the world. Lou
-
Bill Oh come on! I can't be the only dumb kid that spend days building this ship for minutes of of fantasy realization! You need to come clean as well and provide the details! Lou
-
The Blue Devil was my first foray into motorized ships. I build her right out of the box, set the gearbox to use the figure eight cam and set her on her maiden voyage at my local pond. All went well for the first part of the pattern even though it was a bit scary watching the ship heel when turning. Then half way through the second figure eight, while as far from shore as possible, a slight gust of wind came up broadside and over she went! Capsized and sank almost instantly with the props still turning in the air! I was devastated. I managed to wade out and retrieve the ship but I never sailed it again. I could be wrong, but back when I built it as a kid I think it was possibly the largest, (Longest) model ship you could buy. I don't remember how much it cost back then but it could not have been much more than a few dollars or I would not have been able to afford it. Lou
-
I originally thought I had something new and original to possibly add to this topic, but after reading through it in more detail it turns out that my ideas have been expressed elsewhere. But then I thought that if the same ideas were expressed often enough then possibly it would increase the possibility of seeing what we would like to see at some point. First off getting my personal period/ship/nationality choices out of the way, my preference would be American vessels of the American Revolutionary war, with ships like Lexington, Providence, Cabot, and Andrew Doria to name a few that would be representative of the majority of American vessels of the time. I feel these small ships are much more representative of the Continental ships of the time than the larger frigates most commonly offered by companies. The added advantage of these types of vessels is that they are smaller and could be built to a larger scale without taking over the house and having reduced rigging can make an interesting model that is more within the range of a beginner or novice. That is where most of the rest of the idea comes in. It seems like most of the beginner kits have solid hulls to make it easier to obtain the hull shape without having to learn planking. I think that retaining this idea or using the bread and butter method of making semi solid hulls, along with Chuck's method of planking the much easier areas above the wales is kind of the best of both worlds for beginners, learning planking while not having to deal with the more complex bilge, bow and lower stern. This would also make the kit less expensive if the pricing on other solid hull kits are any indication. Here is where I think another departure from the normal kit could be taken. An upgrade kit could be offered that instead of the solid hull it would include bulkheads and profile piece along with the extra wood needed to build the same vessel as a POB kit appealing to the more advanced modeler. The same thing could take the kit to the next level by replacing the POB items with material needed to build a POF kit. All of the same ship but different levels of challenge for the builder, at different levels of cost of course. Then the manufacture could also offer upgrade lumber to replace the standard kit selection. I am not so certain about PE items. I do feel that there are many items that would enhance a kit of any level and of course make a much more refined and detailed model just as they do in the plastic kits of airplanes, ships, and cars. I just do not know if the PE parts should be included in the kits or if they should be an aftermarket item like in the plastic kit industry. The hard to make carved details of the ship could be offered at additional cost for people like myself who have absolutely no talent in carving. They could be made from almost any material that glues well and holds the details of the original. Again Chuck is doing some very innovative work in this area. It would be nice to see a few figures that match the scale/nation/period as well. I think models could be produced in this manner profitably and sales would possibly be extended on any given kit by offering several versions of the same kit to appeal to the skill levels of various potential customers. The same person could build the same vessel more than once as their abilities increased if they desired without having to return to the exact same kit. The same manufacturing technique could be applied to virtually any kit the manufacturer chose to release, and for each named ship that was created there could be at least three or four versions of the model. Hopefully this would increase the longevity of the kit sales for the manufacturer as well. Hope this is still within the parameters of this subject and I did not stray too far into manufacturing rather than just “What ship”. Lou
-
vossy I don't know about you, but my wife would get a little put out with me if I make a statement like that! Lou
-
Hello Alex You are embarrassing me! I look at the quality and speed of your build and then look over at my poor attempt at progress and also realize I will have to kick it up a few notches to even approach your quality. Looking forward to your next installment. Lou
-
Moflea Again great progress. I am glad that the beads worked out for you. I have a bottle of 1.5mm beads that i bought just for this ship and even though they only cost a few dollars it is nice to see that they look so nice in your Union build before I do it on mine. On my "Union" I made many changes to make it look more like a late 18th century Brigantine, at least I hope so. In some ways it would have been better if I had made it into an early 19th century brig as the hull is a better shape for a ship of that time but I did not want to do that time period and I would have had to do MANY more cannons on the more open decks! When I got to the transom I just felt that it needed to be a more rounded shape and different design, so I changed it. The first attempt ended up not shaped right. the second looked OK until I looked at it close up like in the pictures you take and it made me want to do better so now I am almost finished with what I hope will be something worth looking at and not to be ashamed of. I would be finished with it except a few things in my daily life have changed and have kept me all too busy in dealing with them. Lou
-
Great job Alex As you know the reason I am following your build is to show me how to try and make my kit at least partly as good as you have done. I am currently stuck on redoing my third redesigned transom! I wish I had an idea for the shiny beads but to be honest I don't. I think there are some beads out there that are made of plastic instead of glass that could take paint better but I am not sure. I also think you will find that the shine on the parrels will not be as noticable when you start filling in all that open space with rigging and stuff. After all they are REALLY small. Keep it up, you are definitely showing me the way. Lou
-
Hello Michael I am not certain which part you are referring to but I have had some good results in the past using hot water. Not boiling hot but hot enough to make putting your hand in it uncovered uncomfortable. You can wear gloves and start reforming the part while still under water then hold it in place after you pull it out and let it cool. You can pratice with a piece of sprue to get the method down and be comfortable with it. Lou
- 105 replies
-
- 1
-
-
- constitution
- revell
- (and 2 more)
-
Hello Eddie I am not certain if it will be helpful or if I am just adding fuel to the fire, but I always thought that the Revell Constitution rigging plans for their 1/96th scale kit were a good remedial starter for novice riggers of 17/18th century square rigged ships. http://manuals.hobbico.com/rmx/85-0398-rigging.pdf While they are not strictly for the Fair American I would think that with the plans you already have combined with the step-by-step sheets for the Constitution you should find a number of similarities between a brigantine and frigate. Hopefully other more experienced people both with the Fair American and period rigging practices will either confirm or deny the validity of this assumption. There are a number of books on rigging as well that are certain to be more accurate and detailed, but at least with the ones I have, none of them are quite as "Simplified" in their approach as the Revell set. Hope this is a little help at least. Lou
-
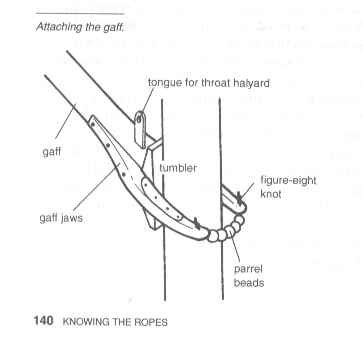
moflea I know what you mean about ships and loving them. I have been loving them since childhood as well but even though I live less than a mile from the ocean I have spent very little time on ships of any kind, and I am almost 70. As for the parrels for the gaff and boom you could use the small seed beads you can get at most craft stores: http://www.michaels.com/dazzle-it-10%2F0-czech-glass-seed-beads-purple-lined-aqua/10478801.html They are very small. For that matter you can also possibly use the double beads: http://www.michaels.com/darice-preciosa-twin-2-hole-czech-glass-beads-transparent-red-dyed/10478791.html when you start doing the rigging as blocks. They are pretty small as well. i think that if you are unsure about the strength of the gaff jaws then you could cut them out of brass sheet, cut a slot into the boom and gaff and glue them into place. When you can paint them black or cover them top and bottom in thin wood you would have very strong gaff jaws without going out of scale size. Good luck Lou
-
moflea How about just adding a gaff parrel and rely on the rigging to hold the boom and gaff in place?
-
Hello moflea I am in no way an expert. I can only hope that mine looks half as good as you are doing with this kit when I get to your point! But to me the quality of your build and the methods you are using are nothing short of outstanding for this kit. It looks like you will have a model to be proud of when you are done. Lou