king derelict
-
Posts
3,295 -
Joined
-
Last visited
Content Type
Profiles
Forums
Gallery
Events
Everything posted by king derelict
-
Thank you OC. I hope I can live up to it. Flyhawk manage to pack an awful lot into such a tiny kit. Lots of tiny parts and PE, Just as much fun as a big one. I hope the Christmas season is going well Alan
-
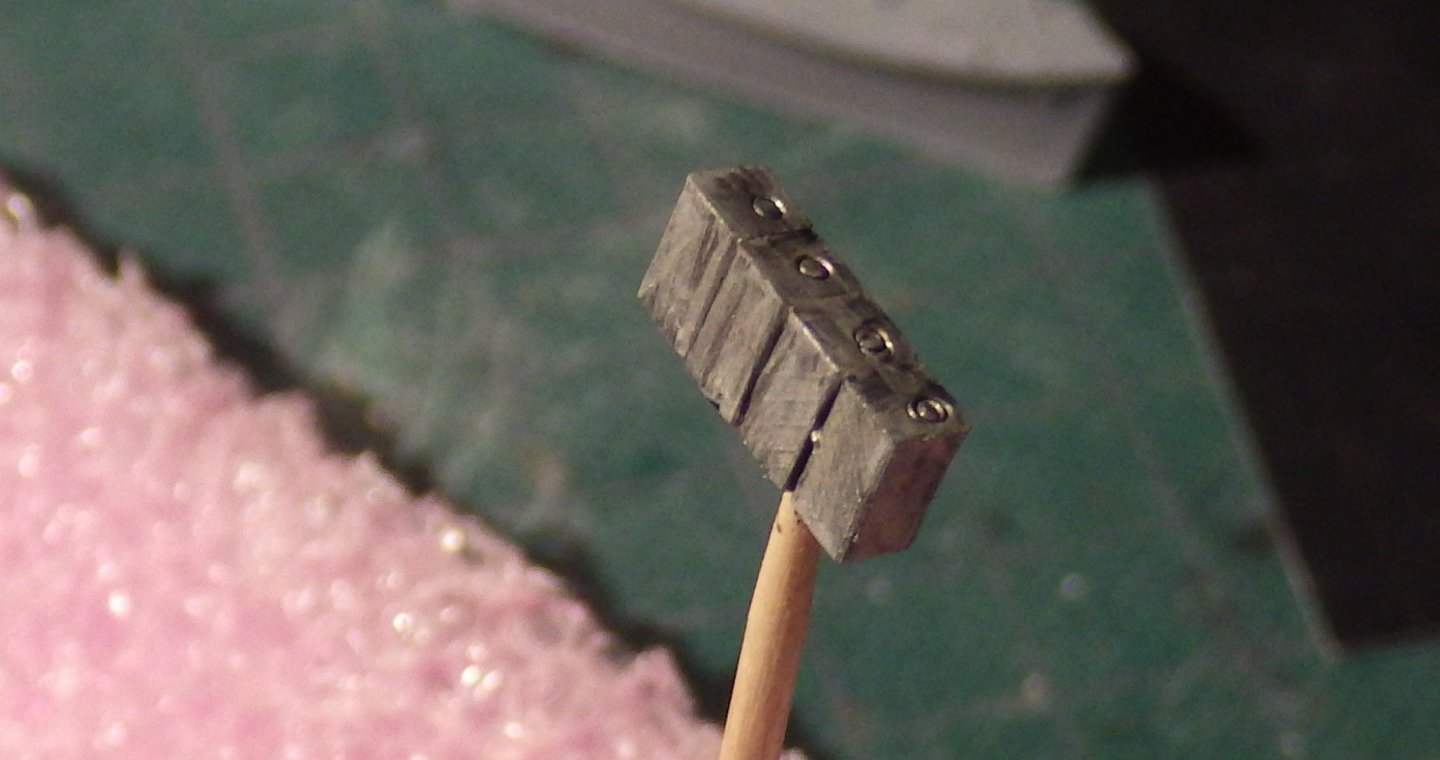
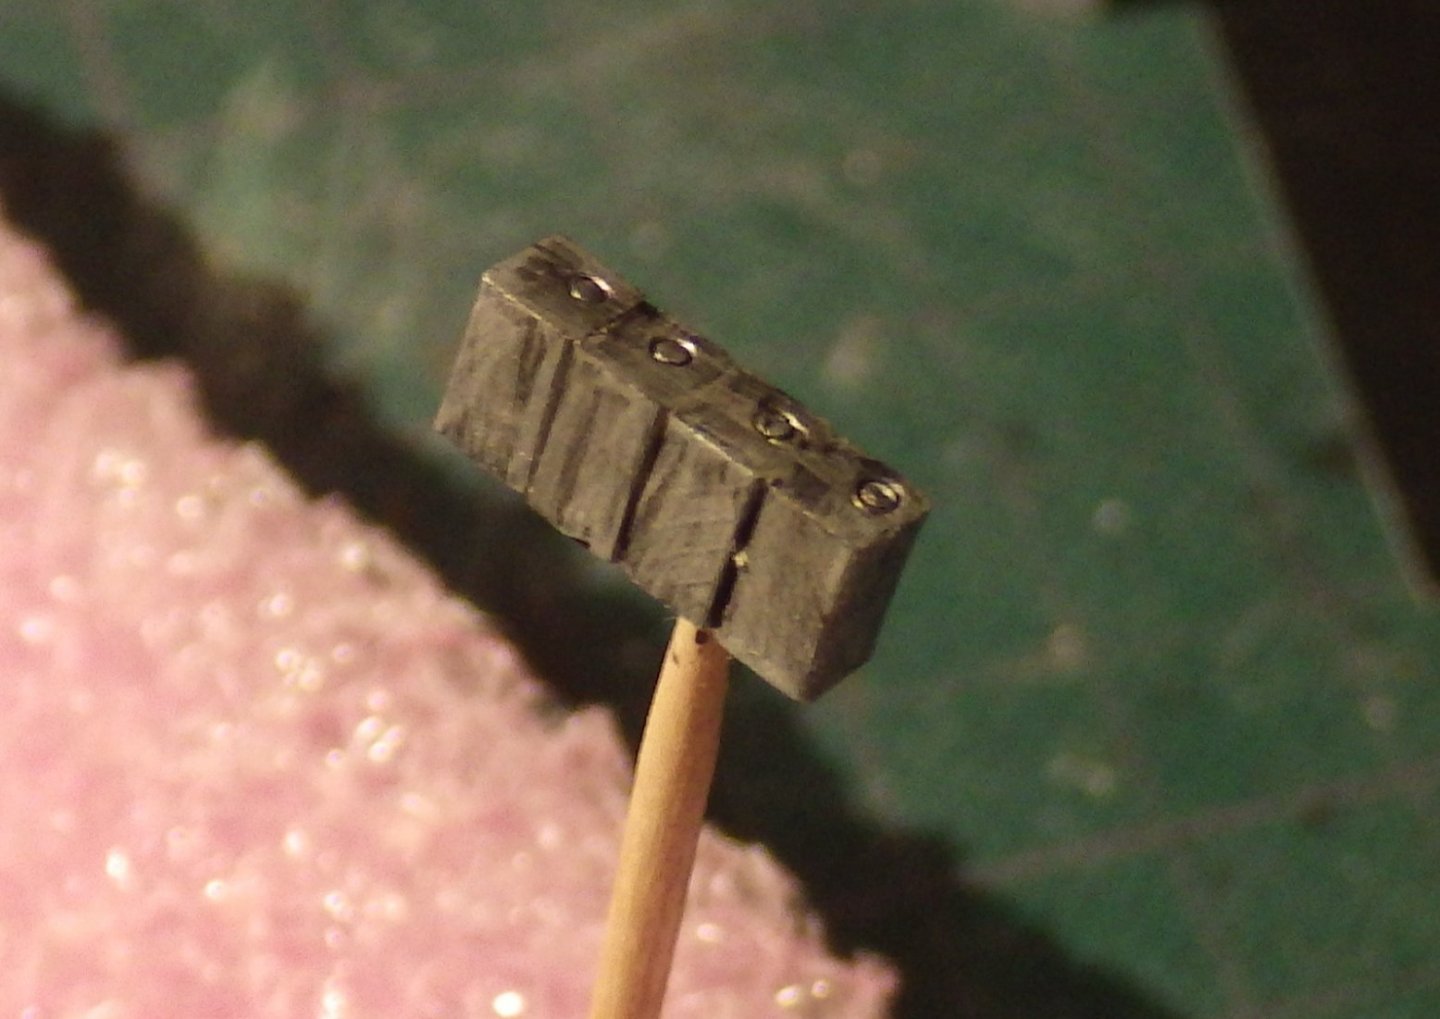
Back to tiny world with a vengeance today. I'm still building the modules that will be painted before assembly and then PE is being added in places as part of that. As @Boydie noted the PE is very thin and the hinges of the folds are well perforated so I don't think there would be a second chance if you bend the wrong way. I was trying to go slowly to minimise that problem. The breakwater for the foredeck was a good example. Just the flexing of the part as I was cutting it from the fret saw three of the ribs breaking away from the breakwater. Actually I found it easier to cut them all off and then glue the breakwater to the deck. Once the breakwater was solidly set i attached the ribs. At least that way I wasn't dealing with trying keep everything in place and orientation at the same time. However the little triangles are tiny. I decided that the plastic gun barrels on the 4 inch guns were good enough to retain. I think anything I gained in the neatness of teh brass barrel would be lost in the lack of neatness in drilling the tiny holes in the barrel stubs to hold the brass barrels I'm definitely working at my PE limit. This is the mainmast platform The plastic mainmast is very well done by Flyhawk but I thought the brass version might be better so I assembled the main components without too much trouble. I made up the plastic version to get the correct placements of the brass parts. The antenna at the top of the mainmast is a very fragile piece and two of the H antenna broke away as I was folding them to the correct angle. I managed to find the broken pieces and glue them in place (approximately). Its not as tidy as I would like but it might look OK once painted (if it survives the airbrush). The photo shows one of the ribs for the breakwater and above it one of the H antenna Thanks for looking in and all the helpful comments Alan
.thumb.jpg.7f7bb6657f4b7a4f788984e607754b08.jpg)
.jpg.85f9f873b847525000e826f50b7d2244.jpg)
.thumb.jpg.4a42196dc18ff96743209054e94421ff.jpg)
.thumb.jpg.cc9bf3b41ce4ef0421032cbc3764572c.jpg)
.jpg.ee93decb6e88148e0a9c9ced8fe7ea58.jpg)
.thumb.jpg.84d9c214e4f42c16ca7903bf6c3f3f57.jpg)
-
The engine looks really good. We used to have parking bases which were just stands for spare engines that were simpler and cheaper than the workshop stands. It looks great too. Alan
-
A fully loaded out AV-8B always looks like something not to be messed with. Alan
-
Thanks Mike This has been a lot of fun Alan
-
A diorama you can enjoy with a glass of wine😄 Alan
-
Thank Egilman. That ceramic brick dust keeps coming in handy Alan
-
Thanks Patrick I really enjoyed building the car - and helping to eat the cake Alan
-
Thanks Mark I read the thread. It will be interesting to see what is going on - though doubtless it will be unintelligible to me.
-
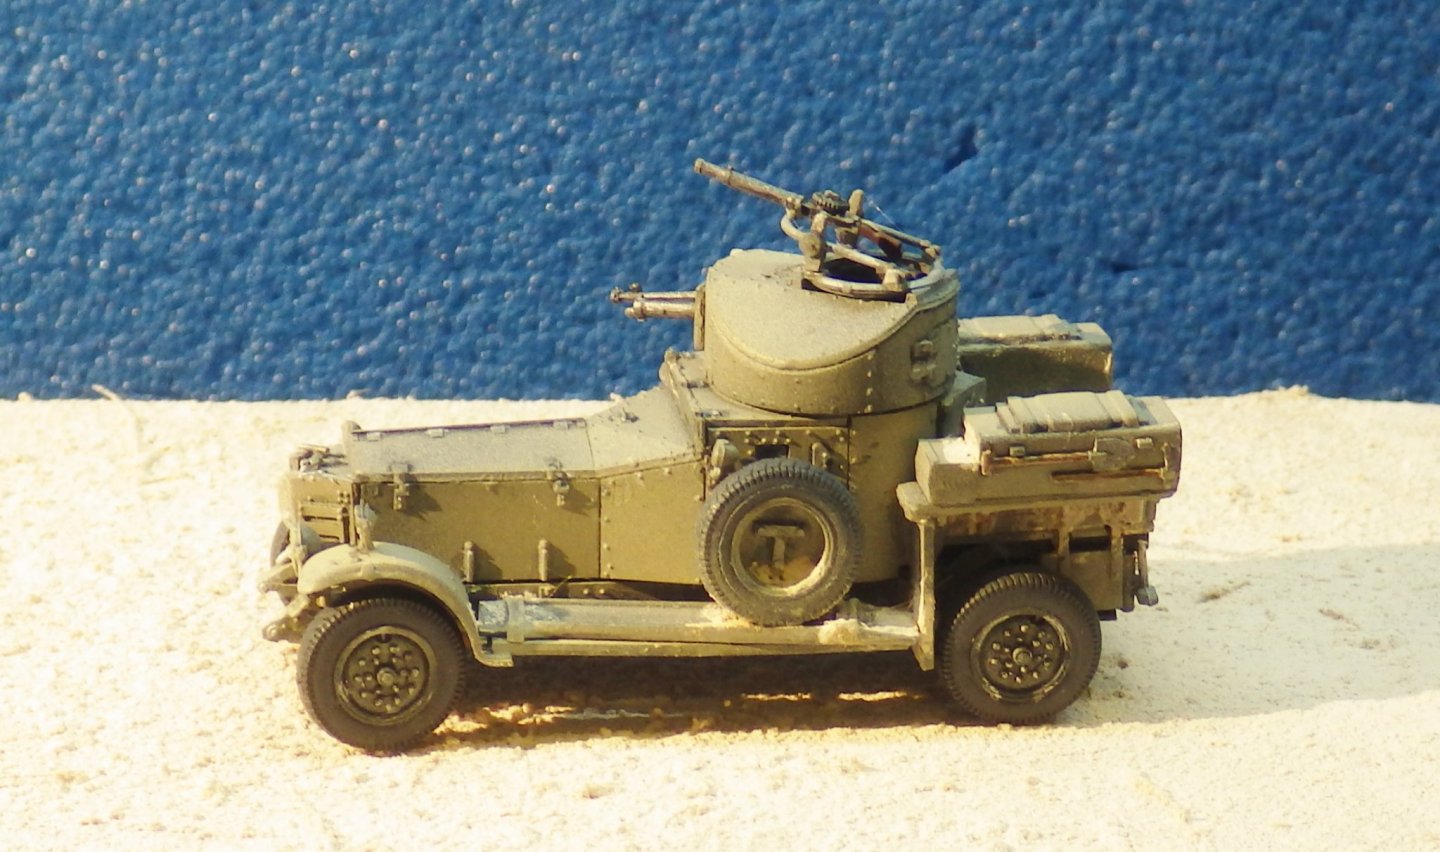
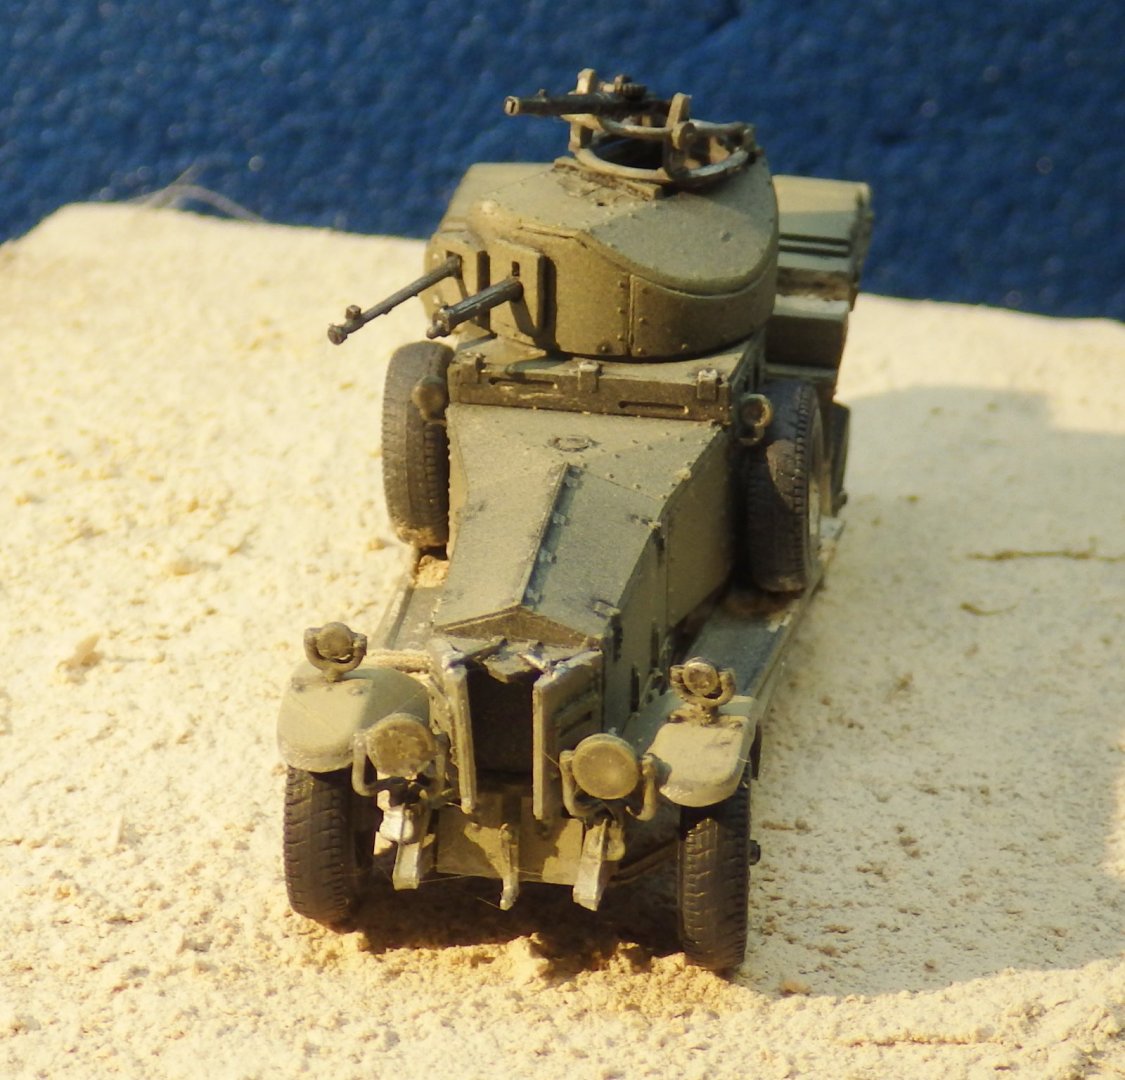
The fuel cans were dulled a little and added to the back of the car. I added a bit more replica sand around the cans and I think this one is finished. The 200 error nailed one of the photos - funny how it picks on one image and even if it is edited, renamed reimported and it still kicks it out. Thank you for all the support, kind and helpful comments. I hope it has been interesting. I hope you all have a great Christmas Alan
.jpg.4c749deb05b5d88008a6dc276ee3aee3.jpg)
.jpg.ad48aaf0b43ae1db237e4ec4b2aac857.jpg)
.jpg.8e9ae9038d58848d688360bc9ef95adc.jpg)
.jpg.f5daf62ea99b76b779895acd116f6ac5.jpg)
.jpg.27c35e34fcfdb8cf230d9a02f0c820bc.jpg)
.jpg.62ed4cc5061934f38051505cbe79cca9.jpg)
- 92 replies
-
- 15
-

-
Thank you very much Popeye I look forward to tasting the cake Happy Christmas Alan
-
Thank you Ken I'm looking forward to trying the edible diorama Happy Christmas Alan
-
Thank you very much Mark Witha third of a bottle of brandy in it; I'm hoping the edible diorama tastes good Happy Christmas Alan
-
That is great way to show the real size of the zeppelin. It is fantastic display and both models are exceptionally well done Alan
-
I was all set to start SMS Lutsow but I made the mistake of looking at the PE set which includes the torpedo nets and my nerve broke! They look delicate and horribly fiddly. So I decided to reenter the 1/700 world in easy stages and lifted Flyhawks HMS Lance off the shelf. This is the deluxe kit with metal barrels and two sheets of PE, mostly railings and davits. I'm not sure i will used the PE davits; the plastic ones look very good and are three dimensional. A box full of parts along with a nice card with the art work on it. Instructions for the kit and then instructions for the PE so there is the need to cross reference. I tend to go over the kit instructions and make up where the PE parts will take the place of the plastic part number. 1/700 scale seems to have got smaller while I have been away playing with 1/72 armour and the corvette. The PE is thin and fragile. There won't be many second chances The overall plan is to put the decks on the hull and then build up the superstructure separately as much as possible and hopefullu avoid some masking marathons. So the bridge structure has been started with the tiny pieces of bridge equipment added and the first bits of PE I hope everyone has a great Christmas Alan
.jpg.b7a1e63c6354af3583c098a268f24902.jpg)
.jpg.c1909070d41296ecc90b29167b3f9749.jpg)
.thumb.jpg.966b3e096efb525363554bb64dd8af53.jpg)
.jpg.ccf282ec01b6ef6b92f75809000d280c.jpg)
-
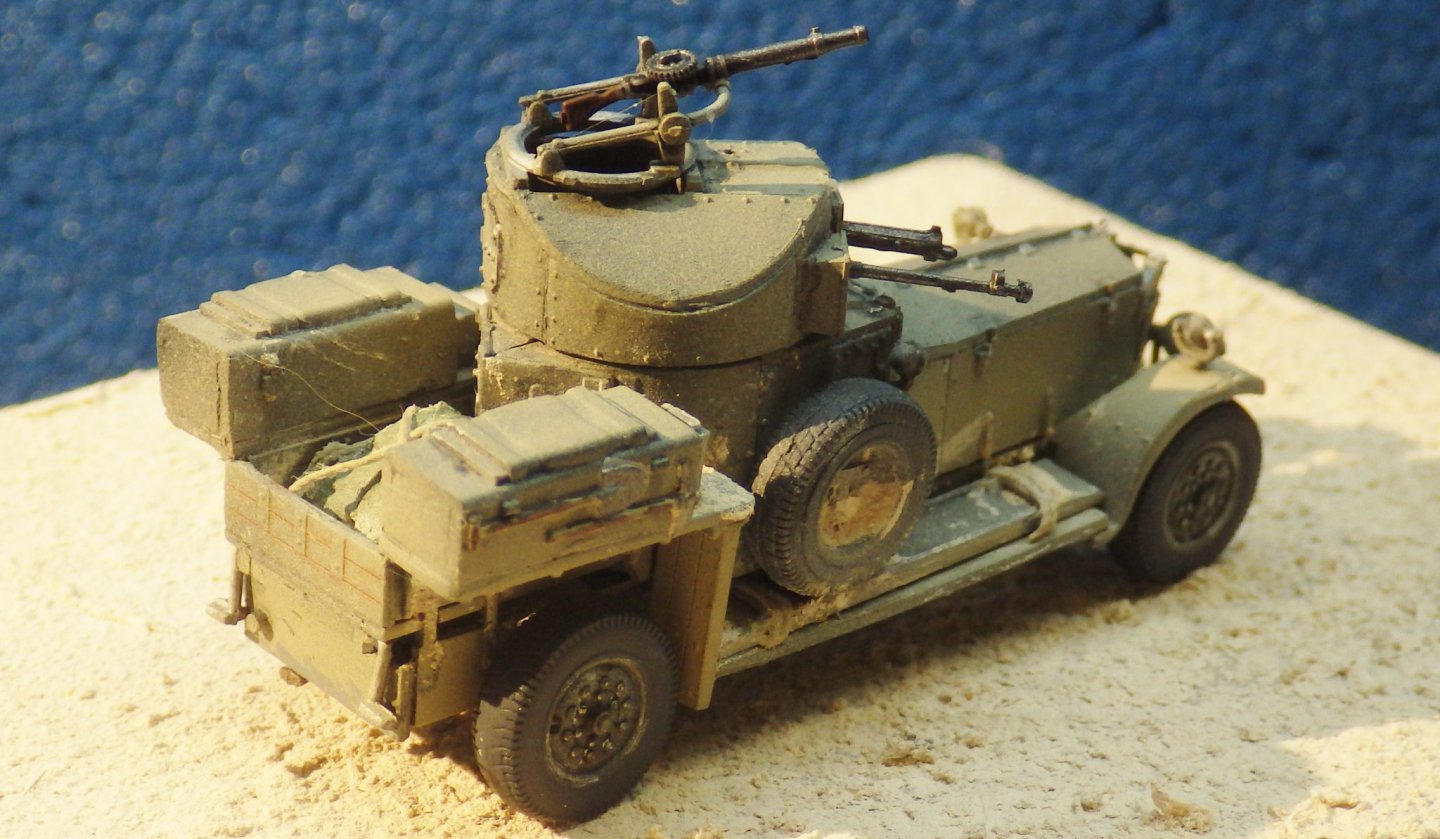
A tiny update. I am making the flimsies for the car. I took a length of 1/8 square styrene rod and rounded the edges slightly to make the individual cans more apparent. I cut four 5 mm pieces and glued them together. I created the appearance of the lids by pressing the tip of a hypodermic needle into teh tops. Its a little out of scale but it was the smallest size I have and its not in quite the right place but any closer to teh edge and it distorts the plastic. I think it will look okay under some dust. A plain top just leaves it as a box After priming with black primer I painted the strip with metal paint and gave it a black wash to delineate the individual cans better Next I will add some dust but first I had a diorama to finish - not a desert one this time I hope everyone has a wonderful Christmas and a safe and prosperous New Year Alan
.jpg.5880f7a84deb37335683daa424d66901.jpg)
.jpg.f56c263cc4f9bedd917582fa6226c793.jpg)
.jpg.b4a559fa03a3b7a09050f0420b1a7914.jpg)
- 92 replies
-
- 14
-
-

-
Hope the tabs bring relief quickly. Thats nasty and worse just before Christmas. I hope it all goes well. I'm glad you have a responsive doctor. Alan
-
Thank you Lou. Yes, I was thinking that the lockers on the side of the truck bed would hold some supplies but ropes, personal kit etc might be under that tarp. Bed rolls if it was a multi-day patrol. Alan
-
Thank you OC. I really like this subject and the model is quite good. The 1/35 scale version just turned up and that does look very good. Alan
-
Thank you very much Ken I need to a better job with the lighting for the photographs. I realise that some of the pictures make it look like I have used a green and sand camouflage Alan
-
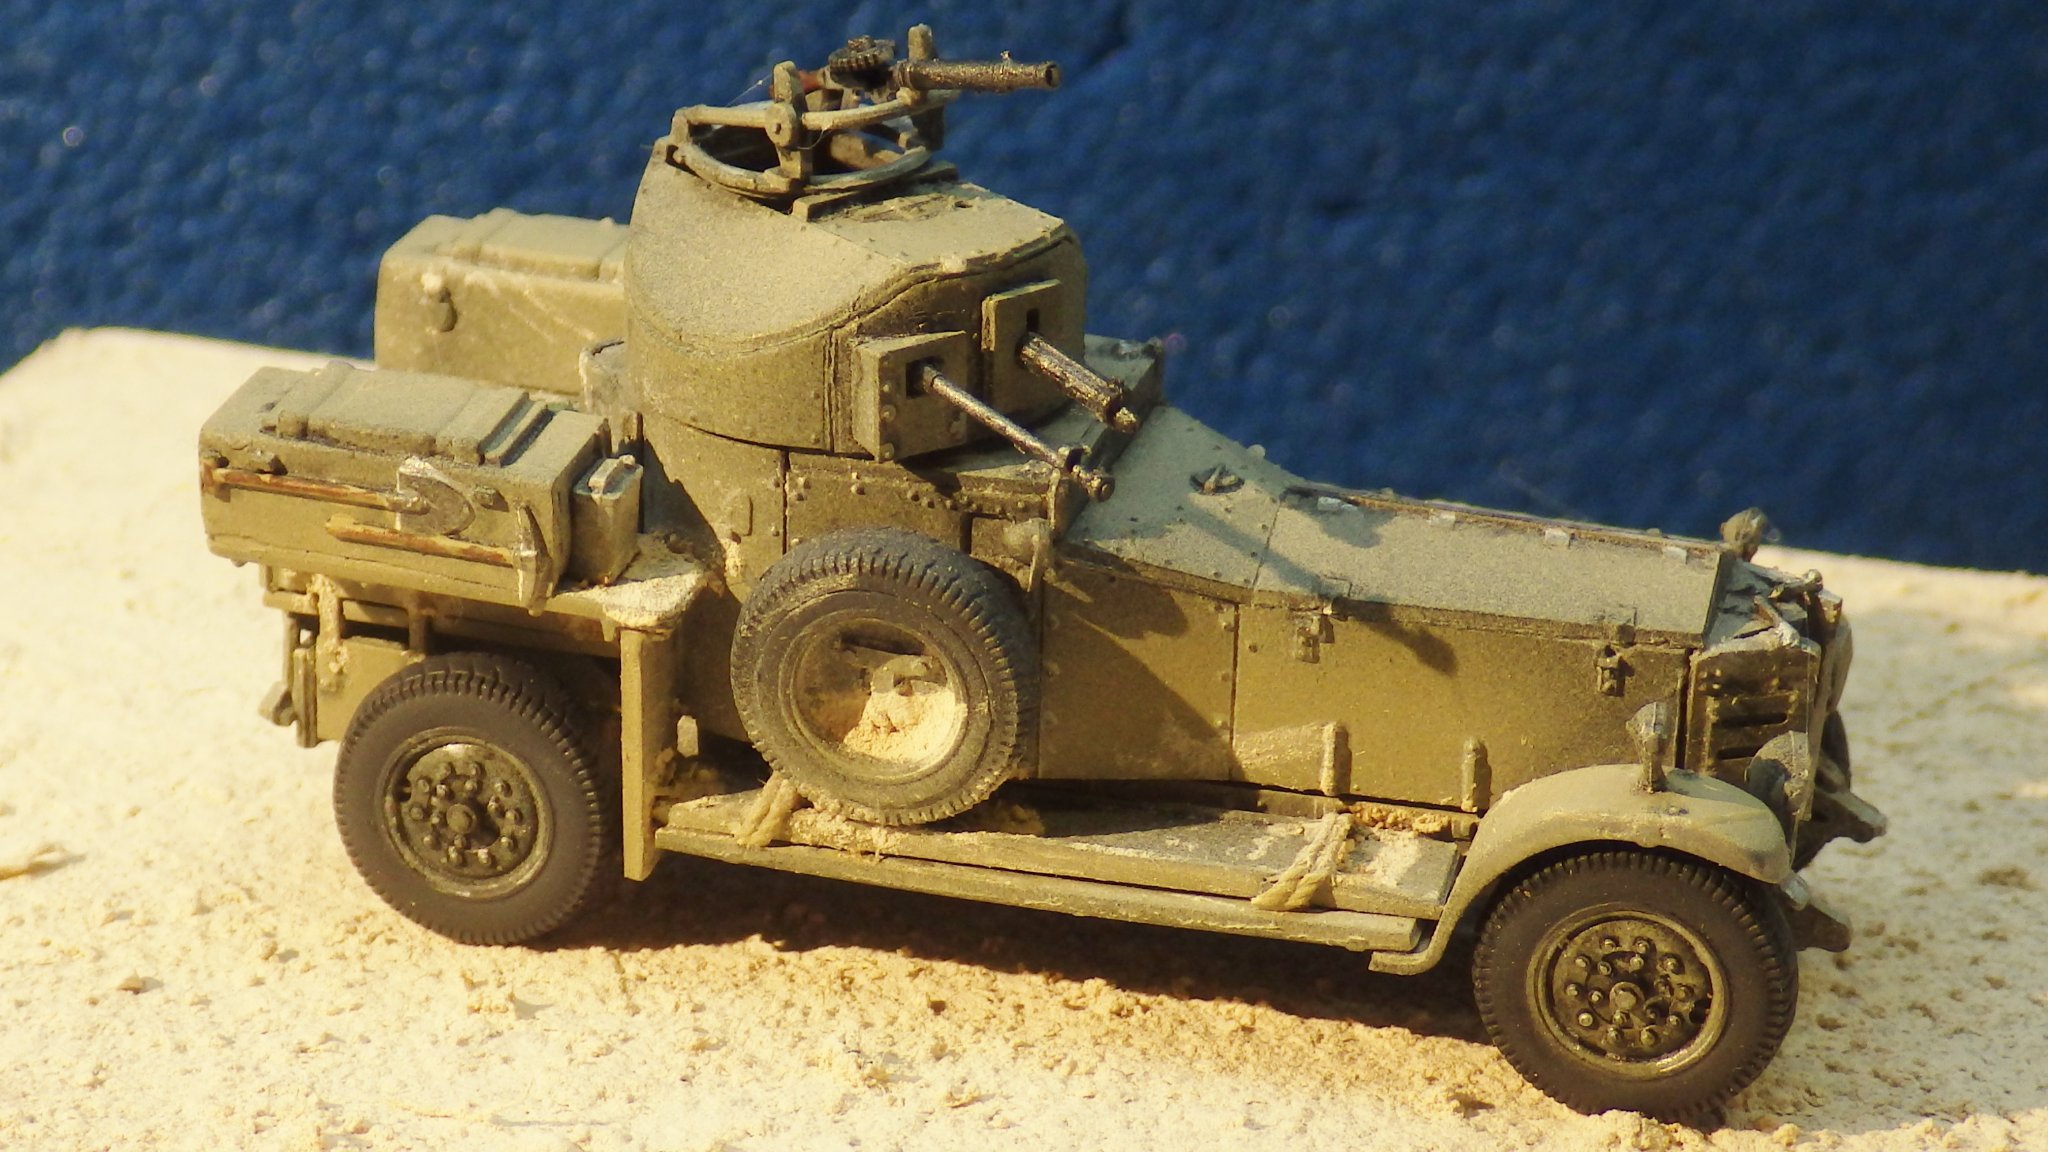
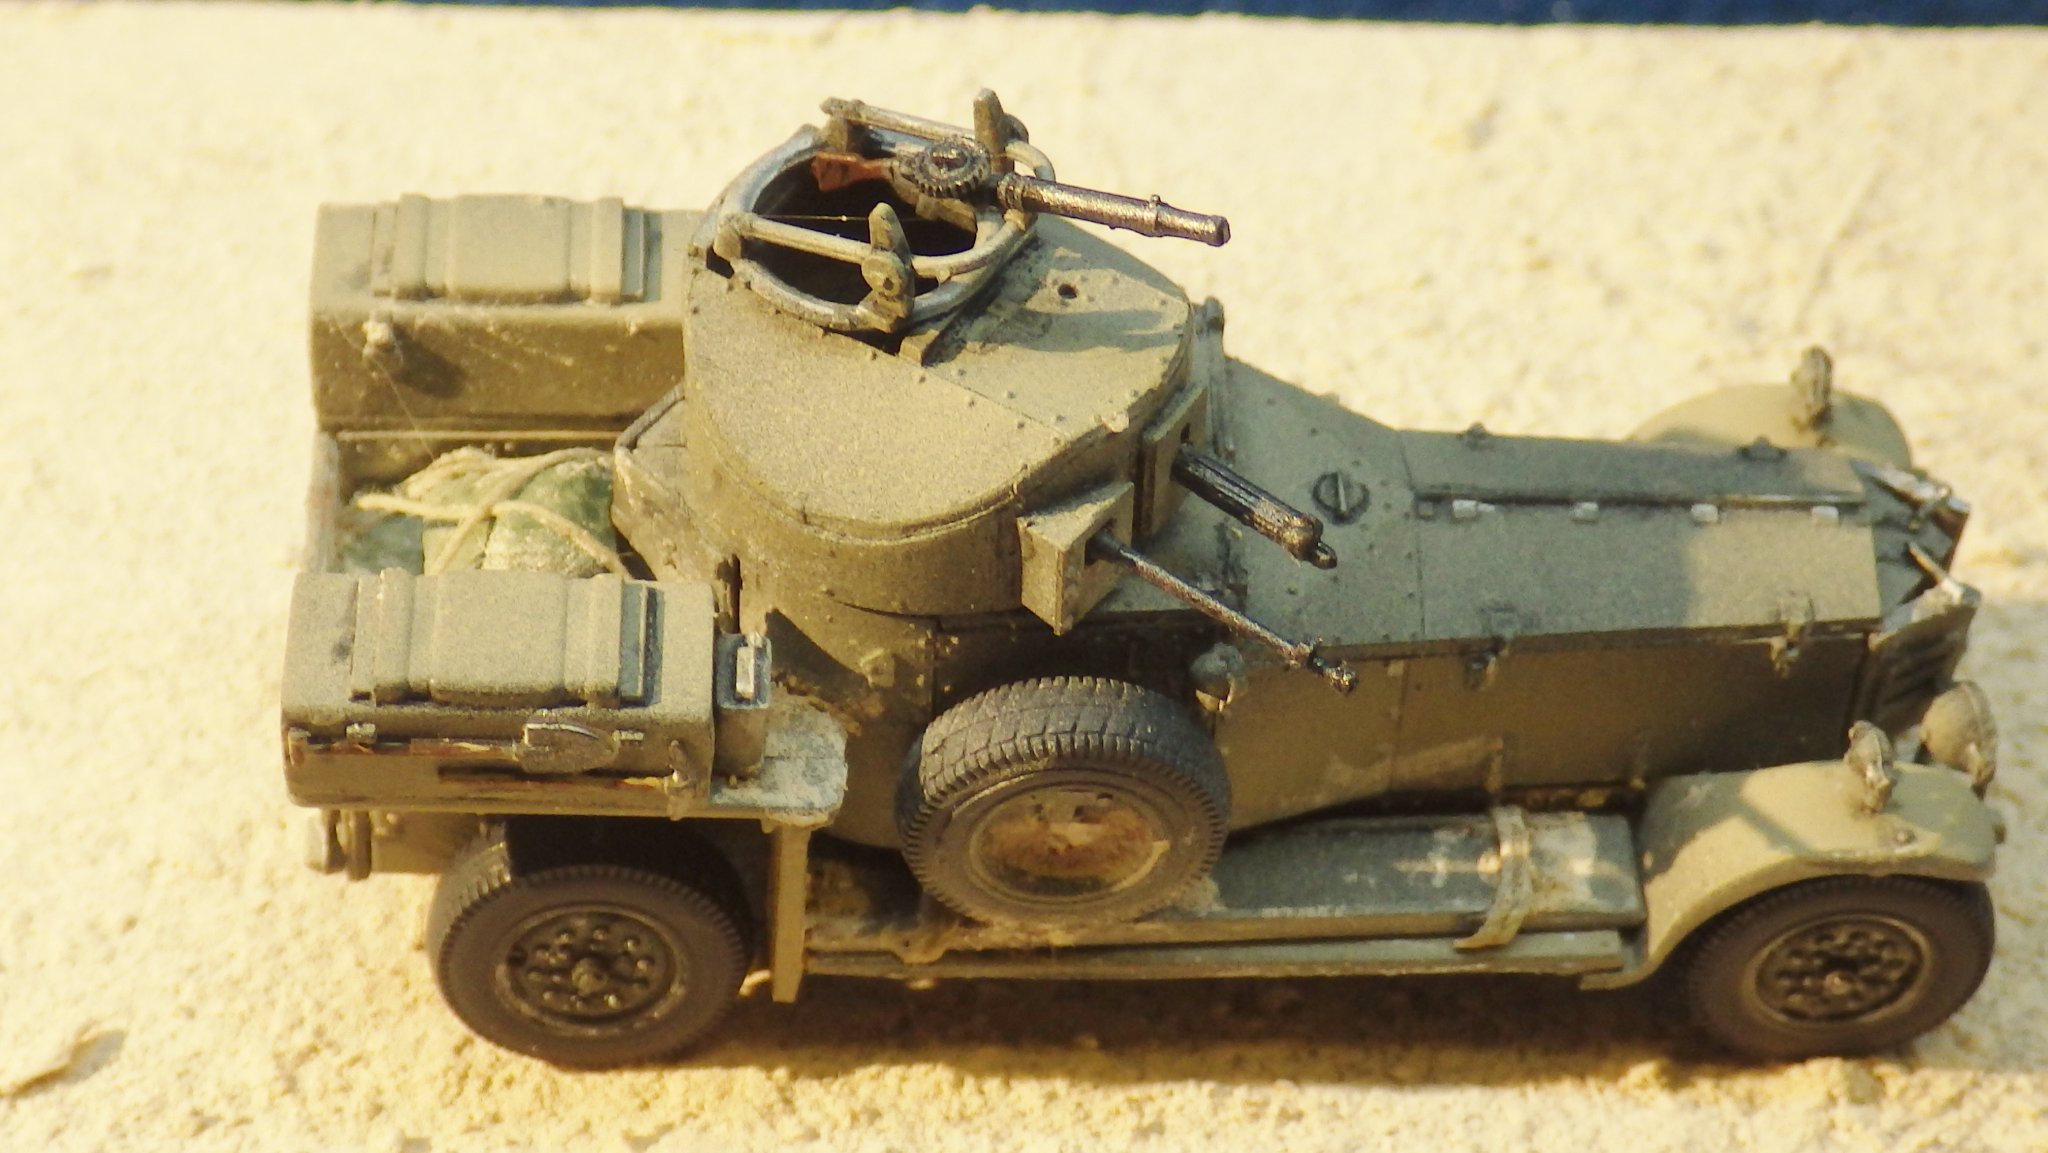
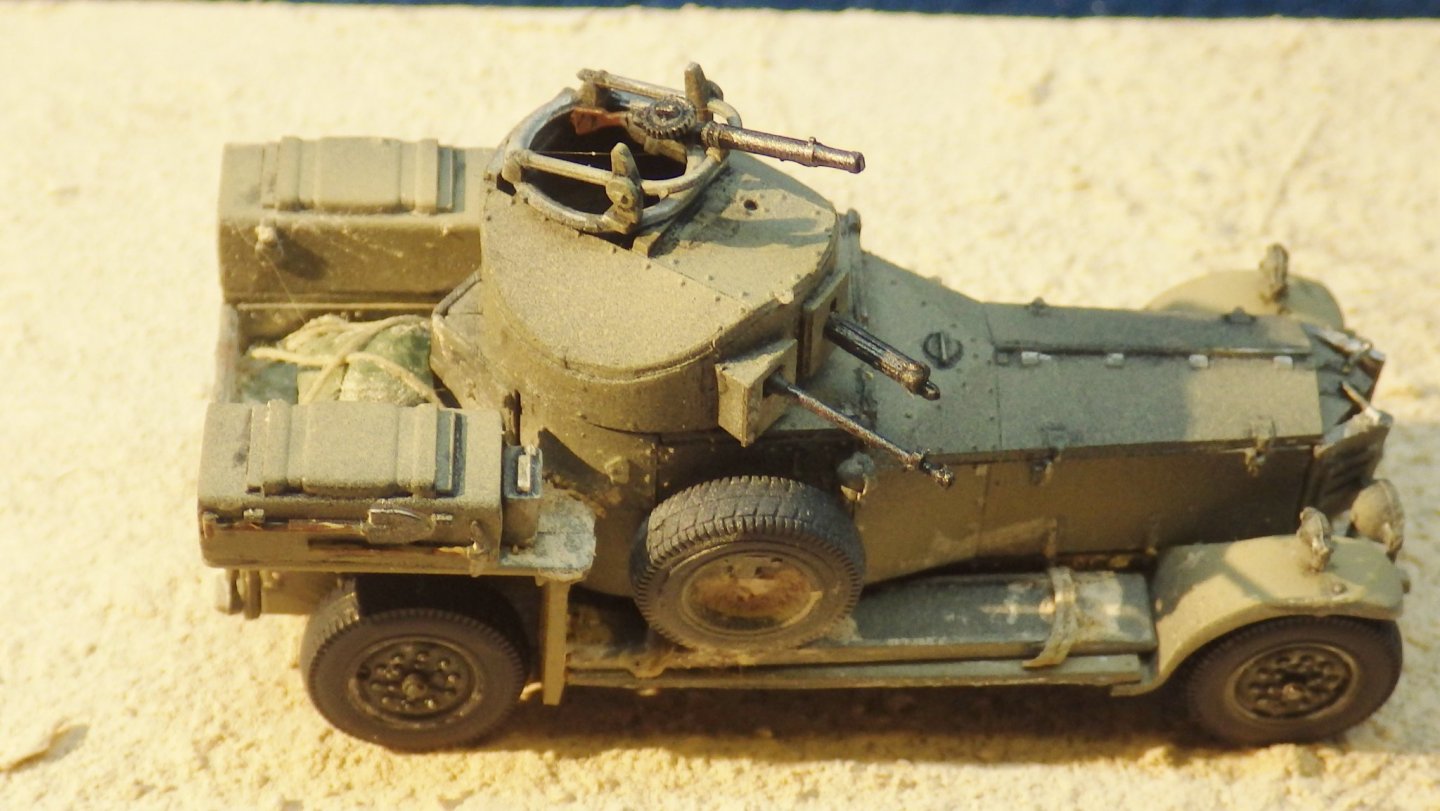
Back on topic today. Yesterday I was playing around to see if I could make convincing representation of the sand that gathers on surfaces not blown clear by travel. I made a mix of PVA glue and water which I painted onto the areas I thought sand would be found. Then I added a spoonful of the dust from sanding the ceramic bricks used in the Aedes Ars models which was sitting around. I tapped the surplus off and dusted off any remaining excess with a stiff paintbrush. I like the effect; its a bit more three dimensional than just using paint but I think its easy to get a bit too wild with it. The tarped load was placed properly in the load bed and then the wheels were added. I was excited to find all four touched the ground. I gave the whole model a coat of matte coat. The 1/8 inch square styrene rod arrived today and I started making the flimsies again. Hopefully these will be better than the first attempt. I like this model enough that I ordered the 1/35 scale version from Roden to see how that builds up. Thanks for looking in Alan

- 92 replies
-
- 14
-
-
-
Thanks Mark. The Sahara is a huge place too. The area around the mountain is a maze of gullies and canyons. I doubt they have ever been fully explored in detail. Stuff keeps turning up out there like the P40 found in 2012 in Egypt. That was sitting on rocky desert so not even buried. In ancient times the area around the mountain wasn't desert. The cave paintings show lions, giraffes and elephants so it was probably savannah like Botswana or Kenya maybe. The ancient Egyptians got ivory and gold from somewhere and a very old trade route is evident leading south towards the mountain. Curiously gold has been discovered (or rediscovered?) in the last ten years very close to the mountain. So maybe a city is buried there somewhere. Its an interesting environment. It fascinates me that you can pick up an expended AK47 cartridge sitting on the desert floor next to a piece of prehistoric pottery or a stone tool. Alan
-
I'm experimenting with some weathering ideas which I'll show tomorrow but today I wanted to share the thread that brings a lot of the less known desert operations together. The tale of a lost city and the explorations to find it. Rumours of a lost city in the desert south of the oases were documented by European travellers in the 17th century. Several nomads looking for lost camels talked of ruins and treasure. There was even a gold and ruby ring in the possession of King Idris of Egypt that supposedly was stolen from the lost city and had been examined by experts who put the workmanship as medieval European style. No trace of the ring has been noted in recent times. In its most enduring form the legend talks of a city with white walls deep in the desert. A pillar by the locked gates has a sculpture of a white bird which holds the key to the gates in its beak. The city was called Zerzura In the early 1930s a group of mostly British officers started exploring the desert using Ford Model A trucks. The leader of the group was Ralph Bagnold (who is a story in his own right - if you ever want to learn how to fill a life full). In 1930 the Zerzura Club was founded to attempt to find the lost city and the cars were supplemented by Robert Clayton in his Gypsy Moth aircraft. From the air three oasis were seen in the shadow of the mountain on the modern borders of Libya, Sudan and Egypt. These became the focus of the subsequent explorations. During these expeditions they learnt the techniques of desert driving and navigation, learnt to lower tyre pressure on soft sand and to use sand ladders. Bagnold developed an accurate sun compass and eventually all three oases were explored without finding any trace of the lost city. Bagnold at least never believed there was a city down there but it gave purpose to the expeditions into the desert. The exception to the British members of the Zerzura club was a Hungarian called Laslo Almasy and it was Laso who found the Cave of the Swimmers in Wadi Sura in the vicinity of the oases. He was of course the basis for the English Patient. The swimmers are still there along with a host of other human, animal and mystical creatures. That is if they are swimmers. There are many interpretations of the meaning of the figures; are they really swimming or drifting through the afterlife. When Italy entered World War Two in 1940 and the fighting moved to North Africa Bagnold created and led the Long Range Desert Group. He commanded many of his previous expedition team mates in their reconnaissance and raiding sorties using their experience and skills to travel deep in the desert. Laslo Almasy joined the German Luftwaffe and led a brilliant desert sortie from Libya right across Egypt to the Nile Valley, couriering two German spies travelling to Cairo. The traces of his expedition, like those of the LRDG are still to be found in the desert. The tarp in the previous post is from the Almasy raid; Operation Salaam. No sign of Zerzura has ever been found and it is thought that the oases have never been occupied by anyone other than nomadic pastoralists. But high on the mountain above the three oases we found a cave with this picture. Doesn't that look like a ruler with a crown and a subject kneeling in obeisance? I promise to be back with the Rolls tomorrow Alan
.jpg.f64f2b7fd6d21f51e4907098584aabee.jpg)
.jpg.e78cb294e444bd11129825942f73b01a.jpg)
.jpg.c60def8e2d95e869178ebacdbcbfdbef.jpg)
-
The PE really looks nice. Railings and ladders always make a great difference. You are getting it very tidy even under the cruel eye of the camera Alan
.jpg.ac50b70cfcb8da4bc960495056159c69.jpg)
.jpg.11a3d122cedfc362679ae4fc516a2fb9.jpg)
.jpg.f7c2a4957e0f9ba3c5ddb8b76b56e2a3.jpg)
.jpg.a83dd8b127c0e57a207e2a22260c704f.jpg)