


king derelict
-
Posts
3,295 -
Joined
-
Last visited
Content Type
Profiles
Forums
Gallery
Events
Everything posted by king derelict
-
Mike, that is absolutely superb. The water base really makes the model stand out. The water effect is beautiful especially at the stern Alan
- 179 replies
-
- 3
-

-

-
- hatsuzakura
- pit road
- (and 2 more)
-
Great to see a favourite build log back in action. Always something. I spent hours looking for a piece of the Wasps radar assembly and still haven't found it Alan.😆
-
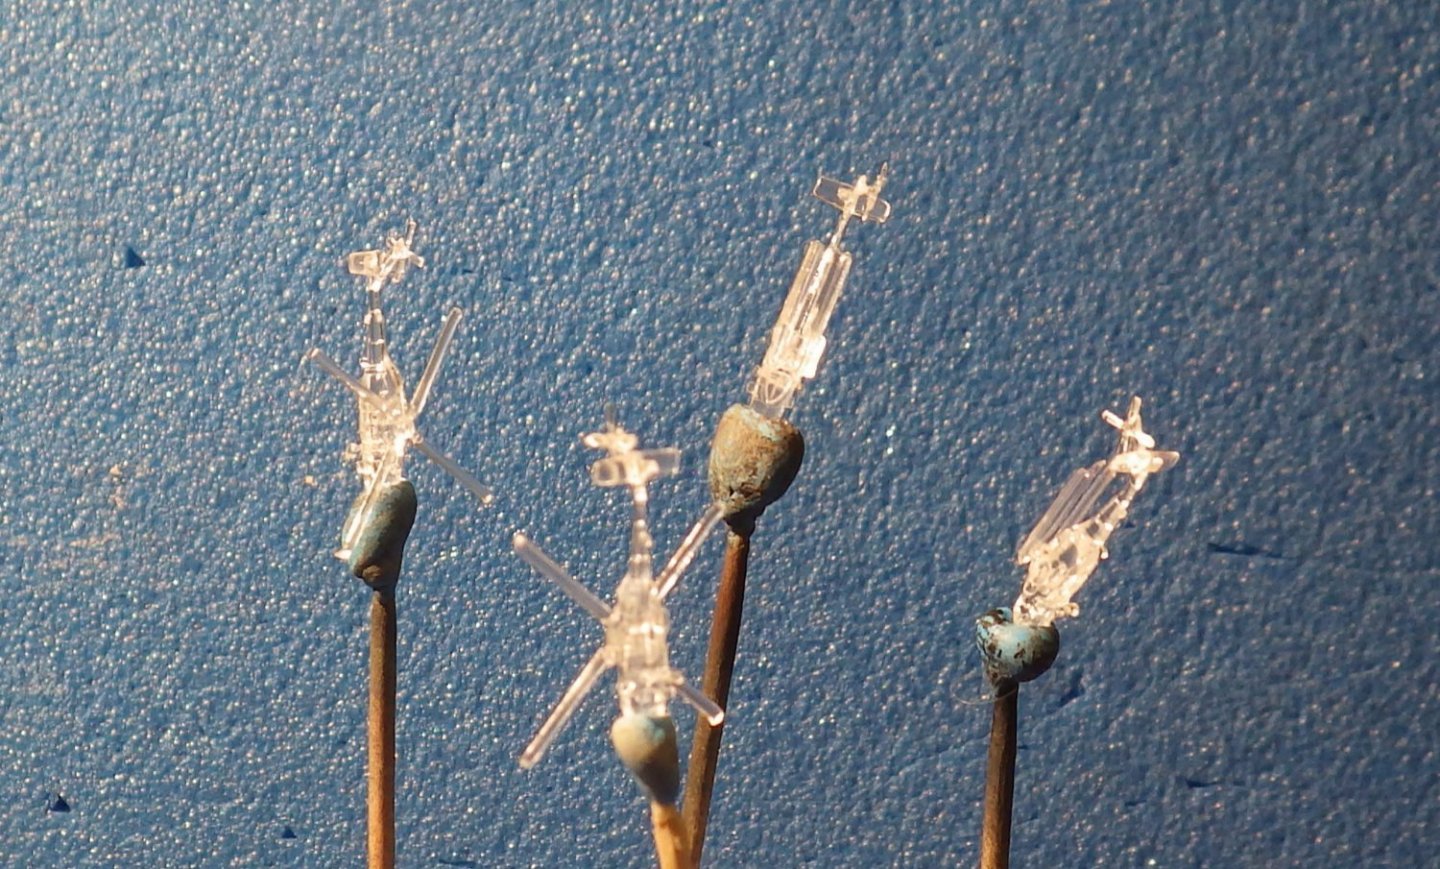
The Wasp build moves forward slowly. Partly this is me trying to work out the sequence of work. It seems harder than usual on this model especially with the island. Do I add the PE railings now and risk handling damage or add the structures above the main parts of the island then have to thread the railings through the structures? Even the decals need careful thought. I added the warning markings for the Sea sparrow and CWIS at this early stage becuase i can't see how I would put them down later when the railings and details are added. Hopefully the clear coat on top of the decals will protect them as the build continues. Earlier I had a bit of excitement while painting some of teh detail on the fantail. I like to base the model assemblies so I have something to hold in my stubby fingers instead of damaging or marking the parts themselves. I ran out of my usual double sided tape at the weekend and used the Amazon version for the first time. Unfortunately it does not have the grip of my usual tape and while tilting the hull to paint it the hull detached from the base and landed on the tile floor. Everything seems to still be in good order and some stronger grip tape has been ordered. In the interim I'm using the Amazon tape with duct tape on top of it sticky side uppermost. That seems to be effective. The first of the railing have been added. My earlier comment about the part number marking on the Eduard frets turns out to be incorrect; thankfully. The flat grey paint revealed small part numbers etched into the fret. The kit provides clear parts to make four SH-60s, two with folded rotors and two with the rotors extended. Five parts make up each helicopter. I plan to use all four and I need to place one on the hanger deck before the lid goes on so I made all four at this stage. A lot to do to the island and deck next Thanks for looking in Alan
.jpg.237018138ed053510255499c58d94815.jpg)
.jpg.95bbc125d3733543e38edb4c13d4eb9e.jpg)
.jpg.9152f34fd50625b7c0cba09739a05583.jpg)
.thumb.jpg.7e8e23ee75f36e2af9f8165867bd1362.jpg)
-
A small weekend update. More masking of the PE to leave the catwalks the darker anti-skid and then pain the lighter railings and structure. I'm probably going to lose some paint when I pull the masking tape off but hopefully not too much. I put the first coat of colour onto the hull. I may add a little shading; its a bit flat. The side decks came out quite well. I will add a wash before putting the PE in place. A crane and RIB go into the aft side deck so the back wall won't be too visible. The stern details now need to be worked on. Some PE to go on, probably after the flight deck is installed. It should all still be accessible I put a coat of gloss onto the flight deck ready for the decals. Getting the lines and landing spot crows feet is going to challenge me Thanks for looking in Alan
.thumb.jpg.50613ee40d2772ed253a53cfaa5a1f48.jpg)
.jpg.333b1a5f6e2d73168e5d861821572620.jpg)
.jpg.4615ded92a7acf8ce5a6a16b33c8fb56.jpg)
.jpg.3ffa054fc95329bdd1fef89b5103d975.jpg)
(1006x1280).thumb.jpg.d15f91e3d696816e286b0d1b47fb6fcb.jpg)
-
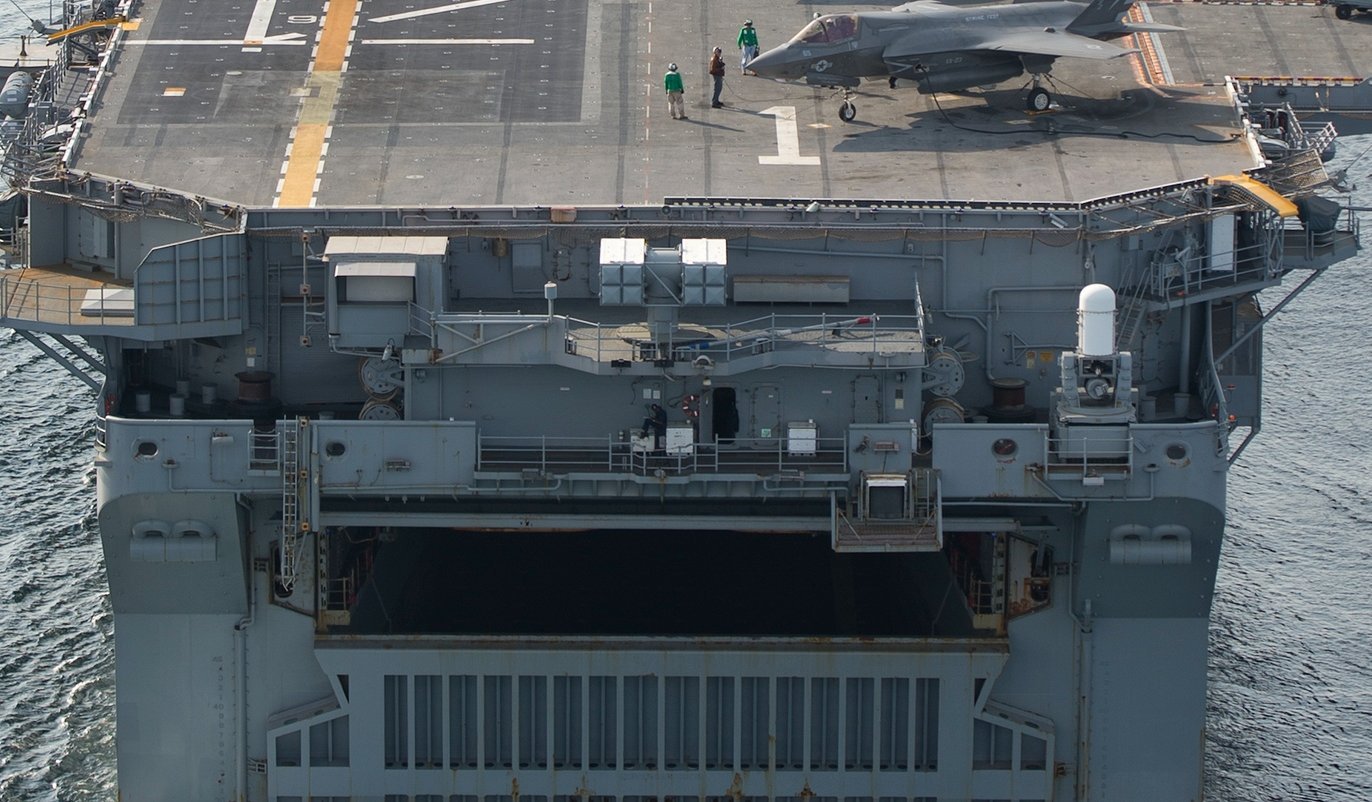
I'm in the middle of mass painting. I think everything has now had a coat of black primer. The deck has had its main colour applied and the anti-skid colour has been applied to most deck areas. The PE sections for the catwalks has both the deck and railings in one piece that is folded to make the completed part. So after painting the deck sections I had to mask them in order to paint the lighter railings. It worked out fairly well although the tape did pull some paint off the brass and had to be touched up. I've not had a problem with losing paint off PE in the general way of things but this is the first time I have masked PE. I need to get a metal specific primer possibly The flight deck was masked to spray the Thermion patch at landing spot 9. This wwas installed on the Wasp because of concerns about the degradation of the deck because of the heat of the F-35B exhausts during VLs This time the masking worked very nicely The island in its current state of construction was masked and the light grey air brushed on . The build is getting interesting. A lot of PE now needs to go on. The flight deck needs to have decals added and exhaust sooting. The hull still needs painting and detailing. I hope everyone has a great weekend Thanks for checking in Alan
.jpg.33f9d3d0d14c603c8e42668d055a815e.jpg)
.jpg.d85f931c70c23063d0a505df44ae77fb.jpg)
.jpg.dc2cd0d1bcf8015109d43ca991d9be33.jpg)
.jpg.3de2407648efd0a9becd1da653da6f0d.jpg)
.jpg.32bd936d450835975e6df4573fab9a92.jpg)
.jpg.6d9a1fed7ae0a603a6b37d0c8e3556b3.jpg)
-
Thank you sir. I hope I get through the PE install without too much mayhem. There is a mass of railings to add. Alan
-
Mike No, the girder PE for the elevator is from the Eduard upgrade kit. Hobby Boss doesn't provide railings either so I think the Eduard add on is important to detail the kit nicely. Alan
-
Yves It looks spectacular. I need to stop procrastinating and get back to mine. I don't think I will attain the heights you have reached but it is still a great subject to work on. You provide a lot of inspiration. Alan
- 321 replies
-
- 4
-
-
- Finished
- Flower-class
- (and 1 more)
-
Not much of a visual update today. I finished adding all the watertight doors. I seemed to need three more than called out in the PE instructions and I also needed an extra ladder. I made up the basic framework for the elevators. The thicker PE made folding the girder sections much easier. and they were robust enough to make several attempts at getting a good fit. I will add the nets etc when they are on the hull/ I plan on up and one down. The rest of the day was spent putting down the black primer on everything. That used up the last of the Vallejo black primer (the bottle has felt like it was almost empty for a month or more). So I finished off the priming with black Mig One Shot Primer which seemed to go on quite well. Next task will be painting the deck and hull Thanks for looking in Alan
.jpg.a244e4e49f1299312338e75ed5709e8e.jpg)
.jpg.a9d376bd788744302f434ca8fd42f1b5.jpg)
-
Thanks OC. Its going to be a challenge but so far so good. The PE is very nice to work with too. I hope you have the bathroom renovation under control; I look forward to seeing the Hood back underway. Alan
-
Progress although very slowly. I am realising that with a lot of good photographic documentation I am cross checking a lot of the assembly instead of assuming that the kit is correct. That is slowing me down but it is interesting and so far Hobby Boss seem to be on the money with the Wasp. I came up with a plan for the build. I will add basic (flat) details to the hull and the island and then paint the hull colours and the deck non-skid surfaces which will then be masked to allow the superstructure to be painted. Details will then be added. The deck will be painted and decals applied before being installed on the hull. We will see how this works out. The Eduard PE provides a huge amount of railings which I'm hoping will really improve the model. The radar arrays are almost identical to the kit PE so second chances are available. So far both kit and Eduard PE has been nice to work with. It cuts out of the fret nicely, bends crisply and it seems to have very little spring. Watertight doors are provided in various sizes in the Eduard frets and are very neat. I added the doors to the hull and the fantail along with the Sea Sparrow and the two CWIS In the photos I noticed that the Sea Sparrow launchers have structure between the two sets of tubes which was lacking in the kit part so I used 2mm lengths of thin wire to replicate the braces. The photo also shows the upper gate to the wet well to be in the raised position. I have gone with that although it does then reveal the false hanger deck but I am hoping that the black paint will hide it. If not it will be set in the lowered position. The basic structure of the island has been started and the watertight doors are mostly installed now I have started on the radar arrays and they have gone together well so far. This is turning out to be a very enjoyable project; especially being able to work off the photos as I move along. The instructions, both kit and PE, are a bit vague and the photos are a great resource for working out the final positions of some of the parts. After fitting the last watertight doors I think it will be time to wake up the air brush. I have one minor issue to resolve before then. The Eduard PE has the part identifying number printed on the fret rather than etched as I have seen in other kits and after market frets. If I primer and paint the frets I will lose the identification of the parts in the fret. I am going to try to photograph the frets and see if that captures the numbers. Thanks for looking in Alan
.jpg.18e30393b276ea124021bb7b411759b9.jpg)
.jpg.f28f3b940322c3d854f8feffb4736a48.jpg)
.jpg.da416e5ce9df53fedc74b19d5ba17637.jpg)
.jpg.5c61531a538366e0b1c7260731b7dc80.jpg)
.jpg.6792104f255364ed98fd1972e8b2ffc7.jpg)
.jpg.600f17830f5555ae833999bd329faab5.jpg)
.jpg.c18f9c3d0230583ff06d5d1cecfd4c6f.jpg)
.thumb.jpg.66bc759611d39199a219b3ccb0b5d127.jpg)
-
The engine frame looks very effective. Very tidy too Alan
-
Wonderful work; absolutely no hint that it all started as a flat sheet of cardboard. Alan
- 130 replies
-
- 12
-
-
The first uncertain steps of progress were made today. I cut a card template for the hanger deck and then glued the side decks and elevator door portals into place. The deck template was then modified to fit against the elevator door portals The pattern was then transferred to a piece of styrene sheet and glued in place. I also added the basic parts of the structure at the fantail. I thought about adding some basic side walls and the forward bulkhead to the hanger deck but a check with the lid on showed that it will be very dark on the hanger deck and even the shapes of the SH-60s might be tough to see so I think it would be a wasted effort. The check with the flight deck turned out to be useful because it showed a poor fit with the top of the aft structure; the deck was about 2 mm too short as it was assembled. Luckily the glue was still soft and I was able to separate the parts and shave a small amount off the two side walls. Reassembly and check showed that the deck now covered the edges of the walls There is a lot of PE to add to the hull now and the decision is going to have to be made when to stop and paint and then add the delicate stuff afterwards. This looks like being a great kit to make. I'm enjoying exploring what I can do with it. Thanks for looking Alan
.jpg.eeb6446d9bba0a06d1f3583054ef436c.jpg)
.jpg.8f23fdc9c039fc500adcbab152231caf.jpg)
.jpg.c92347a80318918af9e0da1ec9fd0b4a.jpg)
.jpg.878ca1395199f4519d05f6f11c9d233e.jpg)
-
I like the idea of painting the tram line; it would be easier to get teh right amount of dirt on it but there are two white checked lines running along the edges of the main yellow line that I think would defeat me so i might have to work with the decals and hope i can get the sooting right Alan
-
Not a lot of progress today; maybe some reverse progress! In thinking through what I needed to do with the hanger deck and the elevator doors I realised I have got ahead of myself a bit so i took the roof back off. Luckily I had only tacked it down lightly to see if the warp had been successfully corrected 9it had) so ! was able to remove the deck without damaging anything. I spent most of the rest of the time moving parts around on the bench trying to work out the sequence of building and painting. The side decks are boxes with detail and a number of PE parts. The elevator doors are also fitted from inside and will require some PE. So do I make up and paint the side decks off the model and install them before putting the deck back on or add them at the start and paint along with the hull and then detail later. I need the side decks and elevator portals in place to make up the hanger deck and the side decks should still have decent access when added to the hull. I plan to paint the side decks a darker grey than teh hull to improve the look of depth but I can mask the hull to do that provided I do it while the hull is still fairly basic. . I spent a lot of time reviewing photos of the real Wasp and comparing it with the kit. I haven't found any glaring anomalies. I thought the boat stowage on the port side was wrong but eventually found a photo showing it to really be there. With the Eduard PE this should make a very well detailed and representative model. I hope i can do it justice. I think I will be going for a lighter grey for the flight deck than given in the kit paint scheme. The anti-skid on the deck has become quite a bit lighter with time so I will use a mid grey. This then gives me scope to use a darker grey for the patch at the aft section of deck and also to add the exhaust marks on the tram line. The deck decals are going to have to go on fairly early because the deck edges are going to get delicate once the PE starts building up. Hmmm, this is going to be a complicated build to think the sequence through; it almost need a project chart to be created. Thanks for looking in Alan
.thumb.jpg.50c2af3ce1db78fbff14f069c3cf9348.jpg)
.jpg.ef89409042639395042afe4a1de43a93.jpg)
-
M29 Weasel family 1/72 (scratch) by Backer Finished
king derelict replied to Baker's topic in Non-ship/categorised builds
This has been a great project to watch coming together. beautiful models and outstanding work Alan -
It is a wonderful inspiration. I am starting an Aedes Ars kit of Loarre Castle. It is a very modest effort by comparison but I will try to improve on the kit. Alan
-
Great decision to correct the diagonals. I suspect paint and shading will obscure any flatness of the tubes Alan
-
A great start; really forging ahead. And I'm excited building something twelve inches long! Alan
-
The matte coat was sprayed onto the tank and some of the ceramic brick dust mixed with dilute white glue was worked over the tracks to simulate sand (and reduce the poor appearance of the tracks) The chipping needs more practice but I'm happy with a first attempt And to put recent AFV builds into perspective here is teh JS-3 with the Renault 35 and the Wz34 Help - Run! Thanks for stopping by Alan
.jpg.80733e0f020c0e92c5ab011b2ad2a2ad.jpg)
.jpg.ad405c8eefc2262270a0ef12d773ccd4.jpg)
.jpg.9dff35cb03c24be147d463c29a20c00a.jpg)
.jpg.7700afc5c2d5a8eb79fd24cec8cad9d8.jpg)
.jpg.c981979cfc4290ddf1b110ef58f26013.jpg)
.jpg.9e9610417217d506406b1cc96c808e54.jpg)

.jpg.81d19140f937870f4f37f93fb9a8561e.jpg)
.jpg.b423d8002b5c69e7f5f57446a1e6aaa9.jpg)
(1006x1280).jpg.b914b3e9e1be92c4493508e73addaf7e.jpg)
.jpg.0819cea6dc4deb7c0a7fbef29ccd6627.jpg)
.jpg.3e9947b533ac619c9b6a03e2400db98f.jpg)