


king derelict
-
Posts
3,295 -
Joined
-
Last visited
Content Type
Profiles
Forums
Gallery
Events
Everything posted by king derelict
-
Thank you Mark; the hair dryer was a great idea too Alan
-
So; the box is open and bits are starting to appear on the table. I have the Eduard PE set for the Wasp and started comparing frets. The kit PE is on the left and the Eduard stuff are the two frets on the right. Looking through the Eduard set it provides a massive amount of railings. It also has coloured parts and its a bit thinner than the Hobby Boss stuff - but nothing like the thinness of the Flyhawk frets. I think I will mostly use the Eduard parts but time will tell I spent quite a bit of time with the administration side of a new build. Checking the instructions, cleaning up the work surface, making sure there were adequate supplies of tea and biccies. I went through the kit instructions and marked on all teh places where i will have to add the Eduard PE I also checked the paint scheme and found the dark gray is called out as Tamiya XF-58 which I don't have. Further examination found that XF-58 is actually Olive Drab so I will check the other paint references for a cross reference to the real colour. This is bigger than my usual stuff so I'm going to have to be careful moving stuff around on the work top. I'll be making a waterline model as usual. The kit doesn't provide a waterline plate but I don't think that is an issue. The starboard aft part of the upper hull is warped but it looked like it could be forced into place. The kit instructions have you build up the island add it to the deck, detail the hull and then add the deck. That seems pretty marginal at the best of times and definitely high risk to the delicate stuff if some controlled violence is needed to fit the deck so I added some plastic strip to push the starboard hull into place and when that was full bonded I installed the deck and clamped it down. Hopefully that's the end of the rough stuff. Although the elevator doors and the side decks are installed from the inside, I think there is enough access still to not be a problem and I needed the hull straightened so i can add a bit of the hanger deck. I think I can add enough of the hanger deck in the vicinity of the elevators to give a shadowy view of a couple of SH-60s in maintenance. Thanks for looking in. I hope you enjoy the build Alan
.jpg.29d009b32a82fbb0d65bca650bfa397d.jpg)
.jpg.faeb782be37d7ba510f14732a891448f.jpg)
.jpg.ba755caa60953bdc85dcc8c9023c9655.jpg)
.jpg.b235c19d166988a23f1b838a2bb778c7.jpg)
.jpg.94ba3cc1e87b82bfa16c4ec43dda0ec6.jpg)
-
Mike; yes this one is going to take a while but it looks interesting. Looking at the kit PE there aren't many railings but the radar sets are good. I hope I can make a decent model out of it. Alan
-
Thanks for the moral support OC. This might take a while; lots of PE and detail parts. Make sure you have a comfy chair Alan
-
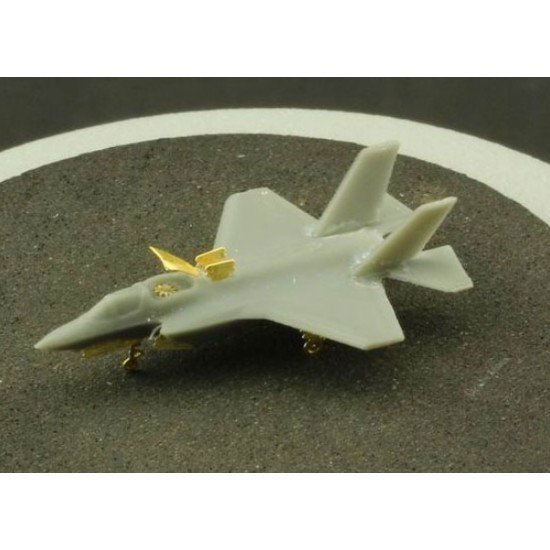
Enter the Gator Navy! I want to build the USS Wasp (LHD-1) as she was in 2013 during the second F-35B carrier flight trials. The first deployment was in 2011 but I don't have as many photographs from that one. I have the Hobby Boos kit in 1/700. The big box is well packed with a lot of sprues including three sheets of PE. Incidentally I checked the PE because it has some real weight to it unlike the Flyhawk PE with the Lance kit. I miked the Flyhawk PE at 0.0045 inches thick and the Hobby Boss stuff is 0.012 inches thick The kit includes V-22s, Av-8Bs, SH60s, CH53s, UH-1s and a full set of expeditionary vehicles. Sadly the stern gate to the wet well is closed so the vehicles could only be used in a diorama setting. For 2013 flight trials all the expeditionary equipment was ashore along with most of the usual air vehicles. Two F-35Bs were aboard along with a number of SH-60s providing SAR support. From time to time V-22s visited so I can use one or two if they make up nicelt. I put an order in with the nice folk at BNA Models in Australia for the F-35Bs. They look very nice (Orange Hobby), the level of detail the PE provides is amazing and I hope I can do them justice. There are six in the set so I have some scope for learning There is no hanger deck so the elevator doors will have to be closed unless I can make up something in the area around the elevator doors. I want to pose one jet on the elevator and one of the deck but we will see how the plot develops I hope I am not about to embarrass myself I hope you enjoy the build and I look forward to the helpful comments Alan
.jpg.9b694939afa67dcd89a69319c4deb487.jpg)
.jpg.57283b14381c584e1ae31dc6a078e457.jpg)

.jpg.d3995c9befa137d6f1b04804227cc45d.jpg)
.jpg.bcd126957496506f0338cefe494f9417.jpg)
.jpg.6a29e0c447bd2b6c3ed8e4c425c8547c.jpg)
-
Thank you very much Mike, I have Kelly and Legion to add to the destroyer fleet at some point Alan
-
Thank you very much OC for your kind comment. Thank you also for the tip about the railings. I will try the black railings when I add the last strip and generally touch up the paint. They are barely noticeable now and the black will blend them in further. Thanks again Alan
-
The last detail; the rolled tarp, was added to the rear of the tank and a little more dust added. This completes the build. I also added the photos of the Wz34 armoured Polish car also by First To Fight which was being built in parallel. Nothing special about the build; very similar to the other kits but an interesting subject and fun to paint. Thanks for looking in Alan
.jpg.de7e0d5a8d01008311658449d642c912.jpg)
.jpg.28612e16d09f5c99ae7cce73d835efe6.jpg)
.jpg.00025d2a403849480bd4c99ec6114cc3.jpg)
.jpg.125ddec661202642aec1011205cb77be.jpg)
.jpg.127e1483988c85fbc46fa5537e91b33a.jpg)
.jpg.d259e24b24ec114228833b24e163b7eb.jpg)
-
I tried using a hair dryer on the nasty tracks. Thanks @mtaylor I wouldn't have thought of that. I couldn't get much sag in the tracks but I think I got rid of a lot of the wobble and they generally look better now. I filled in the gap where the tracks meet with a couple of tiny bits of card and built up the thickness with PVA glue. it looks better with a bit of paint. The running gear and lower part of the hull were sprayed with a dust colour. Some sand on the tracks and the matt coat will complete the build. This wasn't really a detailed build log but more an attempt toshow the results of a first shot at chipping. Thanks for looking Alan
.jpg.c0f6ddc565b12255619774914718b6e5.jpg)
.jpg.958319c7282da11ffc5b4a28a8ead69e.jpg)
.jpg.2a16900d0af6167079f7148789329ef5.jpg)
.jpg.46116c47e3e5d0daa8a95ee03d9e3d4c.jpg)
-
Thank you Greg. From you that is highly valued. I finally got the colour cast out of the photos and they look like the real model. Alan
-
This kit was chosen as a first attempt at paint chipping to simulate a weathered vehicle. The Roden JS-3 kit has markings for the Egyptian army in 1956 so I thought by then the JS-3 would be well past the "One Careful Owner, Only Driven to Church Each Week" stage by then Unfortunately the JS-3 is not one of Rodens better kits; it also has the rubber band style tracks which I don't like. Somehow I seem to have lost the photos of the early stages of the build and the contents of the box. Nothing terribly outstanding in the build so far although I swear some of the road wheels are oval rather than round. Hopefully paint and weathering will obscure that a bit. The tracks are very thin, they look underscale and they are buckled and refuse to straighten . They may look better once the hull is completed. So; the main object of the exercise was the chipping. Once the upper hull and turret were complete they got the usual dose of black primer. I then added Vallejo dark steel in places where I wanted it to be seen and mid grey in other areas. Once that was dry I gave the model a coat of cheap hairspray and left it to dry again before adding the sand top coat. My reading suggests that working over an area with a wet paint brush will cause the top coat of paint to lift away in pieces. That didn't seem to happen but moving to a stiff brush was more effective. I also used a pin tip to scratch through for detailed areas. I seem to have achieved a worn look but I don't think I would catagorise it as chipping exactly although working small areas over with a pin tip first produced a better result. Its starting to look suitably tatty but I would like to improve my technique. Online sources say that it can only be done with acrylics, can't be done with acrylics or must have a clear coat to seal the paints under the hair spray. I would welcome insights from the experts. In the meantime I painted the nasty tracks. They lack detail and thickness. I hope to hide the track join with some artfully placed debris Thanks in advance for any advice. its all welcome. Alan
.jpg.2e0f15076f97fda0520379983aeca4ab.jpg)
.jpg.09dfb09e8eeb345cdbb28dab02f6e3ff.jpg)
.jpg.041c78ddd94b63703bc480f891f8ffd3.jpg)
.jpg.231828c2f26343e61efccaa431f0c4a6.jpg)
.jpg.b01213dfb49ab6c21a78c33337137ff6.jpg)
.jpg.89f099694728f70d565ad862f3679637.jpg)
.jpg.74975bea8f816bb26cc66db399f7f1e7.jpg)
.thumb.jpg.88521e4dcce48aa95fc96b491c3c6180.jpg)
.jpg.00780cd7fa1b041ec506d0519877596f.jpg)
-
The last boat was added and then the PE rails started. I cut the runs into shorter sections and then attached them using Gators Grip glue. I give it glue a few minutes to tack up a bit before putting the railings into place. I have found this way makes the railings a much less frustrating experience. However, I found my lousy planning skills let me down again. Early on in the build I found one of the railing sections was breaking away from the fret and knowing if i left it it would end up damaged, I decided to cut it completely free and keep it out of harm's way. And i forgot all about it when painting came around so its sat there in its native brass colour. I don't feel like loading teh airbrush up with primer and then grey for one strip of railing so it will sit in abeyance until I start the next kit and hopefully, I will remember to paint it then. In the meantime I added the booms and the decals as well as a wash to the funnel. I'll do the weathering once the last railings are in place and the touching up is complete. Thanks for looking in Alan
.jpg.bfe251fb9a9f83cfbef041e8879fe08a.jpg)
.jpg.3b47b0643f4d82cf5c76f4c190ed1ac4.jpg)
.jpg.7f6c5d064df1582300f92b05651517a8.jpg)
.jpg.7535f0ff1aacf3af96cb4b14a6ec65ba.jpg)
-
After i finish cleaning the airbrush I spray a small quantity of cleaner into a paper towel in a good light against a dark background and look at the spray pattern to make sure its symmetrical and strong. Then I can put the brush away knowing its good to go for the next session. If the pattern looks weak then I pull it apart again and poke the nozzle out again. It doesn't take much to obstruct the flow. I'm sure water would be just as good for the post clean check. its reduced the annoyance of loading the brush up and finding its not spraying well Alan
-
Detail painting is almost complete. The black oil paint wash has been used on the running gear and the panel lines. I added the decals; I would have liked to make it as a Polish tank but the decals only allow for a French one. Then a light spray of dust and dirt. A few last items to tidy up and this nice little kit will be complete. Thanks for looking Alan
.jpg.760a5a5dfdc6113ae578767e3dbbd421.jpg)
.jpg.5623a4ebd32d172c19d11d74a488d0cf.jpg)
.jpg.70b5de4431bf05493a00169a09045b79.jpg)
.jpg.f8c4b1460eb230d64607b616f5465682.jpg)
-
M29 Weasel family 1/72 (scratch) by Backer Finished
king derelict replied to Baker's topic in Non-ship/categorised builds
Patrick Beautifully made models. Congratulations Alan -
It definitely helps. I spray in the garage. I just made a first attempt at hair spray paint shipping and the garage stinks of cheap hair spray. I'm glad I didn't try that in the house. Alan
-
I find the Vallejo black primer to be good at blocking the airbrush nozzle. I try to quickly get cleaner into the brush as soon as I've finished painting to dilute it and then really clean the nozzle. I'm going to try another primer next but I do like the coverage from the Vallejo. Alan
-
I've had a few scalpel blades snap when cutting PE. The magnifier do double duty as safety glasses. Your PE looks really tidy Alan
- 33 replies
-
- 4
-

-
- tamiya
- king george v
- (and 1 more)
-
While the paint dries on Lance I started this simple but interesting AFV kit; the Renault 35 tank by Polish company First To Fight. As with the other kits of theirs that I have built instructions are confined to a diagram on teh bottom of the box and the box art on the top is generally just as useful. There are not a lot of parts but I tend to be using these kits to improve my painting and just for the interest of the unusual subjects. A little background from the web Designed from 1933 onwards and produced from 1936, the type was intended as an infantry support light tank, equipping autonomous tank battalions, that would be allocated to individual infantry divisions to assist them in executing offensive operations. To this end it was relatively well-armoured but slow and lacking a good antitank-capacity, fitted with a short 37 mm gun. At the outbreak of the war, the antitank-role was more emphasized leading to the development and eventual production from April 1940 of a subtype with a more powerful longer gun, the Renault R40. It was planned to shift new production capacity to the manufacture of other, faster, types, but due to the defeat of France the R35/40 remained the most numerous French tank of the war, about 1685 vehicles having been produced by June 1940. At that moment it had also been exported to Poland, Romania, Turkey and Yugoslavia. A set of decals is provided but only for the French version An interesting element is the rear wheel. Several versions are provided although only one is referred to. The diagram doesn't give any hints but the struts in the wheel rim have to be cut out and then the appropriate wheel filed to fit the centre. Construction went nicely after that until it came to the side hatches for the turret. They are supposed to be on the sprue shown at the bottom of the photo but something obviously went wrong with the moulding process and there are two sets of small blobs. I made replacement hatches based on the box art from bits of shaped styrene. The usual black primer and then shaded coats of sand and then masking for the olive green. Its quite an intricate paint scheme and I didn't get it exactly right but it captures the spirit I hope😄 I left the turret hatch partly open. Apparently it was intended to be set fully down for the tank commander to sit on The masks came off and I'm fairly happy with the way it came it out. The tracks were painted up with a background of dirt and rust and steel on the running surfaces. Oil washes have been added to the running gear and then they were fitted to the hull. Deatil work and washes on teh hull and turret are next. Thanks for looking in Alan
.jpg.c913f66250092dc2537291190d3666f7.jpg)
.jpg.ef90ba0b9fd51ac6fd5db883206bc67c.jpg)
.thumb.jpg.aef7824886882afd559b6ee39ec0e16e.jpg)
.jpg.f0eac9e4b6b7b3b8f6ae24a4a5a9a1d7.jpg)
.thumb.jpg.96766018217830699a371f72bd5988c3.jpg)
.jpg.afd0d684a1bb9d2495719f692b9542c6.jpg)
.thumb.jpg.e76ab06c78e6d81898cefd610d55e969.jpg)
.jpg.fc9f06eec7ae25ea70dee9de19c91ad0.jpg)
.thumb.jpg.d5adfa5f601204a5264661f830be7214.jpg)
.jpg.43087937b3f5bd778ee523afdc9e69b9.jpg)
-
Thank you for the kind words OC. I value them. Getting the davits and boats into place was a bit of a breath holder. I have seen In Which We Serve and I have the Flyhawk Kelly on the shelf to add to the destroyer fleet. Lovely little kits. Alan
-
Slow progress I'm afraid due to really poor planning of the flow of work. Most of the time being lost waiting for paints and washes to dry. The last major jobs before the railings were the boats and rafts. With the superb example set by @Old Collingwood with his boats for the Hood i felt I had to improve my game if I could. The rafts were given brown washes over the tan planking. The highlights on the sides are still a bit bright but the final washes will subdue it. The rafts were fitted.on the racks with Gators Grip glue The davits for the boats were made up with the PE ladders (which will be virtually unseen in the final assembly). The boats were detailed with black and brown oil washes And added to the ship At this point, ready to move to the railings I suddenly realised I had a boat still on the sprue. There is a fourth boat that lives on chocks on teh port side and I had missed it. That will now be painted and detailed. Thanks for looking in Alan
.jpg.3983335fd5a417d7a3ec1848a67d7839.jpg)
.jpg.2810e2ddb20d69324f27dae5b5a8a905.jpg)
.jpg.c80345efb302f37f4d8c978bd970eabb.jpg)
.jpg.4dcba6b5bdc645926c7d93bc0b765eec.jpg)
.jpg.262e3ab98af5becb3deb263c72ea9ec6.jpg)

.jpg.ca1bb5b7cfd91148eac4b74c6357b915.jpg)
.jpg.c083b2e1d4a1cfbf4f28164976d72af6.jpg)
.jpg.d7a28ad1575c2c4e067a3ec15535a484.jpg)
.jpg.7e0052329a092c2c04e78e4114ee6b0f.jpg)
.jpg.4fdf2d31a5bd558e32d1fcbb2c9b8038.jpg)