


clifforddward
-
Posts
112 -
Joined
-
Last visited
Content Type
Profiles
Forums
Gallery
Events
Everything posted by clifforddward
-

What grit for disc sander?
clifforddward replied to clifforddward's topic in Modeling tools and Workshop Equipment
Thanks folks, exactly the type of information I was looking for. While there's lots of variety in exactly what grit people are using, it does seem that most are using a medium grit for general forming on the disc sander then a fine grit for finishing, primarily via hand sanding. This seems to make a lot of sense...I'll plan my tool selection and actions accordingly. -
What grit do folks use in their disc sanders? I see Jim Byrnes sells 80, 180, and 320 grits on his site for use with his disc sander....seems to me that 80 grit might be more aggressive than needed for forming small pieces, and the 320 grit while great for a nice finish could have a tendency to burn if one is not careful. That would make 180 the obvious choice. Am I right on this, or am I missing something? In reality it seems the best option would be to have more than one grit available, does anybody have multiple disc sanders in their shop or do you have multiple plates and switch grits depending on the work at hand? Looking for some real and practical experience here from folks who have successfully addressed this issue...
-
OK Dan, understood...I'll take your suggestion on finishing and plan to use the Casey Blackening as you mentioned. I may even have some of that in my gunsmithing cabinet from a prior project.
-
Thanks for the details on your Birchwood Casey technique Dan...think I'll try that on some other brass castings I have to see if I like the look...the "Bronzey" color sounds promising.
-
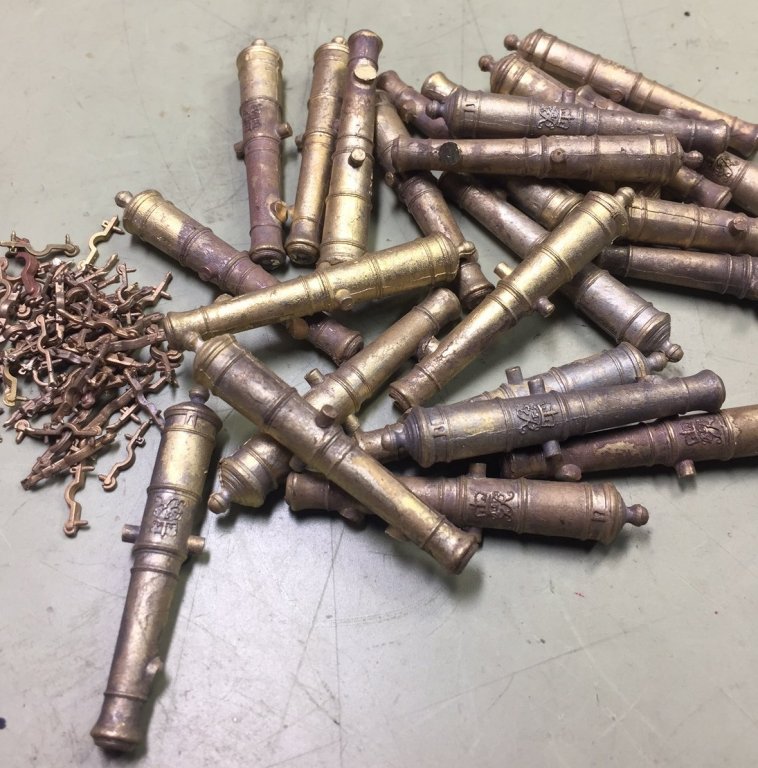
No instructions, but as I've worked with lost wax castings in the past for model railroading activity it is a pretty simple process...file/sand away the flash and gates from the casting process, then I like to use a fine airbrush type sand blaster I have to provide an even "tooth" to the part before either painting or blackening....For these, to accentuate the detail, I'm considering a darker base coat with slightly lighter color overall via heavy handed dry-brush technique...not to the degree that most plastic modelers do it, just a very slightly lighter dark paint to add in "texture"...and then a tiny bit of lighter color via gentle dry-brushing to add in highlights: basically painting in sunlight....I may be describing it horribly, it's really easier to do than describe and involves building up several increasingly lighter layers of paint to add dimension to the cannon.
-
Hi Dan....want to thank you for the lead on obtaining cannon from Alexey Baranov in Ukraine. Time from first email to receipt of the 20 cannon I ordered was 9 weeks, a perfectly acceptable timeline for me considering the "cottage industry" nature of Alexey's operation and matters relating to our two countries/shipping/customs and the like. All in all a very pleasant experience. He has some similar sized English cannon as well as some beautiful French cannon that I plan to purchase over the winter for future use...I have my eye on building a couple of American Revolutionary War and War of 1812 era ships where other sizes of English and French cannon would be appropriate. With exchange rate and shipping factored in the cost of these cannon are higher than others I could obtain domestically, but still a minor cost of a ship build considering they are one of the few items to be bought in versus making myself from scratch. I have no passion at this time to learn lost wax casting, so I am happy to buy in these cannon from Alexey. Thanks again, Cliff
-
Thanks Mike...the #604 is not a shape I have in my toolbox...I can see why it would be useful. I'll have to add it to my list of tools to obtain...
-
Looks good Mike...I had been wondering how frames would hold up to riffler files. Which file shape did you find most useful?
-
Thanks for the heads up Jack....posting now altered as you suggested.
- 3 replies
-
- 4
-

-
- 4h leads
- mechanical pencil
- (and 1 more)
-
Good choice Joe....I look forward to hearing more on your results once you have received the mill and had an opportunity to try it out.
-
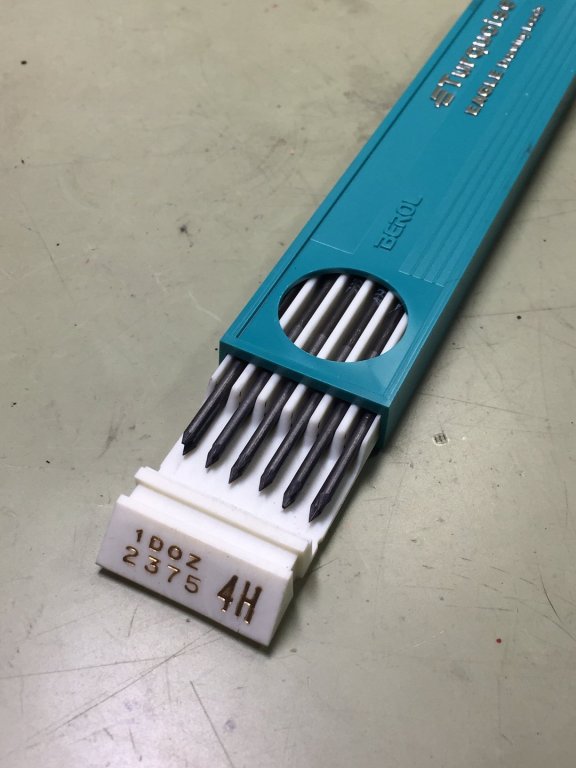
I recently came across a batch of 4H mechanical pencil leads (the leads only as used in "clutch pencil" type lead holders). This is the lead most often recommended for darkening the edges of wood and creating lines in planking and decking. Rather than just get a dozen leads for myself, I purchased the entire lot of nearly 300 leads...all in new, never opened original packages (One dozen leads per package) so I could pass along the deal to others here in the model shipbuilding community. Here's the deal for my model shipbuilding friends...price for 1 dozen 4H leads in original package as shown in the photo below is $6.50 postpaid in continental USA. I'll ship the package in a padded bubble envelope with a cardboard insert to keep the leads safe. I'm happy to ship internationally, but will need to know your country to determine additional cost for foreign shipping. Interested persons can reach me via PM and I'll provide my PayPal ID for payment. Best Regards, Cliff Cary, North Carolina
- 3 replies
-
- 3
-
-
- 4h leads
- mechanical pencil
- (and 1 more)
-
Thank you so very much Doug, much appreciated. This list will make my cutting task so much easier, now I know exactly how much of which wood I need to cut. Best Regards, Cliff
-
Thanks Doug, that would be great. All I need is the wood list...the framing kit I bought had a wood list in with the wood, hopefully your fitting out kit will have the same. I've got some Holly and Costello billets in route to me to cut wood from, just need to know the sizes to cut. I'm also considering Pear for some of the deck fittings... Look forward to hearing what you discover....thanks in advance for taking the time to help! Best Regards Cliff
-
Hello from Perth, Western Australia
clifforddward replied to Peter Bloemendaal's topic in New member Introductions
Welcome to Model Ship World Peter!...You'll find many helpful folks here on the forum and are likely to discover a ship modeler or two right around the corner from you. Look forward to hearing of the progress on your builds. -
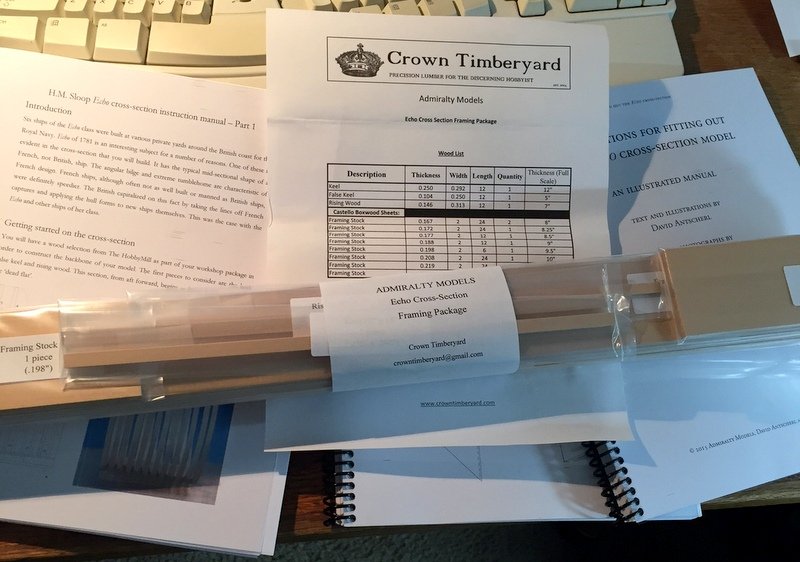
Thanks to everyone here on the forum for the warm welcome since joining NRG and MSW last month. I've enjoyed getting to know folks and have had a great time pondering how to make a serious start in the model shipbuilding hobby. After much contemplation, I decided to tackle an Echo Cross Section for my first POF build. Much of that decision came from wonderful feedback received by members of the MSW forum...thank you to all for your candid and helpful comments. I also decided on the Echo Cross Section because of David and Greg's excellent series of books on building the Swan class Sloop. Between the instructions obtained from Greg when I bought the Echo Framing kit and those books, I believe I'll have what I need to start a successful build. I am confident other members here on the forum will help me fill in the gaps as I improve my skill set and knowledge base. First was purchase of the Admiralty Models Echo Cross Section framing kit which came with a full set of framing wood from Crown Timberyard along with a thumb drive of instructions and plans. I printed out the instructions and plan sheets and had them spiral bound for easy use on the bench. Wood is on a shelf in my workshop getting acclimated before I start cutting parts. Unfortunately Greg has run out of Fitting Out kits and he advised not being able to obtain wood for more kits....he was nice enough to send the complete instructions for the fitting out kit which will allow me to cut my own wood and be able to fully finish out the interior of the Echo Cross Section. I've got a table saw for resawing billets and will be ordering some Castello and Holly to make the fitting out wood...but I have a quandary...namely what are the details of the wood in the fitting out kit? Greg did not have a Wood List for the fitting out kit so could not help me with the details. In the photo below, you can see the wood list of the framing package...I'm looking for the same thing related to the fitting out kit. Is there someone here who purchased an Echo Cross Section Fitting Out kit who could send me a scan of the wood list from their kit so I could have a guide to know what wood quantities and sized to cut?...I would certainly appreciate the assistance. Next step for me will be setting up a building board for this project. Since I'm trying to use this as a test project for a full ship build in the future, I'll be making a building board same as if I was doing a full ship...probably overkill, but should be a good learning lesson. Let the project begin!...
-
Glad to hear all has worked out for you Doug...I look forward to hearing of your progress using the Sherline mill. I've had several machining friends who tried to venture into CNC with small mills who got overwhelmed by the programming side of things...sounds like you will have success since you already have that background, picking up the machining skill set is an easily achievable proposition.
-
Thanks for posting the details of your technique on this Mike. I had been contemplating whether I needed to add a spindle sander to my "bag of tricks" in the shop...now the answer seems obvious and the only question is how soon I can get it and how to find room for it on the bench! (although it will probably become a temporary bench tool with a base plate and storage on a shelving unit along with my small bandsaw, Brynes table saw, and similar bench tools...they all share the same temporary spot on my workbench when in use)
-
Thanks for posting your build log through to the end...after seeing your finished model posting, I went and read through the kit instructions...considering the build for myself as well. Look forward to seeing your next project...will be fun to follow you as you advance to your next ship!
-
Make certain the stepper motors have dual shafts (out each end) so you'll be able to attach handles for manual operation...otherwise you'll have no manual option. I personally would be concerned about buying 7 year old computer technology to drive it. As Mark mentioned above, CNC is really for repetitive operations....not one off. But on the Sherline I think some parts of the CNC version have upgrades over the manual version, at least on new machines...if same held true for older machines it might mean a better machine for you. Remember you'll spend as much in tooling as the base machine..so it will be a real plus to receive a lot of tooling accessories with the machine. Good Luck!
-
Thank you for the quick reply Mike...one further clarifying question, it it Castello Boxwood or genuine boxwood? The reason I am asking is I am looking at resawing some of my own lumber, and have access to some nice Castello Boxwood billets, and some marginal genuine boxwood boards....trying to figure out if anyone used genuine boxwood or is it just too difficult to find reasonable rough Genuine boxwood lumber?
-
Quick question Mike...Are you using boxwood for the parts you've made so far on this build?...and if so do you intend to continue with the same wood for the frames? I'm trying to get an understanding of which wood has what appearance on finished models....thanks in advance for the info...
-
Good point Mark...I forgot to mention I'll be modeling in 1:48...hoping I can gain an understanding of what is a good mix of thicknesses in the different types of wood (Boxwood/Swiss Pear/Holly) I'll be using the table saw to resaw 8/4 and 12/4 lumber into 2-3" wide slabs that will end up 2-3" wide x approximately 24" long x ? thickness. I should be able to cut as thin as 1/8" for certain; probably even 3/32". After that I can use a thickness sander to reduce further as needed. I'll use my Byrnes saw to cut the resawn slabs into final dimensional stock.
-
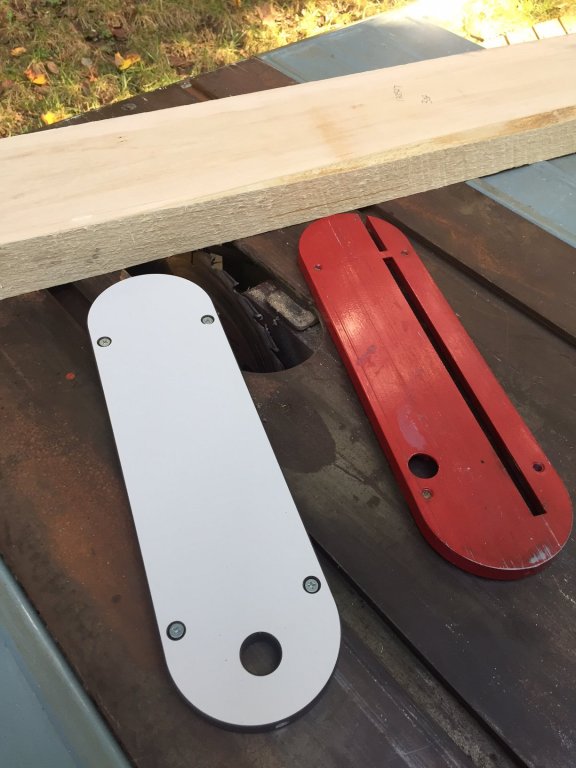
So here's an "as received" photo of the cast-off table saw a friend recently gave to me. An older Delta 10" contractor saw in functional condition with a nice cast table, extensions on both sides, and a decent fence...but it is rough as a cob. I'll be renovating this one to use for resawing lumber for my upcoming POF projects...I've got a 24T thin kerf blade on order, and the white zero clearance insert that will replace the red original will be a key component of the rebuild. Looking at the gap in the red stock unit makes it easy to see why standard table saws without alteration are not acceptable for making thin boards. I've done a good bit of woodworking over the years, and restored several old machines, so I'm pretty confident I can pull this off.... The piece of wood in the background is a 4' length of 8/4 basswood....I picked it up for $15 at the local woodworking store to use for testing as I get this machine together....don't want to use expensive Boxwood until I get the table saw "dialed in". I would like to ask a question of the group....My plan is to obtain Boxwood (for making frames), Swiss Pear (for planking and other furniture on the ship), and Holly (for decking). I'll start with 8/4 or 12/4 lumber, and will be slicing off slabs that are 2" to 3" wide....but what thicknesses to resaw my lumber to? I've looked at the lumber list for the Galley Washington here on the site as a starting point, but it only provides dimensions, not what the various thicknesses will be used for. (BTW, I'm modeling in 1:48 scale) I think I'll need some boxwood 1/4" for frames, but perhaps some thicker and thinner boxwood as well? If I'm using pear for planking and other misc items above and below deck, I suppose I'll need mostly a thickness for planking, but a variety of thickness for other items? And for making the decking out of holly, what thickness for that? I know I'll be able to use my thickness sander to finalize the wood, but where to start? If anyone has a material list for something like a Swan class ship in 1:48 scale by type of wood and size I would be most appreciative.... Any guidance would be most welcome....
-
Proportional Dividers
clifforddward replied to Worldway's topic in Modeling tools and Workshop Equipment
Once again this forum and the older archived messages are proving to be a valuable resource. After reading about the use of proportional dividers for planking, scaling plan measurements and a multitude of other uses in our model shipbuilding hobby, I started trolling eBay for a nice set...today I managed to win an auction for a very nice set of K&E Universal Paragon Proportional Dividers...same as the ones pictured by Bob Cleek above, just the earlier case with the paper insert of charts rather than the metal base. This particular model seems all over the map...I paid $74.95 for mine in very nice condition with a great case....but just a month ago a set sold for nearly $200...so go figure. I suppose it pays to have patience not only for building our models but also when it comes to acquiring tools!..... Now if I could just locate a set of K&E Copenhagen Ship Curves...... -
Hello Daniel: Welcome to MSW!...you'll find a friendly and very helpful group of ship modelers here. You mention returning to the hobby after a long interlude...depending on where you are with your modeling, you may benefit from reading through the thread: "For Beginners--A Cautionary Tale"....I found it very helpful for me: Best Regards, Cliff

