hollowneck
-
Posts
1,589 -
Joined
-
Last visited
Content Type
Profiles
Forums
Gallery
Events
Everything posted by hollowneck
-
 Those who are following my Build Log here should also look at @Beckmann current log for his recently completed HMS Unicorn diorama. His water making technique is similar to mine with his use of simple plaster that's been shaped into a convincing seascape. He's done a great job with the choice of colors and details on the water surfaces to surround his model, right up to its boundaries that touch the perimeter of the artisan's crafted cabinet - a novel and beautiful complement to his model's diorama - as well as his living space!
- 542 replies
-
- 7
-

-
- Sphinx
- Vanguard Models
- (and 3 more)
-
I just caught-up with earlier posts on your thread, Brian. The Master Korabel kit looks like a fun and quite different project to tackle. From my experience, the MK kits are excellent as long as you can read Russian. Actually, their kits have well-photographed instructions and the included translated docs aren't perfect but still helpful. Most important, the materials and vessel designs are excellent, including clever building jigs you make for tricky assembly parts. You'll like this one and you'll have a bunch of followers once you start a log for the Russki submarine - including me. (...word of caution: don't wait too long though, the Ukrainian Navy has some new Naval drones coming...)
-
Presumably, you mean HMS Granado and not your wife.😳
-
Brian, Your Granado is looking great. Your color choices thus far are very tasty - in a word: "Sweet."
-
Welcome. You're in the Right Spot, Mark - 100 PERCENT.
-
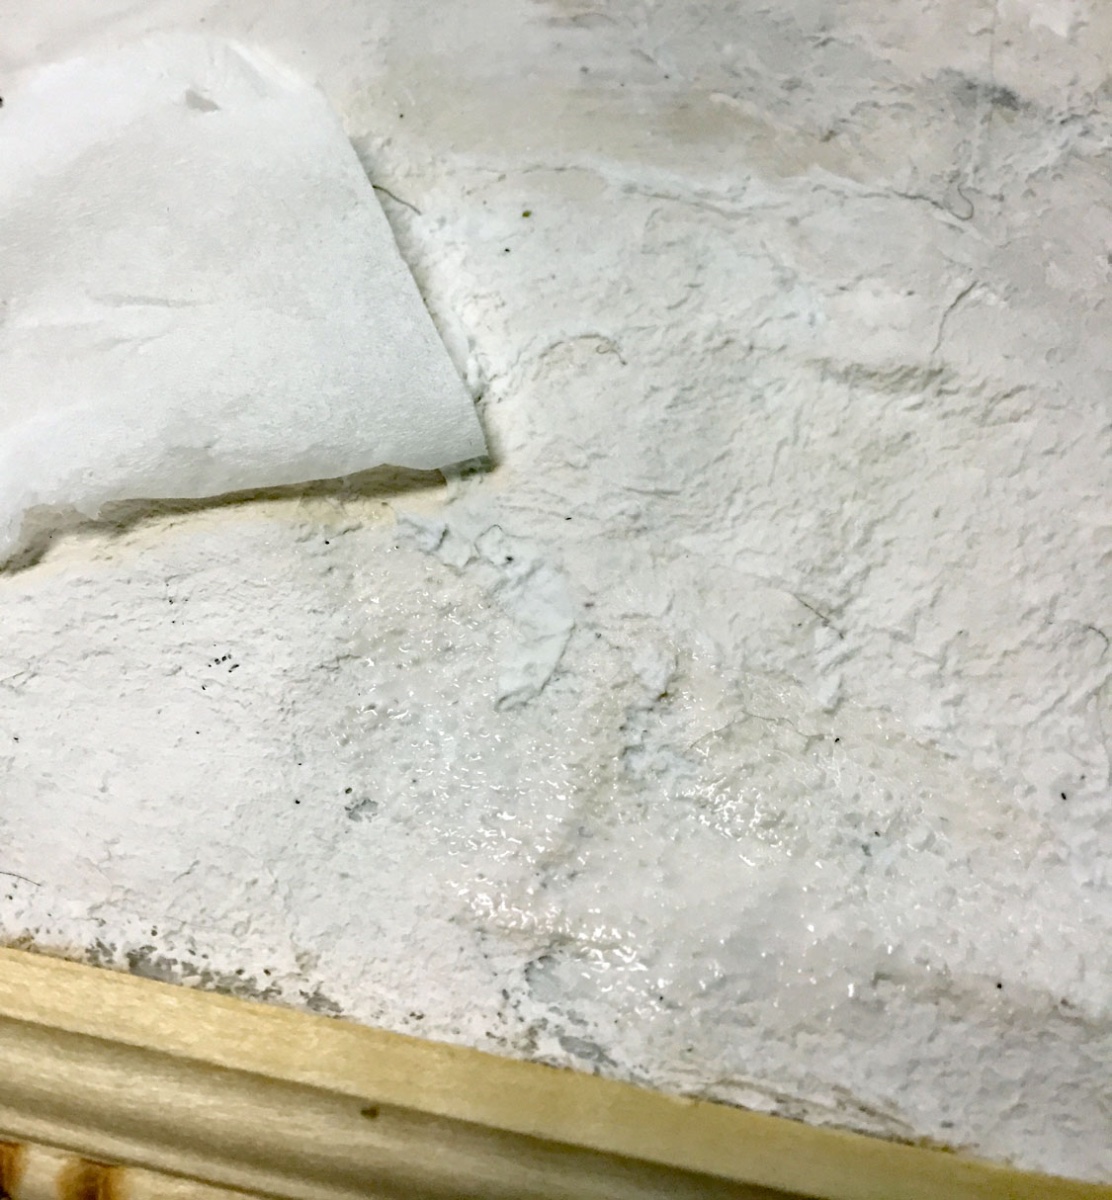
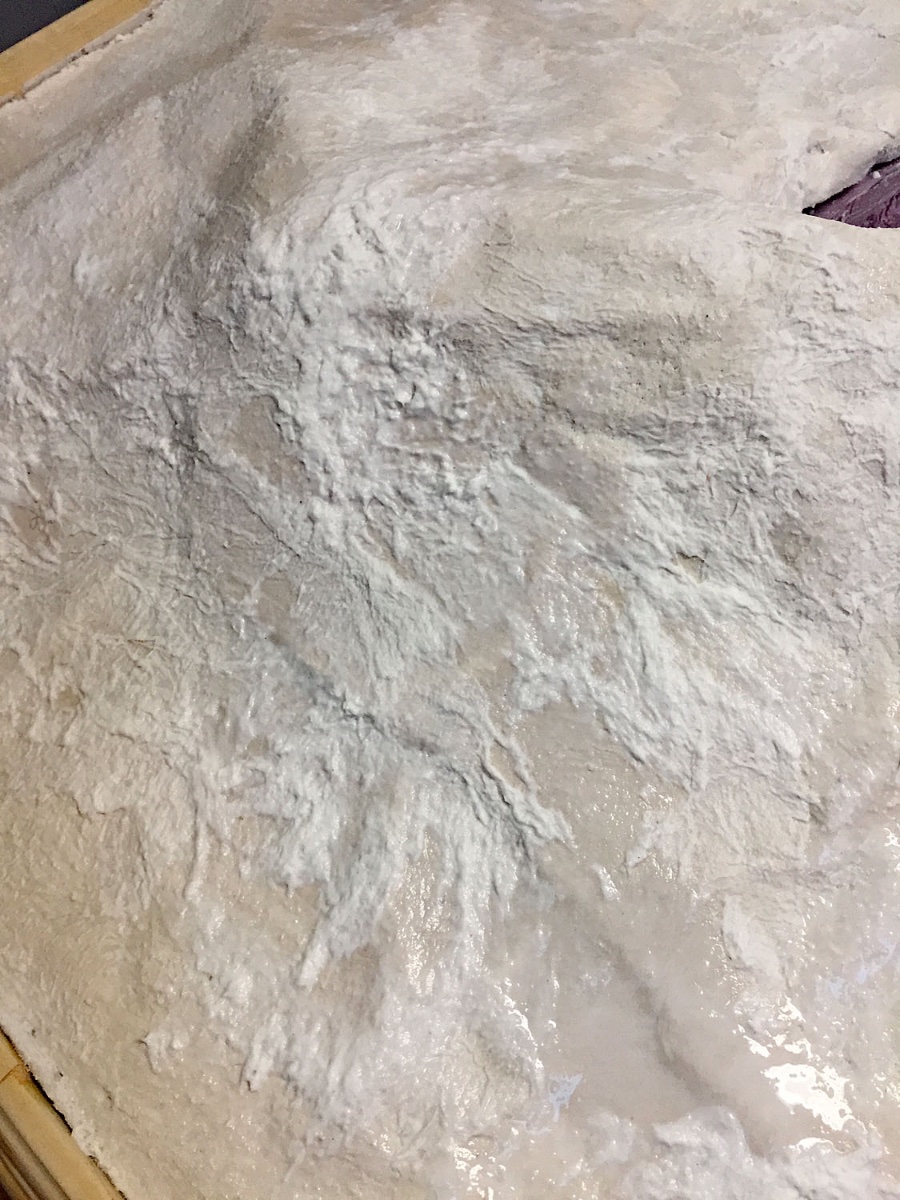
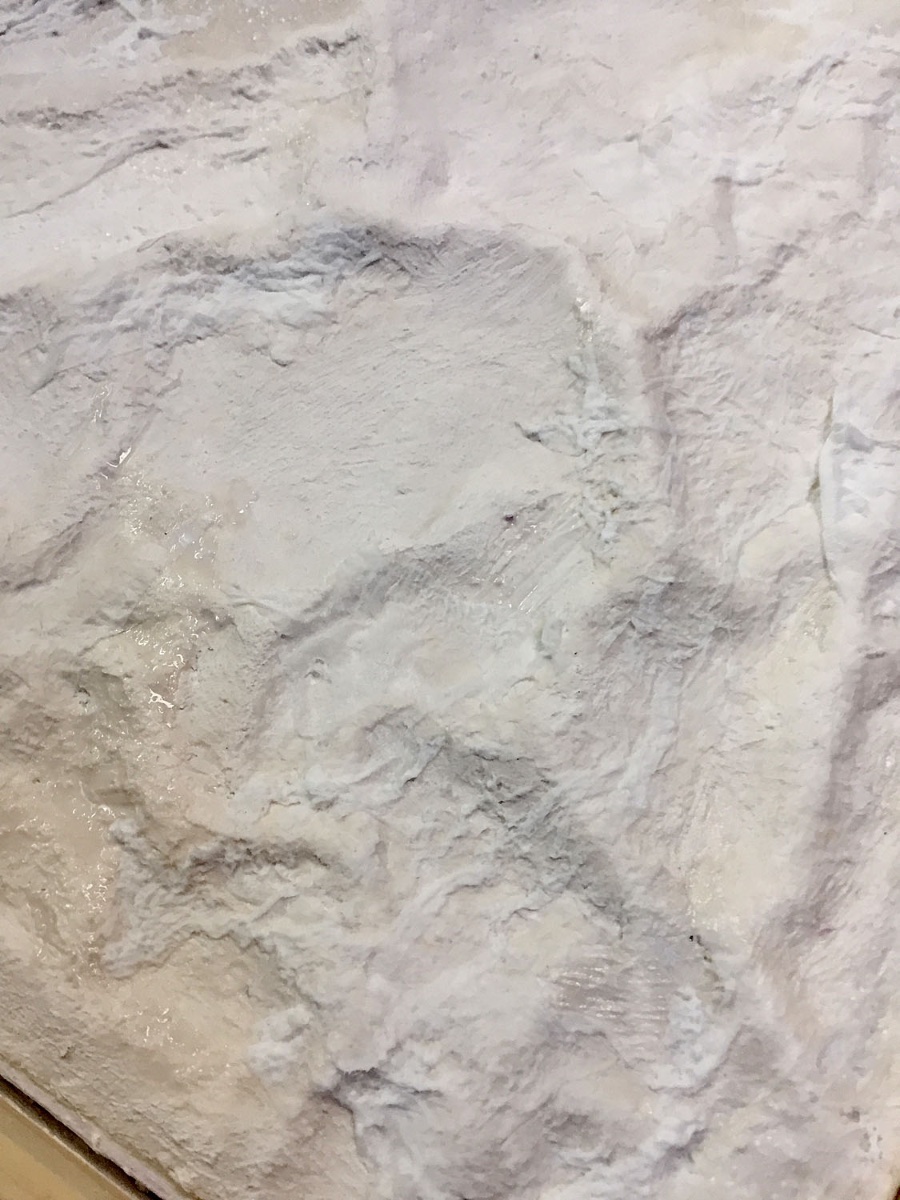
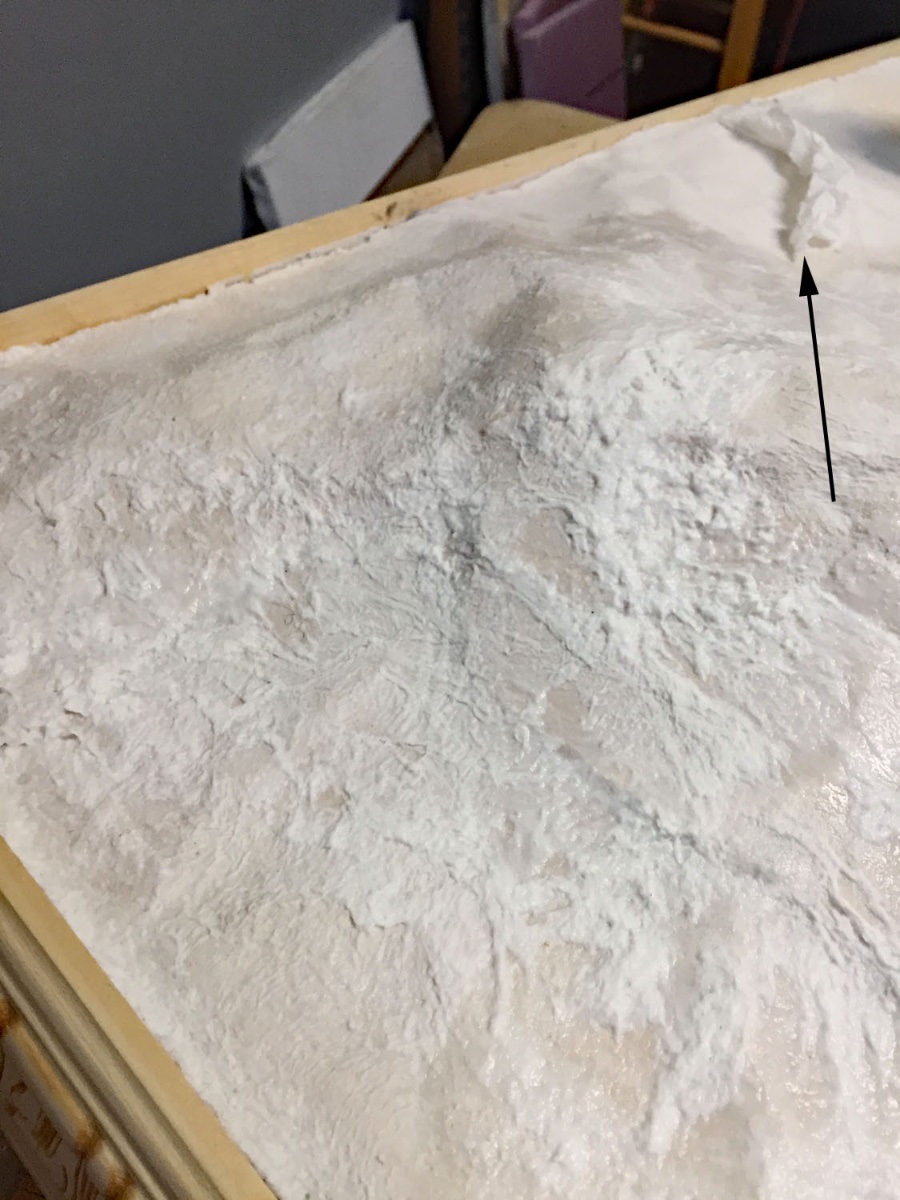
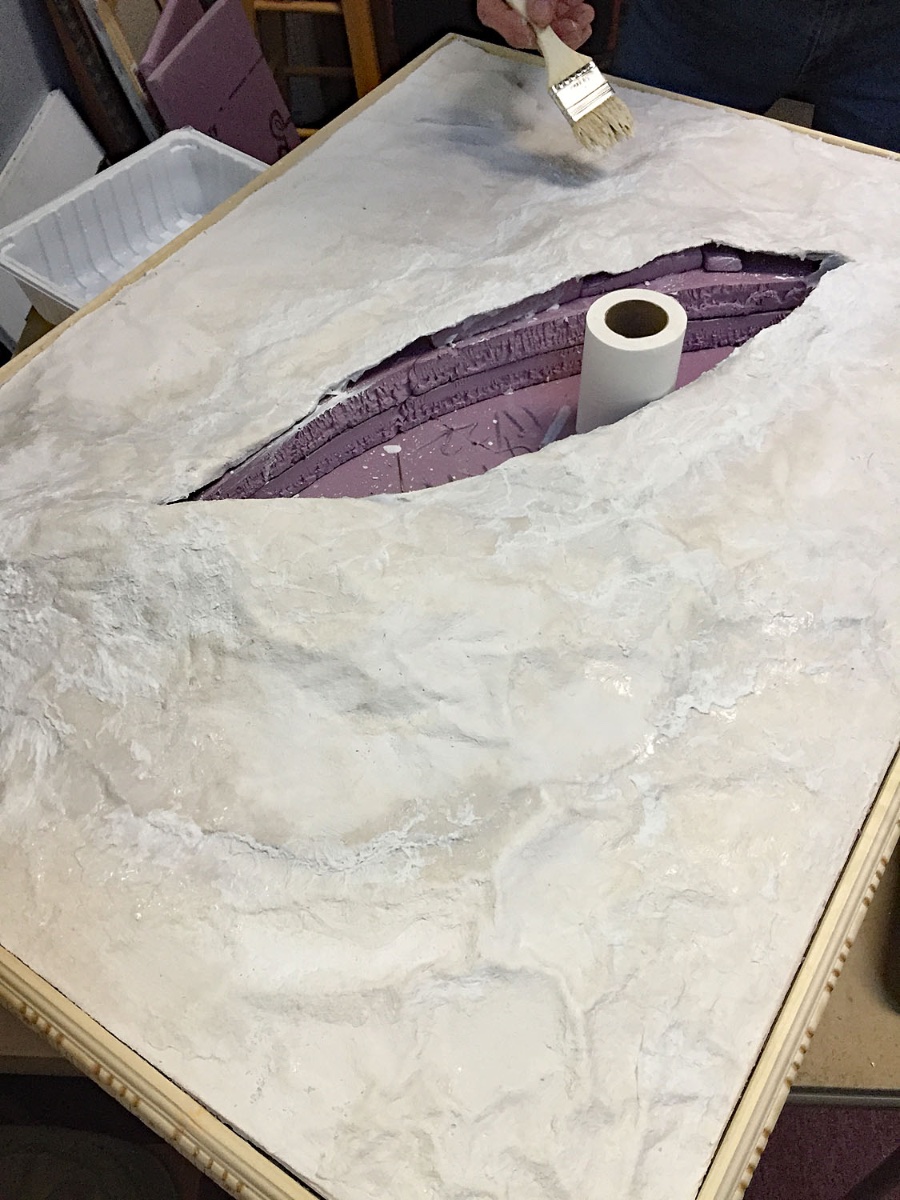
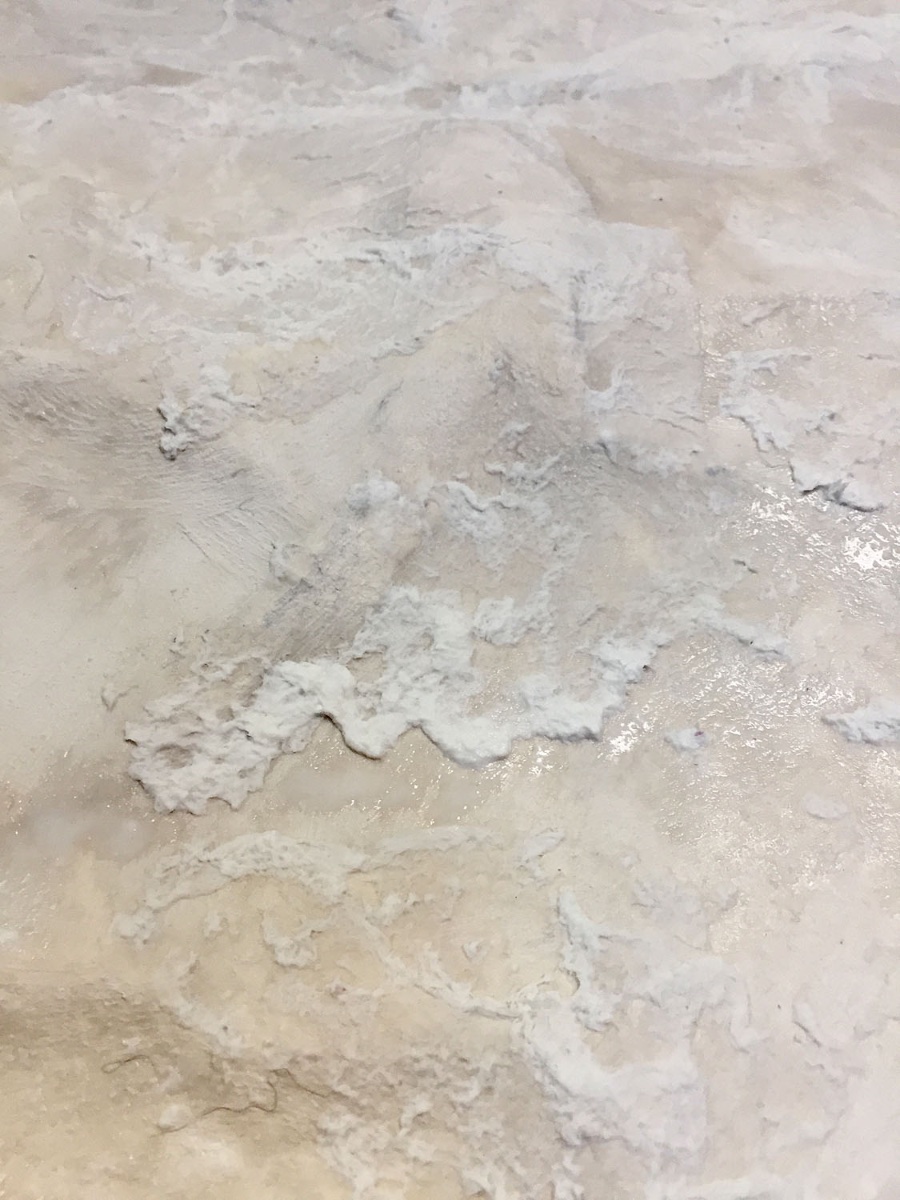
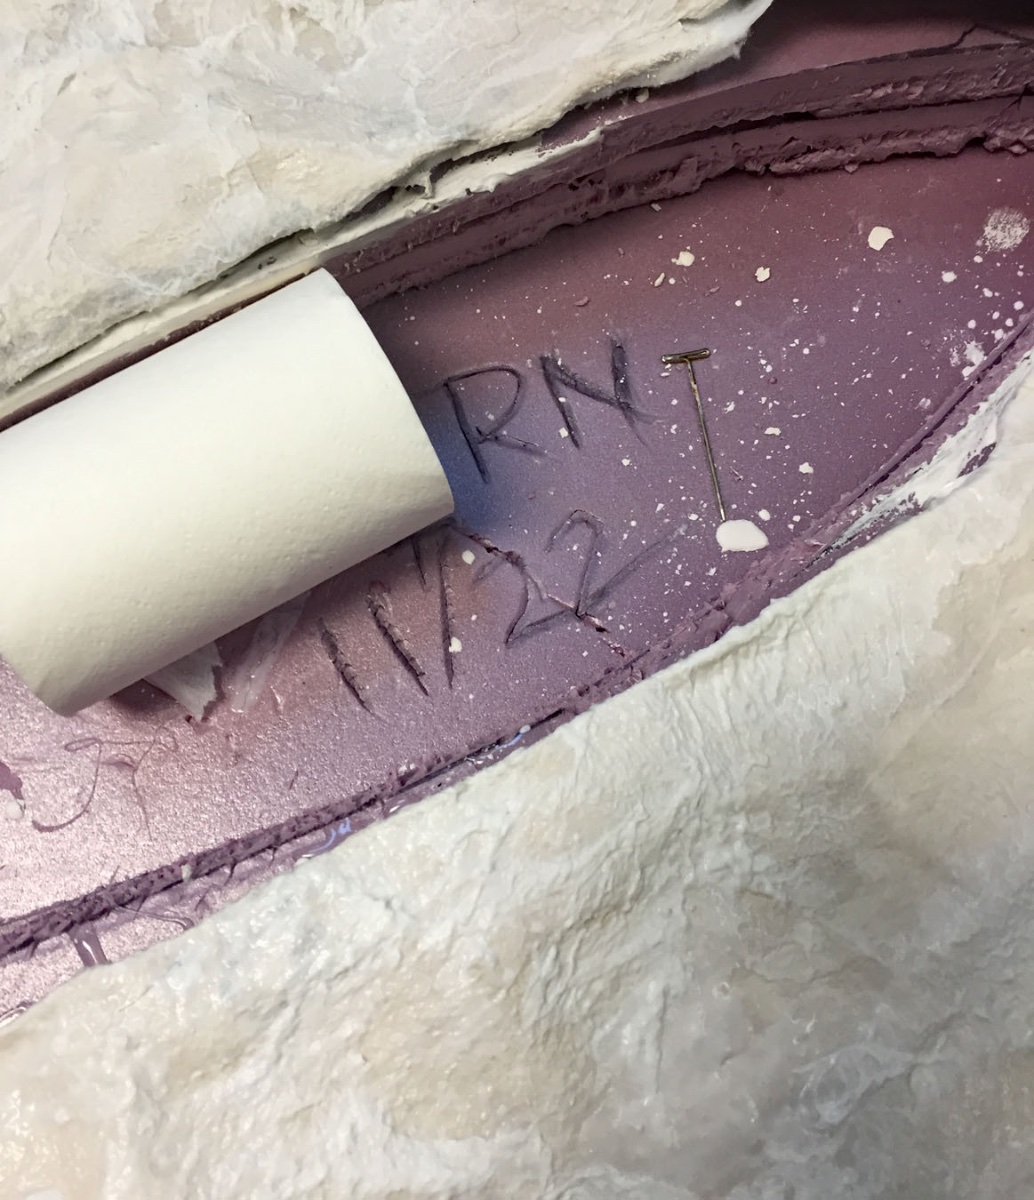
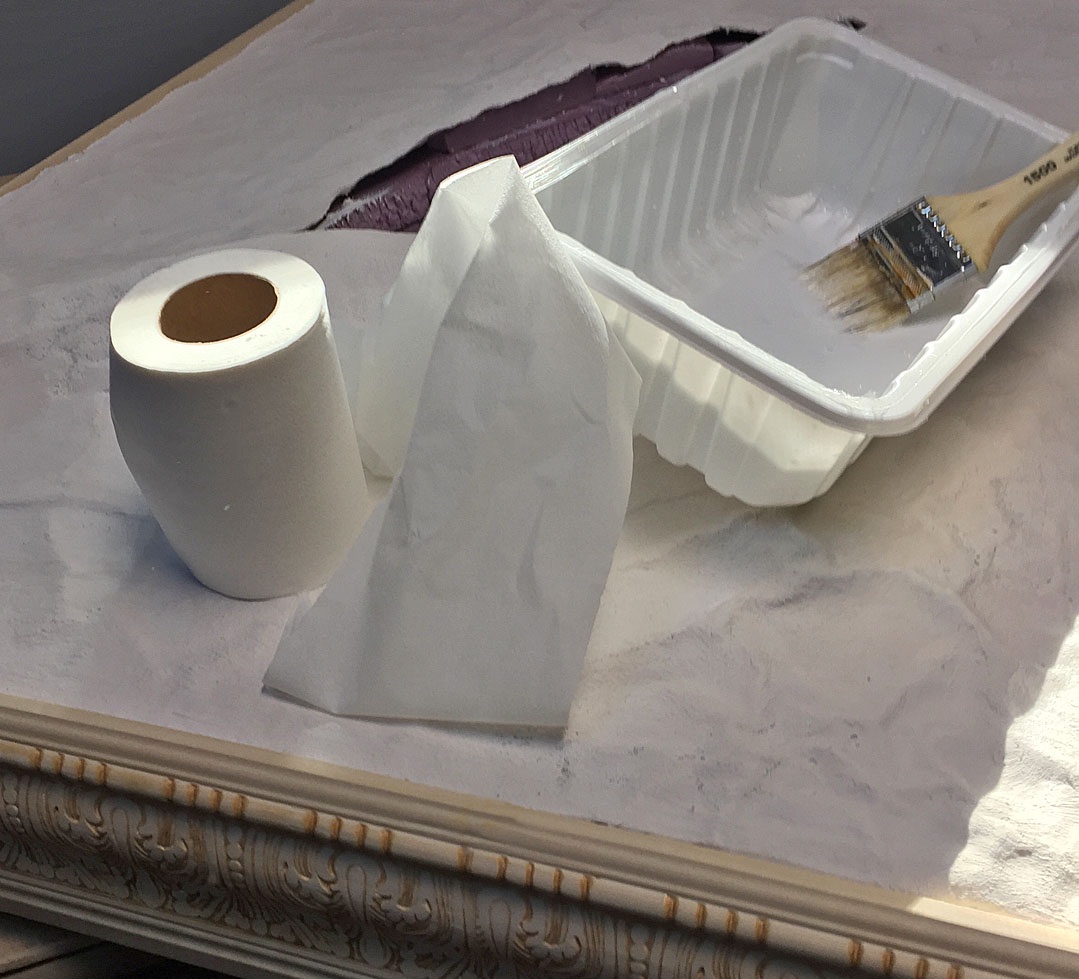
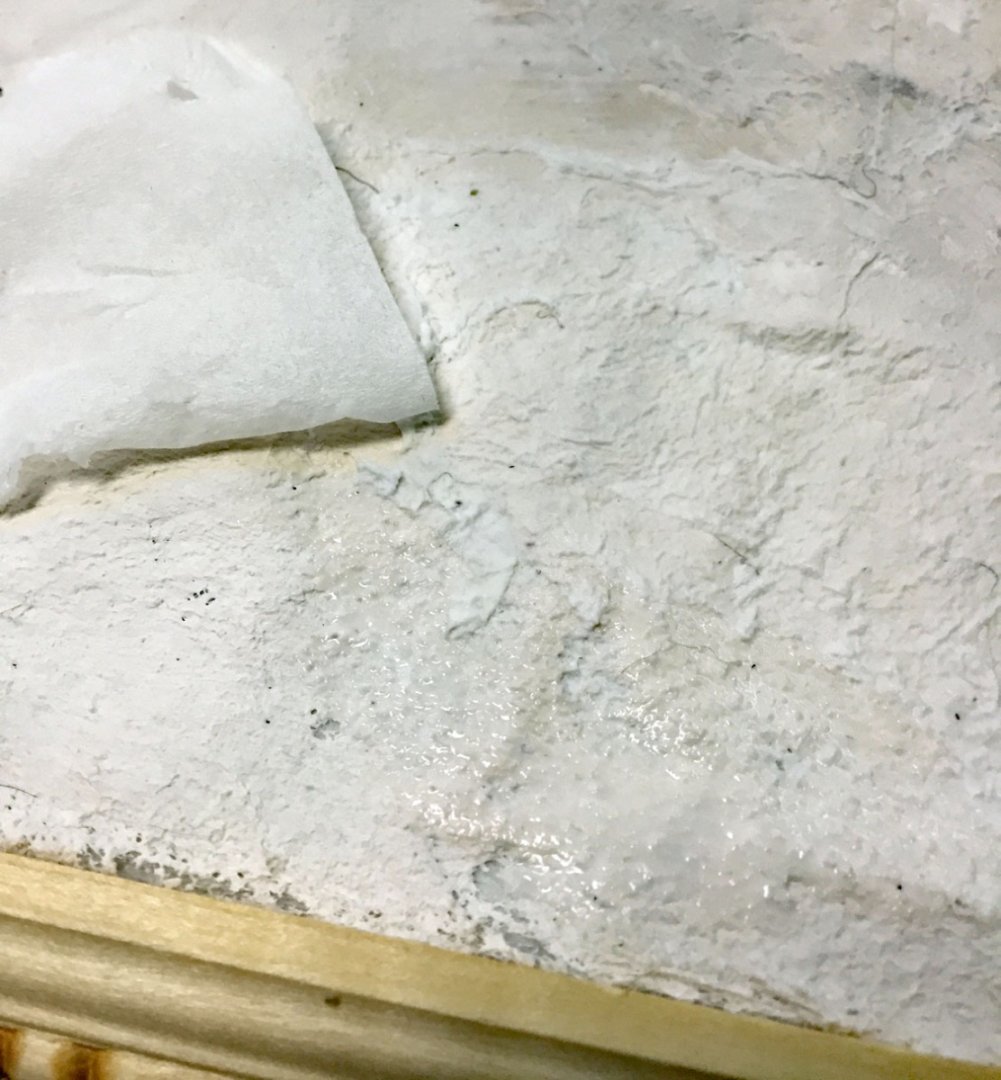
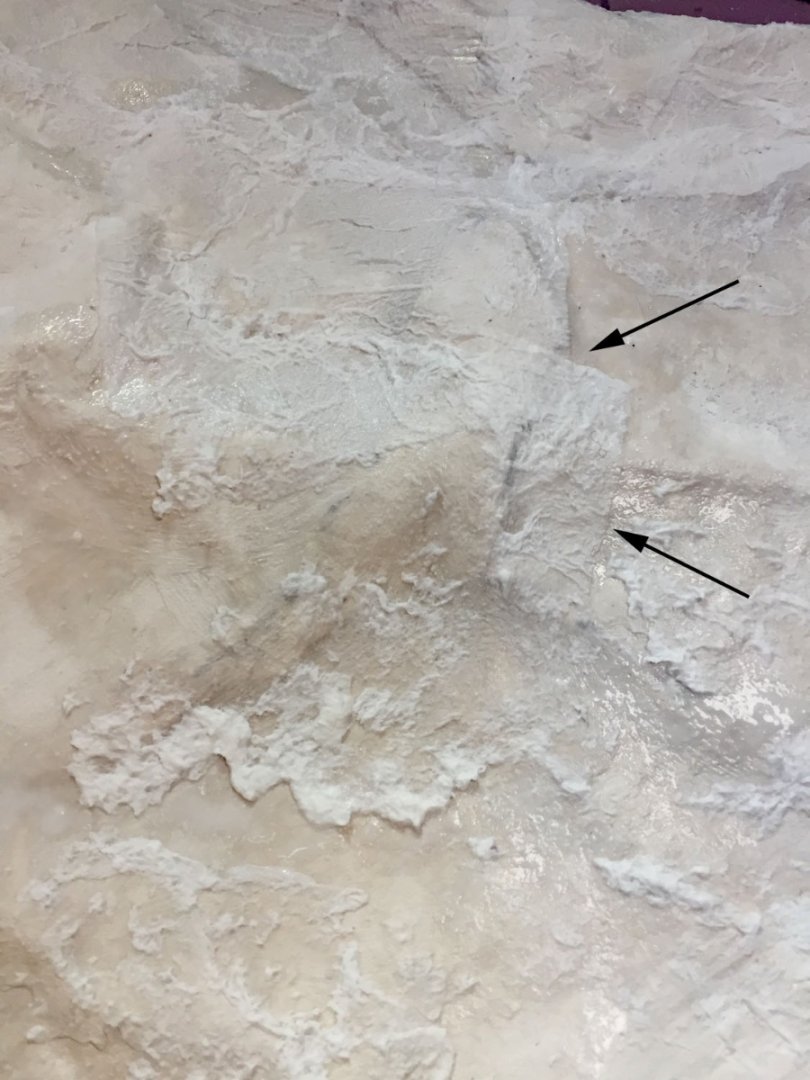
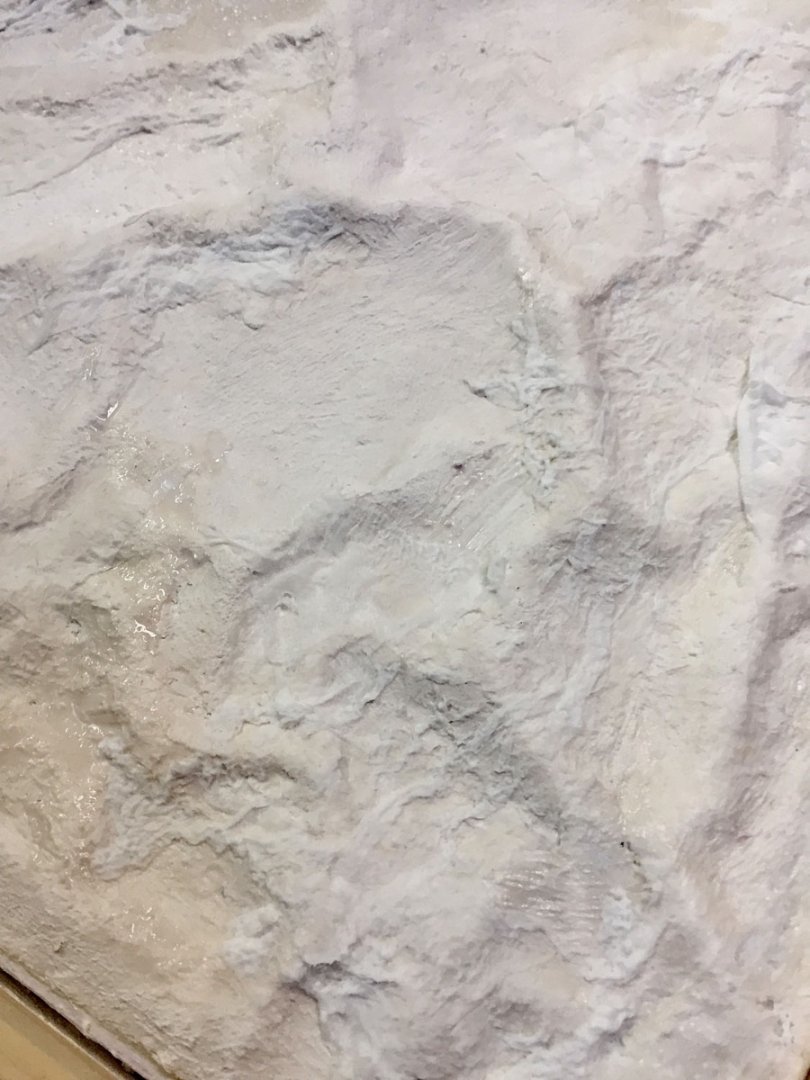
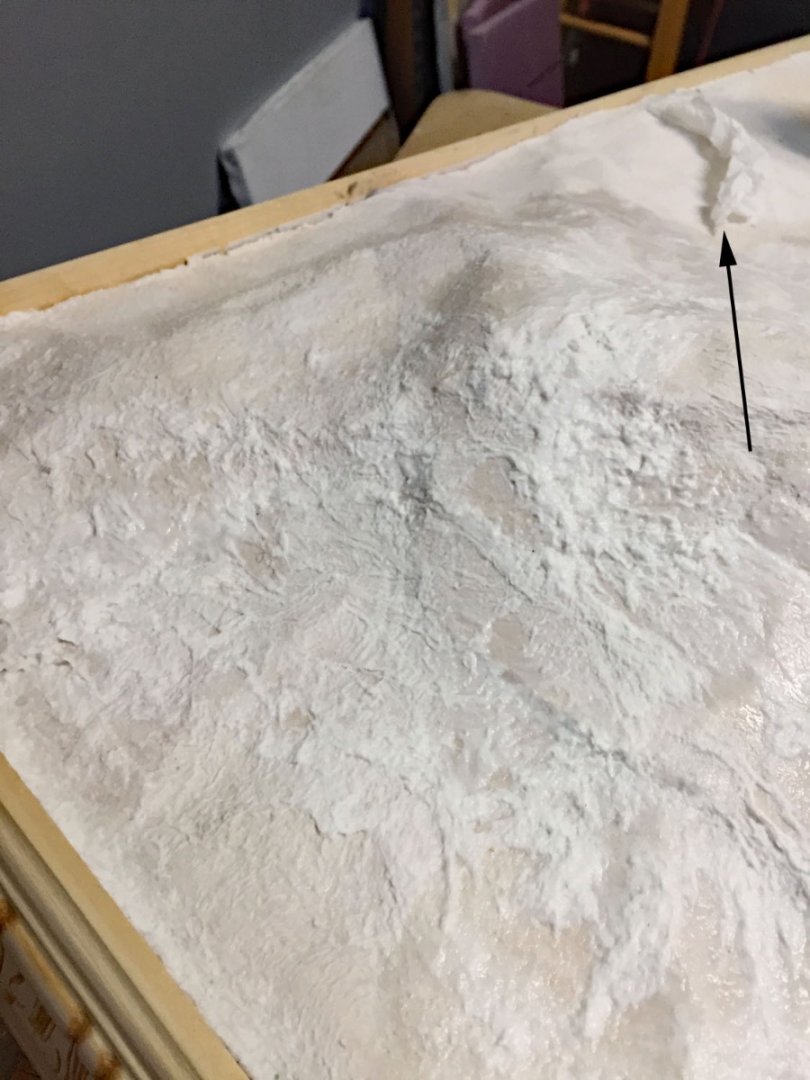
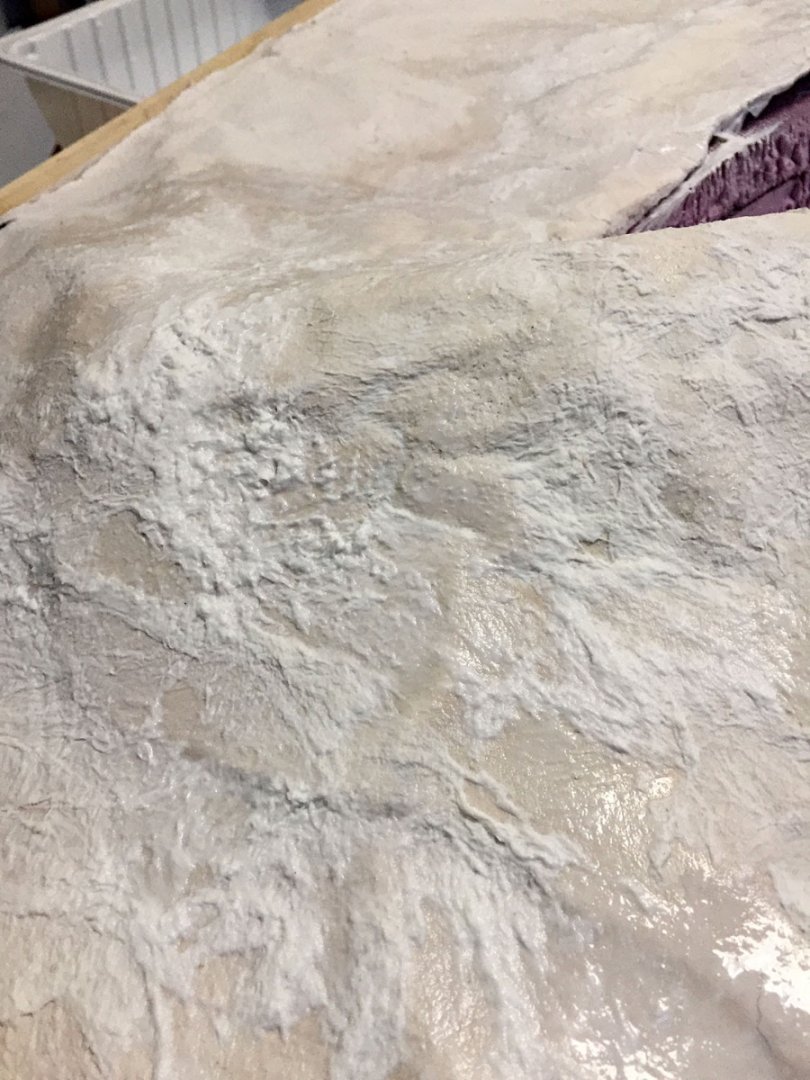
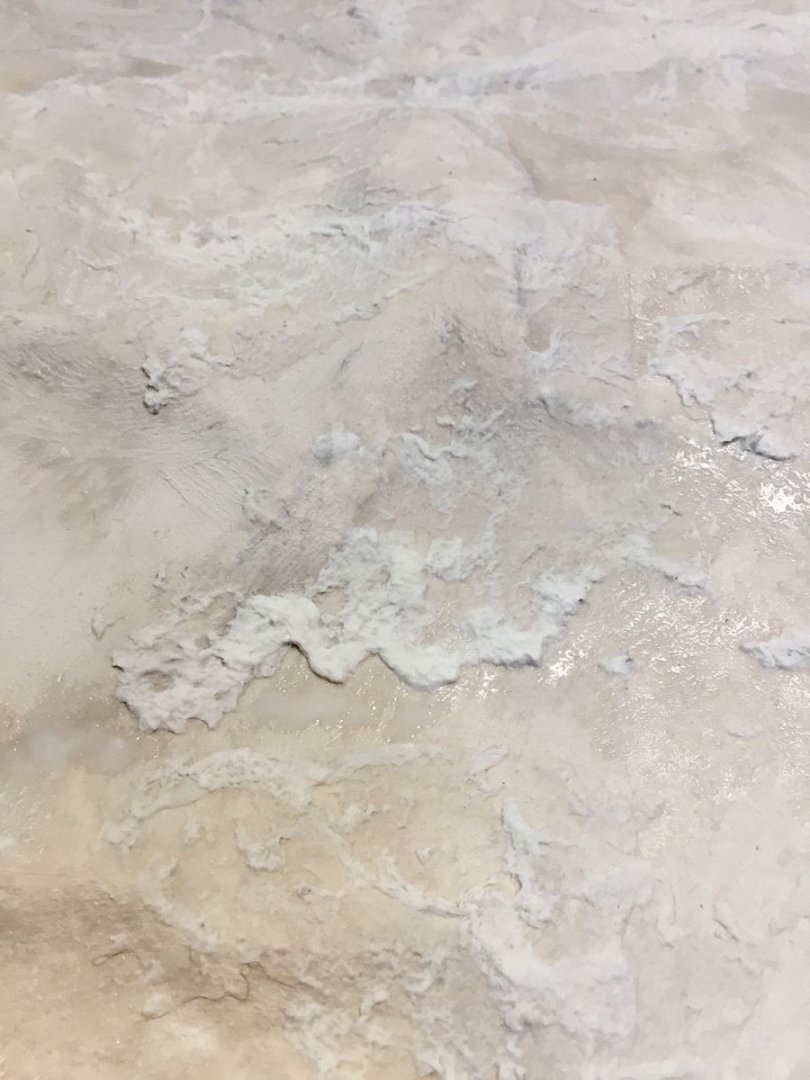
Now that it's dried, it's time to turn the smoothed plaster surface into water, as follows: Water-thinned white glue, a stiff brush and a roll of SINGLE-PLY toilet paper. The following close-up photos are pretty self-explanatory, assorted views of what happens when you "work" the toilet tissue to the plaster surface to create small rivulets, washes and wind "wrinkles." Some of the textures will become wave peaks. There are lots of "happy accidents" in this phase of water making. If a straight line appears, get rid of it by manipulating the stiff brush. An ugly wad appears, pick it off, start over with another piece of torn paper, work the paper so that it makes random textures. Tear-off various sizes of paper too, no straight edges! NOTE BENE: these intense close-ups make the water surface resemble the the surface of the moon or Mars. From a normal viewing distance these details will transform into an ocean that's being troubled by an intense wind. A piece of toilet paper that hasn't been "worked" into a water shape. NG! These straight edges need to be reworked while the paper and glue is still wet... Love how this appeared! TP edges in the previous pic mostly disappeared; paint color and acrylic wave build-up details will mask the tiny irregularities. This lumpy splooge will be a "back wash wavelet" atop the Bigger Wave that Camilla's bow is smashing against. This is a tedious step (like some aspects of rigging!), but well worth the effort. The entire surface of the diorama gets this toilet paper treatment, even the smoother sections. Almost done (with this step). In time terms, we've moved past a halfway mark for the diorama's water creation. The "arty stuff" is coming-up soon: a handful of acrylic paints and various mediums. My "Easter Egg." For posterity, of course. My father also left his initials on the inside of his "Fly" head (see my previous post response to OldSalt1950). Taking a "break" now on the diorama. Touch-ups and then choosing the colors for painting comes next. And, I'm returning to loose ends on the model: a lengthy Mainmast pennant to make (another trip to Staples), dozens of rope coils to hang, loose rigging lines to nail down, tying down a launch and the spare topmast on the midship skids, even clean freshly- laundered britches for Cpt Wigglesworth.


- 542 replies
-
- 23
-
-

-
- Sphinx
- Vanguard Models
- (and 3 more)
-
I too have fond memories working with my father. Dad was a designer for W.E.D. Enterprises in Burbank, CA in the late 50's (Walter E. Disney) and I spent countless hours in his shop watching him make incredible things from commonplace materials: an artist, artisan, engineer, animator, carpenter, he didn't make train layouts but I did watch him as he created the head for the 1958 movie, "The Fly" - the original film. Yep, that now classic film with Vincent Price. That was a highlight of being a 12 yo. in Dad's creative space. Putting the fake fly head on and scaring the crap out of people is a lifelong "highlight" of my youth. He made the head on contract for the movie studio (I believe 20th-C Fox) after his work on the original Disneyland in Anaheim, CA. Check out this URL: https://en.wikipedia.org/wiki/The_Fly_(1958_film) I'm my father's son, in the gene pool, for sure. And Dad nurtured "all things creative"- and that (nearly) anything was possible: if you could think it, you could do it... Peak America.
- 542 replies
-
- 9
-
-
- Sphinx
- Vanguard Models
- (and 3 more)
-
Thanks, Mr. T - much appreciated. Pink insulation foam is the bomb. You can carve it, hot wire it, saw it, hell - in a pinch - I'd bet you could eat it. And, available in various thicknesses, it's relatively inexpensive and comes in inconvenient sizes and working it can be pretty messy at times.😂 Train layout people use pallet loads of the stuff for building massive mountains over tunnels with distant mountain shapes, steep canyon walls and bluffs. You can also attach just about anything to it (with the right adhesive). These WIP pics of my "Takes A Village..." diorama project show how the foam (as a built-up base) and large plaster features on the ShaperSheet can be fashioned to create a realistic rocky coastline (post-painting and terrain "populating" here). For this diorama, I chose to not depict a dramatic sea and simply poured Woodland Scenics colored resin for my water feature(s) after I made a "dam" around the model ship's cutout in the pink foam base (layers of foam board below the "rock" clearly are seen on the left side). Once the stiff aluminum ShaperSheet is coated with plaster its not going anywhere; as I mentioned previously, it dries hard as a rock. The elevated wave sections (mostly the large one at Camilla's bow) do need support as well as some smaller raised sections placed around the hull; these areas do benefit from the smaller shaped foam pieces I've mounted. Risking exaggeration - and I haven't tried this - I'd bet that I could practically stand most anywhere on the finished, plastered ShaperSheet water and it would not collapse. Tuff stuff. 😳

- 542 replies
-
- 7
-
-
- Sphinx
- Vanguard Models
- (and 3 more)
-
I’ve learned a lot from my previous Connecticut ship modeling club members who are also superlative train layout hobbyists; award-winning stuff. They create terrain obviously but many also include water features. Woodland Scenics is a ‘go to’ staple for making train layouts. I’ve adapted some train terrain materials, like the use of insulation foam sheets and the plaster shaping materials. My use of the aluminum ShaperSheet is original, however. I figured that I could use this material to build-up a seascape to make it more dynamic. My first diorama was mostly a flat sea presentation where I principally learned how to combine paints and acrylic mediums to create translucency. I combined this knowledge and skill to adding “depth” in my following dioramas with the techniques I’ll continue to show here. YouTube is a tremendous resource for ‘borrowing’ techniques the trainheads use. Most ship model dioramas are in smaller scales, like 1/96, 1/150, 1/350, and smaller. The water scenarios are typically in small footprints and the water surfaces require less detail to be realistic. These dioramas can be very impressive, especially for steel navy presentations. At the scale I build, 1/64 predominantly, it’s a different ballgame; considerably more water detail over a much larger surface area has to be re-created - especially the dynamics of making water “kinetic.” Also, I’ve sailed on the ocean and have a good knowledge how water looks and behaves. Please continue to follow my Build and you’ll see some very detailed, additional techniques that when combined create some amazingly realistic settings.
- 542 replies
-
- 8
-
-
- Sphinx
- Vanguard Models
- (and 3 more)
-
Great to know you're following along on the final stages of my build; your build of this same kit is the "gold standard" - as all of our followers here know! Thanks.
- 542 replies
-
- 2
-
-
- Sphinx
- Vanguard Models
- (and 3 more)
-
Thanks, druxey. I appreciate the high praise for my 76 y/o eyes and a 10 y/o iPhone!
- 542 replies
-
- 2
-
-
- Sphinx
- Vanguard Models
- (and 3 more)
-
Your comments are much appreciated, Glenn. I do hope someone on the forum will be inspired to present their larger model in a diorama.
- 542 replies
-
- 1
-
-
- Sphinx
- Vanguard Models
- (and 3 more)
-
Thank You, Tom - much appreciated. Thanks Tom. I can easily imagine one of your excellent models in a diorama. Do It - I know you can, 100% I've got a good source for scale-accurate whales!!
- 542 replies
-
- 2
-
-
- Sphinx
- Vanguard Models
- (and 3 more)
-
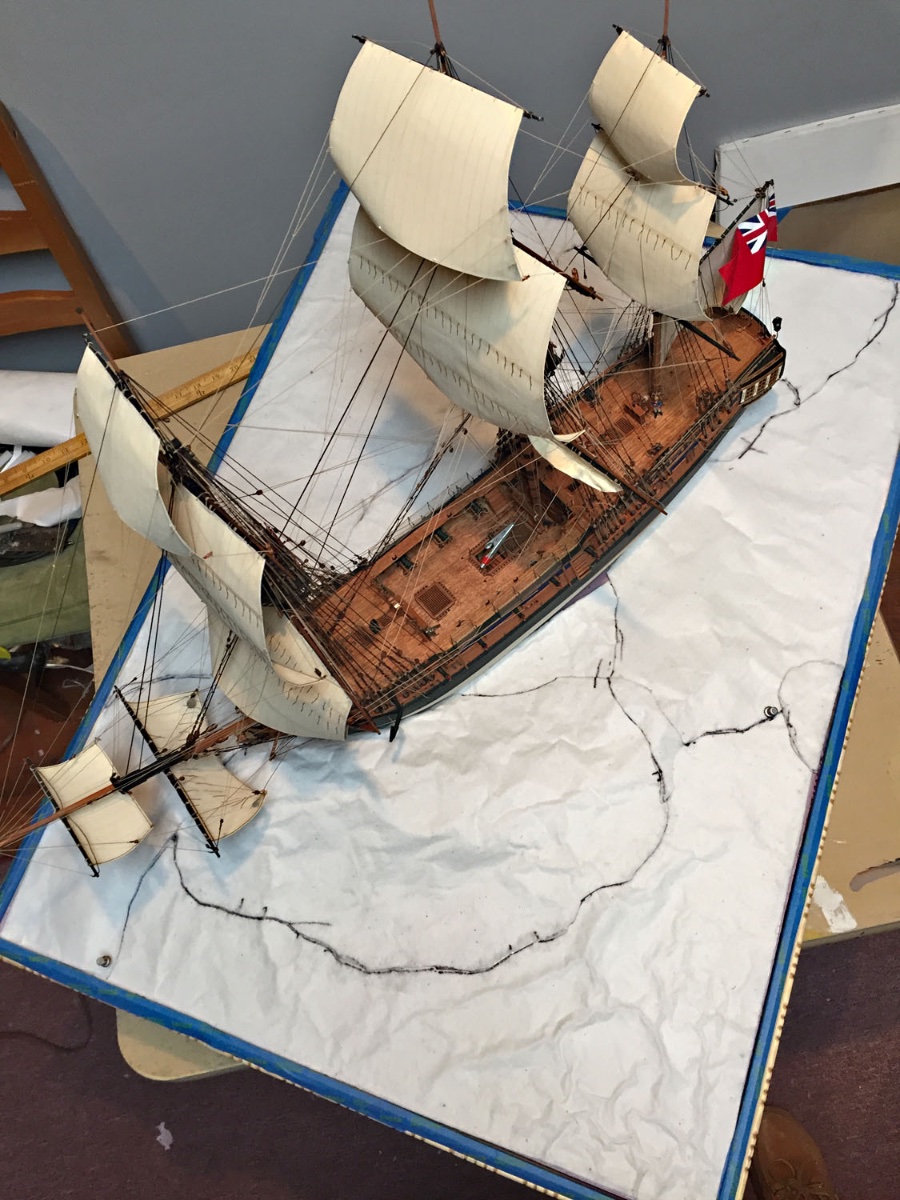
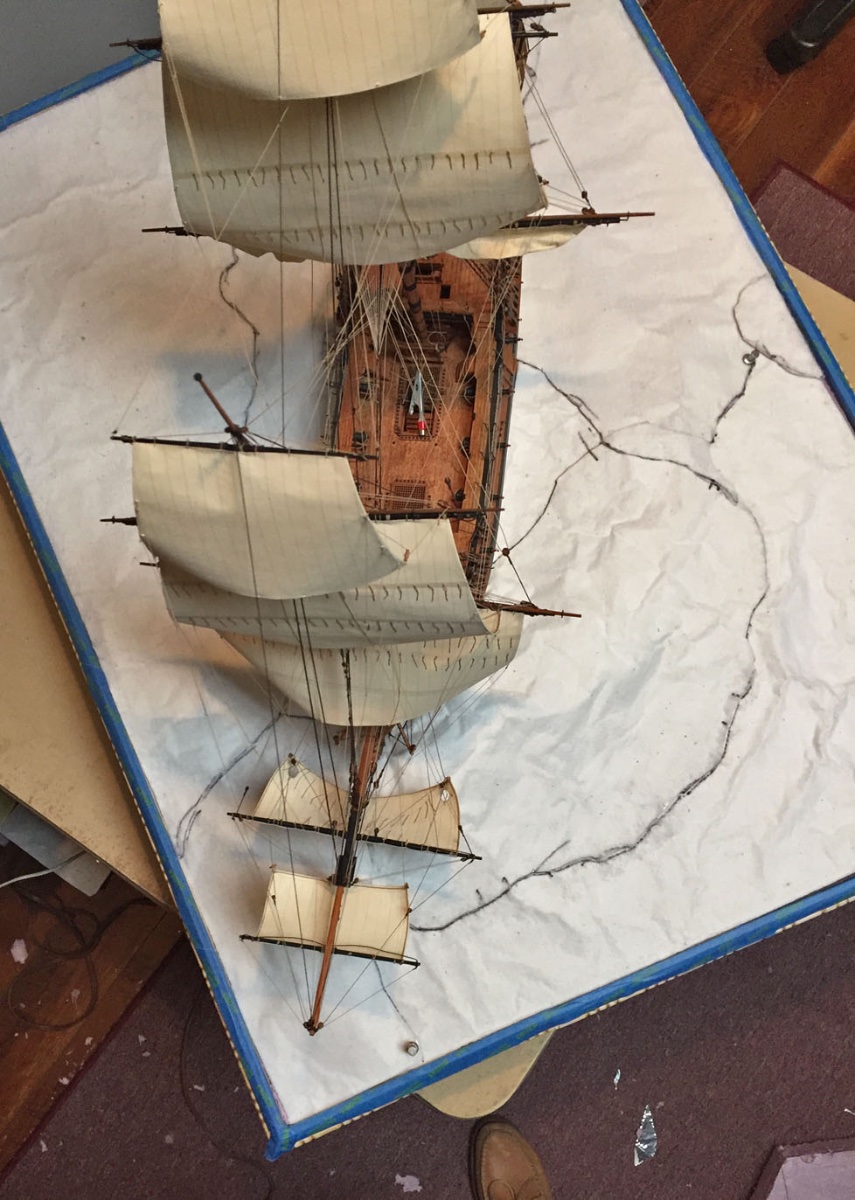
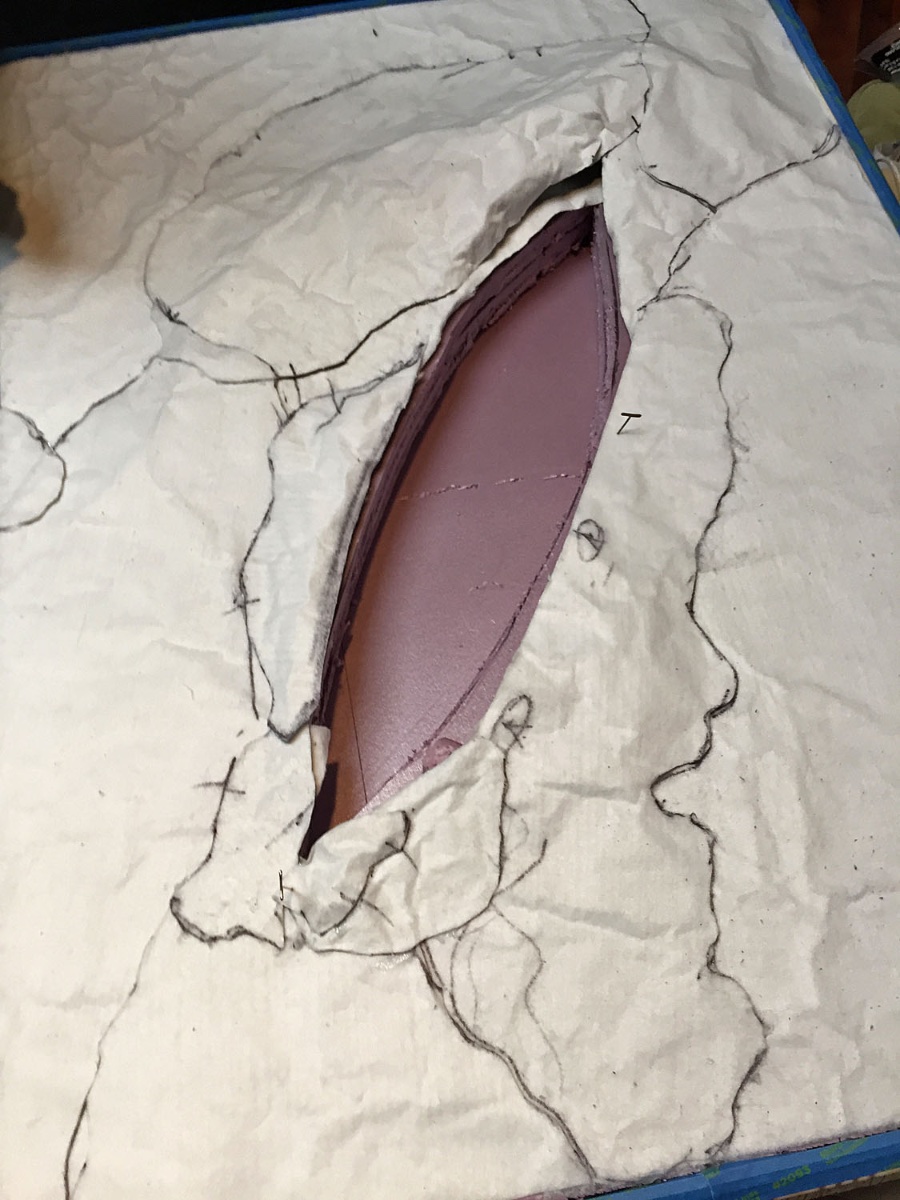
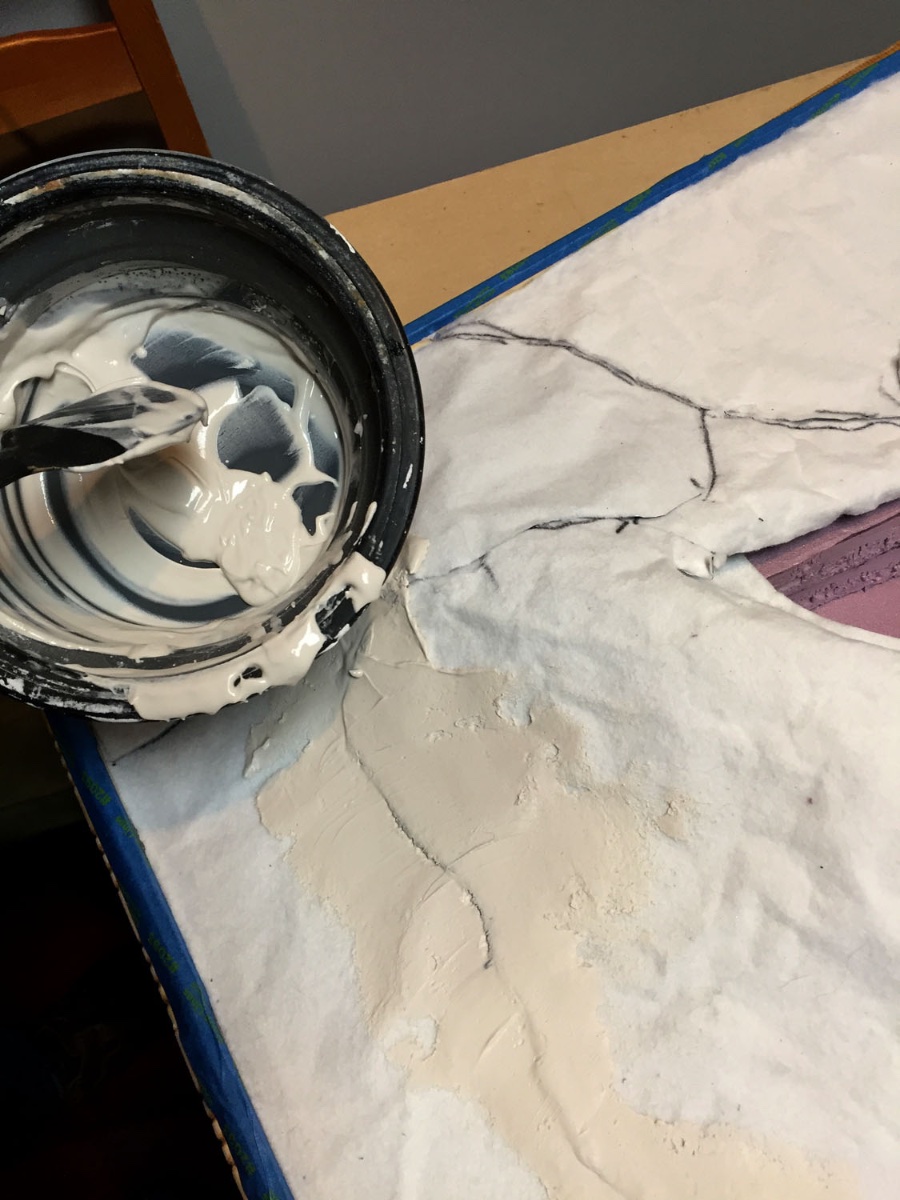
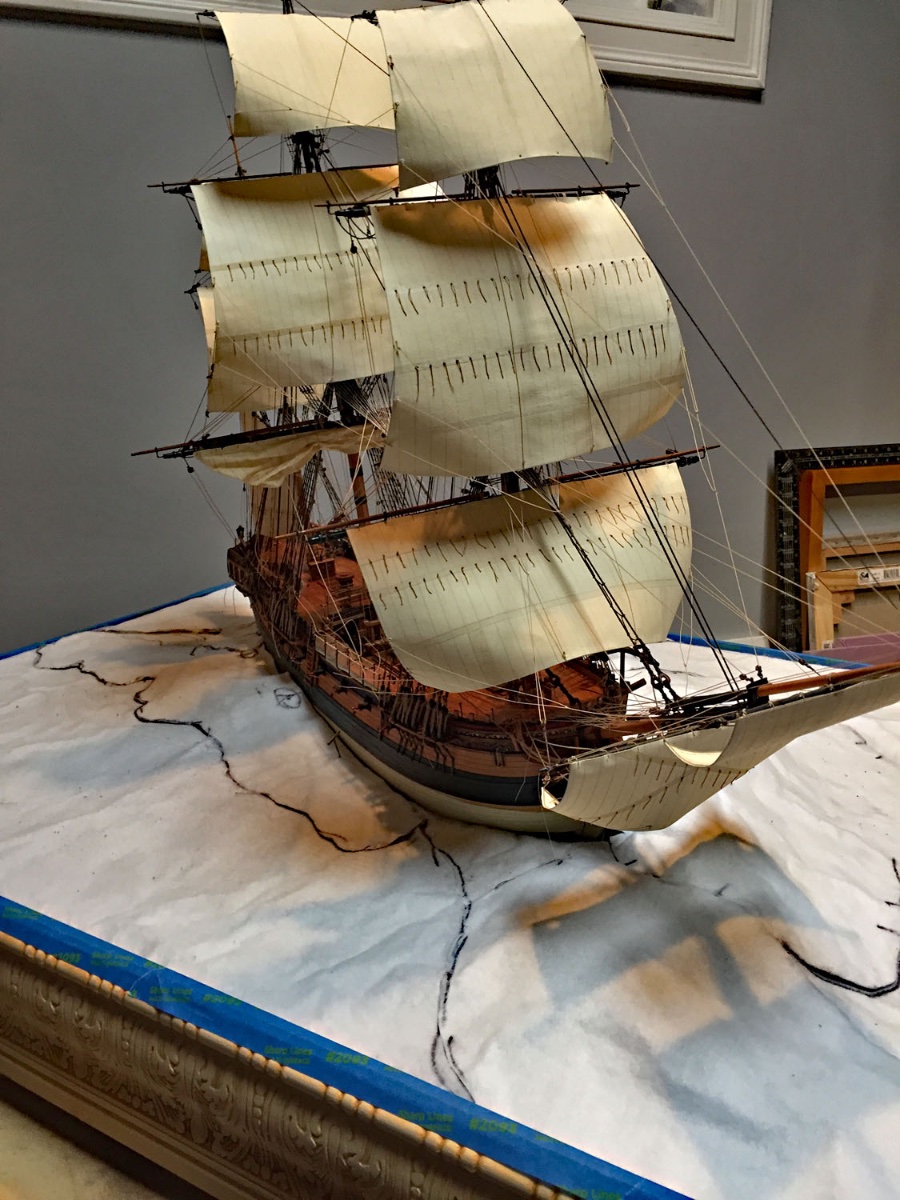
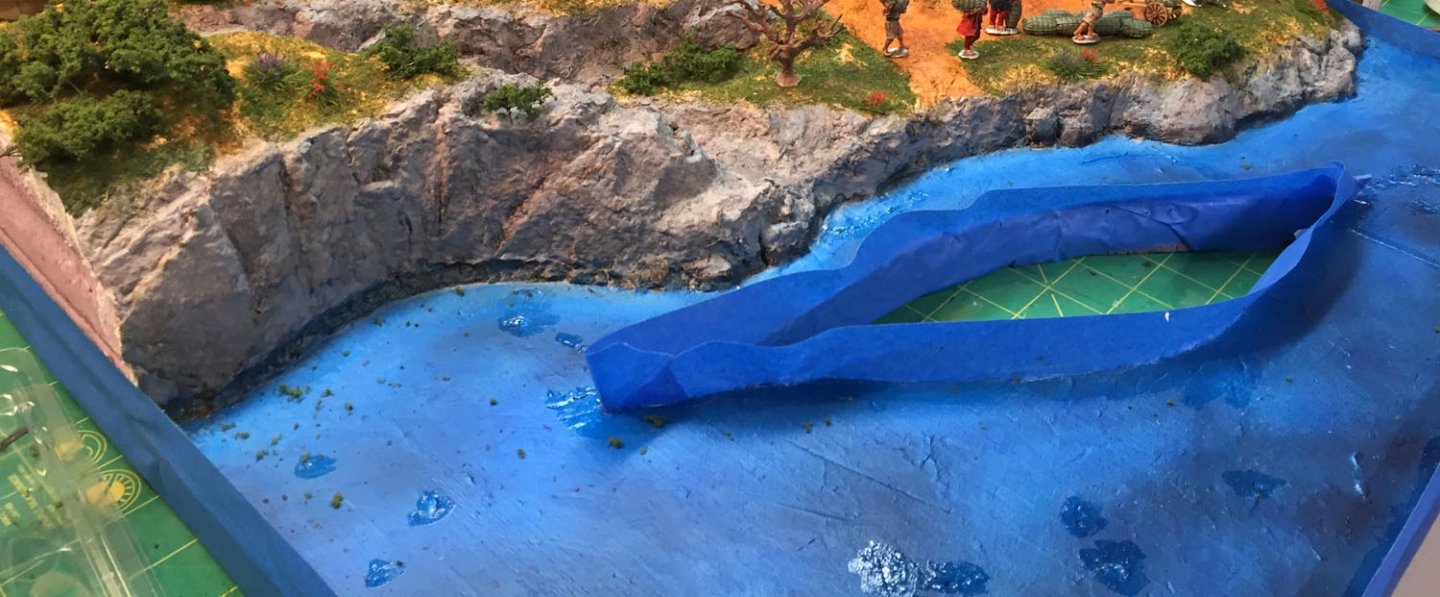
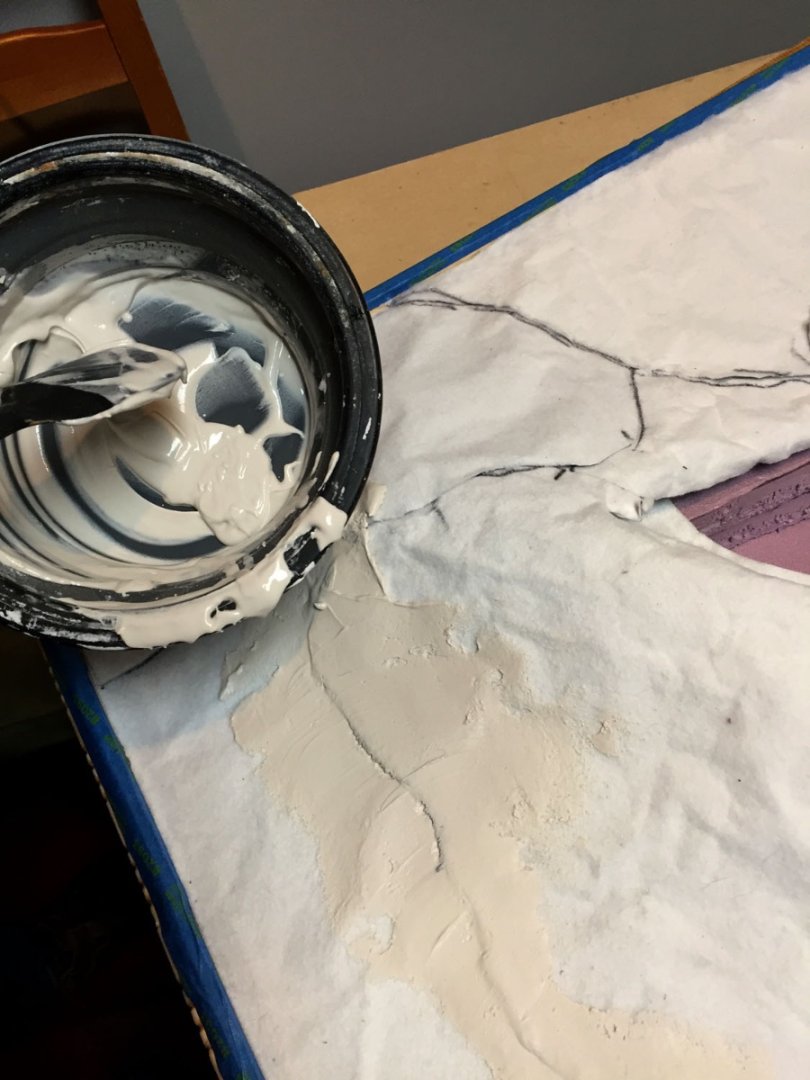
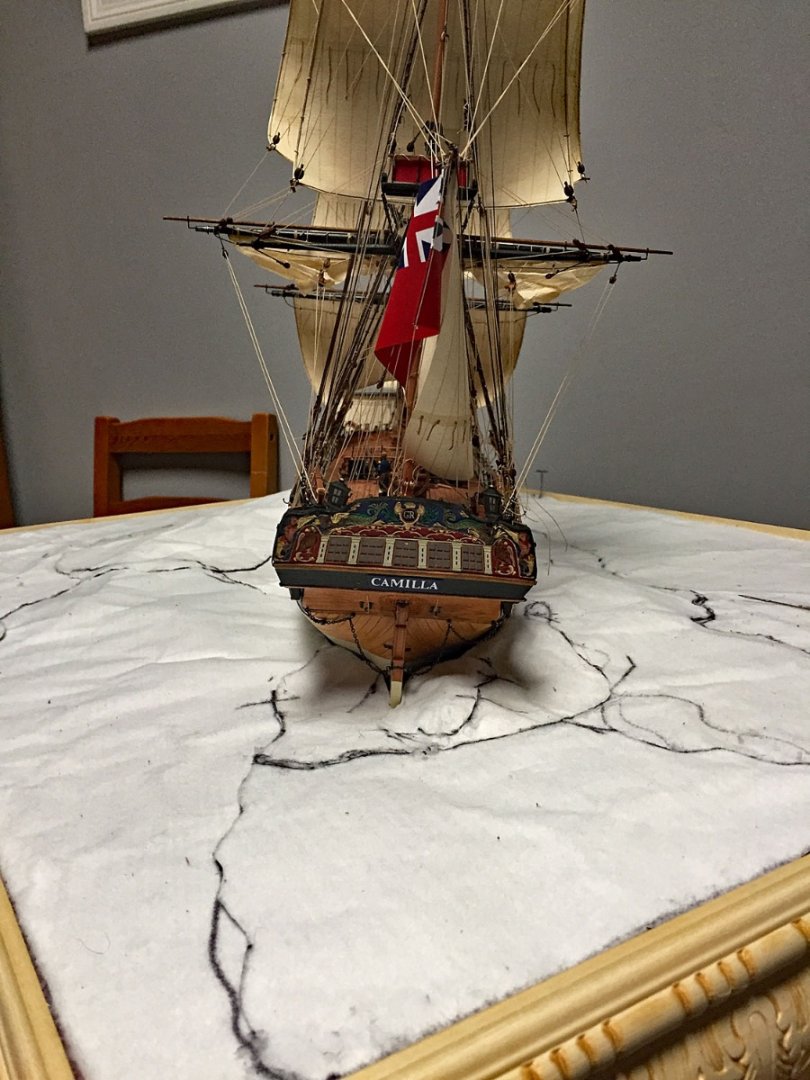
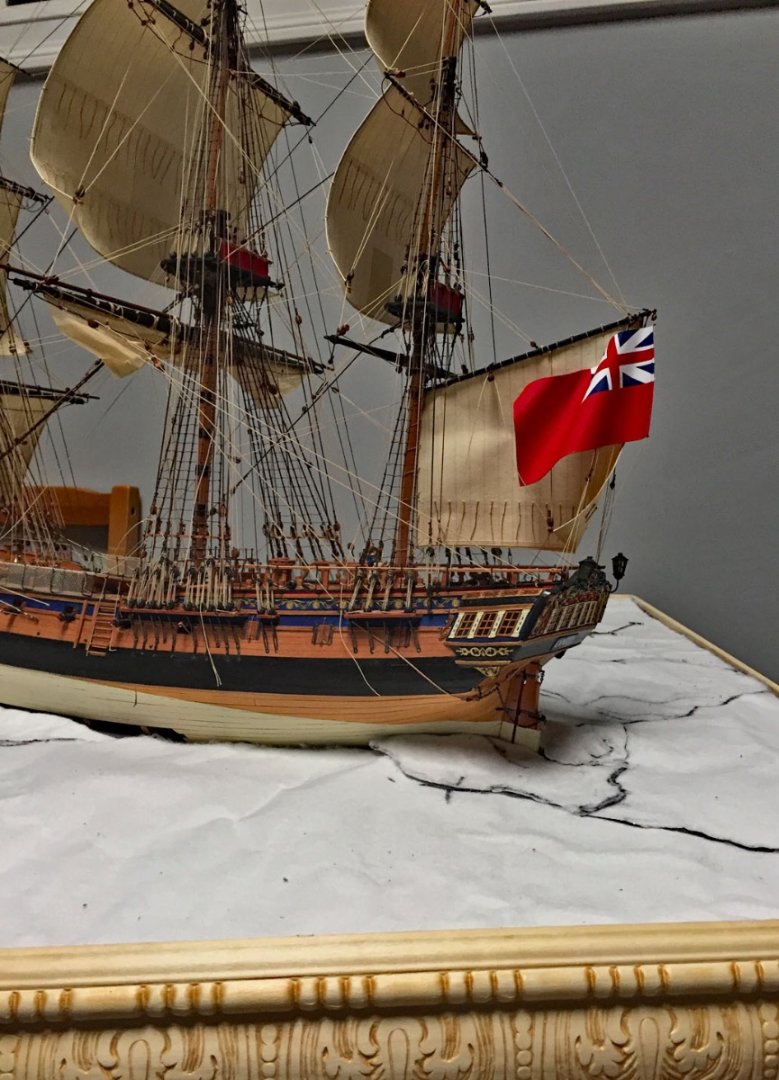
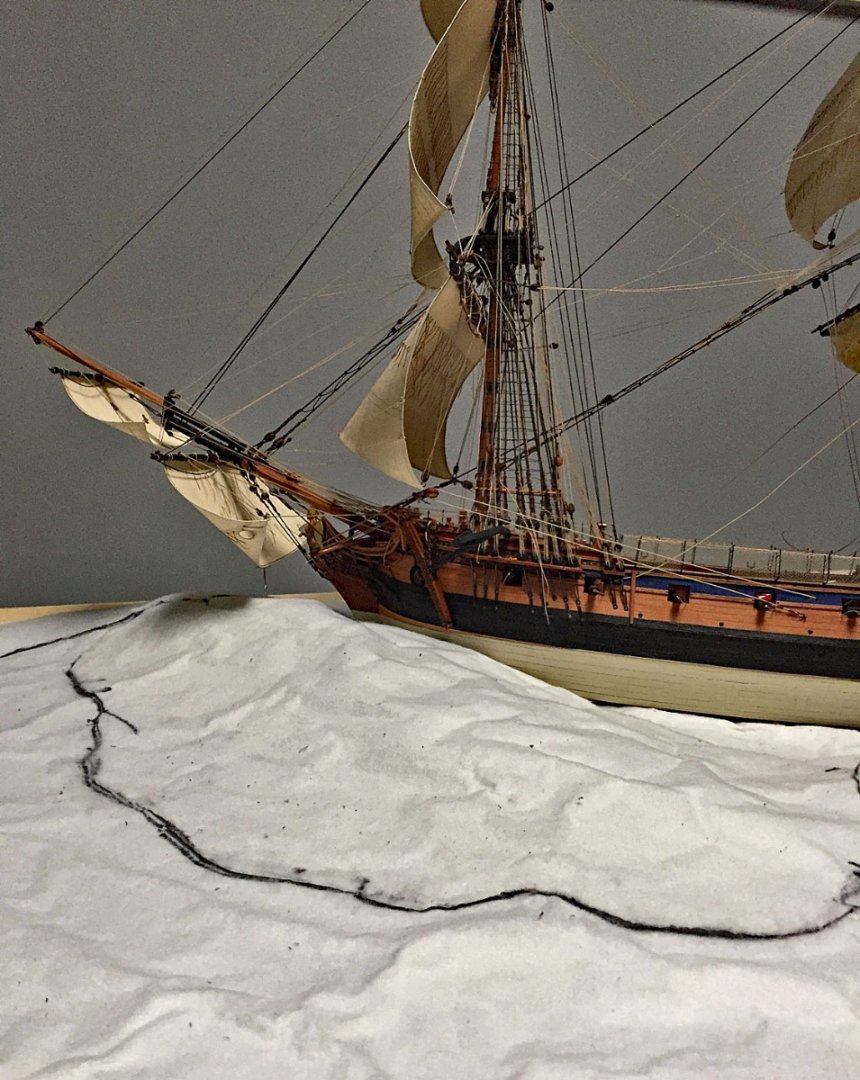
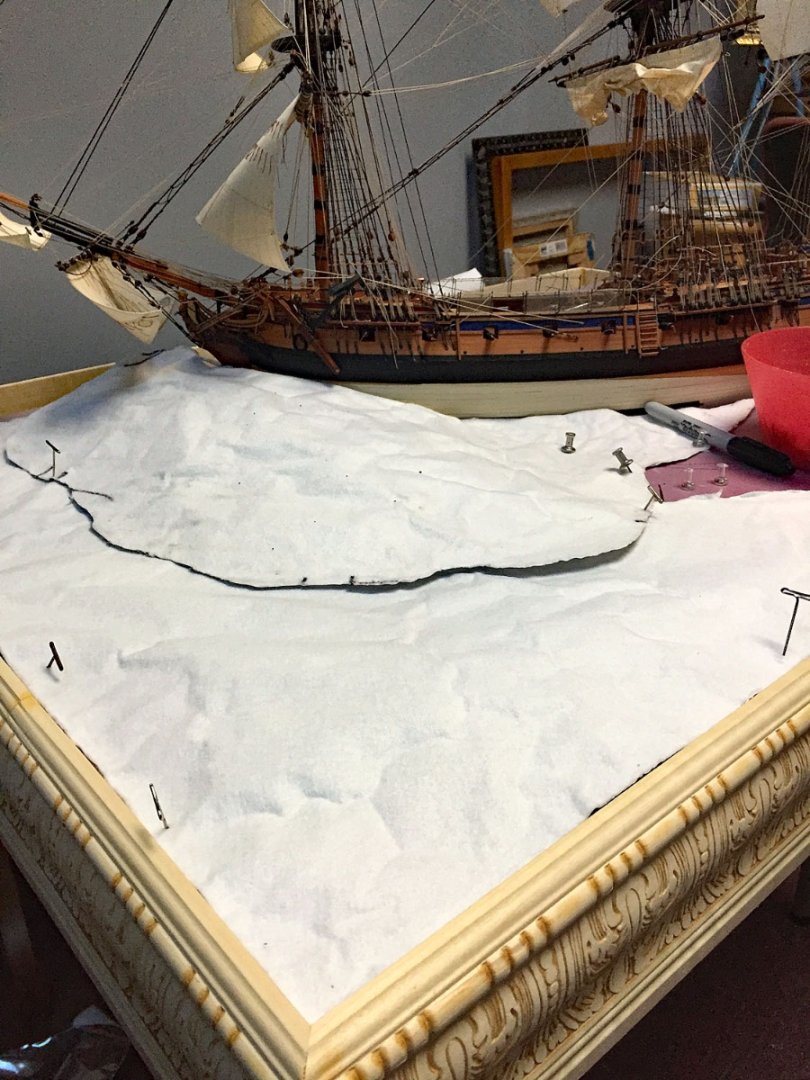
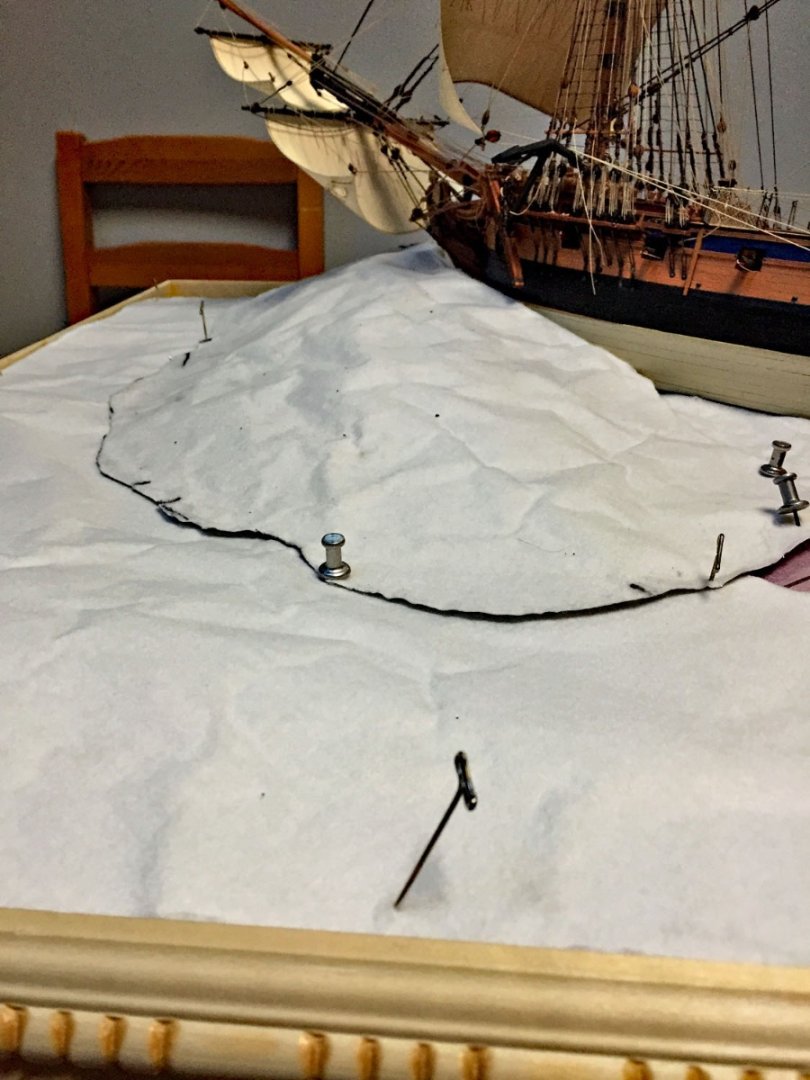
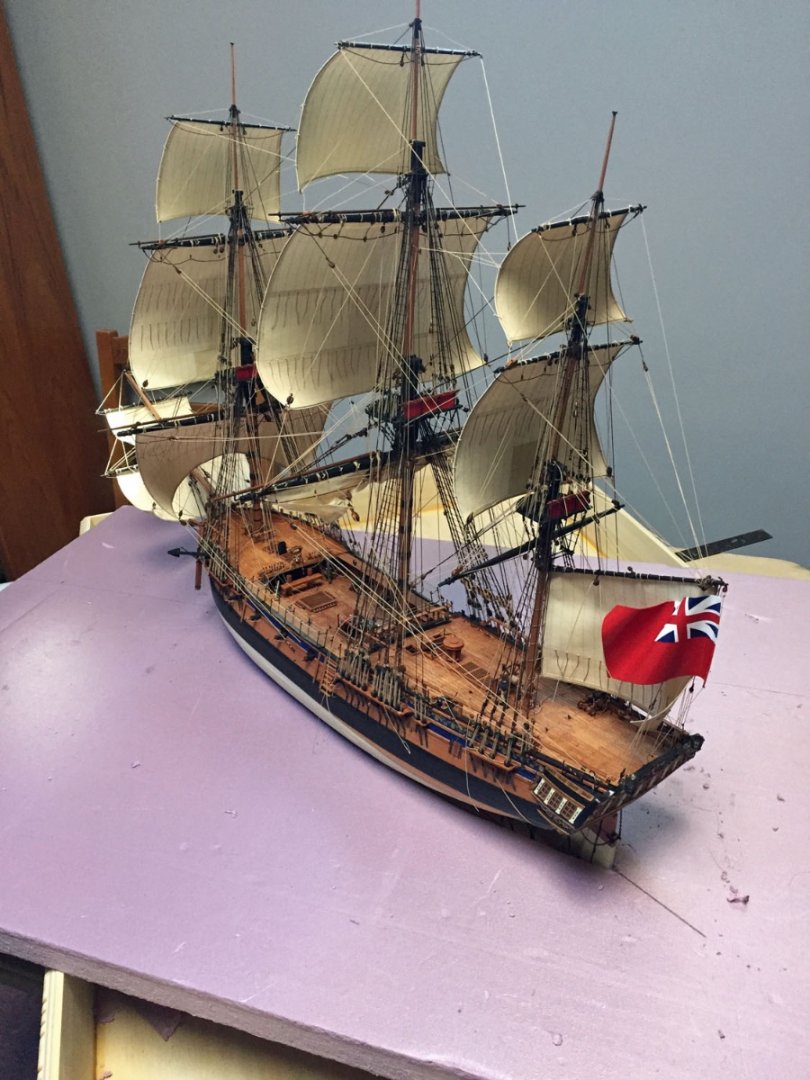
Two more photos of HMS Camilla in her sea environment. What's missing from Camilla's deck? That's correct: the ship's launch. The skids and little boat will be securely mounted post sea creation, since finger access is still required to set the final yard and sail rigging. The launch and her crew board last. Tropical Storm Nicole has moved on from the mid-Atlantic and the sun is re-emerging. It's becoming a nice day...warming up. Time for a dry dock. Warm is good, lower humidity is good too. Time to tackle the next step. A mighty hole where a mighty frigate once sailed. Camilla's keel rests right on the foam board surface. Solid. Once the acrylics I use for making her wake are applied to the hull and onto the plastered cloth, the model will be safely secured into her opening. It's time to give the diorama waves a thin plaster coat. Although I'll leave it o'night and possibly into next week for the next steps, the warm day will help the coating dry evenly. The "cracks" between all the wave pieces get filled first. A kitchen spatula works great for smoothing and spreading the plaster, almost like putting the frosting on mom's cake - if you were lucky enough to have a mom that would let you do more than lick the spoon. The entire surface gets covered in plaster, right up to the edges around the hull opening and up to the blue masking tape along the perimeter of the case. I try to make the coating consistent in thickness but there are spots that will be a little thicker. After smearing-on gobs of plaster, I will use my fingers to smooth out areas that need finessing; I just can't hold my old iPhone with goopy fingers so I didn't take a photo of this technique, but it's important to make all the subtle, undulating surfaces of the ShaperSheet waves reasonably smooth looking. The plaster mix is also from Woodland Scenics. I purchased it at the same time as the ShaperSheet. Almost any good quality hobby brand will work. The consistency of the mixture (just water and the dry powder) is like a thin pancake batter - more watery than not; it gets thicker when spread on the cotton cloth of the ShaperSheet surfaces. The cloth surface holds the plaster well. When the surface has completely dried, it will be solid, hard as a...rock?


- 542 replies
-
- 13
-
-
- Sphinx
- Vanguard Models
- (and 3 more)
-
When you have an itch, you have to scratch it! What a gorgeous model. Congrats on this stage of your build, Glenn. Also, your photography is so good I could easily conclude you are a professional photographer.😂
- 840 replies
-
- 3
-
-
- winchelsea
- Syren Ship Model Company
- (and 1 more)
-
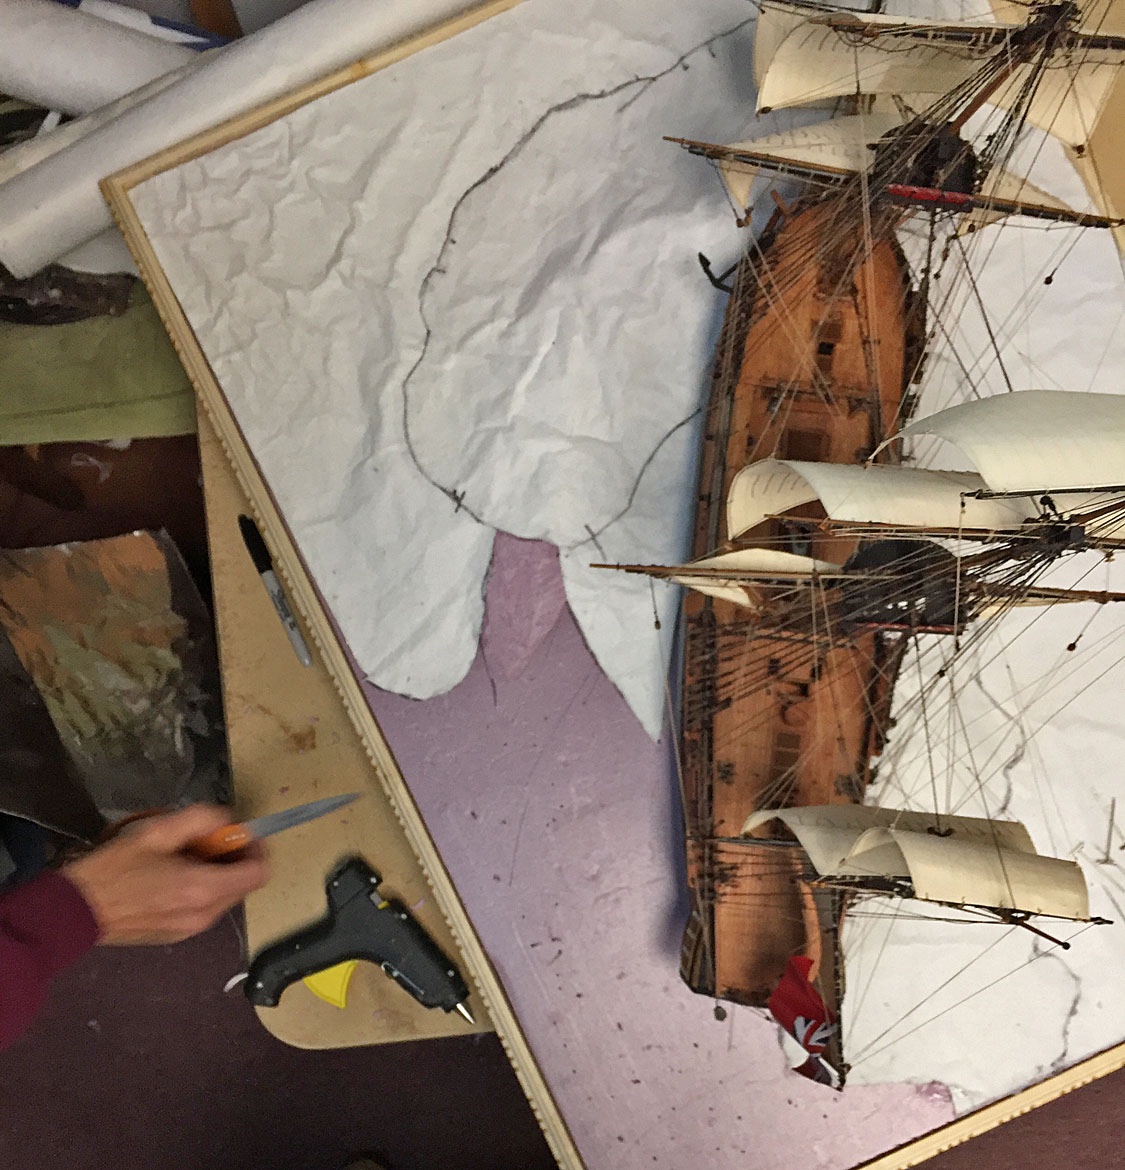
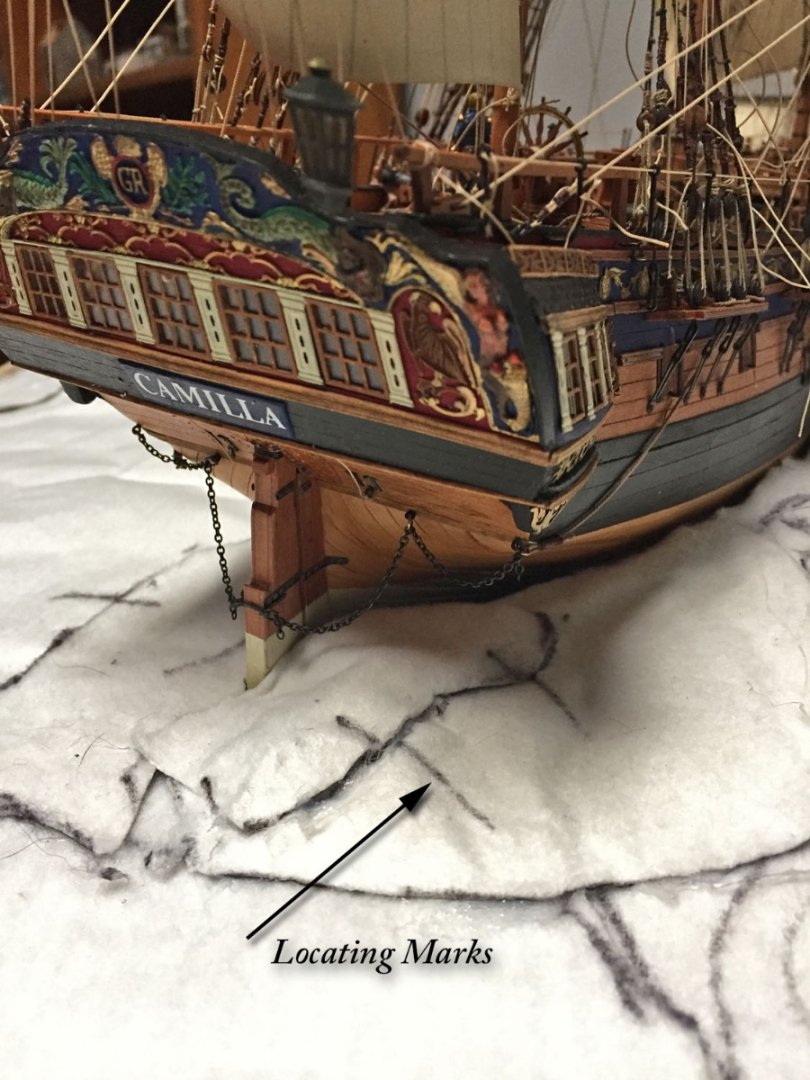
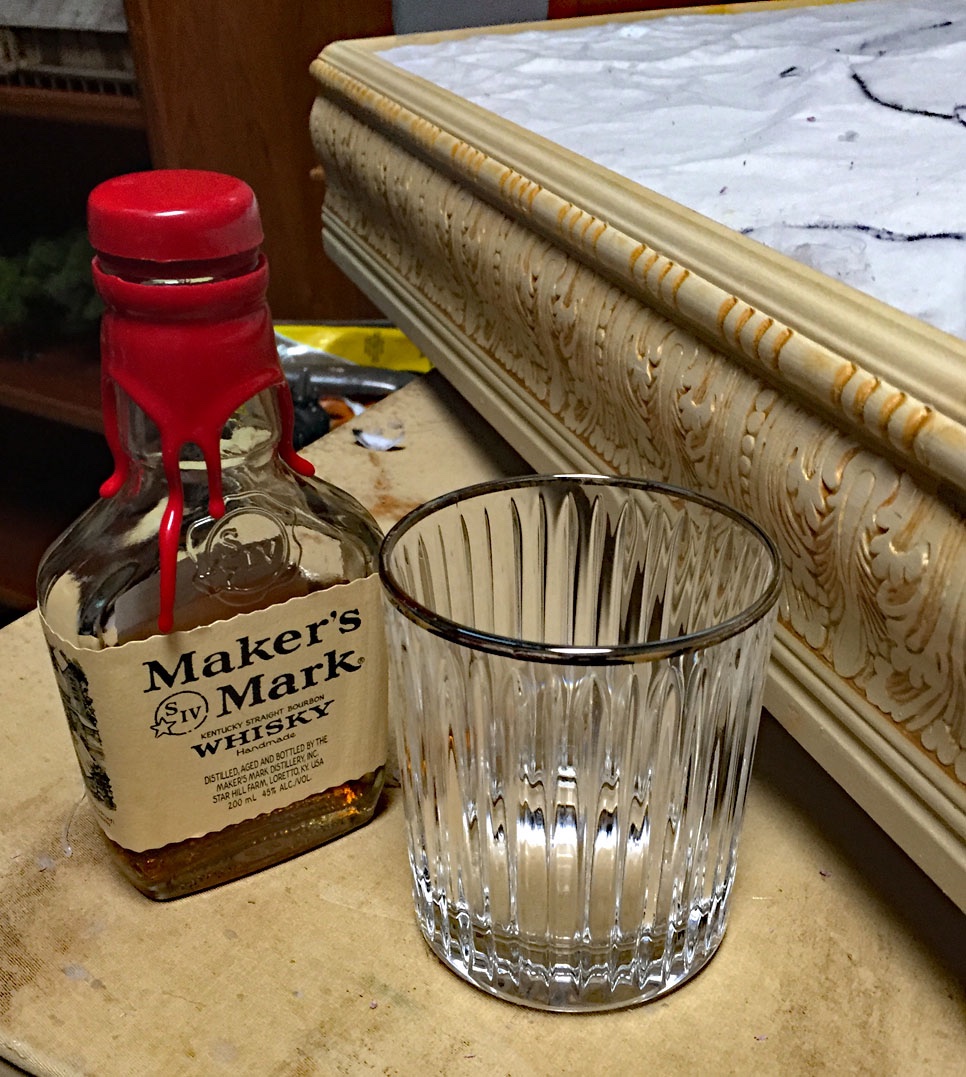
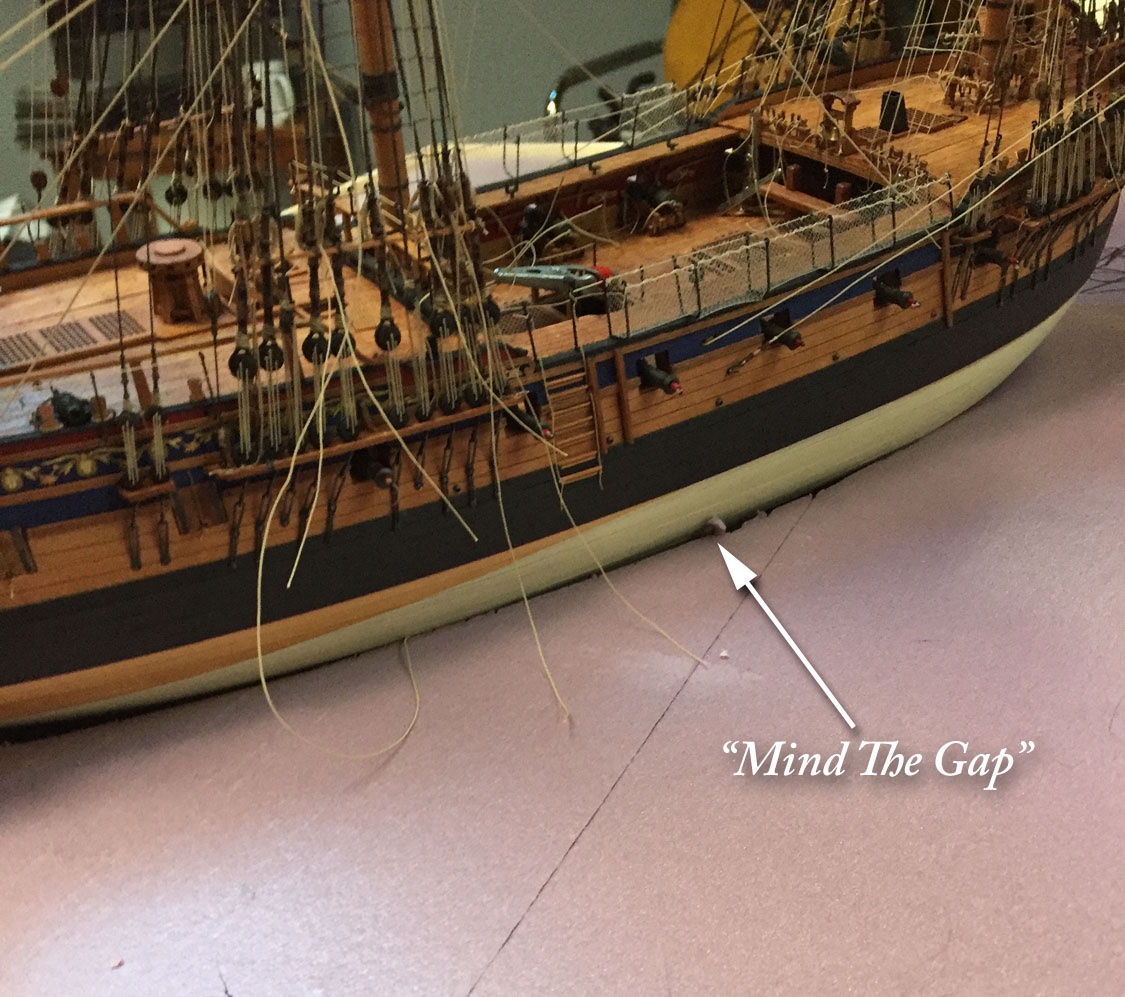
The Water Puzzle continues. Rolling along Camilla's port side, another tapered foam wedge supports three raised wave sections. All the ShaperSheet pieces are cut with heavy-duty scissors; an X-acto knife won't cut the stuff. A few wave sections remain. Working around my completed model while it's in the diorama's cutout isn't too difficult but I needed to be careful while handling the larger sections of the ShaperSheet material. All of the wave sections have been cut and formed and are securely glued-in around the case's perimeter as well as all along Camilla's full hull. She can be easily lifted out of the setting and is not yet secured to her sea. A detail of the tricky stern wave sections shown here. Smaller ShaperSheet pieces were cut and had to align precisely so subsequent "wake" making steps would be easier to execute. The locating marks help when executing the final glue process. All the black Sharpie marks will disappear in the next stage. Time for a water making break: neat. No water, no rocks. Best enjoyed with a good friend or partner, but still acceptable as a solo toast to an involved, multistep process that's gotten to about the halfway mark for the water surface of the complete diorama. A view from the port stern. Note the gap along her hull. This was subsequently filled with another wave piece. The completed port bow wave action. and ...the completed bow waves. The blue masking tape has been affixed to the full perimeter of the wood case to protect its edges during the next step of cladding/surfacing the synthesized waves.


- 542 replies
-
- 25
-
-
- Sphinx
- Vanguard Models
- (and 3 more)
-
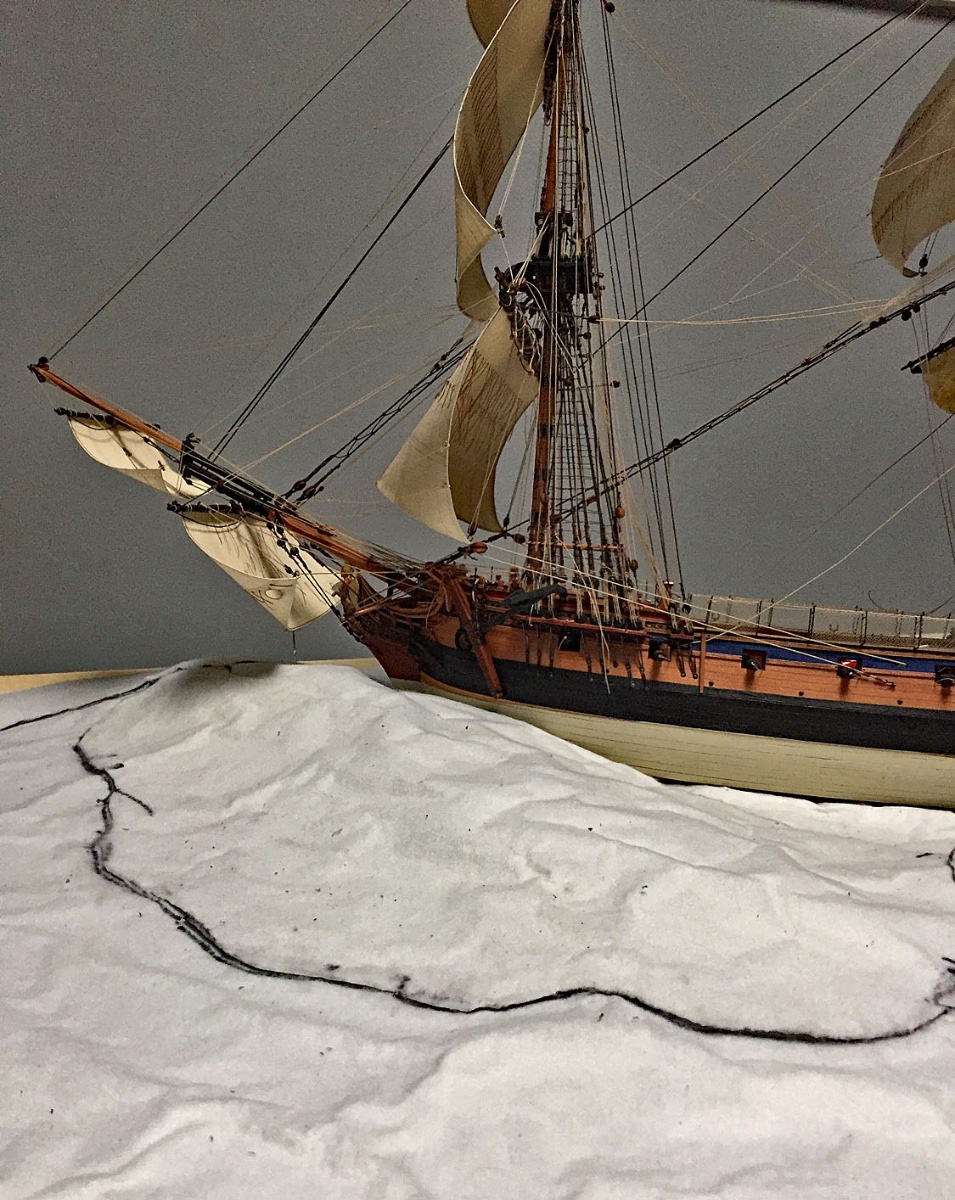
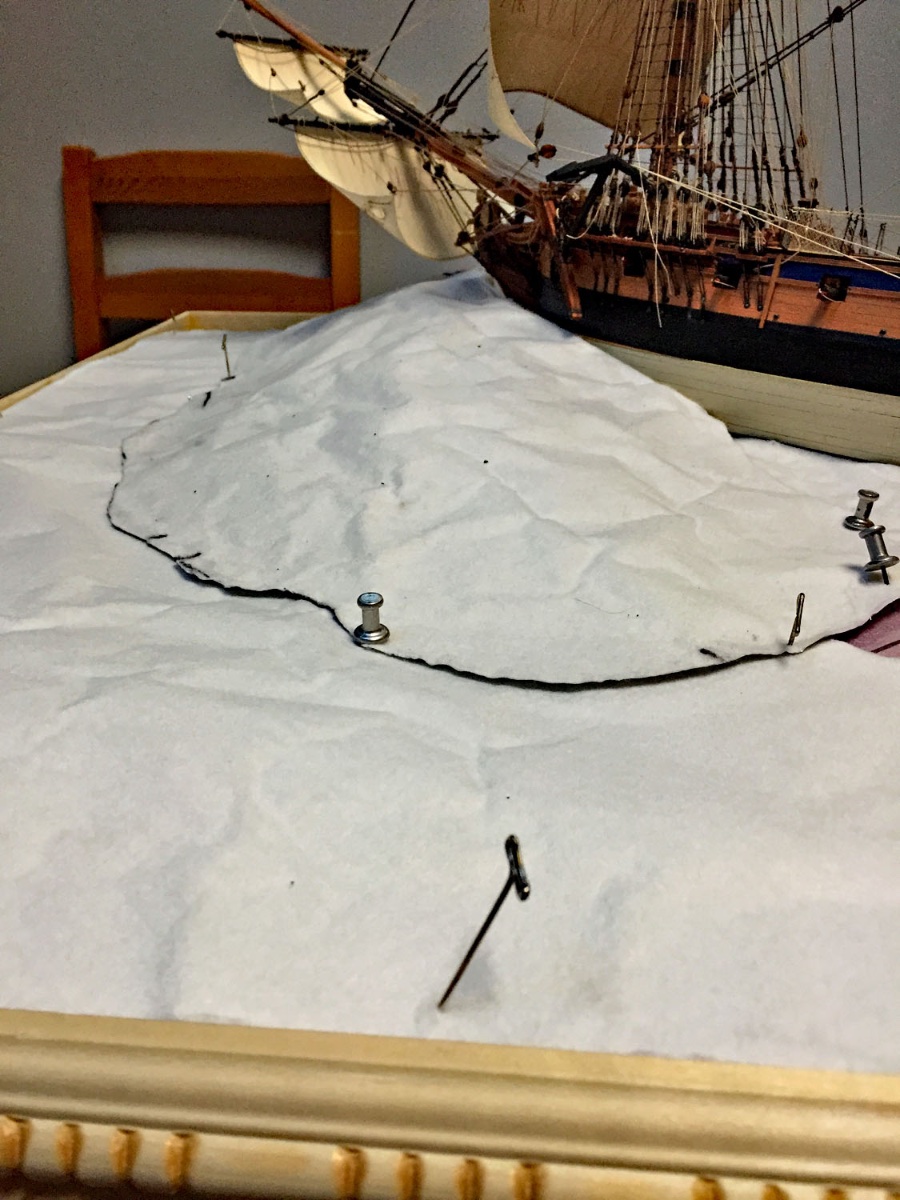
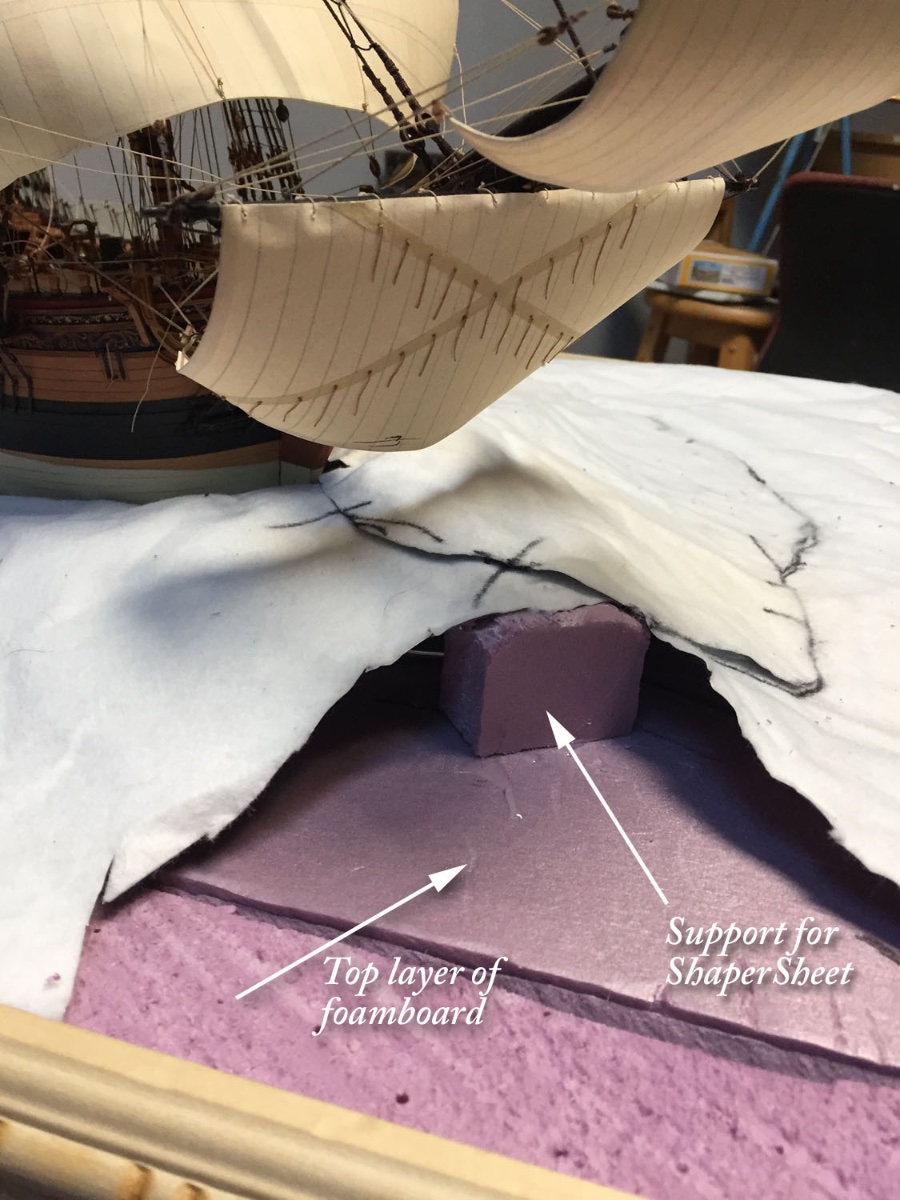
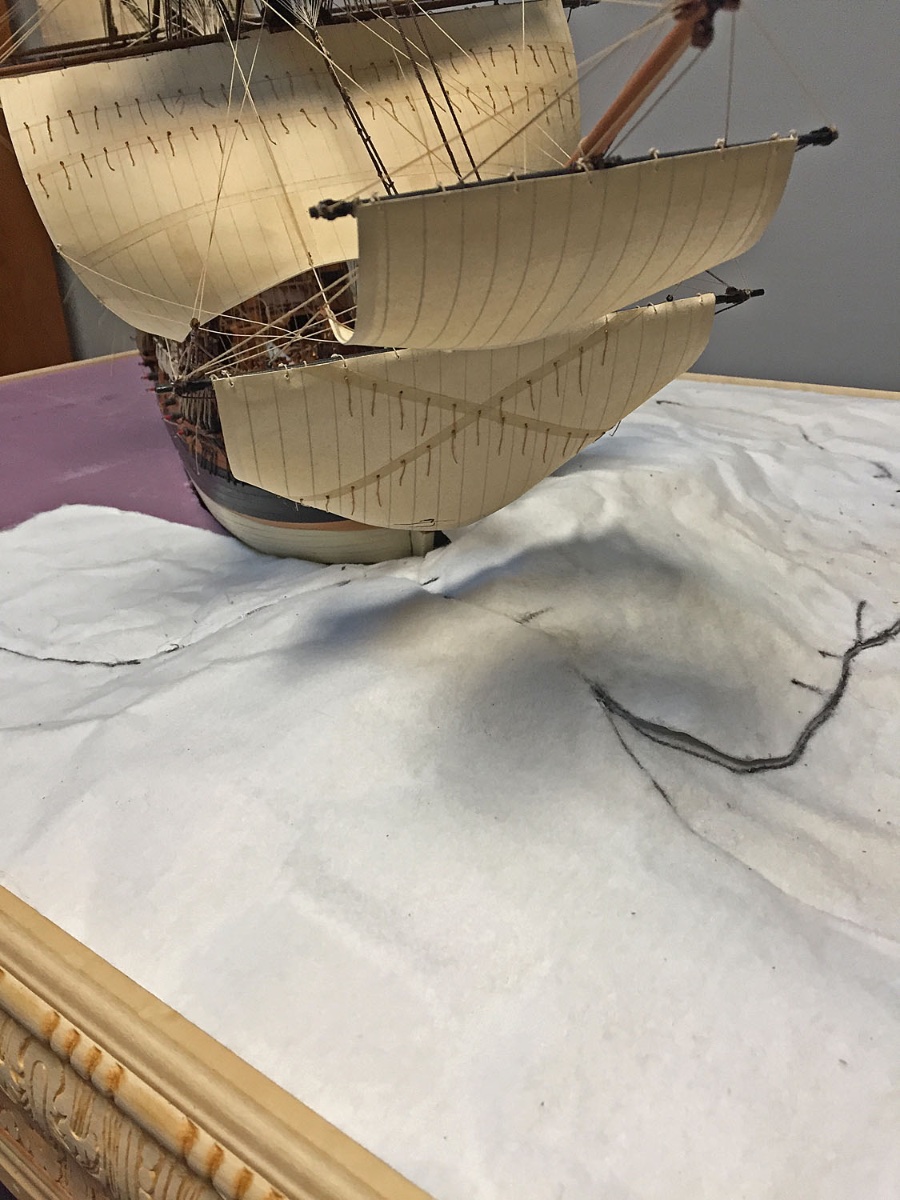
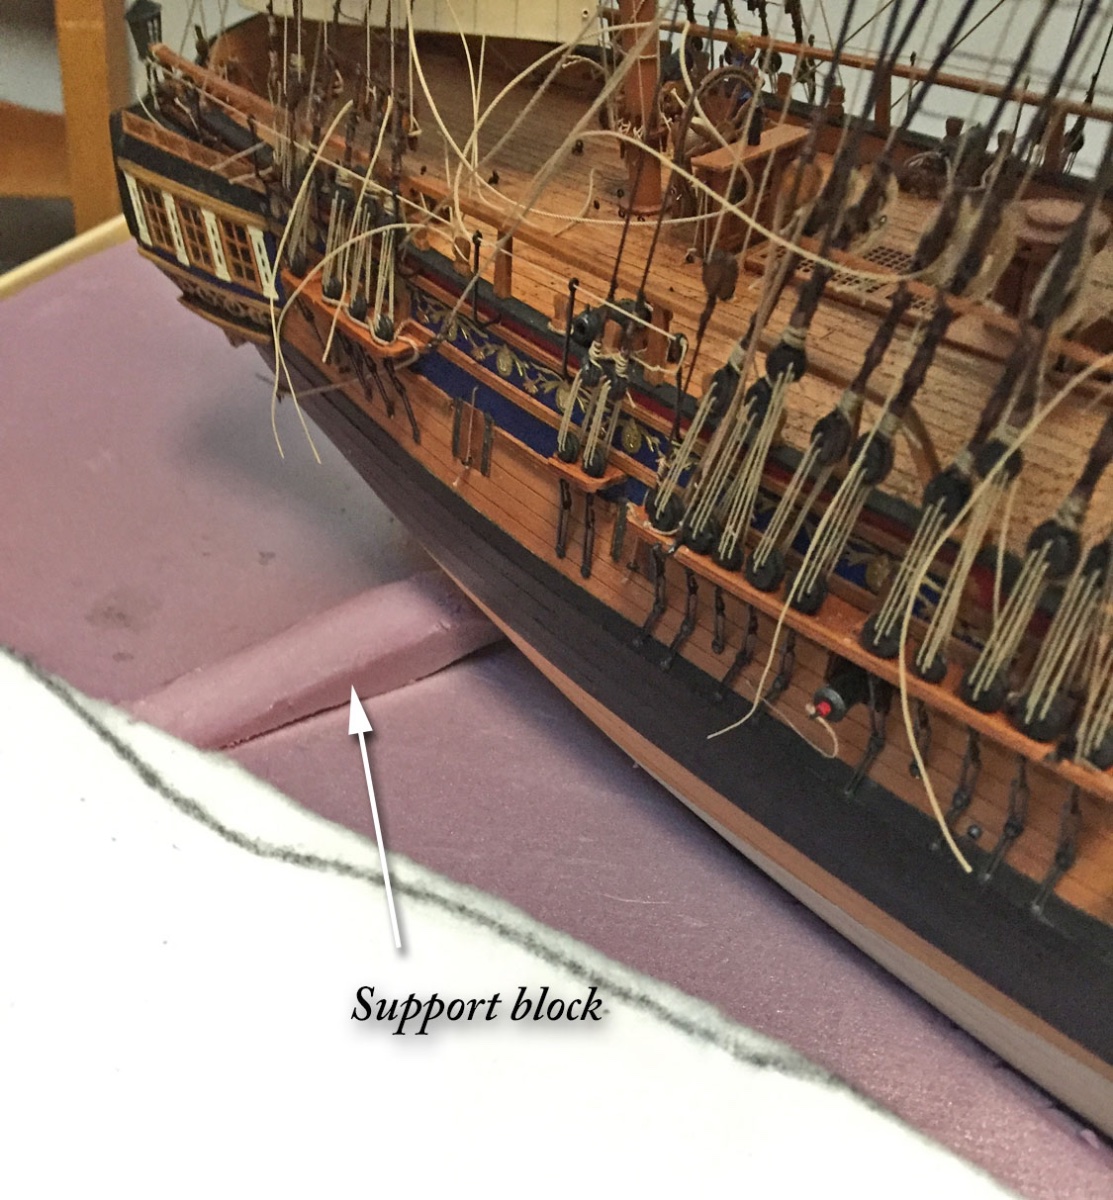
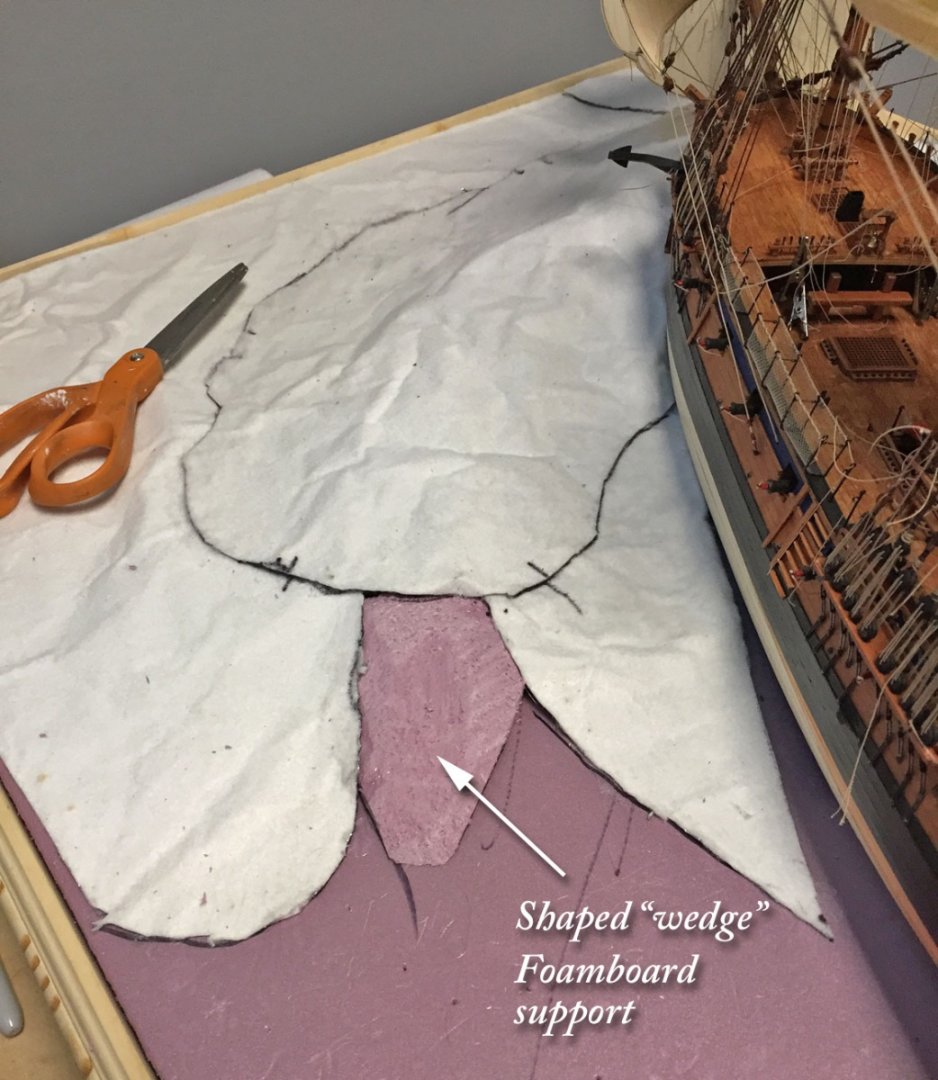
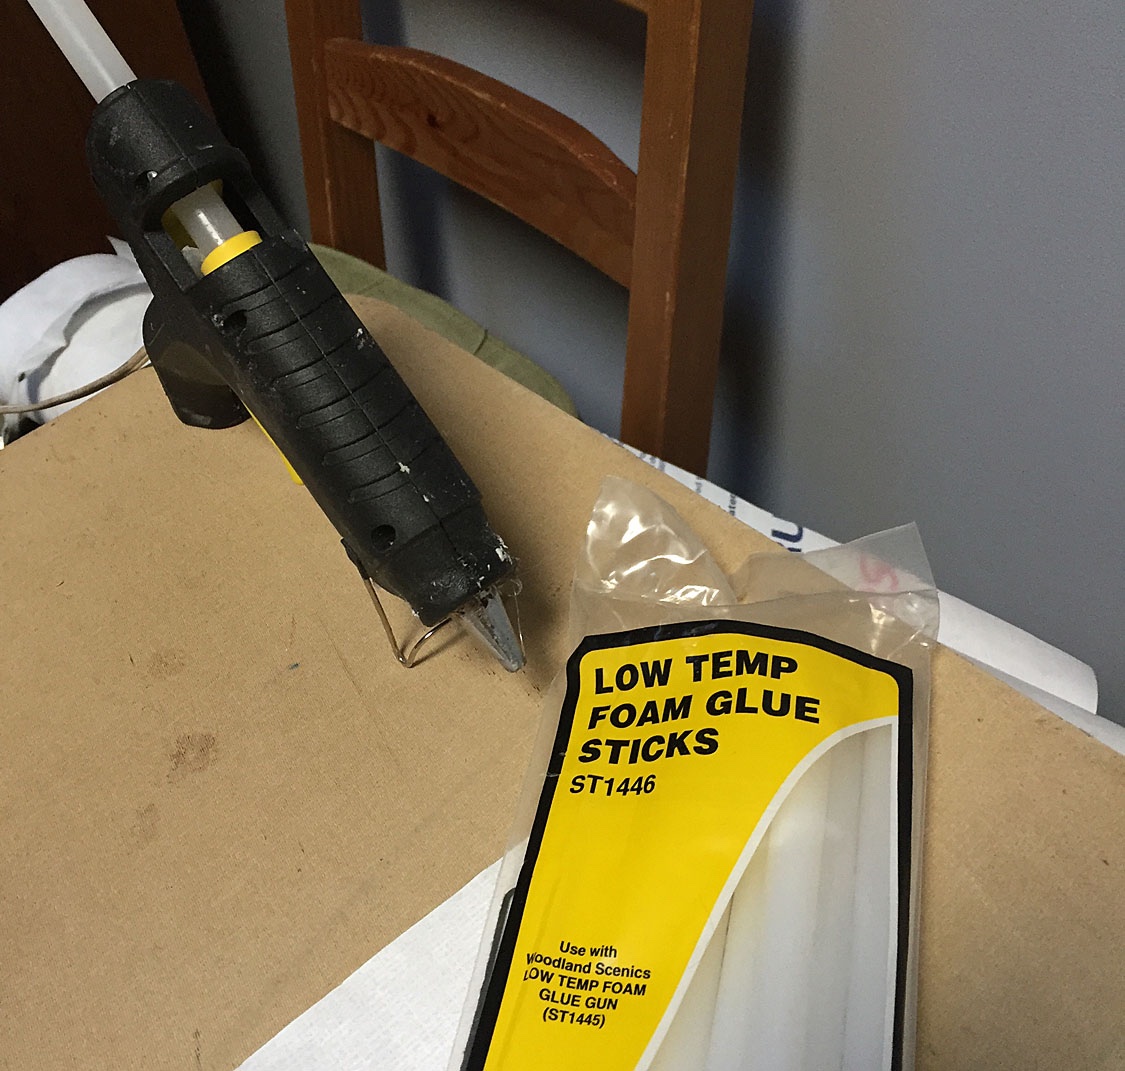
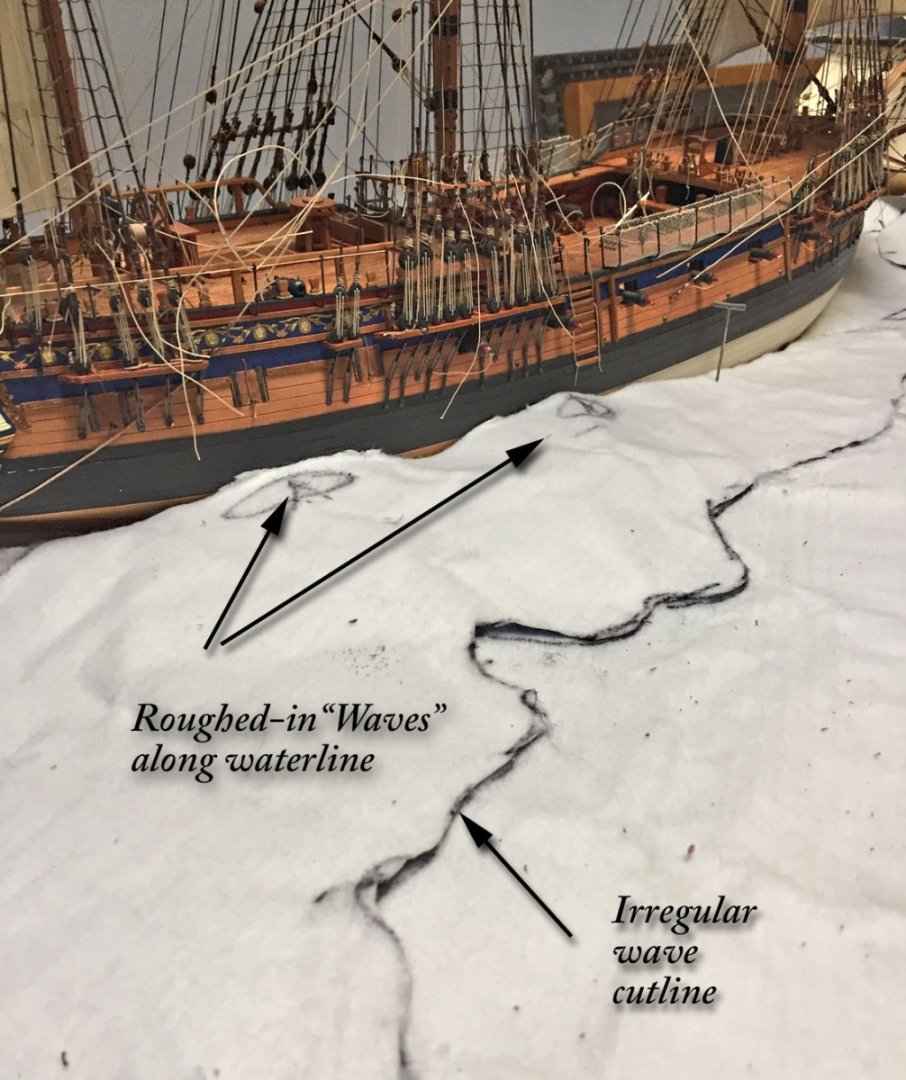
Now I get to Make More Waves, several of them... The first wave piece is formed and up against Camilla's stem and bow. I increased the vertical profile of the cut sheet up by manipulating the aluminum foil. The cotton-clad surface is face up, obviously- not the shiny aluminium one (U.K. English spelling!). As surmised, this is a very subjective process, difficult to describe in precise terms. Basically, I try to avoid sharp lines as much as possible when manipulating the material: in my life experience, I've not seen lines and angles with Euclidian geometry represented in the sea! This said, if some straight lines crop-up during this stage, no problemo. There will be remedies a-plenty forthcoming. A large section of "Wave" meets the case corner and underlays the first wave section that touches the model's port bow. T-pins are very handy to secure the aluminum/ cloth pieces. The section in the forefront is also shaped with raised areas, but less dramatic than the bow wave piece. A different, lower viewing angle to the wave shape that touches the bow of the model. This wave creation phase cannot be rushed as it is quite critical to create a convincing "kinetic" seascape. This view shows the layers of the foam board in the case. The foam board couldn't be cut into a precise, close-fitting case pieces because of the scored lines on the raw sheets so a separate sectional piece was cut and added to close this gap. Both the foam board as well as all the ShaperSheet wave sections will be glued together with low-temp glue sticks, also from Woodland Scenics. Regular hot glue will MELT the foam board and that's not good! The aluminum/cloth sheet needs to securely adhere to the foam board, otherwise a white or yellow glue could suffice for this stage. Since the hot glue is handy I use it to glue the foam board into the case and to glue all three layers together too. In making the wave sections there will be raised areas that need support; in this instance, right at Camilla's cutwater. A support made from the same foam board is placed beneath the ShaperSheet and hot-glued into place to give the wave pieces a firm footing before permanently gluing them into place. Camilla's bow, wave sections hot-glued in place and completed. The edges of the overlapping pieces will virtually disappear in a subsequent "cladding/surfacing" step with hobby plaster. Moving along the hull, another small foam block - in this case a tapered one. The support block is placed near the stern to support a wave section. Camilla's dangling rigging ropes have been left loose since the yard bracing and bow line runs may need to be adjusted to reflect her position in the sea setting. On Camilla's starboard, a wave section is cut and finger-formed to align along her hull with sea "bumps", roughed-in as shown. It is very important to make the edges of all the wave pieces irregular to reduce or diminish as much as possible any linear lines in this sectional approach process. This will pay-off immensely in the subsequent steps I'll articulate later. Camilla's starboard main hull wave piece is shaped. The fuzzy surface of the cotton does shed as you handle it but these extraneous bits can be easily removed; all black edge and position marks will be covered with the cladding shaping plaster when all the wave sections are secured with glue and completed. More wave sections are coming in the next post.


- 542 replies
-
- 15
-
-
-
- Sphinx
- Vanguard Models
- (and 3 more)
-
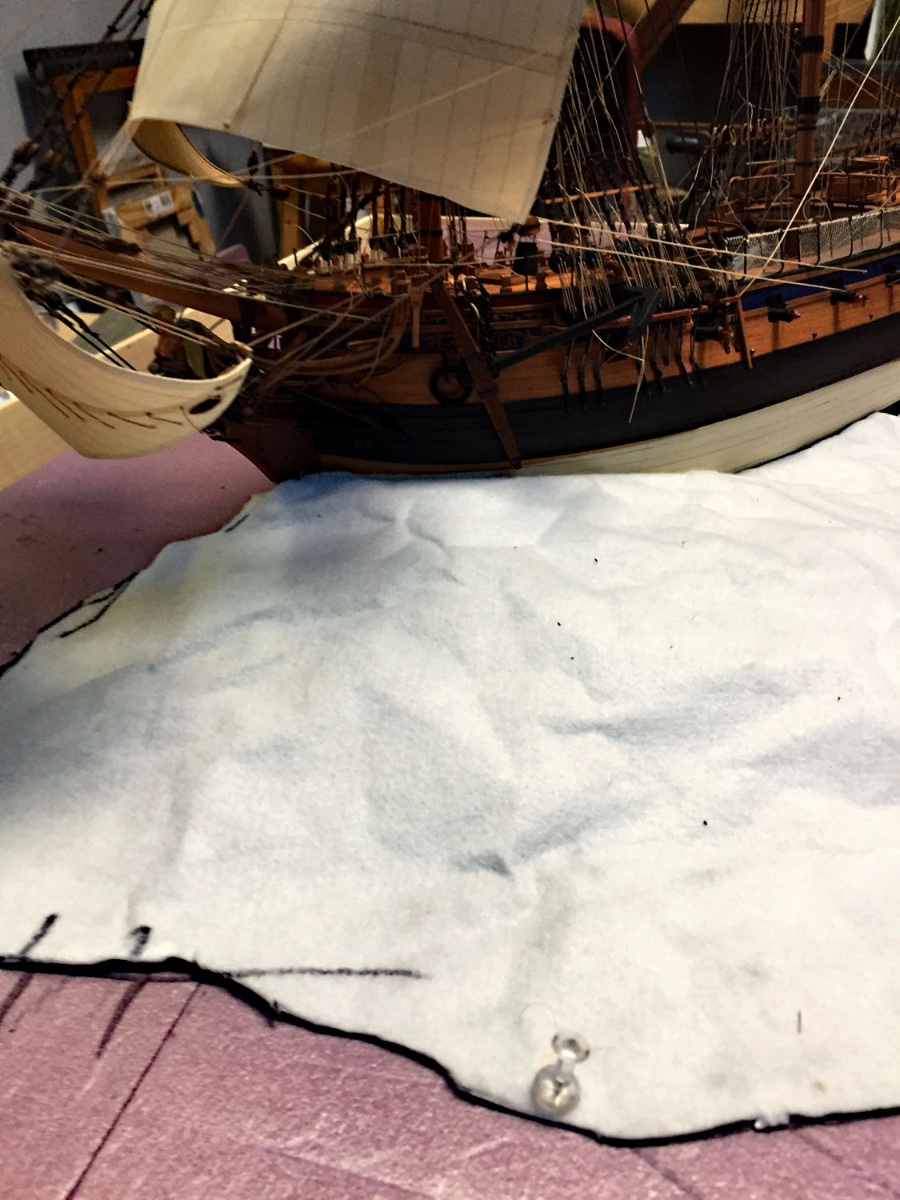
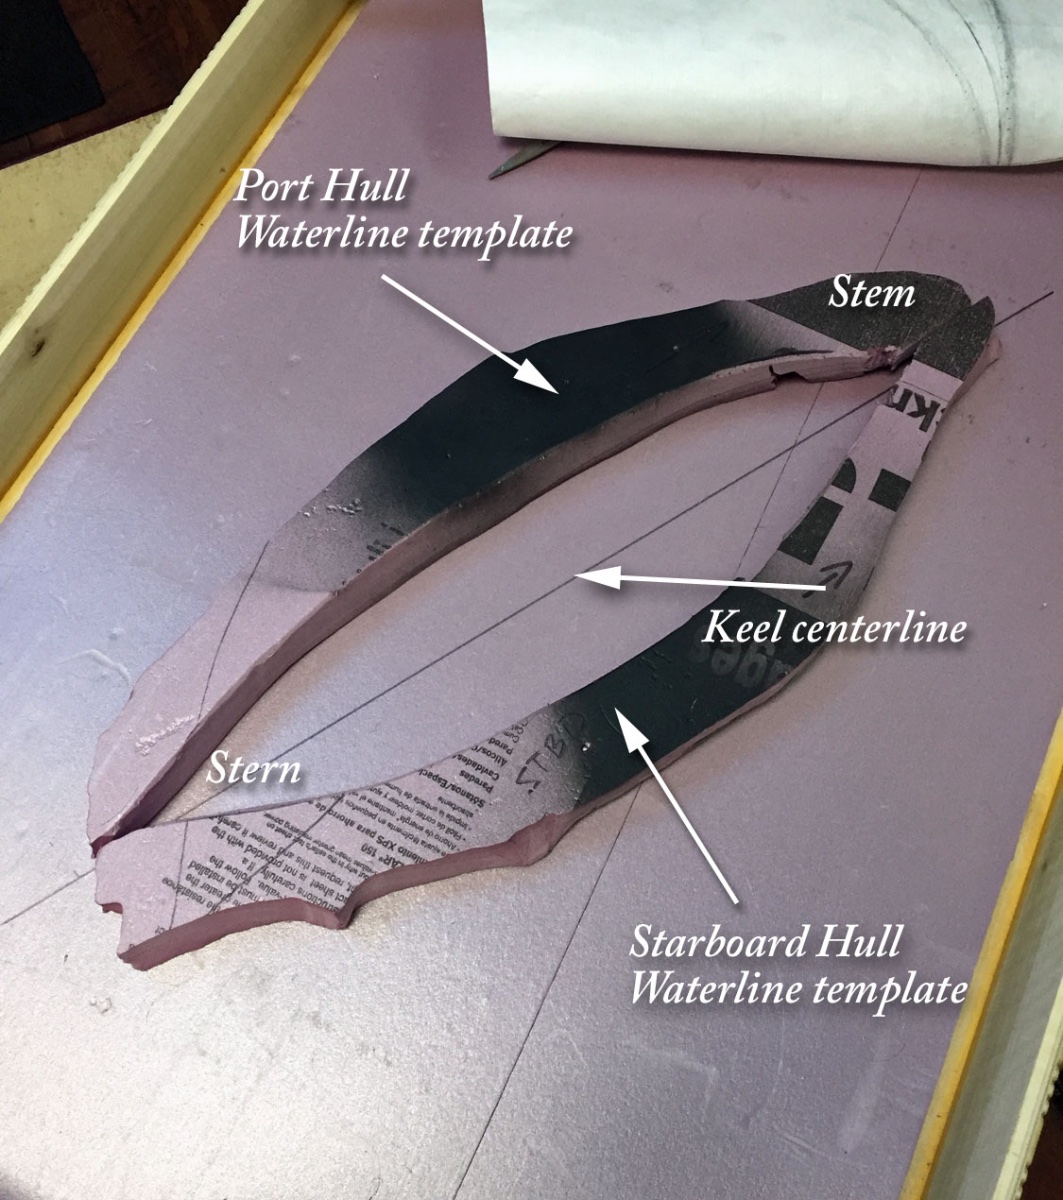
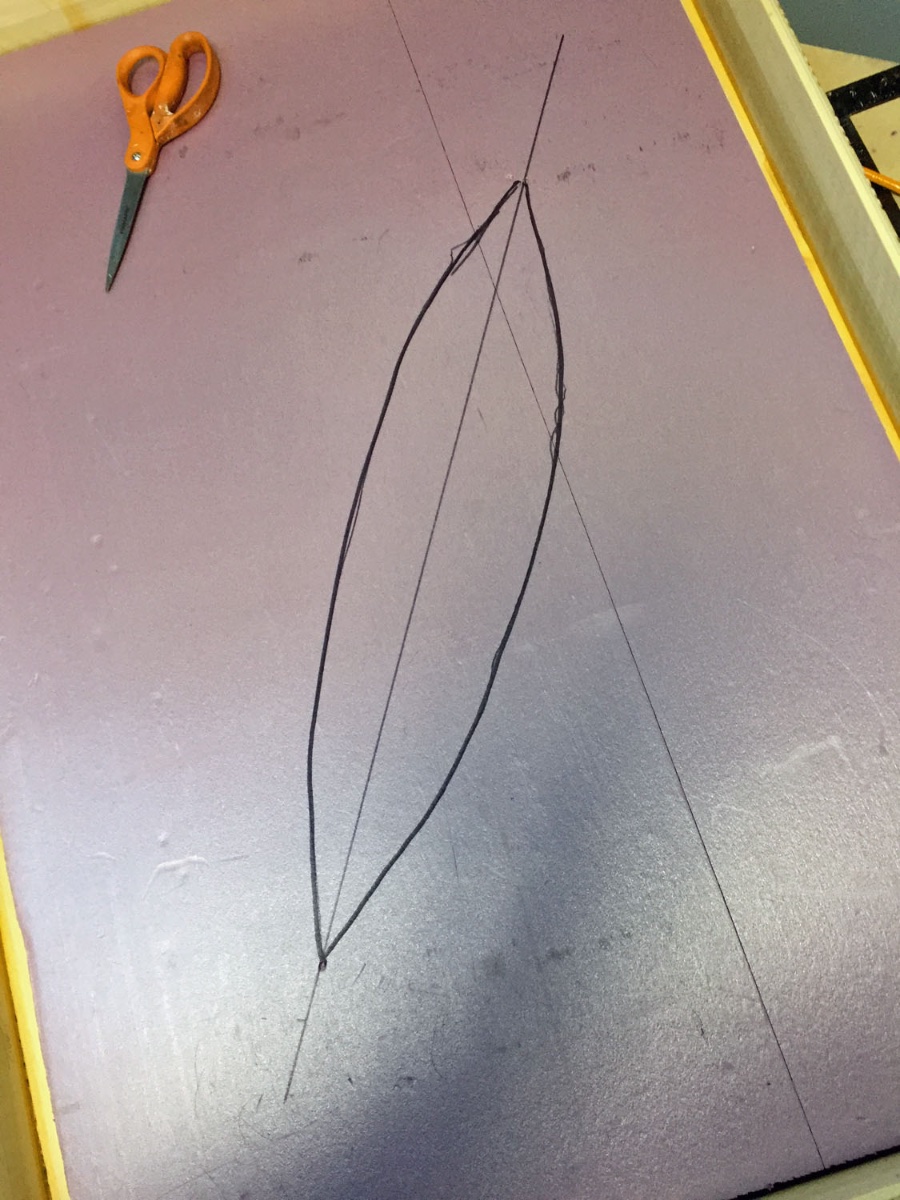
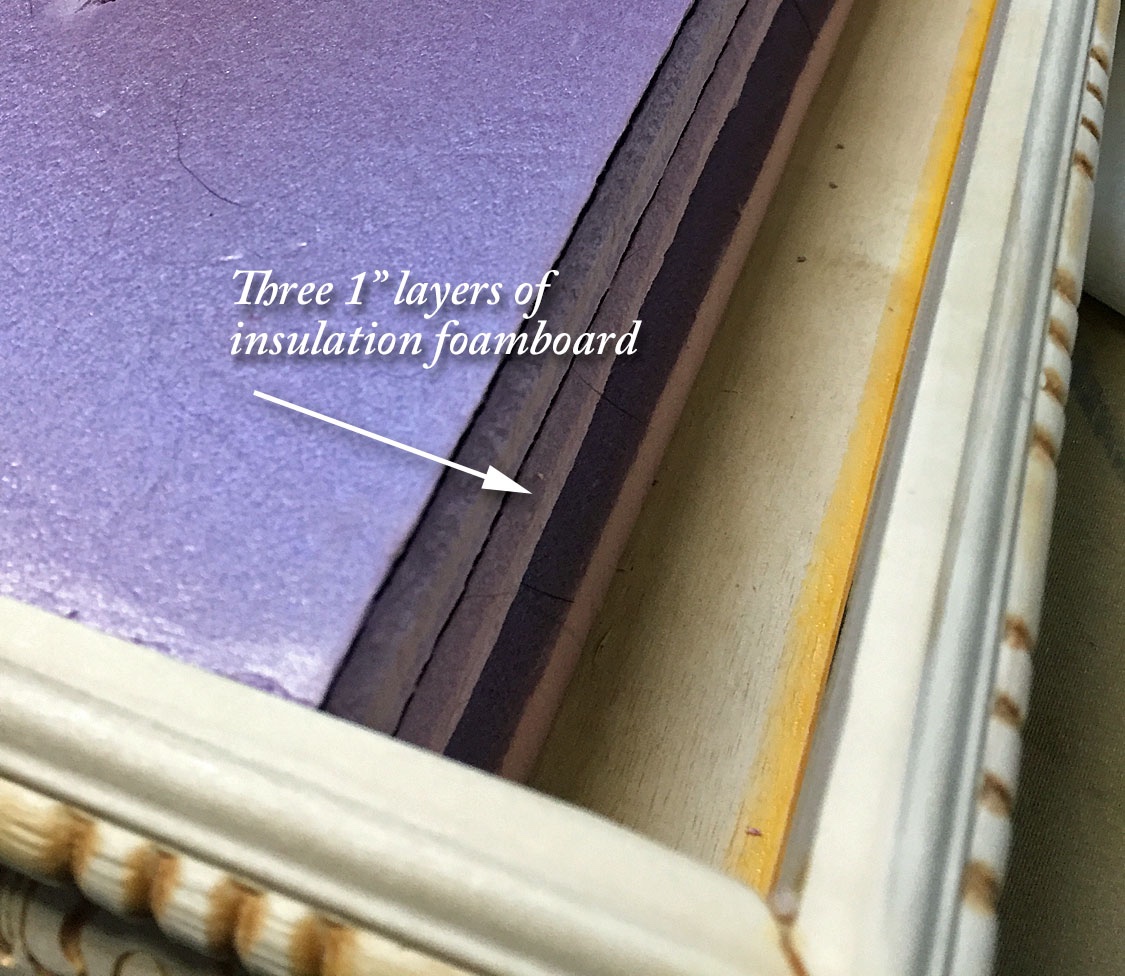
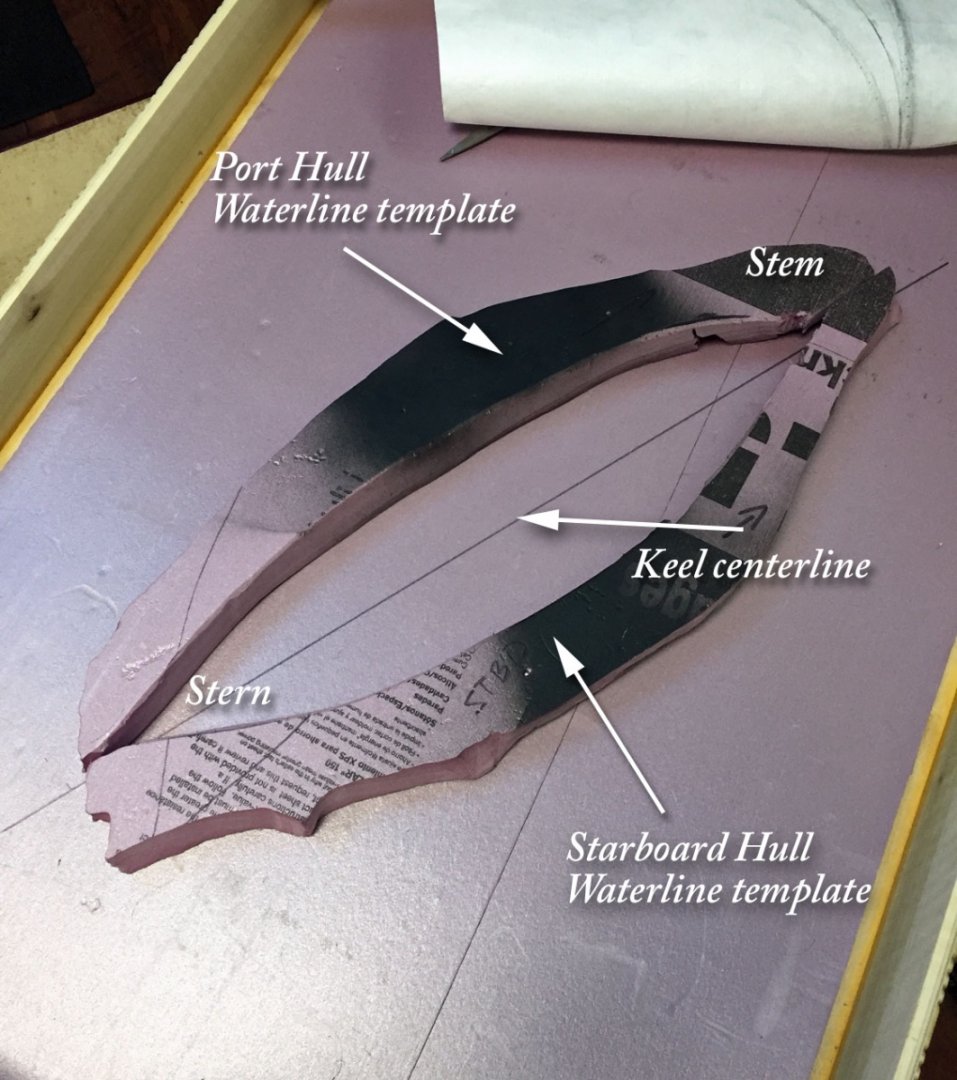
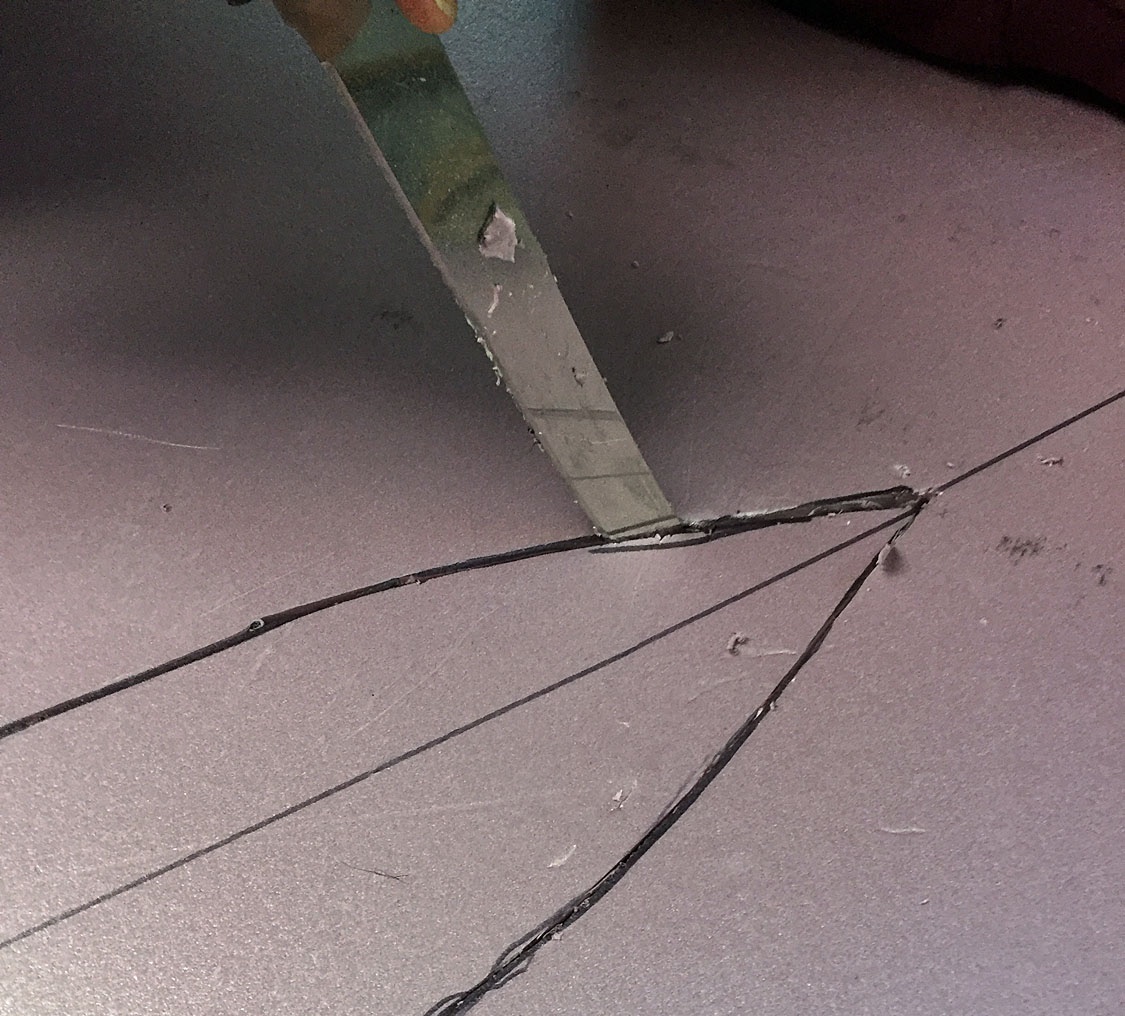
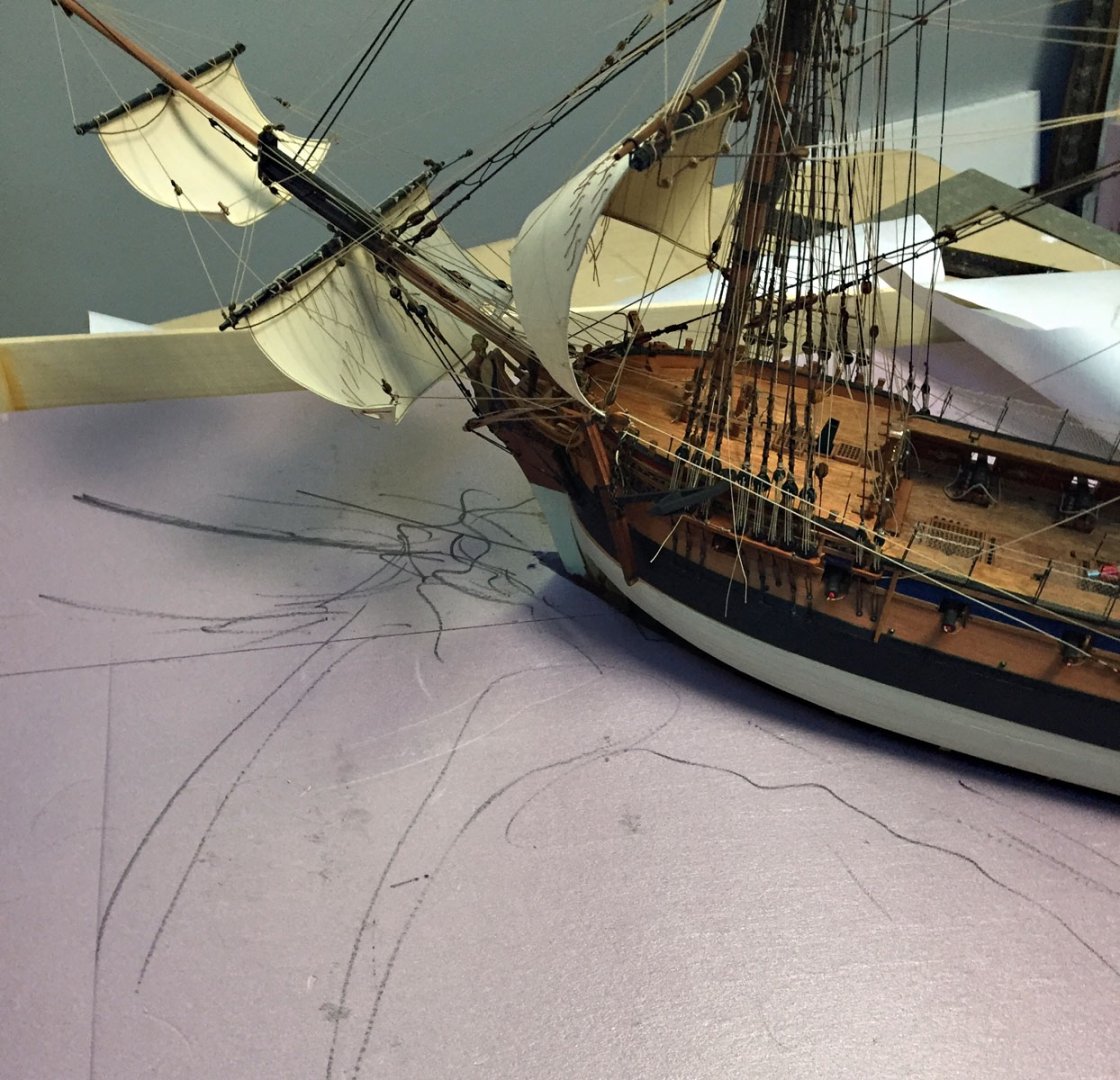
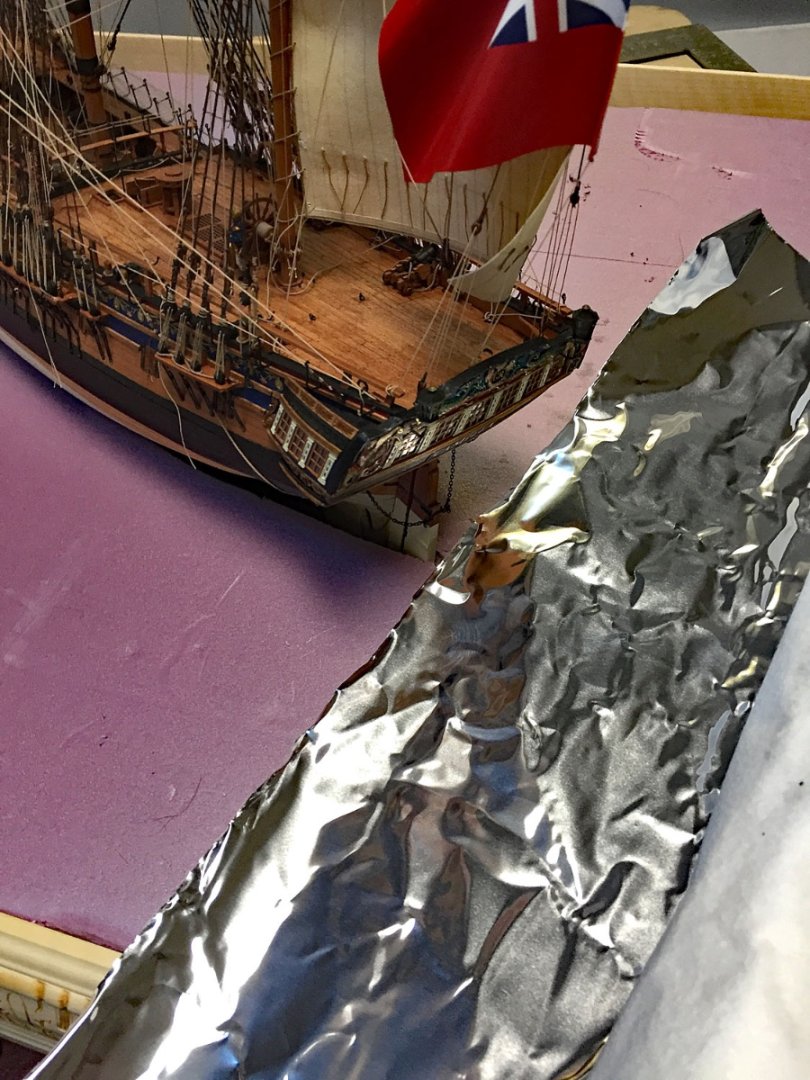
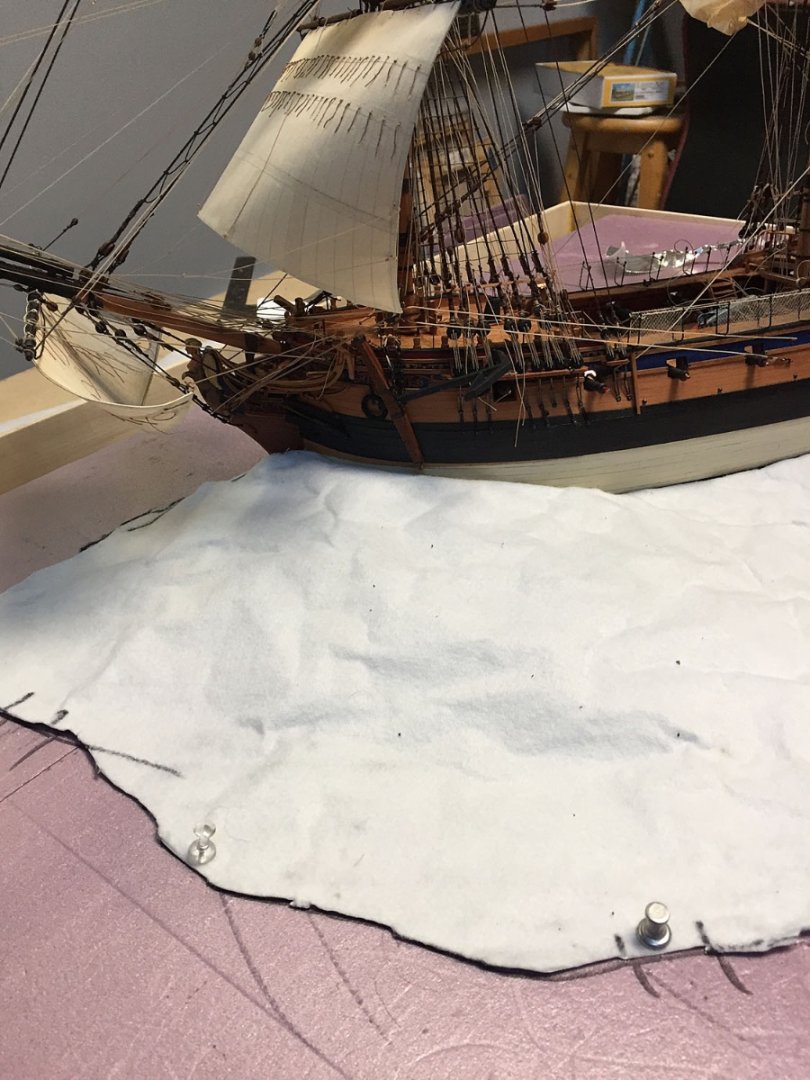
Making Water- Phase One Prior to cutting the large foam board that will be the base of the diorama's waves and model support, the bendable curve - shown in the previous post for gathered materials/tools - was placed along the hull of my model at the waterline level. HMS Camilla will heel at an approximate angle of 10-15 degrees, to starboard. This is important as the PORT waterline will thus, be slightly HIGHER and this must be taken into account for creating the waterline cutout template pieces shown here. Utilizing two pieces of foam board from an earlier project (2" ref thickness), the bendable curve lines taken from the model's hull were traced onto two long pieces of foam board and then trimmed with a utility knife to create two hull curvature template pieces: this is required to arrive at a "template" to trace and mark a reasonably accurate "cut line" into the top layer of the 1" foam board that will be the surface that holds the "waves." The two halves of the foam board template are marked so that stem and stern points aren't confused. The next step is to measure, cut and place a 1" thick sheet of foam board ("Pink Panther" insulation) into the case. This 36" wide piece is one of three (3) of 1" thick foam boards that will be stacked and secured into the case: the internal dimension height after stacking the foam board sections is a little over 3" high. The top piece shown here will be on the majority of photos that follow as it is the one to which the "water" shaping components will be affixed. The final step here is to use a black Sharpie to transfer the final cut line to the top layer foam board. After determining the placement of the hull into the case, a keel line is drawn. In this diorama, the keel will be diagonally across the case from opposite corners as shown. Once the keel line is drawn, the template pieces in the previous photo are used to locate the exact position of the model's hull, which is centered along this reference line. The next step is relatively straightforward; using a bread knife (important: it helps if it's a serrated edge because the thick foam board material's consistency makes it difficult to cut through with a utility blade, even a long one. My cutting action must take into account the 10-15 degree heeling angle of the model as I slice through the foam board. This is done by eye and is important so that the previous templating is followed as closely as possible, including replicating the different angles so the model's hull will sit securely in the resultant opening. Here is the first test to see how the model fits into the foam board cutout. Having done this a few times now, my cutting resulted in a near perfect width, length and heeling angle cutout in the 1" foam board's TOP LAYER. Note the angle of the model to the foam board. Zooming in close to the stem while the ship model is temporarily placed into the foam board, it's time to determine how the wave action will look relative to the ship's hull and wind direction. The diorama's wind is a following one, from aft. The wave action will not be strictly parallel to the ship purposefully so that the diorama's built-up waves will create some "visual tension" between the model and the sea. This purposeful "randomness" is a dynamic that is important and will be a recurring theme throughout this final phase of my Build Log. I'll do my best to note when this is a consideration in all the following steps. Moving down alongside the starboard hull, a slight mismatch on the hull is evident, a gap. This isn't critical because it will be covered-up in subsequent water building steps. However, the tighter the better to the previous waterline cutout step. This precision will help make the wave top detail as well as creating the foam wake along the hull much easier. This photo shows the two sides of the "wave material" I will use to shape all the wave action on the full diorama. The material is named "ShaperSheet" and from Woodland Scenics. It's a composited sheet of thin aluminum (a little heavier than regular kitchen foil) with a thin cotton backing adhered to it. It comes in 18" wide by six foot roll lengths. This material will be used to form multiple sections of waves that get placed onto the foam board surface and positioned tightly against the model's hull. The white cotton surface material will hold the plaster that gets applied after the wave sections have been formed and affixed to the foam board around the hull and to the edges of the diorama case. Here, I've made a first wave section: a large "rolling wave" that the ship's bow is meeting. It tapers off as shown -toward the lens- and is held in place with pushpins temporarily. The large piece has been cut from the ShaperSheet and manipulated with my fingers to form a raised section, all by eye - and yep, by "feel." The random front edge shown where it is pinned is purposeful. The black parallel location marks are important as several pieces of the sheet will be required and will need to overlap. My next post will show the development of these wave foil/cloth sections that will comprise the principal wave surface of the diorama's seascape.

- 542 replies
-
- 12
-
-
-
- Sphinx
- Vanguard Models
- (and 3 more)
-
One of my favorite hand tools is a velvety-soft sable brush.
- 542 replies
-
- 2
-
-
- Sphinx
- Vanguard Models
- (and 3 more)
-
Indeed. I’ve waited for years for these little gems to appear! As I’ve indicated earlier, the sculpts are superb and the 3D-resin printing (and high-quality) material allow one to finish paint them in a very realistic way. Note that over a “base” flesh color, I use darkening ‘tone” washes to bring out the minuscule details like facial features, even the space between little fingers! My paints are standard Vallejo brand acrylics. The washes are from a gaming company called Citadel (war gaming miniatures/U.K. But available in the U.S.). BTW: thanks. This ship has svelte lines and lots of subtle, understated decorative elements - as long as one doesn’t paint every one of them in Bright GOLD, these help to emphasize the beauty. This is sort of like jewelry on a beautiful woman, not necessary - but it doesn’t hurt!
- 542 replies
-
- 4
-
-
- Sphinx
- Vanguard Models
- (and 3 more)
-
Brian, Please look at the last photo of my post #349 in this thread. You’ll see the main tools I use for handling nearly all the rigging tasks. I’ve purchased most of these from Micromark. The scissors are from Germany, “Ginghher” brand, but acquired on Amazon. The original set of dental tools had several pointy things, but the wicked-looking one with the bent sharp point is the most effective for it’s main rigging purpose: hanging rope hanks in difficult to reach spots. The blue handled tool comes from a set of rigging tools designated as such on MicroMark; I’m not certain they’re still available. Spend some time on their site. I wouldn’t bother to go to dental tool suppliers: from my experience that is a deep rabbit hole and completely unnecessary.
- 542 replies
-
- 3
-
-
- Sphinx
- Vanguard Models
- (and 3 more)
-
Thank you, B.E. You’re correct. I got a little carried away on adding schmutz to the crew’s trousers. This Captain does have higher standards and certainly doesn’t have to mess with gun carriages, gunpowder, ropes- unlike his minions. I’ll give his britches a good wash before the muster is called. Wigglesworth’s man-servant has gone AWOL.
- 542 replies
-
- 2
-
-
- Sphinx
- Vanguard Models
- (and 3 more)