hollowneck
-
Posts
1,591 -
Joined
-
Last visited
Content Type
Profiles
Forums
Gallery
Events
Everything posted by hollowneck
-
 You may want to ask - or PM - "druxey" about the most likely font that would have been used for a ship of this era. Great idea to include the lower counter painting details ala' Passaro; this will certainly enhance your very nice build. Ron
- 857 replies
-
- 1
-

-
- Sphinx
- Vanguard Models
- (and 1 more)
-
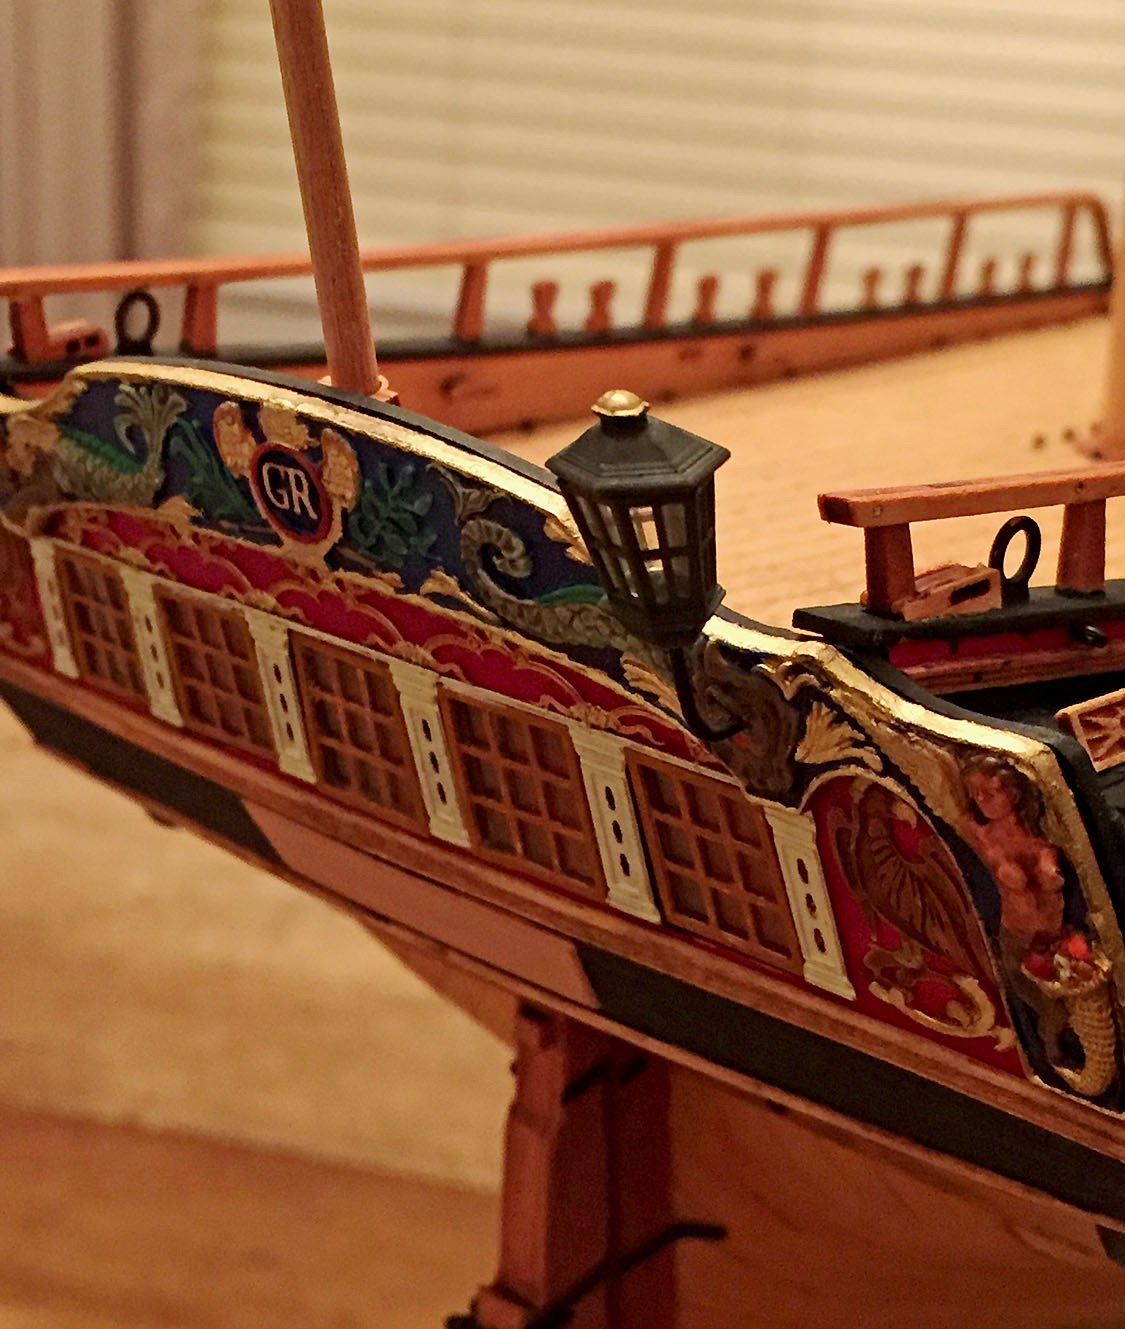
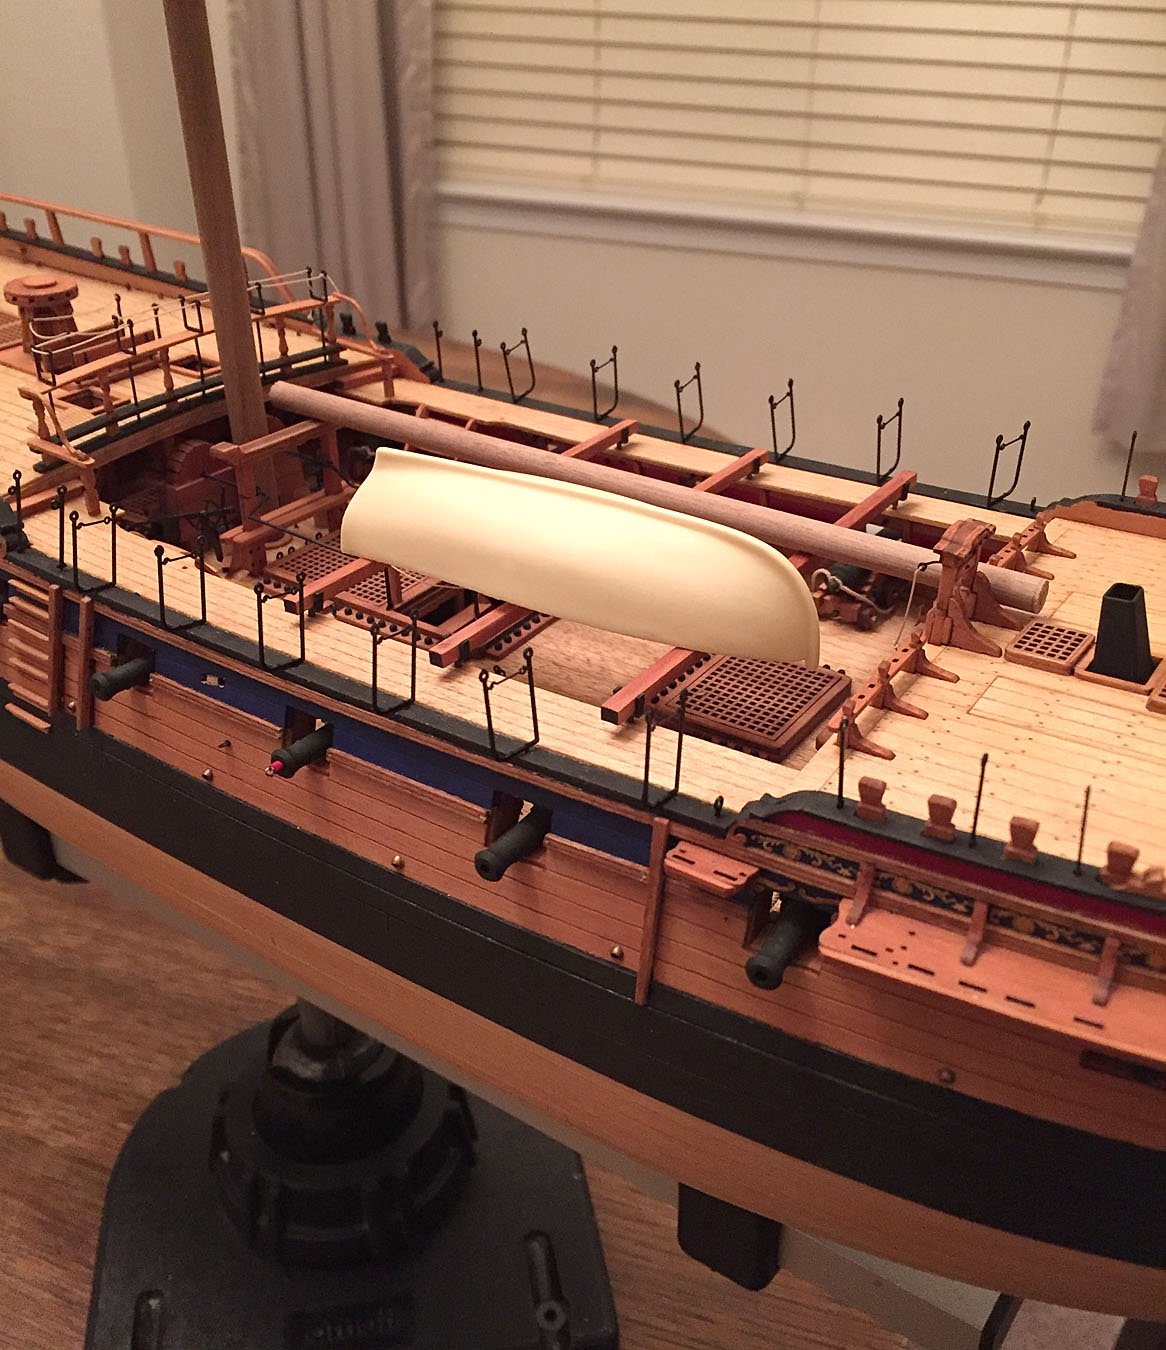
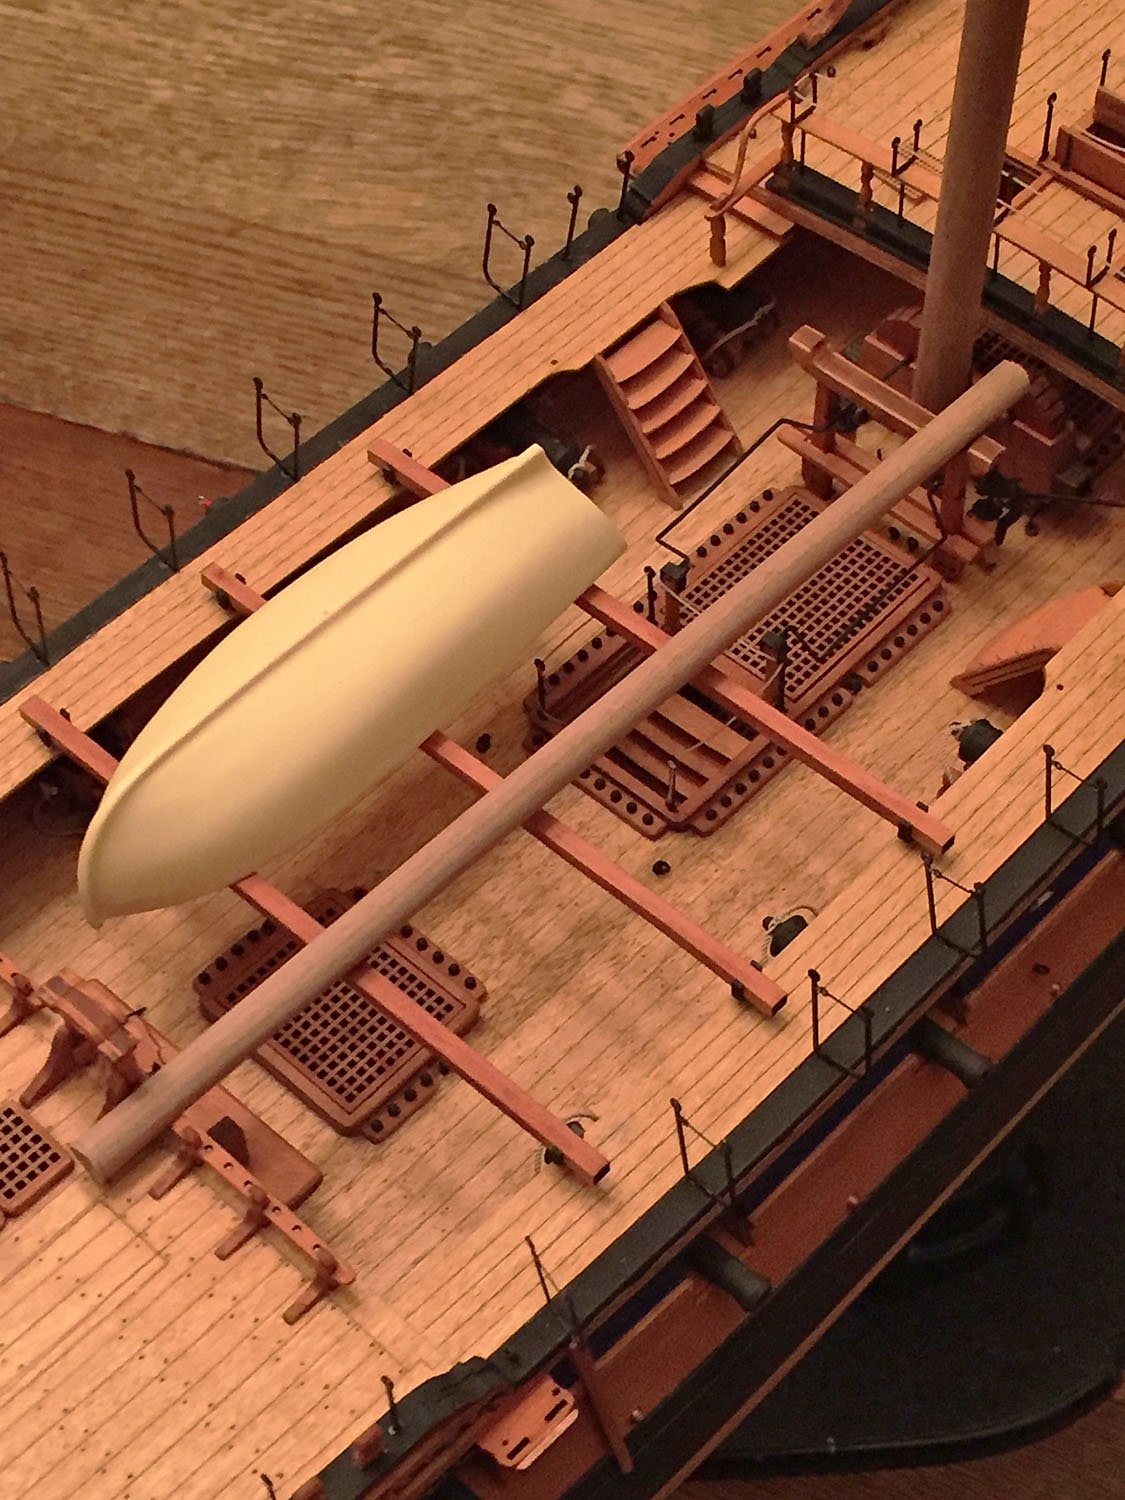
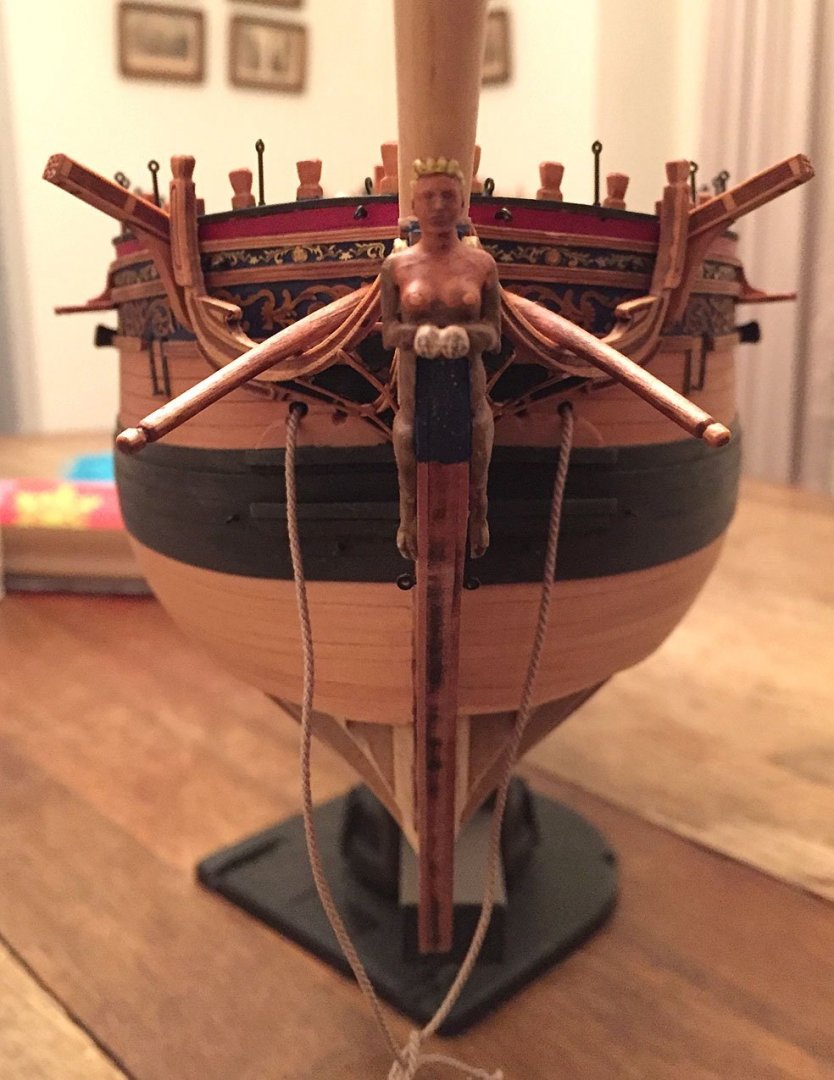
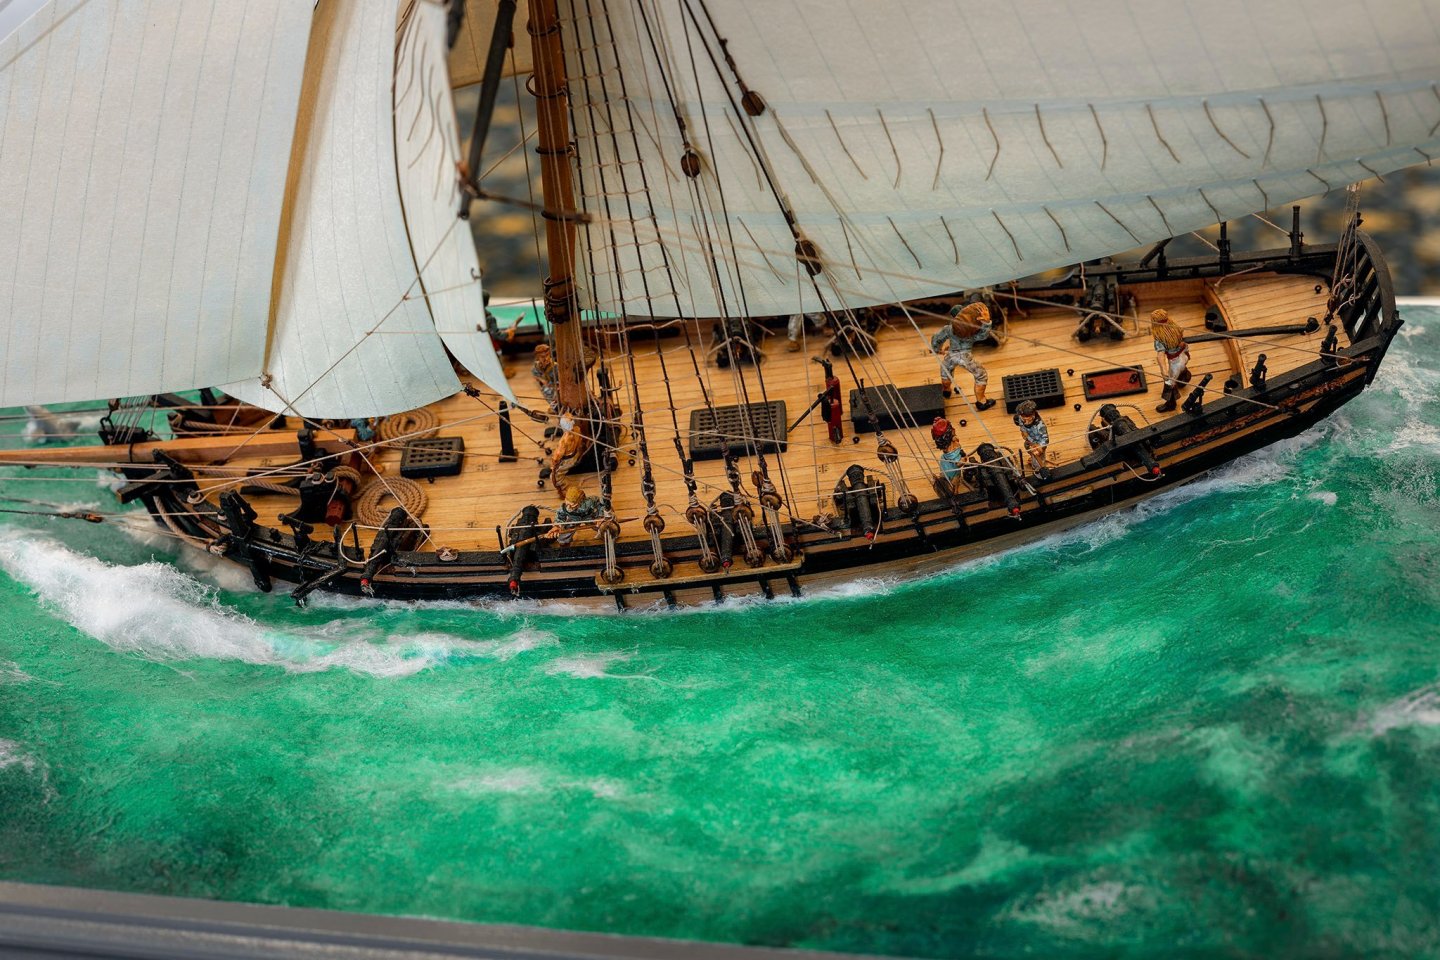
A number of finishing details in this update. Boomkins shaped and mounted. They look huge and out-of-scale here. However, they are tapered and have a slight curvature per normal. I've started serious considerations for Camilla's presentation in the water and what the sea conditions (and colors) will look like. If I decide she's headed into choppy waters and few big swells (the pervasive image throughout my build), I may need to add a few more planks to her bow (not the stern). I envision her cutwater smashing into a large wave, her stern escaping a deep trough and her sails showing a serious starboard list. A set of belaying pins in the forward foc'sle bitts, ready to go! These are the turned pear ones from Russia. Click on MSW's homepage link of vendors for "CraftySailor" for the belaying pins as well as lots of other really nice kits n' bits. No business affiliation here, but definitely a strong endorsement! The dual stern lanterns are superbly-designed, 3D-printed assemblies, the detail quite remarkable; for example, if one looks closely under the cap, there are tiny holes for the air and heat to escape! In addition, they are glazed with a single-piece, laser-etched clear acrylic that is fitted into the interior of the main, single-piece body. This requires a little trimming to fit properly but nothing too drastic or difficult to accomplish. The cap fits perfectly to the body of the lantern. There are lots of options on colors for these two lanterns; I chose to stay with basic black with a touch of gold. Lastly, they mount with a piece of thin brass rod supplied in the kit and fit into the holes that were previously drilled - from the interior transom - from an earlier build stage. I have pliers with stepped, graduated round sections that can precisely bend brass wire into smooth, curving shapes. The ensign pole is also a temporary placeholder. This view doesn't show the acetate glazing mounted inside the stern lights, but it's there! Camilla's name is yet to be placed on the upper transom; this will be added as soon as I decide what color to paint the board where the letters will be added. Those building this kit know that the "SPHINX" name is etched into the pear transom pattern and is a guide for subsequent mounting of the P/E letters. Rather than replace this tricky piece with a scratched one, I decided to simply mount an appropriately-sized, thin section of .6mm pear (lots available from a kit sheet) over the etched name with an added signboard. I'm testing the look and fit of two items here: the addition of a spare topmast to be made at the same time as the one that will be fastened to the lower mainmast. The dowel here is only a placeholder, but cut to the right length of a finished mast. I've placed the 24' launch's pear keel piece from the kit on top of three beams that fit across the width of the mid deck. I'll only need three beams here to carry the spare mast (the kit offers four) and launch when it's completed. The launch will be flipped "belly-up" and lashed to the beams, with no rigging or "boat bits" evident (see next photo). This decision means that I'll only be building one ship's boat purposefully. When completed and underway in the English Channel, my depiction of HMS Camilla places her in an action setting; she has left port on a war footing, with only one boat aboard, and a Captain itching to secure a French prize for himself and his loyal crew... Here is a placeholder hull for Camilla's only boat. I'm not rigging the hammock cranes until much later in the rigging stage. They'll carry ropes as well as netting. By displaying only one boat (and not the three provided), there is lots of visual space so that the details of this exceptional kit will be clearly visible, even post-rigging. Another gull's eye view of the midships arrangement of the spare mast and launch. A spare topmast was more important than another boat. I'm guessing a topmast weighed about the same as a boat. I've put placeholder masts in position just for the fun of it (including the bowsprit). There are just a small handful of items left to do before masting and yards - like all the chains and deadeyes! Oh yeah, rudder chains and ropes, the balance of the tompions...and... as soon as the four Vanguard carronade kits arrive, they'll be assembled and mounted on her quarterdeck, the proper positions pre-determined. Camilla has temporarily sculled into my dining room so the Admiral can help me decide where she is going to go after she departs her building slip in the basement...🤪 Ron


- 542 replies
-
- 12
-

-
-
- Sphinx
- Vanguard Models
- (and 3 more)
-
Igor, A very nice build, indeed. You are a champion of Master Korabel's models. You also had fun taking these photos! Kool closeups and angles. They are excellent and display your skills nicely. Do you know if the silkspan you used for your flag is the lightest weight material? Sig make three weights if I recall correctly. The tape on the edges of the A4 didn't jam the printer? Ron
-
I knew you had the answers! Spanshackle in the center - check; rigged fish davit - check; anchor lining present-check. Thanks. I'm presuming that the word "fish" is a verb and therefore attached to "davit" because one had to "fish out" the anchor from the sea bottom and had little to do with feeding the crew...🤣 The photo appears to be your HMS Resolution, correct? Ron
- 542 replies
-
- 3
-
-
- Sphinx
- Vanguard Models
- (and 3 more)
-
Although it appears the davit is too far extended, I like that the Lowestoft model shows large blocks and tackle affixed to the end and back to the channel, presumably to raise an anchor. If a fish davit was used, would the hauling rope thus be affixed to a capstan? And, would there still be a need for an anchor lining? It seems the fish davit/spanshackle combo disappeared by the late 1700's, yes? ...finally, was a fish davit used for any other purpose (e.g. lifting a boat onto the deck or loading ship's stores)? I'll bet you know the answers to this sailor's burning questions! Ron
- 542 replies
-
- 2
-
-
- Sphinx
- Vanguard Models
- (and 3 more)
-
Your insights are always valuable and valued! That makes good sense, Druxey; just follow the Laws of Physics. The fish davit is not only lengthy, it it bulky and had to be a really heavy lift to put into service. The ropes along its midsection for sailors to manhandle* also makes perfect sense. My Granado model's fish davit is lashed down across the foc'sle. Knowing how bomb vessels were deployed, having a handy fish davit makes perfect sense too. Cheers, Ron *manhandle. I love this word, almost as much as spanshackle.
- 542 replies
-
- 1
-
-
- Sphinx
- Vanguard Models
- (and 3 more)
-
Ai! - Exactement, charaid. You're the winner of my Dalwhinnie dram. I'd be pleased to down that Tallister of Tennant's on my next visit to Falkirk (after dropping in to the Tun Mash in Forres). You won't be surprised to know that I also built the Caldercraft Granado a few builds (and years) back and - discovered the spanshackle hardware artifact - and I subsequently looked it up in Lee's. Sláinte! Ron
- 542 replies
-
- 2
-
-
- Sphinx
- Vanguard Models
- (and 3 more)
-
Thank you, Chris. I am really glad that I can make this excellent kit's designer pleased. I can't wait to take some hi-res, properly lit pics of this beauty. I can see the finish line on completing the hull and it's truly been a fun project right from Page 1. I am now looking forward to getting started on her masting and rigging. I plan to make some modifications with materials for this part of the build; I'll clearly note where I've substituted (initially, for masting/yards). I always use square section sticks - either pear, box or a combo of both, so I'll put the kit's walnut dowel in a wood stash. I've done a little research on how stunsails were deployed on these 5th and 6th rates. It seems that some ships used stunsail booms (the flip-out yards mounted to the channels), but some mounted these helper sails "loose-footed" - the bottom of the stunsail held taut with a single rope lashed to a triangular arrangement at the foot. Apparently, there were advantages to both methods. I'm mentioning this now as I haven't decided whether or not to mount the kit's provided stunsail booms to their channels since I intend to make and mount these sails in addition to the vessel's normal complement, a first for me. I love a new challenge - obviously! Hey Glenn. Good eye...but...actually, Camilla can turn to port and starboard. In both of my photos the opposing end of the steering rope is hidden behind the wheel's stanchion(s). It really does descend down and right through the first Lieutenant's cabin. I know this because he asked me if I knew what a "spanshackle" was. (I'm holding-off on giving a definition for a few days; I'm curious how many builders of this era have this bit of arcane nautical engineering knowledge. Hint: the device was a critical piece of gear that helped to weigh anchor.) NO GOOGLING (please)....🤨 Ron
- 542 replies
-
- 2
-
-
- Sphinx
- Vanguard Models
- (and 3 more)
-
Mike, Thanks for the shout-out! I hope to get to her masts before the Season wipes out my shop time (7 children, 13 g'kids.) Happy Holidays (did I say this already?) Ron
- 542 replies
-
- 2
-
-
- Sphinx
- Vanguard Models
- (and 3 more)
-
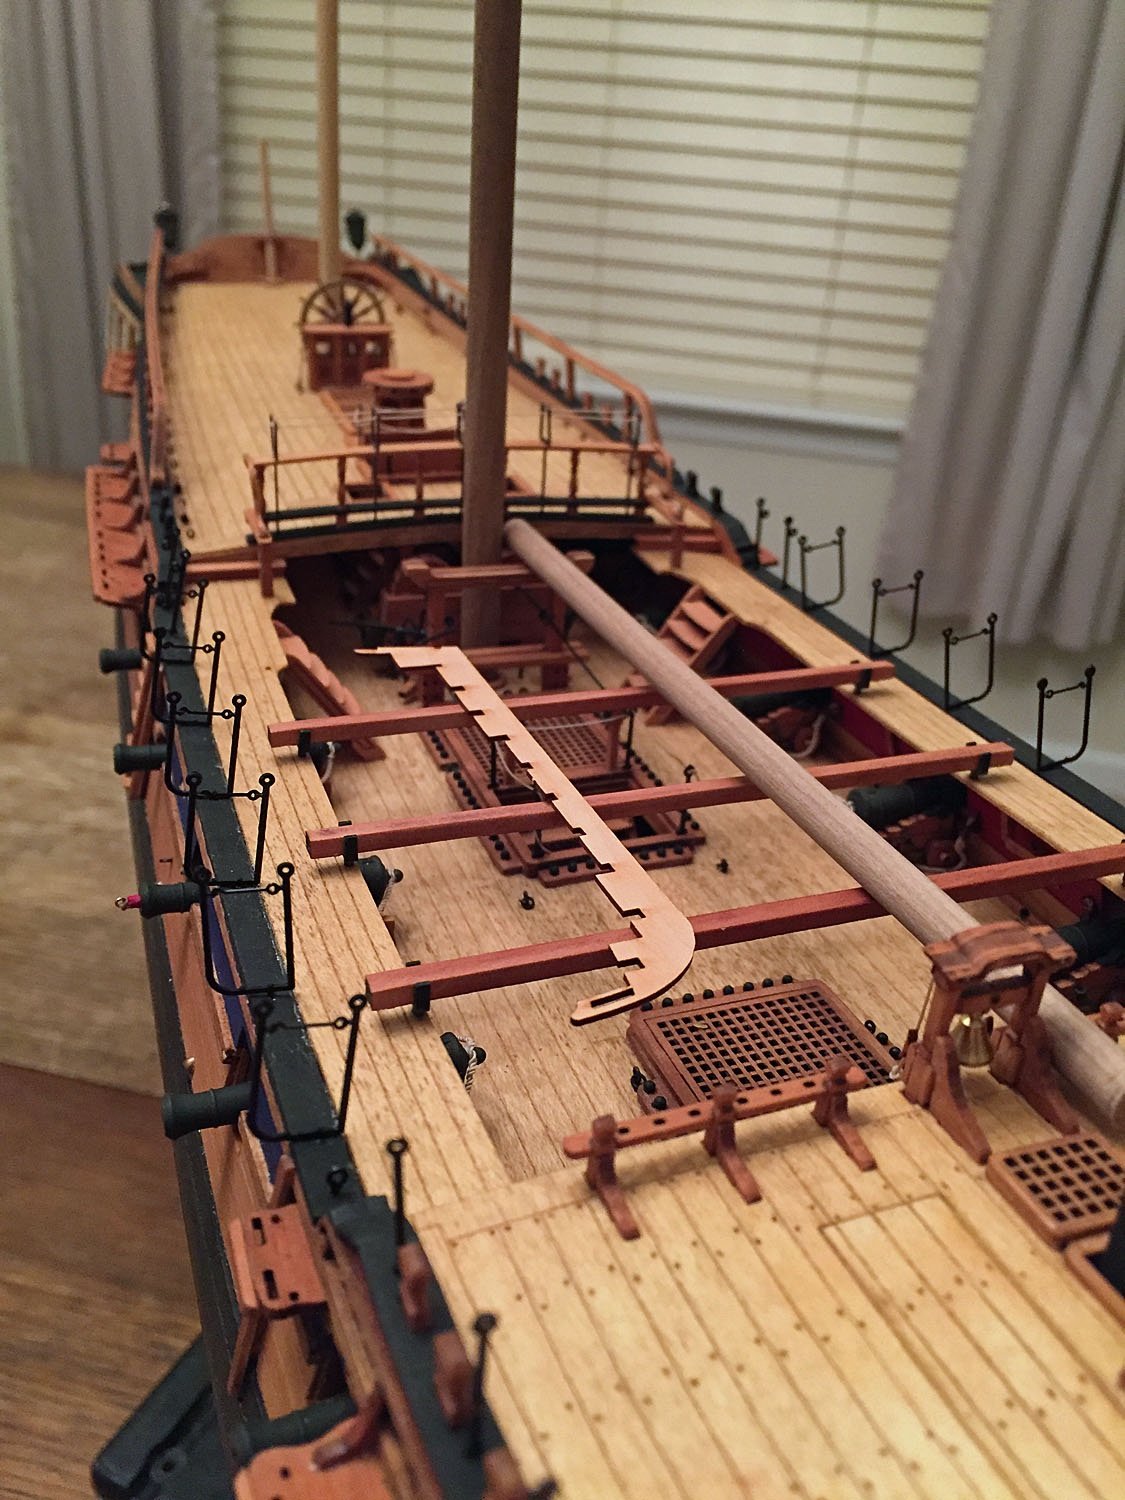
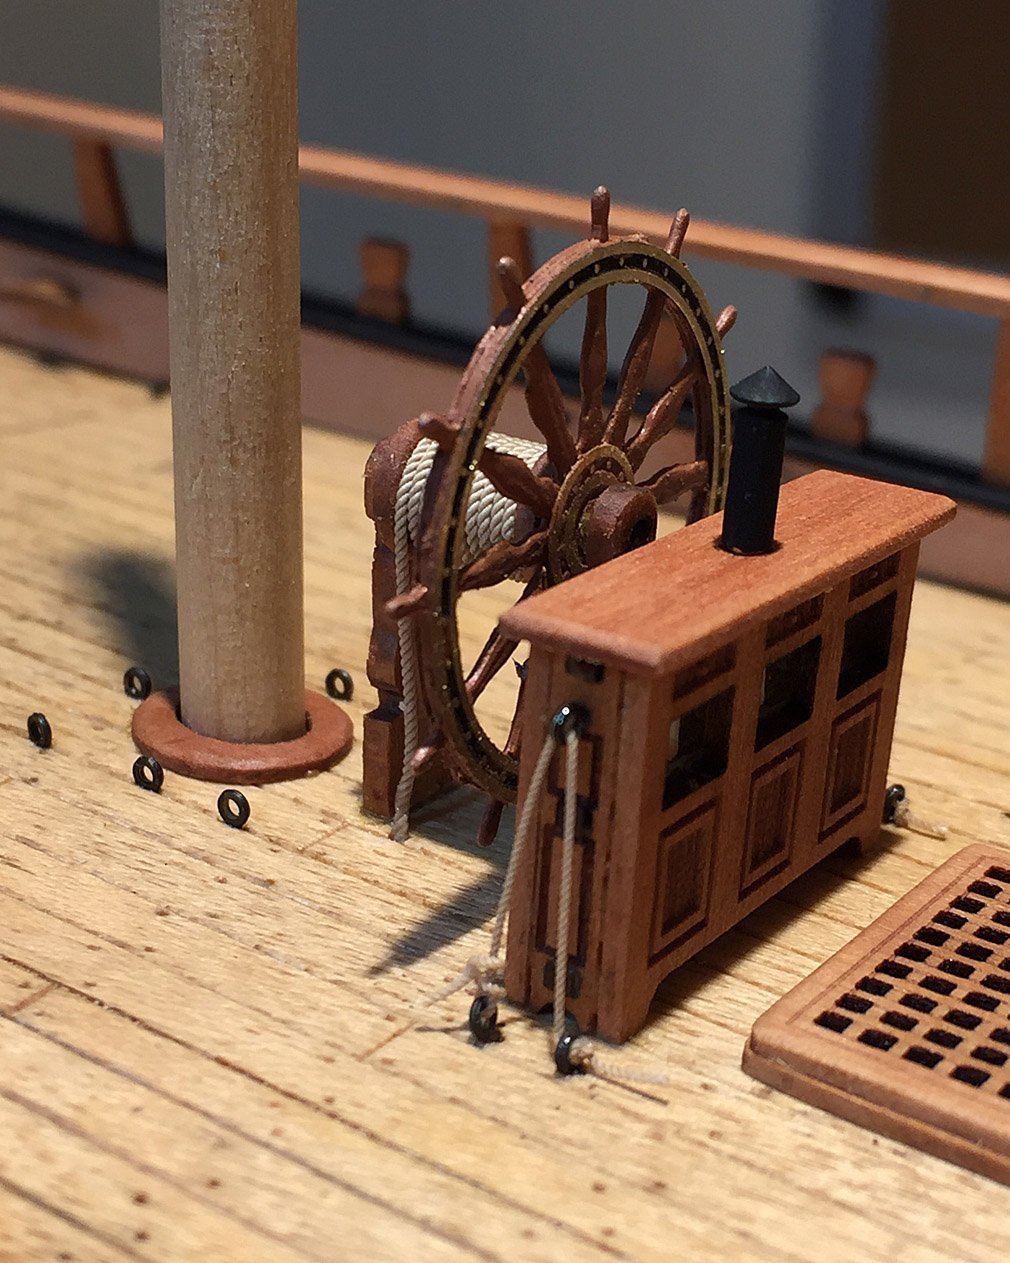
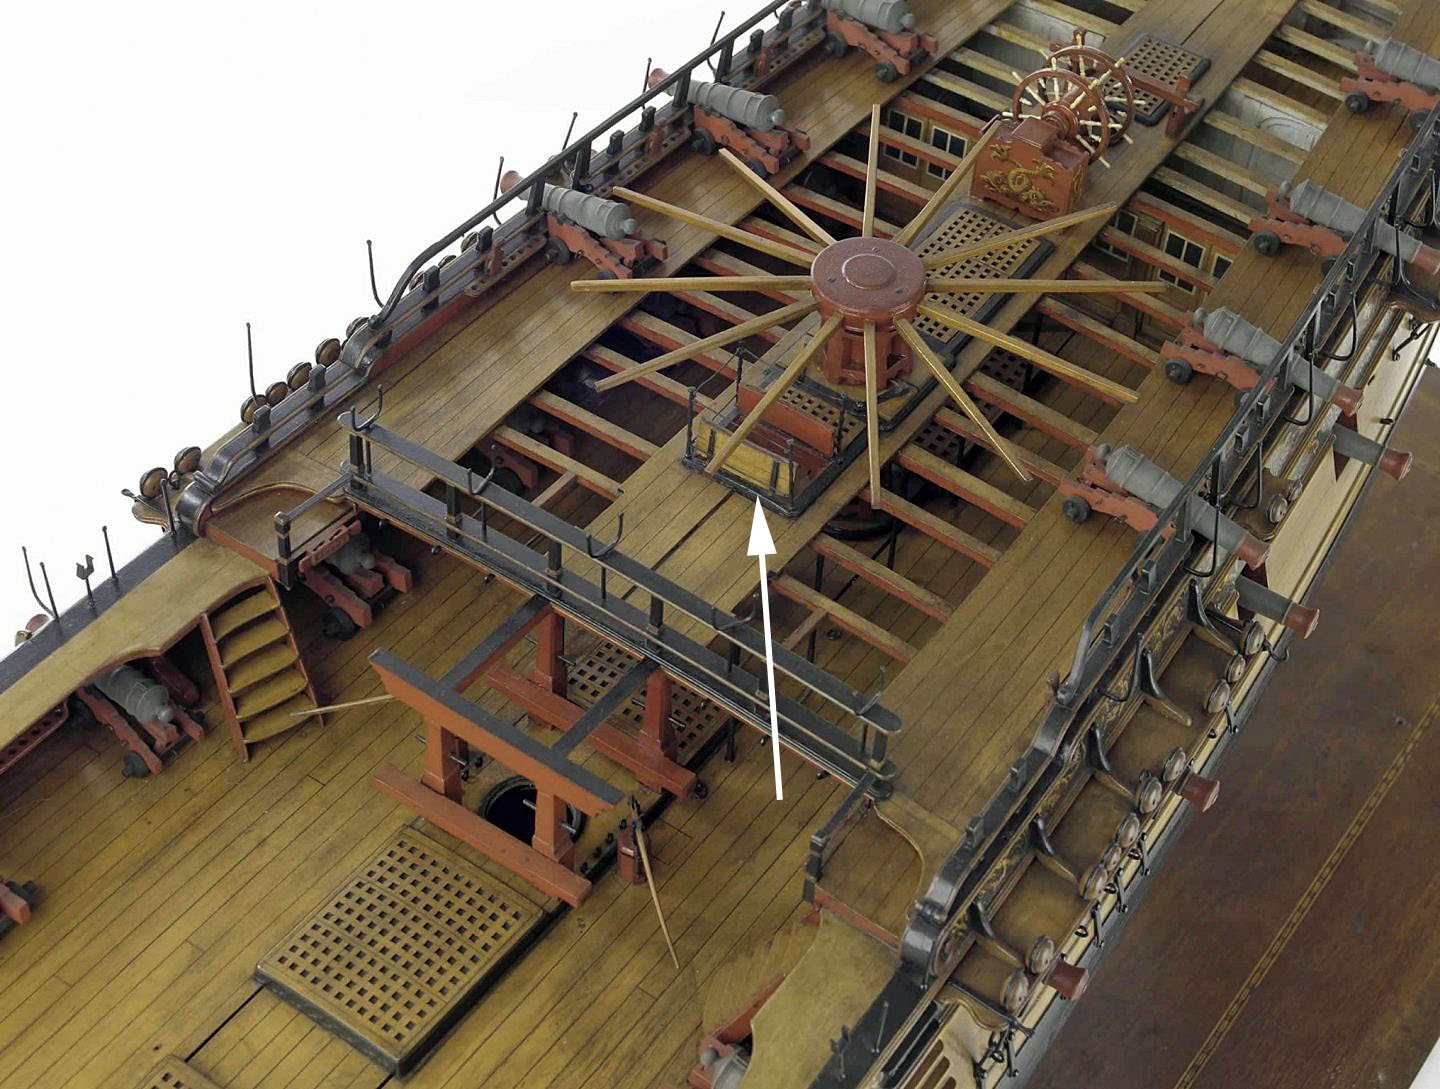
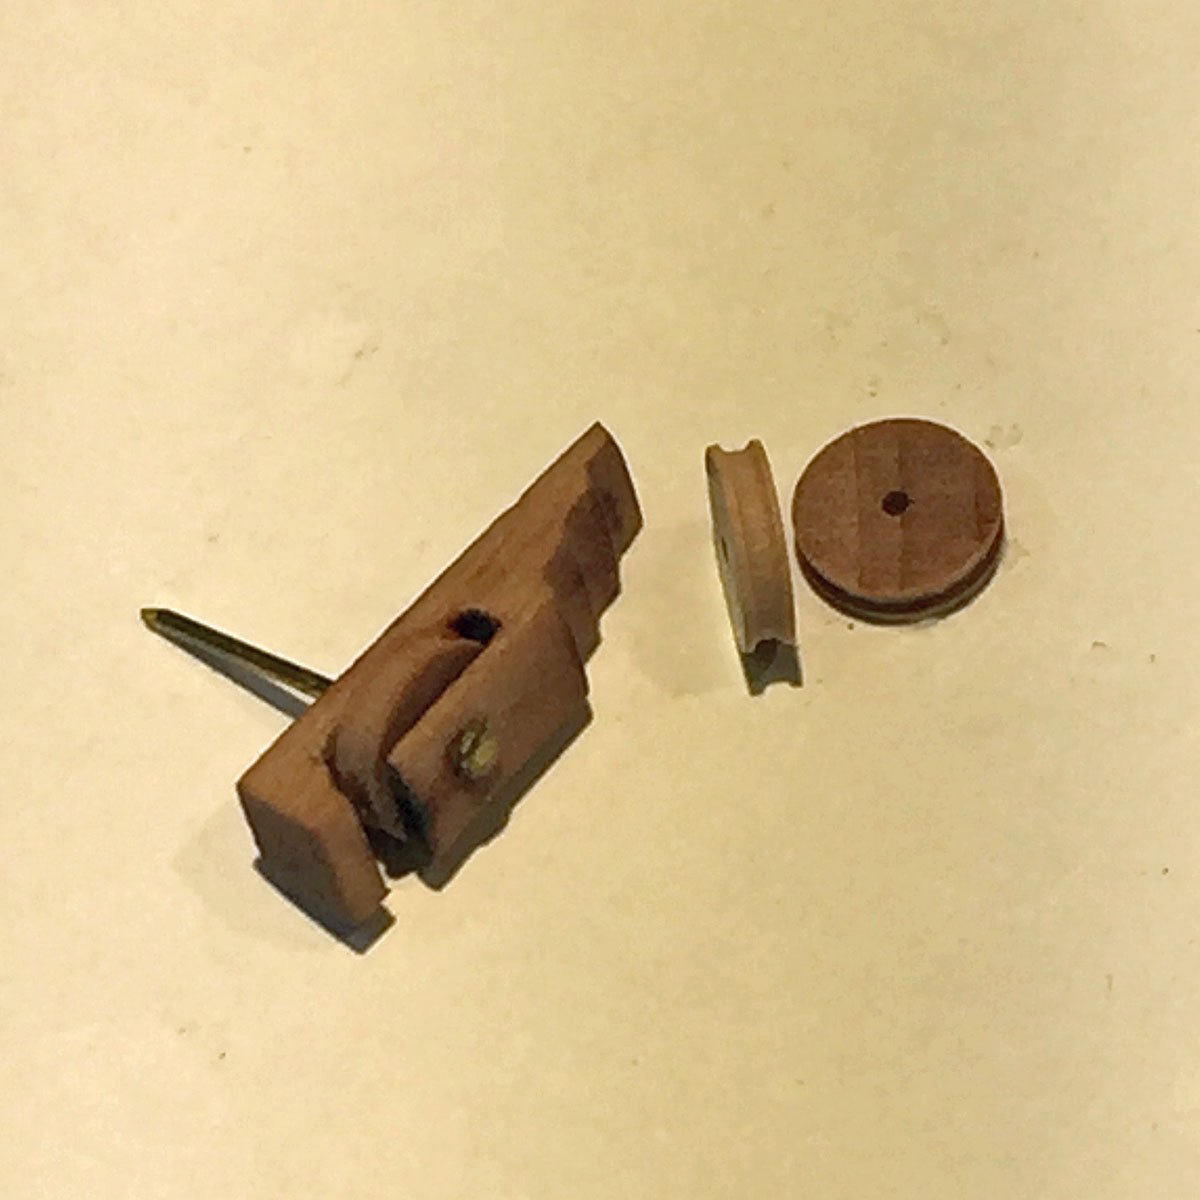
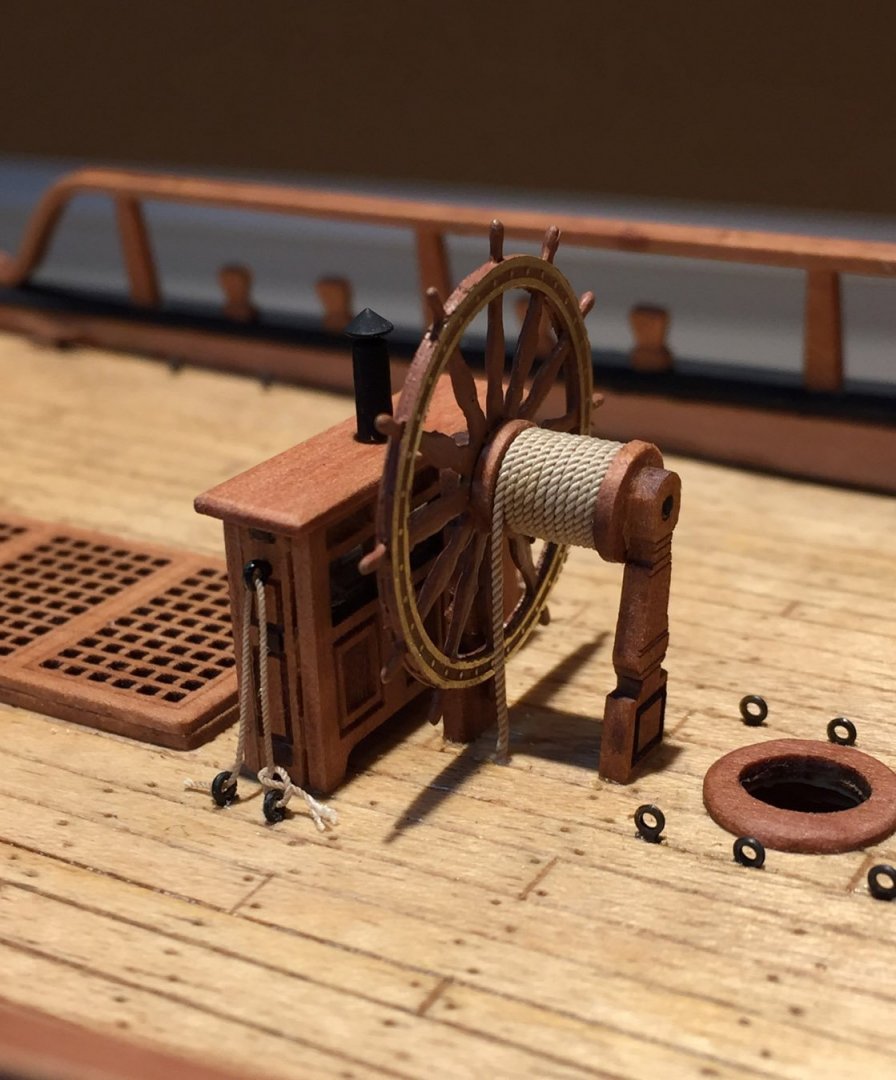
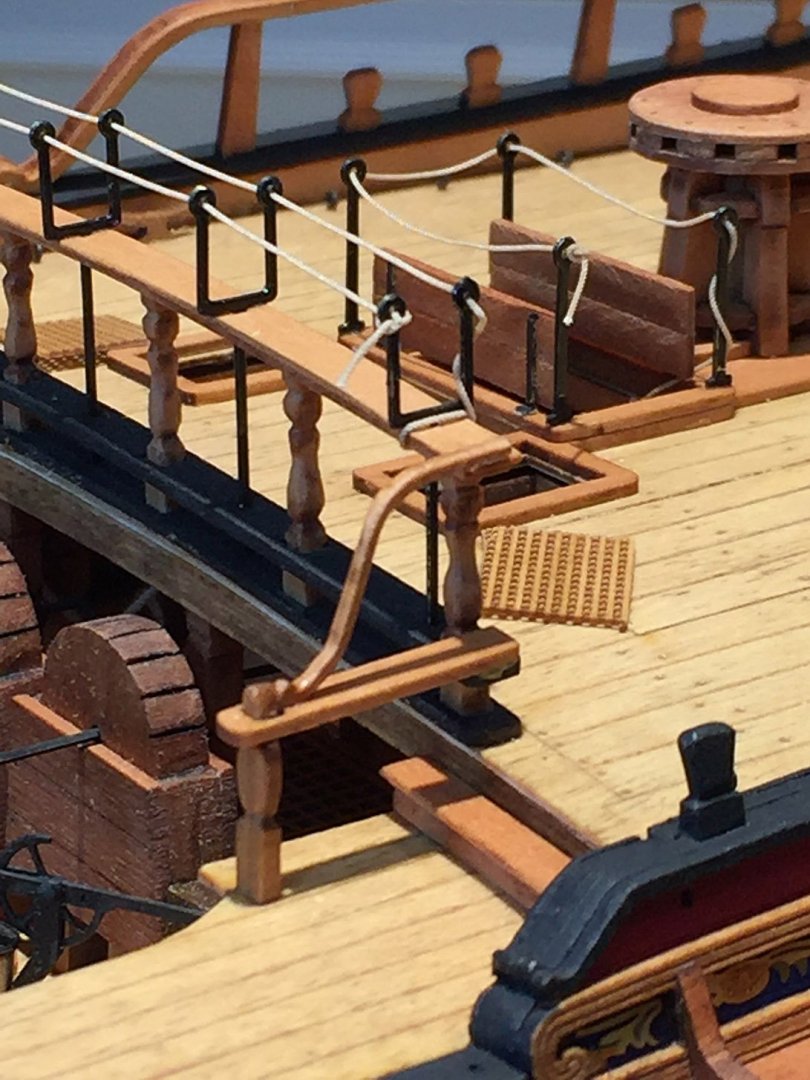
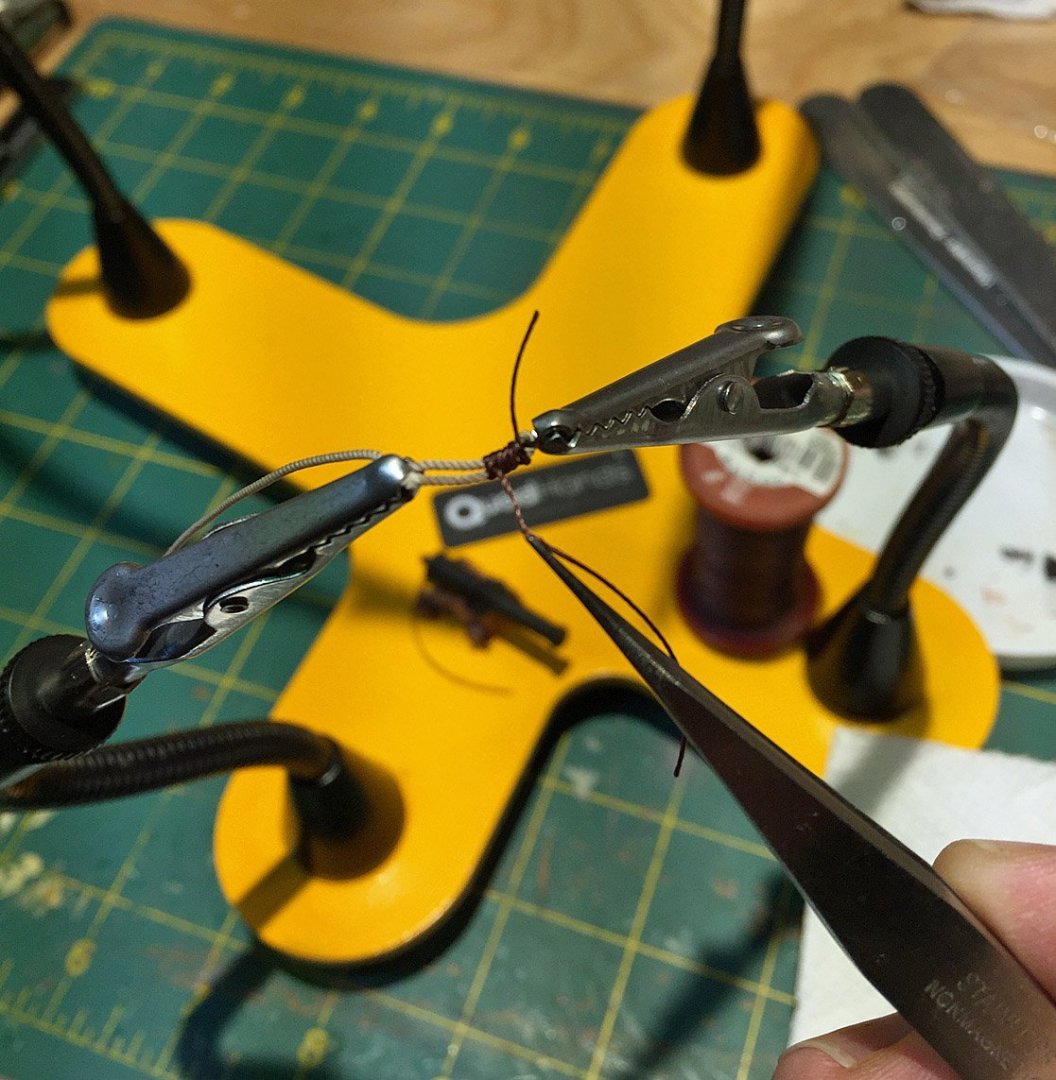
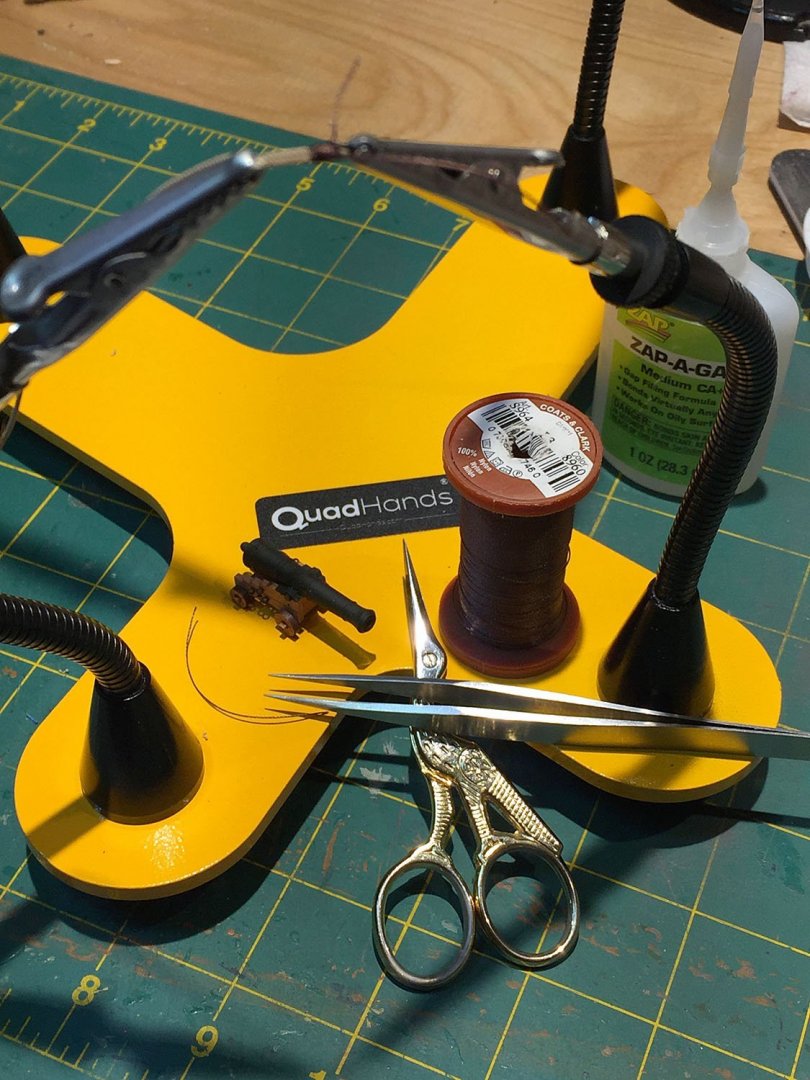
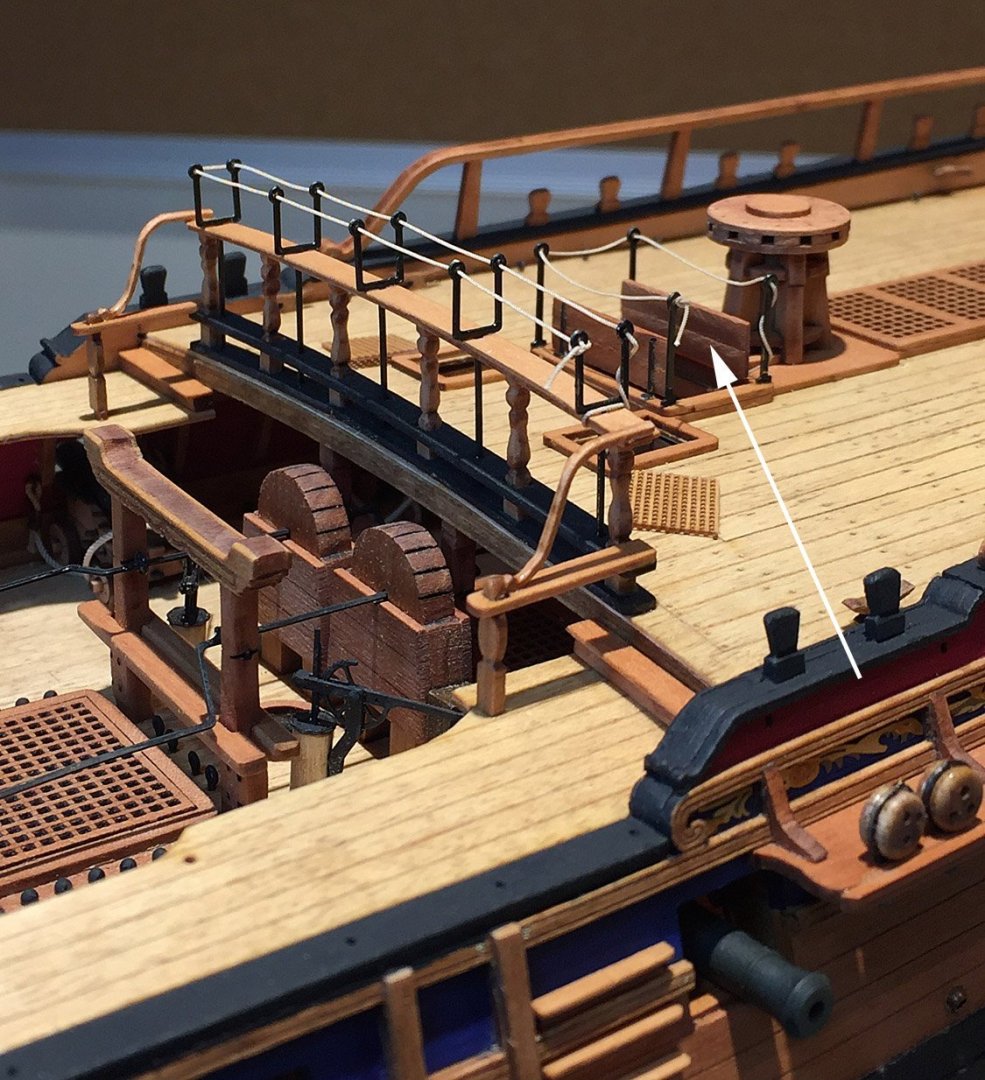
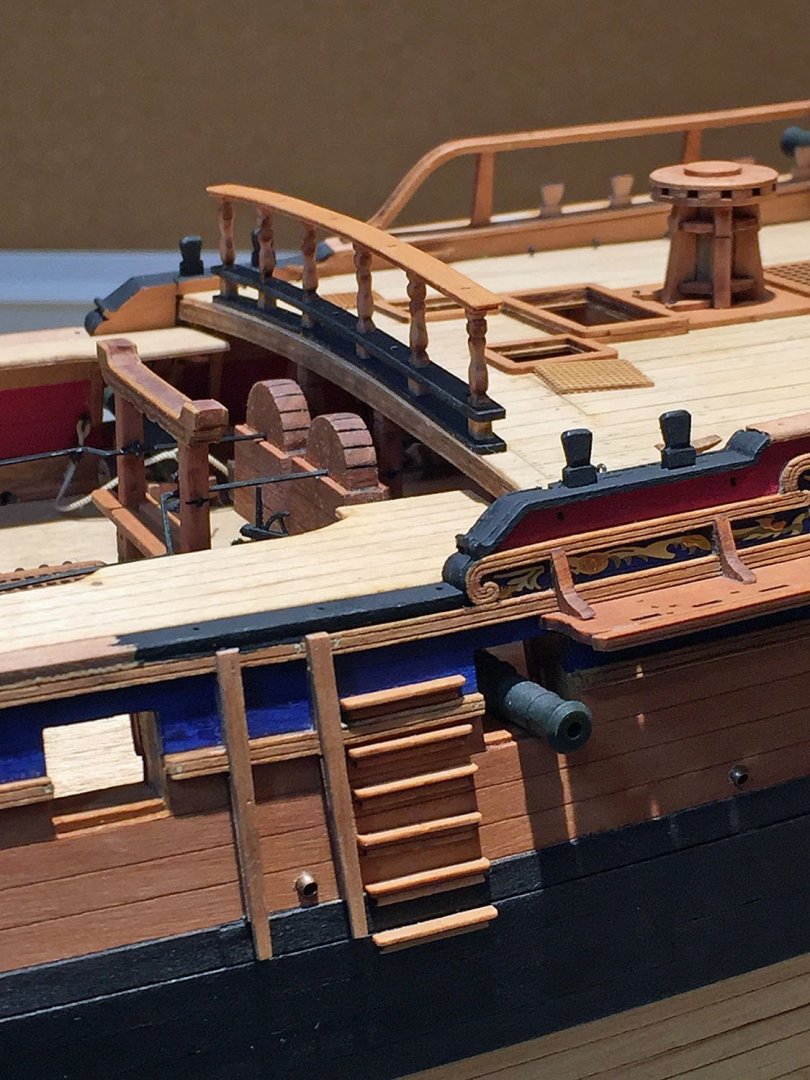
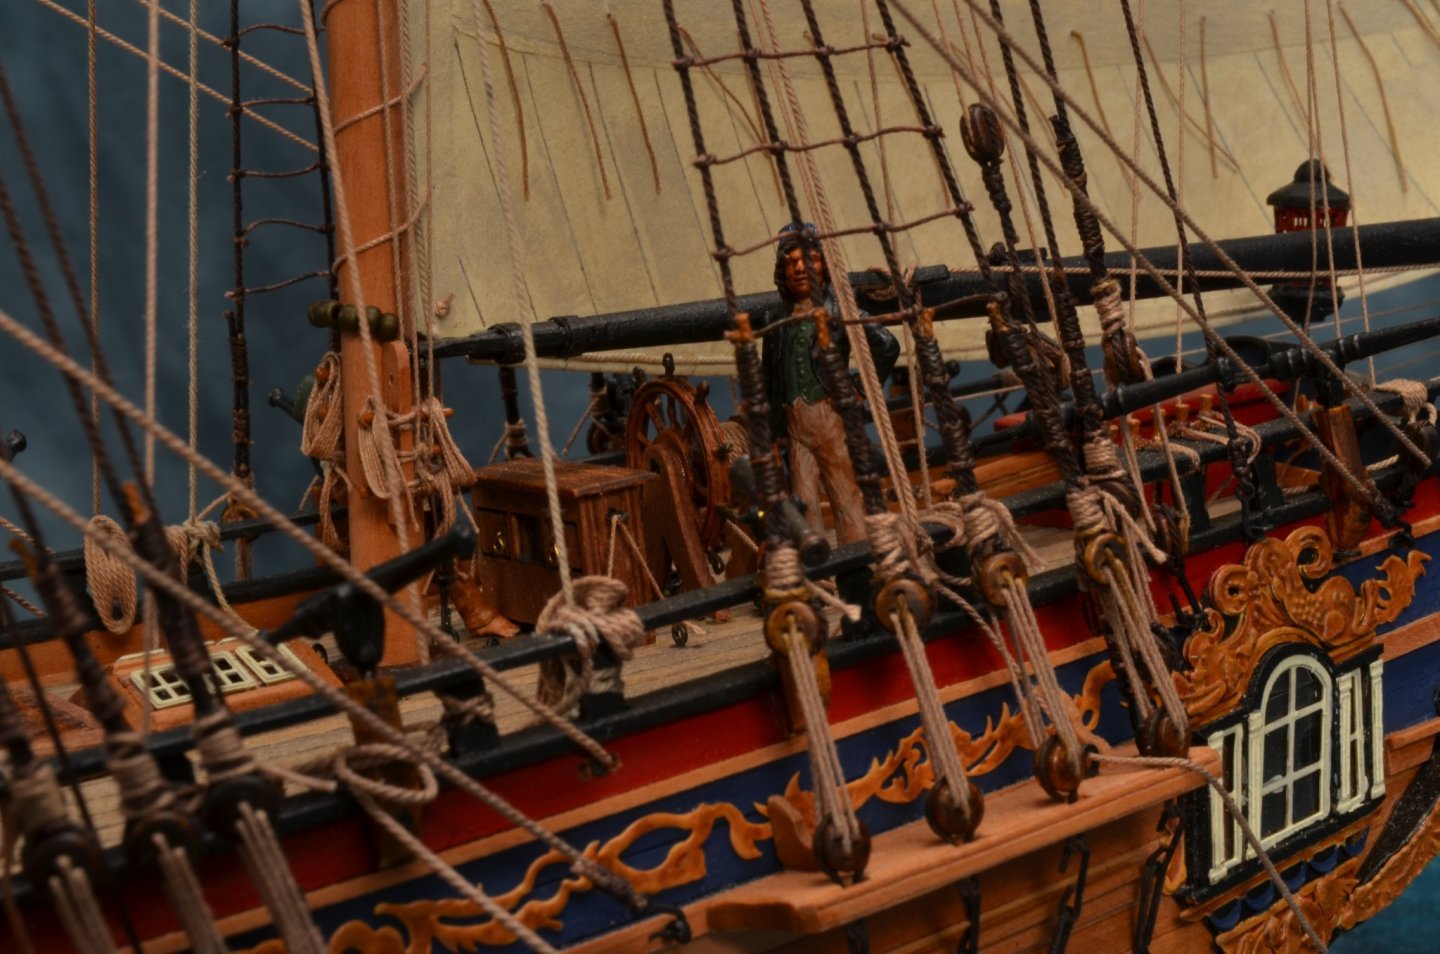
In between the Holiday Madness...more detail work...a few things left, then off to masts & yards. Love this rope! The correct scale, the correct color...but it unravels into three wild-hair strands if one isn't careful! Russian rope (Falkonet),da! The rope feeds through the deck and is termed "steering rope" as it guides the rudder via a series of below decks pulleys. I kept the outer brass circular P/E "ring" and made the main P/E component of the Big Wheel in "wood." I added three layers of burnt umber acrylic paint to build up the handles and spokes (slightly). Being P/E, these are all flat. I also did a paint "fill-in" on the P/E ring: after painting (and drying), you scrape-off the paint with a knife or sanding file (my preferred technique). This leaves the tiny brass heads and the shiny rings intact with the paint only filling the lower recess all around. The binnacle, mounted. Temp mast in-place for scale. A gull's eye view of midships. A nice clean deck, unlike the hood of my car. This is a three-piece, layered detail. Not clear in the manual, but spotted in the lasered pear sheets. This is the fish davit crutch. I kept looking for the spanshackle* P/E, but there aren't any. Will I scratch one? probably not since I'd be then semi-obligated to add the actual lengthy davit that literally spans across the entire foc'sle deck!... *this is a test: what is this and what does it do? Correct answers to what this is will get a free shot of 18yo Inverness Scotch (neat or rocks) at my house this Holiday Season... Breastrail and gangway details close-up; the rope is much brighter here due to intense overhead lighting*. The rope is the same tawny hemp color seen in previous detail photos in my log. Yummy stuff, this rope. * I use three direct overhead light sources which helps immensely, especially when I'm evaluating critical color painting and then shooting decent detail photos. A view that says:" I'm nearly done with the hull!" Hammock cranes come next after installation of the chains, which I always leave for much later in my builds. Rigging (reeving) tools: I use brown upholstery thread for reeving. In this photo I'm tying-off the ends of the cannon breeching lines to their eyebolts. Tweezers mandatory. Quadhands holder is excellent for this although I only needed two of the four flexible tentacles to get the job done. I use CA in infitessimally small drops to secure the lines...and a secret weapon for nearly all rigging tasks: my Gingher embroidery scissors. My inspiration for adding the companionway doors to Camilla; this is a pic of an NMM "Admiralty Board" model of a 5th-rate that is nearly identical to the Vanguard's Sphinx kit of the same era. The double wheel is kool and I thought about scratching this too. The Sphinx (& Camilla) didn't carry normal Ferguson long cannon on their q'decks normally - but, rather the shorter 12lb carronades (in trucks, not swivels) which I'll add as soon as Vanguard can send them. Midships closeup; gangway rails, steps and companionway doors (scratch added). Borrowed (unused) P/E hinges from an earlier part of the kit build and made simple 3mm pear strips. See previous museum photo. Ron


- 542 replies
-
- 13
-
-

-
- Sphinx
- Vanguard Models
- (and 3 more)
-
Thank you, gentlemen. Indeed, this is the "fun part!" Ron
- 542 replies
-
- 3
-
-
- Sphinx
- Vanguard Models
- (and 3 more)
-
Well done, Sir. I like how you've tackled the one-piece wale patterns and solved the dilemma at the stern. After scratch-planking my wales I moved the six scuppers up from the wale to just above the black strake. The "angle of drainage" from the waterways still works. Perhaps Chris can 3D print Lord Cochrane sitting on a seat of ease for you! We need to be able to view him thru the gallery lights though... Ron
- 857 replies
-
- 3
-
-
- Sphinx
- Vanguard Models
- (and 1 more)
-
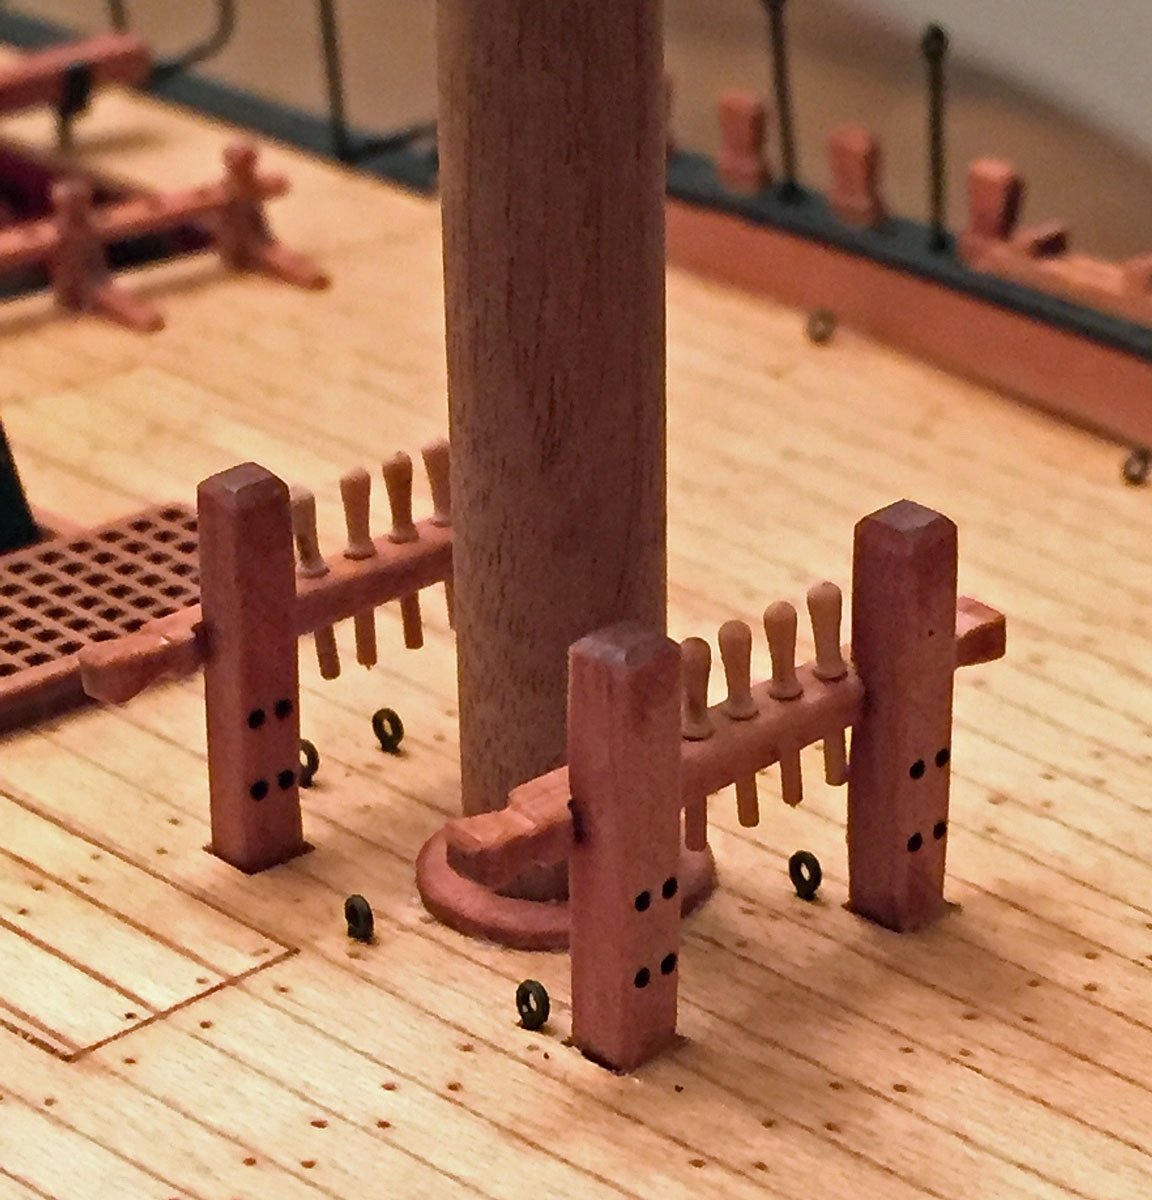
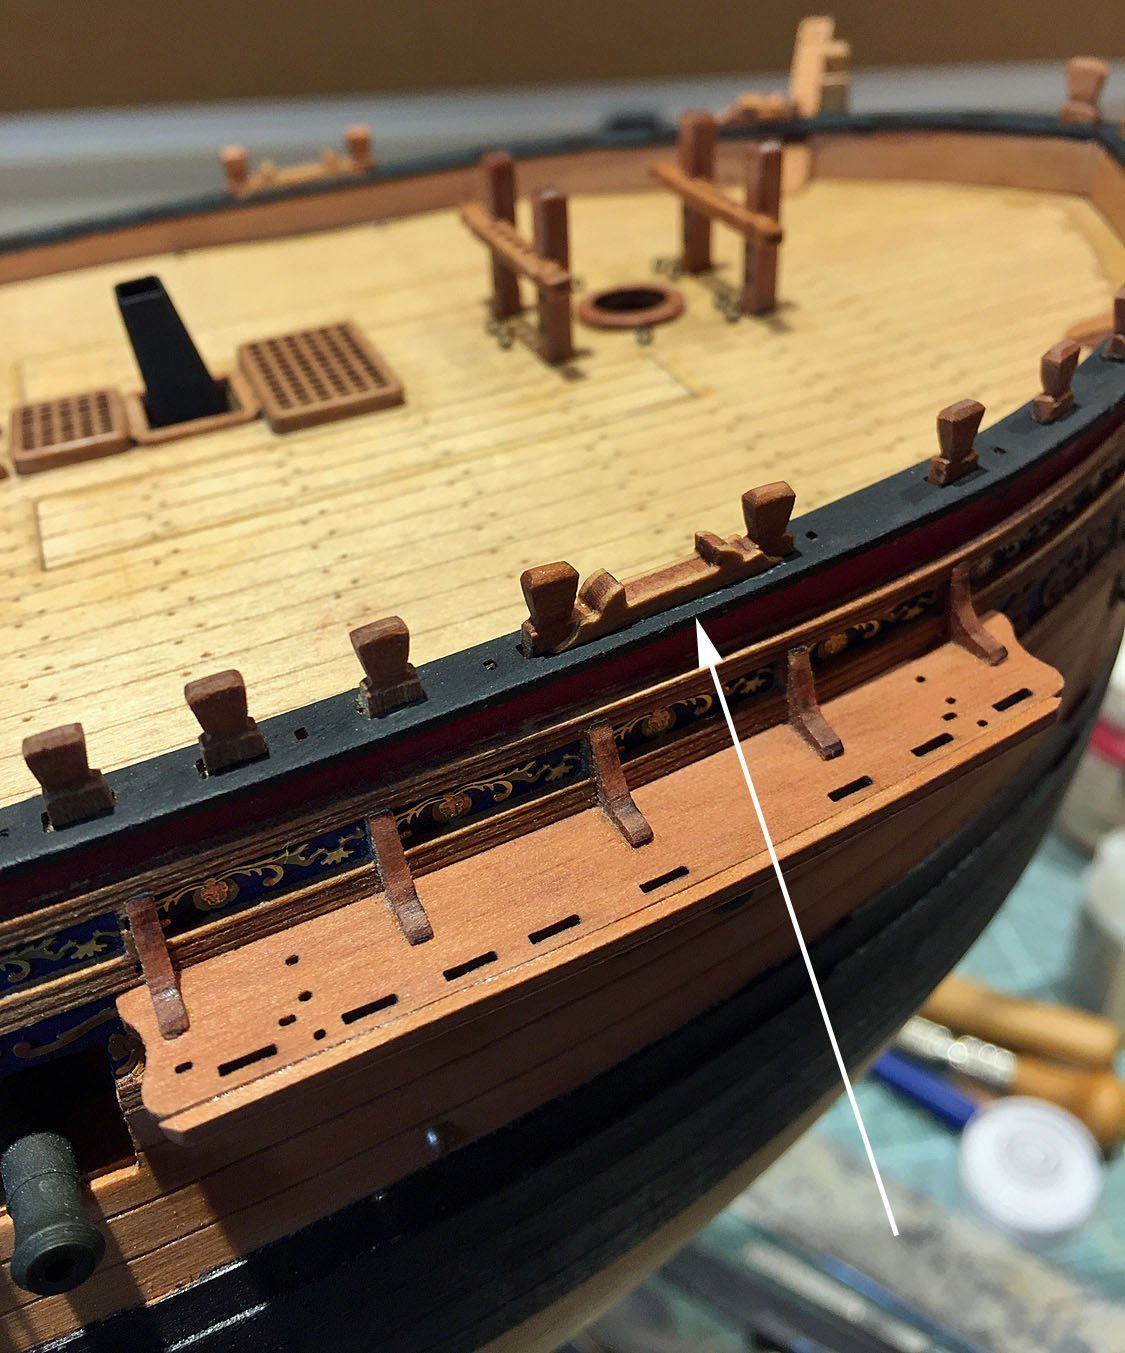
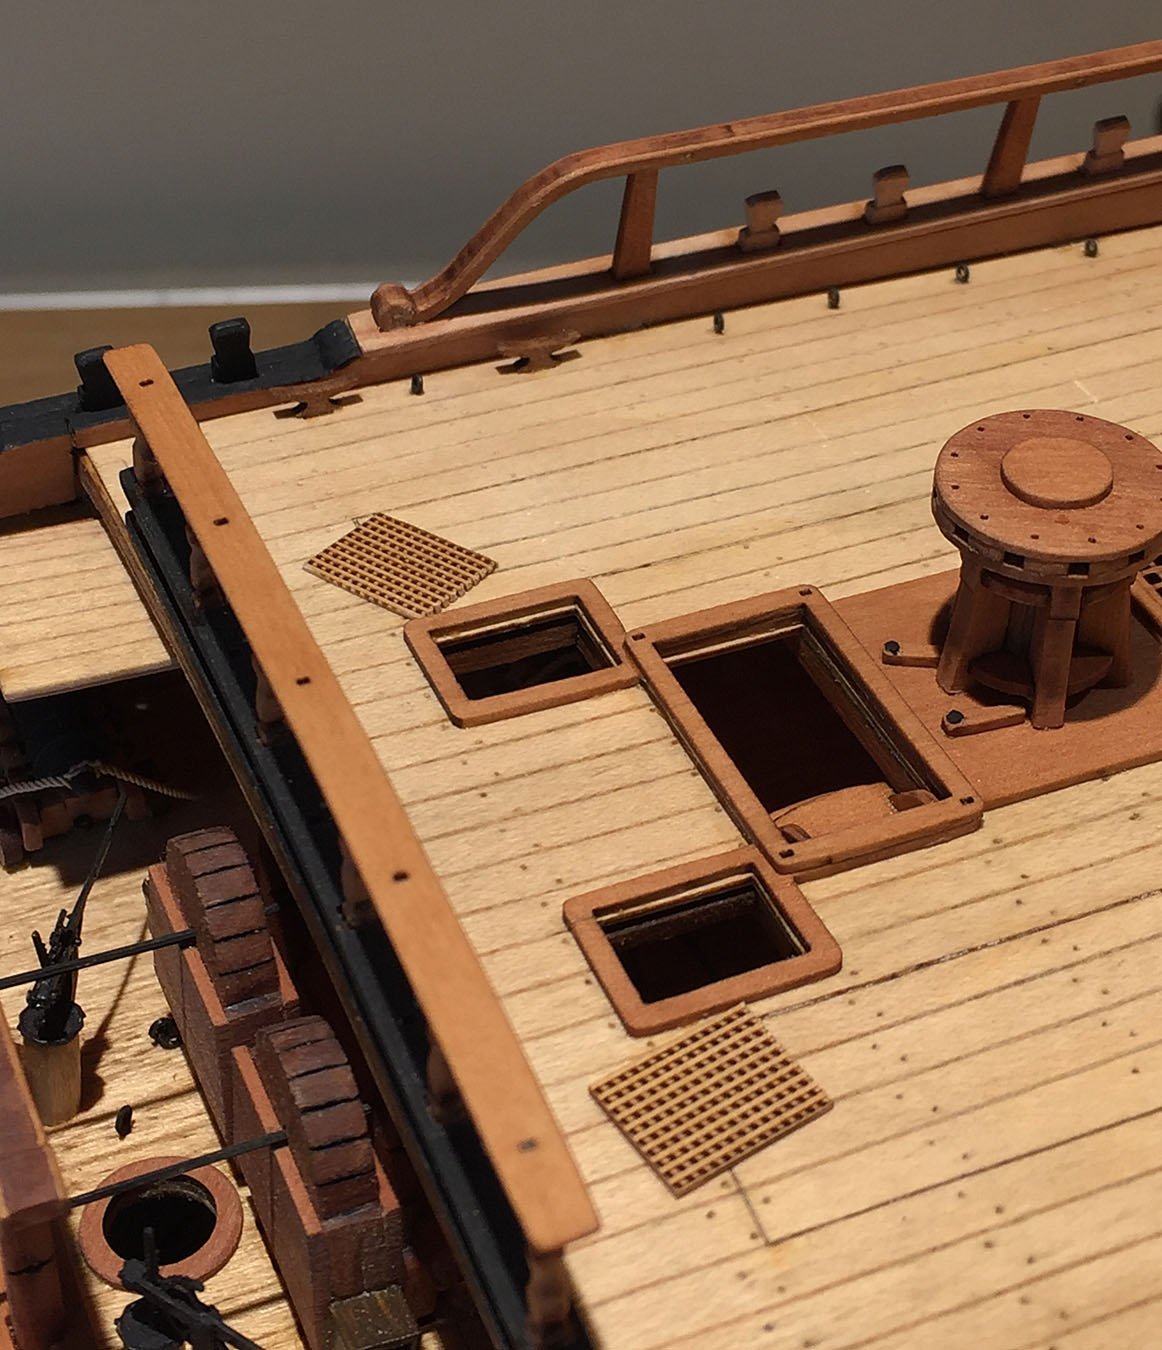
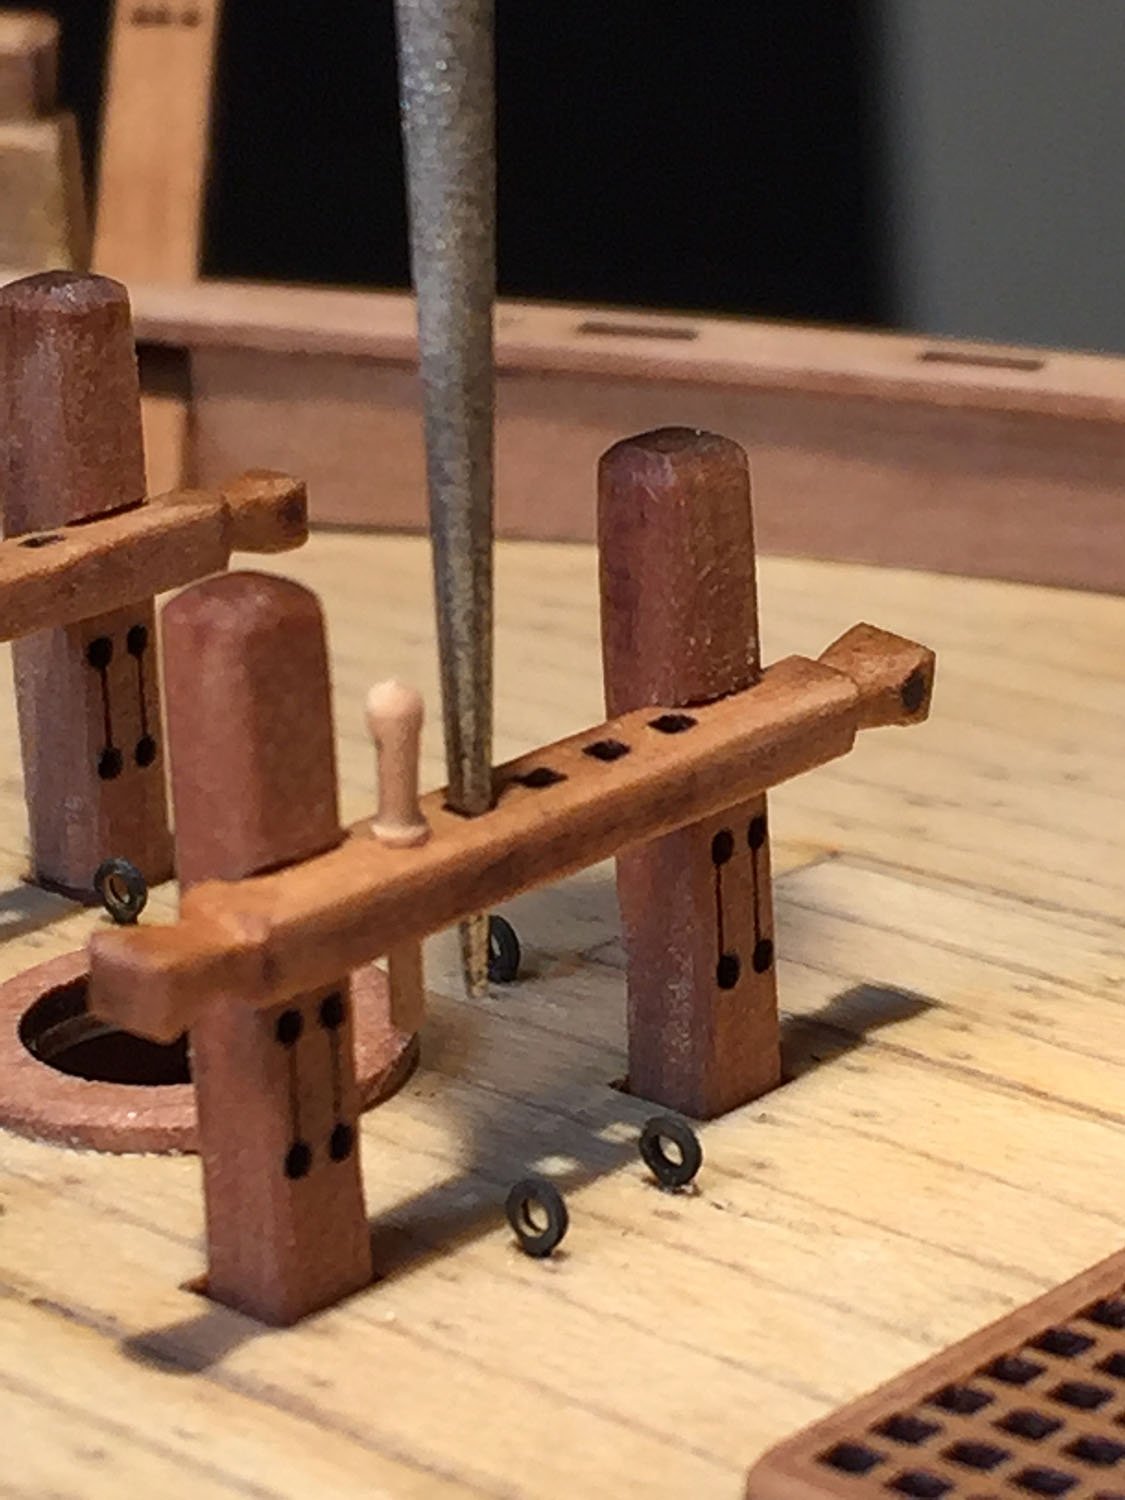
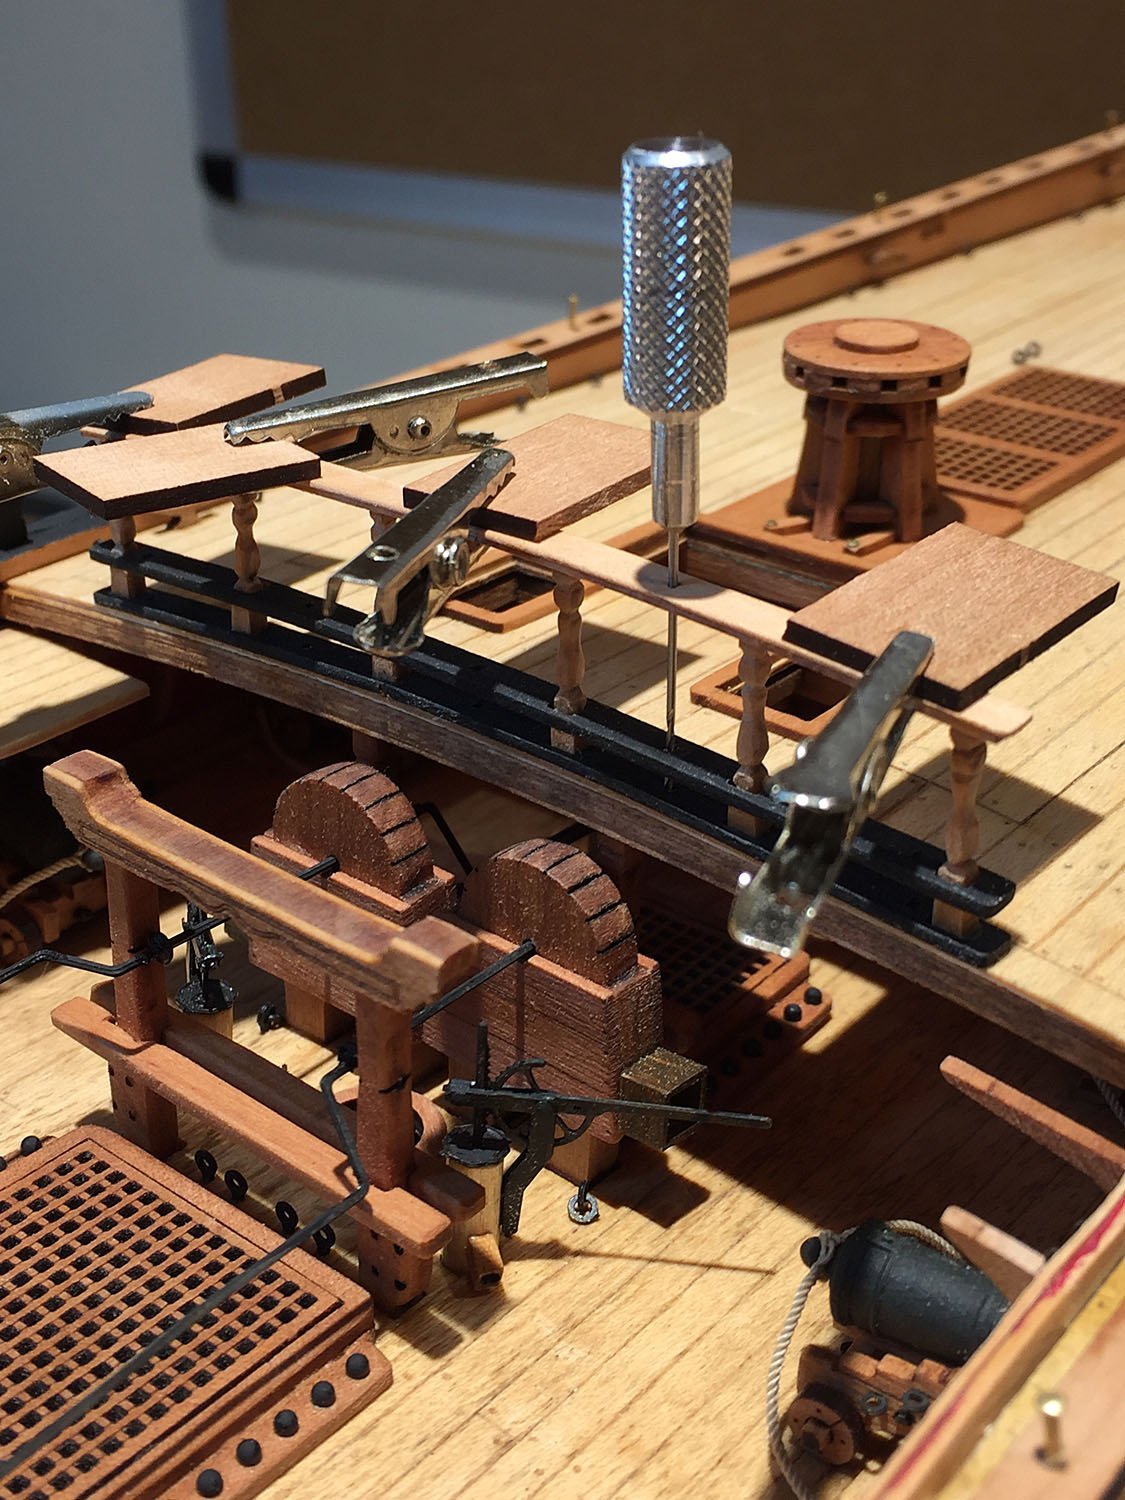
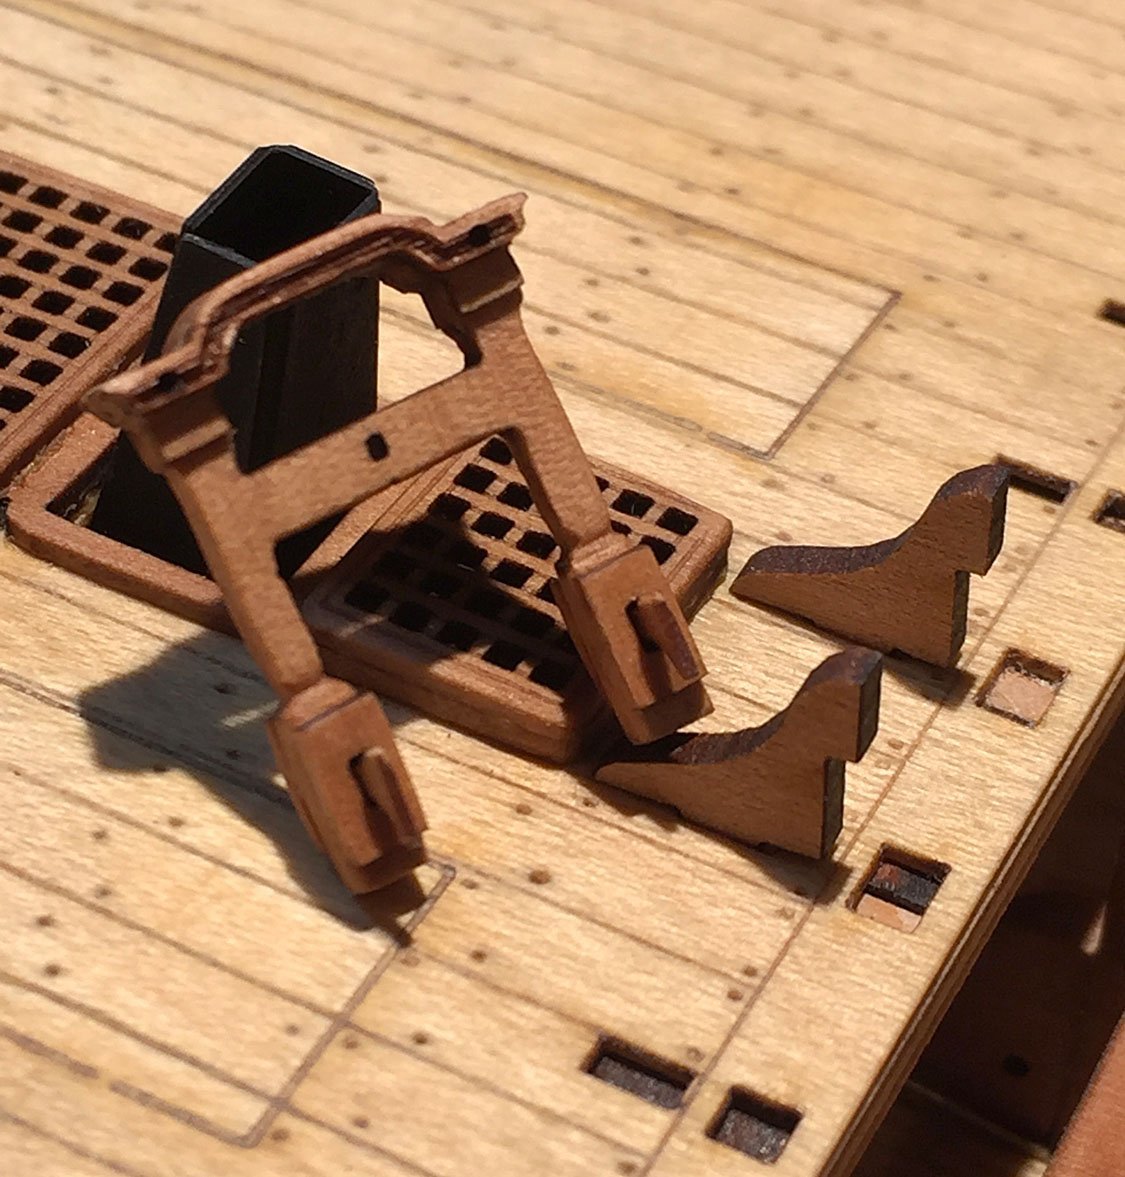
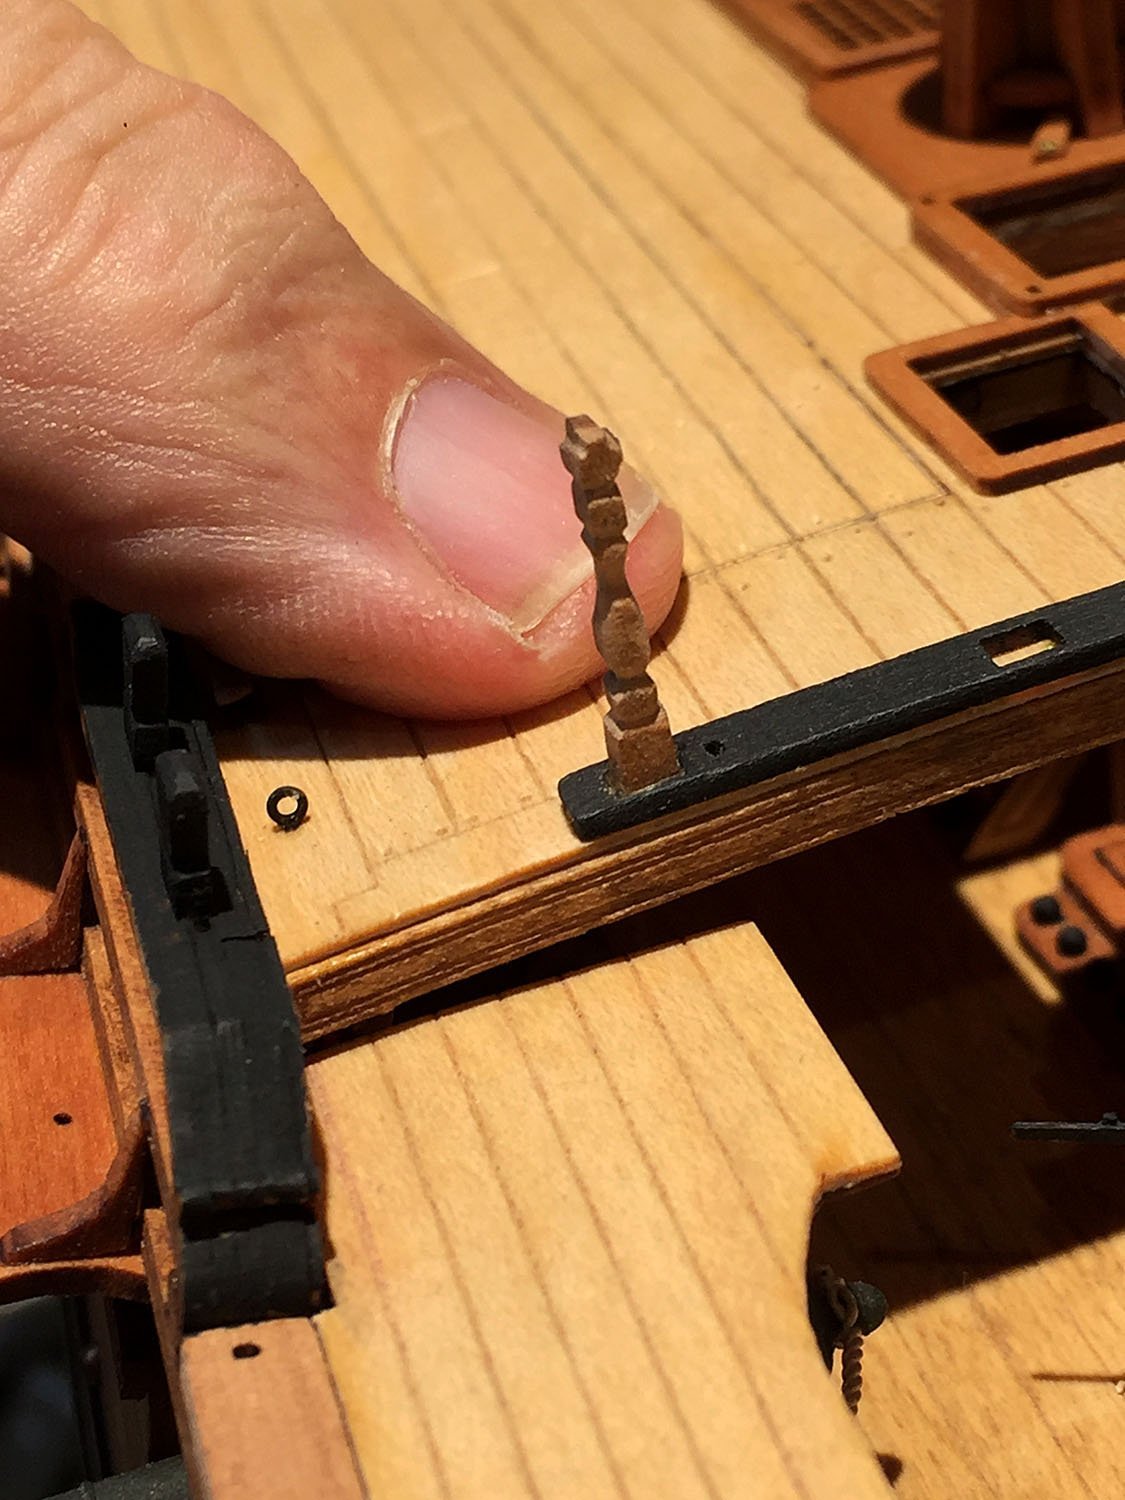
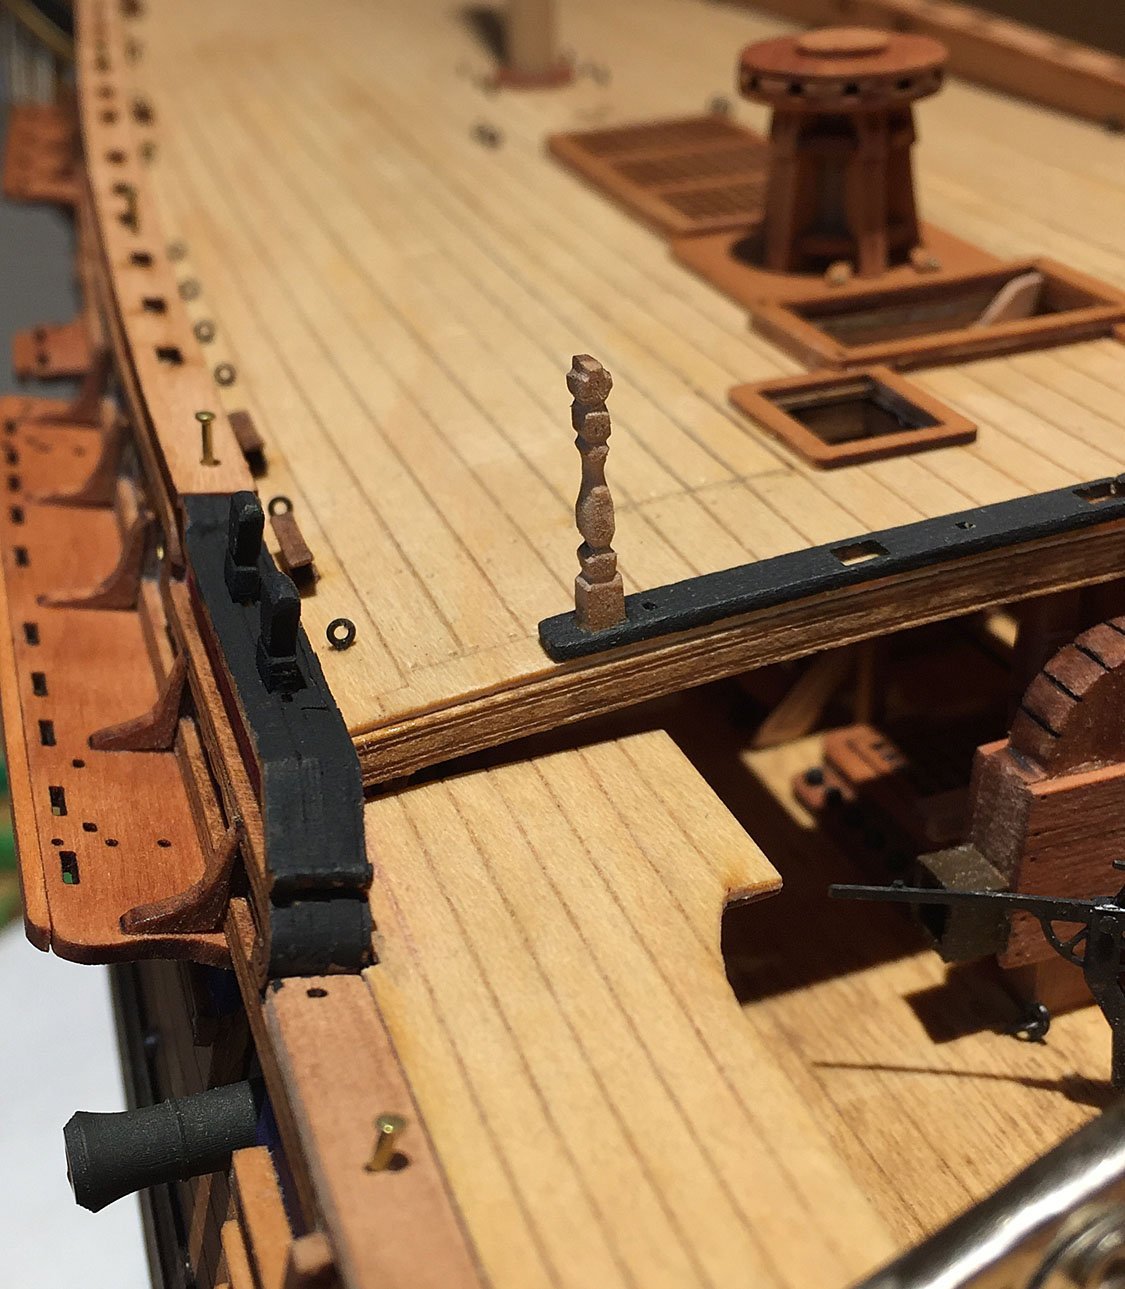
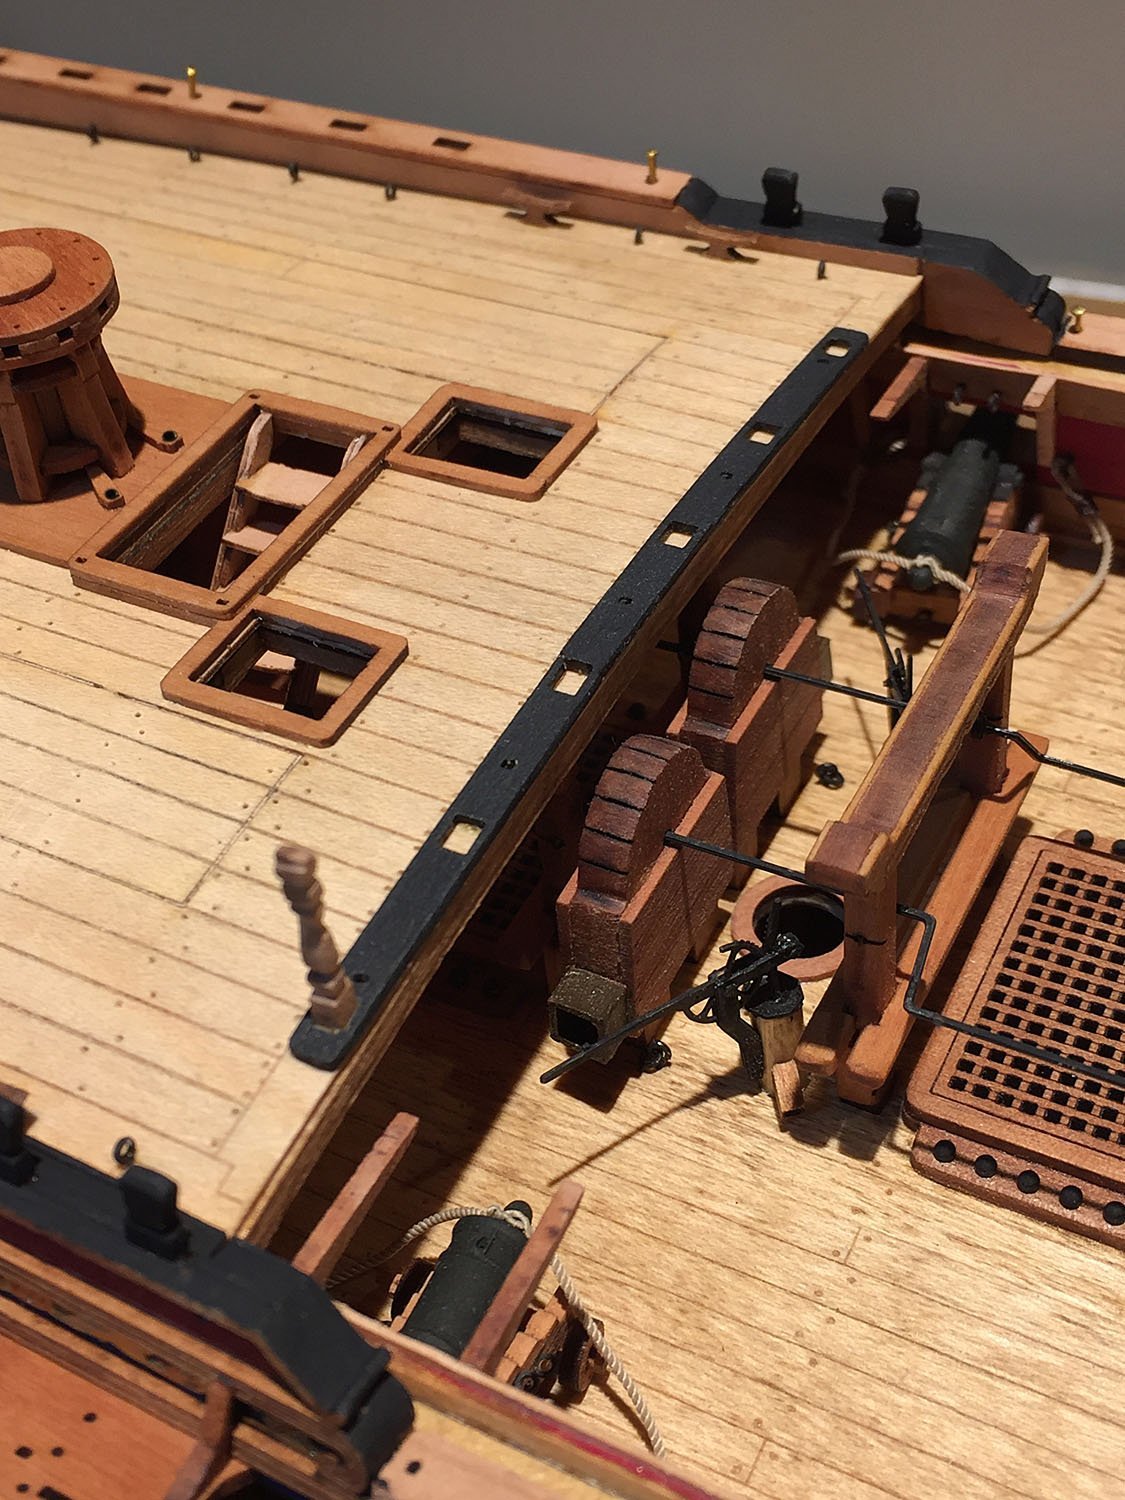
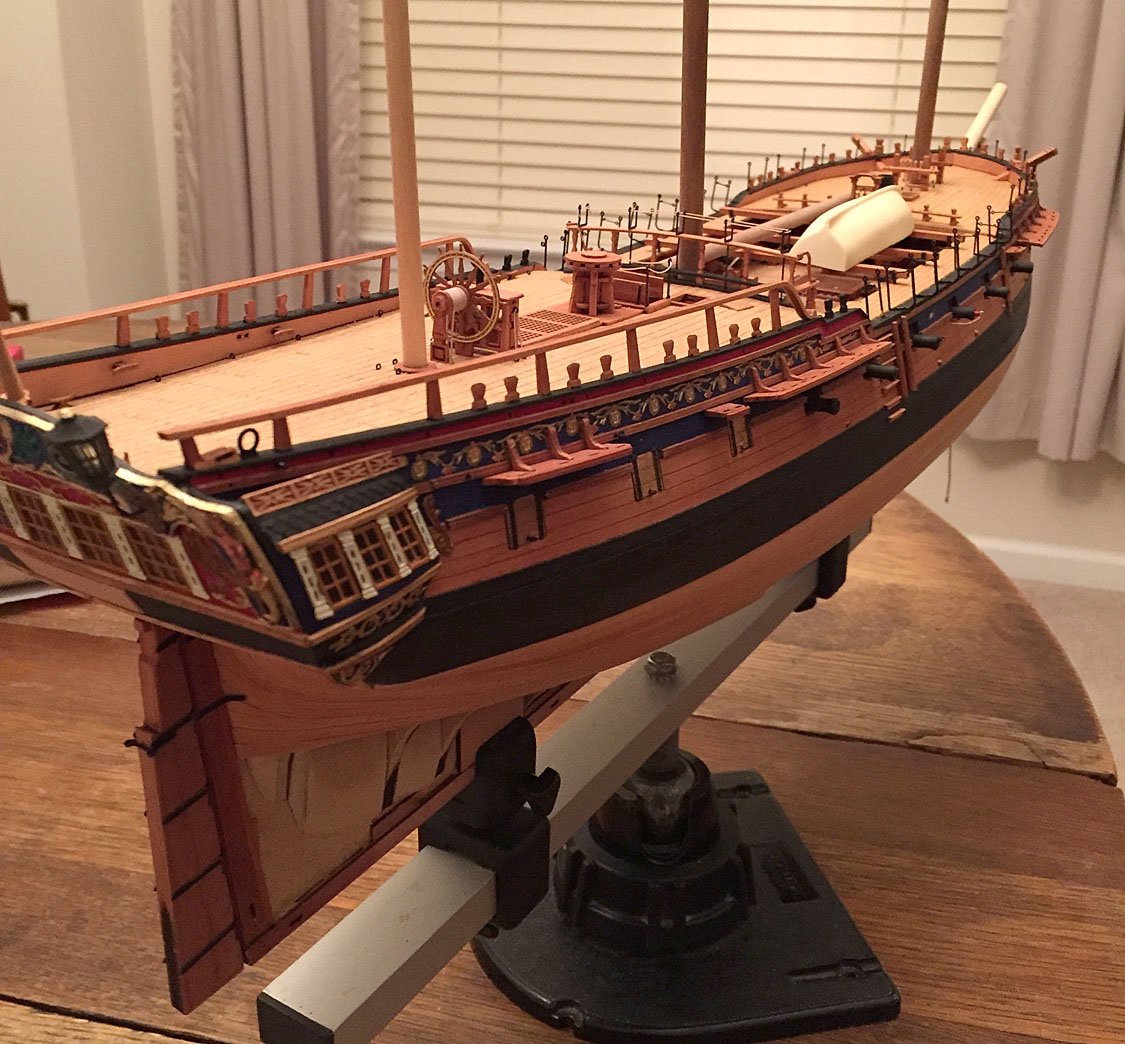
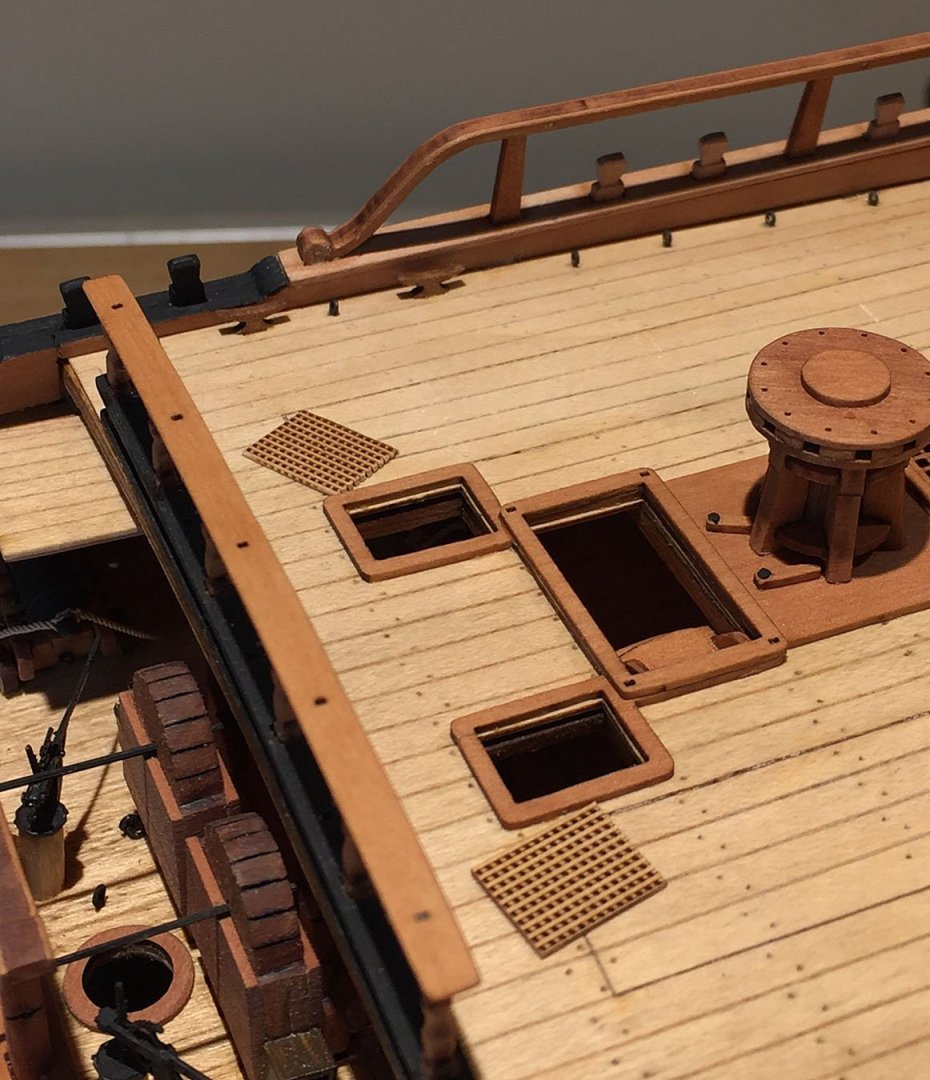
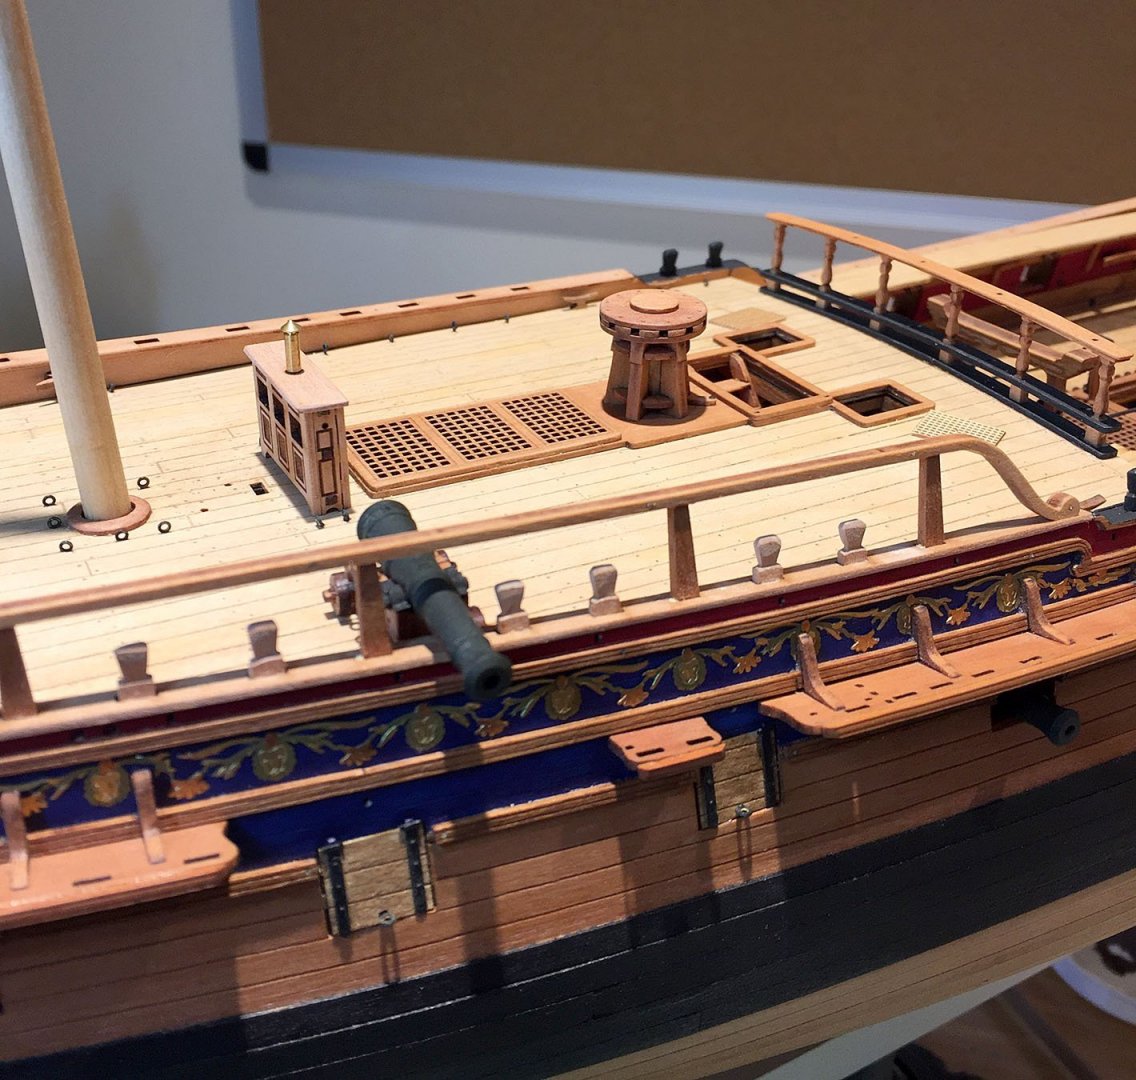
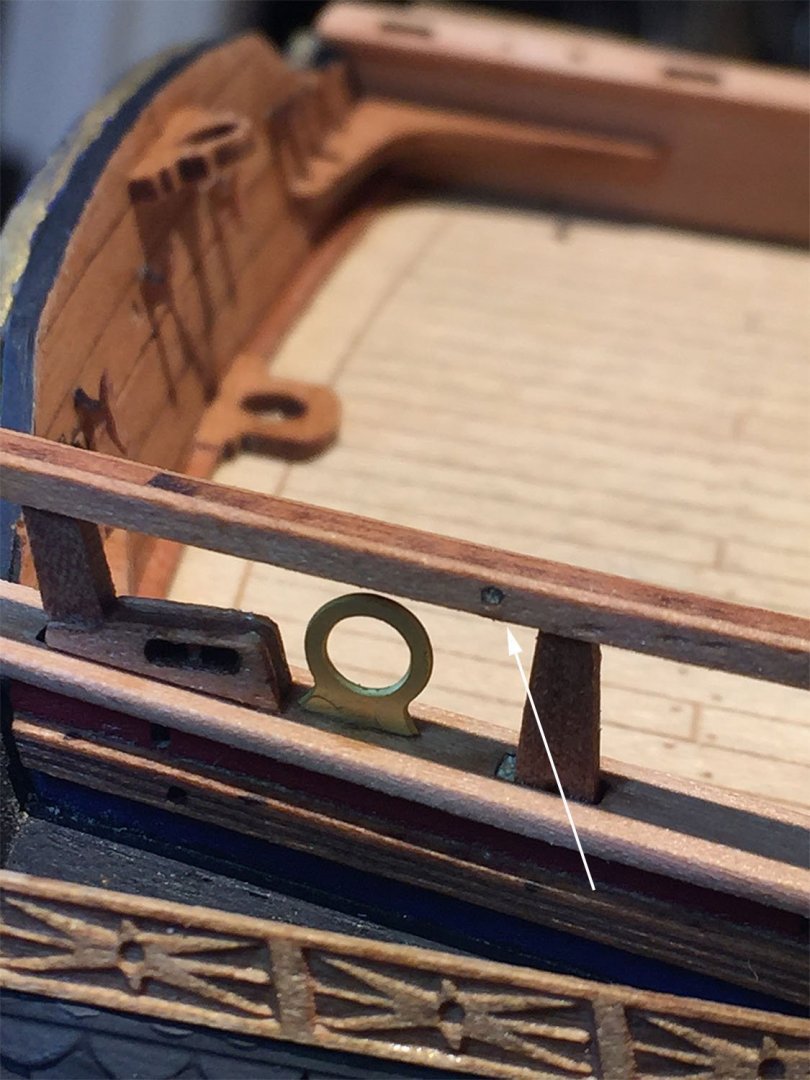
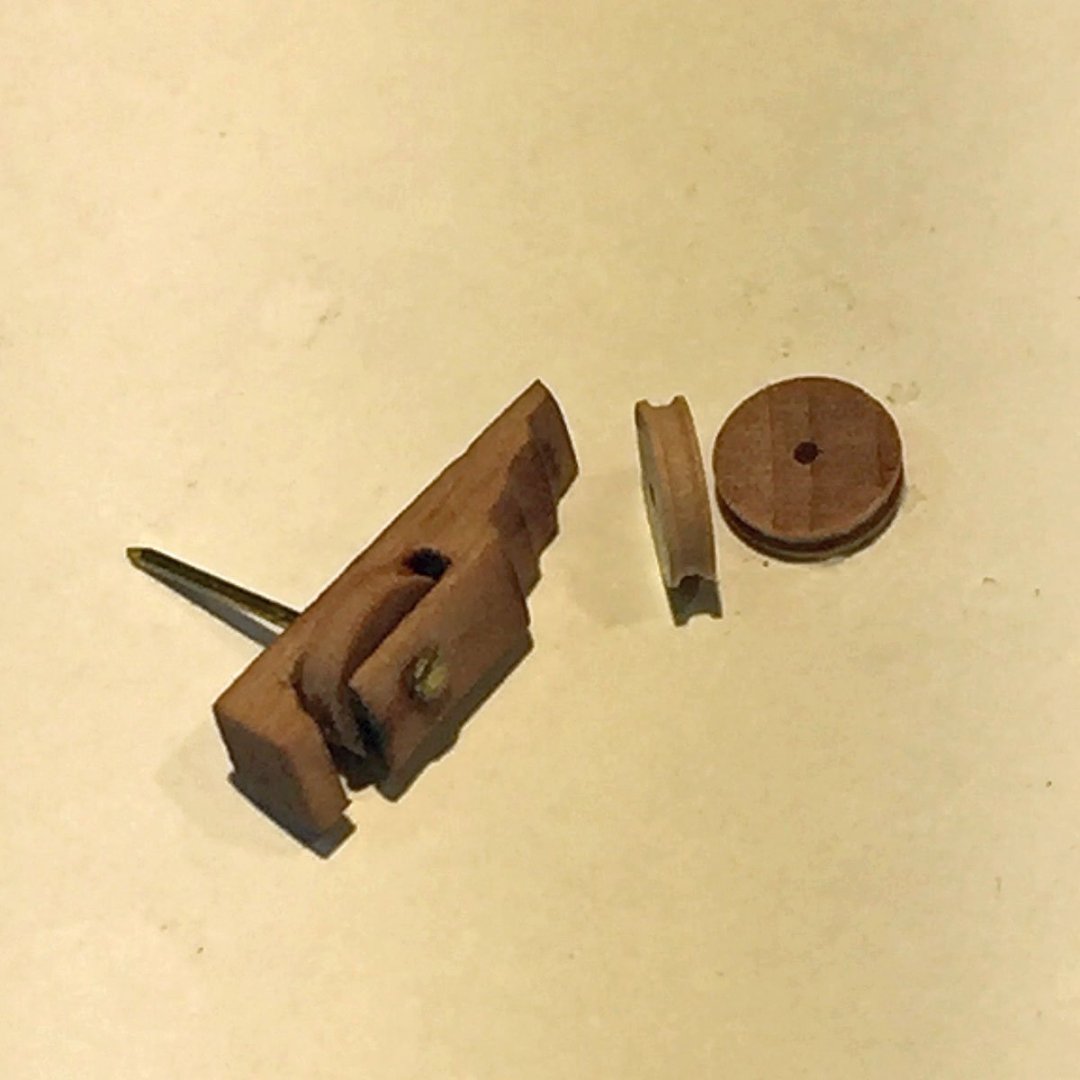
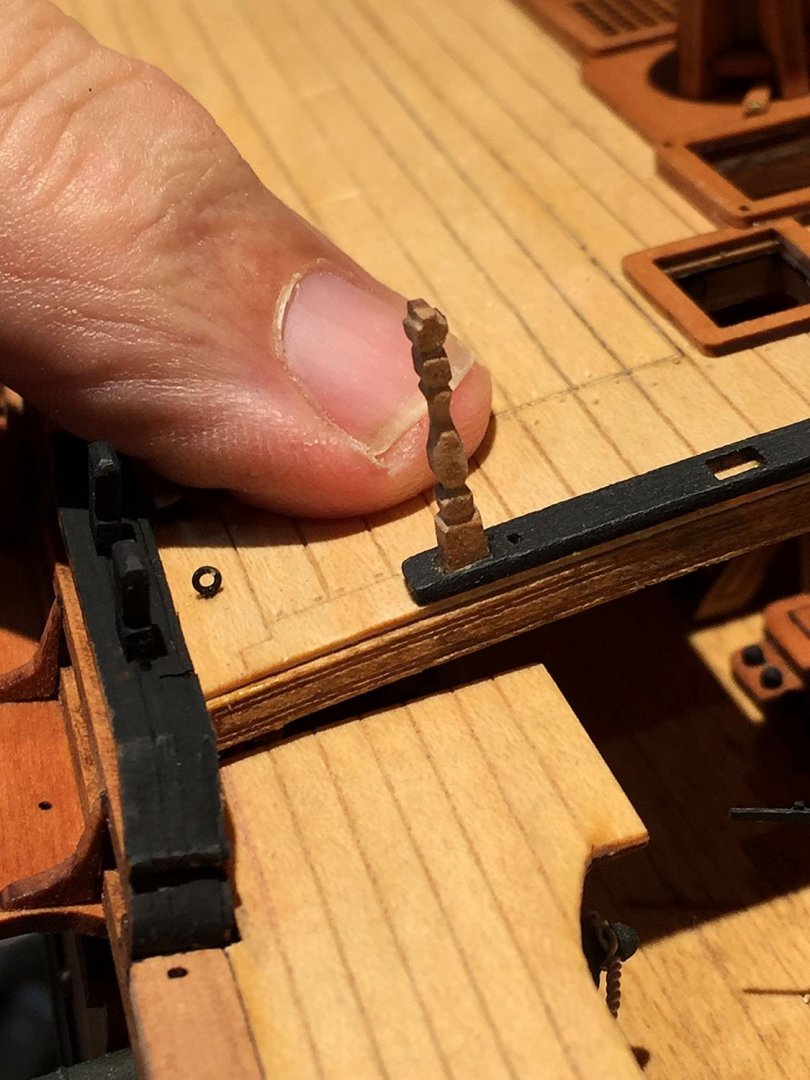
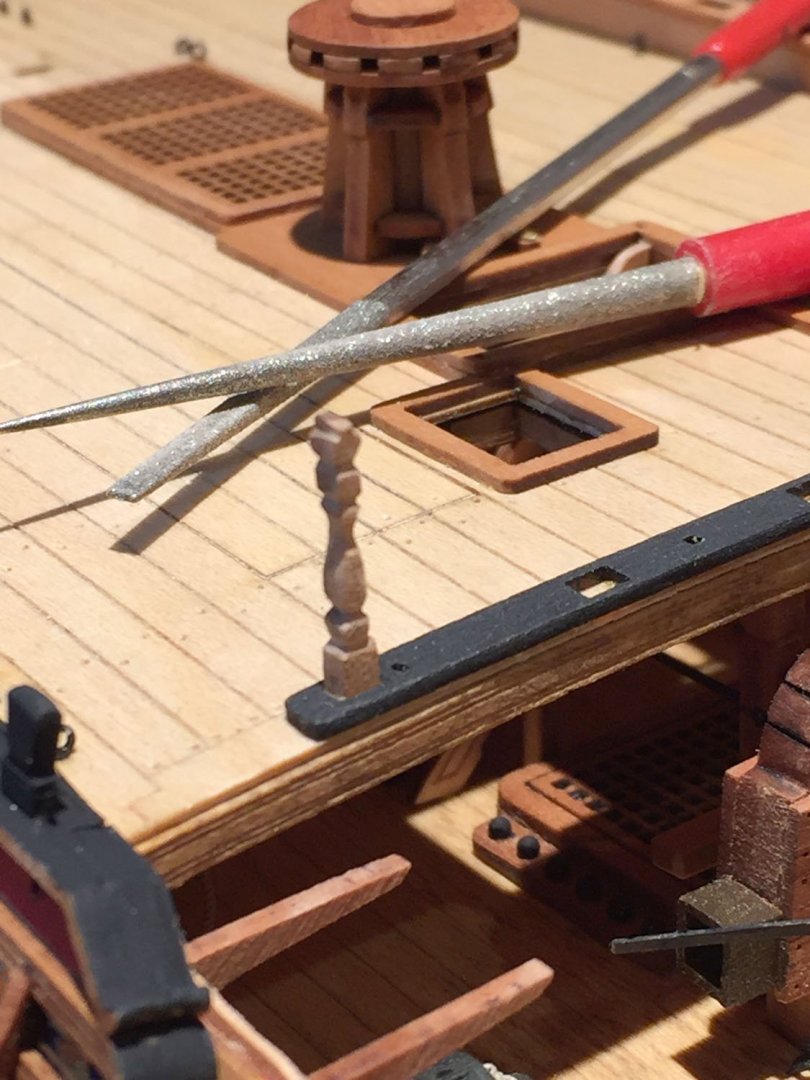
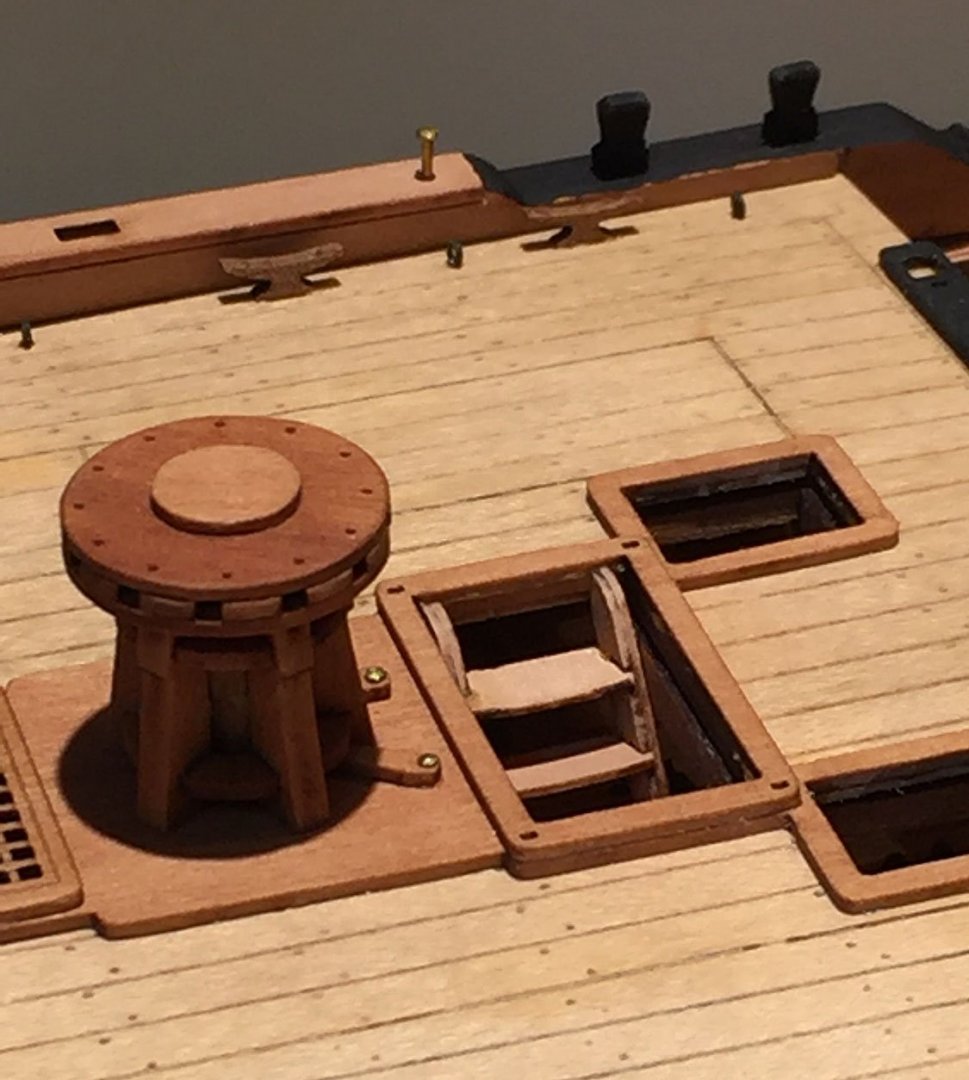
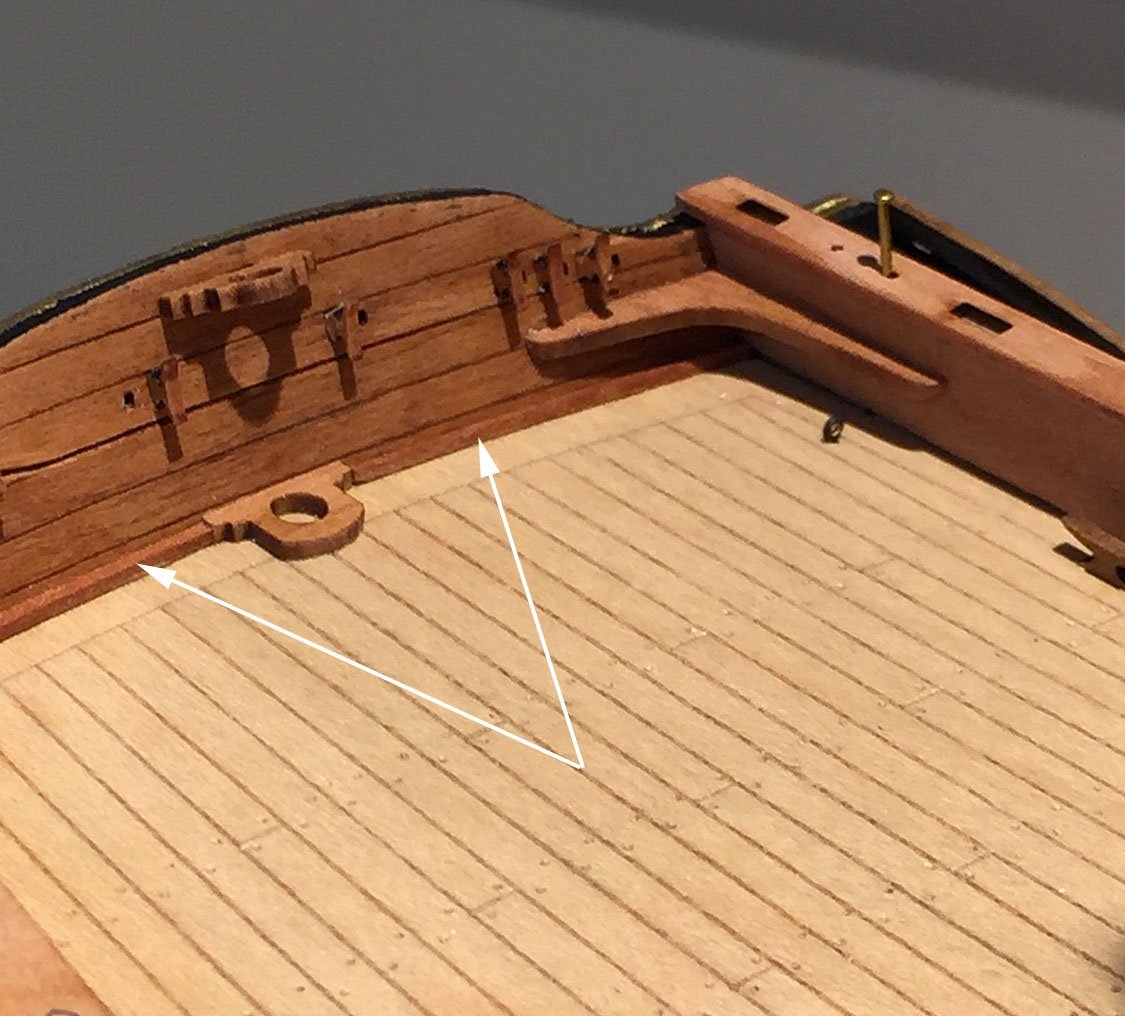
Progress...more detailing. Upgrading the binnacle. Fashioning and finishing the fife rail. Snatch block with sheave. Bitts and belaying pins. Gratings for the q'deck "fix." The kit's binnacle is laser-etched pear and it assembles nicely- however- it was missing its windows! The brisk and unrelenting wind on the weatherdeck would have constantly blown out the illumination source and made it difficult for the helmsman to see what heading the ship was on! I remedied the situation with a couple small pieces of clear acetate before I buttoned-up the assembly. Voila! Kool brass chimney (painted flat black) on this little top deck eye candy. Stained with Natural Minwax only. Needs some rope to keep it from toppling over; on my punch list for later this week... a detail that can't been seen in this photo is the thin, internal P/E brass piece that depicts dual compasses and a place for an oil lamp in the center. I know it's there, a "sweet touch." BTW: the cannon on this deck will be early 12 pounder carronades on "trucks" (essentially a version of long cannon carriages). I am looking at where the four carronades will be positioned along the slender bulwarks and exposed timberheads and fife rail stanchions. 6th-rate (and 5th rate) "post ships" quickly adopted carronades on their quarterdecks (and later the foc'sle). It didn't take long for the Navy Board to discover that these ships needed to have "built-up" bulwarks to protect the crews and come up with a new method for mounting the powerful "smashers" to the bulwarks. The unique "sliding carriage" was invented specifically for these large-muzzled, close-range intimidators (it also pivoted the carronade on a single-point axis in the center of the gunport). I'm making my HMS Camilla an "early adopter" of carronades (just four on her q'deck), but prior to having her aft bulwarks enhanced with more planking. I'm liking the superbly-designed fife rails provided in the kit, their delicate look that is part of the OTT decorative "art" she was so confident to display. Cut the Falkonet gratings to size, testing their locations. Another view of the quarterdeck showing the breast and fife rails. I'm keeping both in natural wood finishes. The gunwales will still be painted black, but I may leave all the timberheads in natural; haven't decided on this color detail just yet. I'll scrape-off the black paint on the pair of black-painted timberheads shown here should I go for the "all natural look." Black paint hides so much of the delicate wood carving. Another midships view; starting to paint the gunwales in black. Another view showing the slender fife rail mounted. A cannon placed temporarily (a placeholder, of sorts) for evaluating the positions of the four carronades that will be mounted on the quarterdeck (two on each side). A close-up of the aft-most portion of the fife rail.The arrow points to the "alignment holes" that are provided to align the three-piece, built-up rail. Thin nails help align the pear pieces for gluing and are then removed. The holes are eyesores (like others sprinkled throughout the design) and need to be filled. My choice again: stainable filler. The "O" ring is a rigging piece in P/E that will be painted black. I've added pear sheaves to the snatch blocks located on the foc'sle gunwales. The 4mm diameter sheaves are from Falkonet, a Russian ship model company that are making very nice, scale-accurate "bits" (as well as a few kits)... I'll likely feed anchor rigging ropes through these blocks. It would look really peculiar to see ropes winding through empty assemblies. Snatch blocks with sheave, mounted and ready to do some heavy lifting. Enlarging the holes in the forward bitts to make room for belaying pins. I'll add 9mm turned pear belaying pins throughout my build (from Falkonet as previously mentioned in my thread). These are things of beauty, scale-accurate and they'll be stained natural (unstained shown here). I used a needle file to gently turn the square P/E pin lasered holes into round-ish ones. I'm approaching the halfway point in just a few weeks. I call it this because the masting, rigging and sailmaking will take about the same amount of time that I've devoted to the kit's completed hull build. My personal rule-of-thumb over the past several years of building ships in the Era of Sail is that I'm still many fathoms away from home port when the hull is completed. I know there are ship modelers who don't look forward to the "other half" of their sailing ship's completion. I'm not one of them. I relish the next stages; it's not over until the wind meets the canvas ... and with HMS Camilla, her keel hitting the H2O. Ron


- 542 replies
-
- 14
-
-
- Sphinx
- Vanguard Models
- (and 3 more)
-
Chris, Nice set-up! Is the orange flash drive sending prototype files at 18.02 to the BIG GCC for the HMS Bristol?🤫 Inquiring minds need to know! Cheers, Ron
-
A Royal Barge on the Yangtze? Ron
-
Eric, The English have a great one vowel word: "naff." This is not quite the same meaning as your use of the word "stupid" - but reasonably close. Perhaps the closest colloquial expression is "lame." Nice work on your Perry BTW; not stupid, lame nor naff. Ron
-
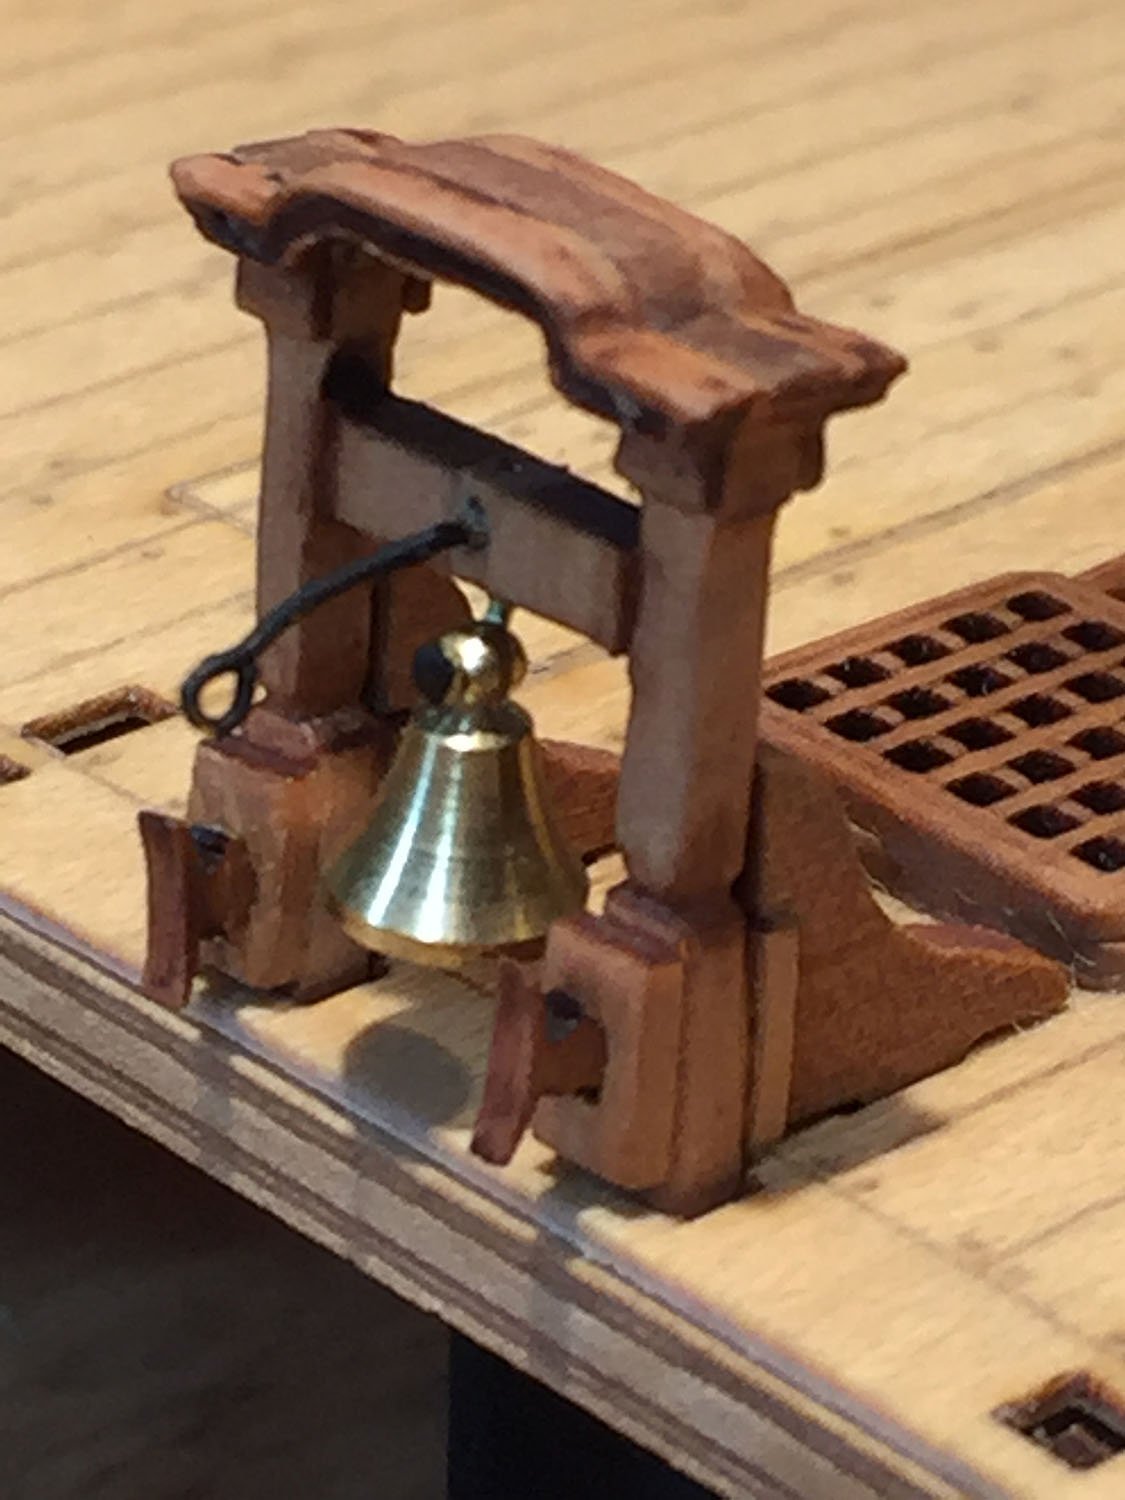
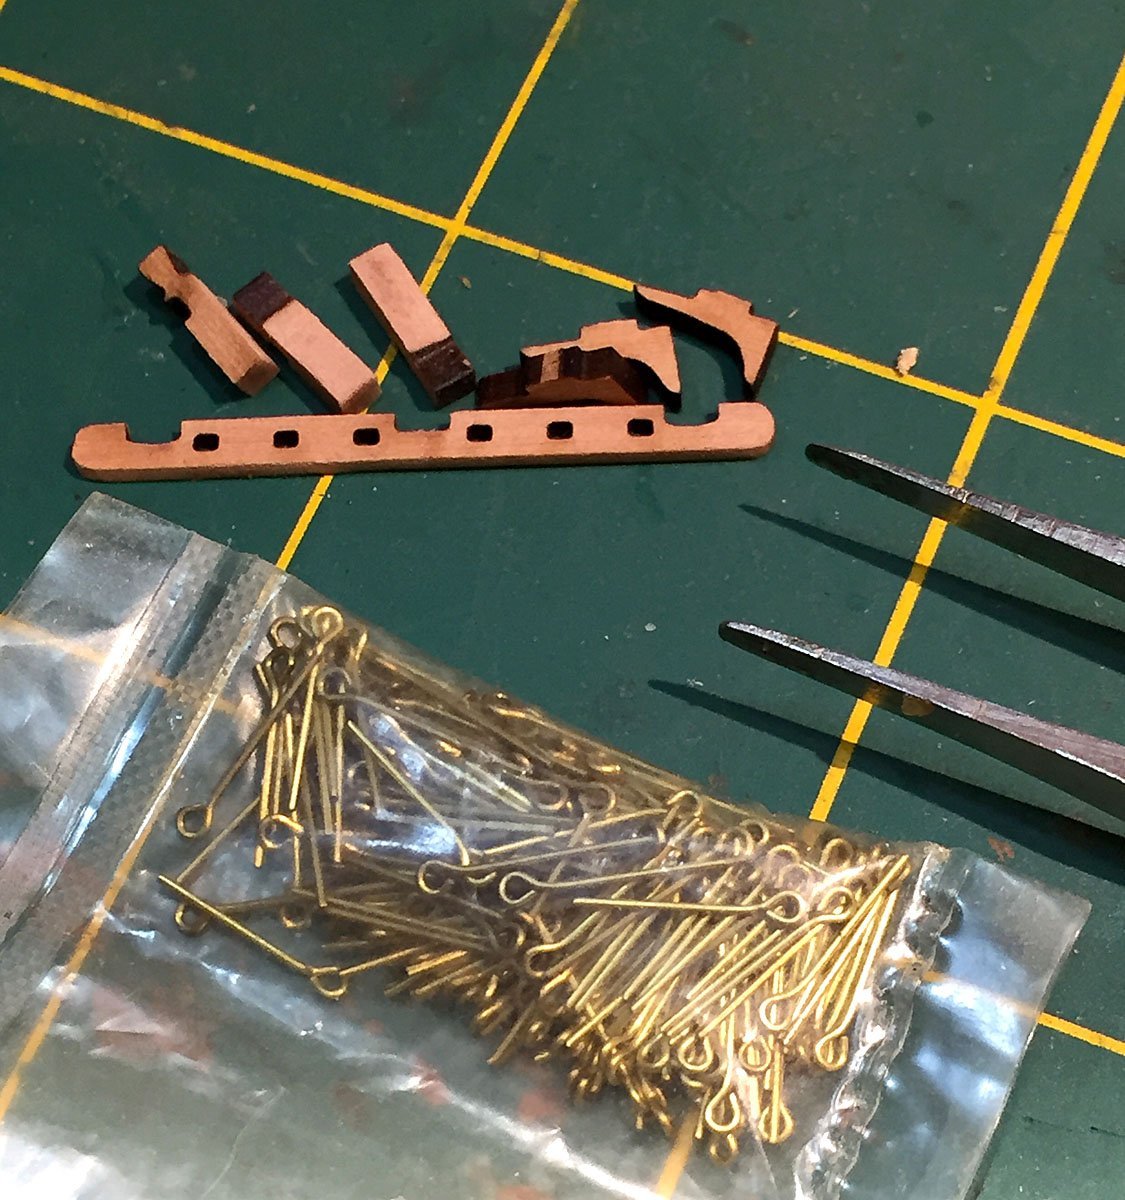
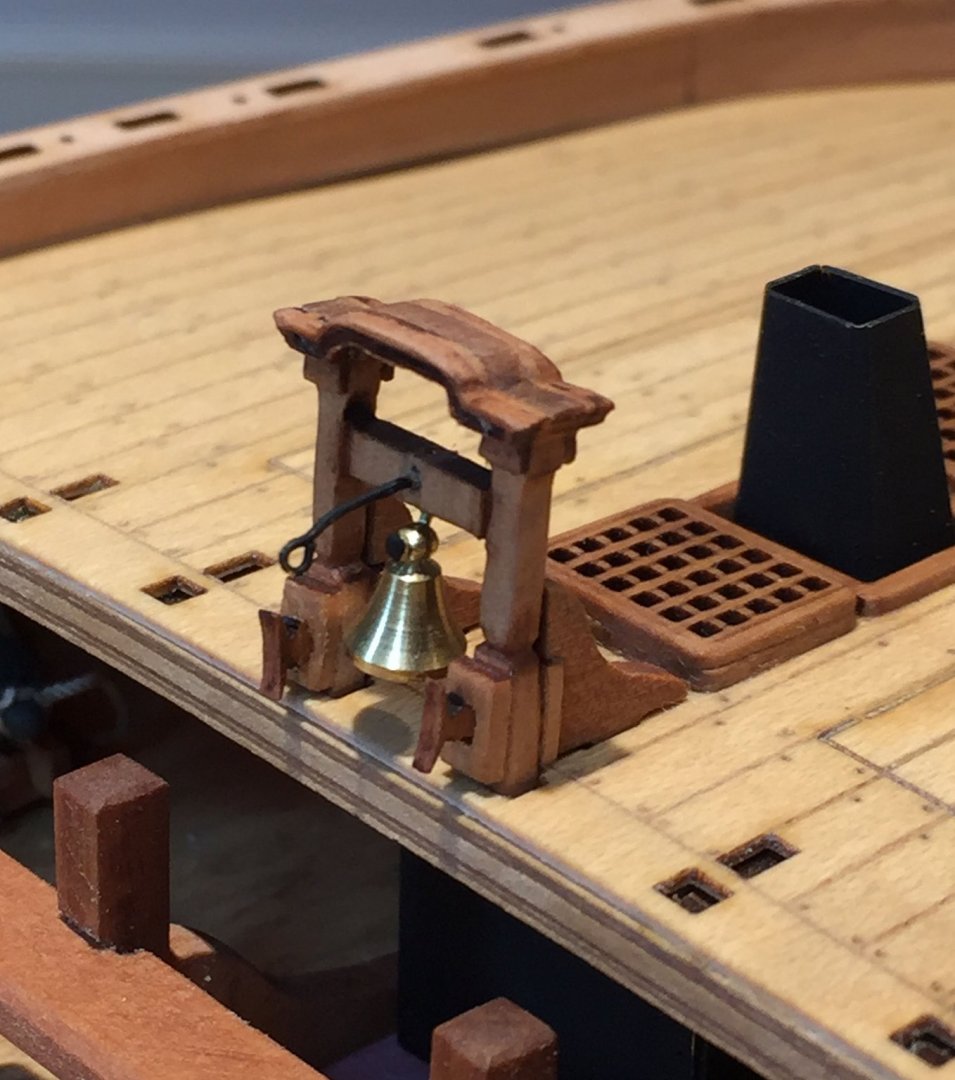
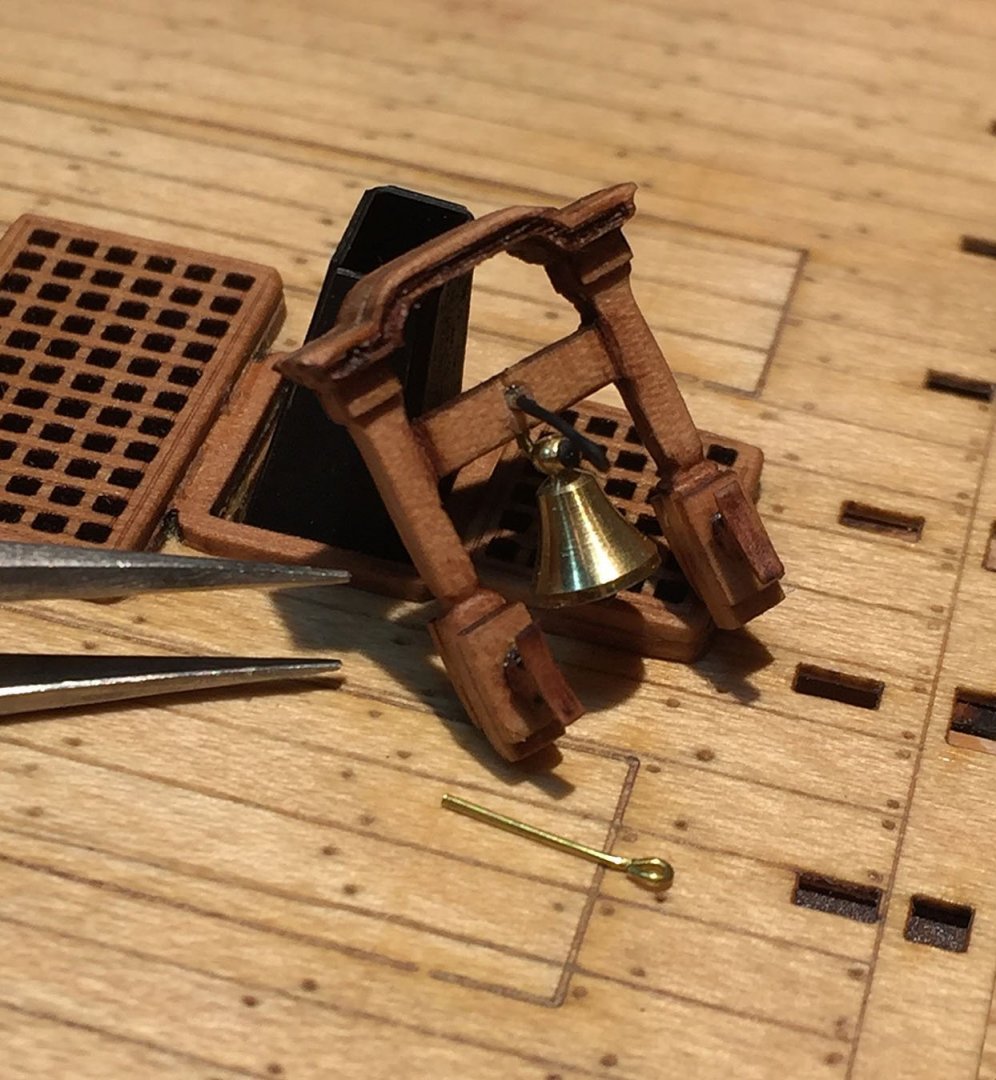
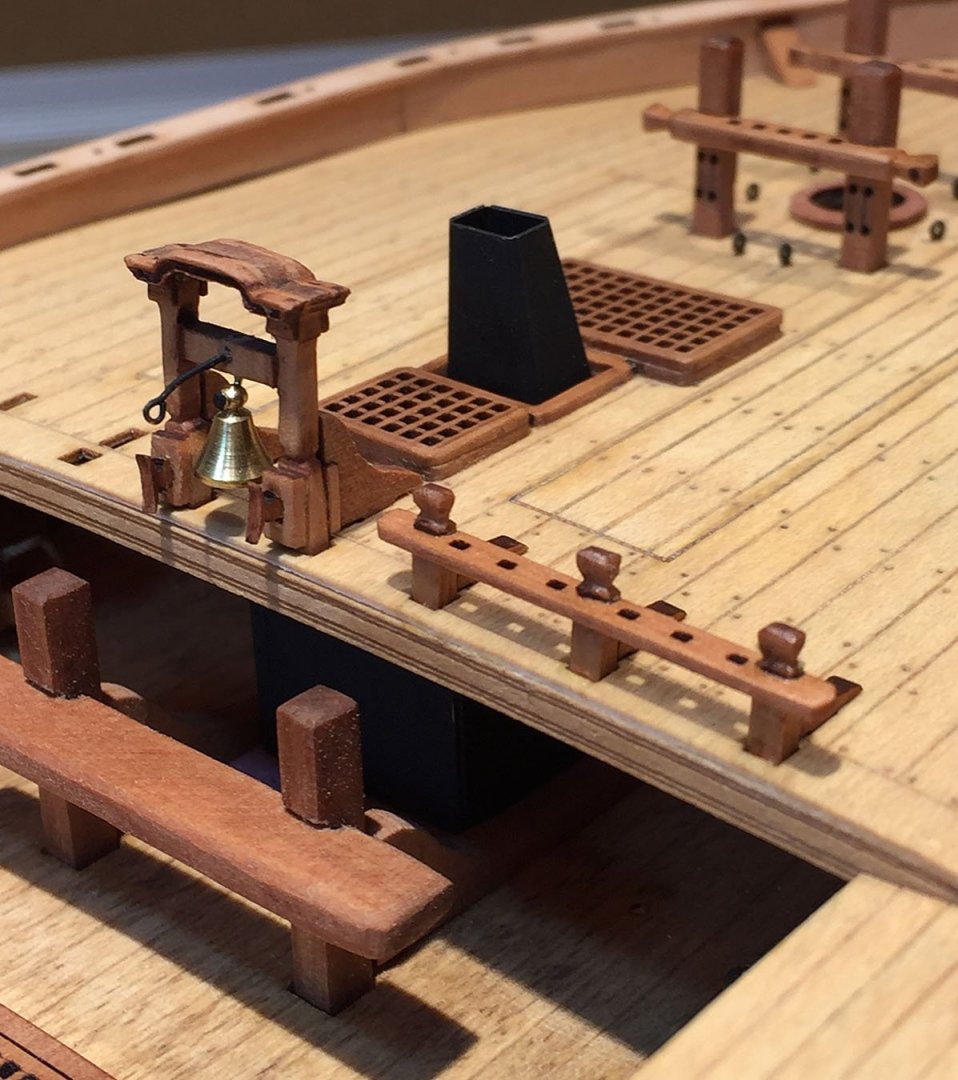
A change of mind on Camilla's Foc'sle deck details...namely, "super detailing" the belfry. NO black paint here. The "enhanced belfry" assembled, modified and mounted in position on the foc'sle deck. A closeup; the black bar will get a length of rope so the bell can be rung from the gun deck. Tweezers shown for scale. The kit's basic pieces that comprise this delicate item are fine, however, this little jewel still screamed out to me to be "Superdetailed." I replaced the thin cleats with two beefier ones (at the base of the assembly). An extension bar was added so a rope can be attached to the bell's support yoke (a tiny brass eyelet shown in front forms the bar for attaching the rope). Incised marks were carefully cut into the yoke's ends (it has to swing on a fore/aft axis in order for the bell to ring!). Tiny alignment holes in the layered, laser-engraved capping on both sides were filled and then stained. I also "darkened" some areas with a chestnut stain to highlight carved details like the marks to either side of the bell's yoke. A set of starboard belaying rails have been mounted alongside the belfry. To me, these small items look especially good in natural wood finish after I bevel-detailed the three post heads. I'll add a complementary set of rails to complete the port side. I can't recall where I bought these very small brass eyelets; if I remember I'll post the source later. I use these eyelets in several instances that demand very small hardware. In addition to forming the extension bar for the belfry, I'll use these eyelets on the tompions for the ship's cannon. When I begin rigging, I may add a few in strategic spots in addition to the P/E that's provided in the fittings that came with the kit. These brass eyelets blacken nicely and of course, can also be painted.


- 542 replies
-
- 7
-
-
- Sphinx
- Vanguard Models
- (and 3 more)
-
I'm also not a fan of vast expanses of white paint applied to hull planking, even considering it is likely a historically accurate representation for this era. Tinting white paint to a more yellowish, tallow-looking color is still jarring to the eye. Your hull planking job is very attractive, should be displayed IMHO- and most important, viewed "au natural." I'm curious to see how you handle the model's wales. Ron
- 857 replies
-
- 1
-
-
- Sphinx
- Vanguard Models
- (and 1 more)
-
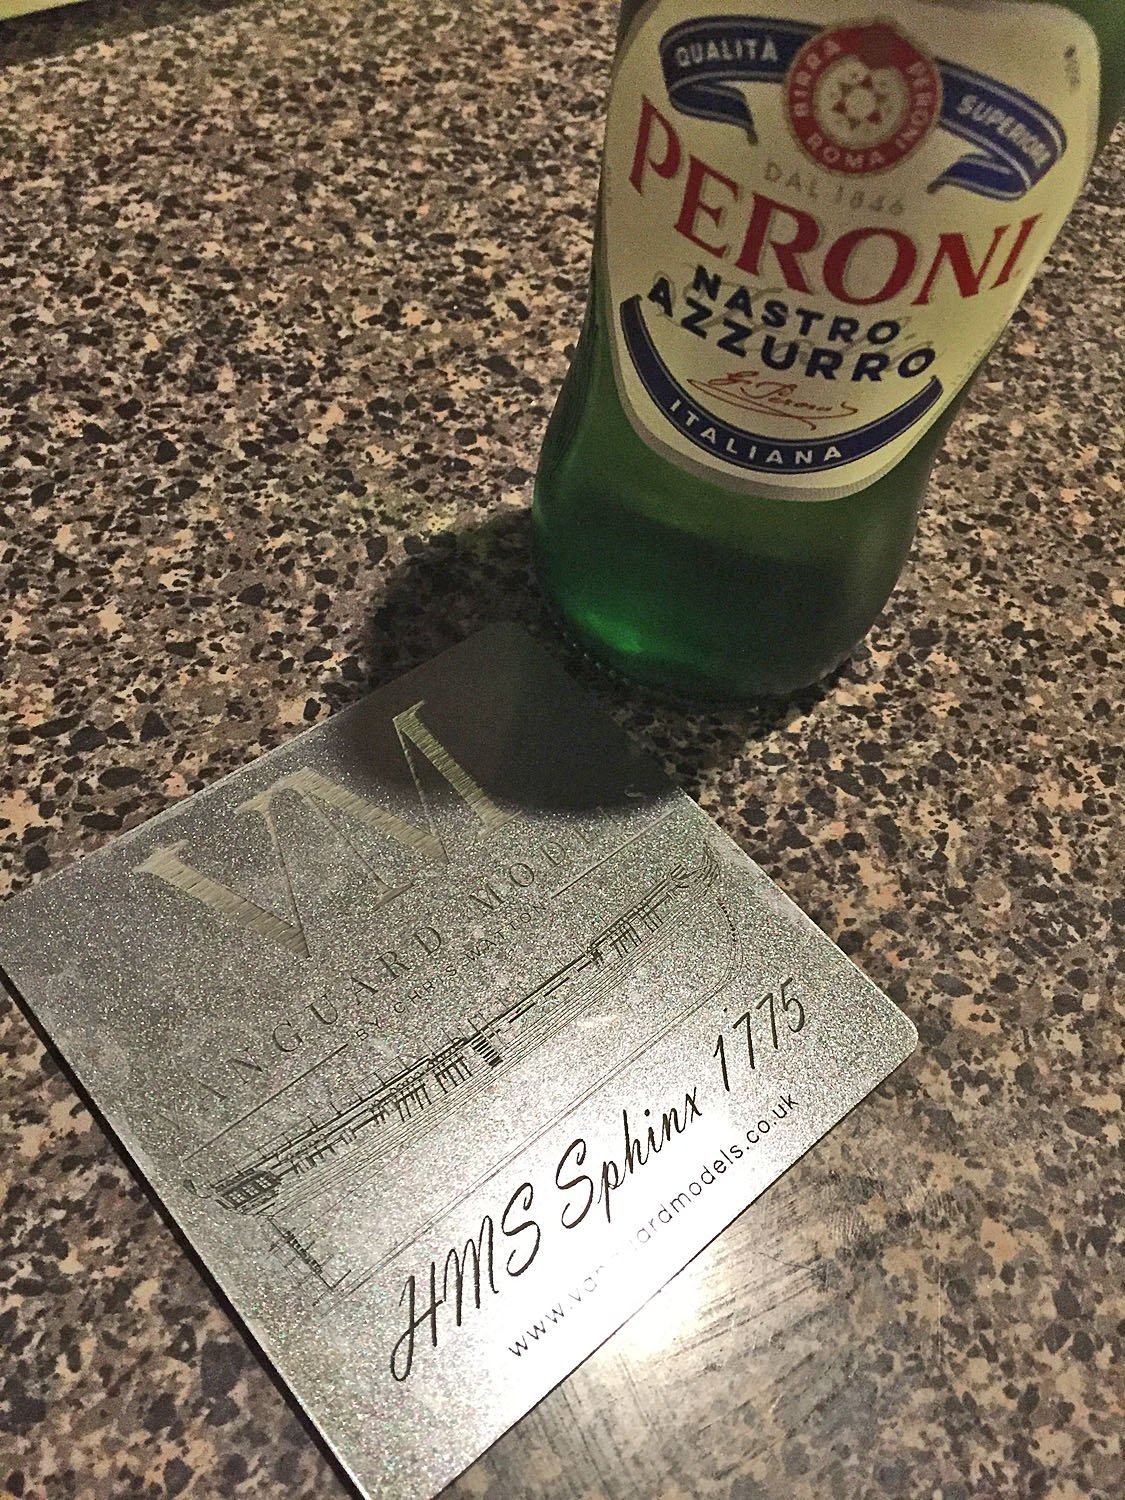
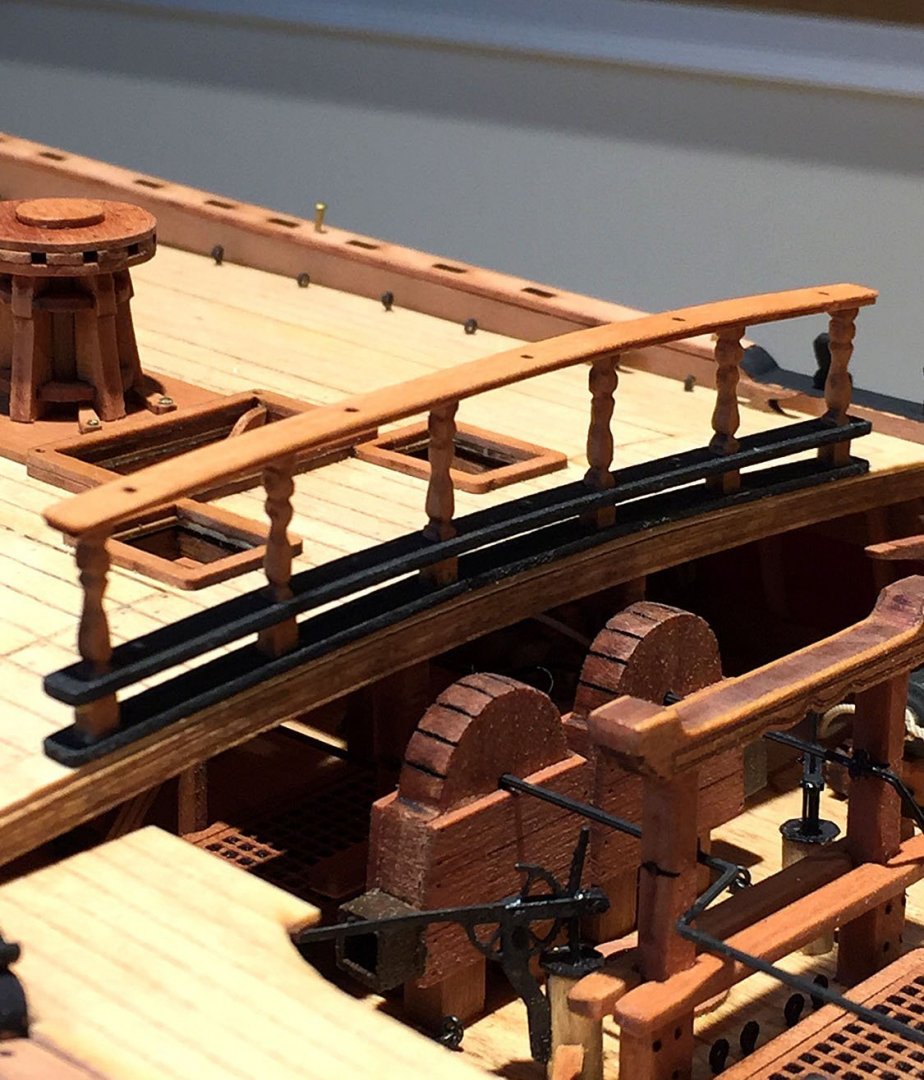
I've been anxious to see what the delicate breast rail and fife rails will look like. The kit provides two complete sets of pear wood balustrades for the breast rail. I was able to shape these six supports without pinging one into the ether...still, it was comforting to know that if I'd bunged a couple, there were more at the ready. The kit includes many duplicate laser-etched pieces as spares. Fastening the lower and upper rails requires a light touch to get all pieces aligned. After gluing the balustrades while ensuring they were perfectly perpendicular to plumb and all aligned to the transverse on the beam, the top breast rail fit perfectly; I also used my thumb drill to align the hammock crane holes in all four pear patterns. The top rail is two laminated pattern pieces that required clamps to set correctly. Again, I used scrap pieces under the mini-alligators to keep from marring the smooth wood. The completed breast rail. This is one of a number of very attractive aspects of this model. The manual shows all the elements of this item painted in black. I chose to keep the upright balustrades as well as the top rail in natural pear which I have stained with Natural Minwax. The holes at the top hold the hammock cranes when they're installed later. A close-up of the breast rail. The delicate shape to the laser-etched 2mm thick balustrades was demanding; time-consuming and twitchy due to their small size and the delicate sections. I spent 3 hours fashioning these 6 pieces. I am pleased with the result, the time was worth it. Even Lord Cochrane thinks it's a good idea to hang out by Lady Camilla's fancy breast rail...😂... The basic belfry assembly at the foc'sle deck's edge. A cleverly-designed, and nicely detailed little thing, this is. I may paint it black as shown in the plans, but I'm not certain yet. I may keep it in natural pear after fixing the tiny alignment holes (at the top) with stainable filler. Also, the cleats (lower portion) will be replaced with extras from thicker stock. There will be rigging lines attached to these cleats and I want them sturdier than the thin ones shown here. The belfry supports I will likely paint black regardless of my decision on the finish for the belfry. Vanguard Models includes nice"surprise" goodies with their kits - like this useful coaster that supports a Peroni beer every once in a while...🤪 A previous photo that shows the nicely-molded scale figure of Lord Cochrane came with an earlier kit I purchased from Vanguard. I also received a paperback novel in another kit (the story of Captain Cochrane). Nice perks, Chris (Watton)...much appreciated. Ron


- 542 replies
-
- 10
-
-
- Sphinx
- Vanguard Models
- (and 3 more)
-
You are welcome, Bob - I'm pleased that you found my techniques helpful. Ron
-
I also get my silkspan from SIG, although I have also bought some from Bluejacket Shipcrafters in the past. I've ordered different weights from SIG, but have mainly worked with the lightest weight material. I'm not surprised SIG's inventory is on a slow boat. I believe it's manufactured in Japan, but it's possible that the latest manufacturing has shifted to China. I like your treatment showing a partially furled sail, great job! Ron
-
Thanks again, Mike. My "frieze" (shown in the previous pic) was, in fact, the P/E that came with the Pegasus kit; I turned all the bulwarks and quarter gallery pieces into "wood carvings" using my matte acrylic build-up and paint/wash technique - after I attempted to paint a decorative, flowing acanthus with various objects (fruit, cherubs, little creatures, drapes...you get the idea) at this small scale; it didn't look great and it was painstaking to accomplish. I tossed my mediocre-looking paper strip that would have been applied to the upper bulwarks area (only - not the q'galleries). If I build a model at 1:48, frieze painting might work better for me. I may - or may not - ever find out since 1:64 is my preferred build "zone." Thanks for the reference to the Russian site...however, I was warned off in three different browsers that it could be hacked. Russia, With Love. They have so much to give and show us, these Russian masters - including internet pandemic digital diseases. Sorry. There are only a couple Russian sites I trust and this one didn't make my "safe" list. Thanks anyway. You should be aware of www.craftysailor.com (Canada). Igor, the owner, is a friendly reseller of excellent, untainted Russian goodies - like Falkonet and Master Korabel; Both Russian companies that are basically endorsed by Chris Watton and Jim Hatch. My Tiger (Vanguard's Alert kit) also has a minimal amount of P/E decorations on the aft bulwarks that I turned into carvings. Here's a pic of the effect. Ron
- 542 replies
-
- 6
-
-
- Sphinx
- Vanguard Models
- (and 3 more)
-
Mike, Thanks. Gilding wax, something I've never heard of! Perhaps, I possibly could have used some of that on my granddaughter's doll house! I actually "coppered" portions of the Victorian Mansard roofs - wait for it - with copper foil. Harry Potter wands. Kool. They'll treasure those wands forever I'll bet! If you do use the gilding wax on a build, I'd like to see the effect, the outcome. Modelers here have also added "weathering metallic" to the black resin cannon of their HMS Sphinx builds to impart a more metallic look; it does render a nice, realistic look to the metal cannon but I'm of a different mind about this: I prefer the dull, flat, nasty black iron appearance of the Vanguard cast resin cannon. The gesso build-up I employ on flat P/E (or on some of the stacked decorative pieces) helps immensely to better depict wood carving. It's another step to add to the multi-step painting/finishing process but I think it is worth the effort. Here's a pic showing how I used this "fake wood" technique on my HMS Swan (nee' Pegasus) model. Best to you - and your family - on this Thanksgiving Eve! Ron
- 542 replies
-
- 6
-
-
-
- Sphinx
- Vanguard Models
- (and 3 more)
-
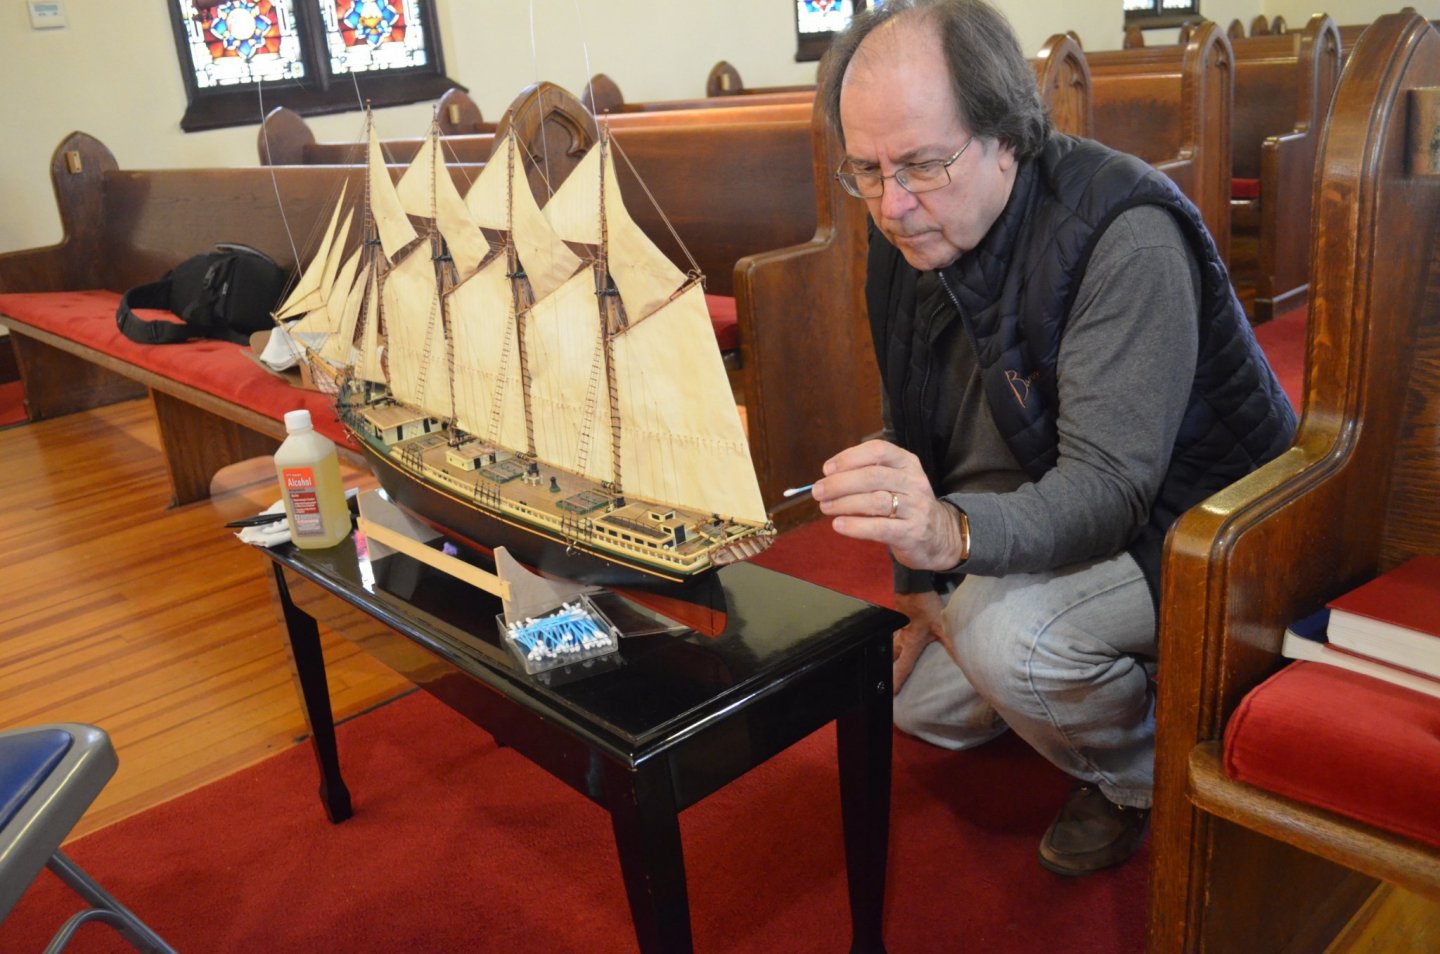
Bob, thank you. I haven't demonstrated my technique on a Build Log here, however I did an in-person demo a couple years ago at the annual Joint Clubs Northeast Ship Modeler's Show. Here is a link to a video that was made of my demo: https://www.philadelphiashipmodelsociety.com/presentations/ I've basically created an amalgam of various techniques of others plus a couple new processes that I conceived. There aren't that many different ways to create realistic-looking set sails; virtually all typically involve making them from either paper or the material, silkspan - or both (in my case). Creating set sails was a challenge that I set myself to somehow solve and come up with ways to make sails look like they're actually working: e.g.; "blowing (billowing) in the wind" so-to-speak. The photo here shows me doing a little maintenance on a nave model I built for a church in New York: my model, HMS Godspeed, is a four-masted schooner with 17 sails if I recall. These sails had only a slight set to them as all the sails are lateen, fore-to-aft rigged typical of these ships. It was after this build that I experimented and figured out how to make set sails on square-rigged ships look like they were doing the work! Ron
-
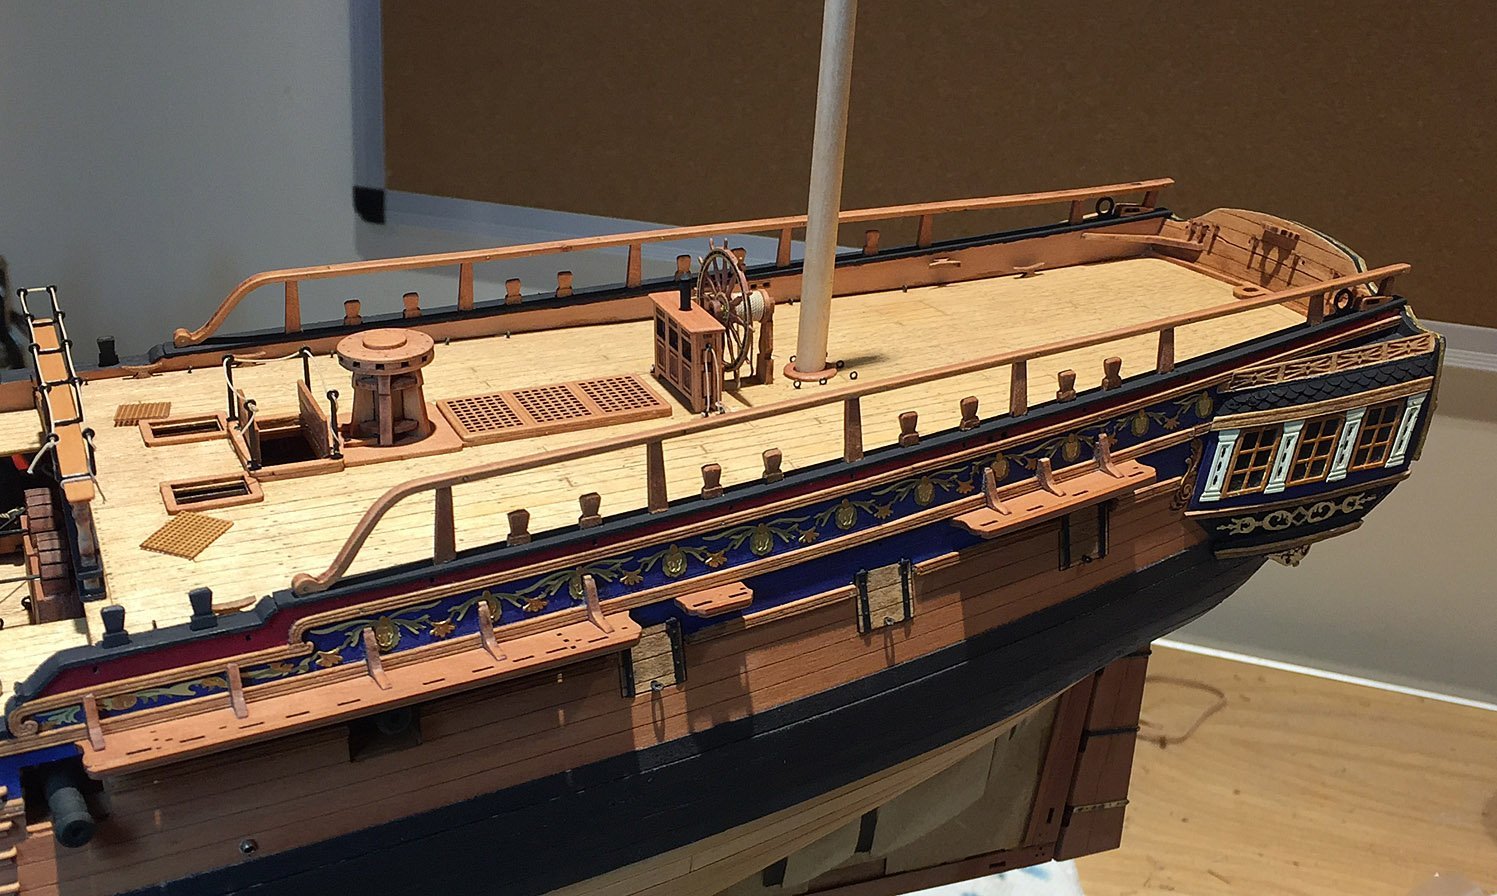
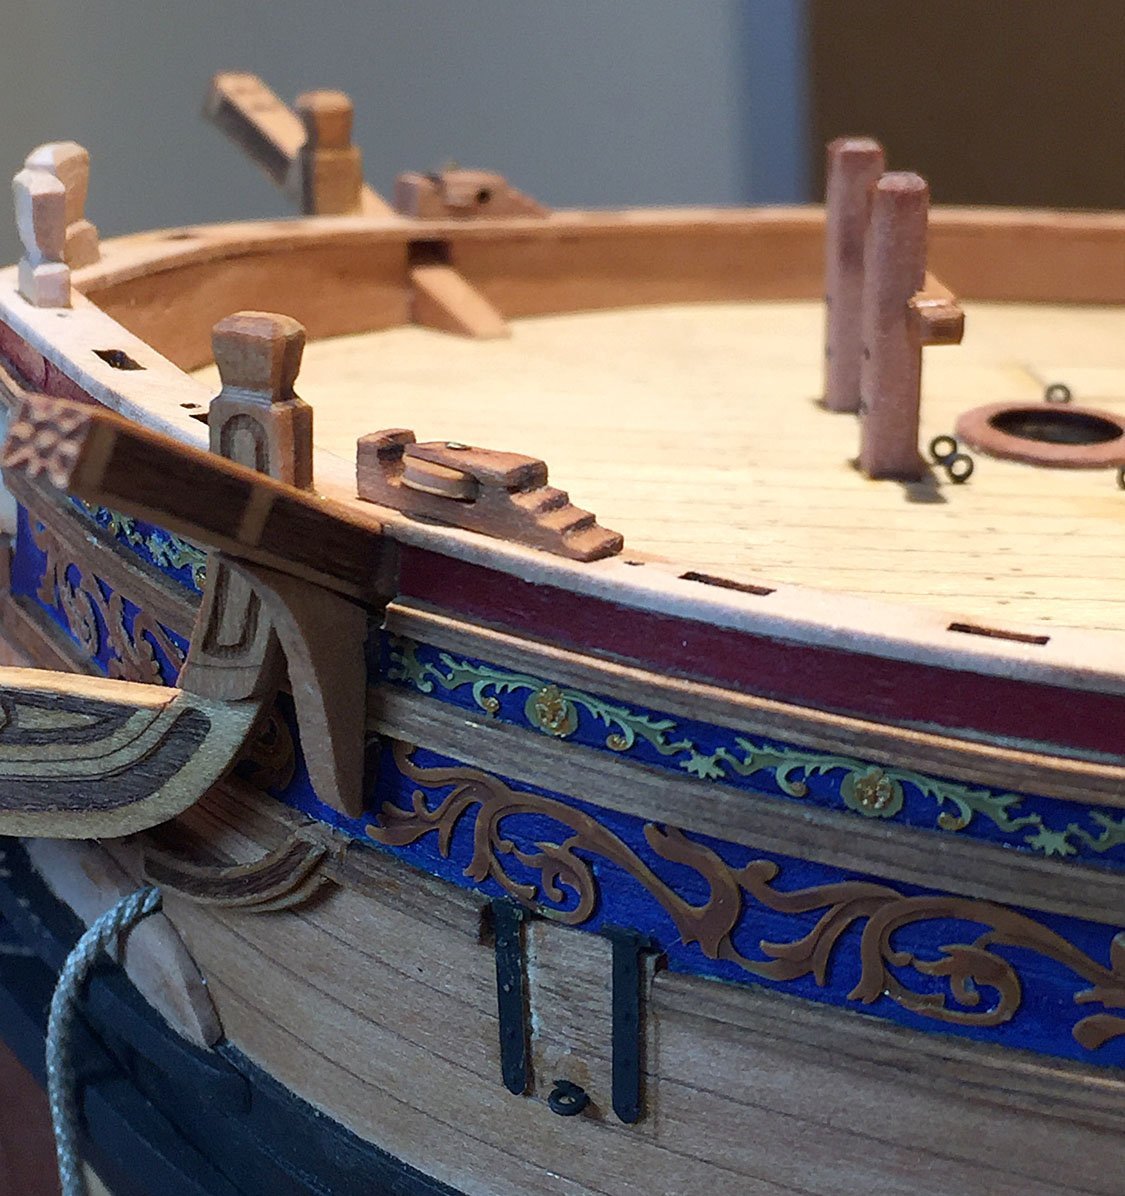
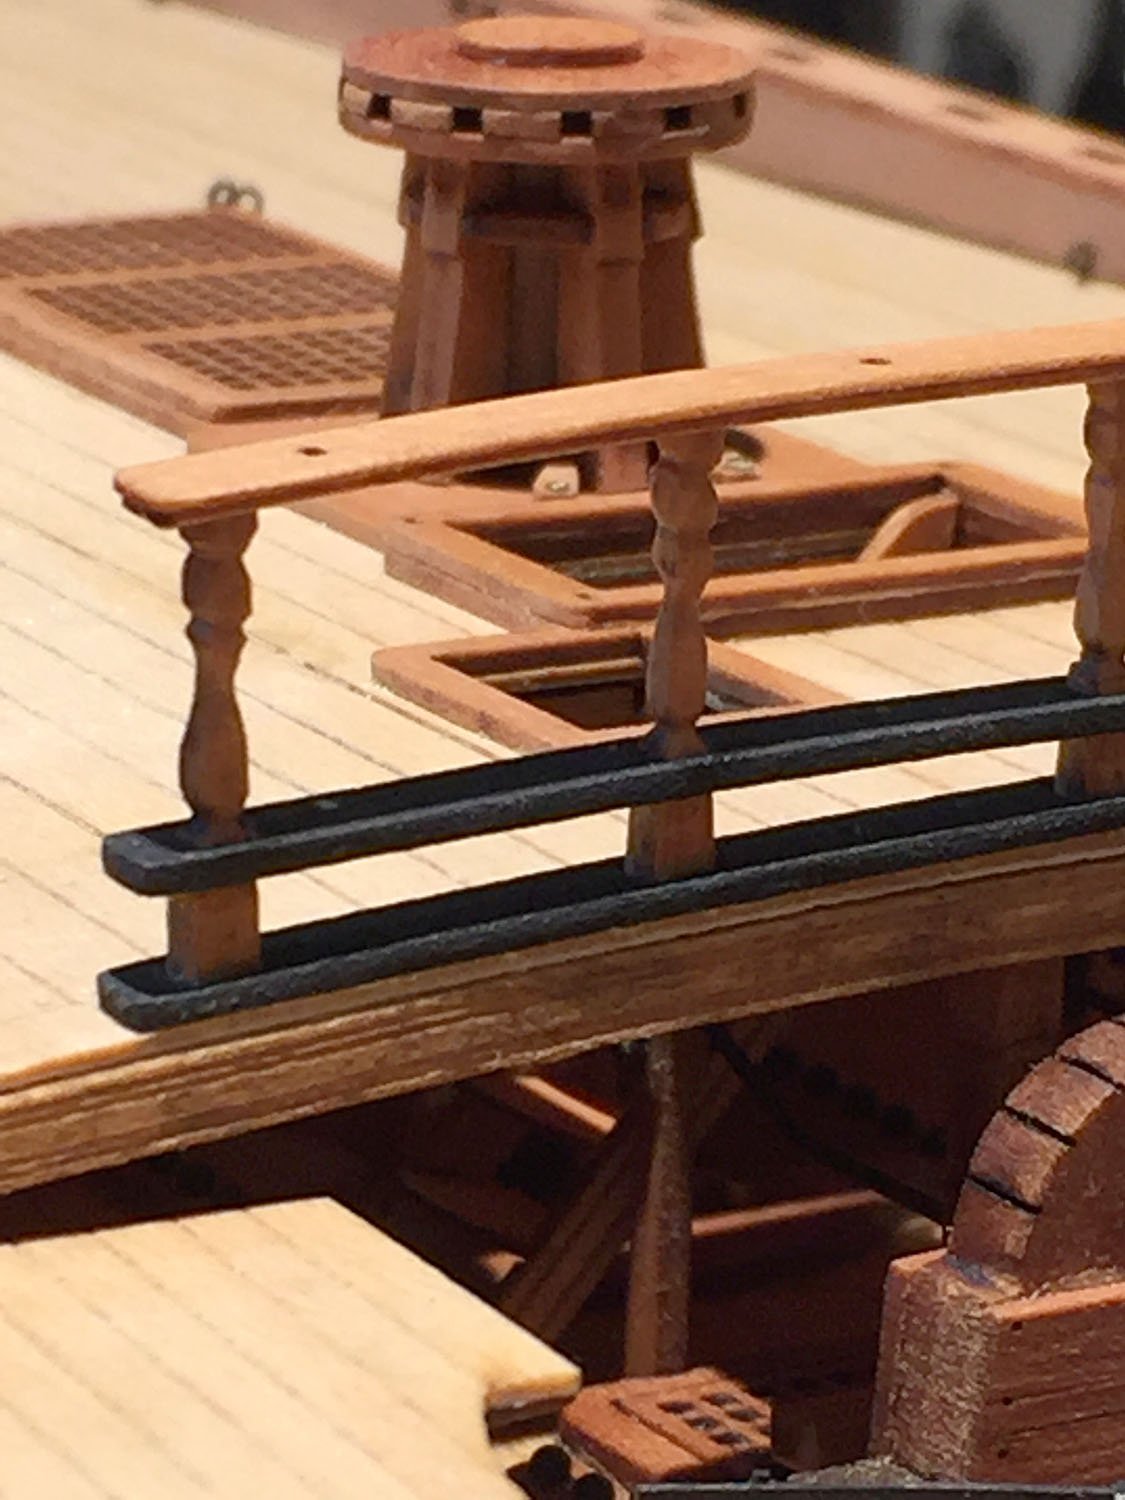
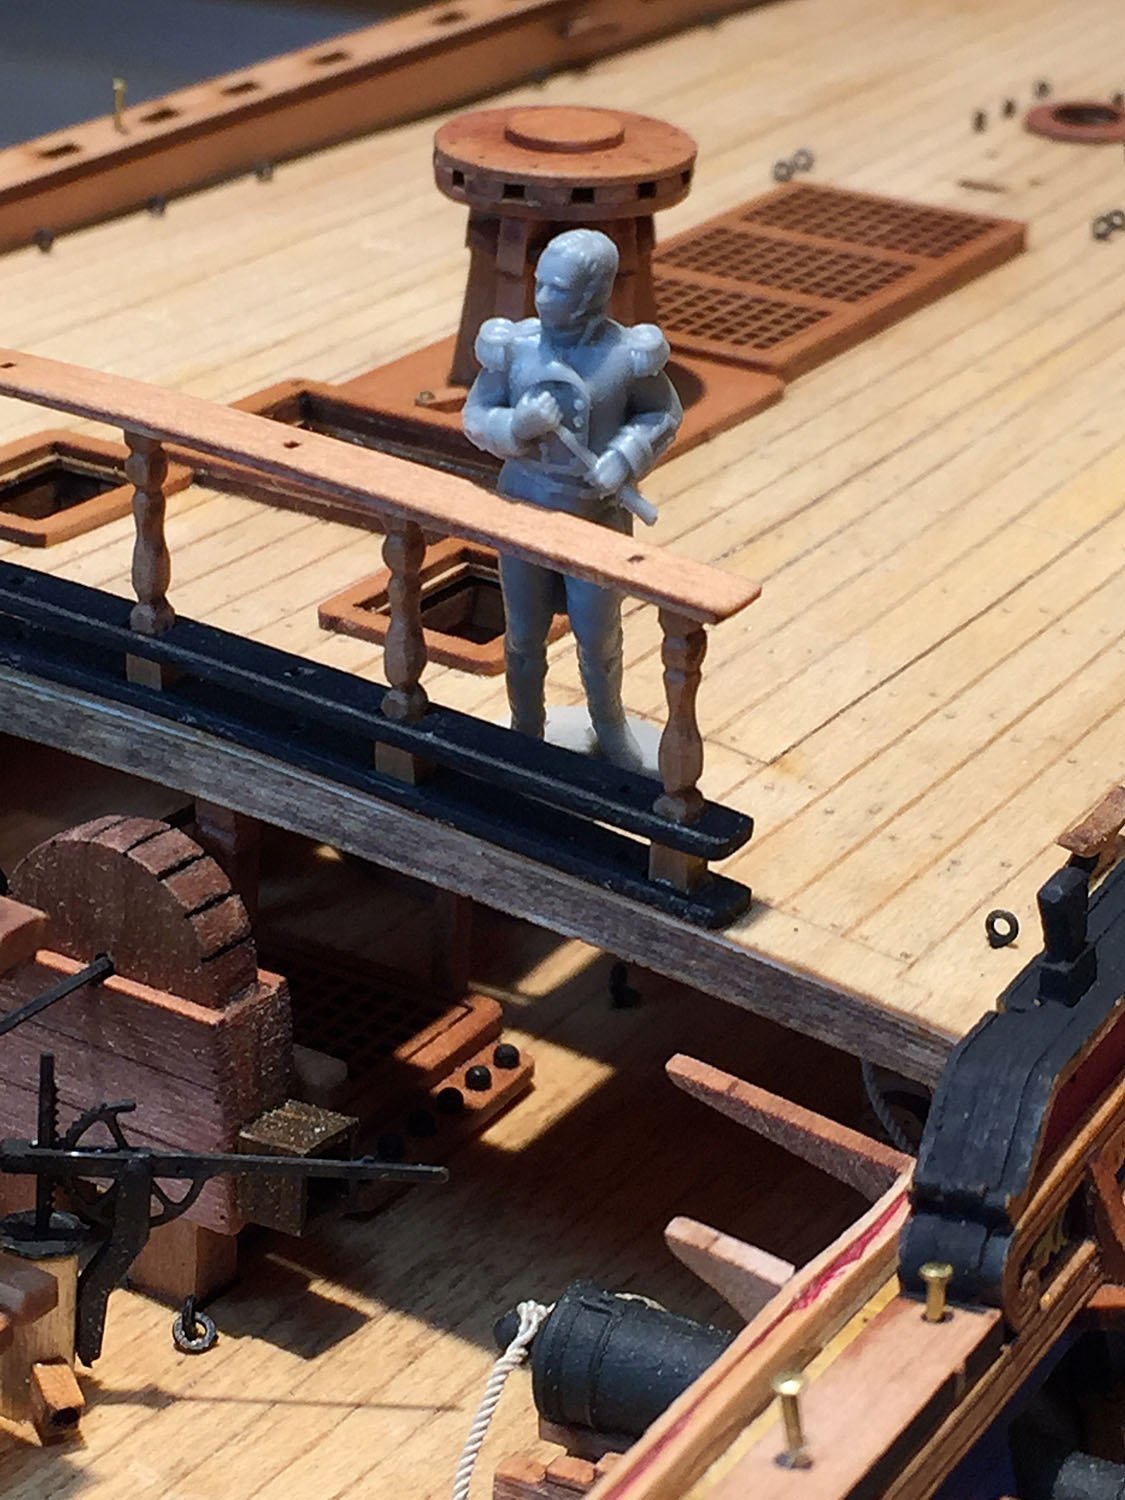
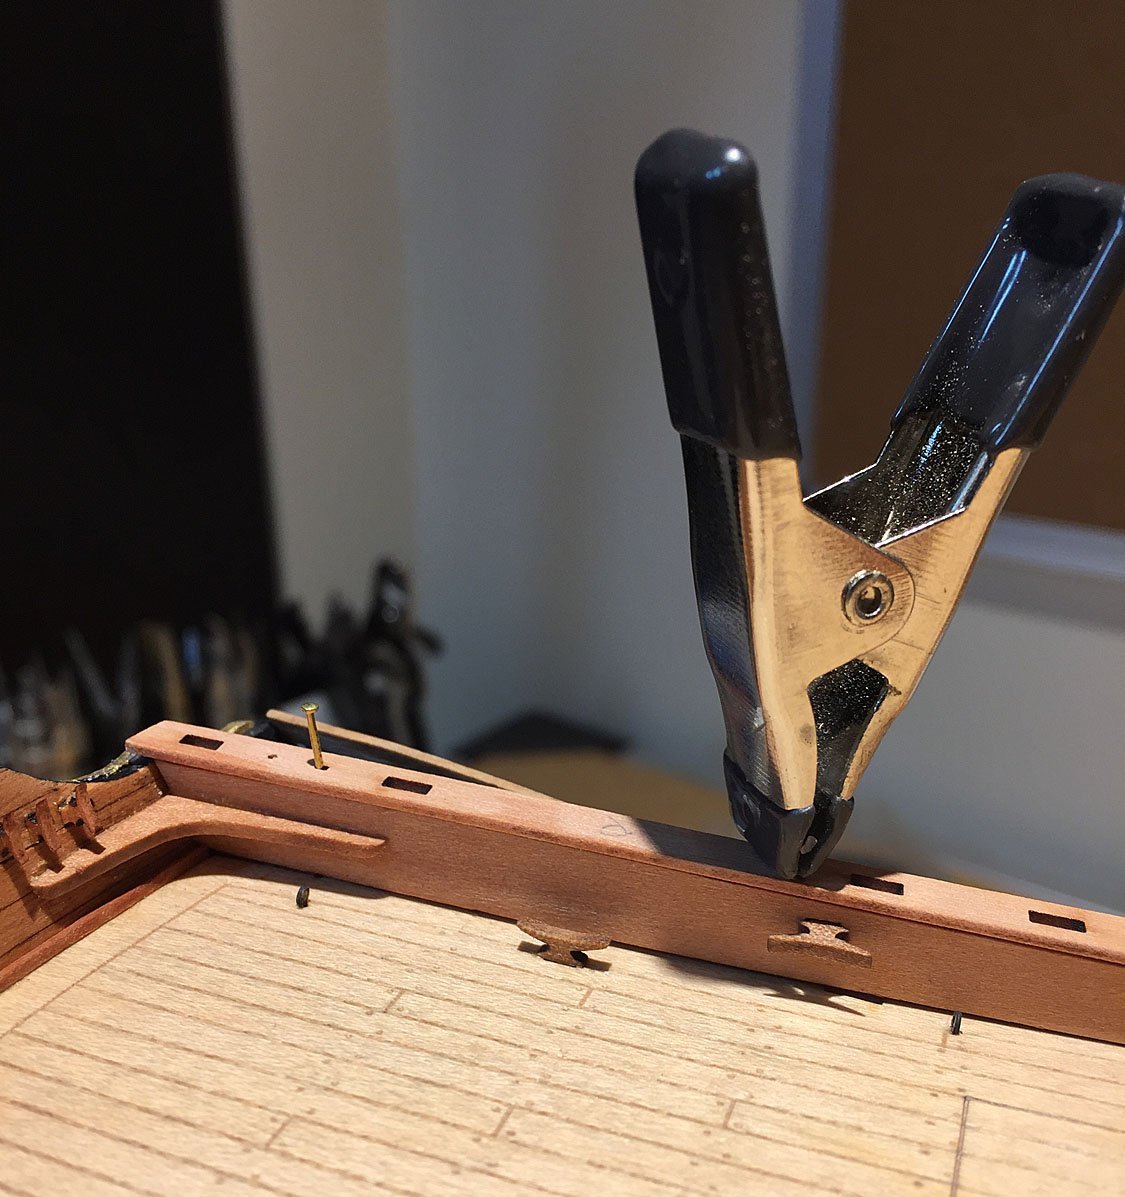
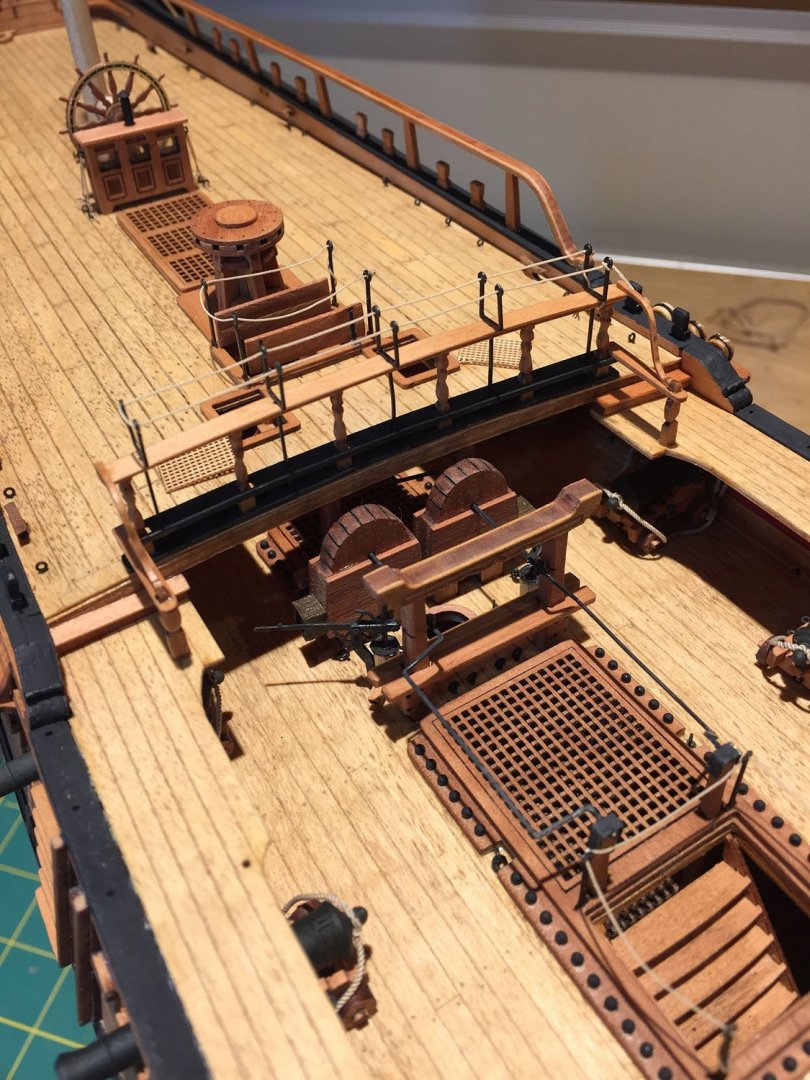
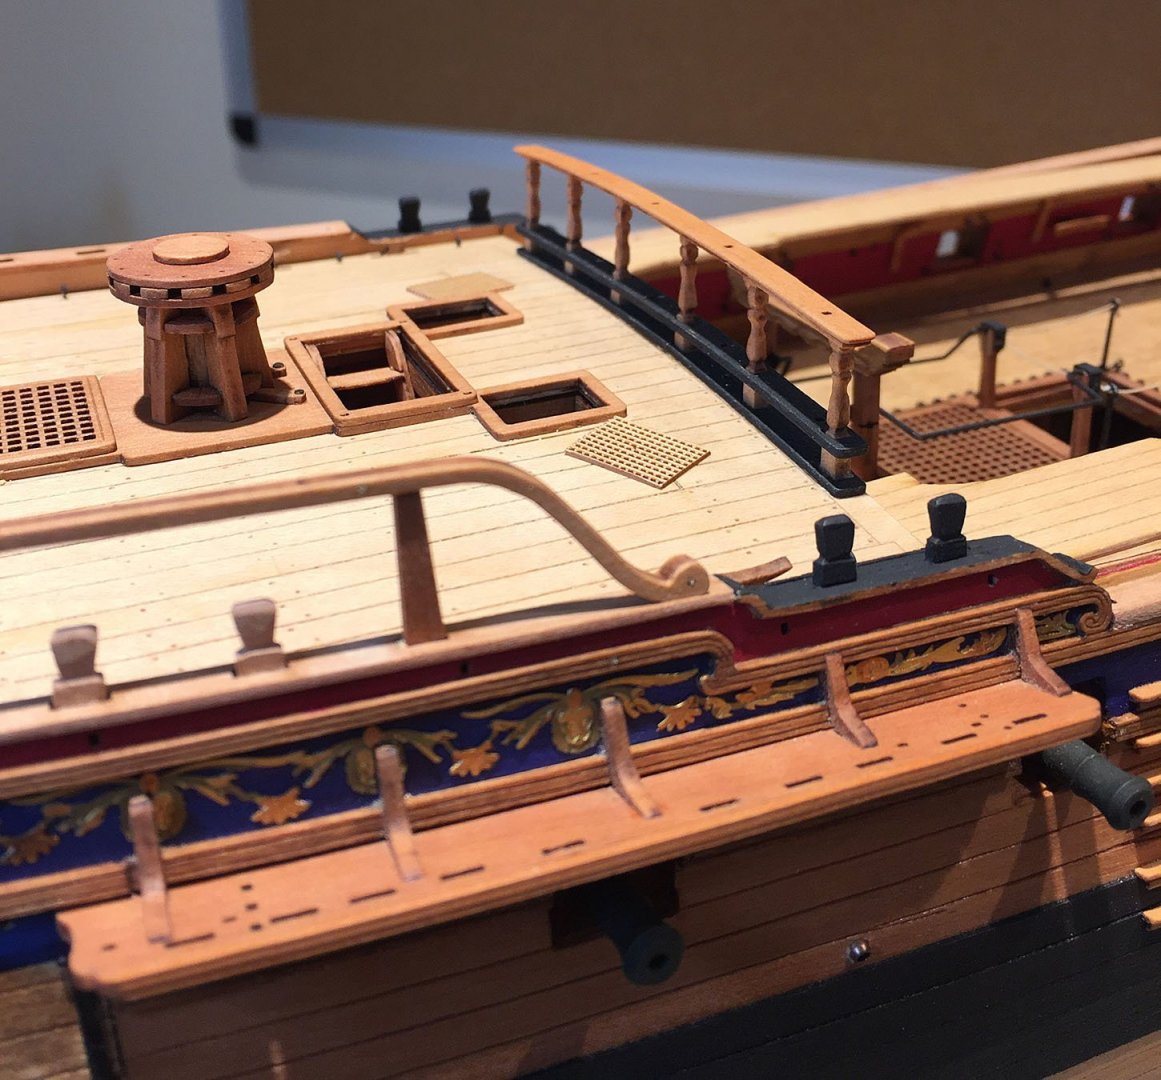
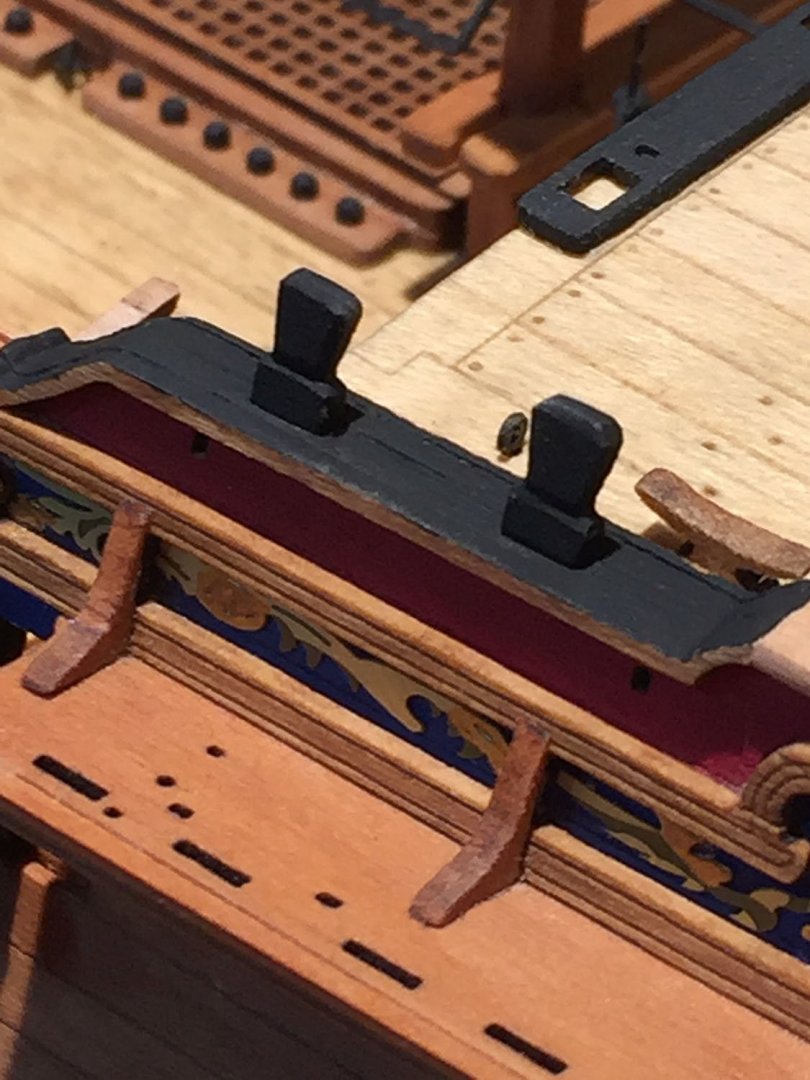
Progress on the Q'deck. A balustrade on the q'deck, shaped and mounted (finger for scale). It is upright, parallel to the vertical, not cocked; my camera was at a slight angle. There are six of these little guys. The first one took me about 30 minutes to shape the lasered pearwood pattern. Five more to go! Better "upright" view of a balustrade. The manual says to paint them black. I'll likely leave them in stained natural wood if they all turn out this nicely after shaping. The natural wood tone will emphasize the shapes of these delicate pieces; black paint would partly disguise their attractiveness. This one of my favorite parts of a build for ships of this era. Art and design mattered to the craftsman and the officers alike, nearly as much as speed and firepower of these hunter-seekers. The tools I use to shape the delicate pear pieces. Gentle curves and squared-off angles: diamonds (and patience) can be a ship modeler's best friend. Take your time with these little guys; they will be quite prominent when completed, whether black or natural. A work-in-progress midships view. Eyebolts and cleats mounted along the q'deck bulwarks. I'm contemplating a couple critical decisions now: whether to add a slightly darker stain to the quarterdeck and whether or not to stick with my original plan to build-up the bulwarks on the quarterdeck so that Camilla can carry four additional, new-fangled carronades. The thin fife rails along the entire length of the quarterdeck are very appealing to my eye. I've tested "the look" of the delicate woodworking pieces and studied the temporarily placed timberheads against the overall lines of the hull; I'm now less inclined to add these carronade "upgrades" to her. NOTE: the P/E hammock cranes along the q'deck bulwarks are NOT SHOWN in the manual prototype build - but shown prominently on the plans). Decisions, decisions. My same technique for gluing the sweeping quarterdeck gunwales to the bulwarks: nails and clamps exerting downward force so the gunwales are evenly attached along the entire length of the pear wood pattern- on both sides. Post gluing (white glue BTW), the nails are removed. The nails were inserted into drilled holes, unlike the foc'sle gunwales patterns that have lasered holes for these temporary positioning pins. Doesn't matter: the little mounting holes will be filled with stainable filler, sanded and then painted flat black. The capstan and a q'deck look-in. The manual calls for painting both capstans in red (to match the interior bulwarks). I prefer a natural look to all these components. I retained the red as a minimal contrast to the interior and the thin "line" on the exterior bulwark sweep. Like gold paint, less is more. The brass pins on the capstan's cam locks will be painted black., the über-delicate pear wood ladder will be stained natural. As I've noted previously, I paint, stain, and finish as I build. Don't forget to "break" all the sharp edges of the lasered pear, like the capstan drum head components, the coamings and grates. The stern transom support: the Q'deck- to - bulwark/gunwale connection. This piece is tricky to get right as it needs a reverse, double sanded angle to fit correctly. The clamp is holding the gunwale firmly in-place as the glue dries. The brass nail had a positioning hole drilled into the wood to secure the gunwale after glue was applied. All this to prevent this piece from rising-up and having visible gaps. Speaking of which: the tiny gap between the bulwarks finishing strip and the deck I can live with. It's about .002-003 under this magnification. Despite this minor annoyance, the tolerances with many of the components of this kit are impressive. The leading timberheads at the Quarterdeck. The thin edges will get painted black with a smaller brush better suited for this task than the one I used to get the black on the larger surfaces. DON'T FORGET TO GIVE CHARACTERISTIC SHAPE TO THESE four pear wood pieces; all the "heads" along the gunwales require precise shaping to render an accurate depiction of these utilitarian posts. Another close-up of the transom area. In keeping with my visual preferences, there is no red paint here. Because my one-piece quarterdeck pattern didn't fit flush to the angled transom, there was a small gap (noted in the previous post). I added two pieces of 1mm square section of pear to either side of the ensign mounting base at the deck. Looks fine, like it belongs.😉


- 542 replies
-
- 13
-
-
- Sphinx
- Vanguard Models
- (and 3 more)