MORE HANDBOOKS ARE ON THEIR WAY! We will let you know when they get here.
×

.jpg.d84ec4dad1d7791e855dca06210ab6f3.jpg.40b7a0ea2cc62bf0a3ec2a716005383a.jpg)
hollowneck
-
Posts
1,554 -
Joined
-
Last visited
Content Type
Profiles
Forums
Gallery
Events
Everything posted by hollowneck
-
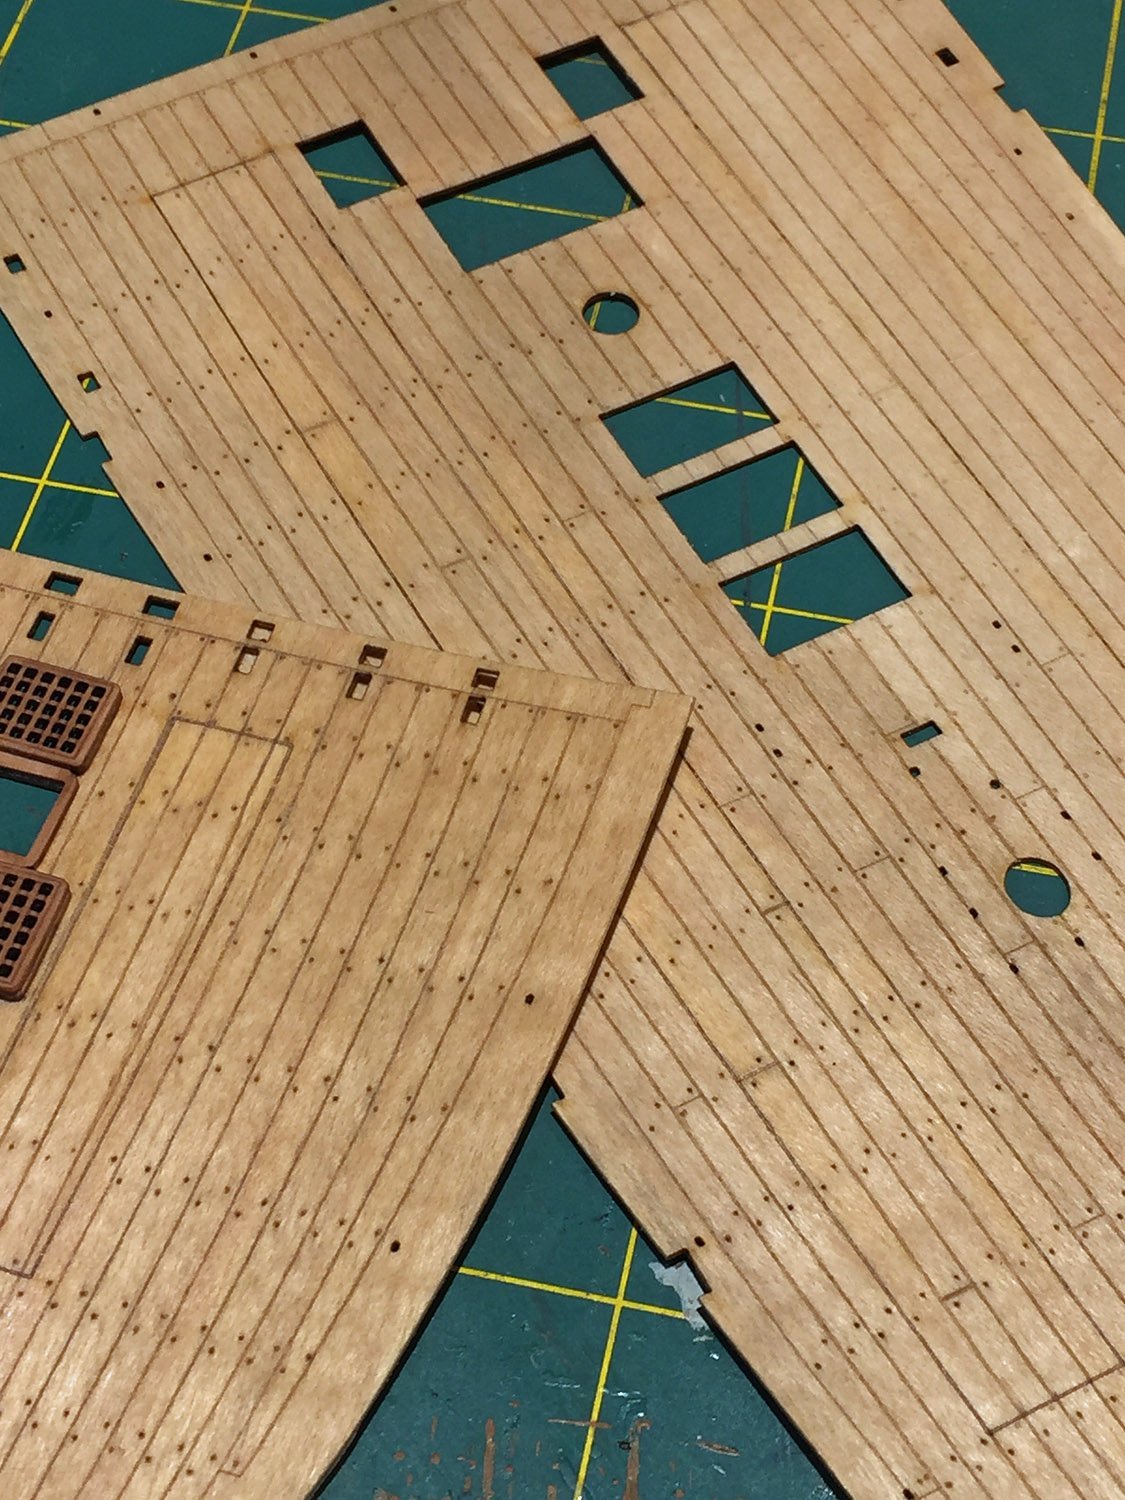
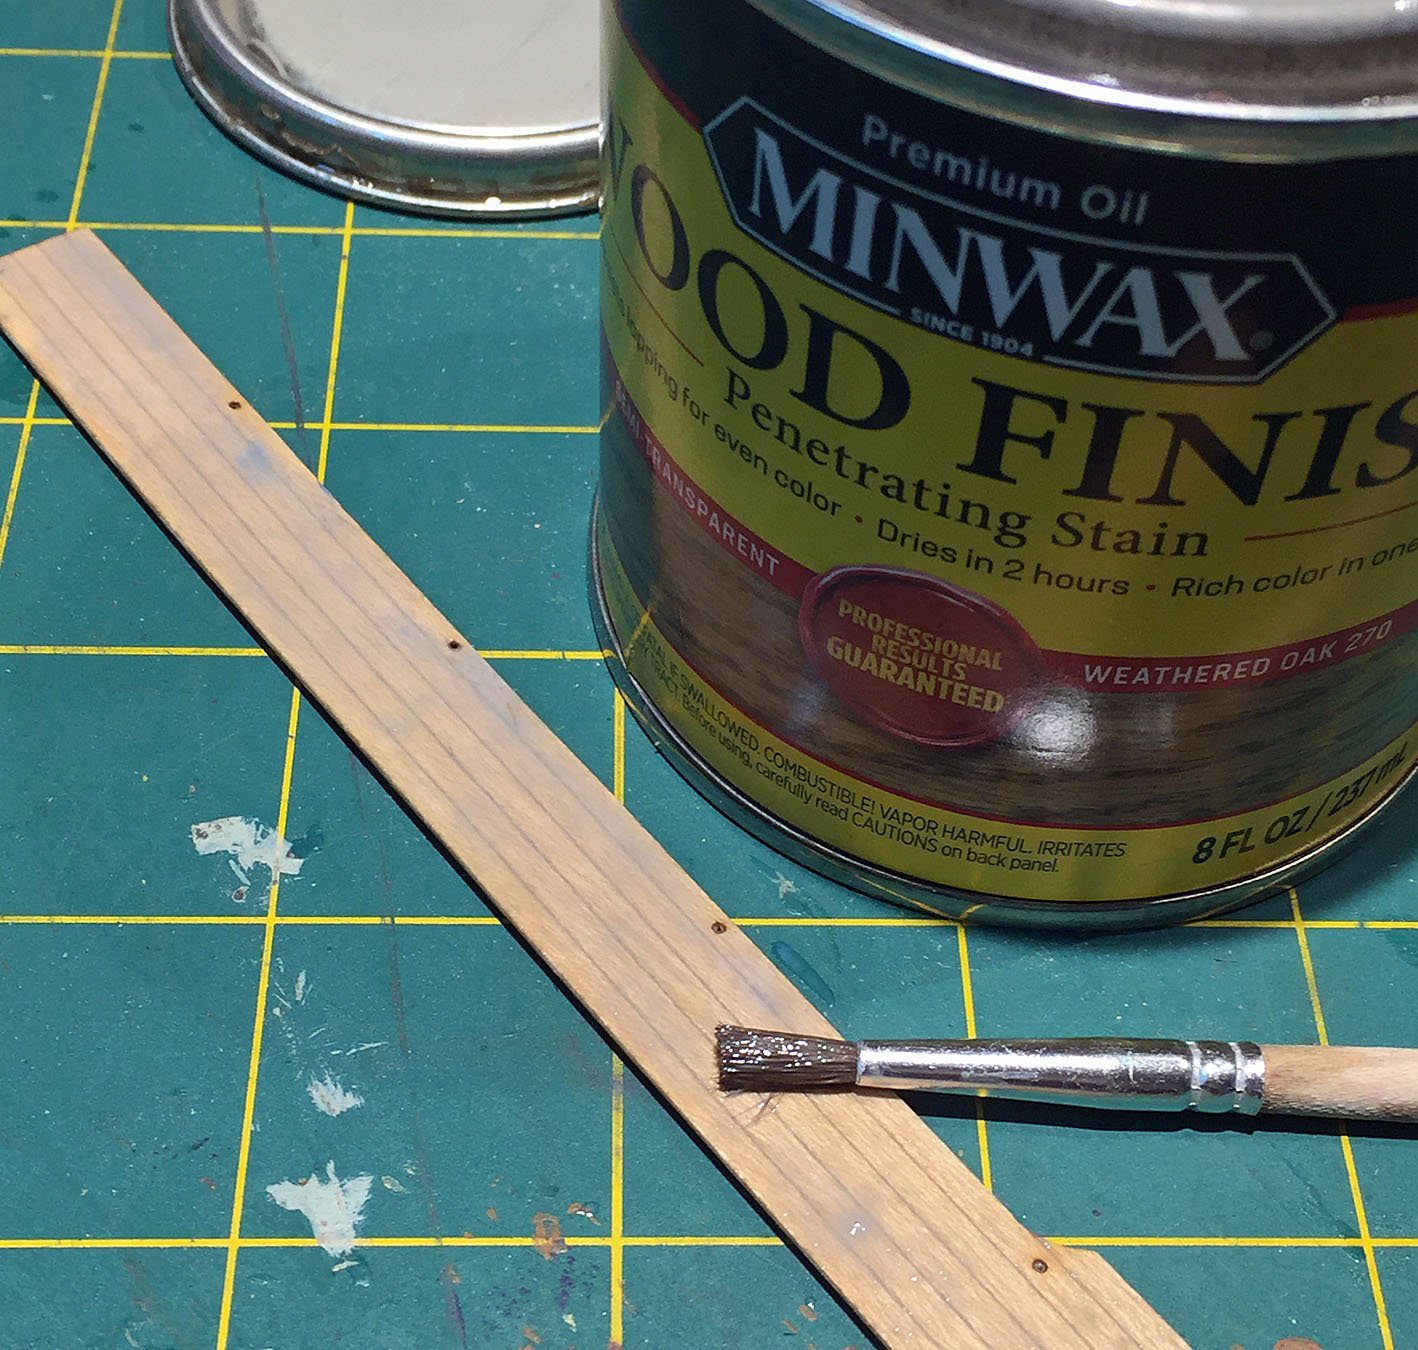
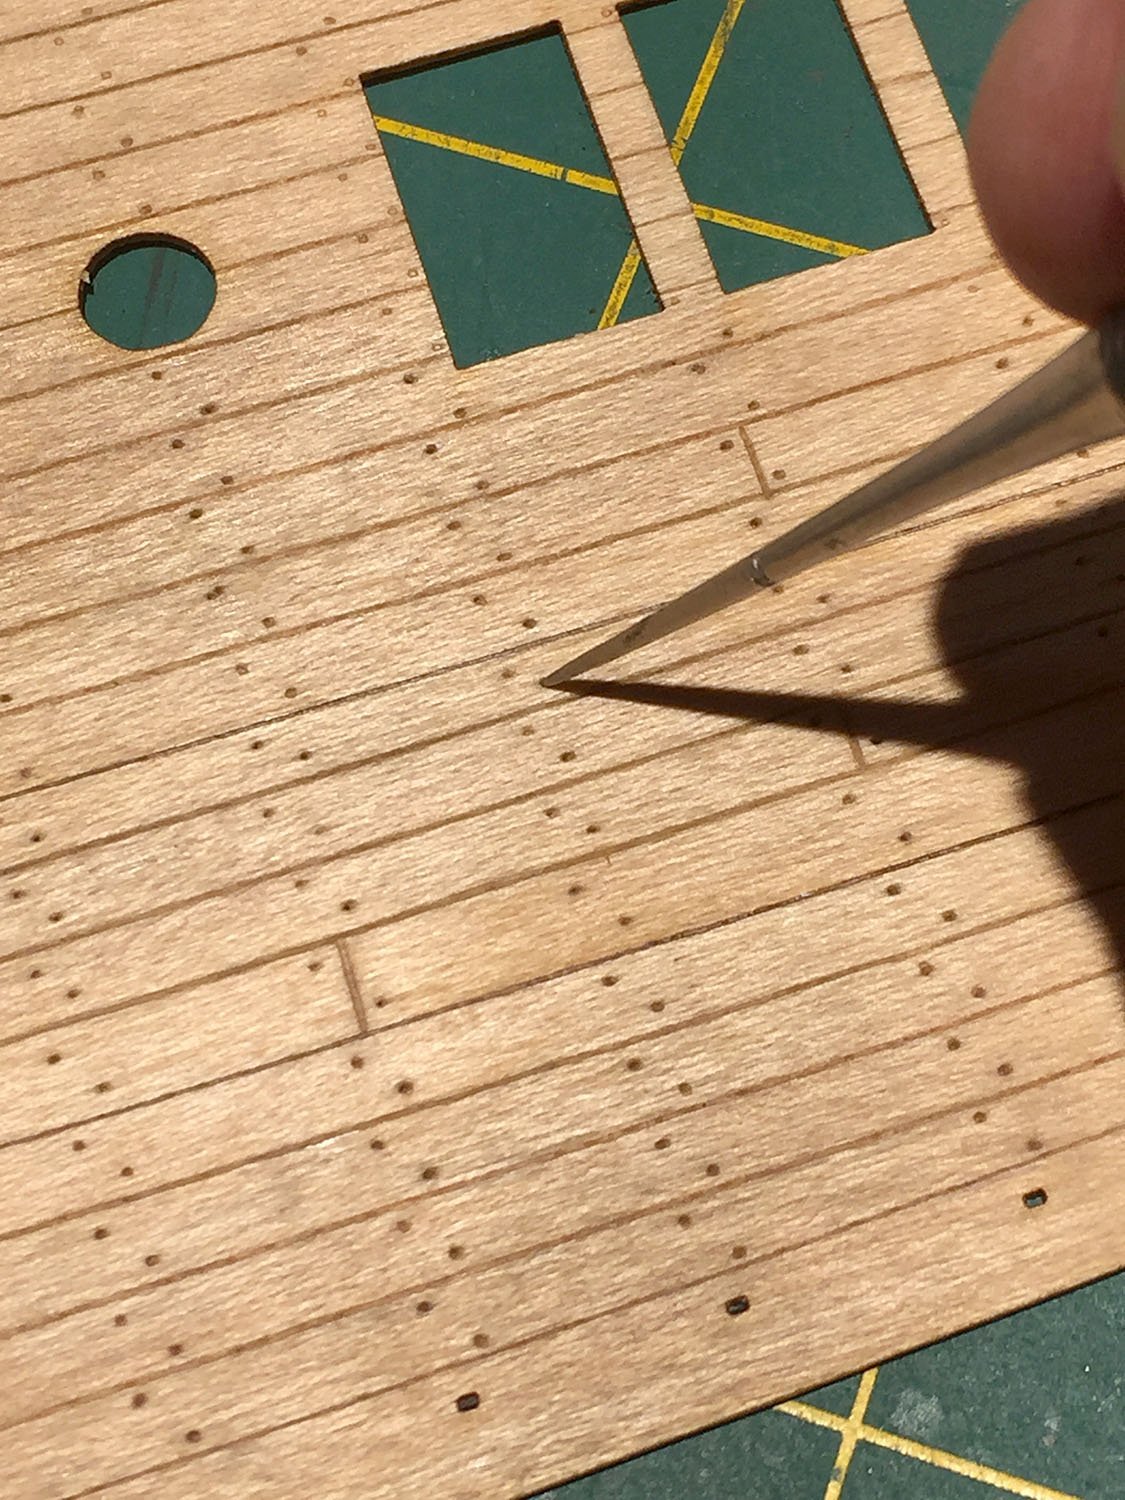
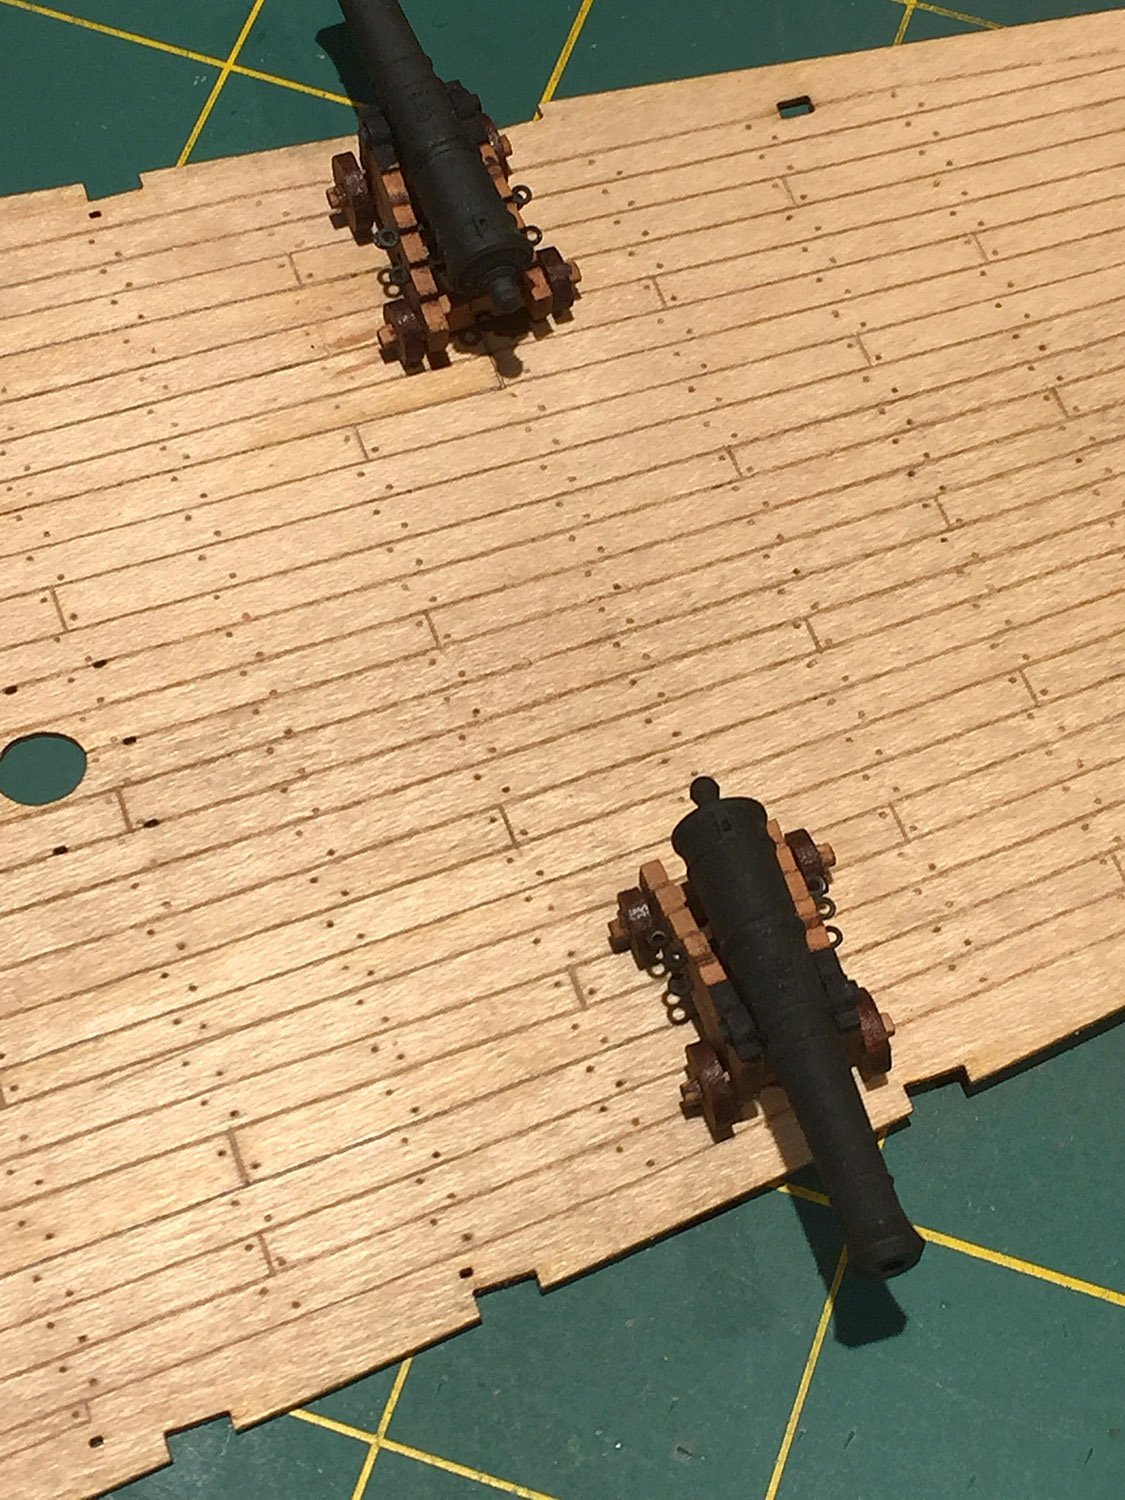
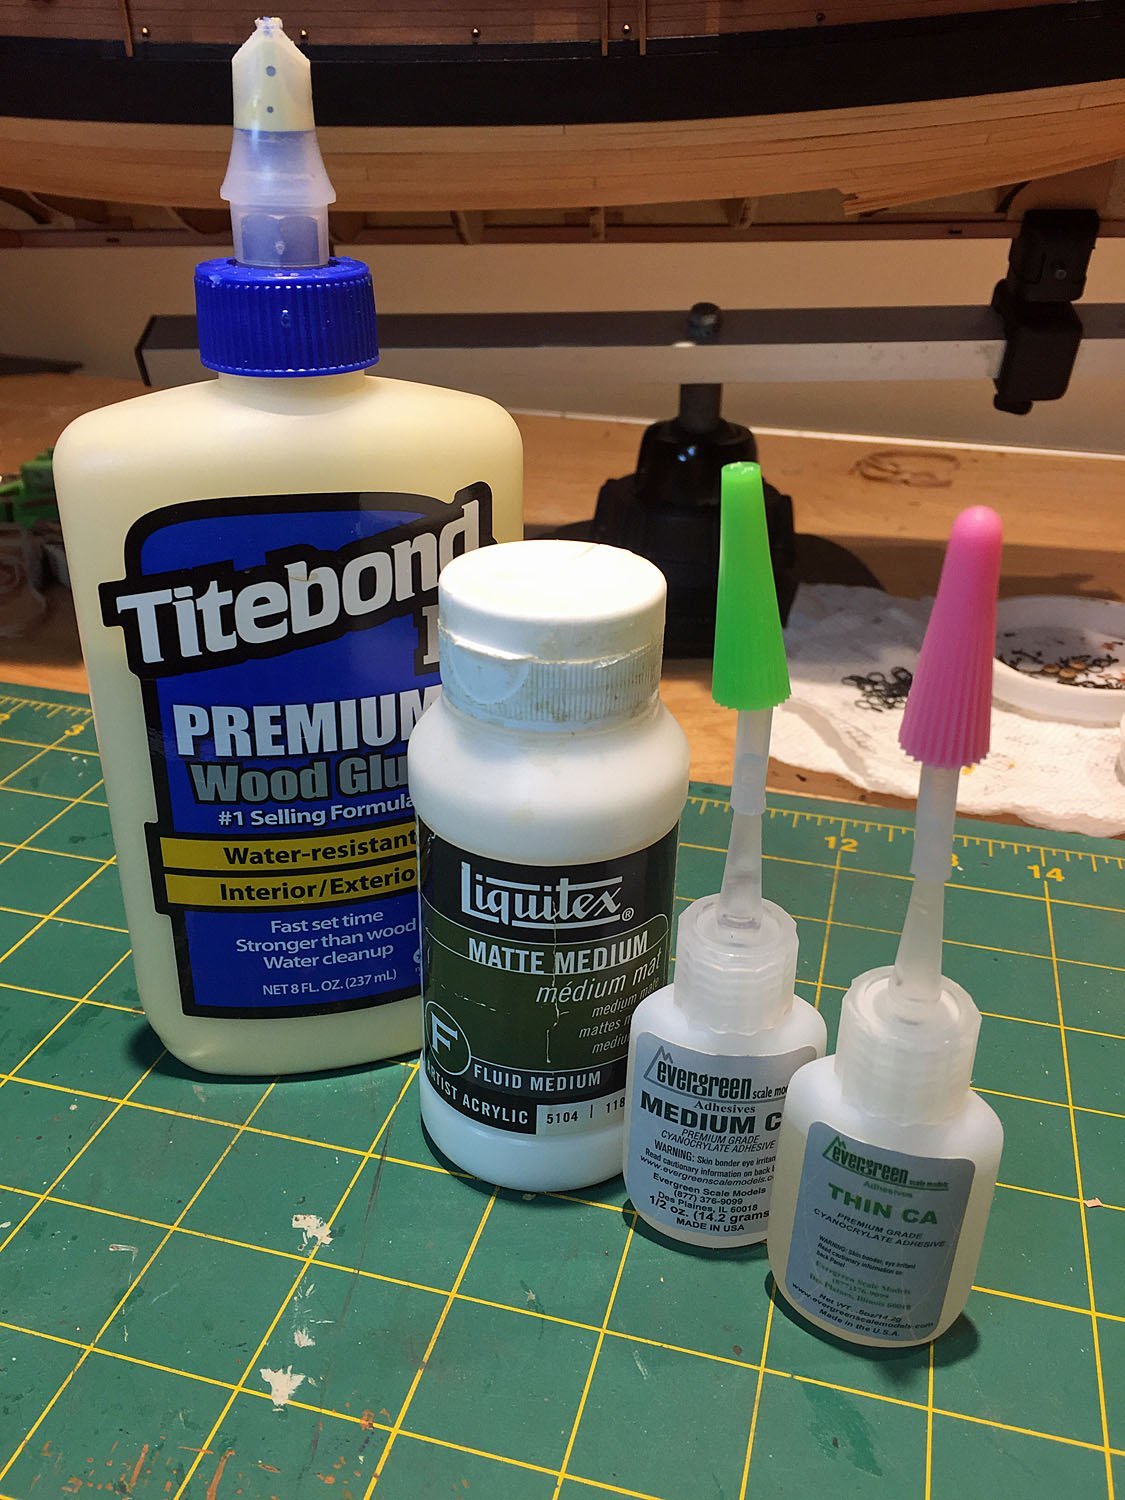
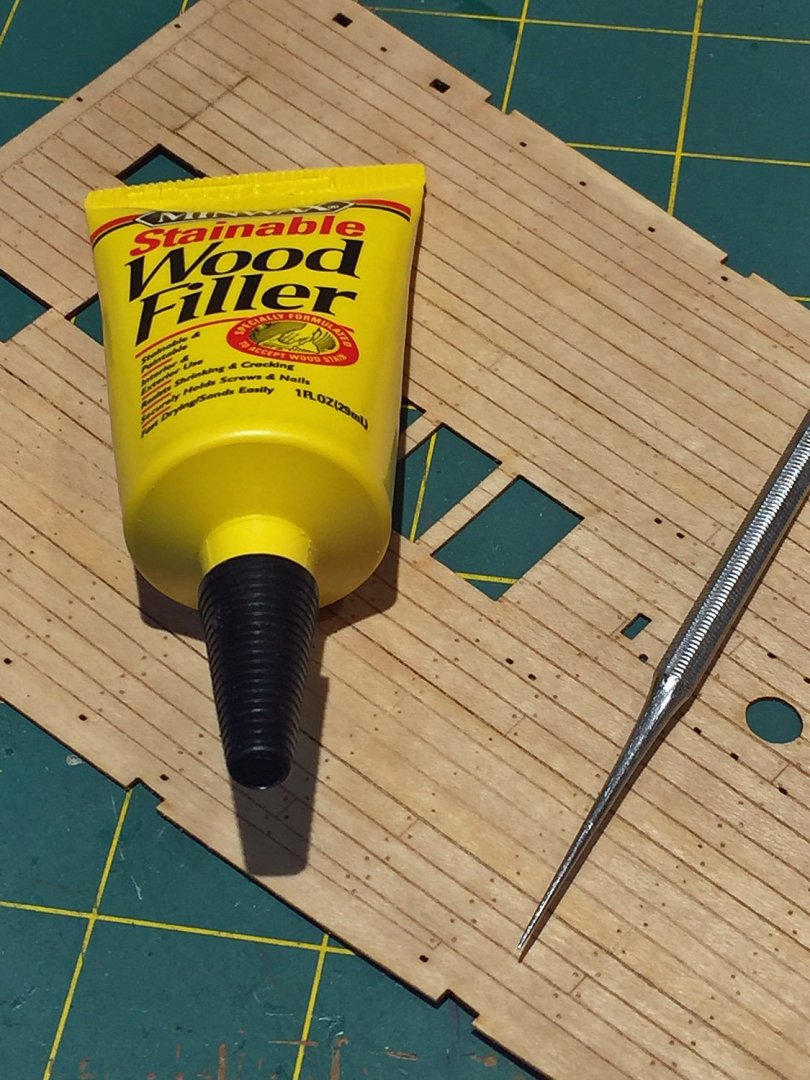
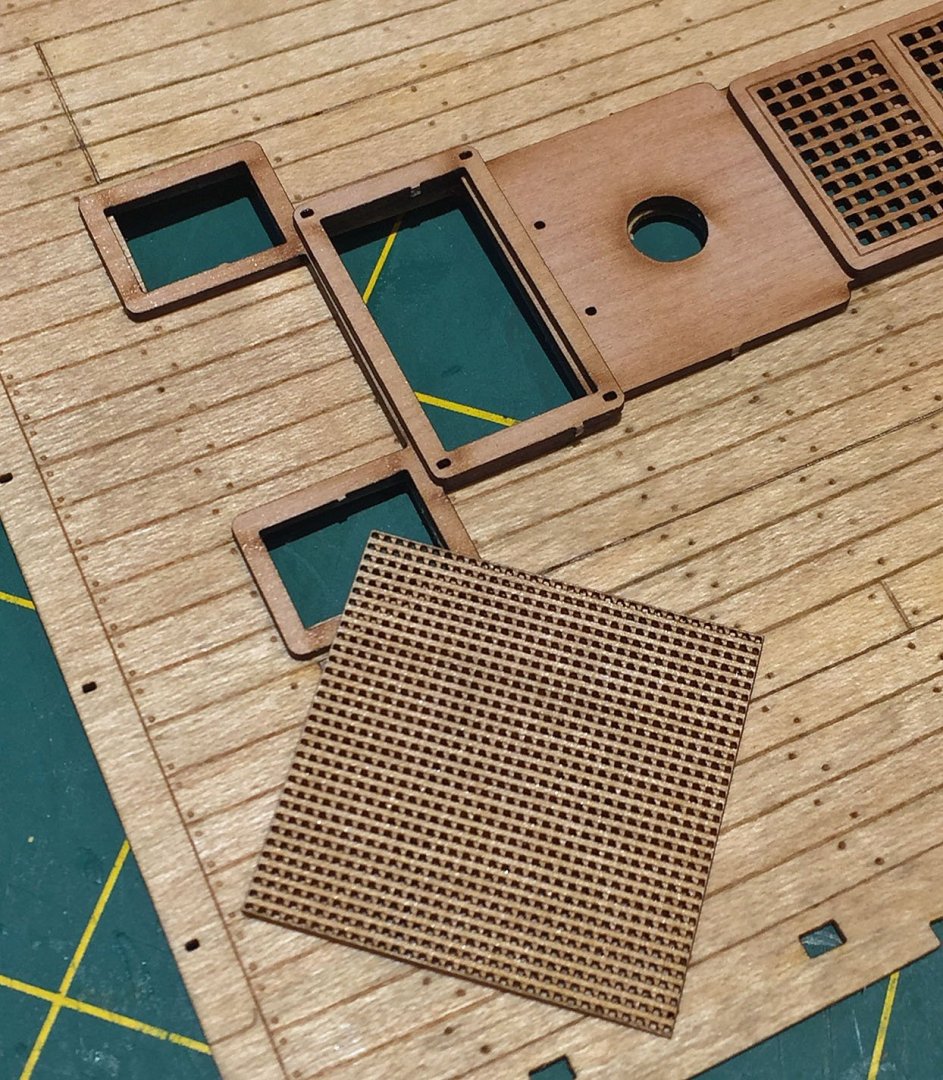
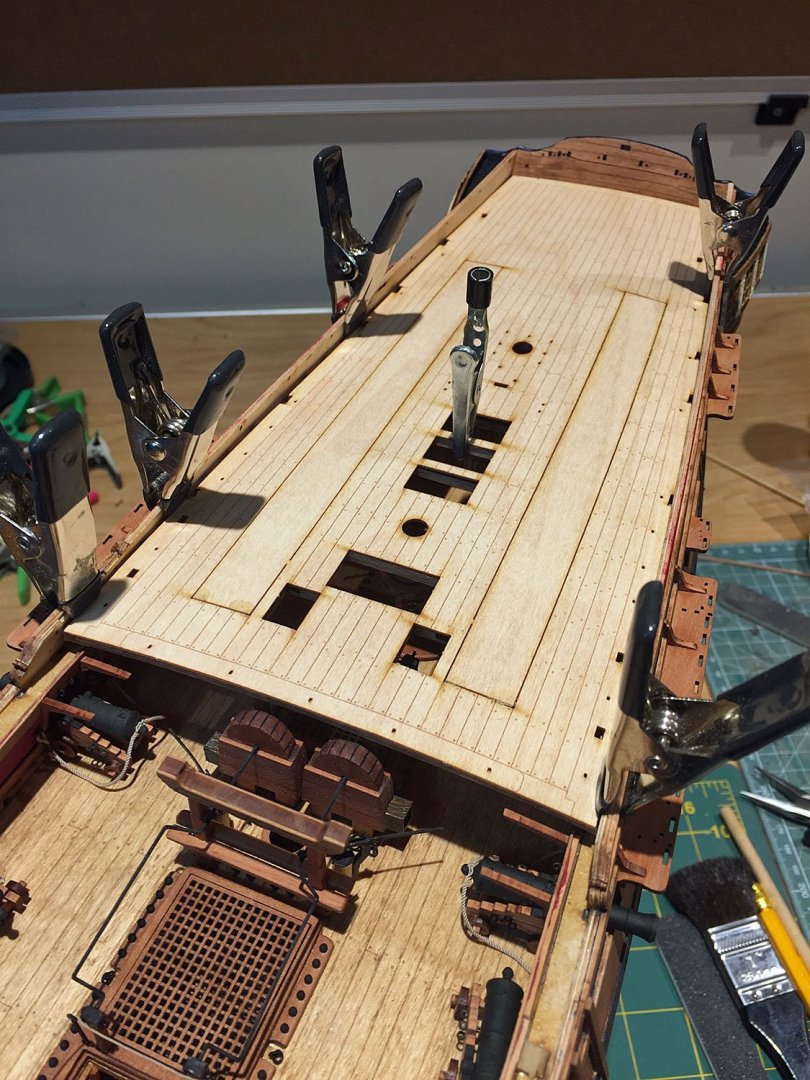
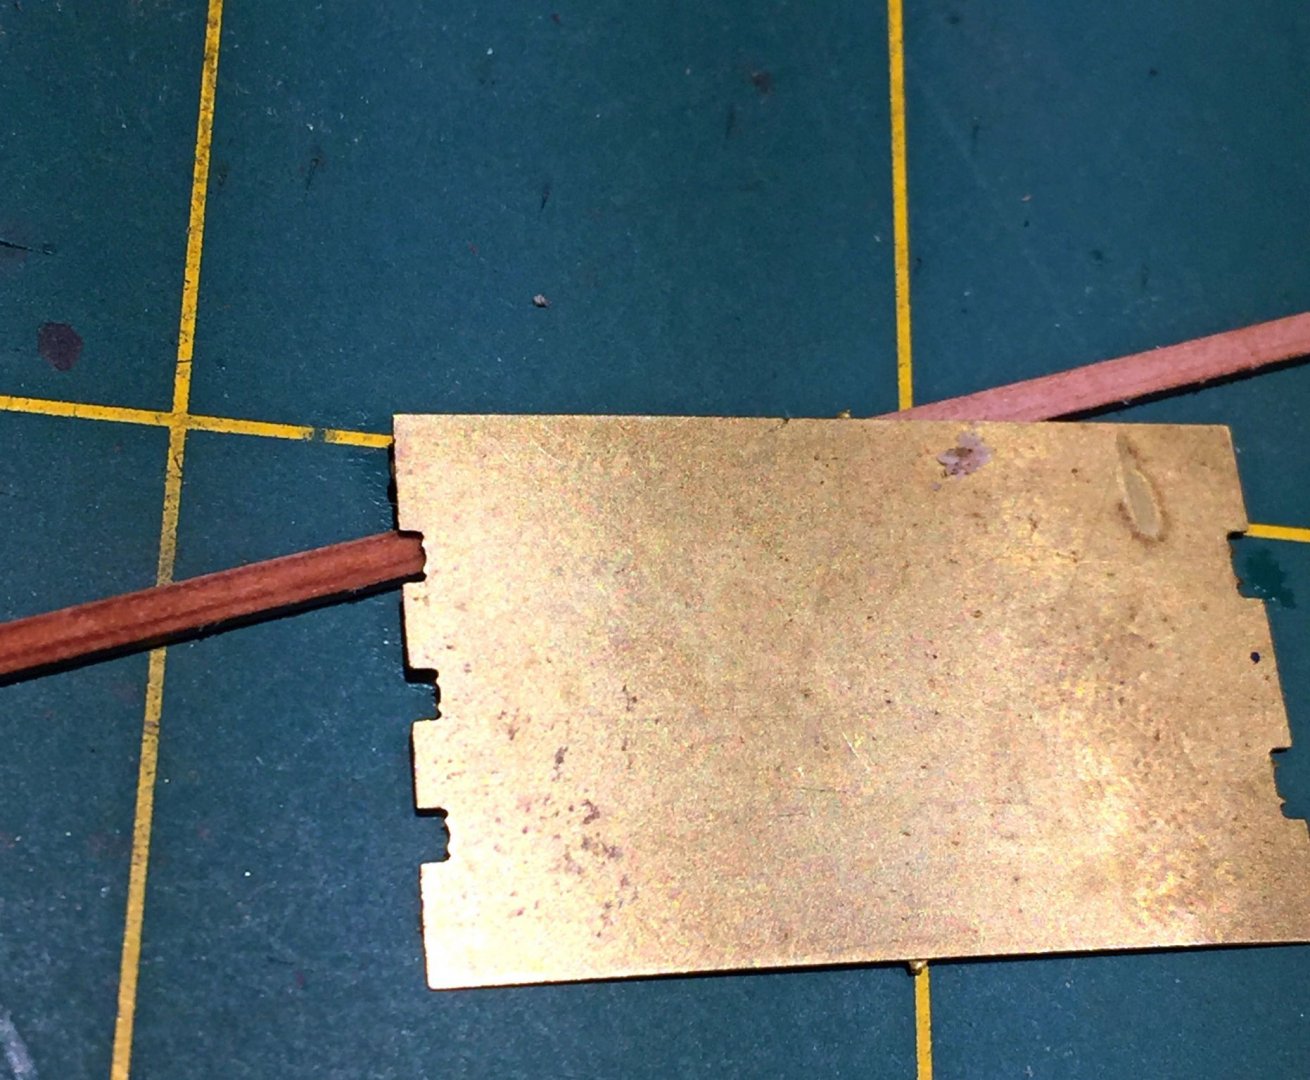
.jpg.d84ec4dad1d7791e855dca06210ab6f3.thumb.jpg.f45209242e851d4409eca1a09293165b.jpg) Alright, alright...a good time to talk about whether to "Admiralty" or Not-to-Admiralty. I made my decision early-on but I suspect some builders of this kit will get well into their builds and then encounter the dilemma I faced early-on: which PROVIDED deck pattern to use? The Vanguard kit provides this choice, which, to my knowledge is a first: go "scratch," and go barebones with a thin ply fitted deck piece, or toss this item into your scrap bin and choose the nicely laser-etched - and thinner - maple pattern for both weather decks (foc'sle & quarter). Here are a bunch of photos to illustrate how I approached "fixing" (upgrading) my decision to go with the very kool "etched" (laser engraved) decking. The preferable decking patterns (.061 vs .071 thick for the ply version), have the "reveal" punch outs burned into the pieces. These are quite objectionable if one wants to use these for a fully-decked model - like me, for Camilla. I arrived at a remedy that I think works reasonably well. First, sand off some of the residual char on the surface areas around the cutout lines (both deck patterns) - you can't miss this. The lasered lines will still remain prominent, but that's o/k....because... You'll next fill the laser cut lines with stainable wood filler. This stuff is magical IMHO. It's STAINABLE, pilgrims. Which means it can take on a pretty good amount of color you'll apply to it. In this case, my MinWax Weathered Oak stain- which another photo shows as being quite grey at application. Don't panic, grey is good. Let it soak into the wood (Maple has decent open grain). The grey will subside slightly after you wipe off with a soft cloth. If one has made mental visual notes of the actual color of wooden decks on replica sailing ships, this will make good sense without going overboard (pun intended!) on ""weathering." Carefully sand off the stainable wood filler residue after it dries - which is about 30 milliseconds. Cap that Wood Filler stuff or it turns hard as a rock in a few minutes. Use your fingers to apply it; fingers are good. I use these genetically - inheirited digital applicators all the time for aliphatic glue (TiteBond) and various fillers. This technique doesn't work as well with CA however...😂 Next comes the fun part: I use a crazy sharp stainless awl (one of my favorite bench items) and carefully (repeat, CAREFULLY) re-scribe the etched lines in the deck patterns - including all the planking lines, the butt end lines and....wait for it: the individual trunnel representations. I also scribe plank lines along the full length of the punch-out pieces (both deck patterns, BTW). The reason I do all this is that I want the deck patterns to ABSORB the stain I'll apply after all this minutiae - by slightly breaking through the wood surfaces - so the offending reveal opening lines are diminished. Note this word: diminished. These lines are not going to disappear entirely and hence, my next "fix" to make these unfortunate cut lines disappear, well, almost. I'll add scratched, gratings of pear (from Russia's Falkonet kit company) near the quarterdeck front hatches which are presented open (since there are no provided kit gratings to add here). The tiny Falkonet grating piece I have on-hand is slightly out-of-scale, but acceptable to me because these "cover-ups" are going to be rather small anyway, lying next to the small coamings. These scratched pieces - that will not be entirely out of place - will cover-up the etch lines at one end of the deck. And at the far end, my added carronades (four- yet to be acquired) will cover-up the other set of cut lines, depending on where I mount them. By the time all the other deck candy and rigging is added - including belaying pins, the kit's kool detailed binnacle, a nice helmsman's wheel and rope coils - nobody will hold out a pointing accusatory finger and say to me: "Hey! what happened on the deck here?" At least that's my post-build fantasy, and I'm sticking to it. Obviously, this is an irreversible decision as soon as I commit to adding deck furniture to the patterns...photos to come. More pics later, maybe this weekend. Two ways to go: use the etched maple pattern (left) or scratch-plank the plywood one (where you'll need to glue the reveal punch-outs first). The sublety of the staining: this is coat #1. After it dries, I'll add another. After 2 coats, it's diminishing returns on the effect of staining. Brush it on liberally, it'll soak in: then wipe it off and apply another coat after thoroughly drying. The "magic" filler and one of my secret weapons - my scribing awl. "A-ha!" New ventilation covers for the open hatches; they'll lay askew alongside the coaming openings, both sides and cover-up the offending laser etch lines for the quarterdeck punch out reveals. Voila! A cover-up placed over the reveal etch lines. These are two of the kit's cannons in position for a visual check; I'll add proper carronades to the quarterdeck in good time. Mein typical glue selection for a build; guess which one I use with my fingers?... The matte medium is used as an adhesive for most of the small P/E decorative pieces (upper bulwarks). Dries fast, most importantly, it's invisible when dry. However, be aware it is also a slightly flexible material post-drying.
Alright, alright...a good time to talk about whether to "Admiralty" or Not-to-Admiralty. I made my decision early-on but I suspect some builders of this kit will get well into their builds and then encounter the dilemma I faced early-on: which PROVIDED deck pattern to use? The Vanguard kit provides this choice, which, to my knowledge is a first: go "scratch," and go barebones with a thin ply fitted deck piece, or toss this item into your scrap bin and choose the nicely laser-etched - and thinner - maple pattern for both weather decks (foc'sle & quarter). Here are a bunch of photos to illustrate how I approached "fixing" (upgrading) my decision to go with the very kool "etched" (laser engraved) decking. The preferable decking patterns (.061 vs .071 thick for the ply version), have the "reveal" punch outs burned into the pieces. These are quite objectionable if one wants to use these for a fully-decked model - like me, for Camilla. I arrived at a remedy that I think works reasonably well. First, sand off some of the residual char on the surface areas around the cutout lines (both deck patterns) - you can't miss this. The lasered lines will still remain prominent, but that's o/k....because... You'll next fill the laser cut lines with stainable wood filler. This stuff is magical IMHO. It's STAINABLE, pilgrims. Which means it can take on a pretty good amount of color you'll apply to it. In this case, my MinWax Weathered Oak stain- which another photo shows as being quite grey at application. Don't panic, grey is good. Let it soak into the wood (Maple has decent open grain). The grey will subside slightly after you wipe off with a soft cloth. If one has made mental visual notes of the actual color of wooden decks on replica sailing ships, this will make good sense without going overboard (pun intended!) on ""weathering." Carefully sand off the stainable wood filler residue after it dries - which is about 30 milliseconds. Cap that Wood Filler stuff or it turns hard as a rock in a few minutes. Use your fingers to apply it; fingers are good. I use these genetically - inheirited digital applicators all the time for aliphatic glue (TiteBond) and various fillers. This technique doesn't work as well with CA however...😂 Next comes the fun part: I use a crazy sharp stainless awl (one of my favorite bench items) and carefully (repeat, CAREFULLY) re-scribe the etched lines in the deck patterns - including all the planking lines, the butt end lines and....wait for it: the individual trunnel representations. I also scribe plank lines along the full length of the punch-out pieces (both deck patterns, BTW). The reason I do all this is that I want the deck patterns to ABSORB the stain I'll apply after all this minutiae - by slightly breaking through the wood surfaces - so the offending reveal opening lines are diminished. Note this word: diminished. These lines are not going to disappear entirely and hence, my next "fix" to make these unfortunate cut lines disappear, well, almost. I'll add scratched, gratings of pear (from Russia's Falkonet kit company) near the quarterdeck front hatches which are presented open (since there are no provided kit gratings to add here). The tiny Falkonet grating piece I have on-hand is slightly out-of-scale, but acceptable to me because these "cover-ups" are going to be rather small anyway, lying next to the small coamings. These scratched pieces - that will not be entirely out of place - will cover-up the etch lines at one end of the deck. And at the far end, my added carronades (four- yet to be acquired) will cover-up the other set of cut lines, depending on where I mount them. By the time all the other deck candy and rigging is added - including belaying pins, the kit's kool detailed binnacle, a nice helmsman's wheel and rope coils - nobody will hold out a pointing accusatory finger and say to me: "Hey! what happened on the deck here?" At least that's my post-build fantasy, and I'm sticking to it. Obviously, this is an irreversible decision as soon as I commit to adding deck furniture to the patterns...photos to come. More pics later, maybe this weekend. Two ways to go: use the etched maple pattern (left) or scratch-plank the plywood one (where you'll need to glue the reveal punch-outs first). The sublety of the staining: this is coat #1. After it dries, I'll add another. After 2 coats, it's diminishing returns on the effect of staining. Brush it on liberally, it'll soak in: then wipe it off and apply another coat after thoroughly drying. The "magic" filler and one of my secret weapons - my scribing awl. "A-ha!" New ventilation covers for the open hatches; they'll lay askew alongside the coaming openings, both sides and cover-up the offending laser etch lines for the quarterdeck punch out reveals. Voila! A cover-up placed over the reveal etch lines. These are two of the kit's cannons in position for a visual check; I'll add proper carronades to the quarterdeck in good time. Mein typical glue selection for a build; guess which one I use with my fingers?... The matte medium is used as an adhesive for most of the small P/E decorative pieces (upper bulwarks). Dries fast, most importantly, it's invisible when dry. However, be aware it is also a slightly flexible material post-drying.


- 542 replies
-
- 7
-

-

-
- Sphinx
- Vanguard Models
- (and 3 more)
-
Welcome Jesse! There is a wealth of information and specialized knowledge here. This is matched by very amenable and helpful members. There are members here who build in both plastic and wood. You might be surprised by some of the "crossover" skills between the two disparate sides of the model making hobby! Jump right in; the water's fine.😁 Ron
-
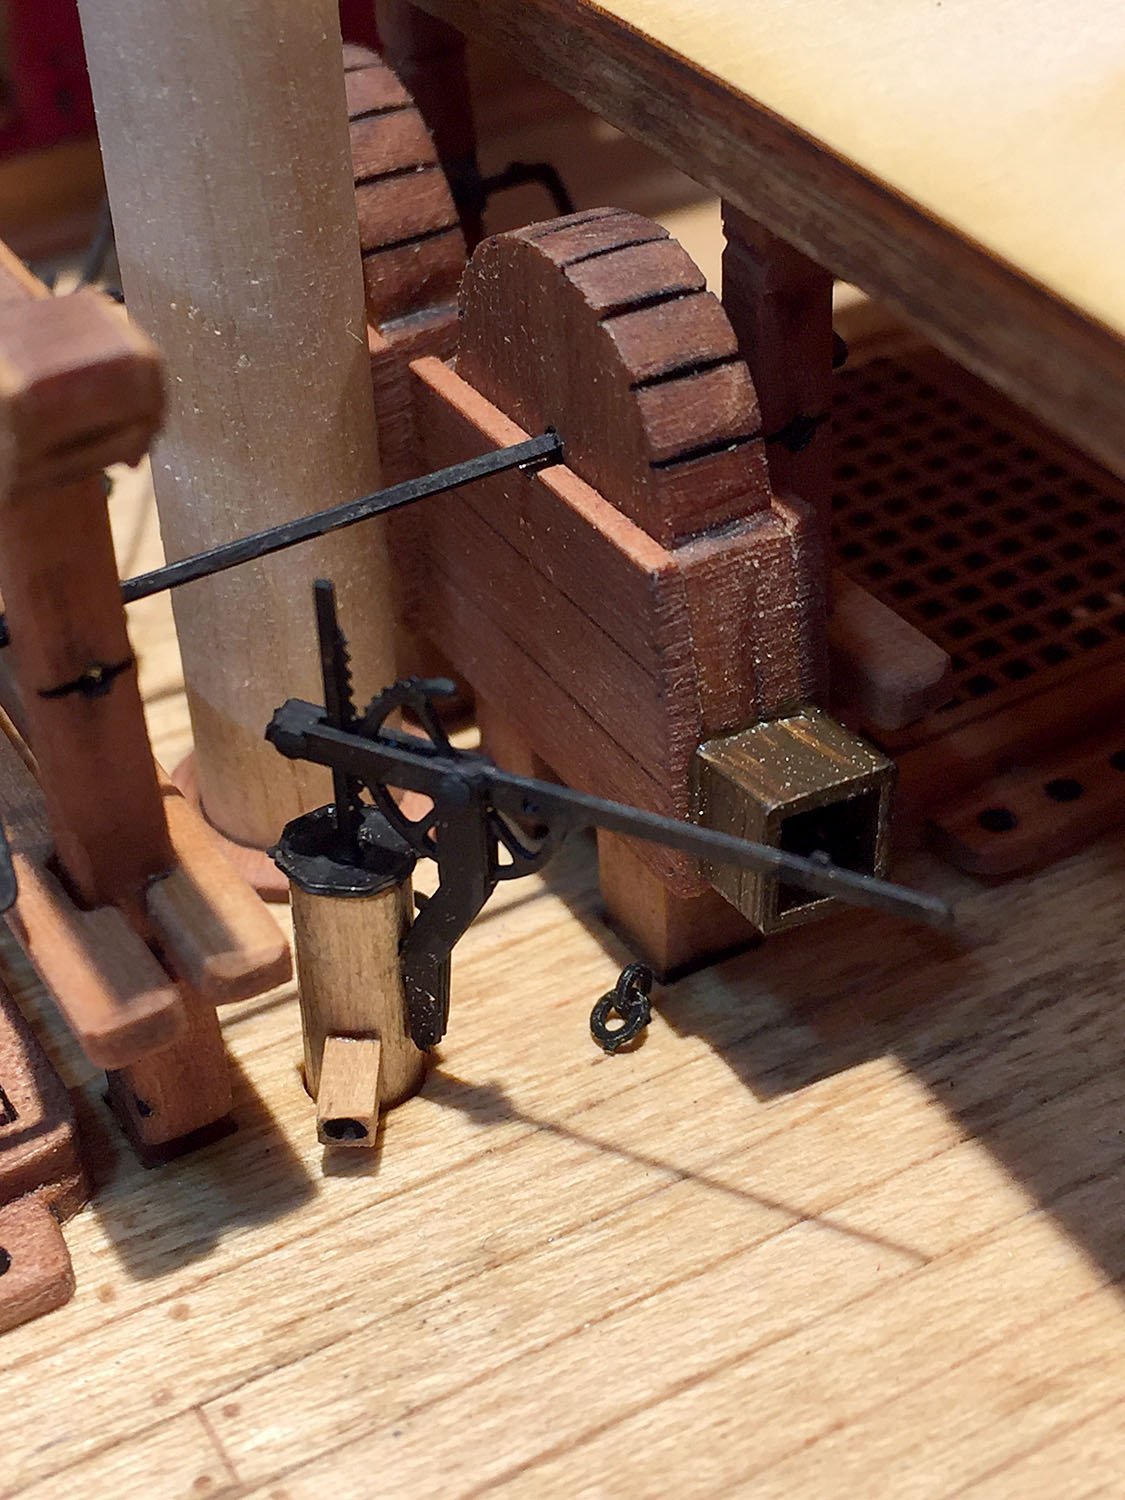
I just realized I forgot to upload a photo for the hand pump after I added the scratched spout. You can also see the larger square spout on the chain pumps body; this one is 3/16" square so you can see that the hand pump spout is less than 1/8" square! Getting that round hole on center so it wouldn't break through the side of the square stock was nerve-wracking! I had to grip the tiny piece with a tweezer clamp when I drilled it. Ron

- 542 replies
-
- 6
-
-
-
- Sphinx
- Vanguard Models
- (and 3 more)
-
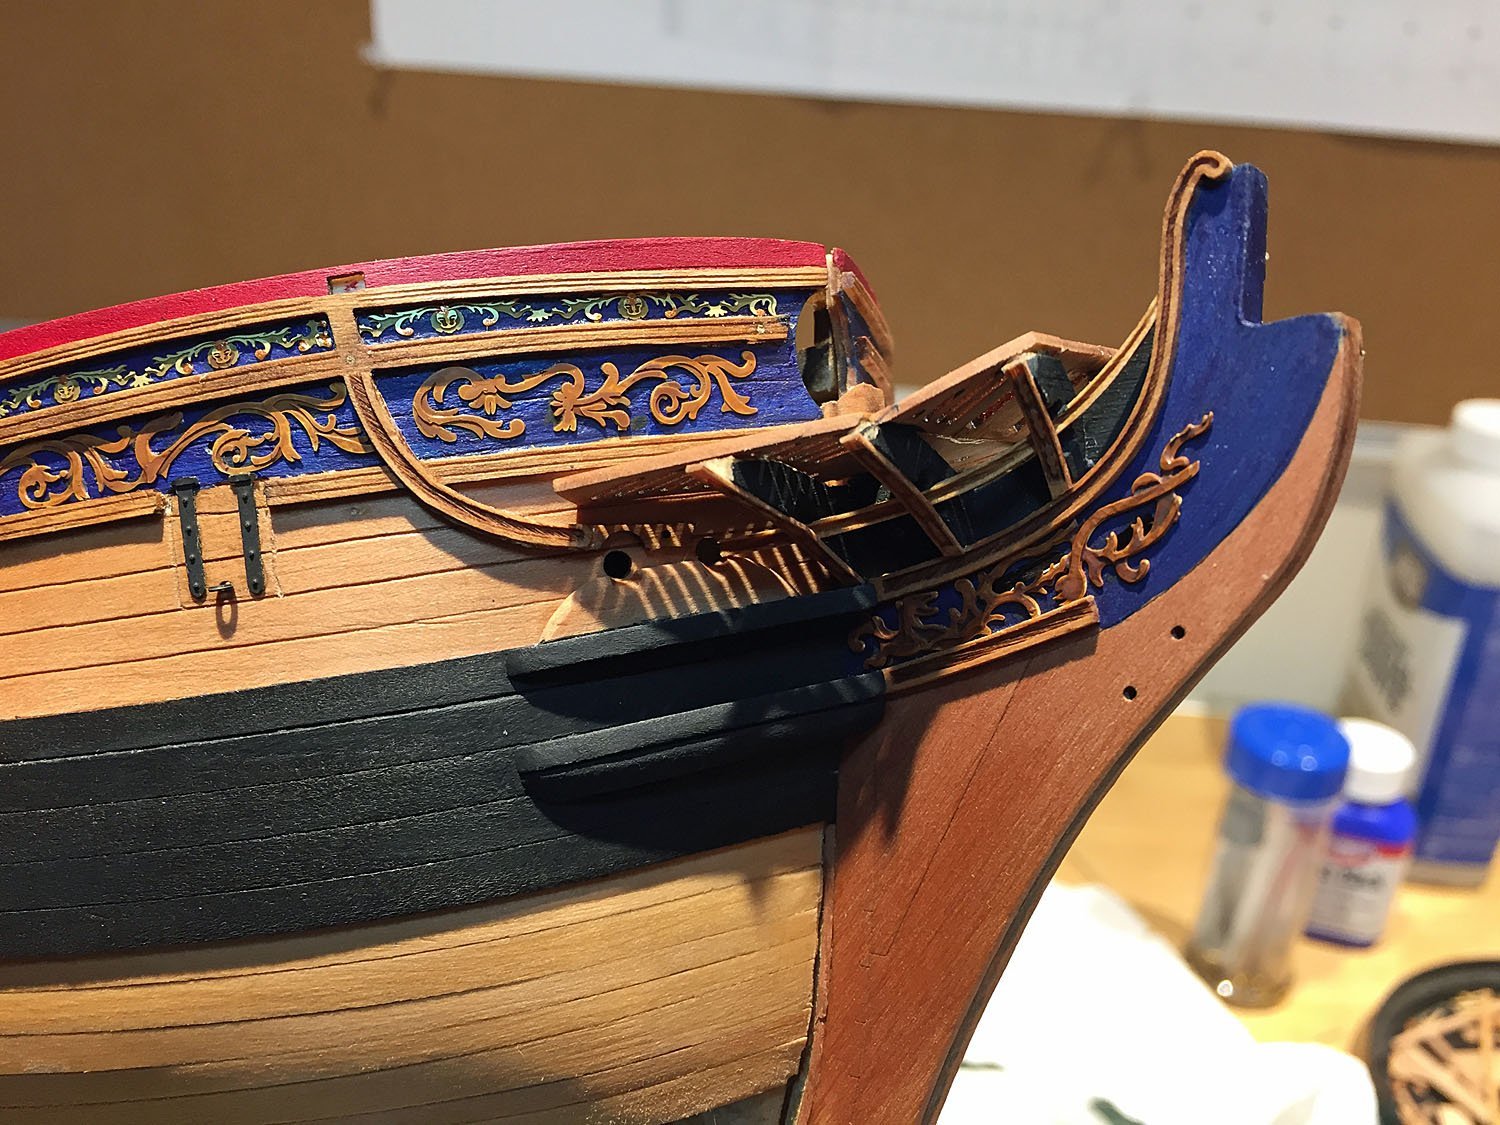
Thanks, Mark. I'm going to try and show as many tools and materials as possible as I continue. I know this helps me when I read a log. We all use different tools and approach building tasks in our own ways, so seeing how something is achieved is just as valuable as why it was done. My next post (perhaps tomorrow) will be about how I approached solving a problem that had me in a slight dilemma. It's about the option that this kit offers for not making it as an Admiralty-styled ship model. Sneak preview shown here... Ron
- 542 replies
-
- 4
-
-
- Sphinx
- Vanguard Models
- (and 3 more)
-
Jacek, That's exactly what I dd with these pieces: cut them into bite-size chunks very carefully and THEN de-char and mount them. Chuck has also suggested just tossing these (with the exception of the upper volute piece) and making one's own. This requires accurately cut 1.5-2mm hardwood strips (pear in this instance for aesthetic reasons) and making a necessary scraper tool. Ron
-
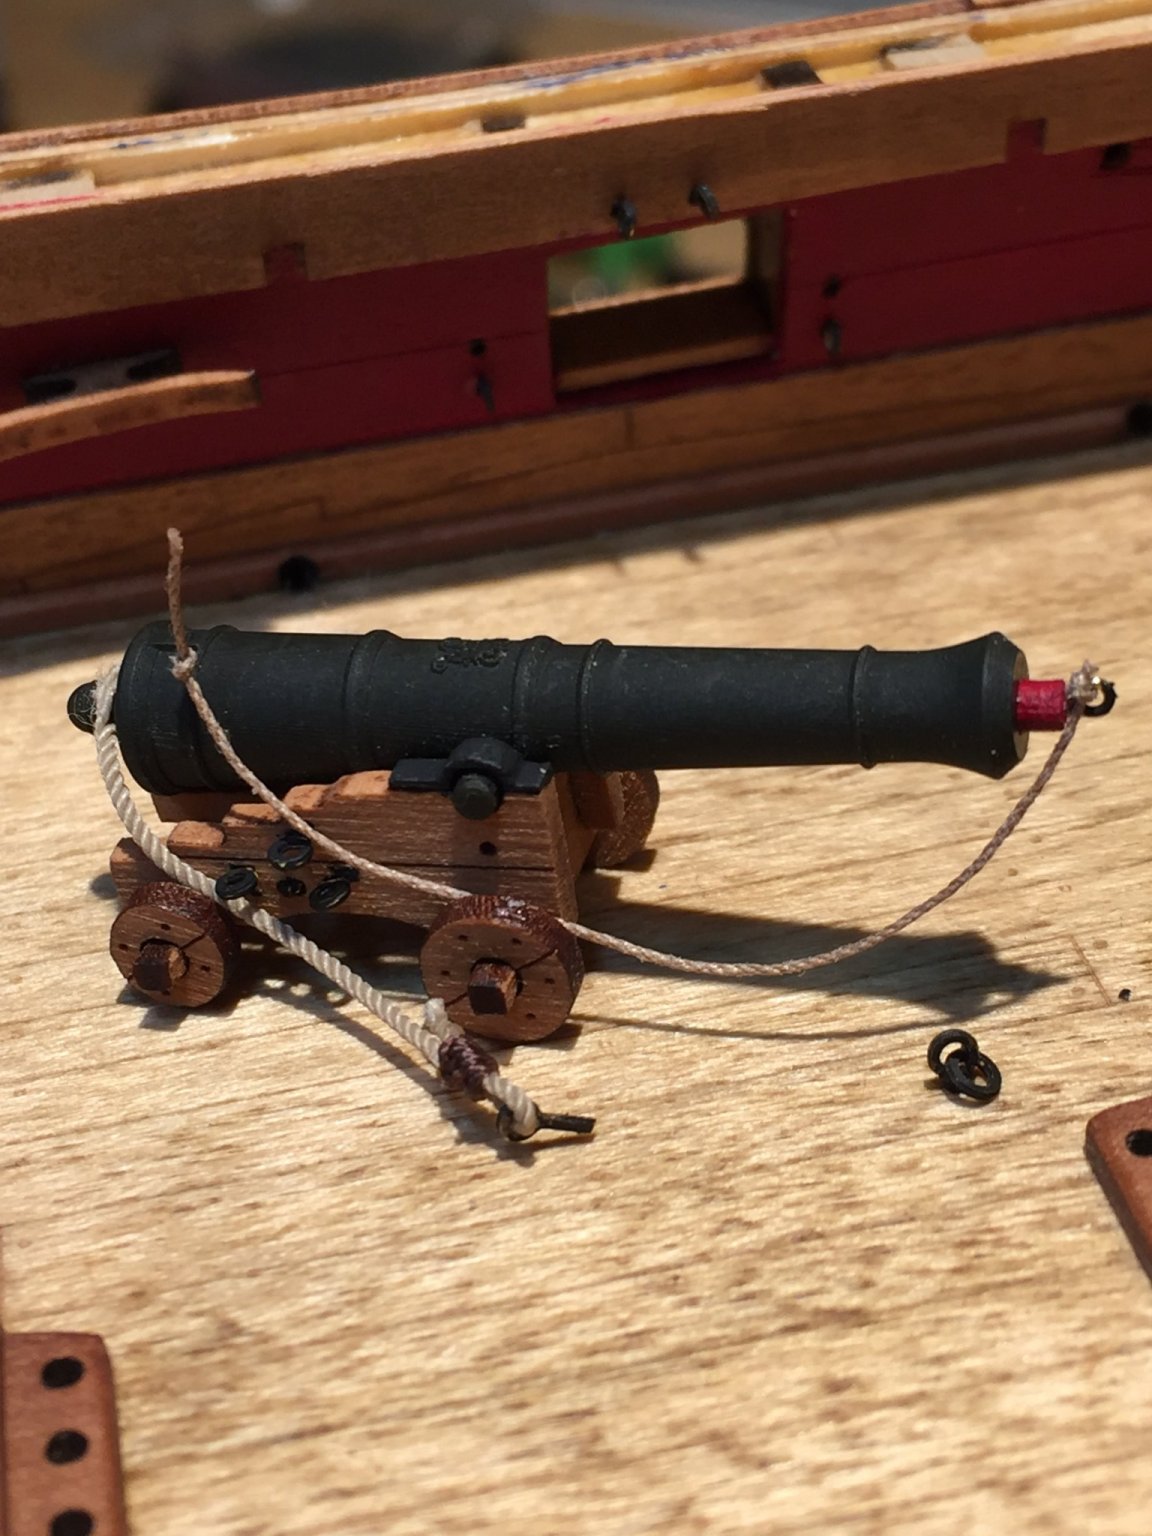
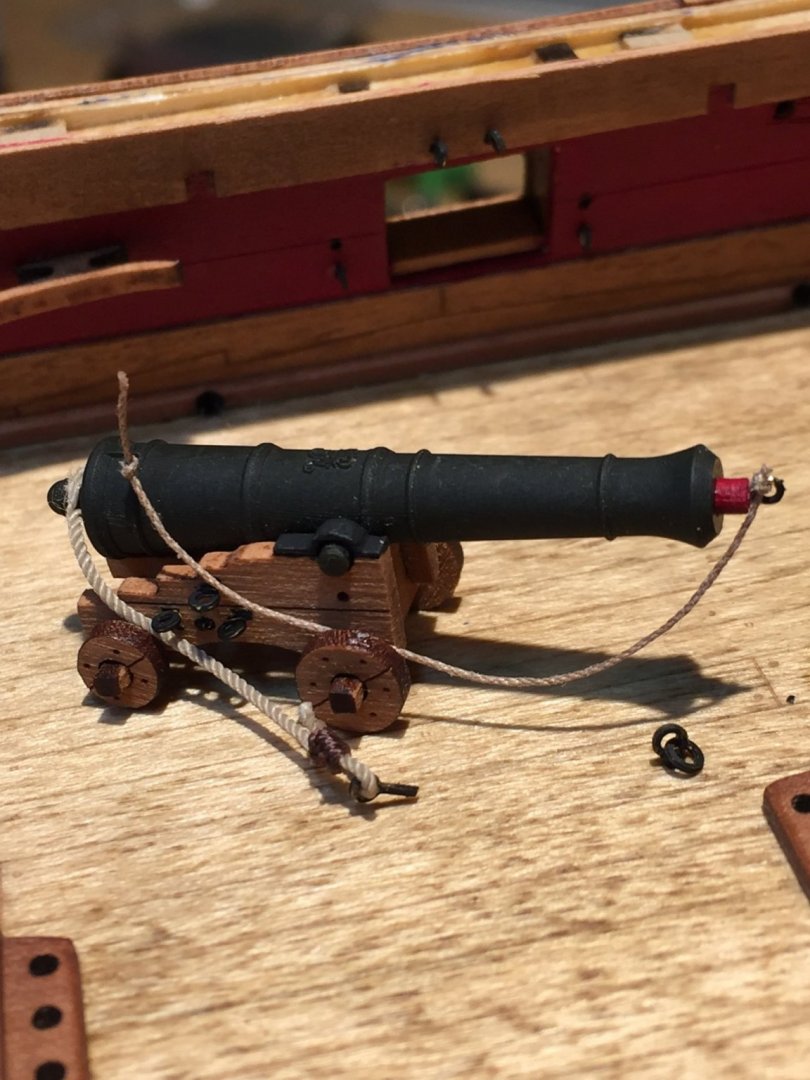
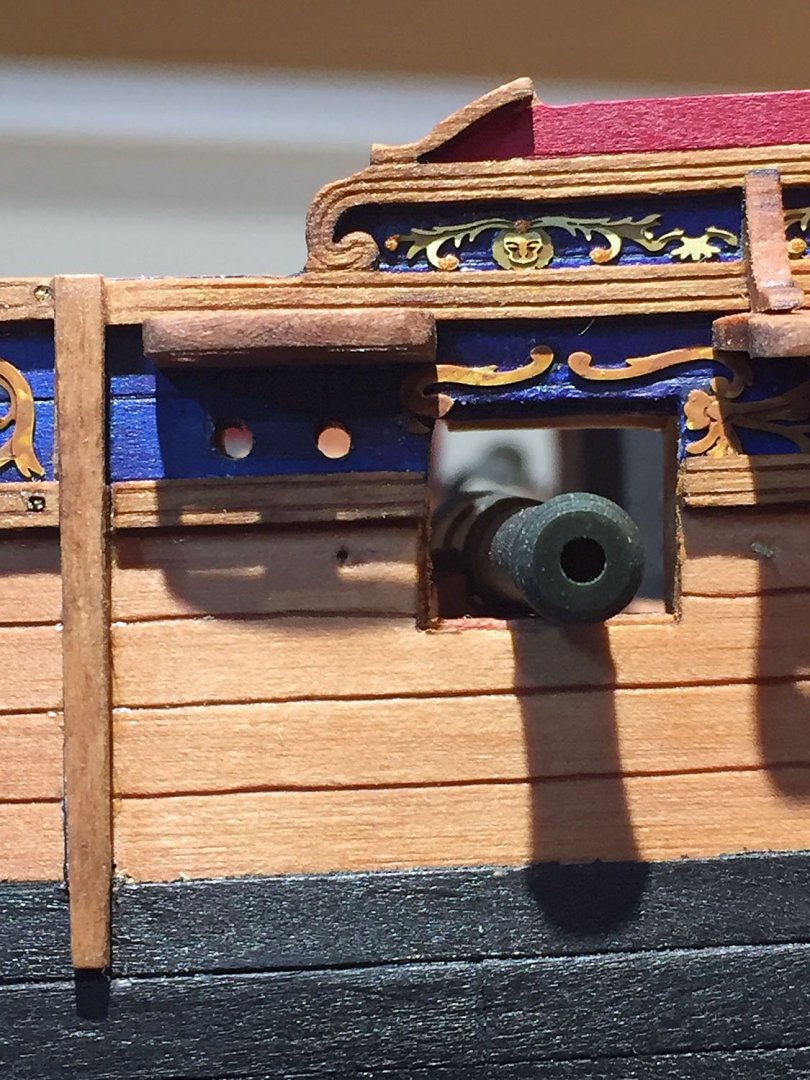
oops, forgot this pic. This photo shows (background) the scratched waterway with a couple scupper holes. You can also see the added pear lining piece on the base of one gunport. On the cannon, tompions will be affixed to most, with added release ropes threaded thru the gunports. These are made from toothpicks and tiny brass "eyelets." I'm certain the actual mechanisms were more complex than this...🤫 I have since removed the char on the carriage axles after someone noted this...(thanks, Chuck). Important edit: You'll see the breeching rope is mounted to the cannon's cascabel BEFORE attempting to rig the eyebolt hardware into the corresponding holes alongside each gunport. This process makes mounting the cannon so much easier to accomplish. I don't do training tackle on my cannon (or trussing tackle, the upper eyebolts over the openings). There are modelers of this era who do add this embellishment and it can be impressive. For me, adding fiddly 2 mm blocks with .12 dia. proper rigging rope is beyond my patience level, especially for rigging 20 cannon (14 of which won't even be seen!)... ...that's my excuse and I'm sticking to it. Ron Technical note: all my log photos thus far are taken with my old iPhone 6, for convenience (2016?). Not great resolution with any of them, but it does the job.
- 542 replies
-
- 8
-
-
- Sphinx
- Vanguard Models
- (and 3 more)
-
I know, I know. Most scuppers of the era were made from lead. But in my workshop the EPA has been looking over my shoulder lately, so I made Camilla's scuppers in a more environmentally and human-friendly material. Ron
- 542 replies
-
- 2
-

-
- Sphinx
- Vanguard Models
- (and 3 more)
-
Amazon. Where else? A set of 4 is $20-something, but worth it. https://www.amazon.com/Finger-Drills-Package-of-4/dp/B06XF39QTX I also think MicroMark carried them a few years ago but not currently. Ron
- 542 replies
-
- 3
-
-
- Sphinx
- Vanguard Models
- (and 3 more)
-
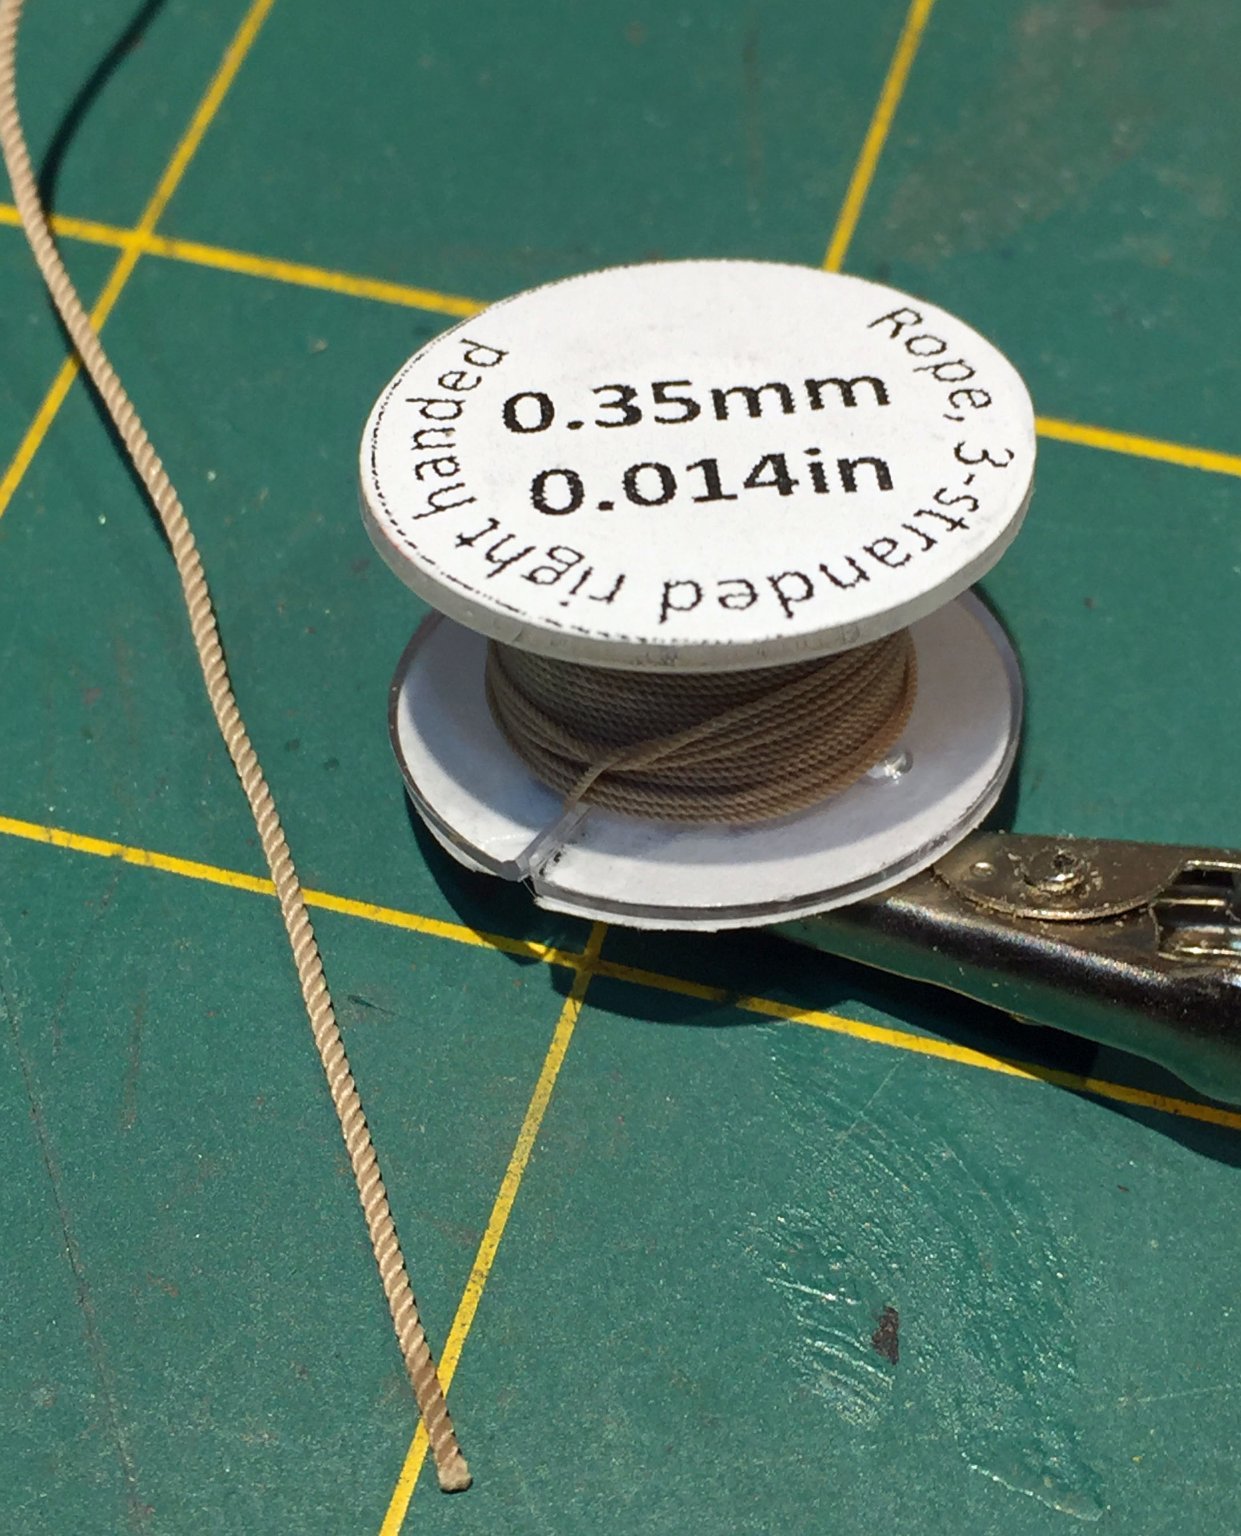
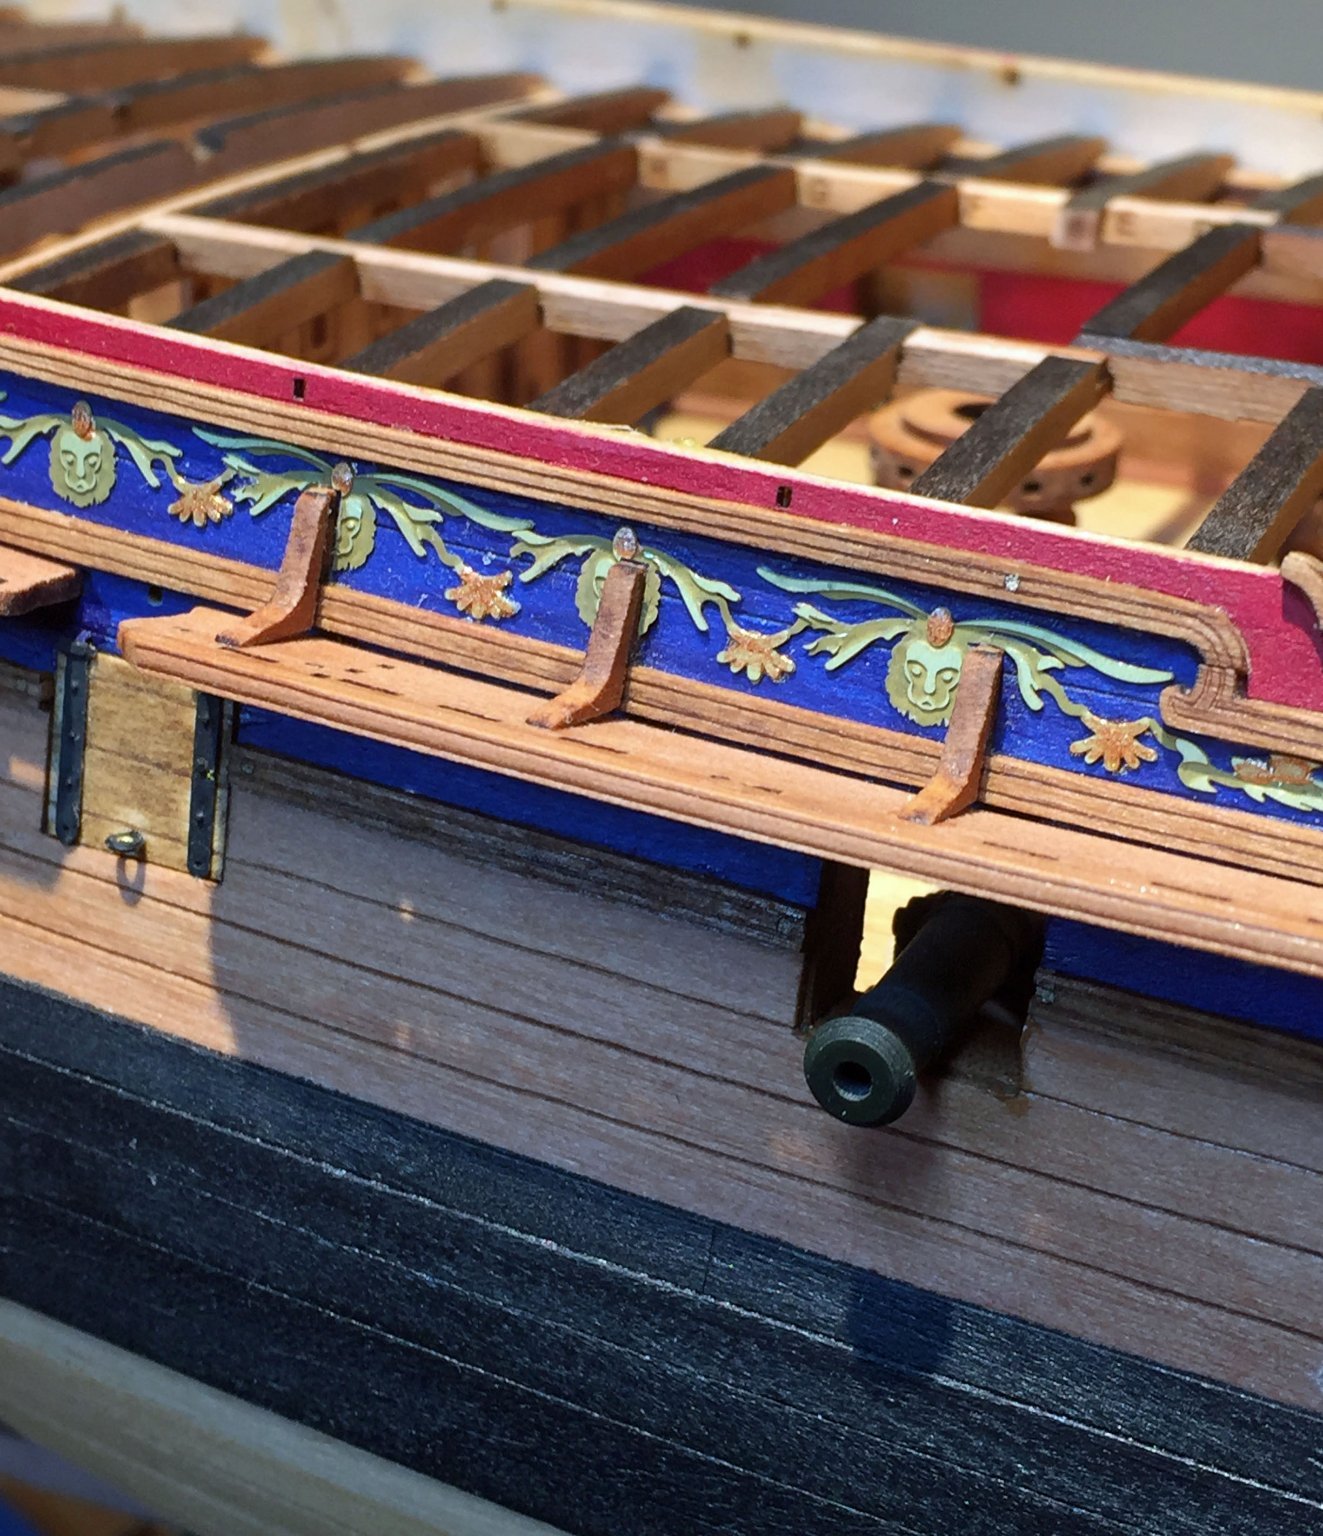
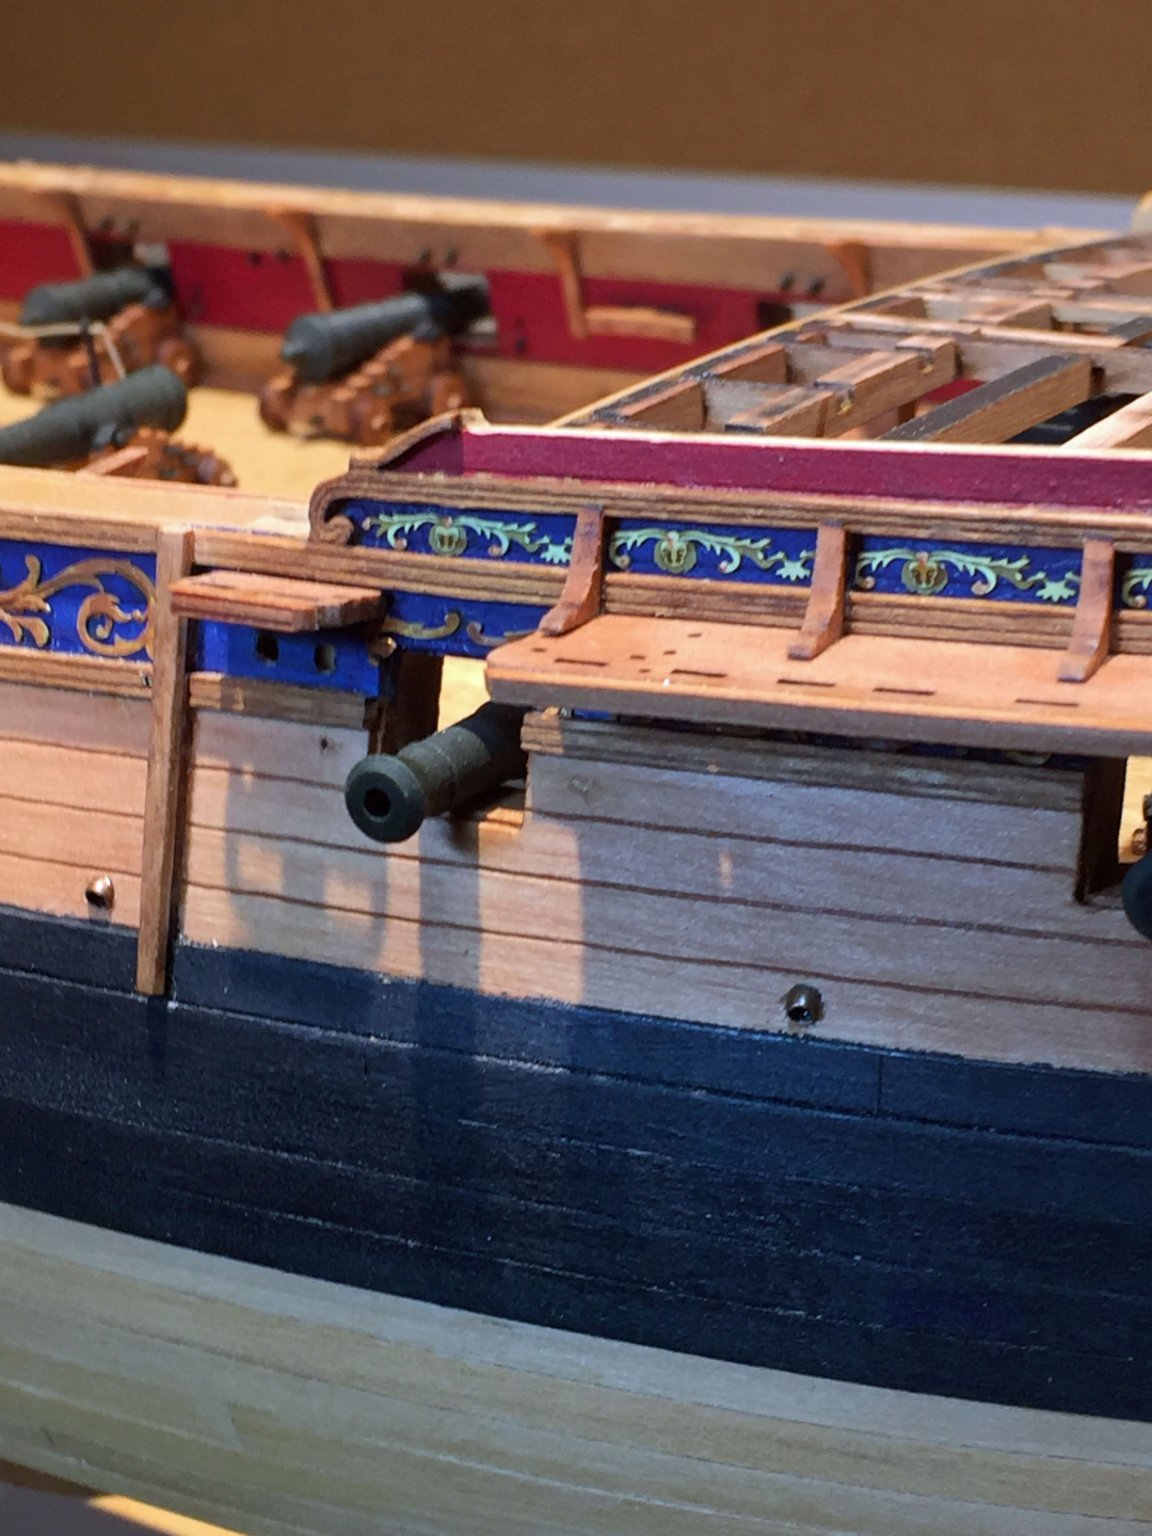
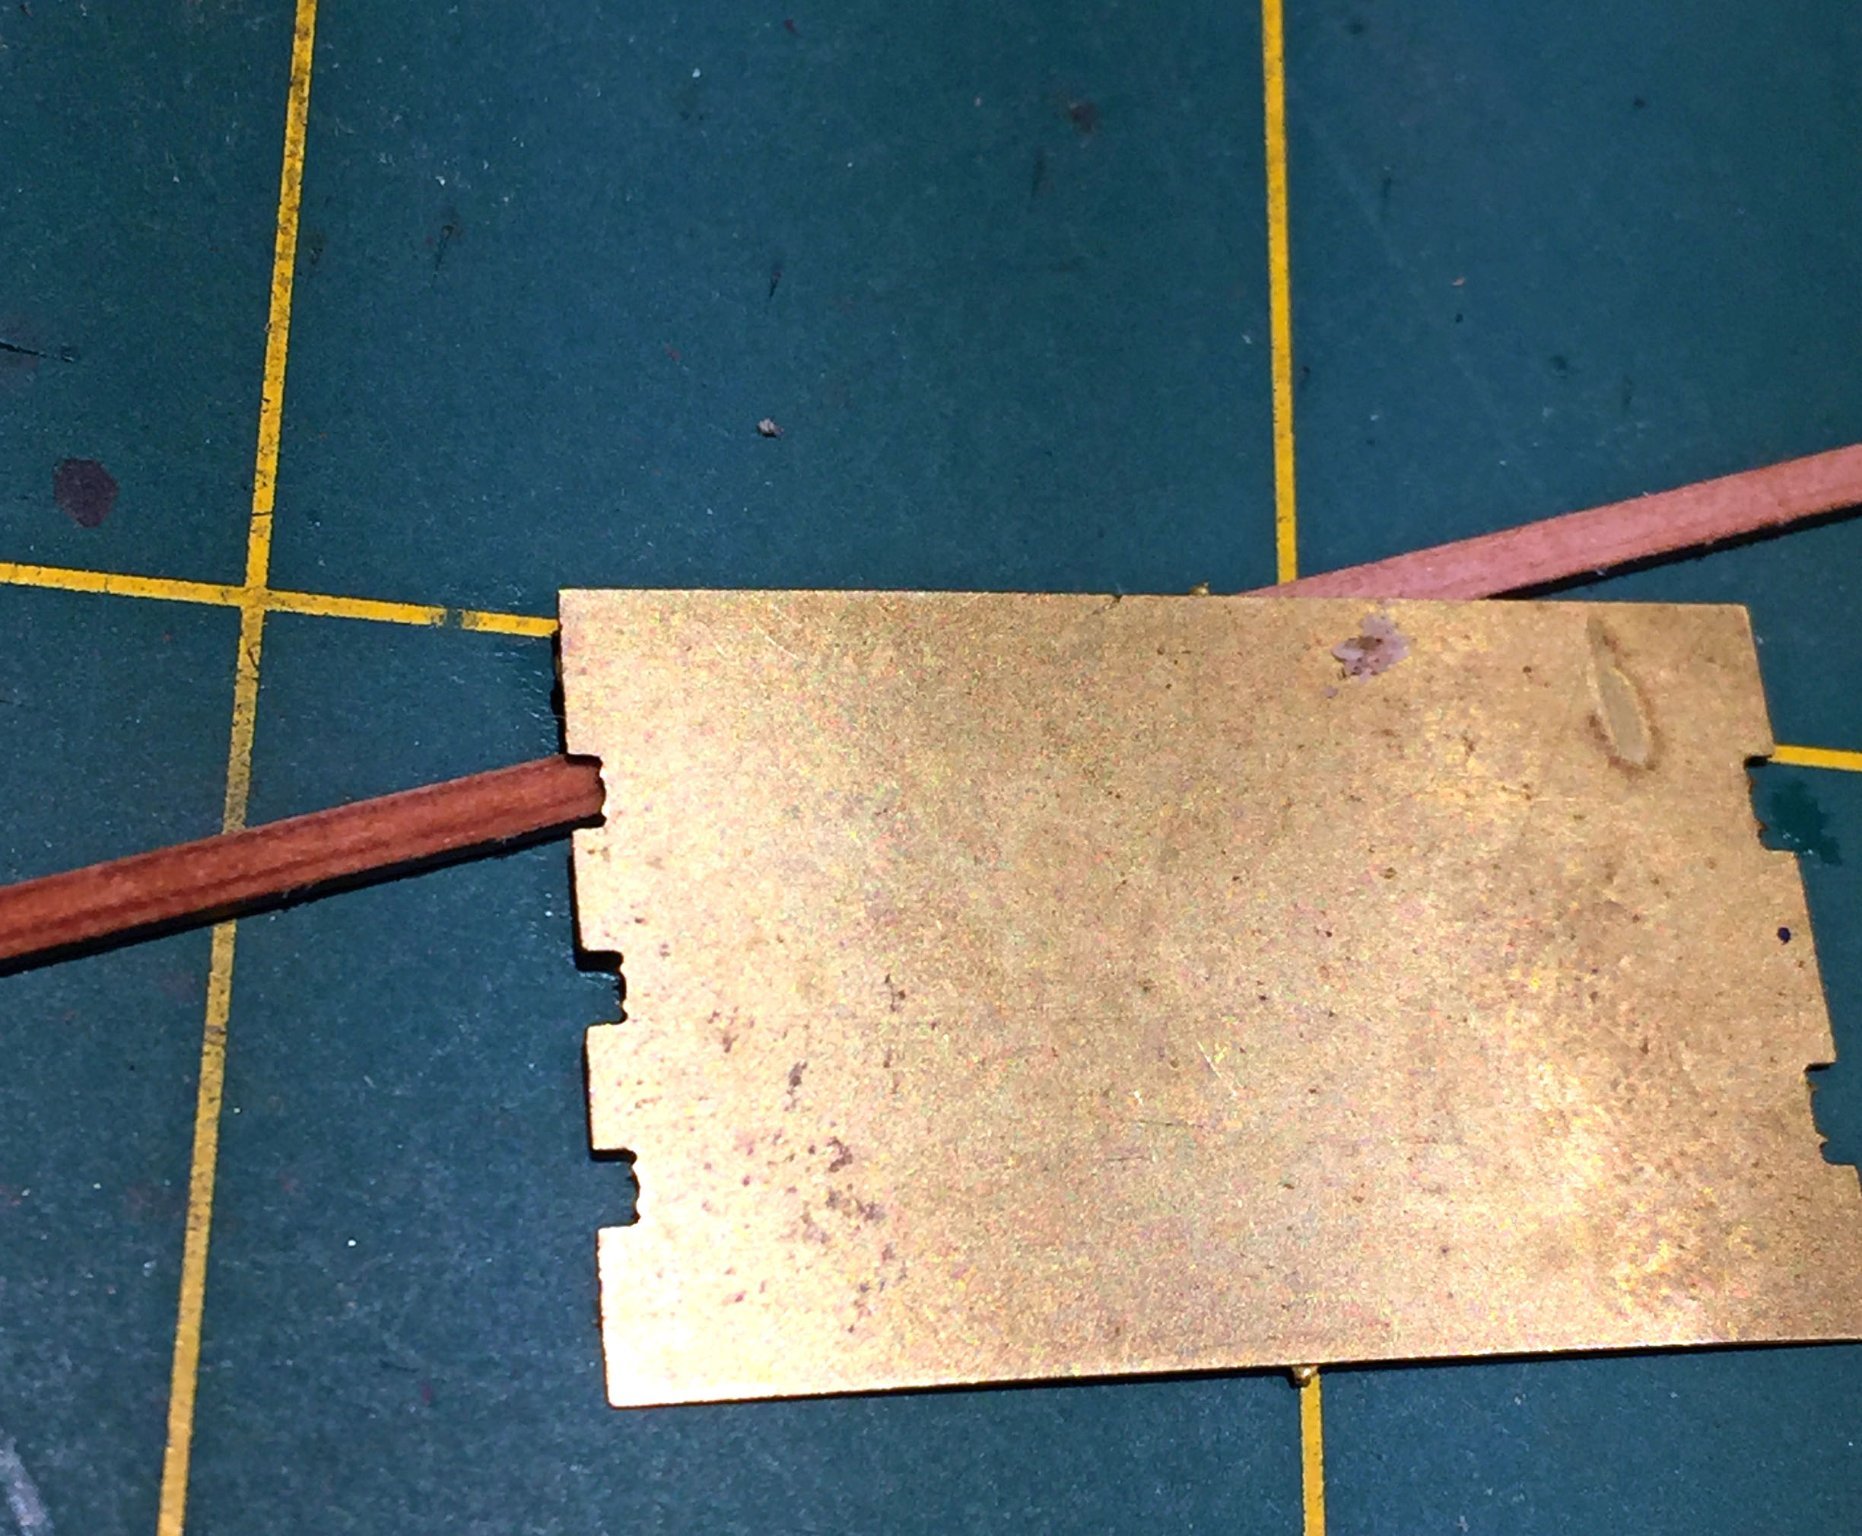
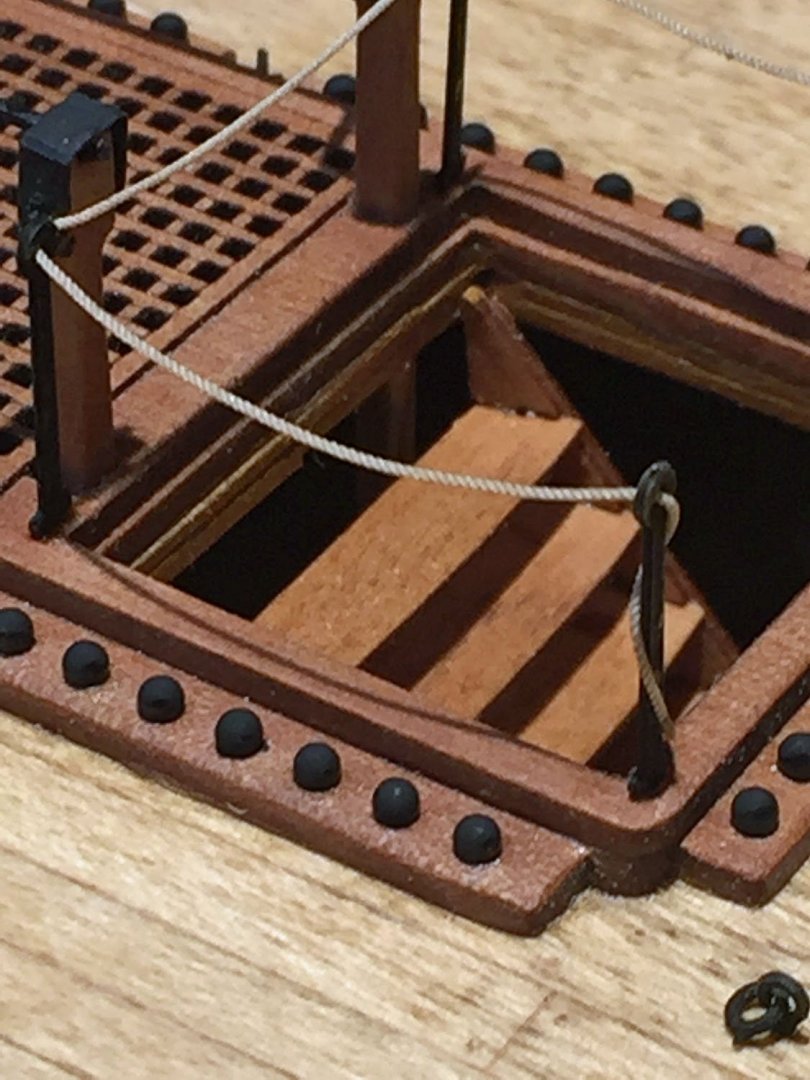
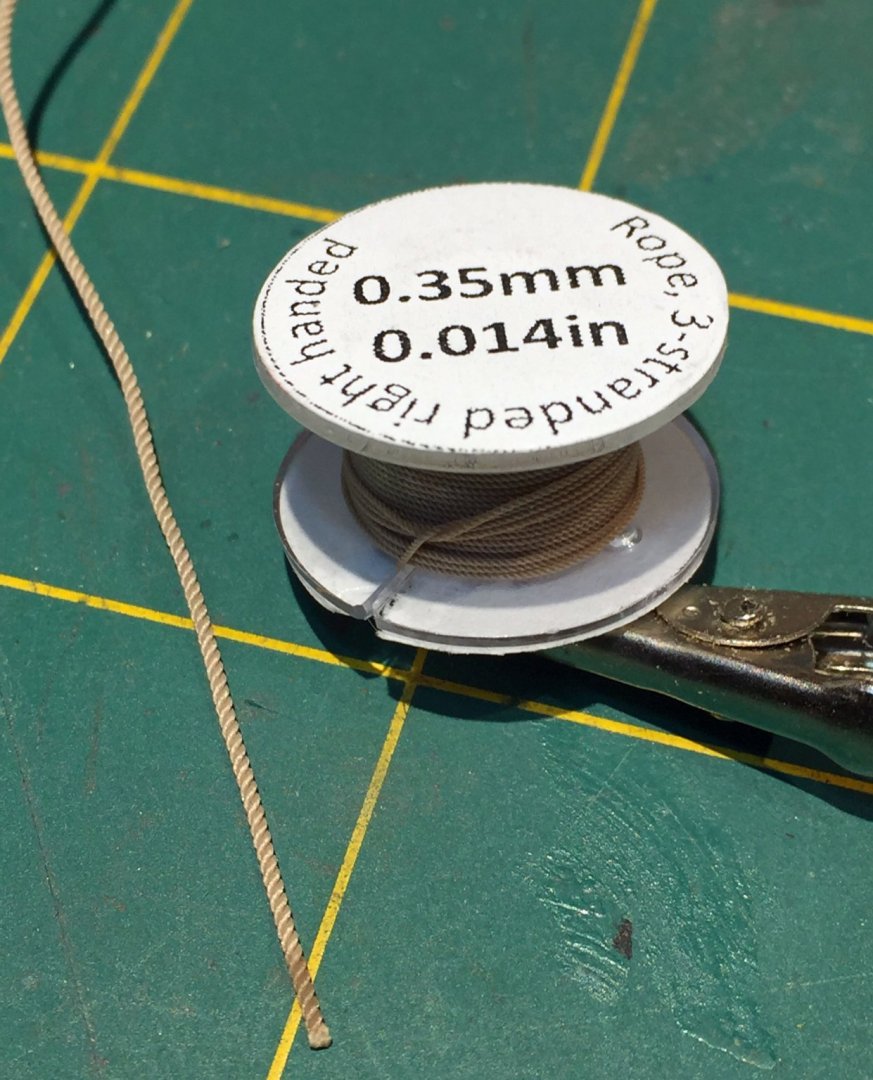
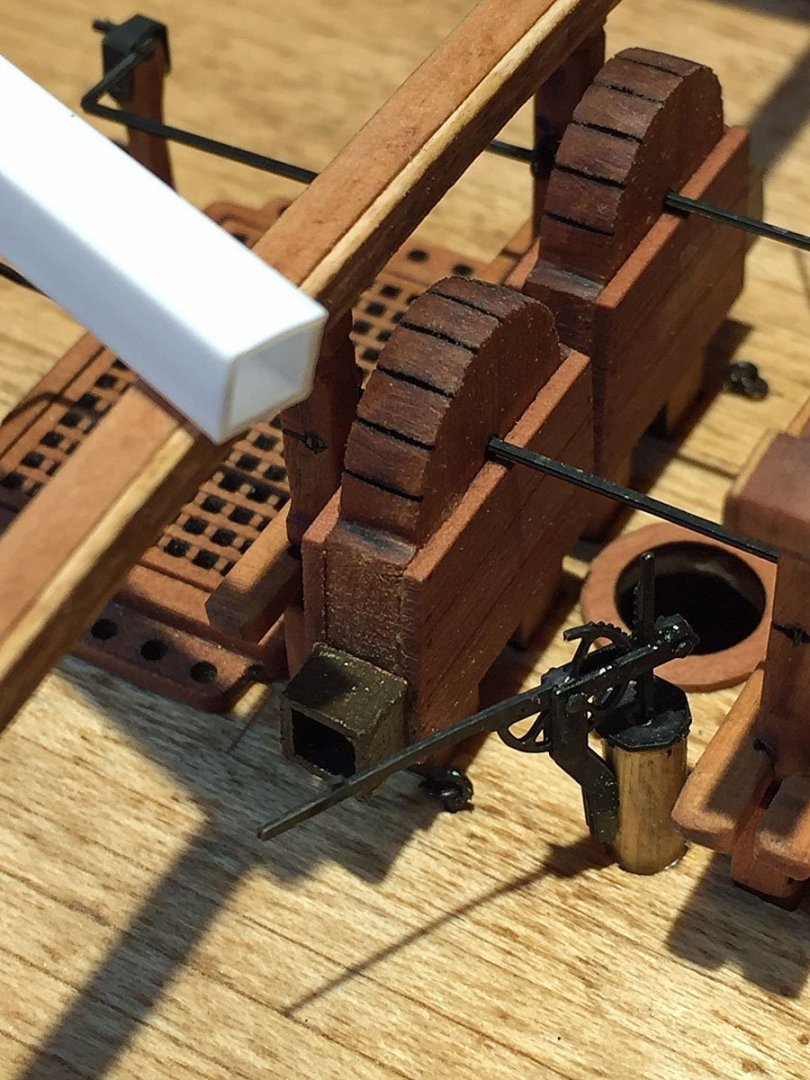
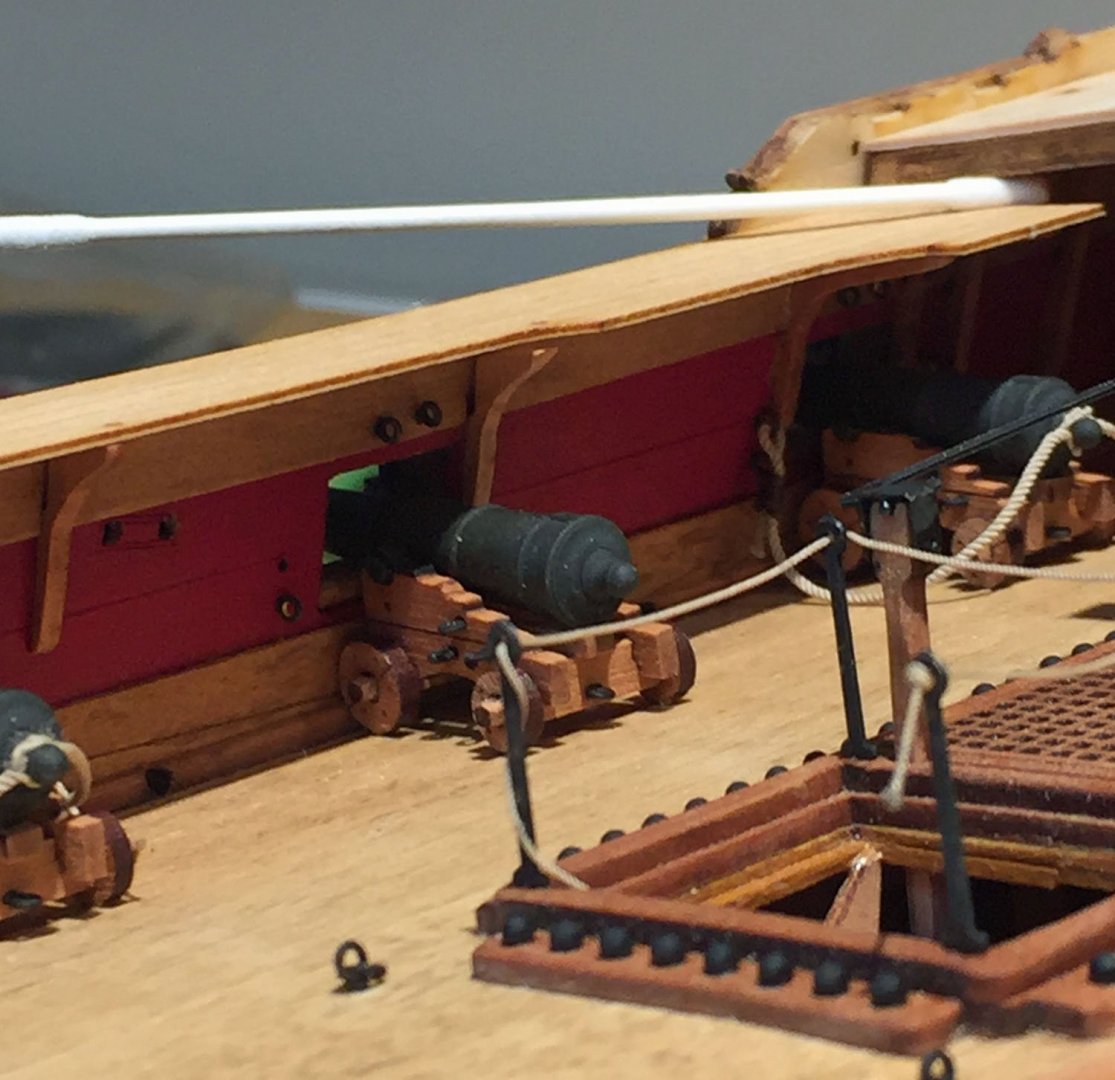
em·bel·lish·ment - /əmˈbeliSHmənt plural noun: a decorative detail or feature added to something to make it more attractive. Although the kit supplied rigging materials are quite adequate, I decided to use a slightly smaller size for the mid-deck companionway safety rope. The manual calls for rope that is .5mm. I substituted .35mm diameter rope from my stash and I liked the appearance much better: not least of all, the better color and the way it hangs, the "swag." As will become apparent in additional photos, I have concentrated on fine details of the mid-gun deck, like the pumps that are very cleverly designed in this kit. The chain pumps are lasered from MDF as a single piece with added cladding pear boards: nice. However, the "spout" isn't a spout exactly, just a square lump. After failing to make this look like a convincing square opening, I hacked this protuberance off and glued on a small slice of Evergreen Plastics 3/16" square white styrene extrusion. Say that 10 times! The CA held well and then I painted it in brown acrylic, two coats. Next time (ha-ha) I'll roughen-up the plastic's smooth surface so the paint adheres a little better. The hand pumps too are clever: the mechanism is crafted with several pieces of small P/E which then attach to a walnut dowel. I wanted the hand pumps to stand out against their larger brothers behind them so I substituted a piece of birch dowel, stained it in weathered oak and glued-on the tiny square spouts at their base. The tiny spouts were made from a piece of 2mm square stock, very carefully drilled-out. I use a sharp awl to create a tiny starter hole, then use a thumbdrill (my favorites for many detailing tasks) to accomplish this. Two photos show the addition of "fancy" moldings on the channels (the Brits spell this "moulding'). I fashioned these with 1.5mm strip pear that has been shaped into a routed profile with a small brass scraper (other photo). Moving toward mid-deck, the other close-up shows the addition of (copper) scuppers, also missing from the kit's bulwarks: I added six per side, per historical convention. One doesn't add these unless there are proper drain holes where the bulwarks meet the deck internally. I added the appropriate drain holes with a small drill into the added waterways which are 1.5mm strips of pear, shaped to a triangular section and affixed to the deck at the base of the spirketting. I put a daub of dark paint to the drain holes. Lastly, for this update, two pictures show the added gangway supports and the fit of the gangway along the top edges of the mid-deck bulwarks. The white "stick" is temporarily wedging the gangway pattern down onto the supports to see how the tolerances add-up before trimming and gluing said pieces to the bulwarks. This is going to be a slightly tricky task to pull-off convincingly, but I think it can be done by taking time to get very exacting tolerances right - like so many other areas of this kit. An observation, and certainly not a criticism: the tolerances to a large number of this kit's components demand an extra high attention level to take the time to fit things together - that - in many circumstances is simply removing char. As I've noted elsewhere (Kit Reviews), this kit has numerous components (not just the P/E I'll also note) that have tolerances that measure +/- .005 on adjacent fittings. Gulp. Pay attention, builders. Ron


- 542 replies
-
- 9
-
-

-
- Sphinx
- Vanguard Models
- (and 3 more)
-
You are most welcome, Bob. Thanks. Some of this knowledge will be my particular deep dives into how I modify kits with various degrees of "scratching" to make them my unique vessels, re-badged, but actual and not "fake." For example, my LeTigre was a renamed "Alert" cutter kit (Vanguard). I my mind, I envisioned HMS Alert being captured and re-branded while she was sailing and raiding while in French hands. Which, as I understand, wasn't for very long.🤣 Ya'll will just have to put up with my humor though! Ron
- 542 replies
-
- 6
-
-
- Sphinx
- Vanguard Models
- (and 3 more)
-
"Alexa"- play Irish sea shantys." For those who may have noticed her in my first image post here. I nearly always have music in the background in my shop. If one could wear out CD's, the soundtrack to Master & Commander would be on its sixth reincarnation. Music helps me concentrate, but I realize others may find it distracting. I think it depends on whatcha like. In addition to pretending I'm standing on the decks of my models as they're being built, I imagine a small consort playing Corelli in my drawing room. You know, late baroque (my favorite) welcoming my guests from London into my country house, just a few miles from Portsmouth...afterall, I do own the shipyard where she is being built! Ron
- 542 replies
-
- 4
-
-
- Sphinx
- Vanguard Models
- (and 3 more)
-
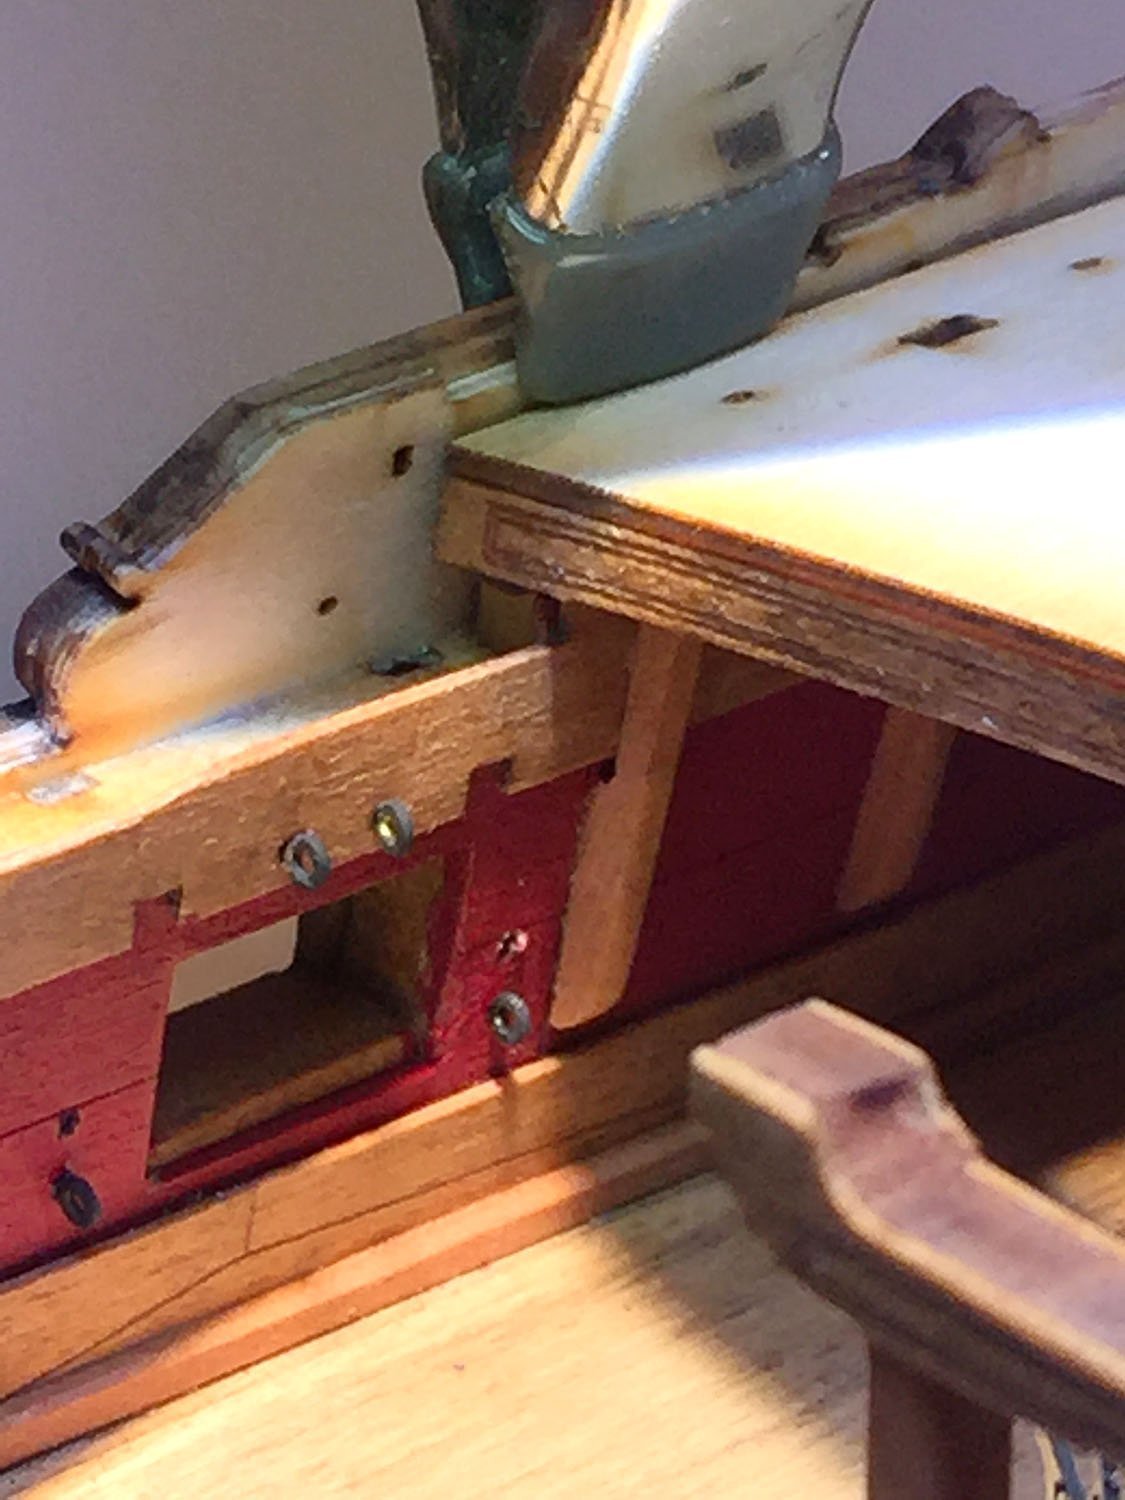
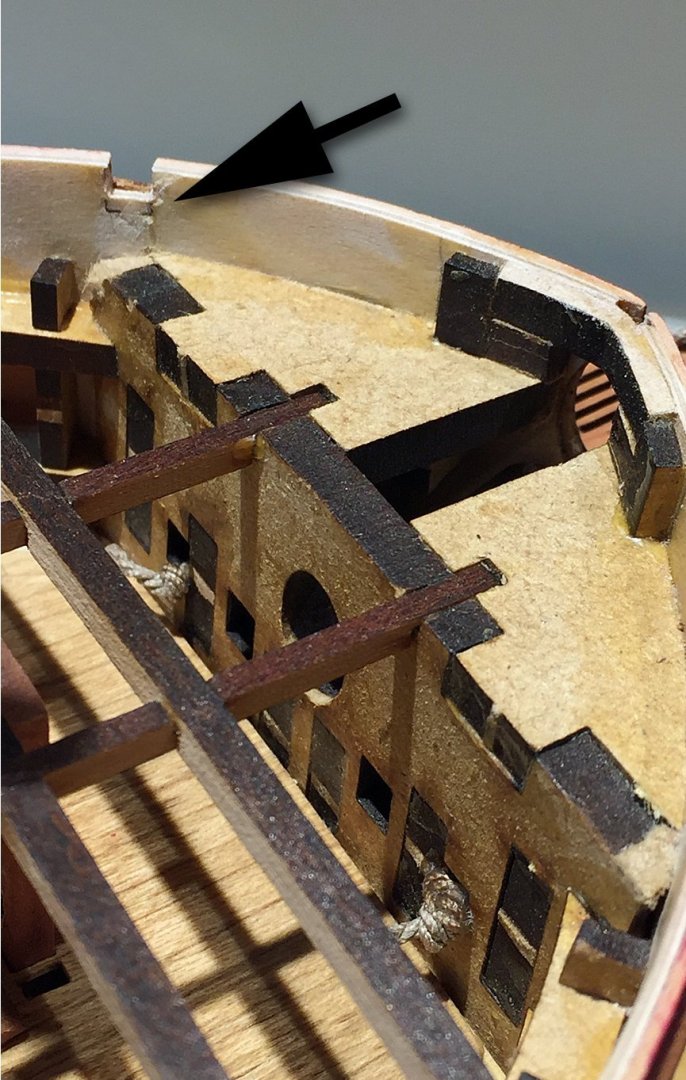
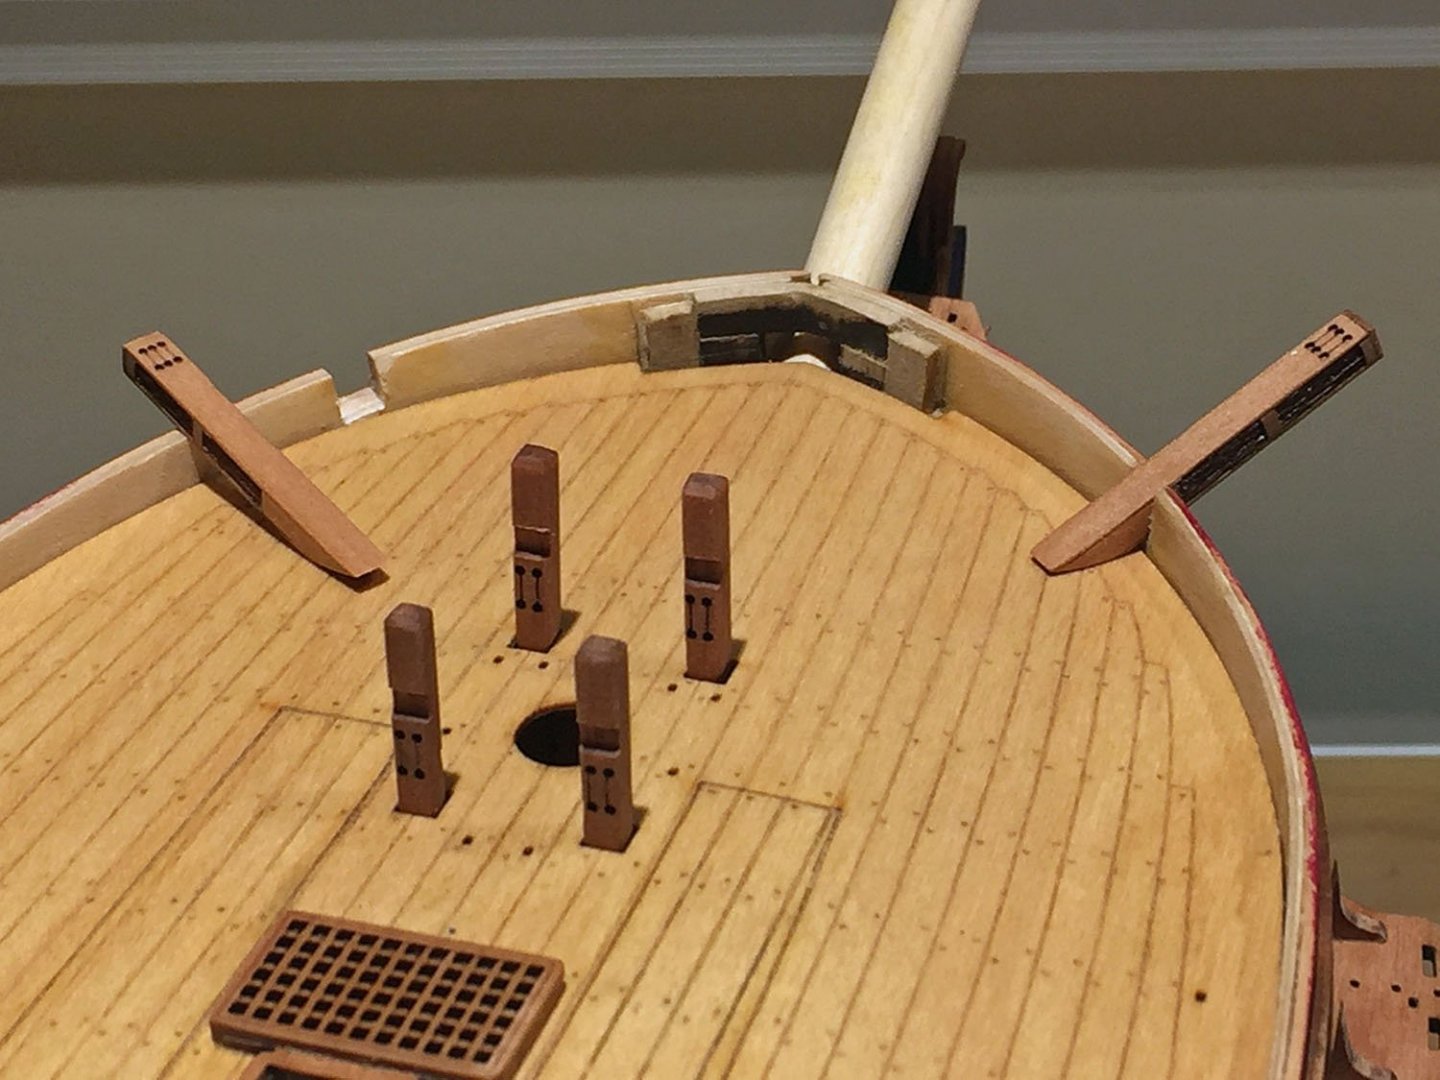
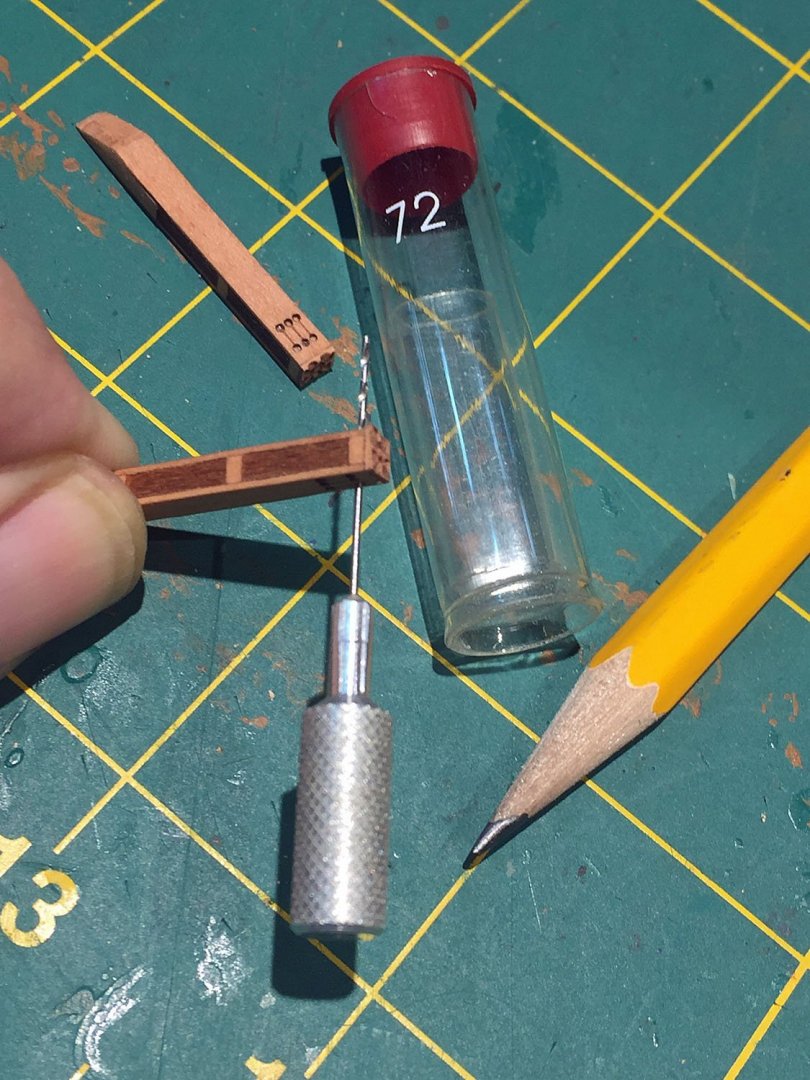
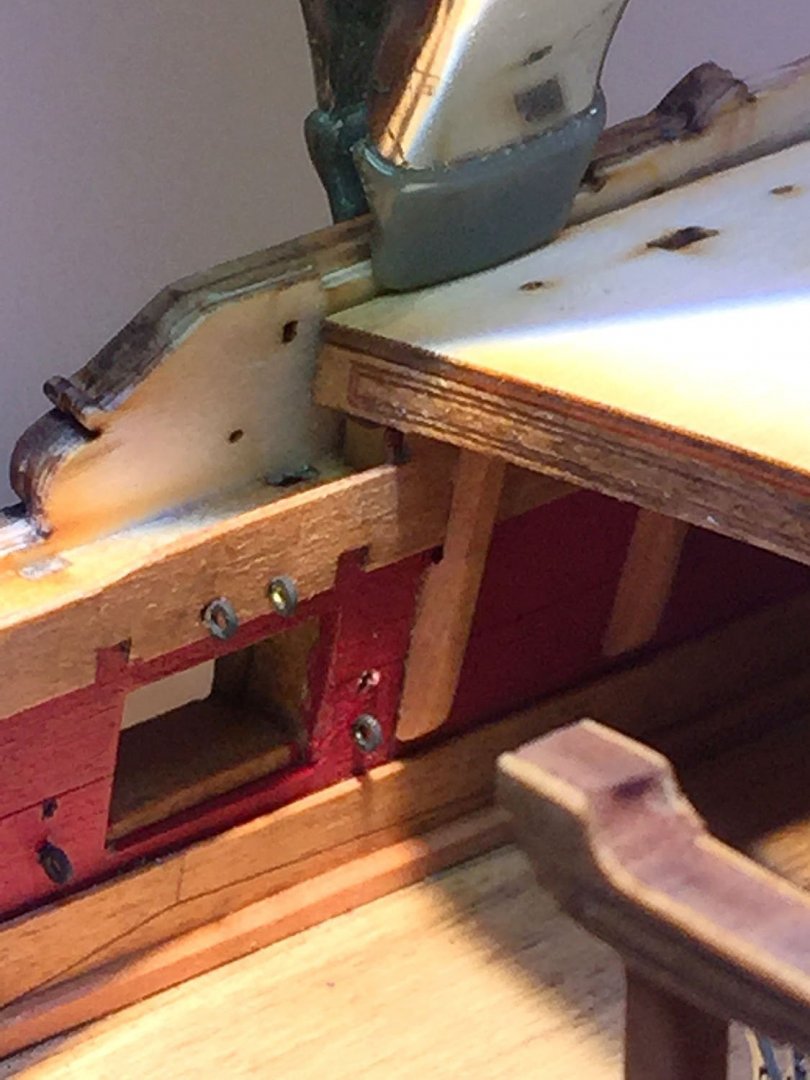
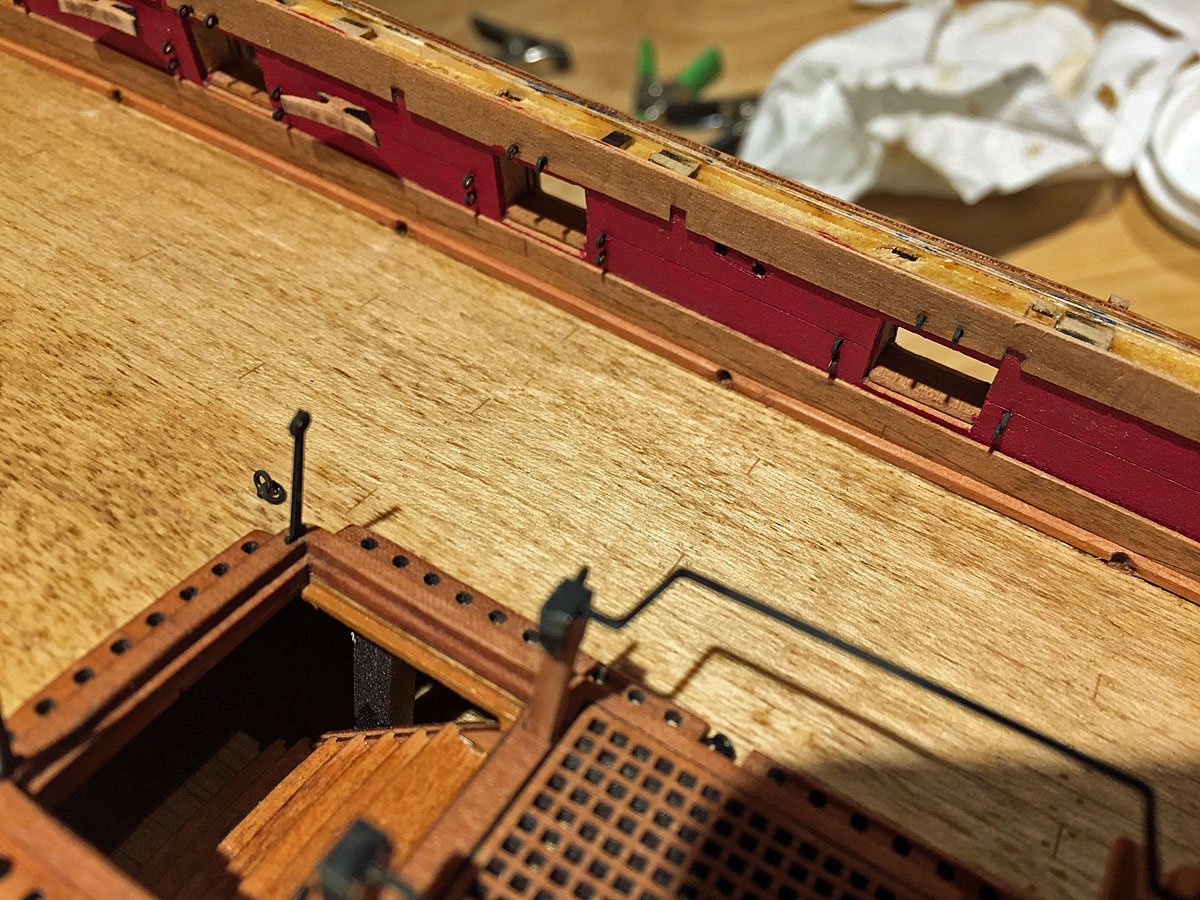
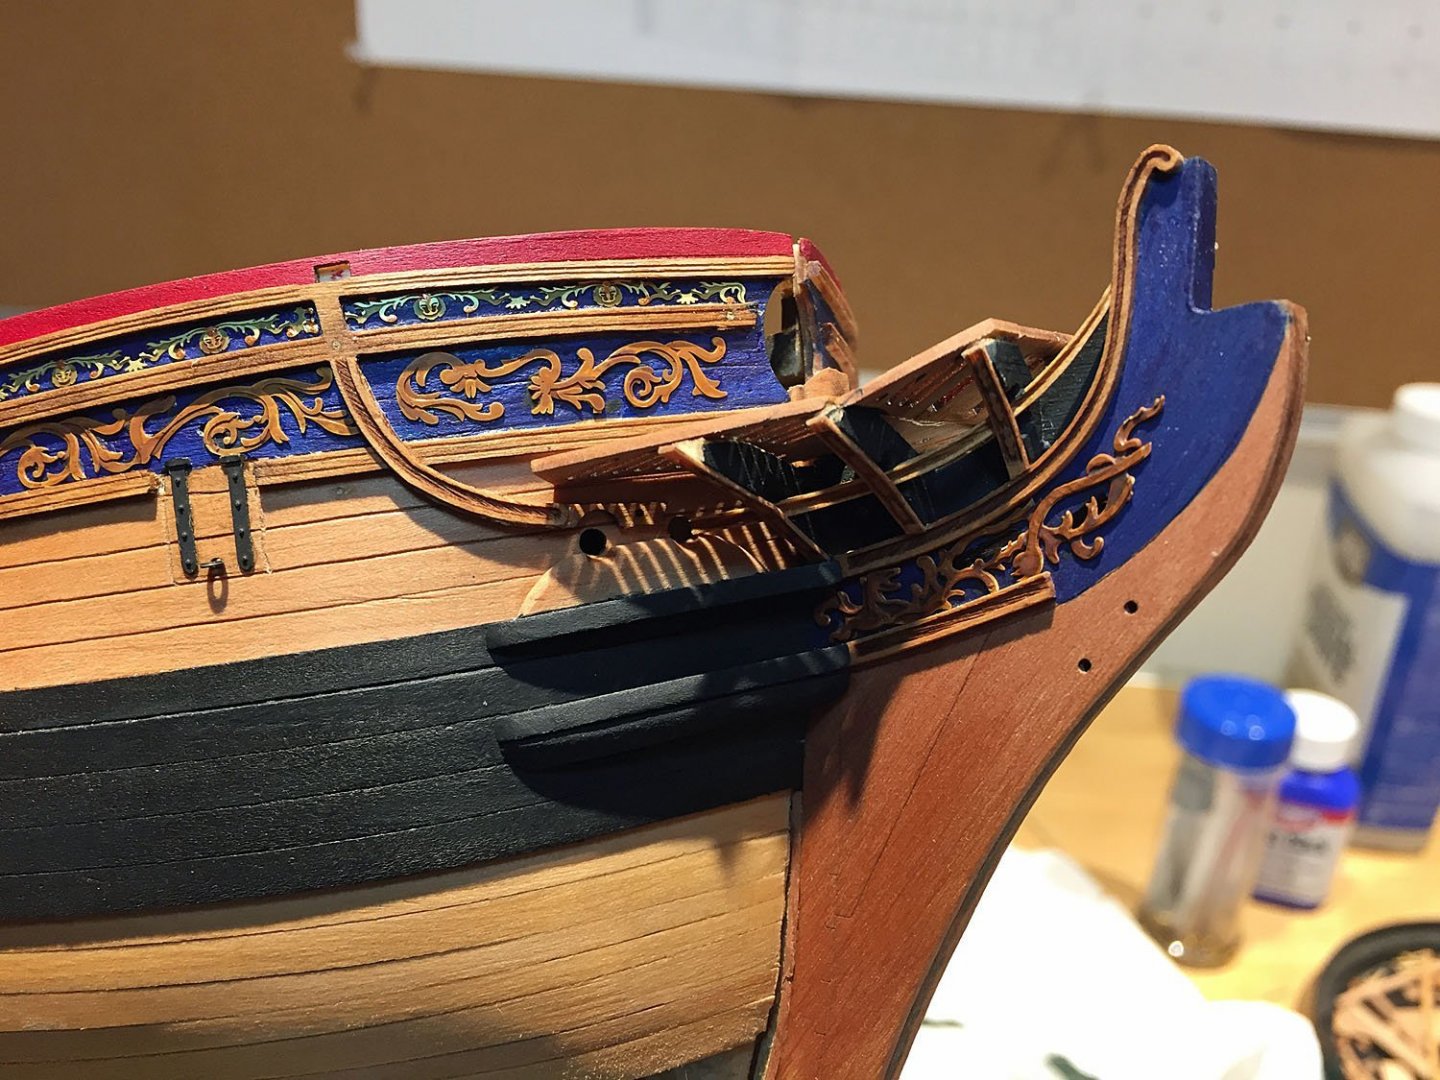
More photos, explanations as follows...I'll call this set "Drilling and sawing"...necessities. The rigging pulleys ( I believe the braces) along the bulwark sides (2 places, each side) do align nicely with the built-up woodwork, but I chose to run a drill through them so that there is free clearance when it comes to rigging. Getting the line through the pulley UNDER the shroud stool will be lots o' fun! First. drilling the catheads. Although not detailed in the manual, I know that when rigging rears it's head, I'll want to have the anchors trussed-up nicely near the cathead weighing lines. Good idea to have rope passing through the cathead for this. The small, cleverly built-up pieces have photo-etched tiny holes that...uh, go nowhere. That is, until I took my #72 thumb drill (.61mm dia) and pierced all six holes (love these little buggers). Make sure to drill on a flat surface and hold your drill as perpendicular as you can since it's easy to miss and drill off center, which would not be good.* *Ignore this commentary should you be building the Sphinx kit as an "admiralty-styled" model without rigging, which I suspect some will do as it is designed at least partially for this specific modeling approach. By test fitting the catheads into the foc'sle surround you'll quickly see that the "openings" for mounting these to the deck are inadequate and rather than try to coax an opening to fit the cathead into the bulwarks through via a square hole with a file and X-acto knife, I decided to saw a tight-fitting slot from the top nearly all the way down to the deck surface. Some may already note that there are TWO (2) additional wrap-around pear wood pieces that must also be mounted to this bulwark arrangement (to basically thicken it). These will also need the "slice" in order to accommodate the cathead(s). Shown here: the starboard cathead is temporarily plugged into place (purposeful tight tolerance here) and the port side shows the opening I've made for each. Be careful to not saw down too far on the exterior of the prow. I did pop-out the corresponding S & P gunwales to check that the depth-of-mounting for the steeply-angled catheads would be adequate to sit below this finishing pattern provided as a single, long piece (both sides). I'll see very soon how the cathead's external supports mate-up and meet as they should. There is some tricky modifying here to both the PLYWOOD as well as pear patterns; I have no idea why one would try to fiddle this area by opening the square holes to allow the catheads to fall into place properly (through three separate stacked pieces, on each side). Perhaps I'm missing something here, but when holding the gunwales to their respective mounting positions, the fit of the cathead to the deck and below the gunwale looks fine to me: no gaps, weird, wrong angles, etc.
- 542 replies
-
- 10
-
-
- Sphinx
- Vanguard Models
- (and 3 more)
-
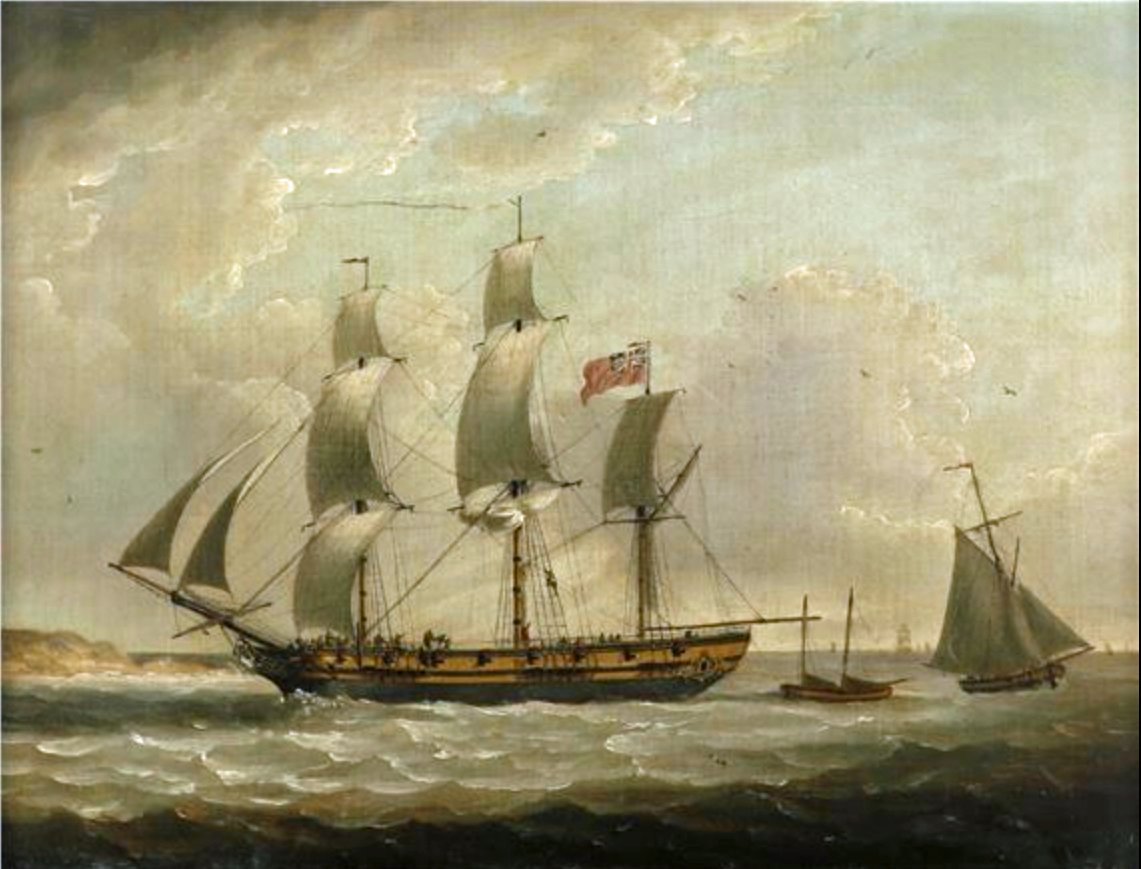
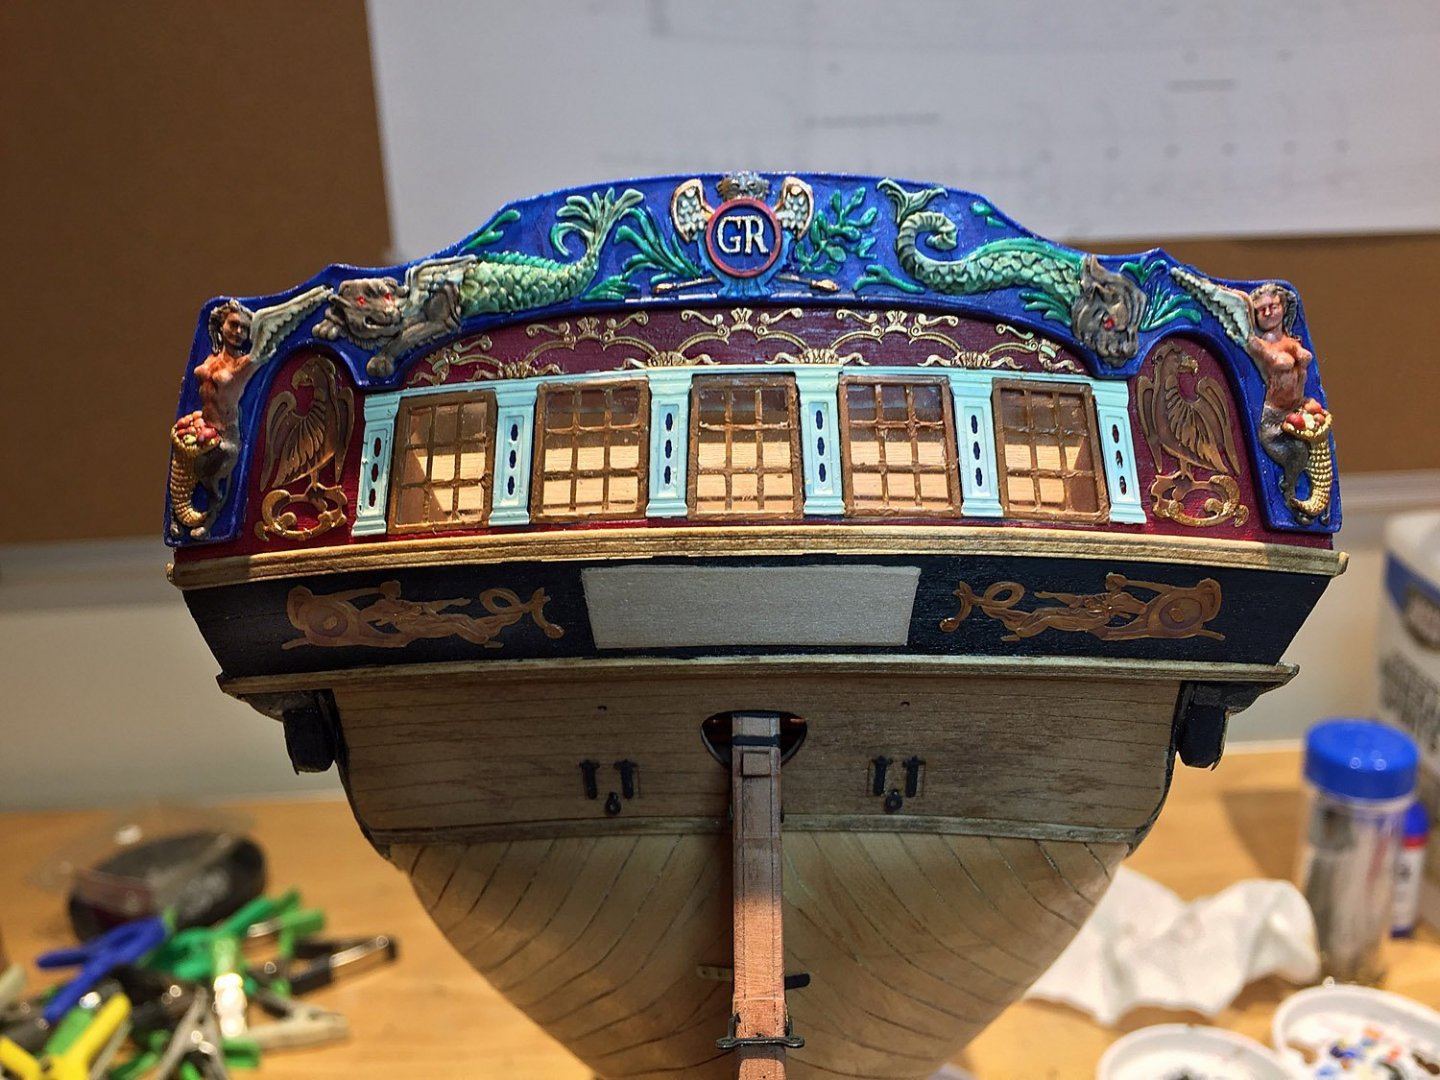
Some background on HMS Camilla. Note that the painting shown here is for HMS Camilla, in 1796 , by artist John Thomas Serres "HMS Camilla was a Royal Navy 20-gun Sphinx-class post ship. Camilla was built in Chatham Dockyard to a design by John Williams and was launched in 1776. She served in the American Revolution, the French Revolutionary Wars, and the Napoleonic Wars, before being sold in 1831." That's about 55 years! But who's counting? Extraordinary service by the standards of any nautical era I know about. "Camilla was commissioned in May 1776 and sailed for North America in August. There she captured the privateer schooner Independence, John Gill, Master, of six carriage guns, eight swivels, and 50 men. She was on a cruise from Boston.Camilla also captured Admiral Montague, sailing from Hispaniola to Rhode Island with a cargo of molasses and coffee, a chance sailing to Georgia with coffee, and Polly, sailing to Surinam in ballast." Loads of info on HMS Camilla here where the above has been researched : https://en.wikipedia.org/wiki/HMS_Camilla_(1776)
- 542 replies
-
- 9
-
-
- Sphinx
- Vanguard Models
- (and 3 more)
-
Thanks, Thukydides. Sails I expect will happen around late December/January since I anticipate masting and rigging will commence sometime late this month. Diorama in mid-February/March, if I'm lucky. I'm planning for the diorama now, but I'll explain preliminary thinking for the presentation "case" reasonably soon as I think about how the sails will be deployed, the bearing of the ship and how it will appear in the water (degree of list and roll - pitch and yaw to pilots - which partially determines the dimensions of the base). I even have thought about the weather that this ship diorama will present. How's that for a little bit of Crazy, huh? Ron
- 542 replies
-
- 6
-
-
- Sphinx
- Vanguard Models
- (and 3 more)
-
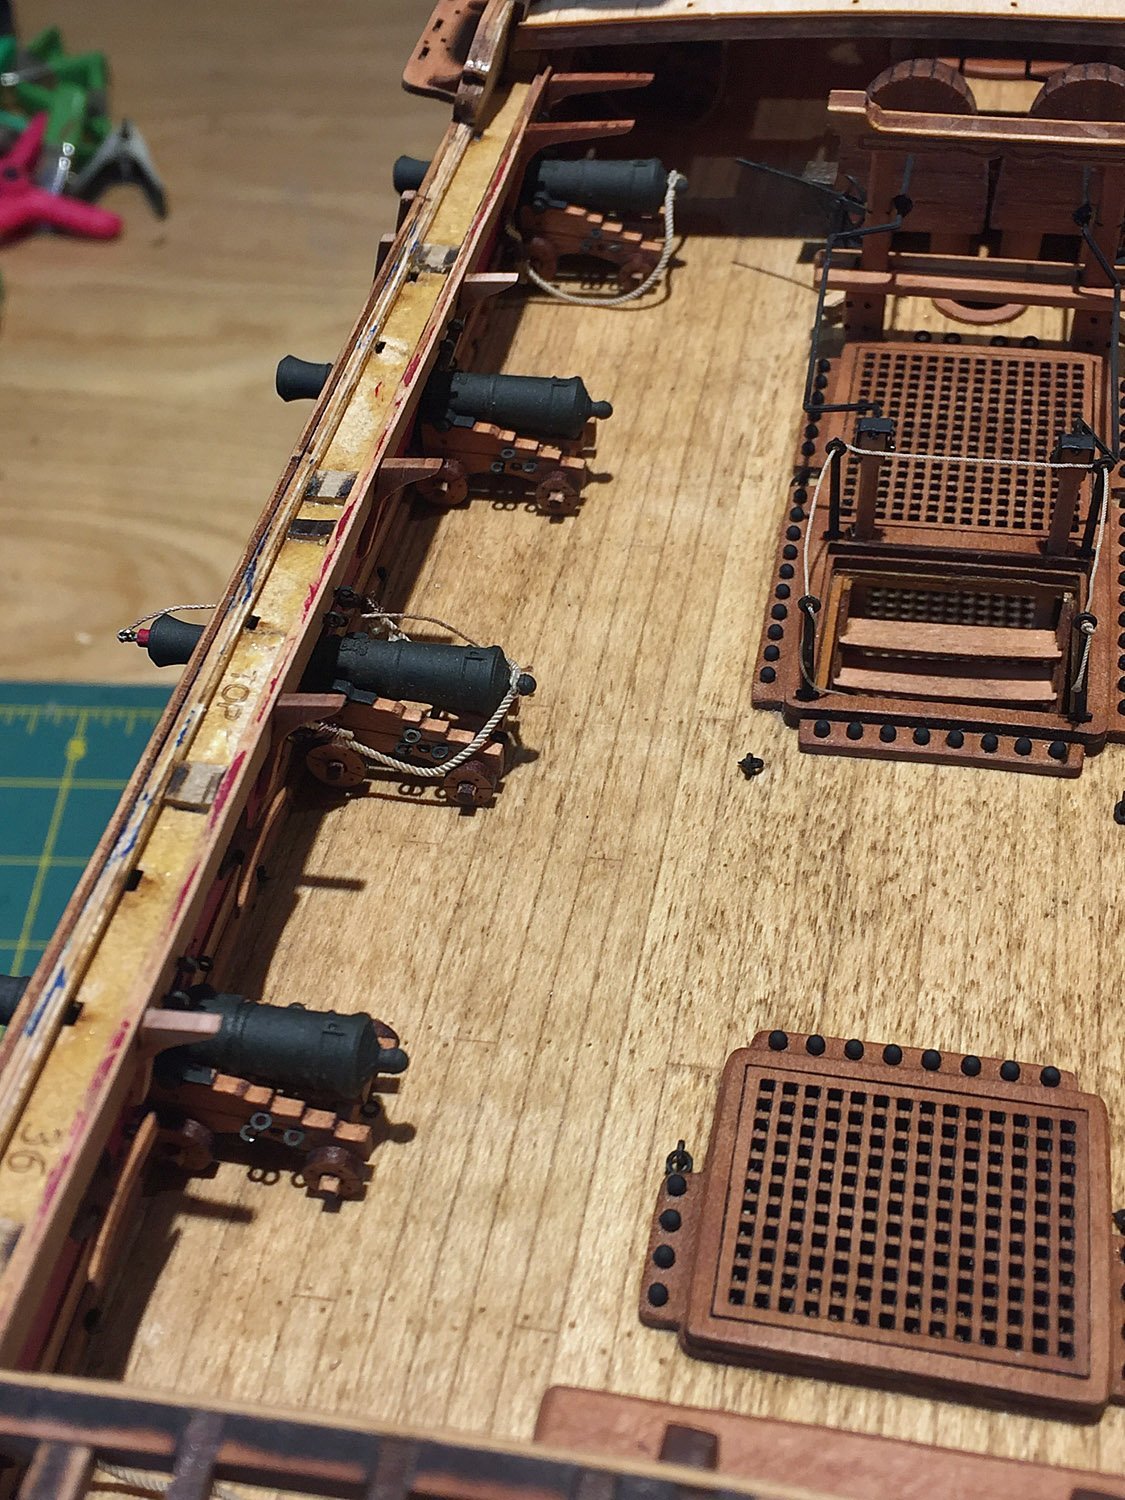
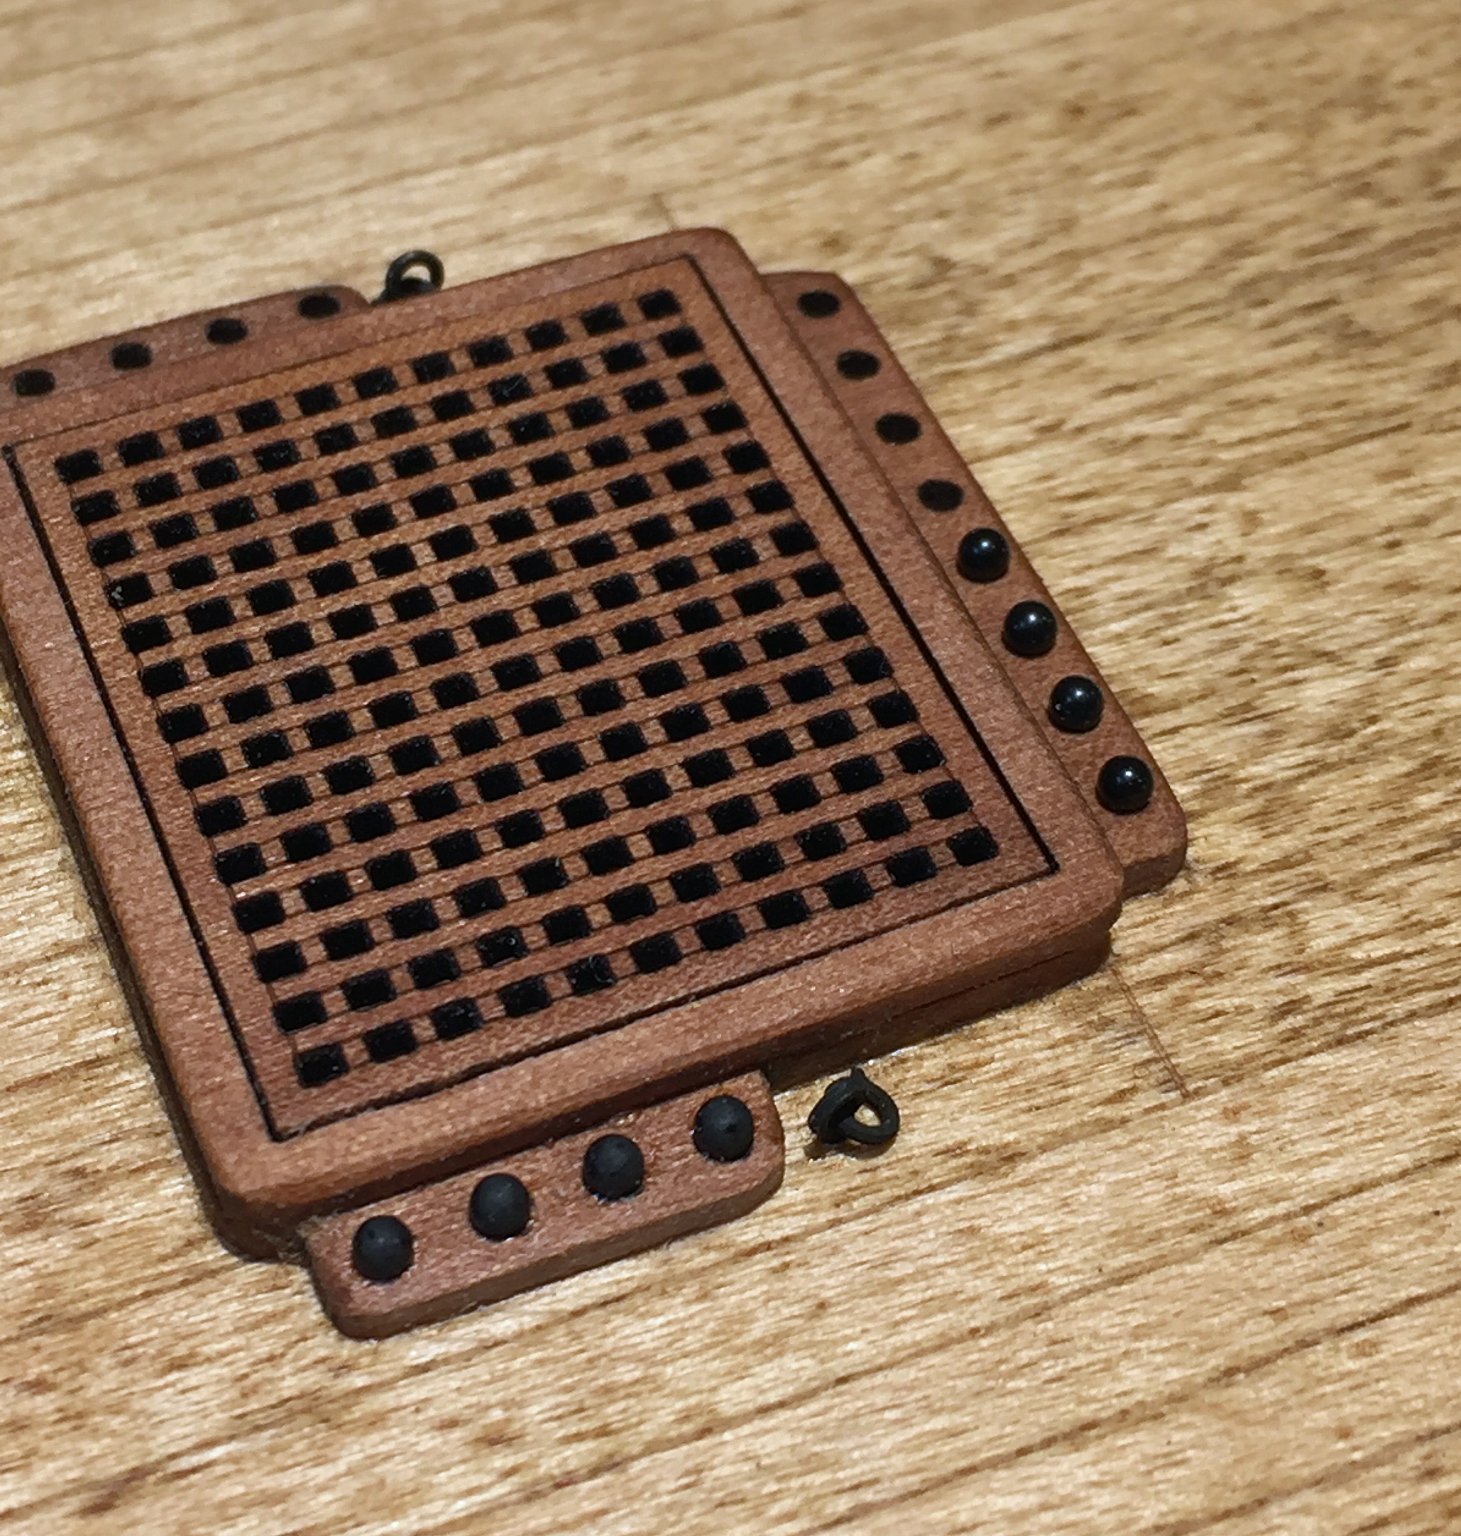
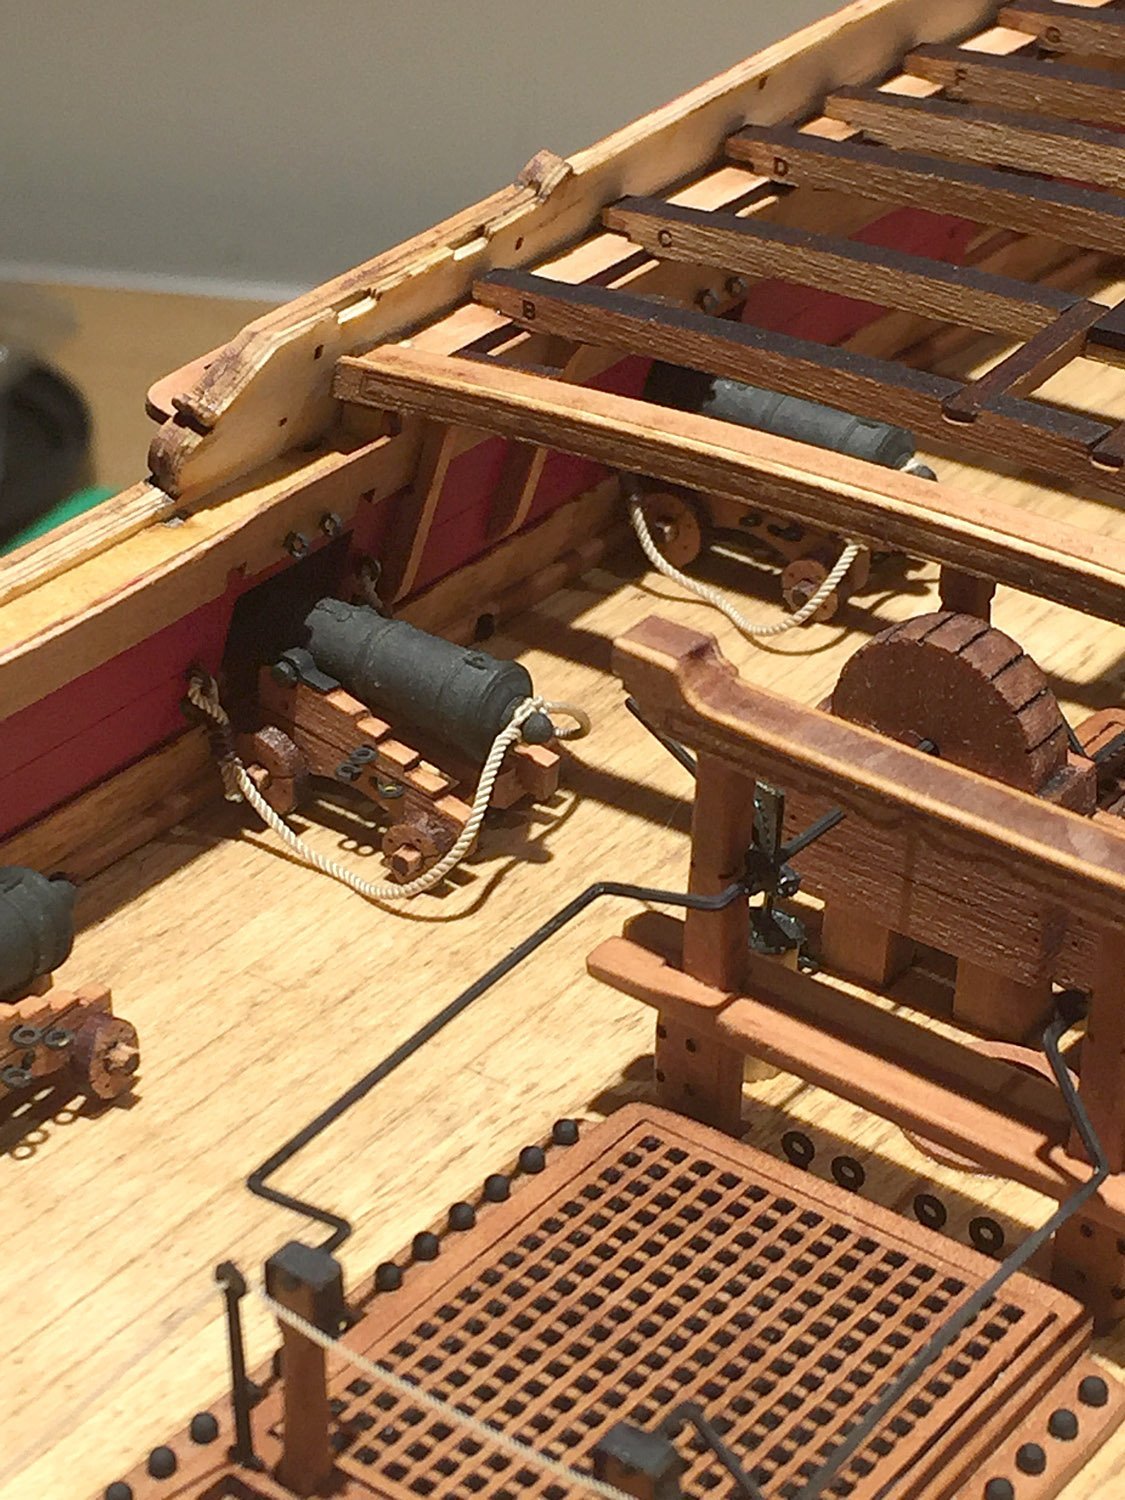
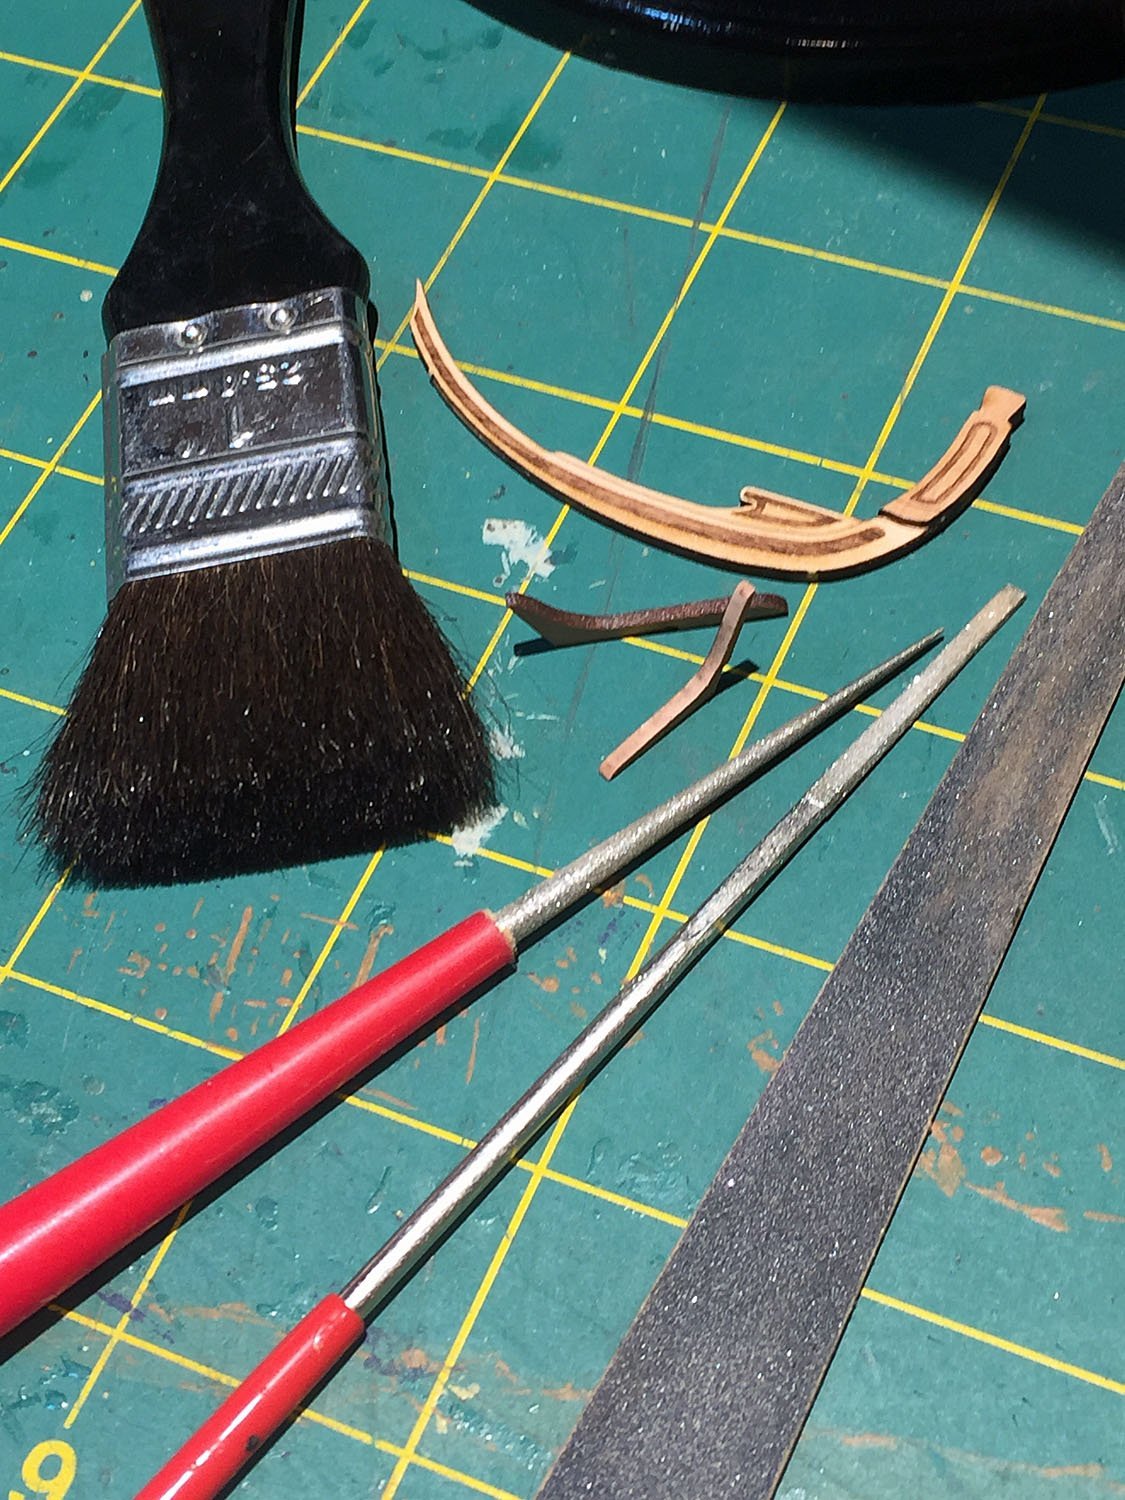
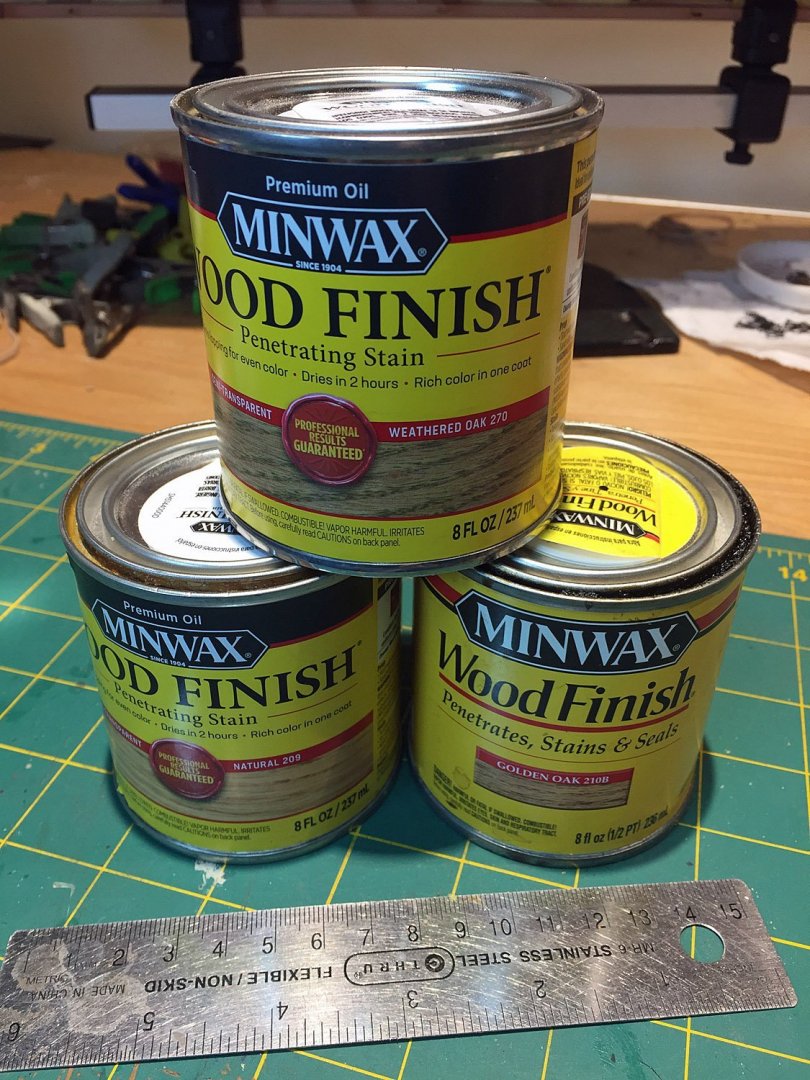
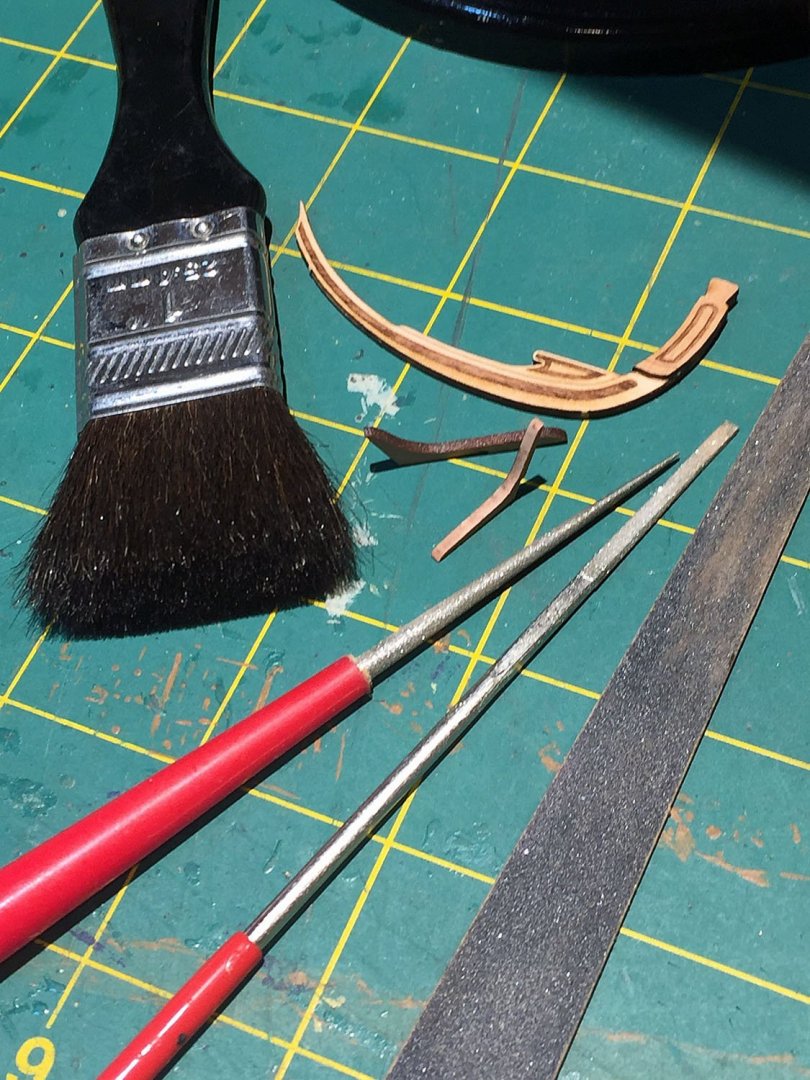
Since I'm playing "catch-up" with my postings I'll mention that these first Build Log photos are NOT SEQUENTIAL. Obviously, I've spent a number of hours getting to point A (the first photo-😁)...and these photos I'll explain, but there may be random "backtracks" as I continue here. The Gratings and the companionway close-up: the purpose here is highlighting the little black beads that simulate cannonballs which are a nice scale-accurate (or close to it) inclusion in the kit's "fittings" box. The little balls were too shiny for me; my 5 yo granddaughter asked me: "Gampy, where did you get those cute little beads?"...uh... Good question, out of the mouth of babes. So I went back painted all of them FLAT BLACK MATTE. Just a tiny touch to each with a small brush. They now look like iron balls and not something random one finds in the beading aisle at Joanne's Fabrics. Not a big deal, but we collectively agonize over minor stuff like this; it's sort of what this hobby is all about- sort of. You don't need to look too close to see the ordnance as they appear in shiny bead black. Next photo, a close-up of deck goodies showing: A. a breech-rigged cannon; B. how I've finished my upper interior bulwarks (with the kit's included spirketting and laser cut deck clamp pieces); C. the hanging knees behind the quarterdeck beams; and D. the pump's iron fittings (also in flat black matte paint to show proper - non rusted - iron) and mid-deck bitts and a partial companionway (with the little "beads"). I am often asked how I get the nice warm look to most of my period models. Nothing unusual here: four shades of Minwax, available at Lowe's. Natural, (my favorite for most quality hardwoods I use and the extensive amount of pear that's included in this kit; Golden Oak for areas that I want to appear darker than the warm pink hue of pear and simulate a more accurate color for oak; Weathered Oak whose name speaks for itself. I used this on this kit's maple, one-piece deck patterns ("patterns" is a general name Vanguard gives to many pre-cut, precision lasered items in this kit). I've applied this stain to the gun deck. I may apply a "second coat" before I button-up everything amidships. A can not shown ( I misplaced it, somewhere...), Chestnut stain. This color I use on my deadeyes and most rigging blocks. I understand chestnut was used extensively by the British navy for this purpose - along with lignum vitae pulleys, both purpose-suited because of their inherent hardness. I'll stain my deadeyes soon, before they get mounted in their iron chains. It should be noted that I paint and stain all my modeling components as I build. I am constantly opening and closing various jars and cans as I build. Simply stated, I make "aesthetic decisions" as I work; these are typically about color of individual component finishes - like cannon balls! I also depart quite often from proscribed building steps for a host of reasons which should become apparent as I develop this log. I need to mention that the build manual and the extensive plans that come with this kit are excellent and generally-speaking, the construction steps are sequenced in a manner that most will appreciate, especially intermediate level modelers. Lastly, the tools I use to remove "char" from all the laser-cut wood in the kit. I've probably spent 60 hours alone (so far) removing "Char."🤯 My tools for this boring, but essential task: lots of emery/nail sanding files I buy at beauty supply stores. They last forever. But I buy new ones often as I frequently wash them and they soften and go limp after a while. Everyone knows there's not a lot you can do with a limp file. When I'm de-charing, I often slap the file on my jeans (don't tell my wife) to unpack the fine sanding dust. Works. But they do eventually need to be taken to the sink. Moving on, two from my set of diamond-encrusted mini-files shown here. The tapered round one is especially useful. Worth the money. My soft, sable hair brush. The brush I continually use on all the various surfaces of the model for clean-up as I build. It is helpful to dust the char off tiny pieces like the miniscule hanging knees shown here. The curved stem piece appears to cast a shadow; actually that's the very dark "char" that needs to be diligently removed. Goodbye Char! And, yes. I did leave it on all my cannon carriage wheels. Good idea, Jim! The manual says this is an option. I obviously agree. More to come....
- 542 replies
-
- 13
-
-
-
- Sphinx
- Vanguard Models
- (and 3 more)
-
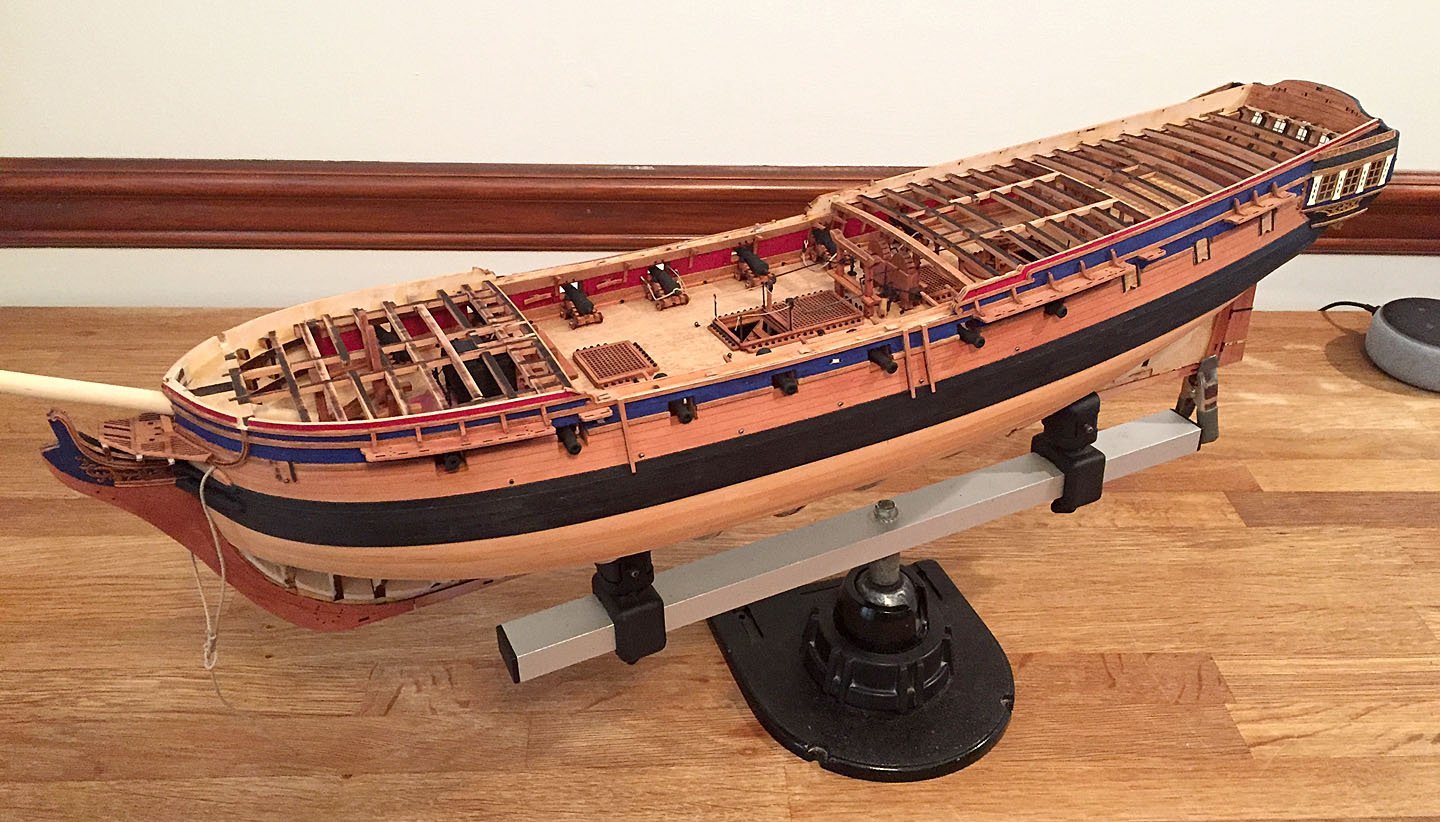
I am starting this Build Log midway in this very interesting and fun project. I'll start with a photo of my overall progress and then there will be the normal, very specific photos about build details I'd like to share with the reader's of this thread. The first thing that I should note is that I am building this model as a sister ship to the Sphinx, HMS Camilla - same era. I have posted an earlier Kit Review of this Vanguard model that covered my early impressions which I can now amplify as well as offer additional insights as I've moved along on my build. I hope the followers of this thread will think it helpful; that is certainly my intention! Here we go...


- 542 replies
-
- 12
-
-
-
- Sphinx
- Vanguard Models
- (and 3 more)
-
Nice work! This is certainly dramatic and the Vallejo liquid gold does drip -😂 No problem, minor blue touch-ups with a steady hand (and a tiny brush) will fix things. I've been thinking about adding the Vallejo gold to the full surround on my stern decoration fascia. It looks especially nice on your treatment. Ron
-
I have decided to create a Build Log for my build of Vanguard's HMS Sphinx, rather than continue to post my photos and comments here - as well as intruding on other's logs with detailed posts. I've got a new set of photos with commentary that I'll post in Kit Build logs sometime soon. This is where all my detailed stuff more appropriately belongs. Thanks for your encouragement guys (and gals), see you there in a few. Ron
-
Jacek, I've lined my gunports since leaving them entirely bare (MDF) isn't acceptable to me. I recall that @Blue Ensign indicated he labored over this task to make the linings fit. He is a consummate über-detail kind of builder, which I do respect. And, I love little details as much as anyone on the forum, however....there is a point for me where this obsession can be OTT. Confession: I lined only the bottoms of my gunports with a scratched piece of pear since this will be easily seen on viewing the model; the cannon protrude and visually occupy much of the gunport and the verticals aren't that prominent, so I didn't bother to line these side areas. The upper lining of the gunports, you ask? Who will to see and inspect this area? I know! Perhaps a ship modeling forensic specialist... Each builder is his own captain, making his ship his own. That's my plan and I'm sticking to it!😂 Ron
-
Jacek, Yes, I believe the blackening I use (in the U.S. = Birchwood/Casey brand) makes the P/E better hold an acrylic or solvent-based paint. I consider blackening like a "primer" coat. In some cases, the blackening alone is quite adequate for the task (especially very small eyebolts, rings, etc.); it does rub off but it still removes the curse of having "golden" fittings sprinkled about the model: Not kool. I'll sometimes even add a matte black paint to these small items to simulate iron. I'm doing the chains now and I'll blacken all the P/E pieces. Then, to make this task manageable, I'm "stringing" all the pieces onto a thin wire so I can spray paint them evenly with either my airbrush or a spray can of matte black. Sure beats painting each one of these complex multi-part assemblies! This will create a consistent look to all these very prominent fittings. I did this with the chain and hand pump P/E and I believe imparts a proper "look" to these on-deck items. On another matter, I've also scratch-lined my gunports; removing all that char first was a Sh$#$& task! I'm somewhat surprised that Chris didn't provide some laser pear for doing this. A minor complaint, but applying red paint to fix this really isn't a good solution - particularly for someone who doesn't want to paint all the bulwark items in screaming red. My preference: less is more in this case, like my removal of the unnecessary extra P/E decs on the stern. I use the Citadel washes quite a lot (in conjunction with appropriate base colors). Ciao, Ron
-
Jacek, I'm building the Sphinx kit too, but not posting a Build Log per se. I do have photos and notes in the Kit Review Thread and I'll be posting additional photos as I move along on my build. You mentioned seeing some different treatments to the decorations for this model. These photos show my alternative treatment to some of the decorative pieces in this kit. The resin cast piece at the stern spoke to me: "GIve me lots of interesting colors!" The headworks/stem P/E pieces are painted with a base coat of ochre and then given a wash (the same Citadel Seraphim color per previous post here) to darken the nooks n' crannies. Acrylic paint, both. This treatment is to specifically simulate "carved wood," not the trompe l'oeil (fools-the-eye) embellished style of ornate painting. I considered doing this with a paper appliqué, but decided that at 1:64 scale, my hand couldn't do this approach justice. The very small upper foc'sle bulwark decorations have small touches of a deeper golden bronze color that help to make these more interesting to look at. Since I posted the stern photo here I have removed the two upper counter decorations (on either side of the "badge") and refinished the black. These were too much to my eye, OTT, particularly after painting the upper fascia the way I envisioned it. My model (built as sister ship HMS Camilla) will have her name on the piece of .o2 thin pear that is now shown blank. I haven't decided on the color yet, but it will likely be the same blue hue I've used with creme or white lettering. Part of the fun with Vanguard's excellent kits is the many things one can do to "customize" - personalize their model. Hope these stimulate some additional ideas! Ron
-
Clare, Thanks for the forum link! Just read through it. Lots of good info. As others have commented, this new WoodyJoe kit is very tempting! I will also be very interested in your impressions once this new kit hits your doorstep... Domo Arigato! Ron
-
Congratulations Tom on your winning BOTH of the NE Show awards! Your model is stunning, beautiful. You've done an excellent job on the case too. Good to see you personally at the show. Best, Ron