HOLIDAY DONATION DRIVE - SUPPORT MSW - DO YOUR PART TO KEEP THIS GREAT FORUM GOING! (Only 72 donations so far out of 49,000 members - Can we at least get 100? C'mon guys!)
×


realworkingsailor
-
Posts
3,268 -
Joined
-
Last visited
Content Type
Profiles
Forums
Gallery
Events
Everything posted by realworkingsailor
-
 The other method I just thought you may wish to try, if the “chain” is able to be well supported in the frame, use a straight edge and repeatedly score with your hobby knife (alongside the length of the chain) across the tabs holding the links to the fret. A few passes with light pressure should eventually pop the links free. Andy
 -
Something like these: https://www.amazon.com/Stainless-Plastic-Cutting-Tweezers-Jewelry/dp/B01MZ6621X Only perhaps hardened for metal work? I’ve seen a few pricy ones for jewellery makers, but there’s got to be something “good enough” for hobbyists that won’t empty the wallet. Here’s a set designed for electronics: https://www.tdiinternational.com/product-category/hand-tools/tweezers/cutting-tweezers/ Andy
-
SS Keewatin - last Edwardian passenger steamer
realworkingsailor replied to JKC27's topic in Nautical/Naval History
I think there are a few good advantages to relocating to Kingston. Primarily the location. The town is right on Hwy 401 (the main road between Toronto and Montreal), so it’s much easier to access for a lot more people. The Keewatin will be part of an actual museum (which, I think, has a couple of other vessels in its collection), rather than a random artifact at a small port few outside the area have ever heard of (although to be fair, Port McNicoll is closely tied to the ship’s history). There are also a large number of other museums and places of interest in the immediate area, so people not necessarily drawn to maritime history might be interested in visiting (“Hey, there’s this other museum just down the road, let’s check it out”). And, for what it’s worth, there is easier access to dry dock facilities in either Hamilton or Port Weller, when necessary. Although the ship should be good for a while, given that I’m led to understand she will be dry docked in Port Weller prior to being put on display, (attention people in the Niagara/Welland/St Catharines area(s), there will be photo opportunities!). Andy -
But if you did, you wouldn’t have the extra parts for your “spare parts” stash! I have hoards of lost-wax and PE brass, plastic, resin, and laser cut wood fittings and whatnot from my model railway efforts (not to mention a “scrapyard” full of locomotives and rolling stock). All from either projects that didn’t quite work out or from ideas for future projects that haven’t yet materialized. I could probably restore and super detail one or two of those donor locomotives without spending another penny (provided I find the right inspirational subject matter). You’ll find a good home for those seats! Andy
-
Nice to see that, although it looks like they’re not sure which version of the aircraft they want to display. Built as a Mk X, from the factory it wouldn’t have had the long over wing windows, but it would have had the triangular waist windows (for an observer/gunner). It was later converted to a Mk T10 training aircraft (I believe specifically for navigation training), and the over wing windows were added (and the waist windows removed). Seems fair enough, but at the time of conversion, they also removed the nose turret, which the restoration seems intent on replacing (according to the article). 🙄 Andy
-
Just a thought, is it possible the blue is similar (or identical) to the blue in the French tricolore? https://en.m.wikipedia.org/wiki/Flag_of_France Andy
-
Very, very nice! Well done! Andy
-
There is a replica of an earlier model Caudron racer: Is that closer to the blue you’re after? Andy
-
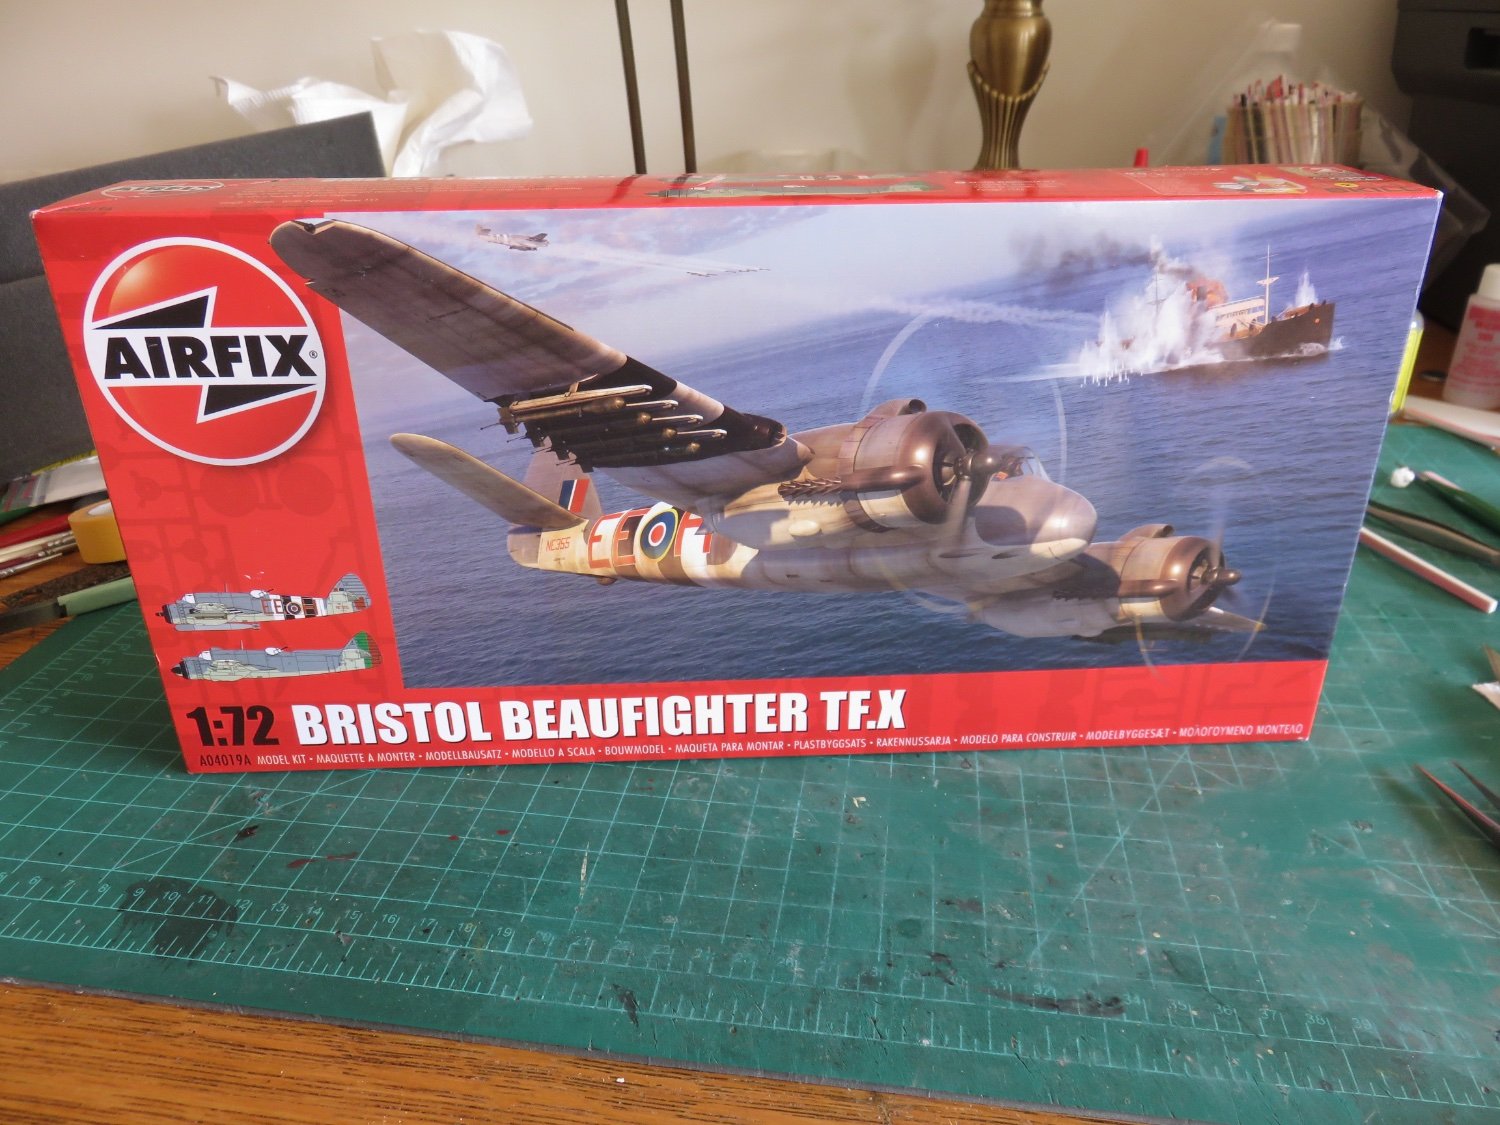
So, I’ve run in to a little frustration. (Not with my tiffy, though. It’s safely on the shelf) After closely examining the parts of my recently acquired Beaufighter kit, I decided that a little upgrade was required in some areas. Namely the cockpit details and the engine exhausts (and the wheels too, but only as a bonus, the kit wheels are okay-ish). So I went hunting around for what was available, I already have the Yahu instrument panel, but I found the resin offerings from CMK, especially the cockpit set, look really nice. This is where things get annoying. While I’ve been able to find CMK detail sets all over the place, I haven’t been able to find a hobby retailer that offers a decent price on shipping (and has the item in stock). Squadron hobbies has all the items I want in stock, but for a $23USD order (of small detail parts), they’re asking $24 in shipping. Uh.. nope! Hannants: same thing (although their quote was in Canadian $) Special Hobby: ditto (back to USD, or EUR) BNA: out of stock ($11.50 est. for shipping, though, so if they ever get back in stock…) Sprue Brothers: no stock (although a more expensive Eduard PE detail set would have cost the same after shipping) Wheels and Wings (in Toronto): no stock Ebay: Nope. Not even. For what it’s worth, I’ve ordered larger quantities of detail parts from Chuck, but the shipping cost was about $10 USD (sometimes less). I don’t know if I should be frustrated with the hobby shops themselves, or the postal services…. If anyone has any suggestions or ideas, that would be great. I would like to up the detail level for this kit, but I really can’t justify the shipping costs. Maybe I should just pour another Scotch and percolate for a while…. Andy
-
You’re gonna hate me: https://www.sunwardhobbies.ca/italeri-r-wessex-uh-5-helicopter-facklands-40th-anniversary-1-48-scale-2720 Sorry… 🤭 Andy
-
Sooooo….. https://uk.airfix.com/products/fairey-gannet-14-a11007 ??🤔 😁 Andy
-
Hmm… I don’t have a subscription, but I have access to read the whole article. Must be something connected with the IP address, it might not like “foreigners”… 😕 Andy
-
Take heart, film photography is not as dead as you may think it is: https://www.theglobeandmail.com/life/article-film-camera-photo-comeback/ Just like vinyl records, there is a growing niche segment that is spurring a revival of sorts. Andy
-
Not necessarily. It doesn’t look like that derrick/crane was designed to pick up particularly heavy loads (probably just enough to avoid having to hand-bomb items from boat to warf). It does, however, look like it was designed to rotate as a unit, so any stays or braces would only impede its use (unless the mast was way taller) Andy
-
I think pretty much all modern Airfix kits have Cartograf decals. If it’s not indicated on the sheet, the Cartograf logo should be printed on the side of the box. Andy
-
People with money….. yeeesh… 🙄
-
The CG question/comment is a bit of a red herring. If the CG was so high that it alone caused the ship to topple in while dry dock, there’s no way that ship should ever even have been allowed near water to begin with. As an engineer I’m sure you already know that an object on solid ground will not topple over unless its CG is forced outside of its footprint on the ground. For anyone else who’s unsure: if you consider a transport truck (or lorry, whatever your personal terminology preference), regardless of how high the load is, the vehicle remains stable provided the centre of gravity remains somewhere between the outside edge of the tires (tyres). In the case of this ship in dry dock, correctly shored (or blocked) the CG would have had to shift laterally, beyond the ship’s side (or outermost row of blocks) for it to topple. If the shores were fixed to the ship’s side, the CG would have to shift beyond where the shores meet the dockside. I’ve seen the docking plans for the dry cargo ships I’ve worked on. Most of them just show the required block placement, the drain plugs for the various tanks, as well as other various inlets and outlets in the hull (pump intakes, etc). I don’t recall seeing much on shoring, as it has become an extremely rare form of dry docking. For what it’s worth, even on an extremely shapely hull form, like the Petrel, there was enough of a flat bottom that an outboard row of blocks could have been placed (even if it was only in the midship area). She didn’t specifically need to be dry docked as she was. I agree, though, that it will be interesting to see what the MAIB has to say. Andy
-
Interesting video. Also interesting that the dry dock in question uses the older method, keel blocks and shores. If the vlogger is correct in his assessment, it looks like a lack of shoring is probably the root cause of this incident. Not sure what their calculation criteria are, but that would highlight a failure to take into account wind loading on the superstructure of the ship. That helipad forward could potentially catch a lot of wind depending on how turbulent it was around the bow (updrafts?) I’d be careful about some of those video feedback comments, I skimmed through a few and I have less than complimentary opinions about more than a few of them. Generally speaking shores are used in compression, as it does not require fittings to be welded to the hull (costly and time consuming). Shores are more commonly fixed to the hull if it’s a long term dry docking, think museum ship. Andy
-
Nicely done! Can’t say that I see any blemishes, but it’s your eye that matters most! Kinda nice to see that even some Eduard kits do require a little bit of extra tinkering too! Andy
-
I’m not sure, but if you are looking to make a version with the visible aerials, you might have to also look at a conversion kit for a flat tail. The Airfix TF Mk X has a dihedral tail, I believe the earlier marks (Mk I, Mk II) had flat tails. Edit: the dihedral tail was introduced with the Mk VI variant. Not a big deal, there are conversions for the tail: https://www.scalemates.com/kits/aml-amla-72-050-bristol-beaufighter--1348014 Or a Merlin version (which does include aerials): https://www.scalemates.com/kits/cmk-7489-beaufighter-mkii-early-type-conversion-set--1403300 https://www.scalemates.com/kits/cmk-7490-beaufighter-mkii-late-type-conversion-set--1415240 And there is a PE set for just the aerials: https://www.scalemates.com/kits/owl-owlpe-72001-radar-aerials-al-mk-iv--1011011 Andy
-
Thanks! The Airfix Beaufighter kit contains the parts for the “thimble nose” version (which I think is the radar version you are referring to). The included decals for that version are of a Portuguese airplane (in addition to the RCAF markings), but there’s always the aftermarket. Andy
-
Thanks EG! My railroad modelling is in 1/87, so this 1/72 stuff is not too bad 😁 Thanks Dan! I’ve read through Beaufighter the instructions, I see exactly what you mean. Almost looks like if you were to look at it the wrong way it would crash like a house of cards. Might have to embed some brass wire between the more critical parts to keep things secure. Andy
-
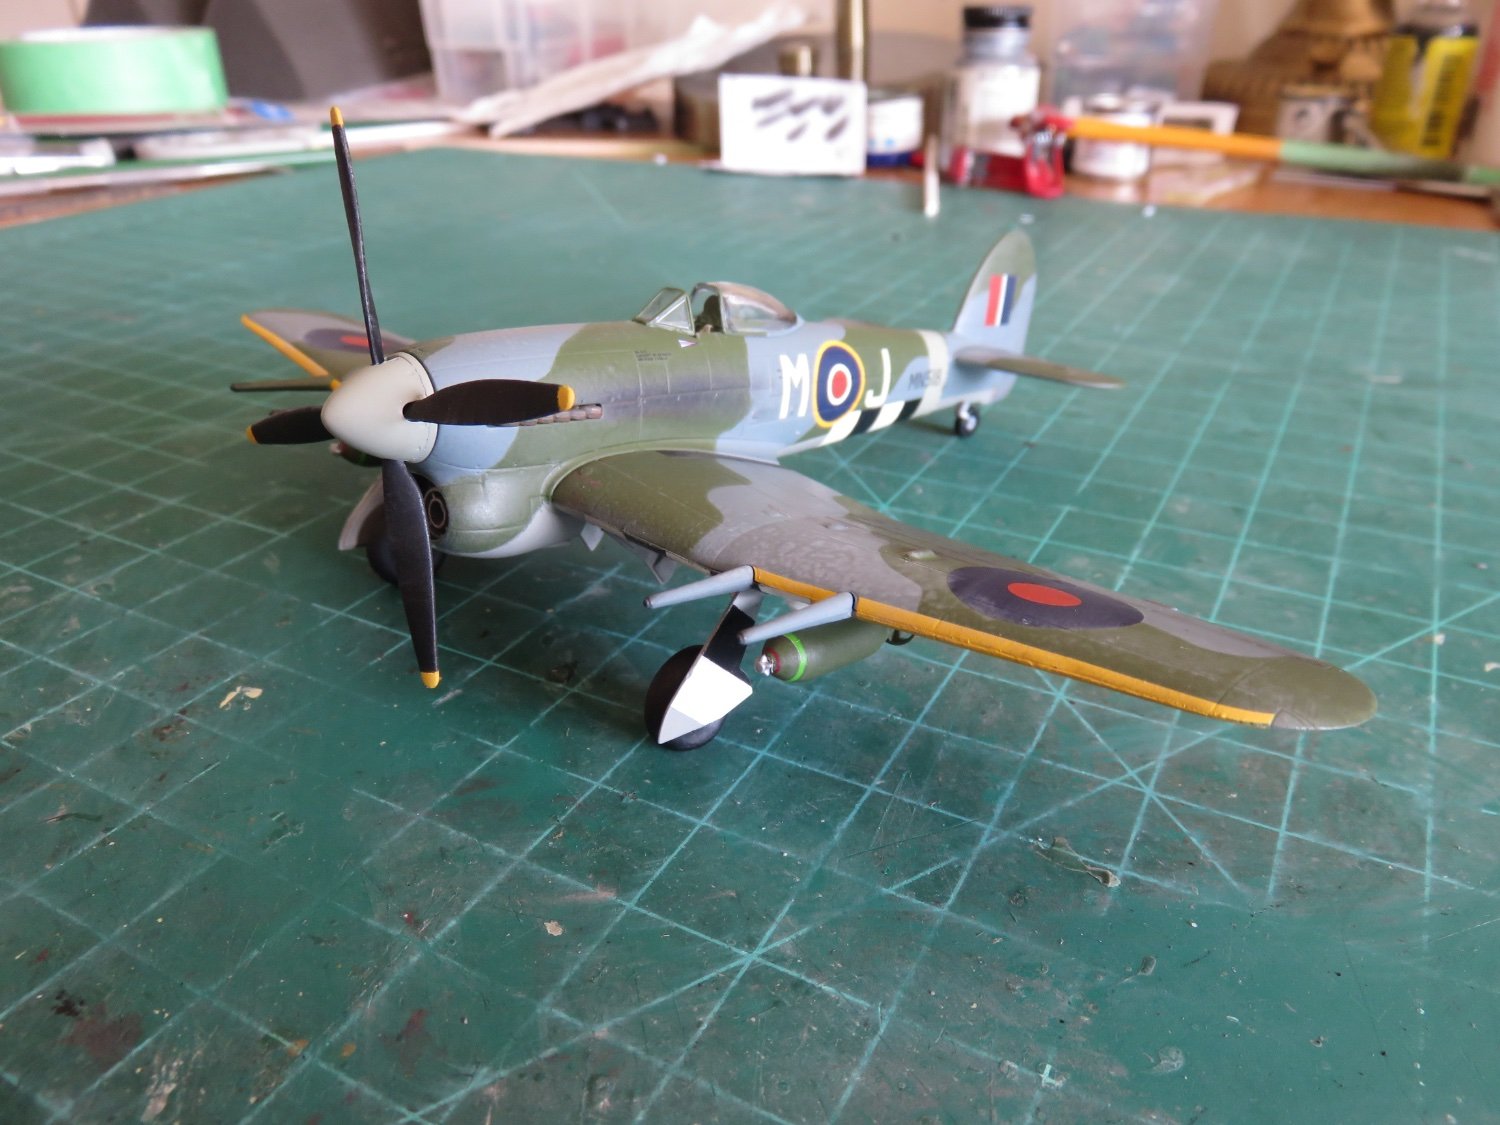
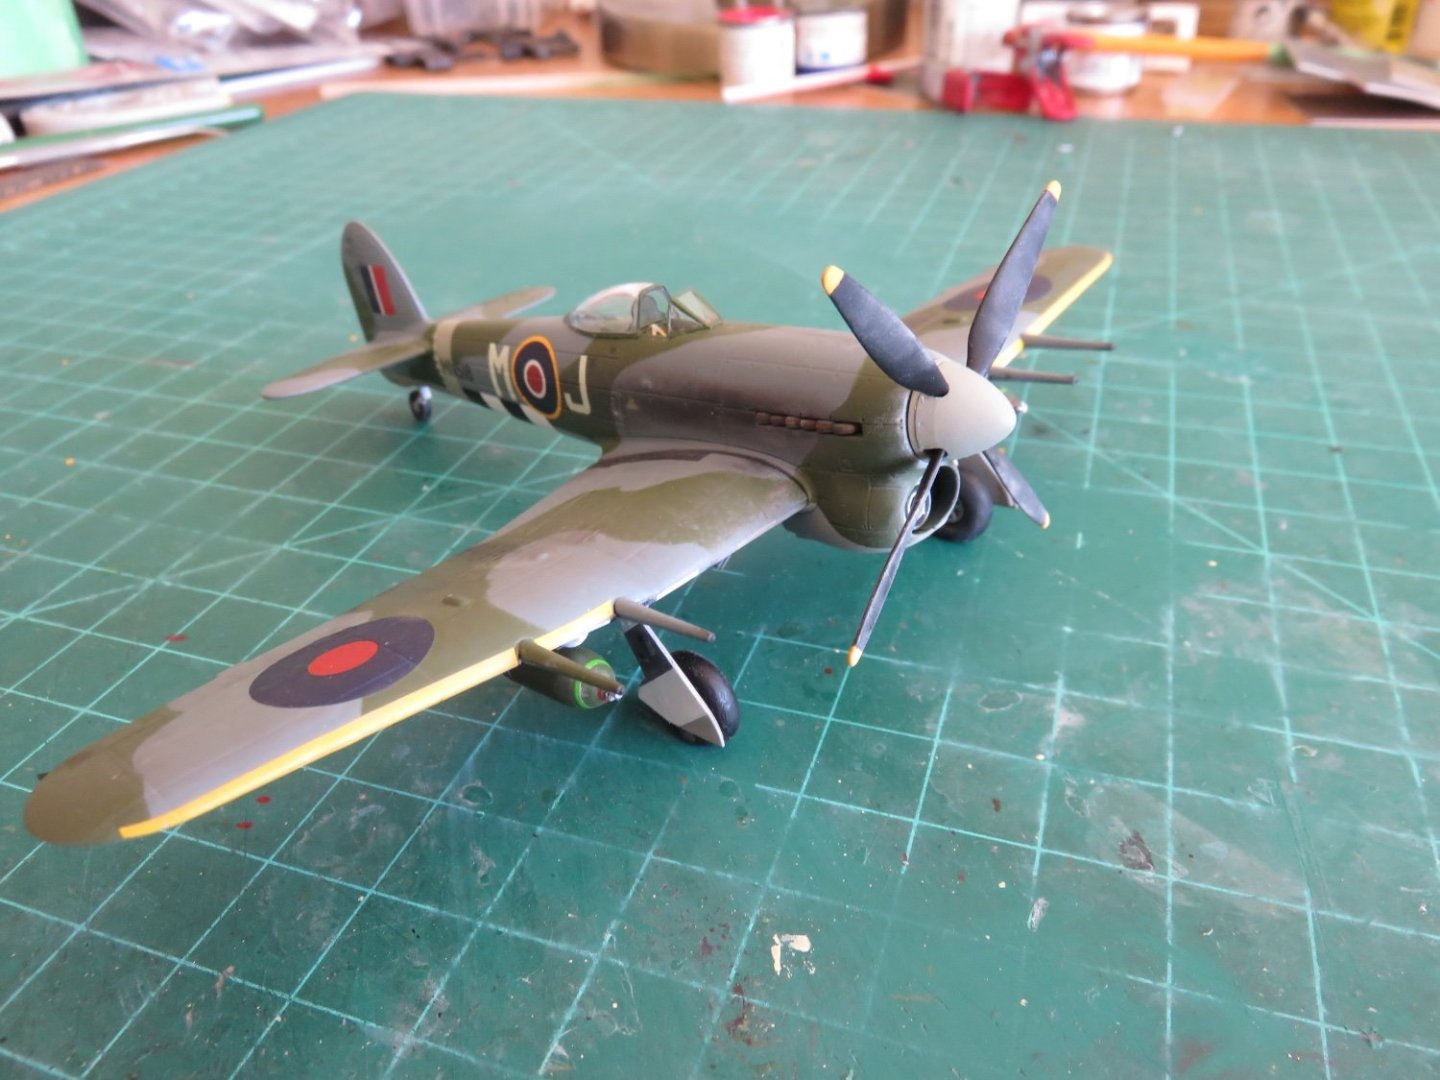
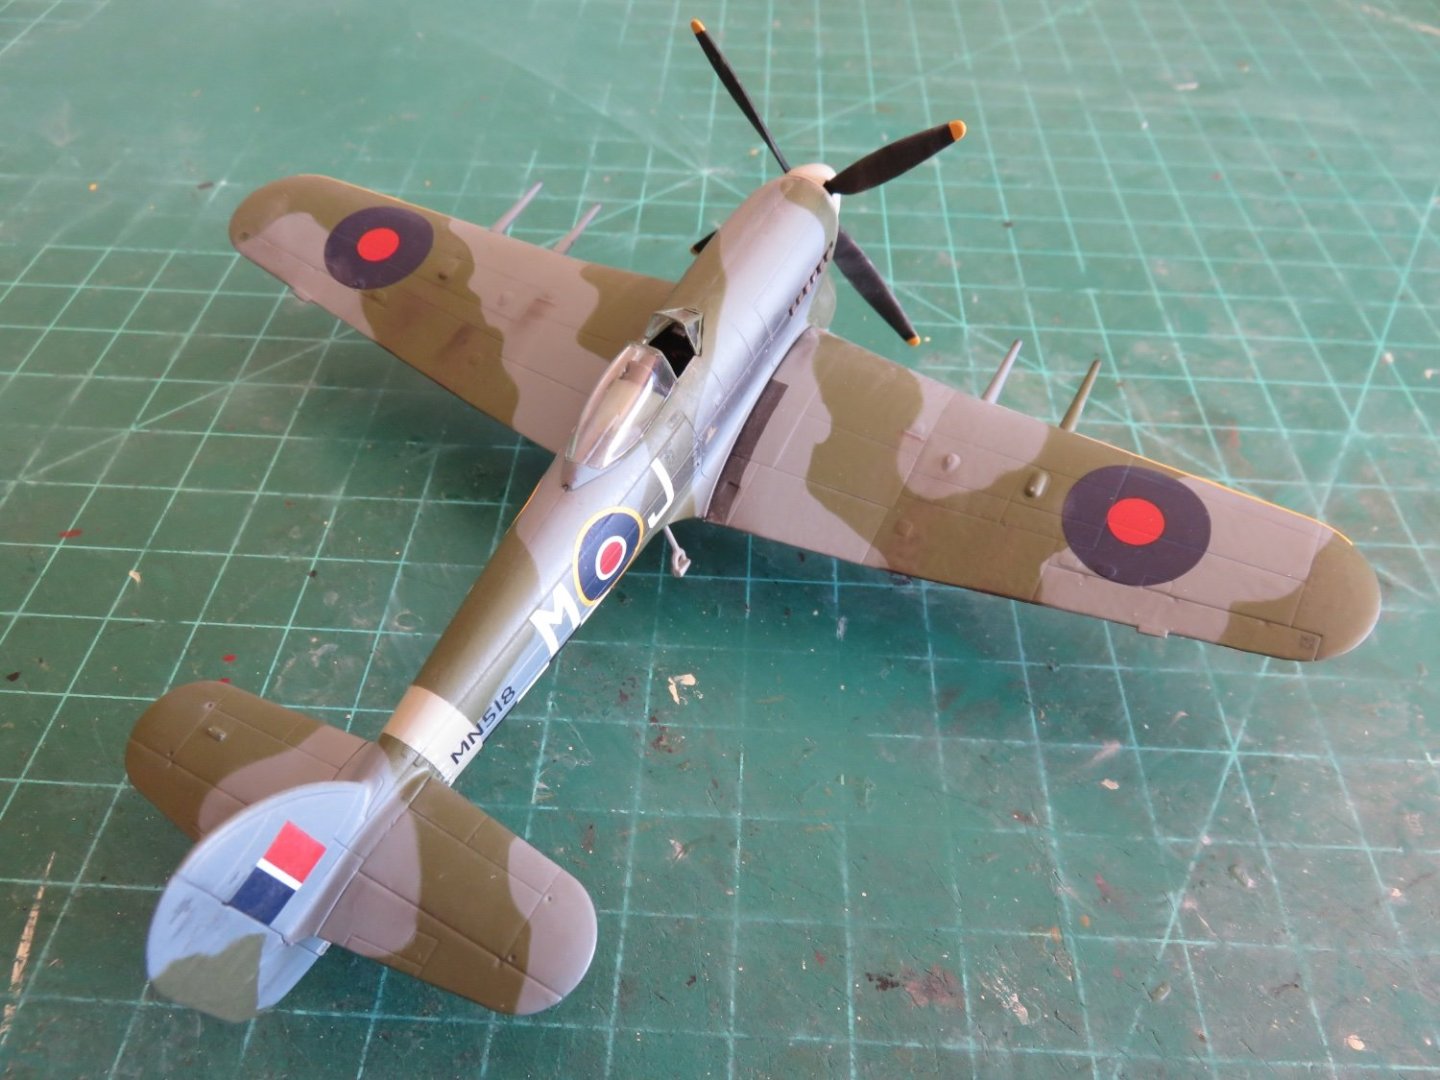
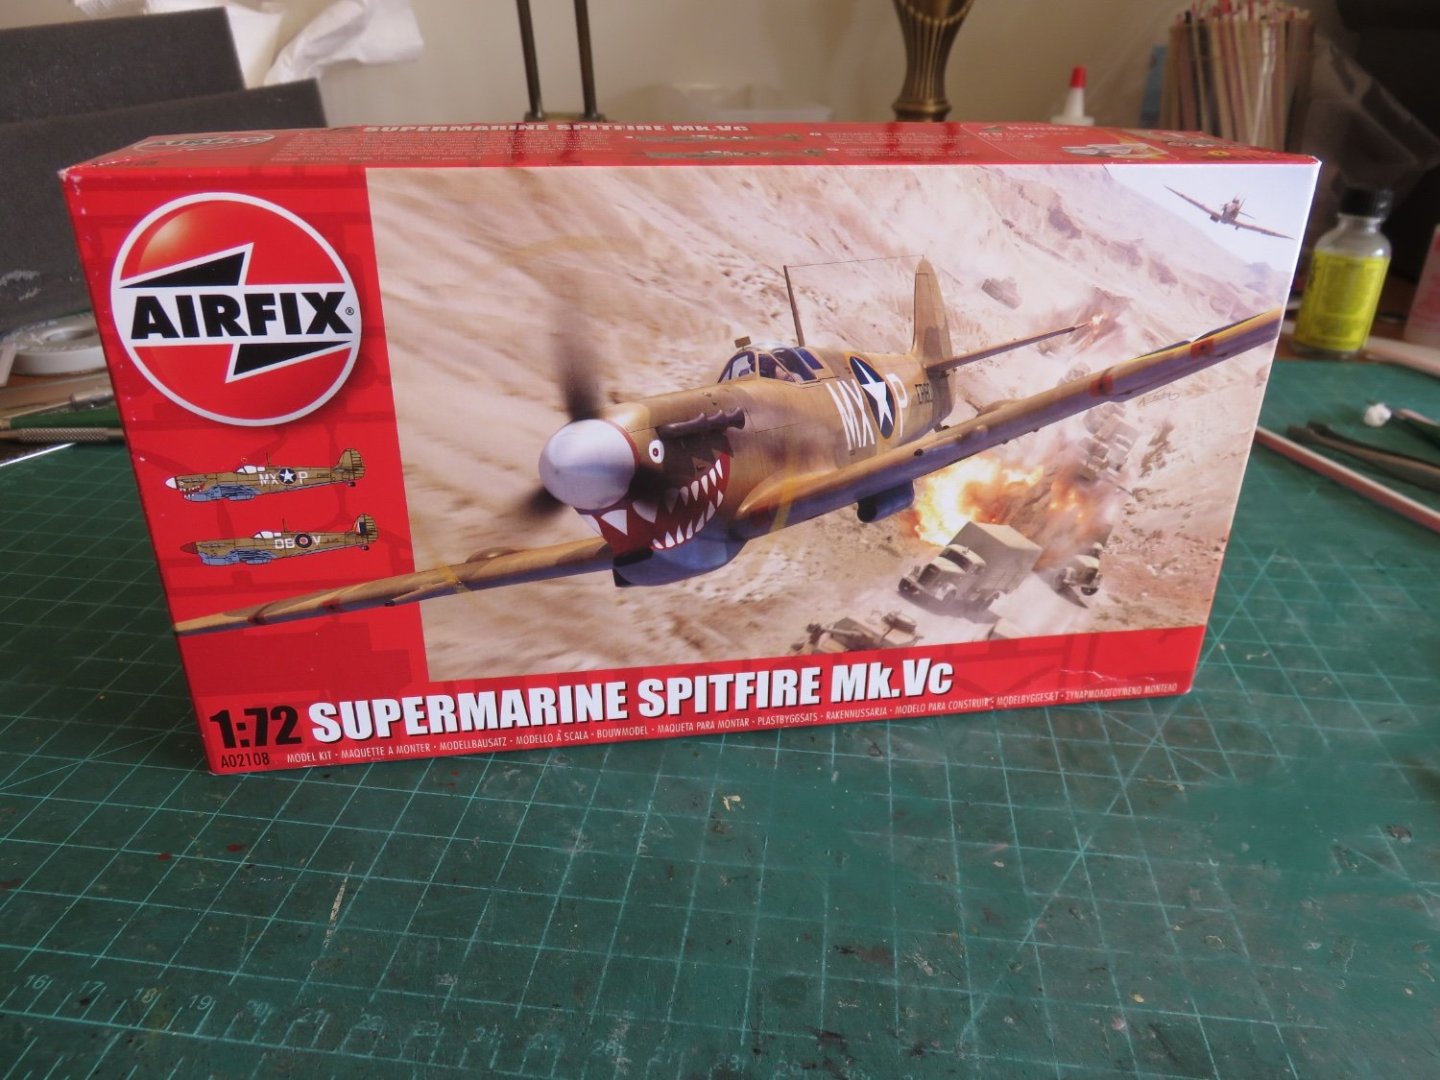
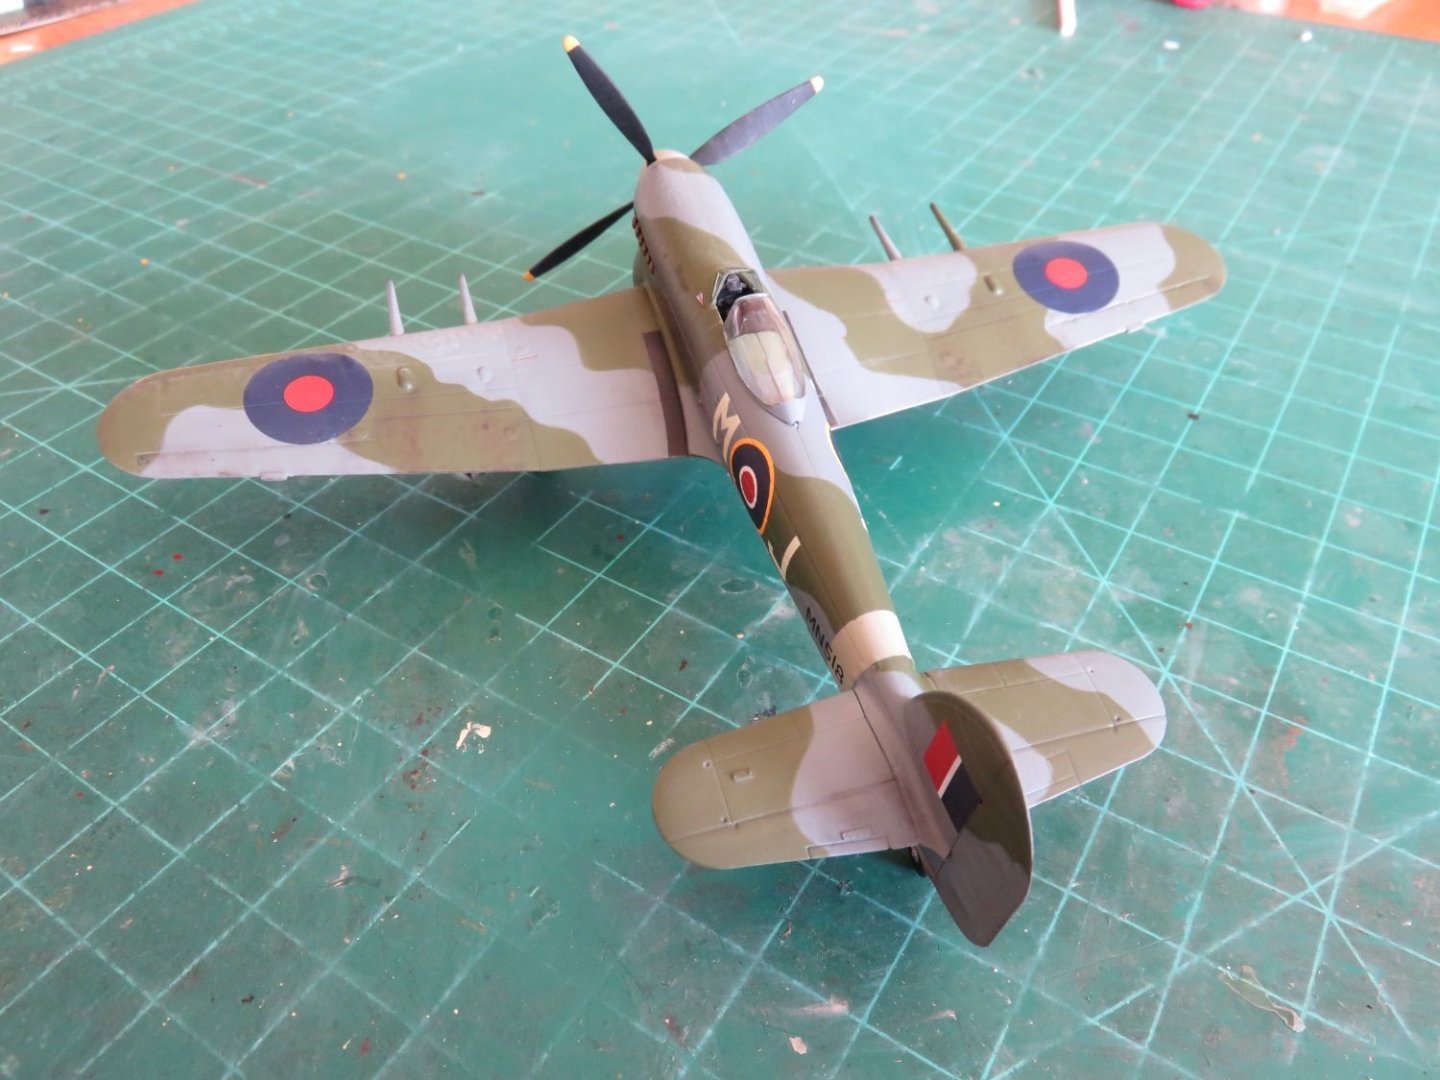
Thanks everyone for following me on this build, as well as all your kind comments, intriguing insights, and generosity. I think its time to call this one finished. A little bit more weathering has been added to the leading edges of the wings, especially in way of the propellor, where the prop wash would kick up sand and grit. I've also dusted some more grime along the propellor blades. The leading edge fade came out nicely on the underside (I think). Finally, a little head to head with the Typhoon's predecessor. I have a couple more WWII planes that have found their way into my stash. I'm not sure if I will get to them this building season, or whether they will turn up in the fall. The weather is beginning to warm up and there's a ton of outdoor work that has been left to pile up while I've been recovering from my collarbone injury back in January. In no particular order, I managed to get a Spitfire Mk Vc, about which there was some discussion about replicating one of George Beurling's planes from Malta: I've read mixed reviews about this particular kit, mostly surrounding some potential issues with the fit, particularly there is the potential for some considerable gaps at the wing root area. From what I've seen in various assembly videos it's not an insurmountable challenge to overcome with a little modelling skill and ingenuity. I've also picked up a Beaufighter TF X: This one comes out-of-the-box with RCAF 404 Squadron markings. Since I didn't get to do a rocket firing Typhoon, this will be a good substitute. Again, in which order I attack these builds is up for consideration. I need to look at aftermarket decals for the Spitfire, as the kit supplied lettering doesn't contain any of the letters I would need for any of Beurling's more well known planes (BR323 "S", BR301 "UF S", EP706 "T L"), I know Xtradecal does make a "Spitfire MkV" set which does include lettering for BR323, I may piece this one out of some of their generic lettering sets to keep options open. For the Beaufighter, I've already purchased a replacement instrument panel (that came along with the panel for the Tiffie), but otherwise there's not much to do with that kit other than build and paint. All in all, I've enjoyed building these little 1/72 Airfix kits. While they don't necessarily have the most detail, or a large part count, they don't take an inordinate amount of time to build and paint, but they do allow the builder to reach that "done" stage in a satisfying amount of time (which really only serves to further the model building addiction, but in a good way). Once again, thanks to all who have been following along, offering such kind compliments, and contributing with your knowledge and ideas. Andy


- 146 replies
-
- 11
-

-

-
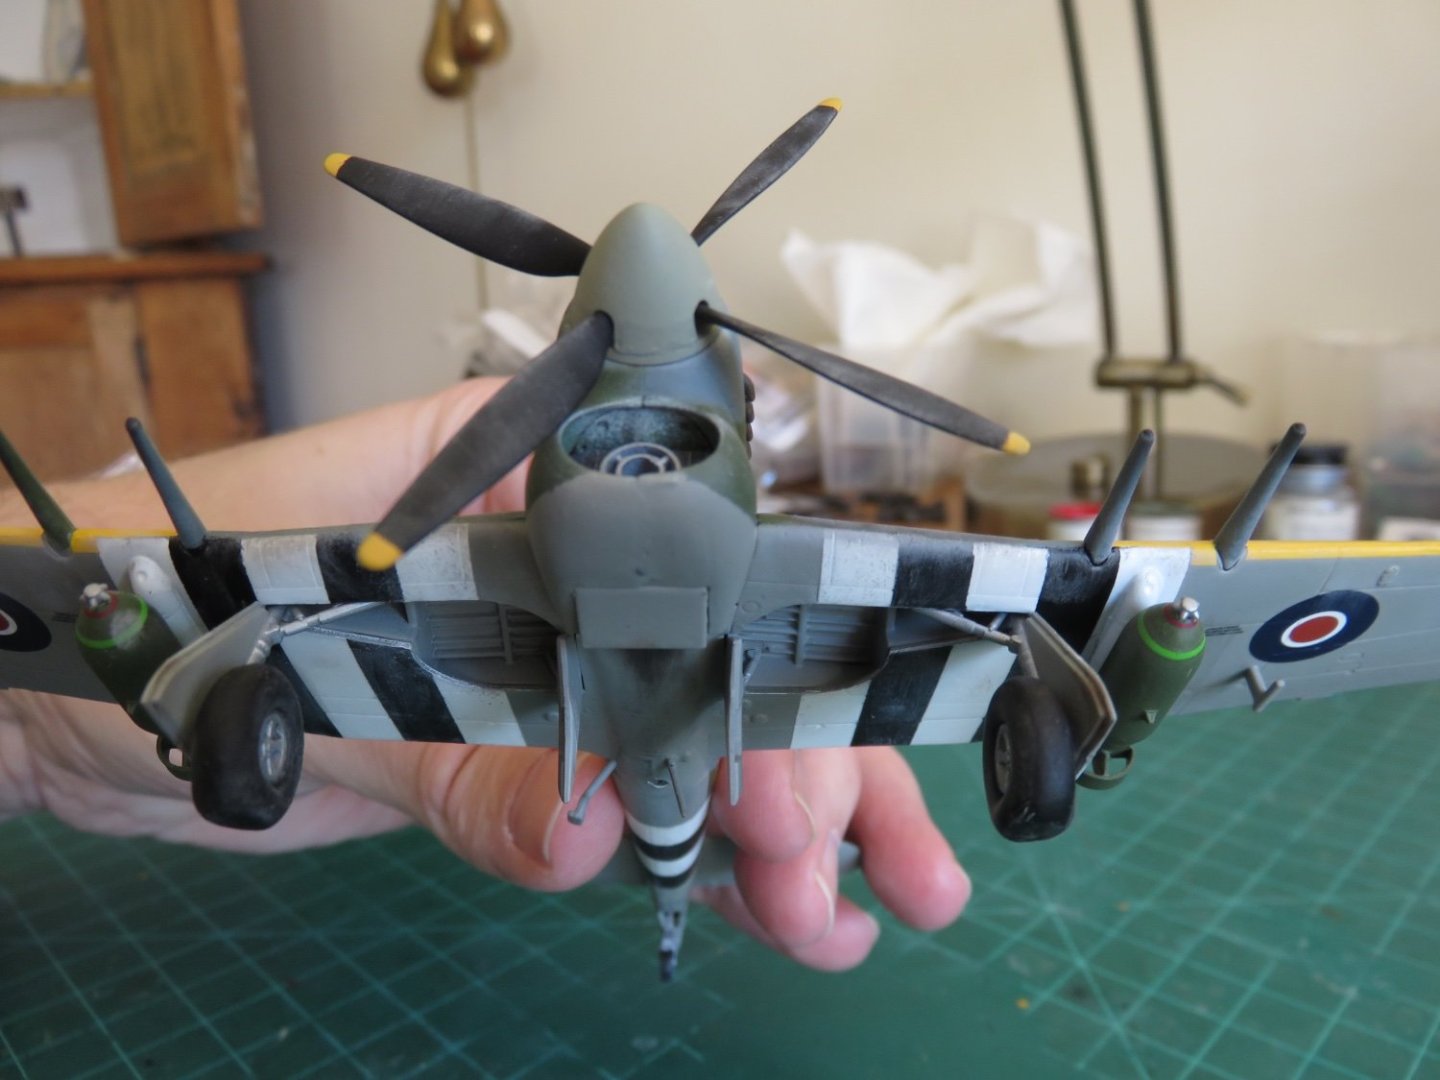
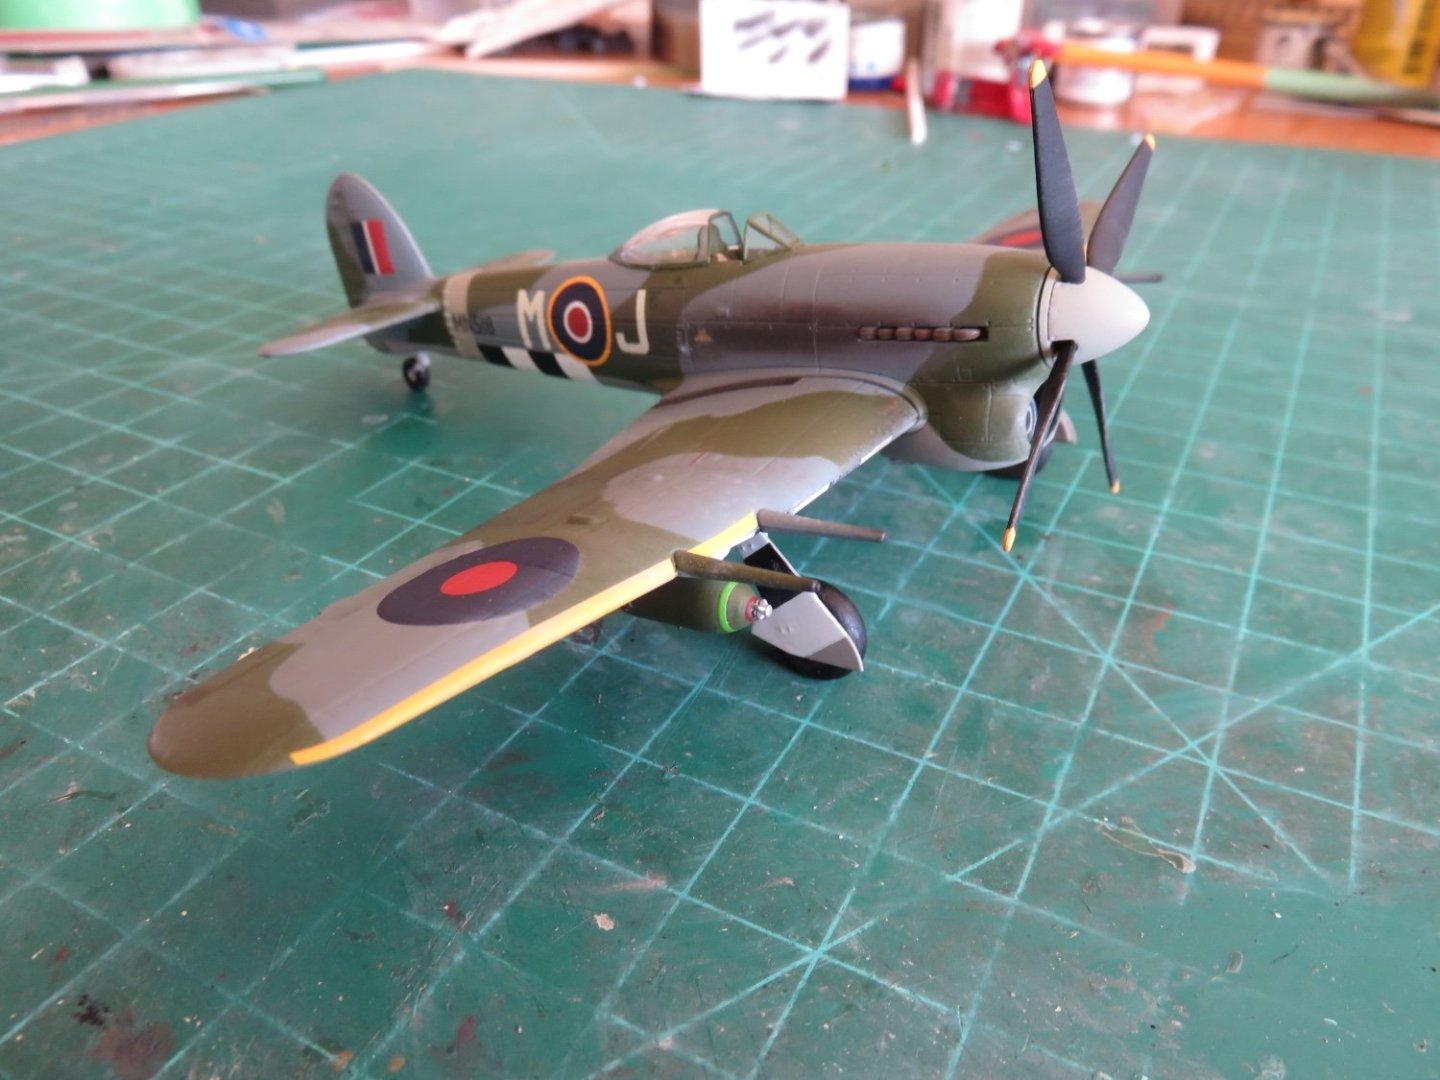
Getting near the end. Final assembly consisted of adding the canopy and propellor. The fit for the latter is quite snug and shouldn't require glueing. All the better to ensure the propellor spins freely. The canopy was posed in the open position, but prior to glueing I dry brushed some silver/aluminium along the top edges of the cockpit, to represent chipped/worn paint in the area where the canopy (and clothing, and hands) would rub. It's hard to see at this scale, but at the right angle, there's a satisfying glint of shiny "metal". I've also lightly dry brushed some silver on the leading edge of the prop, I may have to add a touch more. I have since begun weathering using a variety of pastels from Pan Pastel. They're easy enough to use, and if you have a clean applicator, you can "erase" any mistakes. So far I've added soot and other streaks around various likely areas such as the exhaust and radiator outlets, as well as around the gun bays and ejector ports (although one port is hidden in a black stripe). I have a little bit left to do, I'm planning to add a decent bit of "fade" on the wings' leading edges to simulate the effects of dust and grit (and greasy hands and boots). My goal is to make this plane look like it's been working hard, but not too crazy grimy, (like the plane in the photo I posted yesterday). This is, after all, the Wing Commander's personal plane. One does have to keep up some kind of an appearance. Andy


- 146 replies
-
- 13
-
-
Yep, I’d nope right the heck out of that Kubelwagen with maximum quickness….