HOLIDAY DONATION DRIVE - SUPPORT MSW - DO YOUR PART TO KEEP THIS GREAT FORUM GOING! (Only 36 donations so far out of 49,000 members - C'mon guys!)
×


slagoon
-
Posts
465 -
Joined
-
Last visited
Content Type
Profiles
Forums
Gallery
Events
Everything posted by slagoon
-
 Popeye the sailor was the original chuck norris. I love the lobster traps. They look just like I remember seeing when I used to vacation in Maine. Are you going to add bait?
 -
What can I say other than that the wealth of information from all of you and your encouragement really help me figure some of this stuff out. Popeye, I would love to access your file. It was part of what made me decide I wanted to try the CUX. I'll definitely be reading up on it. Andy, Thank you so much. I love seeing your work and it is especially neat because of your more unique perspective with being around ships all the time. Grant, thanks. It gets sort of frustrating when the instructions are at this level that expects a certain amount of knowledge and aptitude, and then the parts they provide you look...well.... subpar. Sjors, thanks! I have no idea if the whistle is supposed to be red or what, but it seemed better than having EVERYTHING black or grey. Ricky, Thanks - yep there will never be another just like it - mistakes and all! I can't wait to have more updates for you guys.... there has been a lot of painting tiny things lately so I can't install them till they are done, but in the meantime I'll be catching up with reading everyone elses work.
-
John that is a great method, thanks for pointing it out. I think if I don't like the way the sculpy ones came out once I've tried painting them that I'll go to the store and get some piping (the only pipe I've got is the stuff for the funnel and that's WAY too big. Luckily the hobby shop isn't too far away. I'll have photos up on the Harriet Lane log probably by Monday...we can all decide then if its good as is or if I should go get stuff for your method. Thanks again! I'm so lucky to have this forum and you guys.
-
You guys are the absolute best ever! So I'll probably make my "spurling pipe" out of sculpy, and the same with the coaling scuttle (then recess it into the deck), The bitts make soooooo much more sense from the photo, and I think I'll simulate the wheel axel/bushings with a square bit of wood that people would have to "step over" THANK YOU SOOOOOOOOOOO Much. This is why the forum rocks.
-
Titanic by Ricky - Mantua
slagoon replied to ricky146's topic in - Kit build logs for subjects built from 1901 - Present Day
I thought I was crazy with my 1:144... but your 1:200! The details are so neat, especially with it being lit from within. -
I'm glad you have this back up - my husband got this kit for Christmas from his father so I keep looking for other Constitution for him to use as reference. Question, what is the purpose of the parts in the bath? The build is looking nice.
-
Hi Popeye - welcome to the front row Yes I totally agree about the open ended...the hardest part is I know nearly NOTHING about sailing other than my memories of my 5 or 6 times on a schooner for an afternoon during my childhood...so figuring out what things are and how they should look is tough. I've built a little library already which my husband kind of laughs at. He says that for every kit I buy I need to allocate a budget of $20-60 for books hehe.
-
Mark, I sure am having a good time, and I'm learning a ton! I haven't made a TON of new progress since the last update and I am stuck with a few questions (which you can answer here) but I've done a little bit. Obviously once I finished making the funnel look good I wanted to install it, so that was next, including the whistle (it is the forward tube that has a red top). The aft tube is for steam. I attached some fake fasteners made of gun-metal colored wire. Next I worked on preparing the davits that hold the ship's boats. I had to take the blank ones and drill a hole in it. Then it was time to put the steering wheel area thing together. I used a bit of wood and tried to trim the sides down a little to make them fancier. The legs are four 6mm columns. Before I could put it together I needed to work on the wheel. I painted it the same brown as the stand and then dry brushed a little "gold" on it just to make it not look just flat. Here is a perspective photo and here it is installed remember this scale is TINY Next were the fife rails. These are supposed to have belay pins in them and since they are blank I had to drill holes in them. I needed some instant satisfaction so I installed my bell Then I started making my windlass a little more detailed by adding slivers of wood. That's it for now, thanks for looking!!!!!!!
-
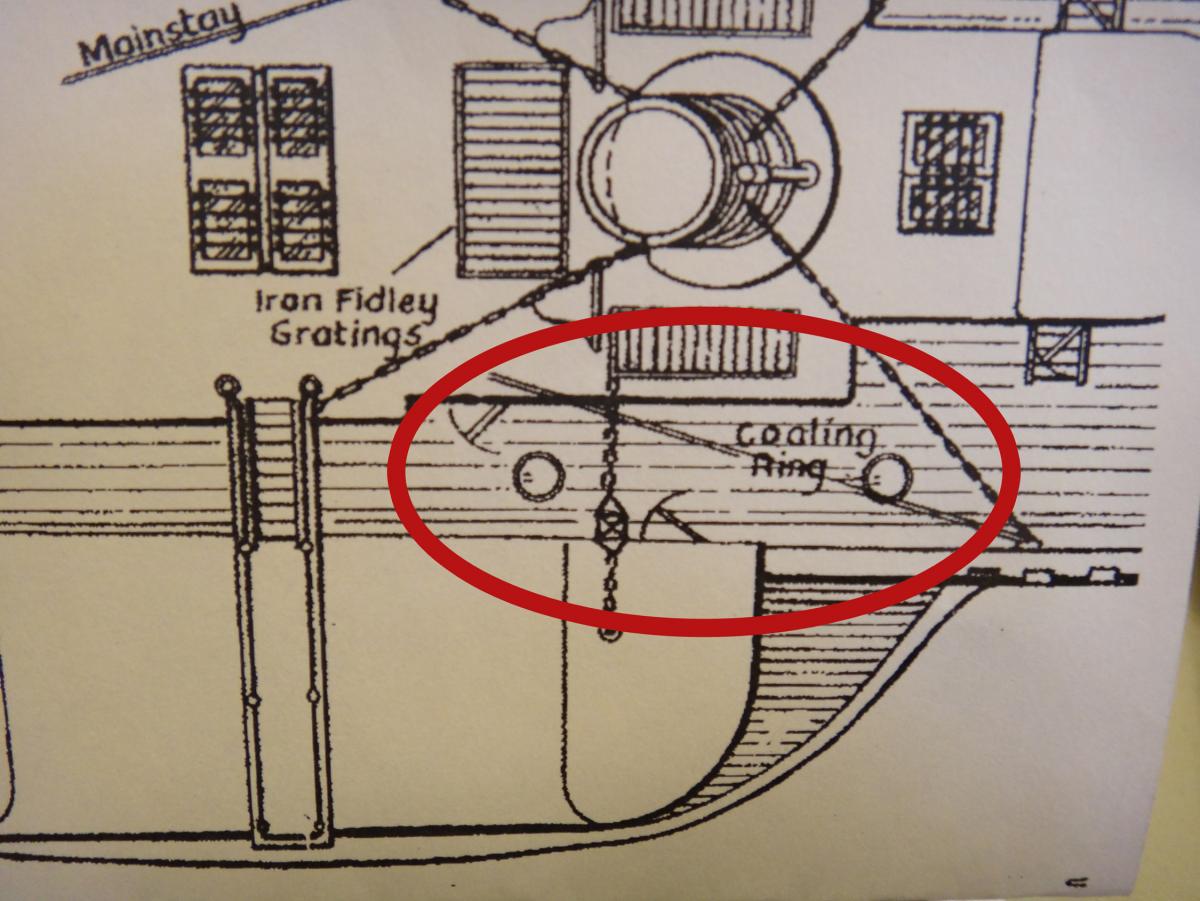
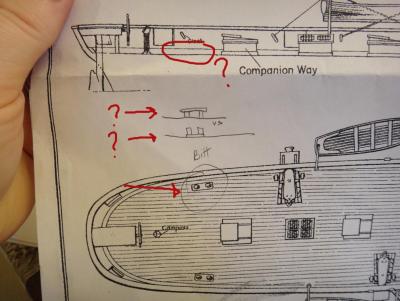
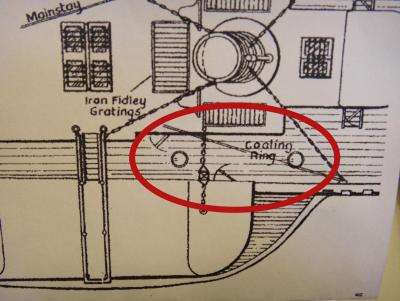
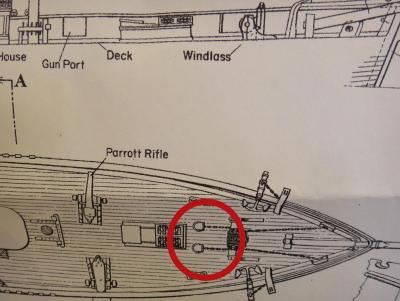
1) Have a few questions on deck fittings for my Harriet Lane. The first is regarding the Bitts. It appears that the ship came with double bits. Do they go flat side on the deck or round things on the deck with the flat side like a table? 2) question: The diagram shows "coaling rings" but my parts list doesn't have them listed and the side view diagram doesn't show them either Wayne suggested they are about 18" man hole thingies that are flush to the deck. Does that seem to be correct? 3) question: Just aft of the windlass are two "thingies" (highly technical terms) where the anchor chains go into...what are these? What do they look like in 3D? Wayne used grommets like the "airports" are made from...is that correct? 4) Final question: On the drawings there is this thing that almost looks like a speaker next to the deck house. It is not show on the overhead view or anywhere else that I can tell. Does anyone have any clue what this is?

-
Hi Wayne, just got started on my deck fittings. I'm again really annoyed at the instructions for not sharing enough details your pics are helping though
-
love the dragon head!
-
Dennis, You are quite welcome. It is good for me to have it written down so I don't forget anyway Sam, There was so much going on in the old MSW I don't blame you for missing it. Also I finished it during that small space between MSW 1 and 2 that was online for about a week. Thanks for the compliments As far as my camera studio.... it was a cheepie off Amazon.com http://www.amazon.com/gp/product/B001MYASTG/ref=oh_details_o01_s01_i00?ie=UTF8&psc=1 that is exactly it. Note that if you have a SLR you CANNOT use the "camera stand", use your own tripod. I will need a MUCH bigger one for my harriet lane.
-
Adam, the decal sheets are micro mark brand but I got them from my local hobby store (http://www.micromark.com/decal-paper.html) they are at the very bottom of the page in two different scales. Augie, that was my goal, I'm glad it worked. Carl, haha yes nail polish is helpful sometimes...just remember that the color was given by the metal and the heat. The nail polish only held down the decal and gave the satin finish. Wayne, thanks a bundle
-
This kit has been at the top of my wish list for when I'm ready for a big ship. It looks awesome so far. Can't wait to see the rest of what you've done. You don't need to say it is the opposite of the quality stuff on here. Your workmanship is quality!
-
Next up is making my funnel. Again, a silly little wood dowel for my funnel? How does smoke escape? through my brand new shiny brass one, that's how. I cut it down and used blacken-it on it, but that didn't get me the look I wanted...so I put it over a candle for awhile, eventually using it as an actual funnel for the flame which got me the effect I wanted. In the drawing of the ship I saw that they wanted it to look riveted so I took some of my scale rivets and applied them with a satin nail polish. I also saw in the drawings that there were bands all the way around the funnels. I created this effect with simulated stained glass lead liquid. My super glue cap is really useful! Here is a before and after of the brass tube. As always, thanks for stopping by. Any questions, comments, criticism are always welcomed
- 160 replies
-
- 3
-

-
- harriet lane
- model shipways
- (and 1 more)
-
Mark, Sjors, what can I do to thank you besides showing you more pictures? Next up was my railings, I chose to ignore the instructions that told me to make them black and instead I chose to have them dark walnut with high gloss for the finish. Next were the catheads which were probably the easiest, just a piece of wood cut down at 45º that matched the size of the ones in the plans. For the bow rail I wasn't really provided with any wood that was the correct thickness so I took some of the leftover sides from the paddle boxes and glued them together. Then I drew on the shape of the bow and started sawing it down. This was tricky so I took a break and started shaping the shear strake. As with all the planking I started by just soaking the wood in hot water then putting it on the ship without glue and leaving it to dry. I got back to the bow rail. I finished cutting it out (which was tough because it liked breaking on the grains so then I'd have to wood glue and wait till the next day). Luckily I had plenty to do with getting my build log rebuilt. I shaped and shaped and filed and sanded and then cut out the couple details that I still had and came up with this! As you can see, by now I have also finished installing the shear strake and the catheads Next up was the doors for the gun ports. They told me to make it out of the plane board provided (yet again I found it inadequate) so I took a piece of teak that I'd gotten recently and glued two leftover planks to it. Then I cut them down to bite-sized pieces...er gun port door sized anyway and painted the front the same black as the rest of the boat. I also added some eyebolts to act as the part where the rope will hold them open. I cut really thin bits of brass and used those as hinges and attached them to the boat. You can see that I just varnished the teak on the other side. It was TOO pretty to paint...I only used it for this because it was the only thing I had available to me without making yet another trip to the hobby store.
- 160 replies
-
- 1
-
-
- harriet lane
- model shipways
- (and 1 more)
-
Bob, I think you murdered a few brain cells with that. I got a PM asking me how I coiled my anchor rope that way so I made a new coil and took a few photos along the way. Lets start out with your materials that you'll need... You need wood glue, rope, something small and round, tin foil or something else the glue doesn't really stick to, and optional tweezers. Start by putting down a blob of glue. Then spread it out so it is a thin layer. I do this with my fingers, but you can use whatever you prefer. Take your round thing and stick it in the middle (I couldn't get a photo of this part since I had to use both hands)then twist the rope around the round thing slowly patting it around (this is with either your fingers or with the tweezers) You will need to go slow and wrap in a circle making sure all rows get at least some glue on it. Now set it aside and wait awhile, I usually just wait until the surrounding glue has dried which can take awhile. When you are done peel off any residue and you are done!
- 35 replies
-
- 2
-
-
- bounty jolly boat
- artesania latina
- (and 2 more)
-
smart use of the felt! Was that part of the kit or your idea?
-
The ship is so garish and over the top that it really allows you to show off your craftsmanship. Your work is impressive and I think I'll have to add this to my wishlist.
-
in your last photo on the deck you have your anchor chains going into the grommets...did your kit have those extra in there or did you just add those yourself? I don't have enough of those to put them in but they sure look good there.
-
Absolutely beautiful work - this kit is on my wishlist. I look forward to seeing where you go with it.
-
Thanks John. I think you will be find doing it...especially with Wayne's and my mistakes to keep you out of trouble . As long as you aren't looking for an actual beginner's model you'll find it quite fun. It really does encourage kit-bashing which I've been told is a complete gateway drug. *I will not scratch build yet....I will not scratch build yet * hehehe
-
Another build log that was eaten by the hard drive monster was my 1:144 Harriet Lane so I will attempt to recreate it here. Again, like my Bounty's Jolly Boat I will include some retrospective content in the attempt to help anyone who wants to try this ship in the future. Lets start at the beginning. I got this gift as a Christmas present from Santa (my husband still denies that he bought it). It is a model shipways boat and this model is from a solid hull. There are lots of little knick knacks that came with the ship too. The first step is to cut out the patterns for the shape of the hull. It was suggested to me (after the fact) that you should paste it to a card stock or cereal box to make the pattern more firm. That would have helped but it certainly wasn't necessary. The next step is measuring and placing the center line on the boat. I have a laser level so I used the laser to make sure my line was fully straight. I also marked the station lines on the ship. I measured from the centerline to the edges of the bulwarks based on the drawings and drew those lines on. Then I started shaping my hull. This was a slow process. I'd hone a station down until it was roughly right and then I'd move to the next, checking against the templates each tie to make sure I was taking the right amount away. Then I worked to get each station to flow nicely into the next. The toughest part there was where the hull didn't have enough material on it so I had to improvise a bit. The bulwarks need to be really thin, 3/32" and to keep the boat from breaking during shipping the manufacturer really makes it thicker than needed. They also made it significantly shallower than needed so I thinned the bulwarks and also dug out the floors. This was really difficult since I didn't have the right tools. Luckily my husband went to harbor freight and bought me a miniature hand planer. After it's blade was honed it worked like a charm. I applied wood putty to the hull to even out the couple dents that were too deep to sand out. The wood was so soft that if I wasn't careful it dented...even with just my little fingernails it would dent. It was truly annoying. But in a solid hull situation like this, putty is your friend. I also used grey primer between layers of fixing dents because it helped the dents show up better. I would have been even more diligent than I was with filling in dents and smoothing the hull but my primary concern was the hull's shape since I was planning on planking above the waterline and coppering below the waterline. Before I could get to that I needed to install the keel, stem, and sternpost. That required lots of measuring and tiny bits of cutting. The hardest part was dealing with the instructions. While this is a "beginners" kit it doesn't tell you where to get the parts from such as the figurehead stand on the bow. It really expects you to be able to figure a lot of that out for yourself...but then too they don't seem to include the optimum types of materials to craft your own pieces from. This kit is a lot closer to a scratch build than the jolly boat was - I'm finding myself creating more parts than the kit gives...so if you are a beginner and don't have much experience either in other types of modeling or woodworking then you should steer clear of this kit. In order to get a good shape for the stem I used a contour gauge against the hull. This was an old one my husband had lying around for ages, but it works just as well as a new one bought off of Amazon or from Harbor Freight. For creating my figurehead stand I traced the shape from the plans onto a piece of cooking parchment paper and then cut that out and stenciled it onto the wood I used. After all these careful measurements my pieces went together perfectly. Again it was time to play with the wood putty and smooth the transition between those new parts and the hull. I needed a break so I started working on the wheel covers for the paddle wheels. I was trying to make it so I wouldn't lose all the detail of these parts but with every layer of paint I lost more and more detail. I tried going back over the details with a knife to make them stand out more but they kinda looked horrible. So I went searching for something better. I came across an old Pyro plastic kit from the '50s for "the blockade runner Harriet Lane" and realized it was nearly identical of the one that I am building of wood. I looked at the sides of the paddle boxes and realized they were indented completely differently and that whole areas were indented with other whole areas sticking out. So I went about shaving off material to let me get that same effect. It looks better. Not perfect but much better. I wasn't ready to go back to my hull yet either so I decided to work on my deck that had "precut" decking. It was basically a piece of wood that had lengthwise slats cut down it to imitate the spots between boards on a deck. The problem was they were the full length of the ship which was about 180' long in real life so I figured they didn't use 180' lengths of timber for the deck so I added little cuts every so often which, once I stained, ended up looking darker and like they were separations in the planks. Much better if you ask me. Next was my intro to kit bashing. The kit supplied me with a figurehead about the size of a fingernail that was supposed to be an eagle perching. It looked like a tooth. It also showed on the plans all this beautiful detail on the side of the figurehead support that was not included in the kit. I'd read Chuck's practicums on the Sultana and Phantom based on someone's suggestion and Chuck explained how to create ship pieces out of Sculpy clay (or similar) so I tried my hand at making the scrollwork and a new figurehead. I also read in the instructions that they wanted me to put the pilothouse together and then paste on the computer printed sheet of pilothouse details and paint any spots that the paper didn't cover. I couldn't take the idea of having paper as the pilothouse so I made the details as I think they may have looked out of wood. I used 5 layers of transparency paper as window glass and leftover nails from my jolly boat as door knobs. I painted the sides white (as they would have been if made from paper) and the top grey as instructed. Then I went back to my hull. I planked the side with thin strips of wood and then at the waterline filed them down until they were as thin as I dared go. I didn't do much sanding on the other pieces as that would defeat the purpose of planking it. I would have just left it solid hull if I didn't want it to appear made of wood. I also put lines simulating breaks in the lengths of the planks and two tiny dabs of super glue to simulate rivets before painting. Then I went to start coppering my hull. I didn't want to just put long strips of the copper on it - again that would be like the idea of putting paper on my pilothouse. I sliced the copper in half then put fake rivets in it by first doing it one at a time with an awl and then I realized I could use my tweezers and put in two rivets at once. I was later told that I could have bought and used a pounce wheel. (Which would have saved me HOURS of work) Then I cut each small tiles from each strip and applied them starting at the waterline. After coppering was done I needed to cut the spots for the wheelhouses. That was scary. Measure once, measure twice, measure a couple more times, take a deep breath then cut was my formula. Then I cut my gunports using the same methodology. Next it was time to prepare my wheel houses. I put the four pieces together for each side, sanded thoroughly, shaped the sides per the drawings and painted it black. I made some railings out of sculpy and glued those on and also glued on my covers you saw earlier. I didn't like the idea of just painting everything black so I used blacken-it on the wheels and dark stain on the actual paddles. I decided that my eagle looked more like a bluebird so I tried just making the head of an eagle. I attached that and the scrolls at the bow. There had been some question of scale before the site died so here are also some shots to show the scale. Then I attached the sponsons to the hull and added on some decking and some trim to make them look more complete. I also added my decking to the rest of the boat at that time. Next I added all my waterway pieces. which I stained in dark walnut. Then I went about starting my railings for above the gun ports. This is as far as I got before the crash. Thanks for visiting and I'll have some actual updates soon! 'Till then feel free to check out my husband's swift.
- 160 replies
-
- 3
-
-
- harriet lane
- model shipways
- (and 1 more)
-
Nice work! Then again it is my job to encourage you... but really, isn't my husband doing great?
- 120 replies
-
- 1
-
-
- swift
- artesania latina
- (and 2 more)
-
Daniel, Thanks! I had just added those details about 2 days before the site died so most people probably didn't see them. Sjors, Thanks - glad to be back here! Good to see you too. Carl, I'm just glad MSW was determined to come back even after the tragedy. I won't be able to recognize you with that new avatar! Nice to see you! Tony, Thanks, I'm glad you are on too!