HOLIDAY DONATION DRIVE - SUPPORT MSW - DO YOUR PART TO KEEP THIS GREAT FORUM GOING! (Only 44 donations so far out of 49,000 members - C'mon guys!)
×


Emmet
-
Posts
401 -
Joined
-
Last visited
Content Type
Profiles
Forums
Gallery
Events
Everything posted by Emmet
-
You must need a ladder to work on the top parts. Hardly any rain here in New Hampshire for some time now.
-
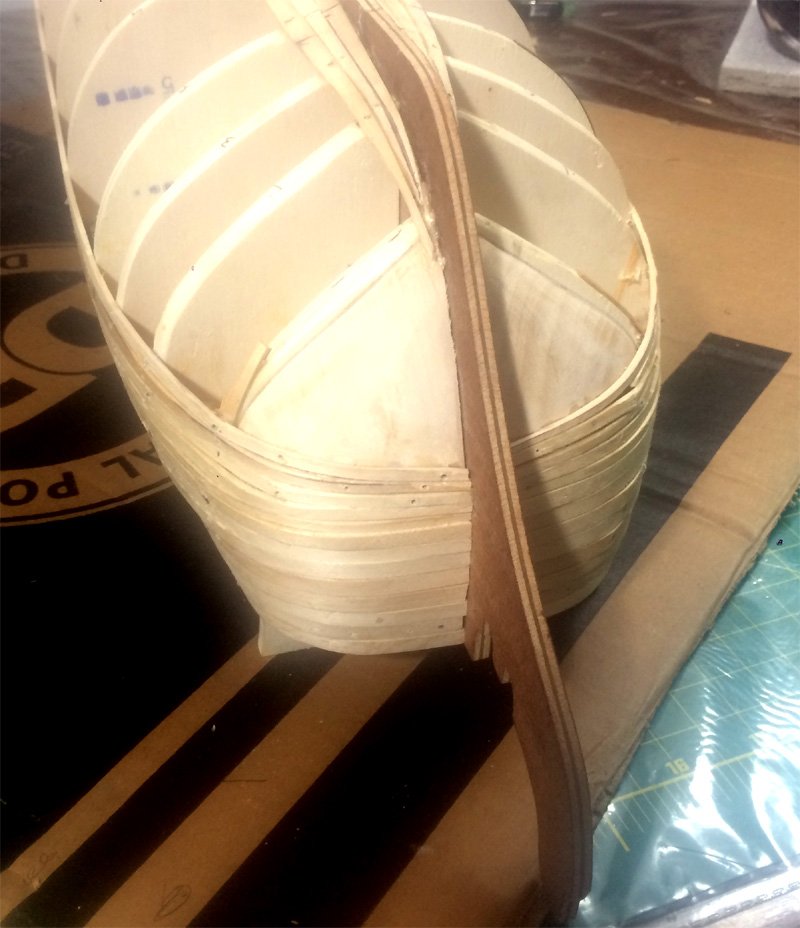
I have been out of the shipyard for various reasons. The most important was my boiler's tankless heater needed to be replaced. While I am at I reached the point where I would replace the expansion tank, the auto vents and the relief valve. The tankless heater was a bit tricky but not as hard as planking. Luckily most of it could be done sitting down. At the same time my hot tub need some attention. I was trying to balance my chemistry and finally got an error message to replace a filter. That solved the problem tight away. I just thought I would how a couple of pics of my status on the ship.
-
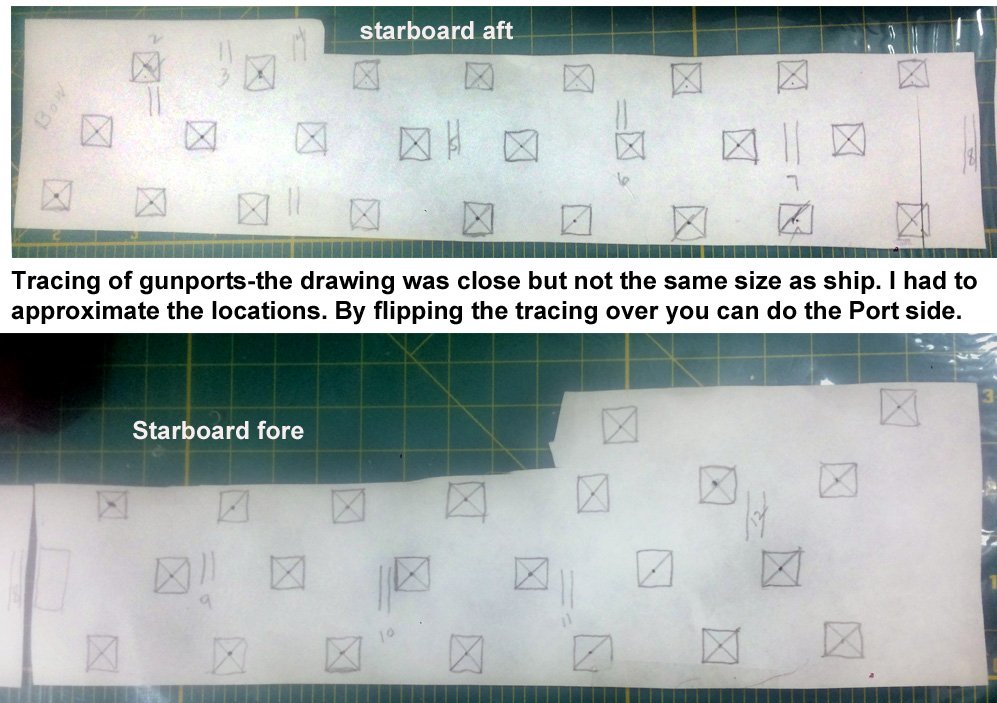
I am putting tracings of the gunport locations at this point in time as an illustration of how the drawings I have are not to scale-close but no cigar. They are a little larger than my ship. The lack of scale has been a continuous problem. I am not ready yet to do these but it might explain why I am doing certain things. I am only marking the center locations of the gunport holes.
-
Thanks Phil I did not realize how important using the filler is as you are planking. I am sure on the second thinking I will use more. I must say that drawing of how fillers fit in to the keel would have been extremely helpful. But I realize that is just part of building ships.
-
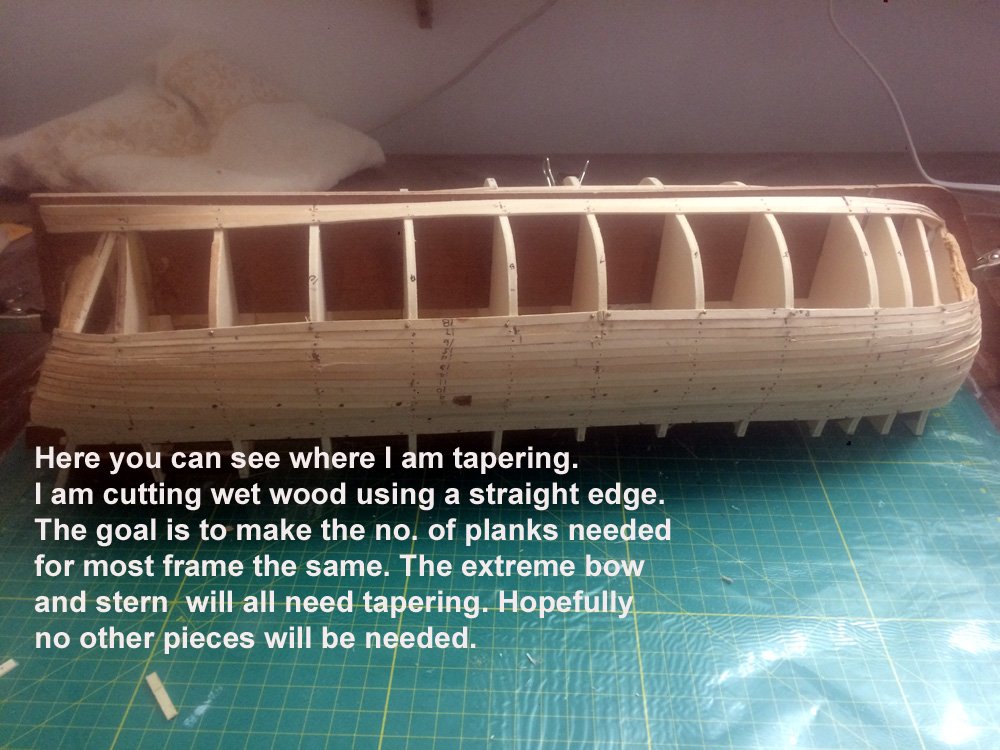
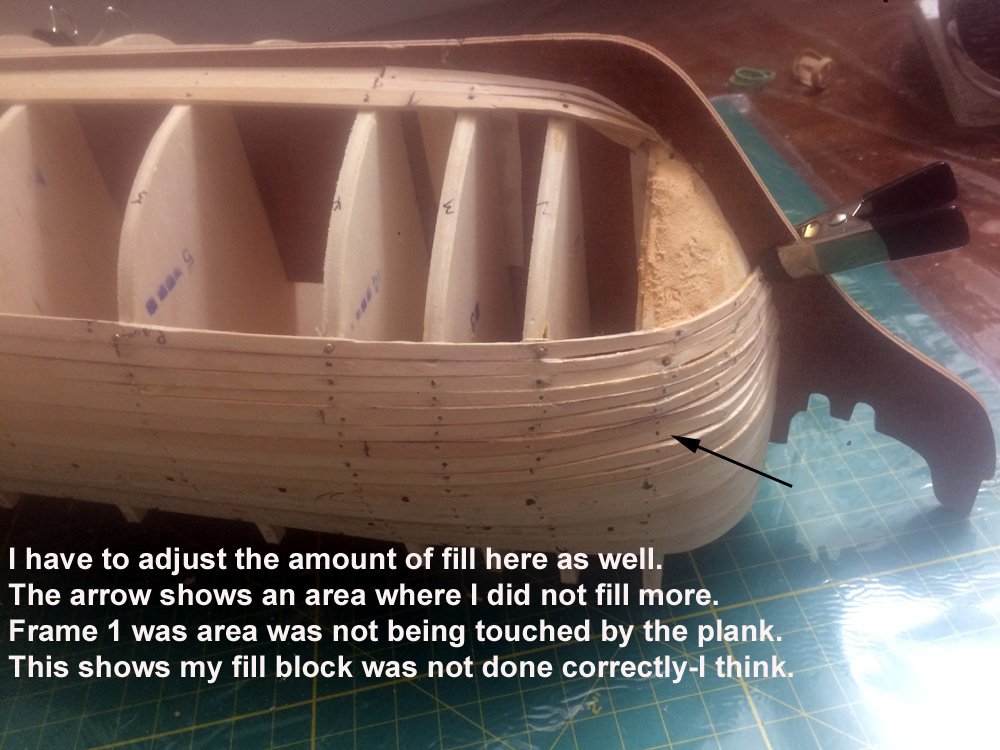
Challenges are indeed fun. The thinking that has to go into planking is extremely complicated. One thing that I should have done while sanding the filler block was draw a straight line along the rudder that would designate where the planks would end on the stern. I am now using filler to replace material I removed. I will say that I am learning to cut the planks for tapering. When dry the planks can be easily carved. However I find that if they are wet I can follow a drawn line better-using a lot of care. You can cut them dry but must use more pressure. I am still waiting for the surfoam blade replacement that Keith suggested. I had one but the blade was bad. I want to see how it will work. Again as many would say working with wood is enjoyable because you can almost always recover somehow. Thanks for your comments-it is very motivating and helpful.
-
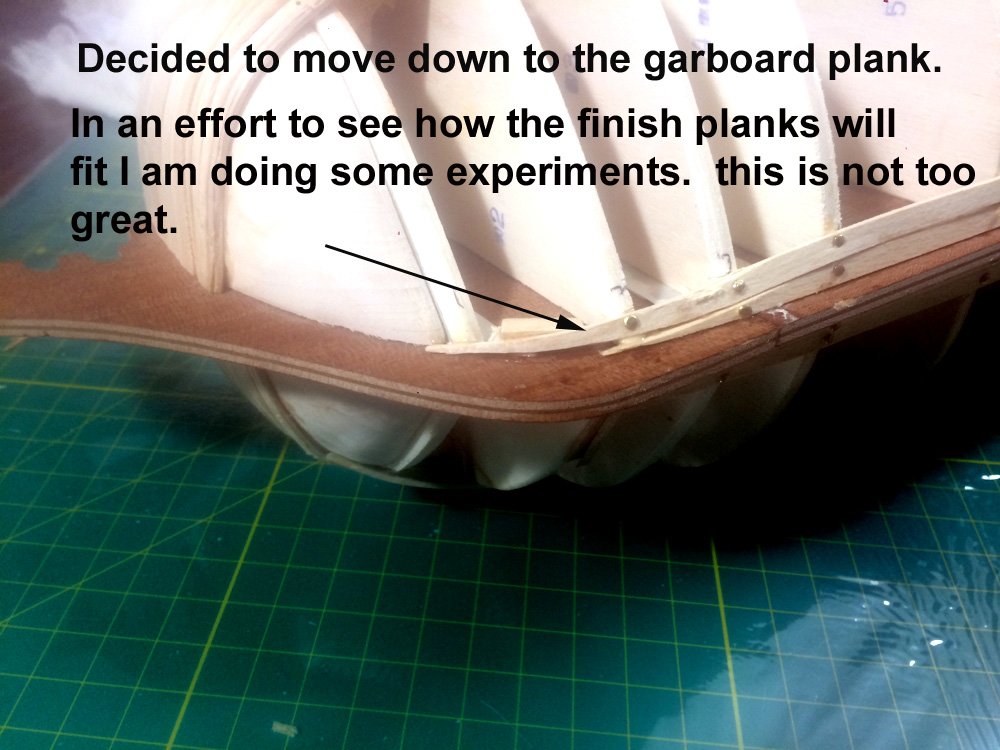
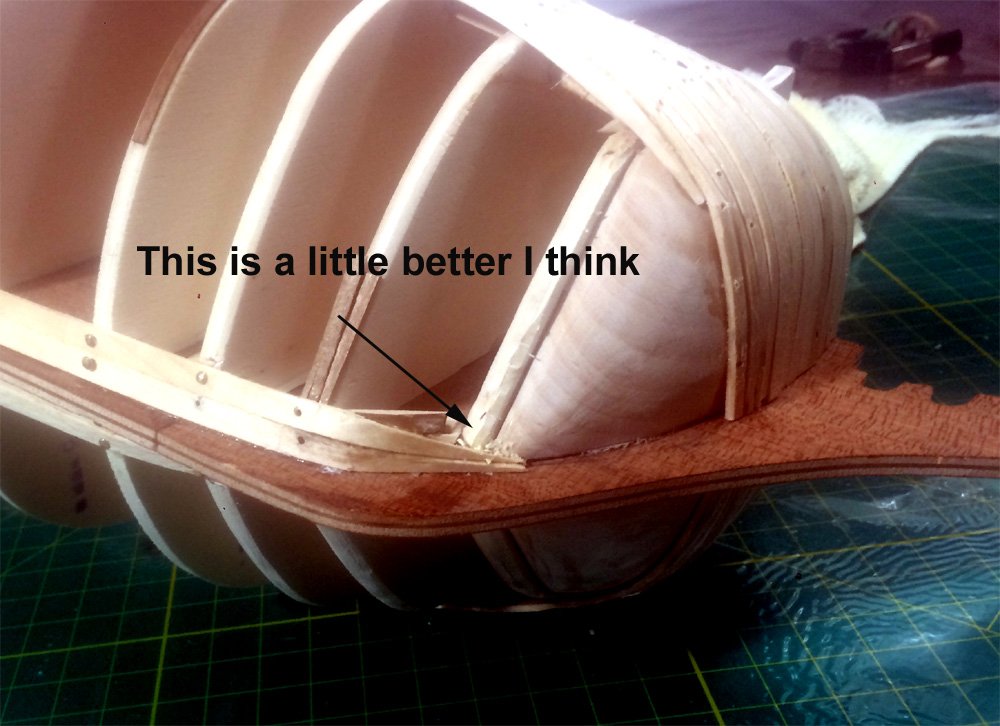
I made some changes with the garboard planks.

-
I did find it. Thanks a lot for the URL. I a in the process of doing the garboard that way. It confirms one of the three ways I was think about. I want to get this right for the 2nd planking and the future. I do realize this gets filled over and copper on top of that. I want to get it as right as I can. Thanks again.
-
Have not found that half hull thing yet. I am revising the garboard by the bow. I will get it. Appreciate your help.
-
Sorry to belabor the subject but it seems the garboard strake has to at least run to the first frame and needs to be tapered as it approaches the bow filler. To be straight it would have to end at the third frame with a long taper. That would mean the second plank would then have to be bent along that taper and go to the first frame. The alternative would be to run both planks past the curve in the bow and cut them off to the shape of the bow. In that case there would be no taper. I totally realize this is difficult to discuss this way. And I appreciate your patience with an old new ship builder.
-
Thanks-happy I found you in the shipyard. I will check the kit logs. It does seem to need some tapering as you approach the bow filler. By sideways do you mean looking from the bttom or viewing the ship on a cradle i.e. viewing the edge of the planks.
-
Hi Keith Thanks for your comment about the straight look for the garboard. Should they go without a taper all the way to the bow filler. I already took the tapered part out and left the straight part.
-
Very interested in the discussion about the rigging. It gets me looking up the terms and looking harder at the pictures. Thanks for the detail
-
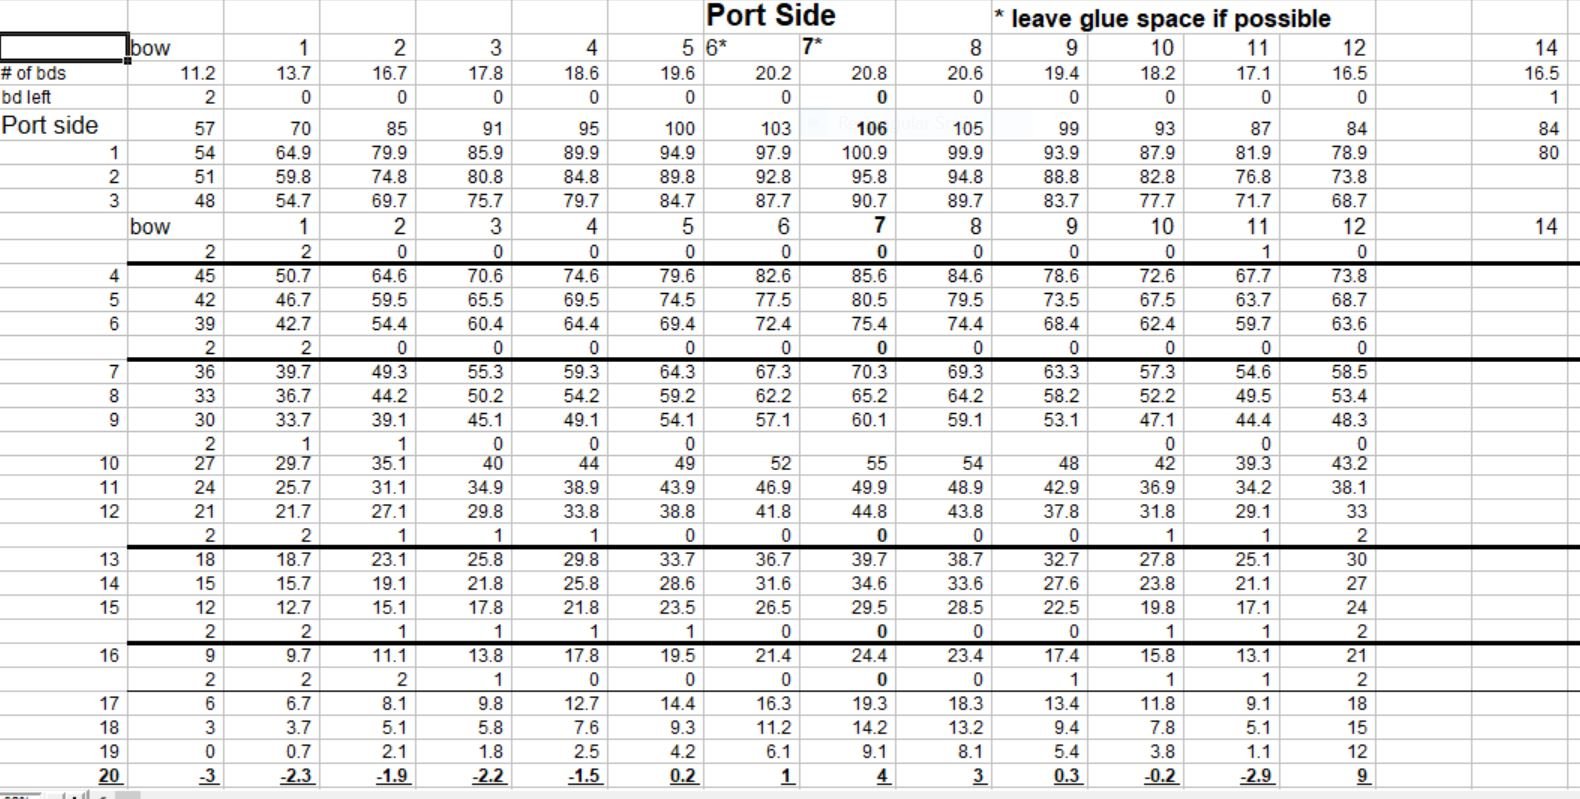
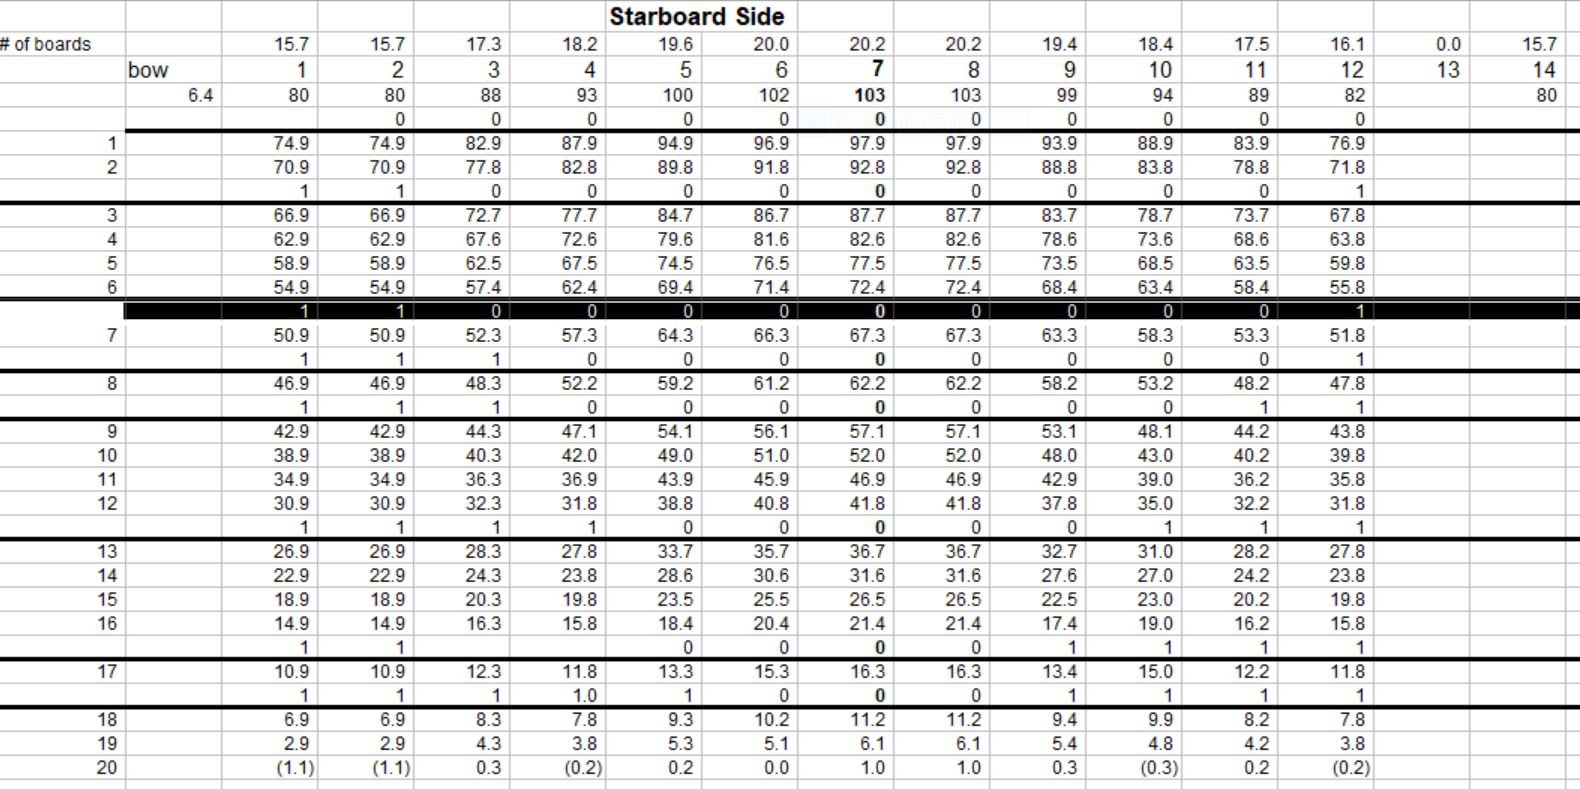
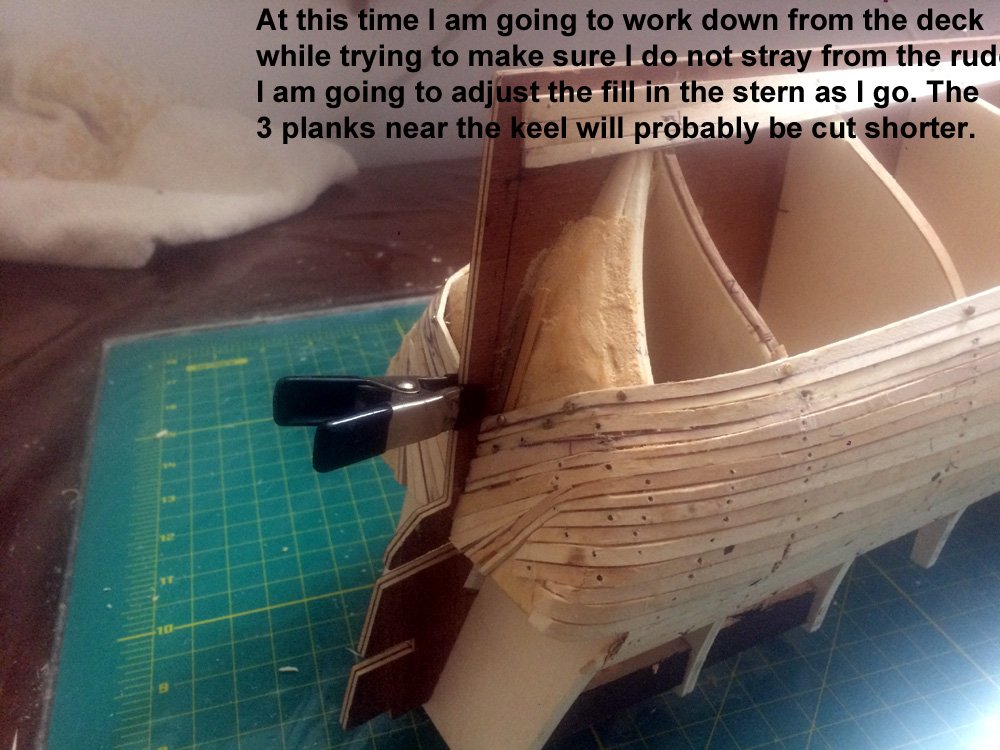
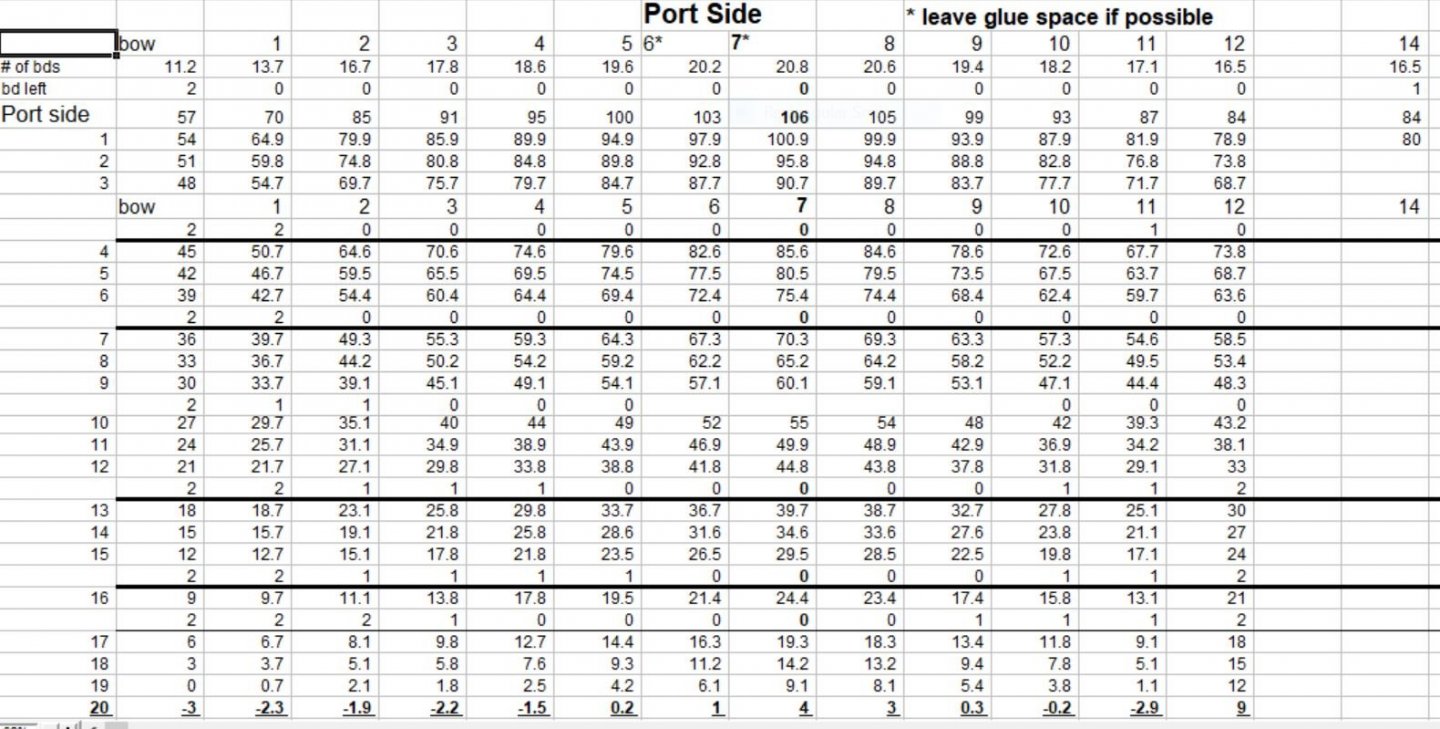
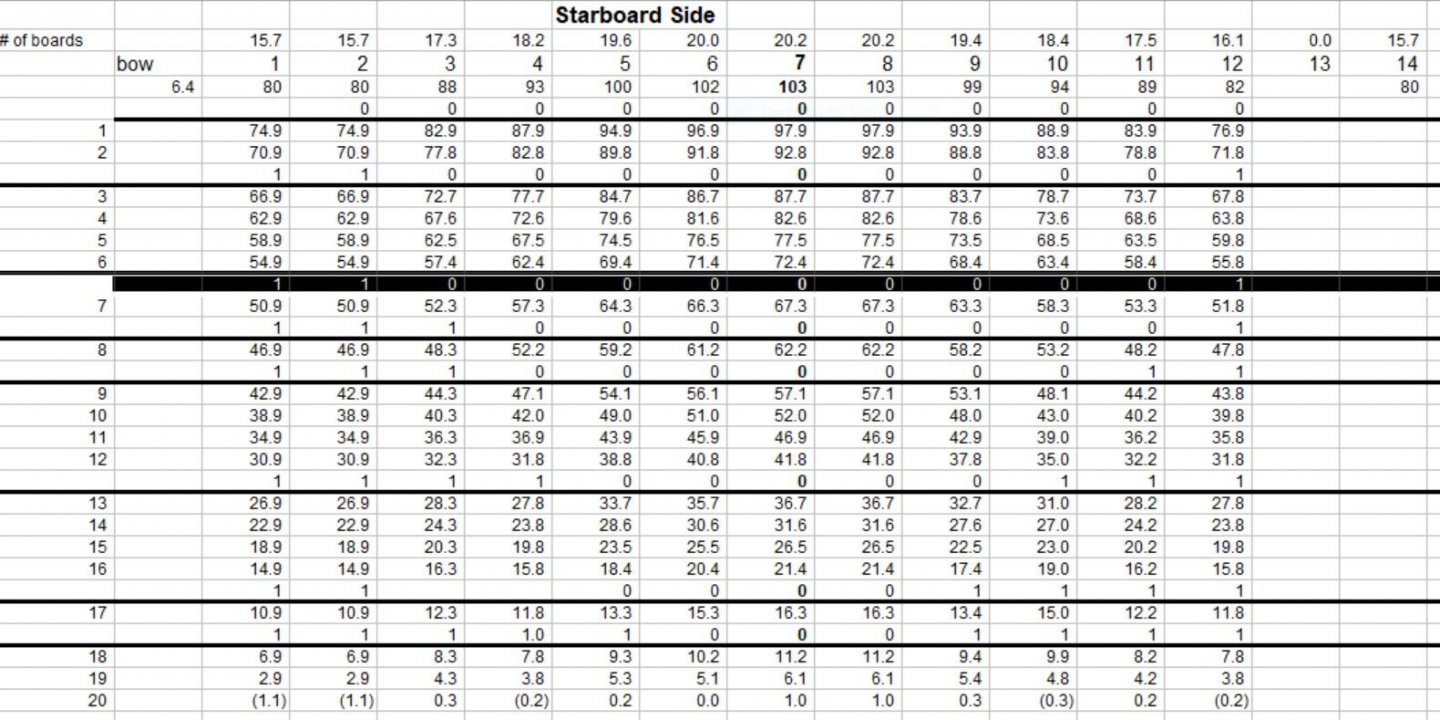
The following plans are for the remaining planks. I waited until I got below the stern gallery counters. I think I should have started about 2 planks sooner. The idea is to taper the planks so that we have a final plank that will make up for small discrepancies. It is also understood that the plan must change depending on the discrepancies in the planned numbers. I am also going to change the garboard planks as well as deviate from the Corel plan for the planking of the stern/rudder area. I prefer the way other Victories look in the rudder area on logs that are not Corel. I neglected to label the numbers underlined. They represent the mm of taper at the frames which are numbered 1 thru 12. 14 is the stern/rudder area where I know there is room but I am changing that section so I did not supply numbers. Stay tuned and thanks Rob for your input.
-
The Corel kit has no instructions for the water line.I guess I will figure it out as I go-maybe I will see if it floats.

-
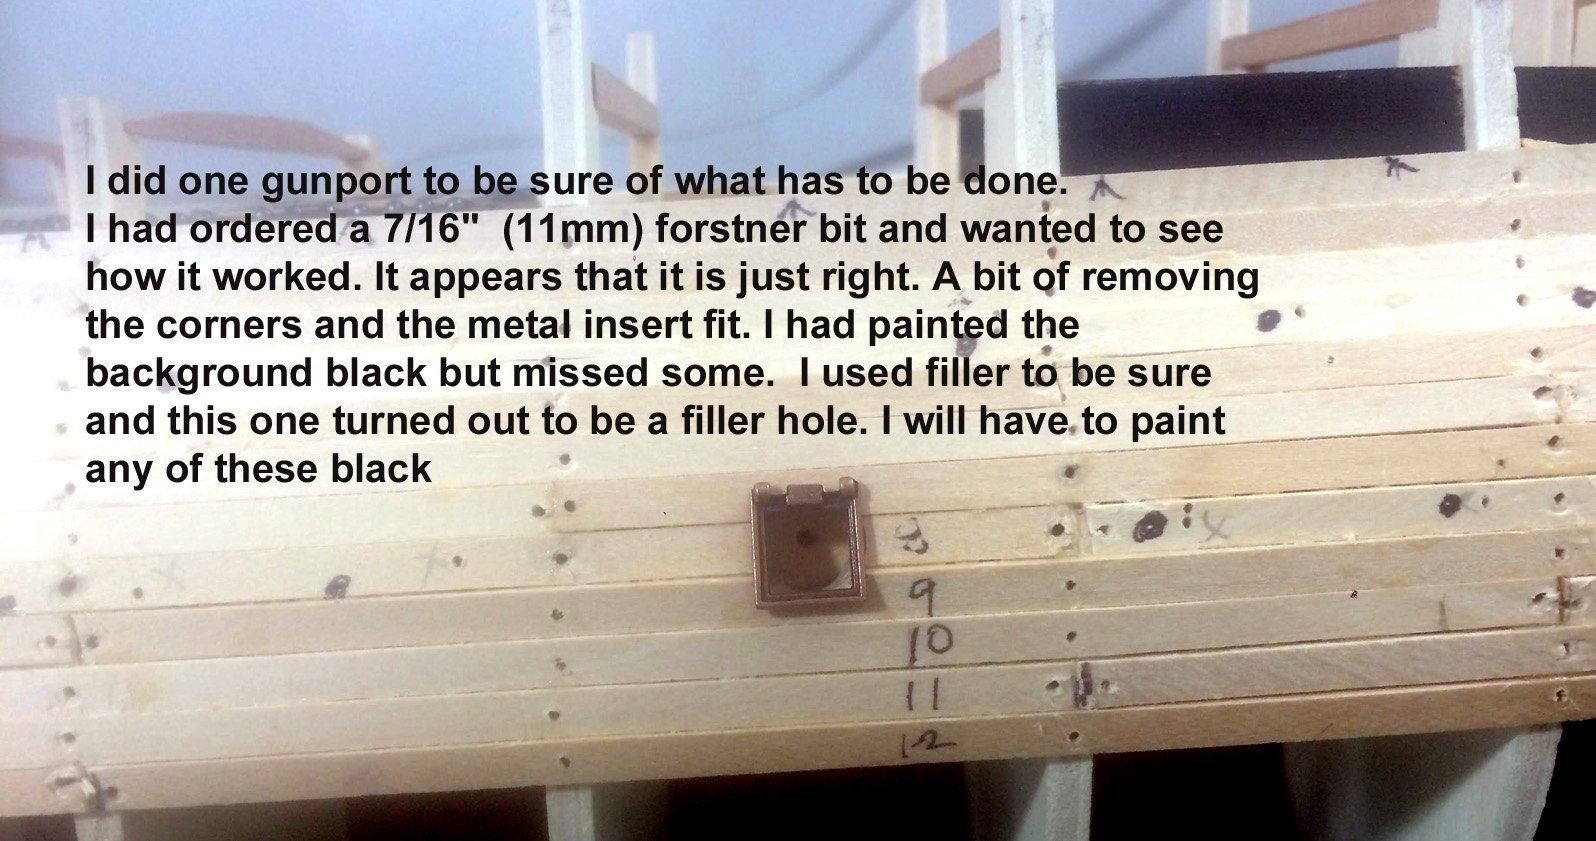
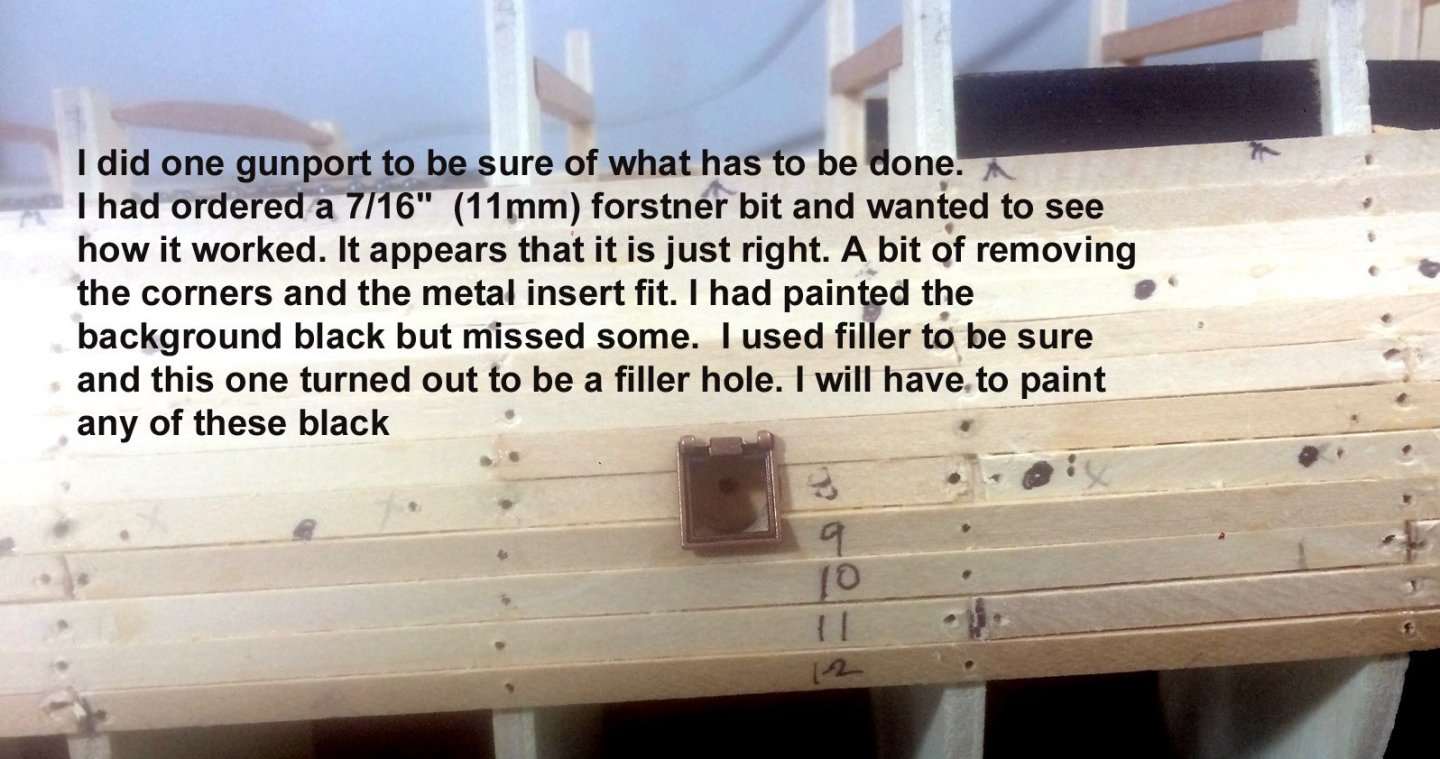
Hey Rob I see you are almost ready to do your 2nd planks. When I did La Nina I used auto body Bondi to smooth the 1st layer-thought it worked well. I just used the Minwax filler you suggested to make sure I have a backing for the gunports which I decided to leave hidden by continuous planks. I had put backing boards but wanted to be sure. In fact you can see above I missed one. I drilled into the filler. The sreawings I have are simply not to scale so I have just tried to use the basic pattern of the ports and wing it. Kind of mysterious kicking Y.T. off the site. It seems he was doing a lot of his own thing-must have gotten a supplier upset.
-
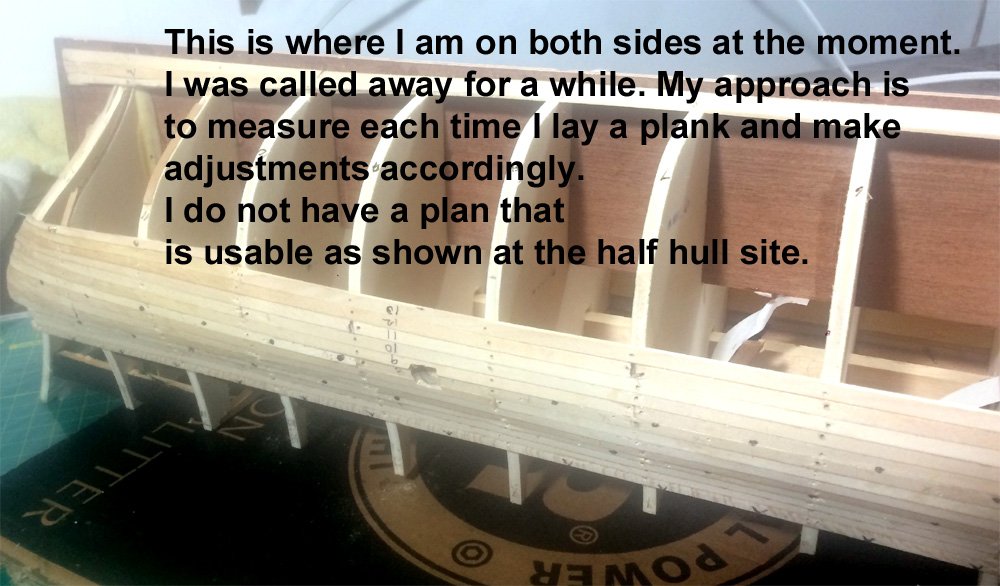
Mostly doing research these days to understand the best way to install planks. Port side starboard side
-
Just wanted to say I enjoy your work.
-
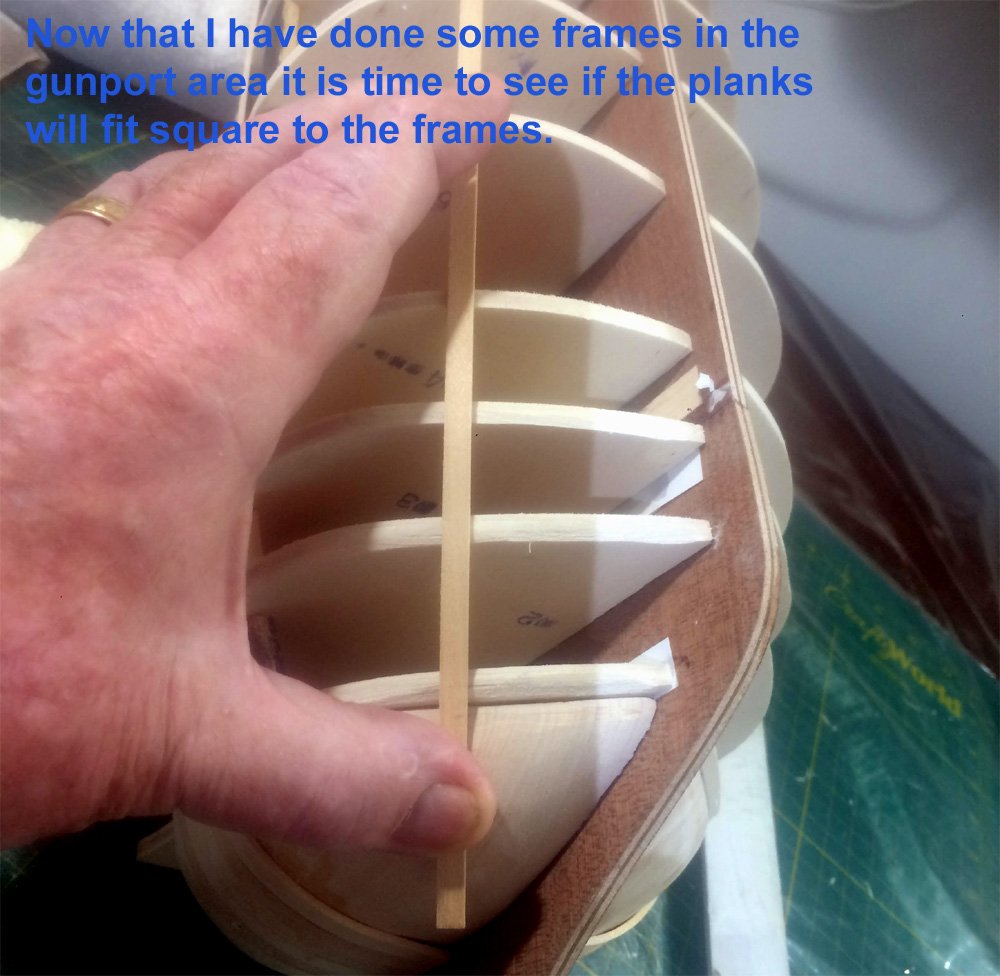
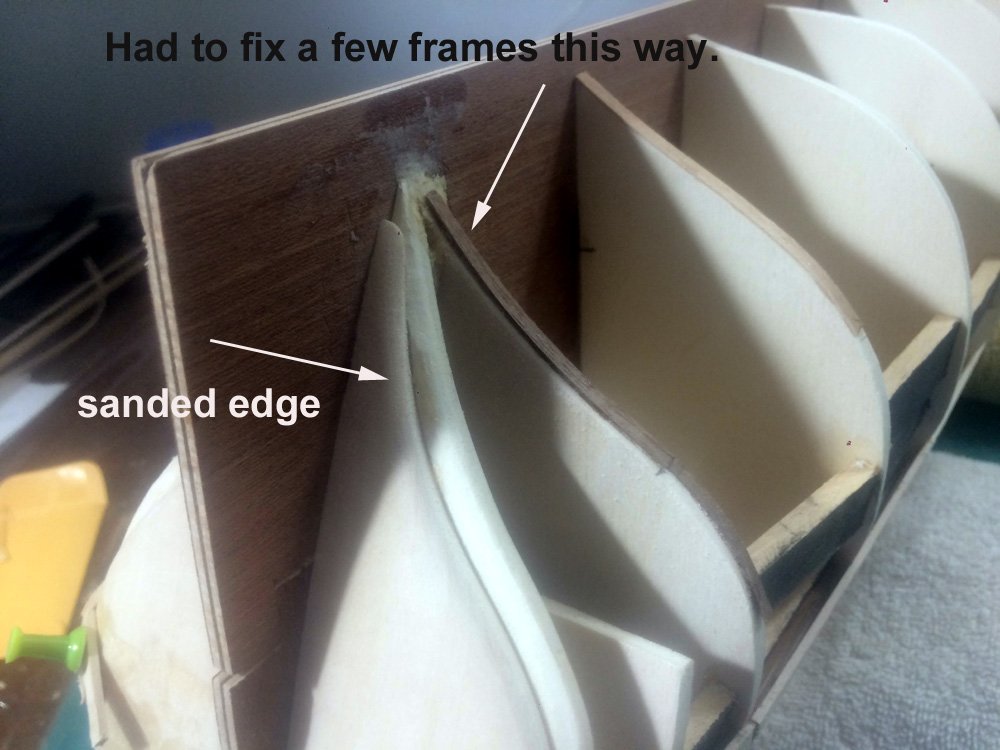
After doing some planks and trying to know when to start tapering in the stern and bow areas I decided to make sure the frames would be square to the planks.
-
Hi Matt, Sometimes you just say "the hell with it" and start. It is rather silly because I had gone to the trouble of plumbing the ship and making sure the deck beams were done properly and did not bother to make sure the distance to the first plank from the lower deck was the same. There is a price you pay for not thinking enough. Yes I do go from one side to the other. I install a wet plank on one side and dry it with the plank bender. Then I go to the other side, remove the plank and dry it more. I am then ready to glue it. As I say sometimes you just feel like you must move ahead. It is a learning thing. People who do not make mistakes are not doing anything.
-
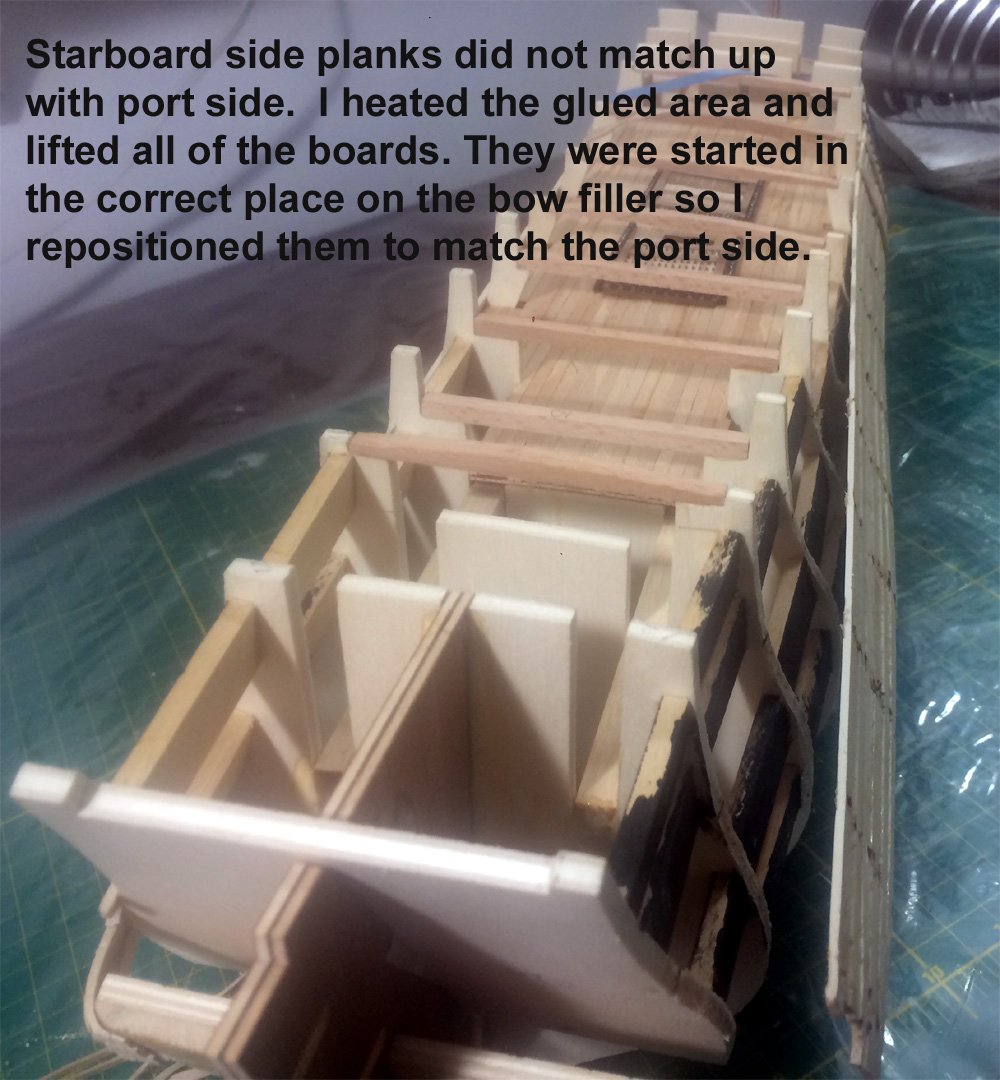
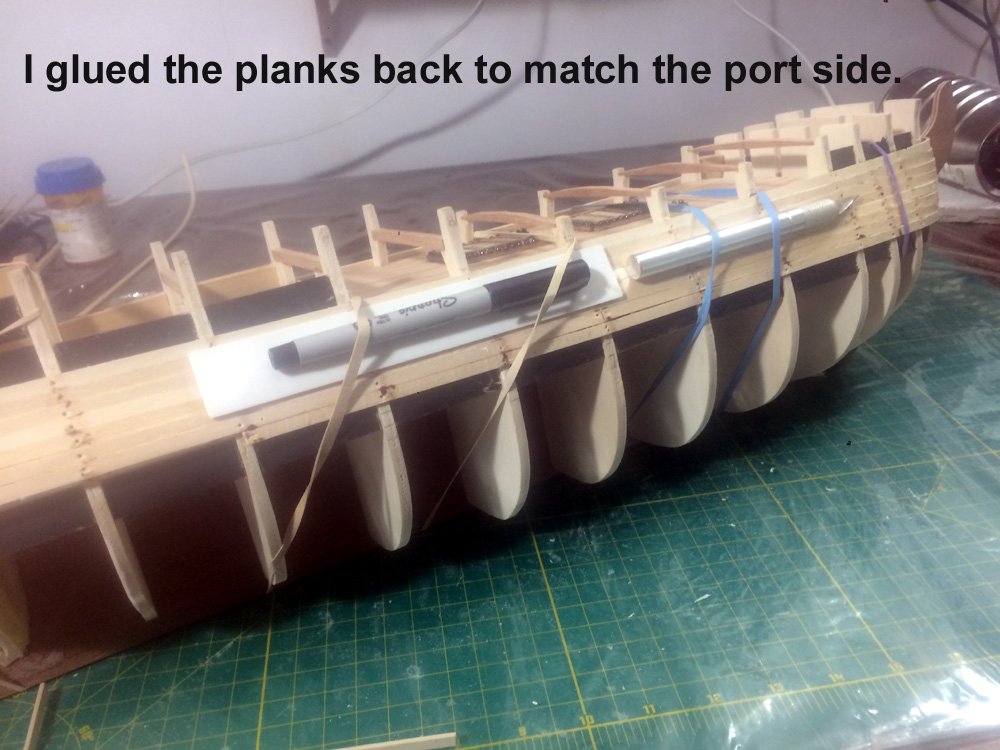
Having done some planks and trying to understand how the counters fit (still not sure if they should be tapered down and in to the ship) I did some checking on the position of the planks on both sides of the ship. I found that they were not the same. I probably could have worked around it but I decided to just fix the starboard side to match the port side. I also have begun to do measurements of the distances to - call it the rabbet line- along the entire hull. I should have done that sooner as that is how I discovered the discrepancy between port and starboard planks.
-
This may work. If not it can be revised again.
-
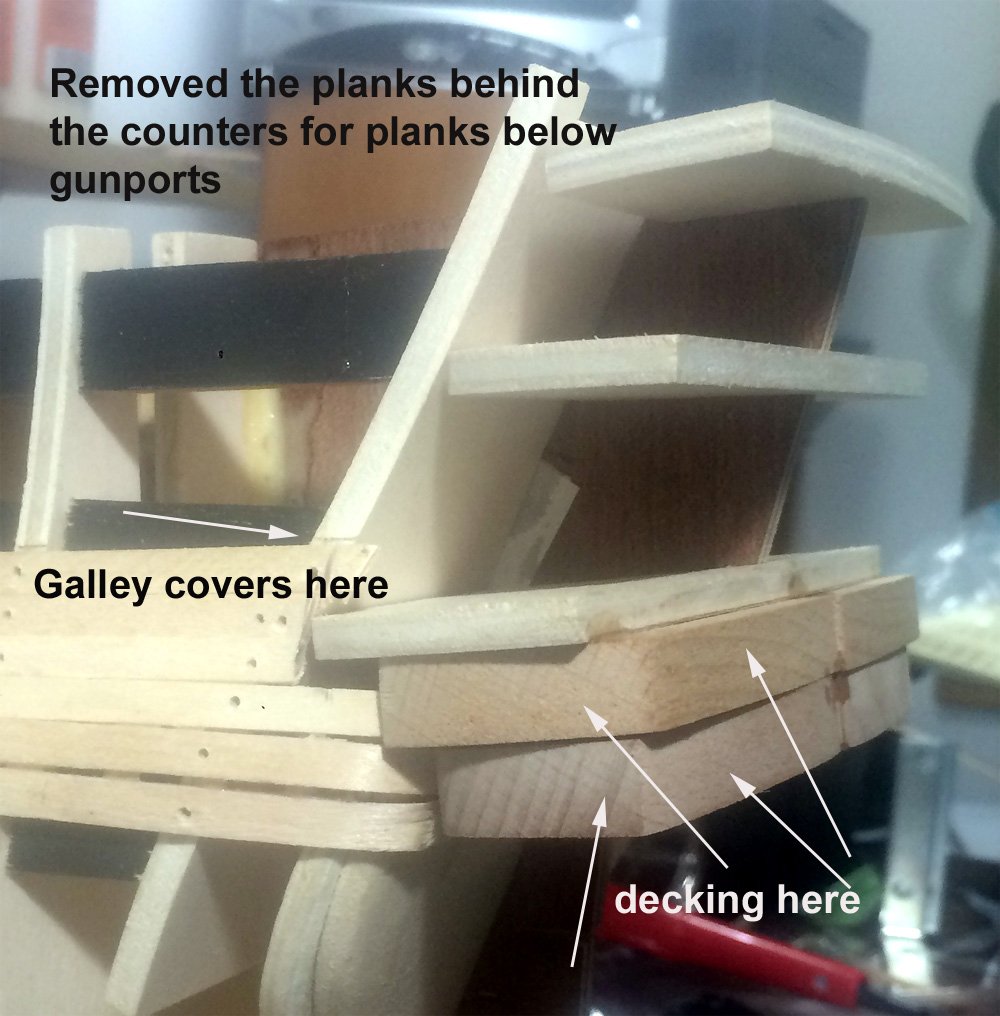
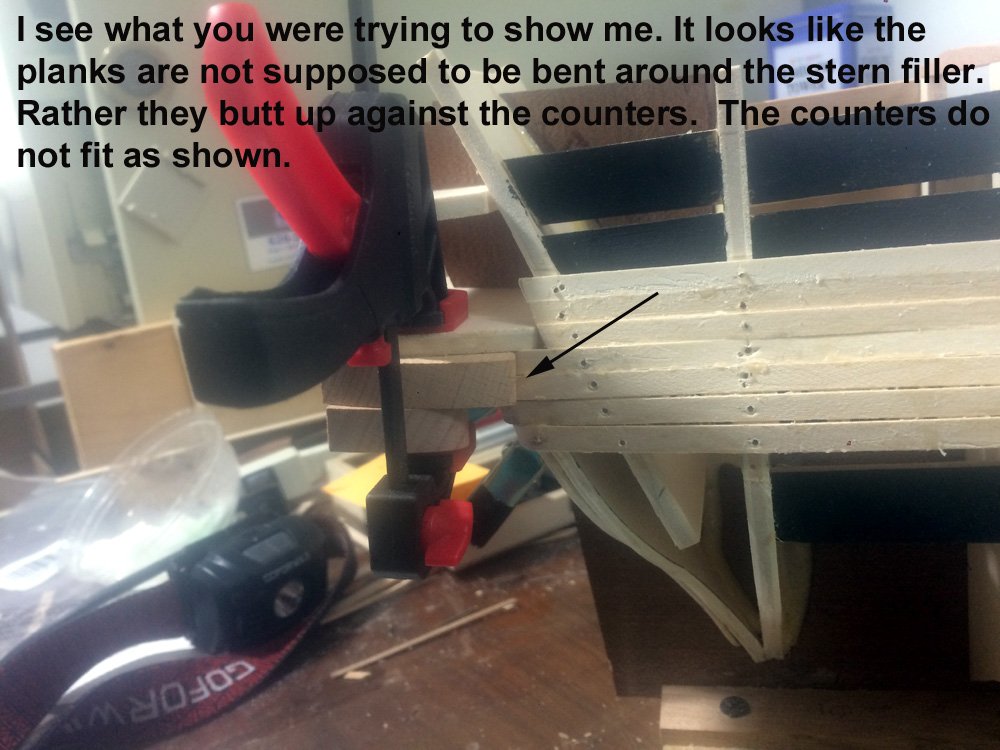
I am moving ahead with the counters. If I do them wrong I will do them again. I probably have to take out pla king around the stern filler. One can only think and research so long.
-
Oh yes I read all of those over and over. I have them saved in a folder. The nails are 5 mm brass and they come out easily with your recommended wire pincers. My problem now is where the planks meet the stern. I have to figure out how to install the counters-again the drawings are not that readable. Your ship photo of Terror helps some as well as other logs I have viewed. But there are none that show how the counters are installed and other makers do the stern differently. While there will be a 2nd layer of planks I am still trying to do these as well as possible from a learning point of view. For the 2nd layer I have to try and get the archer's bow from bow to stern. I think my planks are too straight or level for this layer.
-
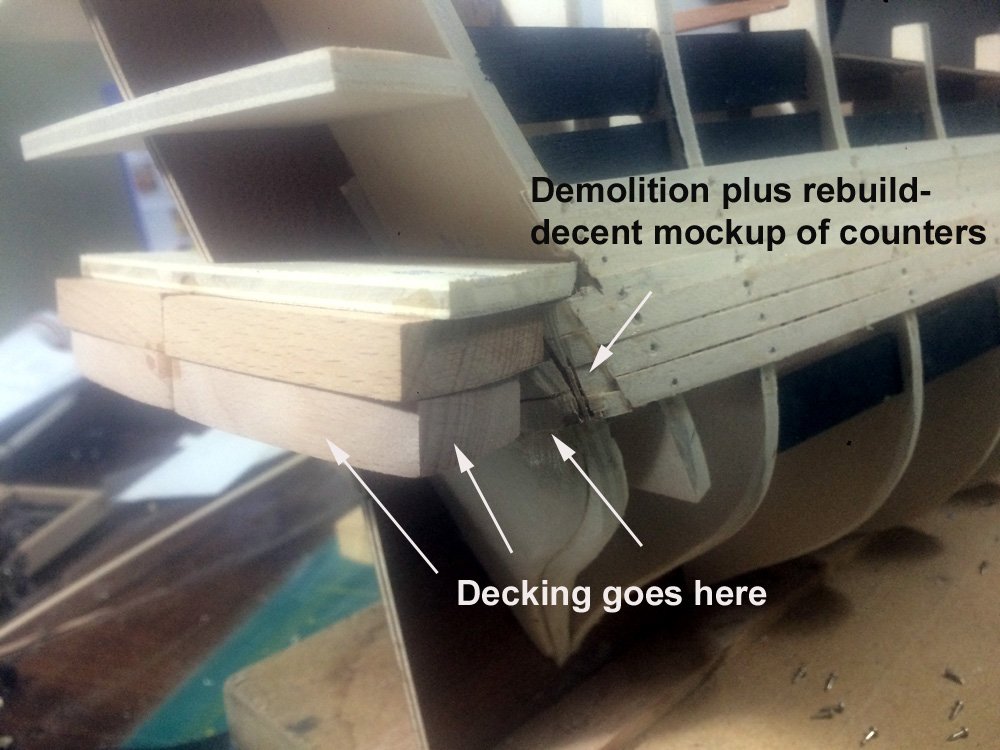
OK Keith maybe I have this figured out. Here is a revision of the stern photo above. The plank are supposed to stop at the counters. Should the planks also be tapered a little here. The look of the planks also bugs me. I so not seem to be getting an archer's bow from bow to stern i.e. the middle does not seem to be below the plane of the ends.
-
That sounds good to me Keith. What confused me is the largest counter seems so oversize. It is bewildering when you get parts made that way. You can only think they use them for another model. The Bow and stern fillers were the same. I cannot believe I cut one of the supplied parts in two and it worked. I am trying to do the first planking as well as possible because I think the walnut boards will not bend like the lime pieces. I hope you are having a good day and thanks for looking in.