


Mirabell61
-
Posts
7,324 -
Joined
-
Last visited
Content Type
Profiles
Forums
Gallery
Events
Posts posted by Mirabell61
-
-
Hi Popeye,
that is the reason why I use stainless steel wire in spring hard Quality
Nils
-
Hi Joachim
an very interesting ship you are showing us, I like your attitude of modeling individual Input and improvements, shall follow further with great interest. Are you intending to doing the complete rigging (inclusive sails) as well ? Keep going, Looks great...., do you have Pictures of the plank on Frame sequences as well
Nils
-
nice Methode popeye,
I like the tea staining colour, and does your "pillow blow shaping" durable last even when sails are mounted and Operation ropes mounted?
Nils
-
Erik
thanks for replying,
yes sure, there were micro size burnrings but the remaining "Centerpole" made from the hollow needlecenter, surrounded by the mini burnring, and all flush to the surface was my Intention..... The 0,8mm diam needle only should have burnt in appr. 1/3 of the plank thickness. But as mentioned it all went to the bin...after trying several attemps
Nils
-
Hi Popeye
I found good suitable Cotton Cloth at IKEA warehouse, is that also known in the place you live ?
Nils
-
Hi Nenad
trust that is the right atitude of saving down impressions as they come in. Would like to see more of your Project, Keep the building log under good steam....
Nils
-
Hi Popeye
thanks for sharing, the wenzelwharft description does not look bad, was this Content of the kit ?
What I would in every case sugest, is to do the straight Cloth connection seams first carrying on with the seam 1,5 to 2cm beyond the contour lines and then cut out the outside contour with the sewing thread fringes depending on if you do it my way (2 x 4mm Surplus)or more.
Regarding to the America I have just sold an 1200mm Long scratch built model hull of this great ship early this year because I had no more space in my Office. In the Moment I have 4 completed models in glass cases here, 2 Steamers next to the 2 Tallships and to date I woul´d`nt even know where to place the Pegasus once she is completed

scratch built mahagony lightweight hull, planked on Frame, epoxy with double glass roving coated, removeable 3000gram deadweight, ruder prepared for RC contol
Nils
-
Hi B.E.
good Suggestion to consider perhaps coppering the "open" side, port side of the rudder, etc, and having the stb side in "anti fouling" broken White a littkle thicker than stain application to still enable Plank and grain structure to come throug a bit. That is i.e. what I liked from many of the "HMS Fly" Pictures.
Nils
-
is that the Billing's kit? the sails {and the ships} look superb.......very well done. I never tried to use a different color thread. I have been using the admiral's sewing machine for a while now........funny, I bought it for her, and I've been the one using it the most. I don't use wire, rather they are painted with diluted white glue, and laid on a bed of towels {covered over with plastic wrap}. the towels are puffed up in areas to give the sails a billowed look. your efforts paid off very well......such a wonderful job !
Hi Popeye,
no, the ships on the pictures of the first post in this sewing related thread are scratch built from plans and gathered Information, plenty of Research before kicking out the first work on the Frames.
An interesting technique you are explaining, would love to see some pics....
Regards
Nils
-
Hi Bob,
I´m glad you liked log, just had the Feeling it had to be shared with others, because before starting These " selfmade Trials" I searched the web in vain for decent sail making description.
By the way, I trust it is`nt the Billing boats Bluenose .... or ?
I have the 1:75 Billing boats BN on the shelf 3/4 completed for several years allready. Every time after I looked at that U-tube video I suggested to Eddie, who is currently building the Elsie, I know I have to carry on with the BN asap. Let us share some of your pics with your sailmaking progress
Happy sailmaking Trials
Nils
-
Hi B.E.
"exact, the forelast fo`csle deckbeam is allready marked for cutout in that deck space. If with "ledges and carlings" you mean the framings of the stairway on deck, yes, shall provide mahogony framing and probably brass threeside railing there same as the others shown in my buildlog.
Thanks for the advice for the Surplus etched hooks availabilty.
Shall priority wise have to make up my mind at this time about the ruddersystem (ref. to my`s and danny`s recent Input). What is your opinion B.E. about coppering or not. If coppering, it must be perfectly applied for optical reasons. if one should leave some plates on, that may fail ones own criterea and they are not replaced, they look at you pityfull ever afterwards from the stand (smile)
Nils
-
Hi Jason,
lovely work you are showing, a great Inspiration to start thinking of what make or scratch i.e. a swan class`s Long boat should be from
Nils
-
Danny
I forgot to feed back earlier on the "building Speed" ( your reply recently), this is seen a Little bit spiced with Humor as you recognised, even though the 4 months are real for the 1:64 deal. But I am absolutely Aware of what it takes for all 1:48 swanie builders to get the "thousands" of parts, jigs and gauges logistic wise made marked sorted and assembled, and this in a way as if it were a real ship, I also mentioned this to Toni before when sighting her buildlog, this applies as well to all the other admirable builds shown in this Forum and which I so much love to see.
keep smiling
Nils
-
Hi Danny ,
you are right with your Suggestion Danny on priority for the rudder, thanks for this reminder. The reason that it was not started before is because I to date did not make up my mind if coppering Sub waterline hull, or leaving it Wood stucture, visable (Planks, grain etc) perhaps with eggshell White heritage "anti fouling" optic. I was intending to feasten the rudder hinges after doing so.
Allthough I was seeking Input opinions on that choise twice allread in my buildlog from fellow builders, i think I Need to flip the coin soon myself.
Nils
-
Part 2

have to push through... "Pamir" takes 32 sails and "Gorch Fock" 23 sails

textile glue with fine applicartion nozzle, works surprisingly well (found on Ebay)

this is a spool of 0,5mm Polyester weaved hollow thread. Predestinated for pushing a wire Soul through, works well !

full suit sails mounted, my Tallship "Pamir" model

likewise, sails attached to "Gorch Fock"
Nils
-
Resubmitting of lost pictures
Hi fellow builders,
as some of the pics went lost some time ago I have resubmitted these, beginning with # 32 post on page 3
Nils
Hi fellow builders,
in Need for sewed sails, I dared to do self Trials with my wifes sewing machine some months ago. If there is interest in anyone trying likewise, pls. dont hesitate to comunicate your queries here. Also feel free to share your own experience....
I use thin fine weaved Cotton Cloth, use 100% Polyester sewing thread, medium machine needle, textile glue for Fixing, some ordinary paper for Patterns and a soft pencil for drawing the contours from the templates onto the Cloth.
The Cloth is only slightly wettend with laundry starch spray and ironed dry . The soft pencil lines are easy to follow during Transit into the sewing machine. There is no Need for prefixing sewing needles along the seams. The ultimate kick I found was to place a 0,5mm stainles steel wire in spring Quality into the lower (bottom) Portion of the bolt-rope that encloses the sail. Braced to the wind, once mounted you get sails shaped as if the tradewind is just providing Swift sailing
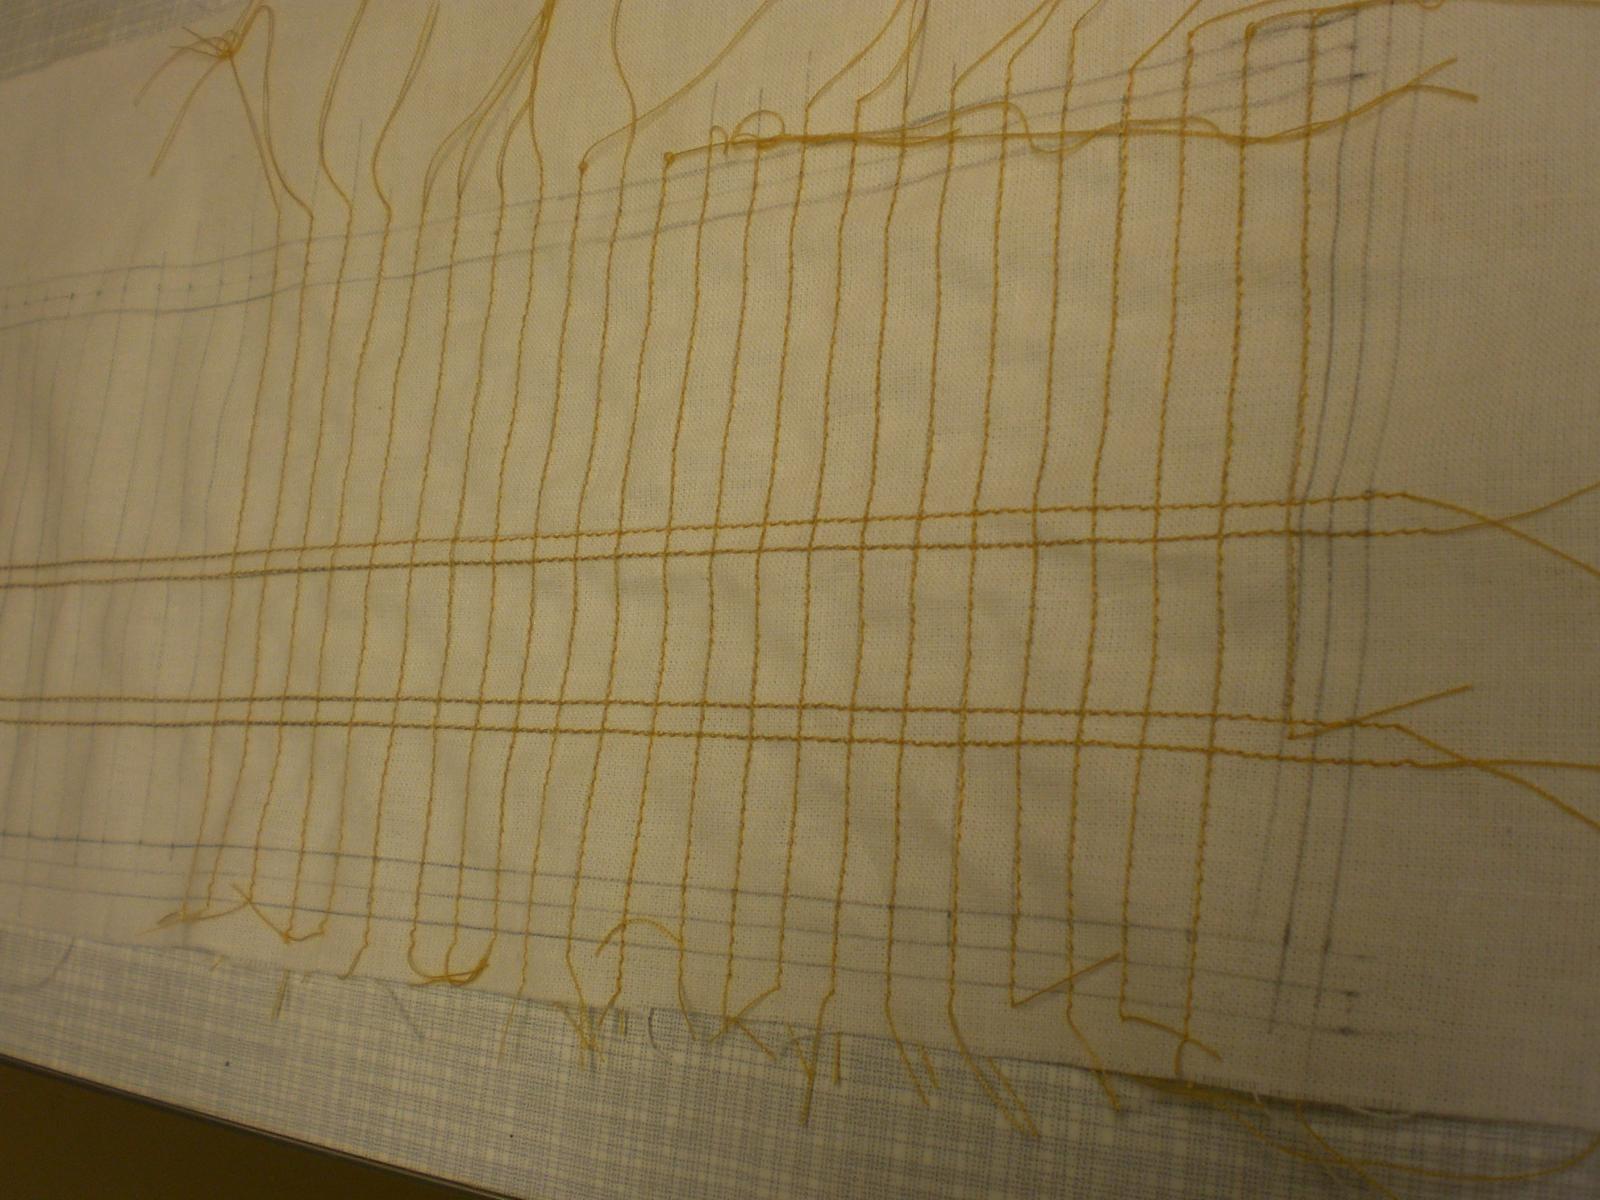
Please follow the (I trust) self explaining Pictures, I added some coments, and a Little Hand scetch for Illustration. It does not Claim to be perfect, but the anxiety for the sewing machine is overcome, improvements are welcome, but last not least the "sewing boat" has been pushed out....
Part 1
sew straight seams horizontal, vertical
follow the soft pencillines on the Cotton cloth
trimm off the edge fringes after doing so, then follow my handscetch at the end of this part 1
spring wire (stainless st)and hollow weaved thicker Polyester tread
sorry, dont know the english Nomination for this seam making device
debur (important !! slightly round)wire edge and push gently though the weaved thread
Surplus wire endings shall be made to small Loops for the the sail bottom bolt-rope rings
stay sail pattern
after many Trials,.... seem to work now...
Comes out of the machine quite clean and neat now
should be self explaining... come on pls.get out your german/ engl. dictionary.
Of course I shall be happy if I can help....
Part 2 to follow
-
Hi Tom
a very interesting introduction into this book that raises my sences for Details on old steamships.
Thanks for sharing so far. Will you be showing a few more pics as to the books Content ?
i.e. are there examples for the ways those steelplates had been rivited ?
Nils
-
Hi Erik
beautifull work, I very much admire your build and was also very impressed of the Feature with the treenails (alone the amount of those to be set !!)
When Thinking about this Point on the 1:64 scaled Pegasus I am currenty doing, I did some Trials with hollow injection Needles mounted to soldering tool and carefully burn-sinking the needle into the appropriate woodplank nail places, but had to give up this after many Trials
Nils
-
Hi Bob
...top aces work you are delivering, when going through this I decided to restart your buildlog sighting more relaxed from the first excitement and just relax and enjoy and study with great pleasure a top Champions build.
Bob, thank you so much for sharing your buildlog with us
Nils
-
Here comes part 17 of my buildlog,
after this I shall have to sort out the further logisticwise Approach in my actual build sequence, it may be the rudder System, Fitting out the rear cabins on the gundeck, or Gunport covers, or, or....
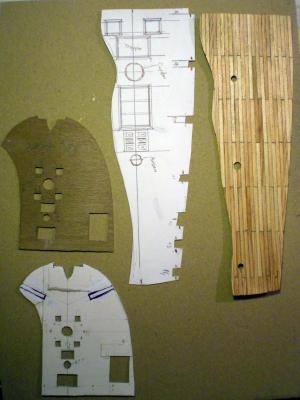
for decks I use cardboard templates for tranfering the shapes onto the 0,8mm ply, they allow easy necessary adjustments during prefitting
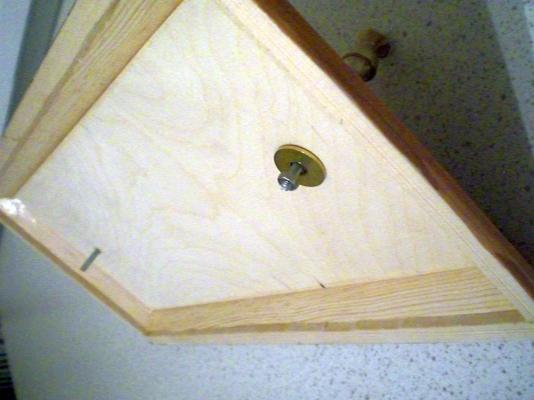
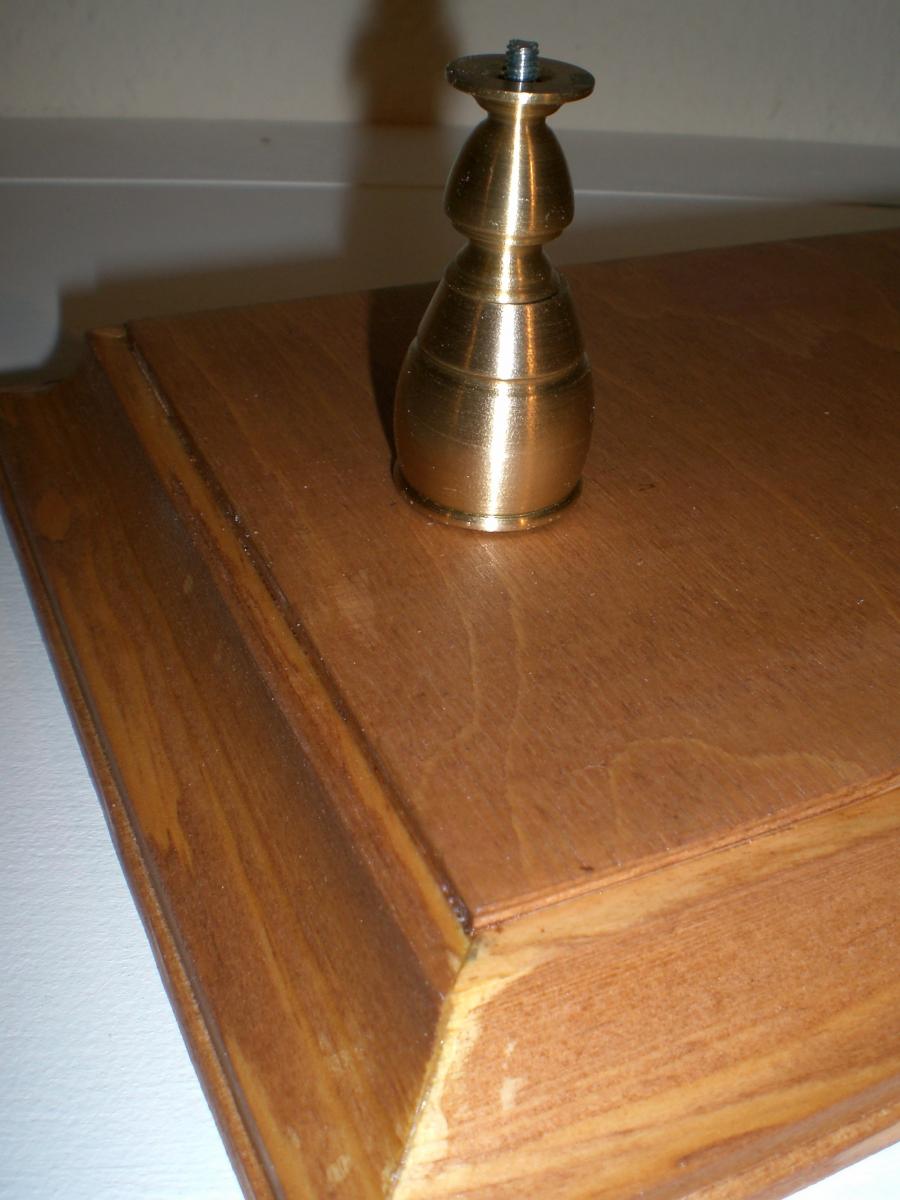
this is the stand in view from below with the pedestal bolts coming through
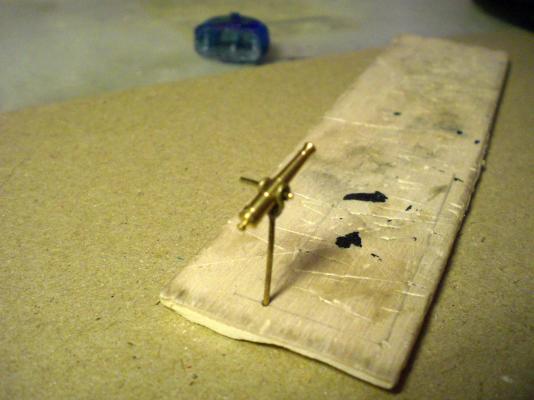
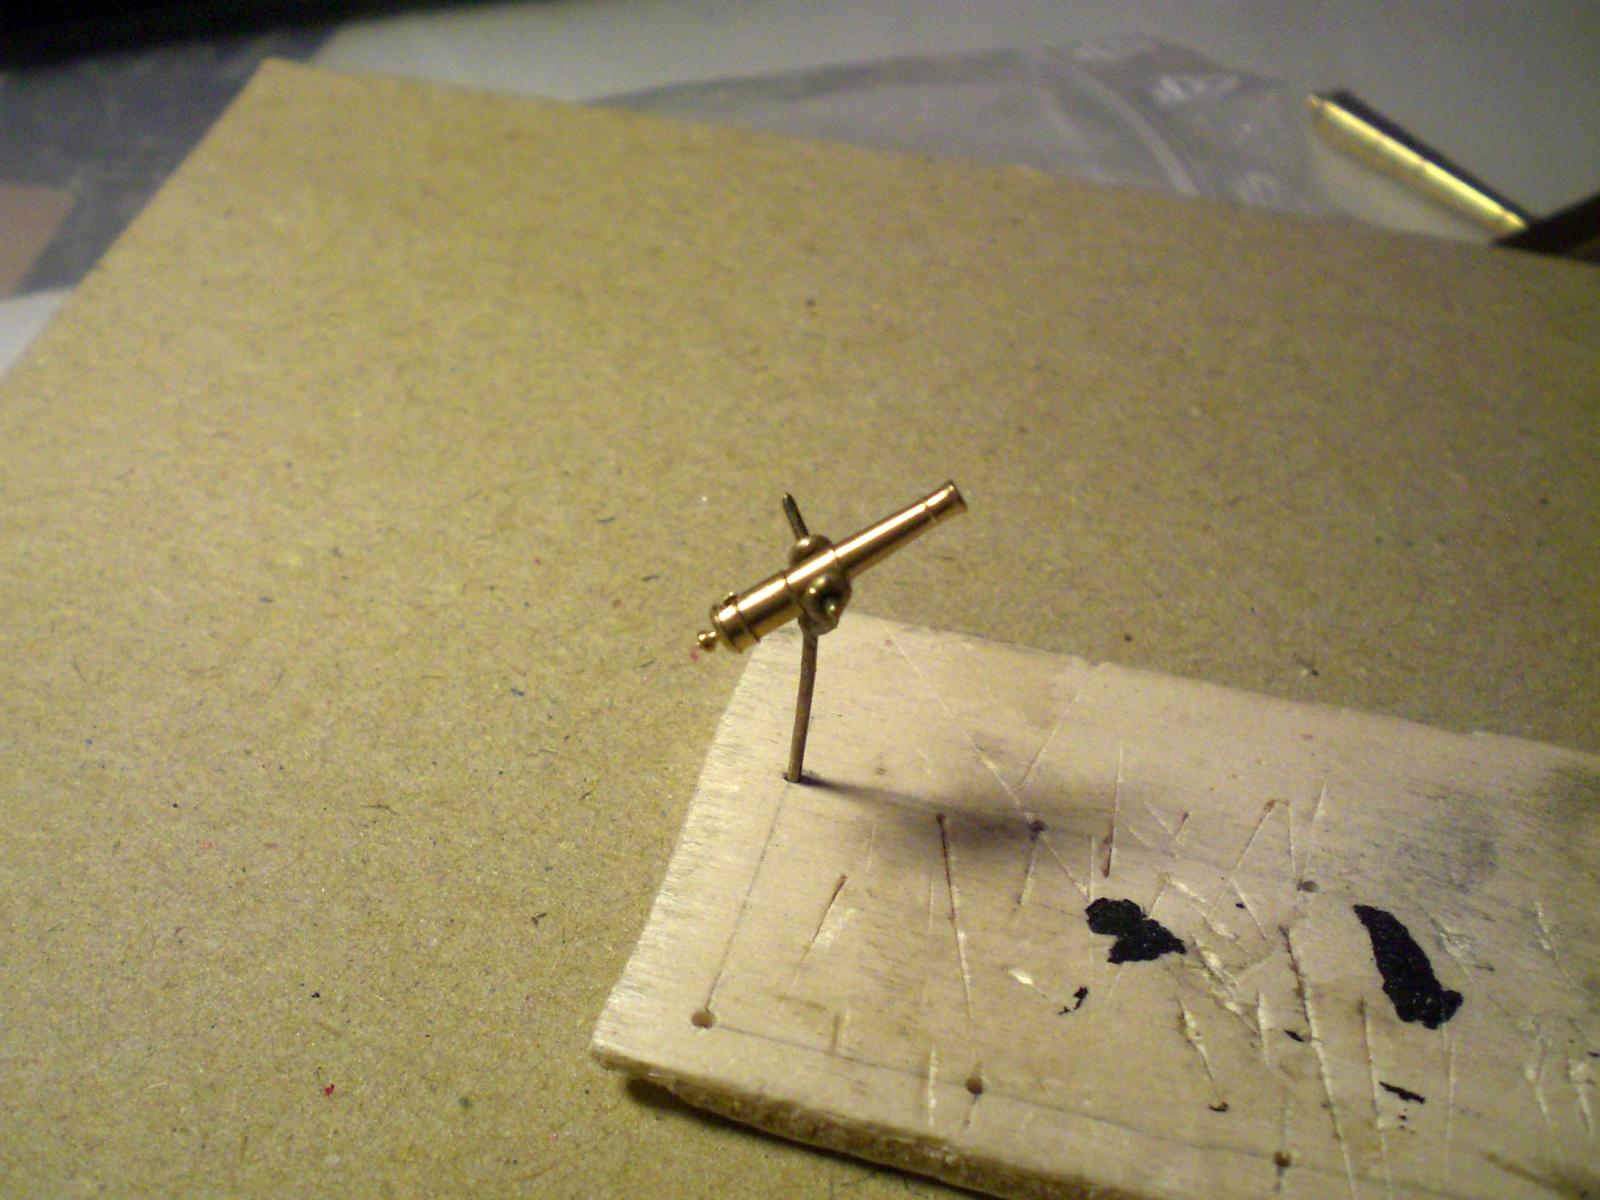
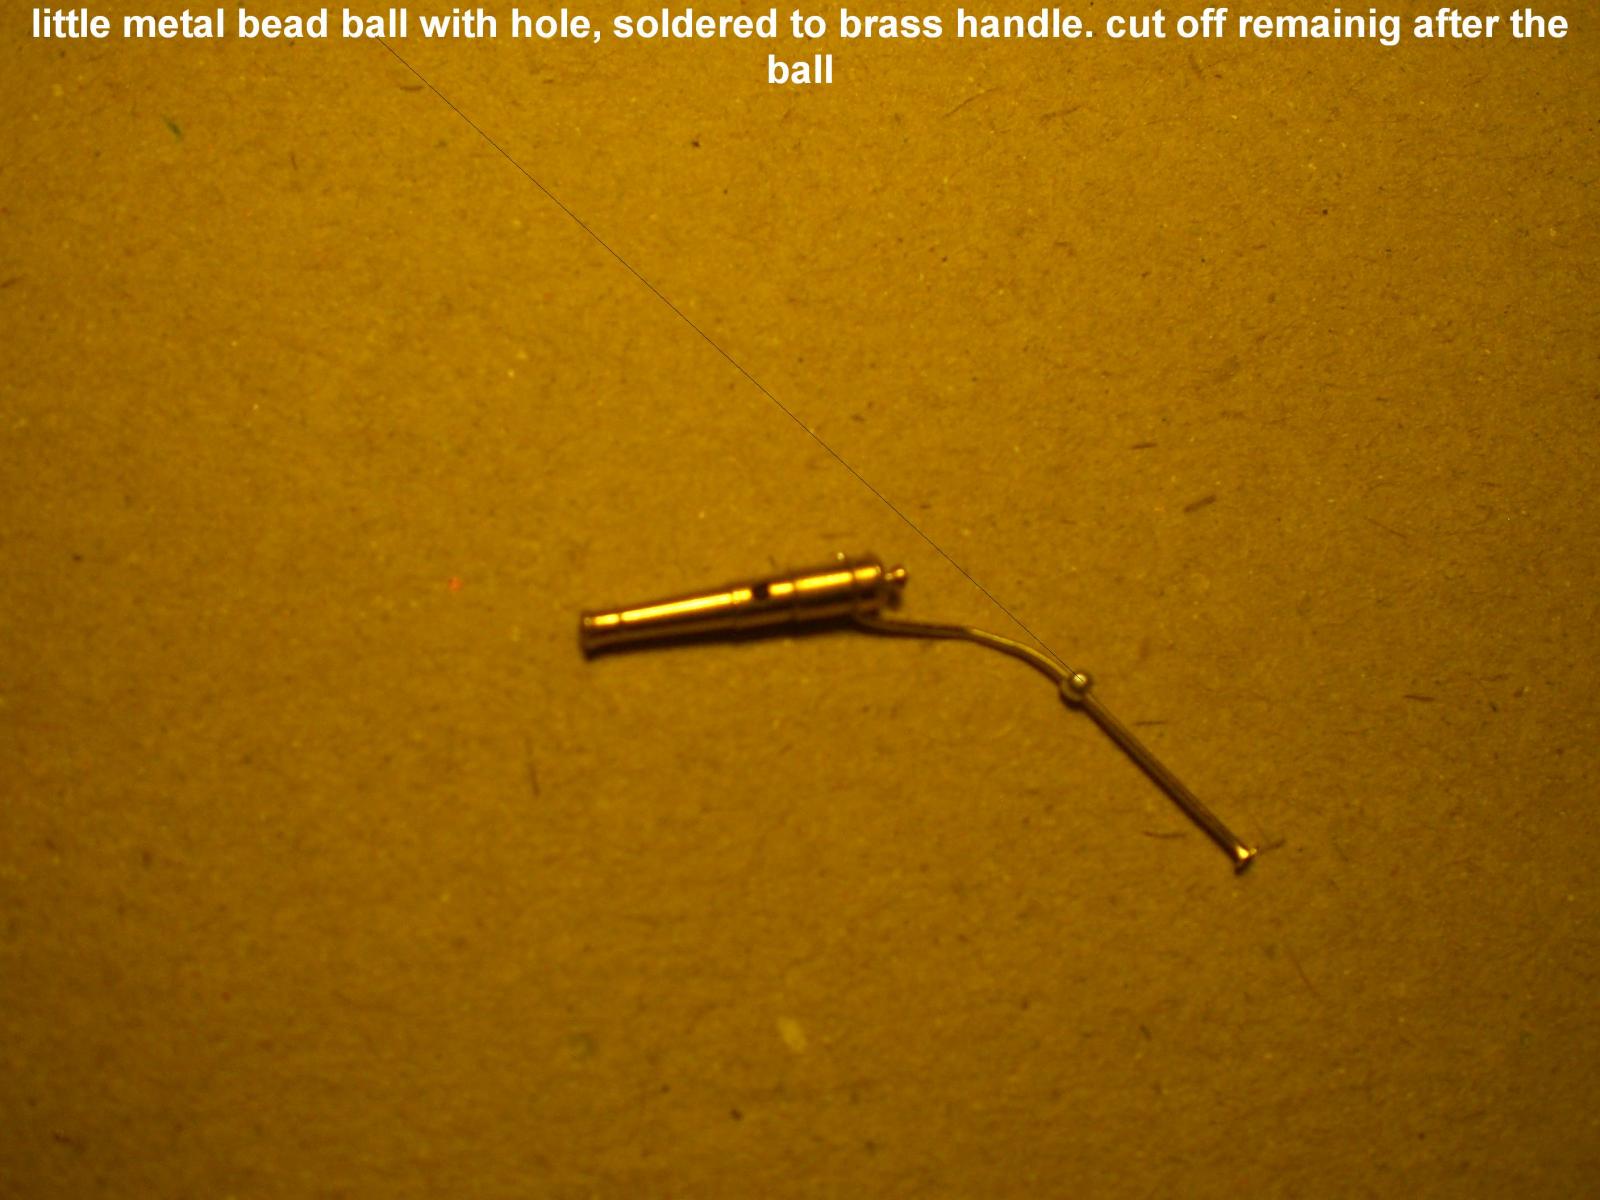
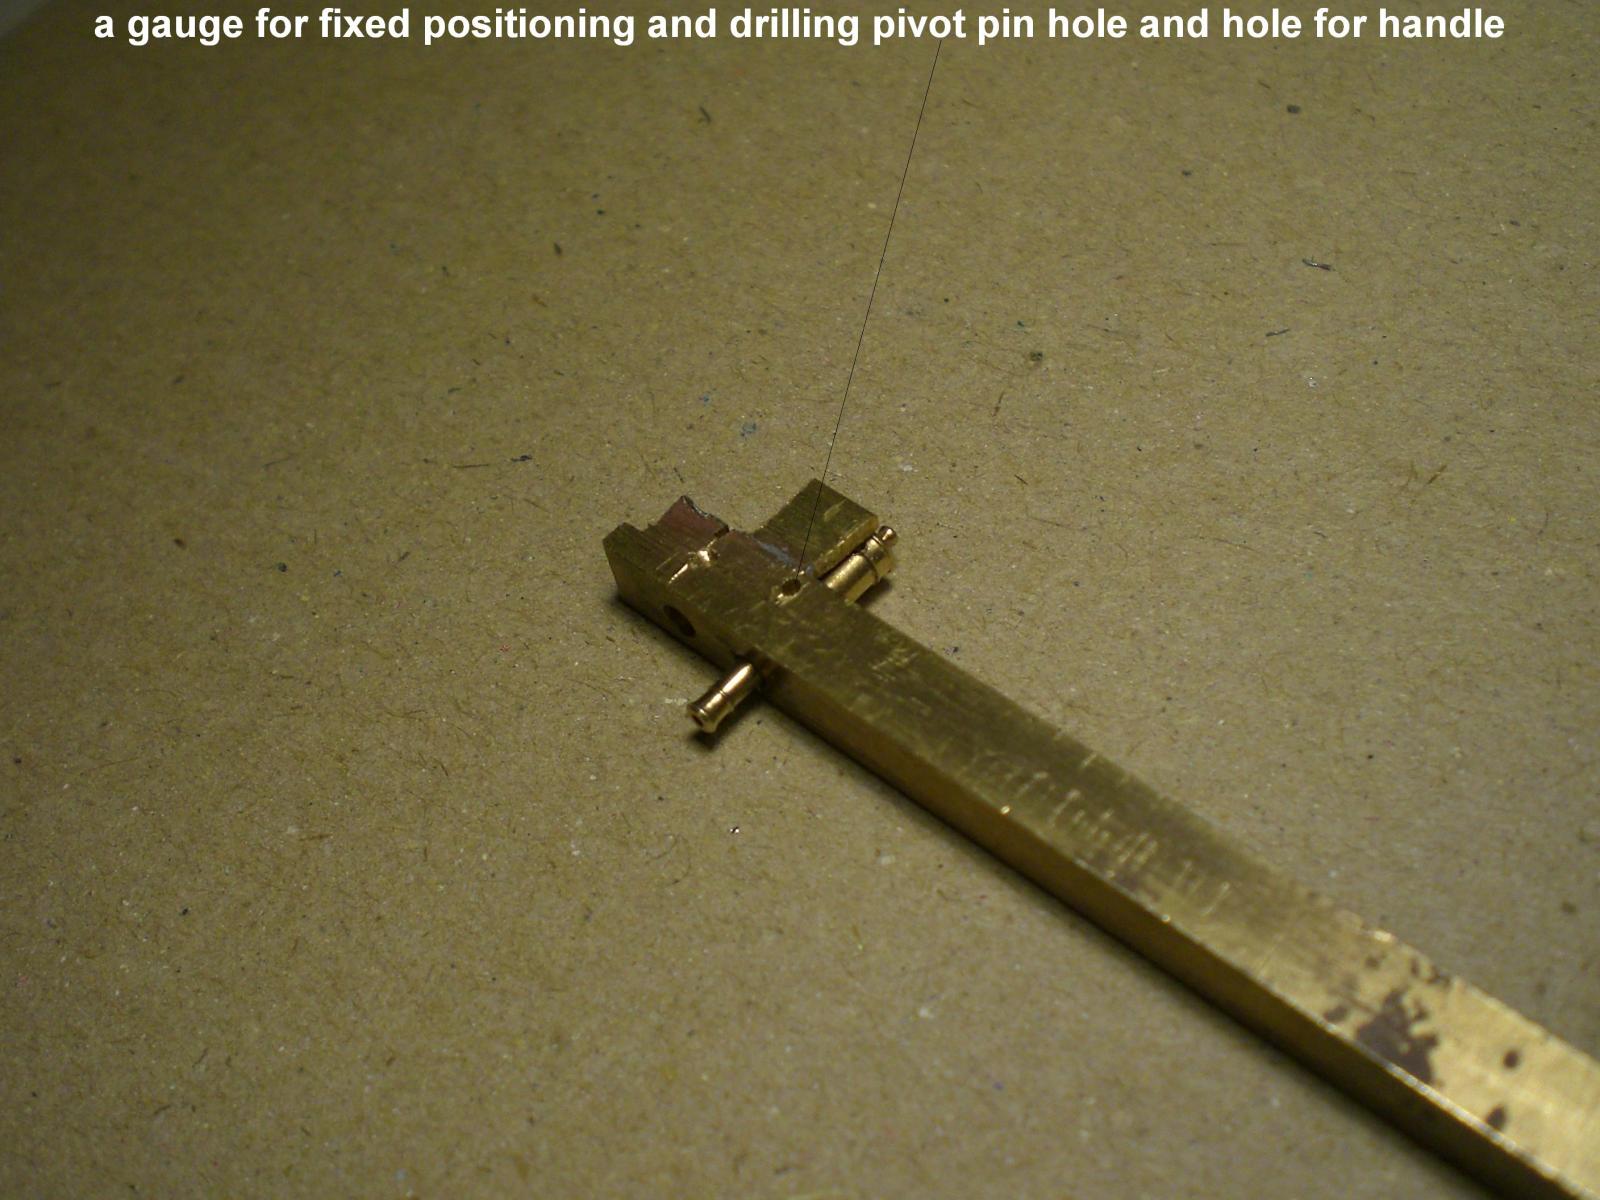
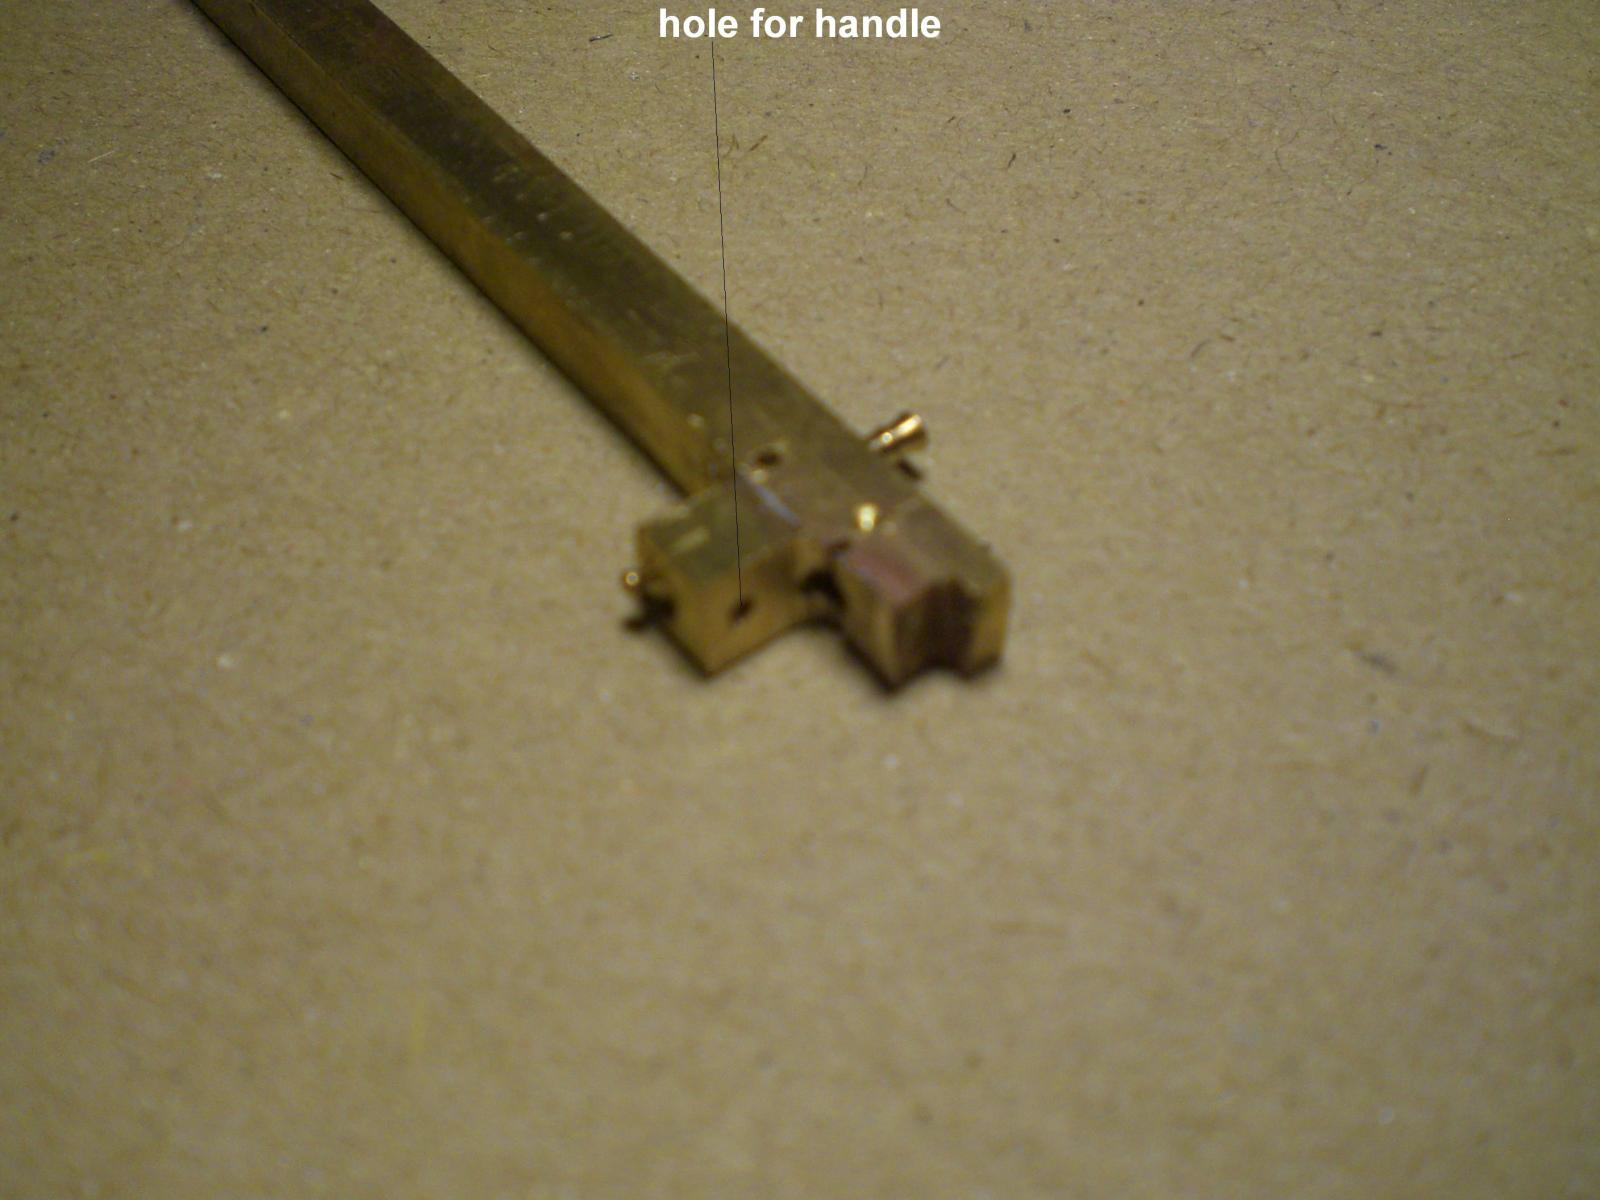
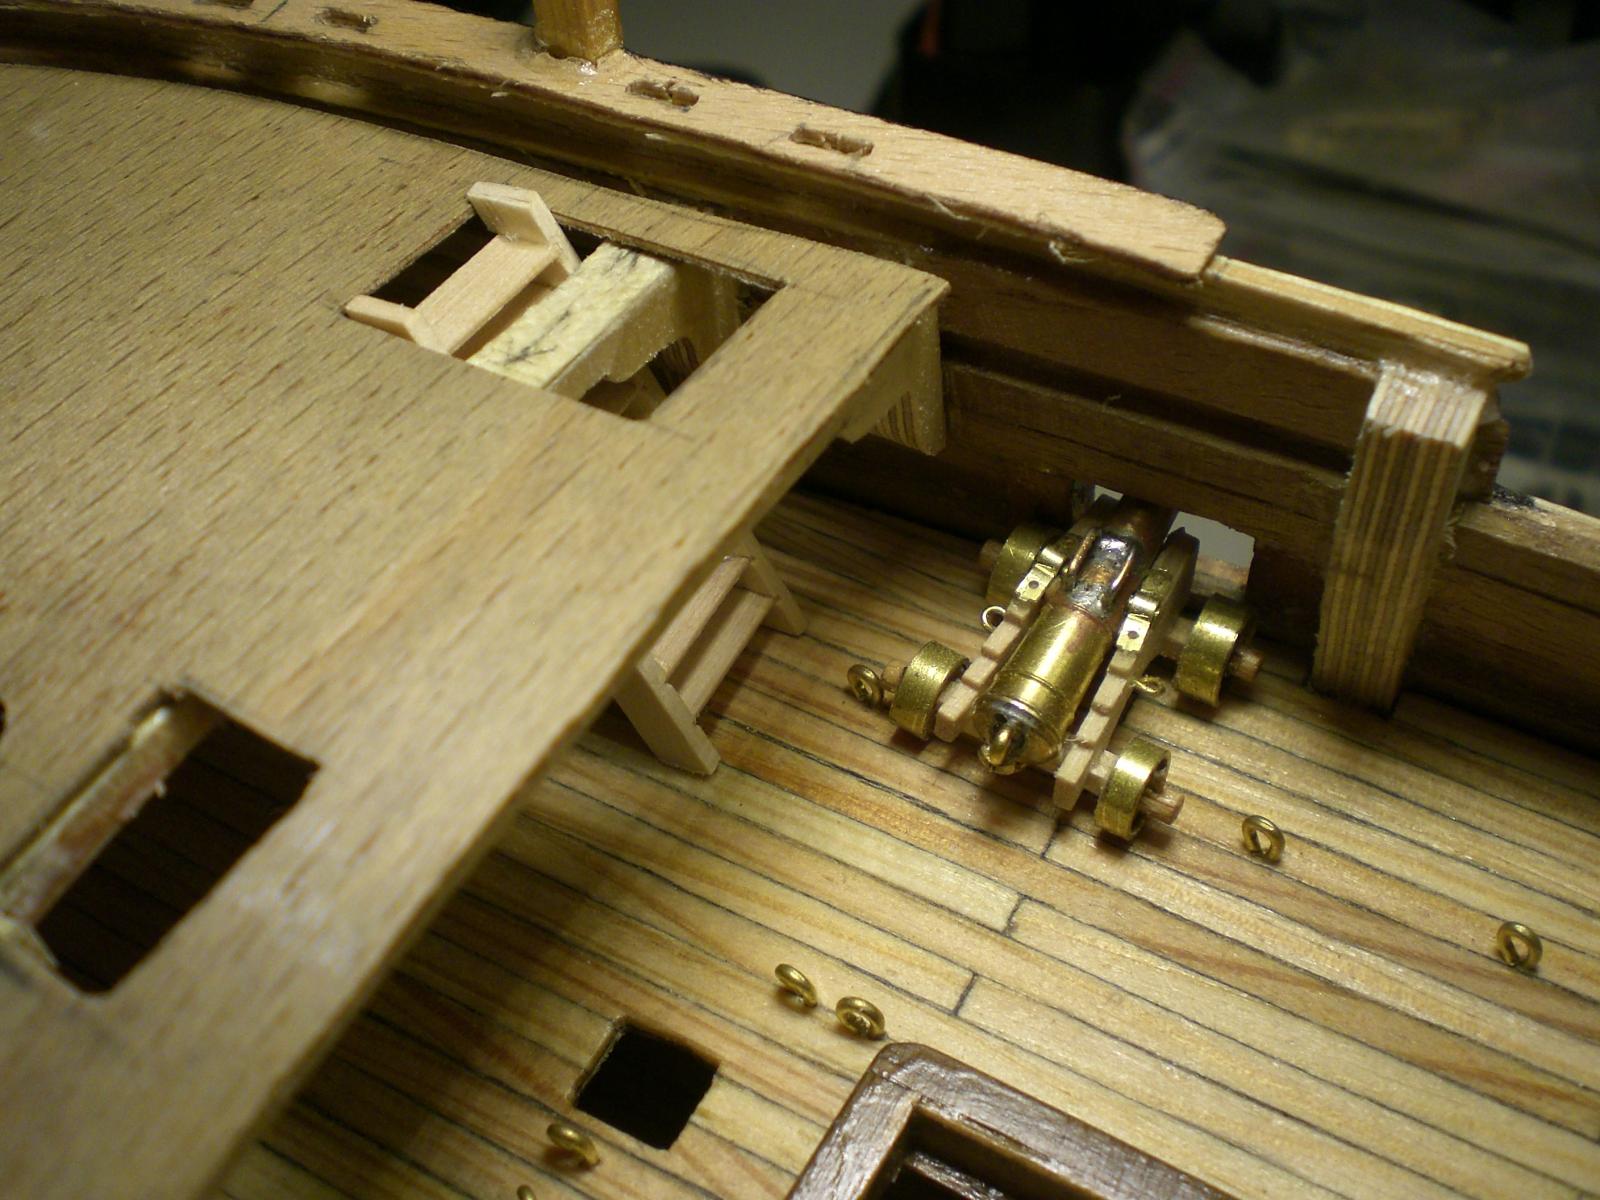
dealing with the first Trials on the swivel guns, using RB Model 15mm gunbarrels. I shall scrap this first Trial for the mounting device again.
B.E. Shows us an excellent solution for the mounting brackets. I hope that Amati may take this up and provide an etchpart solution ammendment to the brass Sheets, because of the limited amout of brass hooks

unfortunately my camera provides no macro Feature.... for the Close ups

just an alternative solution, B.E. also here has a great alternative to Show, well done !
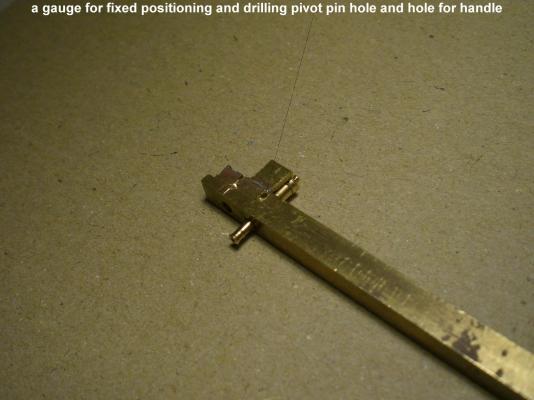
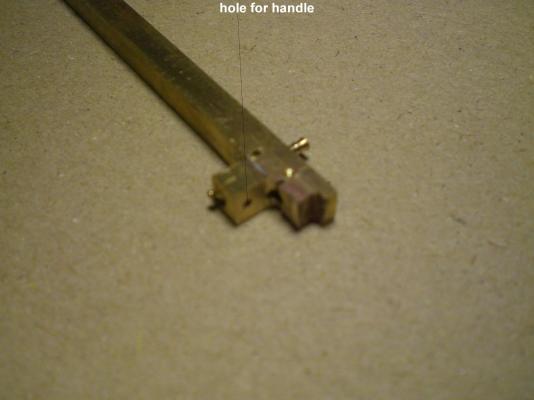
This Little jig supports during driiling pivotpin hole and handle hole into the unbored RB models 15mm length gunbarrels
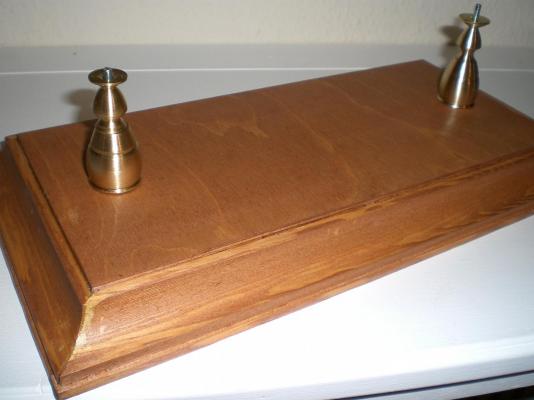

two more Pictures of the stand, this is an easy priceworthy way of getting a not too fancy stand
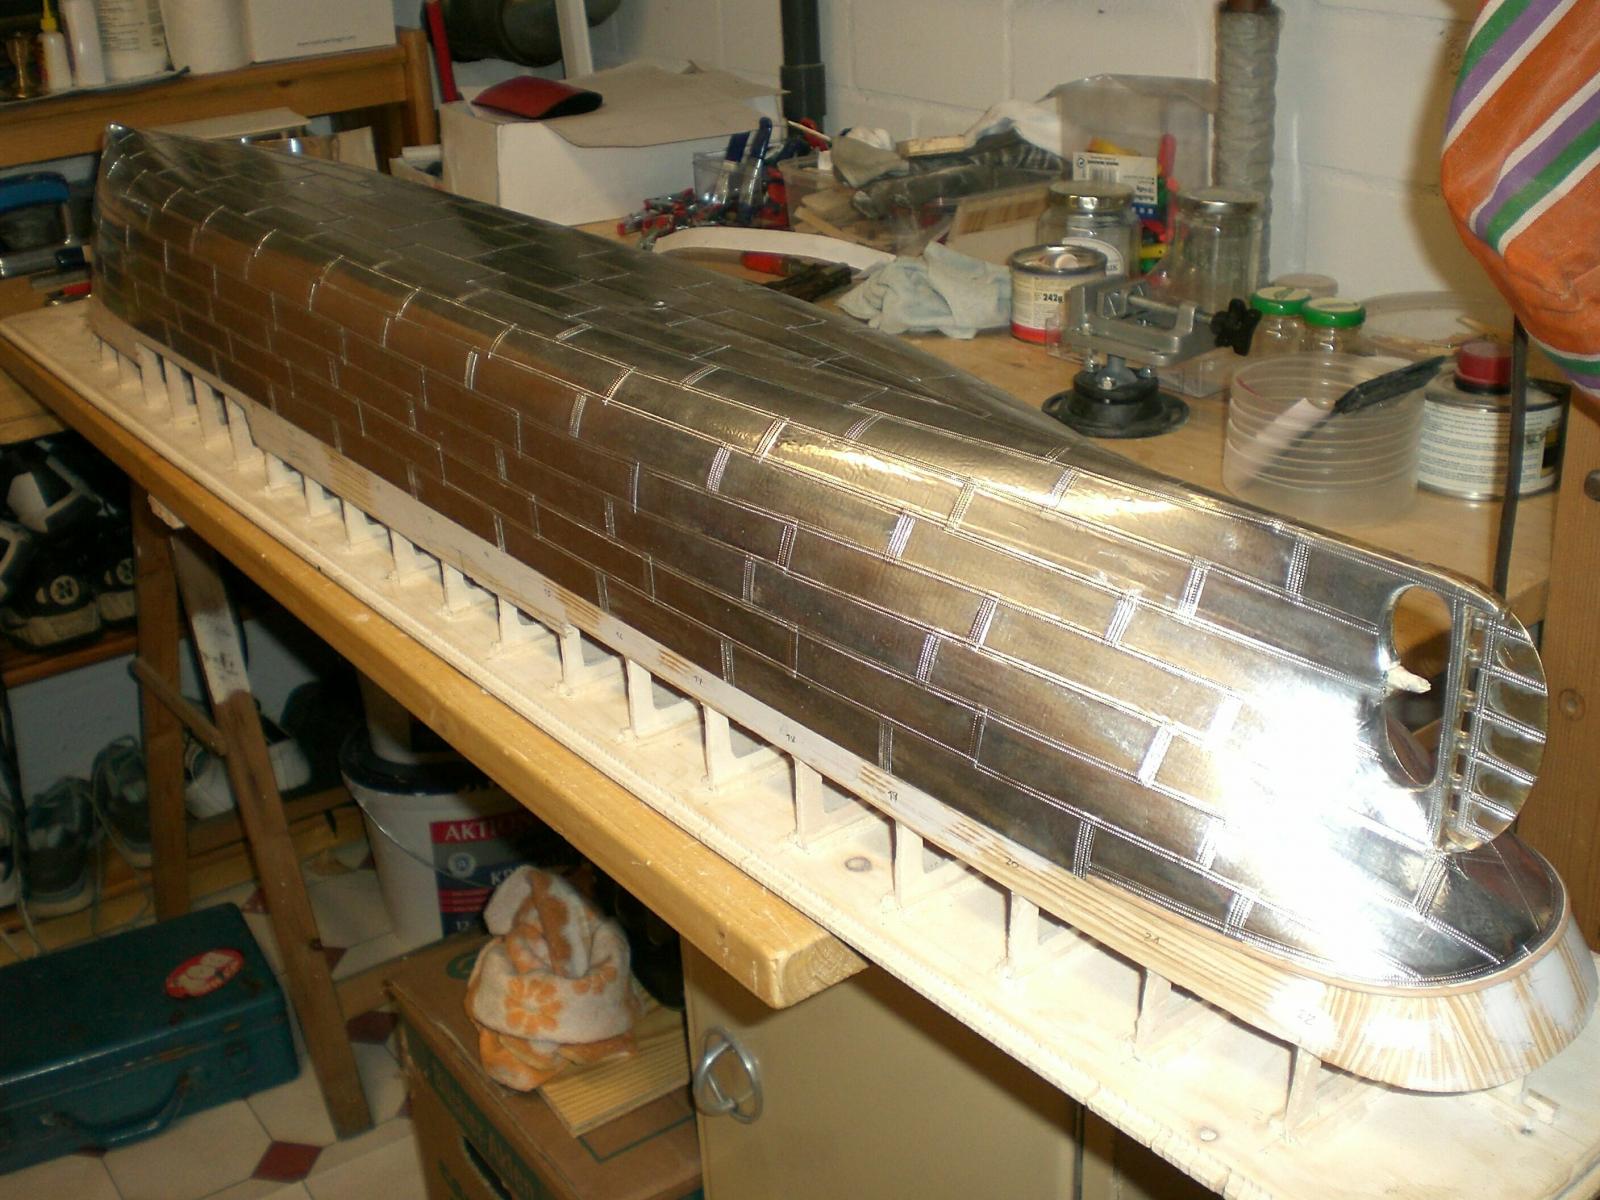
At this buildstage ( I asked Forum members before in my buildlog) any Input on the question : coppering the hull or not ? would be appreciated. Pros and cons would be very welcome. I did a lot of "steelplating" on model hulls before, but that was representing iron/steel plated hulls in riveted Detail (like Titanic, etc.) on early steamships.

this is what I meant, it`s showing the 1400 mm Long raw hull of the german/ australian line Steamer Elbing launched in year 1898
The 18th century coppering plates are more or less nailed (model : glued) on to the planking, but also hiding the wooden planking structure
Nils
-
Many thanks B.E. this is an highly appreciated extra Bonus Information and shall certainly be of great help
Nils
Good day B.E.
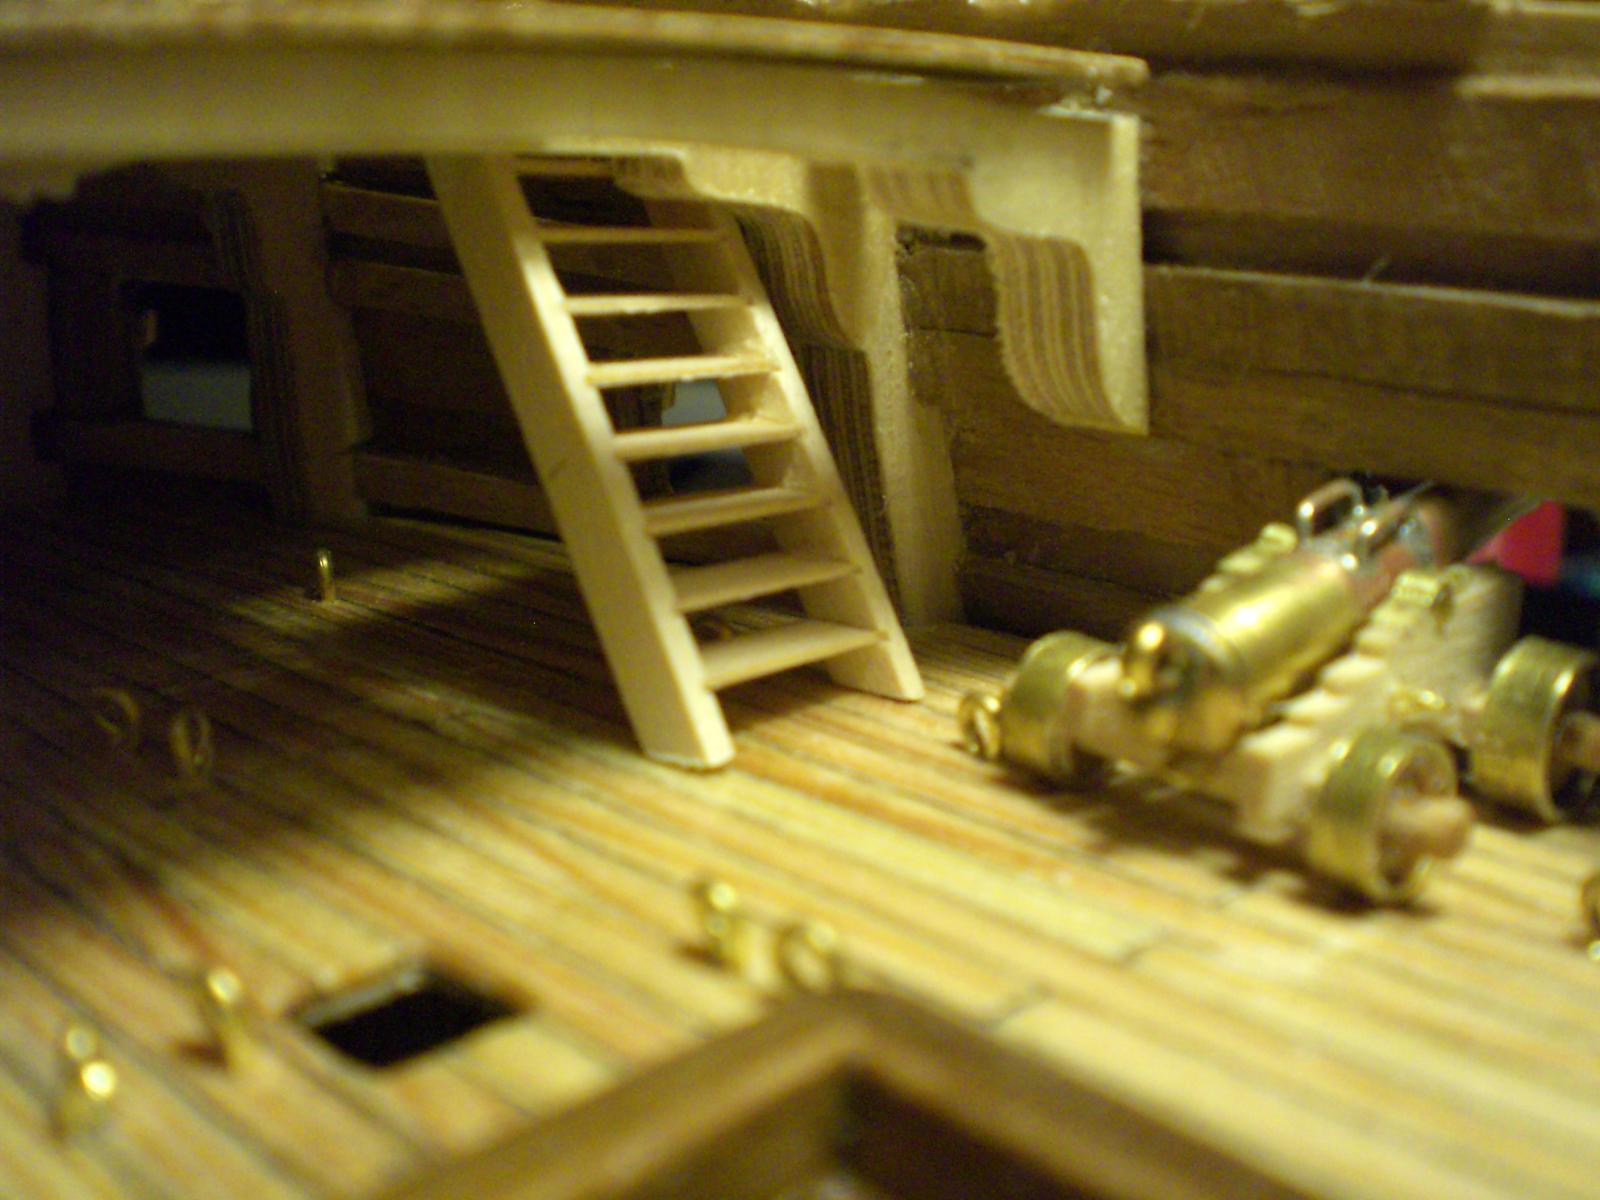
here just a quick Illustration how I meant it with the space, the stairs and clearance to 1st and 2nd gun. The gangwayplanks you provided are still going roun in my head, because I really like them. What do you think about my stair Version in combination with your G-Plank Version ? The swivel gun attendants would not interfere with the heavy gunner Crew one deck lower in battle....
Nils


- aykutansin, NMBROOK, tuciship and 4 others
-
 7
7
-
Danny
wonderfull fellow builder advice..., I looked up your link
Many thanks for the galley stove link in your own buildlog, it`s really great. I know you are building in 1:48, and if possible would like to adopt what is feasible into 1:64 from yours and from B.E.`s 1:64 splendid stove Version
Nils
-
Hello Nils, re the English terms used in shipbuilding - here's a little schematic I did on the plans to help me sort out what was what.
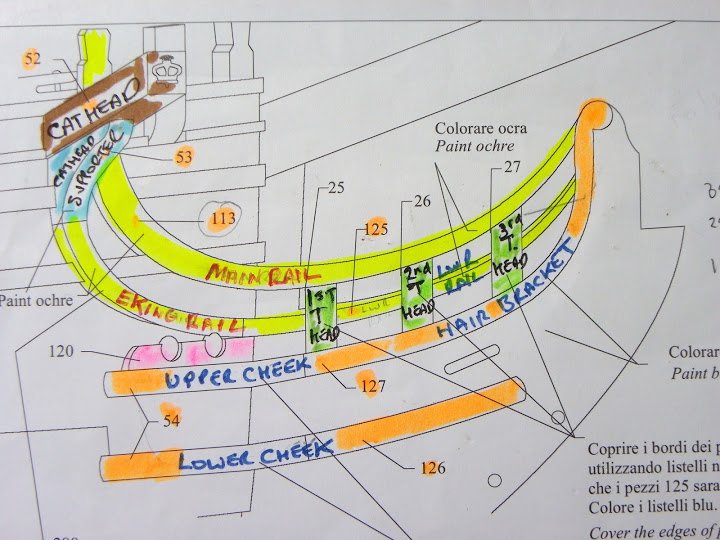
Hope this helps.
B.E.
Many thanks B.E. this is an highly appreciated extra Bonus Information and shall certainly be of great help
Nils
- Elmer Cornish and zoly99sask
-
2
-
Thanks B.E.
These are the comments I love between fellow members, I feel strong Supporting and know someone is actually reflecting my thoughts about Details. A Little handicap I momentarily have with all the naval ship related Features in english language. Pls excuse if I should not always find the correct nominations i.e in my buillog. I have meantime found an old sailors dictionary from Ebay with which I am happy at the Moment, but would Need to look up several nominations in your forestanding reply, allthough I think to see straight away what you meant. Please do`nt hesitate to use These and alike, it is very welcome, no Problem for me and in increasing my knowledge.
now some answers....
Rails finetunig, exactly, here it was also my intention to get the woodwork in place at this time to find a sturdy base for finetuning in a seperate session in some time afterwards.
Gangplanks versa ladders....
also exactly my thoughts when I saw your gangplank Fitting in the pics and which I liked and found nowhere else related to Swanclass. I thought I missed an important Feature when gathering Input. It is intended by myself to use the same Dimension stairs, rather than ladders same as other places between the decks. The Position of the first guns the required adequate angles of the stairs and the scaled size to suit the toughest sailor did spacewise not allow this on the gundeck and the naval inspector would not have approved this anyhow.
Ammendment to this: definately no, the new stairs intended fit nicely with sufficient space to the first under deck gun Tackling and the Tackling of the second gun. Shall provide Pictures when this Feature is ready
Fitting stove.....
yes this is in "the sponge" allready to a certain degree, having seen your stove some time ago I looked up what I could gather from the web, and found it a pitty that the foc`sle bulkhead should hide such eyecandy. So leaving this bulkhead away there was no reason especially with the slightly increased (filigrane framecutting I provide)deckhights, to not providing an open durable staircase for safe and quick Access. My thoughts on the stove have allready been gently cooking along for some time. When the time Comes, I would gladly refer to your splendid and very good looking self explaining Pictures of the stove.
Would love to Exchange more...., and looking Forward to futher comments
happy modeling
Nils


Looking for photos of homemade micro woodcarving gouges
in Modeling tools and Workshop Equipment
Posted
Hi Martin
I have thought much about Wood carving decoration and have a Dremel motortool which to date is mostly used for grinding, What rounds-speed i.e. do you suggest when considering lowspeed ?
Also thanks to all the others for sharing their experience on this thread.
Cheers
Nils