


Pat Lynch
-
Posts
88 -
Joined
-
Last visited
Content Type
Profiles
Forums
Gallery
Events
Posts posted by Pat Lynch
-
-
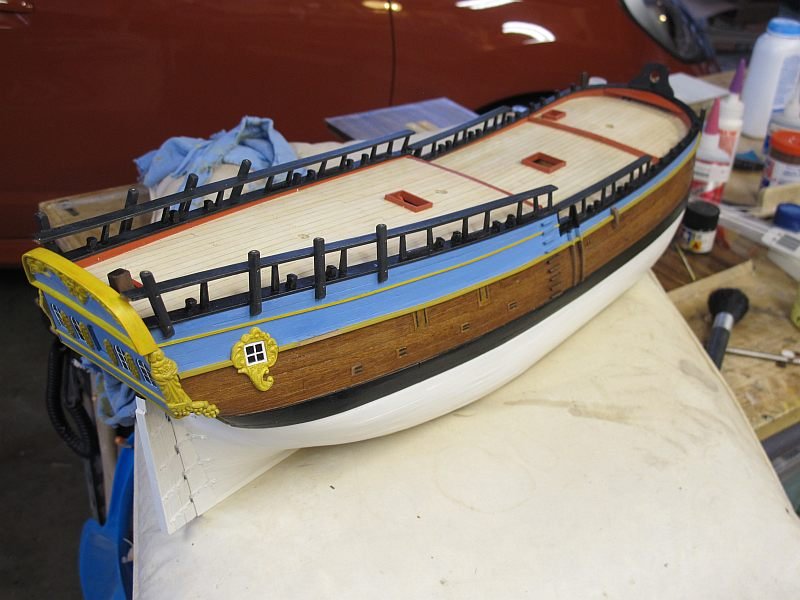
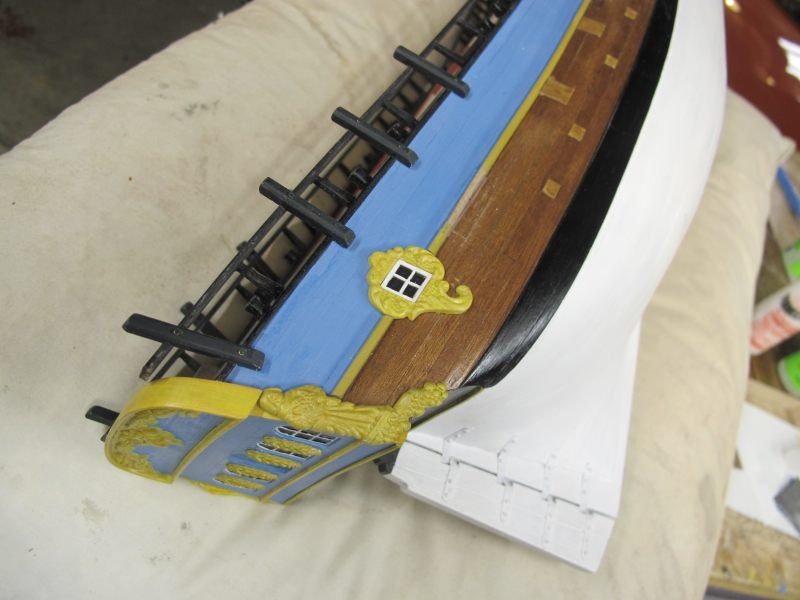
Some more of the hull details were added - the decorative yellow trim on the quarter deck upper hull sides and some dummy hinges on the various side hatches/openings. The yellow strip is 1 X 1mm plastic from the Evergreen stand in the local hobby shop. It was painted yellow on three sides and the rear scraped clean for gluing. The path it would follow was scraped back to bare wood with a #11 blade (only a scratch really) and the strip held in place while a tiny drop of thin CA was applied along a short distance. The process was repeated along the strip until it was secure. Almost no sign of the glue as it was wicked between the plastic and the hull. Looks OK from a distance!
The 'hinges' are just tiny pieces of thin black card about .75mm wide fixed with thin CA. The opening direction is what I could glean from various replica pictures.....not always correct possibly but they look subtle which is what I wanted. The bigger hinges have tiny spots of PVA glue applied as bolt heads. They are almost invisible but I know they're there
")
Next, I'll do the poop deck rail across the transom top - it seems to be curved in two directions so I may laminate some .4mm ply and cut it to shape. We'll think about it.
Pat
- BANYAN, John Cheevers, JpR62 and 1 other
-
 4
4
-
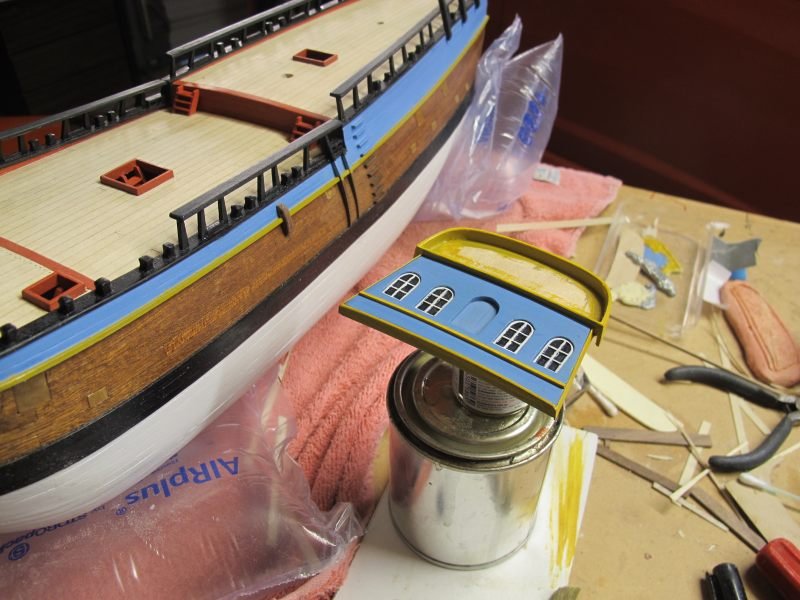
Back to building......The final bit of exterior decoration to be done at this stage - the Port side window at the rear - again from a resin casting and a little window frame added from thin plastic sheet with four panes cut out (a pain) backed by a piece of black-painted plastic. White glue (canopy cement) was run into each pane to simulate old glass.
I thought that was all the decorative stuff but I wanted to do the thin yellow moulding/batten/strip that runs around the quarter-deck hull sides (on the replica) at just below deck level. I'll have a go.......tomorrow.
Pat

- Ryland Craze, JpR62, goetzi73 and 2 others
-
5
-
'.....I did it my way....' I am starting with that disclaimer because this was my first time at resin casting and revealed a few pitfalls and may some folks can benefit from my fumbling attempts

For a one-off casting, I used the plastic clay supplied in the mini-kit. It is easily moulded and with care, makes a good basis for small objects. Make sure the clay is nice and malleable by squeezing it until soft BUT avoid folding it over on itself like pastry as it can leave creases in the 'dough'.
The object to be copied is washed clean and can be given a clean-up around the edges with a file but do not get too fussy - the resin copy will be much easier to tidy up! A dusting of baby powder over the object will make it easier to remove from the clay.
Lay the object on a smooth surface and mould the clay around it, examining a few times to be sure it is making good contact all round. Then carefully prise the object out of the clay (it may even fall out if held upside down). and place the clay mould on the bench so the top is level.
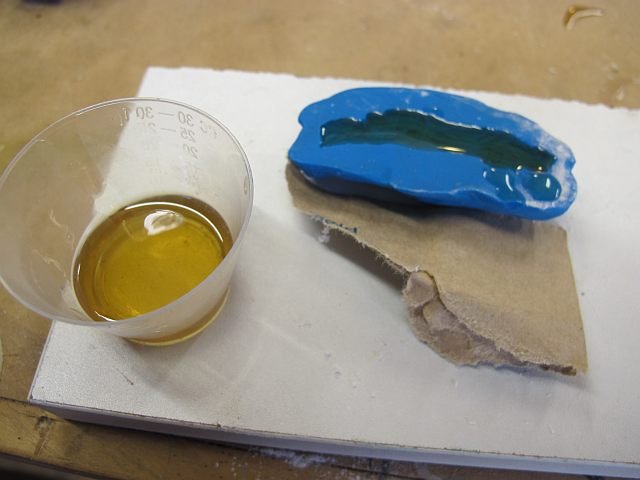
Mixing the 2 part resin is the trickiest bit. The quantities must be EXACTLY the same to ensure success (unless you are very experienced
) It is suggested that the parts A and B be measured into separate measuring cups and then combined into a third as some liquid will stick to the cups after pouring and may cause unequal amounts. Mix the combined liquids thoroughly and quickly - a minute is about all you have before pouring into the mould. The brief user notes suggest mixing a bit more than needed as it makes getting the small quantities more exact. I used about 10 + 10 mils -a fair bit of waste but if you got all the castings ready at once, it'd be more economical.
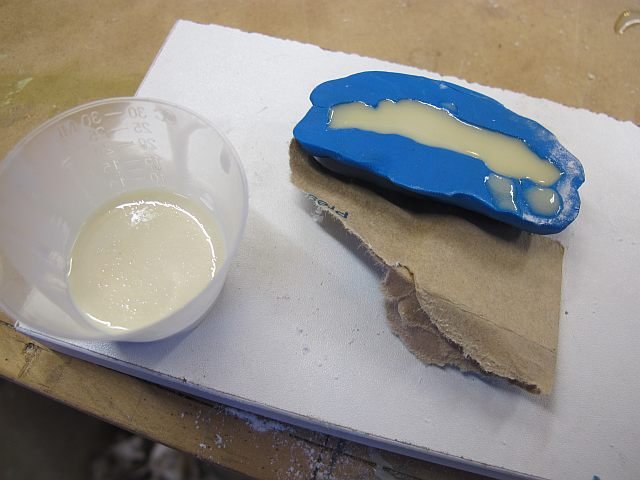
Dusting some baby powder into the clay mould and blowing out the excess is suggested for an easy removal. The resin will change from clear-ish to off-white when nearly cured - wait at least 20 minutes before very carefully easing the clay away from the casting which can be left for a while to fully cure. It seems very small or thin parts such as I did may take longer to fully cure. I found some of them only became fully rigid after several hours. Some warm sunshine might help! Any residual clay can be washed off with warm soapy water before working with the resin casting.
What you do from here is entirely up to you
The resin can be sawn, filed, sanded, cut, scraped and seems very easy to work with. I found it better to wait a day or so before painting and certainly give it a good washing first. A flat white acrylic seemed to prime it OK and Tamiya acrylics have dried OK. Medium CA works as an adhesive but I've not tried other glues.......
Sorry a bit long-winded but I hope it helps. It's easy after a few trial objects.
Again, this is just my personal experience as a first timer!
Pat


-
Whoops! - measure twice, cut once.......
Thanks folks - nice comments help keep the project alive
") However, I still make big errors - carefully positioning the first of the side windows under the wrong cannon post. Right where the mizzen channel will be
However, I still make big errors - carefully positioning the first of the side windows under the wrong cannon post. Right where the mizzen channel will be  So, a quick repair job and try again!
The decorative frame around the window was a bit heavy in metal so I cast a pair of them from resin. This also gave me the opportunity to give the window opening a bit of slant - sort of like many plans and pictures show. Not quite right I know but it gives it my own touch. The great thing about resin is it is so easy to sand, cut, carve, scrape etc so I made these items about a mm thinner and they curve to match the hull. I pushed them against the hull before they completely cured.
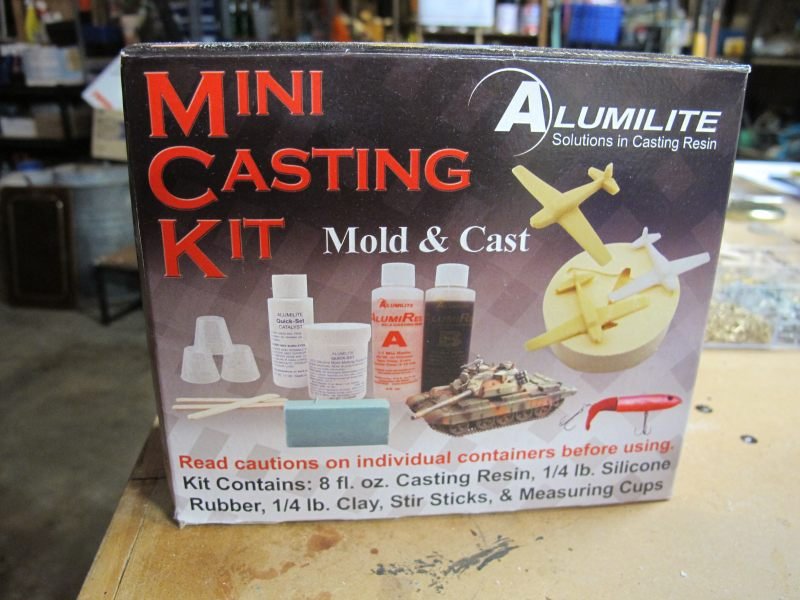
I have shown the little US made kit I am using and I'll try and give a bit of 'how I did it' next! But I AM a beginner and tend to do it my way.
Cheers and happy Easter to all.
Pat

-
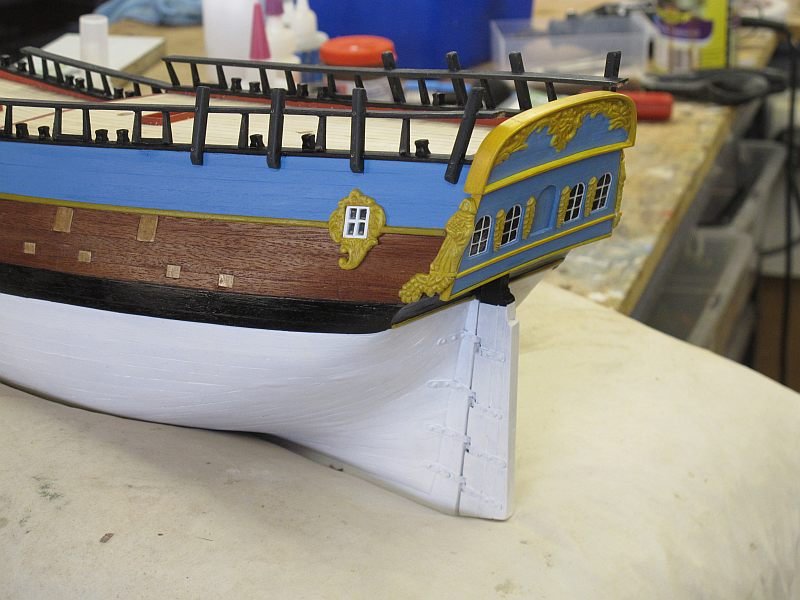
A little progress. The transom and the ornate upper panel have been final fixed to the stern
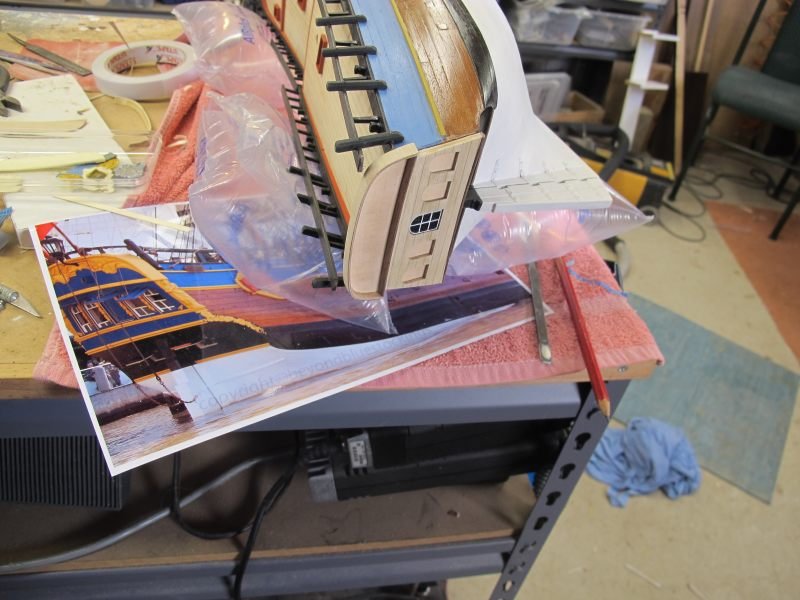
The starboard decorative piece (or the resin copy) was cut and repositioned in a manner similar to the replica ship.
I am aware that the actual figures and motifs are NOT the same as the replica but I have used the photos to try and better position my copied kit parts. It's the idea and appearance I wanted. It would be a lot more work to completely redesign them and most of my friends wont notice.
I've now got to tackle the port side figure in the same way. The replica has her standing on a small flat base above the lower part of the decoration so I did that to break the item into two separate sections and get the bottom part at a better angle on my model.
OK -it's a sunny day here in Inglewood so back to the garden........
btw, the brown line on the lower stern between the black and white areas is a molding that will be painted yellow at some stage. I'd forgotten it was there until looking at the photos
Pat


-
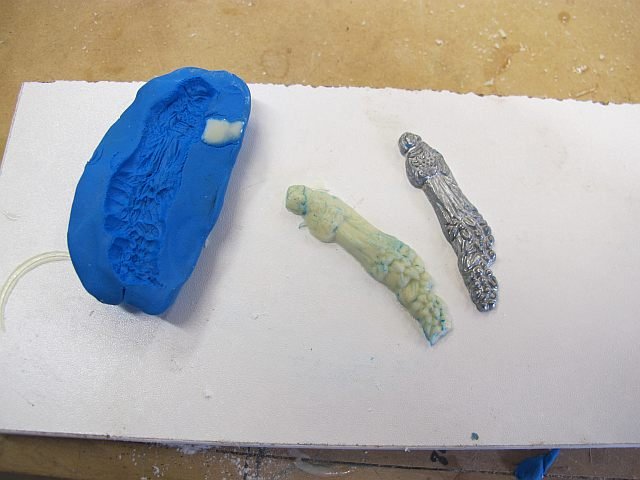
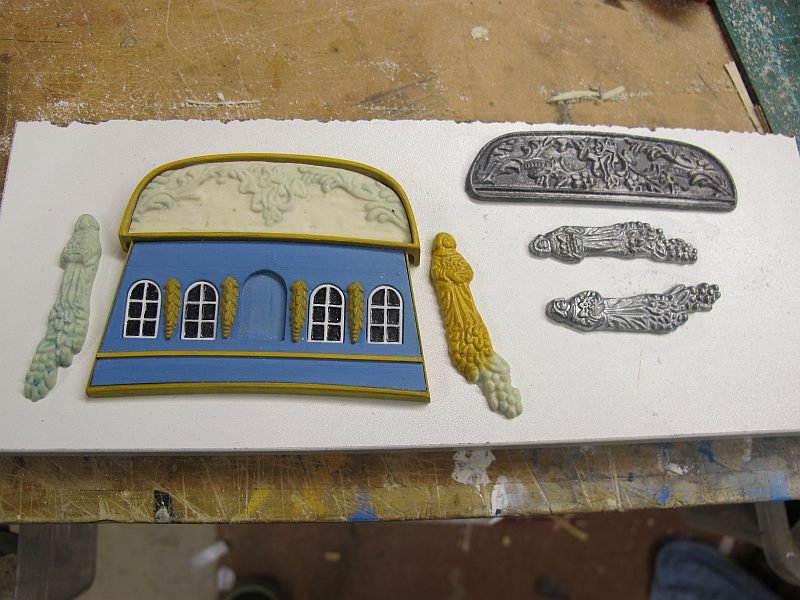
Thanks Pat. Having 'bodged' my way out of trouble, I now am attempting the resin replication of the somewhat crude metal parts - mostly the main decorative panel on the transom and the two side carvings (ladies with grapes) that I want to modify. After some experimenting, I got several near-perfect resin reproductions using a lump of plastic 'clay' as a mould. The metal items were dusted with baby powder and pushed into the clay to make the shallow impressions. The resin (part A and B ) were mixed EXACTLY 1 to 1 and poured into the moulds - 20 minutes later the resin versions were extracted
Excuse me jabbering on - I'd never done a resin casting before and it seems to have worked. A little extra heat was applied to the resin items later to help complete the curing in such thin items.
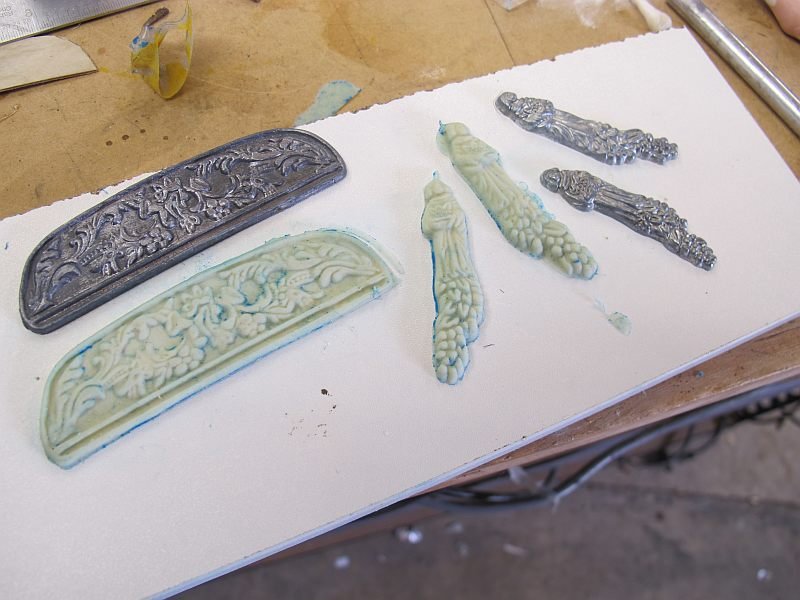
My aim is to remove a lot of the main panel to give a similar look as the replica. Not the same but I like the look.
A work in progress for another day!
Pat

-
VB - I hope it all works out! My fall-back is always the original parts....
Finally the transom stuff is ready and waiting for the decoration. I'll fix it in place when major work is finished. I'm learning a lot as I go and, as always, wish I'd done earlier stuff differently. Cant get it all right on the first model! - first serious one that is......Pat
- Old Collingwood, vulcanbomber, JpR62 and 1 other
-
4
-
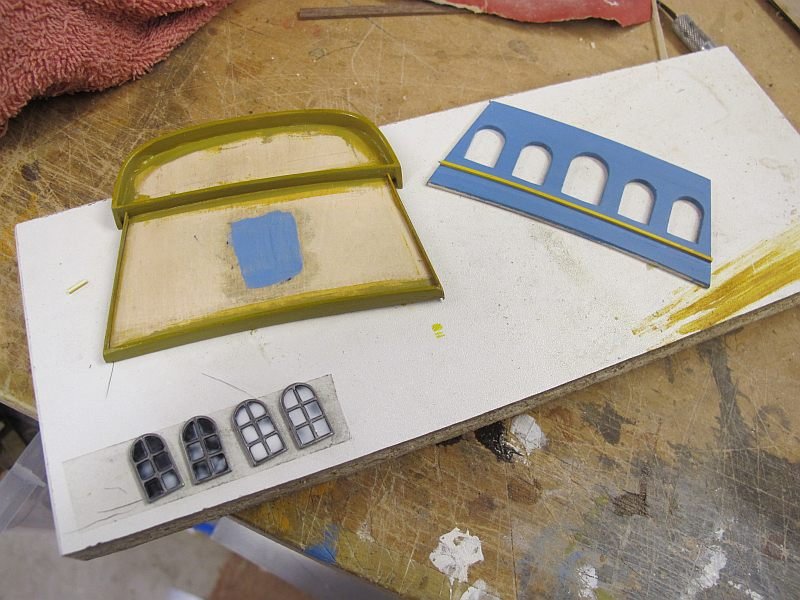
There - fixed! I replaced the transom 'capping' with two bits of Birch ply - .8mm + .4mm. 1.2 vs 1.6. I'm happier now
The transom I've divided into a few separate sections to make construction easier - the back board, window panel and the decorative panel above. I'm hoping to almost finish each section before installing on the stern.
The supplied windows will do fine - the castings are crisp and fit snugly into the cut-outs. I tried out the painting of them on the redundant centre window. The black glass panes were done with a permanent marker pen (a cd/dvd marker) and then a drop of model aircraft 'canopy cement' was spread around to give a nice glaze. Hardly noticeable except by me

I'm getting closer to seeing solutions to the transom area, Hooray!
Pat
- BANYAN, JpR62, vulcanbomber and 1 other
-
4
-
A bit more experimenting. I reshaped the transom ply parts to suit my model and added the top edging as is done on the replica. BUT. I forgot to narrow the ply by the added thickness of the edging and also made it a bit too thick. I used two pieces of .6mm Bass ply plus 1 of .4mm Birch ply - about the thickness of gunwale top. Now I see the replica has a much thinner section so after a spell of mowing lawns, I may redo it and kill two birds with one stone. But the idea is coming right (I think)
Part of my problems is that the back end of my model seems to lake the shape the ply transom parts suggest it should be! I must have misread the instructions somewhere. Instruction?????? What instructions.........


- vulcanbomber, JpR62, pontiachedmark and 1 other
-
4
-
They say a picture is worth a thousand words so what have I been doing? One of the most contentious and variable interpretations on a model Endeavour seems to be the transom décor! The cast metal provided is a bit 'clunky' but I figured with some work, it could be the basis for my model. But the metal is very difficult to work with so I am experimenting with casting polyurethane resin replicas that I can easily carve, sand and generally adapt to 'my' Endeavour! The cast windows look crisp and tidy so I'll use them as they are. I'll leave it there as I need some fresh casting resin - mine is about 10 years old and makes rubbery mouldings!
Pat


-
A question about the Endeavour's channels. The A.S. kit and the Oz replica, do not show any brackets from the channels to the hull above. However a couple of very nice models by builders on this forum who have good references show some brackets. Easy enough to make but is there an explanation?
Cheers, Pat
-
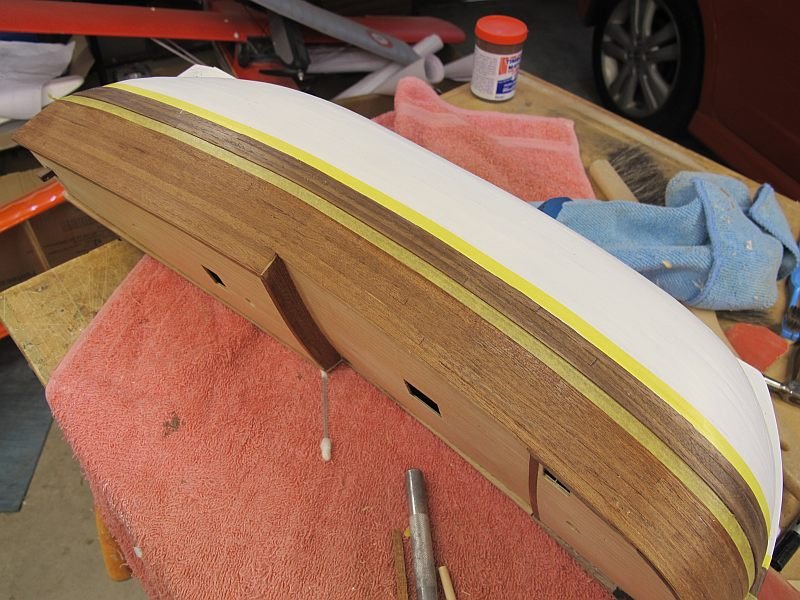
Next small step up this very steep learning curve were the various vertical parts attached to the external hull - mountings for the small guns (culverins) fore and aft and the tricky fender strips which I assume were to protect the hull when hoisting stuff to and from small boats along-side.
The shape of the fenders must match the profile of the hull and no way could I shape them using the suggested wood size so a piece of 5 X 2 Walnut was used and laboriously filed to fit my hull - and of course, both sides were slightly different
but after some grain filler and painted in the manner of the replica, it looks OK (at a few yards distance).
Close-up pictures always look worse than when the whole subject is visible!
Pat

-
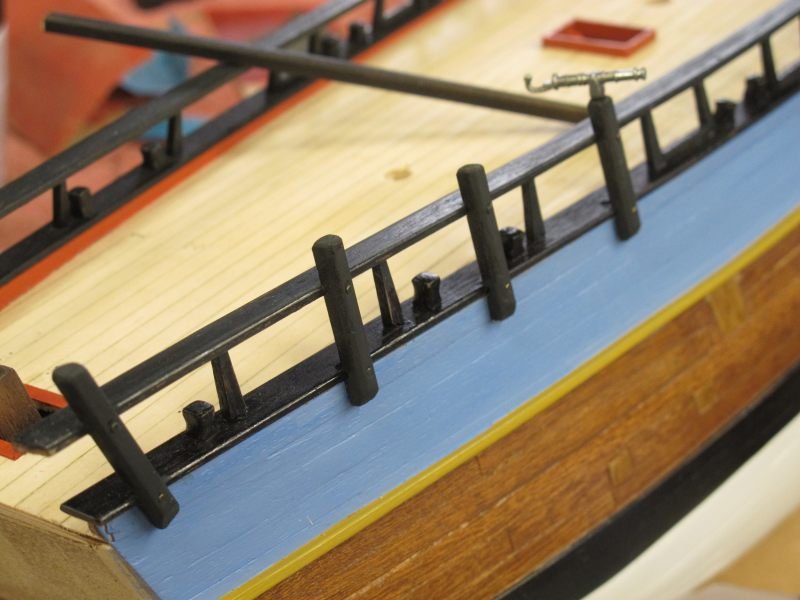
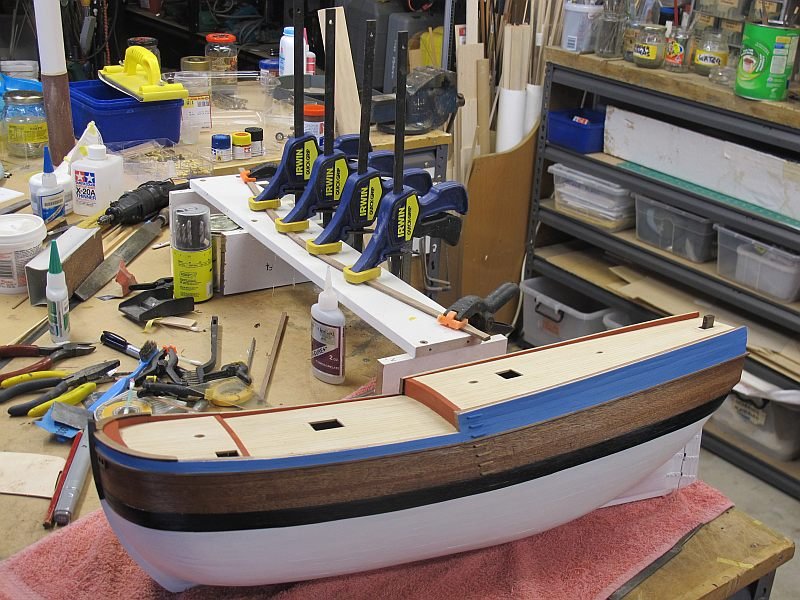
The rails along the top of the gunwales are of 5 X 2 Walnut and I'd pre-bent them to fit the curve of the deck (well almost fit). A tiny drop of med CA holds them in place OK. I can lift the hull by them
 The paintwork is still a 'work in progress'. One of my pet dislikes (for me) is leaving excess wood texture in the finish and at 1:60 scale, it isn't easy! So these rails have had a couple of coats of well-sanded sealer before painting but it still shows some grain. I may give it another fine sanding before the final coat. The paint on the rail is Tamiya NATO Black - more a very dark grey than a true black. Using different shades of the same hue to give some variety to a model adds a bit of interest (I think!). The Black is a flat paint so after drying, it was given a good buff with a soft cloth to add some shine to the edges.
Now, all those vertical bits from the hull sides up the railings........
Pat


-
Thanks for the encouraging words folks
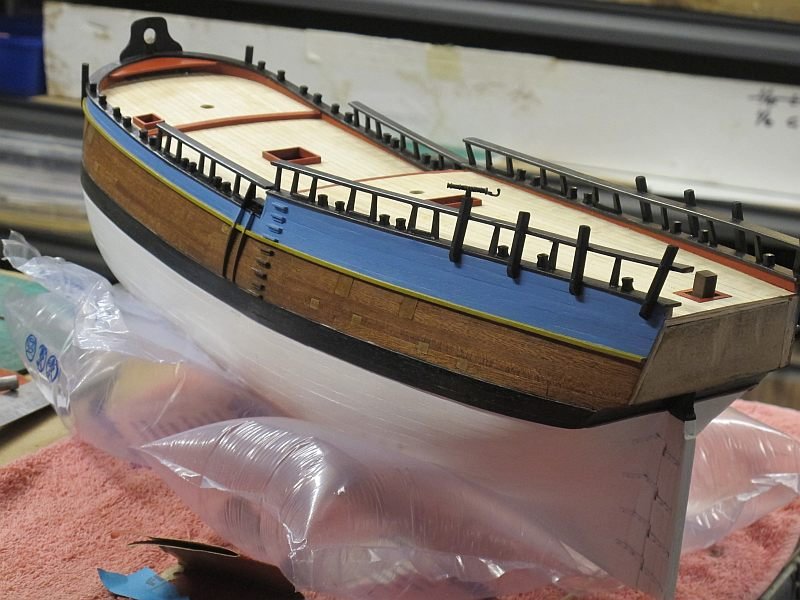
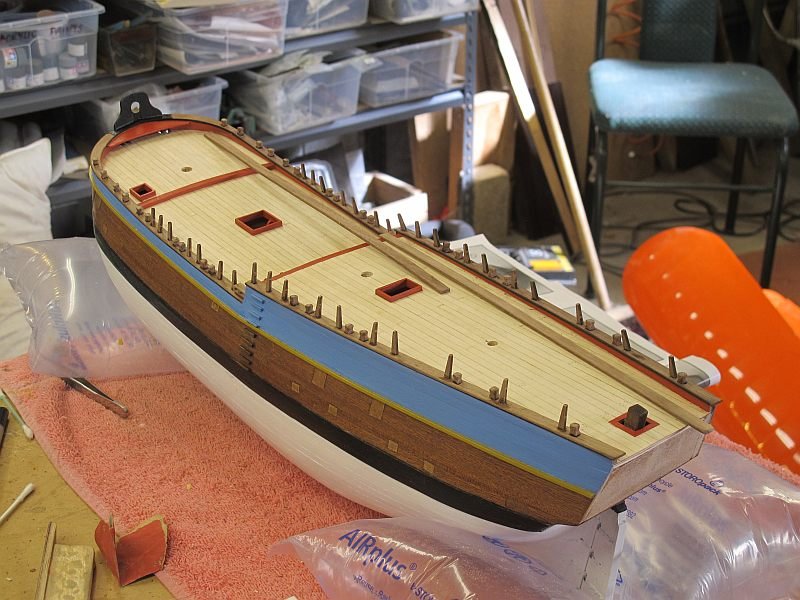
The next task on the books are the stanchions and mooring posts (bollard?) The stanchions have their lower end rounded to fit into a 2mm hole drilled in the gunwale top. I was sure they'd be at a slight angle to match the hull sides so that's what I did. The mooring posts were from 4 X 4 walnut. I used the 4 jaw chuck on my little lathe and gave them a bit of shape and 5mmlength. They are CAed into positions on the ship (not always clear where!)
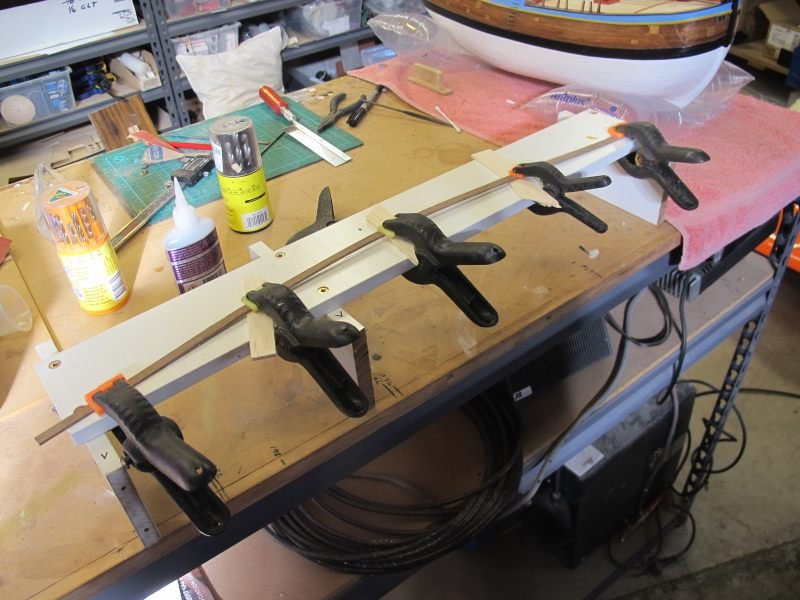
I also wet and steamed some 6 X 2 walnut strip and clamped to give me two lengths with a curve in 2 dimensions. They will be glued to the rail supports hopefully with little strain on the joints.
Pat
-
28 minutes ago, Cabbie said:
Hi pat very solid and neat looking steps and the ship as well. You are moving along very quick,
there musn't be an admiral around to keep you occupied otherwise, or you are one of those lucky retired types.
Cheers Chris
Retirement does the trick! but yes, I do have an Admiral on board but she loves craft, art, music .....and model building
-
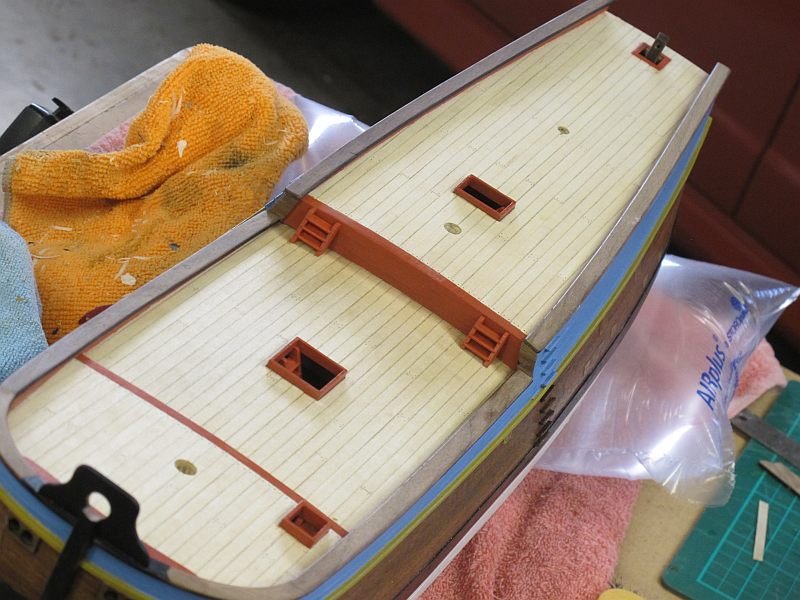
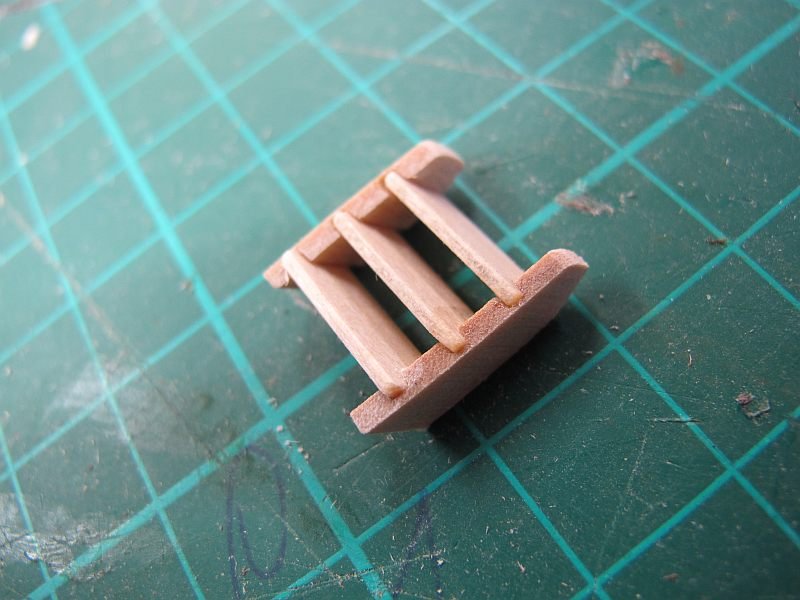
One small step for a man.......
Well, five sets of steps actually. As a break from other stuff, I thought getting the steps down onto deep hole in the deck might be better soon rather than later. Plenty of step material is supplied - including the usual grooved side parts. I had to be careful to select a left/right pair where the slots for the steps matched! Cutting the steps to exactly the same length was also important and a small jig helped with that. After the first couple of almost-invisible steps down small, dark holes, I went a bit more carefully and fine sanded the side rails and a length of step tread wood, then gave it all a coat of sanding sealer/grain filler. Another fine sanding and the slots cleaned out with an exact-size file, the two end steps were glued in place (a tiny drop of Med CA) and checked for squareness. The remaining steps were inserted and given the tiniest drop of thin CA to hold them in place. Another even finer sanding plus a coat of paint completed them, the ends were cut to fit the location and they were CAed on place. I had also sanded the sides as thin as I dared having read comments about that in other posts.
Although not strictly scale, I allowed the steps to protrude slightly in front of the side rails - it seemed to give a tidier finish. (imho
)
I have to start on the various rails soon and am pondering the many elements....
Pat
-
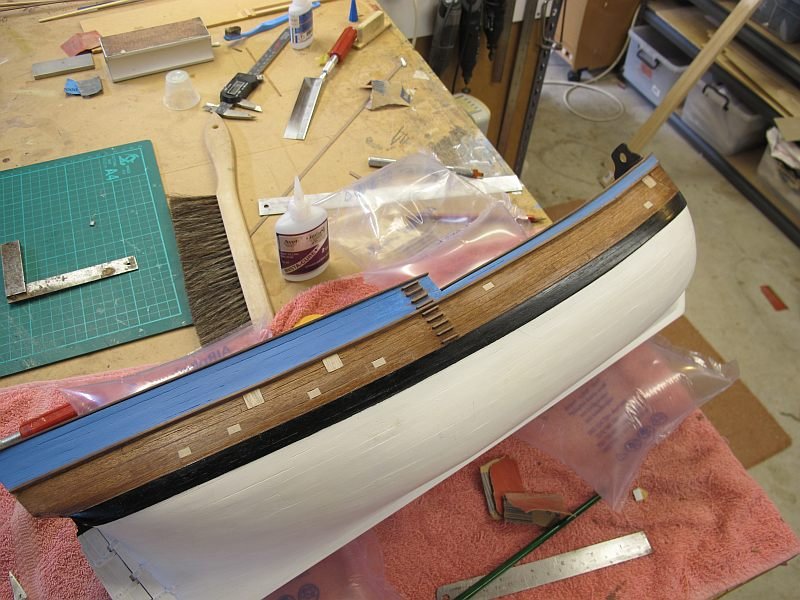
After a few false starts, I decided to use Yellow ochre as the basic trim colour. It is a bit subdued compared with a freshly painted replica but looks good on a small model. The channel wales were masked off with Tamiya 6mm masking tape (nice stuff) and carefully pressed adjacent to the wale. A primer coat of Tamiya Flat deep yellow was applied (not too runny) and then Reeves artist quality acrylic was applied and allowed to dry.
The wale will be de-painted where the channel parts are to be fixed. It seems the replica does not have the braces from the channels back to the upper hull as some plans must indicate. More research needed
Pat
- BANYAN, vulcanbomber and JpR62
-
3
-
With the planking done, a slower pace is inevitable. I wanted to get the lower hull details sorted so the side hatches and vents were done. I didn't like the cast objects supplied as replica photos showed them to be flush with the hull so small recesses were chiselled in the sides and .4mm Birch ply 'doors?' were glued in place. They were given a coat of walnut stain to darken them a little and after the first hull coat of Cabots Maple stain/varnish they have a subtle difference in appearance - esp. with vertical grain. Dummy hinges will be added later. The location of these openings is a combination of info sources. As usual, this Endeavour is a mix of A.L. design, stuff gleaned from other modellers, the Ozzie replica plus a bit of my own preferences.
I'd like to get the chain-plate wale painted while I can still get some masking tape in there so that may be next.
My build sequence is rather personal - I do the same with model aircraft. Some parts seem to get the final finish before others are built - often for rational reasons, but often just because I feel like it
Pat
- JpR62, Sea Hoss, vulcanbomber and 1 other
-
4
-
Thanks Pat - It's all questions at the moment but I enjoy the problem-solving as I go (with a little help from other builds!) Interesting the differences between the Endeavour reference books and the Oz replica! But I guess almost any model of an old ship is going to be a compromise. Esp. if built from a kit. Thanks for looking in on my efforts
Pat
-
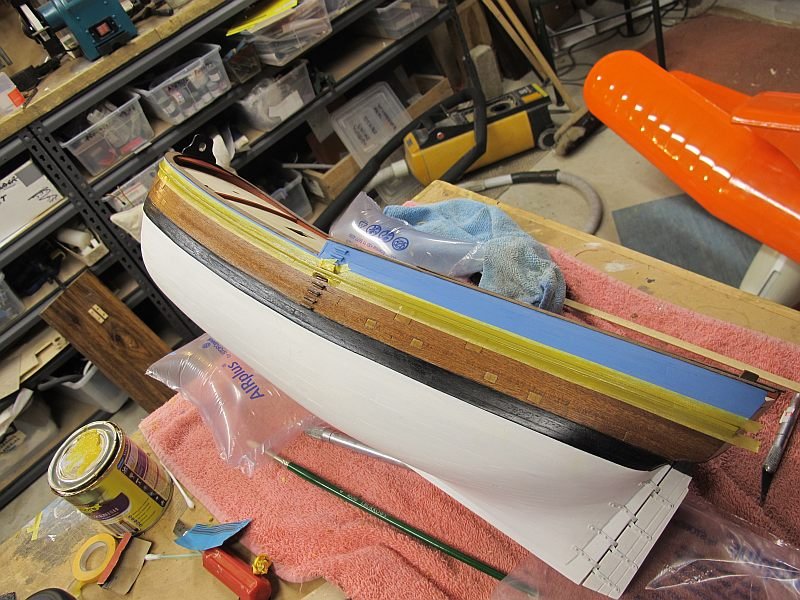
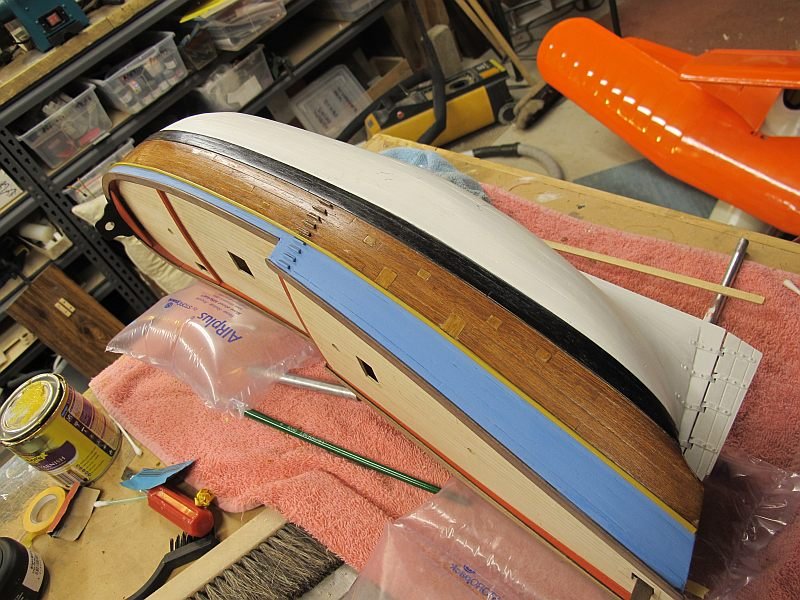
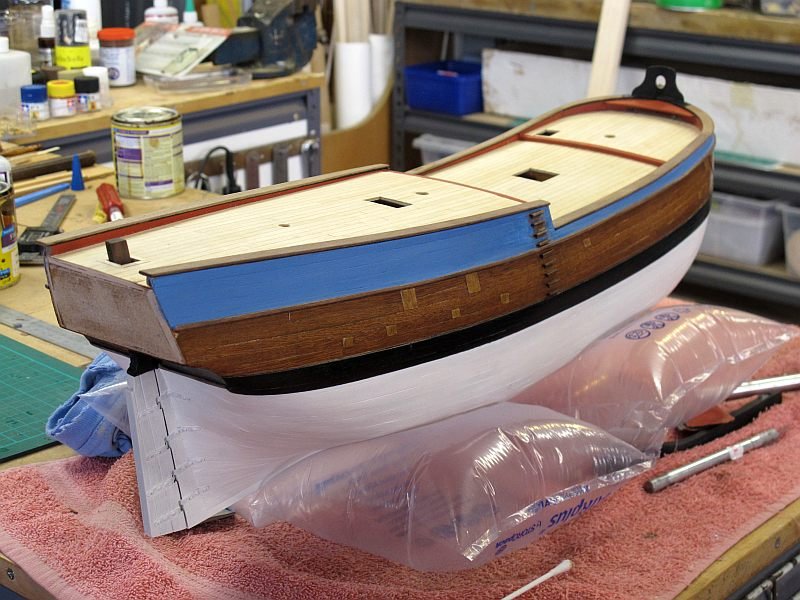
A rainy day gave me an excuse for getting out of the garden and into the workshop! After a couple of trials, I mixed a blue that was a bit duller than the photos of the replica but which suit the small scale model OK (imho)! When the paint is fully cured, I'll mask off the yellow chain-plate wale and experiment with colour there too.
The gunwale capping sections at the bow fitted perfectly and were glued in place - the rest of the gunwale capping (not sure of the nautical term!) needed some pre-bending edgewise (8 X 2mm) to be fitted nicely so that must wait until the walnut strips have dried.
While waiting, I masked off the inside faces the gunwales and painted them a sort of brick-red colour - something close(ish) to the replica photos.
Pat
- chris watton and JpR62
-
2
-
A long while ago Pat but many thanks for a great, helpful build thread. I refer to it often
Pat (also)
-
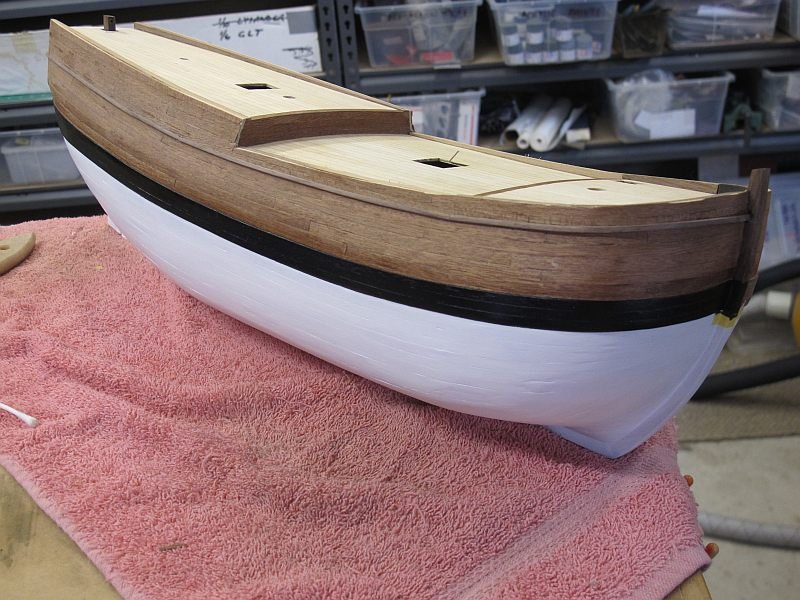
The waterline wales were masked off with Tamiya 6mm tape and Tamiya semi-gloss black painted on. I was careful to use a minimum amount of paint while doing the masked edges to minimise leakage under the tape. It worked! The tape was removed as soon as the second coat was applied.
I also added the moulding that runs where the chain-plates are fitted. This had been pre-curved to fit the bow and all is well!. This piece will be masked off later and painted yellow (of some sort) along with the chain plates.
I intend fitting out the hull sides with the various openings, steps etc and painting the upper blue area prior to capping the Gunwales. This will make it easier to paint the exterior blue and interior red of the gunwales. That's my plan anyway
-
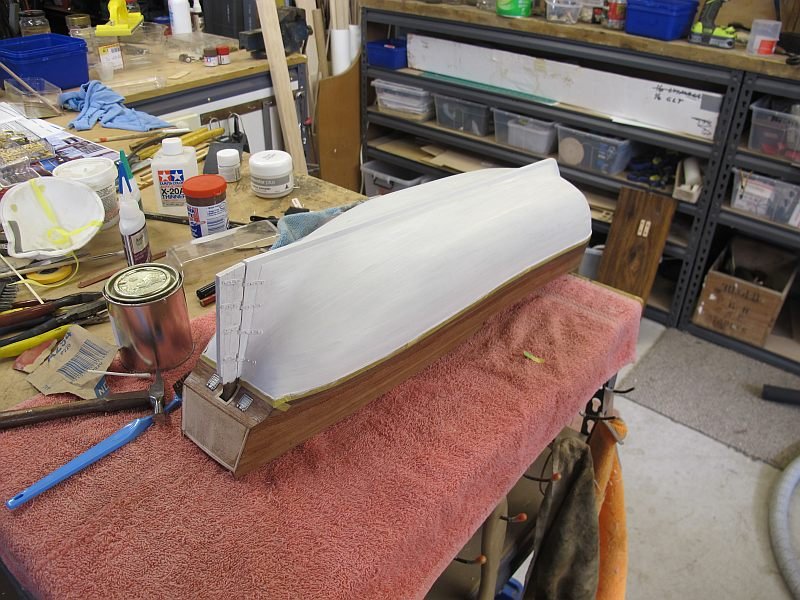
Thanks VB. Naturally it seems that a painted finish may well need a top-notch planking job to look good. Mine was a little lacking in places so I applied microscopic amounts of white filler to the offending gaps and gave Endeavour its first white undercoat. After a good sanding with 800 wet n dry, I decided the rudder should be fitted as it too is mostly white. That took a couple of hours making up and securing the hinges. The nails were given a tiny drop of thin CA to secure them. While the first coat of white acrylic on the rudder was drying, I gave the hull its first white finish coat - it'll need one more I think but although the planks look a bit uneven when viewed close-up, so does the replica full-size
- it's wonderful having so many excellent pictures available on the 'net.
Later this evening I should be able to apply the last white coat and remove the masking tape (6mm Tamiya).
Pat

- JpR62 and vulcanbomber
-
2
-
Having decided to go with a painted model, I also decided to complete the lower areas before starting to detail the top-sides. The underwater areas are white and the main waterline wales are black - on the replica. On the curved area under the transom windows are two hatches and the rudder post surround. The little cast metal hatches supplied look quite good but need to be recessed flush with the hull to look right. Suitable sized holes were chiselled into the hull and after some cleaning up, the little hatches were glued in place. This whole hatch/rudder hole area is black like the wales so will be almost invisible.........
Many things look a bit rough close up but I hope the overall impression will keep me happy


Queen Anne Barge by JpR62 - FINISHED - Syren Ship Model - 1:24
in - Kit build logs for subjects built from 1501 - 1750
Posted · Edited by Pat Lynch
Lovely work on a beautiful model Jean-Paul - inspiring")
Pat