modeller_masa
-
Posts
950 -
Joined
-
Last visited
Content Type
Profiles
Forums
Gallery
Events
Everything posted by modeller_masa
-
Intro to Card Models Pt. IV: Tools & Other Supplies
modeller_masa replied to ccoyle's topic in Card and Paper Models
It looks like the Butapren is a solvent-based glue that makes headaches stink. https://pubmed.ncbi.nlm.nih.gov/5285742/ Also, its poisonous vapor has been reported several times. It is relatively easier to find a solvent-based waterproof glue. I found the Beacon 3-in-1 advanced craft glue. Unfortunately, the solvent-based low viscosity glue is not produced by my country's major glue company. I ordered UHU all purpose glue and UHU allplast glue, which are favorites of German card model builders. -
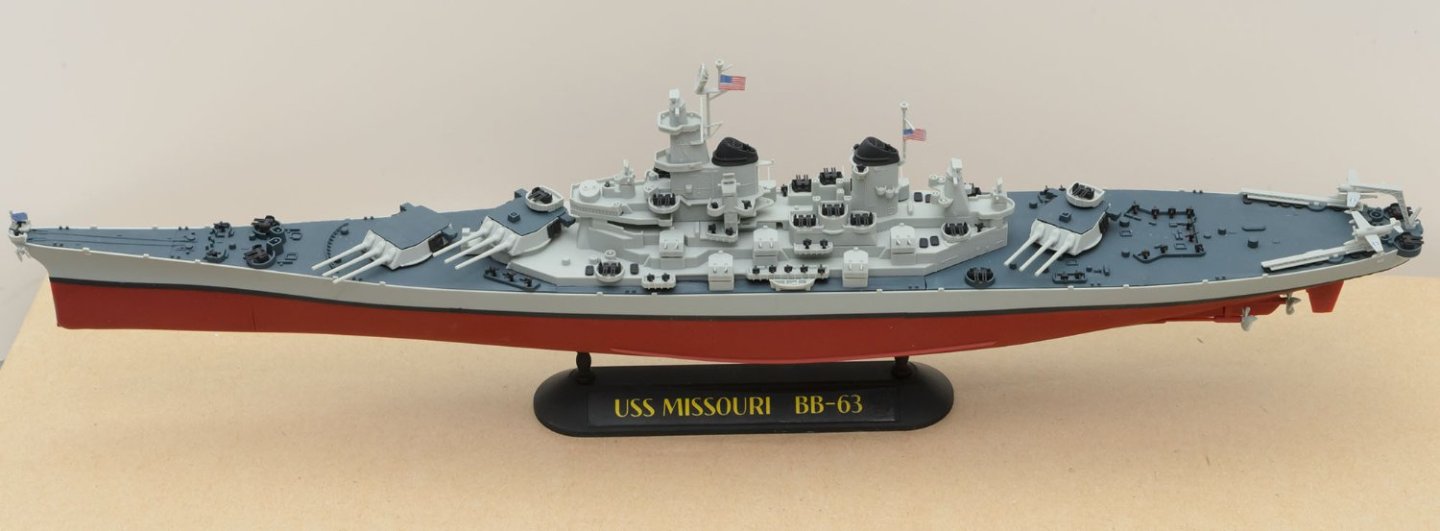
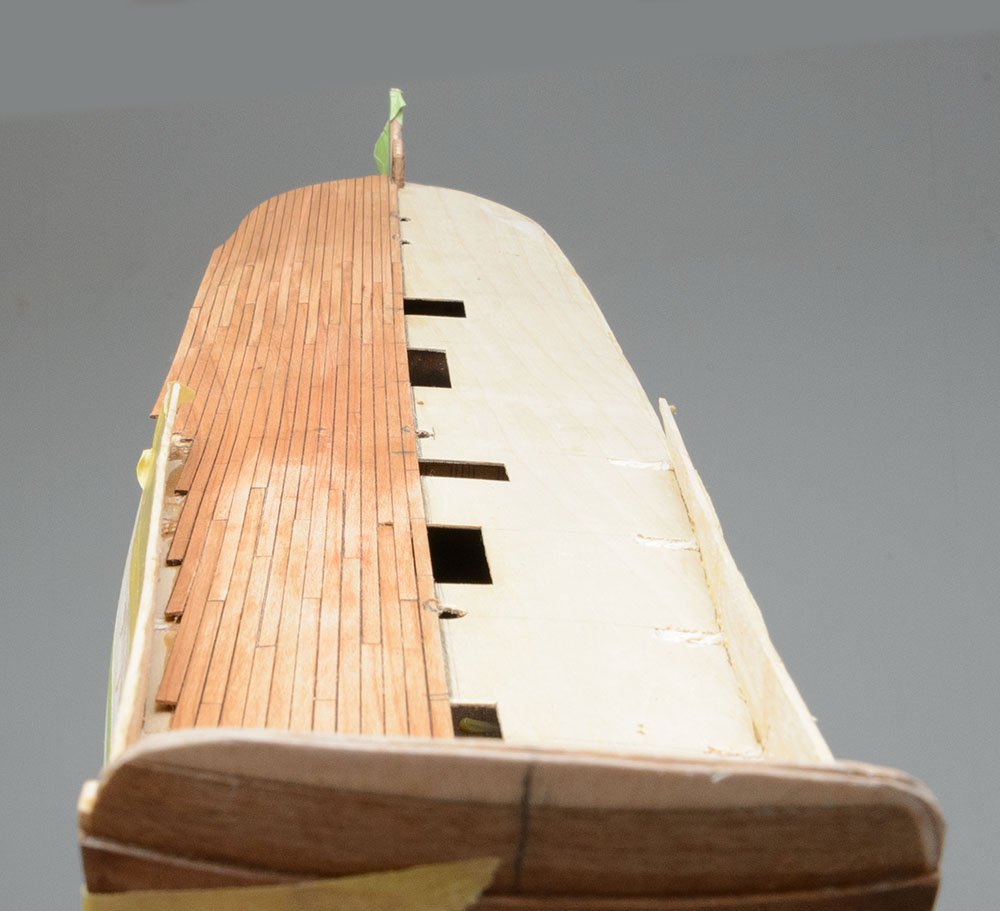
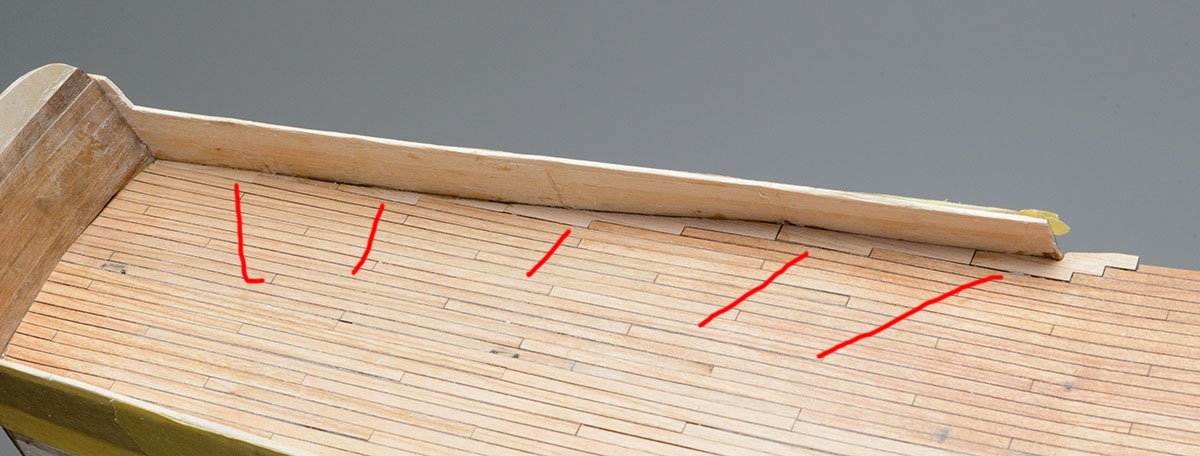
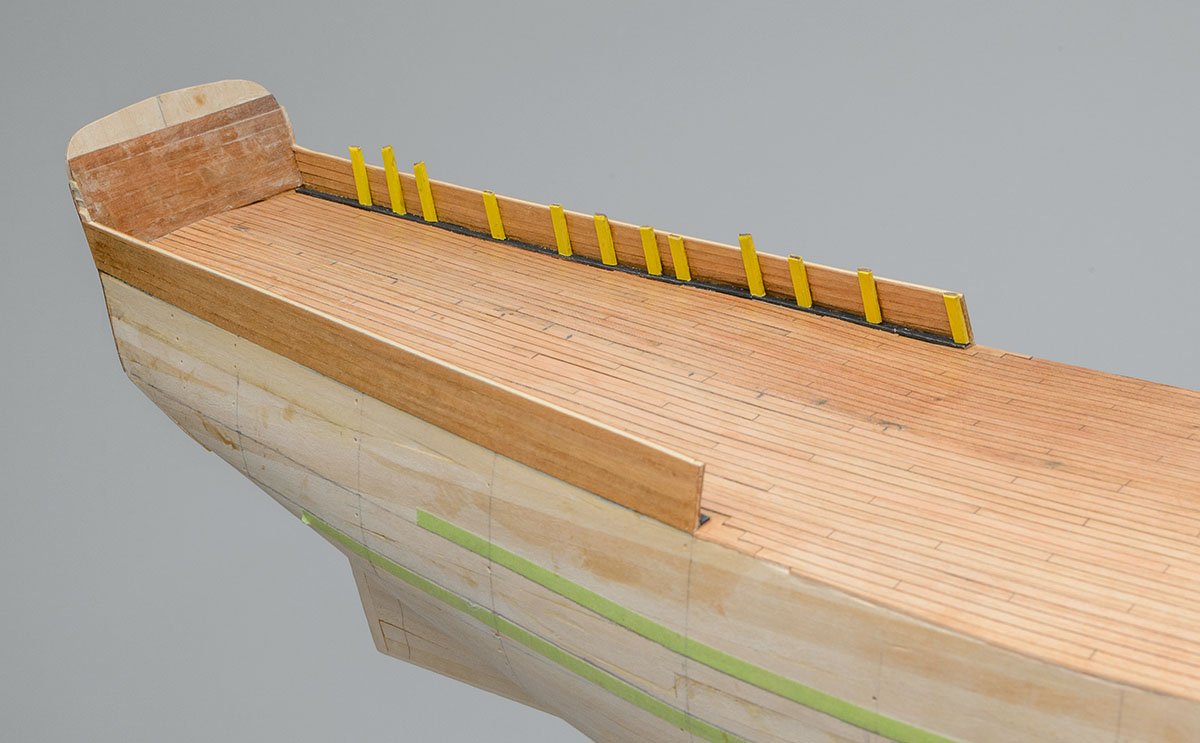
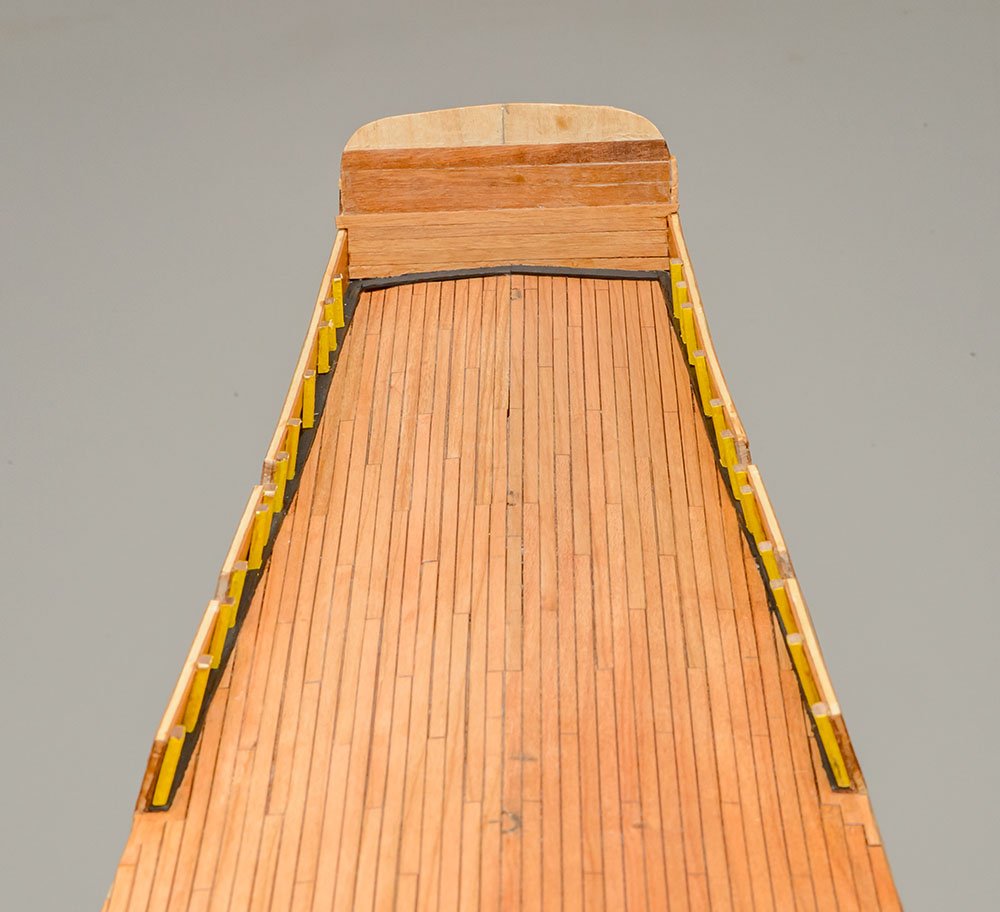
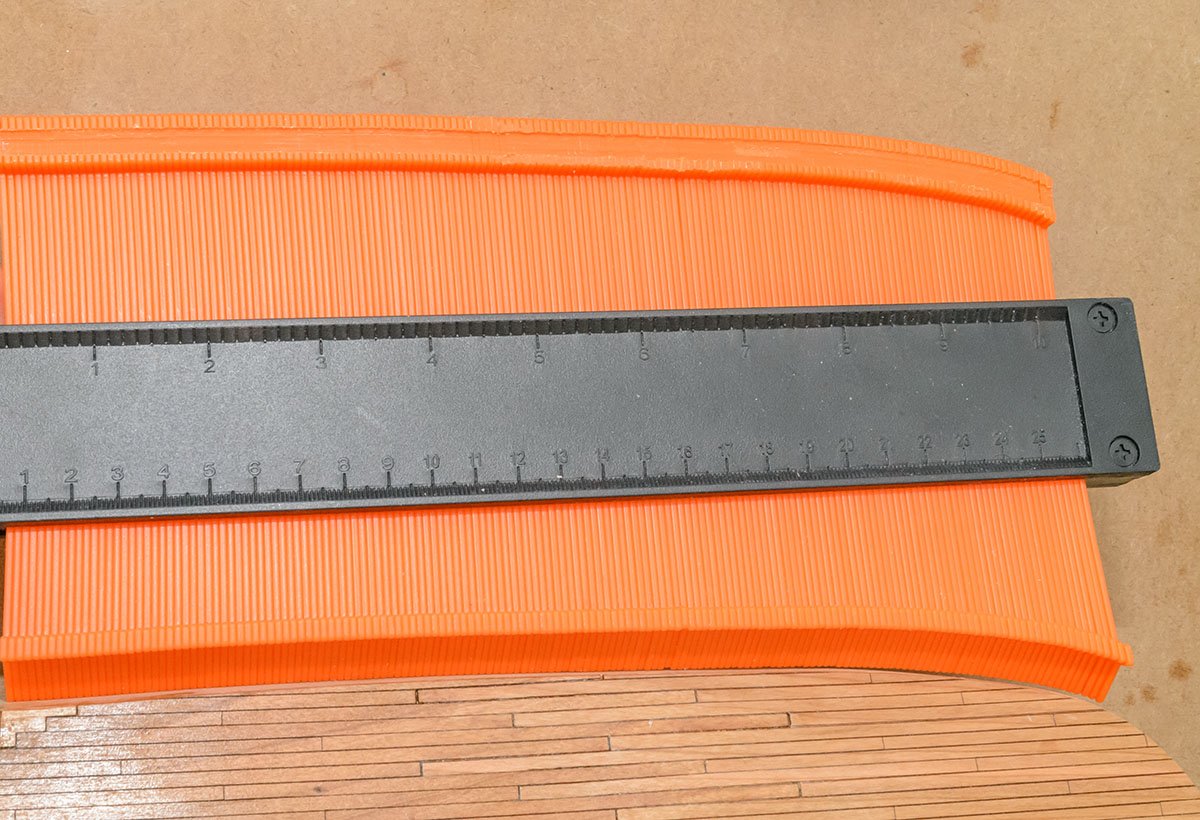
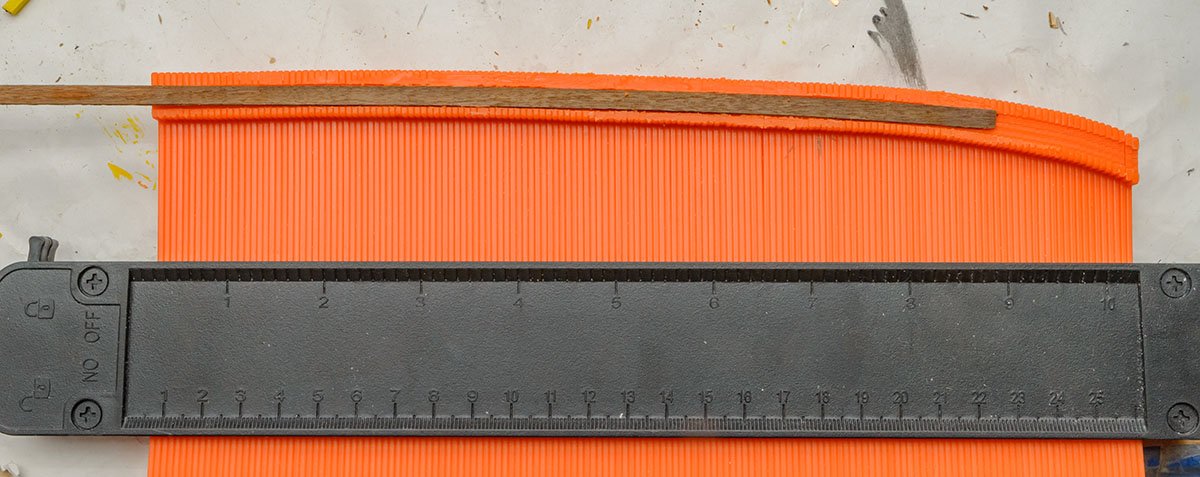
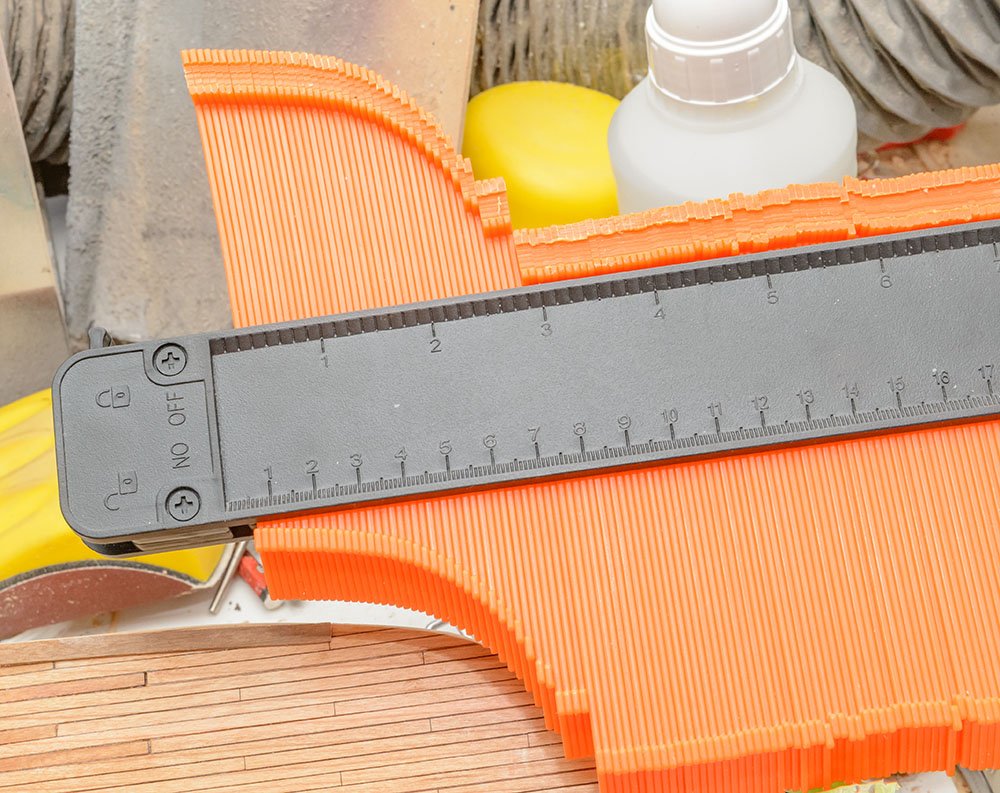
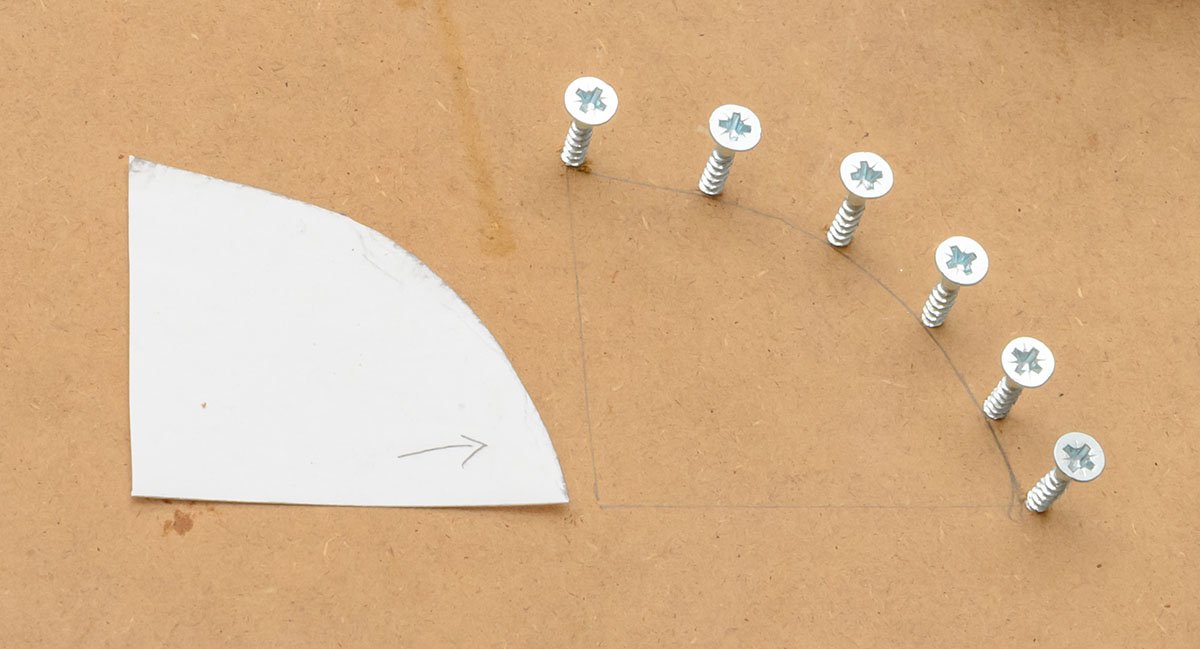
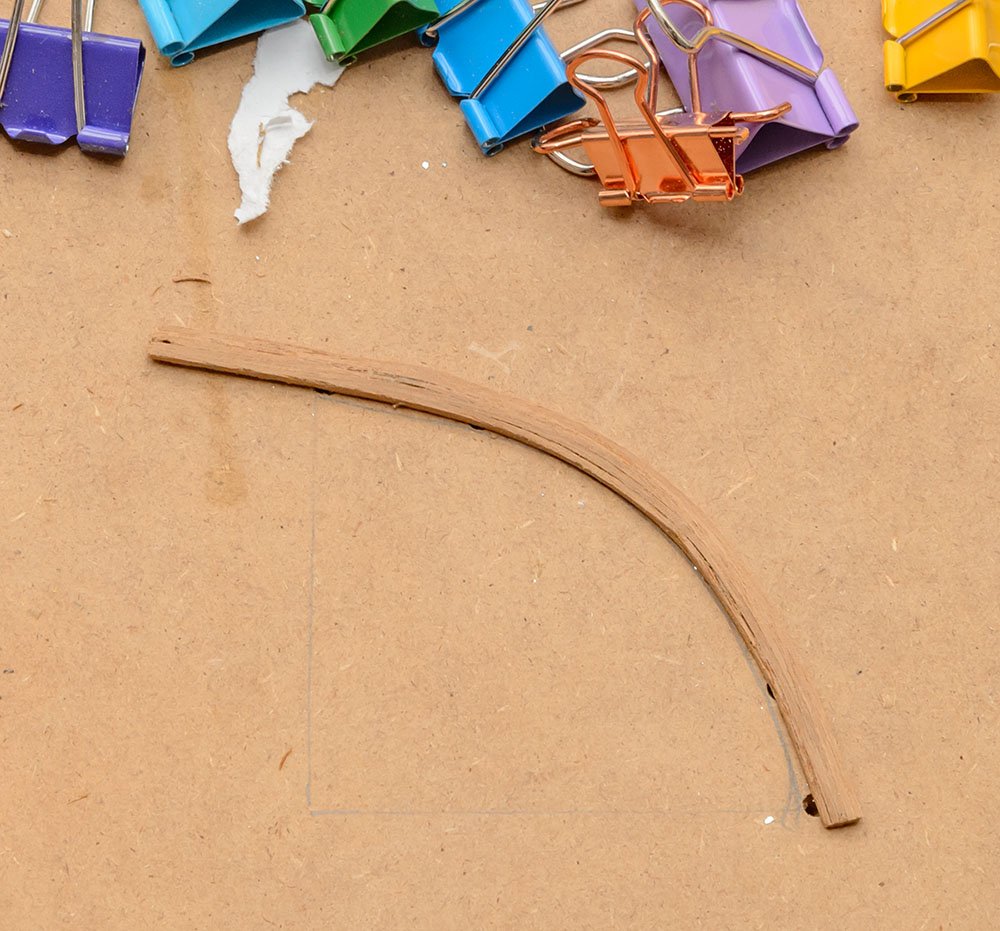
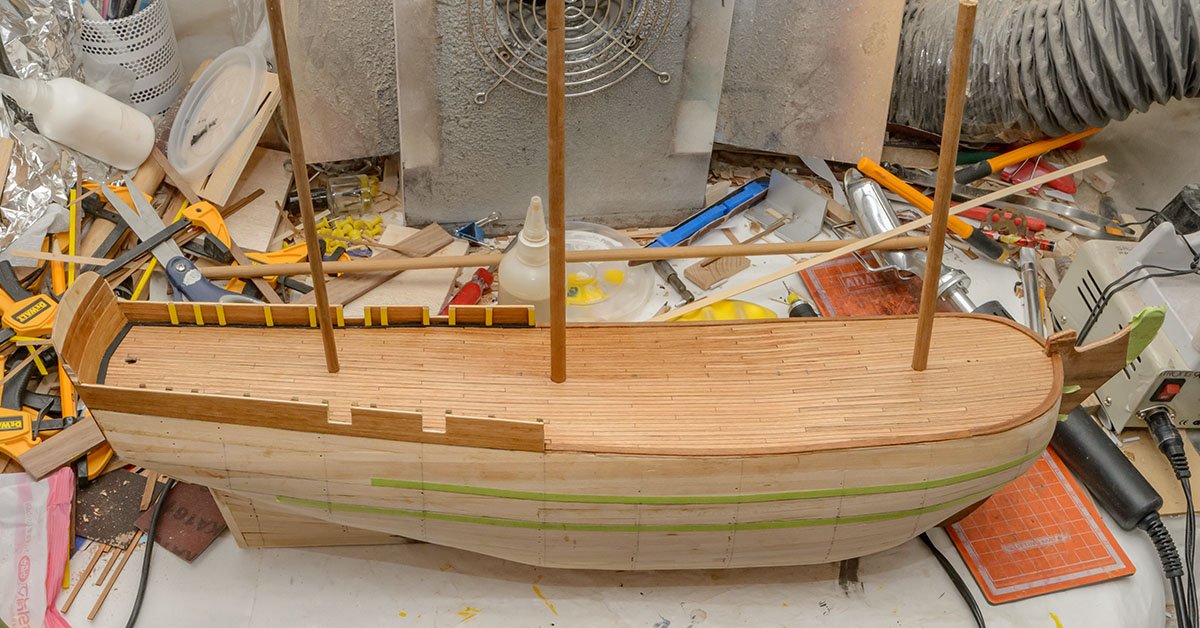
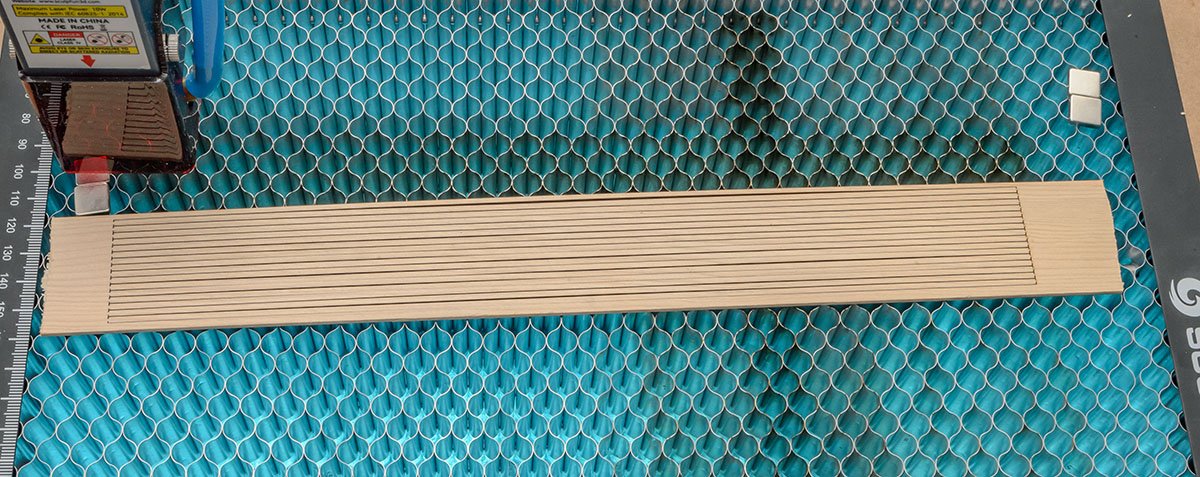
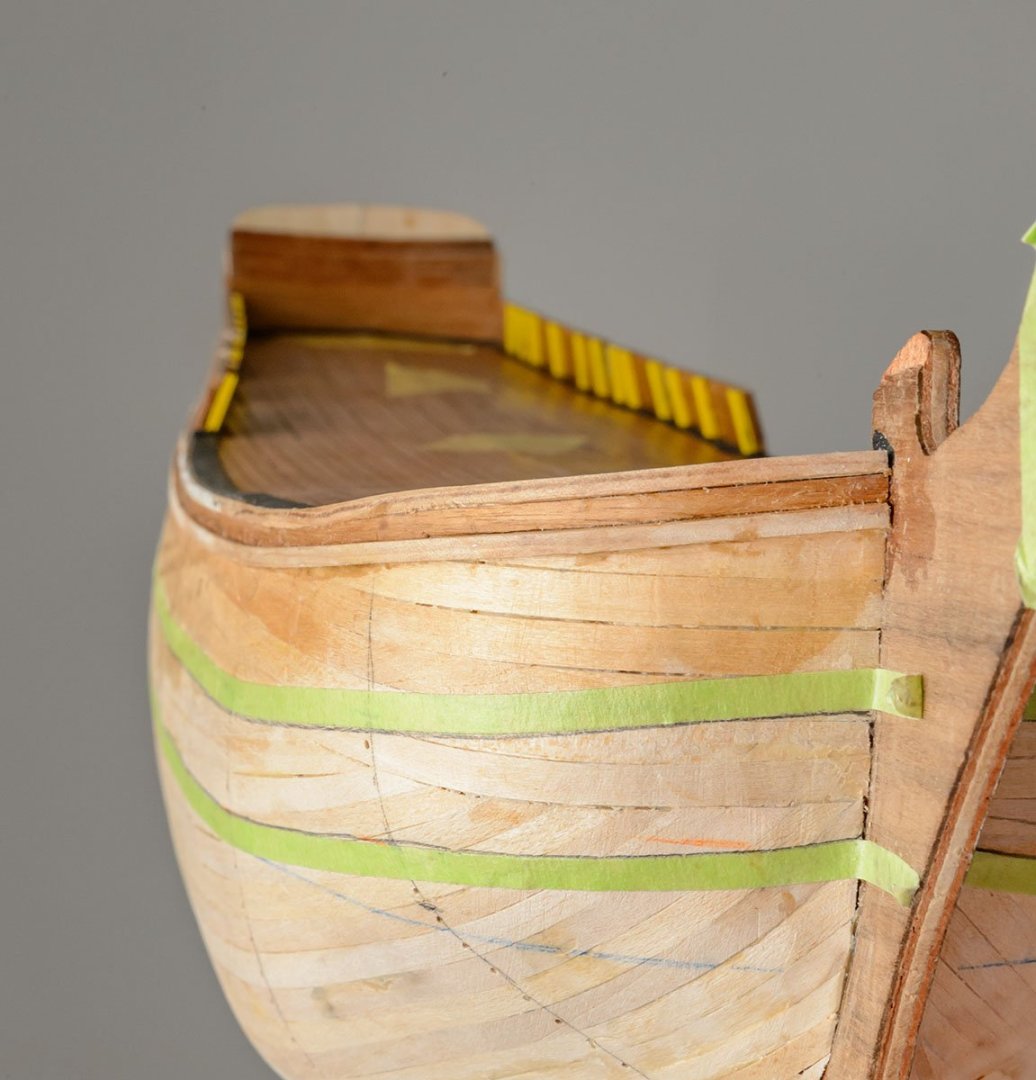
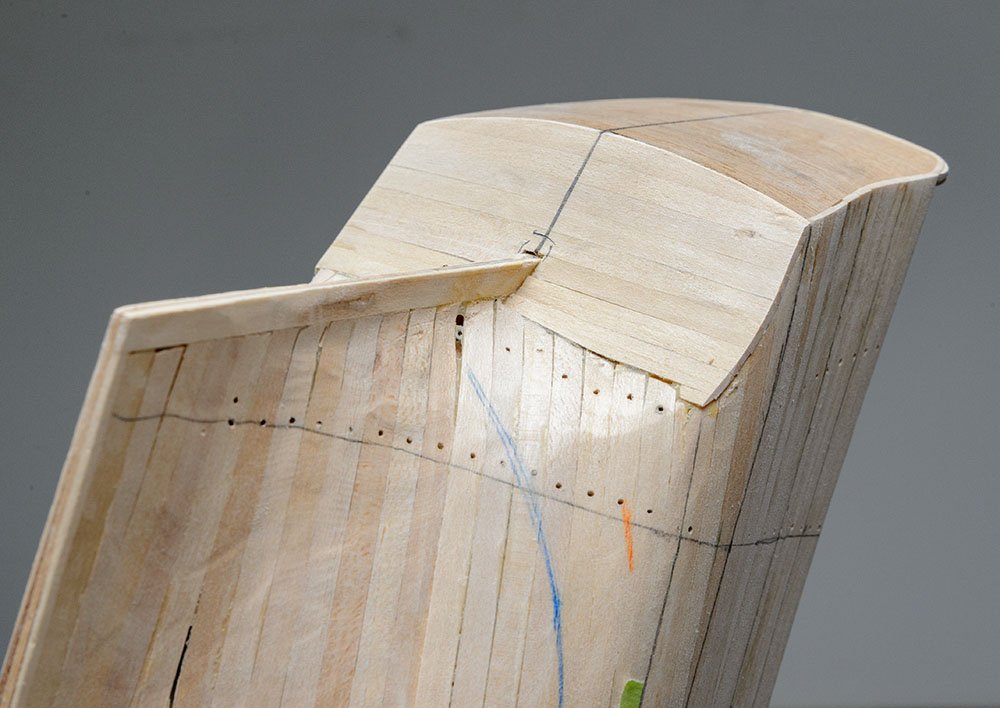
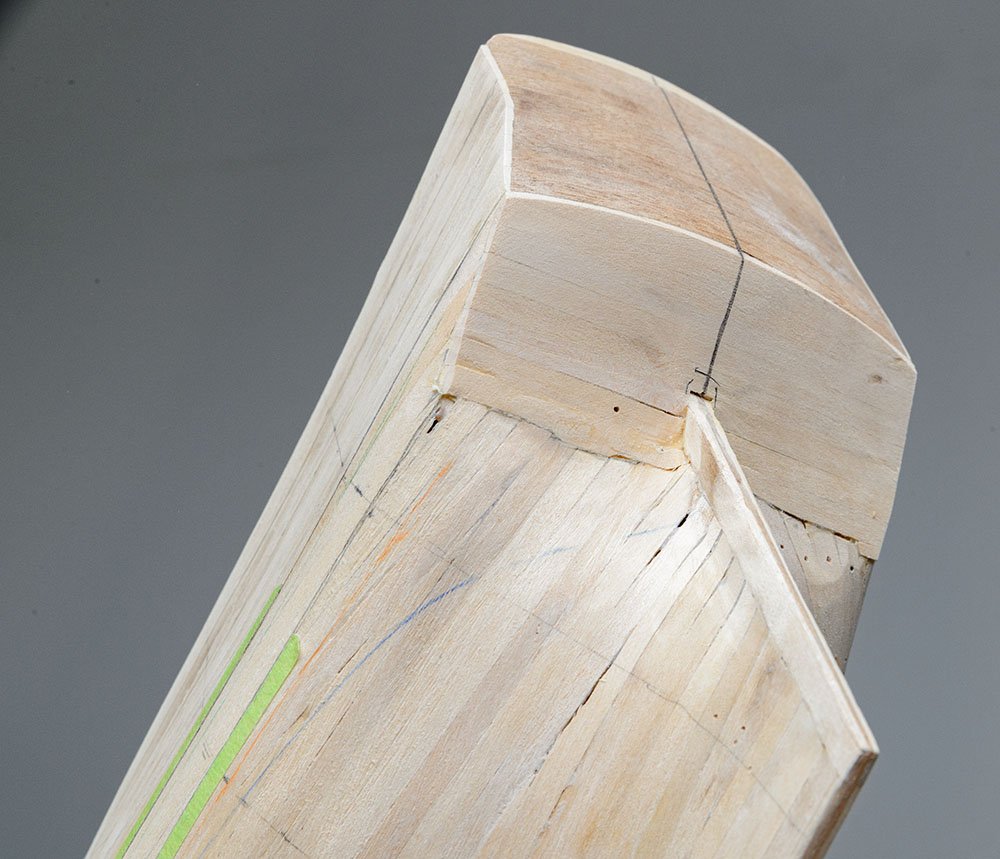
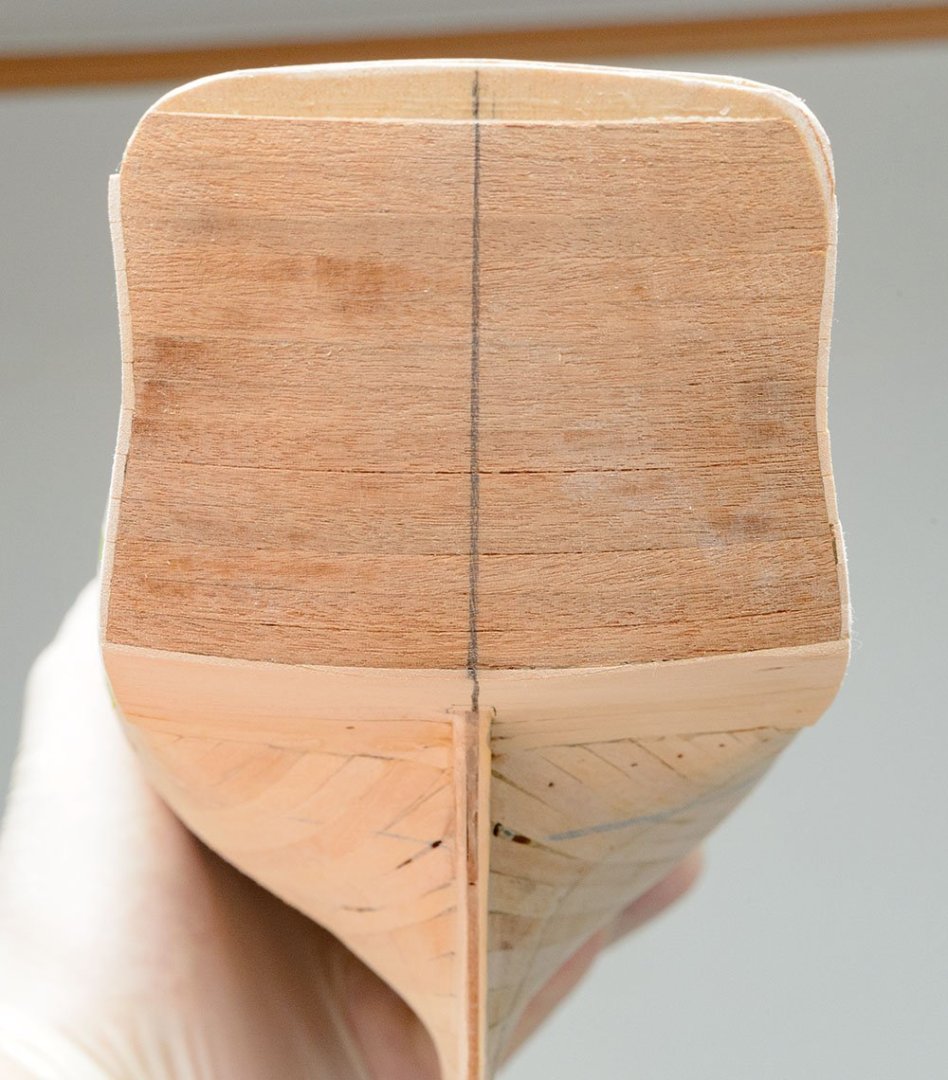
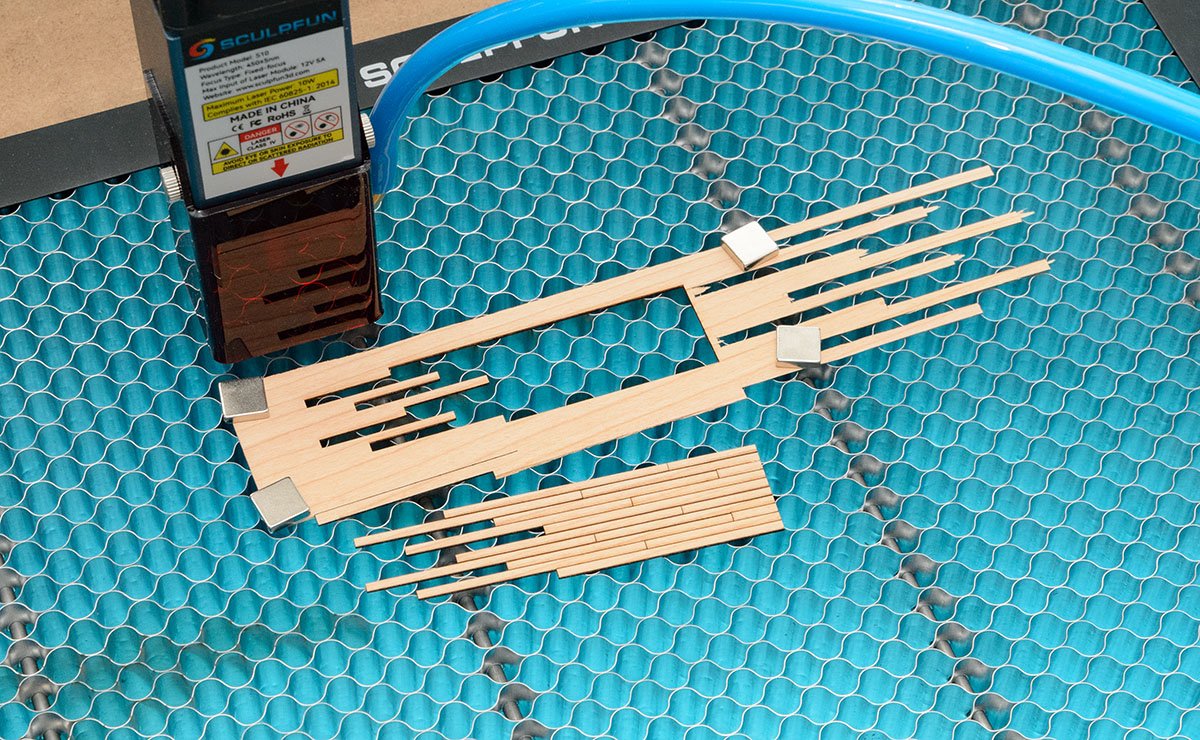
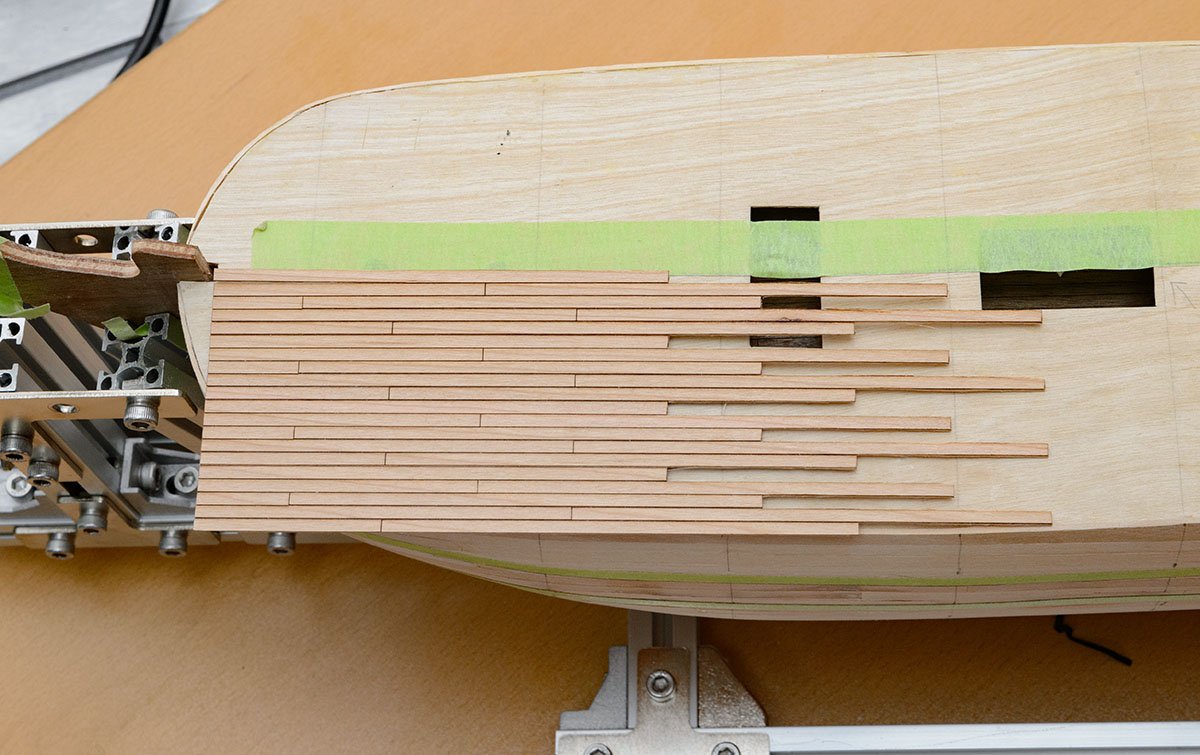
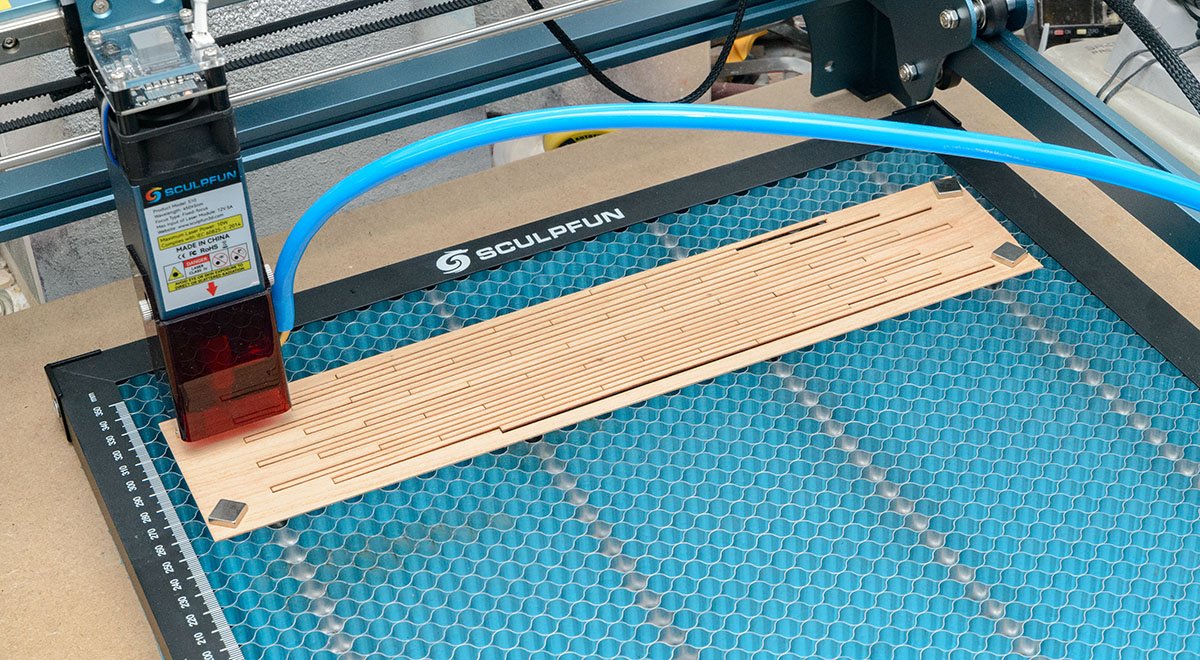
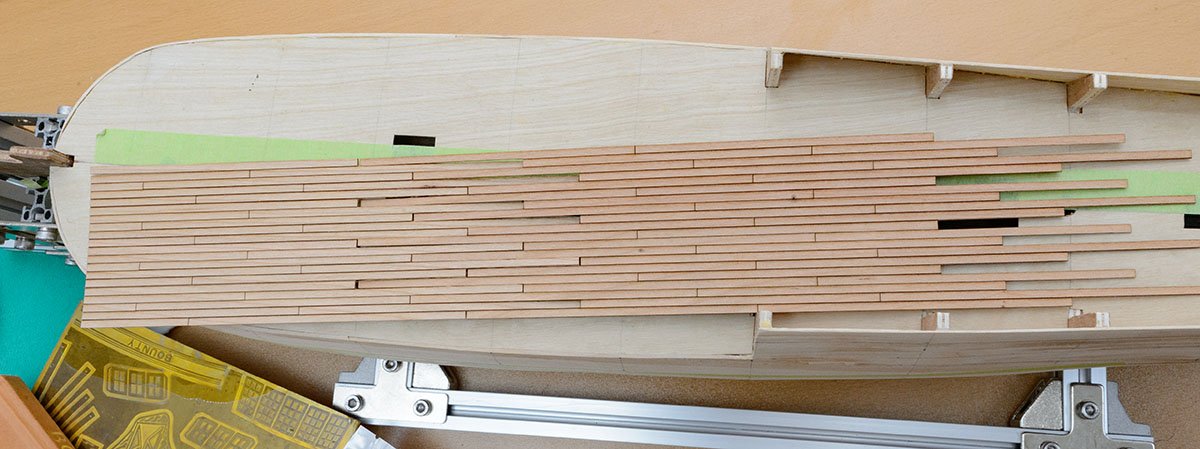
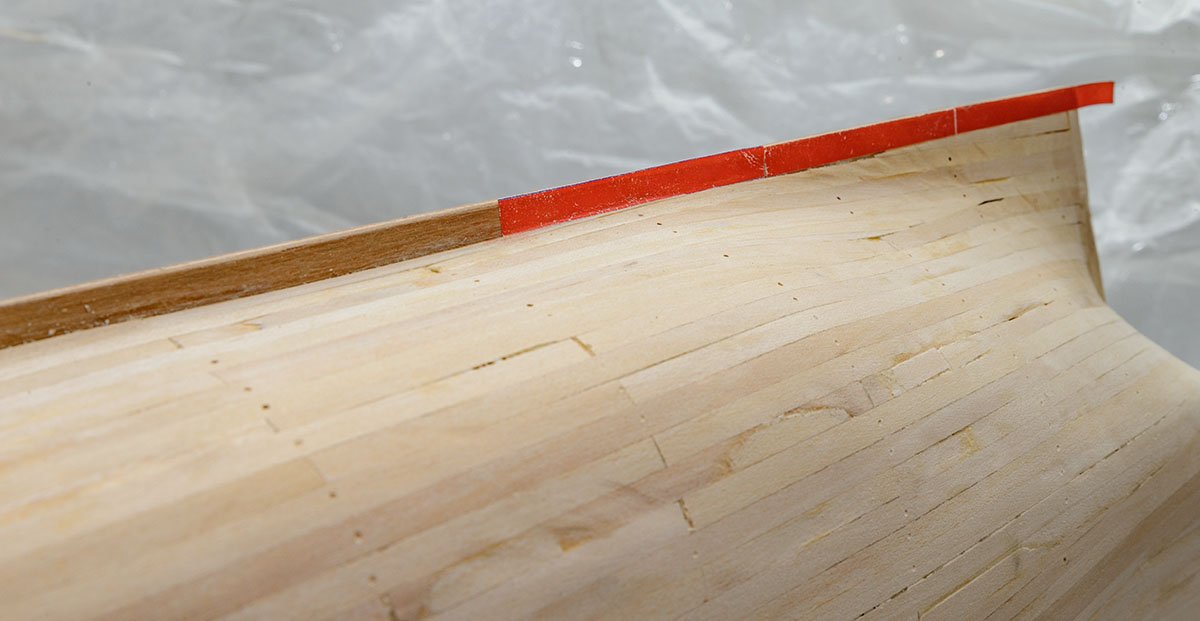
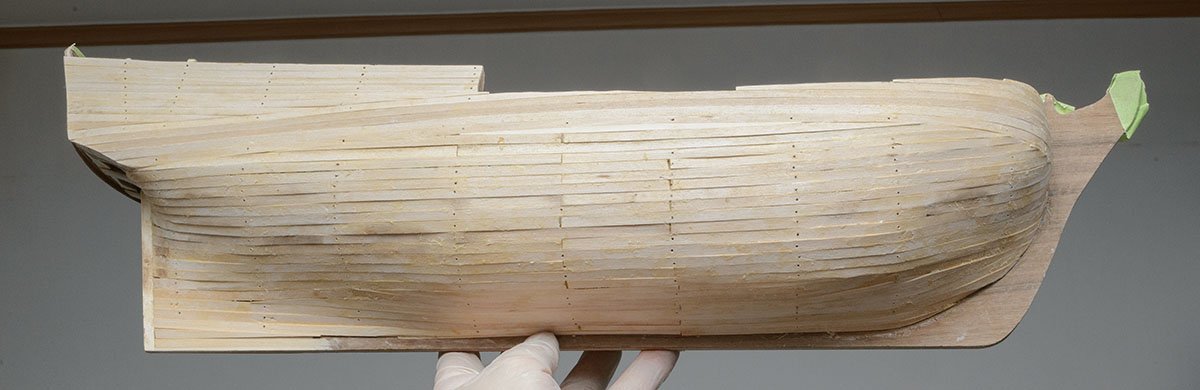
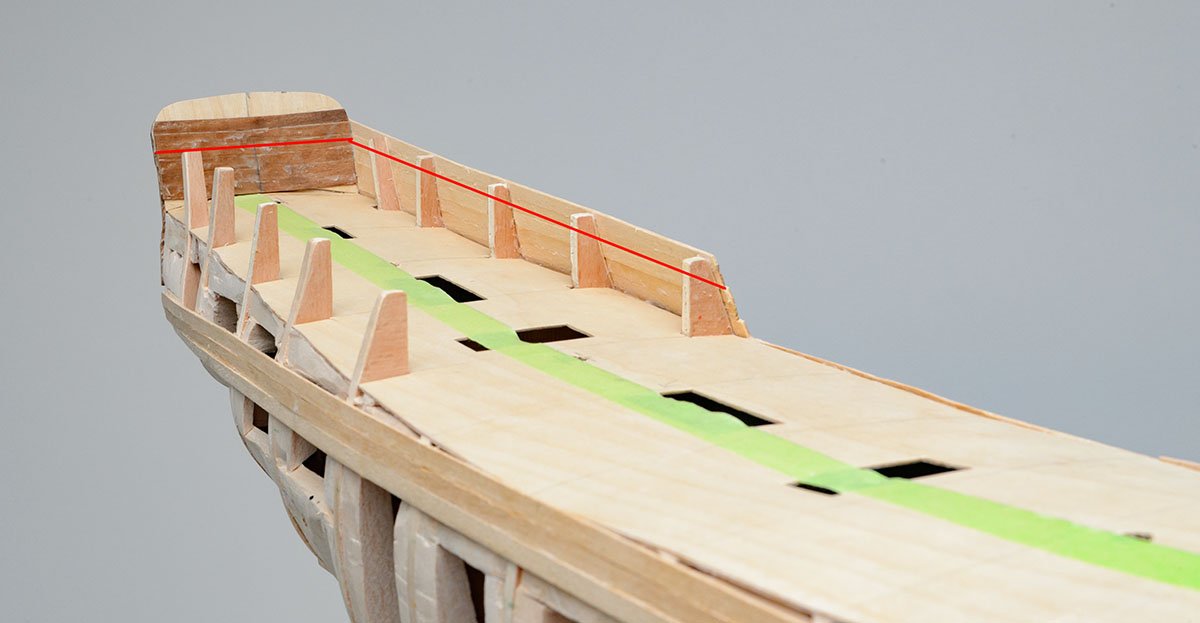
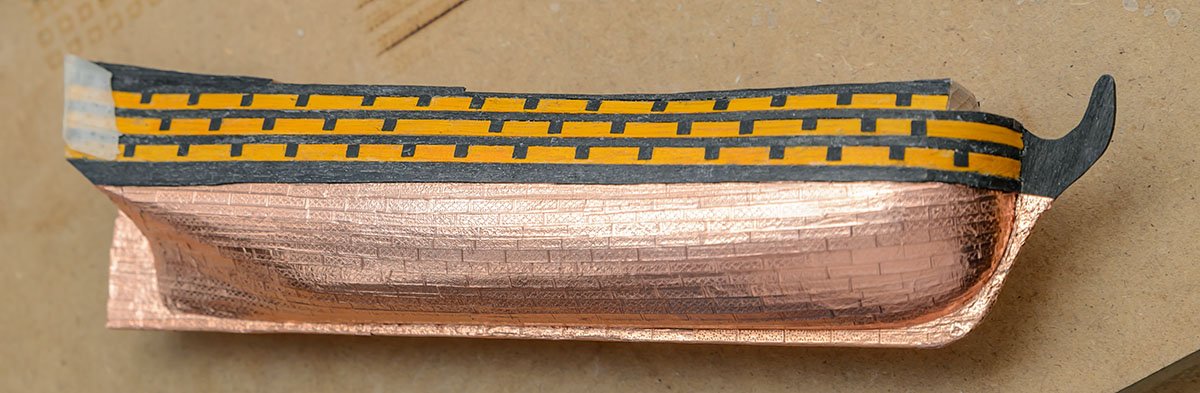
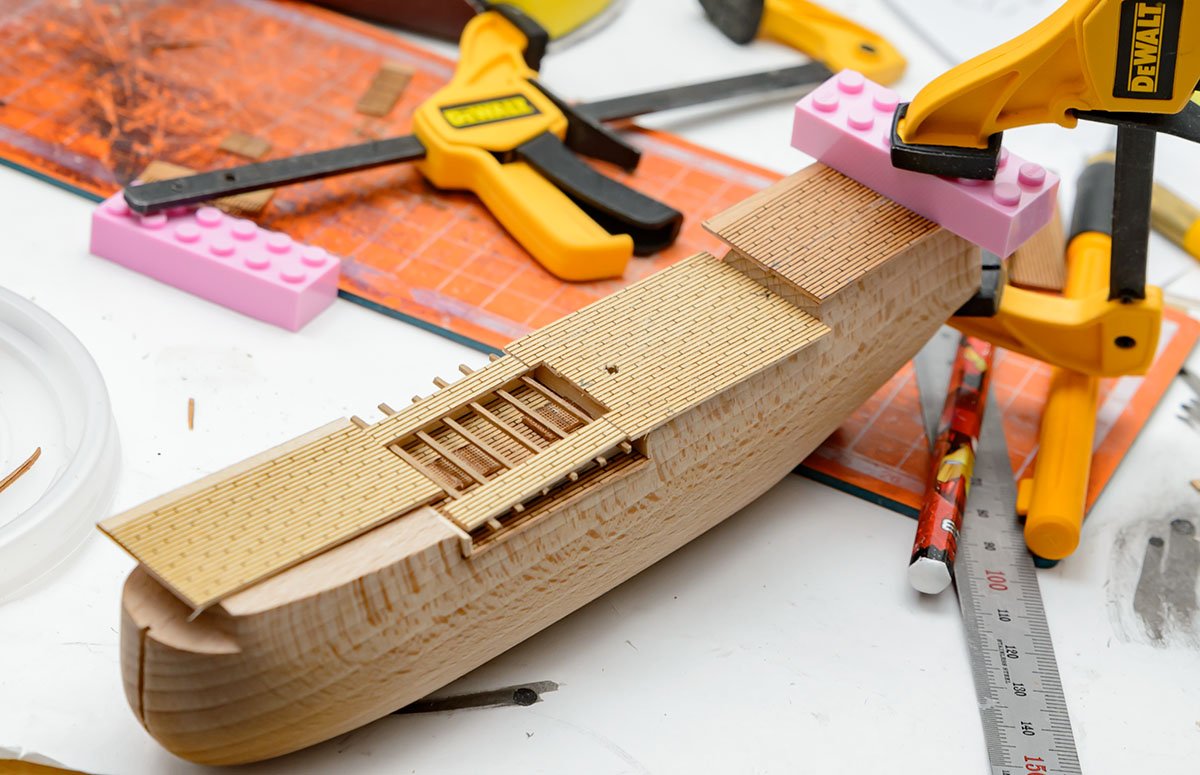
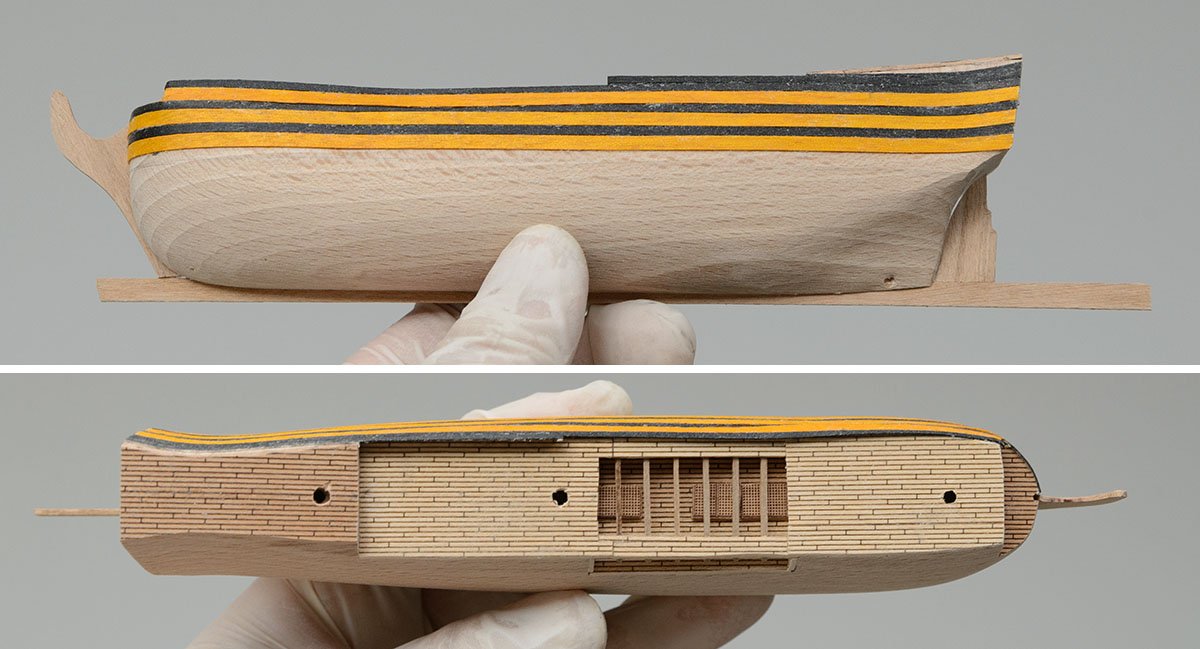
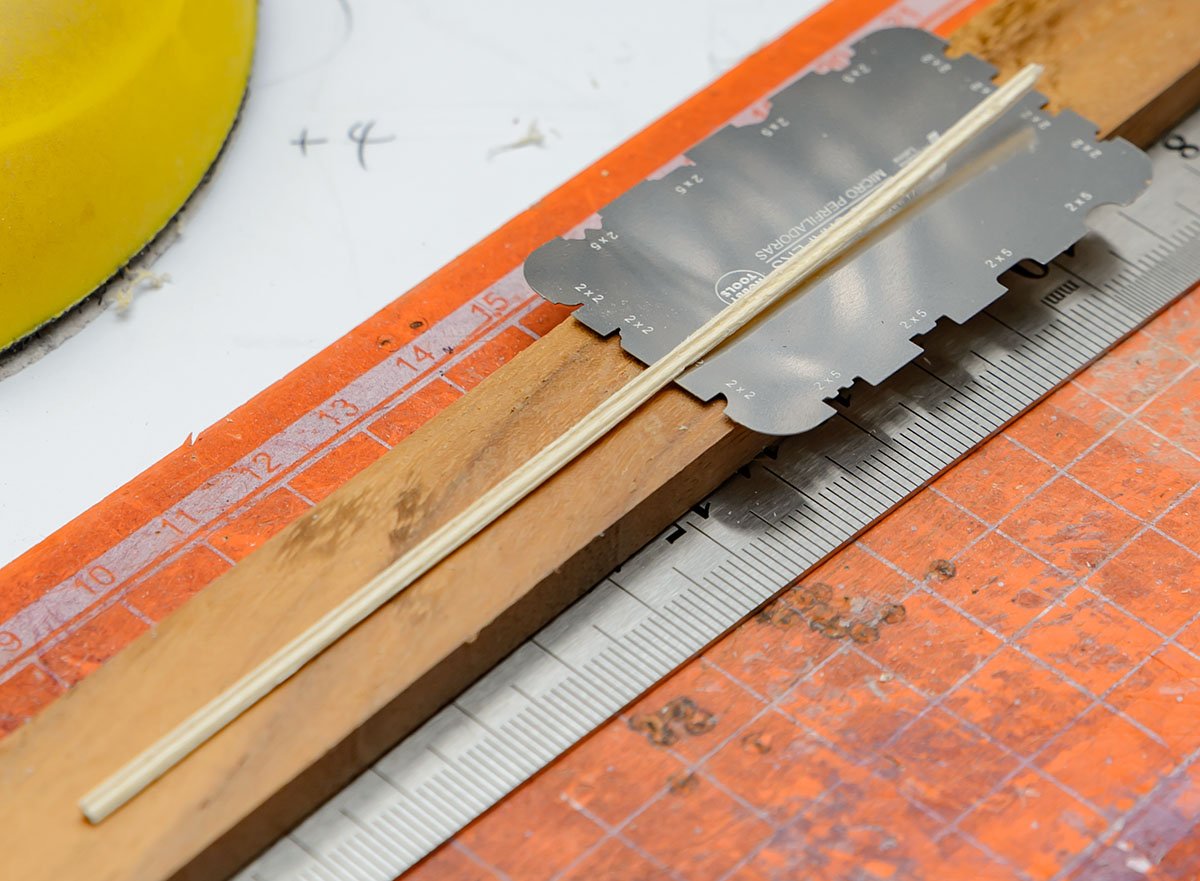
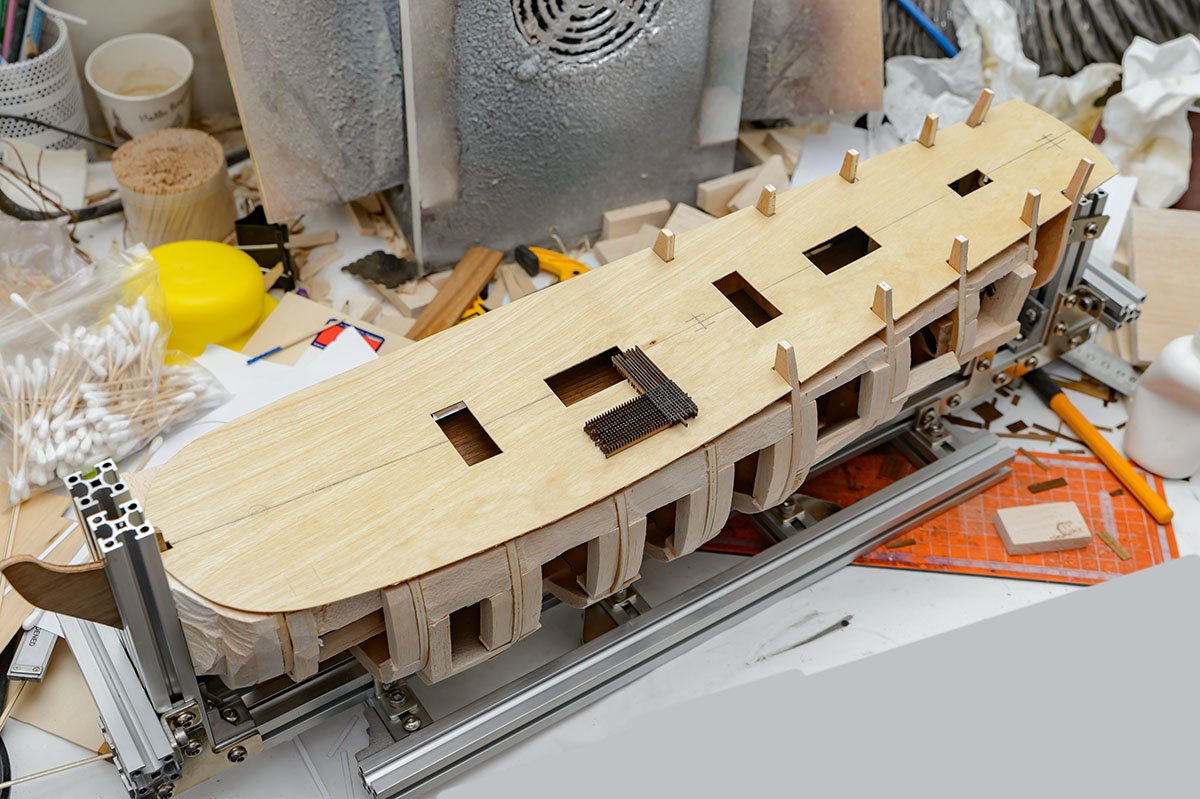
It was a huge leap week. I got lost again and had to rethink my entire planking plans. To relieve the high stress level, I made a simple plastic model ship. This article gave me lots of perspectives on wale lines. I decided to change all my planking plans. I finished installing deck planking sheets. I also added nibbling strakes. Because they were hidden by the edge, the narrow nibbling strakes were an oversight. According to my new plan, the hull shape is based on the AotS book, and the color profile came from the 1982 Bounty movie. I widened the edges and cut the gun ports. To extend the edge to a bow, I used a customized shape gauge. The tool worked well, as I planned. However, the gauge didn't work well on the steep slope at bow. I used a traditional method to make the special edge plank. It is called a cold bent lamination. The method saved more time than steam bend method. It looks good with the walnut strips, but I would choose a steam bend method if it were light colored wood. I made the mast holes. Finally, it looks like a ship! According to my new planking plan, I'll attach planks from top to bottom. I cut strips for the upper wales. The laser cutter is much safer and clearer than my table saw. It doesn't look bad. There is much foom for improvement in time efficiency... Merry Christmas!

-
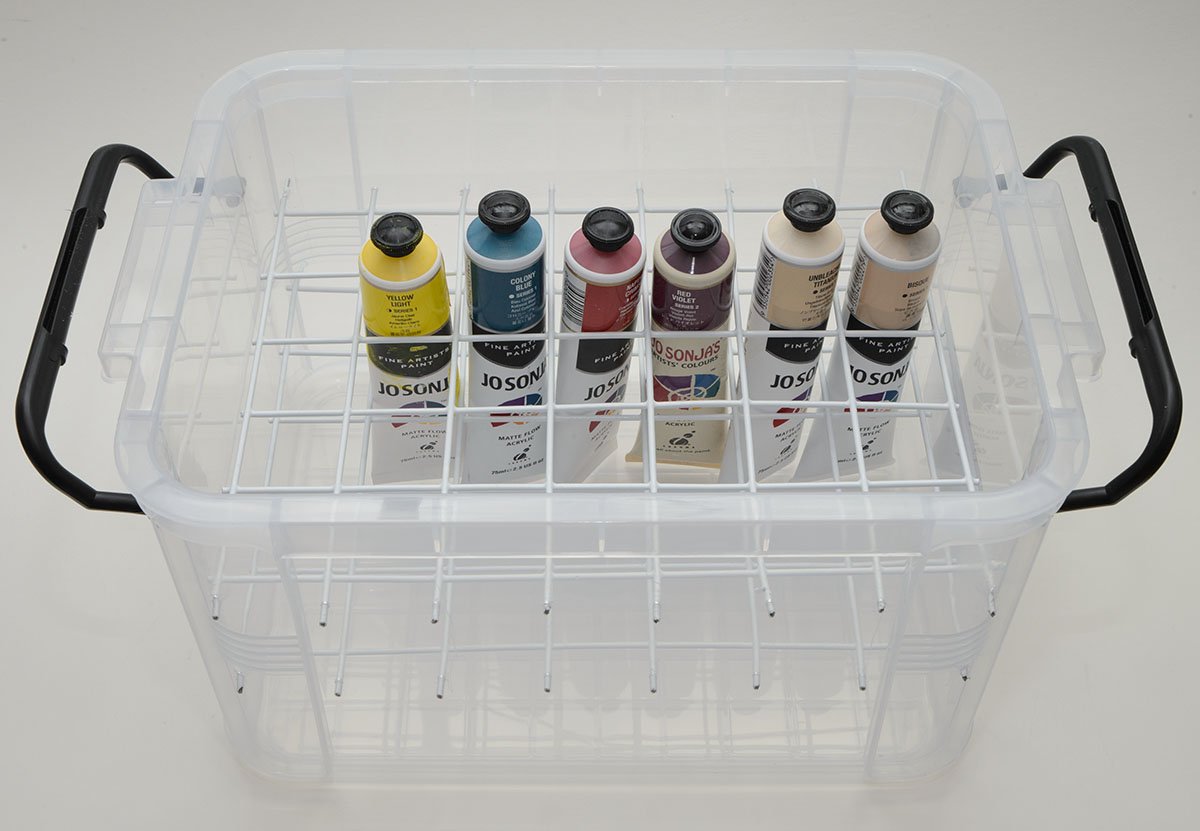
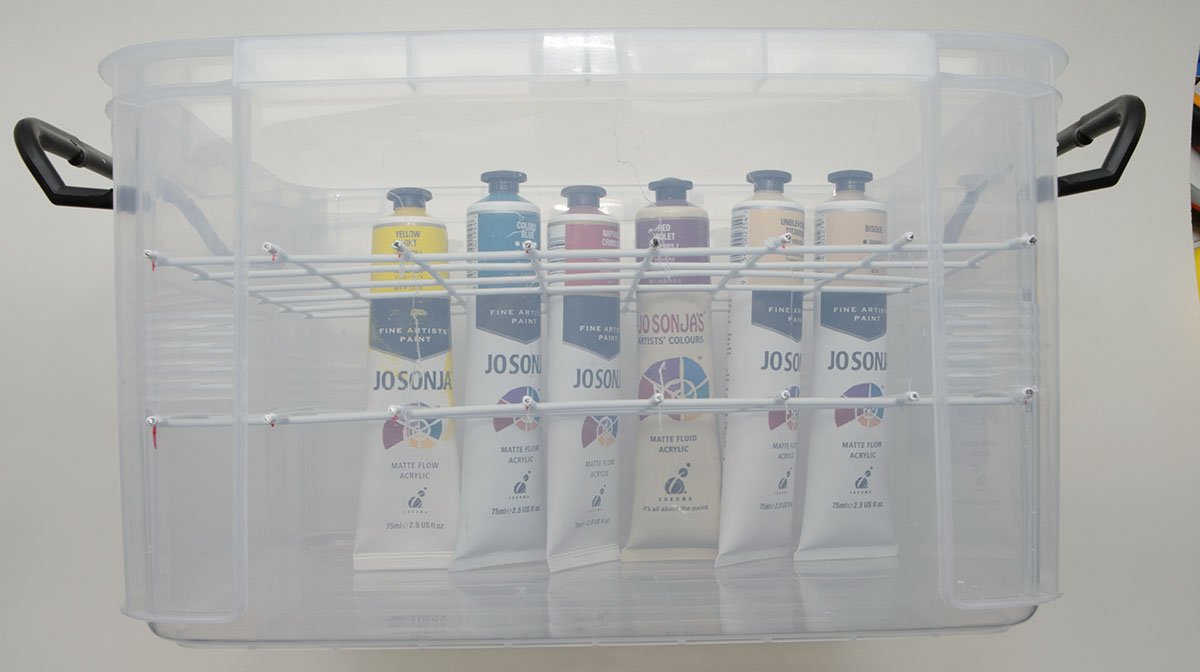
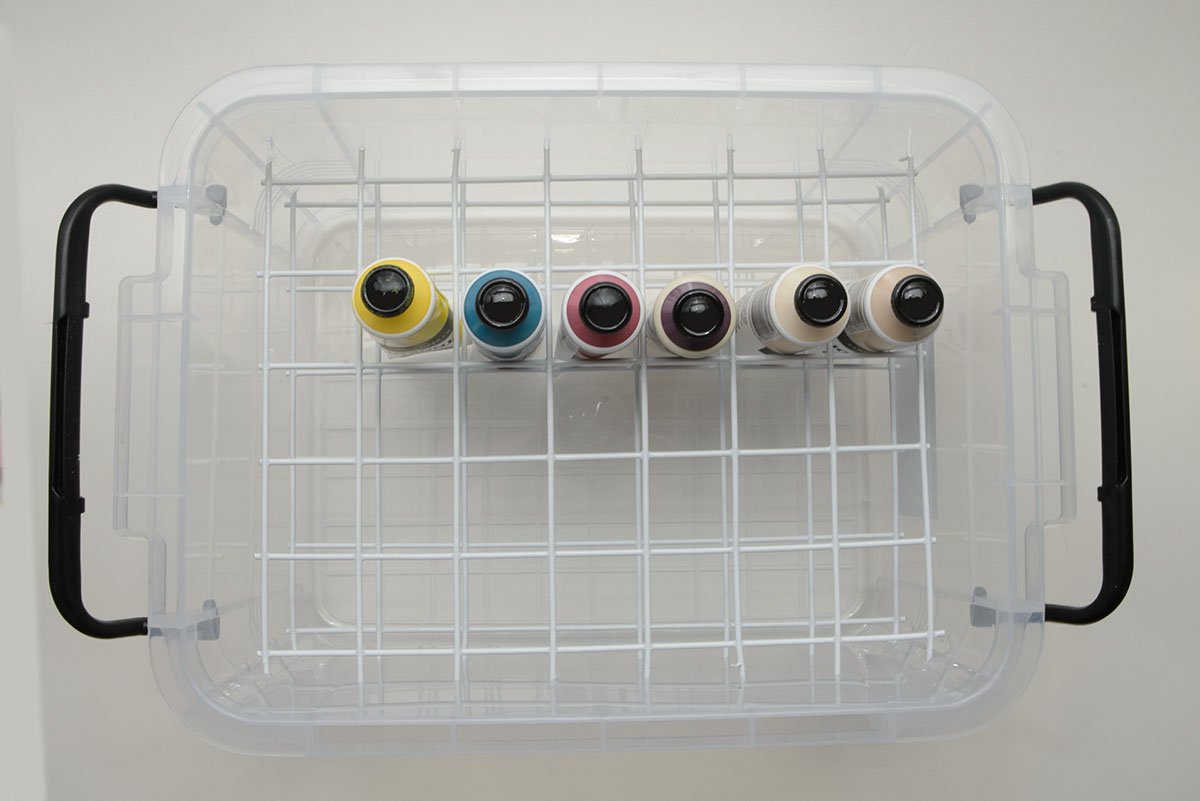
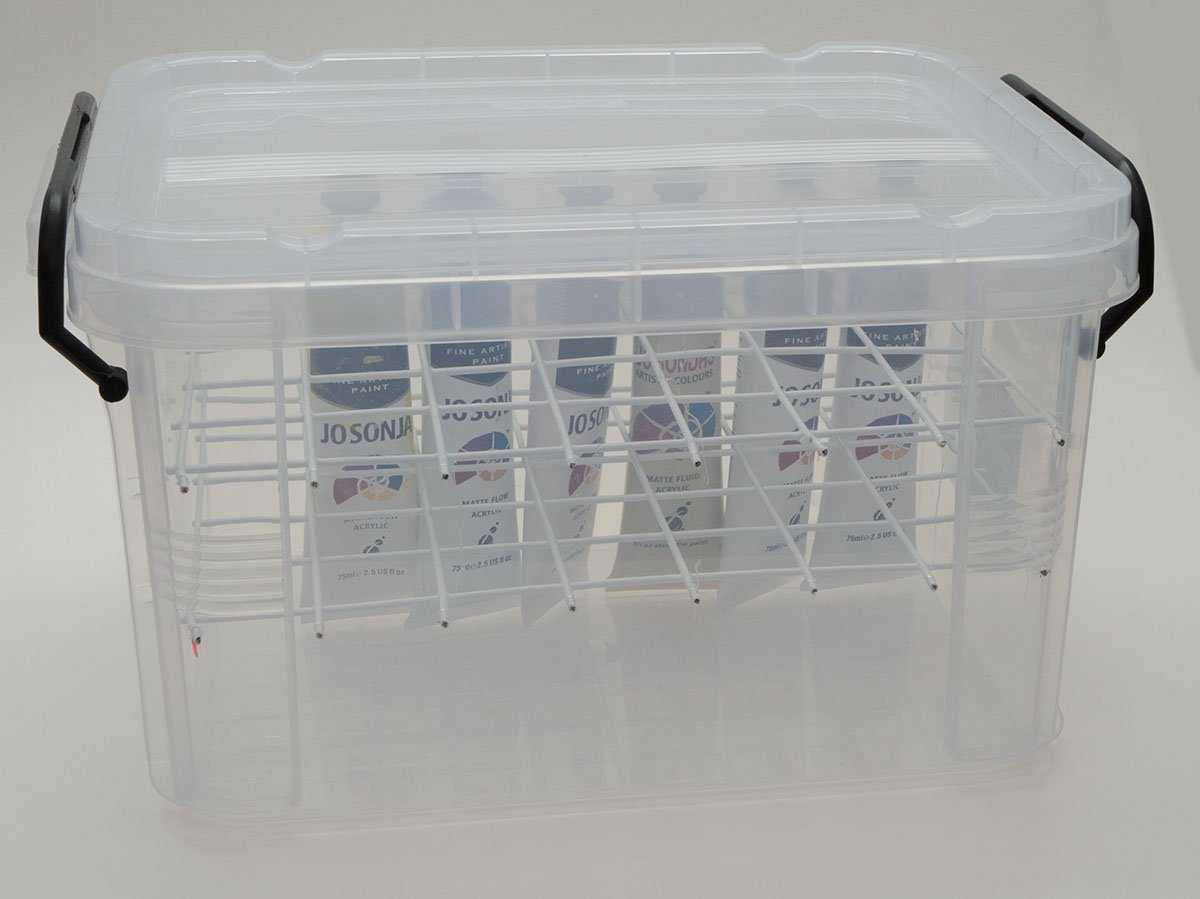
I made a Josonja acrylic paint case with cheap materials.
-
- 7
-

-
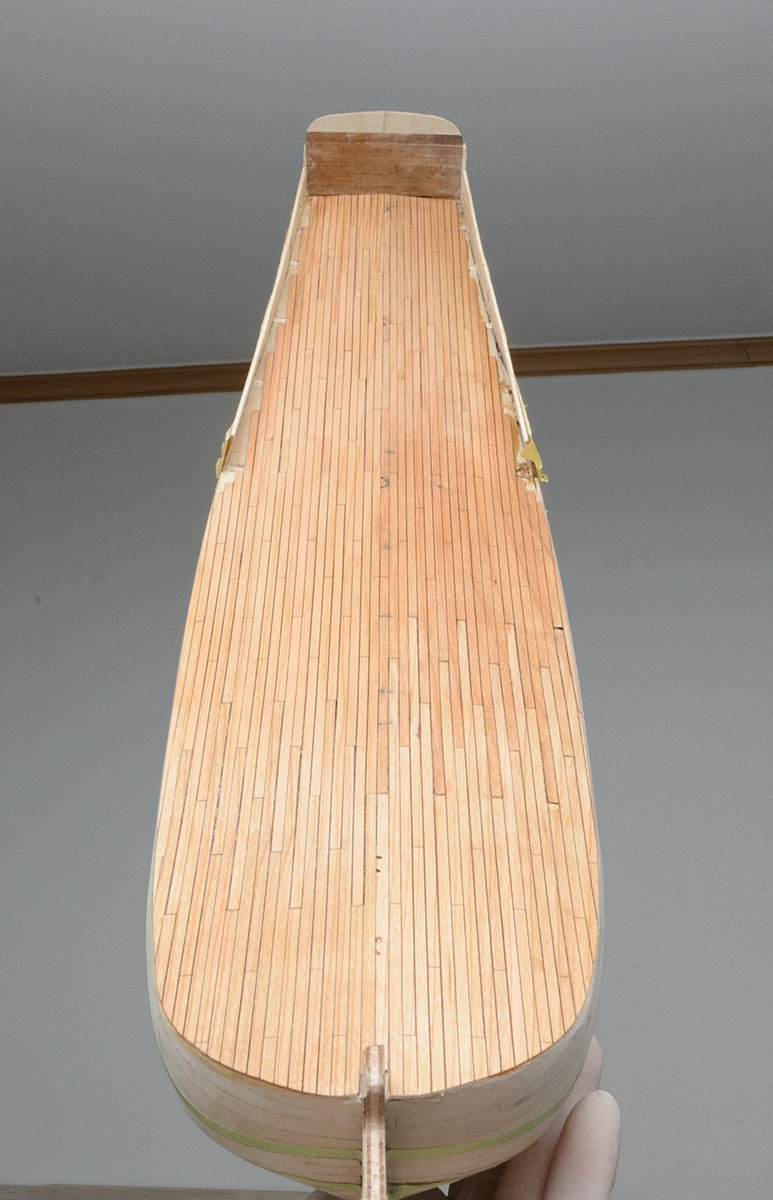
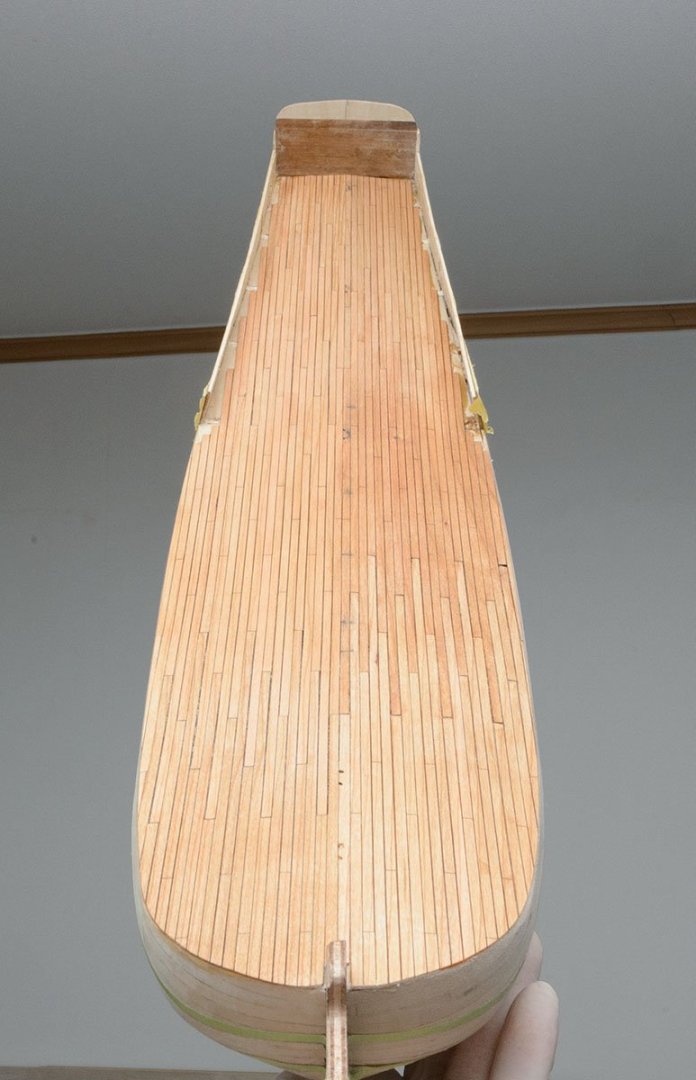
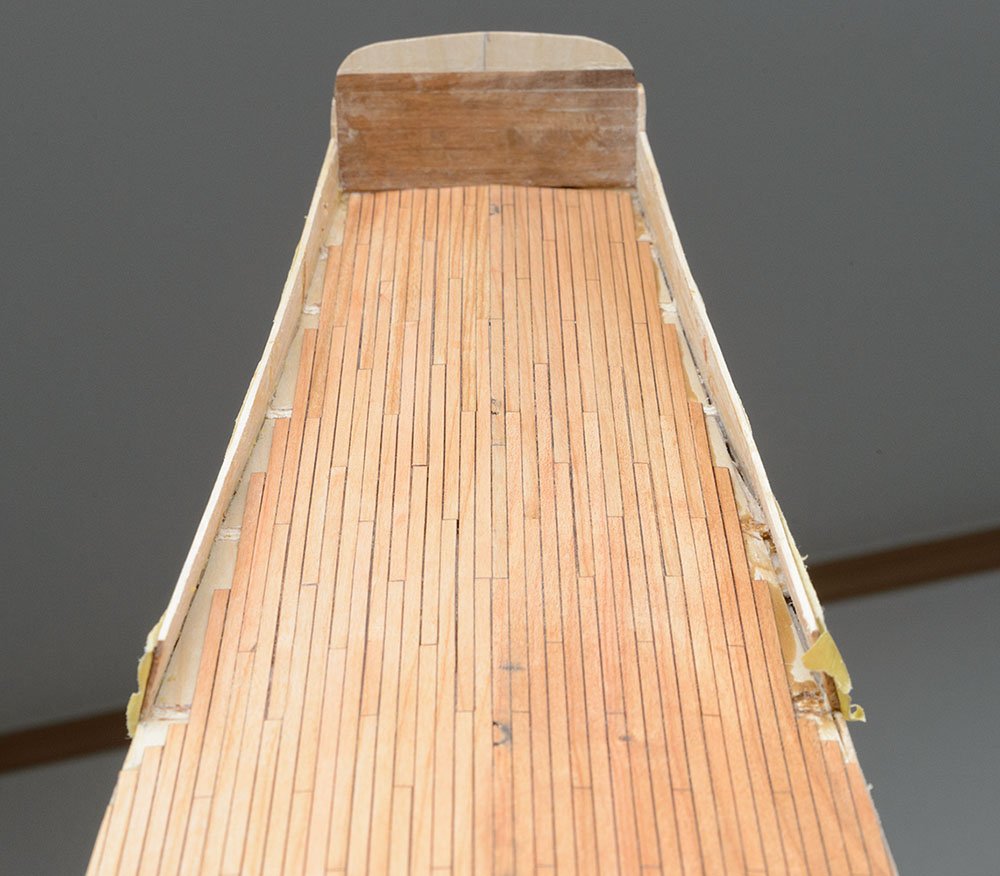
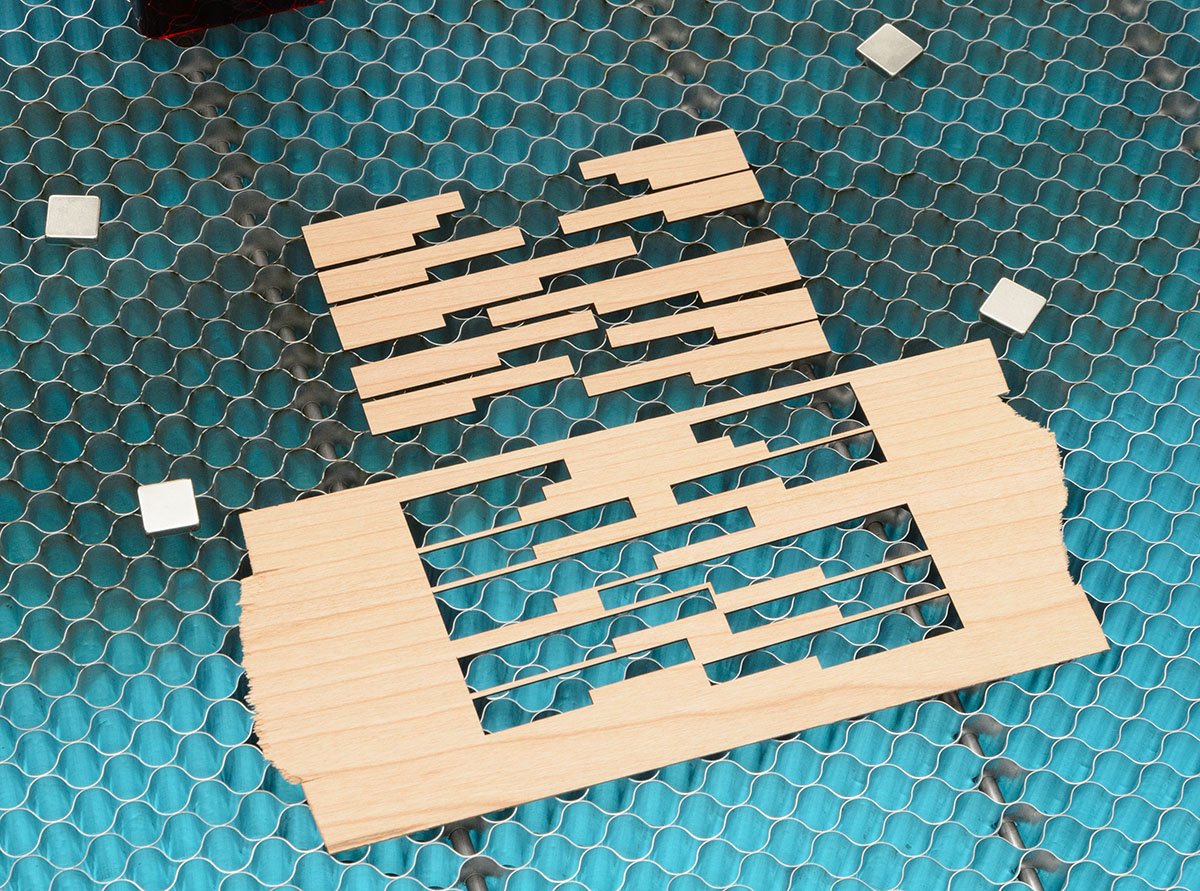
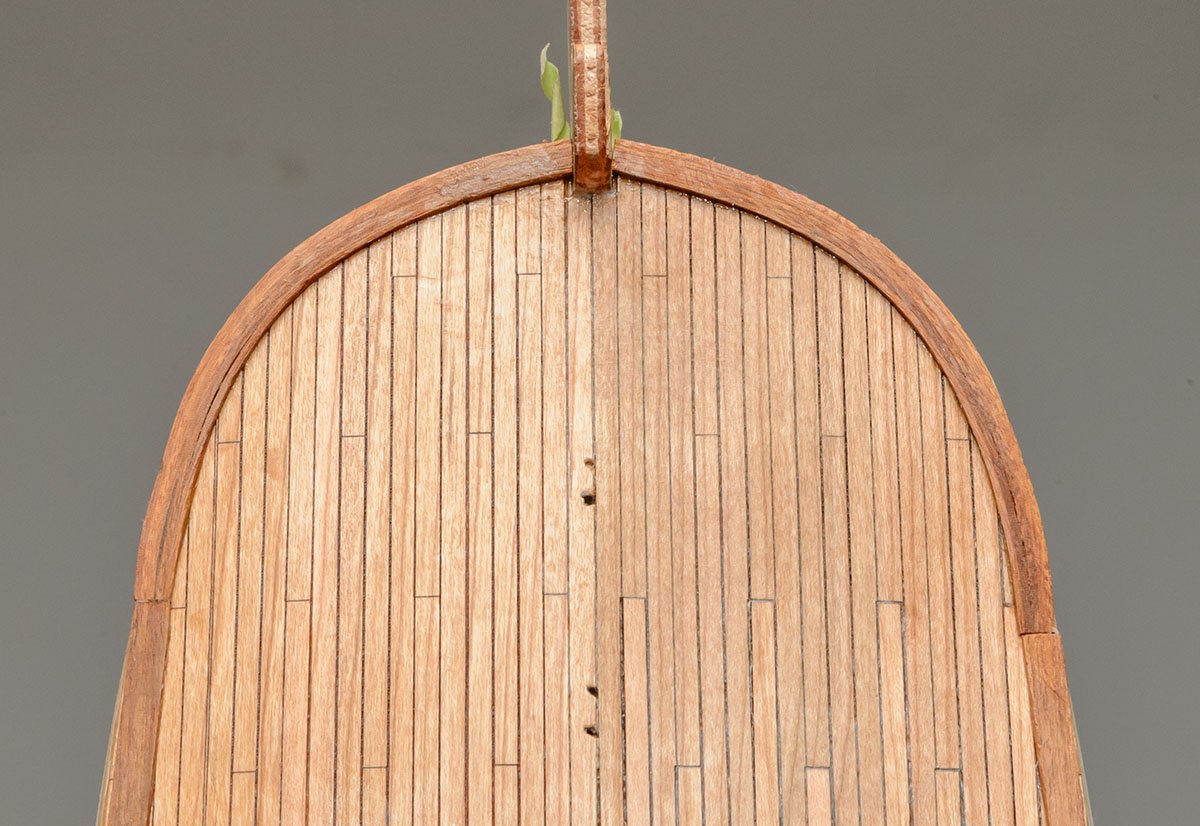
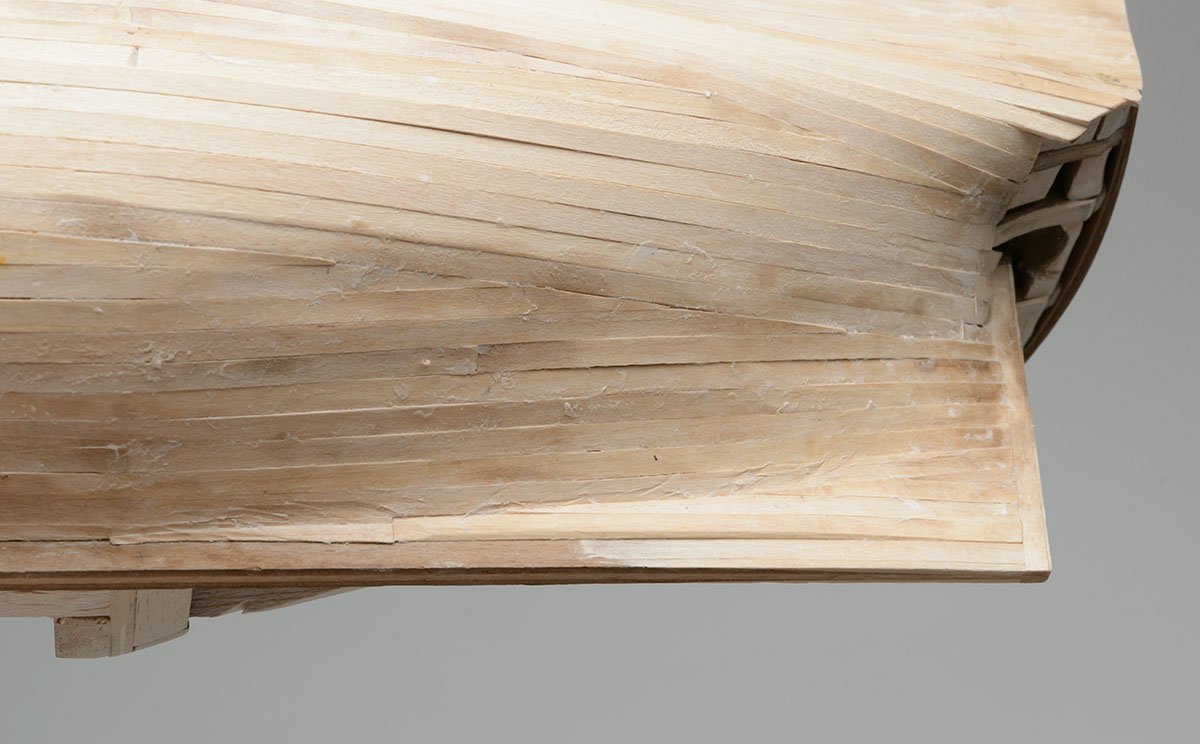
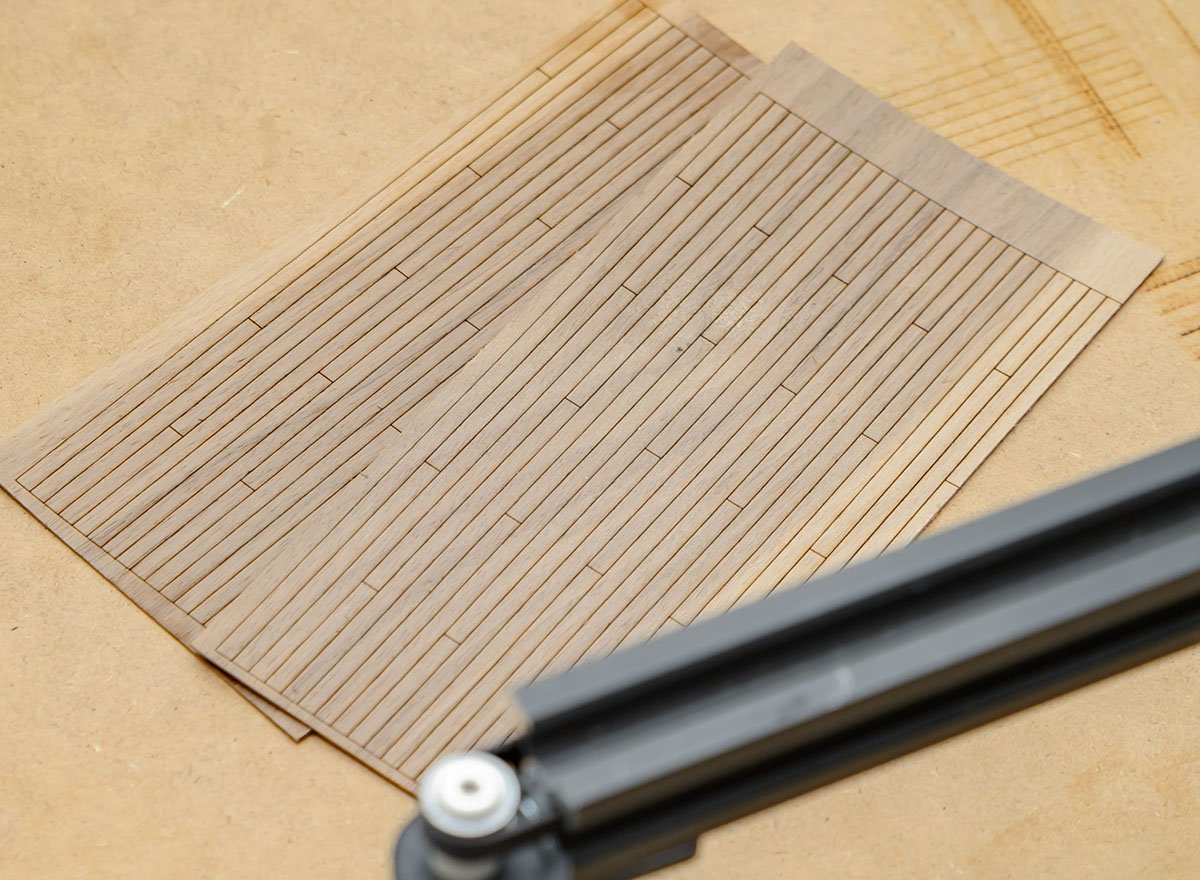
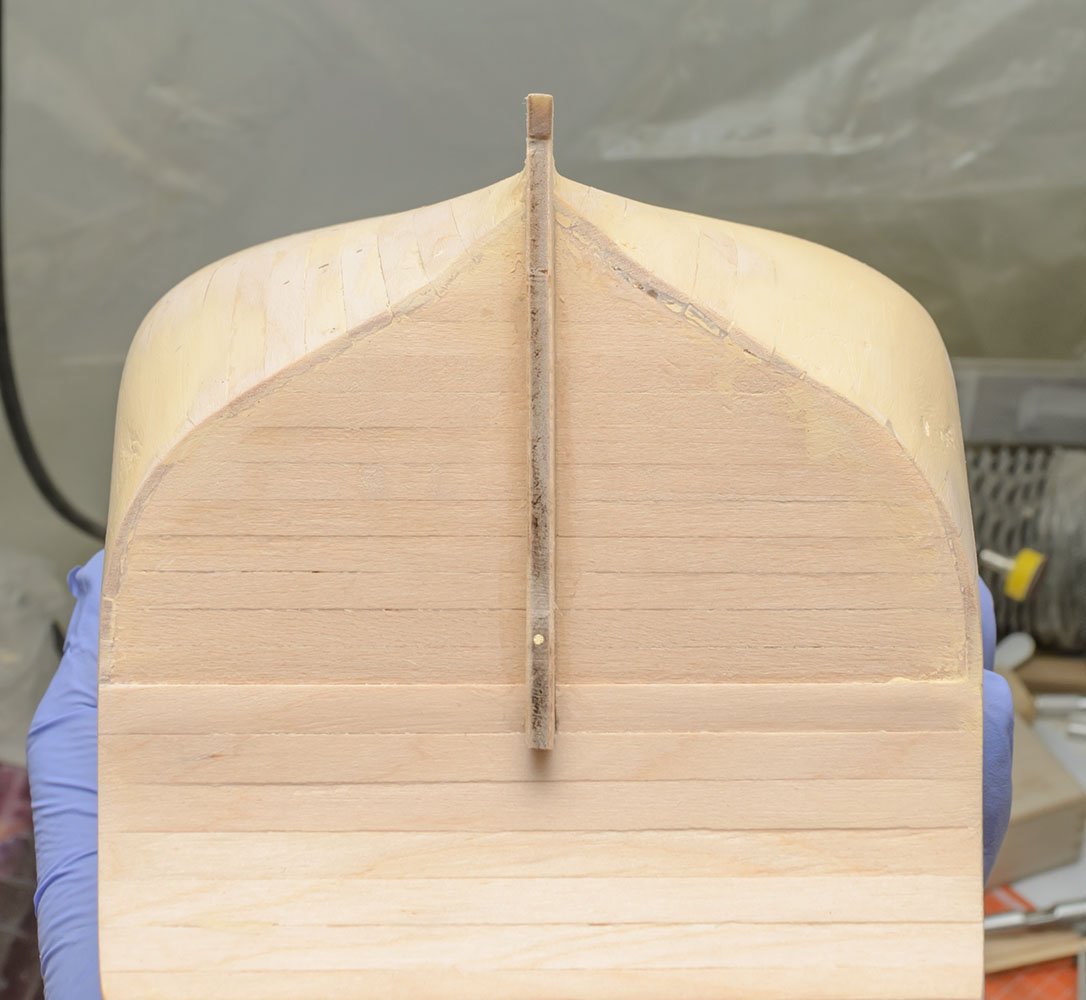
I sanded the transom. It seems unrealistic, but it is the best I can do... I applied a new technique I had planned long ago. It works. The wood is a 1/32 inch cherry veneer sheet. It takes about 25 minutes to complete the 30cm = 1 foot 4 butt shift pattern planks. I'm trying to add nibbling strakes.
-
Best Spindle Sander for Ship Modelling
modeller_masa replied to whaynes's topic in Modeling tools and Workshop Equipment
I'm using a 40W laser cutter, so I may need to sand charcoal dusts slightly.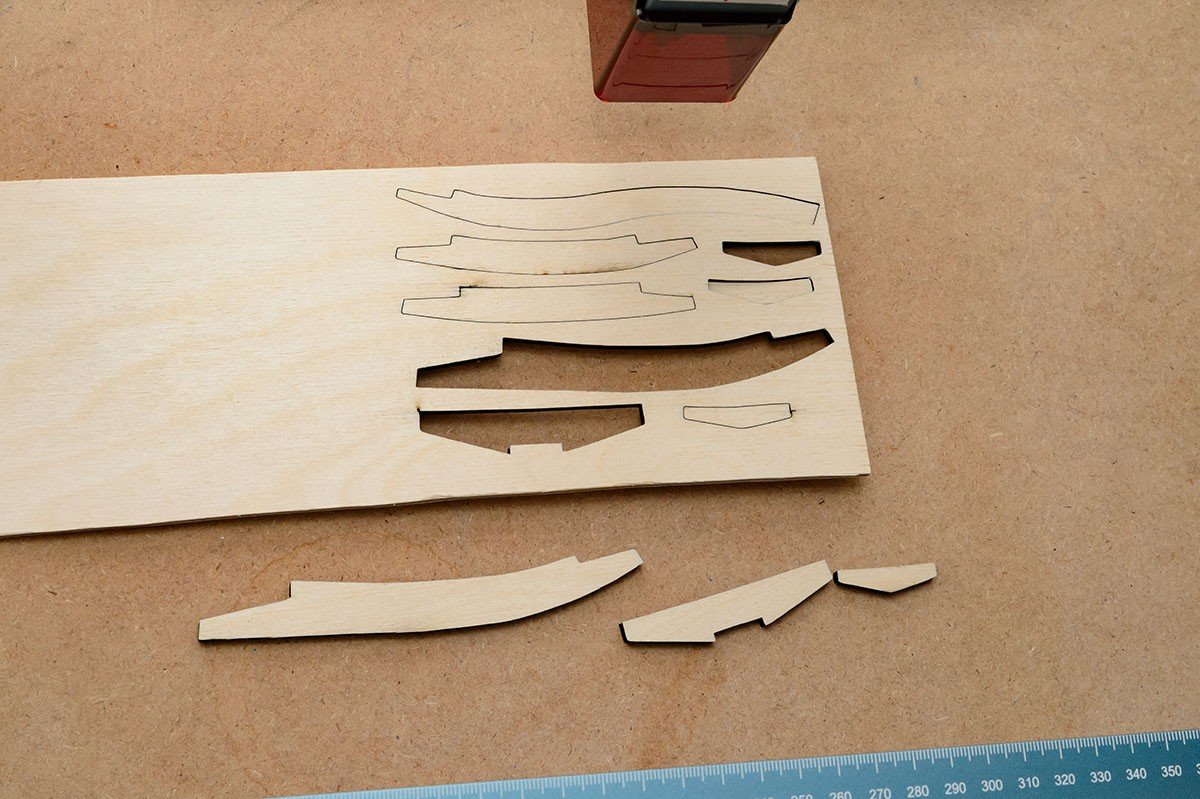
-
Best Spindle Sander for Ship Modelling
modeller_masa replied to whaynes's topic in Modeling tools and Workshop Equipment
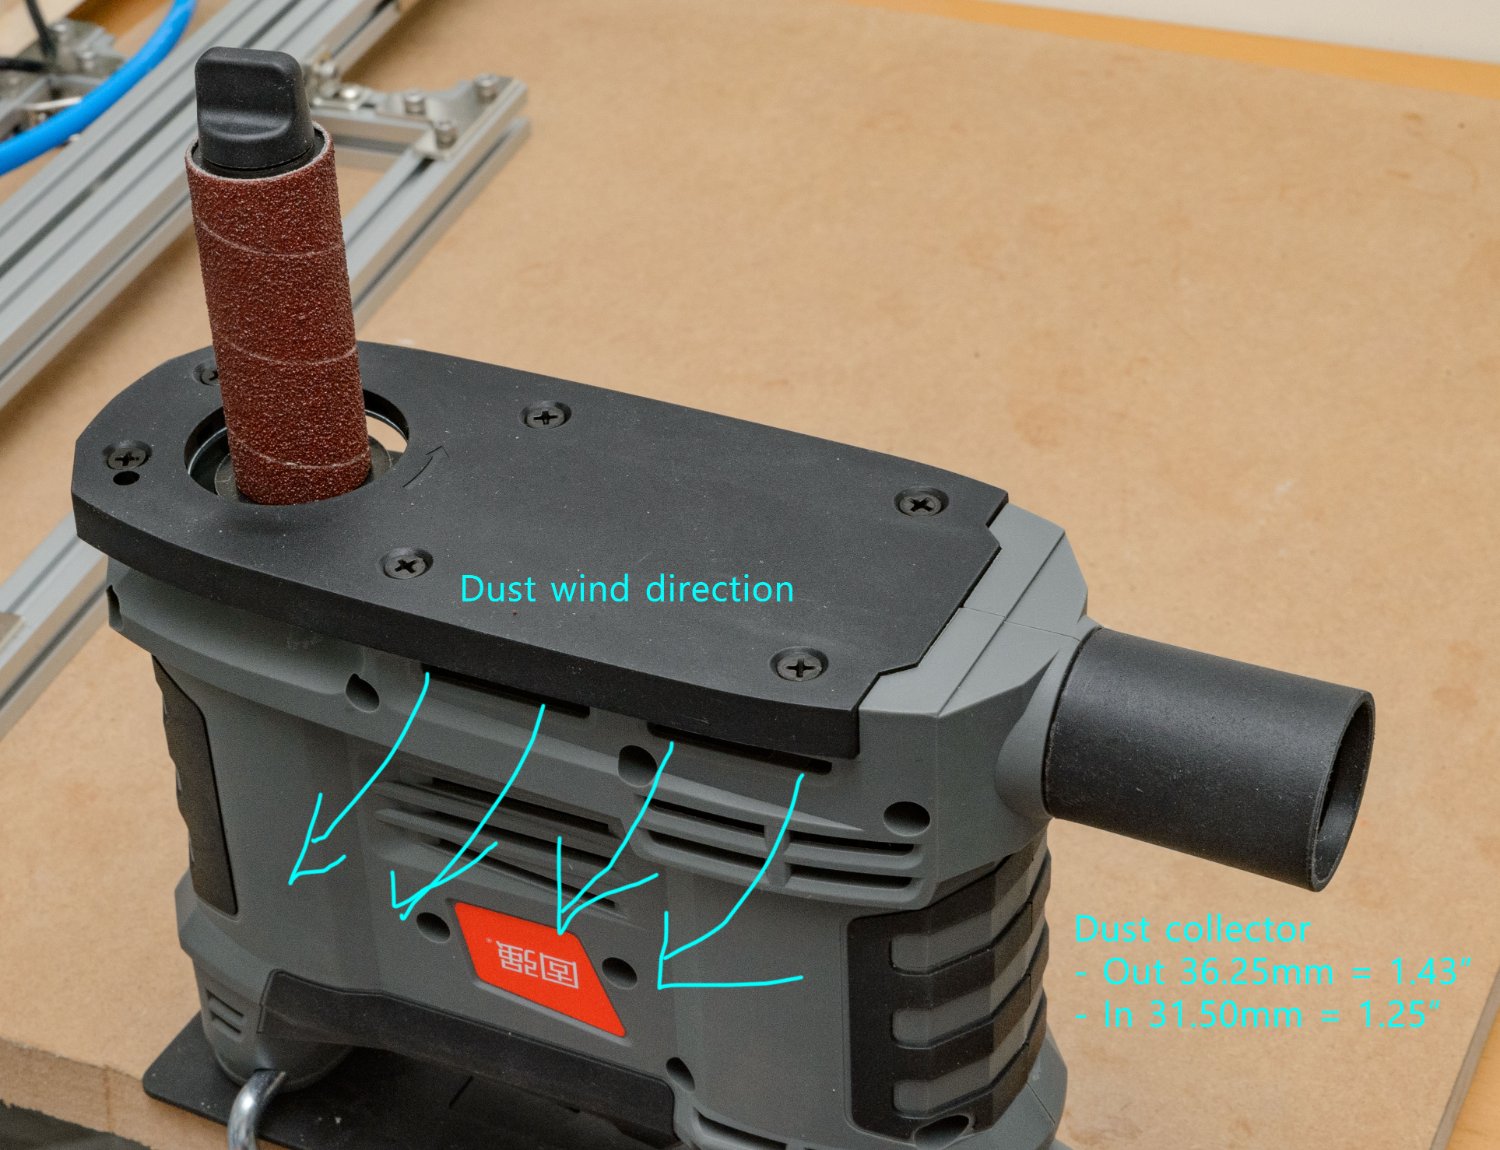
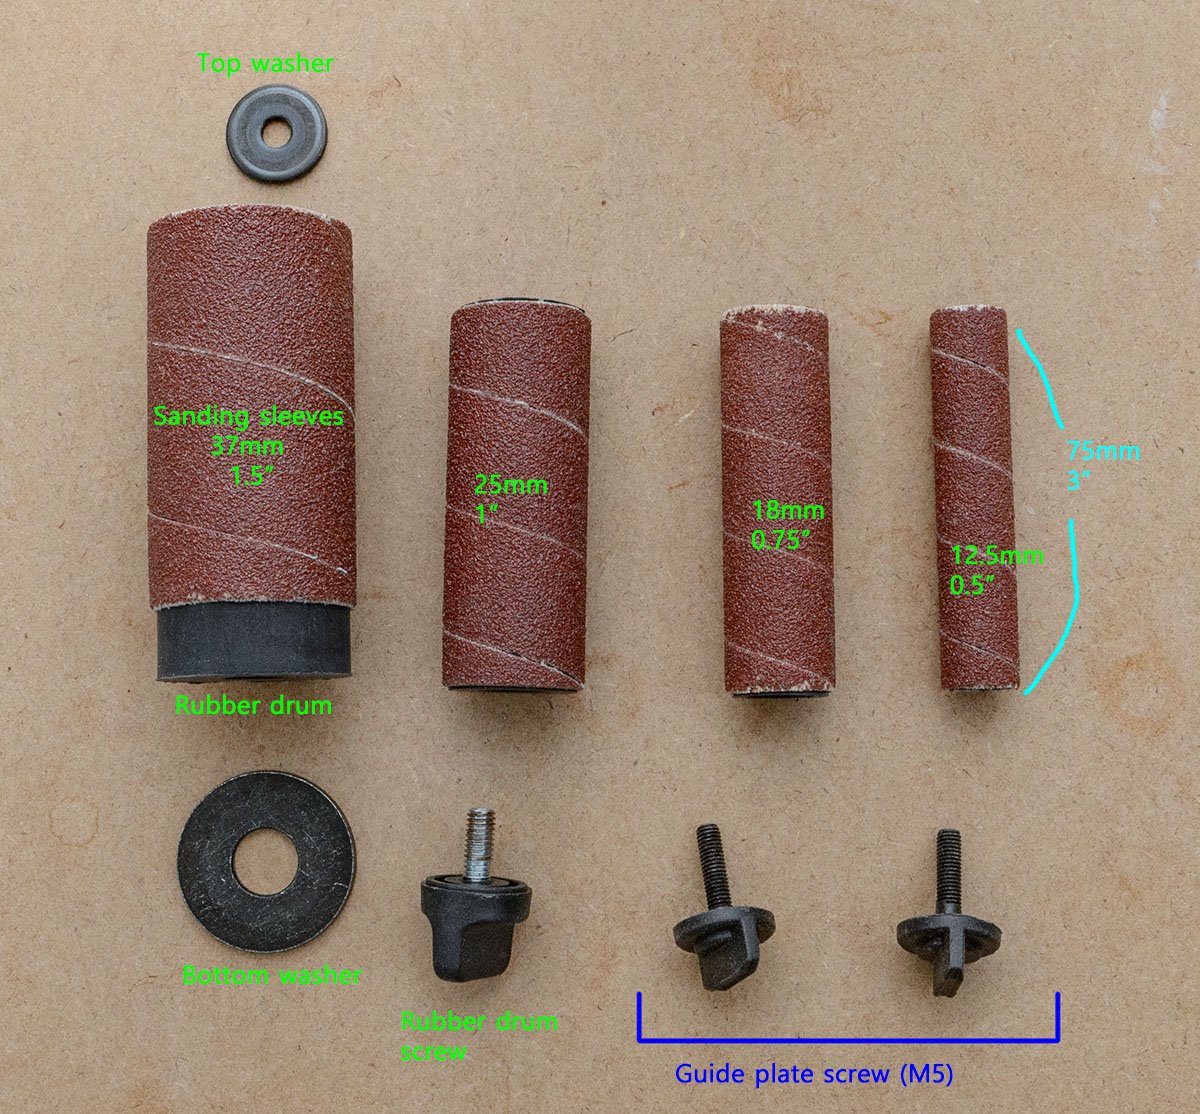
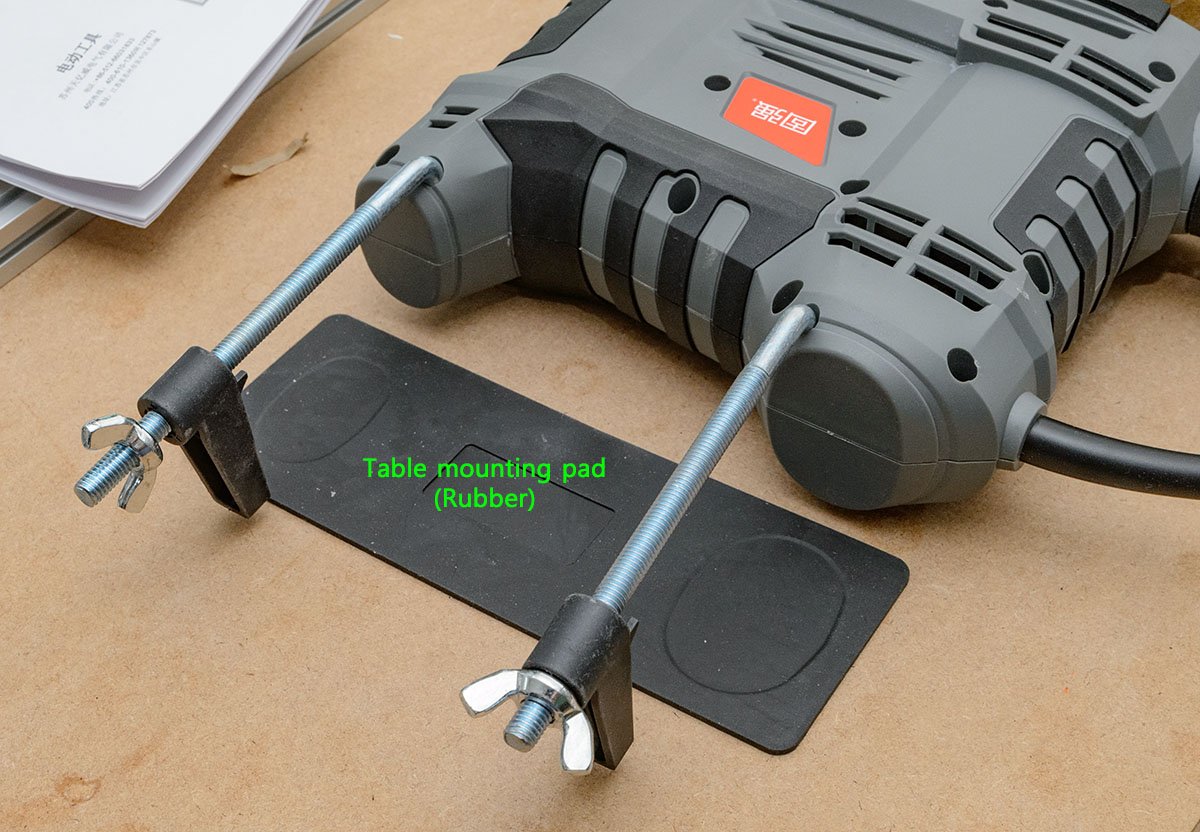
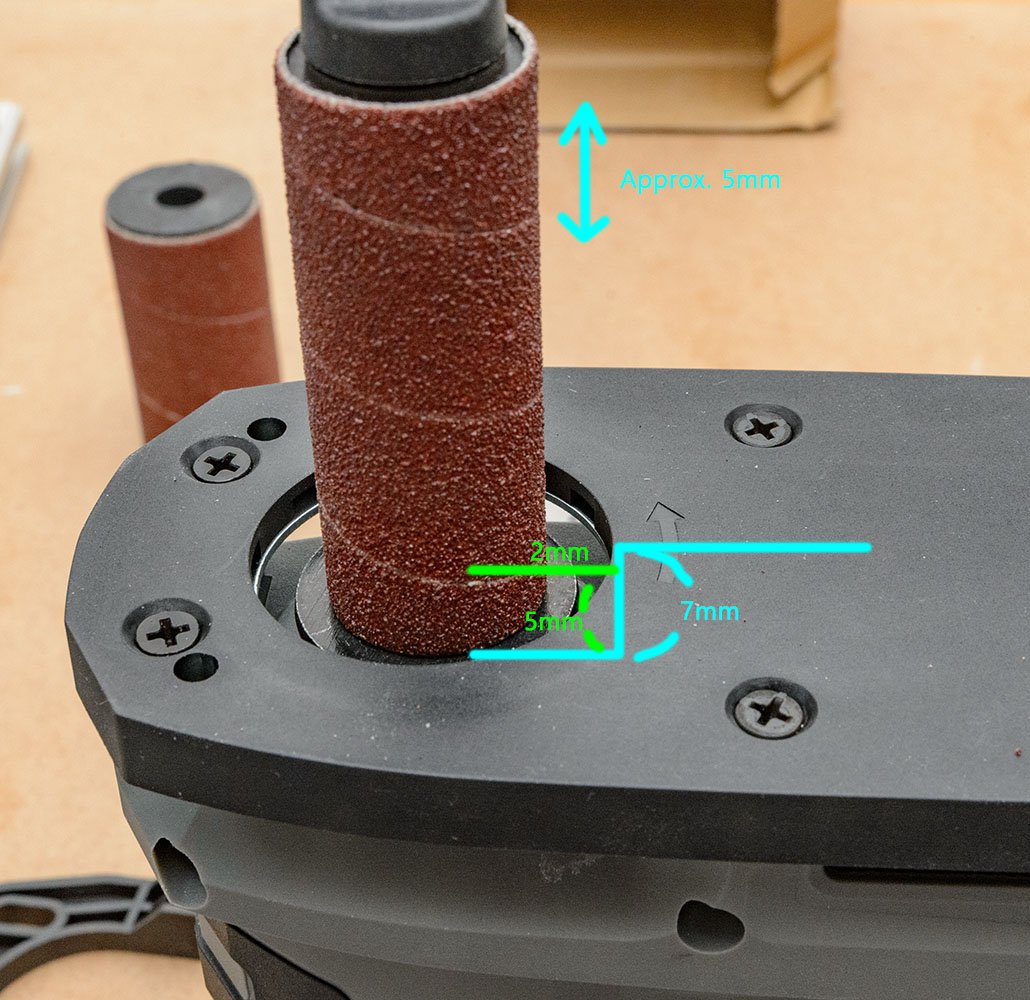
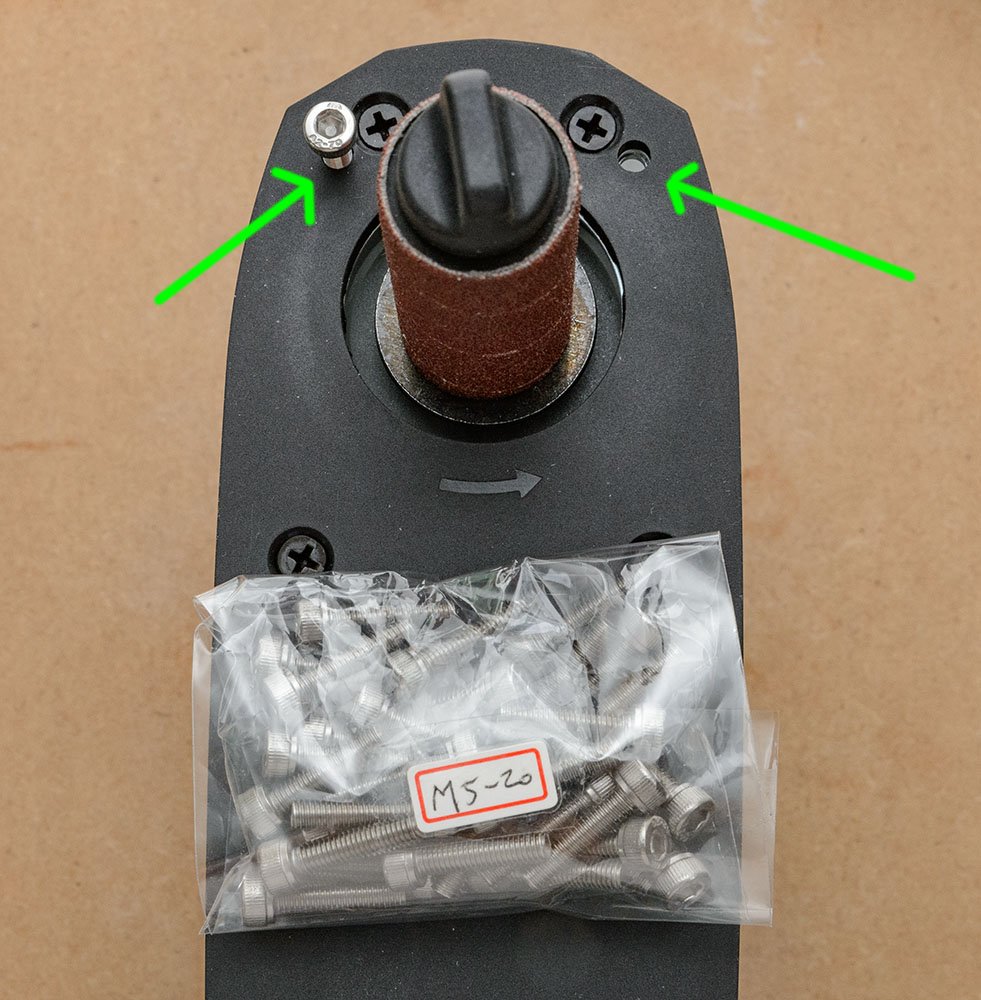
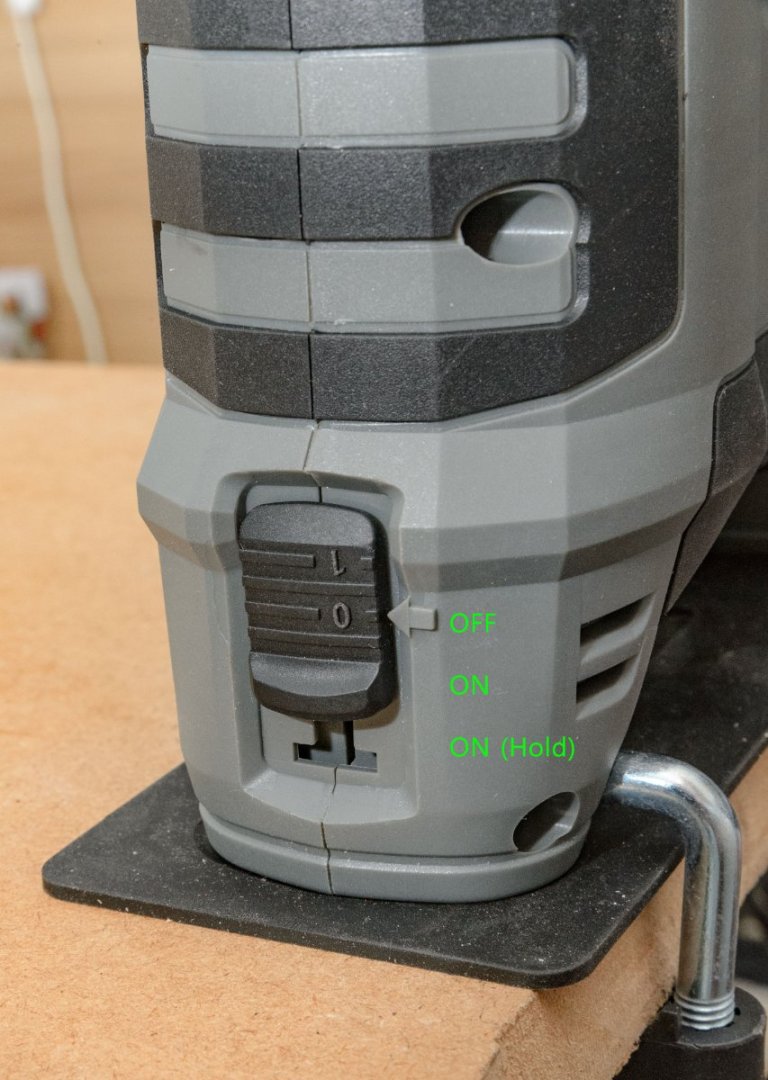
I don't know the RPM at the maximum speed. According to the manual, the maximum power consumption is 650W and it is quite loud at 6 speed level. I found replacement sanding sleeves at 60, 80, 120, 240 grits. There are more grit choices at 1/8 shank, but it is useless for the spindle sander that oscillates sanding drum. I'll make a zero insert plate and hold it with two M5 screws. Someone may make a work table like the trimmer table. Probably the best tool , which has a 6" oscillating drum, starts at $150, so the $55 miniature spindle sander attracted me. I may need to buy 240 grit sleeves for a better result. -
Best Spindle Sander for Ship Modelling
modeller_masa replied to whaynes's topic in Modeling tools and Workshop Equipment
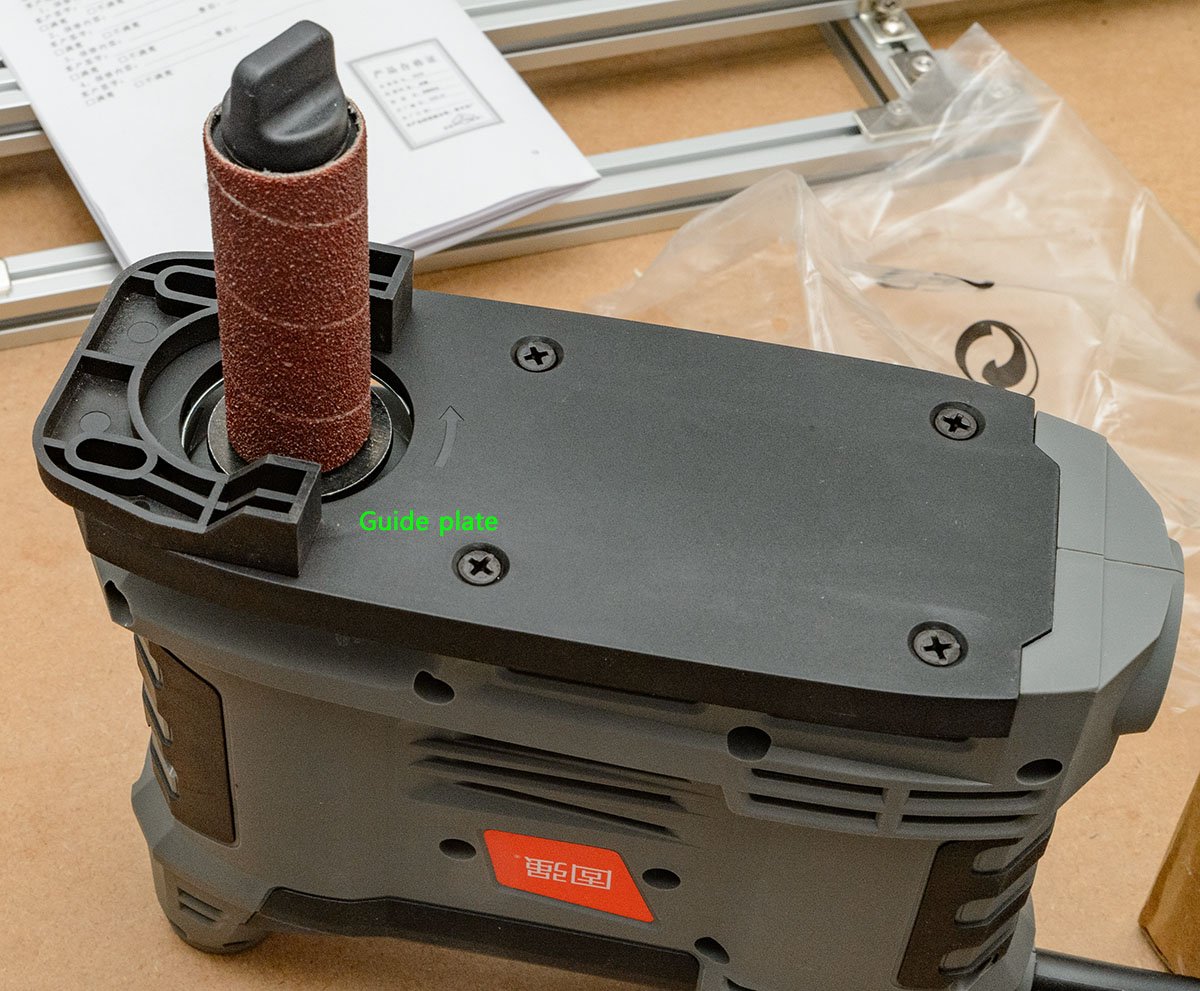
I received the portable spindle sander. The variable speed dial is from 1 to 6. It seems solid enough for a scratch building. 😎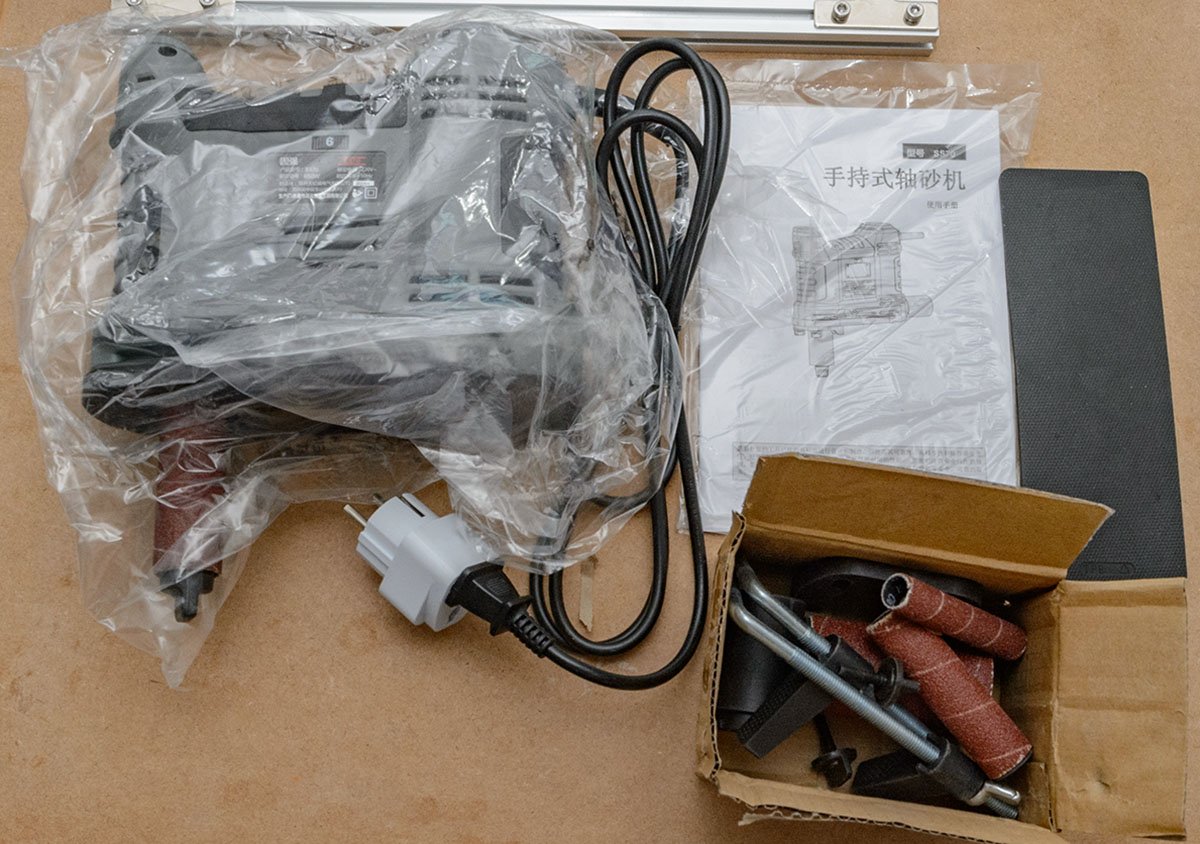


-
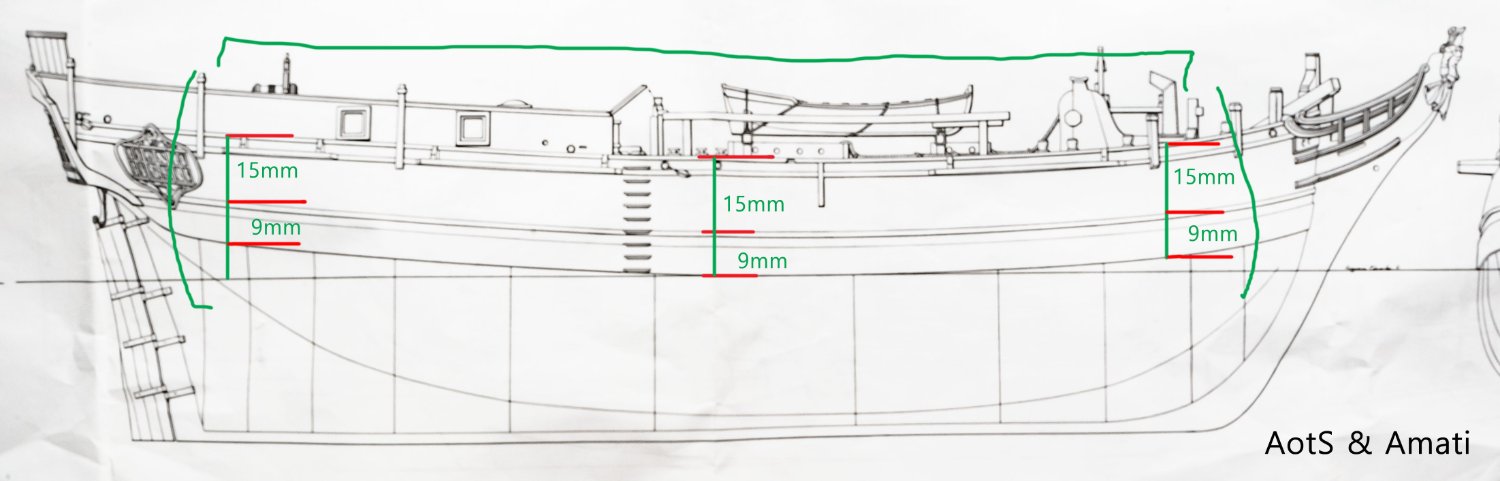
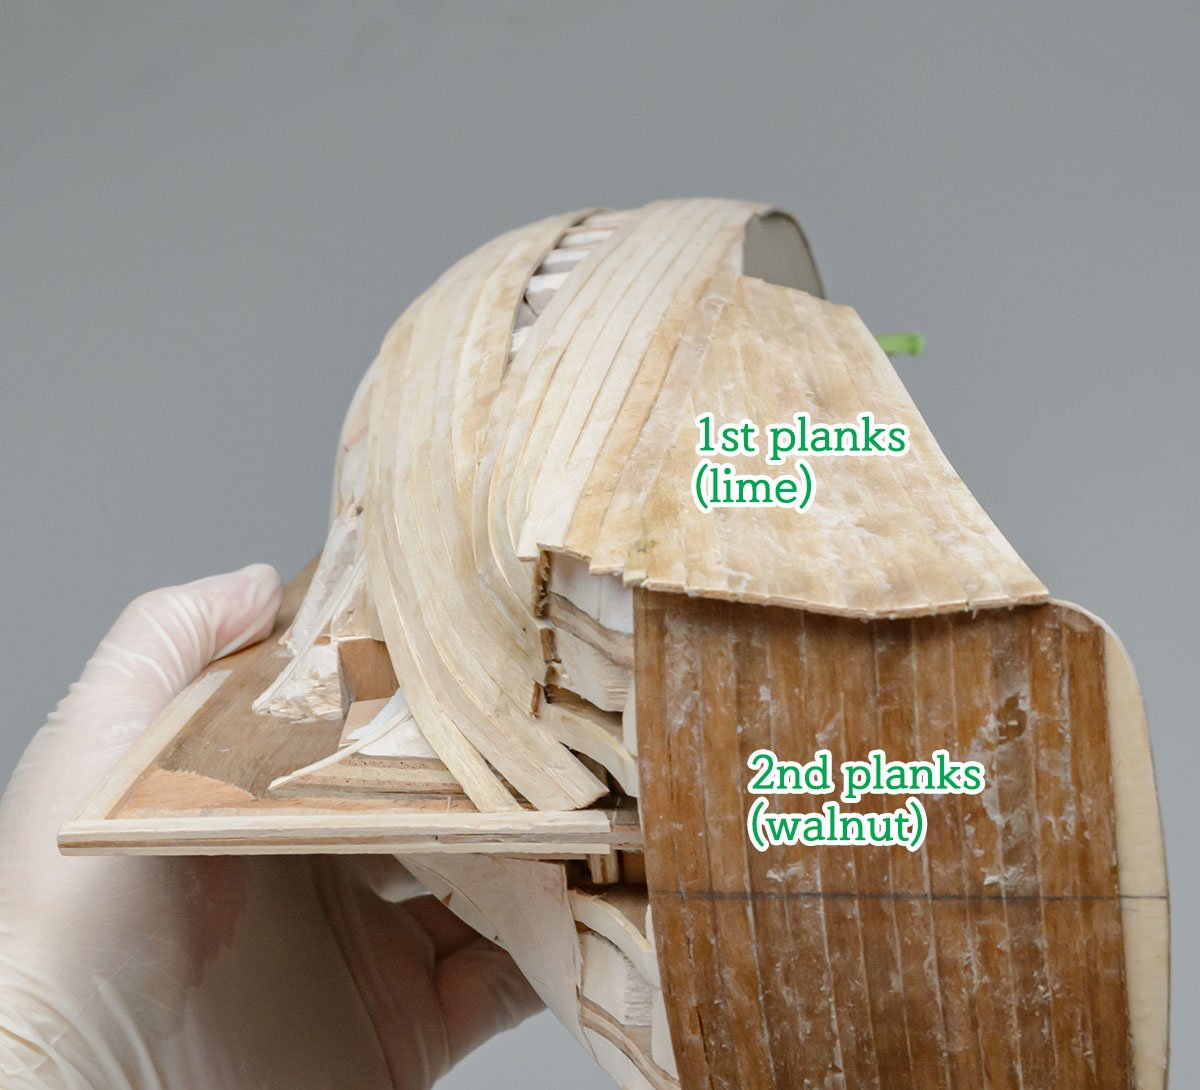
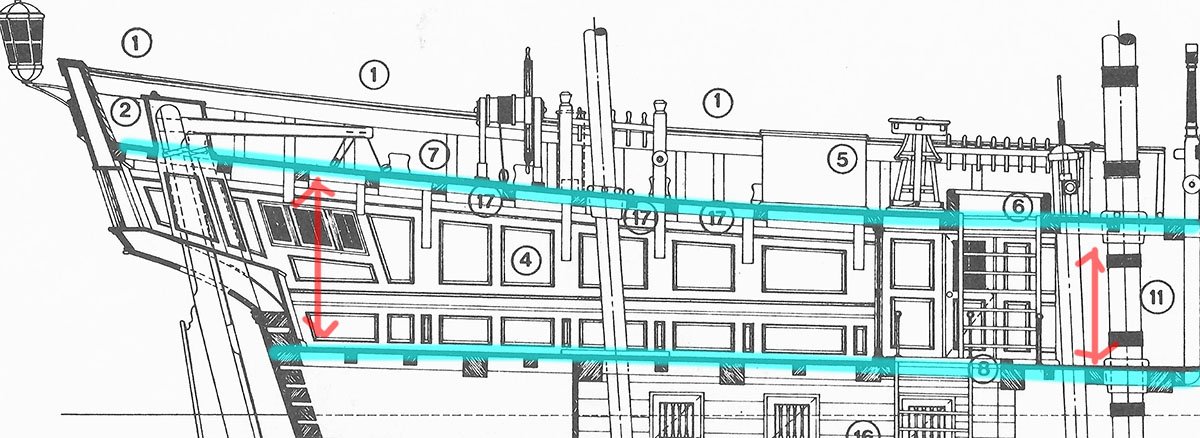
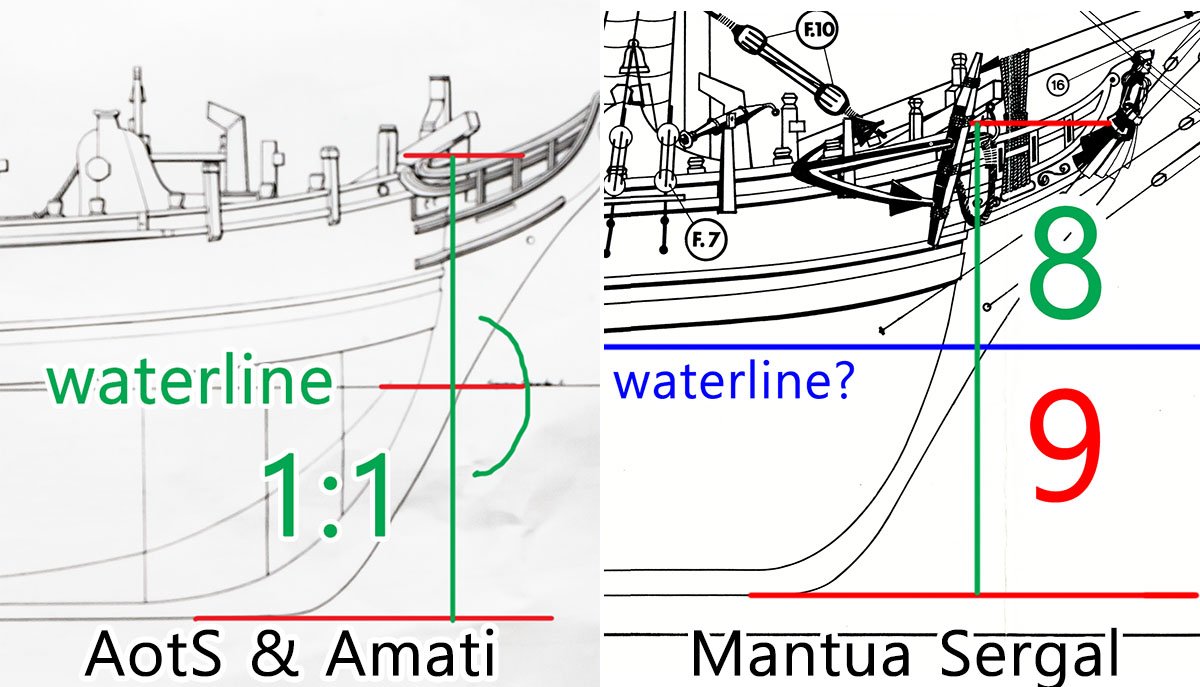
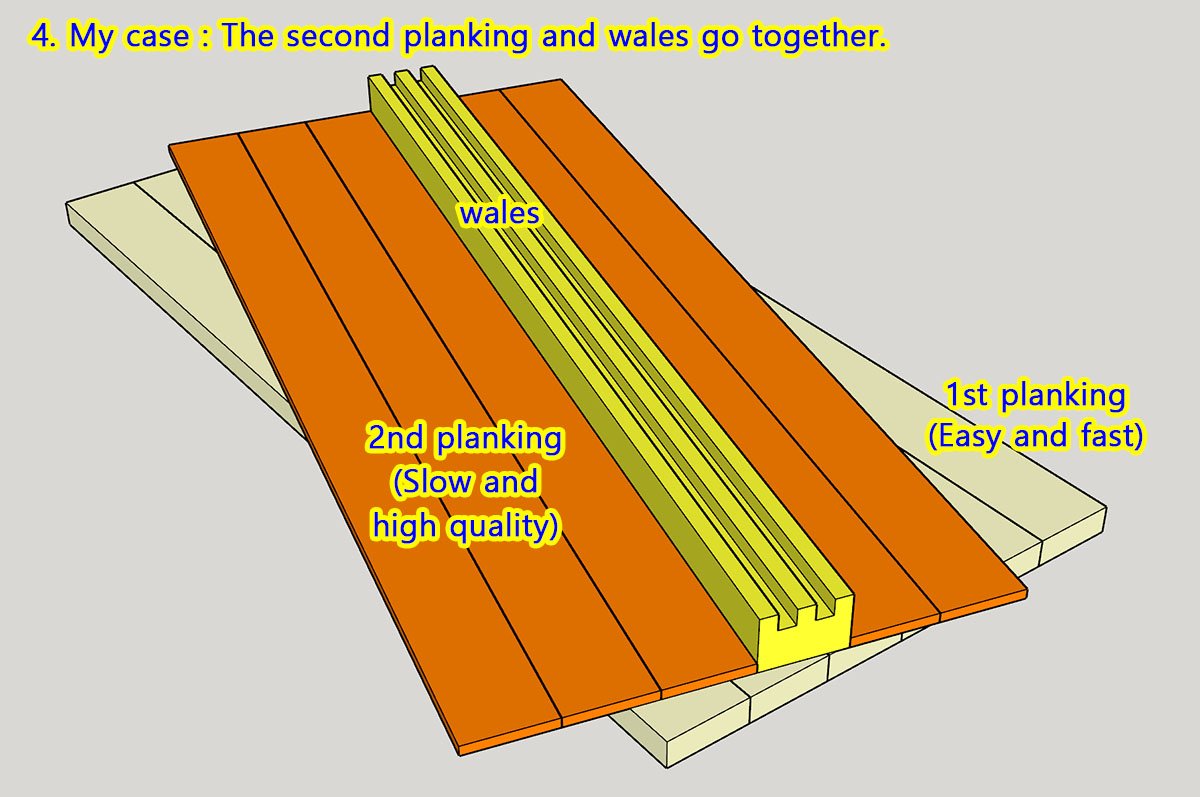
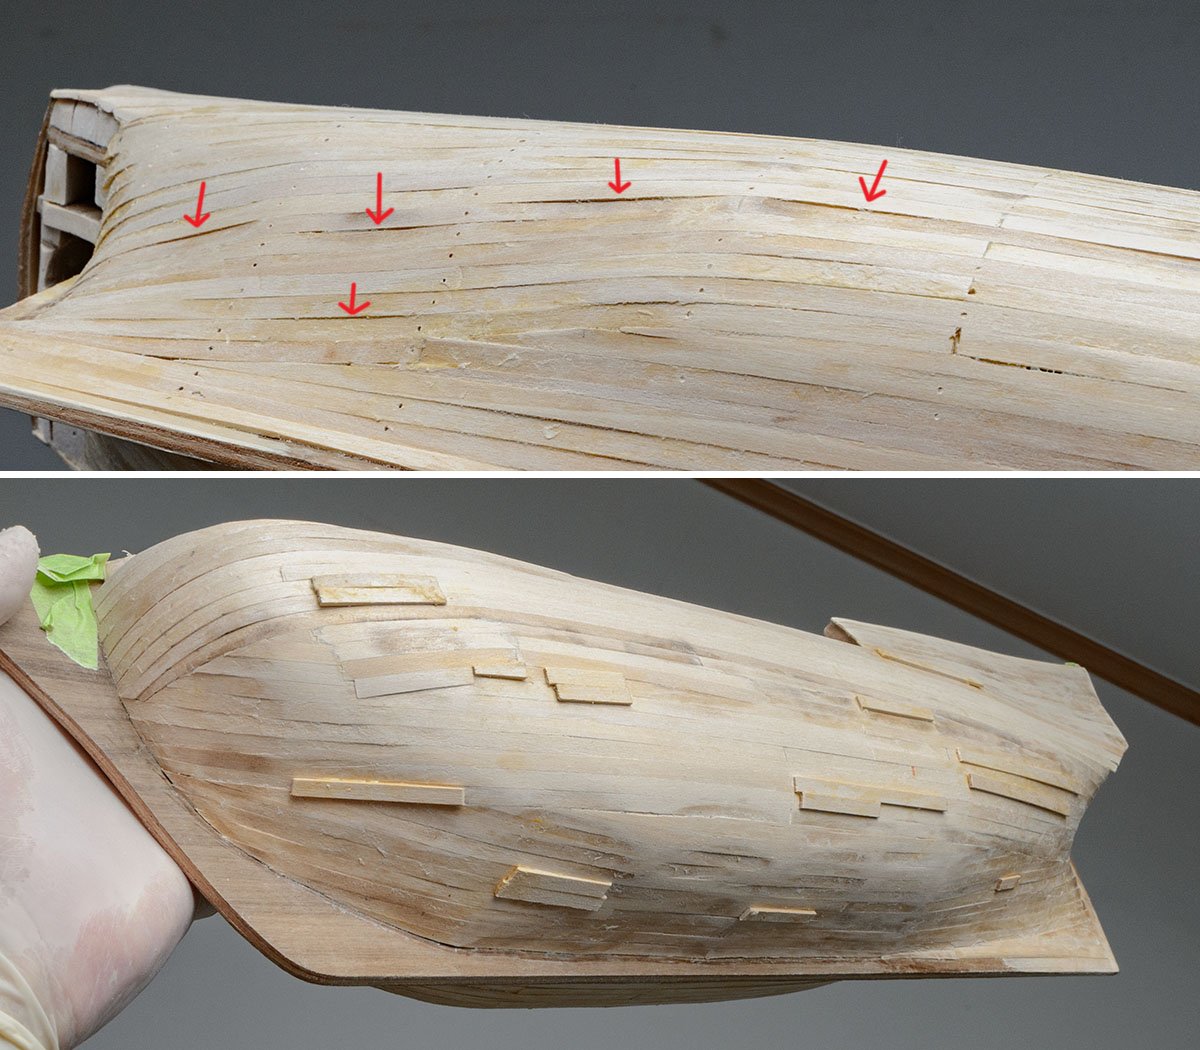
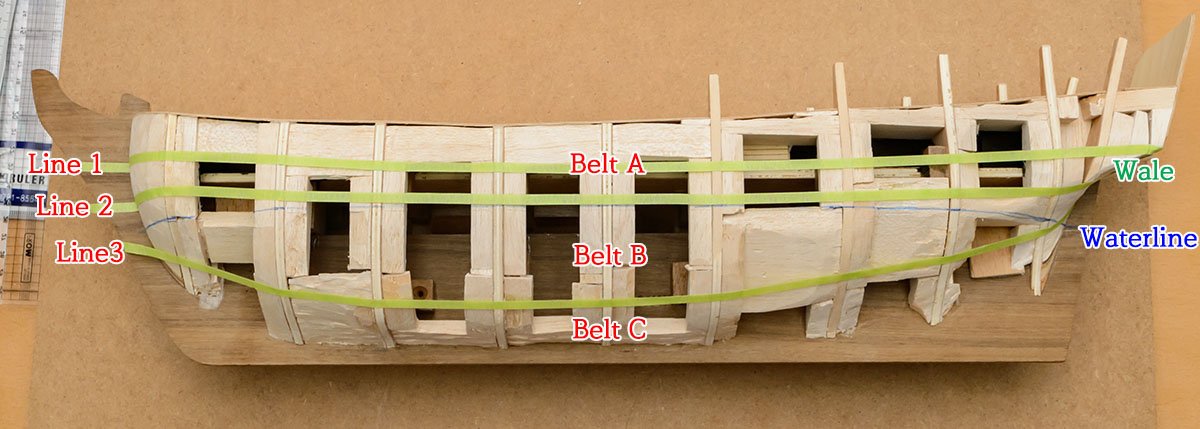
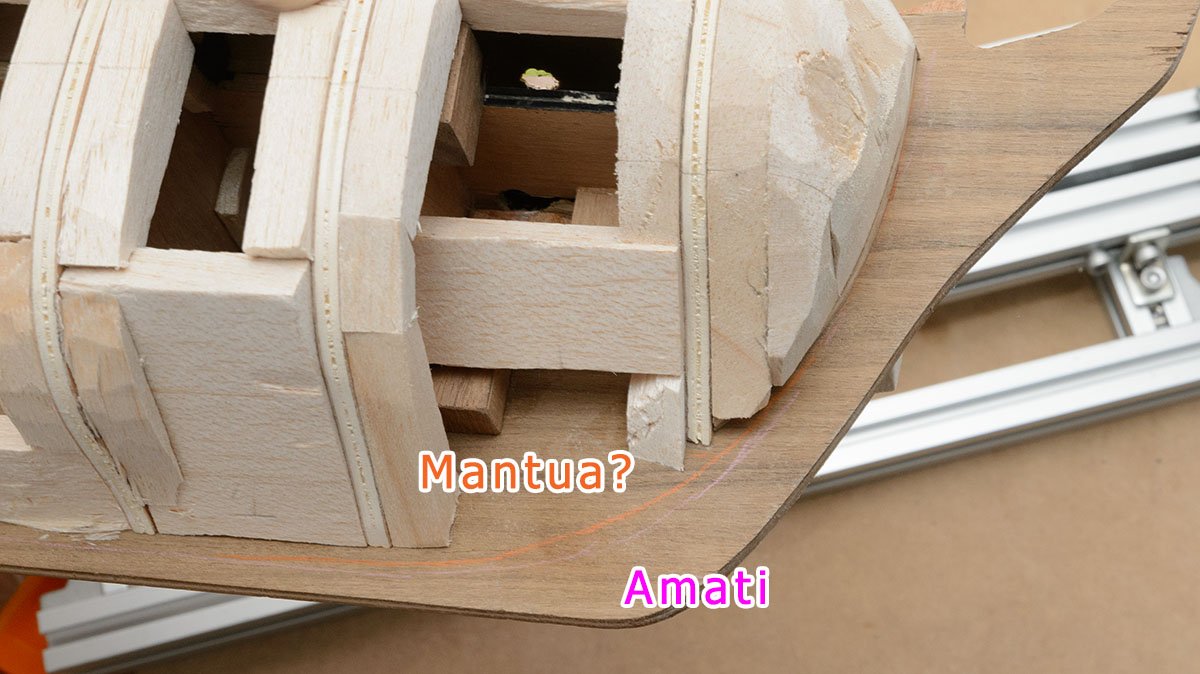
Hello, white jamest. I wouldn't have reached this stage two years ago. The kit tested and tried my limit, but it is barely in my hand. Thanks for your advice, Allan. According to the "Allan"'s planking guide, the second layer should be layed on the first layer differently. It helps solidity and increases resistance against moisture. In addition, I purchased the ME's Bounty launch 1/16 kit to add detail to this kit. I planned to downscale the launch kit and install the scratch build 1/60 launch boat. However, as you see, I already have difficulty fixing this old kit's errors. I cancelled the downscale plan to focus on more general matters, such as the hull. In the future, I'll build a scratch build Bounty again with all the details I planned. Please consider this kit as a practice build. I hope to finish this old kit without any big issues that I can't manage. I'm planning to wrap a metal boat with wood strips, but I'll refer to your post if I can affort to do so. While I was drawing new wale lines, I found some magic numbers from the reference book and Amati's plan. From the different proportion of the height of the waterline, I think the Mantua kit is a bit squeezed. The wale lines are set by height of the deck, according to the AotS and Amati. The Mantua kit doesn't. It gives a relatively good wale line that connects to transom, but it doesn't look uniform. I adjusted the wale lines so that they were all the same height from the deck floor. Now it seems much better and fairer. Although the wale line bites the transom, I decided to use this curve. I realized the importance of setting the deck floor. Based on the new wale lines, I determined the transom's position and am planking it. I'll apply wood filler and sand it again. It is the end of the first planking.


-
I finished sanding work. I can't raise my arm... 🤣 I found a minor error between port side and starboard. The reason for the different planking lines on both sides is that I planked each side separately. I understood another reason why the guide said to plank both side at the same time.

-
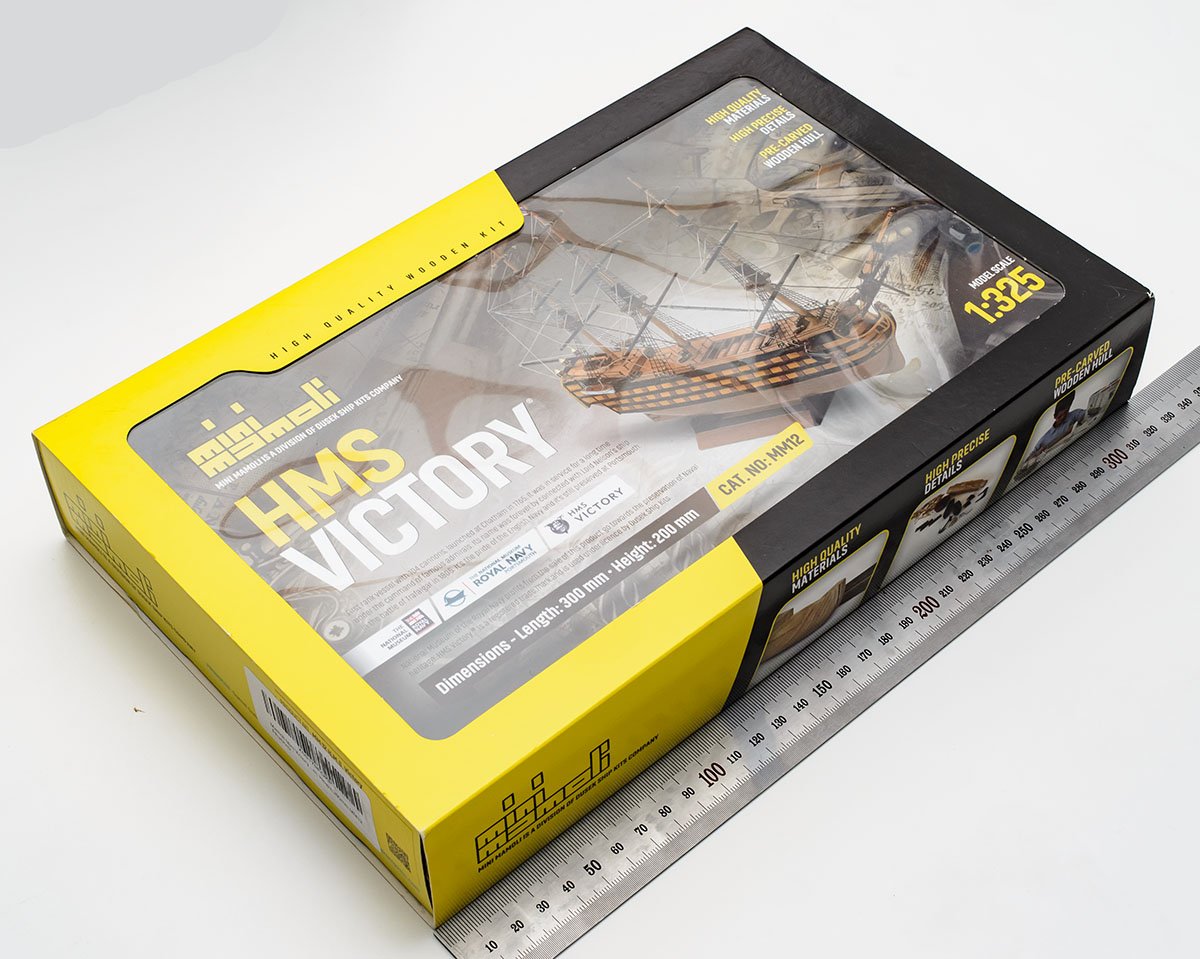
I finished the first planking layer. I'll determine the transom line after I draw the waterline and wale line. I patched up hollow areas to make hull smooth. It was a lesson from the last build, Santa Maria. I learned that wood filler isn't effective in wide and open area. This is a video of the hull fairing and half hull first planking. I'm enjoying this build, and my stress level is quite low. I would say that I know what I'll do next. The HMS Victory 1/325 kit, which is an easier kit and which I build when I need a refresher, is not on my workbench but on my book shelf.
-
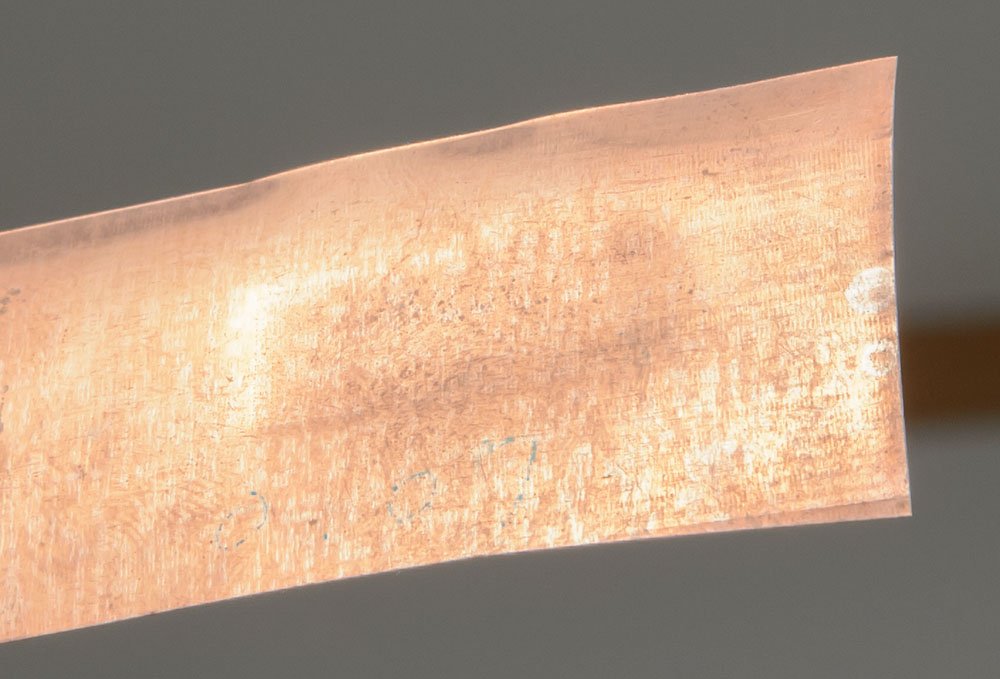
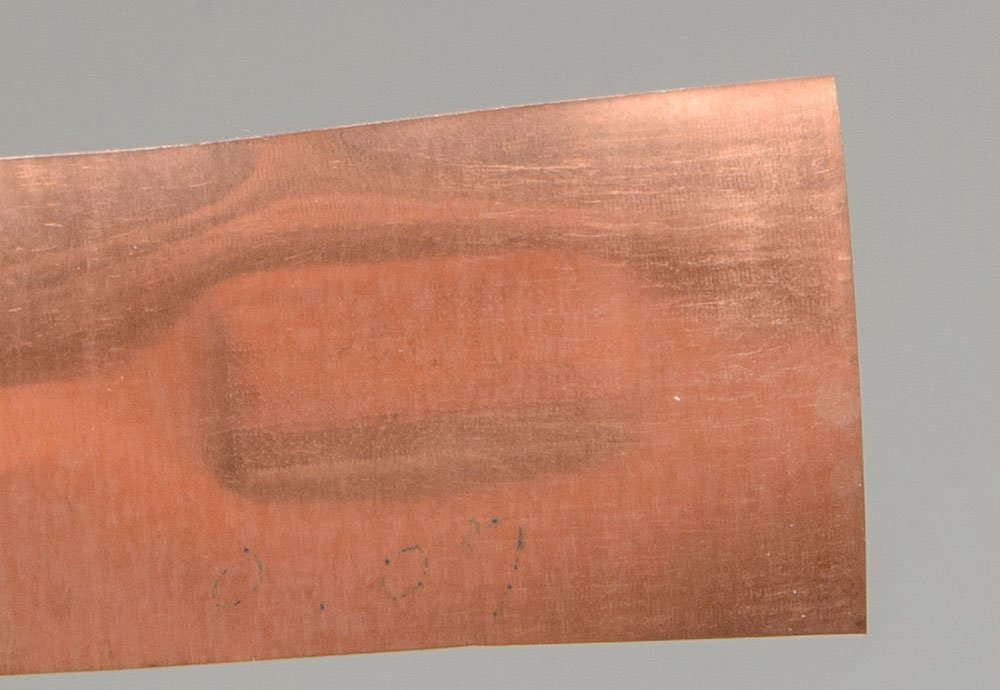
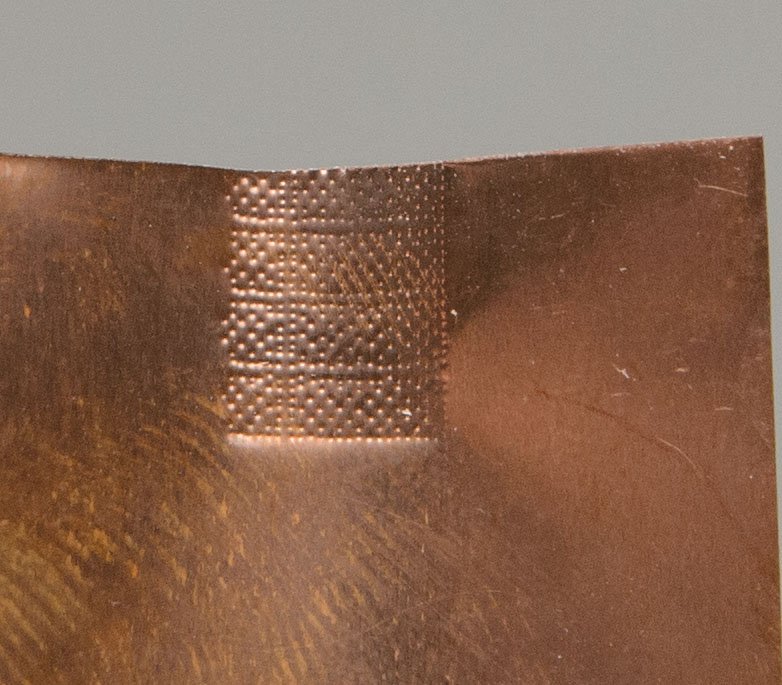
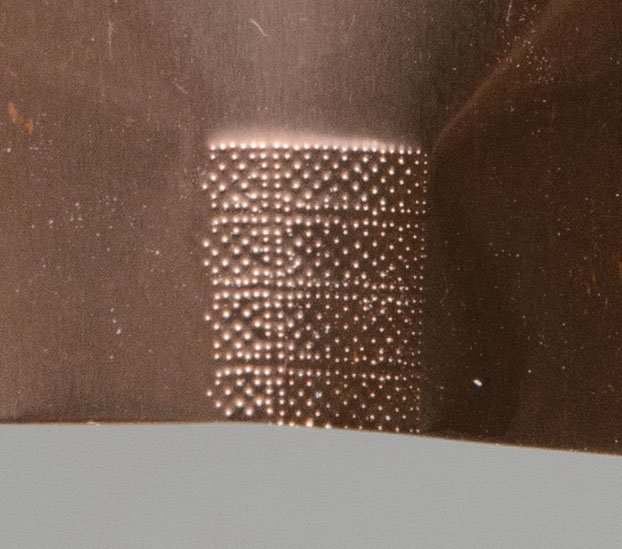
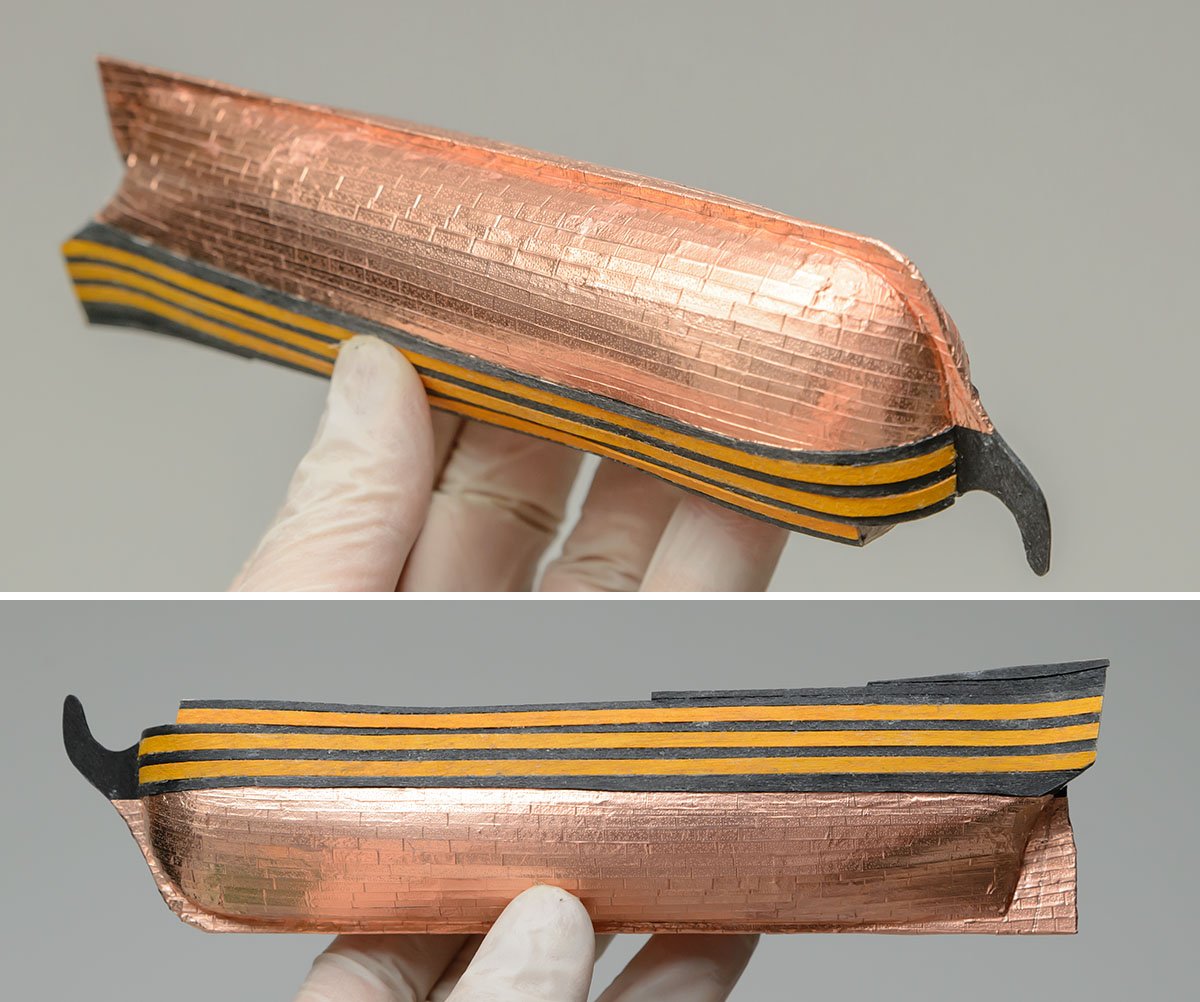
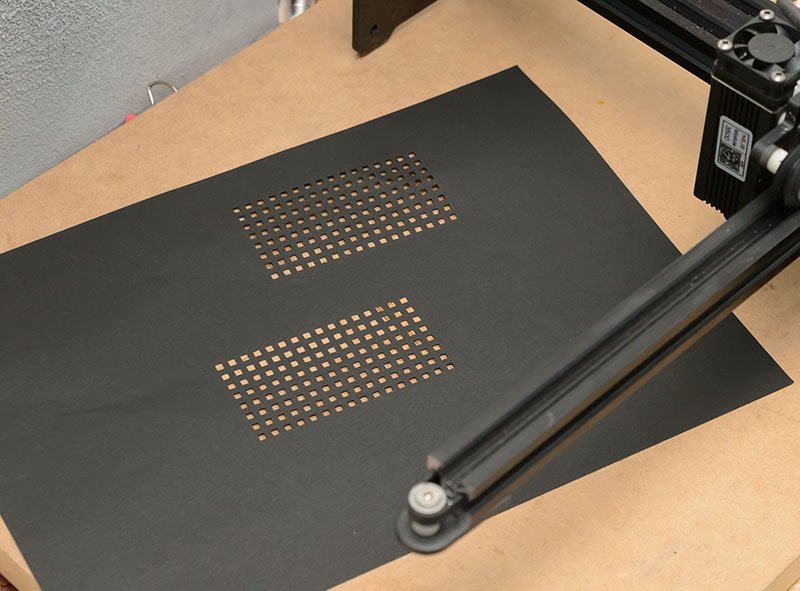
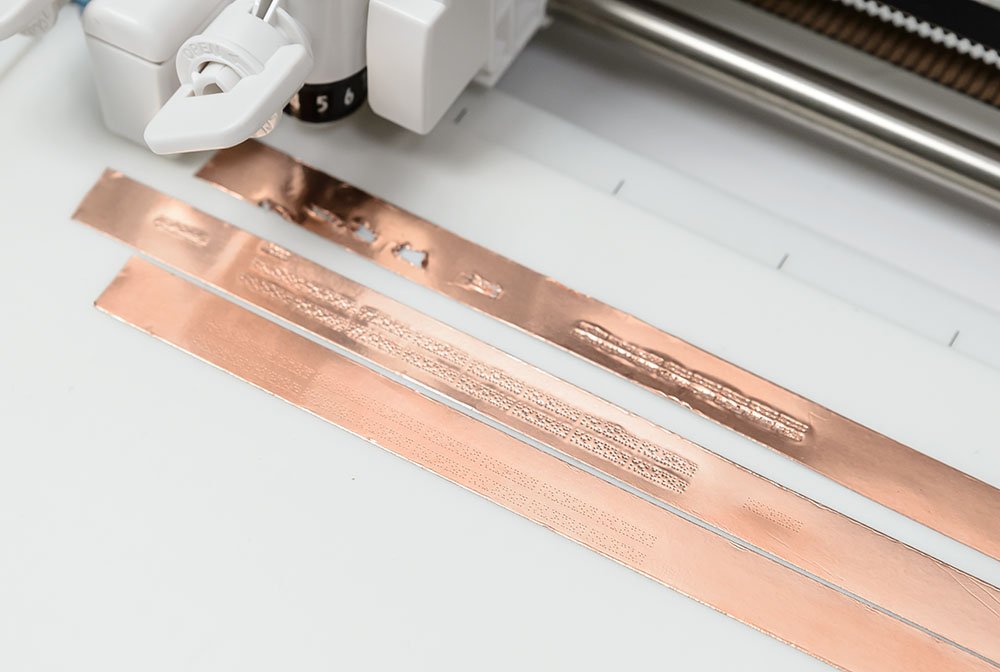
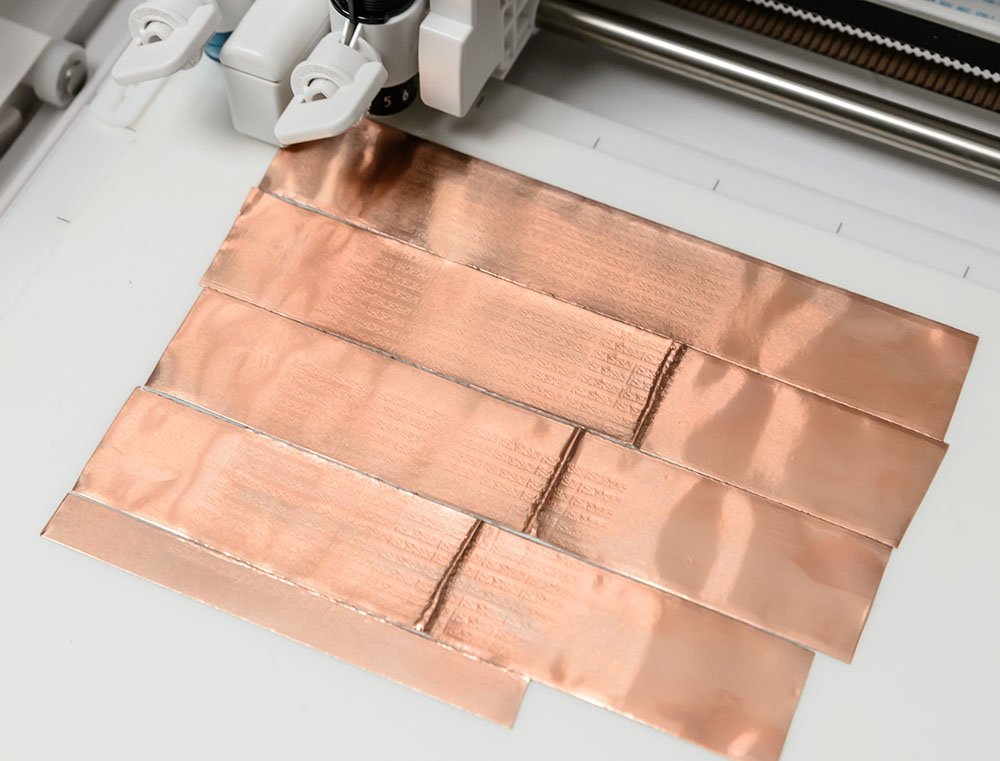
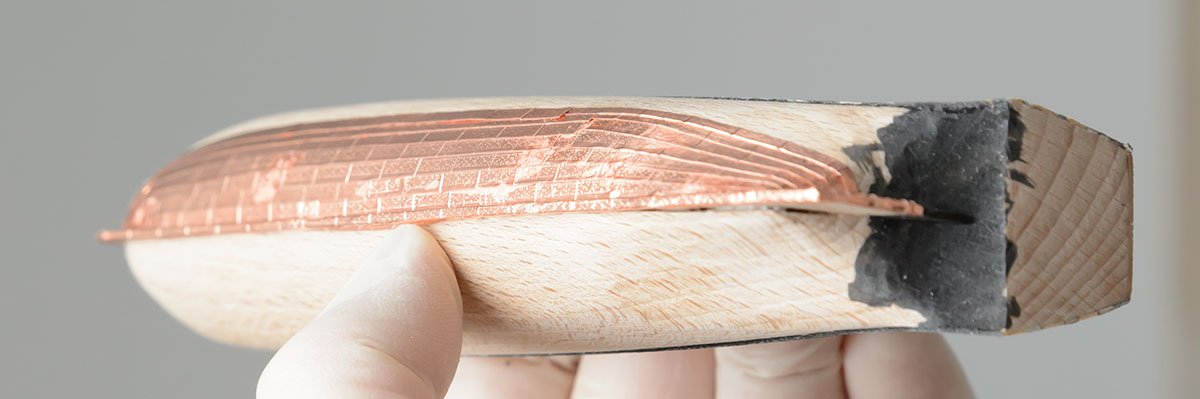
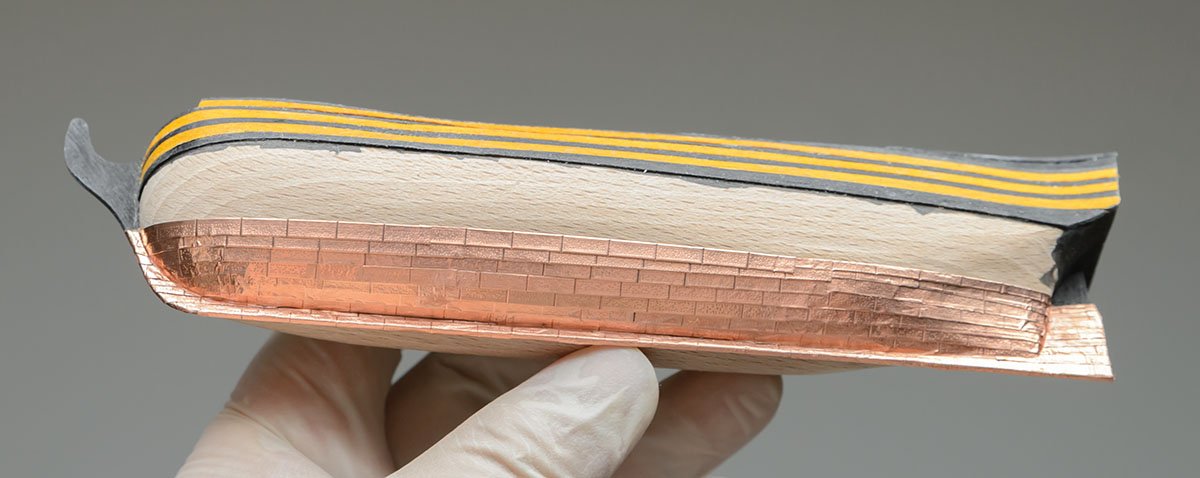
The AL introduced an one-stop riveting tool for copper sheathing. My Silhouette Curio seems to be outdated, but it is only one consumer CNC machine that can produce customized copper sheathing plates. I added some tests from the Curio. If I use the AL's riveting tool with copper tape, the negative rivet marks are clear and look good for scale models. Can I make positive rivet marks with the tool? I proved it using reversed copper tape and my Curio. The result shows dull positive rivet marks. From the result, I guess the AL's riveting tool is also able to produce the positive rivet marks, although the copper tape's back side makes the rivet mark dull. The copper tape's thickness is fairly slim compared to the former copper sheathing plates that some kit companies provide. The tape can be easily bent, but it is also easy to leave scratch mark and not best for long term storage. I guess the thickness of the copper tape is about 0.03mm or 0.001", although the spec thickness is 0.07mm, including acrylic adhesive layer. If I use thicker copper plate, the result will be more durable and stiff. Also, my Curio has an adjustable needle that can stipple the same hole size at every result. I tested the maximum thickness of copper sheet that the Curio can stipple hole marks. I purchased various copper sheets with various thicknesses and tested them. - 0.10mm - 0.08mm - 0.07mm - 0.06mm = Not possible. - 0.05mm = It works at the maximum power setting. (33/0~33) - 0.04mm = I didn't test it. - 0.03mm = Equivalent thickness of the copper tape According to the study, the Silhouette Curio can handle thicknesses of up to 0.05mm = 0.002" in copper sheet or 0.03mm = 0.001" in brass sheet. If you are interested in traditional methods, the Syren's guide will be greatly helpful. https://modelexpo-online.com/assets/images/documents/MS2260-SYREN-Addendum-CopperJig.pdf https://modelexpo-online.com/assets/images/documents/MS2260-Syren-Instructions-Chapter-08.pdf By the way, the copper plate is easily polluted by hand oil or oxidation. It is recommended to wear nitrile globes and apply metal varnish ASAP, such as dewaxed shellac.


-
https://modelshipworld.com/topic/33390-hms-victory-by-modeller_masa-mini-mamoli-1325-easy-build/?do=findComment&comment=949265 It looks really nice. I'm using the Silhouette Curio for the ribetting work. It stipples 144 holes per minute, which is hundreds of times slower than the ribetting tool.
-
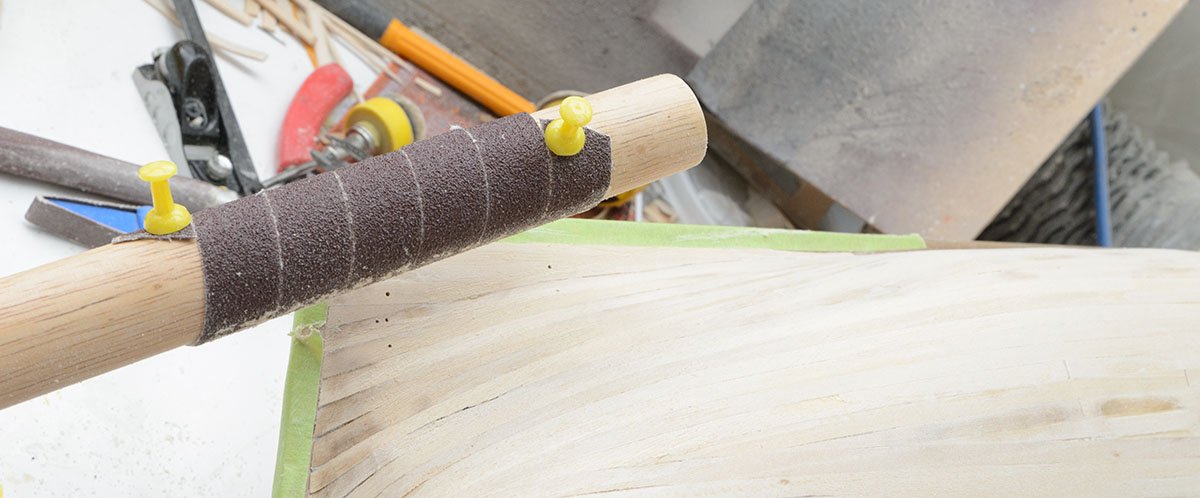
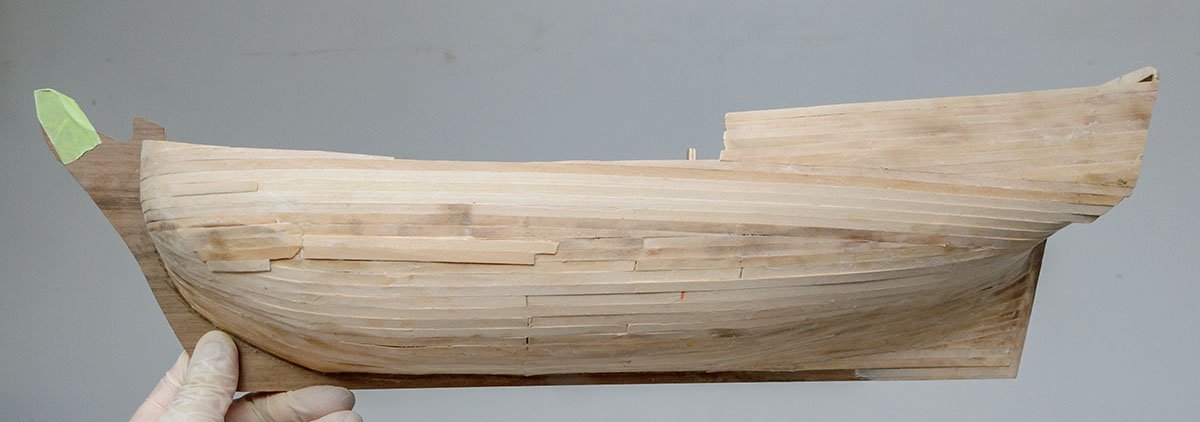
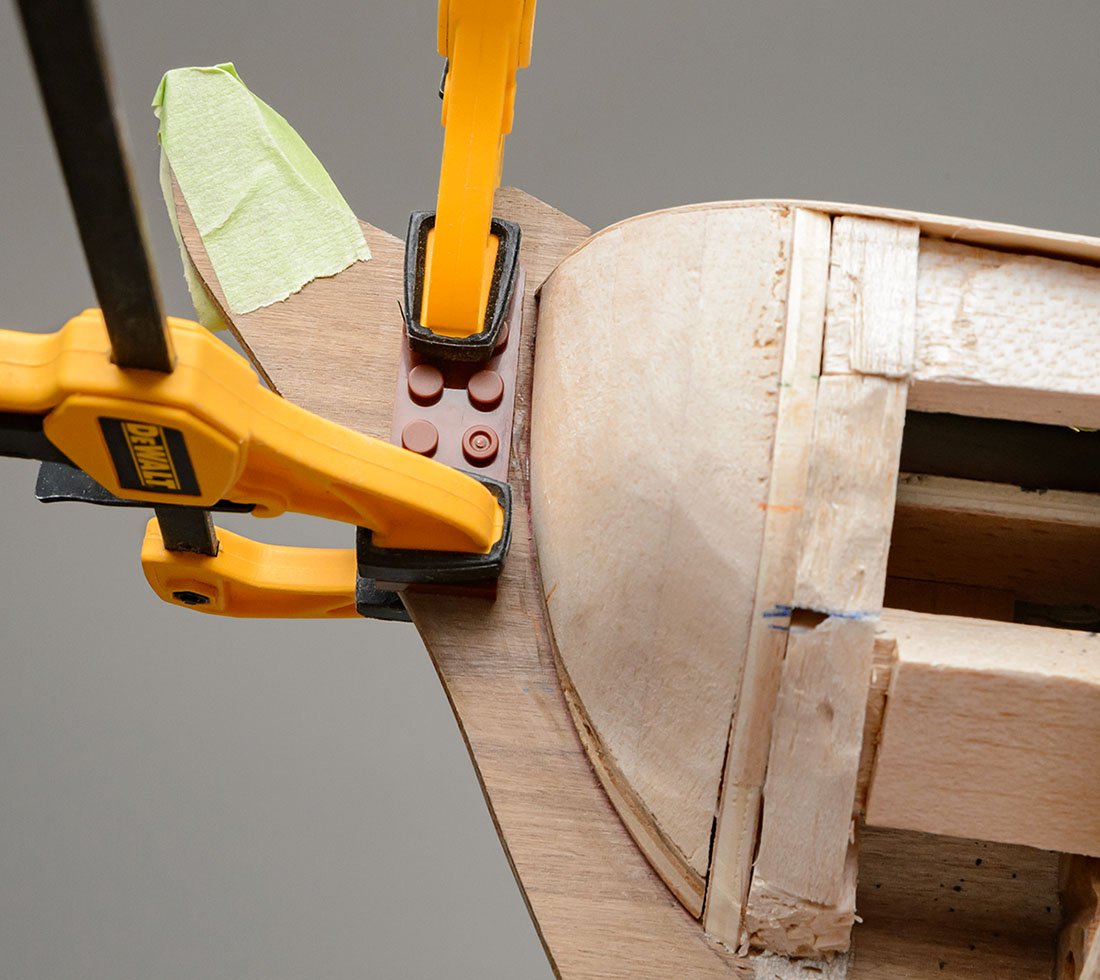
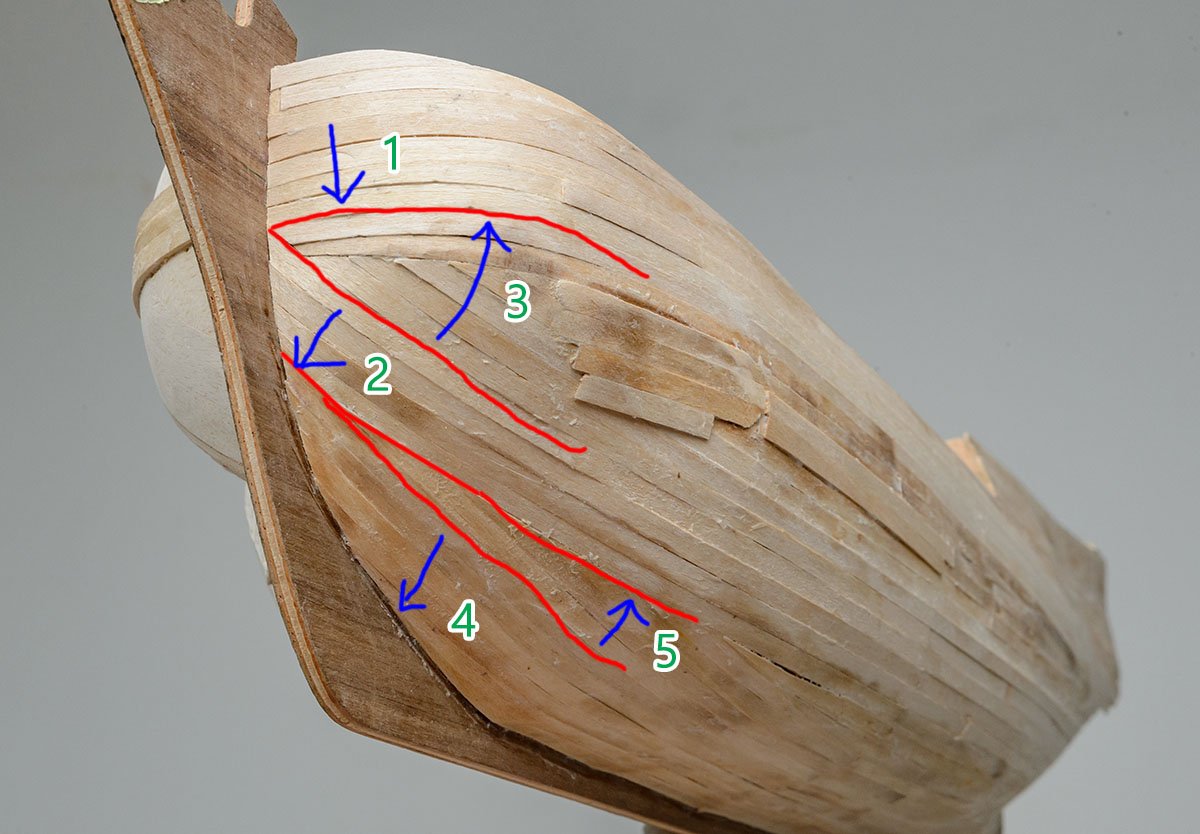
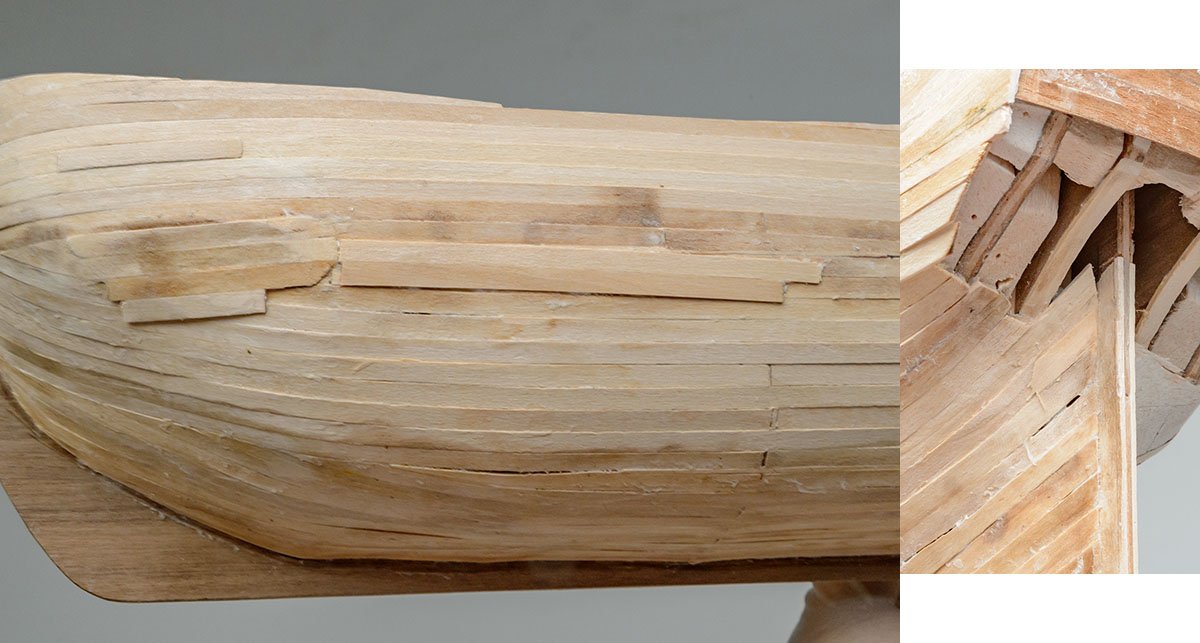
Thanks for the useful information and your great planking guide, Allan. I firmly concur with your advice. I already sanded transom and stern extensively. 😆 I finished the first planking on a half hull. I used a Lego brick to hold strips at bow. I discovered that I couldn't easily apply the lego brick at the stern. I slightly sanded both side of the stern post and emulated the rabet. I used balsa blocks and push pins to hold strips. I won't use the balsa in the next time. I finally realized that the wood is more expensive than cherry. 😱 Unlike the planking guide, I finished a half side first because the balsa block keeps the hull stable. The red planks are mistake. The 5 and 6 planks made later work (10-13) difficult. The greens are better. This is a total planking sequence. I hope I finish planking at third stage on the other side. This is a second mistake. I had to attach the 1st planks first. I had planned to only paint the wales, but the exposed 1st planks changed me to paint all. 😆 There were some hollow parts or cracks that couldn't be sealed by wood filler. I patched them with junk strips. The stern post is nicely done. The experience will make a better 1st planking on the other side. By the way, I found that the deck wall is unusually higher than real ships. The height is 28mm, which is equivalent to 1.8 meter or 6 feet. On the contrary, the height of the AOTS book is 13mm, which is the height of desk, and the height of the Amati's plan is 17mm, which is equivalent to 1 meter or 3.3 feet. In addition, two Bounty movies shows that the height of the wall doesn't exceed sailors' waist. I'll cut the deck wall before I do the second planking and cut the gun ports.


-
Best Spindle Sander for Ship Modelling
modeller_masa replied to whaynes's topic in Modeling tools and Workshop Equipment
https://www.amazon.com/dp/B07VCTPCJQ/ I purchased a portable spindle sander. The $55 price is perfect for the first scratch builder.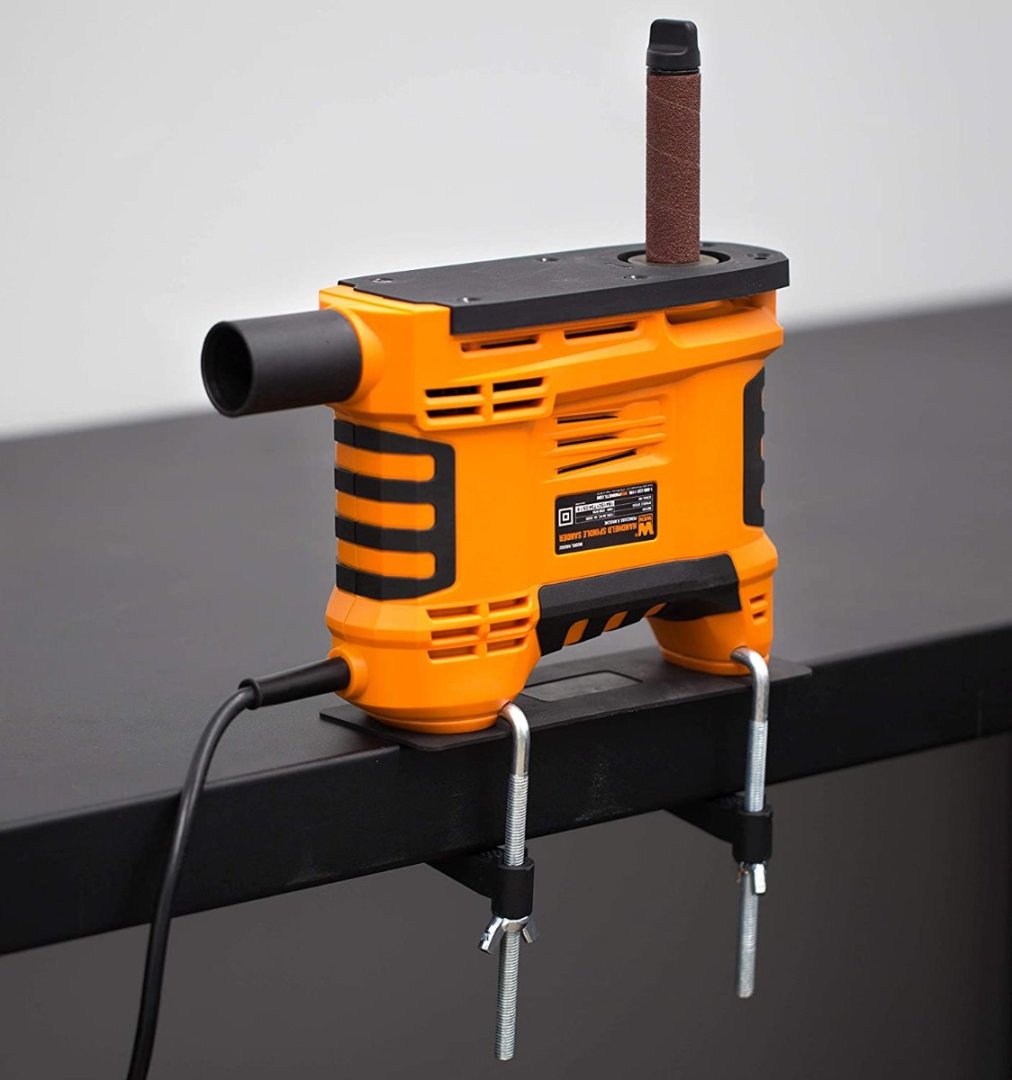
-
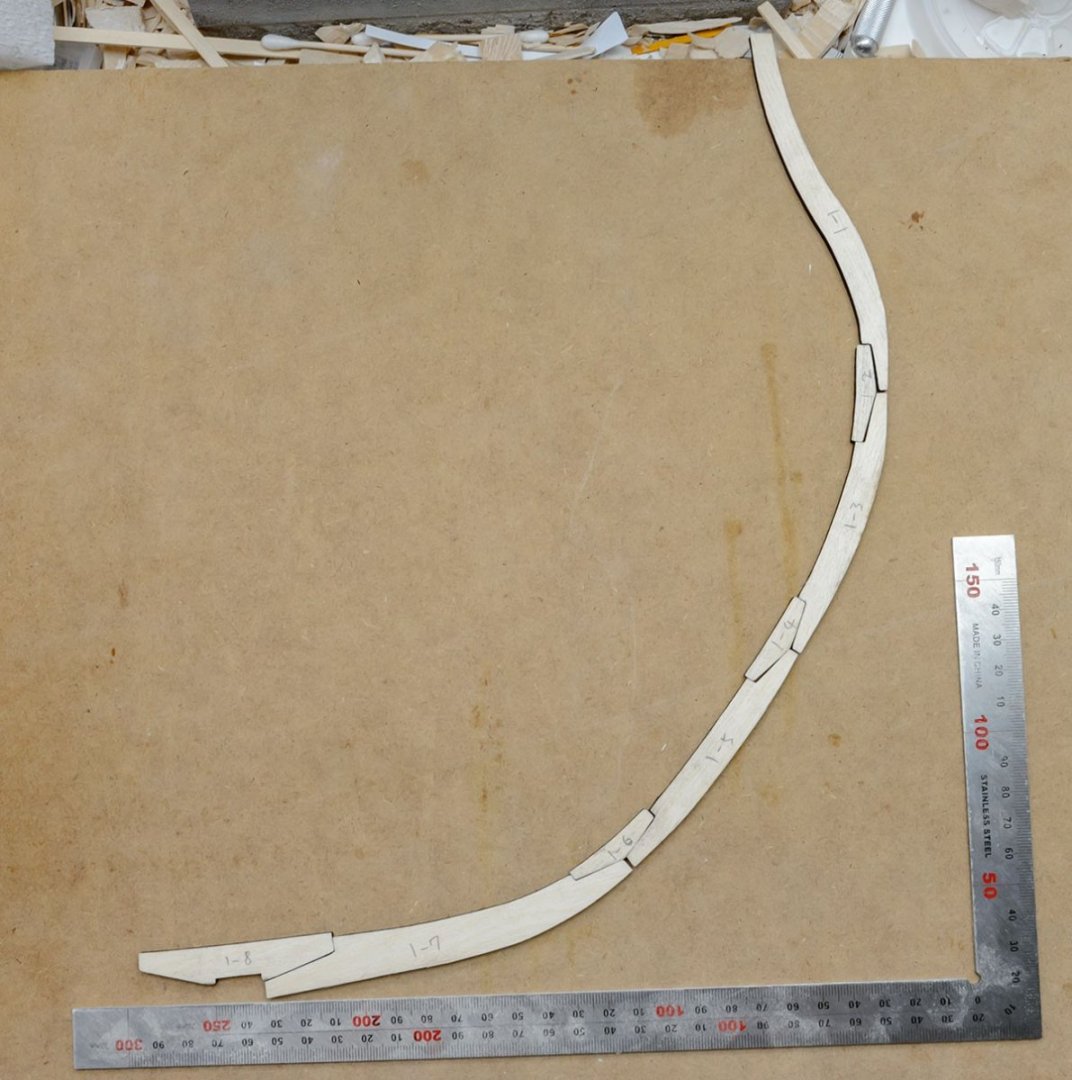
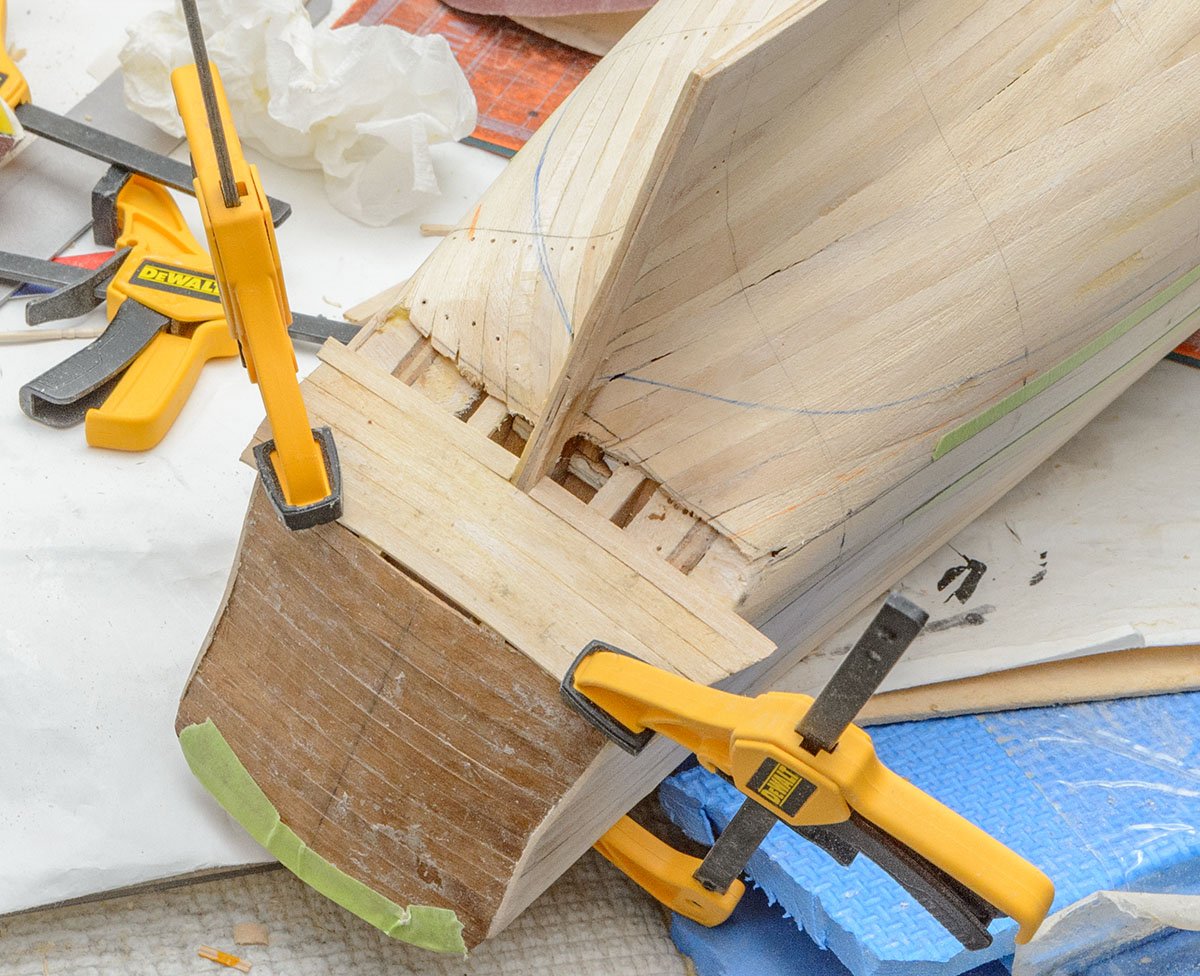
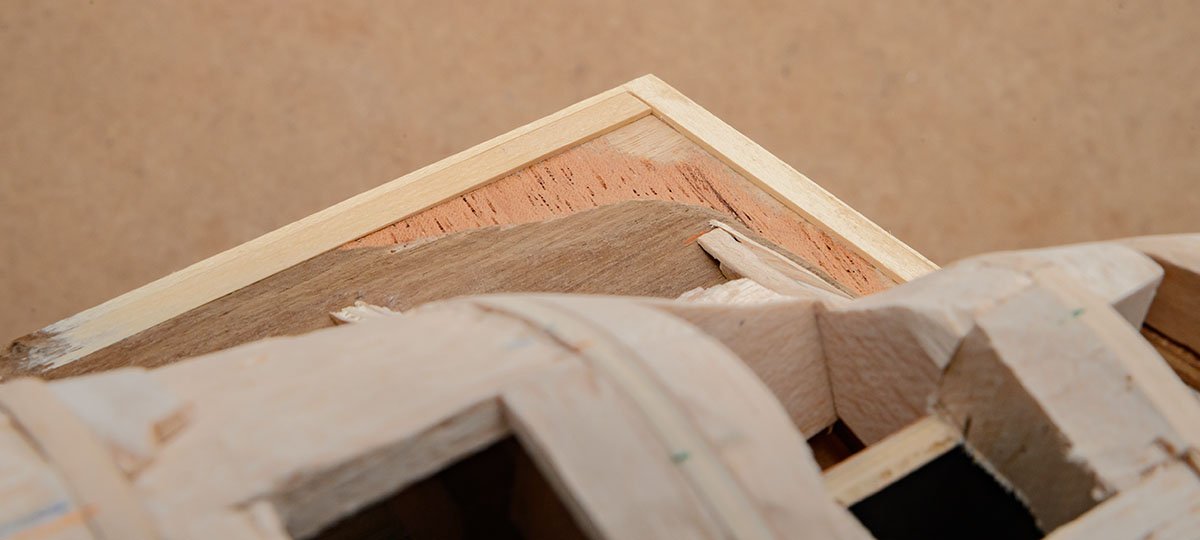
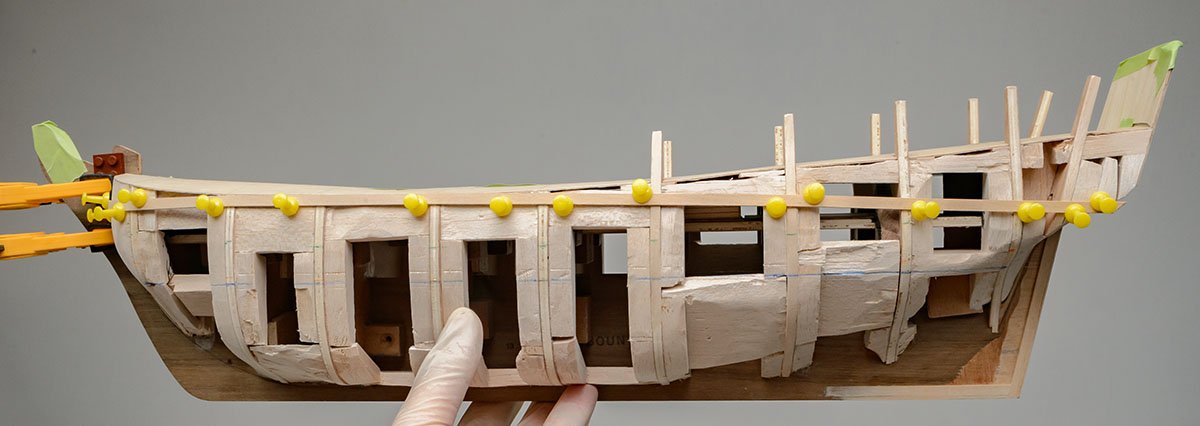
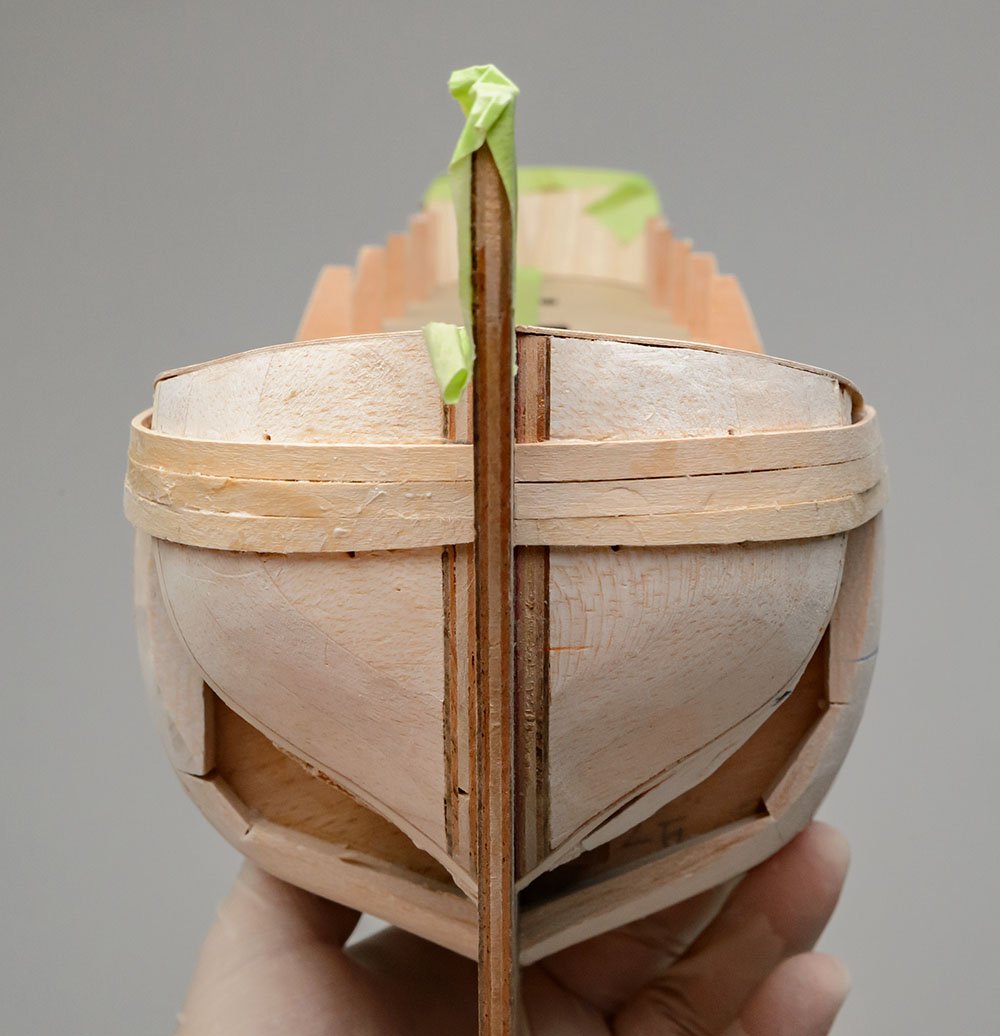
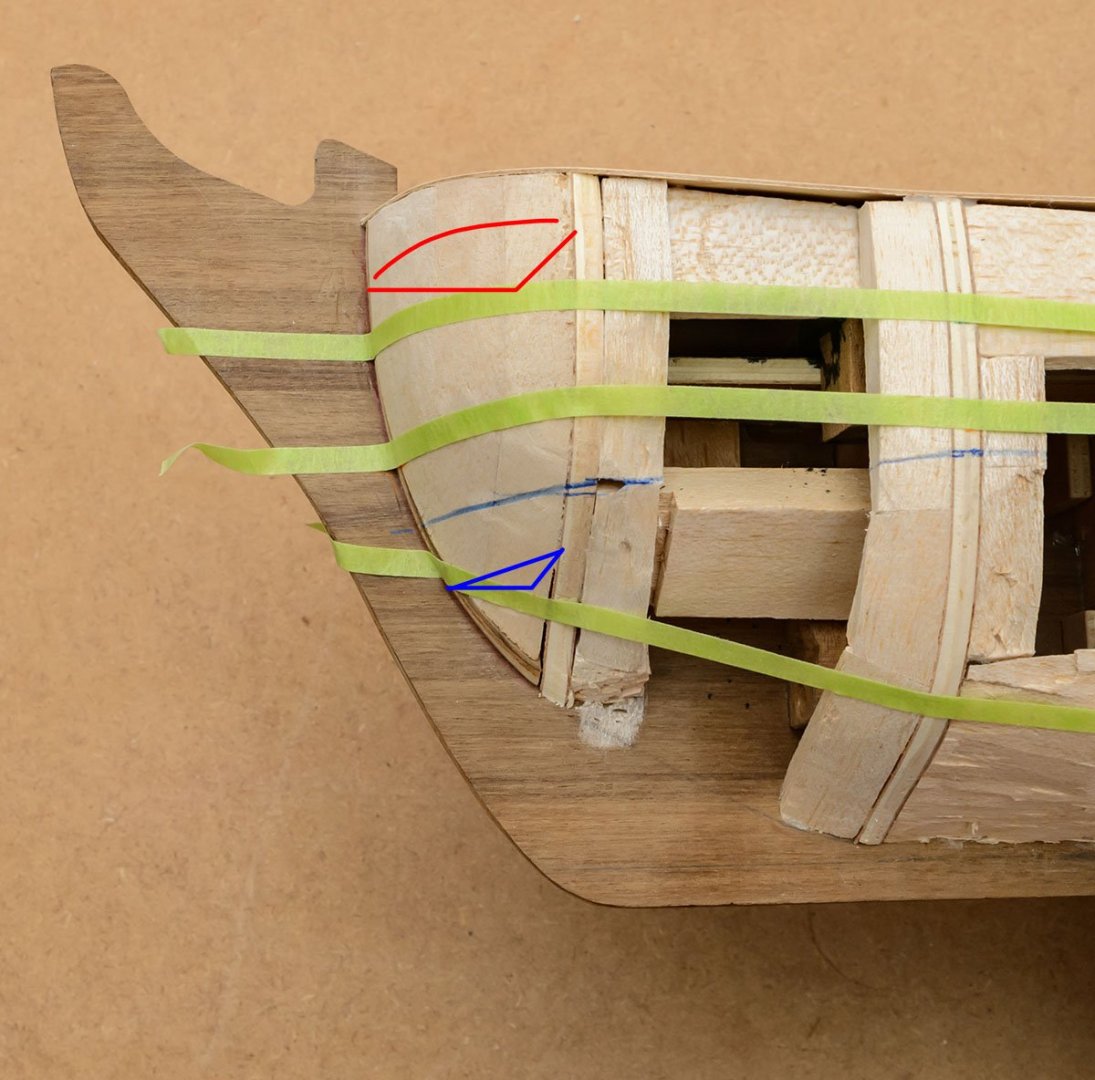
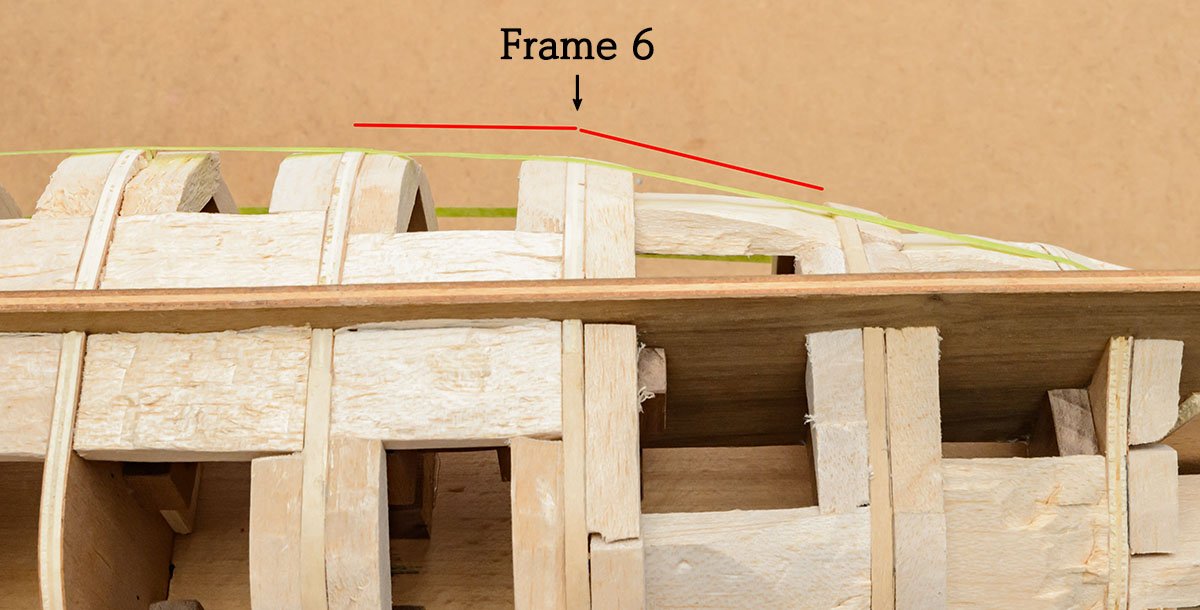
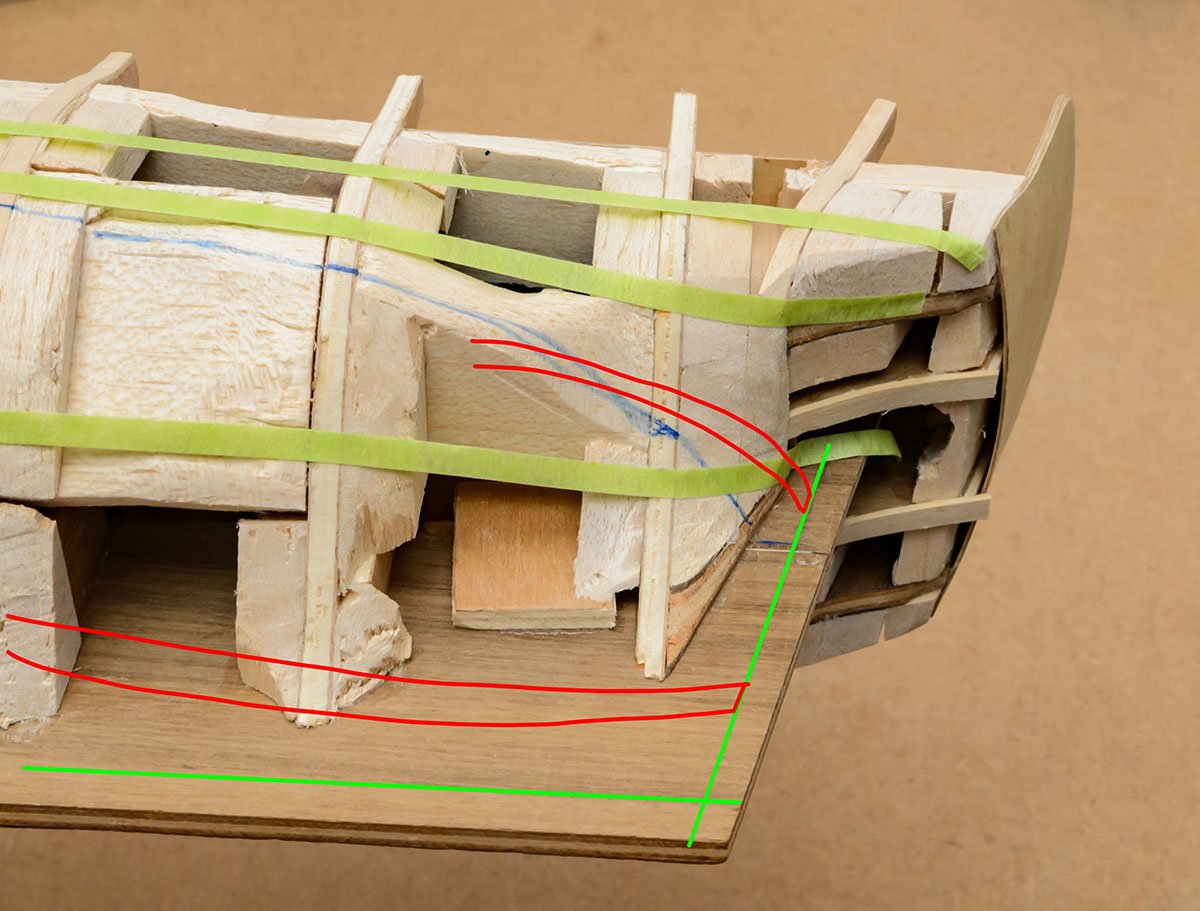
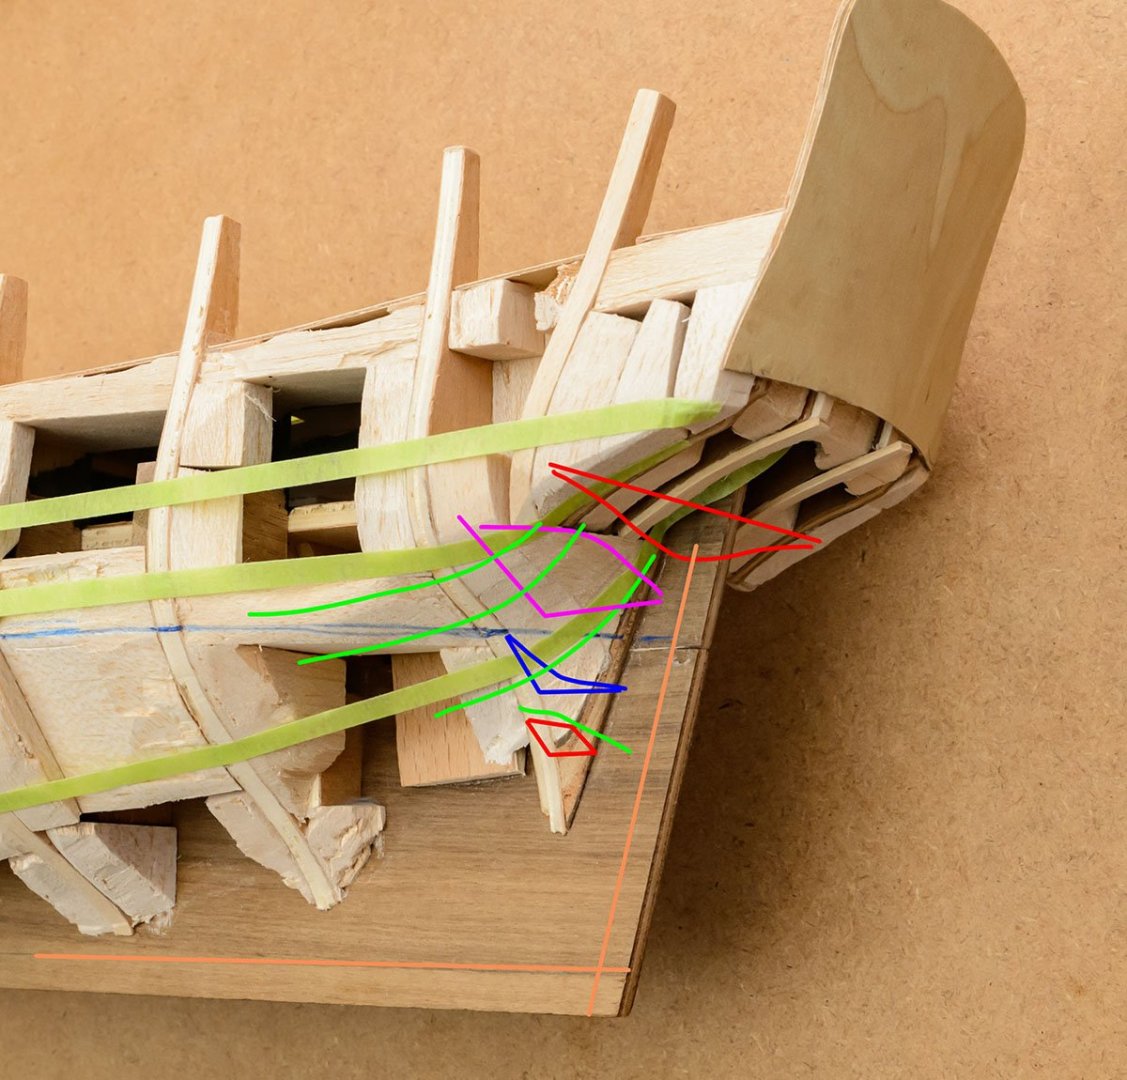
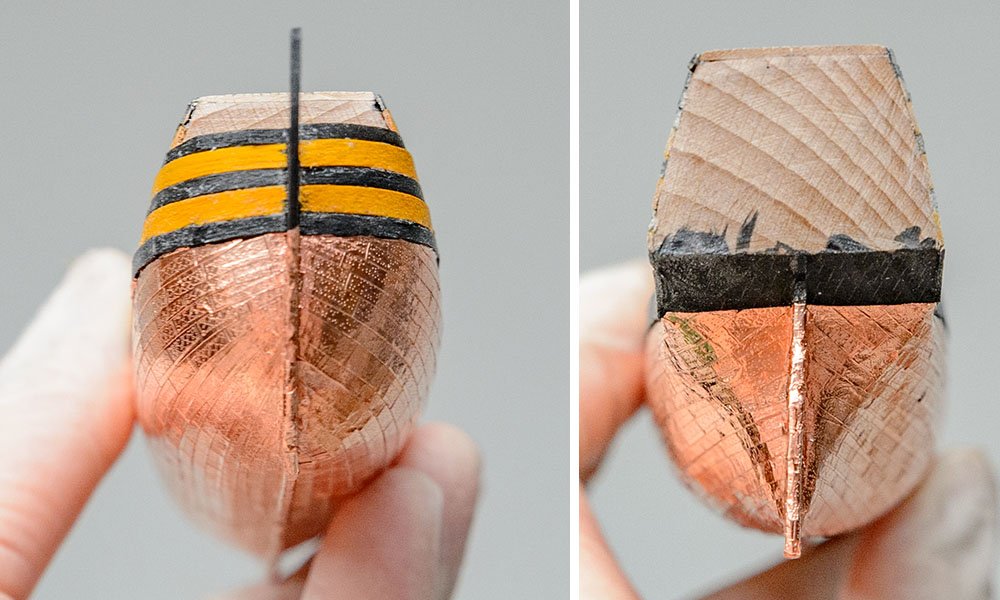
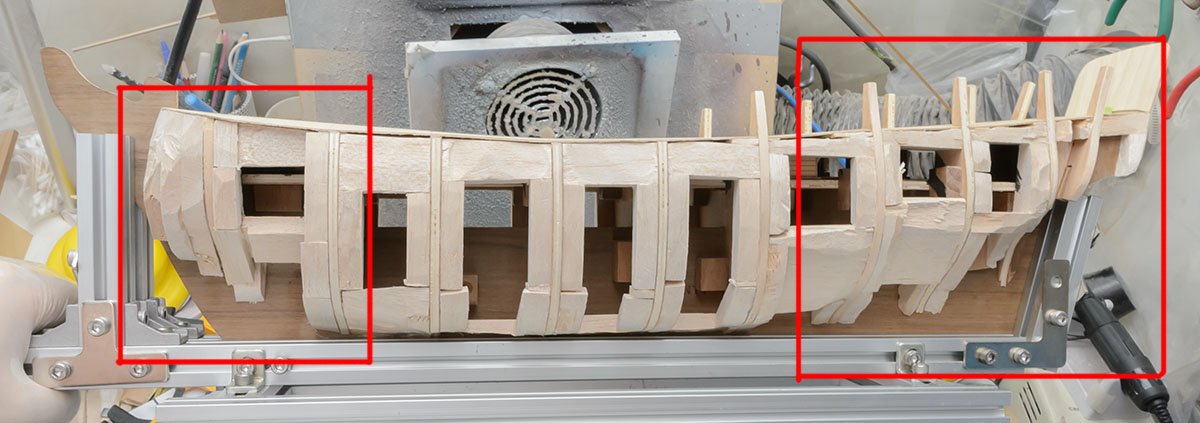
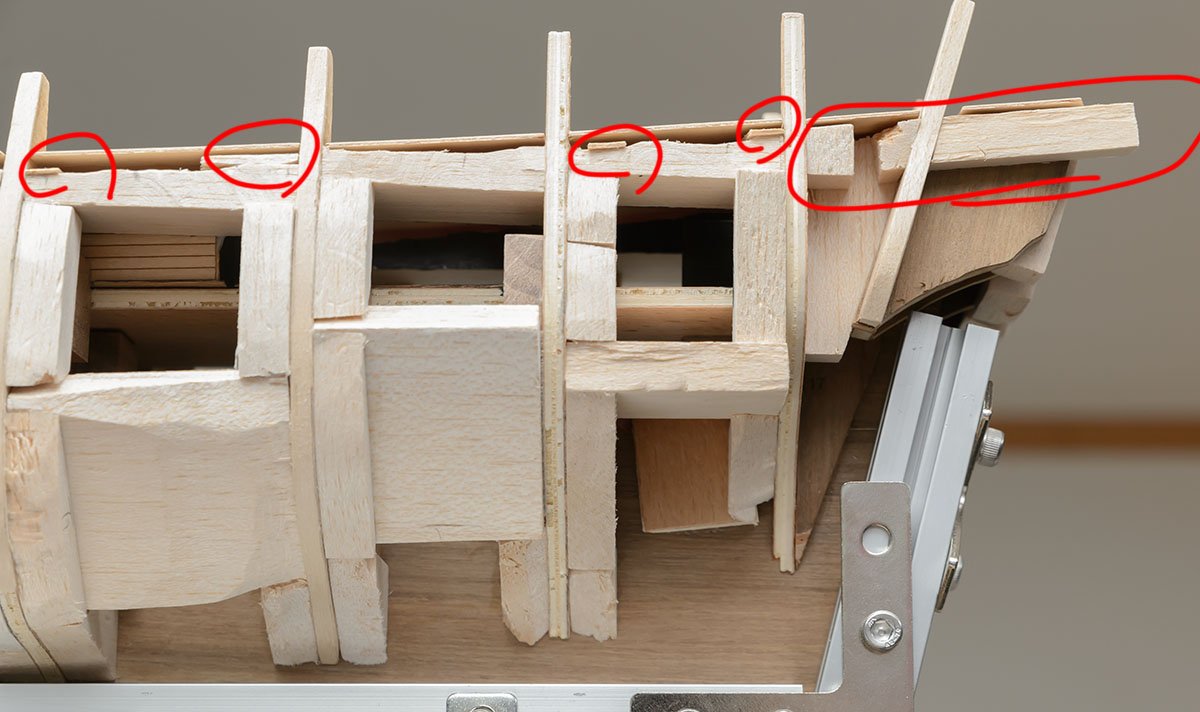
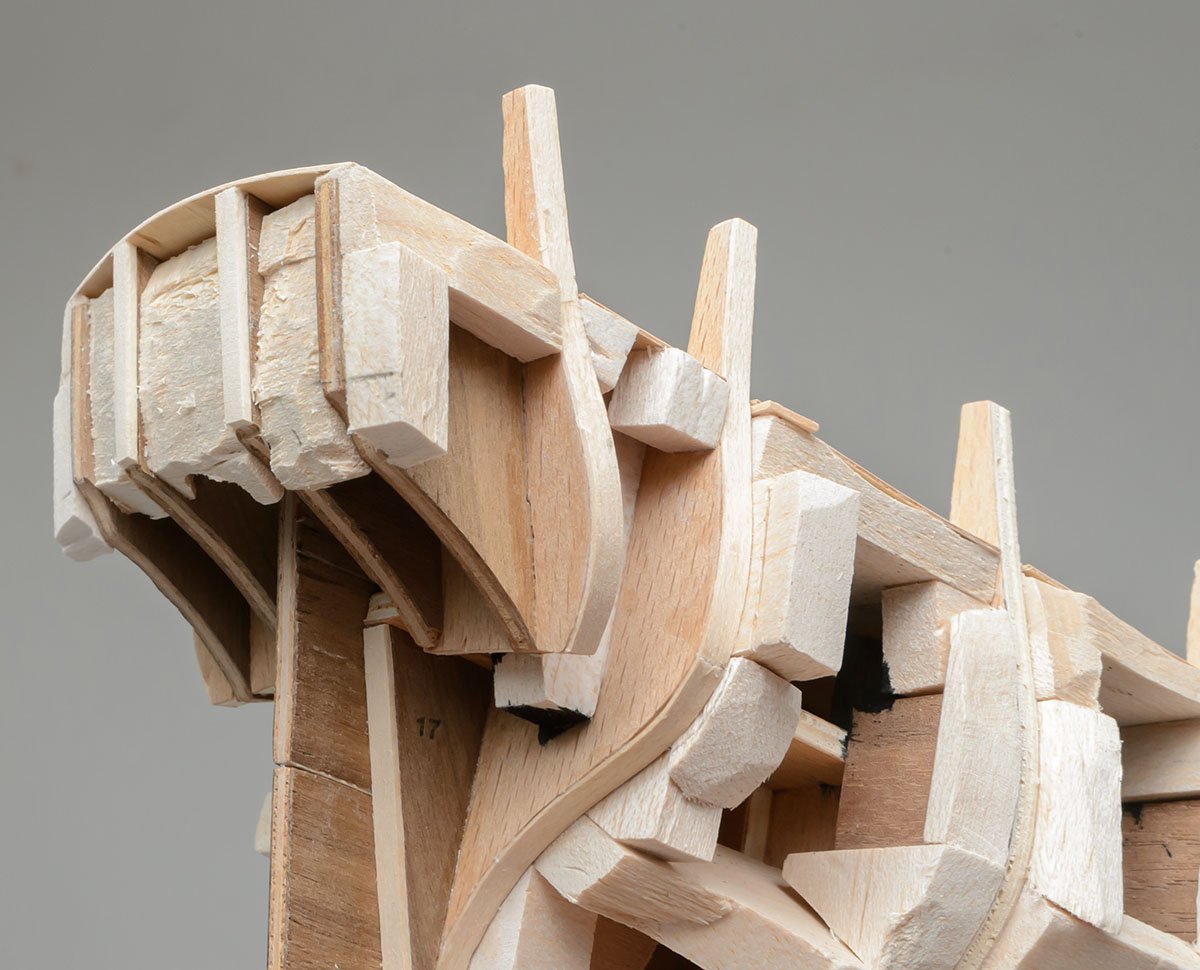
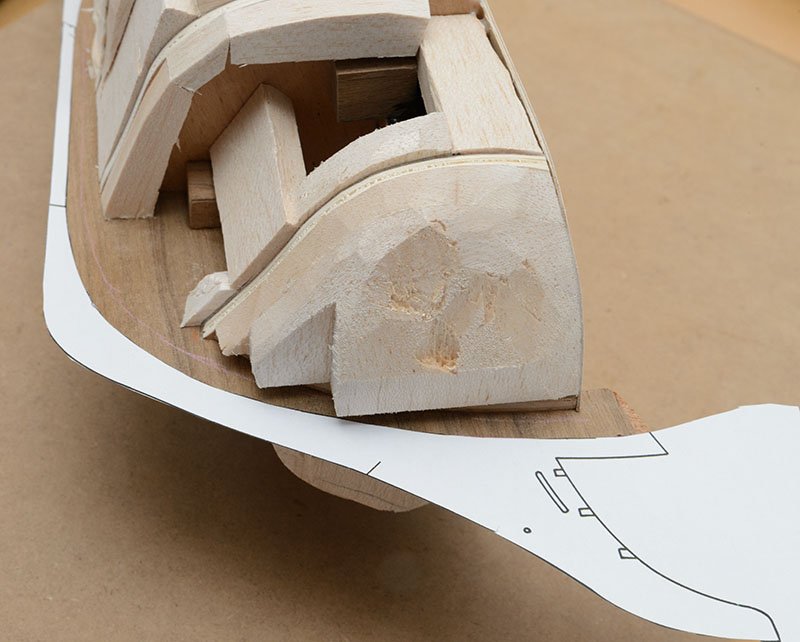
I translated Allan's planking guide, which means I read it 100 times. Here is a result. It took a month, and I finished only half of the hull. The bow side was the easiest part. The red and blue shapes show a cross section diagram of the stem. Against my expectation, the frame 6 in the center of the hull made a trouble. I sanded it to make a smooth curve. The stern and transom made me almost cry. The upper plank (red) couldn't be clamped by the stern post and the last frame because the last frame had moved forward. The Amati kit plan didn't. I'll add some balsa blocks to hold the plank edges. This is another cross section diagram. It is heavily modified, according to the Amati plan and the AOTS book plan. 🤣
-
I purchased more copper tape and received some precision tools. I'm waiting for another modelling tool for HMS Bounty. I made gunports using a laser cutting machine. It's clear that this model is less detailed than the Revell 1/450 plastic model I made. I'm testing new techniques I'll use and enjoying them.
-
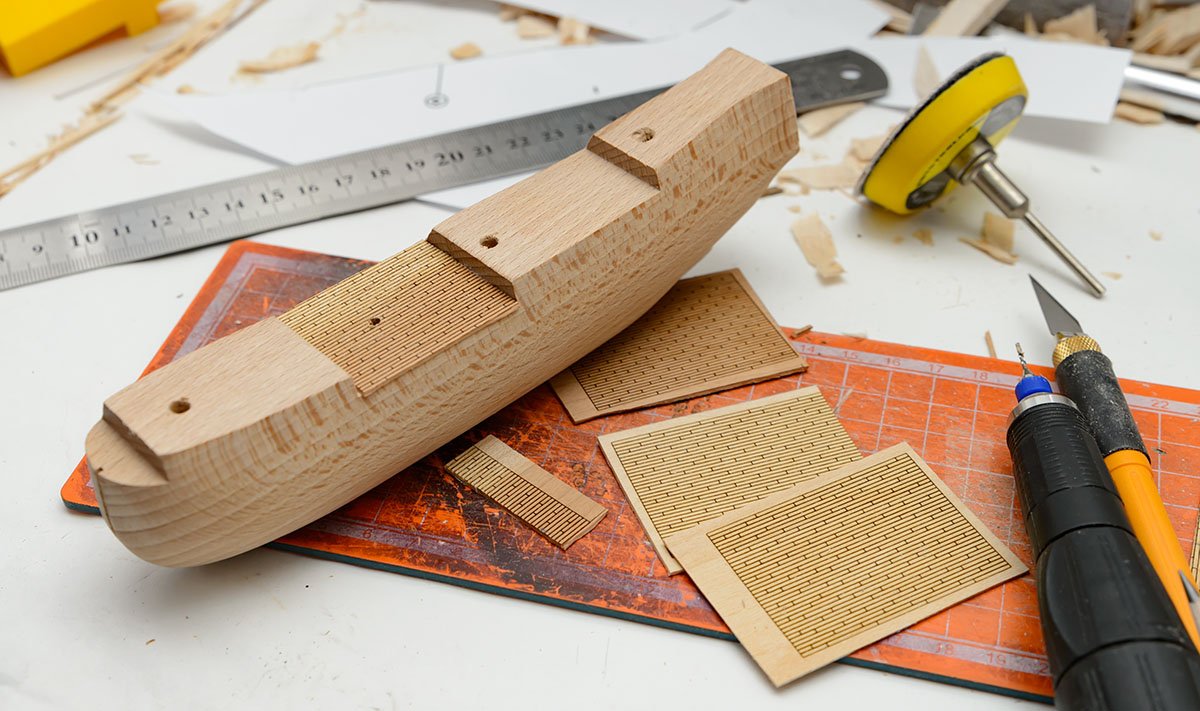
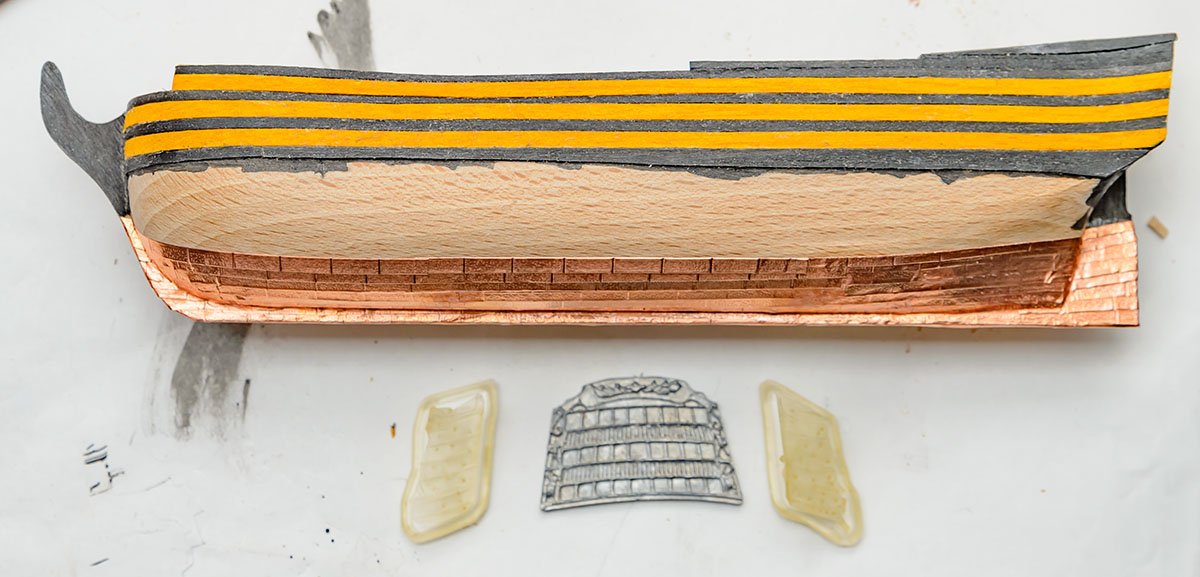
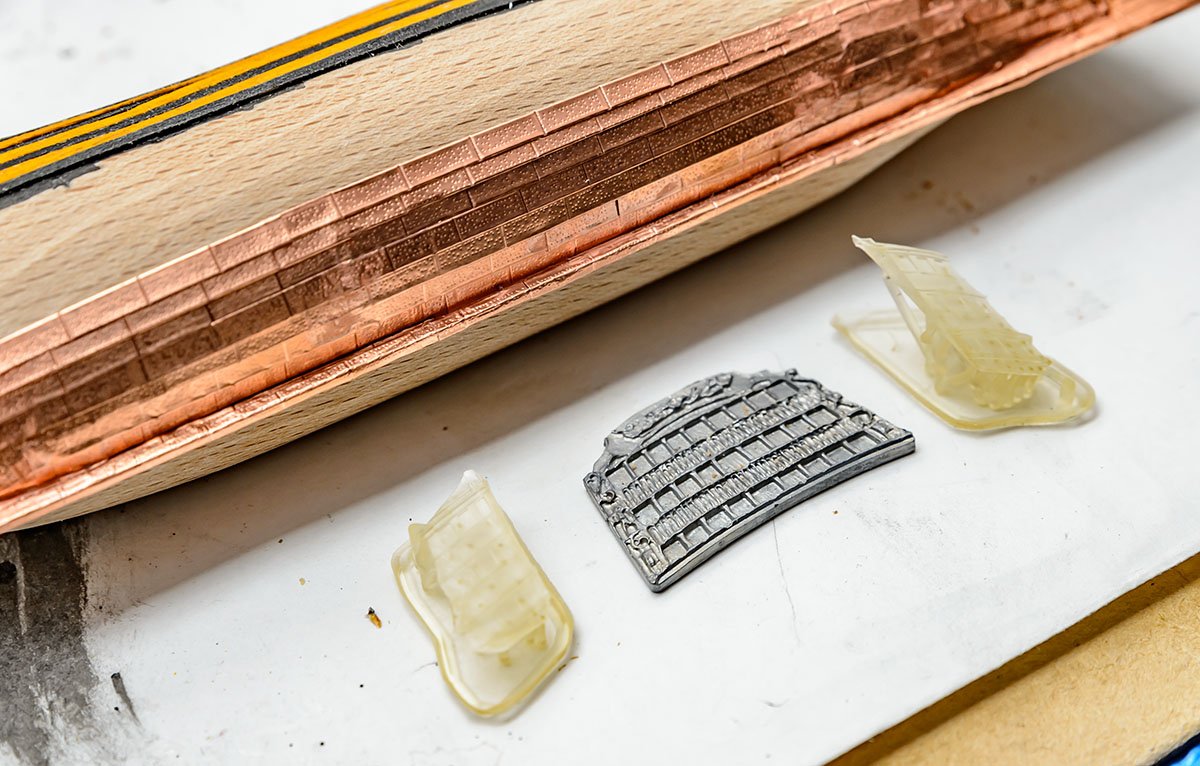
Hello, This is a side project for refreshing. I'm working on the HMS Bounty's precision hull fairing from old Sergal kit. On the contrary, this kit is designated for relaxing and fast build. So, please sit comfortably and relax while watching. Hull fairing... pass! I made some deck planking. It is considered an easy and fast build. I added gratings to cover my mistake on the lower deck. Easy and fast build... Yeah. It was easy to plank the hull. But the hull fairing made it difficult... After some trial and errors, mass production! Easy and fast! I figured out the quarter galley parts are not in the kit. I downloaded some free HMS Victory 3D models, edited them, and printed them using a 3D printer. The details are horrible, but this is an easy and fast build. 😎
-
After I read posts, I was curious about holding ratlines in the 18th century. When I researched ratlines, I was surprised that the ratline in the video wasn't fixed. (Time: 11:00) Of course, it is possible to slip. Was it true that ratlines in the 17th century were not tied to shrouds tightly?
-
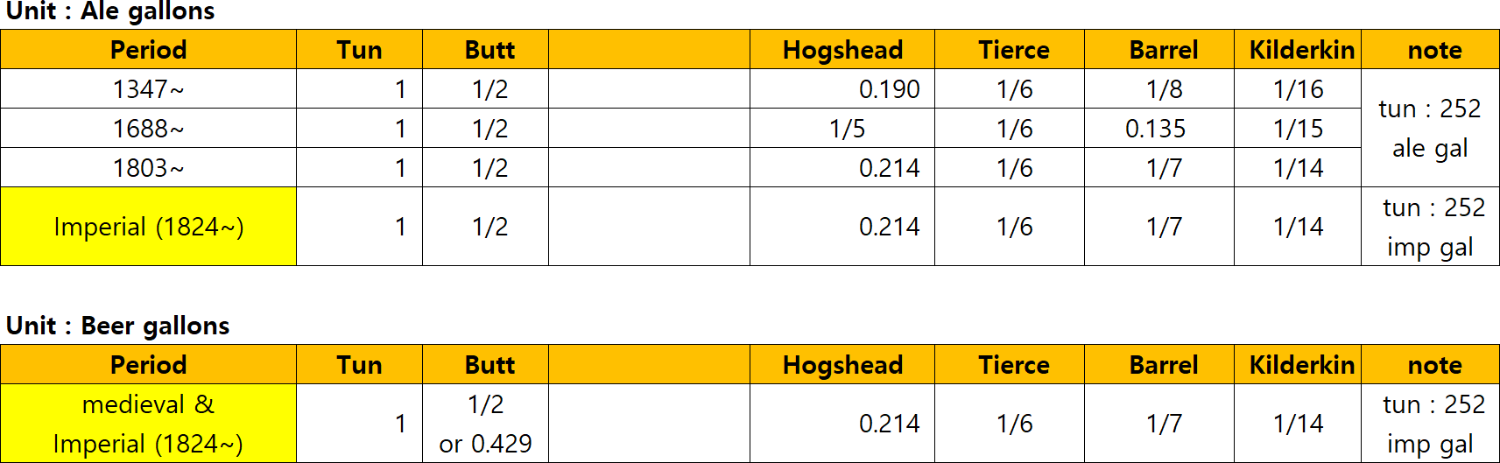
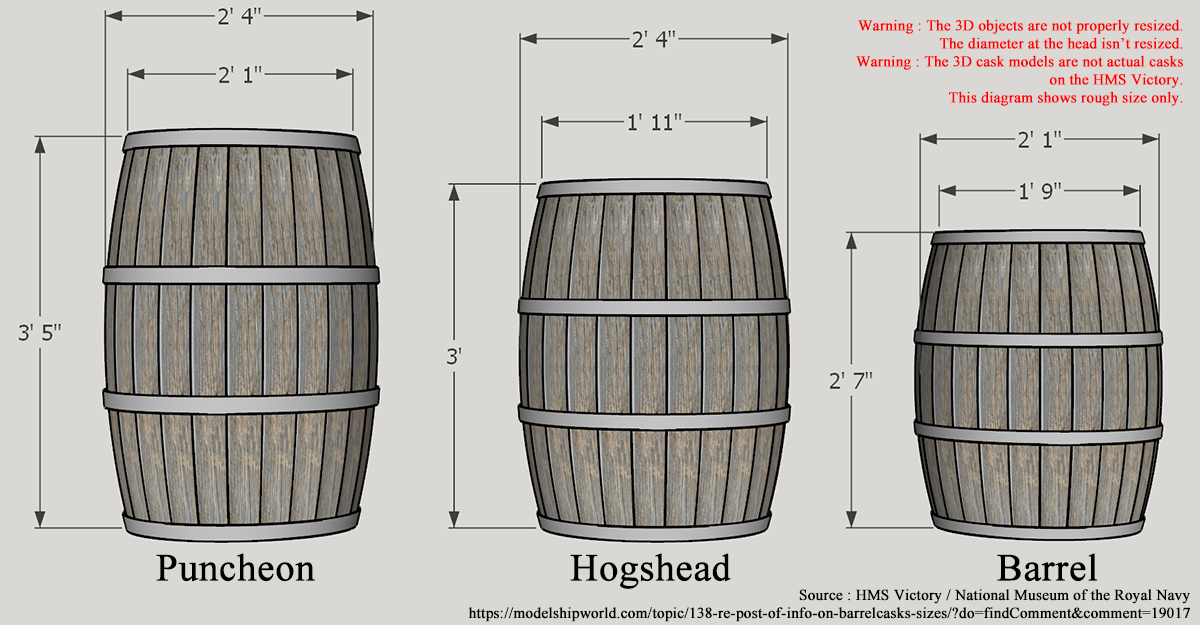
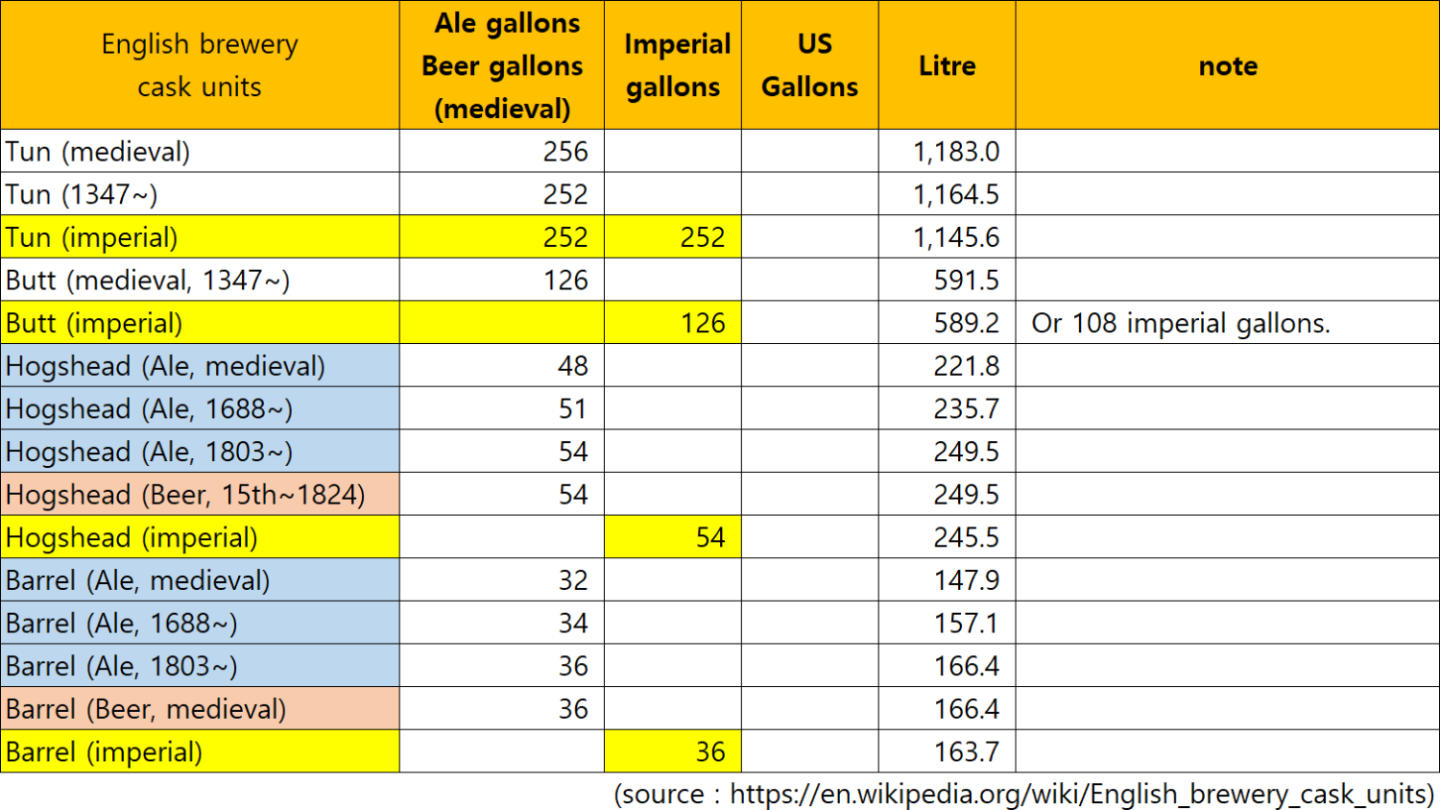
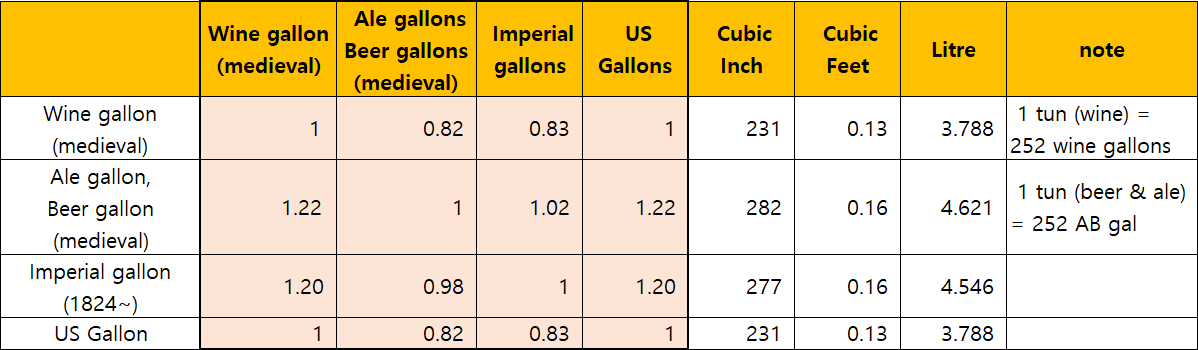
I made some summary charts. I read articles and researched some Wikipedia documents, but I didn't read all the reference books, so the numbers and direction of editing may be biased.


-
More tools are always better, especially for amateurs. I purchased some interesting movies. The movies include tons of details of two replica ships. The 1962 Mutiny on the Bounty replica was launched in Canada in 1960. Sadly, the ship was sunk during Hurricane Sandy in 2012. The 1984 The Bounty replica was launched in New Zealand in 1978 and is still operating as a harbour cruise on a river in Thailand. These replicas in the movies are very different. The 1962 replica in the movie has a very colorful hull, and the gears on the deck seem like those on a modern ship. The 1984 replica in the other movie is a more realistic sailing ship, and the gears are much legitimate wooden fittings. Also, the hull isn't painted. The difference is noticeable that it gives me many inspirations. Of course, the current building kit, which was designed in 1973, is similar to the 1962 replica.

-
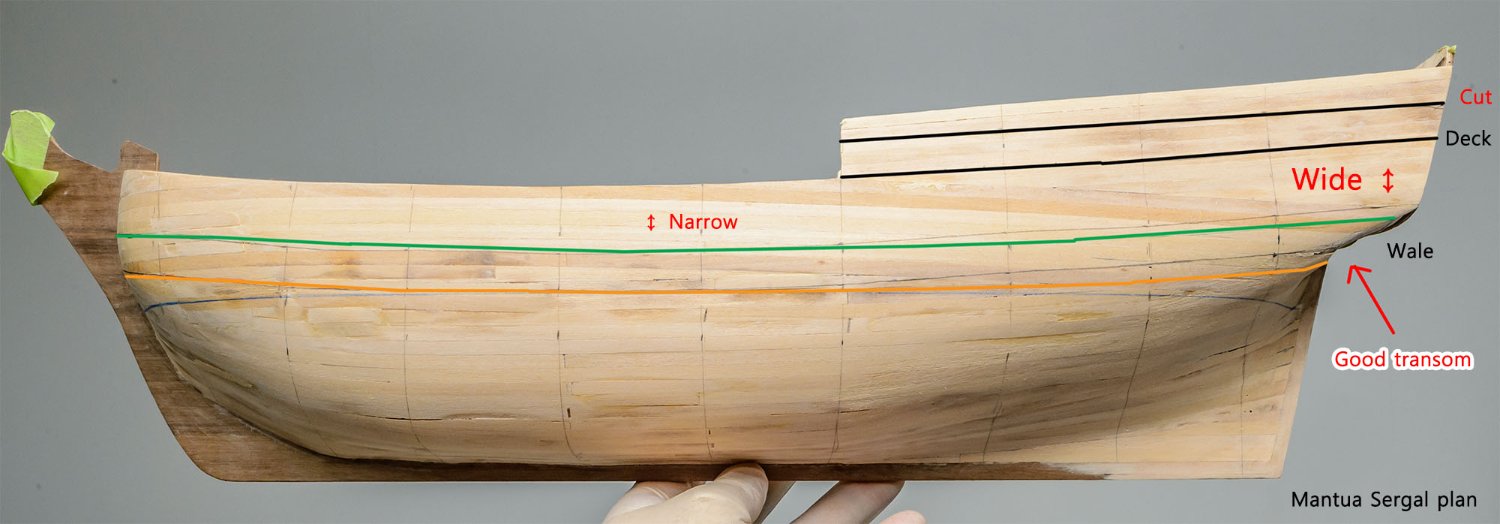
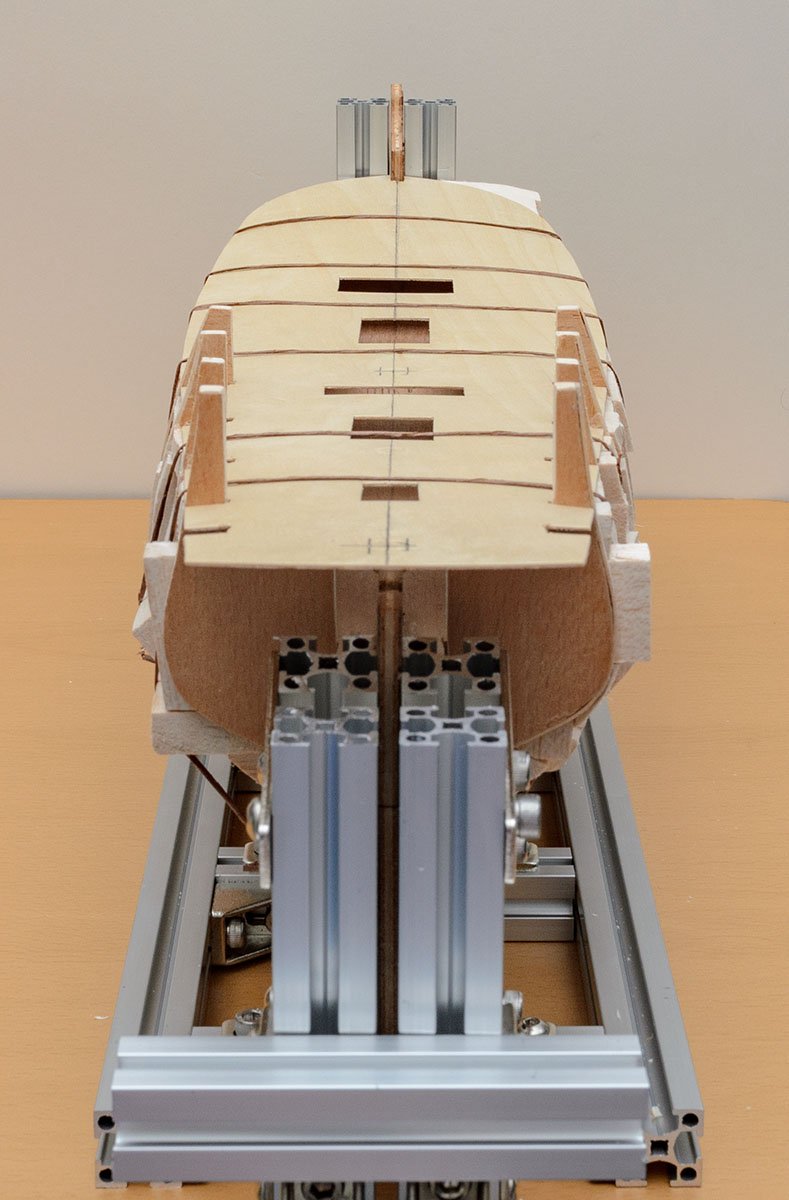
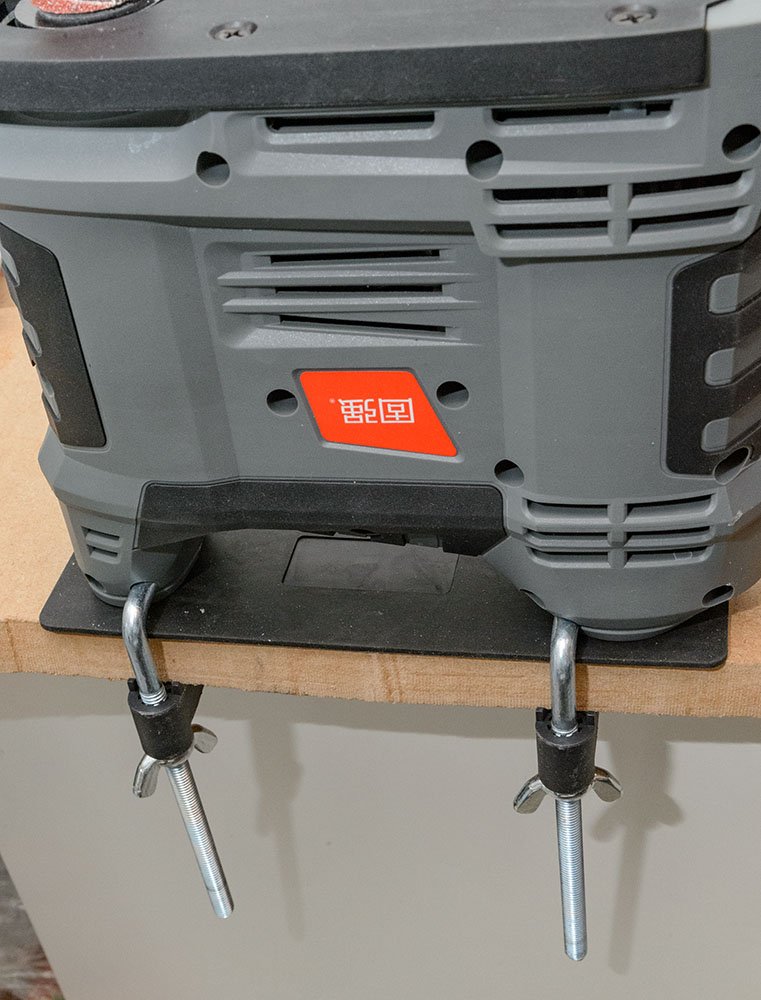
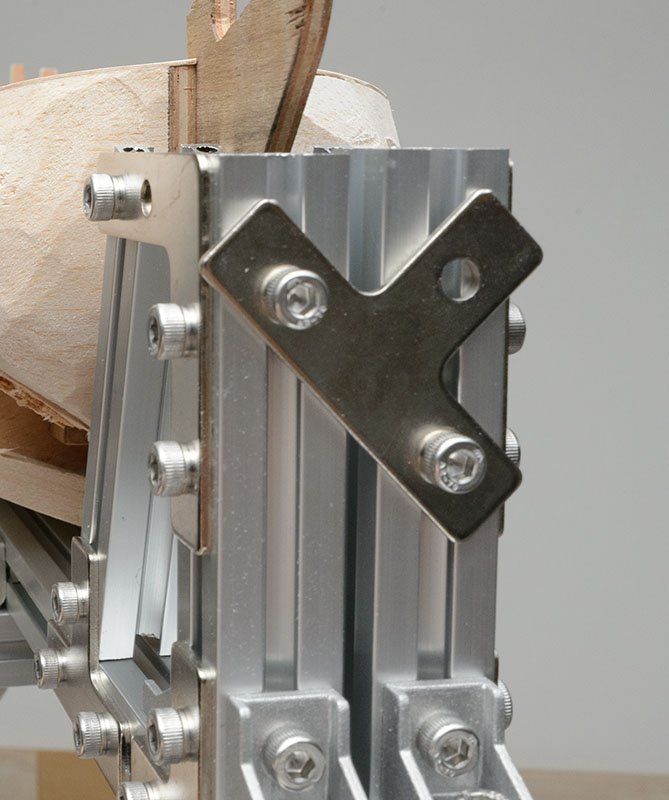
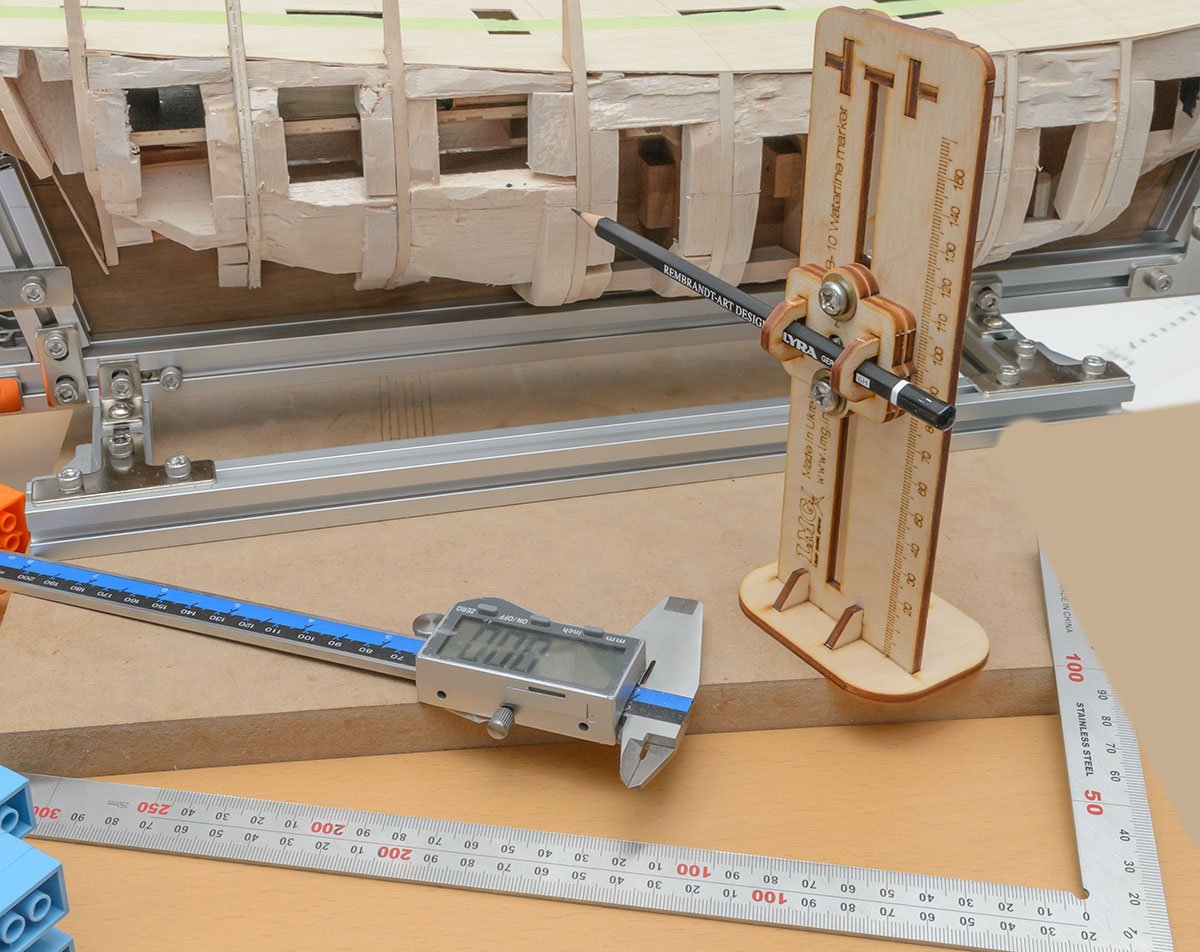
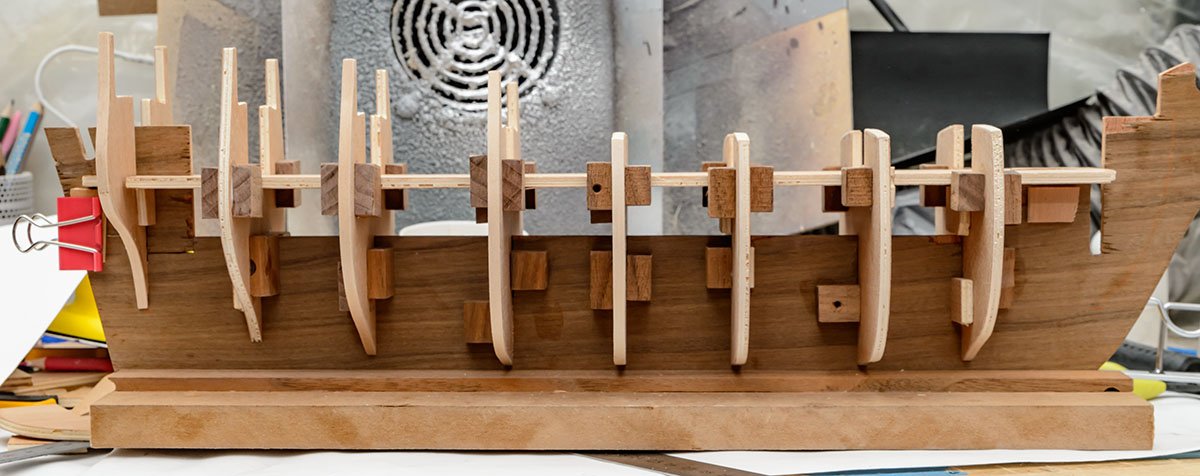
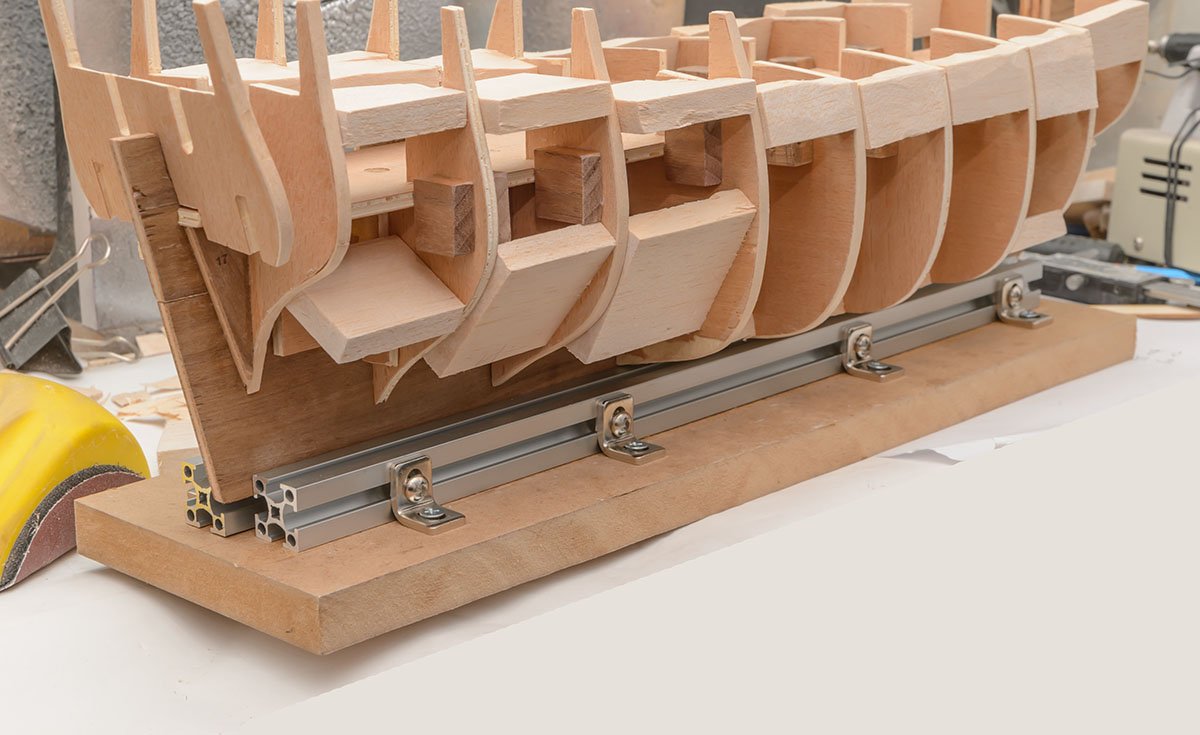
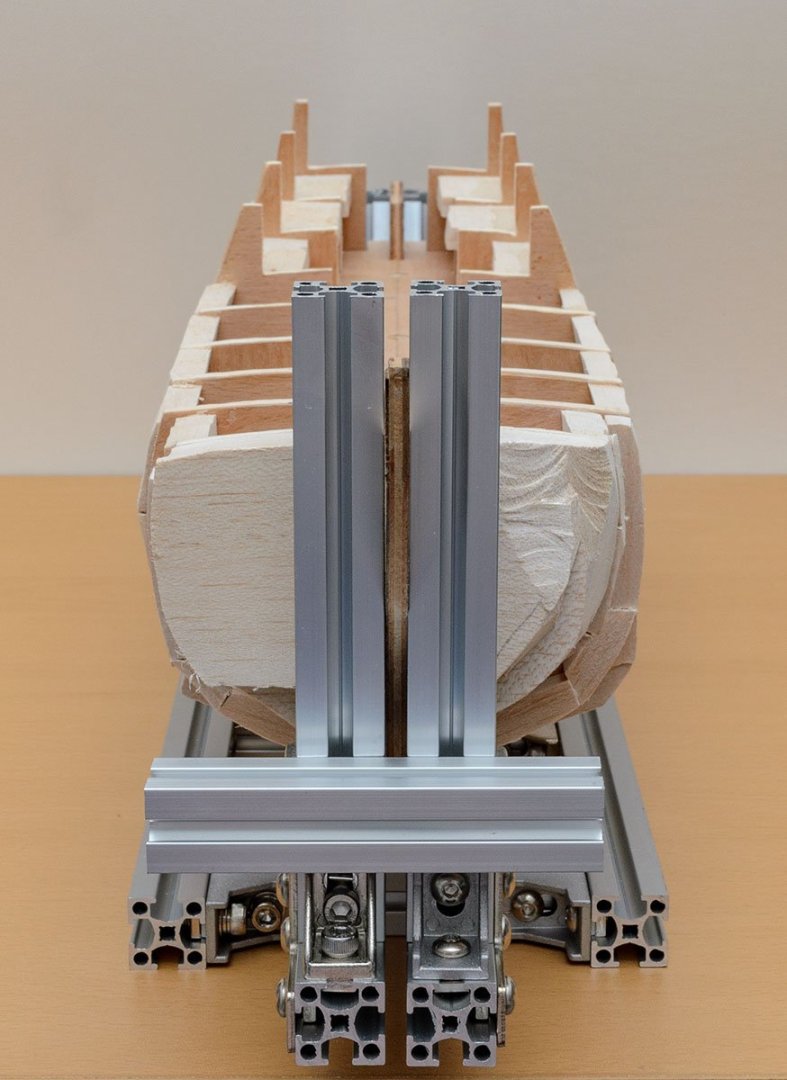
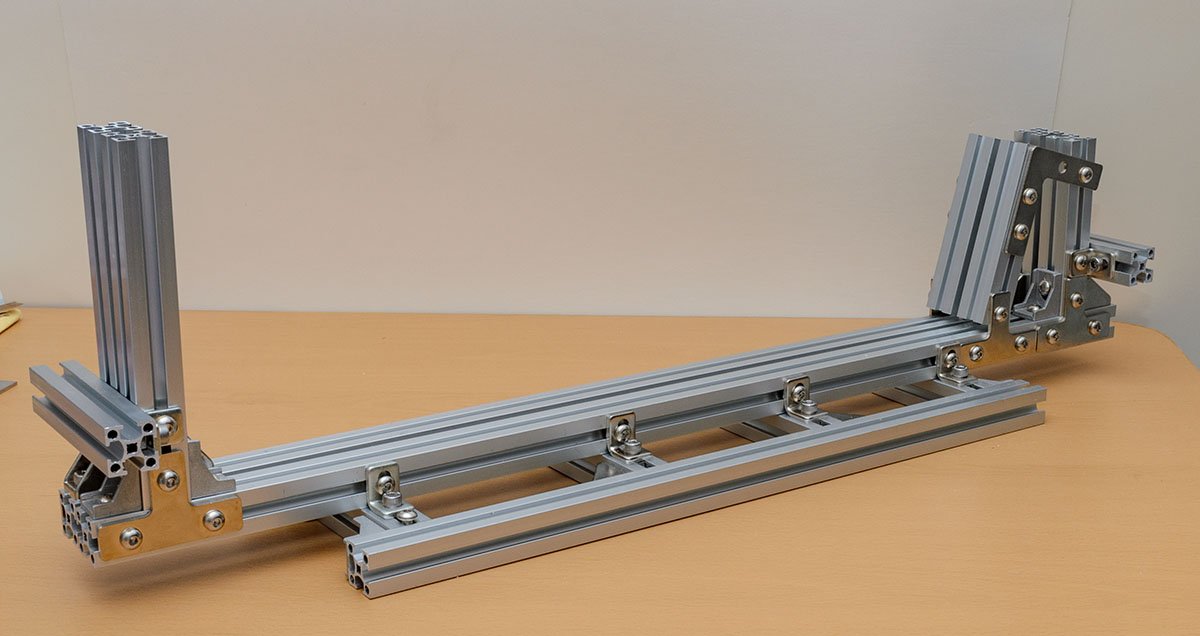
I appreciate your comment, Oldsalt1950. I updated the jig. It is the ver.5 Final of Finale to the end. I placed bolts under the keel. It secures exact 5.00mm depth equally. In addition, I optimized the horizontal bar. By the way, the hull fairing of this old kit is really hard. The Mantua Sergal's plan is different from the AOTS or Amati's plan, especially on the fore and aft sides. I placed wood blocks under the edges of the deck before I installed it. The Mantua's transom is so weird that I had to sand it a lot to fit the deck. To sand it properly, I spent lots of time understanding the shape of the Bounty's transom. It isn't surprising that the line of the bow hull is different from Amati's plan and the AOTS book. I won't fix the line because fixing frames is huge work for me. To get the best planking section lines, I'm transferring waterlines and wale lines from the plan to the real model. Although the tools aren't efficient, I found some weird numbers... I found that the drawings on Mantua Sergal's plan have different sizes and shape. 🤨 Which drawings should I believe? Anyway, I ordered digital height gauge. It'll help my future hull fairing work.

-
https://www.amazon.com/dp/B0834WL2JV/ Here is a one-stop shopping link.
-
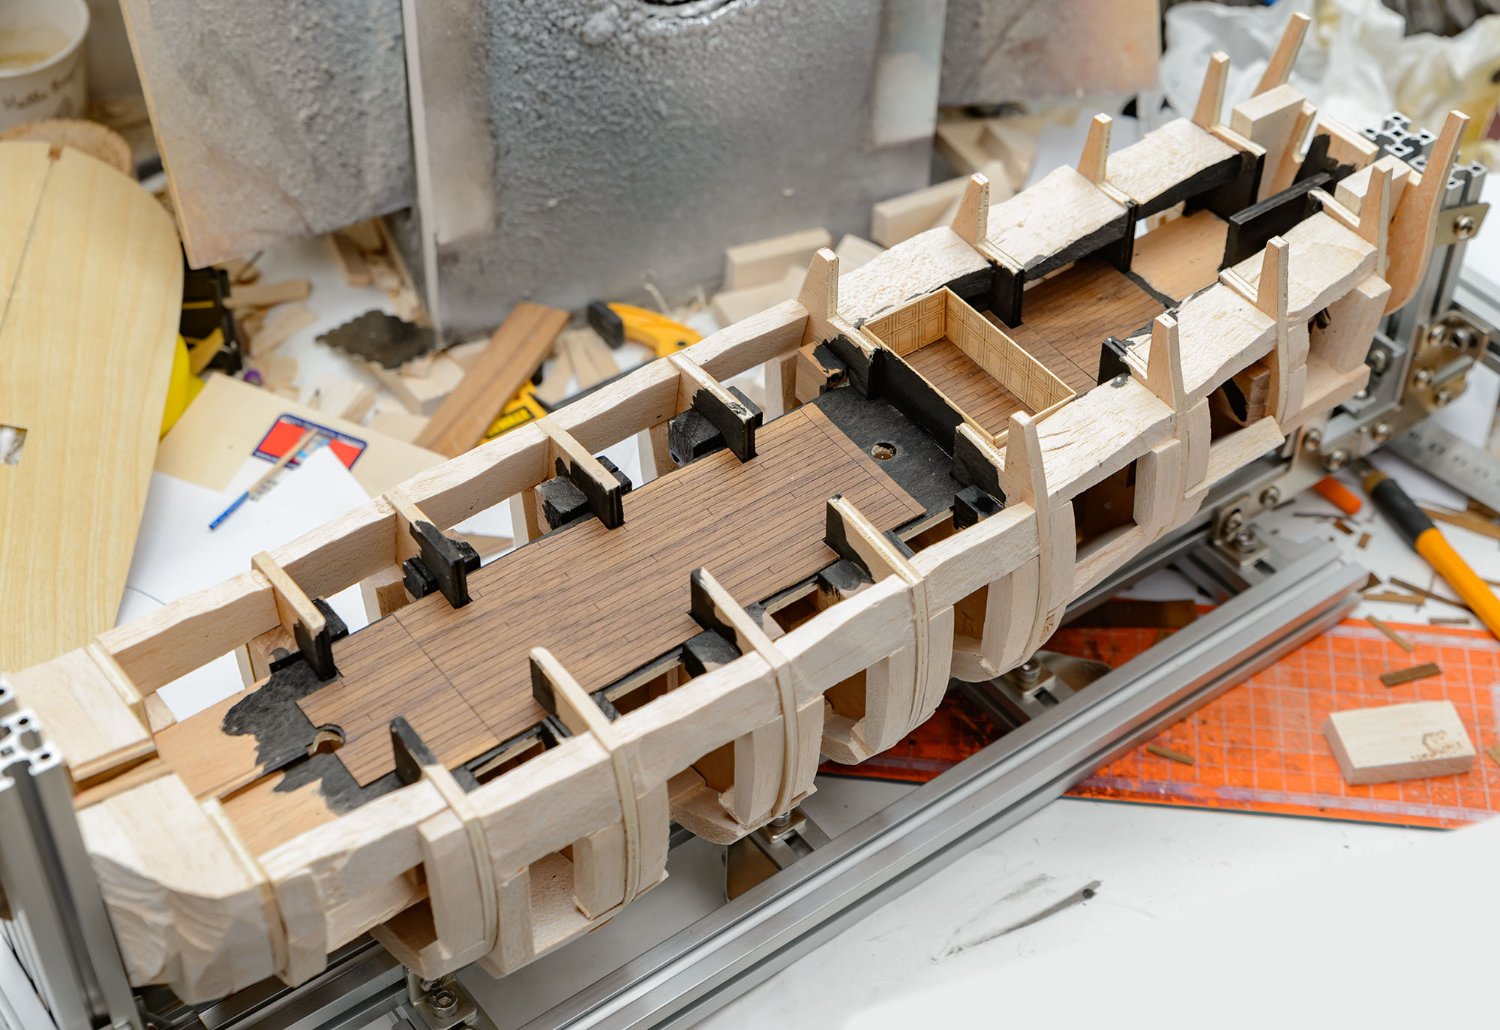
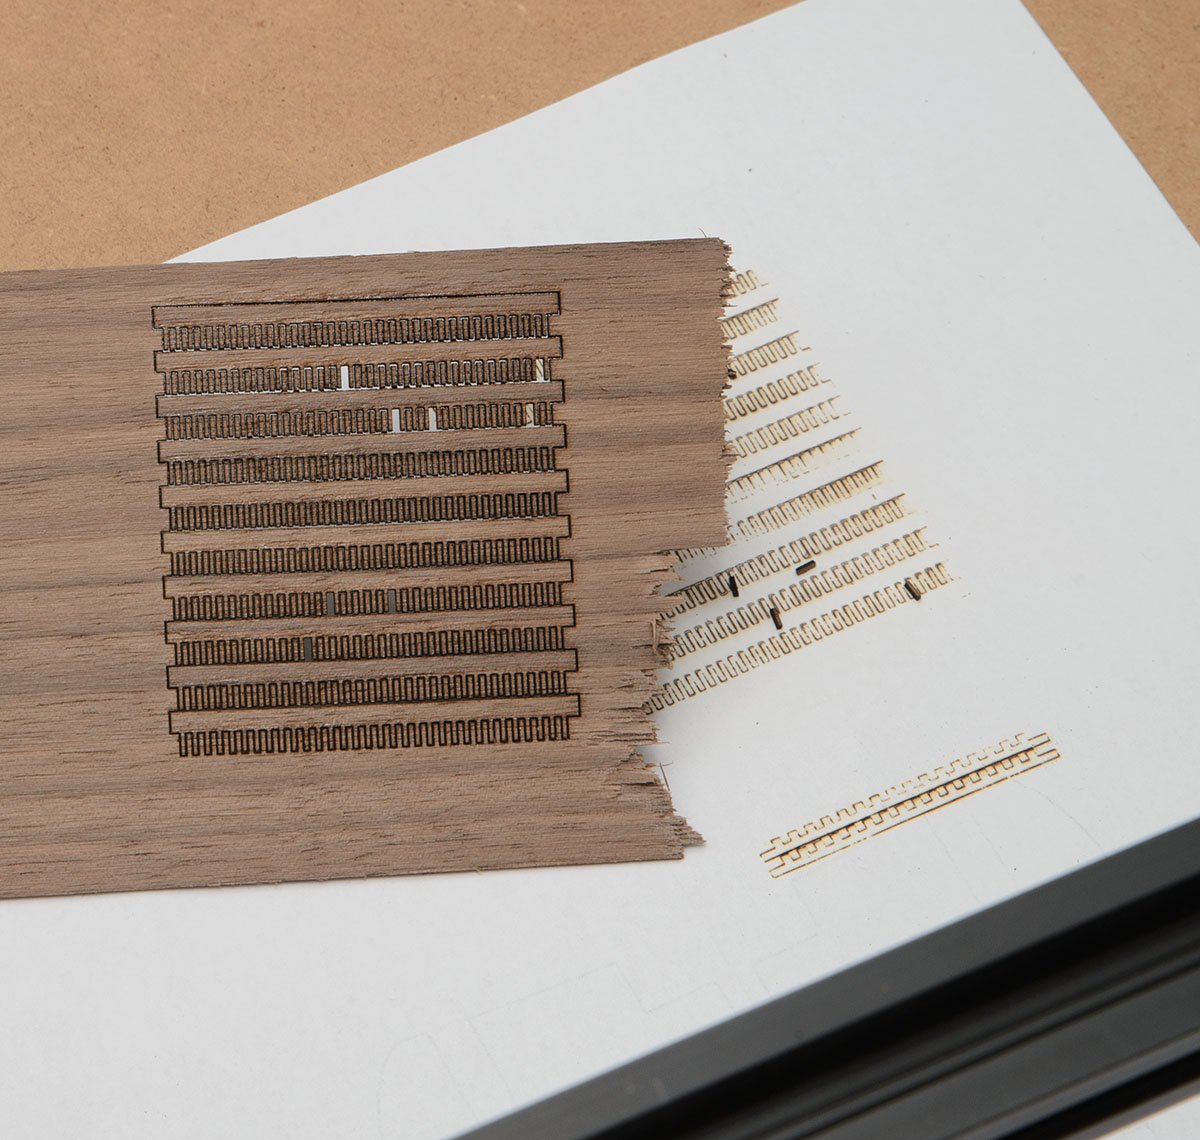
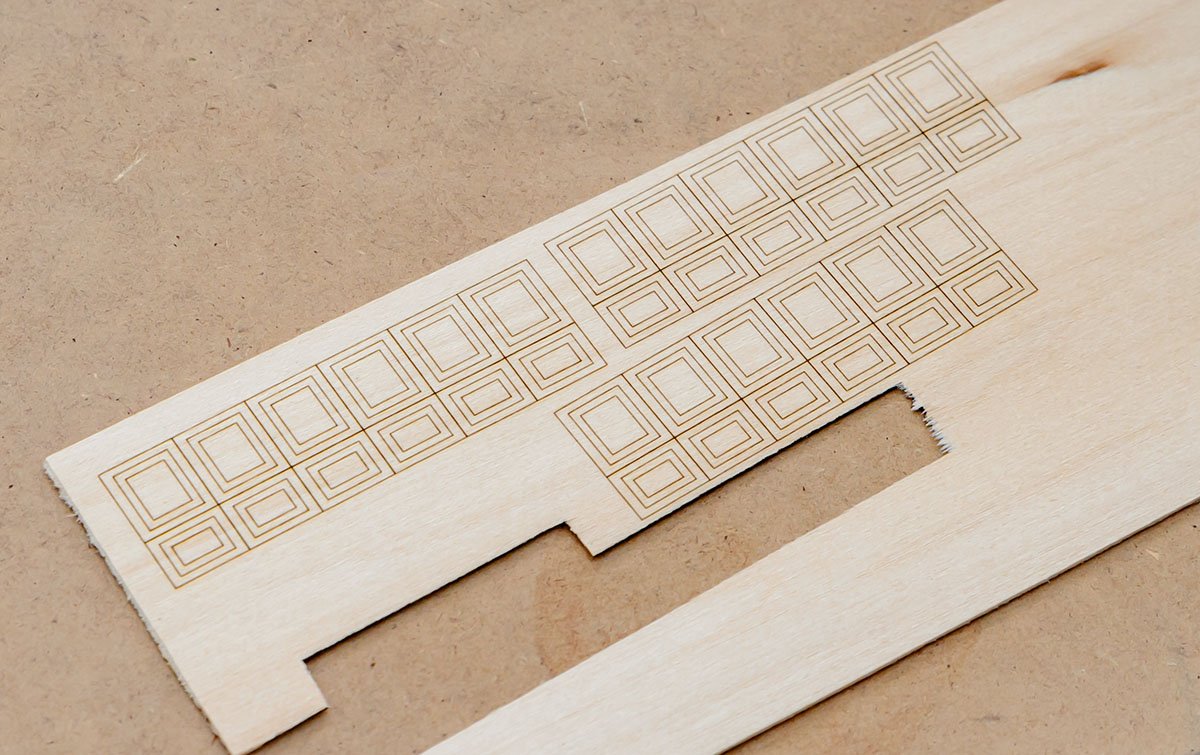
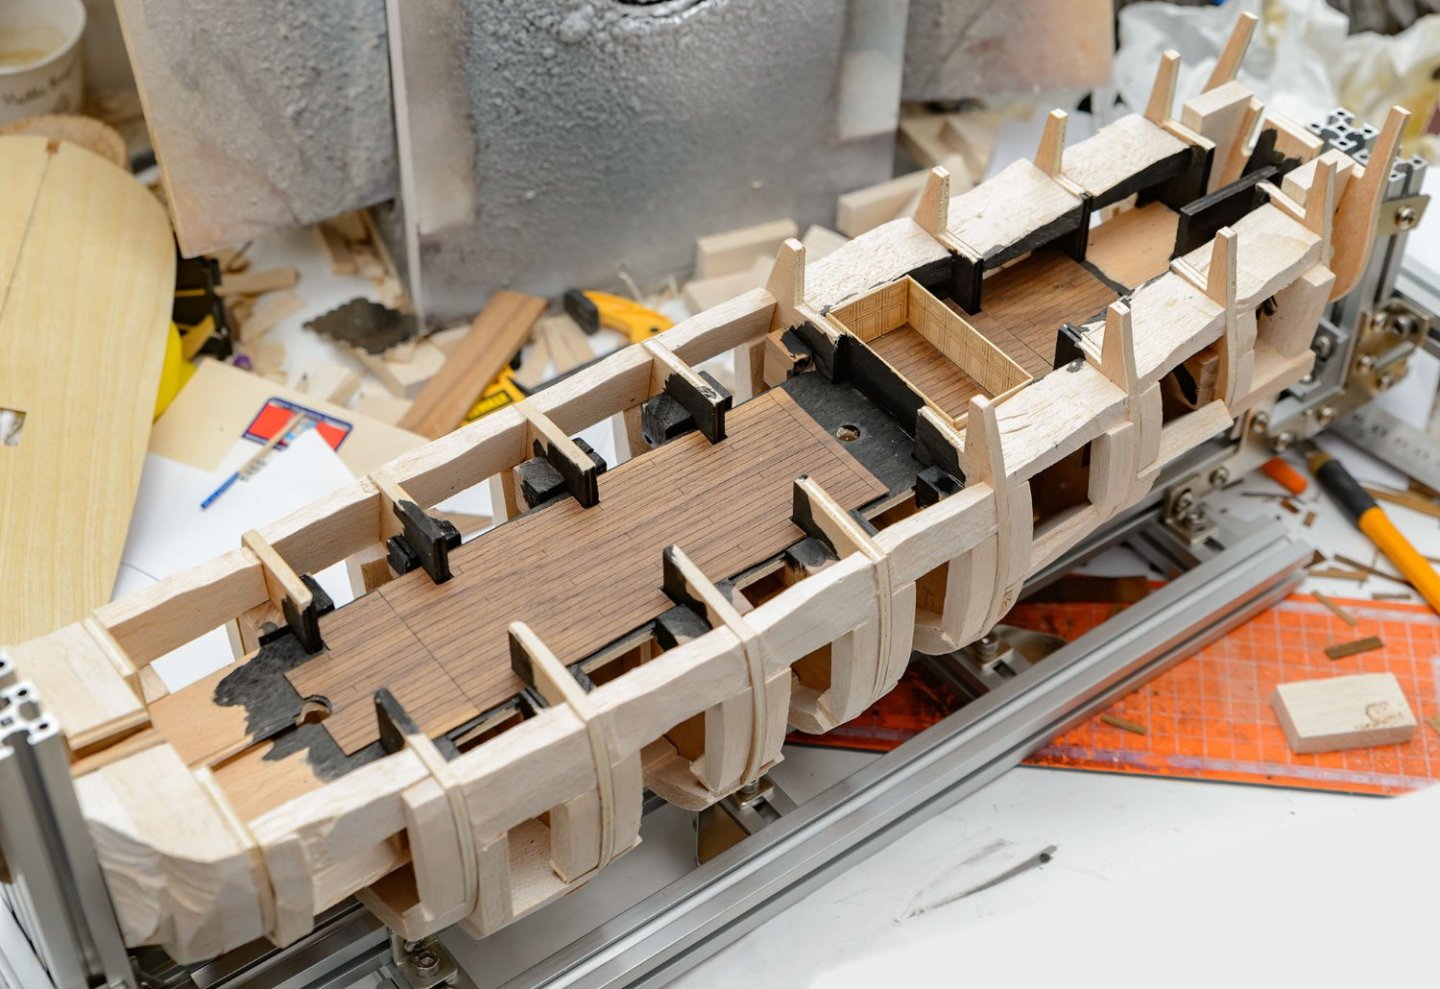
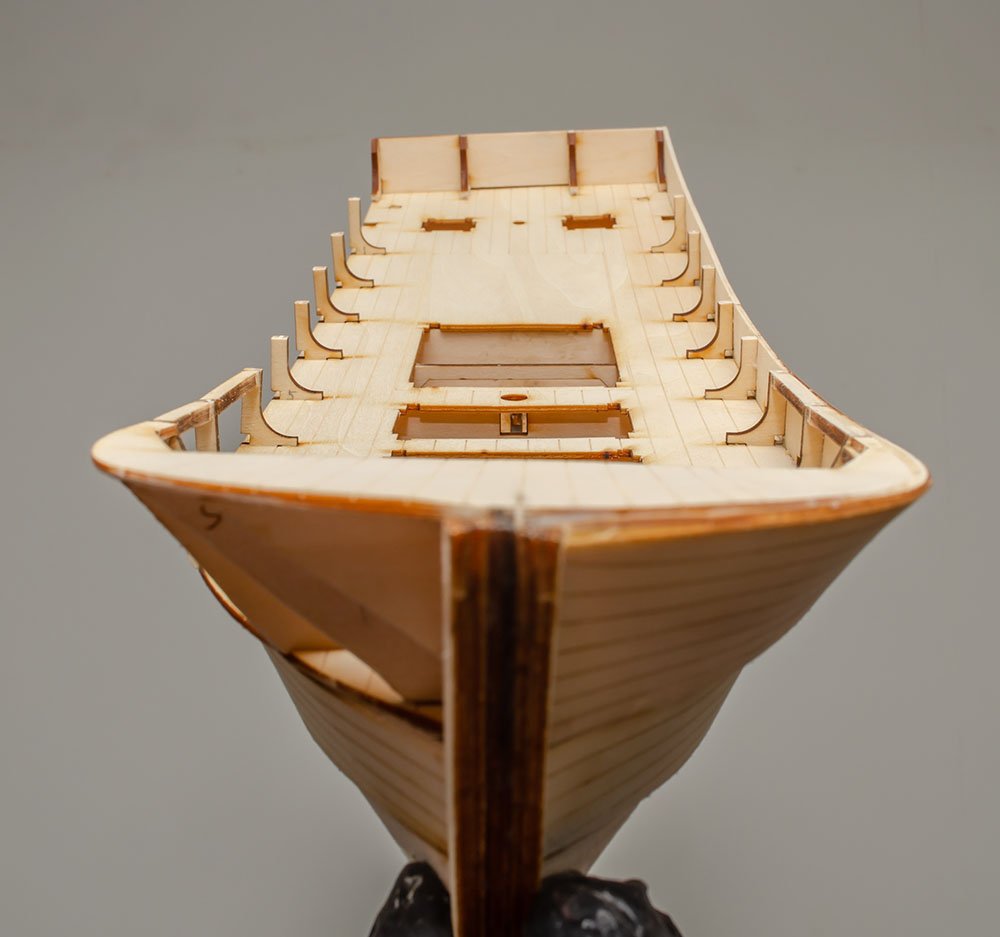
I figured out that I need to decorate the lower deck before I attach the upper deck. There are only small grating windows and staircases, so I didn't want to pay many hours for lower deck planking. After some brain storming, I used my laser cutting machine to engrave 4 butt shift pattern on 0.40mm (1/64 inch) thick walnut sheets. I also engraved the walls surrounding a staircase. I tried to imitate the wooden frames on the AOTS Bounty book. However, the 2mm frames are 5 inches frames in reality, so I gave up using them. I may need to make DIY 0.50mm scrappers... Today's work is done. I used black calligraphy ink from Winsor & Newton. The calligraphy ink is made of a water-based pigment ink that has a lifespan of more than 100 years. I can see the lower decks through the small slots. There is no reason to pay huge labour cost on the lower deck. Also, I'll use 0.80mm hole gratings, which are good for the 1/60 scale. It'll reduce visibility but save the sailor's heels.
-
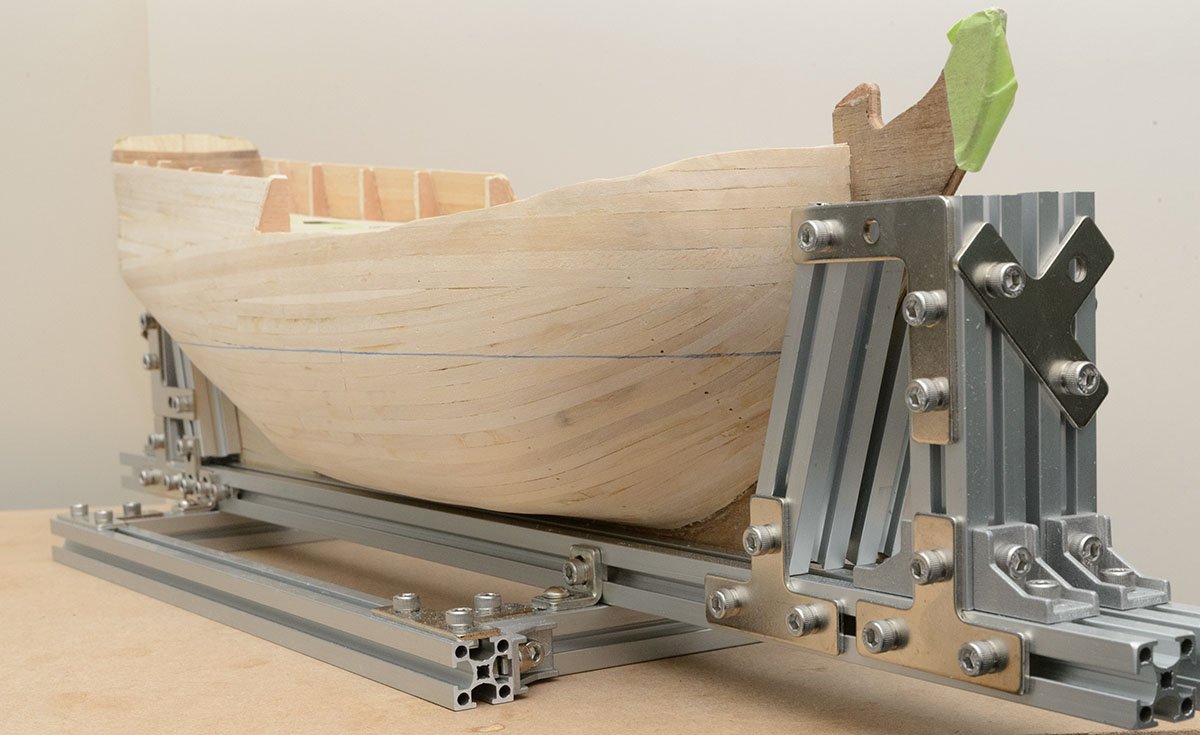
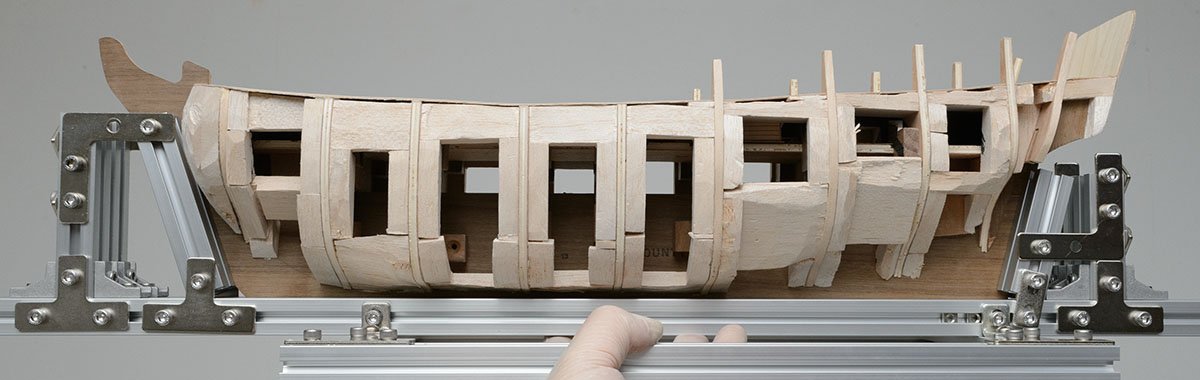
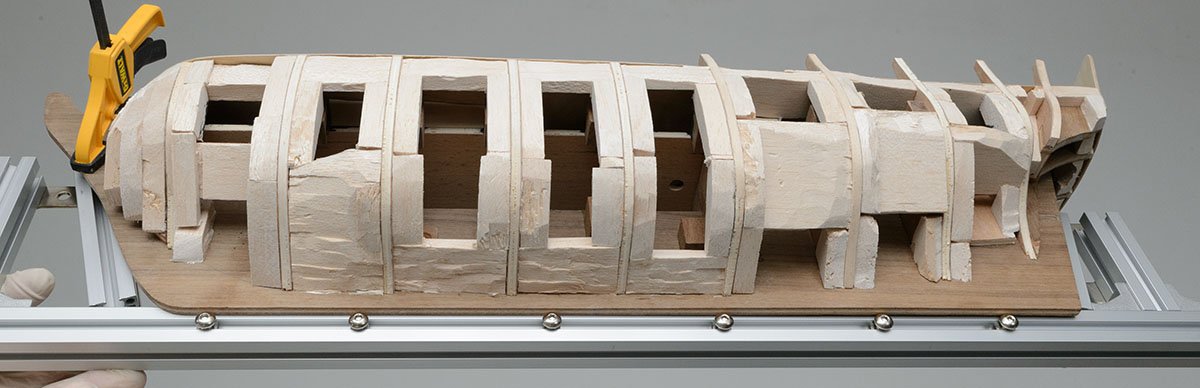
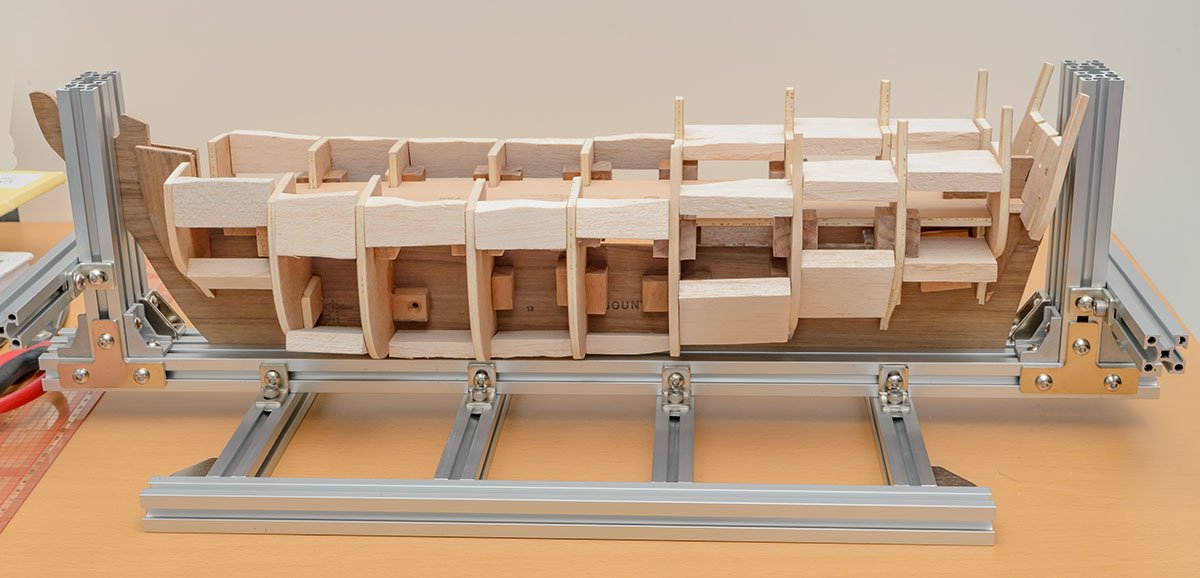
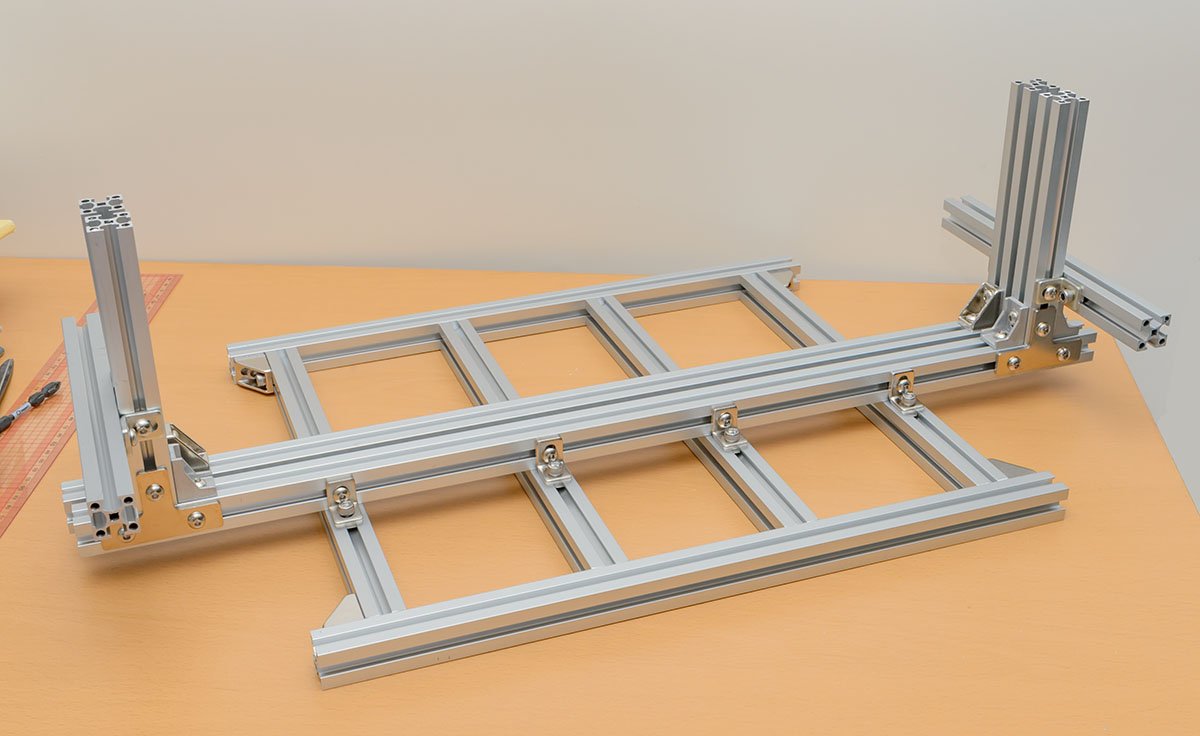
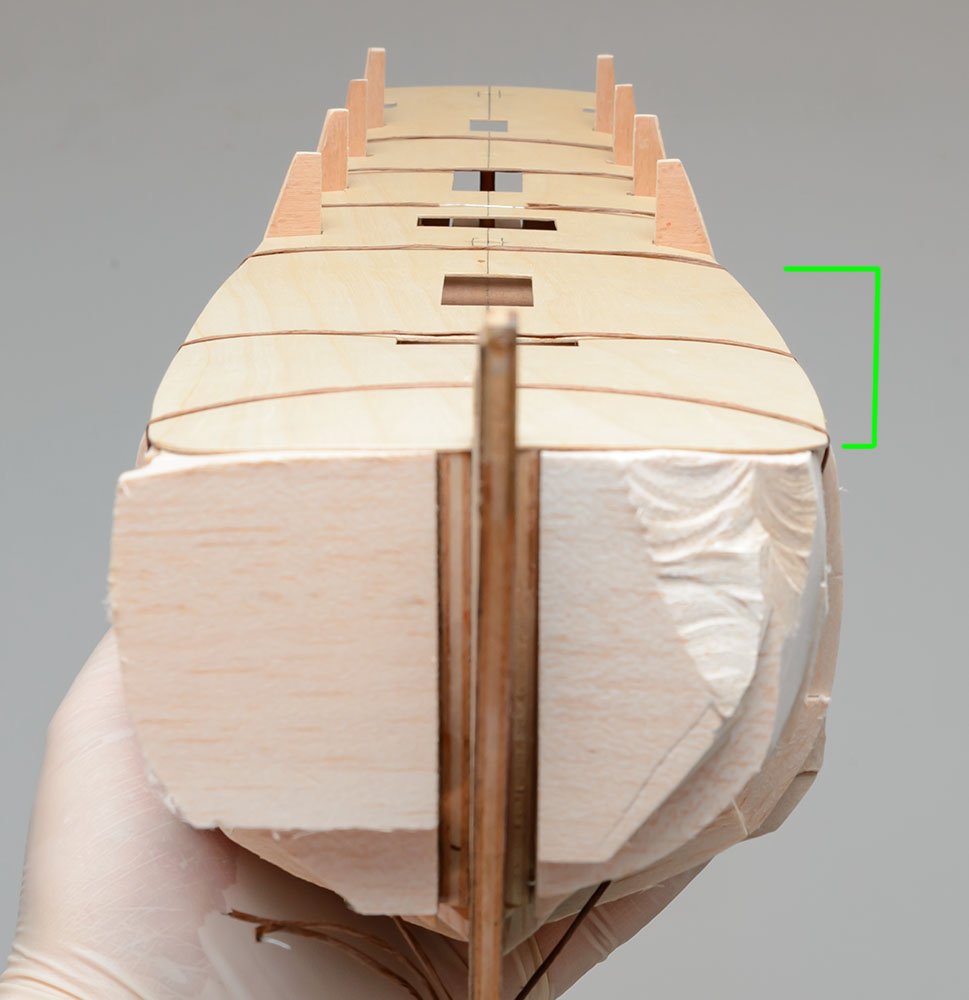
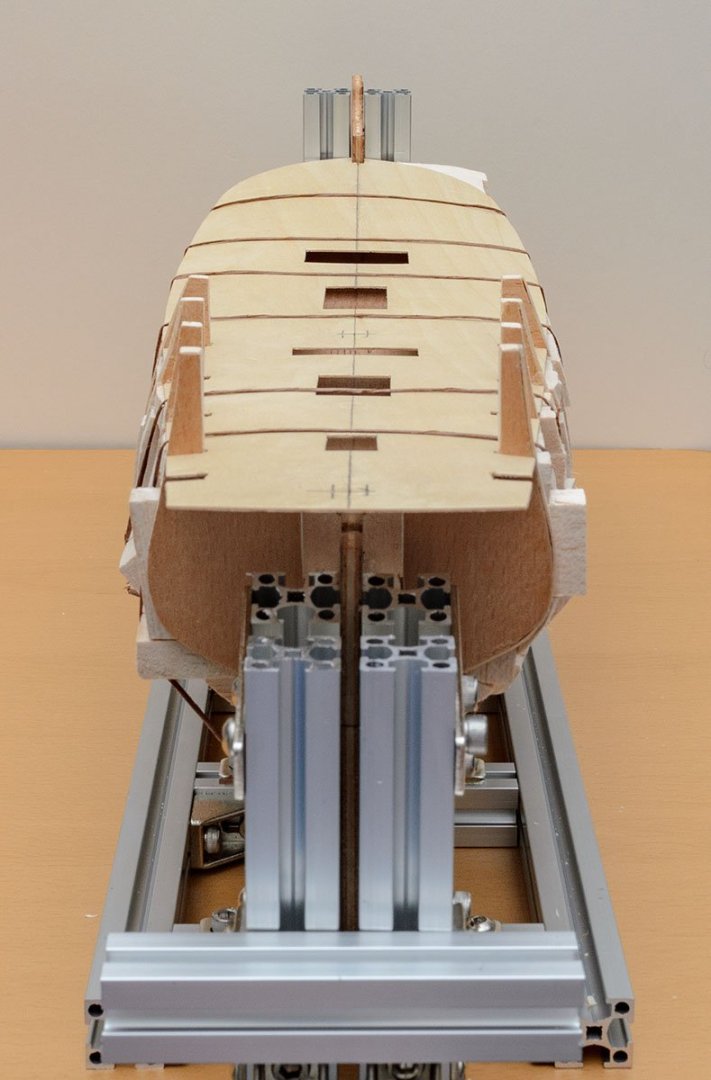
The imbalanced hull and twisted deck has been my biggest issue ever. It irritated me and put me in a slump. To overcome the old foe, I made a DIY berth to measure every corner. Ver.1 - The wooden bars were ripped off next day. It wasn't durable. Ver.2 - I switched to the aluminium profile bars, but the MDF stand couldn't hold the bar tightly enough. Ver.3 - Quite better and useful. I added more functionality to it. Ver.4 Final - OK. Stop to play with Mechanix. It's time to return home. With the new tool, I sanded frames to flatten the deck layer. I took this picture in the middle of sanding work. I finished half of the hull (green area). As you can see, the aft side is twisted again. 😂 This is a final result. It's the first flat deck floor I've ever made! The error is less than 1.00mm. It's time to decide on the planking sections. I'm in the eye of the hull fairing storm.


-
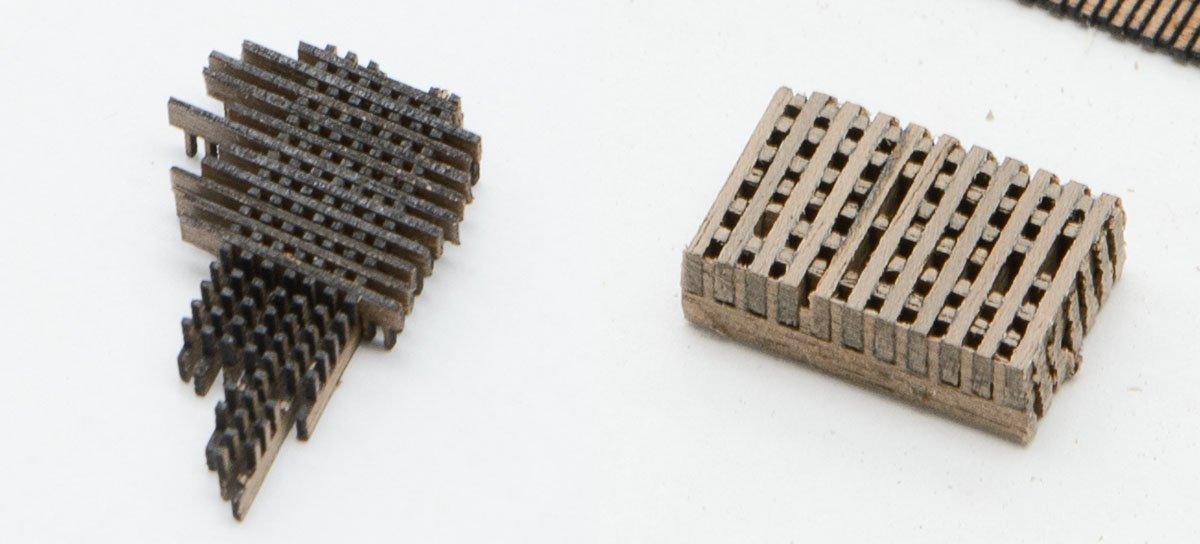
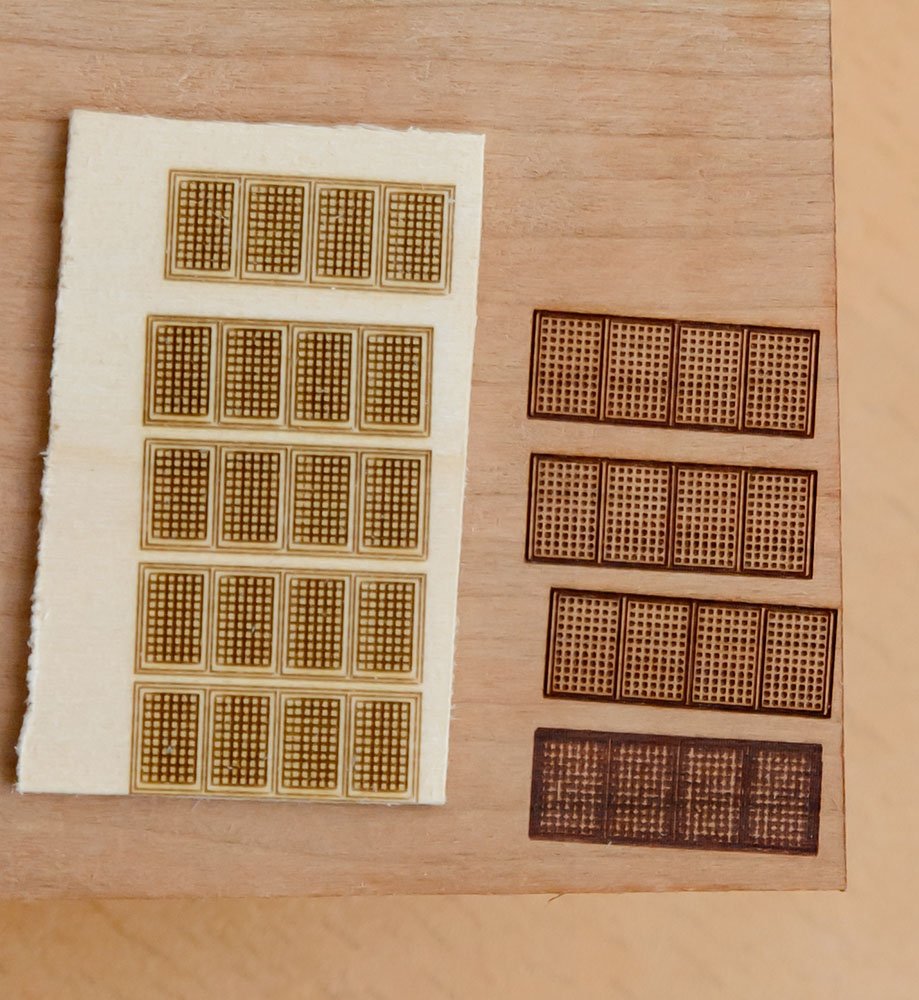
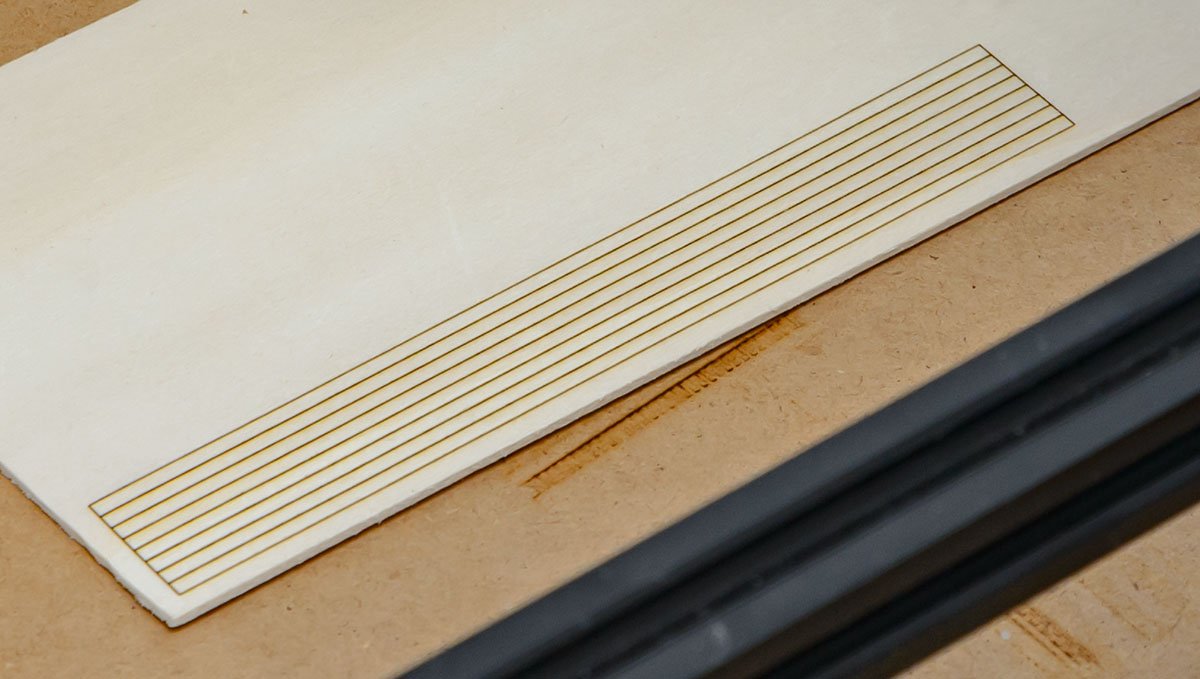
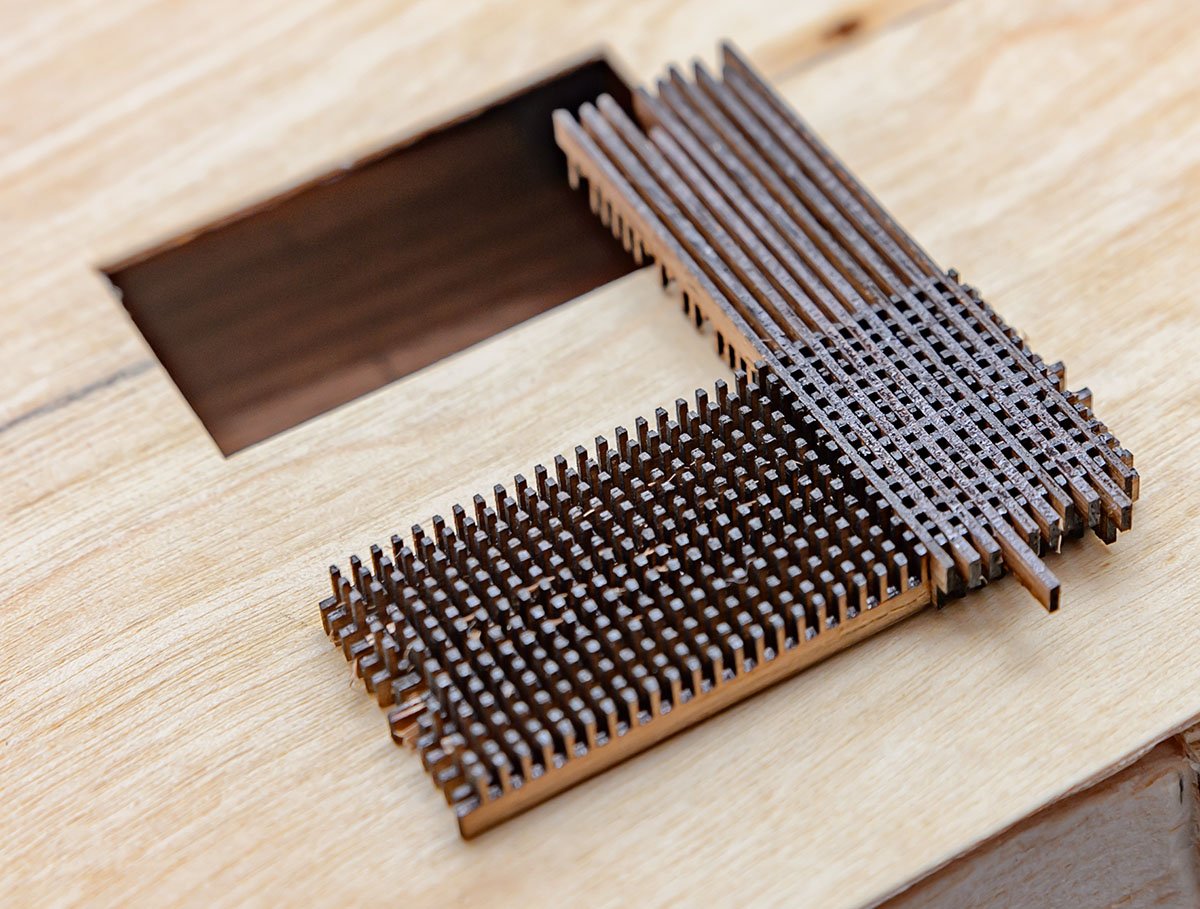
While I was checking, checking, and measuring every centimeter, I focused on the size of the gratings. The kit's 3mm gratings are bigger than those in the McKay's AOTS book. I opened a box of laser cutters and tested the machine. After several trials, I got a remarkable result. I used 0.75mm (1/3 inches) walnut sheets and passed them 4 times with the 3.5W output laser. Yes. it is so weak to cut wood sheets and was time-consuming inefficient work. 🤨 But, the result gave me confidence. The realistic 0.75mm walnut grating is much better than the kit's 3.0mm grating. I'll order 12W laser cutter for intensive use. The hull fairing work will need more time...