HOLIDAY DONATION DRIVE - SUPPORT MSW - DO YOUR PART TO KEEP THIS GREAT FORUM GOING! (Only 20 donations so far - C'mon guys!)
×


Brewerpaul
-
Posts
190 -
Joined
-
Last visited
Content Type
Profiles
Forums
Gallery
Events
Everything posted by Brewerpaul
-
Your stern came out just fine. If I don't come up with my own solution, would you mind if I stole yours? Someone from the actual Pride was kind enough to send me two stern photos which I think may work.
-
The PRIDE OF BALTIMORE II are indeed incised and it looks like they have gold leaf applied. I don't know anyone with the equipment to do that, and in any event the letters will be pretty darned small.
-
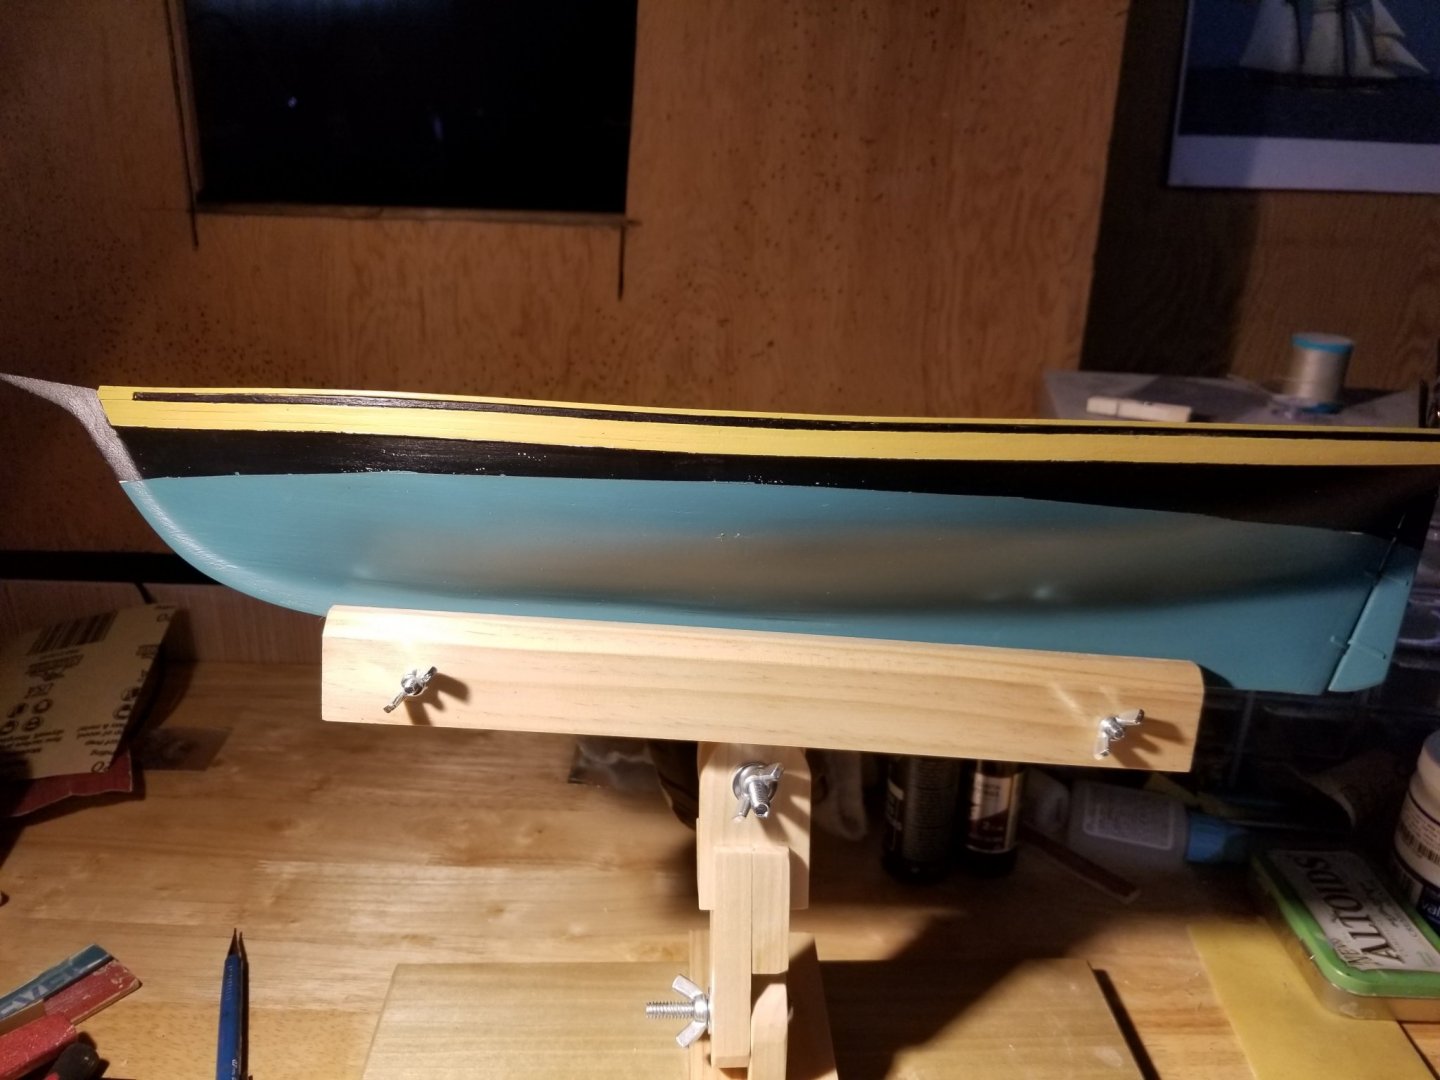
No need to show everyone all the filling,sanding,repeat I went through. Actually, my planking wasn't as bad as I thought it was. Here it is with a couple of finish paint. There are a lot of little chips,dings, and other flaws in the paint which I'll fix. Once I have the hull paint as good as I'm going to get it, I'll add a few brushed on coats of brush on polyurethane to protect the paint from further chips. Contrary to some builders' warnings, I got my green as a $4 sample of satin wall paint from Lowes. I also have some cream color from there for the inside of the bulwarks. I'm quite happy with the way the green came out. My current task is to get a transom that I'm happy enough with to install it. Then I can add the stern knees and fix up parts of the sheer plank that don't quite mesh. As some builders have done, I'm thinking that sizing a good high res photo of the upper part of the transom with the PRIDE OF BALTIMORE II and applying it to the transom. Maybe even the lower part containing Baltimore Maryland if I can tweak the yellow in the photo to match the color of my wales. I've already applied a shrunk copy of the Maryland Flag to the little stern shield.
-
I saw yours David (in fact,I bookmarked your build and have used it as a reference) and it worked out well for you. It's a possibility. I already fabricated the transom with planking at the top, color of the wales painted below, so I'd like to try to use it. Still, I'll keep it in mind.
-
I need a reasonably easy and inexpensive way to letter the stern of my Pride of Baltimore II model. Here's the real thing. It was pretty simple to do the Lord Baltimore coat of arms plaque by simply printing it to scale,gluing it to the plaque and coating with a couple of coats of spray lacquer. The name of the ship appears slightly arched, but I could live with it flat. It's gilt and actually carved, but I think the yellow of the wales would look just about as good. Question is, how to do this neatly? Decal paper? Are there dry transfer letters small enough? I'm open to any ideas apart from hand painting them myself.
-
What primer?
Brewerpaul replied to Brewerpaul's topic in Painting, finishing and weathering products and techniques
I already had a can of shellac based water stain primer so I gave it a try on a small, isolated part of my current ship. It went on nice and smooth,leaving a very fine sandpaper feeling surface. I hit this with some 400 grit sandpaper as Nirvana suggested,dusted it off, then applied the craft store acrylic I plan on using. The results were terrific. I think the bit of "tooth" provided by the primer actually helped the paint go on smoothly. I'll post results once I do the entire hull. -
Keel Clamp (Home Made)
Brewerpaul replied to DocBlake's topic in Modeling tools and Workshop Equipment
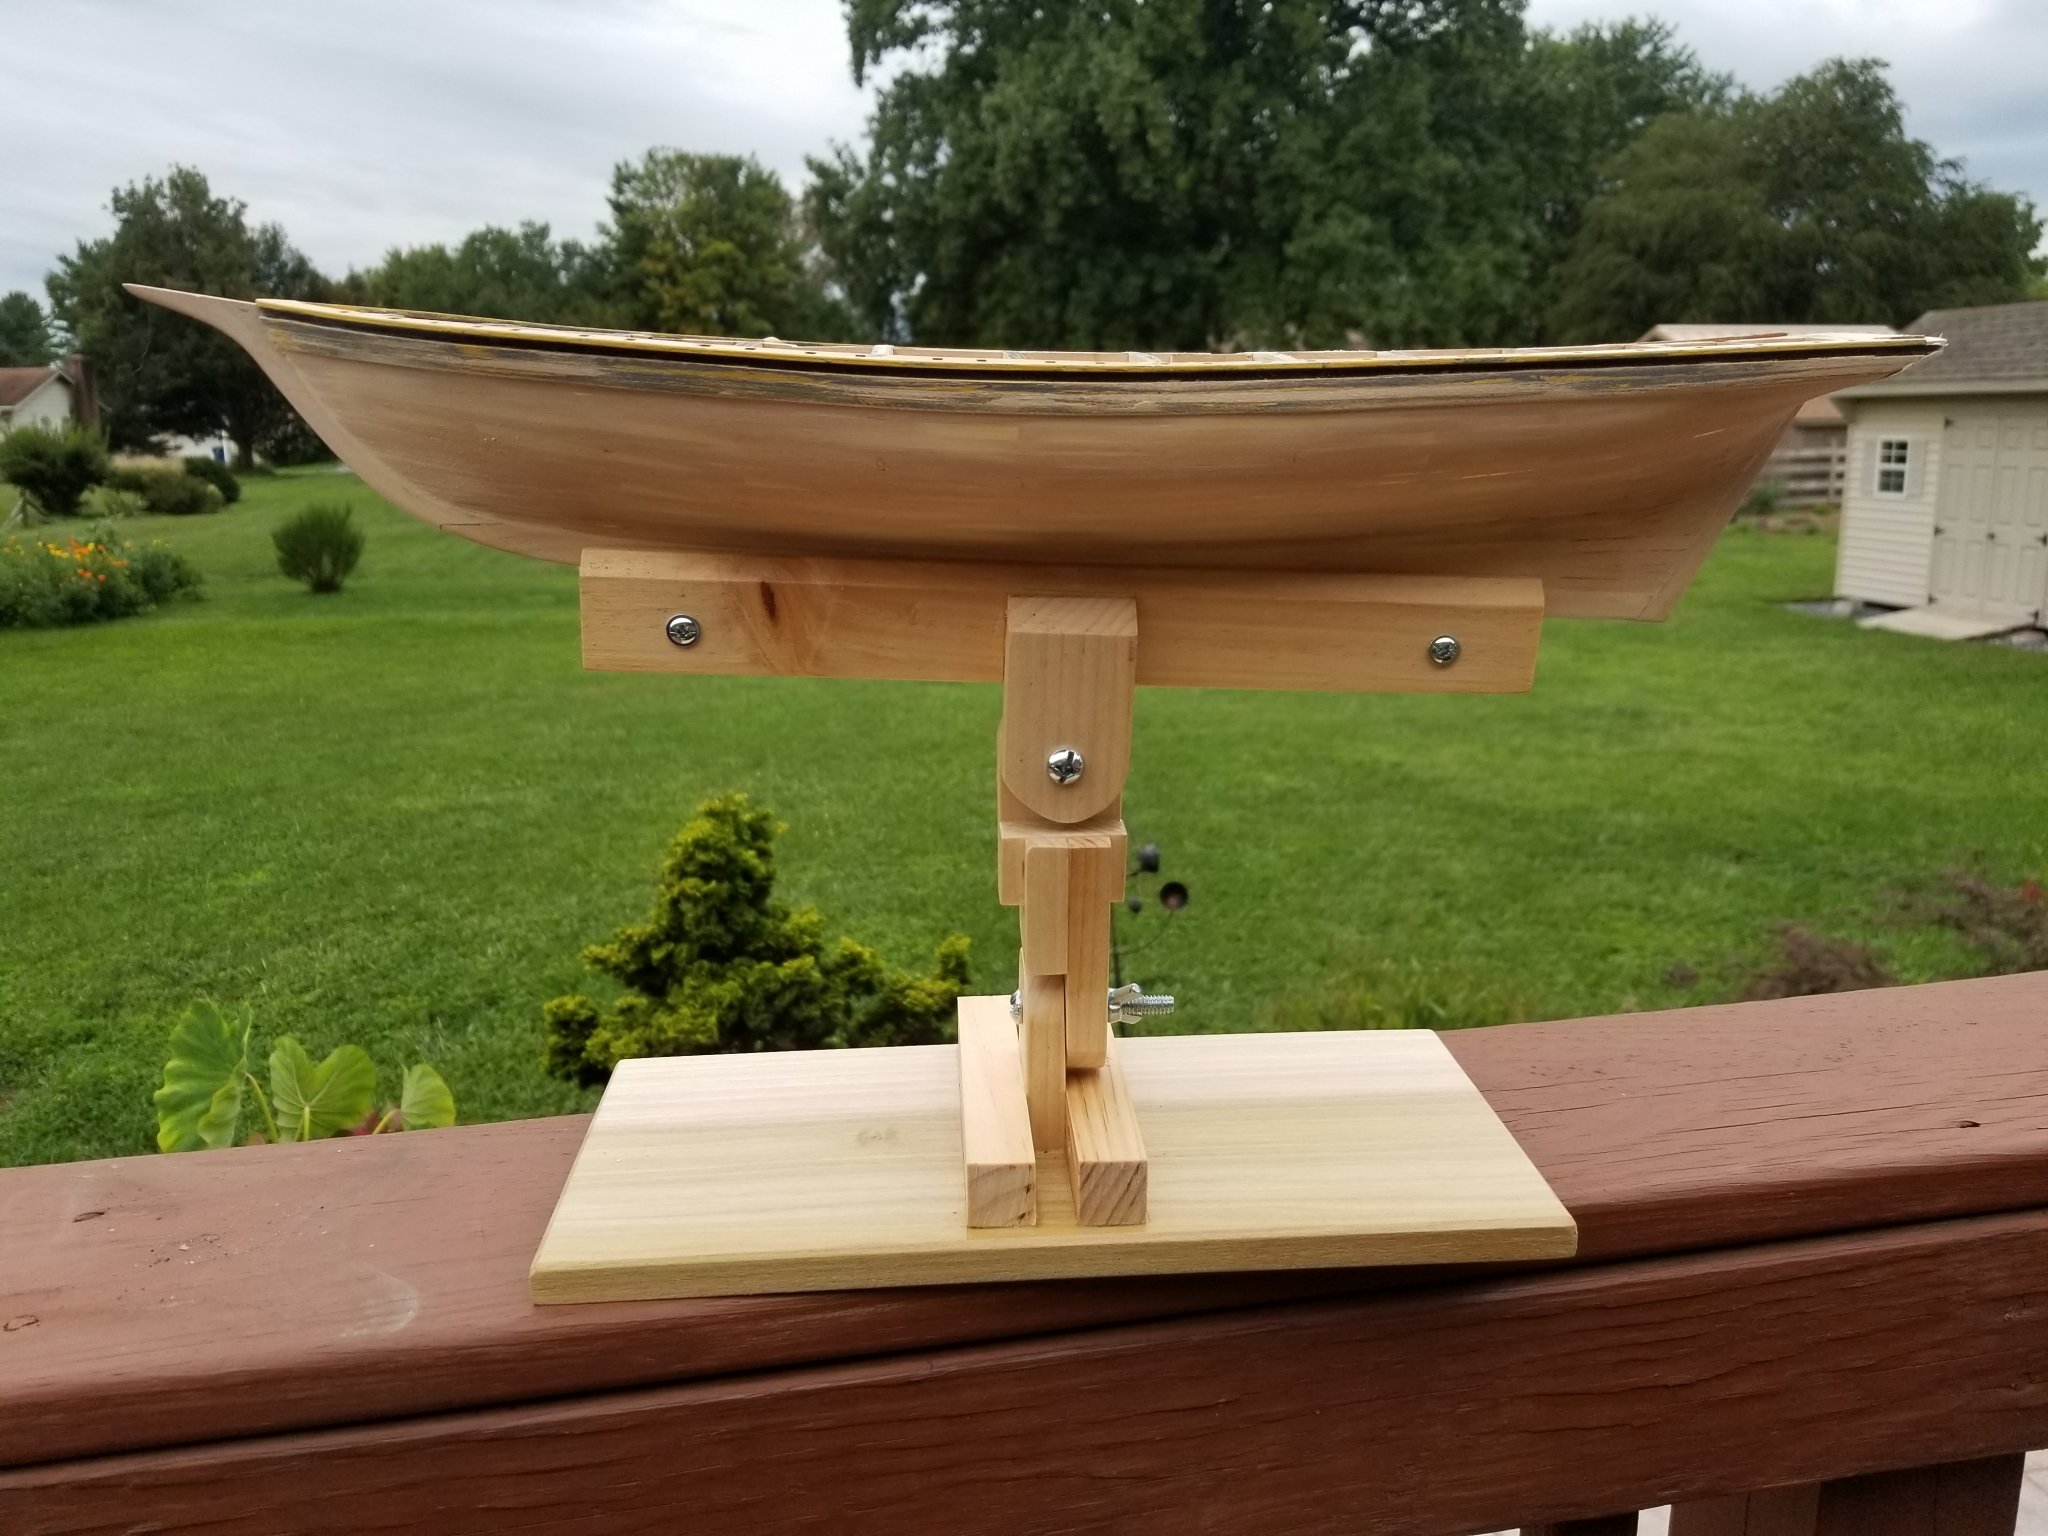
I took a little break from my Pride of Baltimore and made Doc's keel clamp. I shortened all of the working parts that I could, since I'm very short and as the clamp was it would have kept the ship too high to work on. Actually, it's still too high for me while sitting on my 24" shop stool. With the ship level, my eyes are at deck height which isn't too useful. I can tilt it for some tasks, others not so much. A simpler solution will be a higher adjustable stool. I bought the kit used and partially built (bulkheads installed,rabbet cut although not deep enough) and the seller included a stationary keel clamp. I pirated the actual clamp parts for this adjustable clamp, and also used the legs of that clamp on the new one,where the upright attaches to the base. Being lazy, I did not use any screws to hold it. I think Titebond II should be strong enough.
-
What primer?
Brewerpaul posted a topic in Painting, finishing and weathering products and techniques
I've got my hull planks on my Pride of Baltimore II (first planking attempt). Sanded the planks then added Minwax color change filler. OK, quite a bit of filler 😉. This sanded out nicely so I think I'm ready for a primer to seal the hull and to reveal any remaining defects. What kind of primer do you folks use? A rattle can would be nice but I'm willing to brush it on if that's better. Would something like Kilz shellac primer be a good choice? -
Keel Clamp (Home Made)
Brewerpaul replied to DocBlake's topic in Modeling tools and Workshop Equipment
Thanks for posting the clamp tutorial. I just printed the diagram pages and will make one ASAP. -
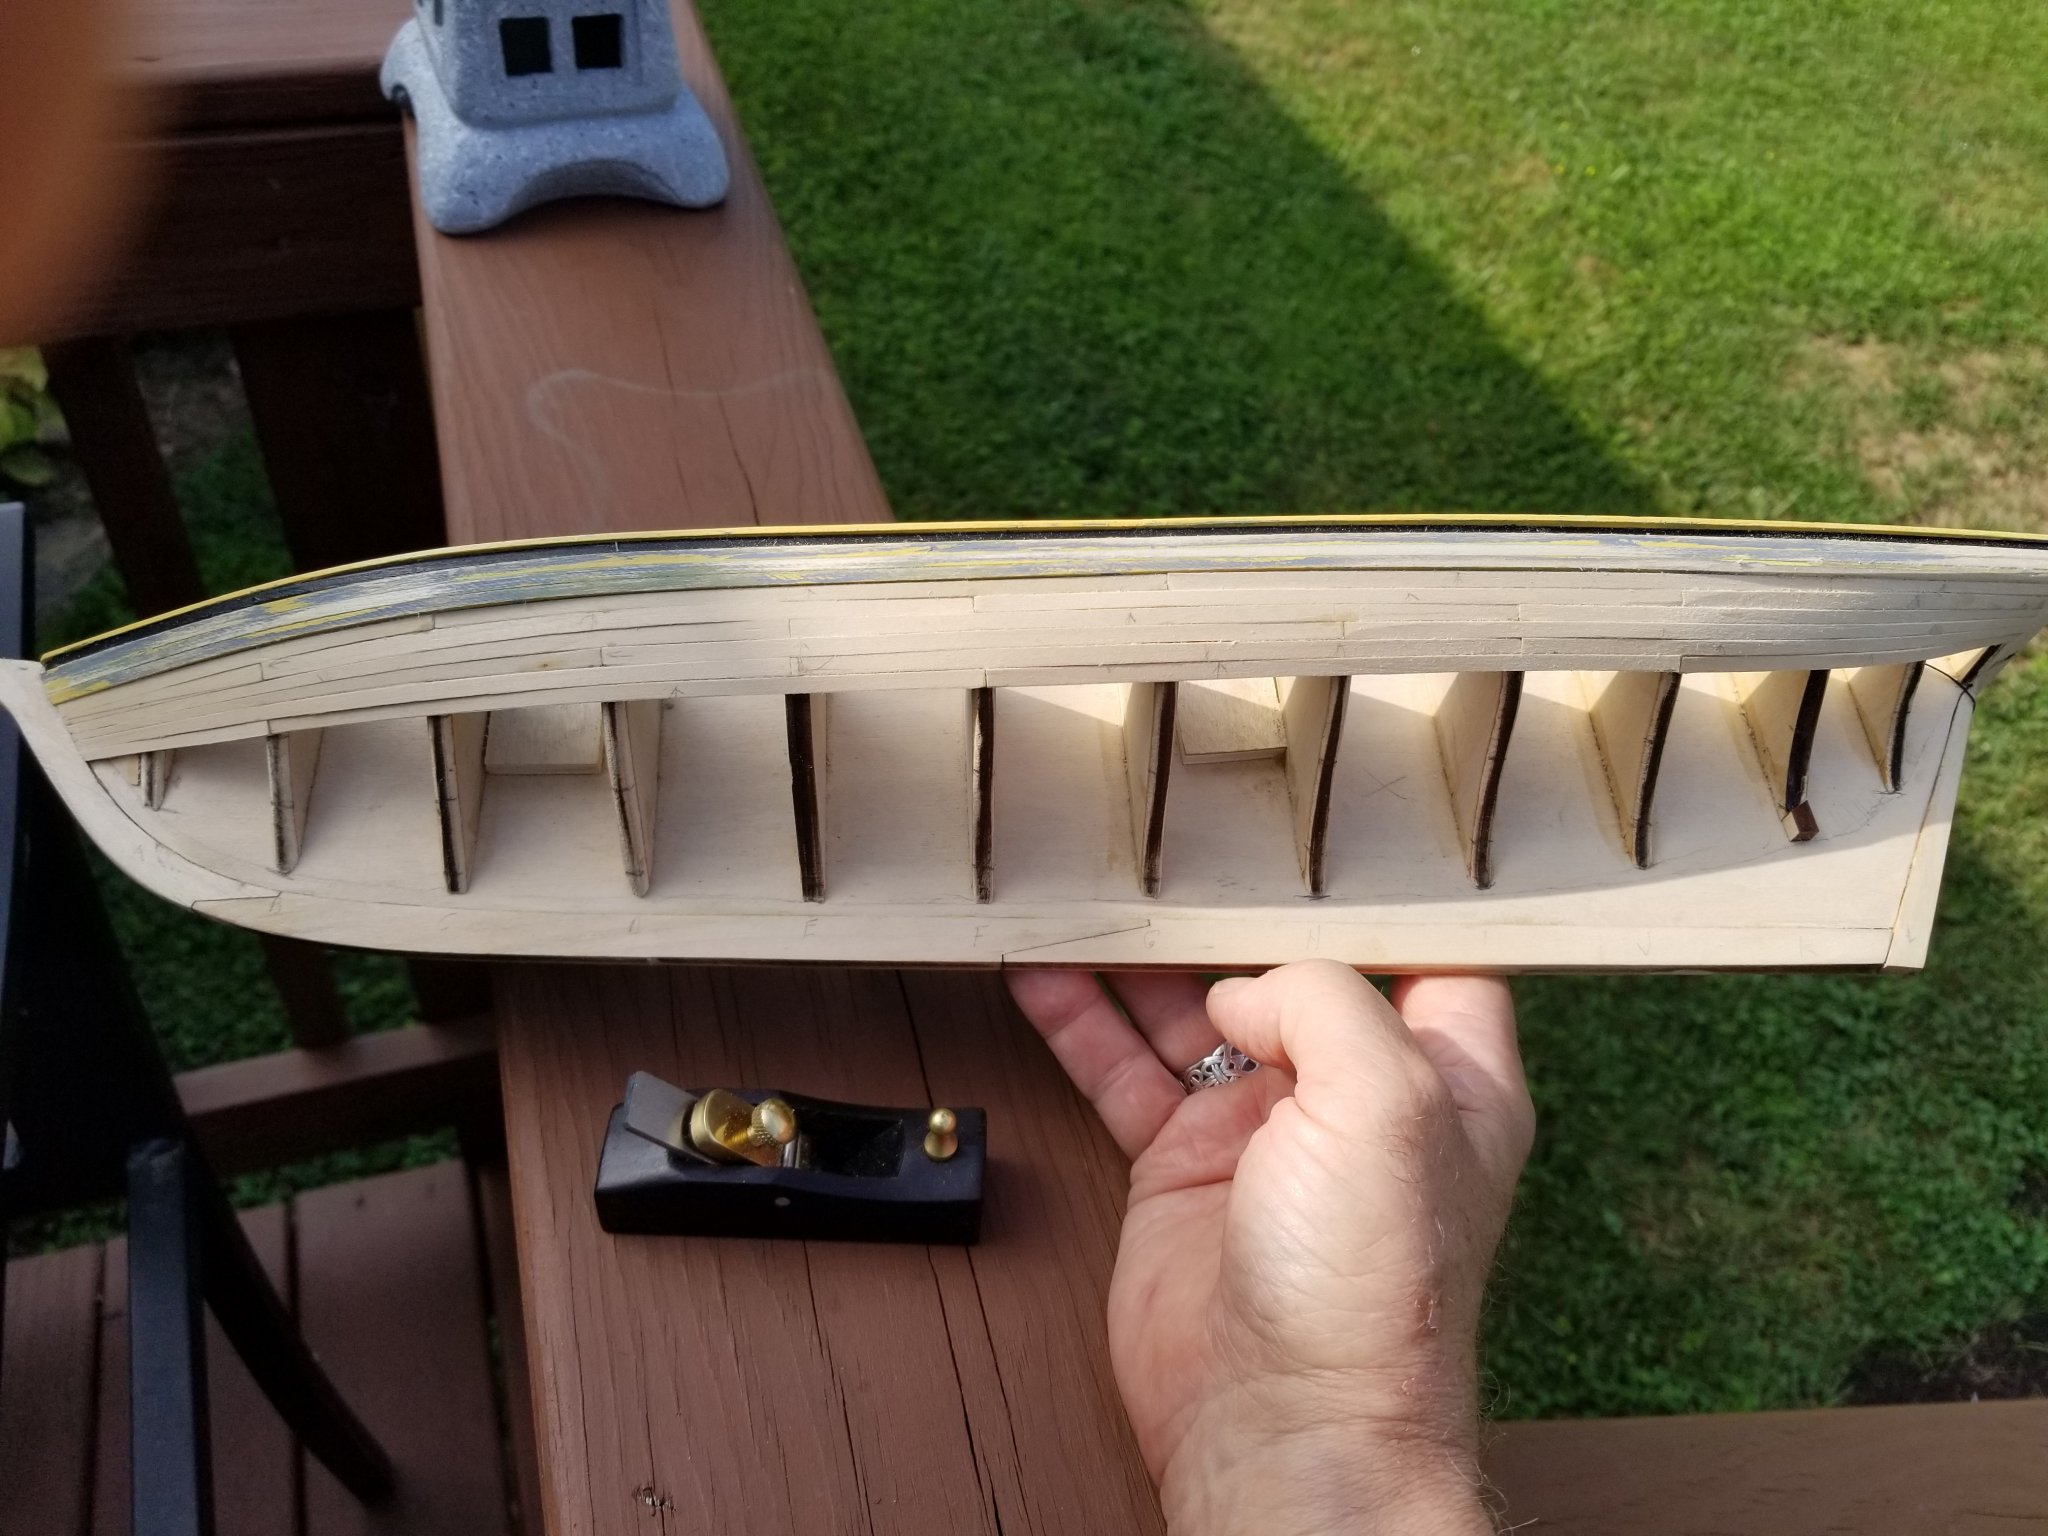
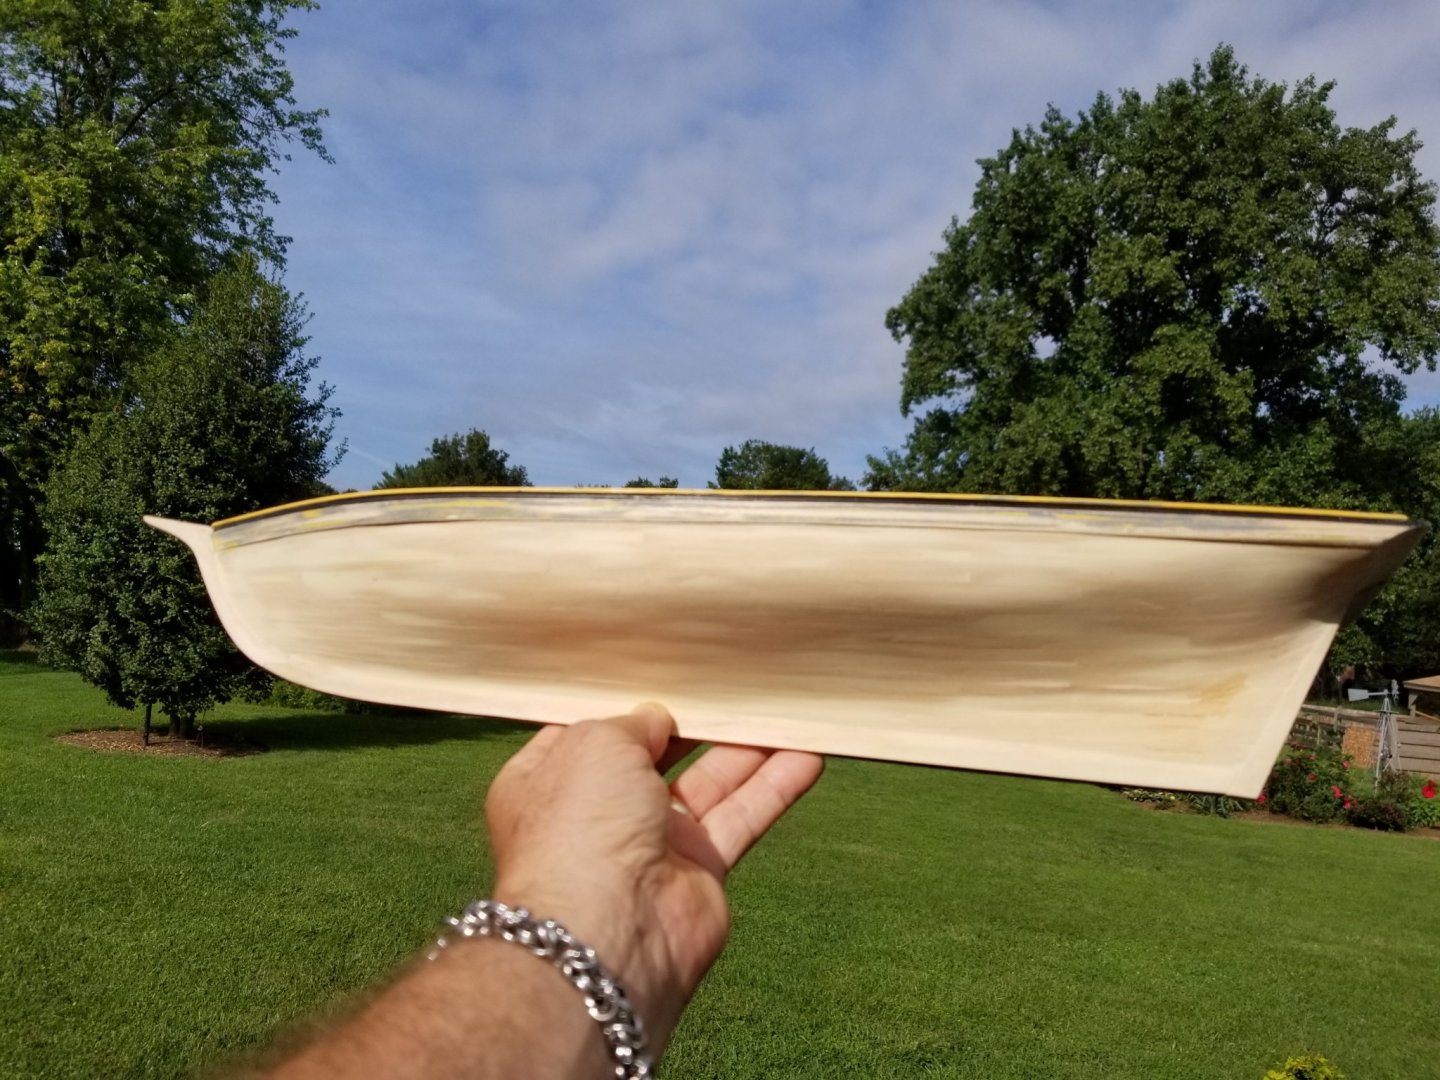
Port side is fully planked sanded and has had first application of filler. It really does hide a multitude of sins! I had to improvise a bit when I got to band C and D. I didn't end up with enough room at the stempost so I had to do a drop plank, and I had to do some patchwork planking at the stern. She'd sink for sure if this was a real ship, but sanded and filled it doesn't look bad. I think I'll try to do my sanding outdoors in the sunlight in the future. It shows up small defects really well. I've read that applying primer does that too; what kind of primer do you folks use?
-
I'm still planking (not all that well,as it's my first) my Pride of Baltimore II which I'm planning on de-modernizing,leaving off things like radar,propellors,engine room hatch etc to make it look more like a period ship. I don't think my stern is going to look a lot like the POB's, and getting the stern graphics to look good is daunting. I have the Chapelle book and will draw on that. I may end up making her generic, perhaps naming the ship CHARLENE, for my wife. BTW,Doc PR-- are you an actual Doctor, and if so, what kind? I'm a retired podiatrist.
-
Amazing work Doc. I've bookmarked this and will use it as a resource as I build my Pride of Baltimore II
-
Dr PR-- thanks for the epoxy suggestion,although I think I'll go with the easier polyurethane inside my hull after I reinforce the plank/bulwark connections inside the hull. Probably several coats for humidity protection. Thanks also for the link to your fantastic,dare I say obsessive 😉 Albatros build. I bookmarked it and will refer to it as I progress on my POB. What I'm shooting for is not so historically accurate as your build. I hope to end up with a reasonably well built and attractive looking Baltimore Clipper, for decorative purposes, and good enough to satisfy casual observers. Being from Maryland I want it to be basically the Pride Of Baltimore II, but I plan on de-modernizing it to a degree. I'll leave off the radar equipment, modern life rings,propellers etc. I may also change some of the deck furniture too, particularly the engine room hatch.The rigging in the kit is supposed to represent the modern wire rigging,at least for the standing rigging. I'd like to represent old tarred hemp, so I'll need new cordage and deadeyes. Can you suggest sizes for these for 1/64 scale? I'll never be able to make the ship's wheel look like brass and wood, but maybe I can find one that looks good. Otherwise, using a tiller instead might be an option.
-
Band A is planked, both sides. As you can see, it's not a fantastic job, but I think I can tweak it into shape. Apparently my fairing wasn't so great, as you can see from the shadows cast onto lower planks. I know I'll be using filler on this hull, but for the worst dips I'm thinking of gluing in a piece of 1/32" and sanding that flush with the adjacent planks. BTW-- what do you like for filler? I've seen recommendations for that water putty. I've used that for other purposes, and it's interesting stuff. For the planks that I've had to bend and twist so far, all I've done is run the part to be twisted under hot tap water, twisted it back and forth a bit with my fingers, then glued it. Easy. Why are bands needed? It would seem with a good set of tick strips, you could just plank according to those rather than bothering with thread or battens. I'm thinking of starting up from the keel next which will involve stealers. Why do they call them that, when they don't steal anything but actually add to a plank's width. It's probably overkill, but once I get all the planks on, I'm planning on running a bead of CA glue inside the hull where the planks meet the bulkheads. I worry too much but I can envision the wood expanding and shrinking over the years with humidity changes, and springing some planks. In fact, I'm thinking of adding a coat of poly inside the planks to minimize humidity changes. Oh, about that little plane. I started a thread on narrowing planks, which I was finding to be with just a knife and straightedge. Someone suggested Veritas mini planes, but those are pretty pricey. An Amazon search found this plane for all of $16 and it's a jewel. Right out of the package it produced pretty little curls of plank wood with no honing, although I did adjust the blade a bit. It made tapering the rest of the planks actually enjoyable.

-
"I have Bob Hunt's practicum for this kit, and while I haven't been following it, I did use the method that Bob suggested for this job. He suggested building each section of bulwarks between the gunports off the model, (spacing the stanchions correctly of course,) and then installing each as a sub assembly. This method is proving to work very well." I like this idea and when I get to that point I'll use it, but with modification. I'm thinking, insert the stanchions without glue, glue the planks and rail, remove them for painting, then glue them in place. That should eliminate having to measure the spacing of the stanchions
- 23 replies
-
- 1
-

-
- pride of baltimore ii
- model shipways
- (and 1 more)
-
I see you're from Woodstock. Where do you plan on sailing your ice yacht? I lived for many years in the NY Capital District, and I'm familiar with the Hudson. I don't recall it freezing as far south as Woodstock for many years.
-
Thanks for the helpful replies. I dug out a small cheapie plane that I already have and found that it works fairly well to remove the bulk of the plank, then finish off with a sanding stick (sandpaper on a paint stirrer). I looked at the Veritas planes but they're too costly for my purposes, but I found this little cutie on Amazon. https://www.amazon.com/gp/product/B07GN4KZYQ/ref=ppx_yo_dt_b_asin_title_o00_s00?ie=UTF8&psc=1 I ordered it and had it in hand the next day! I haven't had a chance to test it out yet but it appears well made and the blade looks and feels sharp. This brings up another question. The blade came installed bevel down. Would this be best for this kind of work,or would bevel up be better? I'll experiment on some scraps later to see. I'm a retired podiatrist.I had a box of @11 X-acto clone blades in my shopping cart with the plane but in digging in my tool cabinet I found the majority of a box of #11 surgical blades. I still had an appropriate handle, so I'll be using those. I have an assortment of hemostats,rasps and other surgical implements which were of great use on my U.S.S Constitution cross section build. Glenn-- I don't think much spiling is wanted for this ship but I looked it up anyway and luckily stumbled upon your 2013 thread "My Process For Planking". I've bookmarked that and will study it further later, but I'm intrigued by your use of full length planks, and not using battens. I'll be painting my POB so filling and sanding is not a problem.
-
Having figured out how wide your planks need to be, and how much they need to taper, how do you folks actually remove the extra wood from the plank. My Pride of Baltimore uses 1/16" thick plank timber. I just did my first plank and had a hard time neatly doing this. I tried using a #11 blade and a stainless steel straight edge. The ruler wanted to flop down off the plank which made following the edge with the blade very difficult,even with making multiple light passes. Backing the straight edge with an extra piece of plank material helped a bit. Is there an easier, better way to do this?
-
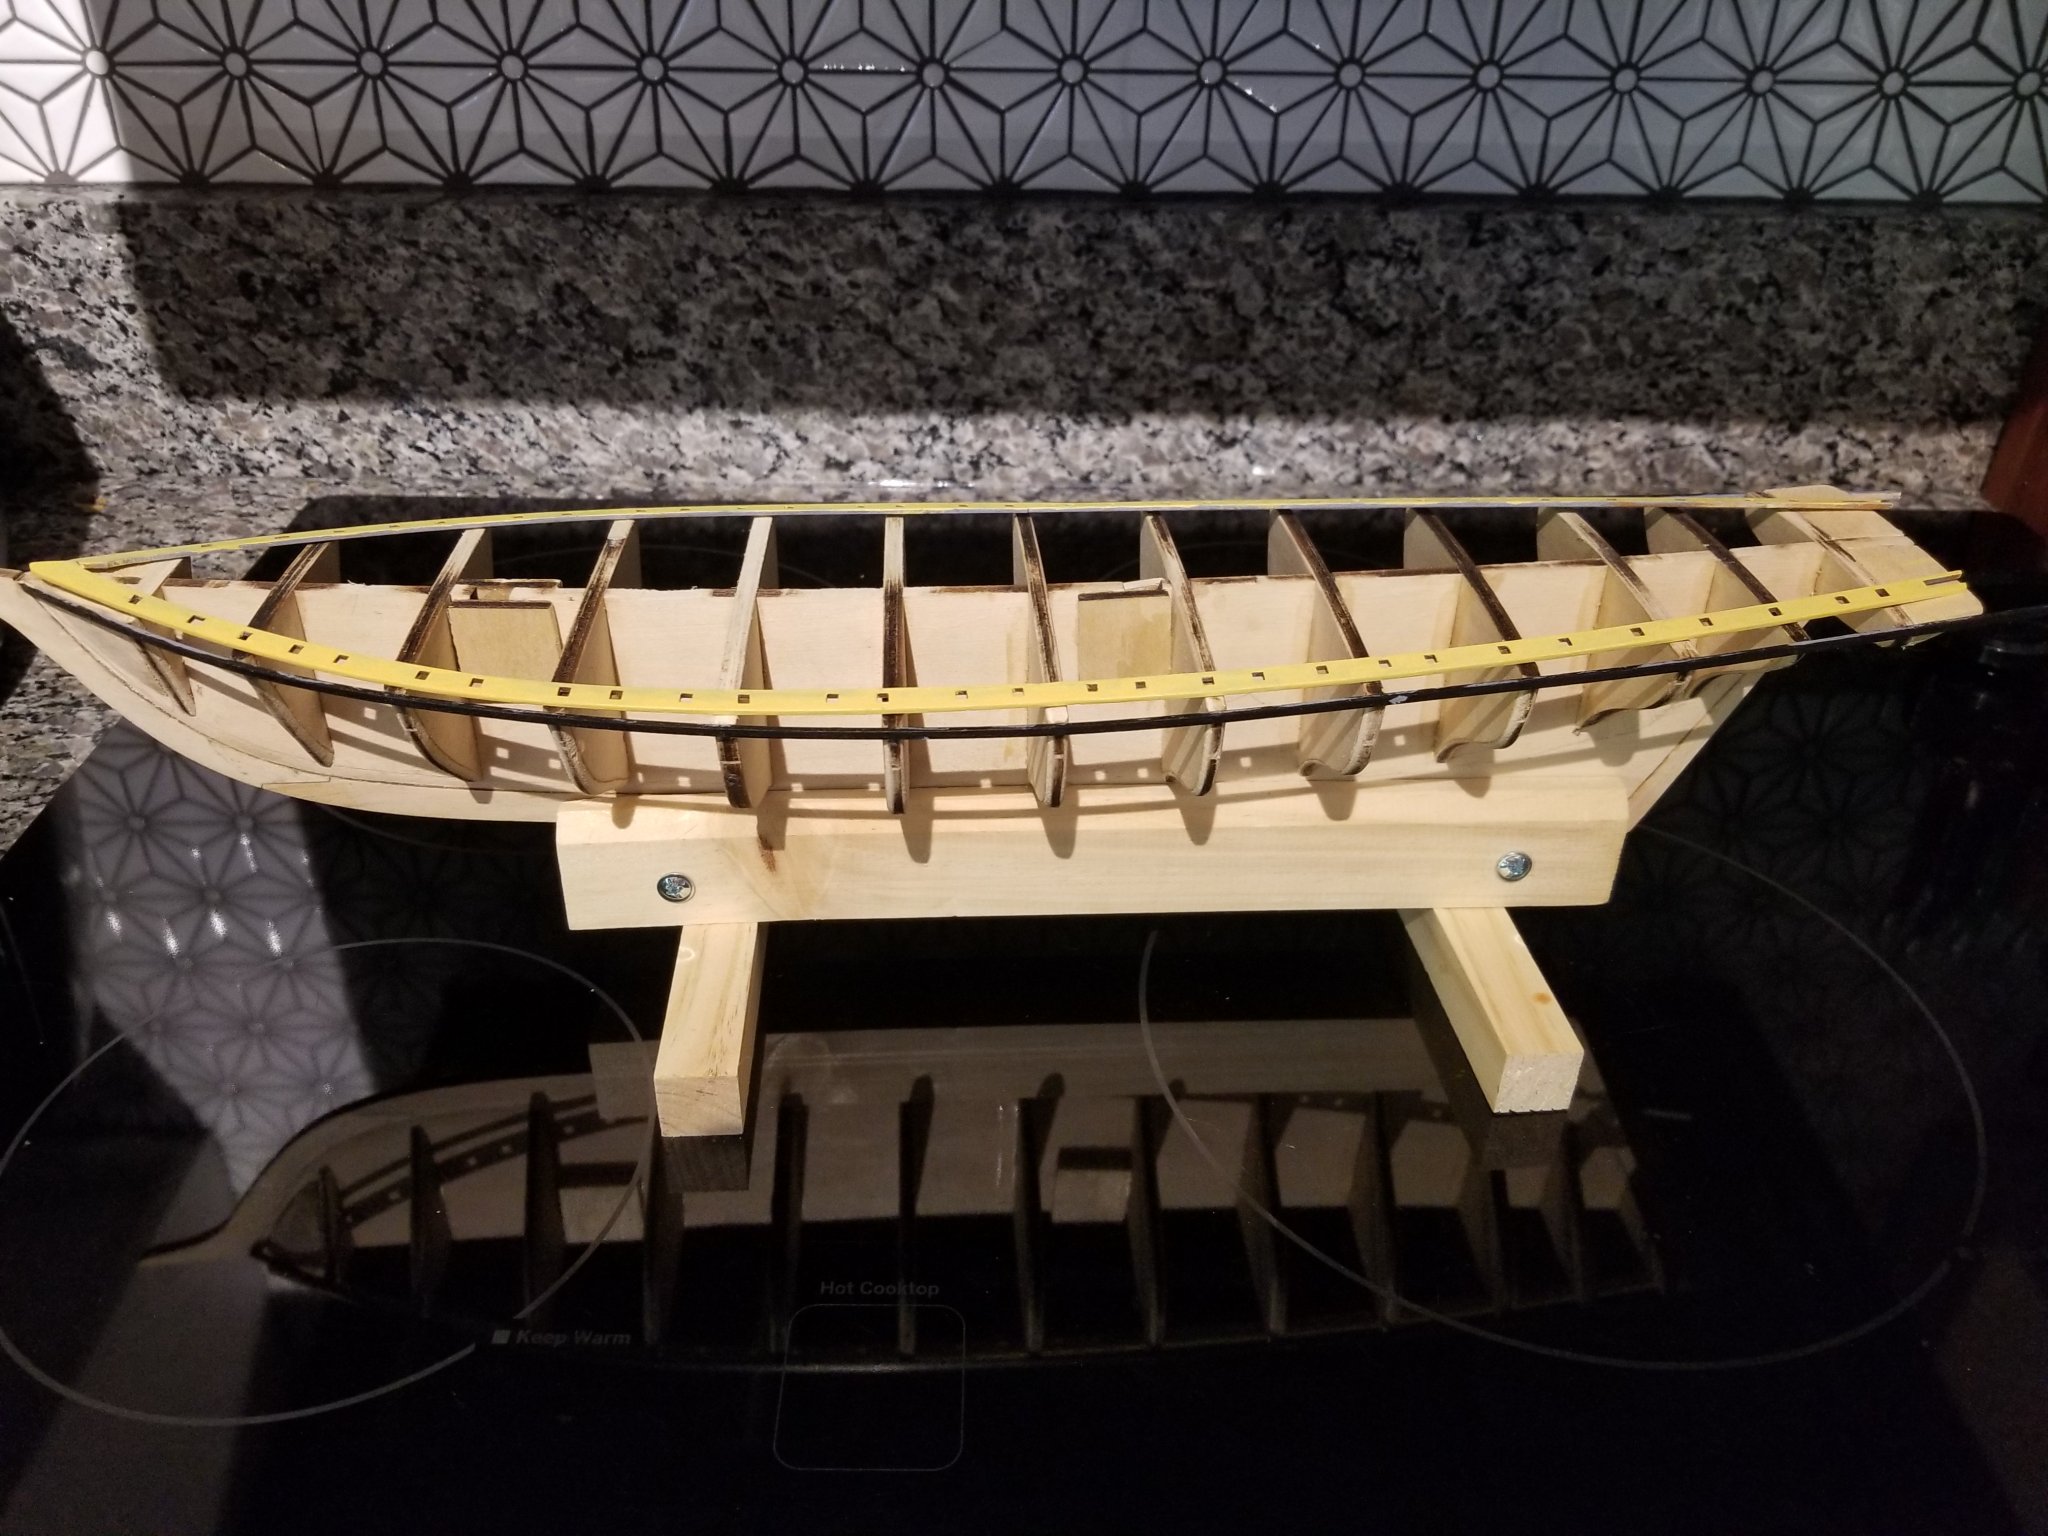
Got my wale planks applied. My well intentioned painting them ahead of time was for naught. I had to sand them to get them even, and goodbye paint. Still some sanding needed on them. Oh well... At the stern, I got that staircase effect that other builds have had, with the planks not completely on top of each other. My fix was to add a piece of 1/16" plank where the jog was, then sand it level. Time will tell if this was a good idea, but at present it doesn't look bad. The transom should hide this fix. I'm about to start planking band A and I'm wondering about edge gluing the planks. First, how necessary is this? I'm guessing that it's a good idea to keep the planks from flexing independently of each other while sanding. How would it be to install the planks without edge gluing, then running a bead of CA on the inside later on and letting it wick in between the planks to seal them? White or carpenter glue would also secure them.
-
Moving along slowly. I have the wale planks on one side, partially on the other. I'm finally getting a handle on how the stern will come together. While looking for more builds of this ship, I came across this remarkable build. A working model of the original Pride by a guy who worked and crewed on that ship! http://todd.mainecav.org/model/pride/building.html
-
Woo hoo! My first planks! OK, they're probably the simplest planks on the whole ship, but they give the model a bit of a shiplike appearance,rather than just a bunch of bulwarks. I did have to shape the part that went into the stem, and found that I had to fair the top edge of a couple of bulwarks so that was a bit of practice. I'm not exactly sure what happens with the top few planks past the last bulkhead, so I've left that unglued for now. Do they extend to the transom and get butted there?

-
That's what I thought. Like making dollhouse furniture. BTW-- I couldn't tell from your build log, but did you leave holes in the deck for cabins, hatches, or just plank the whole deck and then cement them down. I liked your idea of painting the planksheer before installing it, and I'm planning on carrying it a step or two further. I'm going to paint the first plank next to the planksheer black, and do the wales in yellow now. Maybe even paint the first plank below the wales black so I don't have to paint the borders between black and yellow at all.
-
Checked my parts list and I DO have all of the laser cut sheets,complete. That still leaves a lot of parts that I will need to fabricate; transom, fancy piece at top of transom, pin rails, channels, fife rails etc. So, my question still stands-- how do you get the dimensions or profiles of all of those parts transferred from the plans onto the stock timber?
-
I just found your builds, and I am most impressed! I will learn a lot from them.