

ZyXuz
-
Posts
429 -
Joined
-
Last visited
Reputation Activity
-

 ZyXuz got a reaction from FrankWouts in Blue Shadow by SkerryAmp - Mamoli - 1:64 - Fictional Revolutionary War Brigantine - Recommissioned as the Kara June
Nice progress so far, Adam.
will follow with interest..
-
ZyXuz got a reaction from FrankWouts in HMS Prince 1670 by Spiderpig - FINISHED - Constructo - Scale 1:61
well done on the hull planking, Adam!
so clean and neat and your stern gallery is going well!
-
 ZyXuz got a reaction from GrandpaPhil in HMS RaceHorse by ZyXuz - FINISHED - Sergal - Scale 1:47
Thanks for all the comments!
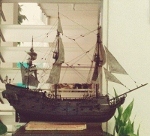
Finally, 1 month plus after ordering.. my display case had finally arrived..
It was really slow, but since it looks nice.. I've decided not to complain them..
Also, I've uploaded my ship's photos to the gallery
Here's how it looks now in my living room!
Anyway, my next model is now at my home!! Actually a month ago..
One quick peek
Last but not least..
Thanks all for helping and encouraging me through the whole process!!
It has been very precious!! :)
-
 ZyXuz got a reaction from Calista in HMS Diana 1794 by Ray - FINISHED - Caldercraft - A 38 gun Heavy Frigate
very nice work on the rail, Ray
-
 ZyXuz reacted to vossiewulf in Lady Nelson by vossiewulf - Amati/Victory Models - 1:64
Thanks Tony. I've never bought ship fittings but it seems a real crapshoot considering the fairly random number of sizes offered by any manufacturer vs what size they should be considering the plethora of ship scales from manufacturers. I did find these guys making bronze thimbles that look pretty realistic but I haven't figured out what size mine should be yet.
I did figure out a way to make them, though, but the basic requirement is telescoping tube. If you can get tubes small enough you cut the thimble-sized one in half lengthwise, giving you a nice long c shape. Make a thimble-opening shape to wrap it around, and wrap it on that form with open side out, using the telescope-fitting rod to make the bend and prevent the c shape from collapsing.
Thanks for the compliments Pat, I try
Only a couple photos, as noted not feeling well and all I managed was gluing on the keel and sanding it down. And I only remembered to take a couple pics.
As I mentioned, I already broke off the kit top piece, not good kit engineering; no matter which way you point the grain that piece is going to be very weak made out of one piece like they do. So I will make a replacement in three pieces and I have to take a look at the upper bulkhead planking strip fit before I decide what order I'm going to put them on.
Here it has its pins added. Normally for something like this they'd be twice this long, but being at a 90 degree angle to each other meant they had to be very short to get them in the holes on the ship without snapping the stem.
Because of my pins and the fitting work, as I hoped I could just CA on the pieces with no clamps, starting with the sternpost and then the keel itself. Only mild complication was the stem where I needed a little help to ensure straightness so I clamped a piece of brass on the keel that was nice and straight to give me a reference line when hand-clamping the stem.
And there they are all glued on and ready for level sanding.
And we could do the final profile also, here it's being checked against the little piece of balsa I was using as a template. For those less experienced making stuff, it generally makes more sense to make your template out of something harder than your work as you can clamp it in place then sand your work quickly down to that. But I knew I was very close already in this case so I made my template out of something quick, if I'd had card stock within reach I'd have used that.
And now all level-sanded on both sides and profile done, time to attach deck.
As for the little carbon fiber rod sticking out of the keel, the sun was in my eyes, the check is in the mail, the guy was already dead when I got there, I DIDN'T DO IT
-
ZyXuz reacted to tkay11 in Lady Nelson by vossiewulf - Amati/Victory Models - 1:64
Really nice explanations of your process and build. Are you going to stick to the three holes at the top of the stem for the forestay as per the kit advice, or put in 5 as it would have been? If you have Petersson already, you'll have seen this, but I'm raising it now as it's the perfect time to drill those two extra holes.
Tony
-
ZyXuz reacted to vossiewulf in Lady Nelson by vossiewulf - Amati/Victory Models - 1:64
Instructions want to first have the keel/stem/sternpost added and then deck and then the last stern hull bulkhead, so I've left the hull in the "almost sanded fully down" state, and fully sanded the deck side so it's ready for the false deck to be added.
First I made a sanding block out of maple with a radius somewhat less than the radius of the deck sheer so I could sand the deck lengthwise without fear of flattening the sheer.
And used it to fully clean up the deck along with knives and planes.
Then it was time to start making the cocobolo replacements for the keel/stem/sternpost, so I first ripped that 2x2 turning blank, making a .550" x 2" piece that I could then take to my little table saw. Checking the existing keel shows .124" thickness.
So I ripped my .550" x 2" x 12" piece into strips that were .550" x .150". Then I took those to my Mk. I Thickness Planer, you see it's a pretty high tech machine consisting of a Veritas low-angle smoothing plane with PM-V11 iron, a 1/8" thick piece of scrap, and two cam clamps. It's more physical effort of course, but I'd be surprised if a Byrnes thickness sander was faster than this method for anything less than a whole pile of planking stock. And this method leaves a far superior finish, absolutely perfectly glass smooth, even if you wanted to improve that surface, you couldn't.
Here's the replacement keel.
And it doesn't vary more than .001" over its length, not bad for three total passes on each side.
I like sturdy, so I decided I'd put some .040" carbon fiber rod reinforcement to the keel glue joint. For this kind of thing I just use my rotary tool with nice twist drills from Otto Frei on 3/32" shanks, they drill wood like it isn't there. I can drill reasonably orthogonal holes in surfaces freehand looking at a 45 degree angle, and that's what I did here since we can ream it out if there's a problem, but there wasn't in this case. Still for real precision holes I use a pin vise and constantly flip between two 90 degree views to ensure perfect alignment. Sometimes I use my mill, but most often done by hand by one of these two methods.
Here are the keel and sternpost/stem pieces, arrows point to marking knife cuts showing shape of stem and sternpost pieces. With the keel piece, I just flipped it up on its side and planed a perfectly straight and smooth and square edge with the smoothing plane.
First I drilled holes in the kit false keel and made the carbon fiber pieces. Red arrows pointing to those, since they're hard to see.
Then drilled holes in my cocobolo keel, and here it is mounted on the kit false keel with no glue. So I think we're good here, and I will rip it down to final height now.
However before I did that I also planed about a .005" sweep in the glue joint of my new keel, so when it goes down on the carbon fiber pieces the two ends hit first. So when I go to glue it I can use CA and just press down in the middle for 30 seconds and the whole length should have a good glue line.
That's where I knocked off. Next up is cutting out the stern post and stem pieces, gluing the latter together, and then then gluing them along with the keel onto the boat.
-
 ZyXuz got a reaction from Nirvana in US Brig Syren by Gahm - Model Shipways
being busy and didn't have much time on ship modelling, moreover she's just displaying right in front of you is really torturing..
Anyway, she looks great!
-
ZyXuz reacted to Stuntflyer in HM Cutter Cheerful 1806 by Stuntflyer (Mike) - FINISHED - 1:48 scale
Hello!
I managed to complete the shrouds today. "Turning in" the deadeyes required a few do overs and a test of my patience. The lanyards are not secured. I like to go back and look at things when my mind is fresh before committing. Next, I want to clean up the chainplates which is something I try not to look at since right now they look like c***.
Mike
-
 ZyXuz got a reaction from glbarlow in HMS Vanguard by gbarlow - FINISHED - Amati/Victory Models - 1:72
well done on everything!
And I love the the color selection on the decoration
-
 ZyXuz got a reaction from maddog33 in HMS Unicorn by ZyXuz - Corel - Scale 1:75
Thanks Mike and Ian for your advises..
I almost placed an order of timbers which cost around £30, and then I read your replies... really appreciate the quick respond.
My problem was that I've forced the strips to bend too much and cause it impossible to put the next strip on in whole piece. Well, I don't know why I didn't come up with this simple solution which is to cut the rest into shorter length.. It seems very workable now, but need more patient than doing 'normal' planking. A lot of tapering works needed.. will start working over when I have a good mood.
Mike,
Thanks for reminding me on the beakhead area It really helps covering a lot, and the wales too!
for the area below the waterline, I think a thick white painting is unavoidable now. It has to be so thick that the strip borders couldn't be seen. I remember Dubz did the same for his Syren on the wale area (well, of course he didn't do that to cover his superb planking job ):
I really like how he finished his painting, just brilliant!
I've also just noticed that most of the Victory models have the upper stem painted to black, which is quite a good idea to cover the plywood structure. I'm not quite sure whether my color theme fits the black upper stem, but I think it's good to find a way to cover it, either painting or wood strip
Ian,
Thanks for the idea on the sawdust! I'll try work it out this few days. Anyway, I'll need to fix the planking first
and 'switching tasks' sounds good too! so I won't easily get bored doing same work for a long time
I might now consider switching my annoying job too! haha
-
ZyXuz got a reaction from maddog33 in HMS RaceHorse by ZyXuz - FINISHED - Sergal - Scale 1:47
Finally, after 3 months and a half, my ship is now completed
All the yardarms are now on, and also the anchors (which I finished as closing ceremony ) Anyway, I'm still working on the display case. It shouldn't take too long.
Anyway, here are the updates!
Spritsail and main yards riggings were easier because there are lesser riggings in front, in which I can do the riggings more comfortably.
Spritsail Lift
Main Yard
And some 'forcing' were done to make the yards look parallel
The Yards
Lifts Running Rigs
Also, added more lamps on my ship..
The mizzen riggings are harder to handle because all the backstays are blocking my hands to rig on the pin rail.
Mizzen Lifts Running Rigs
And the anchors...
Anchors
Messy Forecastle
And finally the full view
Flag pole is on too, with a lamp attached.
Starboard
Bow
Port
The whole process has been very fun and enjoyable. Thanks MSW for creating such a good site, to share and learn together. That really benefits me!
And thanks to those who helped me on this.. without references and opinions here, I couldn't finished my ship as such satisfying result
Thank you and thanks again for dropping by my build log!
OK, it's time for the display case!!
-
ZyXuz reacted to Stuntflyer in HM Cutter Cheerful 1806 by Stuntflyer (Mike) - FINISHED - 1:48 scale
What's that old adage, "measure twice cut once". That's what I should have done while making the bowsprit. Luckily Jason over at Crown Timberyard had another stick to send me. That's my next project. Meanwhile the bowsprit step is now painted and in temporary position. I still need to weather the windlass gears, while being careful not to get any of the powder on the deck. Should be fun.
Matt, if your looking in, This is closer to what the deck color really looks like.
-
ZyXuz reacted to guraus in HMS Victory by guraus - scale 1:48 - plank on frame
There still is a little work to be done on it.
Alexandru
-
ZyXuz reacted to guraus in HMS Victory by guraus - scale 1:48 - plank on frame
After the cable was done I continued working on the deck framing as you can see from the pictures.
Thank you,
Alexandru
-
ZyXuz reacted to marsalv in Pandora by marsalv - FINISHED - 1:52
Than you Albert.
Lower rails and gratings.
-
ZyXuz reacted to marsalv in Pandora by marsalv - FINISHED - 1:52
Thanks to all for very nice comments.
To RedDawg - blackening solution is desribed in post #206, with regard to nuts and bolts I used the following parts that simulate bolts and nuts:
http://www.litomysky.cz/kadee/kad088.htm.
So the guns are finally done, rigging will be added immediately prior to installation aboard.
-
ZyXuz reacted to marsalv in Pandora by marsalv - FINISHED - 1:52
Thanks to all guys .
Stern gradually begins to fill up. There remains to stick ships name and some moldings and the stern will be completely finished.
-
ZyXuz reacted to Michiel in Prins Willem 1650 by Michiel - 1:50 - POB Zeeland ship from own plans
What was done before part 4:
Lighting
-
ZyXuz reacted to Michiel in Prins Willem 1650 by Michiel - 1:50 - POB Zeeland ship from own plans
What was done before part 2:
Konstapel kamer:
-
ZyXuz reacted to aviaamator in La Jacinthe 1825 by aviaamator - 1:20 - schooner
My second attempt. I hope, not a bad result...
-
ZyXuz reacted to aviaamator in La Jacinthe 1825 by aviaamator - 1:20 - schooner
Young - little sailor! Great helper!
-
ZyXuz reacted to aviaamator in La Jacinthe 1825 by aviaamator - 1:20 - schooner
Continued.... This work also participated: "AC/DC", "Yes", Chris Rea and Ozzy Osbourne! Of course, as a musical accompaniment!
-
ZyXuz reacted to aviaamator in La Jacinthe 1825 by aviaamator - 1:20 - schooner
The first model I built when I was the same as my younger son's, little helper daddy...
-