
yamsterman
-
Posts
550 -
Joined
-
Last visited
Content Type
Profiles
Forums
Gallery
Events
Everything posted by yamsterman
-
hi patrick thank you.....its coming together slowly! plenty of mistakes and re working along the way. might have something presentable in six months or so! ways to go before the deck beams go in......finish frame work....fair.....internal works,keelson thickstuff limber boards etc etc. might get to the main deck around Christmas time!!!! thanks for looking in cheers....mick
- 504 replies
-
- 5
-

-
- washington
- galley
- (and 1 more)
-
hi carl the clamps not my original idea.....sort of borrowed and adapted from various sources.....you definitely wouldn't want to pick thru that grey soup of mine that passes for a brain.....sometimes wonder how I even put my socks on!!!!! nice to hear from you again......need to see you cutting some more wood shipmate! cheers....mick
- 504 replies
-
- 5
-
-
- washington
- galley
- (and 1 more)
-
hi chuck many thanks.....but a long way to go yet! still got your cutter to do as well. cheers ....mick
- 504 replies
-
- 5
-
-
- washington
- galley
- (and 1 more)
-
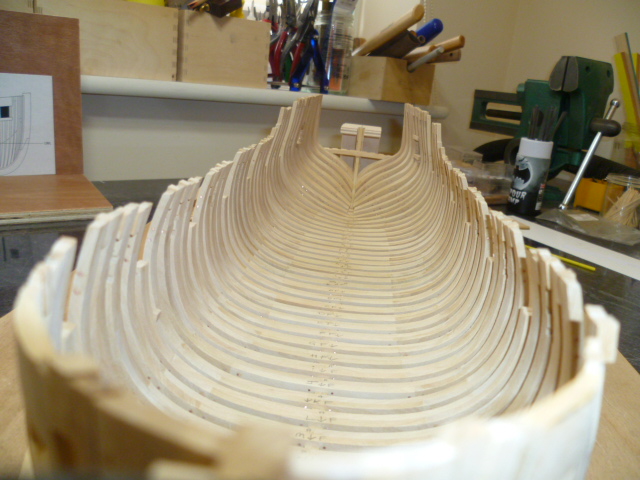
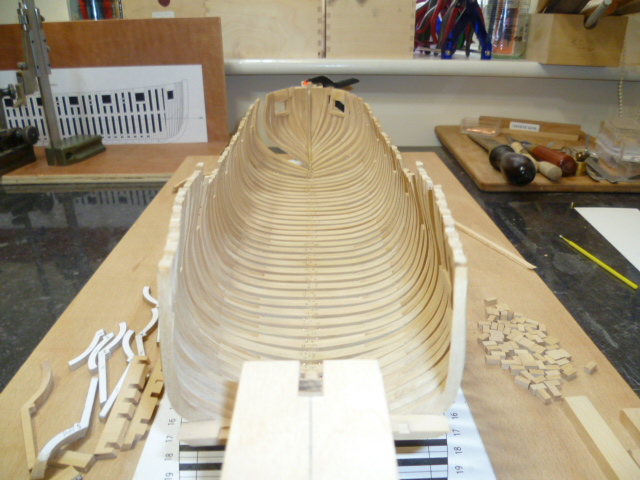
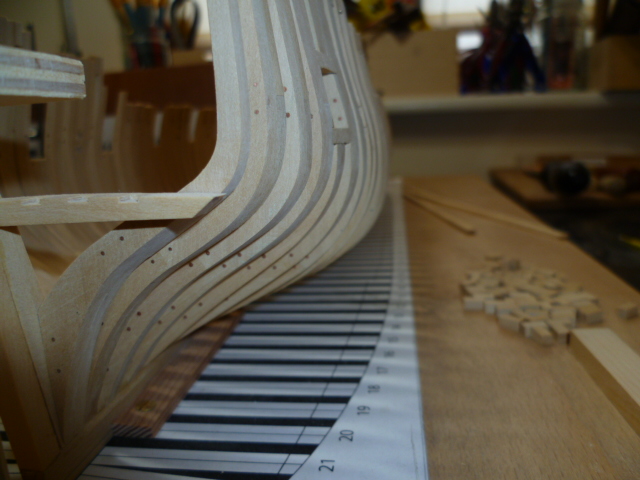
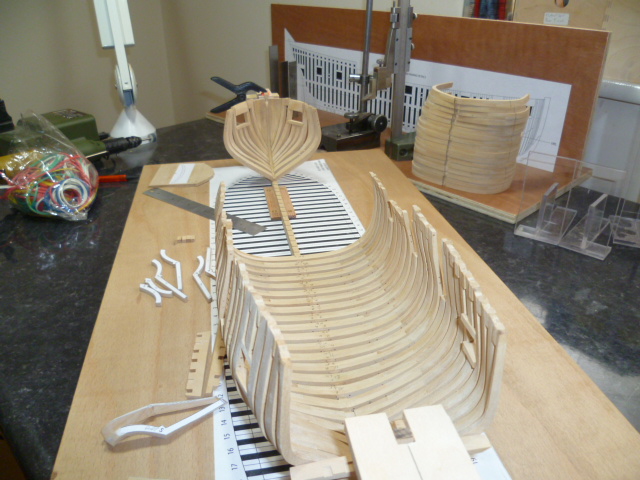
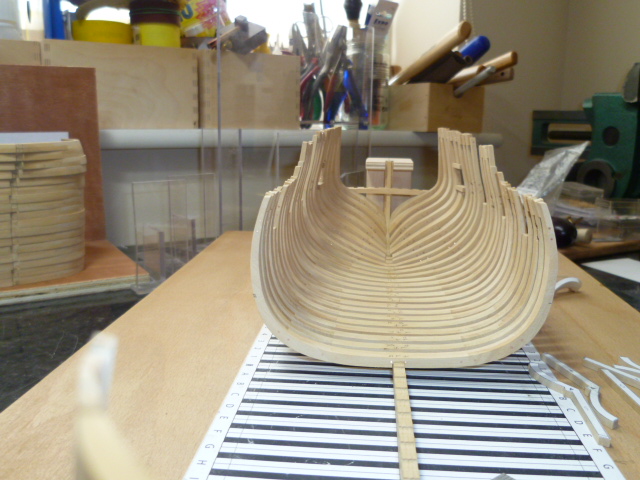
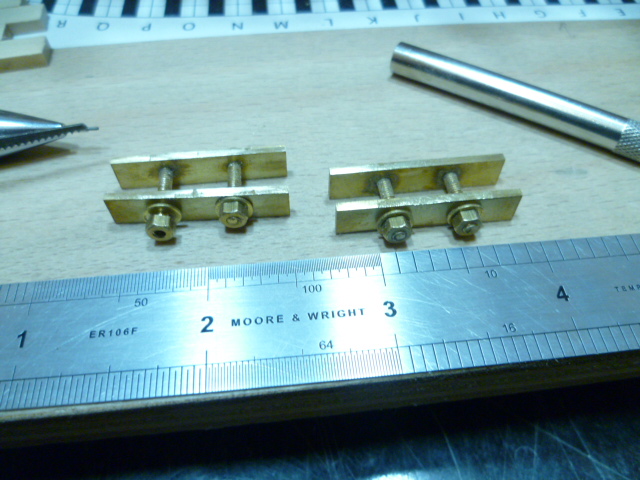
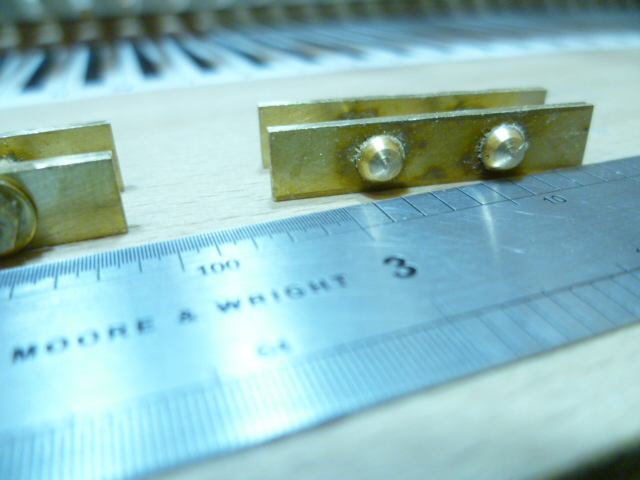
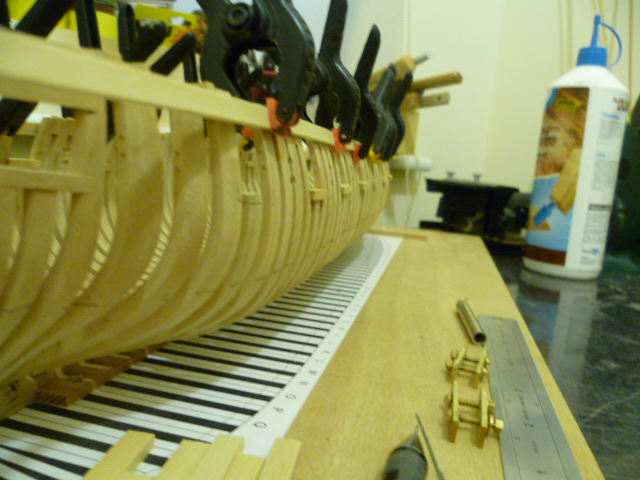
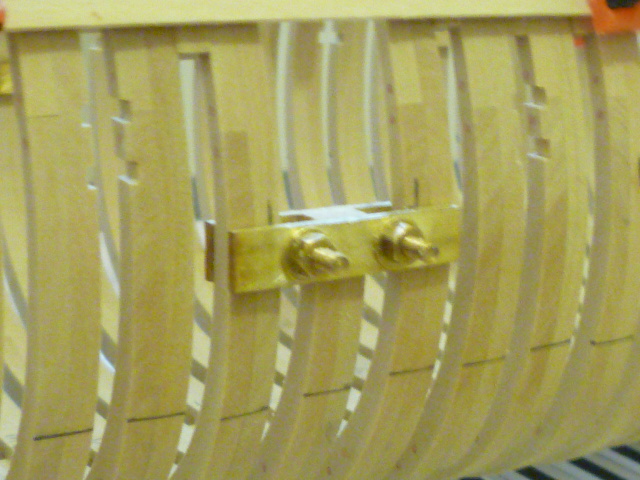
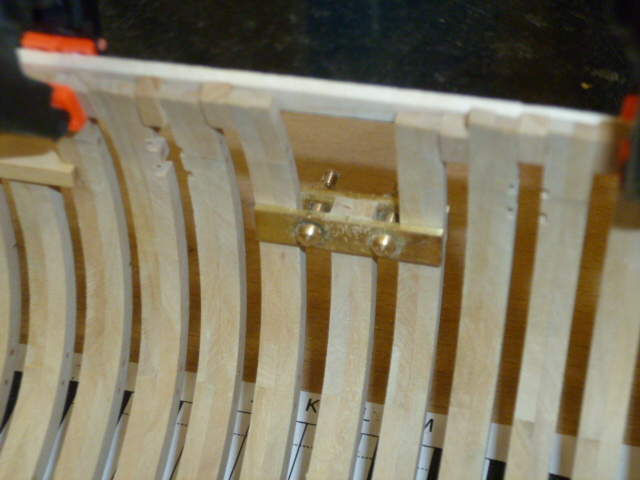
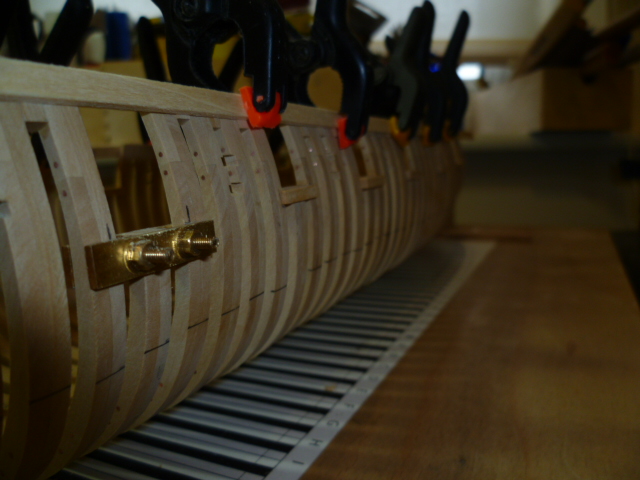
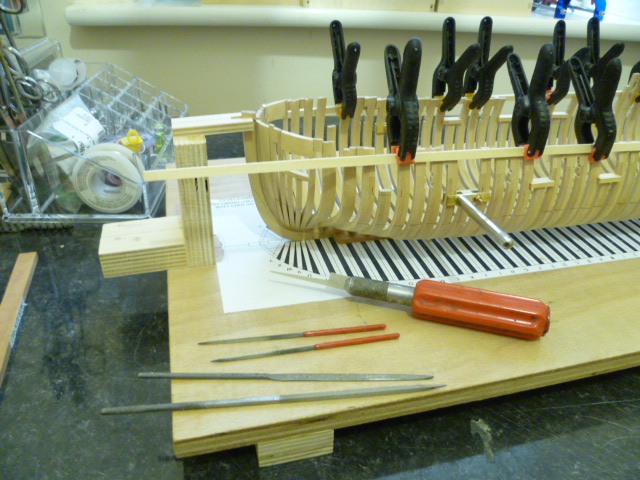
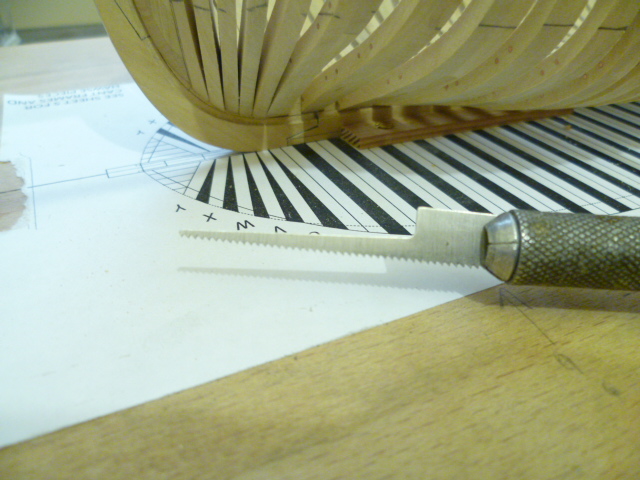
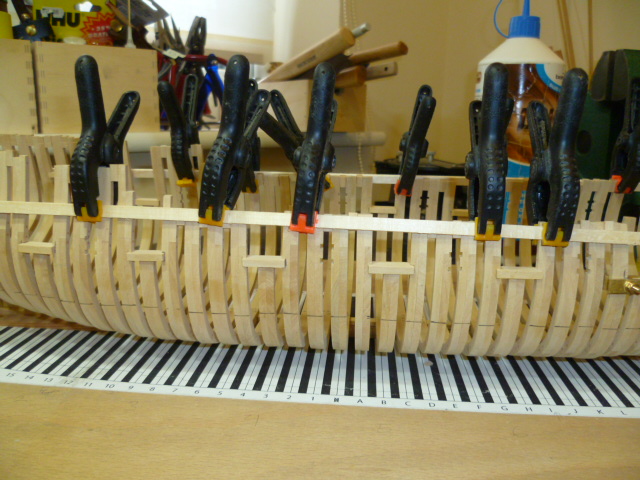
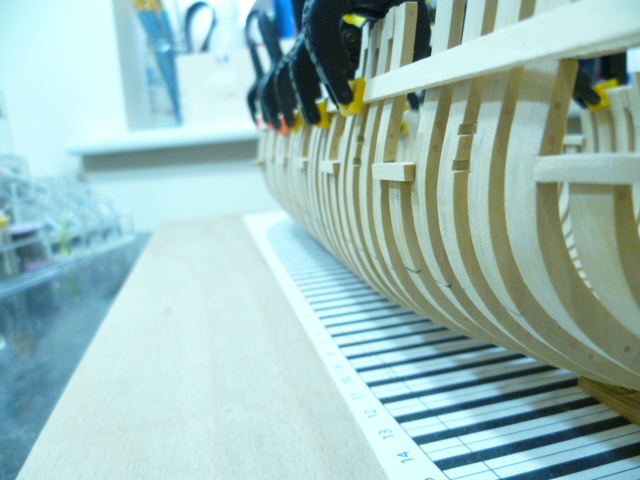
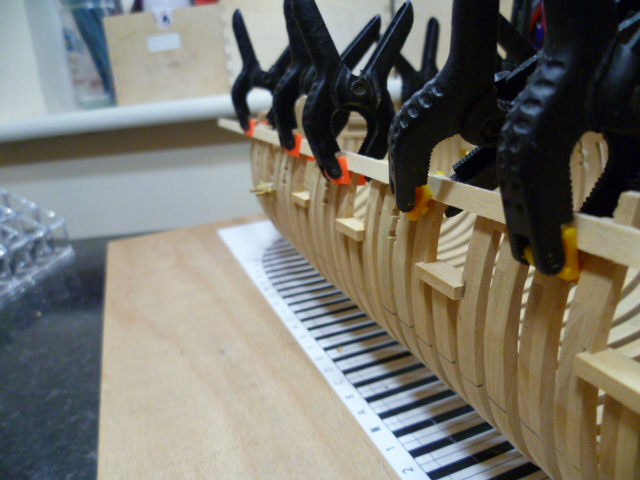
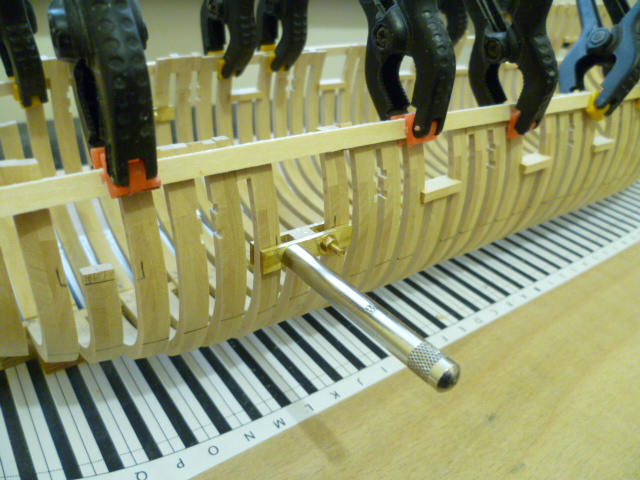
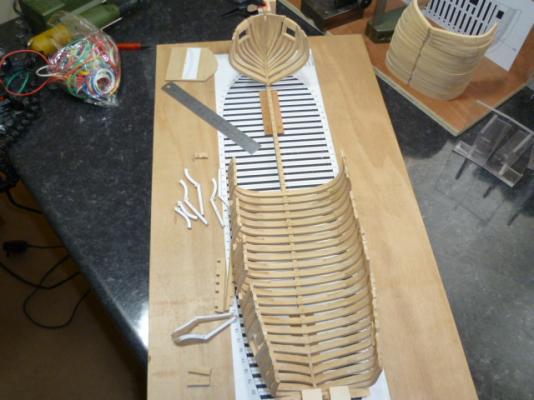
hi all time for another update. been busy installing gun port sills and stern framing, starboard side stern framing had to come out as I made a boo boo with a couple of measurements. port side is ok. made up a clamp to act as a saw guide for cutting out the sill rebates.....just a couple of pieces of 1/16 x 1/4 brass with tapped holes on one piece and clearance holes on the other for 3/4 inch 8ba bolts......I used an 8ba box spanner to tighten the nuts.....the silver tube in the photos. just one more set of sills to go before I start on the lintels and finish the stern framing......then the sweep ports to fit.....and on to fairing the internals before fitting the keelson pieces. photos enclosed as per usual. all comments and screams of approbation welcome. cheers for now.......mick

- 504 replies
-
- 27
-
-
- washington
- galley
- (and 1 more)
-
hi al congrats on the approaching retirement......ooh for all that lovely time for modelmaking.....oh well only twenty more years of toil to go.....government permitting. enjoy experimenting with the pear and box....nice sharp tools and you will find it a revalation compared with the average kit material. if at first you don't succeed......chuck it in the scrap box and try again!!!! oh and invest in some isopropanol alchohol its bloomin useful stuff!!! cheers....mick
- 504 replies
-
- 5
-
-
- washington
- galley
- (and 1 more)
-
hi roger thanks for the info....I will have a look for that book. I started this project as it was contemporary to the royal naval sloop which I had built previously, although this was a conjectural model as the plans exist but there was no firm evidence the ship was actually built, and it was available from the nrg as a researched package. unfortunately I don't have masses of knowledge of this period , the model is being built because its interesting and a stepping stone for me in construction techniques........but the extra info is always helpful. many thanks cheers....mick
- 504 replies
-
- 6
-
-
- washington
- galley
- (and 1 more)
-
hi alde thanks for stopping by.I chose this ship to model for several reasons. firstly it was a contemporary vessel to the sloop model I constructed previously and at the same scale. secondly the research was pretty much done so no redrawing of plans,which I would hesitate to attempt , plus plans and frames were all drawn out. thirdly it was a relatively straight forward hull shape,single decked,lateen rigged,with a modicum of armament and some interesting fiddly bits. prior to starting this my only other scratch builds were the sloop and importantly the triton cross section. I would highly recommended this as a starting point for learning about frame making etc. Washington was to be my first venture into a full hulled framed model. this was intended to be a learning curve prior to starting a fully framed model of hms echo ( I shall attempt the cross section first as a taster) and then hms euryalus. all of this is thanks to model ship forum and learning from some seriously talented modelmakers on here. go for it alde....whatever you decide to do there will be plenty of help and encouragement along the way. cheers....mick
- 504 replies
-
- 7
-
-
- washington
- galley
- (and 1 more)
-
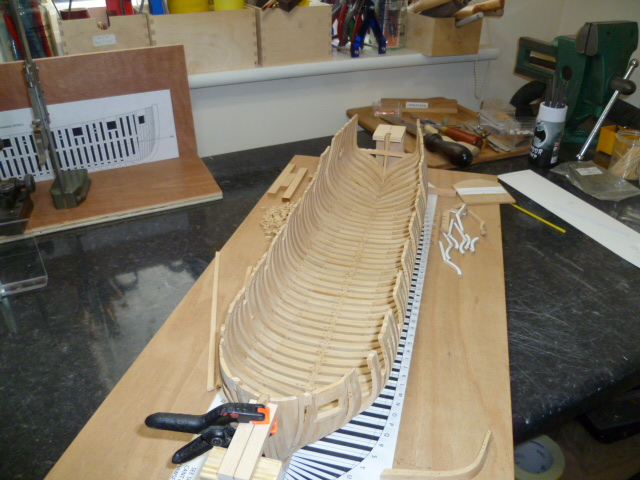
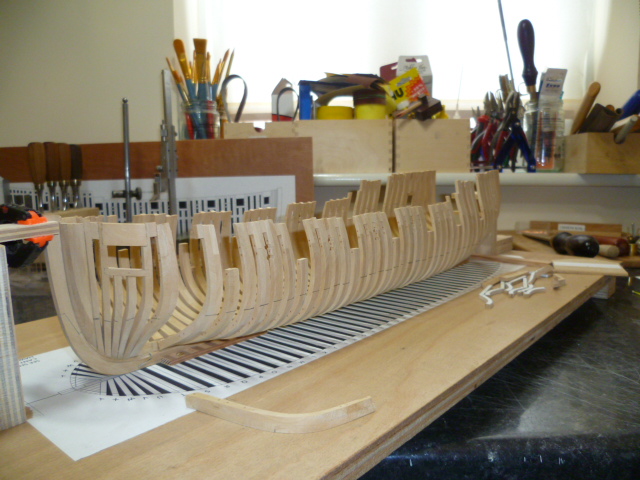
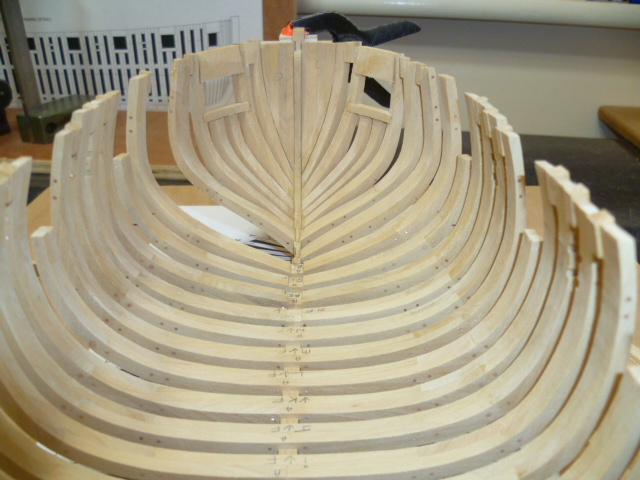
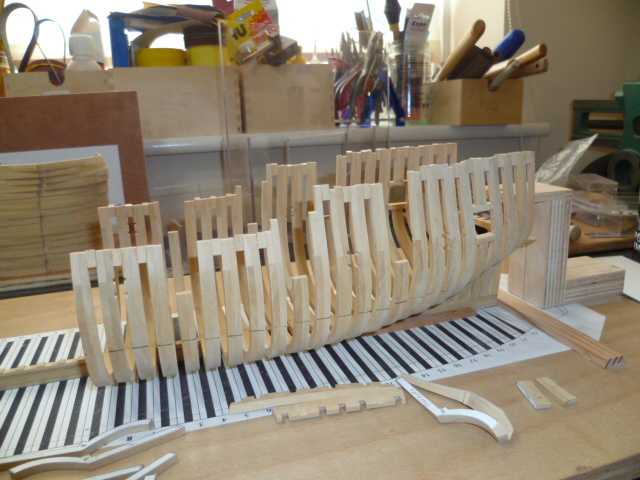
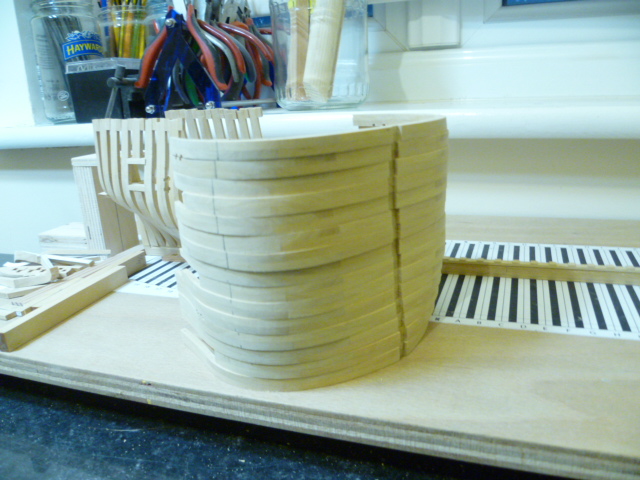
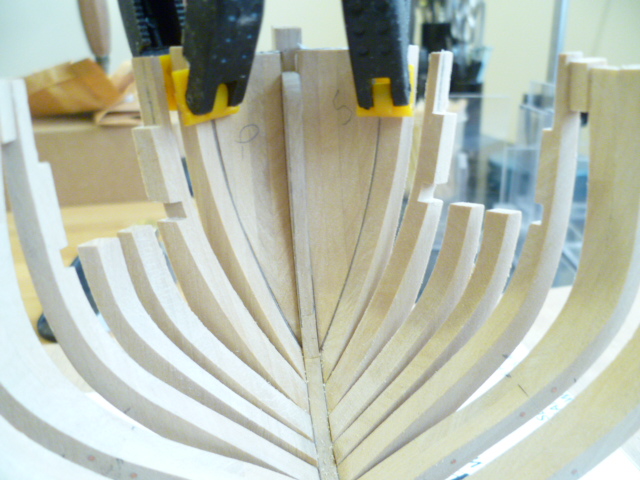
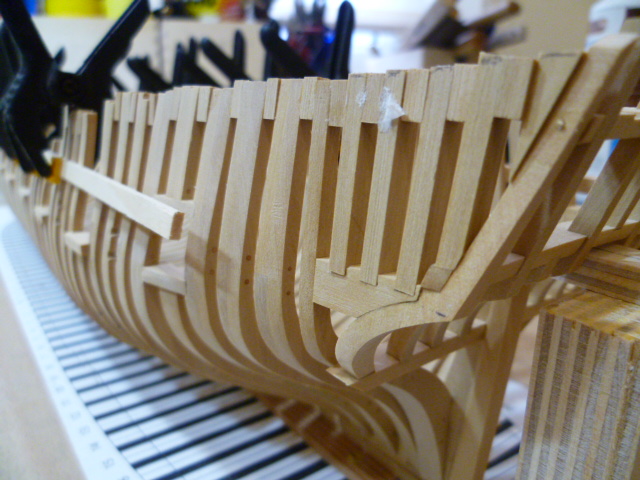
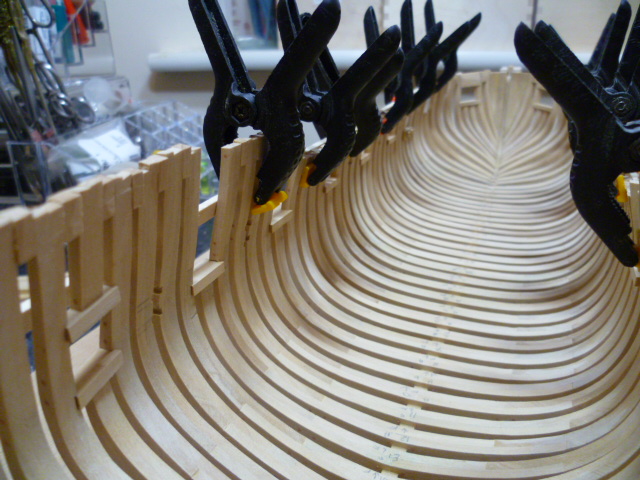
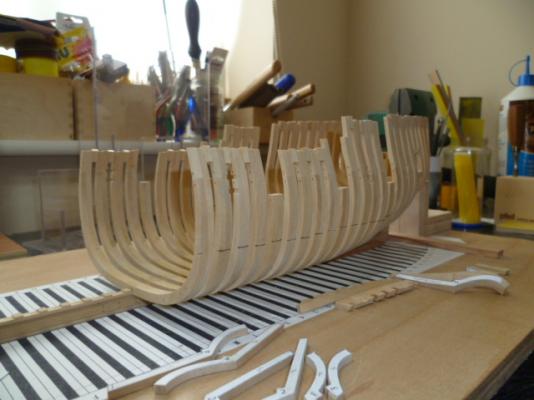
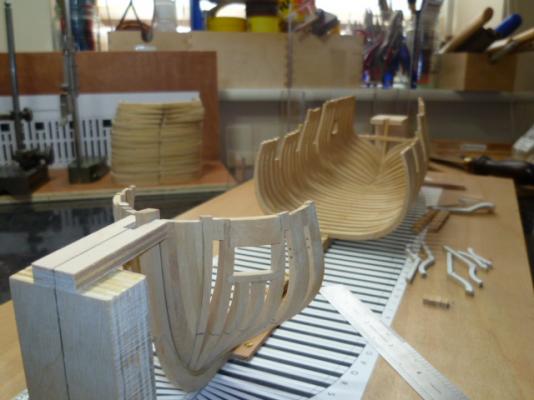
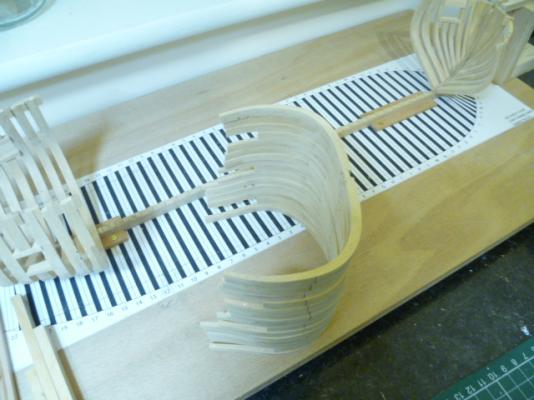
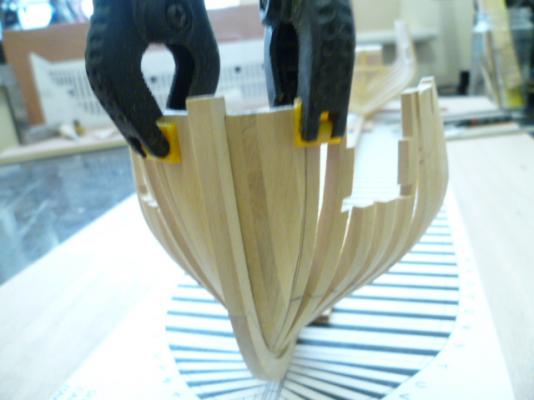
HI ALL FRAMES ARE NOW RAISED!!!! WITH ONE SMALL BOO BOO!!!! PORT SIDE , FIRST HALF FRAME, LETTER "R" ON THE PLANS WAS,WELL, ALL OVER THE PLACE. MUST HAVE BEEN A LACK OF CONCENTRATION WHEN FIXING THIS ONE. SHIP BUILDERS BAND AID TO THE RESCUE......LIBERAL SOAK WITH ISO AND THE OFFENDING ITEM HAS BEEN REMOVED. FORTUNATELY IT SEEMS I SANDED THE ANGLE AT THE FOOT INCORRECTLY.....VERY CAREFUL USE OF THE PROXXON SANDER AND THE CORRECT ANGLE HAS NOW BEEN ESTABLISHED WITH MINIMAL LOSS OF MATERIAL. I WILL SEE HOW IT LOOKS WHEN IT GETS TRIAL FITTED TOMMORROW........IF ITS NO GOOD A NEW PART WILL HAVE TO BE MADE......BUT SO FAR IT LOOKS OK. NEW PHOTOS ENCLOSED. NEXT UP WILL BE GUNPORT SILLS AND LINTELS. CHEERS FOR NOW .....MICK


- 504 replies
-
- 19
-
-
- washington
- galley
- (and 1 more)
-
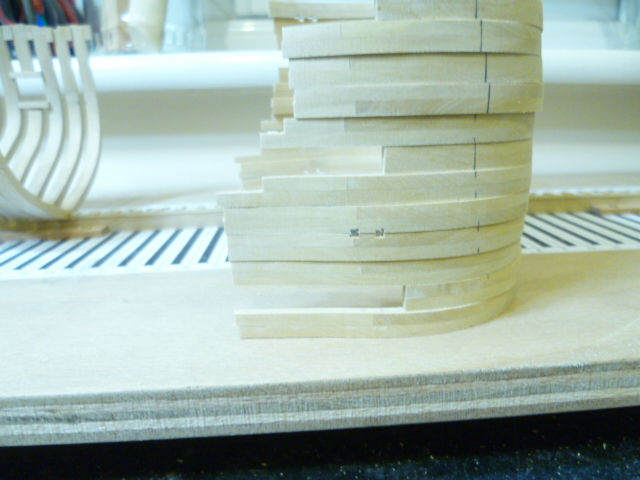
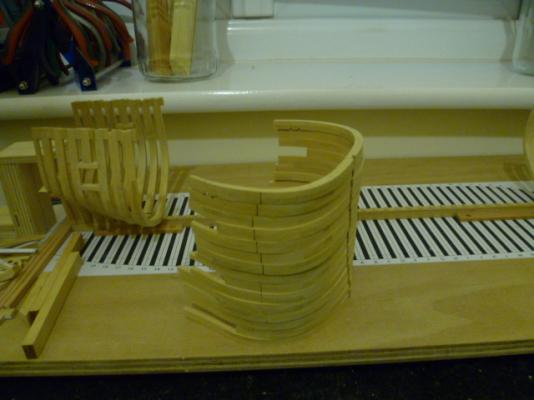
HI ALL ITS ABOUT TIME FOR ANOTHER UPDATE. BEEN PREOCCUPIED WITH NON SHIP BUILDING STUFF RECENTLY..........HOWEVEVER WORK HAS NOW RECOMMENCED ON THE WASHINGTON GALLEY. FRAMES HAVE BEEN RAISED! I PRECUT THE DADOES FOR THE SWEEP PORTS......BUT FORGOT TO DO THE ONES BETWEEN FRAMES 5 AND 6 ......DOH! I WILL CUT THESE IN SITU WHEN I DO THE GUN PORT SILLS AND LINTELS. SO FAR THE FRAMES AFT OF THE DEAD FLAT HAVE BEEN RAISED.......SHOULD GET ROUND TO THE REST LATER THIS WEEK.......THEN COMES THE TRICKY BITS! PHOTOS ENCLOSED AS PER USUAL ALL COMMENTS WELCOME. CHEERS.....MICK


- 504 replies
-
- 16
-
-
- washington
- galley
- (and 1 more)
-
hi carl thanks for looking in......havnt seen any of your posts for a while......been busy? cheers...mick
- 504 replies
-
- 3
-
-
- washington
- galley
- (and 1 more)
-
hi patrick progress has been slow and steady....couple of frames needed remaking as they wernt up to scratch. with approx 9 pieces of timber plus upwards of 20 bolts per frame i can see why it takes years for a fully framed model to be completed. i work fairly slowly and have to cut all the frames by hand as i dont posess a scroll saw.....no where to put one anyway!! this is a fairly small model as well only 48 or so frames plus stern timbering! i am indeed chomping at the bit to get some more frames raised.....but this is also going to be little by little....all those sills and lintels need to run in a fair curve so.....steady as she goes!!!! still dropping in every so often to view your miniature marvels.....ive just brought a copy of phillip reeds building a miniature navy board model. seriously tempted to have a go a something simpler in the same style. cheers for now....mick
- 504 replies
-
- 3
-
-
- washington
- galley
- (and 1 more)
-
hi johann absolutely wonderful work as always......your method for making gratings is very similar to the method that Bernard frolic uses in his book.......I shall be trying this when I get to the gratings on the Washington model. keep up the good work. cheers....mick
-
hi janet thanks for stopping by...the tricky bit is yet to come , getting those gunports to line up in a graceful sweep! look forward to following some more washington builds. cheers....mick
- 504 replies
-
- 3
-
-
- washington
- galley
- (and 1 more)
-
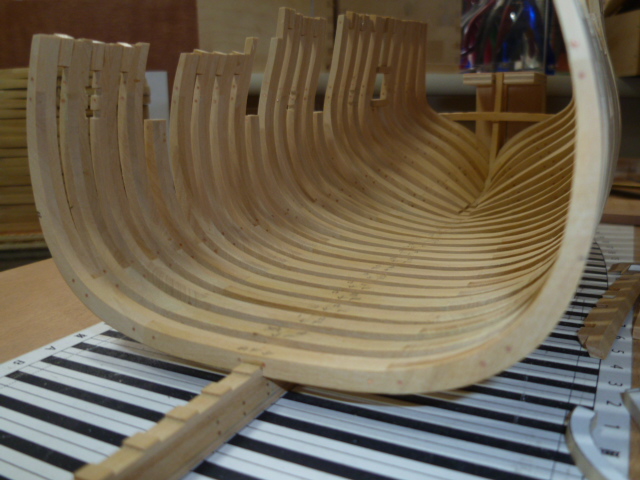
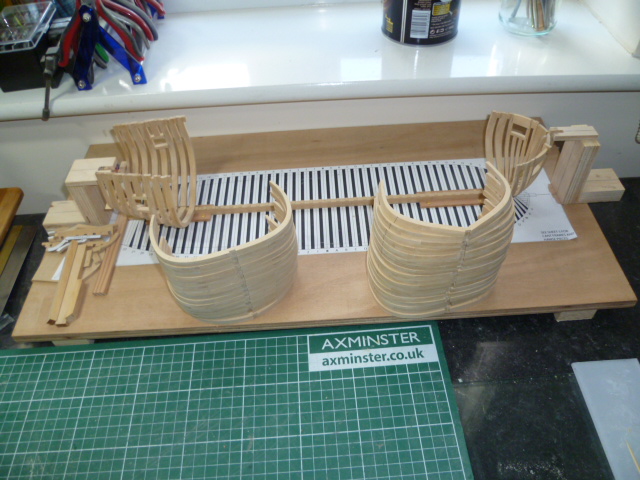
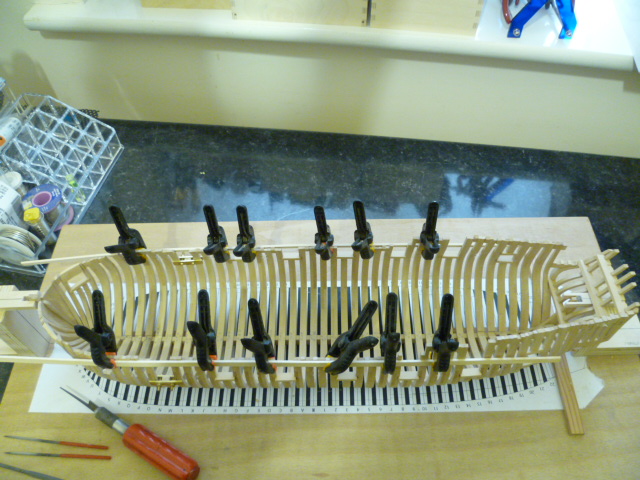
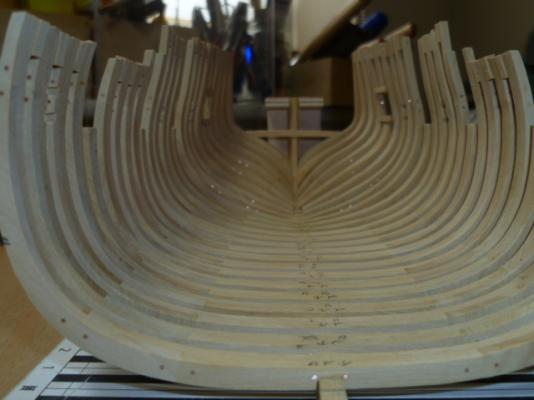
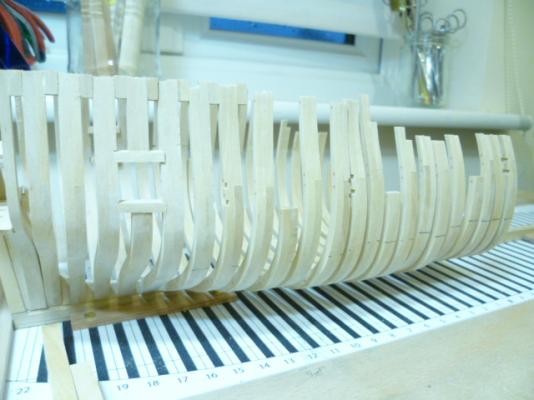
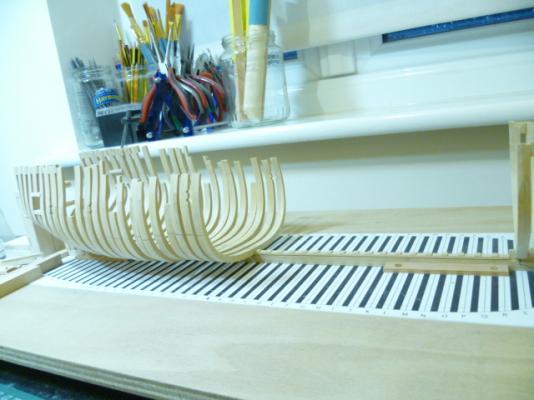
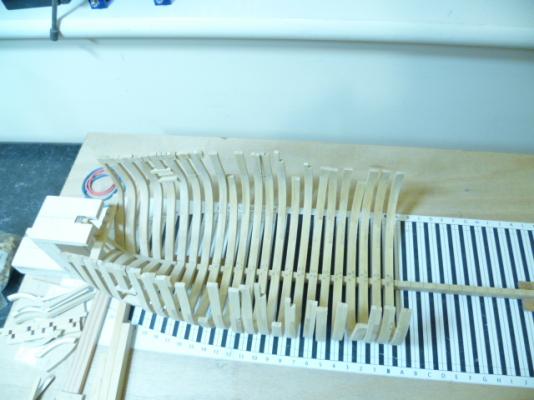
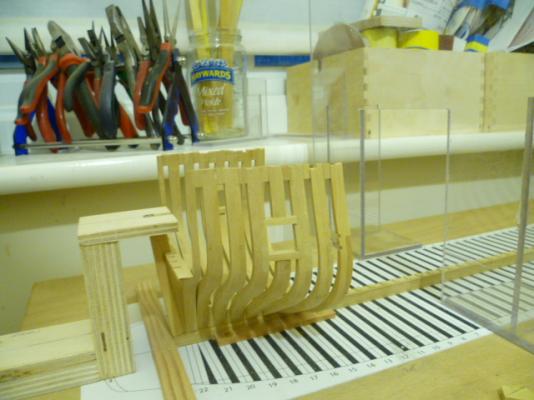
HI ALL TIME FOR A VERY QUICK UPDATE. ALL FRAMES ARE NOW MADE!!!! SHOULD SEE SOMETHING THAT LOOKS LIKE A SHIP EMERGE IN THE NEXT FEW WEEKS. PHOTOS ENCLOSED. CHEERS.....MICK


- 504 replies
-
- 20
-
-
- washington
- galley
- (and 1 more)
-
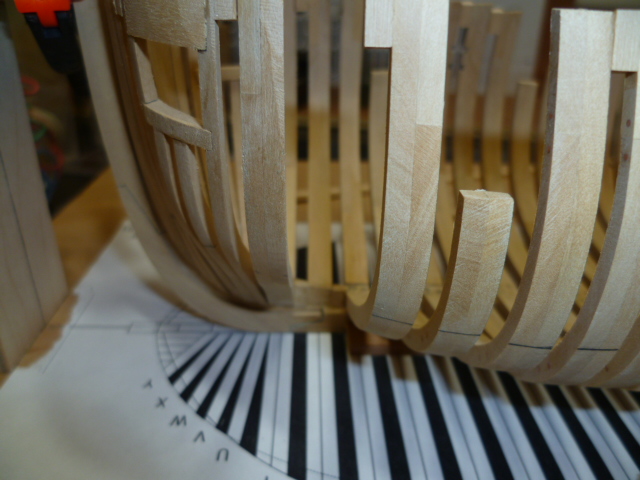
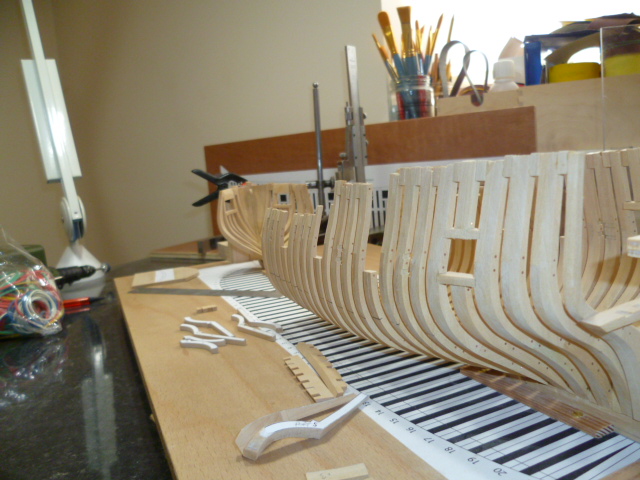
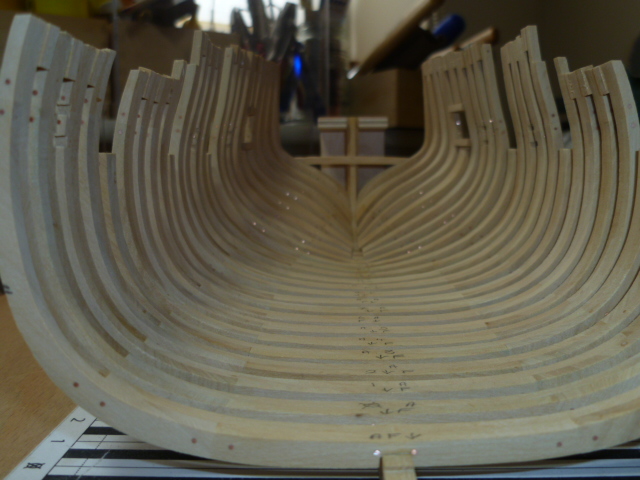
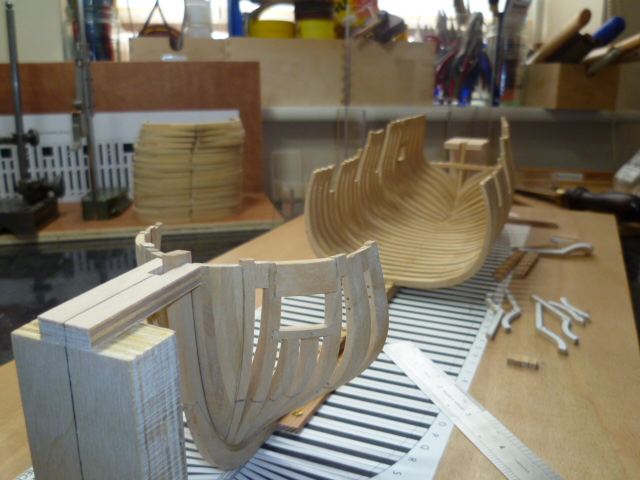
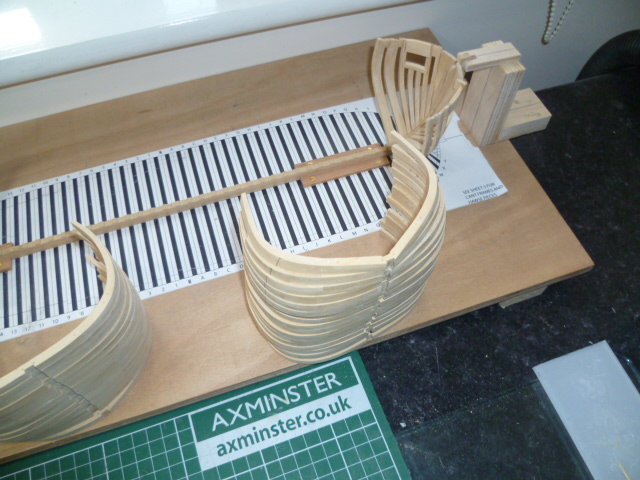
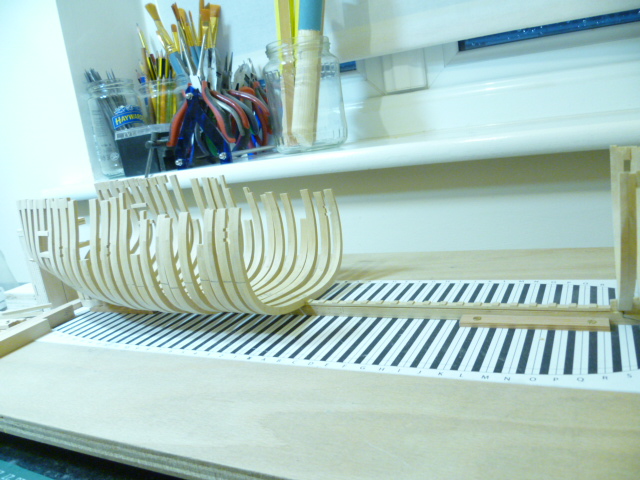
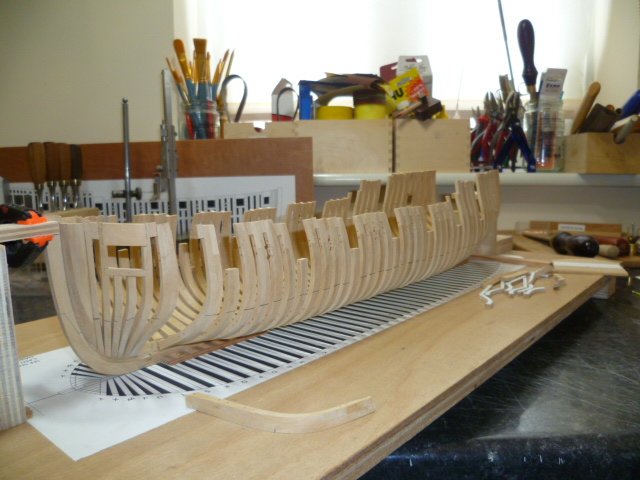
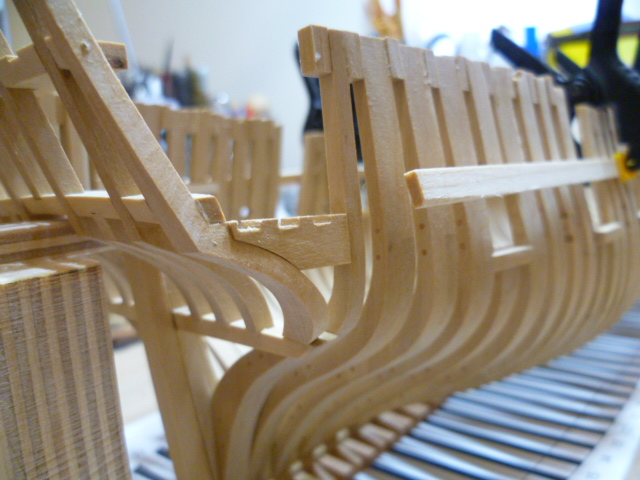
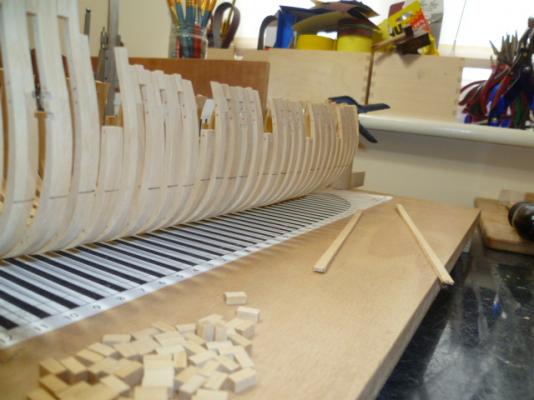
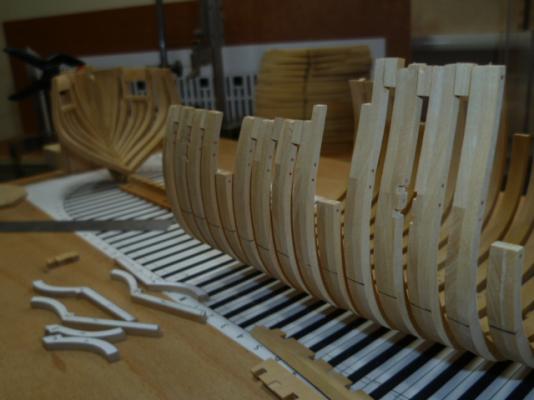
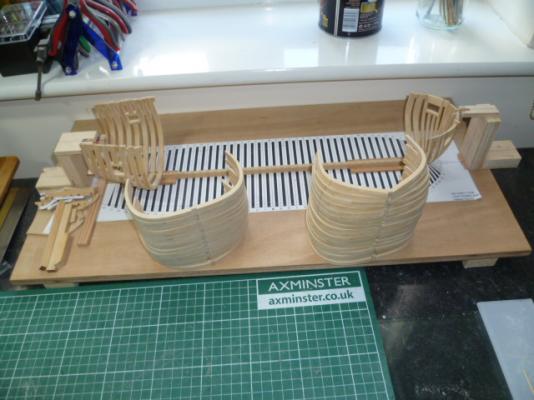
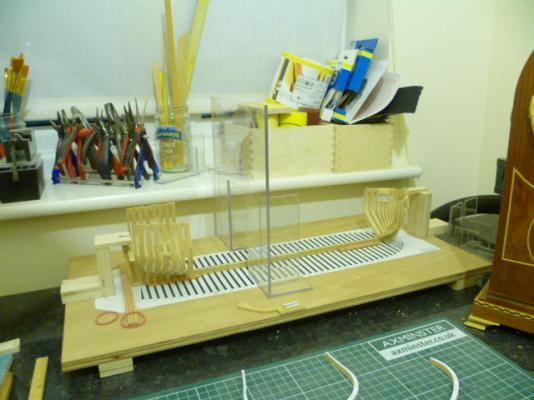
HI ALL TIME FOR AN UPDATE TO PROVE I HAVNT BEEN TOO LAZY OVER THE FESTIVE PERIOD. FRAMES ARE CONTINUING TO BE BUILT........STERN TO DEAD FLAT ARE NOW READY TO BE INSTALLED........DEAD FLAT TO FORWARD HALF FRAME ARE YET TO BE BUILT. FIRST OF ALL THOUGH A CONFESSION HAS TO BE MADE I HAD BEEN CUTTING RECESSES FOR SWEEP PORTS AND GUNPORTS AS I BUILT THE FRAMES. THE SWEEP PORTS PROVED TO BE QUITE STRAIGHTFORWARD.......HOWEVER THE SECOND GUNPORT FROM THE STERN ENDED UP AS A TRAPEZOID......HMMMN.......NOT CORRECT METHINKS! SO THE RELAVANT PAIR OF FRAMES HAD TO COME OUT.....ISO TO THE RESCUE!!!!.......AND BE REMADE. I SHALL NOW BE FOLLOWING GREGS EARLIER SUGGESTION AND CUT THE APPERTURES FOR SILLS AND LINTELS AFTER THE FRAMES ARE IN SITU. WE LIVE AND LEARN AND I AM ALWAYS WILLING TO BOW TO WISER AND MORE EXPERIENCED HEADS!!!!! PHOTOS OF CURRENT PROGRESS INCLUDED......THE LAST ONE SHOWS THE FRAMES JUST PLACED ON THE KEEL FOR EFFECT NOTHINGS BEEN GLUED YET. CHEERS.......MICK


- 504 replies
-
- 18
-
-
- washington
- galley
- (and 1 more)
-
hi albert absolutely breathtaking workmanship......you are setting some exemplerary standards for the rest of us to follow. looking forward to more updates......could you persuede your friend who made the stern section to join the forum? his carving work is fantastic!!!!!!! I shall go and sit in the corner now and contemplate my meagre efforts. cheers....mick
-
hi aviaamator I wish it was easy..........but then again it wouldn't be worth doing if it was easy!!! it is a constant learning curve this ship modelmaking hobby of ours......which is why I like it so much! I very much admire the work of our friends in Russia....some brilliant ship modelmakers over there and I thank you for your compliments. merry Christmas cheers....mick
- 504 replies
-
- 5
-
-
- washington
- galley
- (and 1 more)
-
hi patrick i think i will have to post it in the "anything else you do" catagory or the moderators may move it! frames are coming along slowly but surely.......with a couple of rejects along the way......thanks for the like......been lurking in the background of your current build but have run out of superlatives!!!! i hope your back to fighting fit after your recent health problems. merry christmas to yourself and your family cheers....mick
- 504 replies
-
- 3
-
-
- washington
- galley
- (and 1 more)
-
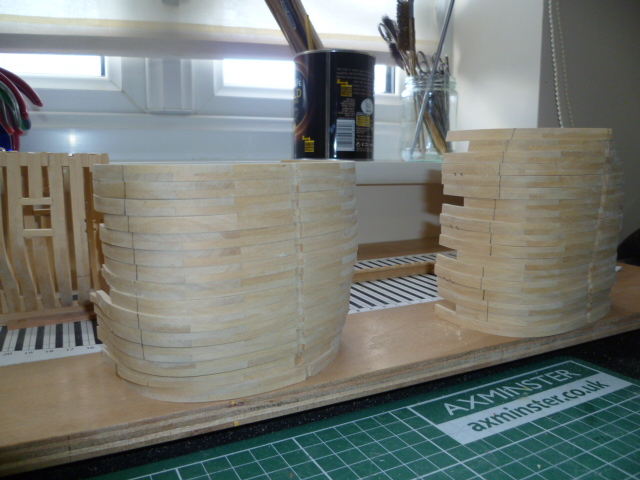
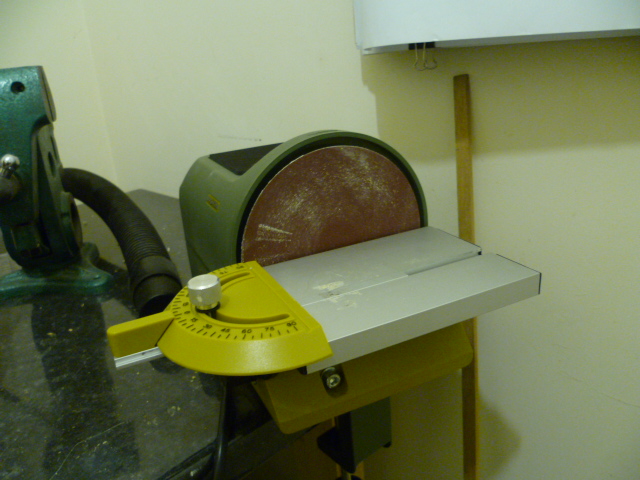
HI ALL NOT A GREAT DEAL OF PROGRESS TO REPORT.......BUSY SLOWLY MAKING FRAMES. HAVE STARTED A NON SHIP MAKING PROJECT.....SOMETHING TO DO WHILST THE FRAMES ARE DRYING! I HAVE ALSO UPGRADED MY SANDING MACHINE TO A PROXXON TG125 I WAS FED UP OF TRYING TO KEEP THE TABLE AT 90 DEGREES ON MY GENERIC CHINESE MADE SANDER. HAVING GOT THE PROXXON OUT OF THE BOX AND SET UP I WONDER HOW I MANAGED TOO SAND ANYTHING SQAURE ON THE OLD ONE! THE TABLE LOCKS RIGIDLY AT ANY DESIRED ANGLE...THE MITRE FENCE IS ACTUALLY SQAURE TO THE TABLE AND THE ANGLES MARKED ARE TRUE.....IVE CHECKED.....IT HAS DUST EXTRACTION!!!!......AND BOY IS IT QUIET!!! BRAND NEW AND DELIVERED FROM EBAY IN TWO DAYS FOR £100 ISH. PHOTOS INCUDED AS USUAL. PROBABLY BE THE LAST POST BEFORE NEW YEAR. WISHING EVERYBODY A HAPPY AND PEACEFUL CHRISTMAS AND NEW YEAR. CHEERS.......MICK


- 504 replies
-
- 13
-
-
- washington
- galley
- (and 1 more)
-
hi bob usually printing newspapers about that time.........have to wait until days off to make sawdust. coffee will help....black and strong glad you found the website have fun cheers....mick
- 504 replies
-
- 2
-
-
- washington
- galley
- (and 1 more)
-
hi bob many thanks for the compliments bob......my first go at hawse frames.....thankfully theres no air gaps or other complications with this model.....i think they would prove more challenging when i get round to hms echo and euryalus......but having said that i think i use pretty much the same approach. i dont have an address as such , i wish i knew how to post a link, my computer skills are not what they should be really. having said that if you do a google search for dieter smith fine tools it should get you to the right website. i agree with your comments on lie nielson tools...absolutely magnificent....i wouldnt be without my modelmakers plane. i too have a little brass flat soled luthiers plane which i find indispensible for small scale planing jobs. i would also recommend quangsheng planes......i know that they are chinese BUT they are made to british standards and are at least on a par with clifton and veritas......the build quality is excellent and the tool steel for the blades takes and holds a fine edge. their block planes are useful for larger scale work and they have just released an all bronze mini block plane which i shall be investing in. they can be found at WORKSHOP HEAVEN.CO.UK it would be good for your son to inherit your tools.....he in turn can pass them on to his son in due course. looking forward to following your YA build. cheers....mick
- 504 replies
-
- 3
-
-
- washington
- galley
- (and 1 more)
-
hi mark thank you.....not quite sure about perfect....but they do fit nicely......lets see how much timber is left when ive faired the hull!!!! I was approaching these parts with some trepidation after reading how difficult they can be.....indeed they are not simple to make but I have to say I quite enjoyed spending a quiet sunday morning with some hand tools whittling away. cheers....mick
- 504 replies
-
- 3
-
-
- washington
- galley
- (and 1 more)
-
hi nigel thank you and thanks for stopping by. the awkward bits are done for the time being........some of those stern timbers will be a challenge to get right though......but that's for much later. tomorrow operation frame will begin!! the bulk of the rest of the frames are fairly straightforward.....but with careful attention to gunport and sweep port sills and lintels. should keep me busy for a few weeks yet. cheers....mick
- 504 replies
-
- 3
-
-
- washington
- galley
- (and 1 more)
-
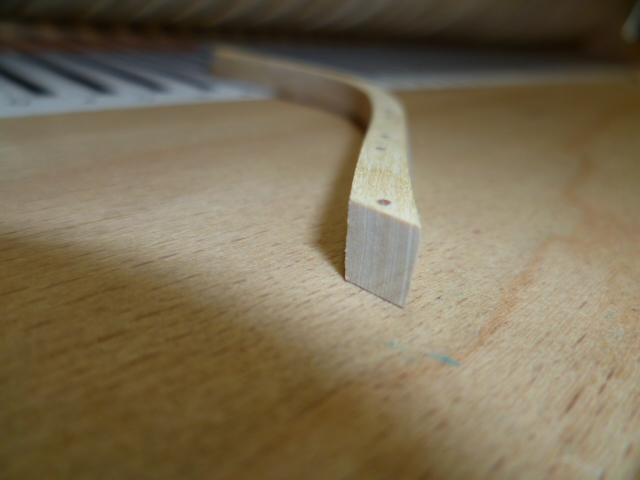
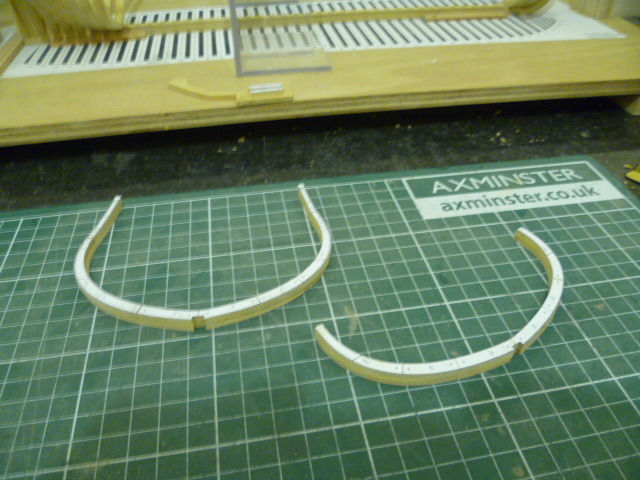
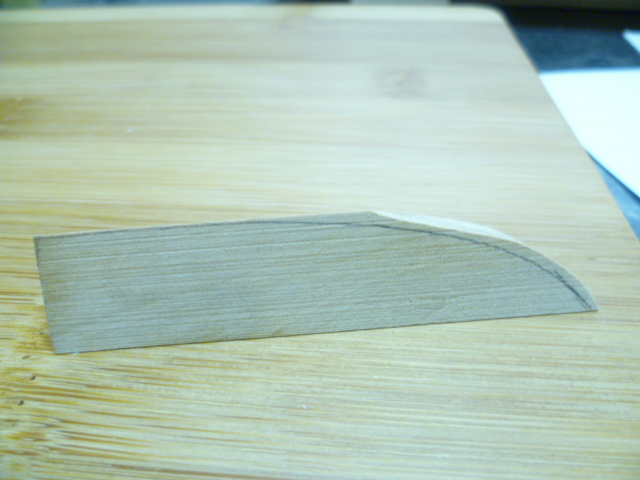
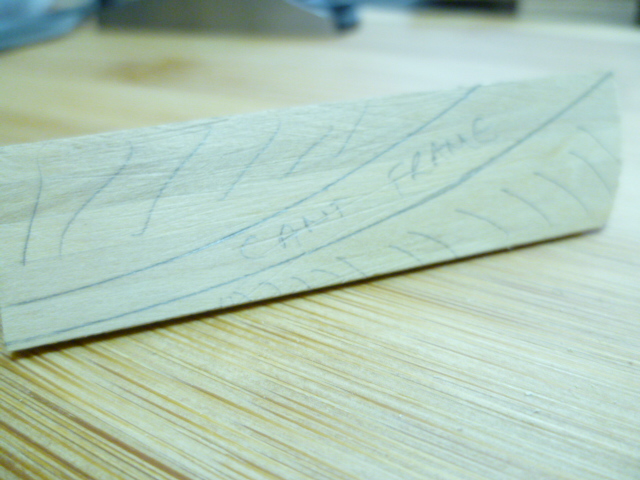
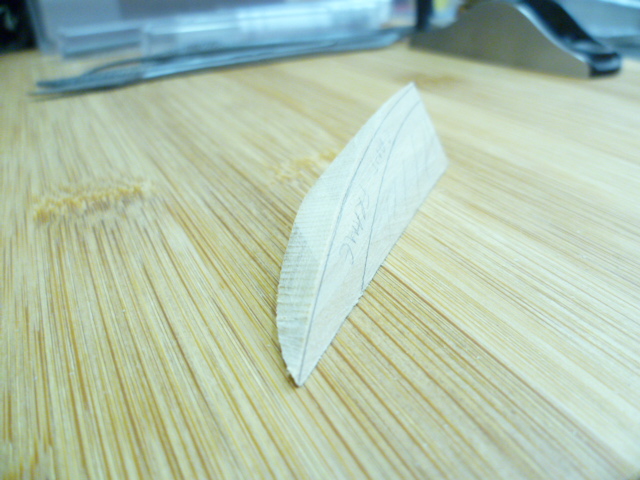
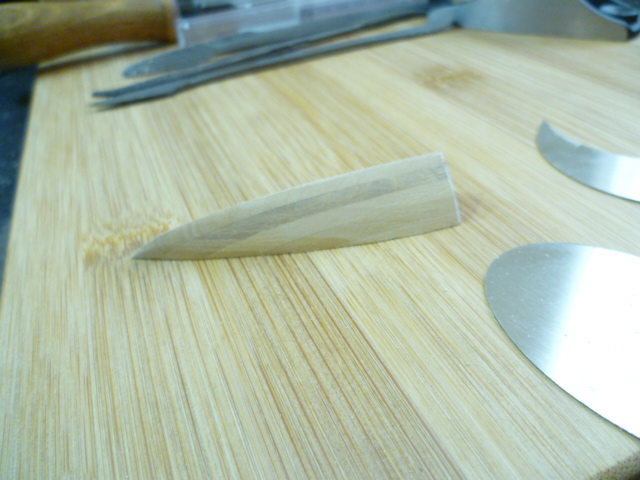
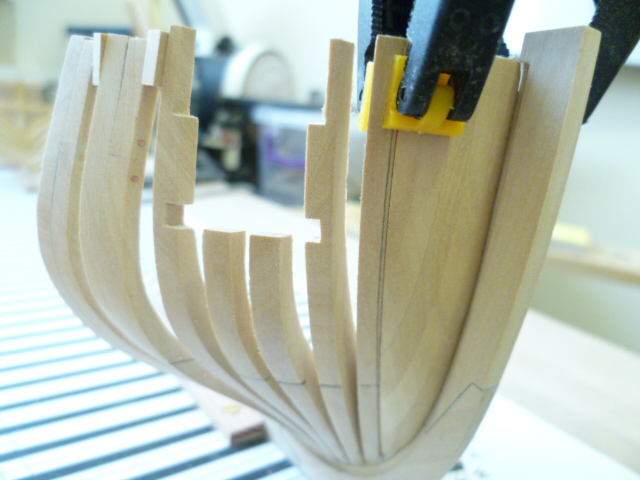
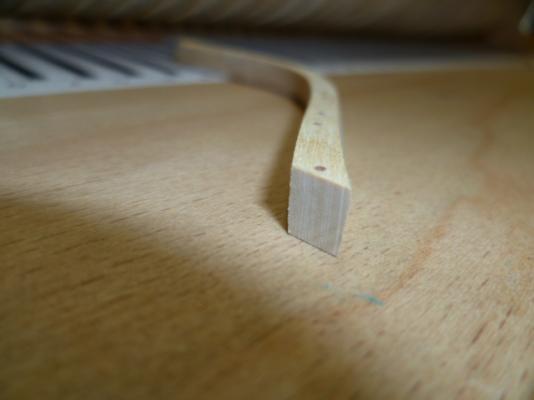
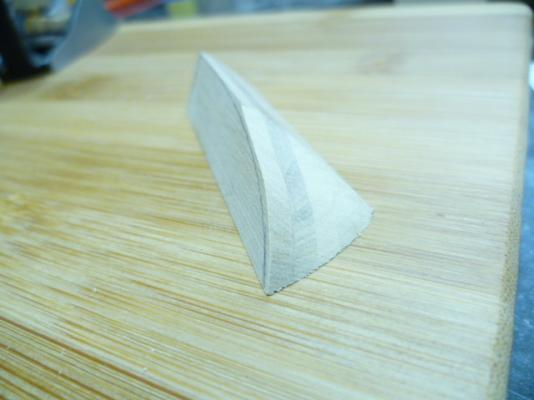
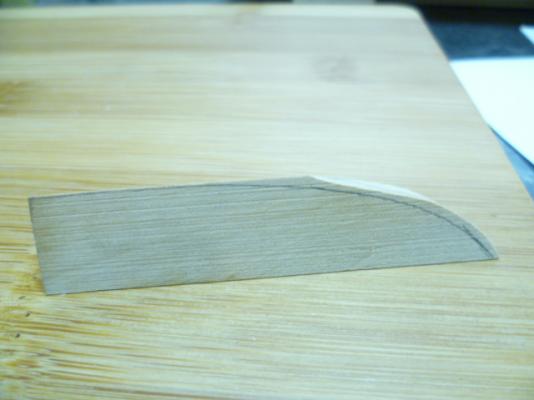
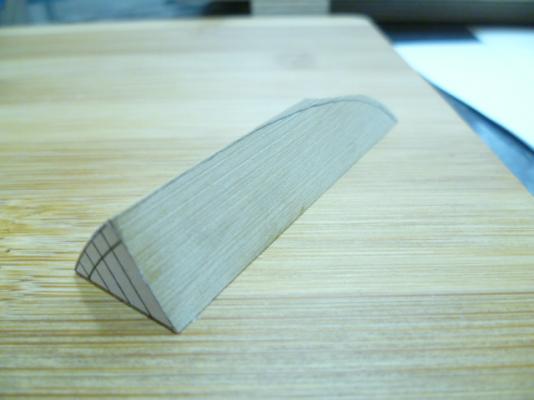
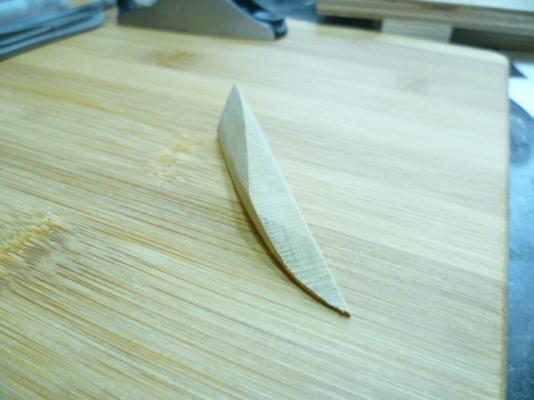
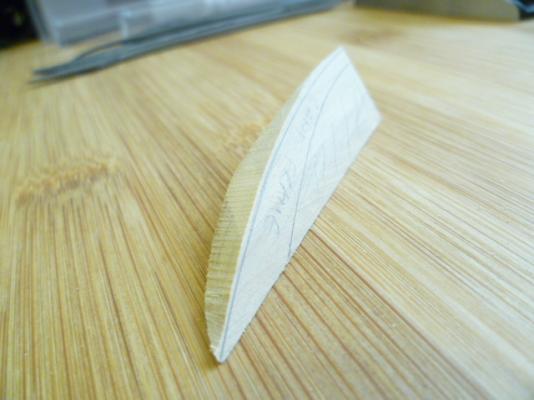
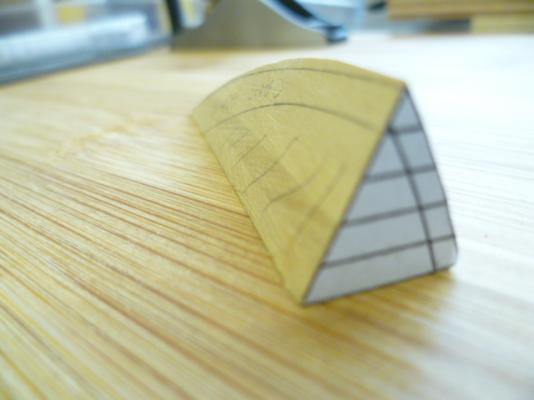
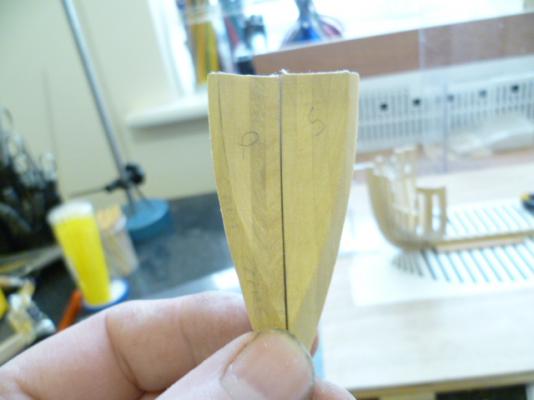
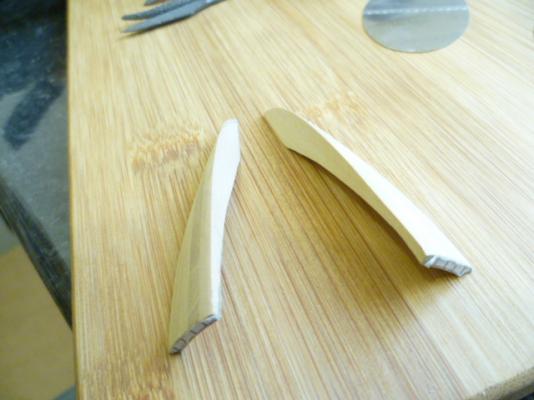
hi Patrick easy? no! but in all honesty it was more straightforward than I was anticipating.........as long as you work to one profile first ie the stem rebate......then work to the cant frame profile.......then fair the outside curve until its about right...leave a bit on for final fairing. the inside was marked out off the cant frame and stem and most the waste "carved" out with a scalpel fitted with a 10a blade.......the concavity is formed by those lovely little cabinet scrapers.......DIETER SMITH TOOLS, BERLIN.......highly recommended tool emporium. as a first ever set of hawse frames I'm quite pleased with the result.......the glue is now setting! the forward gunport sills are also in and glued ......will fit the lintels later after some fodder......and then time for some of scotlands finest!!!! cheers....mick
- 504 replies
-
- 4
-
-
- washington
- galley
- (and 1 more)
-
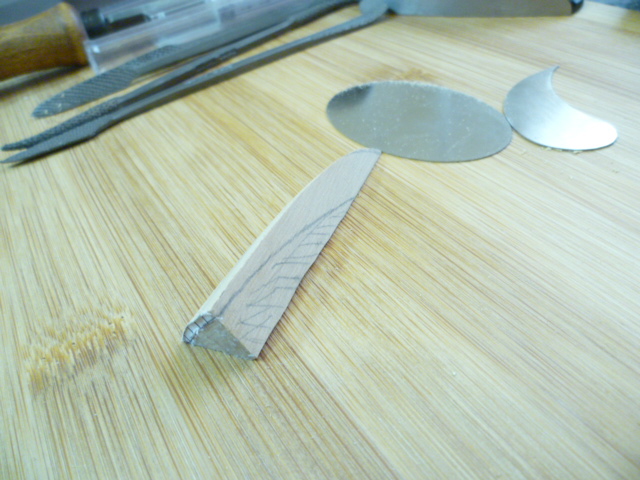
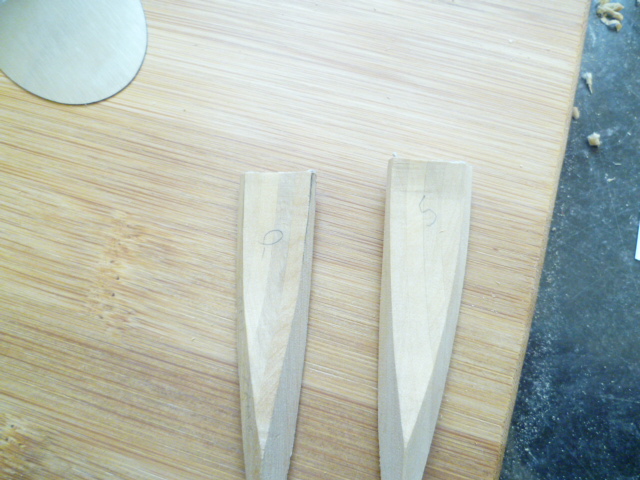
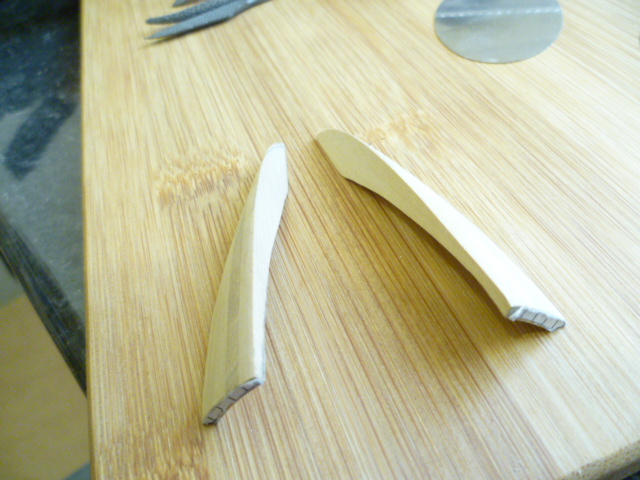
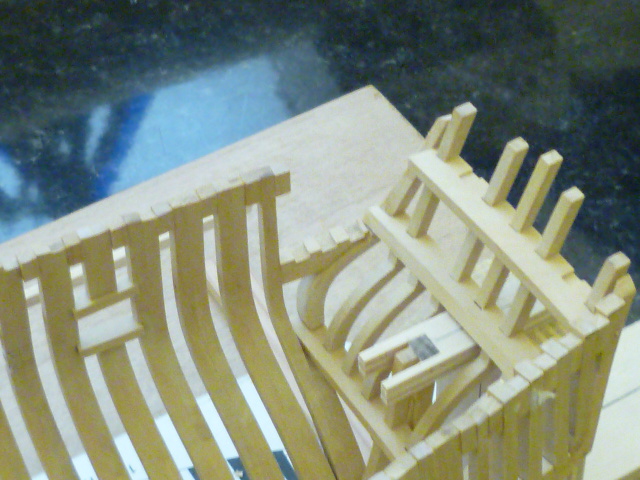
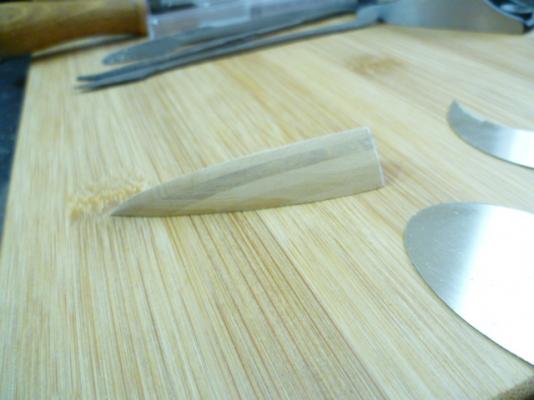
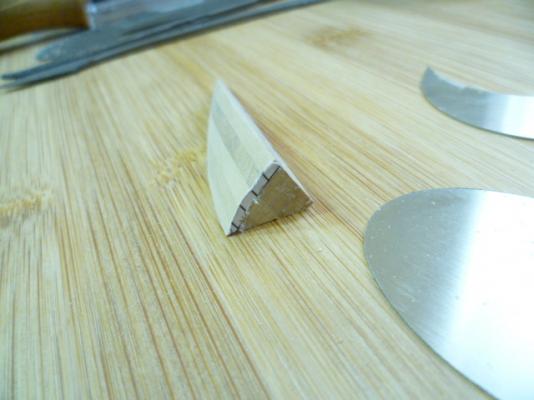
HI ALL SECOND POST OF THE DAY..........BEEN A BUSY OLD MORNIN SO FAR HAWSE FRAMES ARE NOW COMPLETE. IVE INCLUDED PHOTOS WHICH I WILL UPLOAD IN ORDER....HOPEFULLY THEY WILL MAKE SOME SENSE OF THE SEQUENCE OF PRODUCTION. I HAVE BEEN A BIT OF A MASOCHIST THIS MORNING AND MADE THESE ENTIRELY BY HAND WITH PLANES FRET SAW RASPS AND SOME LOVELY LITTLE CABINET SCRAPERS WHICH WERE JUST THE RIGHT SIZE. ANYWAY PHOTOS ENCLOSED. AS USUAL ALL COMMENTS CRITISMS ETC GRATEFULLY RECEIVED. CHEERS....MICK


- 504 replies
-
- 19
-
-
- washington
- galley
- (and 1 more)