

yamsterman
-
Posts
550 -
Joined
-
Last visited
Content Type
Profiles
Forums
Gallery
Events
Everything posted by yamsterman
-
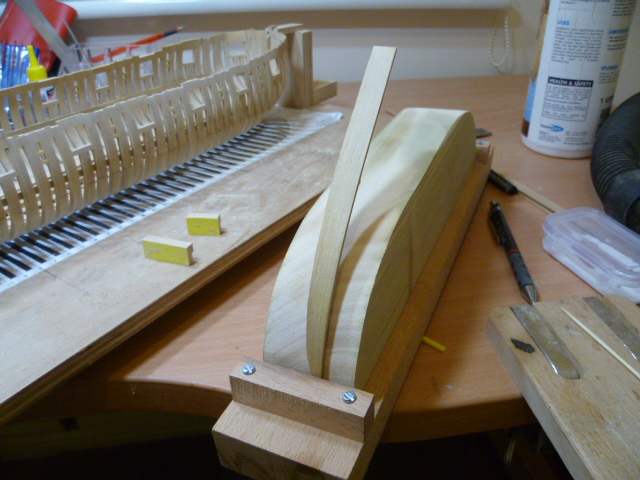
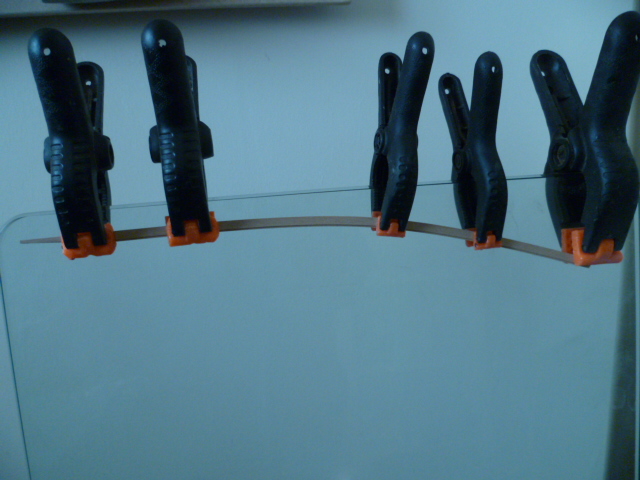
hi kurt thanks! took a couple of attempts to get the forward deck clamps to the right profile......the rear section of the lower thickstuff is also awkward. i can highly recommend chucks heat bending method.....no water required....even works on 3/32" thick stock. once the thickstuff and associated planking is laid it will be time to fair the outside.....already had a little play hence the " dust" in acouple of the photos. cheers....mick
- 504 replies
-
- 6
-

-
- washington
- galley
- (and 1 more)
-
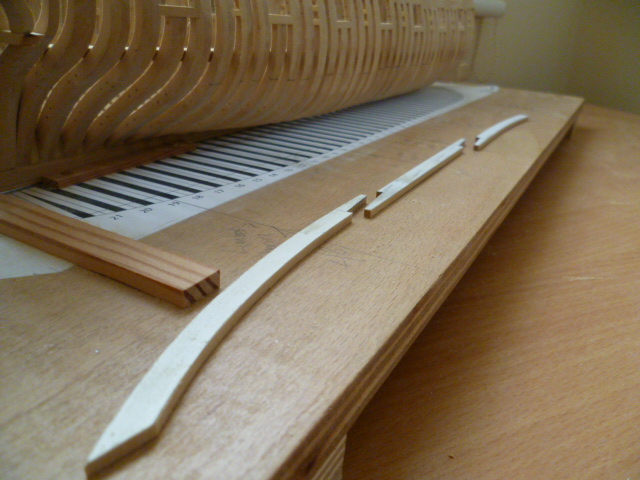
hi carl work always gets in the way! the jig should also prove useful for bending the forward section of the wale strake. lots of sanding coming up though...almost time to fair the outside of the hull. cheers...mick
- 504 replies
-
- 4
-
-
- washington
- galley
- (and 1 more)
-
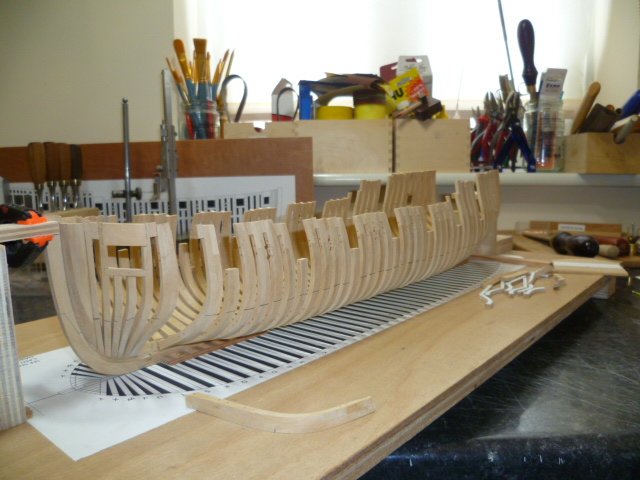
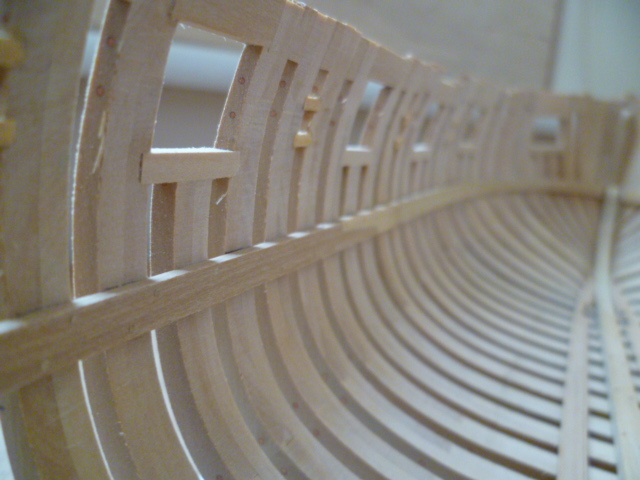
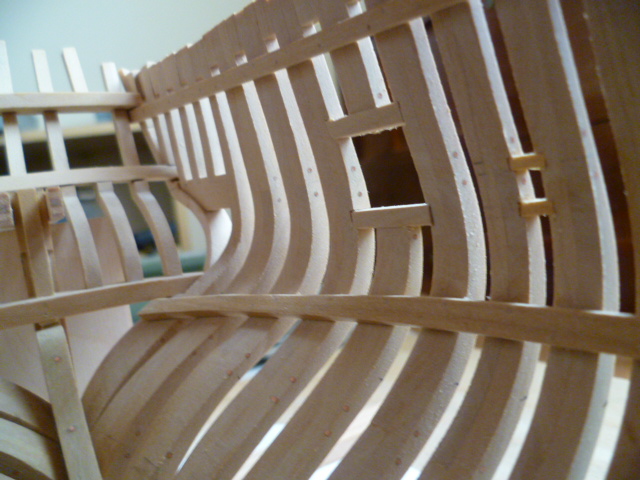
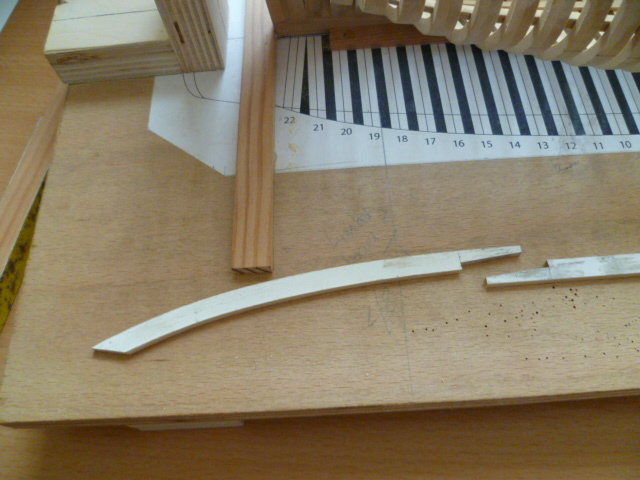
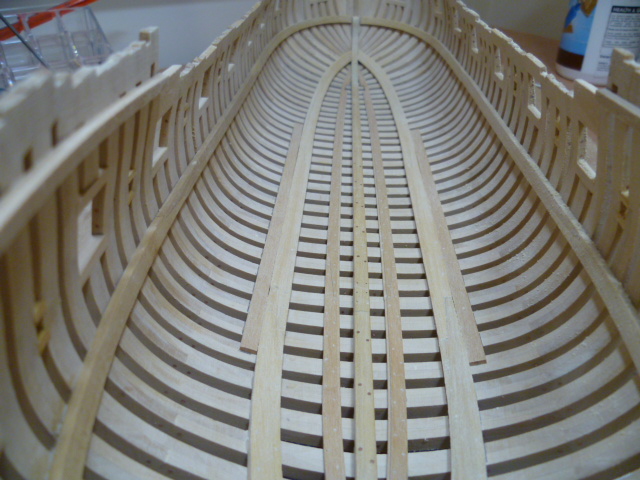
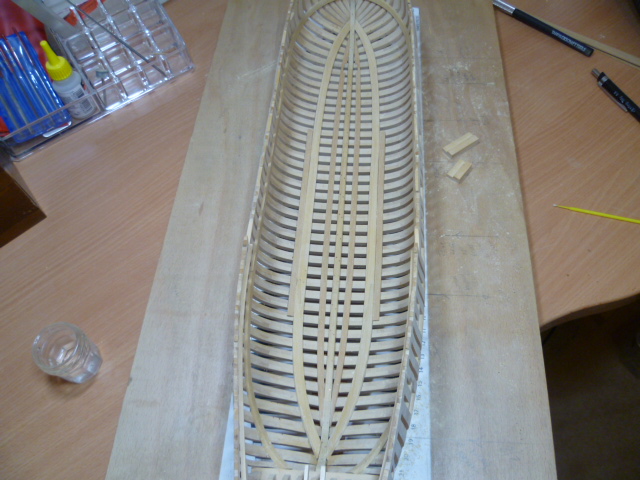
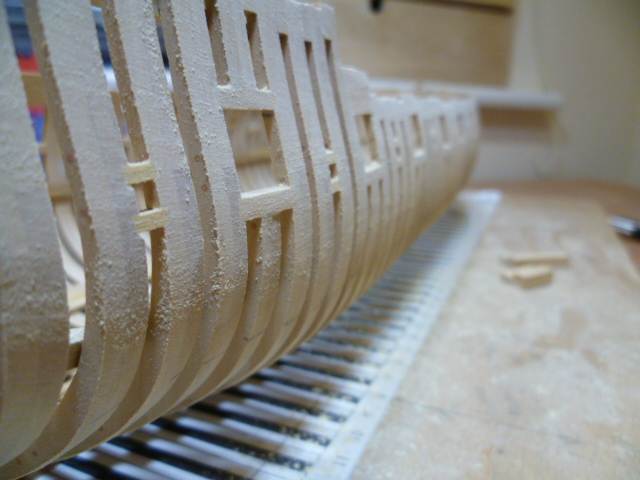
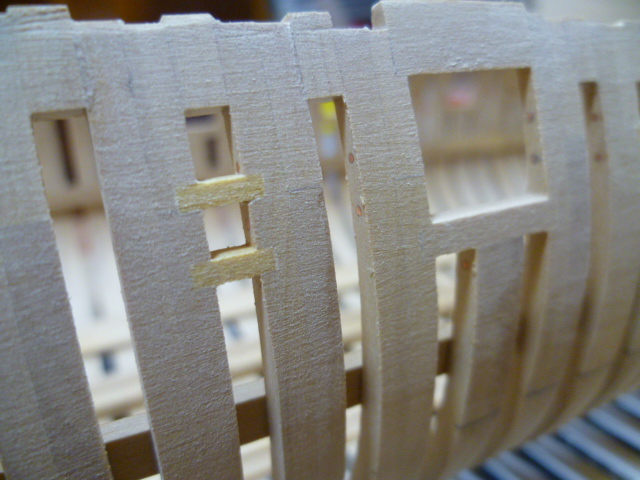
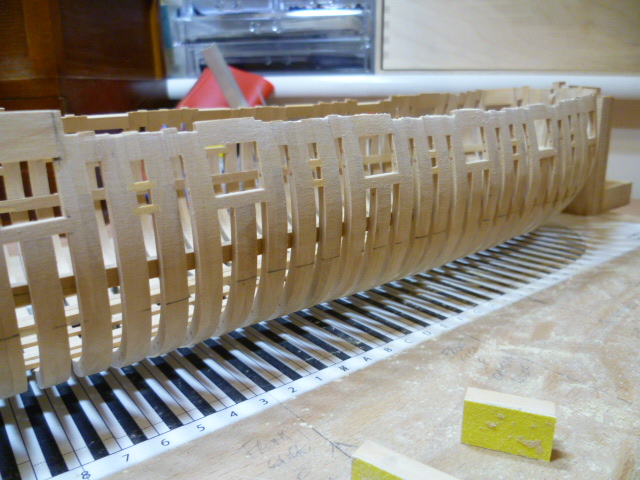
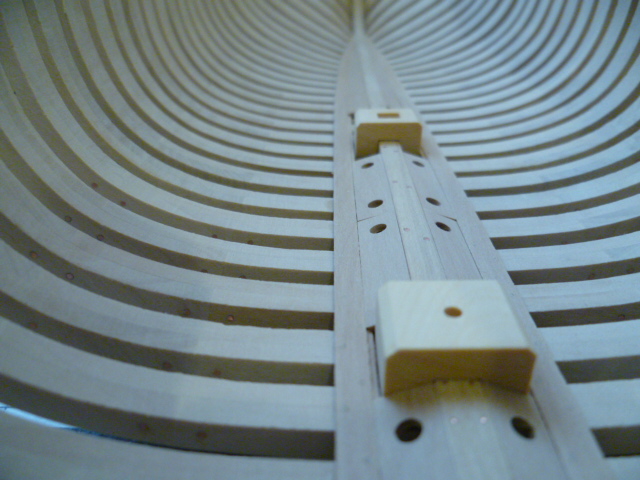
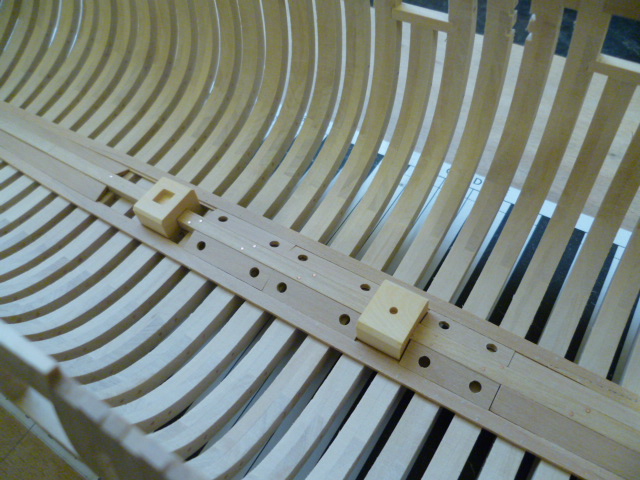
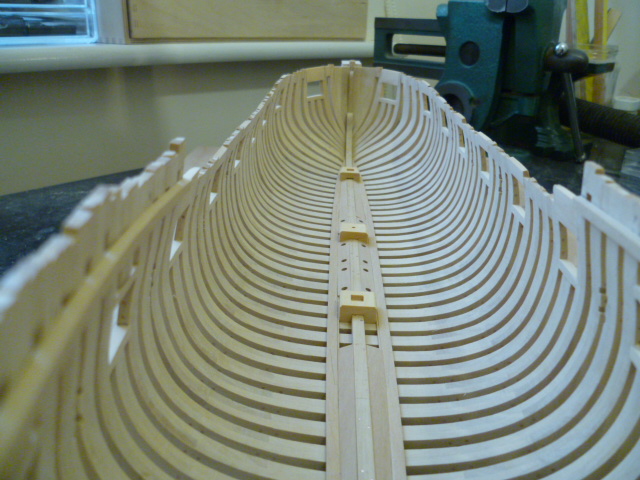
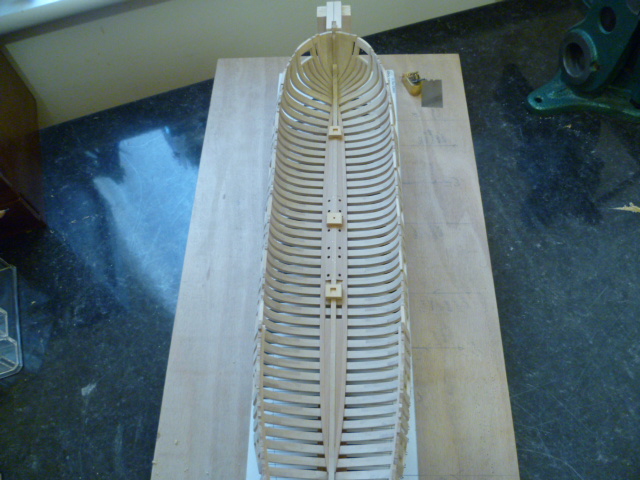
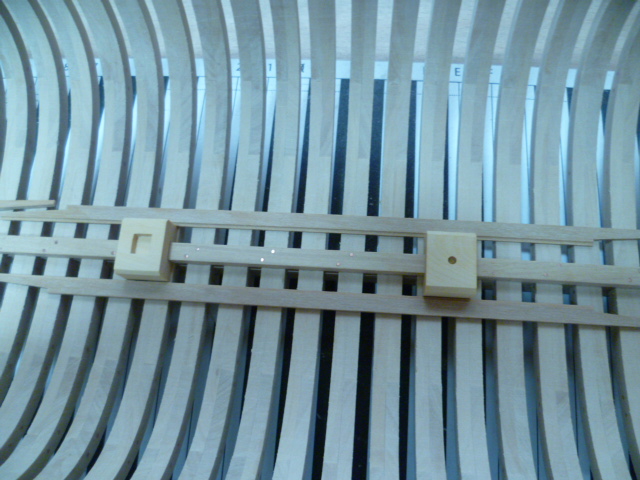
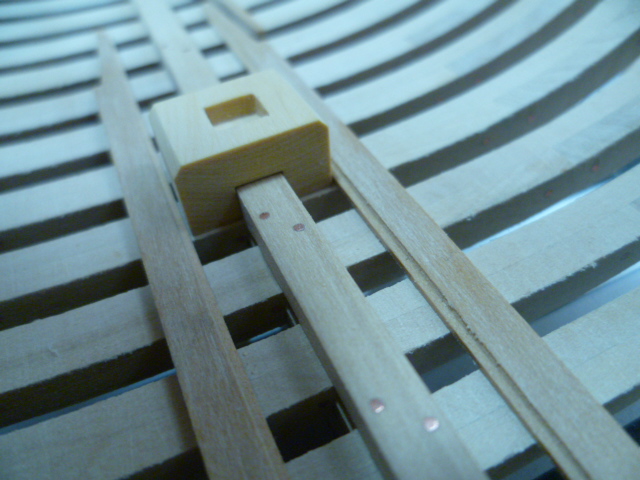
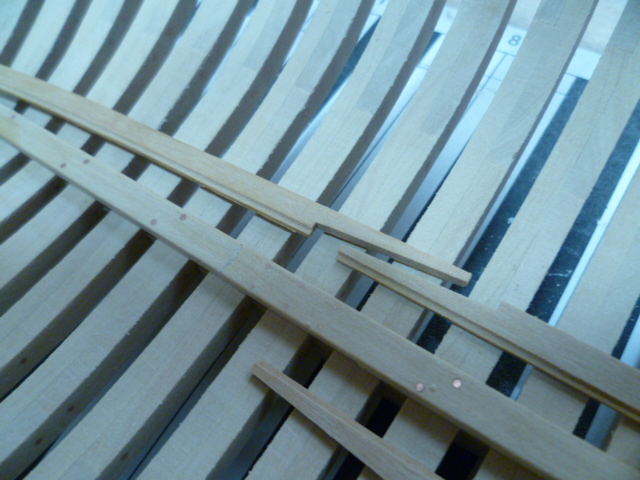
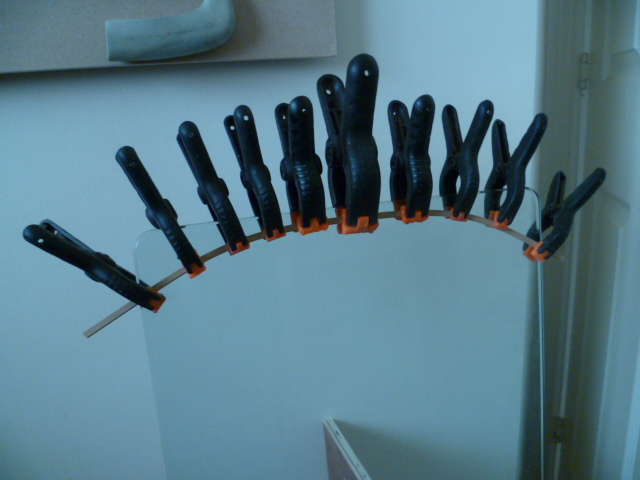
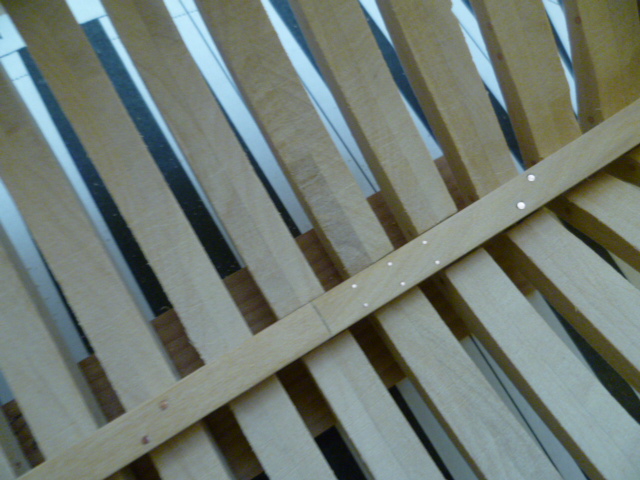
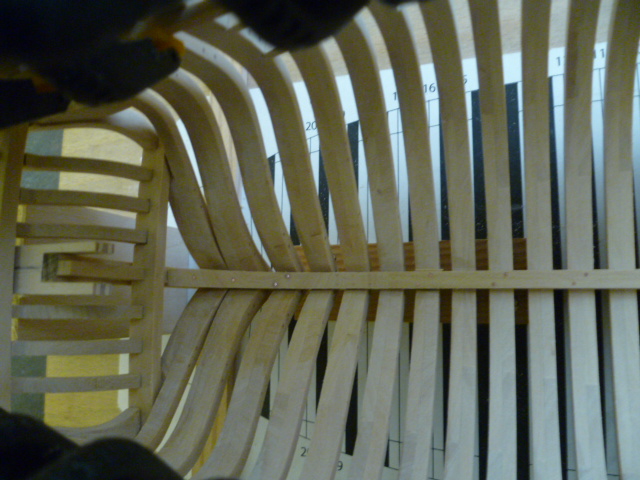
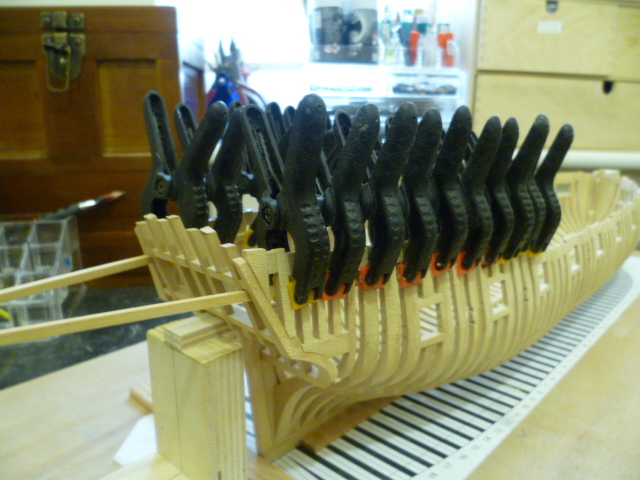
HI ALL SOME MORE WORK HAS BEEN DONE. DECK CLAMPS HAVE BEEN FITTED..I FIRST HEAT BENT A SHEET OF 3/32 BOX ABOUT 1" WIDE AROUND A FORM AND ONCE THAT HAD COOLED DOWN A CARDSTOCK PATTERN FOR THE FORWARD SECTION OF THE DECK CLAMP WASGLUED ON WITH SOME PRITT AND THE PLANK CUT OUT. PROCESS FOR THE THICK STUFF .....SPILE THE BASIC SHAPE AND THEN HEAT BEND AND TWIST TOO THE REQUIRED SHAPE. THE JIG IN THE PHOTOS WAS USED TO BEND THE DECK CLAMPS TO SHAPE FIRST ROW OF THICKSTUFF IN PLACE AND TREENAILED. JUST STARTING THE NEXT THREE ROWS OF THINNER PLANKING. SWEEP PORTS HAVE FINALLY BEEN LINED OUT ASWELL THATS ABOUT IT FOR NOW...THE INEVITABLE "BACK TO WORK" LOOMS LARGE! CHEERS FOR NOW....MICK
- 504 replies
-
- 30
-
-
- washington
- galley
- (and 1 more)
-
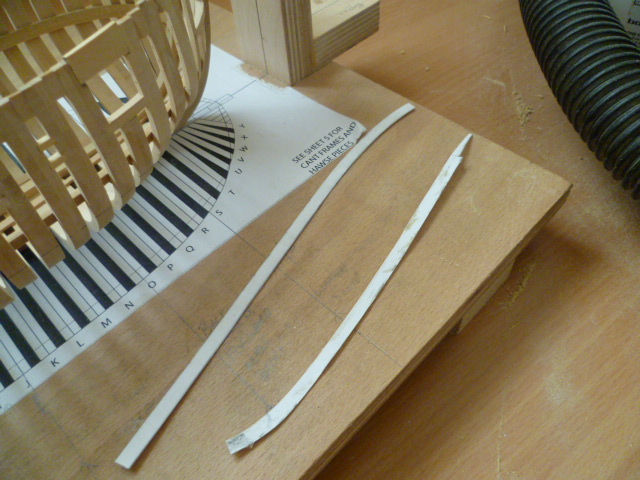
I can vouch for chucks heat bending with no water. just used the same method to bend 3/32" x 1/4" boxwood for the washington galley.......first row of thickstuff. it works!!!!!! cheers....mick
-
hi keith thanks for stopping by and the compliments....much appreciated. we used to have a Labrador that was an inveterate twitcher when snoring his head off. must have been dreaming of chasing rabbits or cats......no chipmunks in dear old blighty! my skills , such as they are , have developed over thirty five years of modelmaking of one sort or another. like many I started with airfix kits then the new wave of Japanese kits , Tamiya etc........I was also an avid meccano and lego buff as a kid. I have always made things.....its what I do! keep those tools razor sharp and plenty of practice.....if at first its not right do it again...and again....and again......and soon the dream will become reality! cheers....mick
- 504 replies
-
- 6
-
-
- washington
- galley
- (and 1 more)
-
hi kees thank you again! I doubt their are many who could match your skill in working with plastic, mould making and casting and general level of detailing.......and the vast majority is done from scratch. truly magnificent work. cheers....mick
- 504 replies
-
- 5
-
-
- washington
- galley
- (and 1 more)
-
hi all a very quick update. limber strakes and limber boards now done.....a bit of final sanding and scraping to do. next up deck clamps and sweep ports. cheers.....mick

- 504 replies
-
- 26
-
-
- washington
- galley
- (and 1 more)
-
hi albert thank you....I am aiming to get to your standard some day! cheers...mick
- 504 replies
-
- 3
-
-
- washington
- galley
- (and 1 more)
-
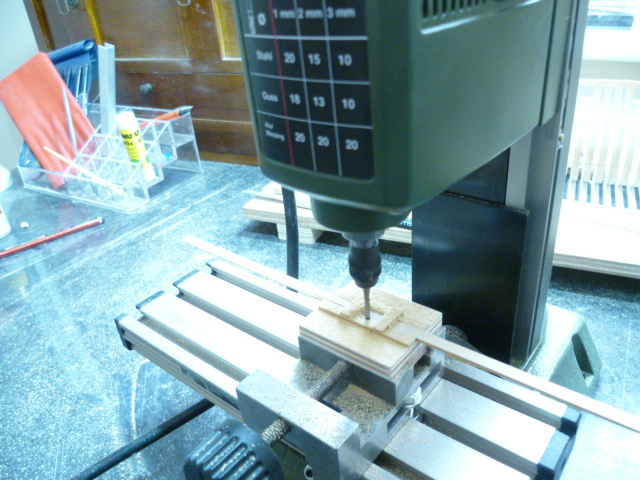
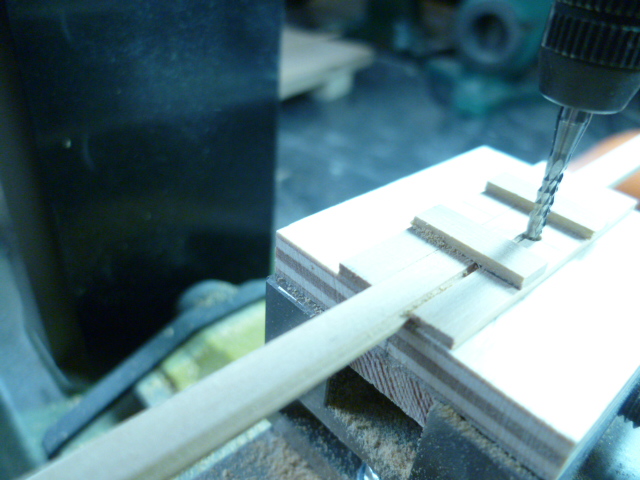
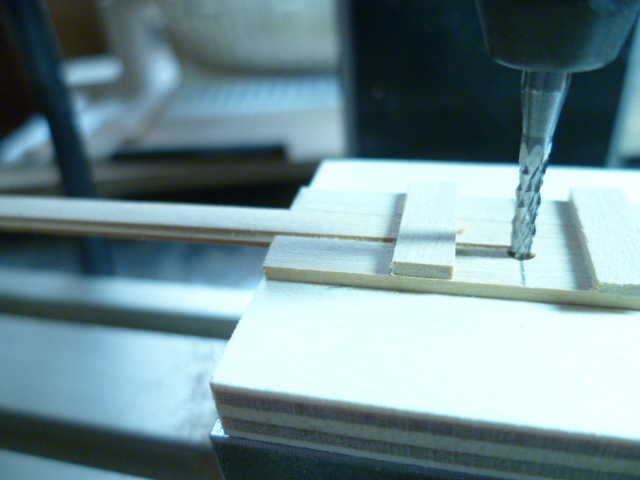
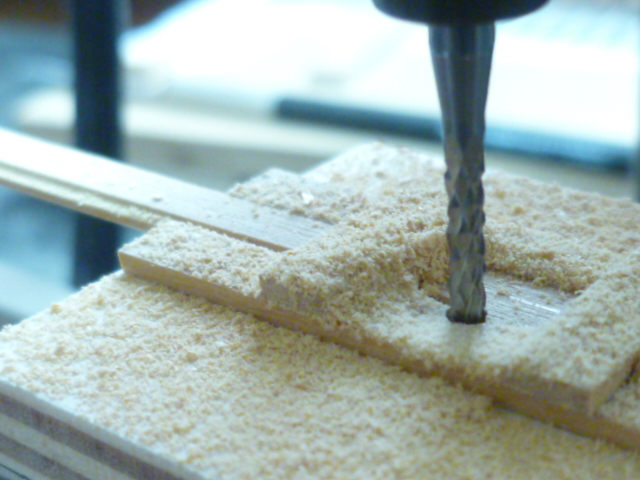
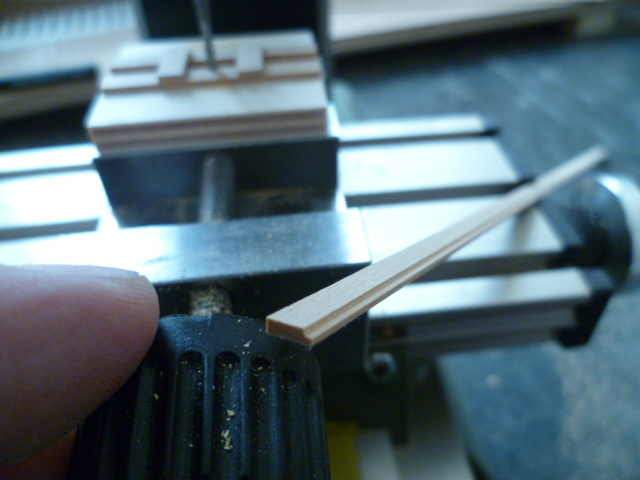
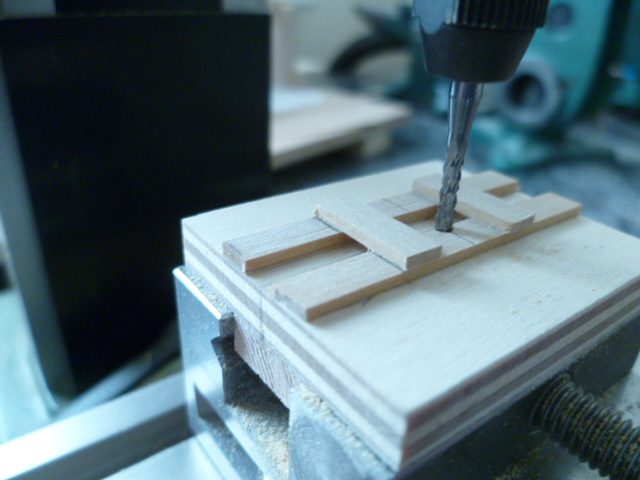
hi al the proxxon is variable speed from 5000-20000rpm......I didn't look at the speed setting! it was probably on its lowest setting of 5k. the milling cutter is 2mm diameter......one of those used in the electronics industry as sold on amazon.........box of eight I think for about £10. they are pretty good for our purposes and give a nice clean cut. the jig was pretty simple to make....max 10 minutes work.....then let the glue dry! the important thing is its very controllable and it keeps my fingers away from rapidly spinning hss. the timber was cut on the byrnes saw and I did think about cutting the rabbet on the same.....but came to the conclusion the mill was safer. shall be fitting the limber strakes today and drilling lots of holes for treenails! cheers....mick
- 504 replies
-
- 9
-
-
- washington
- galley
- (and 1 more)
-
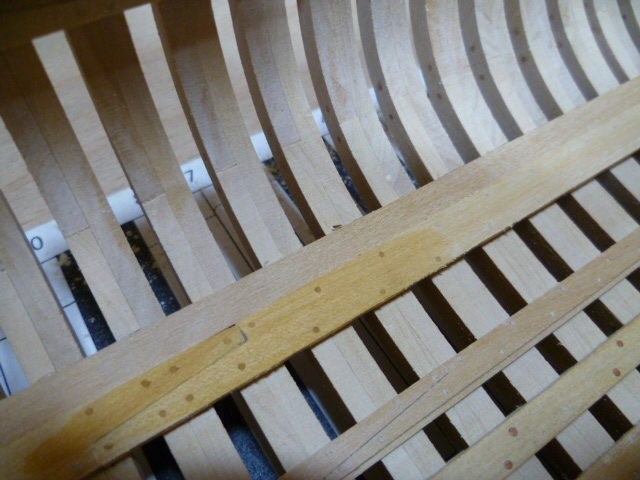
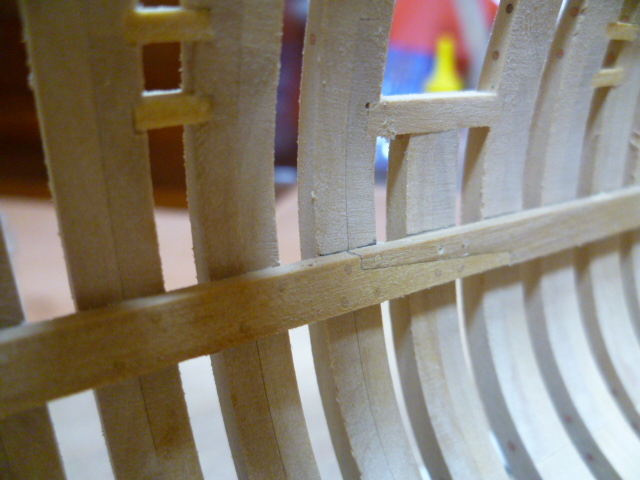
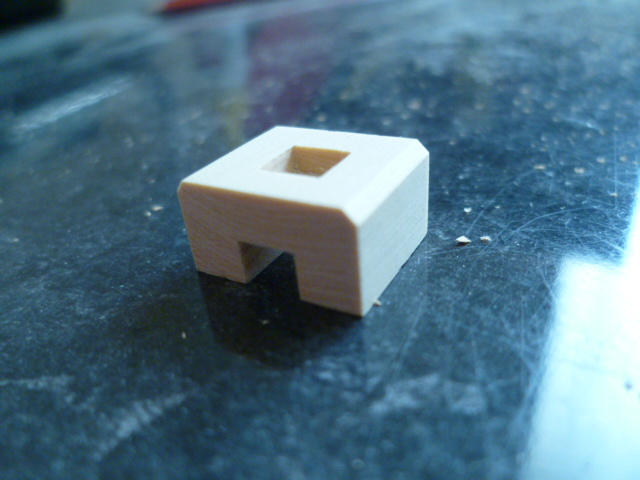
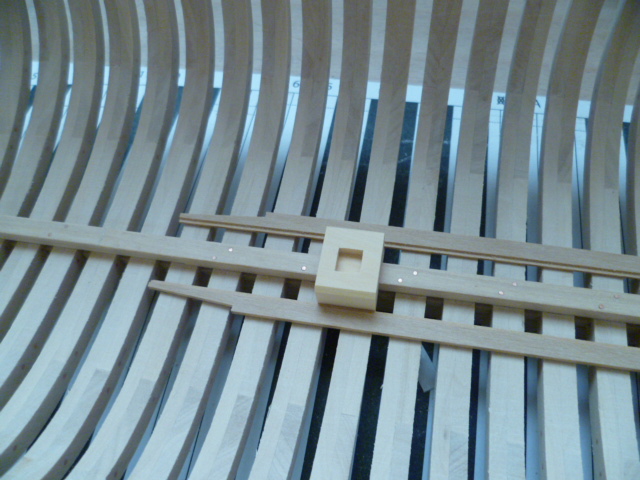
HI ALL SOME MORE COMPONENTS HAVE BEEN MADE. I STARTED WITH THE FORE , AFT AND CAPSTAN STEPS........THESE WERE MADE FROM EUROPEAN BOX BY WAY OF A SMALL CONTRAST TO THE PRIMARY TIMBER OF CASTELLO BOX. PRETTY STRAIGHTFORWARD TO MAKE....THE DADO FOR THE KEELSON WAS CUT ON THE BYRNES SAW. LIMBER STRAKES ARE UNDER MANUFACTURE...CUT FROM CASTELLO SHEET TO 1/16" THICK BY 3/16" WIDE. THE INNER EDGE OF THIS RECIEVES A RABBET FOR THE LIMBER BOARDS 1/32" BY 1/32". I WASNT TOO HAPPY ABOUT CUTTING THIS ON THE SAW SO I USED THE PROXXON MILL. THE PHOTOS SHOULD BE SELF EXPLANATORY, I HOPE, BUT IF NOT FEEL FREE TO ASK. THERE ARE THREE STRAKES PER SIDE....THE CENTRAL STRAKE BEING STRAIGHT WITH A SCARF AT EITHER END. THE FORE AND AFT STRAKES HAVE TOO BE CURVED TO MEET WITH THE KEELSON. I HAVE DECIDED TO TRY CHUCKS EDGE BENDING METHOD WITH THESE AND SO FAR ITS WORKING PRETTY WELL. MAIN DECK CLAMPS HAVE BEEN CUT 3/16" BY 3/32"...I THINK THERES A LITTLE MORE FAIRING REQ BEFORE THESE GO IN. PHOTOS ENCLOSED FOR YOUR DELICTATION! CHEERS....MICK


- 504 replies
-
- 14
-
-
- washington
- galley
- (and 1 more)
-
hi mike plenty of sanding! not sure how thick the toptimbers should be on this one....will probably go with the dimensions goodwin gives for cutters/sloops. outside of the frames have to be faired yet but fortunately amidships is pretty uniform with no excessive tumble home or curves to worry about. things might get a bit funky at the bow and stern! cheers....mick
- 504 replies
-
- 6
-
-
- washington
- galley
- (and 1 more)
-
hi kees your work in plastic is just as fine! cheers...mick
- 504 replies
-
- 4
-
-
- washington
- galley
- (and 1 more)
-
hi al i was looking through goodwins construction and fitting.......apparentley they bolted every frame after 1800. prior to that it was every other frame....with two bolts per frame. i tend to use goodwin as my construction bible. if anybody knows if they did it differently please let me know. as to why they did it i dont know...theres no explanation given as such. cheers.....mick
- 504 replies
-
- 5
-
-
- washington
- galley
- (and 1 more)
-
hi al please I'm blushing! if it wasn't for kurt and all the other staff at the nrg I wouldn't be building the Washington galley......and also thanks to jeff for drawing the plans in the first place. hopefully I can do the plans justice. thanks for all the likes and positive comments. back to work for me........I shall return shortly. cheers....mick
- 504 replies
-
- 4
-
-
- washington
- galley
- (and 1 more)
-
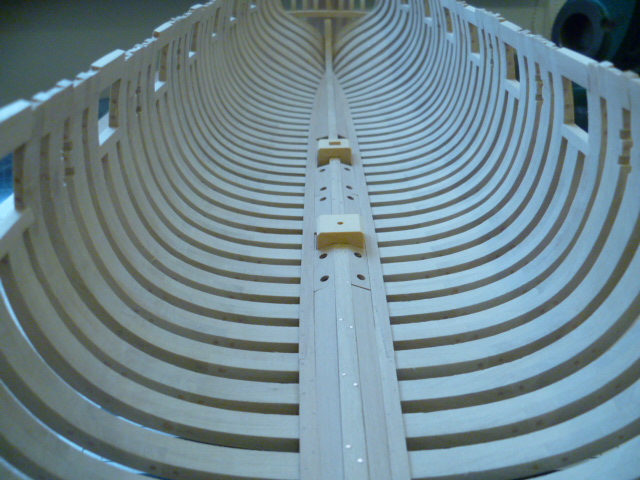
hi all just a quick update. keelson has now been fitted bolts for the scarf joints are 0.4mm copper........Goodwin says 1"-1/2" for these bolts so I spilt the difference and went for 3/4" more or less. bolts for the keelson into the frames are 0.8mm copper at every other frame station again as per Goodwin ...approx. 1 1/2" full size. quarter deck clamps are being glued in.....all treenails fitted prior to glueing. cheers for now.......mick


- 504 replies
-
- 20
-
-
- washington
- galley
- (and 1 more)
-
hi al nice job on that rabbet! looks like your cracking on with frame production. from your photos it looks like you have left more than enough to fair the frames.......I pretty much went to just outside the lines for the plan components and had no issues with fairing the hull...inside or out. I like marks method for the frame construction.....guaranteed to be flat with 1/4" glass on top.....I used a similar method.....drawingunderneath on a flat surface (mdf in my case) frame components glued up and weighed down with 1" square steel bar. looking forward to the frames going up! cheers....mick
-
hi mike welcome to the "dark side".....may the force be strong with you! looking forward to seeing your build log for triton. cheers.....mick
- 504 replies
-
- 5
-
-
- washington
- galley
- (and 1 more)
-
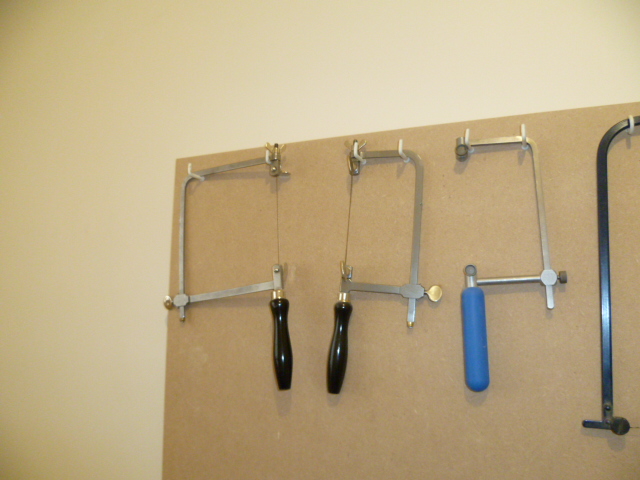
hi again al just some photos so you can actually see the tools I'm on about. cheers....mick
- 504 replies
-
- 10
-
-
- washington
- galley
- (and 1 more)
-
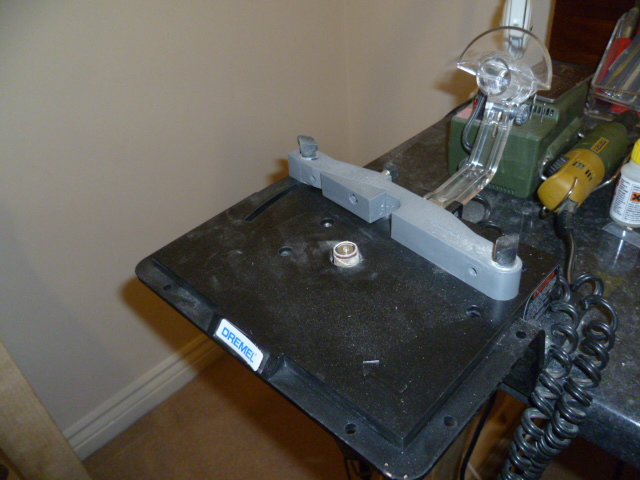
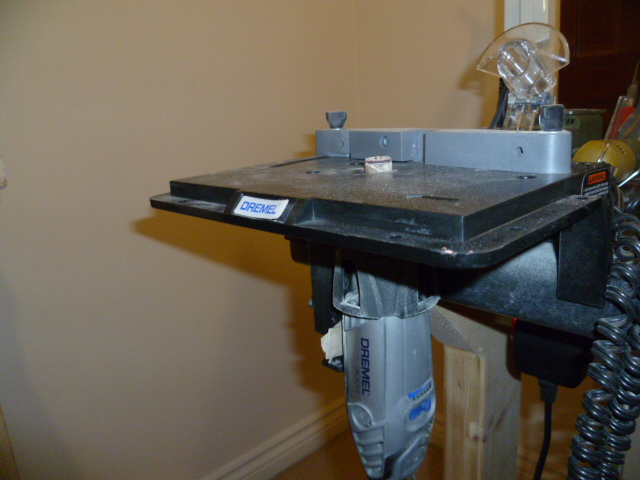
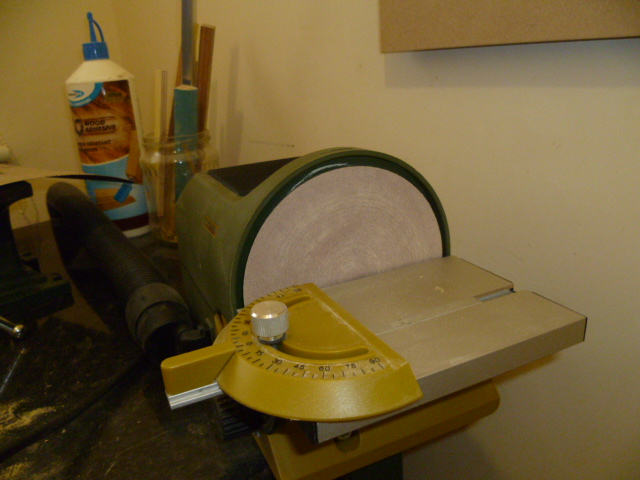
hi al all frame components for Washington and triton were cut out by hand with a jewellers saw with the appropriate blade. unfortunately I don't have space in my workshop for a scroll saw as I work in a small spare room in the house. I could put one in the garage but its too cold to work in there!!! once the frames are cut out I use a proxxon sanding machine to establish the flat edges for the butt joins between frame components and also for sanding as much as the outside of the frame as possible. I then resort to a dremel which is mounted in the dremel shaper table and fitted with a small sanding drum. I use this for all the inside curves and any bits on the outside that couldn't be dealt with on the proxxon.......sort of miniature spindle sander I suppose! I tend to sand just to the outside of the line...all lines have a "thickness" so its my way of leaving a bit of meat on the bones for nibbling away at later! hope this helps. cheers.......mick
- 504 replies
-
- 4
-
-
- washington
- galley
- (and 1 more)
-
hi johann tapered gratings!!!! beautifully done! wonderful to see as usual cheers....mick
-
hi alde cooperation has always achieved more than direct competition........but a little competitiveness is always healthy! always glad to share what little I know. cheers....mick
- 504 replies
-
- 7
-
-
- washington
- galley
- (and 1 more)
-
hi alde thanks for the nice comments. I make more mistakes than I care to admit!! small steps and youll soon be trying your hand at a fully framed hull......Washington is my first fully framed hull.....I chose it because it was relatively straightforward.....only one main deck...no shifted or cast frames...minimal number of gunports etc etc. I have long been an admirer of the likes of Harold underhill.....Harold Hahn....napean longridge to name just three. I looked at their work and thought I could never do anything like that despite having built numerous ship model kits. and then I found model ship world......the world of ship modelmaking is now your oyster!!! whatever project you decide to do there will be plenty of support not to mention the incomparable amount of knowledge that's available......plus photos!!!! a picture can be worth a thousand words especially when trying to explain something complex. having completed the triton cross section I can highly recommend it as a starting point for framed construction. I shall at some point start on the echo cross section as its a next step in frame construction......and hms echo in full hull form is very high on my list of priorities. look forward to seeing your triton build log.....shall follow avidly!! cheers....mick
- 504 replies
-
- 6
-
-
- washington
- galley
- (and 1 more)
-
hi albert thanks for looking in.....I hope one day to be able to emulate your standards sir! cheers ......mick
- 504 replies
-
- 5
-
-
- washington
- galley
- (and 1 more)
-
hi mark thanks for dropping in.....jig proved most useful as a saw guide for the bottom cut of the sill.....then as a resting point for a piece of timber,which was the thickness of the sill minus the thickness of the saw blade. hopefully this has kept everything lined up and rebates nice and tight. borrowed and adapted the jig from various builds....I think jeronimo was the main inspiration. now to rework those pesky filling frames on the starboard side! cheers.....mick
- 504 replies
-
- 5
-
-
- washington
- galley
- (and 1 more)