

.jpg.2c2c29e54623bd7b752bc2cdab599665.jpg)
Danstream
-
Posts
747 -
Joined
-
Last visited
Content Type
Profiles
Forums
Gallery
Events
Everything posted by Danstream
-
.thumb.jpg.c459ce4140b54c12eddb8eedfd446df3.jpg) Great start. Quality of details is astonishing already in your first post. Cheers, Dan
Great start. Quality of details is astonishing already in your first post. Cheers, Dan -
Very nice and realistic model. It really conveys the mood of such constructions. Cheers, Dan
- 333 replies
-
- 10
-

-
Here another build of the guy that takes pictures of real things and tells us that they are models, in 1:87 scale! Surely I will tag along. Cheers, Dan
- 98 replies
-
- 12
-
-

-

-
F4U-1A Corsair by DocRob - FINISHED - Tamiya - 1/32
Danstream replied to DocRob's topic in Non-ship/categorised builds
I have followed your build and enjoyed it a lot. You got a very nice model with a distinctive weathering finish. Congrats, Dan -
Fine result, Mike. although the edges are a bit 'soft', you got a very good feathered camouflage. Also the smoothness of the surfaces looks very good. I see you are getting constantly improved results. It will look great when finished. Best regards, Dan
- 51 replies
-
- 10
-
-
-
Lovely models, I like so much the Opel bus design. Kind regards, Dan
-
Fokker Dr1 by Javlin - FINISHED - Revell - 1/28 - PLASTIC
Danstream replied to Javlin's topic in Non-ship/categorised builds
Lovely done. Carefully assembled and very precisely painted. Indeed, you got a great looking model out of this old kit. Cheers, Dan -
F4U-1A Corsair by DocRob - FINISHED - Tamiya - 1/32
Danstream replied to DocRob's topic in Non-ship/categorised builds
Fantastic details. Waiting for the final, cheers, Dan -
Awesome model, I love the livery portrayed in the model. This time it was a quick build. The thick wing, trademark of Fokker on his late planes (Dr-1, DVII) and based on aerodynamic test data overlooked by others, is well visible in the model. Congrats, Dan
- 46 replies
-
- 11
-
-
Fokker Dr1 by Javlin - FINISHED - Revell - 1/28 - PLASTIC
Danstream replied to Javlin's topic in Non-ship/categorised builds
Your Fokker turned out very nice. 👍 Dan -
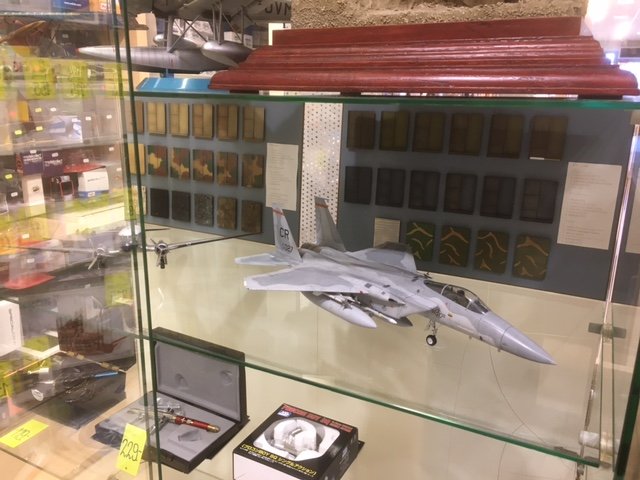
My F-15 model found its final place in the exposition case in the local hobby shop, proudly showing off together with other models of mine: Dan
-
Fokker Dr1 by Javlin - FINISHED - Revell - 1/28 - PLASTIC
Danstream replied to Javlin's topic in Non-ship/categorised builds
Please note that the green color was applied by Fokker using a stiff brushes to deliberately obtain a streaked finish. I am looking forward to see this classic finished. Dan PS - I just noticed that the start of this build is appended to the Re 2005 one. I see that the streaking finish is what you are aiming at, so discard my comment above. If you would like to accept a comment on the result so far, I would say that it conveys the impression. However, in my view, we have to consider that the finish was done manually by brush strokes and if you imagine a person in scale doing that, probably you could have obtained a finer (smaller scale) texture. But this is just a thought of mine. -
You got an imposing model from this old lady with a great three tone livery. The cockpit through the canopy looks great. Congrats, Dan
-
Dehavilland Mosquito by Edwardkenway - Tamiya -1:48
Danstream replied to Edwardkenway's topic in Non-ship/categorised builds
As already said by @Canute, the only way to avoid silvering of decals is to prepare the surface with a gloss coat. Unfortunately this means that you have to restore the wanted finish (matt or satin) afterwards. The Tamiya decals are known to be thick and recalcitrant to settling agents Pressing them down with pads soaked with rather hot water might help (probably the heat softens the decals and helps them to conform). If you have a look to my Spitfire in the link below you may see the result that I obtained with them. There I used hot water followed by numerous applications of Micro set/sol. I also sliced the decals around recessed or prominent details in several cases. Dan- 33 replies
-
- 10
-
-
-
F4U-1A Corsair by DocRob - FINISHED - Tamiya - 1/32
Danstream replied to DocRob's topic in Non-ship/categorised builds
Amazing level of details. Following silently. Cheers, Dan -
It turned out very nice. The reveresed insignias on the wing are barely noticeable and do not detract from the good look of the model. I like the green finish which is not dead matt. Indeed, the paint used by Reggiane was a very dark green and had a degree of shine, probably to increase wear resistance and decrease drag. Cheers, Dan
-
Lovely model and beautiful presentation. As said, there is a lot to like: the careful assebly, the great finish, the rigging, the propeller, the many details, etc. Are you aiming at muting the large decals? In that case, I might see your point. Have you tried to play a bit with post-processing the picture? I would like to see one of them turned into B/W or, better, to sepia. Congrats, Dan
-
Hi Chris, let me add to what already said on this subject, having had the same problem and, luckily, a very satisfactory solution of it. I do not think that you activity of making models had anything to do with the insurgence of a cataract (although I rekonise that you used the sentence ironically). Among causes, we have: genetics, ageing and degradation due to UV exposure. I had all of these (I spent in my youth lot of time in sunny places without any sunglasses protections). Said that, the surgery resolved the problem brilliantly and I could see the world with new eyes (literally).
-
Beautiful model. The green finish is spectacular and the rigging gives that busy look which is typical of these biplanes, I love it. Cheers, Dan
-
Thanks Gary, I appreciate your comment. Dan
-
Nice job on this great looking plane. I hate to say it now, but the insignias of the 'fasci's are unfortunately all upside down (including the colored one below the cockpit). If that doesn't bother you, I would suggest to leave them like that (it could even have an associated ideological meaning, if you wish). Greetings, Dan
-
F4U-1A Corsair by DocRob - FINISHED - Tamiya - 1/32
Danstream replied to DocRob's topic in Non-ship/categorised builds
Great looking radial! Dan -
F4U-1A Corsair by DocRob - FINISHED - Tamiya - 1/32
Danstream replied to DocRob's topic in Non-ship/categorised builds
Great work on painting the cockpit, greetings, Dan