Freebird
-
Posts
336 -
Joined
-
Last visited
Content Type
Profiles
Forums
Gallery
Events
Everything posted by Freebird
-
Looking really good Rusty! I’ve been picking at mine on the frames. With work, yard/house upkeep and honey does, doesn’t leave much modeling time. Once cooler weather comes around I’ll be back at it. Keep up the great work! Best Regards …. Rick
-
Let me add my 2 cents. I've been a modeler for decades of R/C airplanes and this I feel has given me some skills that have helped me to transition over to model ship building, so keep this in mind. After reading many build logs and seeing some of the awesome and inspiring builds on MSW, I decided to start with Chuck Passaro's Medway Longboat. It ticked off a lot of boxes for my first build. It was of a nice size, the instructions were very detailed, no guns, limited rigging, learning to single plank a hull and a fair amount of scratch building even though it was a "kit." Plus, the subject matter had a tremendous amount of appeal for me. Best of all, there were several build logs and the designer was available to answer questions and give advice - priceless! My Longboat came out very nicely and I attribute this to the well thought out design and available help. Chuck has a way of building confidence and making you think that you can build anything. For me, anything that Chuck has designed would be a great choice, Model Shipways has a few of his designs with very nice instructions. Chuck also has some offerings at his own company "Syren Ship Model Company". Check it out! Best Regards .... Rick
-
Non-perfections?!?! I didn't know that was in your vocabulary. LOL! I can't wait to see your next steps. Summer is going well, working a lot and honey do's hasn't left a lot of shipyard time. I have started Chuck's Speedwell and have the keel and some frames built. I really like your choice of a longboat, really have a fascination about them; Olha's example at the convention was amazing. My Admiral got me Pavel's kit for Xmas and I'm chomping at the bit to start it but can't until I really make some good progress on Speedwell. Best Regards .... Rick
-
Thukydides, I’ve been following your build and I’m extremely impressed with your level of attention to detail. I have only one question: how did you shrink a real cutter to 1:64 scale? Congratulations on a truly impressive model! Best Regards …. Rick
- 562 replies
-
- 3
-

-

-
- vanguard models
- alert
- (and 2 more)
-
Tom, you are an amazing modeler! From your gorgeous Morgan to a longboat, I’m truly impressed! Your longboat is looking awesome and I’m sure it’ll equal your Morgan in detail and finish. Best Regards …. Rick
-
Looking really good, Rusty! Best Regards …. Rick
-
Rusty, very happy that you’re better. Your Speedwell is looking great. Mine is stalled at the moment, work has been a bear and family has been demanding a lot of time. The notches on the bottom of my frames are pretty clean, so it looks like I’ll have to deepen them a little. Not a big deal and all part of the process. Keep plugging away! Best Regards …. Rick
-
Absolutely - YEA! Best Regards .... Rick
-
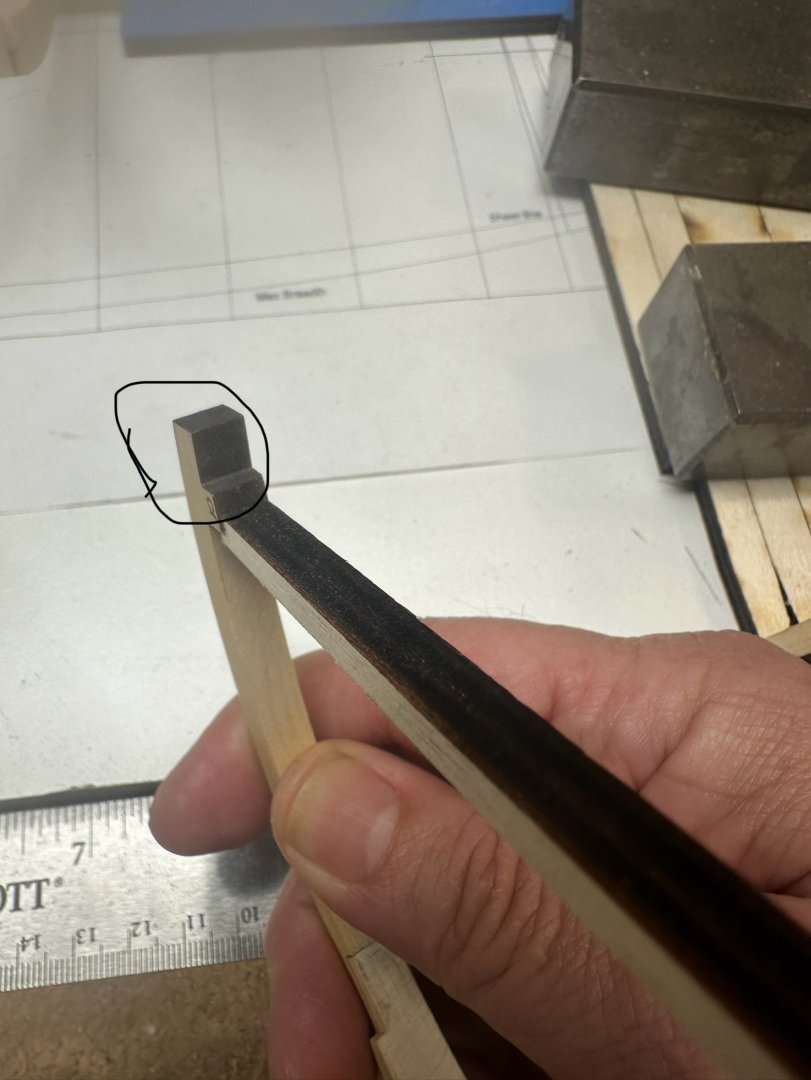
Rusty, Quick question - in your close-up picture of frames on the keel, the bottom of the frames are flush with the top of the rabbet, did you have to deepen the notch in the frames to get them to seat? Best Regards .... Rick
-
Excellent Rusty! Best Regards …. Rick
-
Thank you Chuck! Best Regards …. Rick
-
Here’s the area I’m asking about, it’s circled. Thank you! Best Regards …. Rick
-
Chuck, Not to change this fascinating subject, but when removing char from the short frames, is the char removed from the area above the tab? Or is this area going to be covered by other details. It's hard to see in the framing pictures. Thanks! Best Regards .... Rick
-
Nice job on the frames! Lots of work indeed! I was thinking about the same thing, adding treenails to the frames before or after they are glued to the keel. My first thought is to (if you're adding them) is to do so before the frames are glued to the keel as they are easier to handle while in a free state. But then, if they are glued to the keel, you could make adjustments to their alignment to make sure you have consistency for the overall effect. I'm also thinking that a jig of some sort would give the consistency needed for a neat effort. Best Regards .... Rick
-
Mike, I’ve read your Winnie log several times, and it’s truly an amazing model. Thanks for reminding me that your model was built without treenails, it’s a very nice look. Best Regards …. Rick
-
Mike, It's really nice to see the treenail contrast between yours and Chuck's Speedwell. At the moment, I'm hesitant to add treenails to my Speedwell as if not done correctly it'll really ruin the look of the model. I got the opportunity to really scope out Chuck's Speedwell at the conference back in April and in my mind I was trying to visualize the non-treenail look and your Speedwell shows me exactly what I was looking for. Best Regards .... Rick
-
Just fabulous, Mike! Are you going to add treenails to the frames and planking? Best Regards .... Rick
-
Totally awesome Glenn! Best Regards .... Rick
- 840 replies
-
- 2
-
-
- winchelsea
- Syren Ship Model Company
- (and 1 more)
-
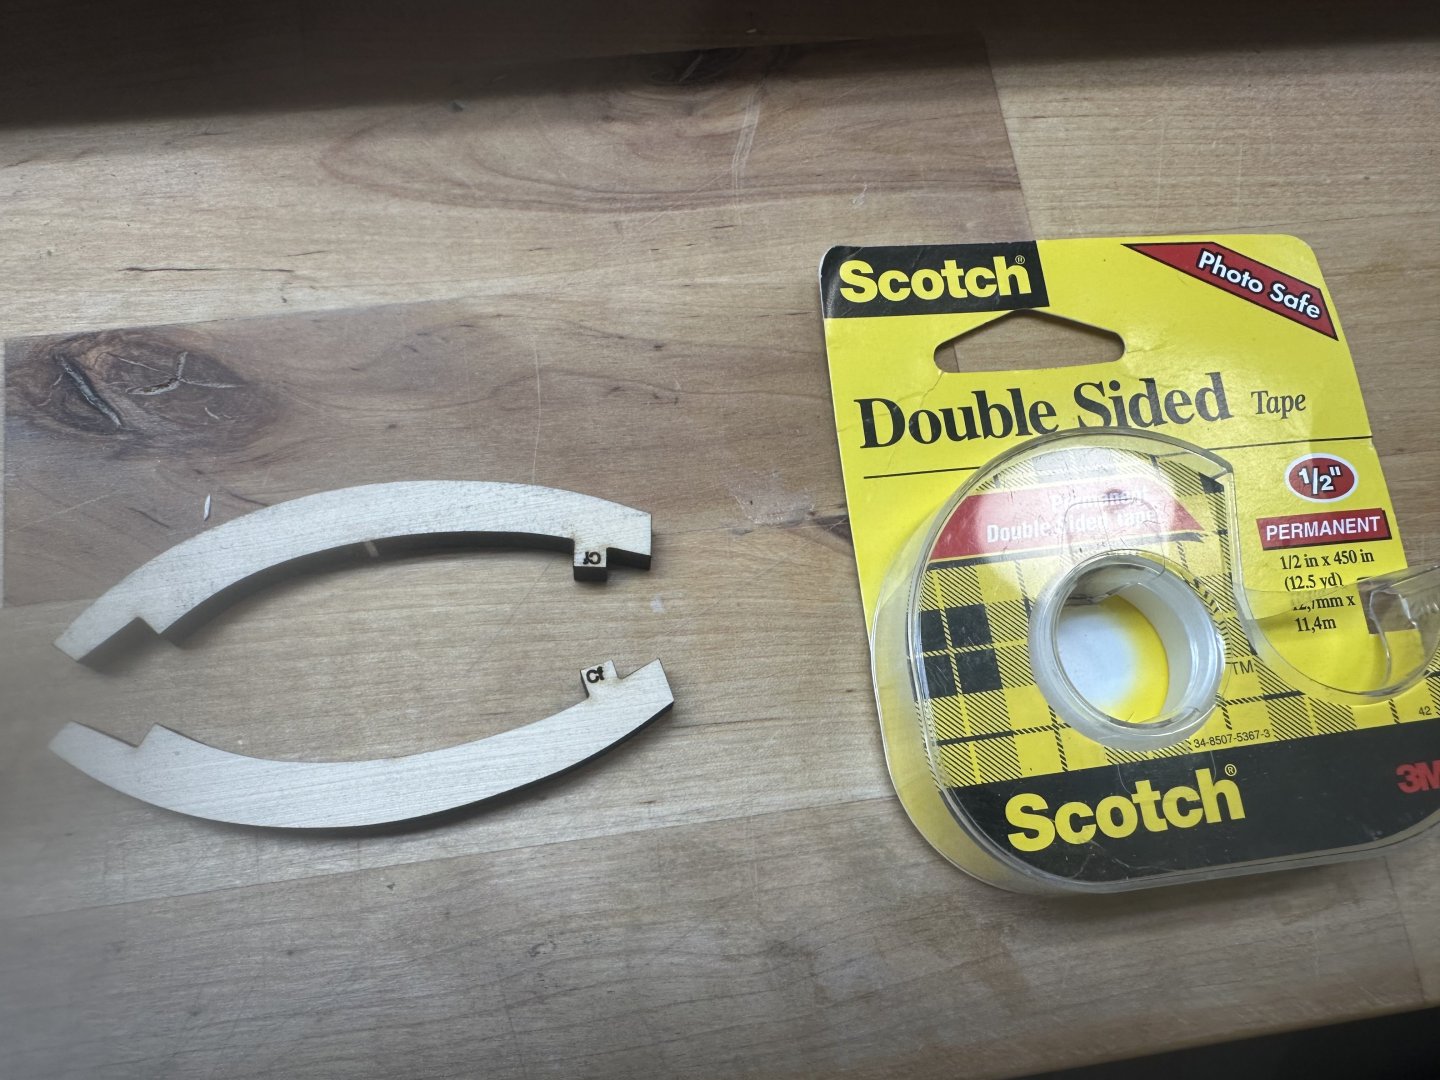
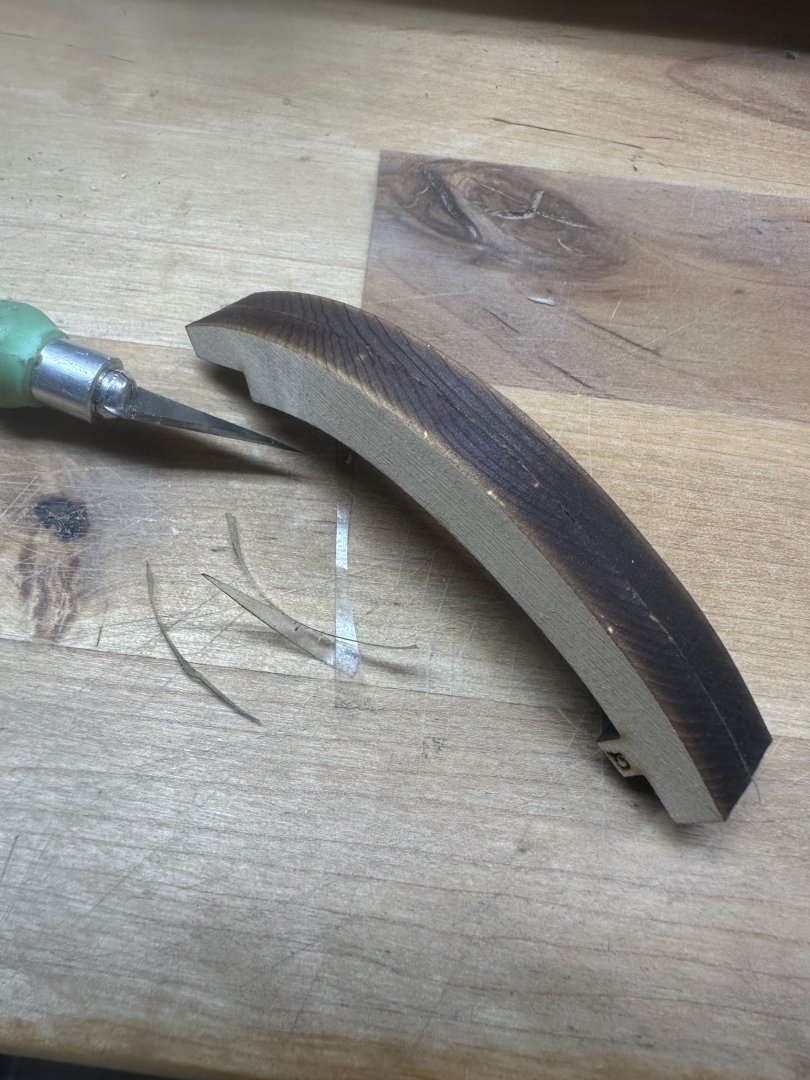
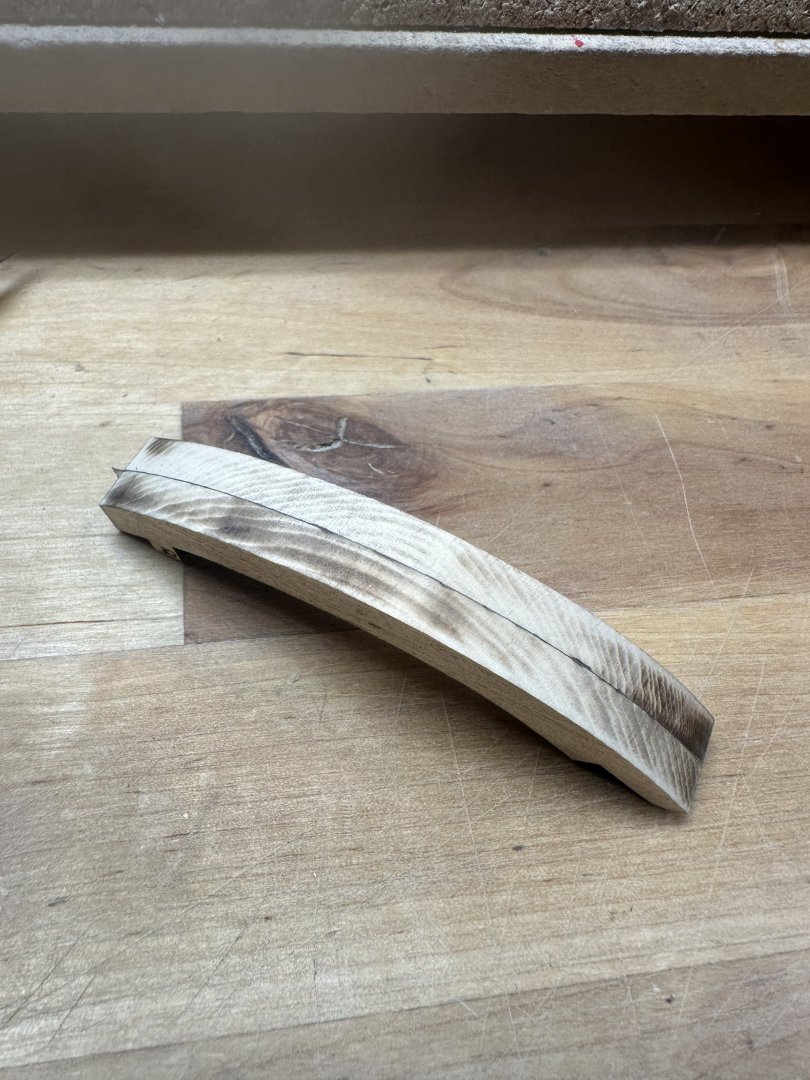
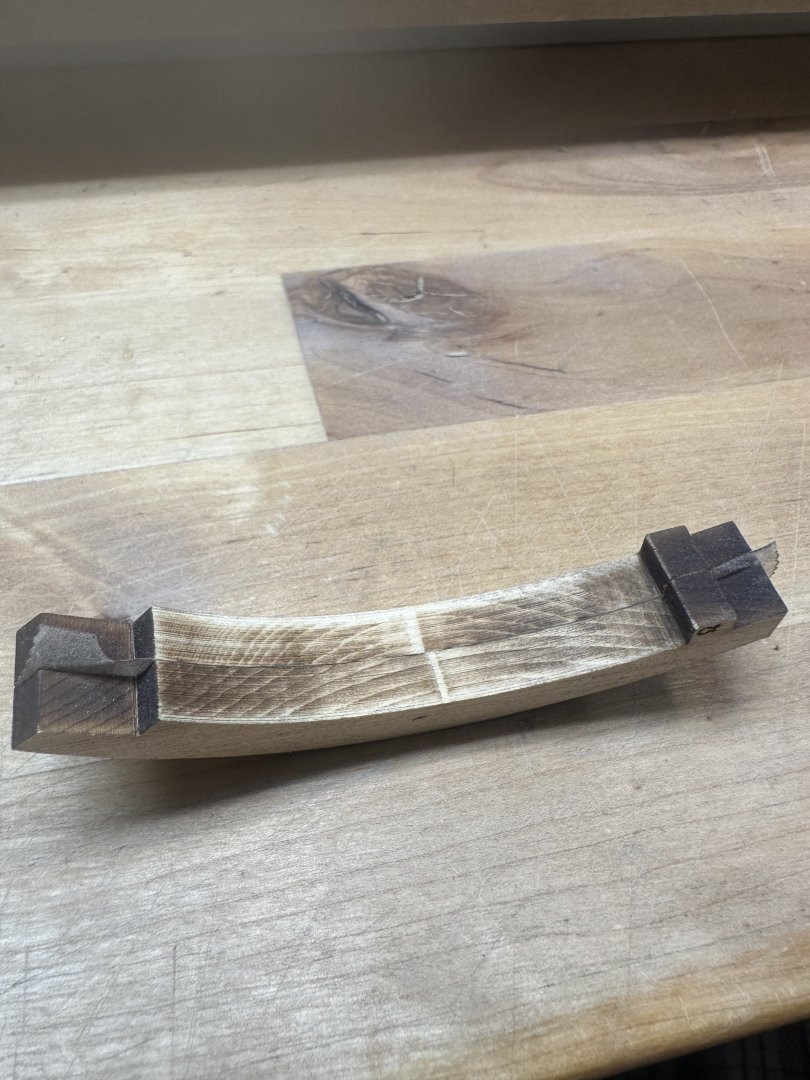
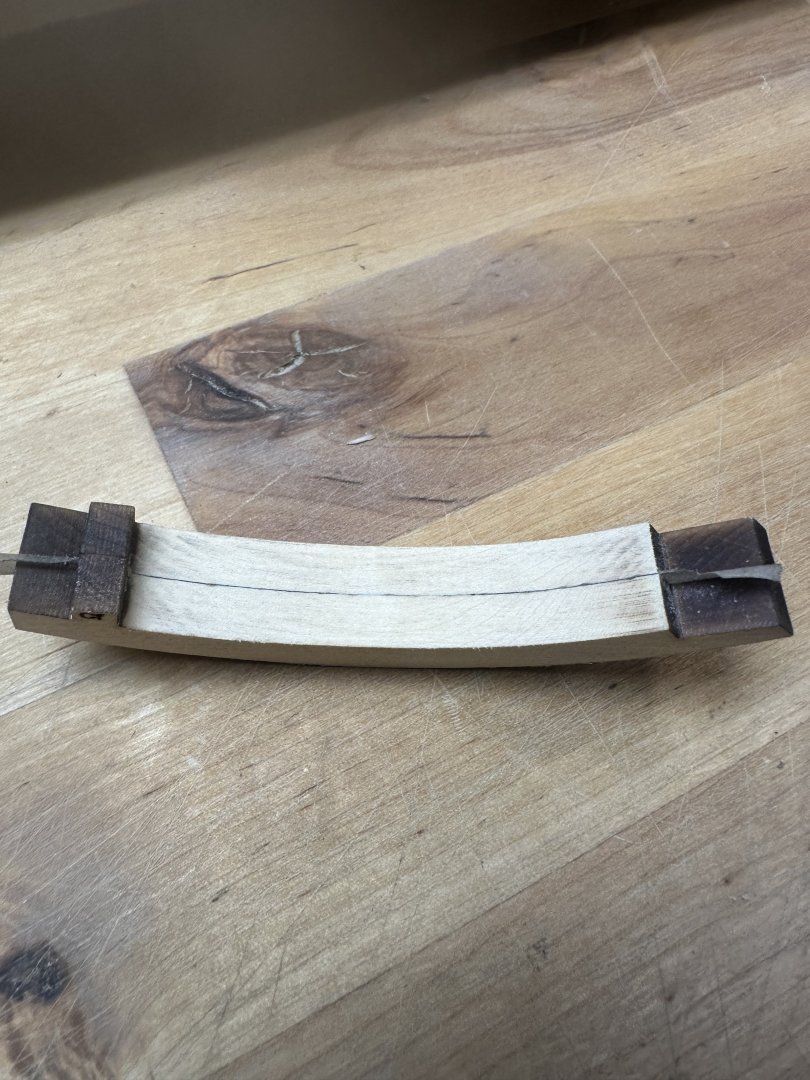
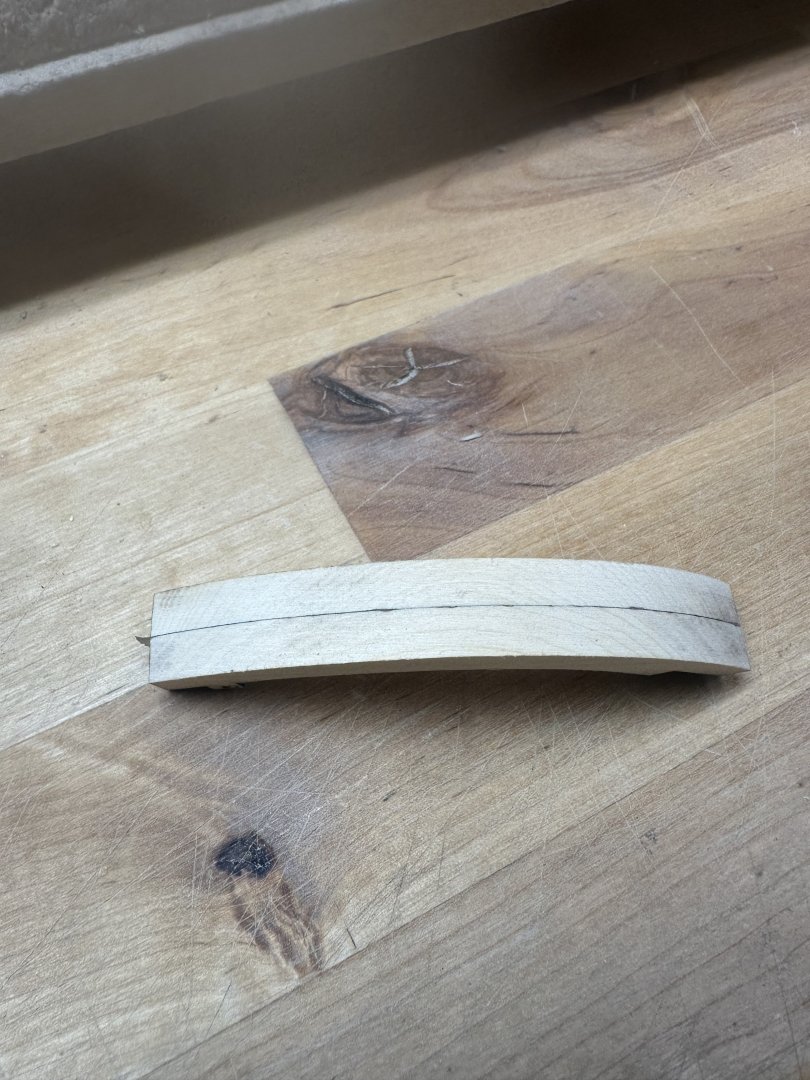
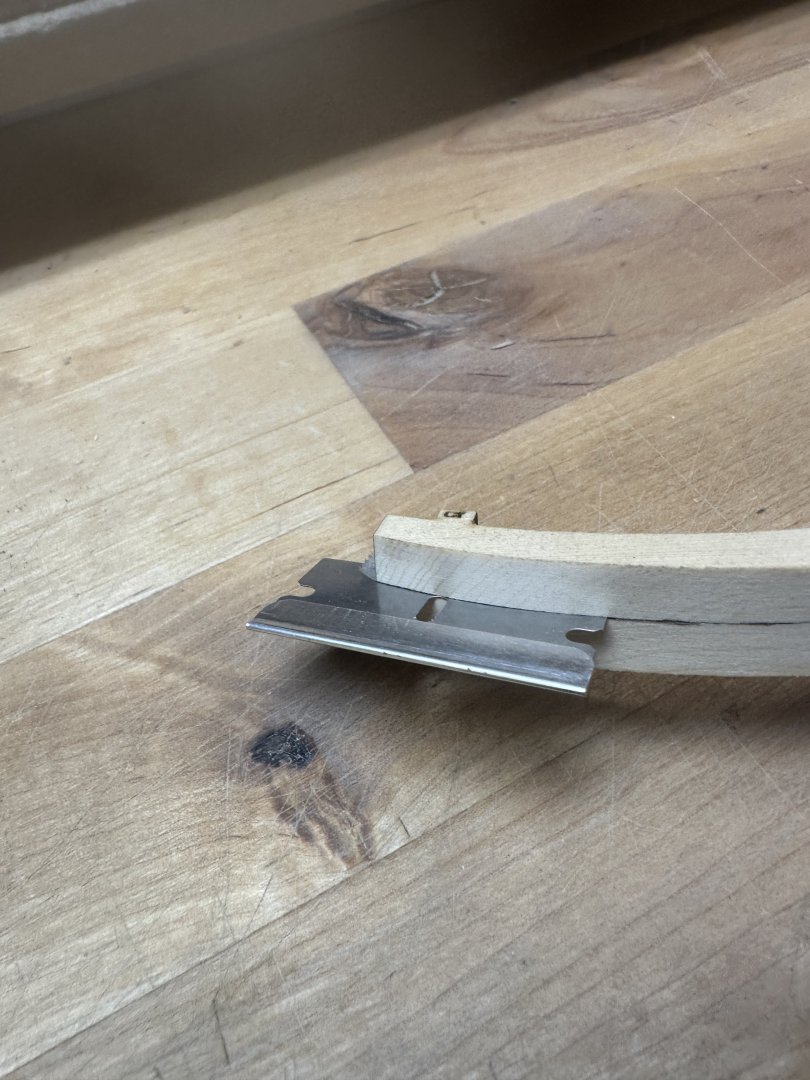
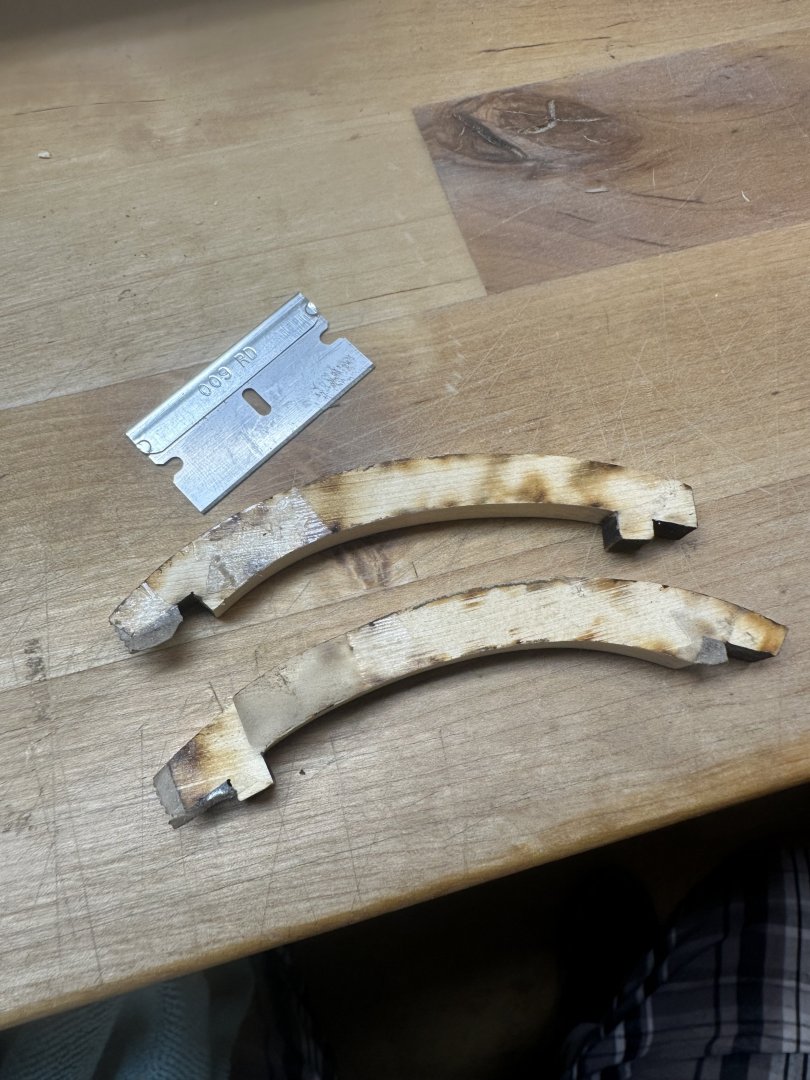
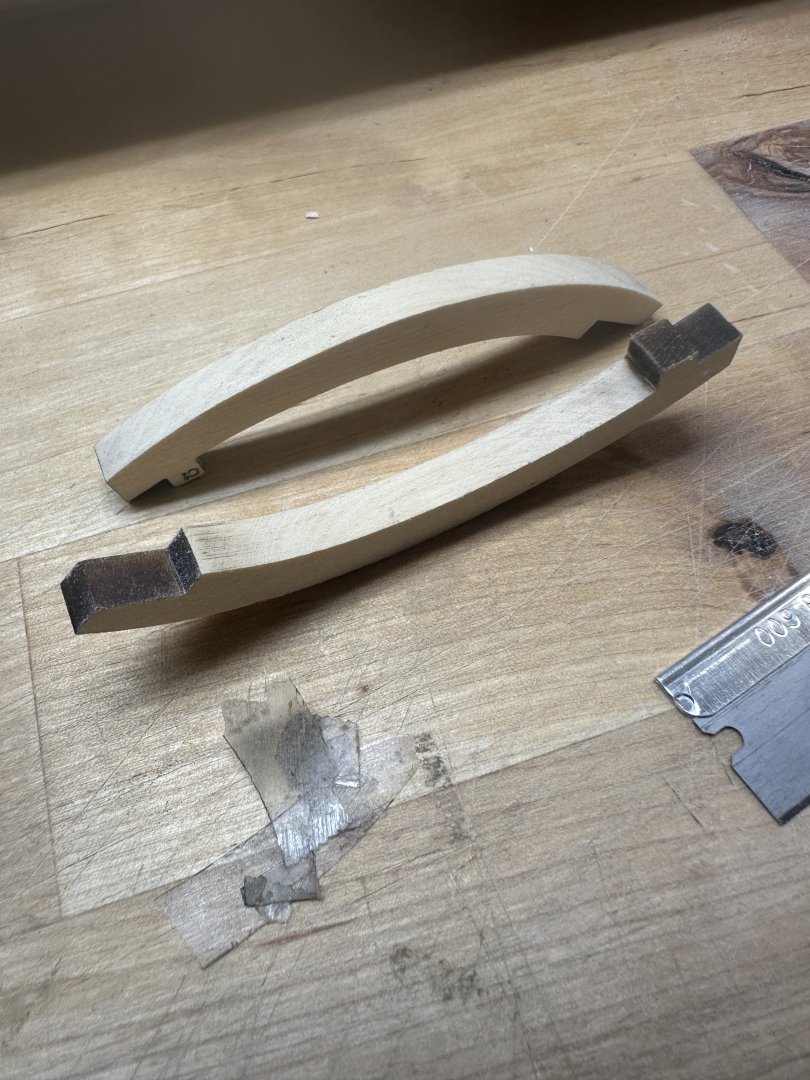
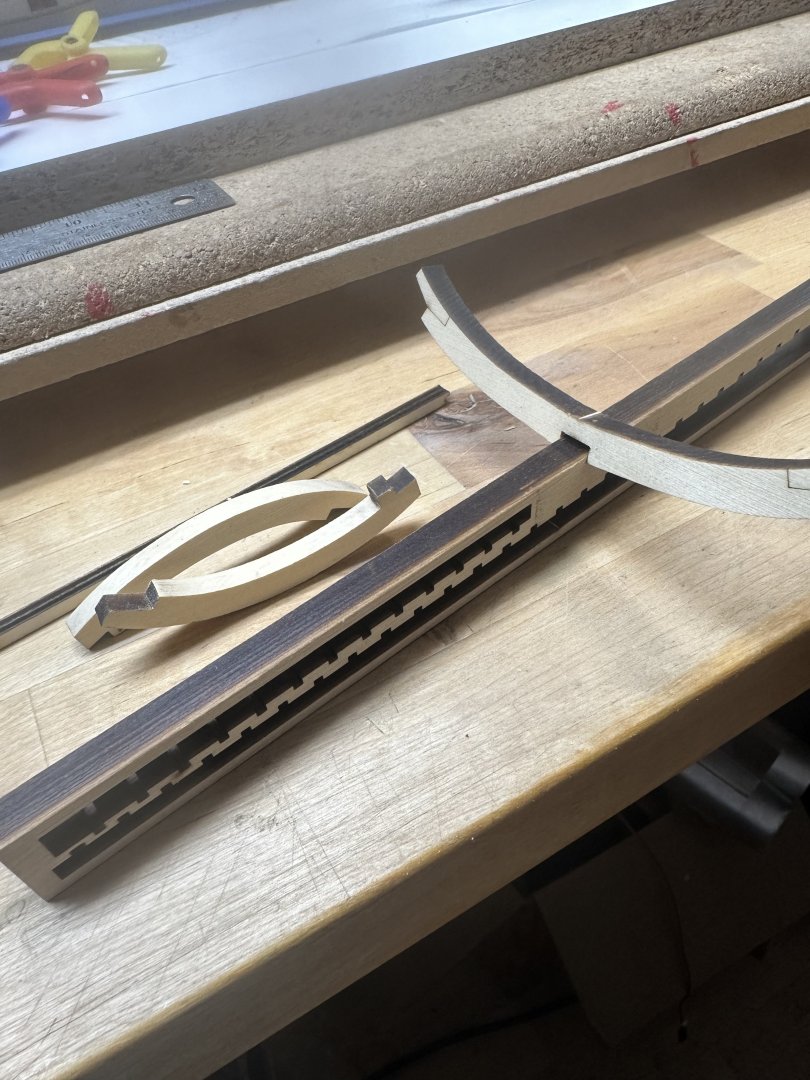
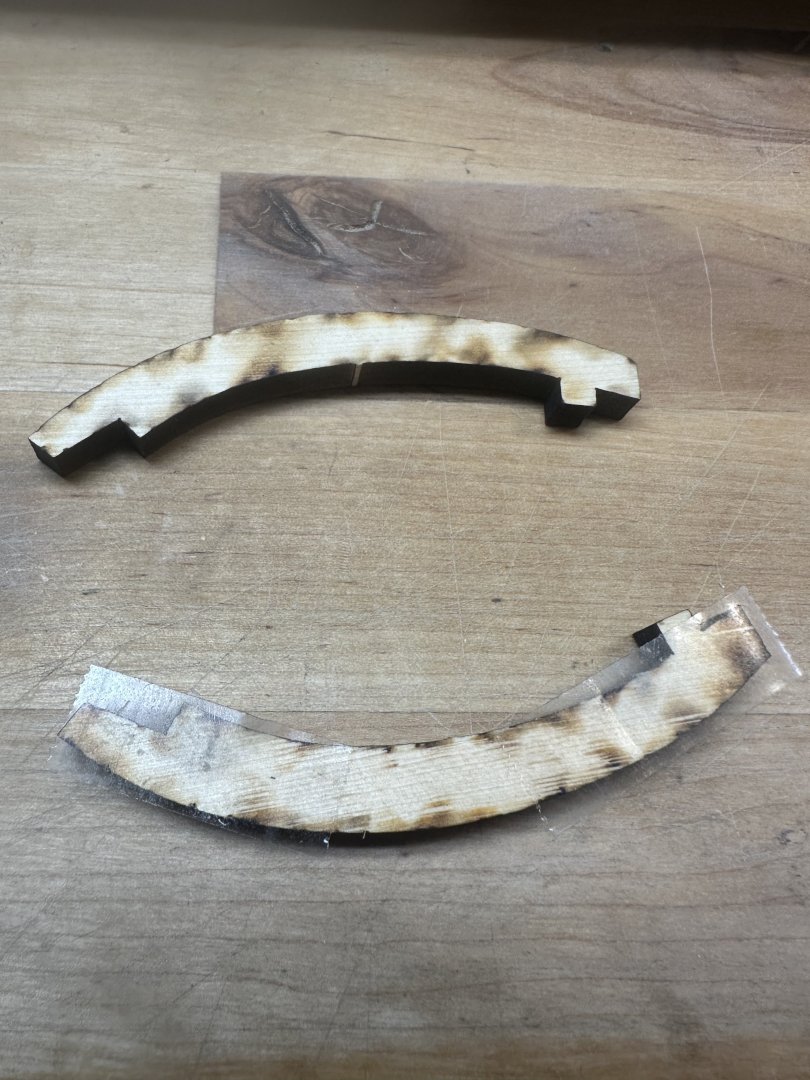
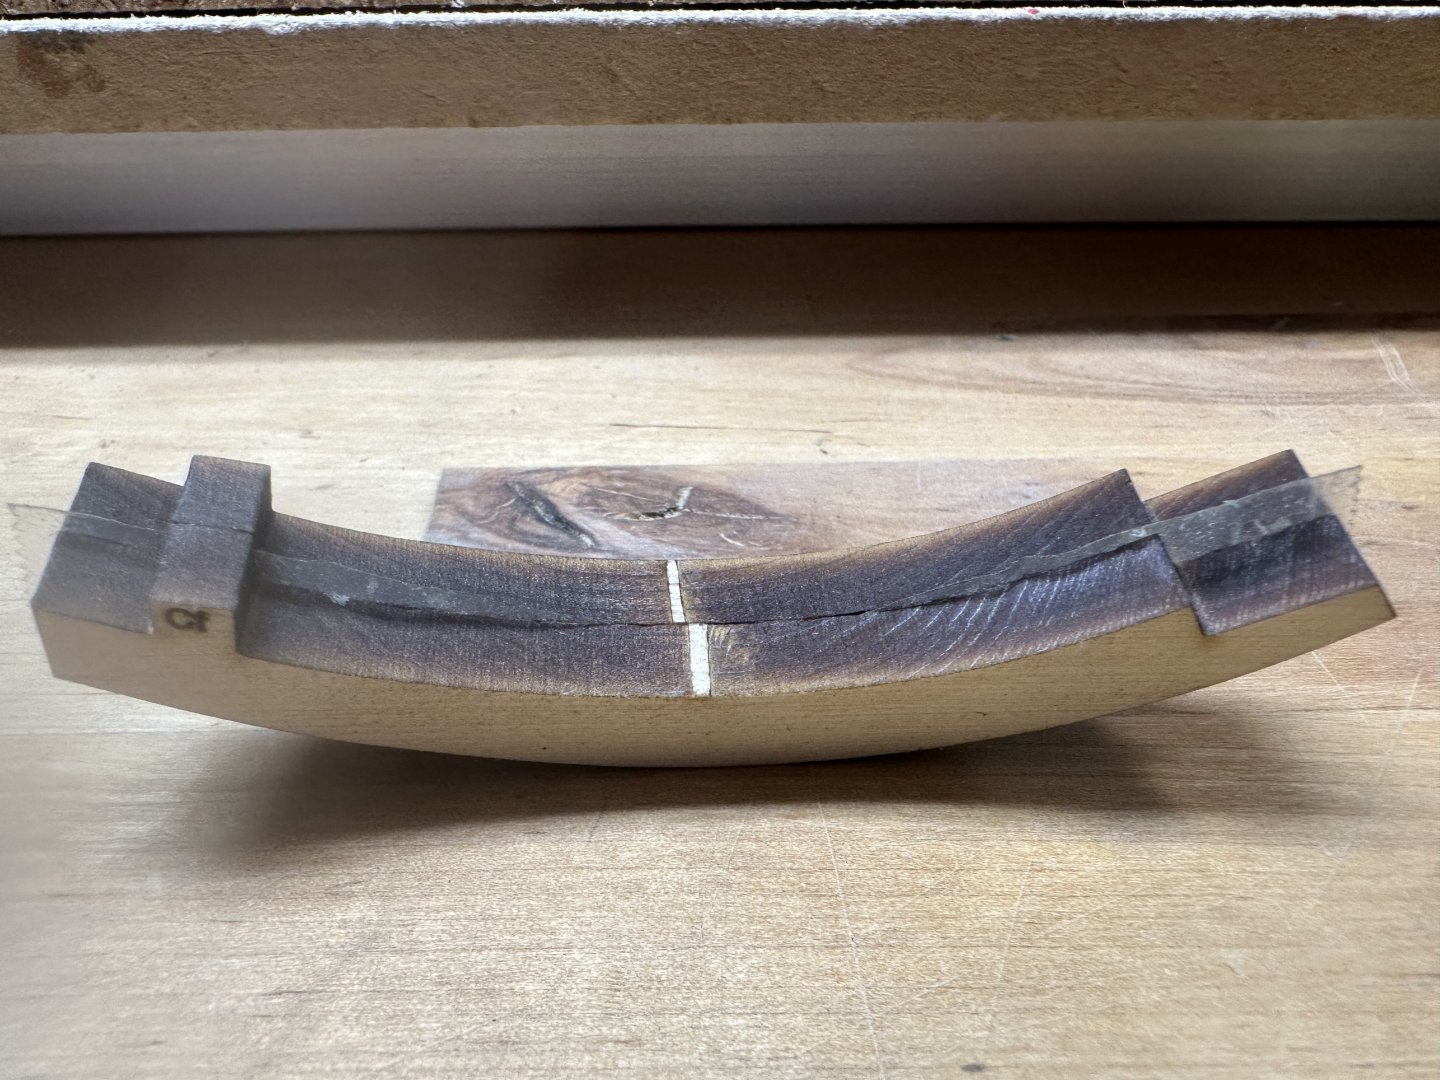
Frame Sanding: I’ve been working on sanding/building the frames. Assembling the frames for the most part goes easily, not much trimming is needed for good fit of the parts. Sanding on the other hand is a long process for each frame, especially the tall frames with their many parts. I don’t mind the sanding as it’s relaxing, but there’s so much of it. I was thinking there had to be a more efficient way to sand the parts especially those that are the same size/shape. Thinking back to my r/c plane building days, which I still enjoy, I remember when making multiple parts that were the same shape/size, I’d stack them together and sand them to size. Why couldn’t I do the same here? All I needed was a way to hold the parts together without leaving any marks on the wood. Clamping them together was out as the clamps would need to be moved around as sanding progressed. Rummaging around my tape supply I came across some Scotch brand double-sided tape. Hmmmm….would the adhesive have enough hold to keep the parts together? Only one way to find out. Starting small, I used the futtock’s from short frame Cf. I applied a short length to each end with some overhang on each end. Matching the parts together is easy (thanks Chuck!), just press them together making sure they look like a single part. Using a sharp blade I trimmed the tape from the concave/convex sides. Now it was a simple task with a spindle sander (a sanding drum on a drill press) for the concave side and a disc sander for the convex side. A couple of swipes removes the majority of the char. Gentle pressure is needed so you don’t over sand the part. I finish up using 320 sand paper and then separate the parts. To do so, you’ll need a new razor blade to pry the parts apart, the tape holds them extremely tight together. Once separated, use the overhang to remove the tape. You now have 2 parts that are identical and the rest of sanding goes very quickly. It takes me about 10-15 minutes to sand a pair of parts instead of 20-30 minutes per piece. Sorry for being so long winded, but I hope someone can use this technique. One other thing, I use the billet from the rising wood as a gage to check the width of the notch and adjust it so the frame will fit on the keel easily. Some pictures. Best Regards …. Rick
-
It took me over 2 hours to bag the frames, it’s the only way to keep them organized. Nice idea about applying WOP while in the billet, I’ve been applying poly when I finish building a frame. Best Regards …. Rick
-
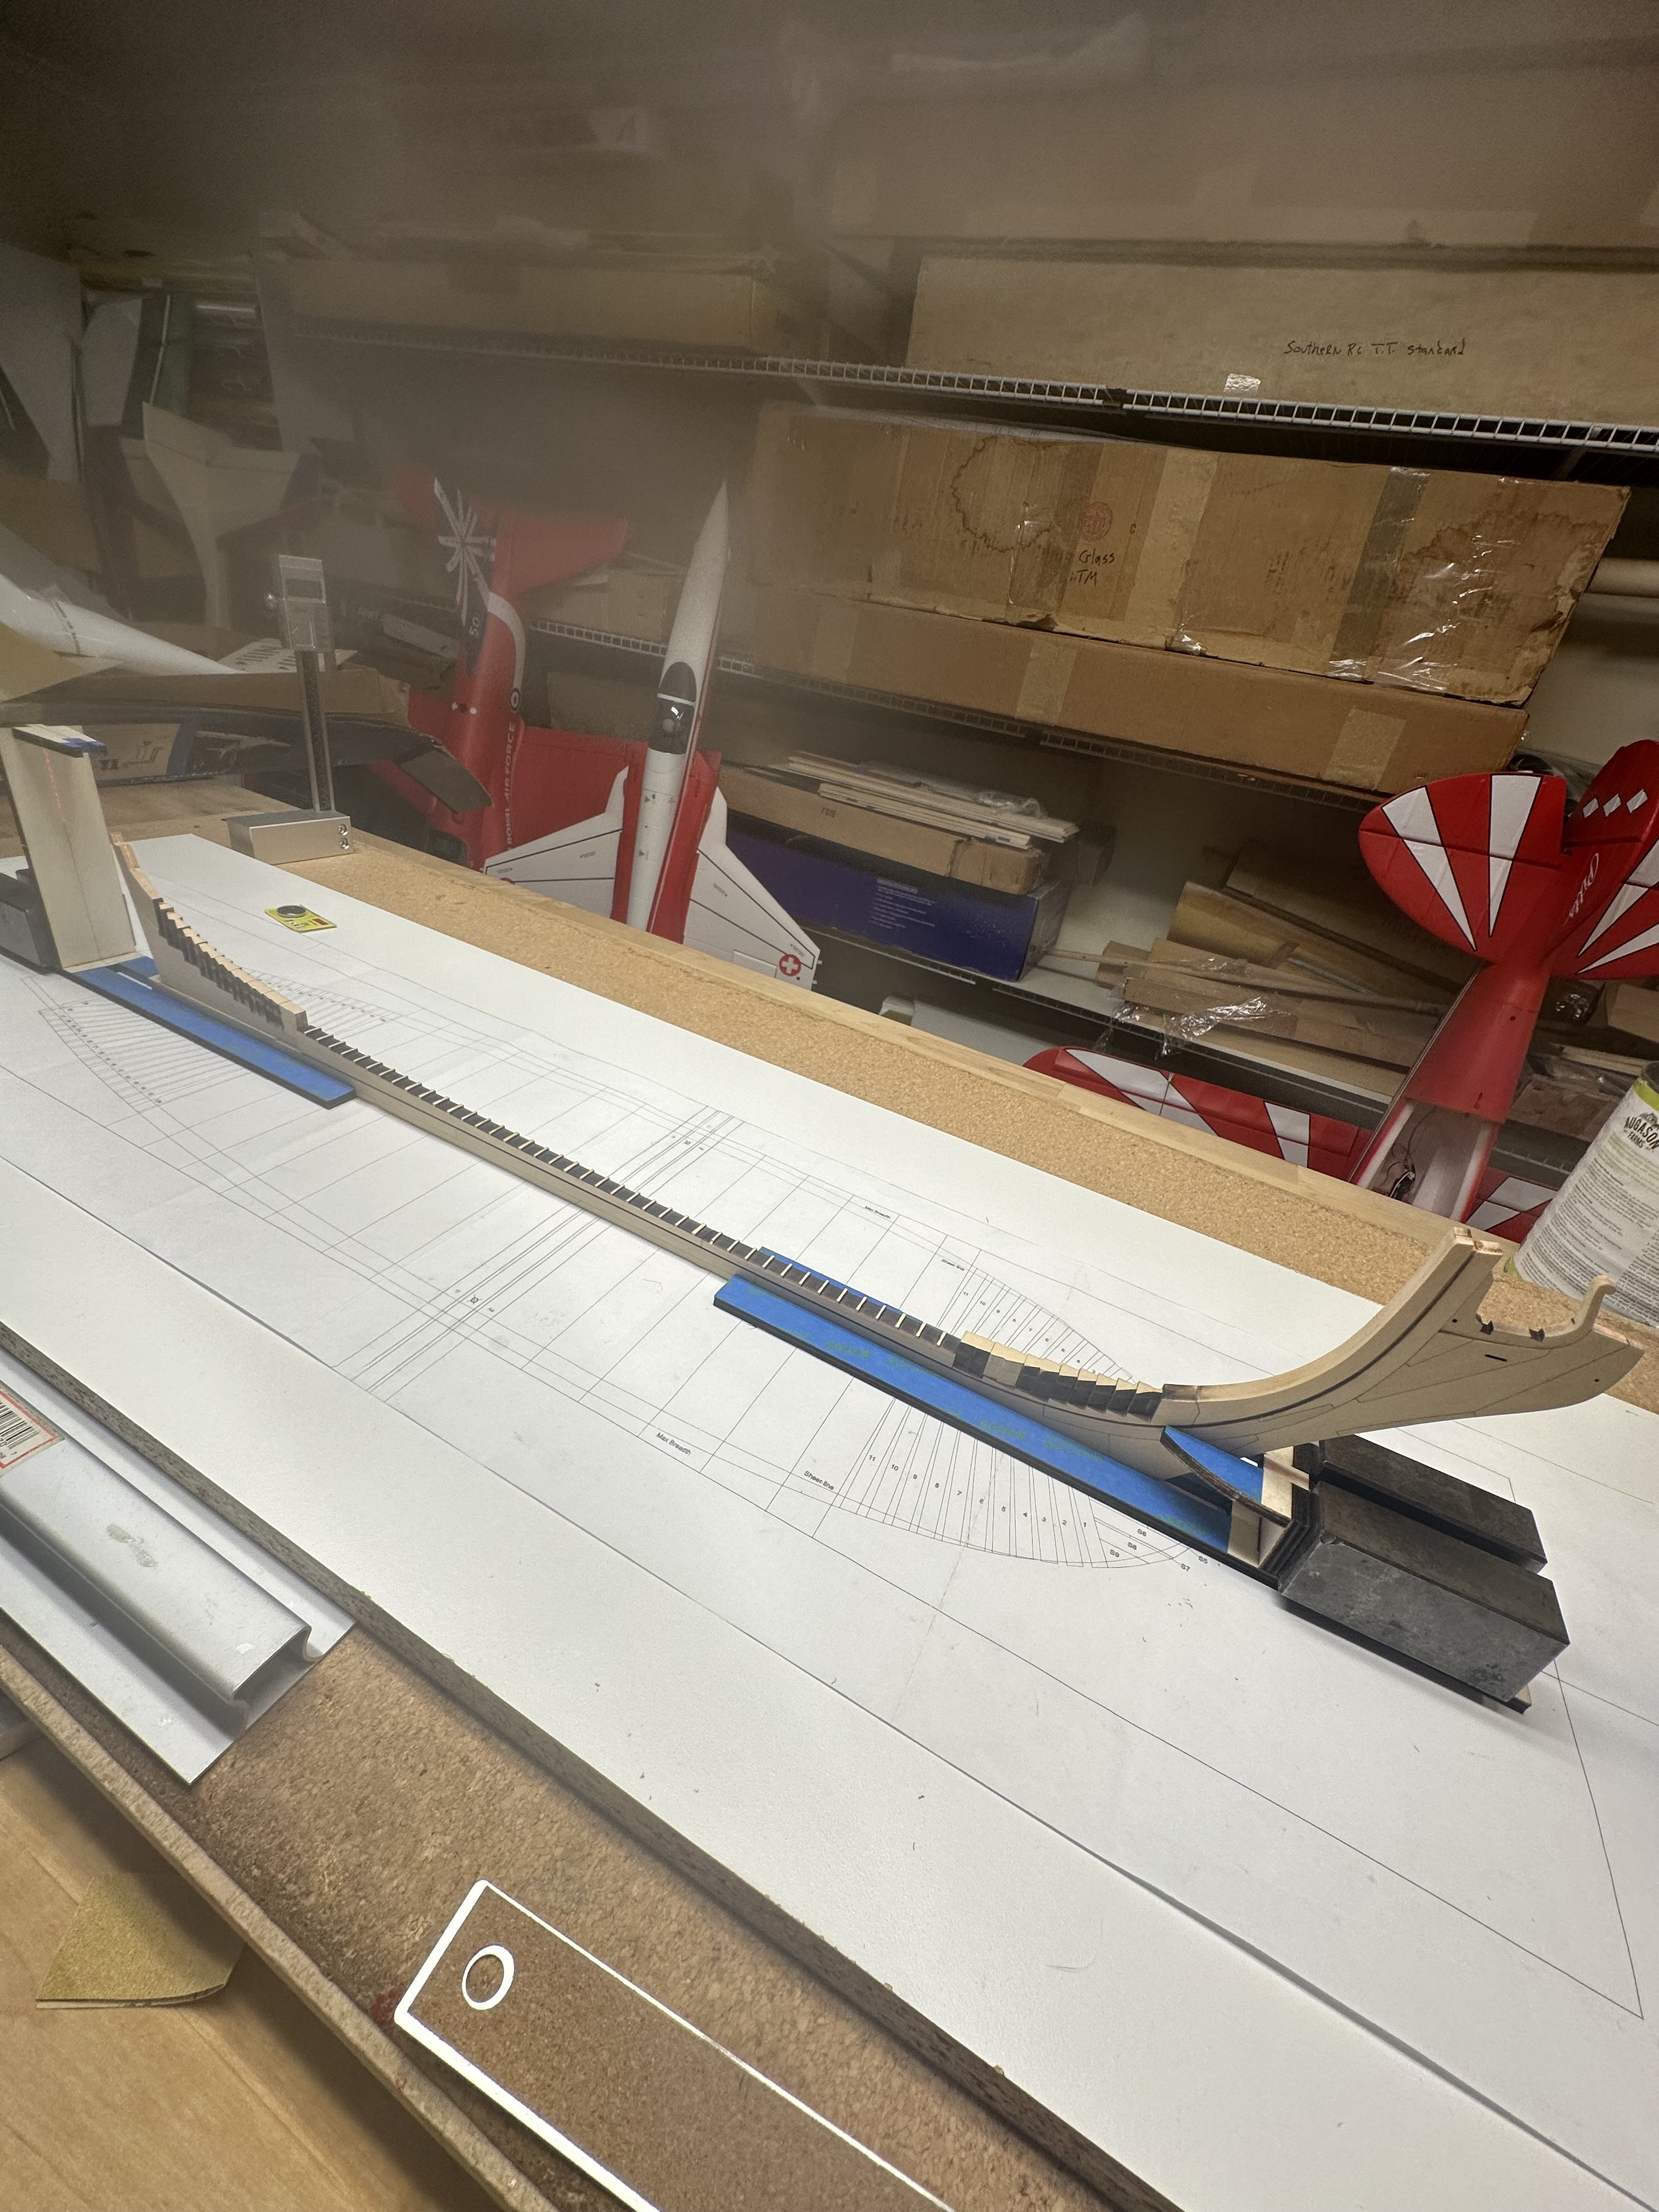
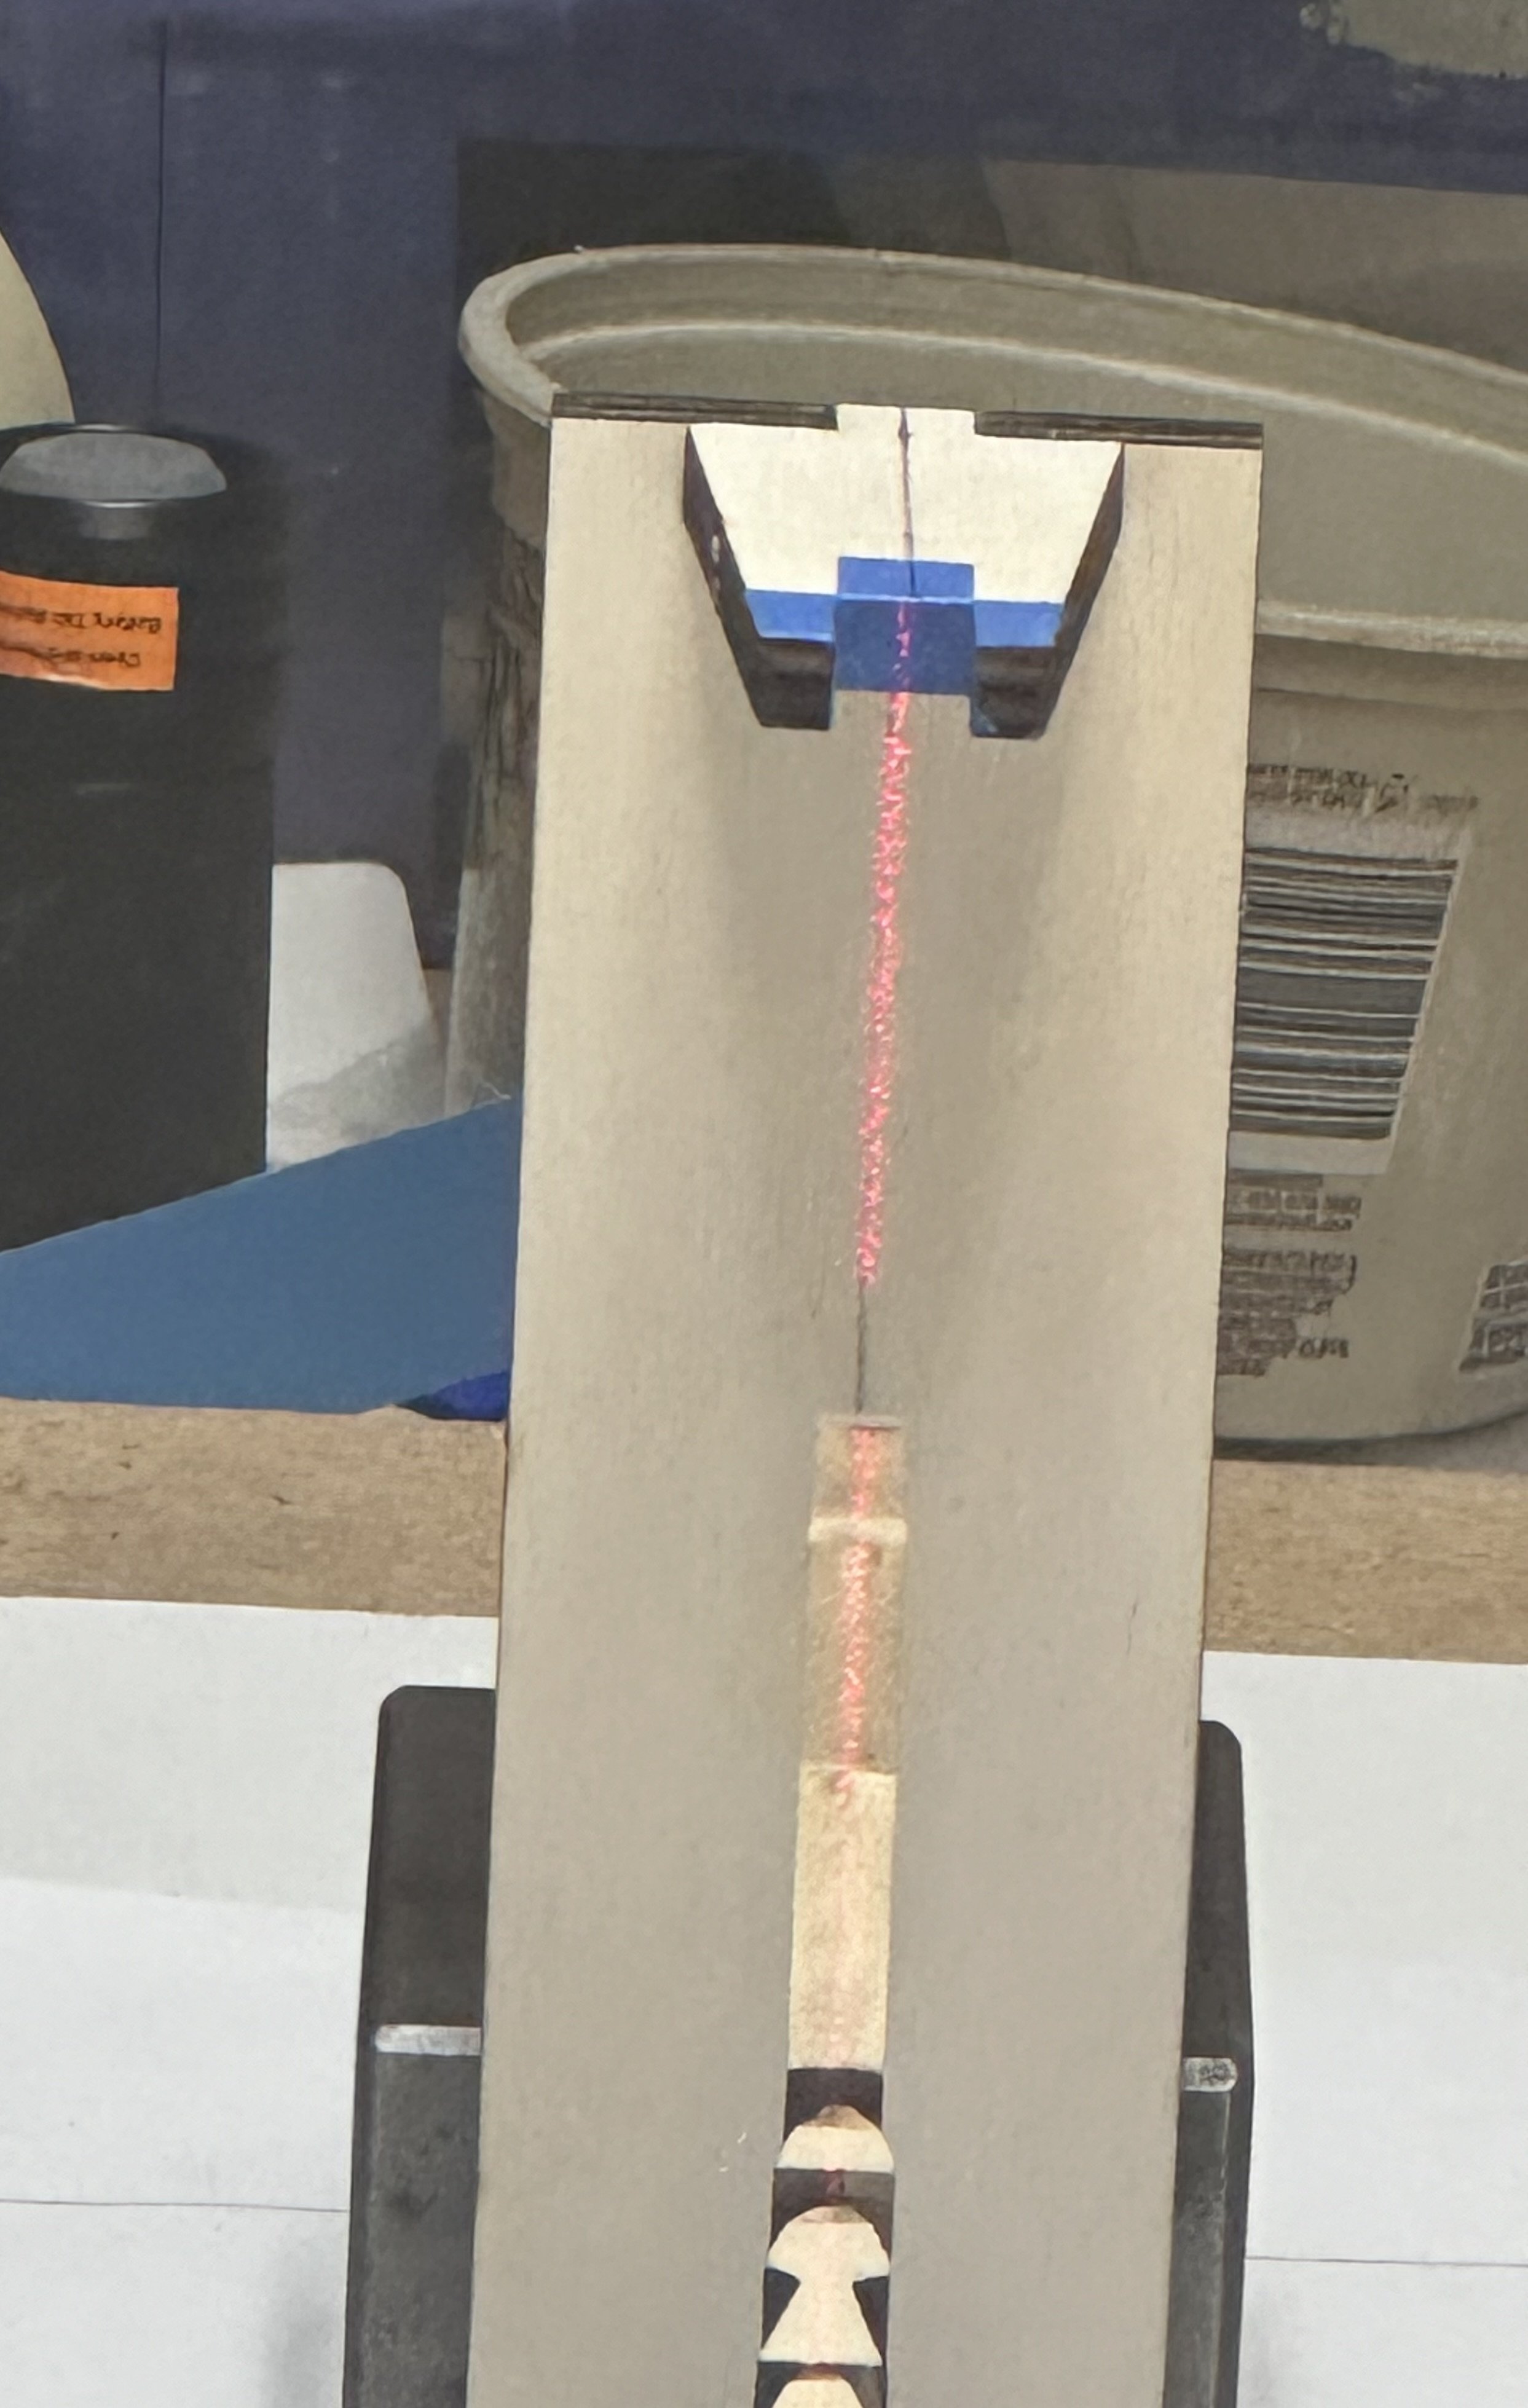
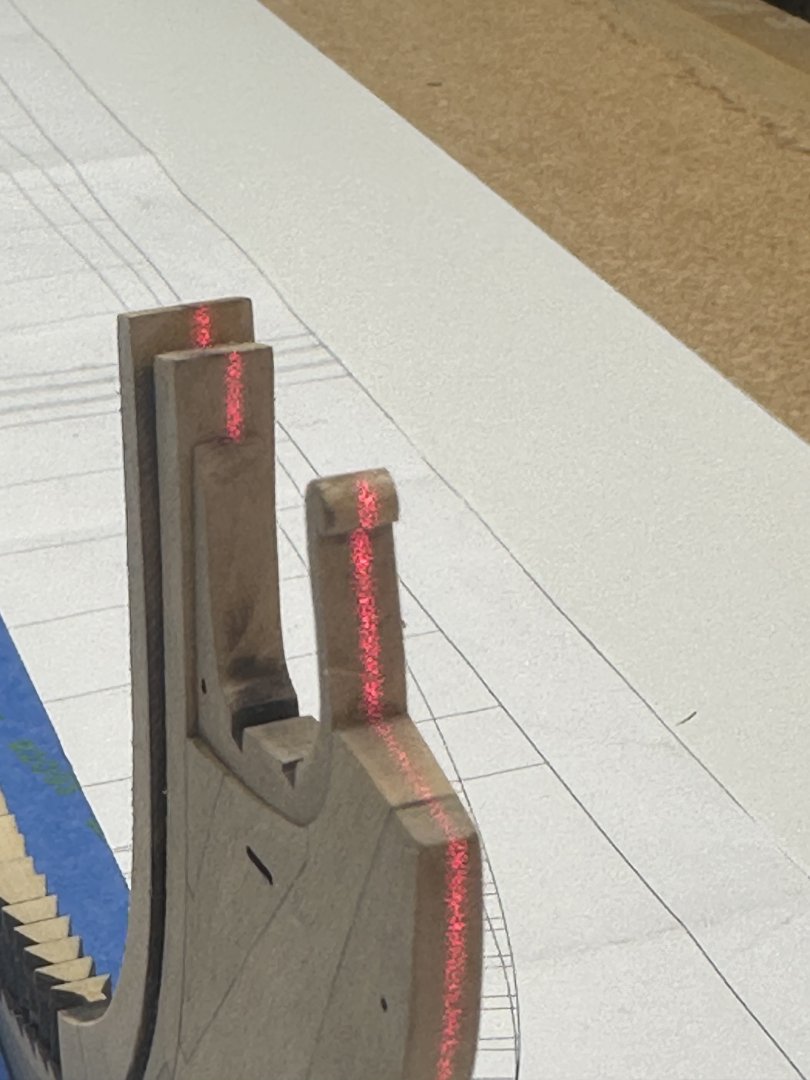
Given the length of the keel, especially since it's assembled in a free state (not constrained), chances are good that the keel might have a twist or slight bend in it. I can't draw a straight line with a ruler, so checking with a laser seemed like a good idea. Also, with the stern needing to be exactly vertical, the laser makes that an easy task to accomplish. But mostly, with the keel coming out as straight as it did, is a testament to the quality of Chuck's laser cutting skills, design and quality materials. Best Regards .... Rick
-
Jeff, is the lower apron a tight fit between the upper apron and the riser? If so, that'll compress the wood a little and not allow the apron to seat properly. I too had some gap on the lower apron, I gently sanded ends of the apron until the gap was smaller and used a clamp to seat fully on the rabbet strip. It didn't take too much effort to get the apron in place. Best Regards .... Rick
-
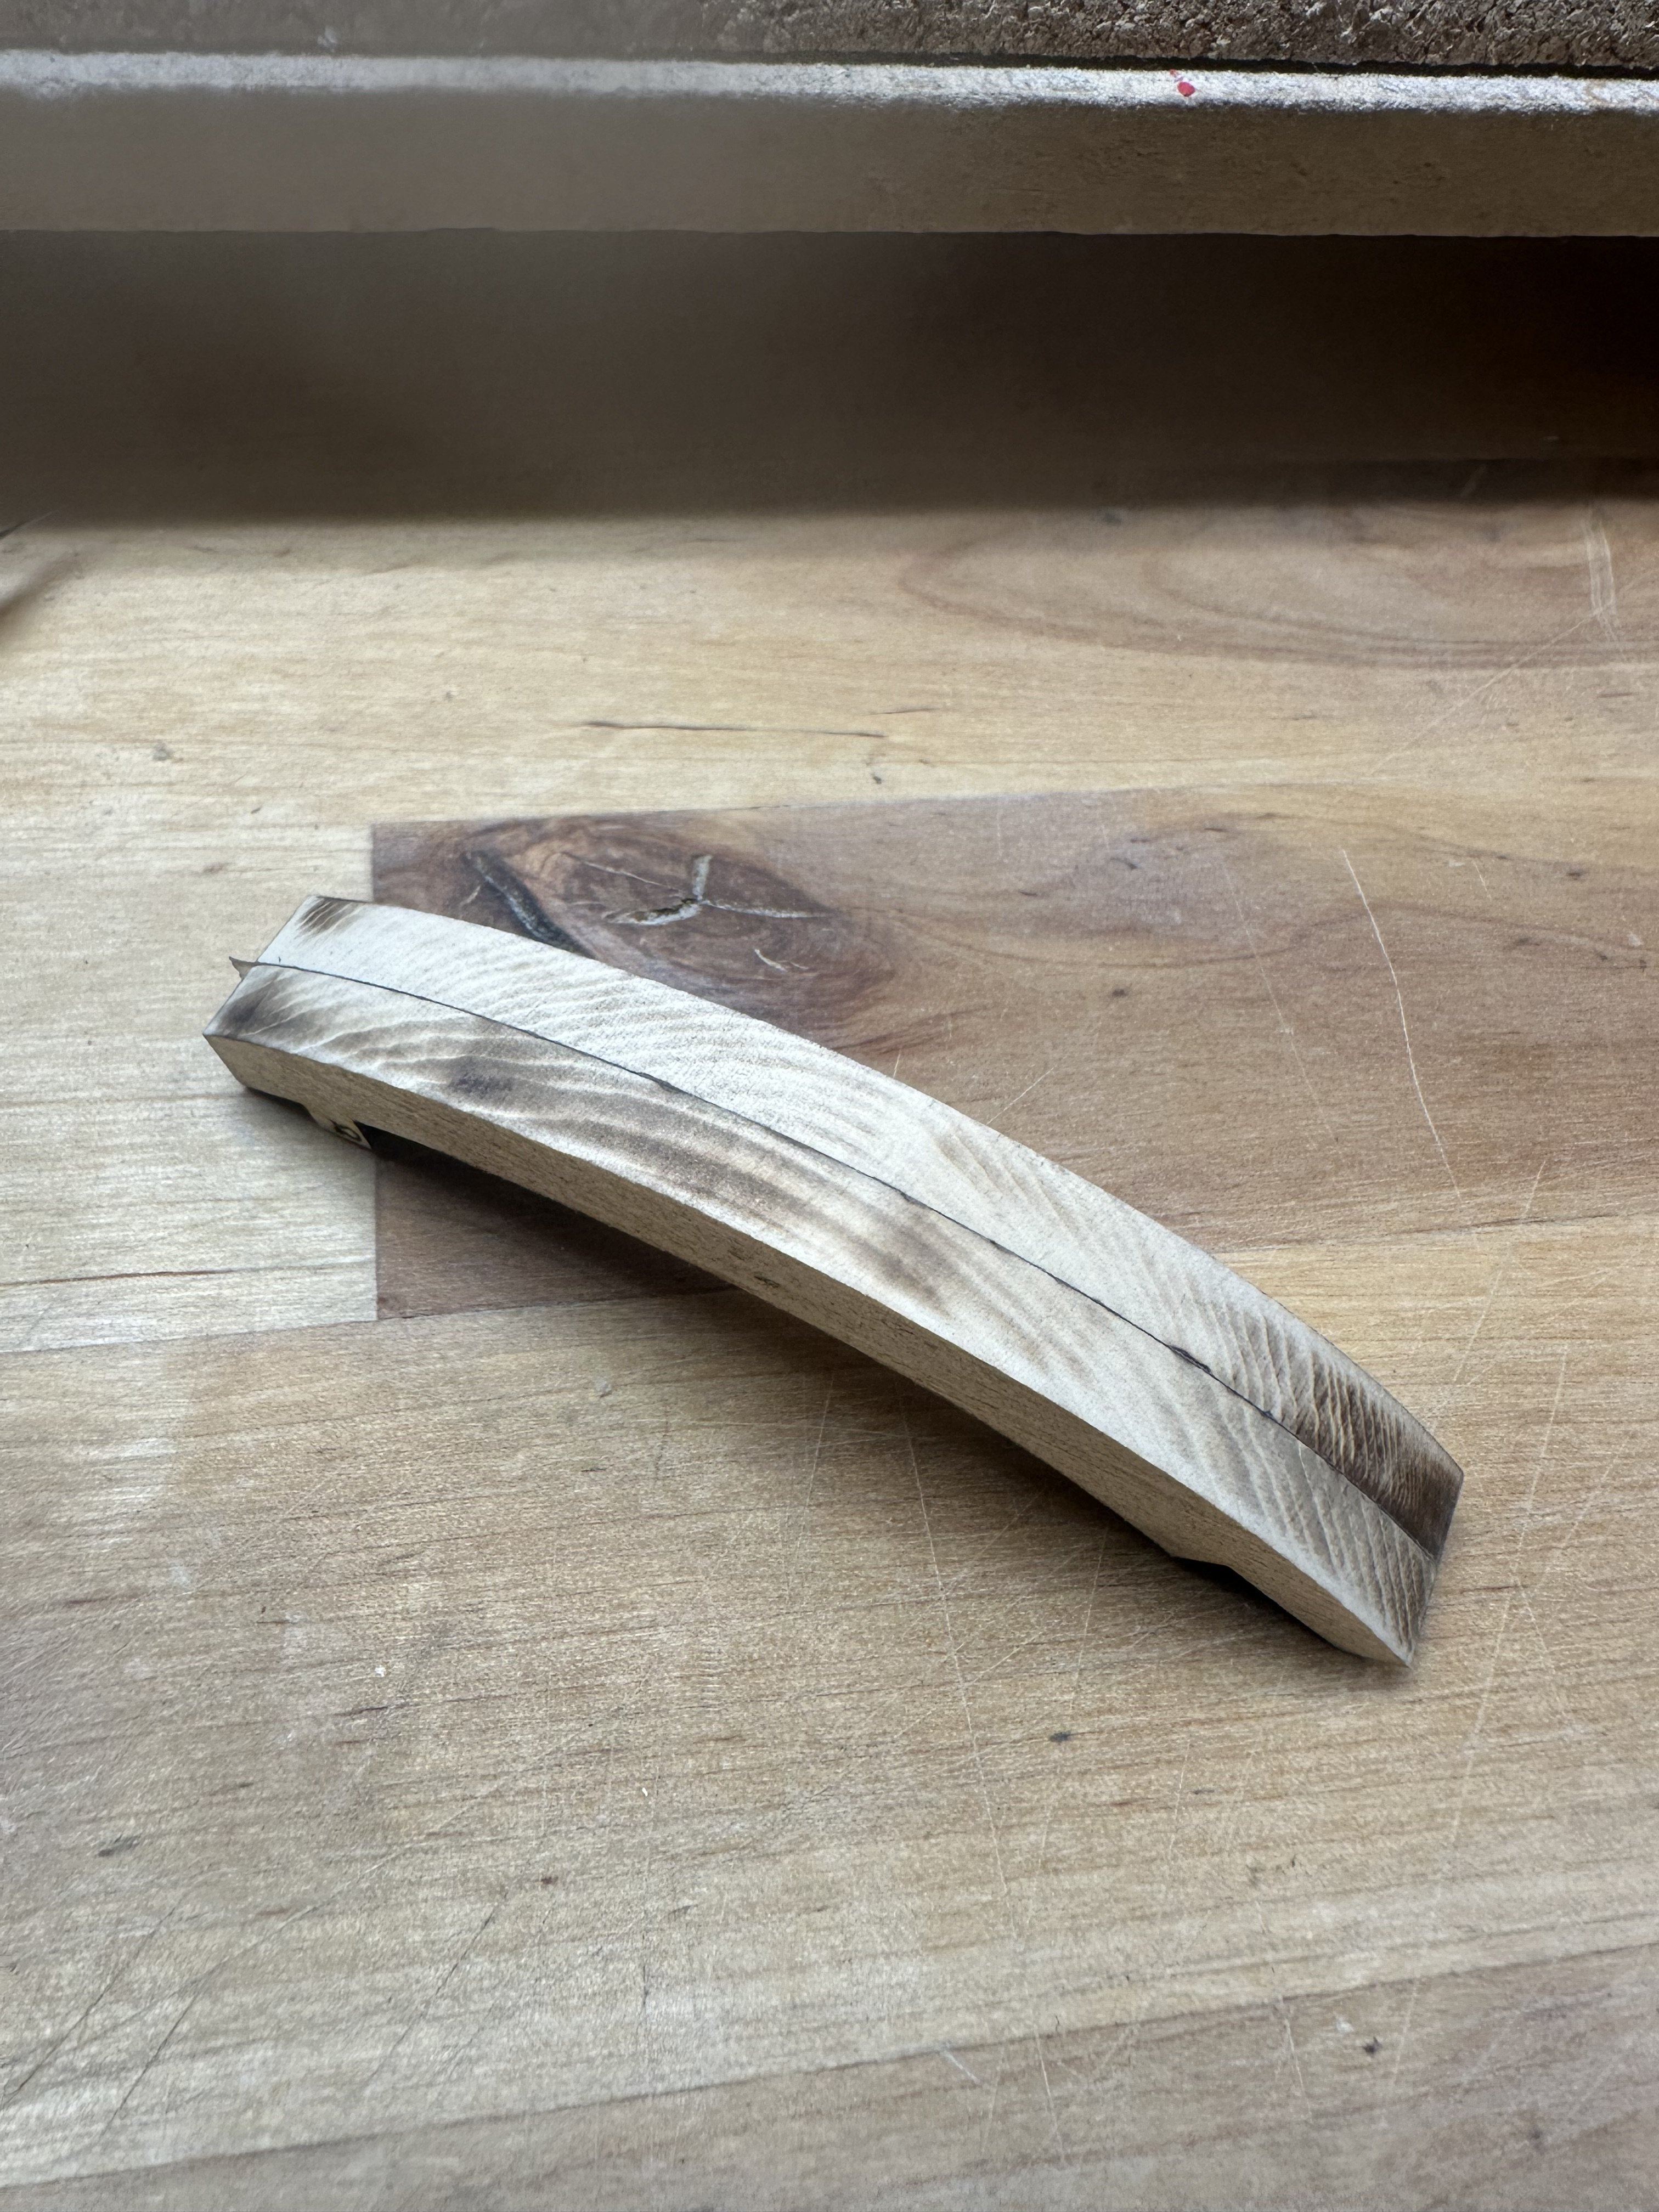
First, thank you ALL for likes, I very much appreciate it! Shaped the deadwood and added the wedges. Sanding down to shape was an all day affair, lots of patient sanding. Not 100% happy with the results, it’s a little too thin at the base of the wedges. Hope that won’t be a problem down the road. This morning I glued the deadwood to the keel. It needs to be perfectly vertical and since the keel is so long naked eyeballs won’t cut it. In anticipation of this build I had bought a cheap laser level a while back. I built the jigs to hold the keel assembly and laid everything out on my building board. I first aligned the plan to the laser line and then the jigs, which I had drawn center lines on. Nothing is secured yet, just some weights for now and I know when I secure the plans and jigs, I’ll have to go through this exercise again, but it this gives me a feel for where I’m at alignment wise. All I can say is Wow! Once everything was in place the laser line lined up almost perfectly with my center lines. Never would have thought something this long would be straight. I took some photos but it was very difficult. Best Regards …. Rick


-
Very nice Ian! I was wondering about the wood, now I know. It’ll look nice on the model. Best Regards …. Rick