
Harvey Golden
-
Posts
485 -
Joined
-
Last visited
Content Type
Profiles
Forums
Gallery
Events
Everything posted by Harvey Golden
-

Flag with ship name reversed on one side?
Harvey Golden replied to daschc01's topic in Masting, rigging and sails
I can't tell if "Otto" is forwards or backwards. -
There are drawings of a few of the boats in it, but you'll need to add a scale, baseline, etc. Definitely "buildable" drawings, though, and the author may have more available. Also, he may be the best person to ask regarding lines drawings of historic Japanese traditional vessels. H-
-
Hello Micha! Not sure if this will be much help, but I'd recommend Douglas Brooks' "Japanese Wooden Boatbuilding" (2015); it features a number of traditional small craft that no doubt have very ancient forms and roots. It also has a brief chapter ("The Last Shipwright") on a builder there who has made two full-size replicas of large 'ancient' Japanese ocean going vessels-- the Michinoku Maru and the Naniwa Maru. The book has lines for neither, but projects of this scope must have some serious research and drawings behind them, so perhaps they are available somewhere. The book is a superb primer on traditional Japanese boat joinery, though. The book: http://douglasbrooksboatbuilding.com/japanese_wooden_boatbuilding.html Hope this helps! -Harvey
-
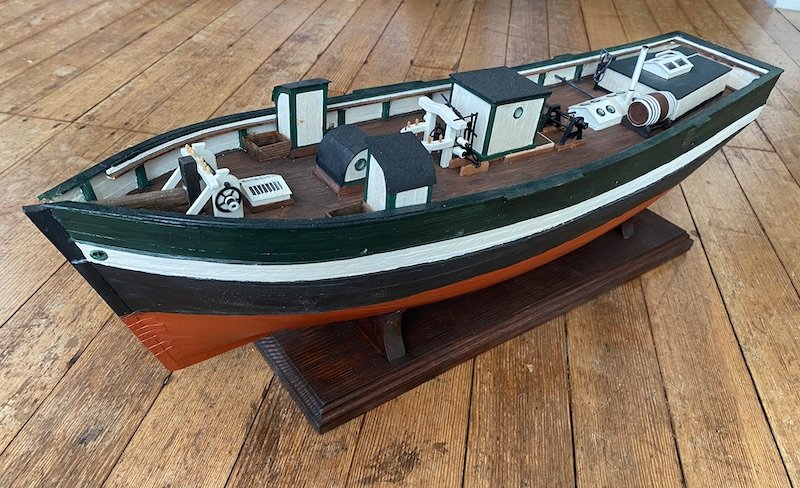
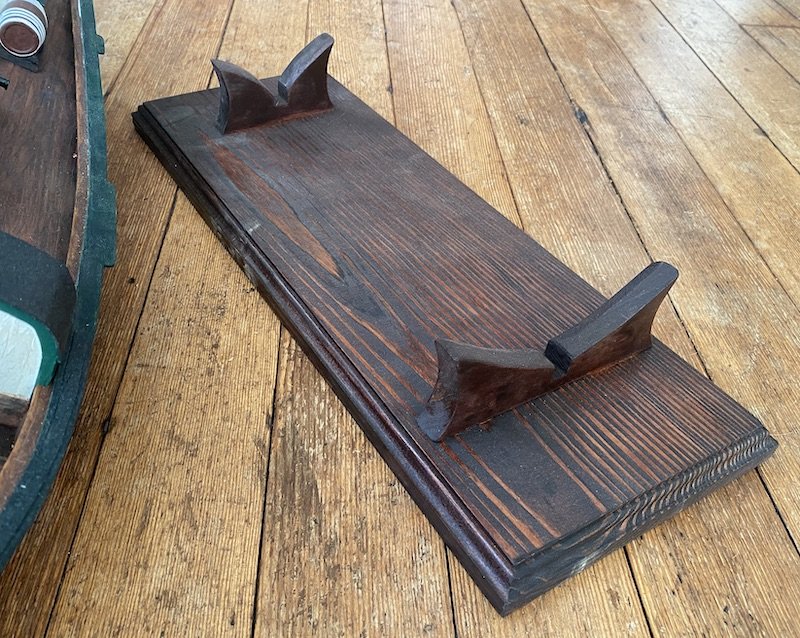
I like the boat stand; it has a bit of a cribbing/strongback look to it. A matching colored wooden base for the stand might balance it out nicely. The contrast with the black hull works well in my opinion.
-
Beautifully done! I've been aboard, so this is especially nice to see. Your improvements are superb!
-
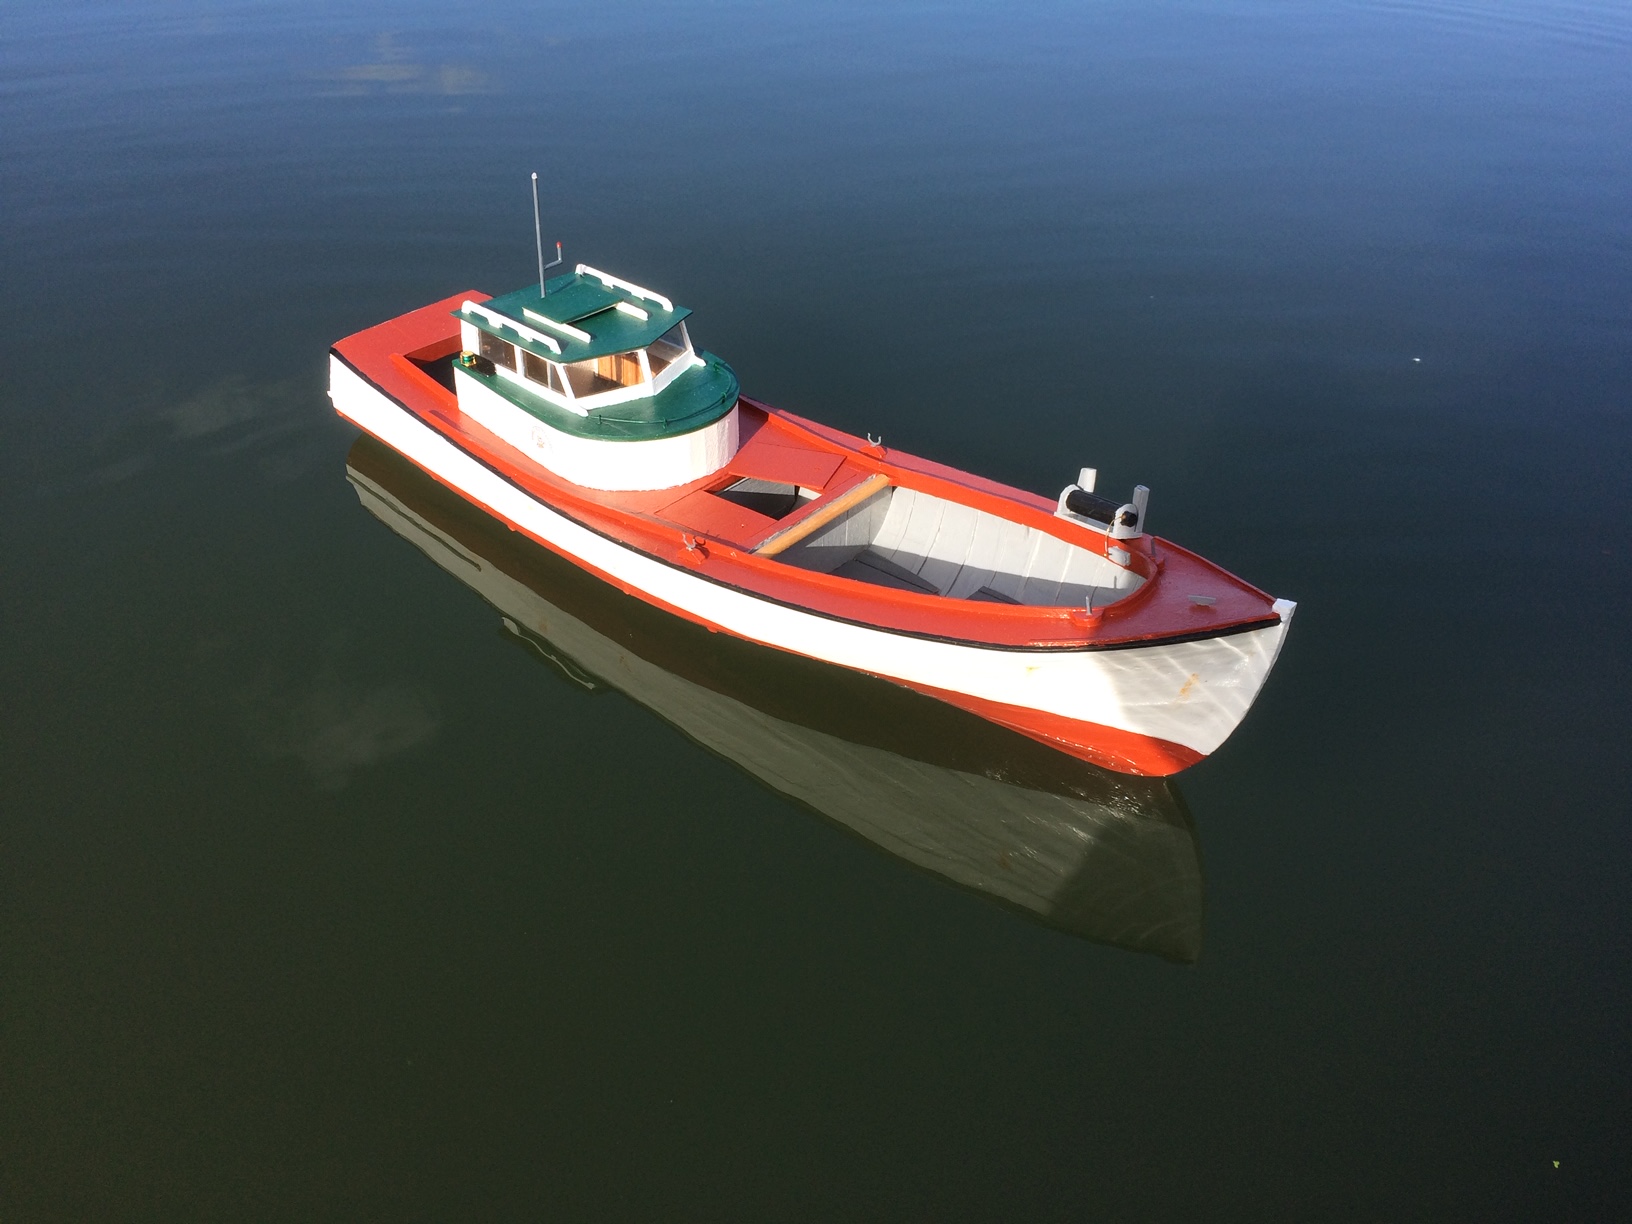
Well, it's back to the Gjøa again.... As I get close to the mast and rigging, I needed a good sturdy work stand for it-- one that will double as a display stand. (The stand is 7/8" thick Southern Yellow Pine--a heavy and solid foundation). The hull, as shown below, measures 27" long, and will be considerably longer once the stern davits and the bow sprit are on. My workspace is only 45" long, hemmed in by a steel file cabinet, and a bookshelf, so this will be tight work. I expect slow progress from now through the summer, but am aiming for an early '25 completion. Welcome back!
-
It was tippy as heck-- wanted to lay right over. It is positioned on a thin board with a long dowel stuck in the mud 😉
- 40 replies
-
- 4
-

-
- Okahumkee
- sternwheeler
- (and 1 more)
-
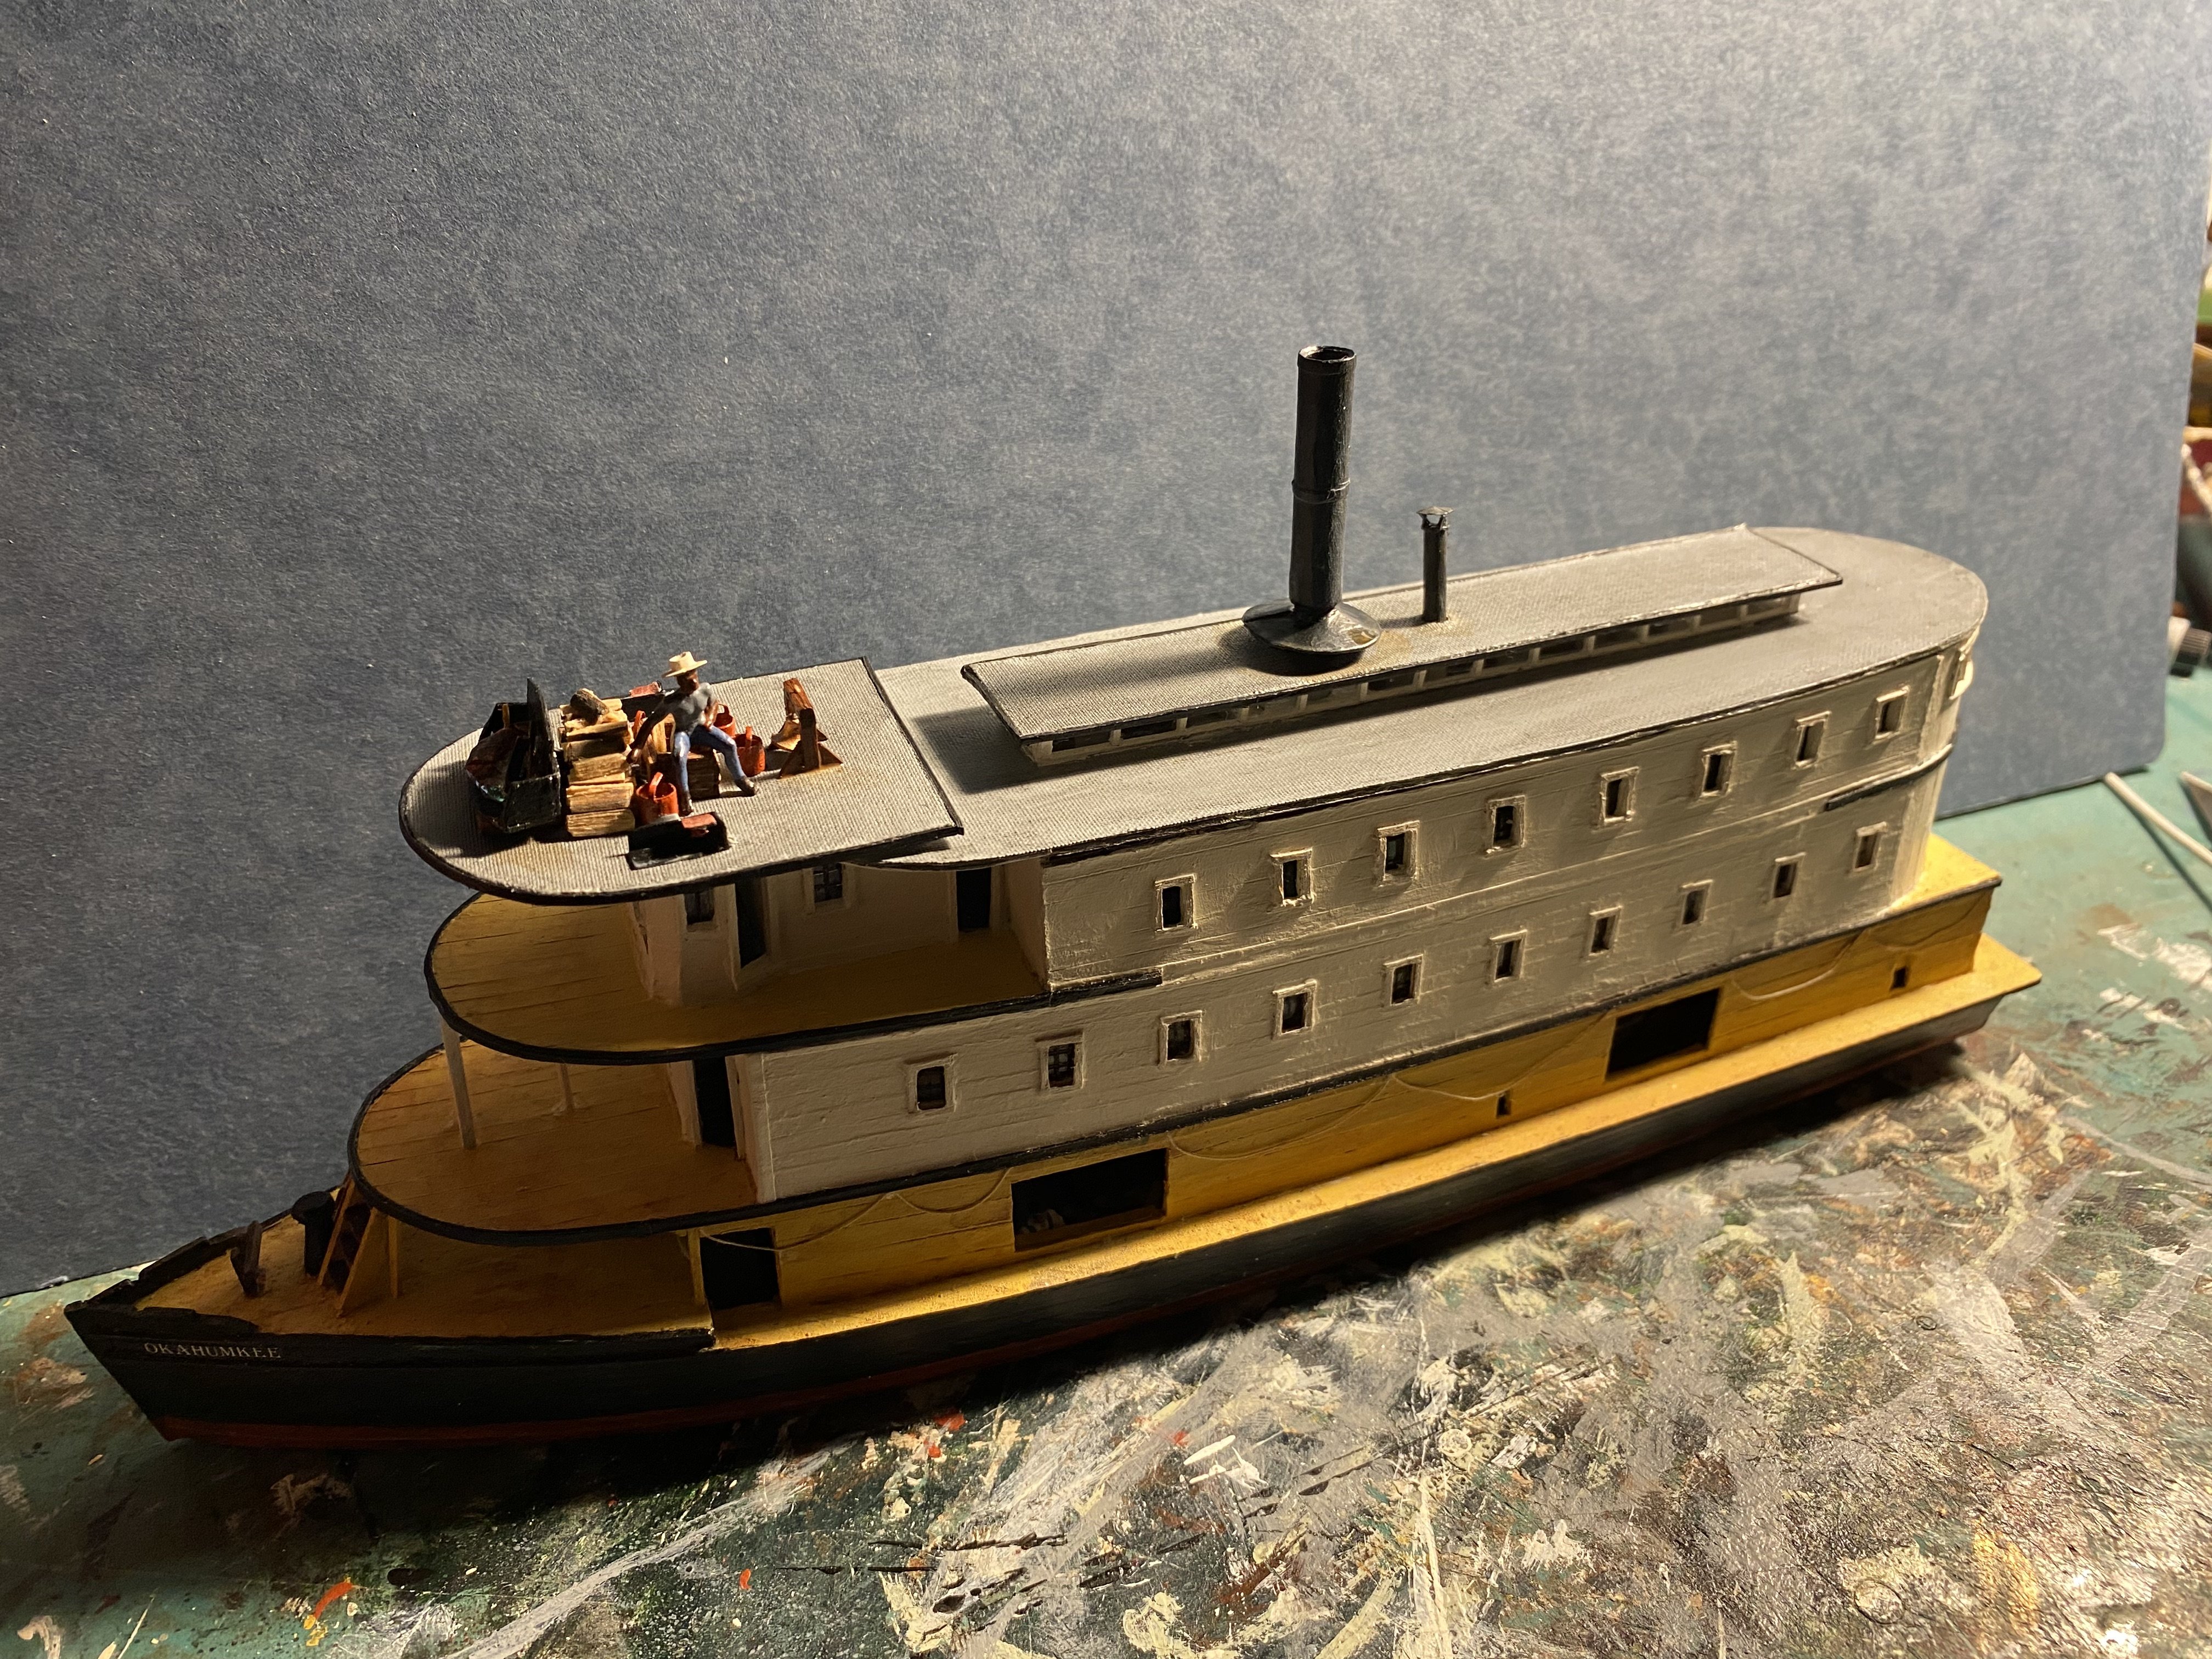
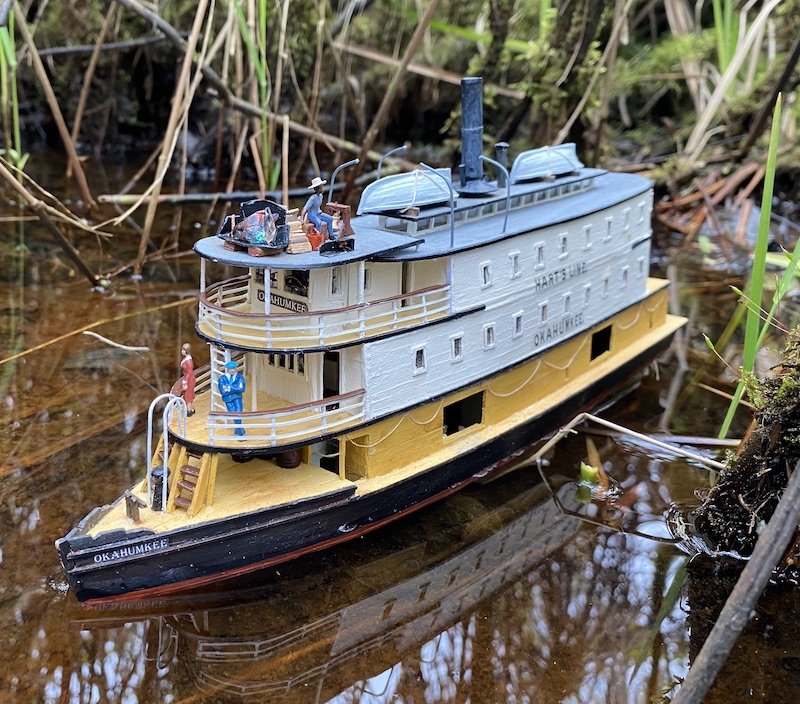
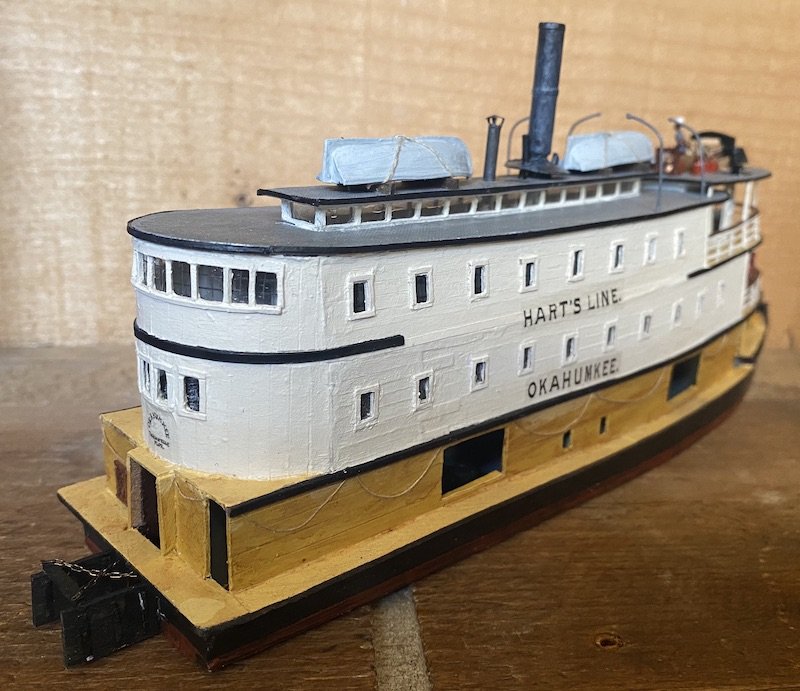
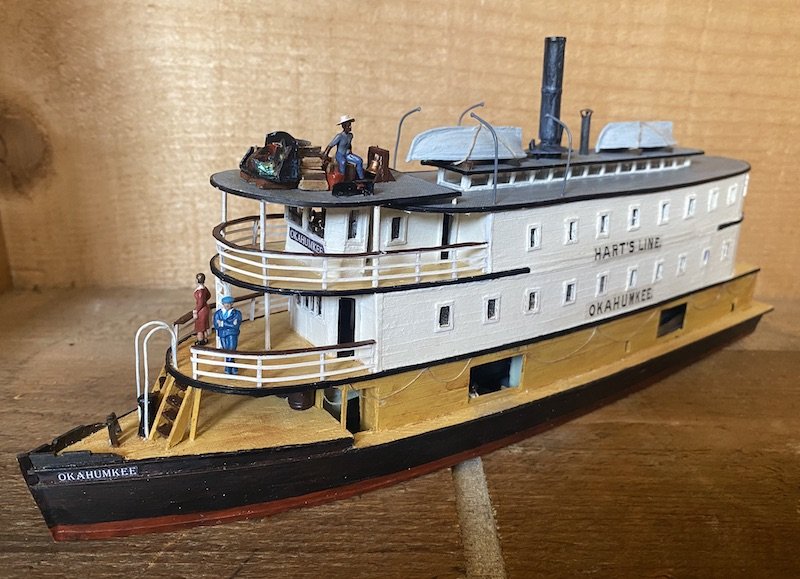
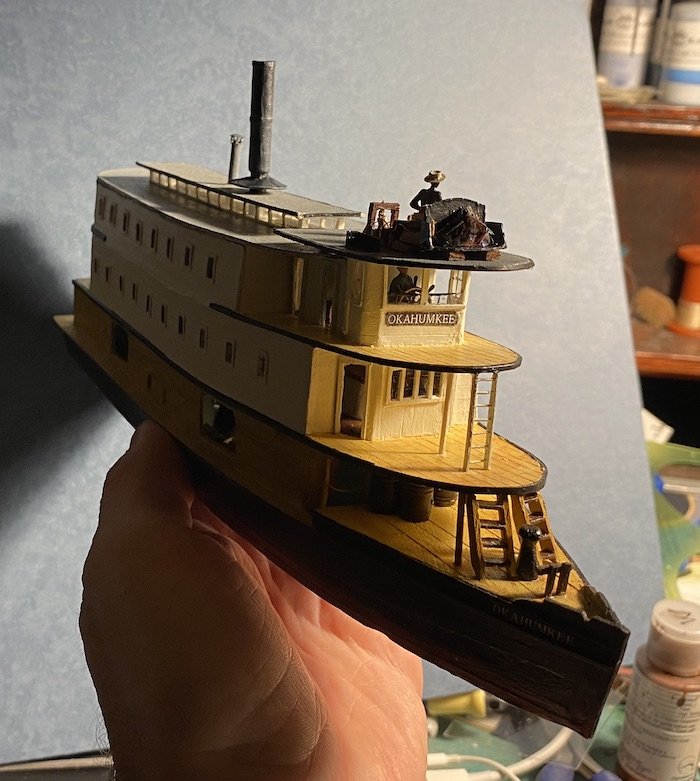
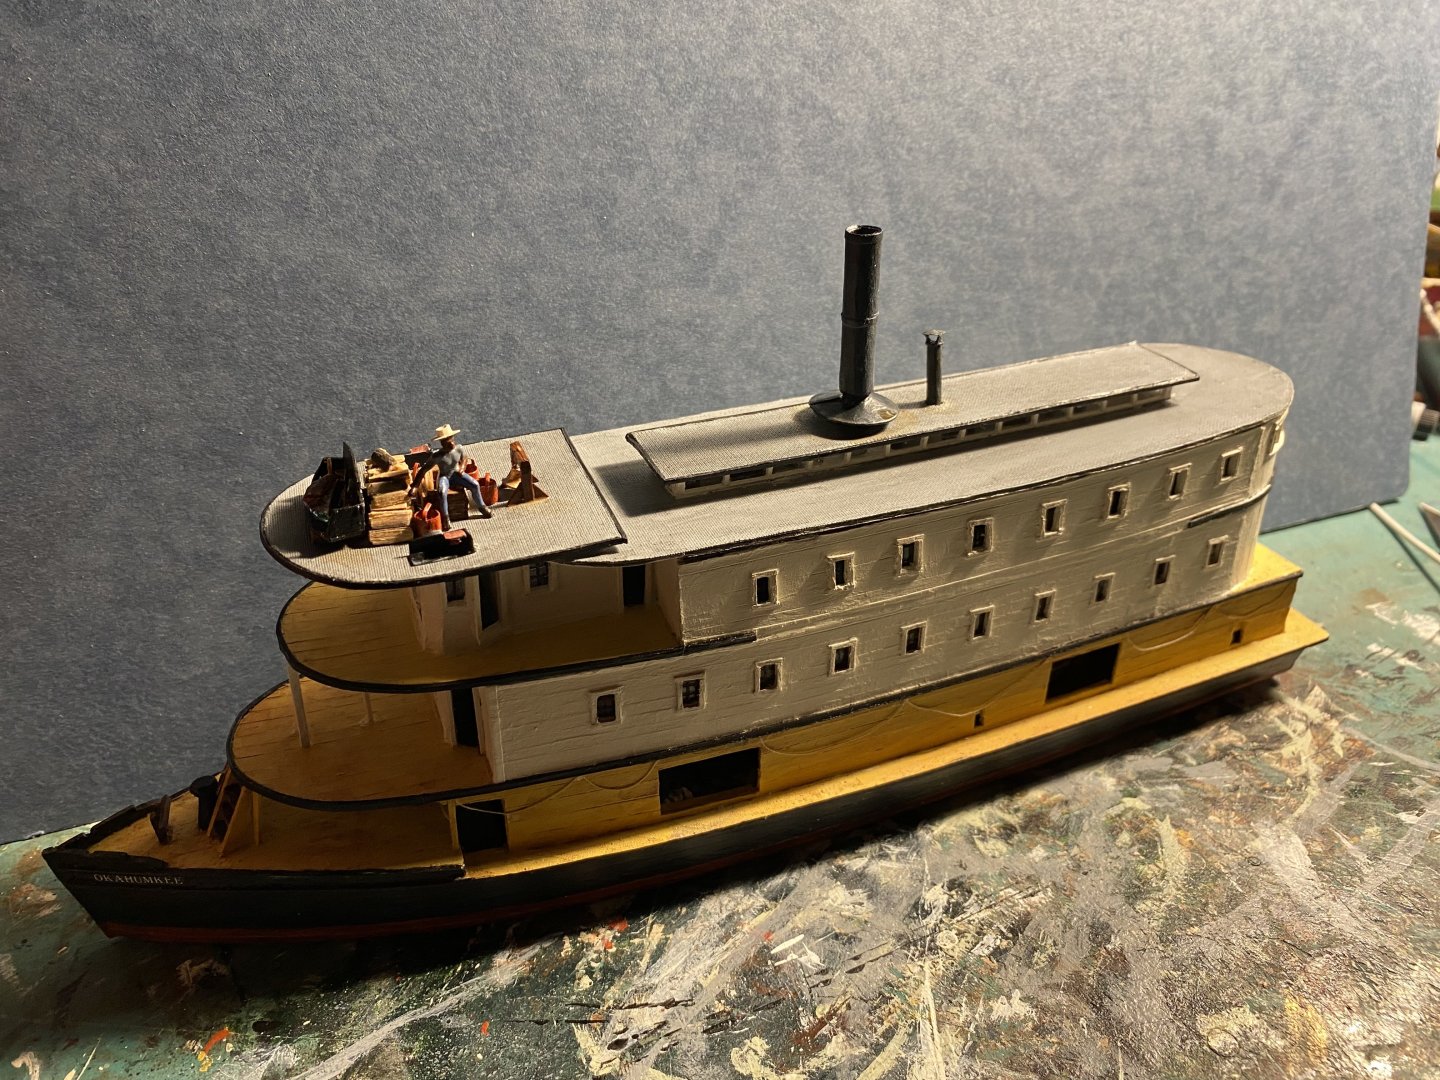
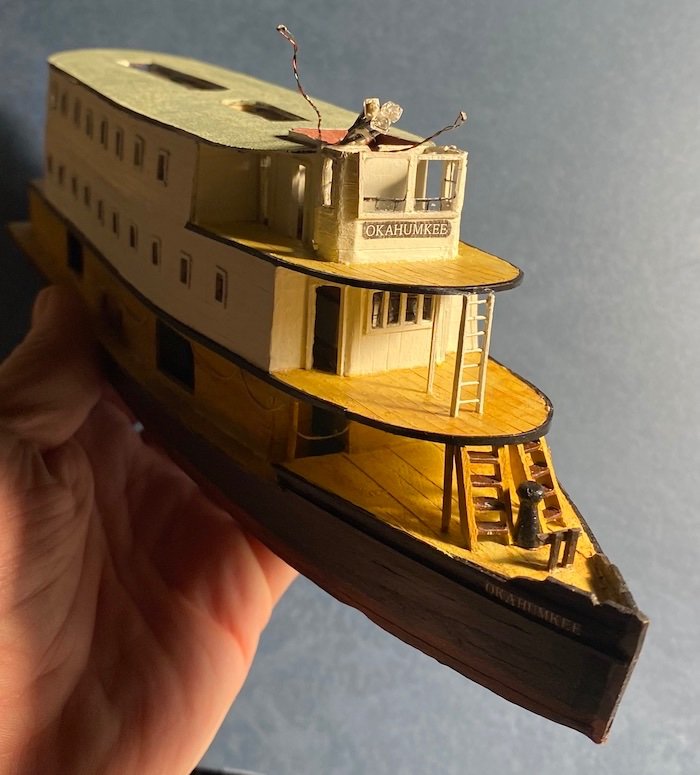
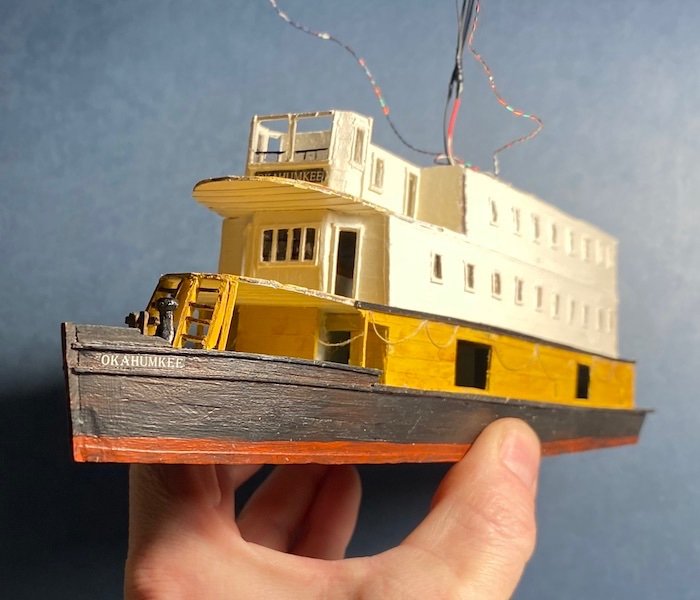
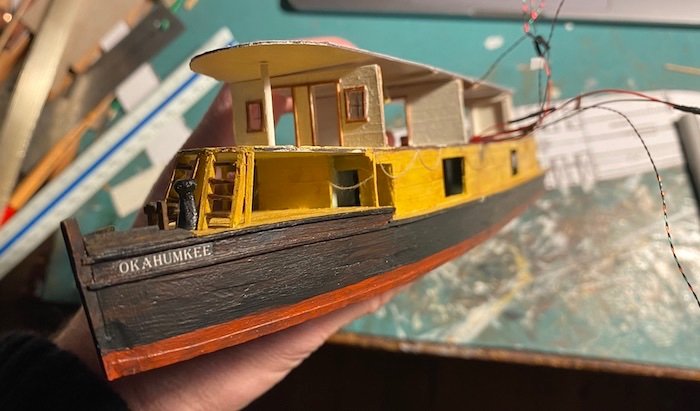
The "Okahumkee" is completed! The display case and diorama are in progress though.... Here's the finished vessel: The decals have a certain sheen to them, despite my going over them a few times with water-base satin varnish. Any hints on this matter? Thank you all! --Harvey

- 40 replies
-
- 9
-

-
-
- Okahumkee
- sternwheeler
- (and 1 more)
-
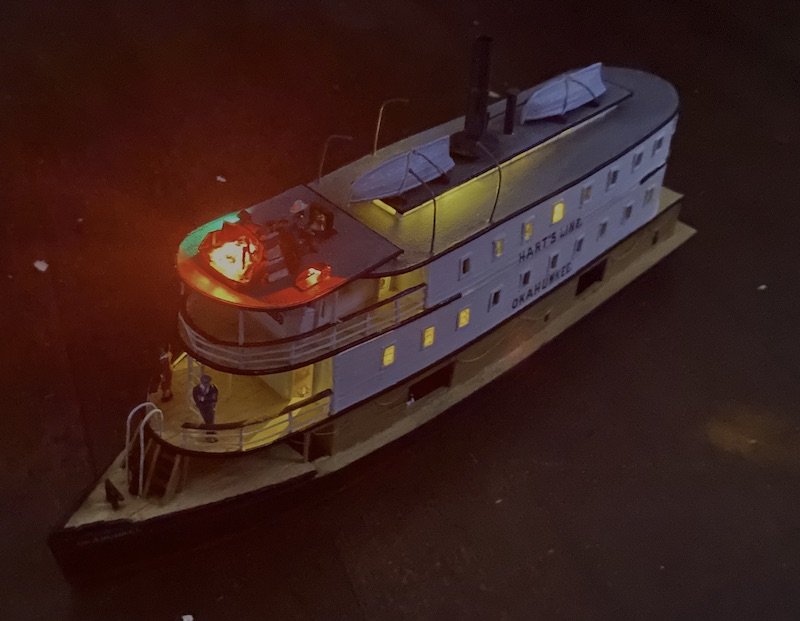
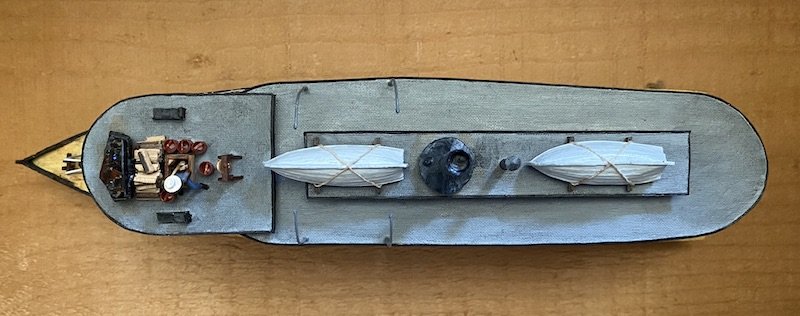
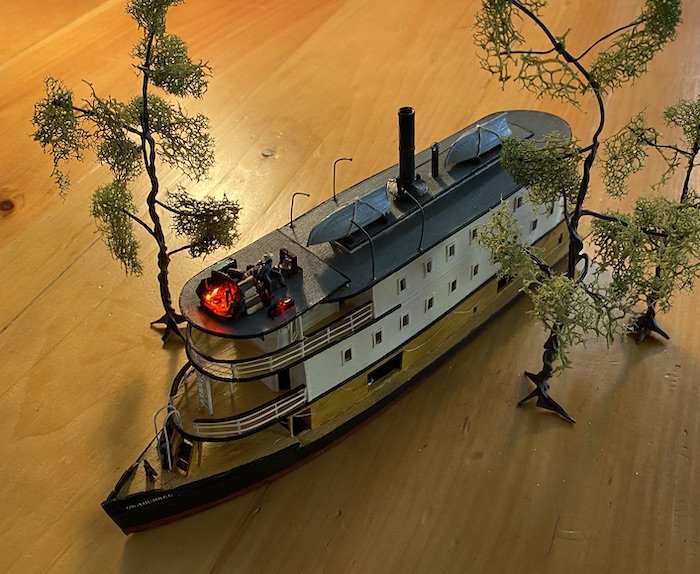
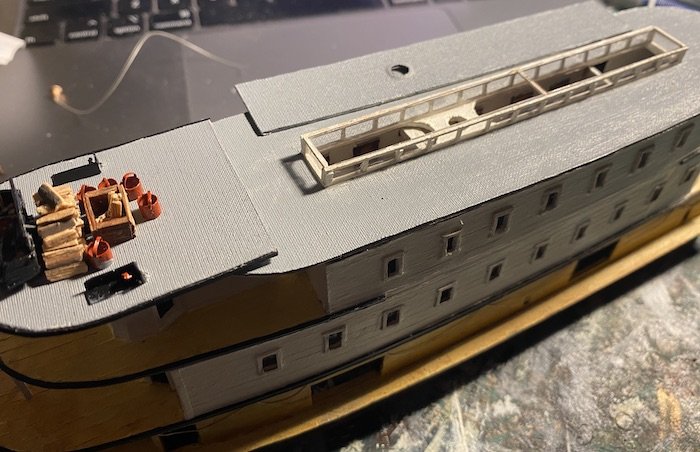
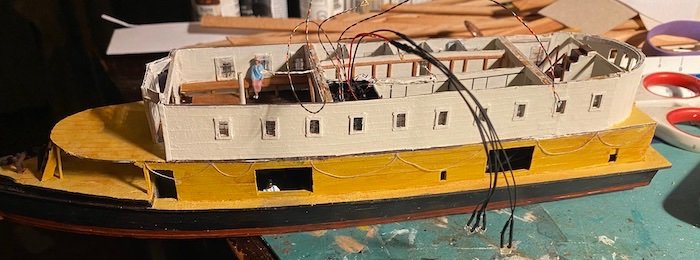
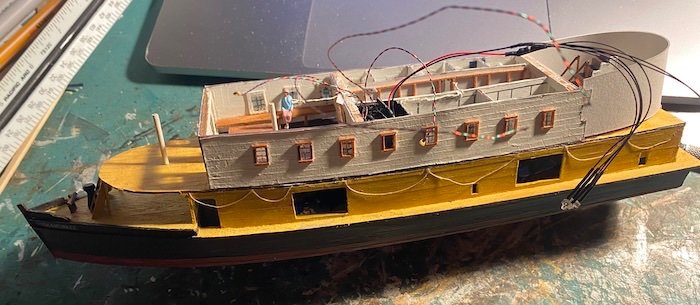
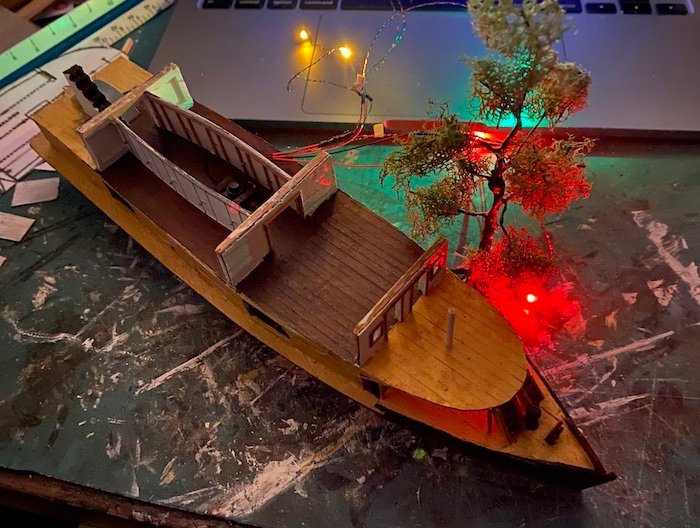
Railings are on! Life/Utility boats in place. The original davit arrangement is a mystery-- many old photos don't show them, but a picture taken of the steamer as a relic in the 1930s shows some davits in place. A number of things to finish yet including rudders, a stanchion or two on the foredecks, decals, and of course the diorama which will be about 21"x 10" and about 10" high, glass encased. The wire trees are turning out nice; I've picked up some wool strands to make Spanish moss. The lighting works great with the stack triggering the switch. For some reason the flickering of the fire LEDs has transferred the flickering to the interior lighting as well, so its a tad blinky inside(!) The running lights aren't affected by this, which perplexes me further (all are run to same switch and battery).
- 40 replies
-
- 9
-
-
-
- Okahumkee
- sternwheeler
- (and 1 more)
-
Bragozzo by maurino - FINISHED
Harvey Golden replied to maurino's topic in - Build logs for subjects built 1901 - Present Day
Very nice to see this! I, too would like to build a model of one someday (torn between these or a Trabaccolo...). Marzari's book is superb; another is Penzo's, from 1992: (They are very complimentary, with each having things the other doesn't cover; I'd say either stands alone well for model making). Lesser known than Venice of course, is Cessenatica (south of Ravenna): A superb museum there with a Bragosso in the museum, and several outside in the canal:
-
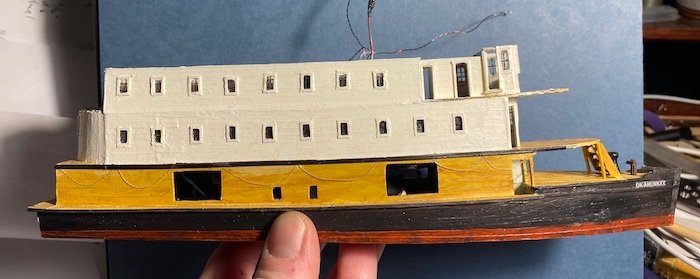
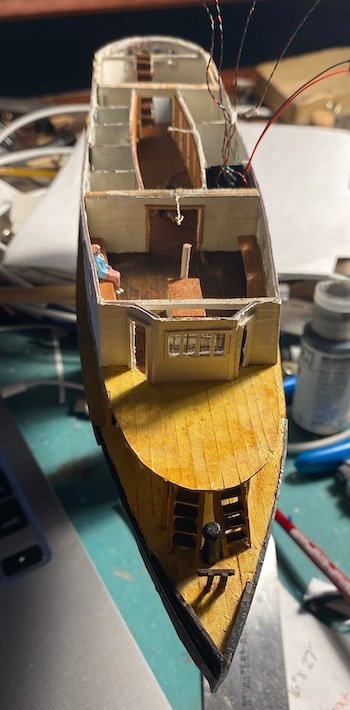
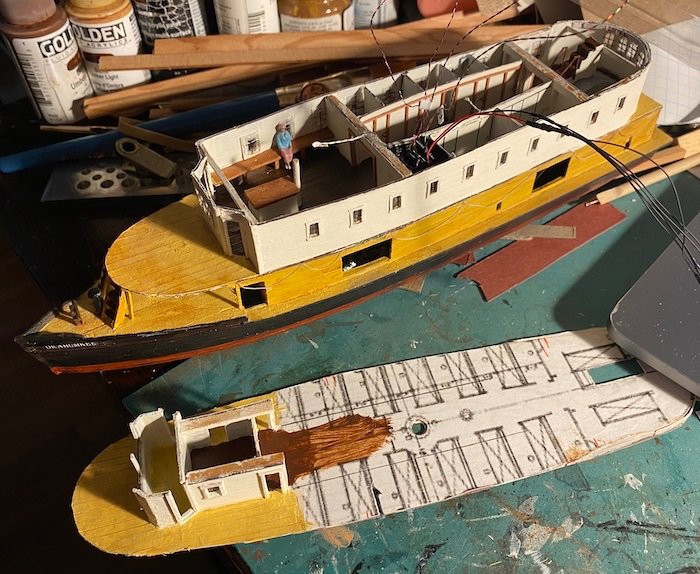
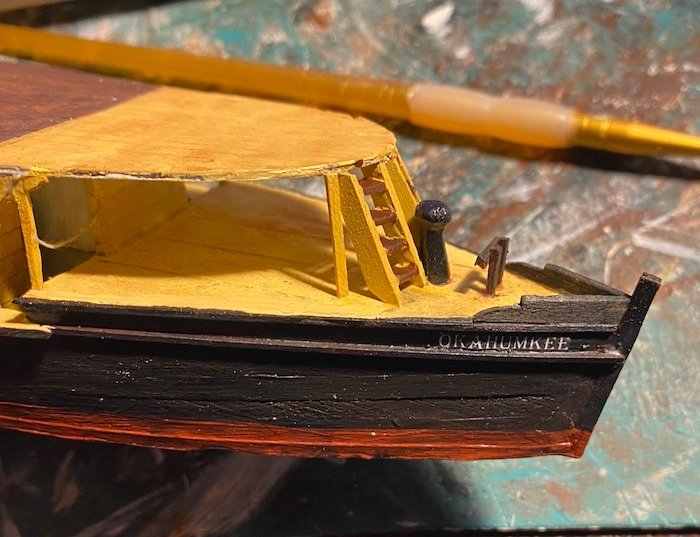
On the home stretch! The wheelhouse roof is on, with side-lights, bell, fire bin, firewood, fire buckets, and crewman. Got the wheel installed and a pilot. The skylights were a delicate challenge at this scale, but turned out nice. Here's the uncovered lights below: The stack and other vents are also in place now. (The stack operates the lights, with a firm push downward). Dry fit of the cabin roof: Next up are the railings and some columns, some trim work, and trying to make decals for the line and name on the sides and the name/port on the stern. As this will be a diorama, I'm also beginning a wood-framed glass case and a whole bunch of hand-made cypress trees. (I've ordered palm trees. . . not gonna try to make those). The steamer is almost done, but a lot of work ahead.
- 40 replies
-
- 8
-
-
-
- Okahumkee
- sternwheeler
- (and 1 more)
-
Wreck of Bonhomme Richard found off Yorkshire coast.
Harvey Golden replied to uss frolick's topic in Nautical/Naval History
I found a cannon ball on a beach at Saltburn in '98. Who knows what ship it was from? Also found a hand grenade; definitely not from the good man Richard. Left both with a friend and local, as I thought best not to try and fly home with either. Lovely coastline there! -
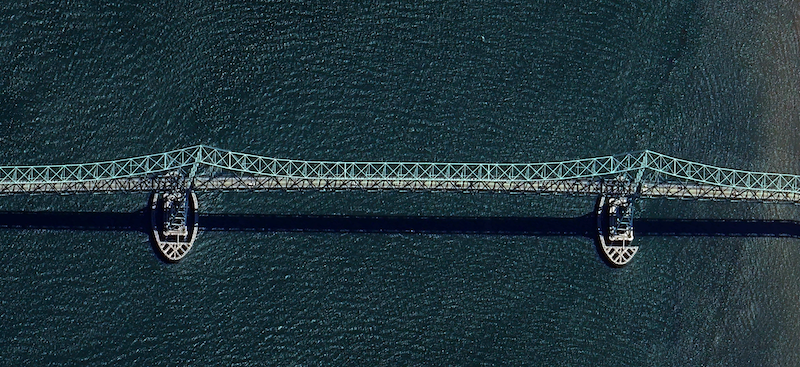
I compared the column protection of the FSK bridge in Baltimore (top) with our local Astoria-Megler Bridge (NW Oregon, Columbia River) on Google Earth. I think the images speak for themselves.

-
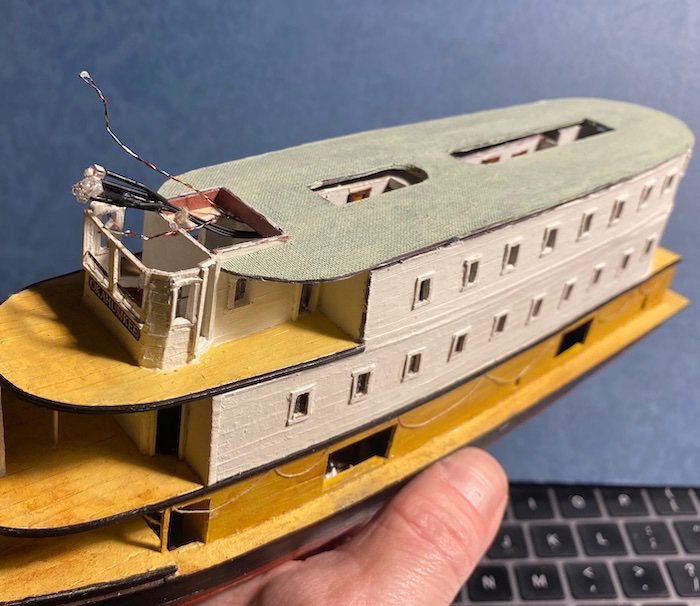
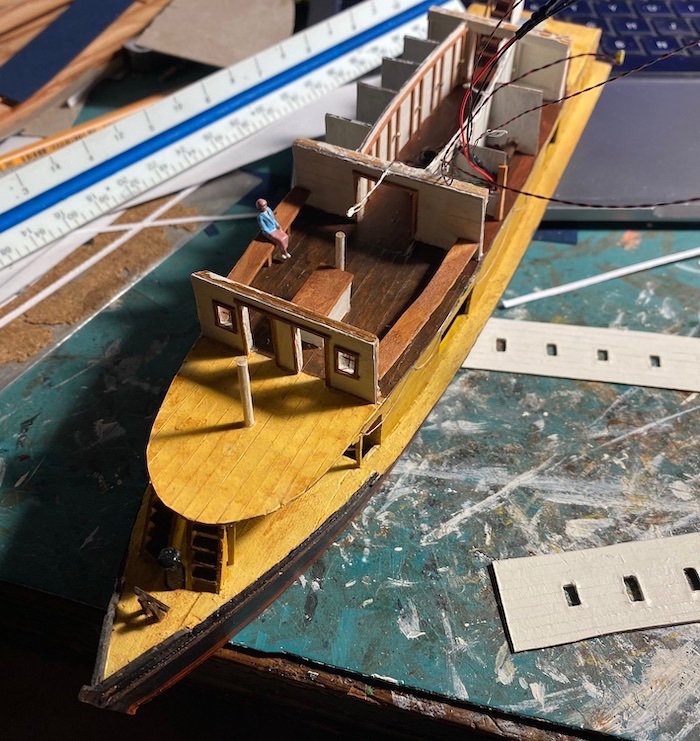
The stern gallery is in place, though not glazed yet. What an odd looking stern, to say the least. The windows will be a single strip of plastic, mostly held in place by bracing against stops at the forward ends of the curve; I might score them at the frames so they appear flat-paned. Getting the roof together.... The skylights are cut out; the covered section in the middle will receive the stack, which will also serve as the light-switch. The roof is made from paperboard, and covered with a scrap of book cloth to give it a nice texture. The captain's cabin and the wheelhouse are slightly taller, and will have a separate roof-- one that also supports the bell, the side lights, and the primordial head-light, which was an iron basket full of flaming pine knots. (This will be safely rendered with L.E.D.s). I'm guessing they must have had a few buckets of water close at hand.... 'Flame' L.E.D.s and side lights are ready to meet the wheelhouse roof. The flame lights are big and bulky-- I hope I can pull this off!
- 40 replies
-
- 7
-
-
- Okahumkee
- sternwheeler
- (and 1 more)
-
Perhaps of interest: https://www.bermuda.com/the-bermuda-rig/ Features quite an old engraving and some early description. The photo atop shows a schooner with two jib-headed sprit sails.
-
It could just be a naive/simplified rendering of a Barbados Schooner, as described by Morris in his "The Fore and Aft Rig in America." Without any context (date, location, surrounding details), the image could well be interpreted as having any number of rigs, e.g., gunter, lateen, jib-headed sprit, etc.
-
Thank you Phil-- I hadn't heard of this book before. Phillips-Birt's "Fore and Aft Sailing Craft" (1962) and Morris's "The Fore and Aft Rig in America" (1974) also cover origins/history of these types.
-
Just a touch early for a sharpie, which it otherwise resembles considerably.
-
Second passenger deck is on, minus the curved back wall. Starting to get the moldings on as well, such as the strake between the machinery room and the lower passenger deck floor. Much more of this is needed, along with deck railings. The wheel is en-route from Bluejacket, so will put the roof on soon; it'll have a skylight of sorts-- covered on top, with glass sides (not sure the proper term for this type of light....). The bonfire/headlight will be a bit of a challenge-- a lot of wires and three sizable bulbs to deal with.
- 40 replies
-
- 7
-
-
- Okahumkee
- sternwheeler
- (and 1 more)
-
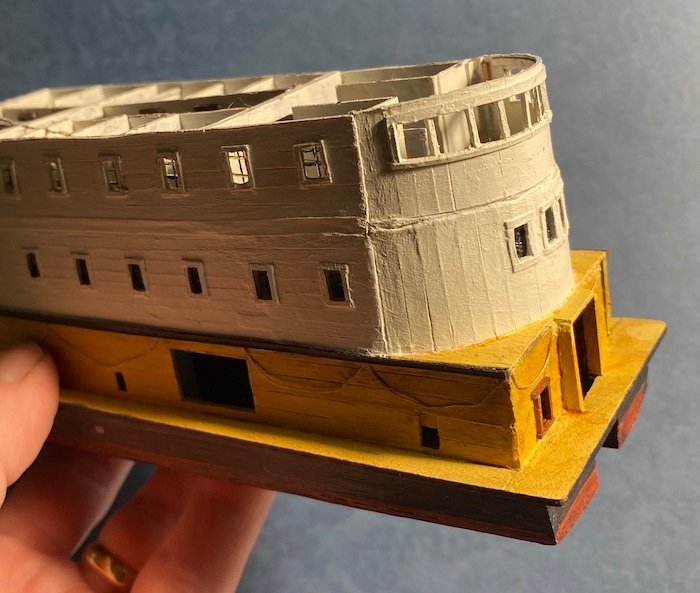
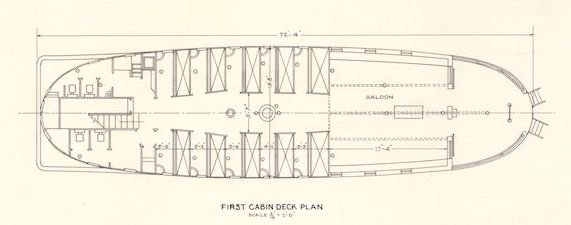
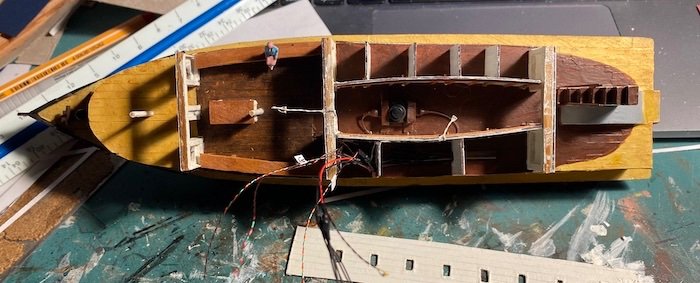
Progress and corrections.... I had to tear out the front wall of the lower passenger deck, as I had built it wrong. The plans were a little vague, but historical images showed that it bumped-out a bit and had doorways on the angled sides. There is a chance it is still incorrect, as it seems this steamer was modified quite a bit over the years, and the time frame for its various forms isn't too well documented. I'm building for circa 1900-ish, and the drawings are from the mid-to-late 1930s-- made from the vessel. Here's the floor plan, courtesy of State Library and Archives Florida: The re-done front wall: The curved stern is finishing out nicely, made from card stock, and vertically-oriented planking made from paper: This deck is nearly completed; just realized I need side-walls on the stairway, so as to not afford a view of the lavatories(!) Fun building a stairway that no one will ever see... (I hope I don't complain too much-- this is such a fun project!) Getting the second passenger deck layout together, with a bit of the wheelhouse pre-installed: There will be two lights on the lower passenger deck: one in the lounge, and one in the hallway. I'll bend the lights' wires up above the tops of the walls, dab clear glue on them, and when the ceiling/upper deck is glued down, they'll attach to the ceiling.
- 40 replies
-
- 7
-
-
- Okahumkee
- sternwheeler
- (and 1 more)
-
Recent progress: The lower passenger deck with berths and lounge is coming together. Many pitfalls in scratch-building, in terms of what step is next; It's easy to paint yourself into a corner, and the added complication of lighting doesn't help. The elliptical stern will be a challenge-- I did decide to get the walls in first, so as to serve as molds for the curved sides, which lean inward slightly-- no doubt they'll need shimming here and there. Below shows the berths coming together, and the stairway aft tot he second floor, which rides up the wheel housing. Also not the switch for the lighting, which will be activated by pressing down the smokestack; it is heavily re-enforced beneath the switch (i.e., the ceiling of the machinery room), as most of these upper works are just paper. Sides are on, with an initial fitting/bending of the curved stern. The joint lined up with a window of course . . . fun times! The windows are just plastic from packaging, with etched pane-frames lined with ink. The outer frames are wood-- they are too thick, and will be sanded down for much lower profile.
- 40 replies
-
- 7
-
-
- Okahumkee
- sternwheeler
- (and 1 more)
-
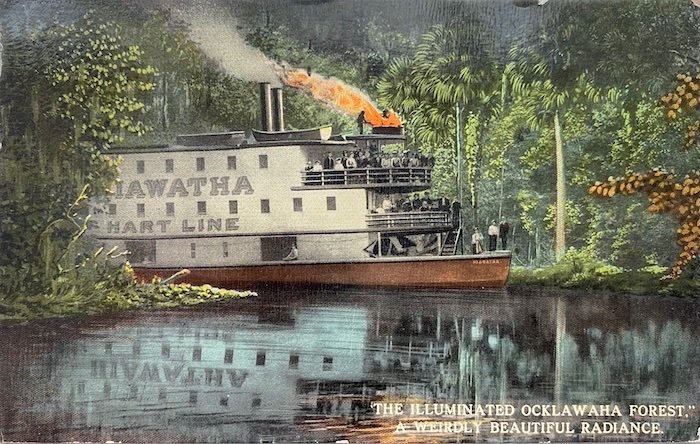
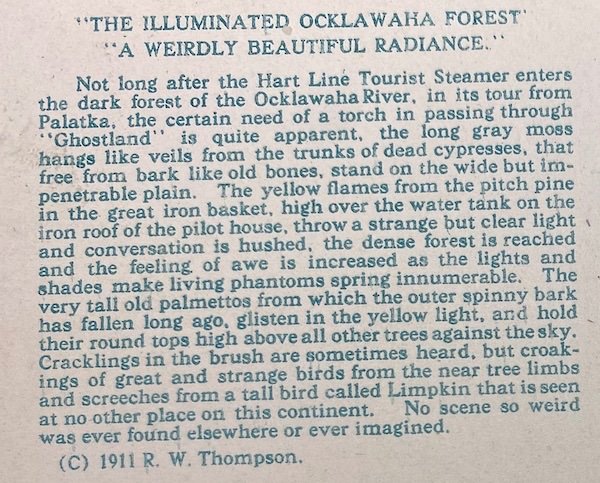
Starting to build up the lower passenger deck: Yes, those are wires. A historic postcard (ca. 1911) shows the "Hiawatha" rounding a bend with a bonfire (serving as a headlight) on top of the pilot house. The vivid description on the verso made me want to render this as a diorama. Below is a test-run of wiring/lighting, including a 3-bulb flickering flame, sourced from Evan Designs LED (An MSW sponsor). Also using four white lights and P & S running lights. The steamer's smokestack will serve as the on-off button. . . nothing like making a complicated model even more complicateder. Here's the historical image and description.... Looks like a lot of cypress and palms to make as well. Who could resist a diorama after reading that?
- 40 replies
-
- 5
-
-
- Okahumkee
- sternwheeler
- (and 1 more)
-
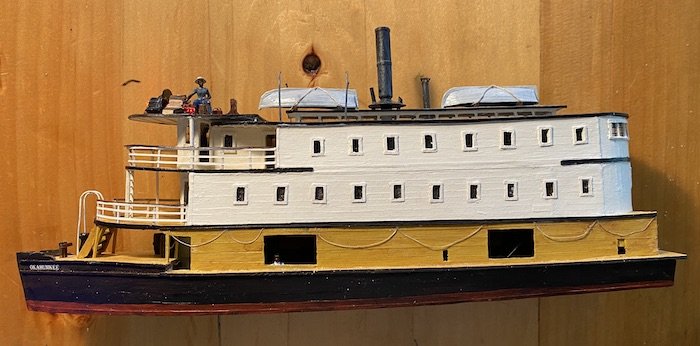
For some reason my photos are coming out extremely yellow-- its definitely more like the Smithsonian model in real life.
- 40 replies
-
- 2
-
-
- Okahumkee
- sternwheeler
- (and 1 more)
-
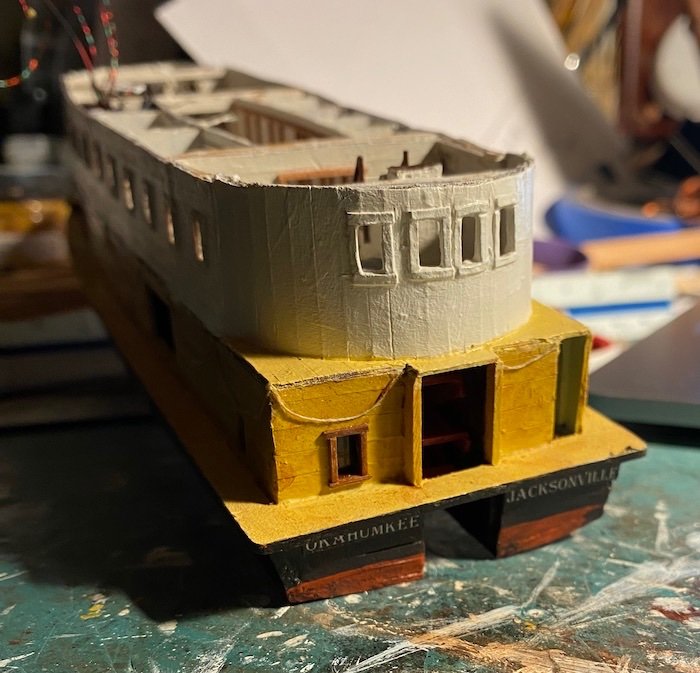
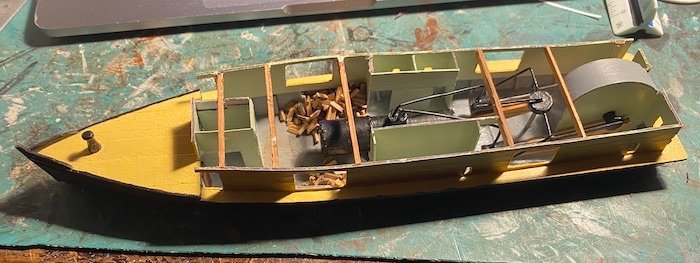
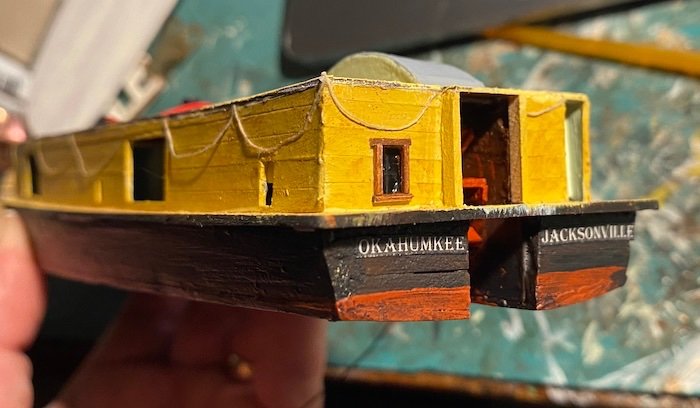
Ready to cover the engine room, galley, and crew quarters. I spent a lot of time splitting firewood, so please don't tell me I need to stack it neatly too. Most of this will not be visible, but I can't help myself with certain details. Some details of the bow and stern, with tentative lettering: The color scheme was a big mystery; vintage hand-colored postcards show the yellow, but a model of the Ocklawaha in a regional museum is dark green instead of yellow. The breakthrough came when I found a Hart Line steamer model (the "Ocklawaha") in the US Postal Museum/Smithsonian's on-line catalog: https://postalmuseum.si.edu/object/npm_0.052985.271 It's a beautiful model, and there are many very good photos of it; it also answered a few questions the plans had left me with.
- 40 replies
-
- 9
-
-
- Okahumkee
- sternwheeler
- (and 1 more)
-
Indeed! I have a friend who kayaks on the Ocklawaha, and he was surprised to hear 80' steamers used to ply it. Historical texts describe passengers being raked by limbs, and some steamers were sunk by snags.
- 40 replies
-
- 3
-
-
- Okahumkee
- sternwheeler
- (and 1 more)