GGibson
-
Posts
1,070 -
Joined
-
Last visited
Content Type
Profiles
Forums
Gallery
Events
Everything posted by GGibson
-

Question re: Rigging Multiple Blocks at One Location
GGibson replied to GGibson's topic in Masting, rigging and sails
Thanks, Rich. Thanks, Phil. Appreciate the input from both of you! Phil, thanks for directing me to your post with diagrams. Helps to visually see the differences. Appreciate the guidance, gentlemen! Gives me confidence in moving forward. 👍🏆 -
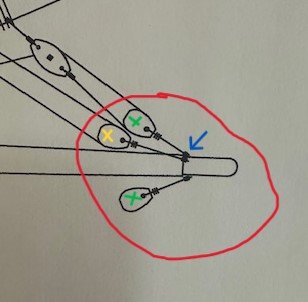
Anyone have any advice or recommendations on the best way to rig multiple block lines to a single location on a spar or mast? In the plans for my Santa Maria shown below, there are a couple locations like that depicted where this situation occurs. My best solution is to rig the two blocks noted with the green X's with one line and wrapping the line a few times around the spar. The line for the yellow X'd block would then be slipped under the wrapped green line so that when the green blocks line was tied securely with perhaps something like a rolling hitch, the yellow block line (probably with its own knot, as well) would hold. Any different recommendations on how to best secure these lines? Thanks...
-
USS Constitution by mtbediz - 1:76
GGibson replied to mtbediz's topic in - Build logs for subjects built 1751 - 1800
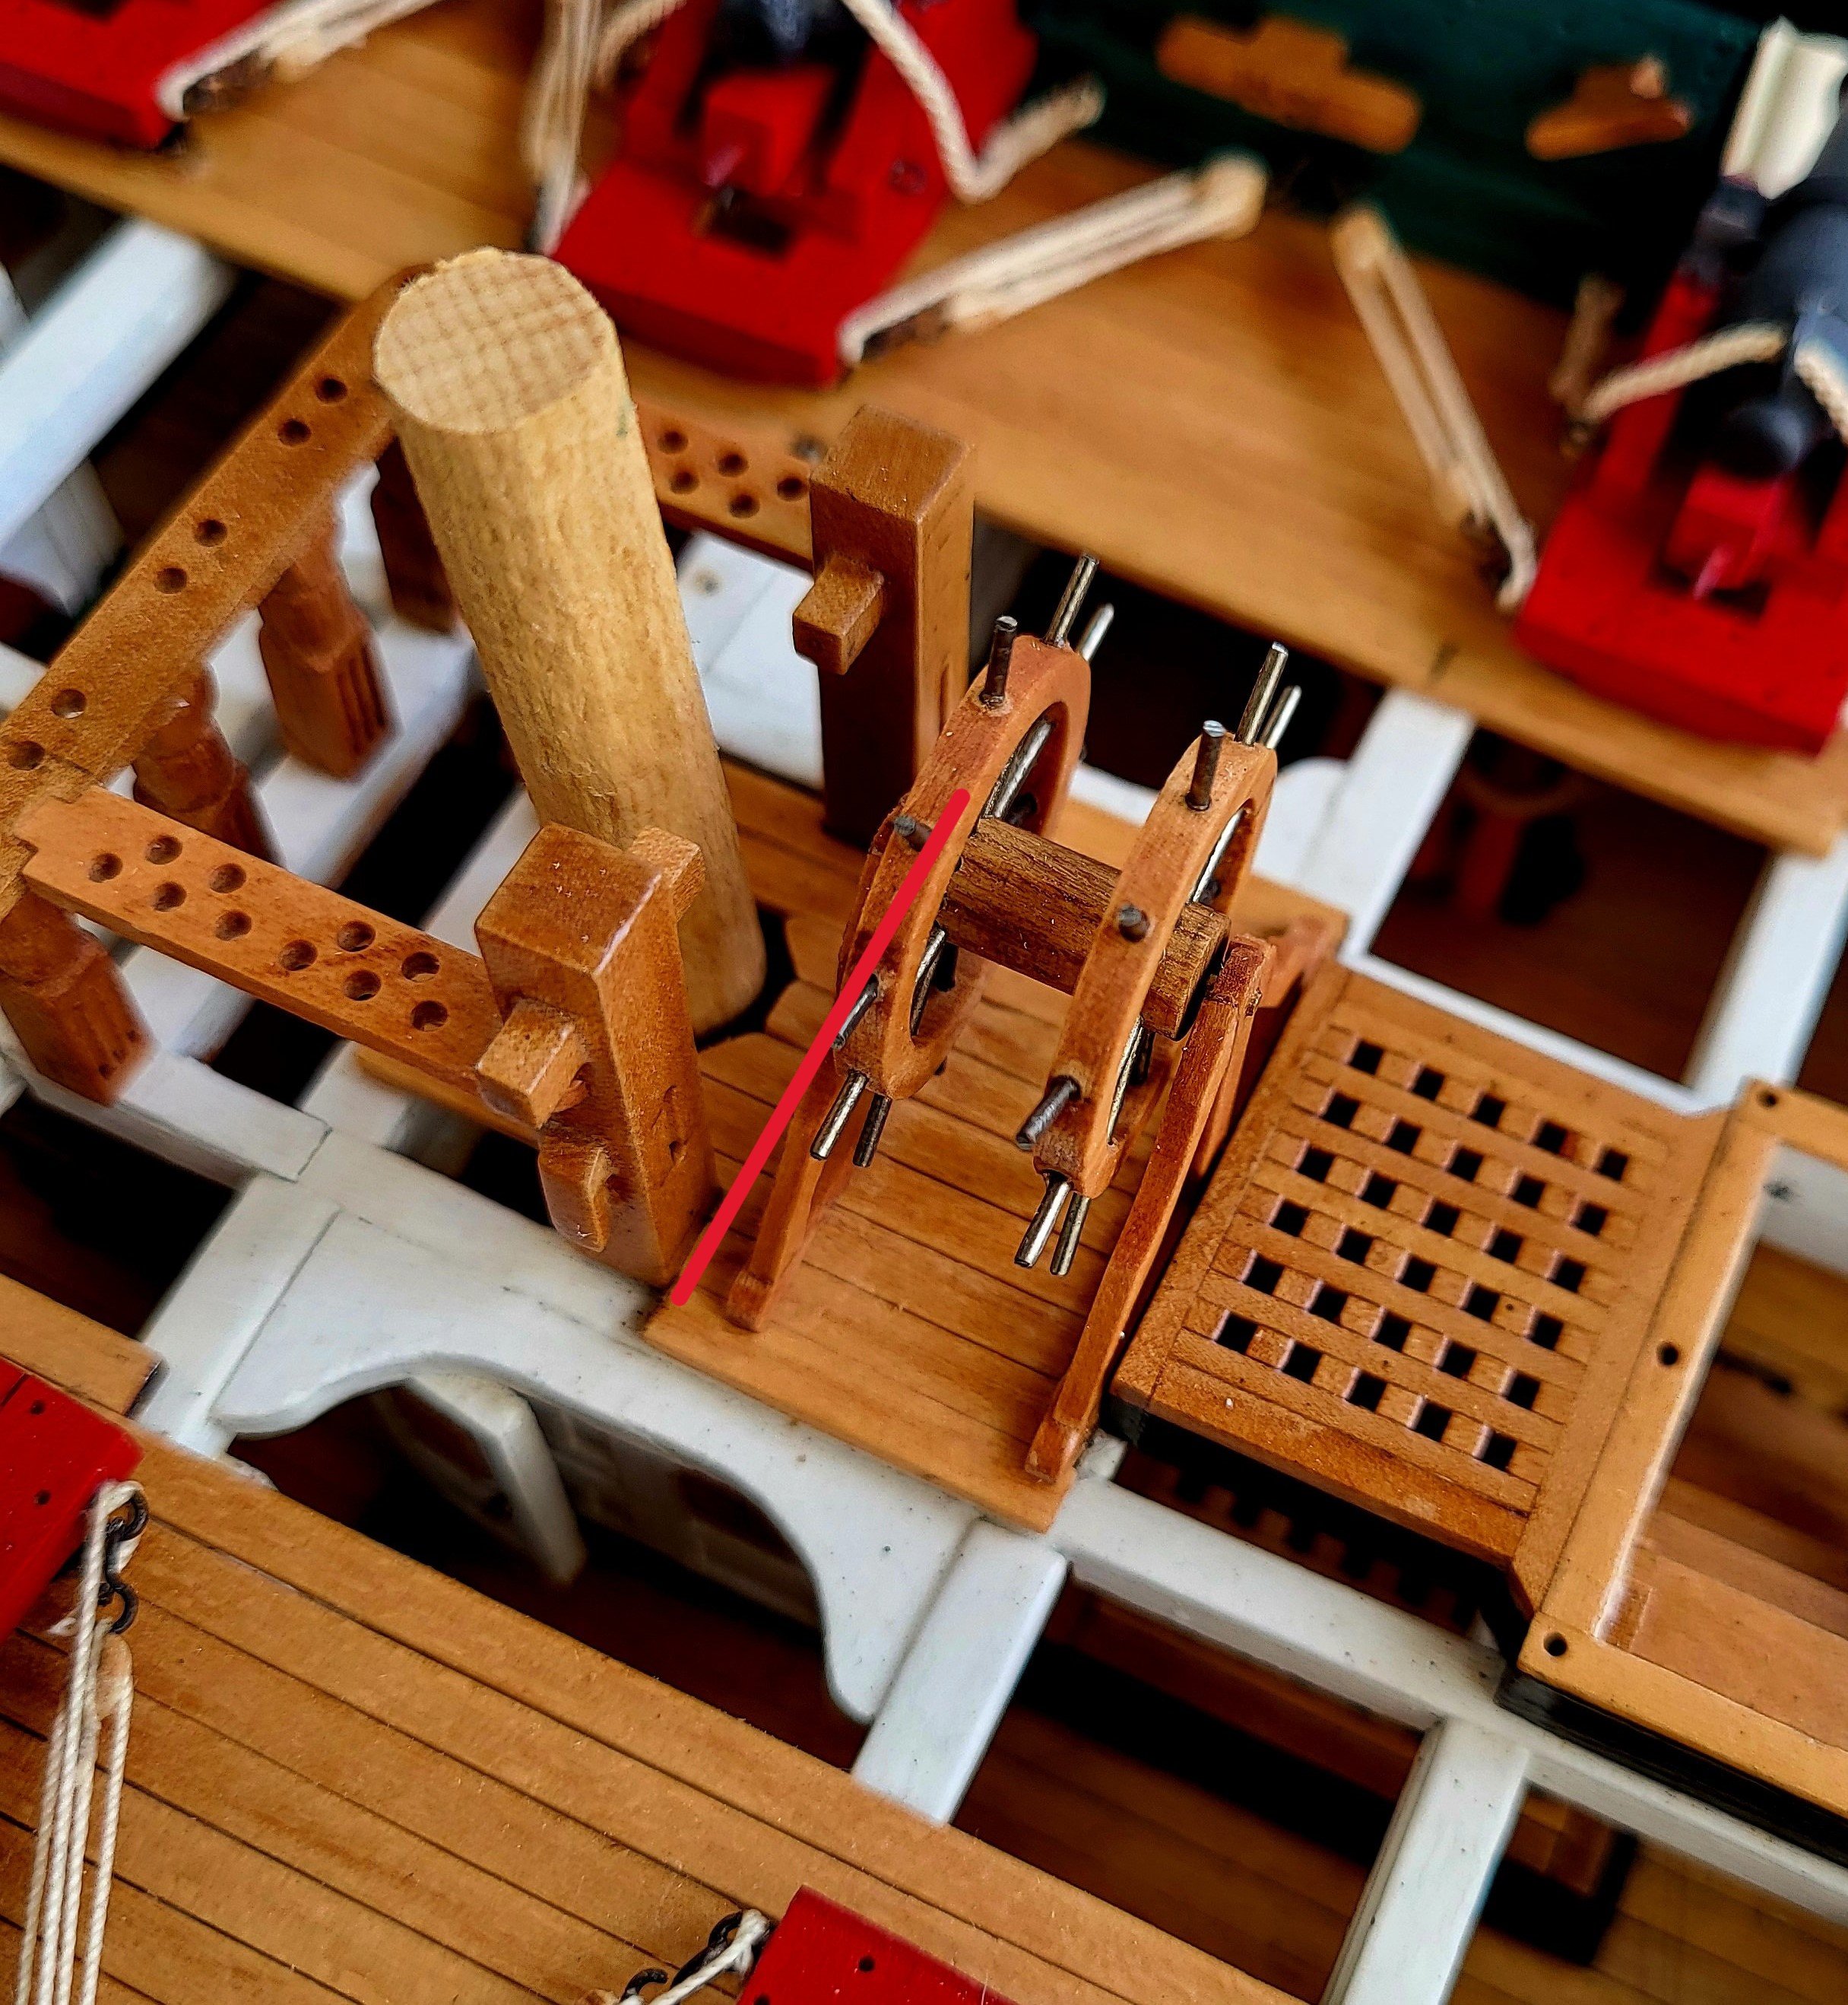
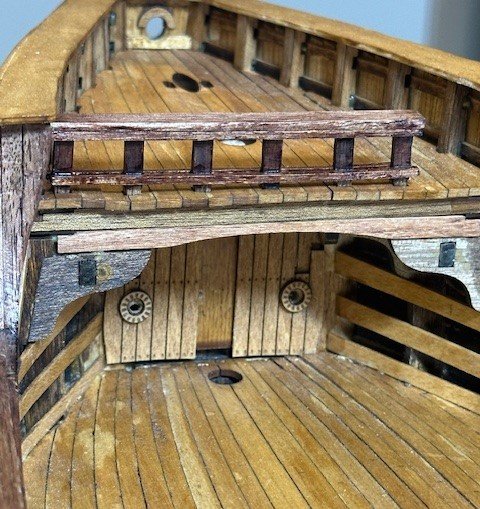
One more silly, stupid question before the end of my day, Mustafa. Just so I understand how you are doing your awesome work. You placed the decking under the ship's wheel and brought it back so it begins to surround the mizzen mast. In order to do that, to have the decking rest solidly, I'm assuming you placed some type of "dummy" support beam between the fife rail and where the ship's wheel sits, somewhat like where I drew the red line in your picture below? I will also assume you will also place decking, then, on the aft side of the mizzen mast, as well, to help support the mast and to have the mast base (can't think of its proper name now) sit on. Again, apologize for taking up space on your build log, but I love to see how you are doing things with this exposed deck. Thank you, sir! Carry on!
-
No idea which "batch" my order fell under, but received my Ship Modeler's Handbook in the mail today! Even with the unreliability of the USPS! 🤷♀️😆 Thanks, Mary! Will be excellent plane reading material during my upcoming weekend trip.
-
USS Constitution by mtbediz - 1:76
GGibson replied to mtbediz's topic in - Build logs for subjects built 1751 - 1800
OK, so this was very interesting to me. My apologies, Mustafa, for taking up this space in your build log. Your ship's wheel looks awesome in its place on the deck! Great pictures, Jon. So, I wondered where do those ropes wrapped around the drum go after they go through the spar deck?!? Should we be able to see them somewhere on the gun deck, then? Well, I did my own research (I've learned so much from you guys!), and found the plans on the USS Constitution Museum website related to the steering. I saved these files as pdf's, and can't figure out how to show them as a picture here, but hopefully the pdf will open up ok. It appears the cables go through the gun deck and then travel along the ceiling of the berth deck where they attach to the tiller and the rudder. Very interesting! It appears that on the gun deck, they are going through some sort of conduit located in the Commodore's pantry (circled in red on the PDF), which is why we don't see it on the Museum's virtual tour website. Jon may have been able to get in that area during his actual visit to the ship. Anyways, I thought that was interesting, and thanks to Jon for pointing out the cable on the ship's wheel drum. Again, this all looks fantastic on your Constitution, Mustafa! Steering_Cables.pdf -
I'm a little late to the discussion, but I am just starting to rig the Pavel Nikitin Santa Maria, and in my first few cuts of his 0.45mm beige rope, the strands are unraveling on me as they are cut. Not happy about that. I previously used his thicker 1.3mm black rope and it was ok. So, looks like I might be relying on my supply of Syren and Ropes of Scale inventories, as I have used them in the past with great success.
-
USS Constitution by mtbediz - 1:76
GGibson replied to mtbediz's topic in - Build logs for subjects built 1751 - 1800
Absolutely excellent work, Mustafa! You really do make it look simple. Getting those drill holes spaced such that each of the rods fit perfectly. Impressive, sir! And, yes, the proper tools certainly help! I have the dividing attachment, as well, for my drill press and mill but have not used it yet. Dividing Attachment for MF 70 – PROXXON Inc Nice to see how it can be used for making these measured cuts. -
USS Constitution by mtbediz - 1:76
GGibson replied to mtbediz's topic in - Build logs for subjects built 1751 - 1800
Watching and (hopefully) learning from the challenges and successes that each of you gentlemen have faced in your individual builds has truly been instructional and inspirational. You all will still be hanging around here in the next five or so years (plus or minus) to be entertained by my Constitution challenges, right?!? 🤷♂️🤔🤣 -
...and the United States Postal Service does such a fine job in delivering our magazines and other important mail with such speed! <Enter your own sarcastic smile/frown here.> Seriously, though, my guess is that, with the NRG being a non-profit and the Handbook itself is so well priced, the $8.50 shipping charge probably also includes additional costs such as the envelope used to send, etc. Perhaps if the 100-page Handbook was advertised for $22.49 with free shipping, it would sell just as well?
-
USS Constitution by mtbediz - 1:76
GGibson replied to mtbediz's topic in - Build logs for subjects built 1751 - 1800
Awesome work on these canopies, Mustafa! Very interesting and ingenious how you made and used the jigs to shape the rods. I apologize if you stated previously, but what size of brass rods did you use for these canopies? I currently have a supply of 0.51mm, 0.81mm and 1mm brass rods that could be used... once I get to this point in 6-7 years! Hahaha... Great details, sir! -
Thanks for looking in at my progress, Mustafa! Appreciate your advice! The rope provided in Pavel's kit looks pretty decent, but don't know his source. The anchor rope around the windlass comes from the kit's supply. I also have a decent inventory of rope from both Syren and from Ropes of Scale. The rope I used to wrap the main mast shown above is from Syren. Both are great quality rope providers but, as you say, occasionally we run into some stock that has more fuzz on it than usual, and the lighter flame is a good reminder. Thanks!
- 58 replies
-
- 1
-

-
- Santa Maria
- Ships of Pavel Nikitin
- (and 1 more)
-
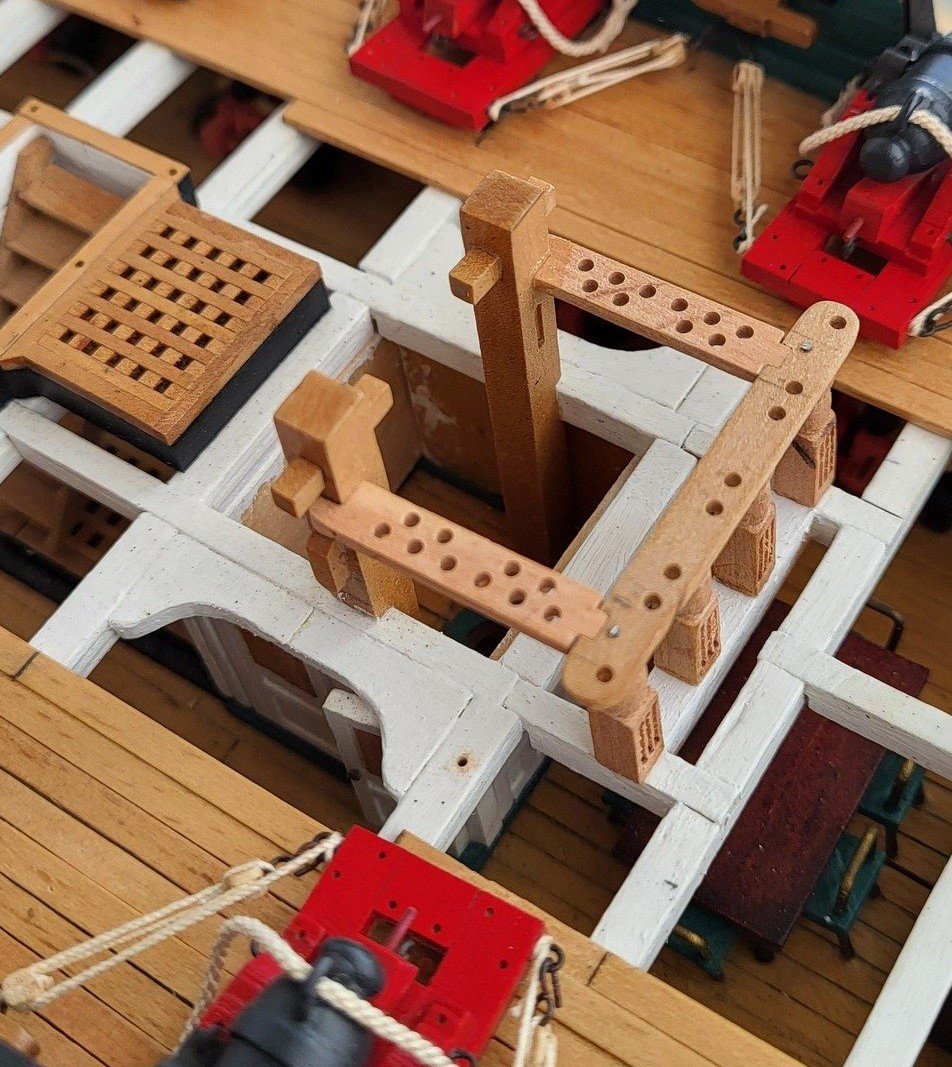
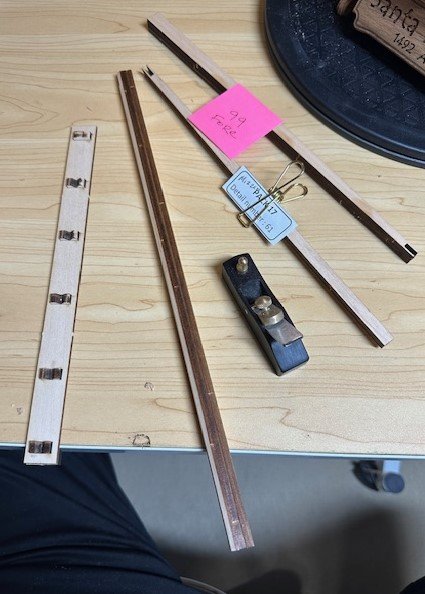
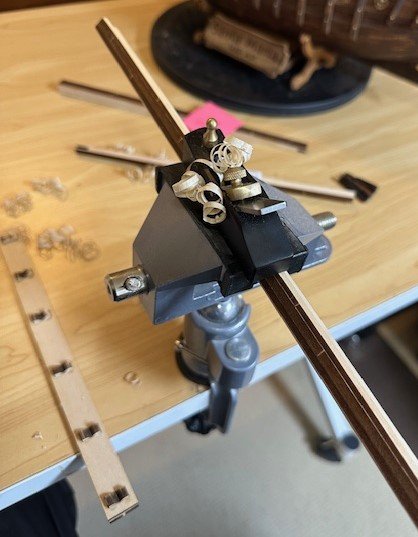
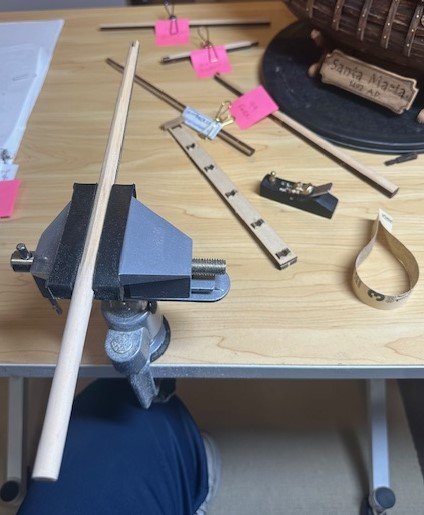
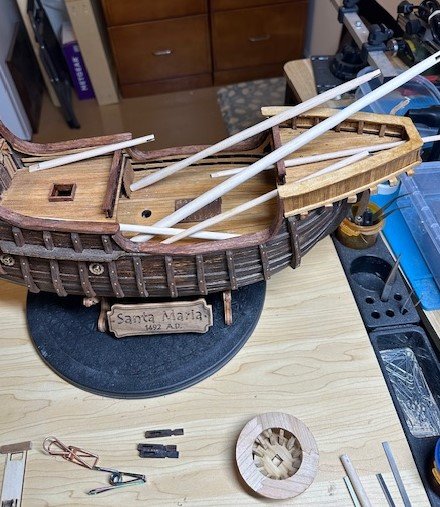
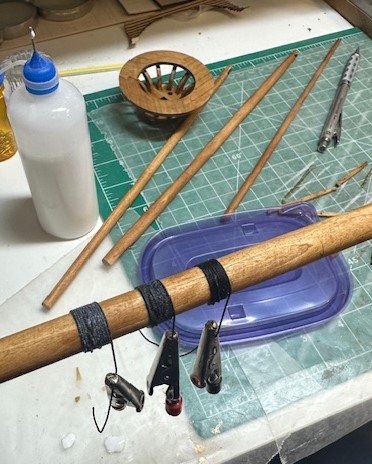
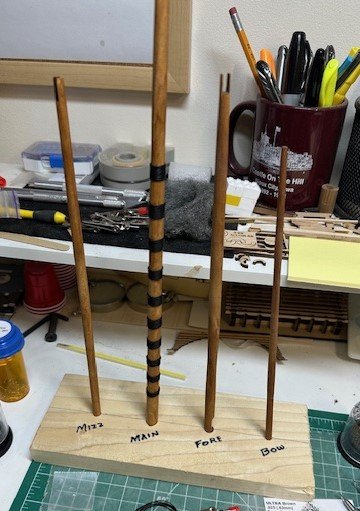
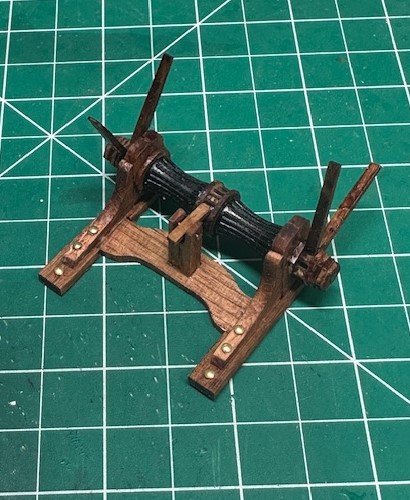
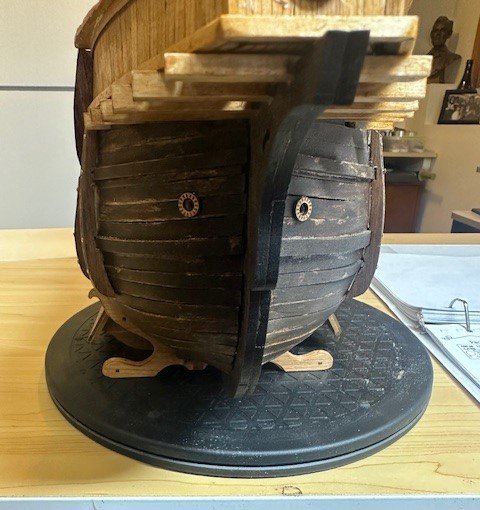
A couple small updates to my Santa Maria progress. In my last update, I had completed all of the deck accoutrements, including the windlass. In order to simulate the anchor ropes secured by the windlass, I wrapped some length around the windlass barrels with the extension to be placed through the holes under the forecastle deck, as if they were going out to the anchors. I am still waiting on the permanent placement of the windlass (and other pieces) until I feel it's safe to put them in without fear of breaking them. There will be a crow's nest on the main mast, so those pieces were removed from the applicable sheets, sanded and put together. Next task was to begin assembling the masts and spars. Like much of the other Santa Maria parts, pieces were removed from the laser=cut sheets. For the main mast, three pieces were to be glued together to produce a thick squared dowel, For the foremast and mizzen mast, two pieces were glued together. I then needed to round the square dowels to make each of the masts. To do this, I relied on a jig that was included in my first Norwegian Sailing Pram ship to assist in shaping masts. Using my mini-plane, I shaped the square dowels to octagons, then used sandpaper to shape to round masts. Although it is definitely time consuming, I really like to shape masts this way. Seems it is easier for me to more accurately taper the masts to their needed diameters along the length of the masts. Anyways, shaped each so they fit into their respective deck slot locations. The spars were also shaped to their proper forms, as well. This Santa Maria kit by Pavel Nikitin also includes some "mast toppers" (not sure if there is a formal name to them) that will have some rigging run through them, as well as will hold the flag poles. The faux pulleys for the toppers needed to be inserted and were then held in place by short pieces of 0.84" brass rod. The main mast has a series of bands around it running from the deck to under the crow's nest. Those bands were made using 0.63mm dark brown rope. Once wrapped, I applied diluted glue to each band and, once dried, they looked pretty decent. I will now begin to do as much of the rigging on these masts and spars as I can while they are off-ship. Hopefully, this little mast holder I made will help the organization process. Pavel's rigging plans have much to be desired, so taking my time to see if I can accurately follow the standing and running rigging as shown on the plans. Interestingly, much of the rigging information is listed on his plans in Swedish, so I am spending some time using an internet translator app. I'll update as I move forward on the rigging. Oh boy! Ratlines are once again in my future!


- 58 replies
-
- 3
-
-
- Santa Maria
- Ships of Pavel Nikitin
- (and 1 more)
-
This will demonstrate my relative "newness" to the model ship world, but... never seen rack blocks before, to my recollection. What would they be used on? How are they used? They do, however, look awesome, Chuck! 👍🏆
-
USS Constitution by mtbediz - 1:76
GGibson replied to mtbediz's topic in - Build logs for subjects built 1751 - 1800
Haha! You are too kind! And.... one of the dumber questions I have ever asked on MSW. Of course, the mast slots would be in the false keel when you first began! And I see where you cut the various openings in the gun deck on your post #10. Thanks again, Mustafa. -
USS Constitution by mtbediz - 1:76
GGibson replied to mtbediz's topic in - Build logs for subjects built 1751 - 1800
Perfect, Mustafa! Thanks for answering! I was too lazy to go back and look at your log history before I asked the question, but figured you had a quick answer for me. Appreciate your time. Can't wait to get to this one! -
USS Constitution by mtbediz - 1:76
GGibson replied to mtbediz's topic in - Build logs for subjects built 1751 - 1800
Fife rails look great, Mustafa! Now I have to look back in your build log to remind myself how your masts will be seated when they are securely placed. Do they just go down to the gun deck where they are secured there, or will they slide down farther past the gun deck to be seated? -
USS Constitution by mtbediz - 1:76
GGibson replied to mtbediz's topic in - Build logs for subjects built 1751 - 1800
These fife rail stanchions are looking great, Mustafa! Job well done, sir! Don't remember if we've discussed this before, but which Proxxon lathe model do you have? I have looked at both the FD150 and the PD250 but, since I would be totally new to lathe work, not entirely sure of the model differences. If you have the FD150, have you used it for metal/brass work, as well as wood? I am really enjoying seeing how you are placing the spar deck fixtures (like these fife rail stanchions) on the exposed beams so that we can still see gun deck details. This is exactly how I would envision an "open view" to look. Awesome detail. Mustafa! -
USS Constitution by mtbediz - 1:76
GGibson replied to mtbediz's topic in - Build logs for subjects built 1751 - 1800
Excellent rigging work on these carronades, Mustafa! Very consistent look to them all. Did you give the blocks any stain or topcoat prior to placing them in the rigging? -
Can those front trucks/wheels be moved back in order for the carriage to get closer to the gun ports?
-
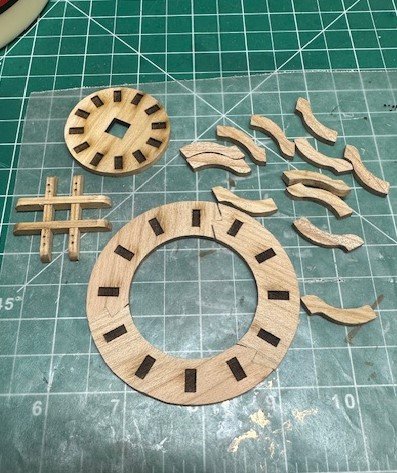
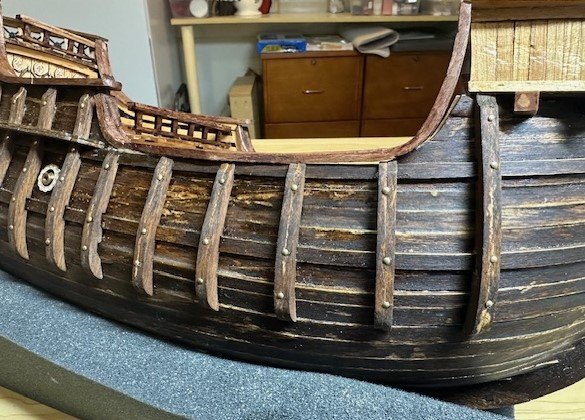
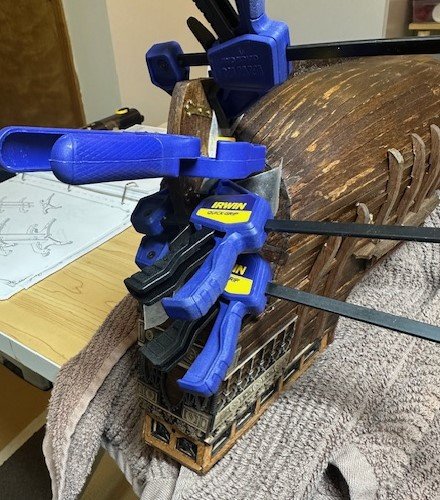
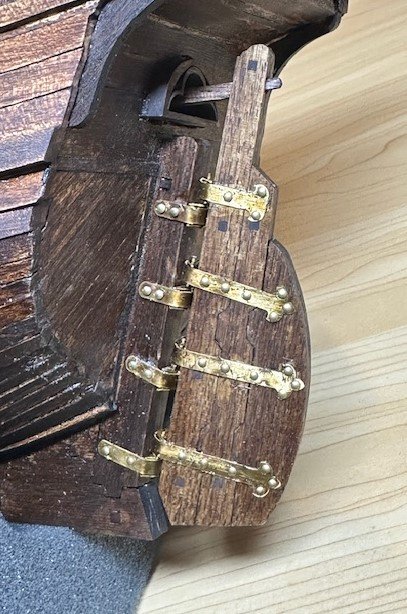
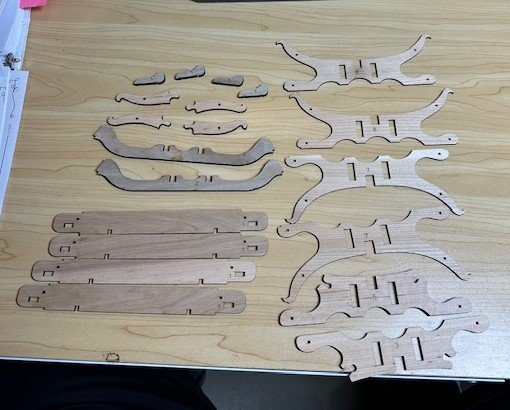
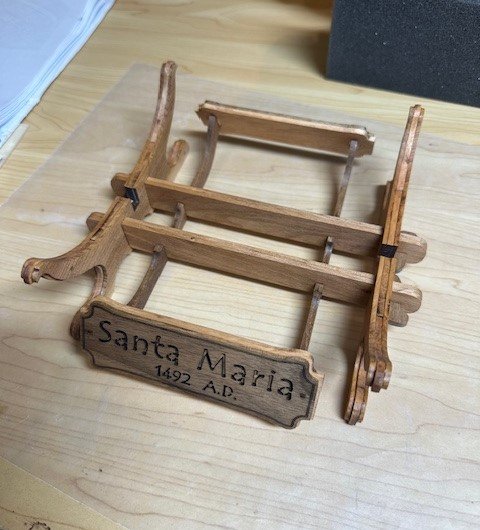
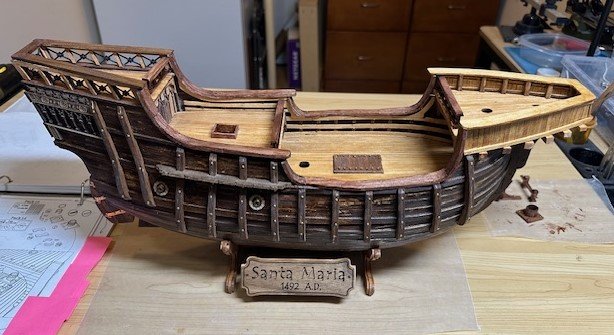
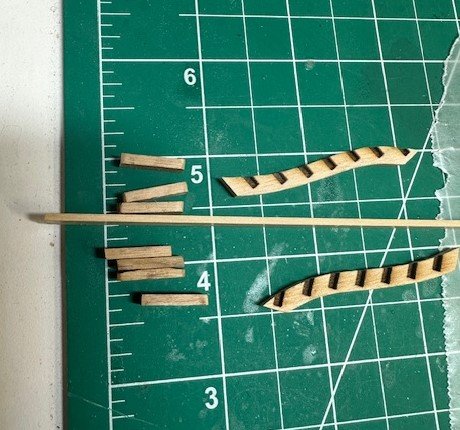
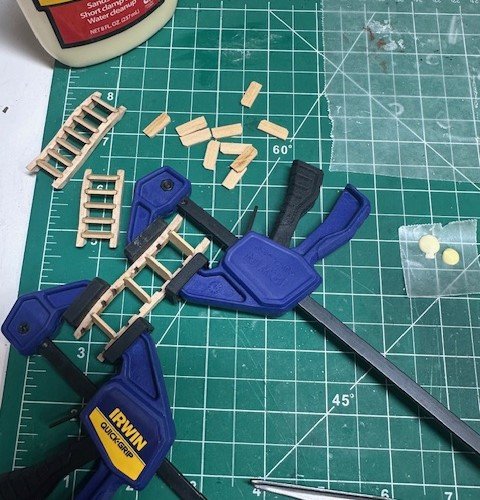
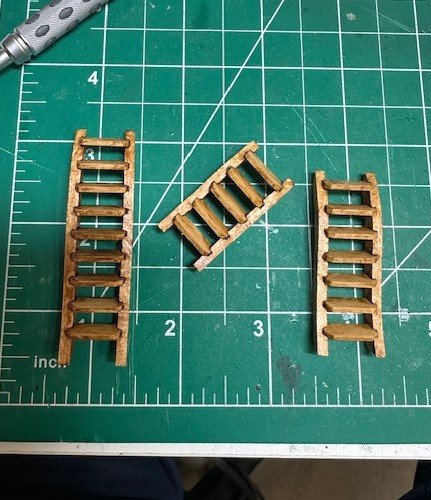
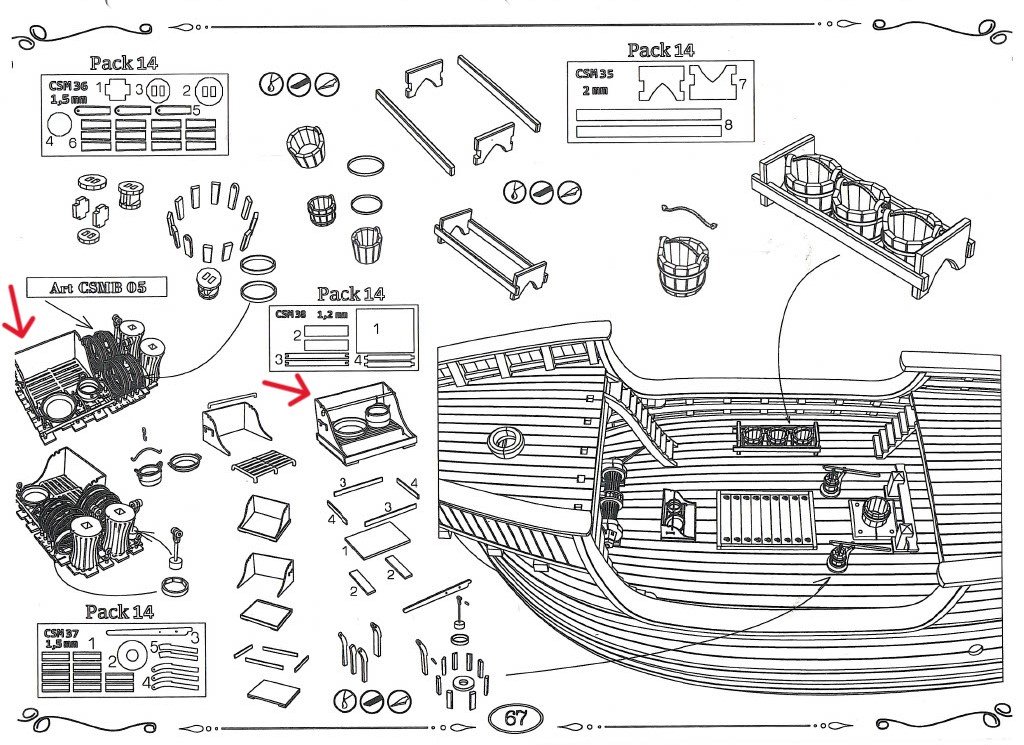
Got a few more little things done, so... time for another short update. A few weeks ago, I had placed the fenders on the sides of the ship, so it was now time to place the bolts (nails) in the fenders. Forty-seven (47) of them on each side, if I am counting correctly. Used a pin vise to create the holes that the trimmed nails were then secured into. Looks nice with the faux bolts in the fenders. I had also begun work on the rudder previously, so wanted to finish it. Positioned the kit-provided rudder straps for the pintles and gudgeons to fit properly and, with the ship flipped upside down, it was much easier to secure the rudder in place until the CA glue dried. Wish I could get the brass straps to appear a little darker and may continue to work on that. But, with the exterior work pretty much completed on this Santa Maria, it is time to get this on the cradle. The kit provided a pretty nice stand for the ship to sit on. So, popped out all the cradle pieces from the sheet, cleaned up the char as best I could, and then pre-stained it, stained it, and assembled it. Still a bit undecided on if I want to permanently secure the ship to the cradle but will make that decision shortly. Placing much more stuff on the various decks will make it difficult to flip the ship in order to drill the necessary holes for any permanent rods between the ship's keel and the cradle. OK, time to work on some of the deck accoutrements. First, the three ship ladders. The kit provides three sets of rails with slots already pre-milled for the steps, and a whole bunch of rungs/steps that were popped out of the sheet. After cleaning up the char on everything, I noted that the thickness of the kit-provided steps was 3/32", while the pre-cut slots in the rails only had clearance for 1/16". At first, I sanded a few of the steps at the ends in order to fit, but then decided to just cut some new steps using a couple spare 1/16" x 7/32" basswood strips I had available. Worked much better, less frustrating to fit in the rail slots. Assembled the three ladders, tested them in place and then stained them. Will wait on permanent placement of them (and several of the other deck pieces) until I know placing them won't be in the way of anything else going on the decks. One of the next pages in Pavel's Santa Maria Instruction Guide has a diagram of several deck pieces that require assembly. The kit contains some small plastic-type pieces that were designed to all be snapped off a base from which they were created (the red arrows), representing various deck pieces and parts, including the windlass barrels, bucket rings, pump parts, and stove parts. Unfortunately, the stove pot and pan were all broken in the kit. So, my Santa Maria stove will only have the grates with no pots. However, I was also able to make some buckets and pumps. I was able to shape, as best I could, the circular slats to create the buckets and the pump covers, and then using my Dremel sander, was able to shape them into more rounded shapes. At this scale, that'll do fine. The windlass was a fun piece to assemble. The Instruction Guide showed MULTIPLE pieces required for assembly. Like the other deck pieces, these will all be permanently placed in their positions once I am confident they won't get bumped while doing other work on the decks. Another example of items in this Pavel Nikitin kit that suddenly appear in diagrams or pictures without discussion are the anchor ropes that go from the anchors through hawse pipes at the bow and are then secured around the windlass barrels. It would have been much easier and cleaner to create these hawse pipe holes earlier, especially on the inside, under the forecastle deck. So, we will now work on the anchor rope and then get some of these deck pieces secured onto the deck. Also, it's about time to begin working on the three masts for the ship. Continuing to trudge forward... Again, as always, thanks for the reads, the likes, the comments, and the criticisms.


- 58 replies
-
- 4
-
-
- Santa Maria
- Ships of Pavel Nikitin
- (and 1 more)
-
Easy, peasy... 🤷♀️🤣
-
USS Constitution by mtbediz - 1:76
GGibson replied to mtbediz's topic in - Build logs for subjects built 1751 - 1800
These blocks look amazing, Mustafa! Nice, detailed work. Hope you don't think any less of me if I buy my blocks from Syren! 🤷♀️🤣 -
With all the toil and trouble that you have endured over the recent weeks working on these, the results are outstanding, Jon. Looking great!
-
USS Constitution by mtbediz - 1:76
GGibson replied to mtbediz's topic in - Build logs for subjects built 1751 - 1800
Perfect! Will be interested in your process.