


GGibson
-
Posts
1,086 -
Joined
-
Last visited
Content Type
Profiles
Forums
Gallery
Events
Everything posted by GGibson
-

USS Constitution by mtbediz - 1:76
GGibson replied to mtbediz's topic in - Build logs for subjects built 1751 - 1800
Awesome work on these canopies, Mustafa! Very interesting and ingenious how you made and used the jigs to shape the rods. I apologize if you stated previously, but what size of brass rods did you use for these canopies? I currently have a supply of 0.51mm, 0.81mm and 1mm brass rods that could be used... once I get to this point in 6-7 years! Hahaha... Great details, sir! -
Thanks for looking in at my progress, Mustafa! Appreciate your advice! The rope provided in Pavel's kit looks pretty decent, but don't know his source. The anchor rope around the windlass comes from the kit's supply. I also have a decent inventory of rope from both Syren and from Ropes of Scale. The rope I used to wrap the main mast shown above is from Syren. Both are great quality rope providers but, as you say, occasionally we run into some stock that has more fuzz on it than usual, and the lighter flame is a good reminder. Thanks!
- 58 replies
-
- 1
-

-
- Santa Maria
- Ships of Pavel Nikitin
- (and 1 more)
-
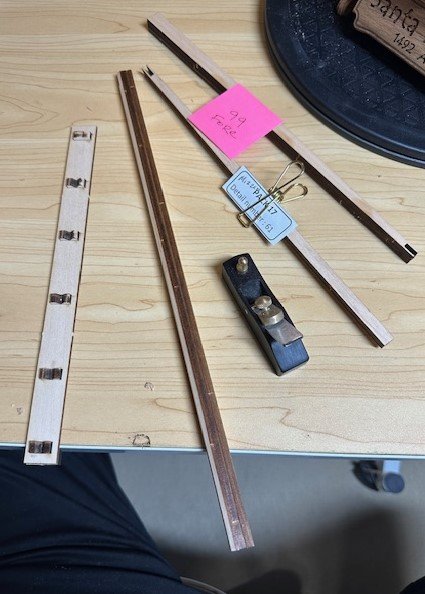
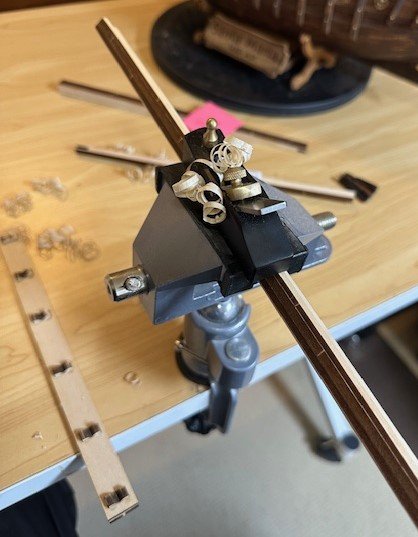
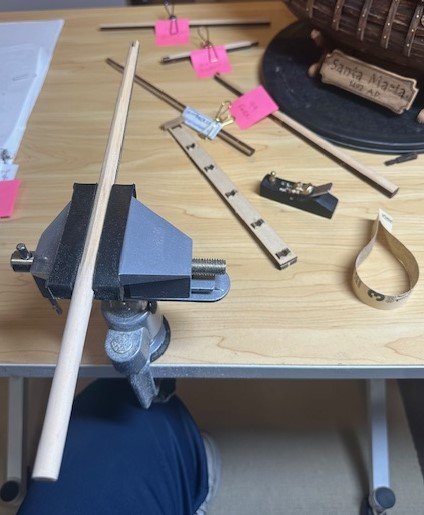
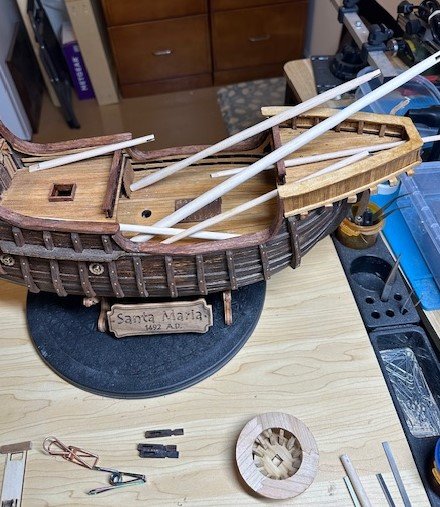
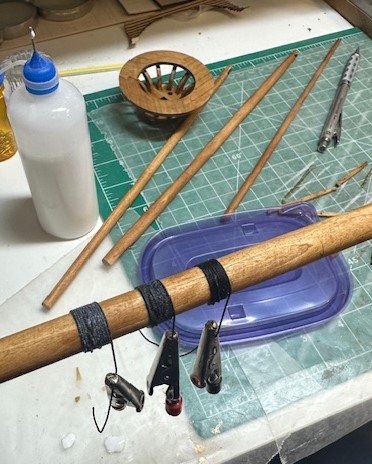
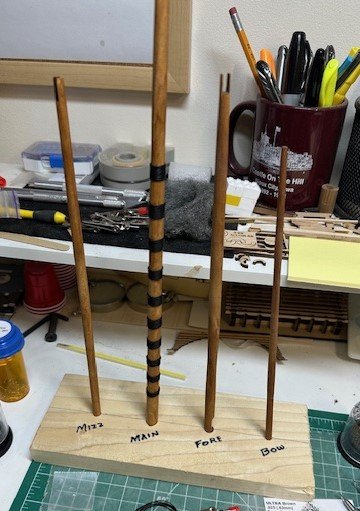
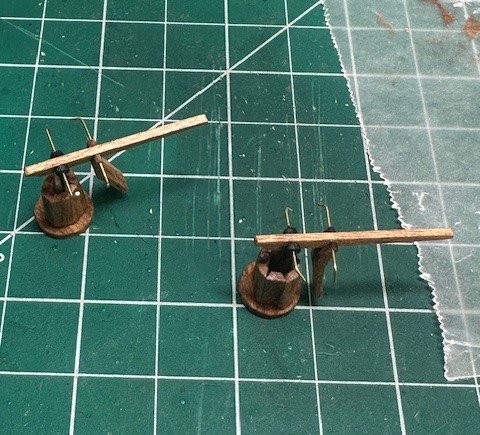
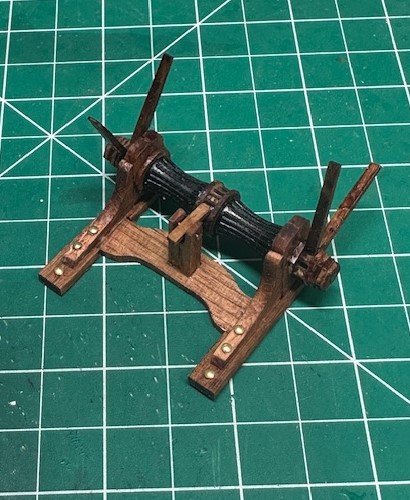
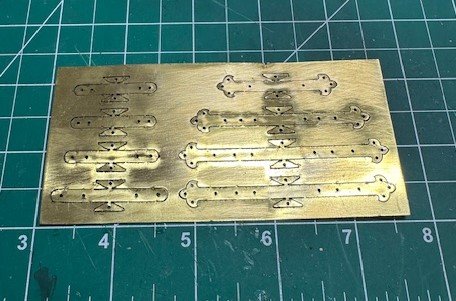
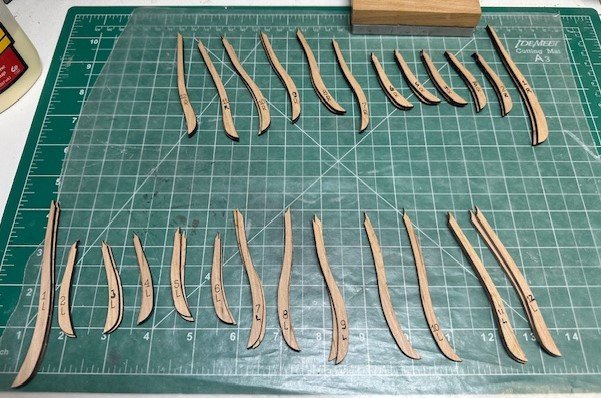
A couple small updates to my Santa Maria progress. In my last update, I had completed all of the deck accoutrements, including the windlass. In order to simulate the anchor ropes secured by the windlass, I wrapped some length around the windlass barrels with the extension to be placed through the holes under the forecastle deck, as if they were going out to the anchors. I am still waiting on the permanent placement of the windlass (and other pieces) until I feel it's safe to put them in without fear of breaking them. There will be a crow's nest on the main mast, so those pieces were removed from the applicable sheets, sanded and put together. Next task was to begin assembling the masts and spars. Like much of the other Santa Maria parts, pieces were removed from the laser=cut sheets. For the main mast, three pieces were to be glued together to produce a thick squared dowel, For the foremast and mizzen mast, two pieces were glued together. I then needed to round the square dowels to make each of the masts. To do this, I relied on a jig that was included in my first Norwegian Sailing Pram ship to assist in shaping masts. Using my mini-plane, I shaped the square dowels to octagons, then used sandpaper to shape to round masts. Although it is definitely time consuming, I really like to shape masts this way. Seems it is easier for me to more accurately taper the masts to their needed diameters along the length of the masts. Anyways, shaped each so they fit into their respective deck slot locations. The spars were also shaped to their proper forms, as well. This Santa Maria kit by Pavel Nikitin also includes some "mast toppers" (not sure if there is a formal name to them) that will have some rigging run through them, as well as will hold the flag poles. The faux pulleys for the toppers needed to be inserted and were then held in place by short pieces of 0.84" brass rod. The main mast has a series of bands around it running from the deck to under the crow's nest. Those bands were made using 0.63mm dark brown rope. Once wrapped, I applied diluted glue to each band and, once dried, they looked pretty decent. I will now begin to do as much of the rigging on these masts and spars as I can while they are off-ship. Hopefully, this little mast holder I made will help the organization process. Pavel's rigging plans have much to be desired, so taking my time to see if I can accurately follow the standing and running rigging as shown on the plans. Interestingly, much of the rigging information is listed on his plans in Swedish, so I am spending some time using an internet translator app. I'll update as I move forward on the rigging. Oh boy! Ratlines are once again in my future!


- 58 replies
-
- 3
-
-
- Santa Maria
- Ships of Pavel Nikitin
- (and 1 more)
-
This will demonstrate my relative "newness" to the model ship world, but... never seen rack blocks before, to my recollection. What would they be used on? How are they used? They do, however, look awesome, Chuck! 👍🏆
-
USS Constitution by mtbediz - 1:76
GGibson replied to mtbediz's topic in - Build logs for subjects built 1751 - 1800
Haha! You are too kind! And.... one of the dumber questions I have ever asked on MSW. Of course, the mast slots would be in the false keel when you first began! And I see where you cut the various openings in the gun deck on your post #10. Thanks again, Mustafa. -
USS Constitution by mtbediz - 1:76
GGibson replied to mtbediz's topic in - Build logs for subjects built 1751 - 1800
Perfect, Mustafa! Thanks for answering! I was too lazy to go back and look at your log history before I asked the question, but figured you had a quick answer for me. Appreciate your time. Can't wait to get to this one! -
USS Constitution by mtbediz - 1:76
GGibson replied to mtbediz's topic in - Build logs for subjects built 1751 - 1800
Fife rails look great, Mustafa! Now I have to look back in your build log to remind myself how your masts will be seated when they are securely placed. Do they just go down to the gun deck where they are secured there, or will they slide down farther past the gun deck to be seated? -
USS Constitution by mtbediz - 1:76
GGibson replied to mtbediz's topic in - Build logs for subjects built 1751 - 1800
These fife rail stanchions are looking great, Mustafa! Job well done, sir! Don't remember if we've discussed this before, but which Proxxon lathe model do you have? I have looked at both the FD150 and the PD250 but, since I would be totally new to lathe work, not entirely sure of the model differences. If you have the FD150, have you used it for metal/brass work, as well as wood? I am really enjoying seeing how you are placing the spar deck fixtures (like these fife rail stanchions) on the exposed beams so that we can still see gun deck details. This is exactly how I would envision an "open view" to look. Awesome detail. Mustafa! -
USS Constitution by mtbediz - 1:76
GGibson replied to mtbediz's topic in - Build logs for subjects built 1751 - 1800
Excellent rigging work on these carronades, Mustafa! Very consistent look to them all. Did you give the blocks any stain or topcoat prior to placing them in the rigging? -
Can those front trucks/wheels be moved back in order for the carriage to get closer to the gun ports?
-
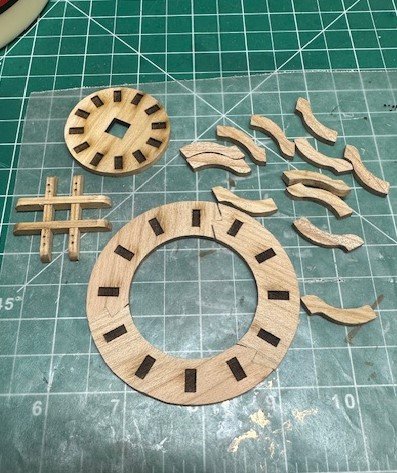
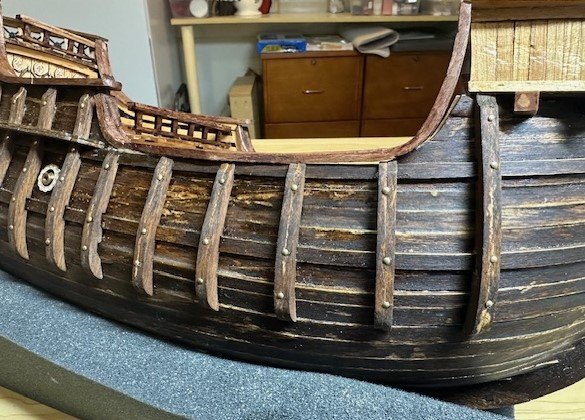
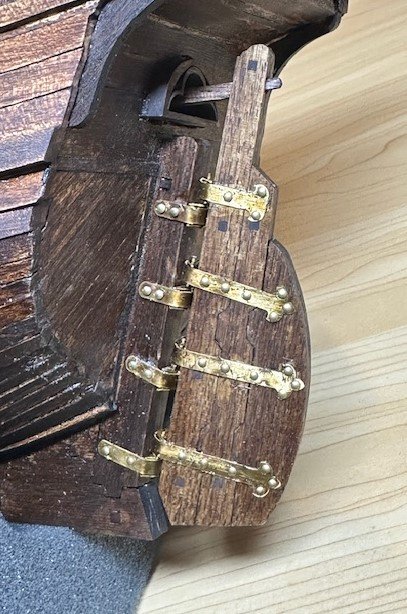
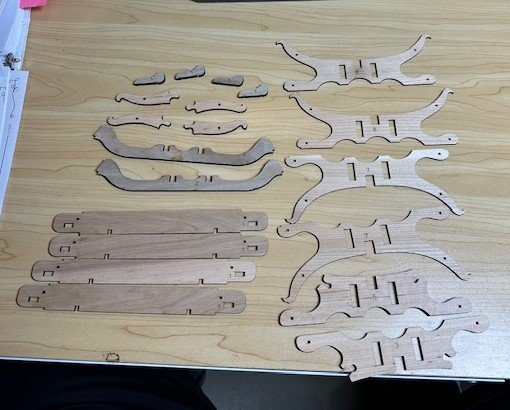
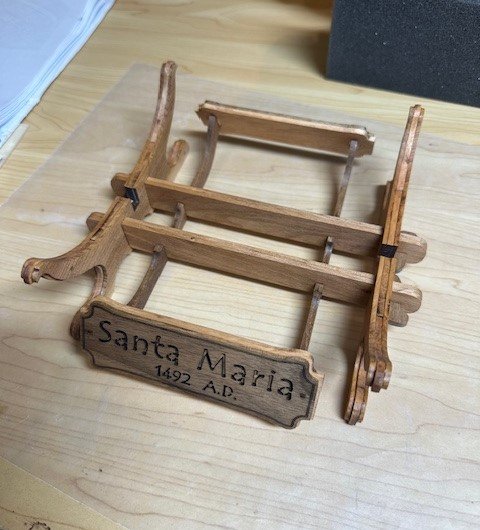
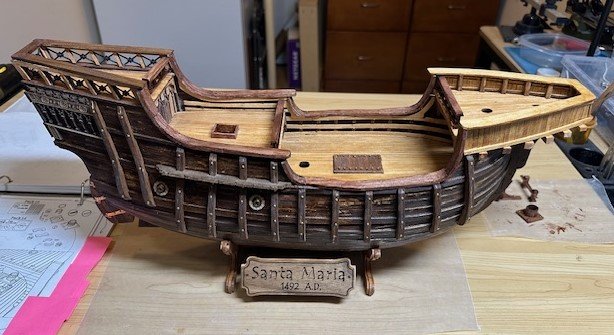
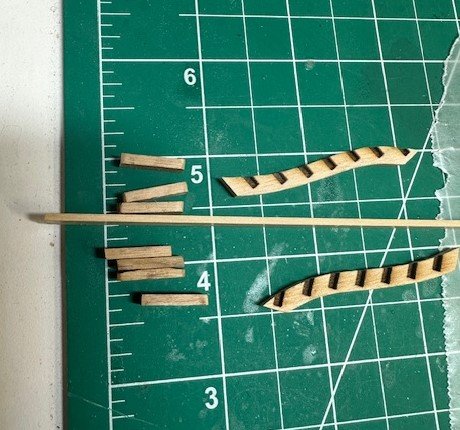
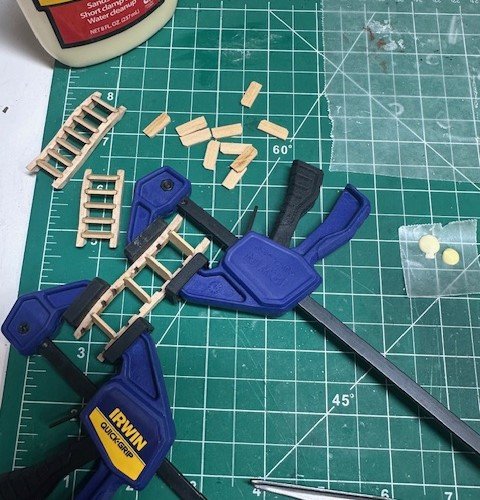
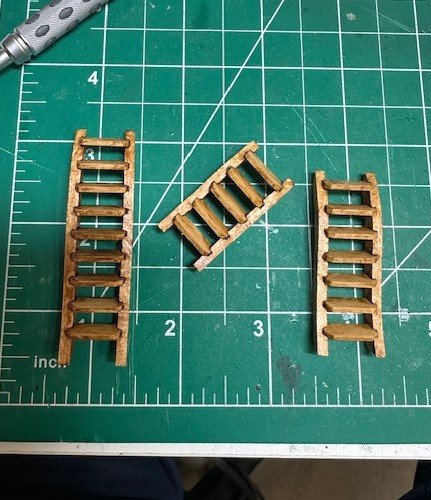
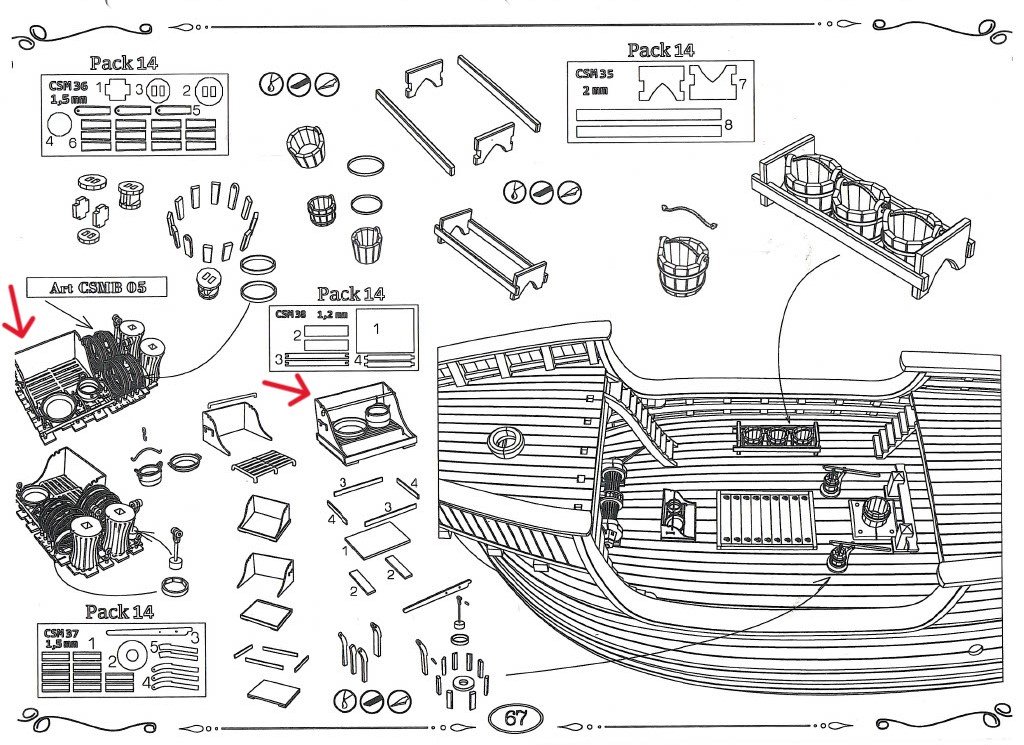
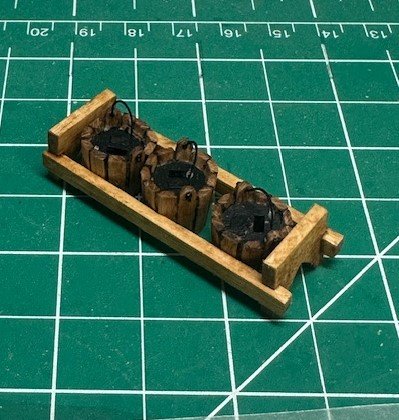
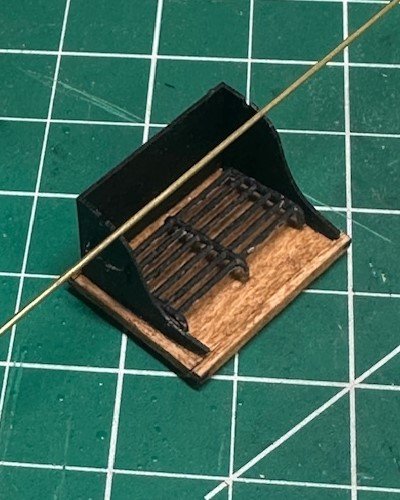
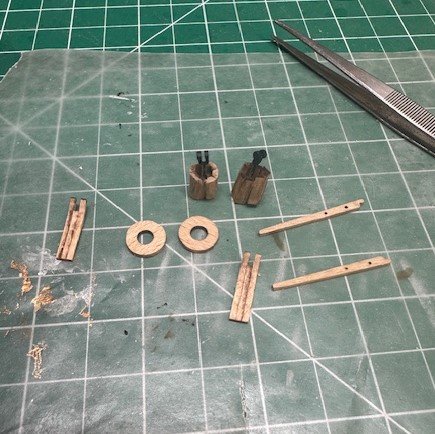
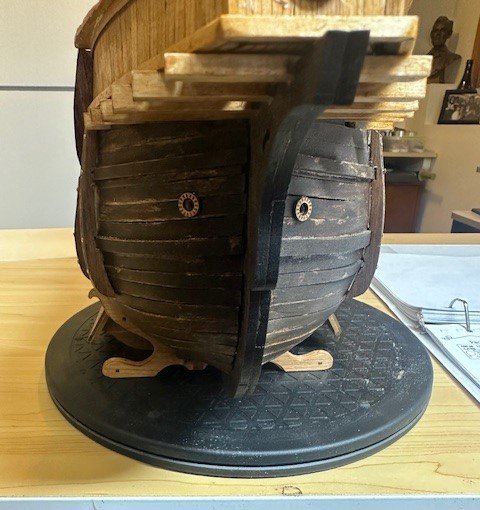
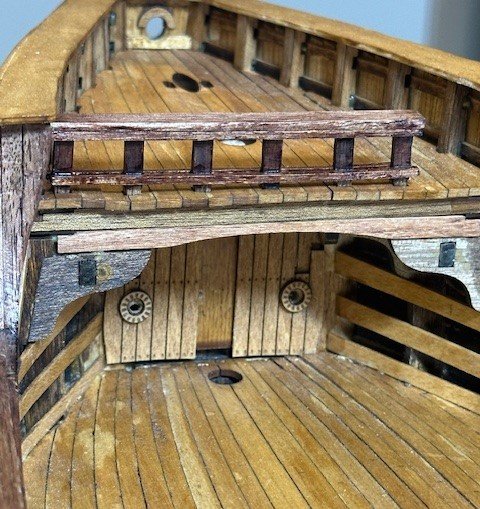
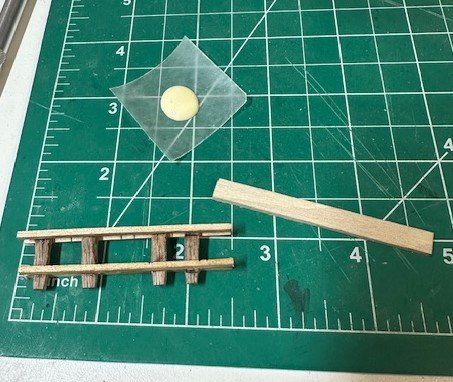
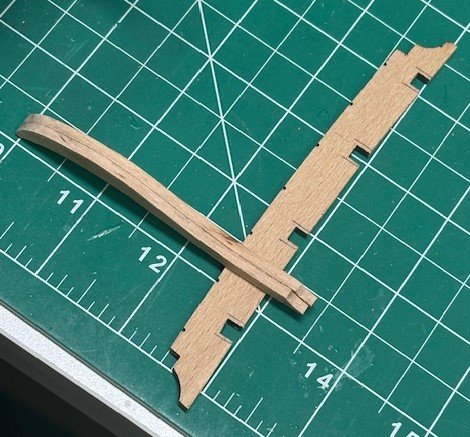
Got a few more little things done, so... time for another short update. A few weeks ago, I had placed the fenders on the sides of the ship, so it was now time to place the bolts (nails) in the fenders. Forty-seven (47) of them on each side, if I am counting correctly. Used a pin vise to create the holes that the trimmed nails were then secured into. Looks nice with the faux bolts in the fenders. I had also begun work on the rudder previously, so wanted to finish it. Positioned the kit-provided rudder straps for the pintles and gudgeons to fit properly and, with the ship flipped upside down, it was much easier to secure the rudder in place until the CA glue dried. Wish I could get the brass straps to appear a little darker and may continue to work on that. But, with the exterior work pretty much completed on this Santa Maria, it is time to get this on the cradle. The kit provided a pretty nice stand for the ship to sit on. So, popped out all the cradle pieces from the sheet, cleaned up the char as best I could, and then pre-stained it, stained it, and assembled it. Still a bit undecided on if I want to permanently secure the ship to the cradle but will make that decision shortly. Placing much more stuff on the various decks will make it difficult to flip the ship in order to drill the necessary holes for any permanent rods between the ship's keel and the cradle. OK, time to work on some of the deck accoutrements. First, the three ship ladders. The kit provides three sets of rails with slots already pre-milled for the steps, and a whole bunch of rungs/steps that were popped out of the sheet. After cleaning up the char on everything, I noted that the thickness of the kit-provided steps was 3/32", while the pre-cut slots in the rails only had clearance for 1/16". At first, I sanded a few of the steps at the ends in order to fit, but then decided to just cut some new steps using a couple spare 1/16" x 7/32" basswood strips I had available. Worked much better, less frustrating to fit in the rail slots. Assembled the three ladders, tested them in place and then stained them. Will wait on permanent placement of them (and several of the other deck pieces) until I know placing them won't be in the way of anything else going on the decks. One of the next pages in Pavel's Santa Maria Instruction Guide has a diagram of several deck pieces that require assembly. The kit contains some small plastic-type pieces that were designed to all be snapped off a base from which they were created (the red arrows), representing various deck pieces and parts, including the windlass barrels, bucket rings, pump parts, and stove parts. Unfortunately, the stove pot and pan were all broken in the kit. So, my Santa Maria stove will only have the grates with no pots. However, I was also able to make some buckets and pumps. I was able to shape, as best I could, the circular slats to create the buckets and the pump covers, and then using my Dremel sander, was able to shape them into more rounded shapes. At this scale, that'll do fine. The windlass was a fun piece to assemble. The Instruction Guide showed MULTIPLE pieces required for assembly. Like the other deck pieces, these will all be permanently placed in their positions once I am confident they won't get bumped while doing other work on the decks. Another example of items in this Pavel Nikitin kit that suddenly appear in diagrams or pictures without discussion are the anchor ropes that go from the anchors through hawse pipes at the bow and are then secured around the windlass barrels. It would have been much easier and cleaner to create these hawse pipe holes earlier, especially on the inside, under the forecastle deck. So, we will now work on the anchor rope and then get some of these deck pieces secured onto the deck. Also, it's about time to begin working on the three masts for the ship. Continuing to trudge forward... Again, as always, thanks for the reads, the likes, the comments, and the criticisms.


- 58 replies
-
- 4
-
-
- Santa Maria
- Ships of Pavel Nikitin
- (and 1 more)
-
Easy, peasy... 🤷♀️🤣
-
USS Constitution by mtbediz - 1:76
GGibson replied to mtbediz's topic in - Build logs for subjects built 1751 - 1800
These blocks look amazing, Mustafa! Nice, detailed work. Hope you don't think any less of me if I buy my blocks from Syren! 🤷♀️🤣 -
With all the toil and trouble that you have endured over the recent weeks working on these, the results are outstanding, Jon. Looking great!
-
USS Constitution by mtbediz - 1:76
GGibson replied to mtbediz's topic in - Build logs for subjects built 1751 - 1800
Perfect! Will be interested in your process. -
USS Constitution by mtbediz - 1:76
GGibson replied to mtbediz's topic in - Build logs for subjects built 1751 - 1800
Long guns look great up front, Mustafa! Very interested in learning how you approach the gun tackle rigging, and how much you do "off-ship" vs. directly on the spar deck. Awesome work, sir! -
Were you thinking about some type of "helping hands" tool? Helping Hand Magnifier – Micro-Mark Amazon.com : helping hands
-
Great to hear, Chuck! Bet it's nice to get settled again... and as you say, FOR THE LAST TIME! When I start my Constitution, I'll be in touch!
-
USS Constitution by mtbediz - 1:76
GGibson replied to mtbediz's topic in - Build logs for subjects built 1751 - 1800
Spar deck is really coming together. Starting to get a better feel of how it will look. Excited for you! -
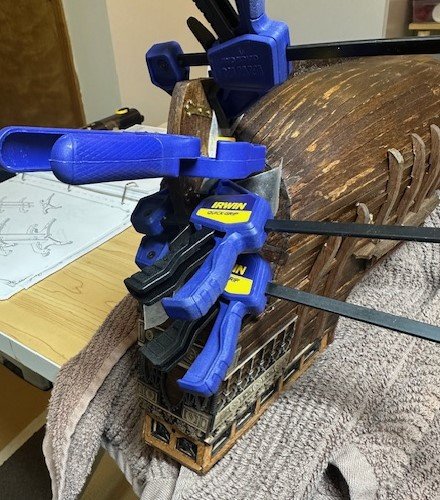
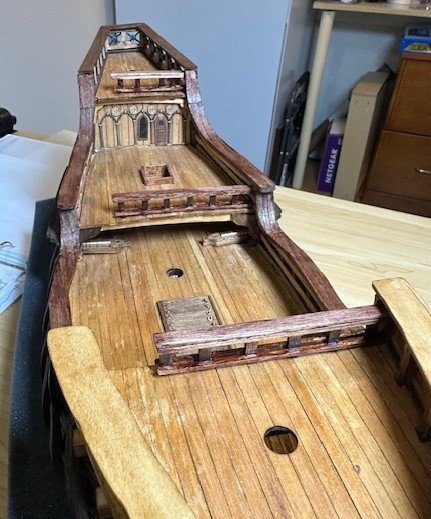
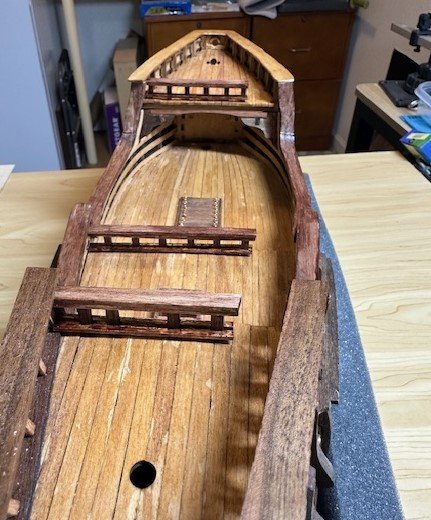
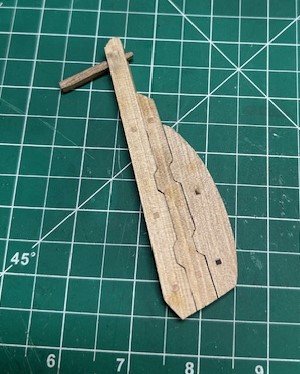
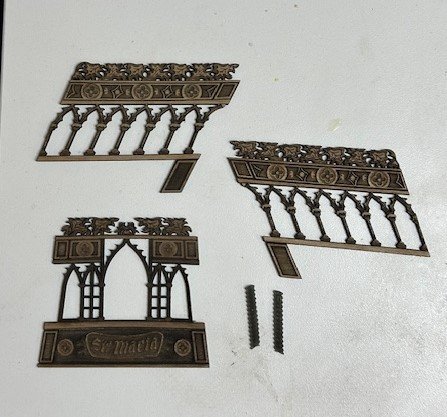
OK, another quick little update on what I've just finished... Three of the decks (forecastle deck, quarterdeck & poop deck) have railings. The railing pieces in the kit were in multiple sheets, so I popped them out, cleaned them up, and assembled each of them, noting the positioning of the posts so they fit into the predetermined deck slots. Gave them each a coat of prestain and then the Minwax Satin Bombay Mahogany stain. After they were each secured on the respective decks, it looks like I may need to give them another coat of stain before we call it good. However, it's nice to see these decks continuing to take shape. Working on the rudder now. I'll show how far I've gotten today. Again, like all of the wood pieces, I popped the rudder parts out of the sheets and cleaned up the laser char. The rudder, like the hull, is double-thickness so parts were glued together and then fit to create the full rudder piece. The kit provides a sheet containing the brass pintles and gudgeons. These were popped out, cleaned up, and I began shaping them using my parallel pliers, which worked out well. Will work now on where to position the four (4) pintles to the rudder and where to position the corresponding gudgeons to the transom. A 1mm brass rod will serve as the pin for each and will be secured on the pintle so that the rudder slides onto the transom. I will also be staining the rudder and hinges so that it matches as best it can, of course, with the hull color. Baby steps, but steps closer to completion, so that's a good thing. Appreciate the likes, comments and critiques.


- 58 replies
-
- 7
-
-
- Santa Maria
- Ships of Pavel Nikitin
- (and 1 more)
-
Thank you, Mustafa. Appreciate the kind words. And, yes, I have looked at your Santa Maria Mantua build. Actually, I think I have looked at both, but have referred back to your Mantua build more frequently at various points. 👍🏆
- 58 replies
-
- 1
-
-
- Santa Maria
- Ships of Pavel Nikitin
- (and 1 more)
-
Great work on the Red Jacket, John! Enjoy the warmer weather! Our oldest granddaughter grew up in South Florida but decided to go to college in Kansas close to us, so she is definitely getting a quick introduction to cold winters, scrapping ice and snow from car windshields, etc! I try not to tease her too much...
- 165 replies
-
- 2
-
-
- Red Jacket
- Marine Model Company
- (and 2 more)
-
Hey Peter! My 2 cents... if the bottom picture is from the Hunt practicum, they look way bigger than they need to be. If I can try to pretend to be Jon Gerson with any type of accuracy on my part, attached are the plans for the carronades that I had downloaded a while back as a part of my prep for my own eventual build and the concerns y'all have expressed regarding the various carronade configurations. I'll let you do the scale math for the 1:76.8 rate but, if I am reading the plans correctly, the eyebolts are 1-1/4" in diameter in real size. What does that convert down to in our scale in inches or millimeters? Also, the plans' list of materials states there are twelve (12) of these eyebolts for two cannons, which is six each (if I'm doing that math correctly... 🤔). I can spot four (4) of them on the Detail "13-A" drawing (Item #13 in the parts list), but not finding the other two. Anyways, I think you are good with the eyebolts you have, if they even need to be a bit smaller. The carronades, though, that you have made look great! EDIT: Just realized (duh) that these plans are for the 'elevator screw' type carronades and not the ones you have made. Not sure how that changes the measurements on the eyebolts. Sorry!! 6184310-Carronade.pdf
-
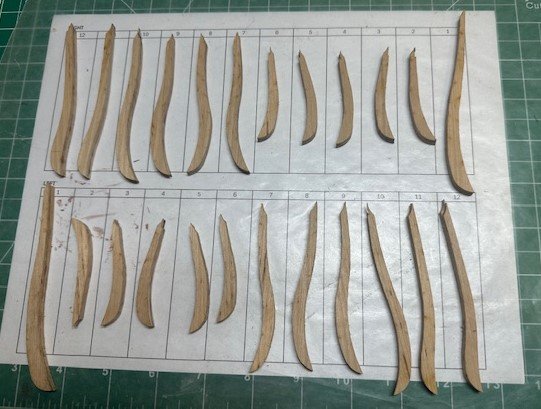
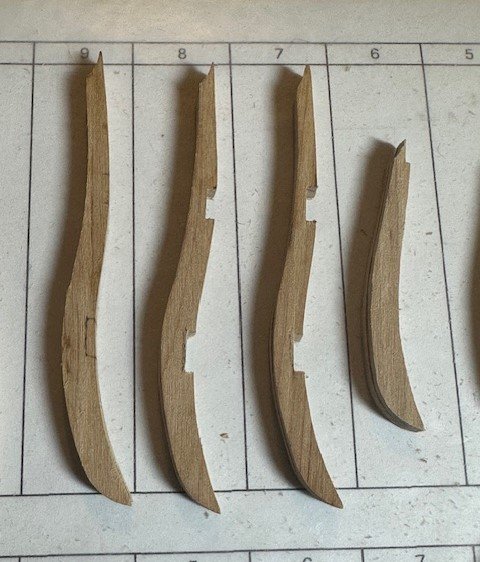
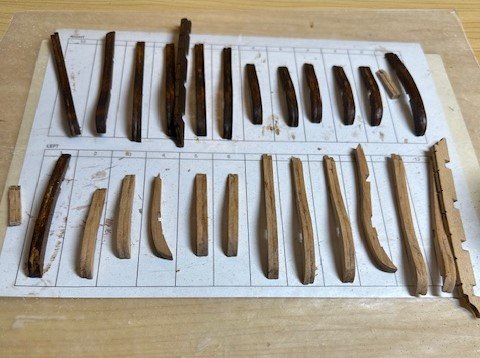
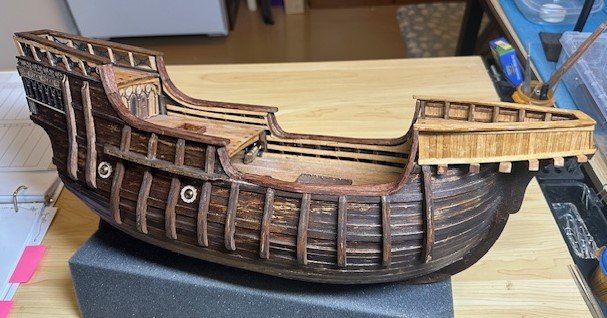
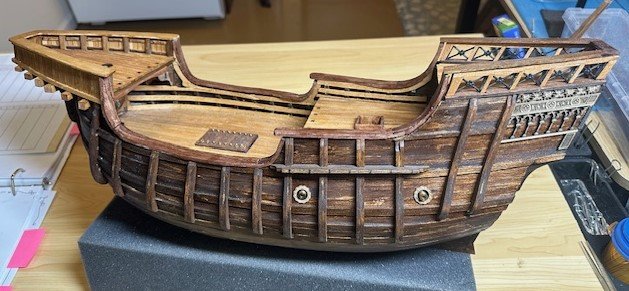
Another short update... Trying to complete everything on the outside of the ship, so the ship's buttock fenders (is that the proper term for these?) were next on the to-do list. Like almost everything else in this Santa Maria kit, these fenders were provided in the laser-cut sheets. The plan was to pop these out and match two of them together to make the buttock lines thicker as they were placed on the outside of the hull. In order to not mix them as I was gluing them together and fitting them, I made a little box chart to assist me in the organization. There were also some design pieces included in the kit that needed to be placed on the hull and stern below the poop deck. Since these were critical for the placement of the aft fenders, the pieces were secured on the ship's exterior with some CA glue. The buttock fenders off of the quarter deck needed to be placed so that the kit-provided channel board would fit based on the spaced slots in the board. In hindsight, I really messed up in preparing each of the buttock rider lines for placement. They needed to fit smoothly over the wale strakes and, rather than cutting the wale strakes back to the hull where the buttock fenders crossed, I measured and milled slots into each of the buttock rider pieces. Nice way to use my Proxxon mill, but it was not the best way to fit these vertical boards. After they were milled but before final placement, I stained them, first with a pre-stain, and then with the same Minwax Honey stain that, of course, I used for the hull. They were then secured to the outer hull with CA glue and the channel board secured, as well. Still a bit more to do on the exterior, placing the nails in the buttock fenders, securing the rudder, and a few other things, but think I will work on the three decks' railings and ladders next. Anxious to get this one done. As always, appreciate the follows, the clicks and the comments.
- 58 replies
-
- 3
-
-
- Santa Maria
- Ships of Pavel Nikitin
- (and 1 more)

