


GGibson
-
Posts
1,086 -
Joined
-
Last visited
Content Type
Profiles
Forums
Gallery
Events
Everything posted by GGibson
-
 We've all had days like this... some of us more than a dozen days like this... I'm sure someone will suggest an A+ solution, Peter. And the rest of us will take notes for when it happens to us again. 👍
 -
Difficult to answer specifically, Jim. Really don't think it's either. Pavel Nikitin is a quality builder and designer and has created some remarkable model ships. Not that I fully understand the "mass production" process of creating an inventory of model kits, but the issues seem to more be in how the parts are laser cut on the sheets, perhaps not setting the lengths perfectly in the CNC controls, etc. The builders over on the YouTube channel have commented about obvious omissions in parts that are shown in the instructions on particular laser-cut sheets but missing on the actual sheet in their kits. I have run across a couple of those instances, as well. So, I guess that comes down to quality control in the production process, rather than a quality/design issue? But... we'll continue to work through it. The others have. With that said, though, I have already begun prepping for my Constitution build... 🤷♂️🤣
- 58 replies
-
- 1
-

-
- Santa Maria
- Ships of Pavel Nikitin
- (and 1 more)
-
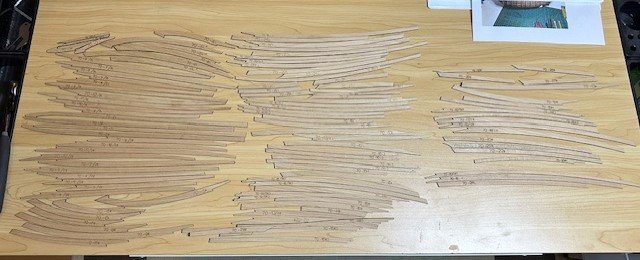
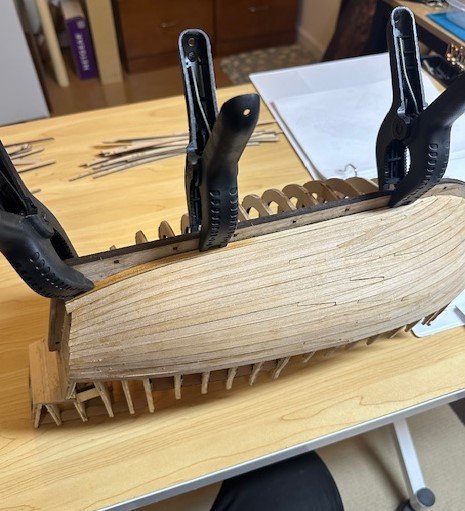
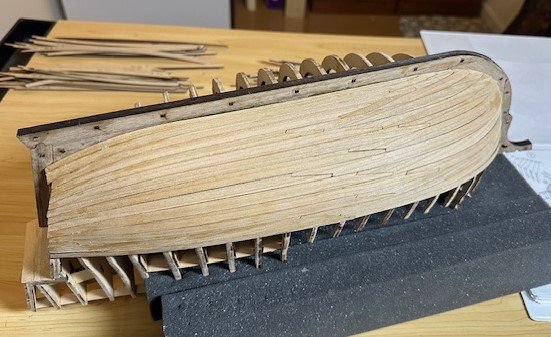
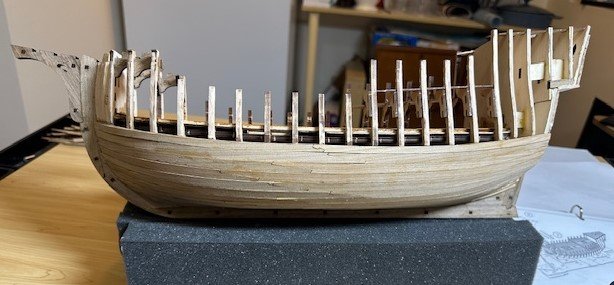
After completing the lower part of the port side hull, it was now the starboard side's turn. As you will recall, all of the Pavel Nikitin Santa Maria hull planks are pre-shaped and include nib scarfs where needed. Many of the strakes, though, did require some careful bending to shape them around the bulkheads. I've been doing this successfully on these planks by holding them under a stream of hot water for a bit, then pinning them against the bulkheads until dry, then glueing them in place, using Acco clips and mini-clamps. Although Pavel has been adamant in other modelers' YouTube build logs that all of his planks fit perfectly, modelers have had issues with some planks not being long enough or the spacing being a bit off. I had that issue on the port side that I noted in my post #19 above, and had a similar issue on the starboard side (actually a bit worse). I also had an issue with what would, I guess, be Pavel's garboard strake #1 not meeting the keel fully, so I added a small 3/32" square strip to fit in the spot to take up that space. It will all be sanded and filled as I clean up the hull before finishing. So, the lower half hull planking of both sides is now compete. I will now work on the hull planks at the wale and higher. To those celebrating Thanksgiving this week, hope it is a wonderful time for you. Safe travels if enjoying away from home. As always, appreciate the reads, likes, comments and criticisms.


- 58 replies
-
- 9
-
-
- Santa Maria
- Ships of Pavel Nikitin
- (and 1 more)
-
Transom looks really nice, Peter! OK. Haven't even started my Constitution, so probably five years (or more) away from this step, but... based on your "still available online" comment, I thought I better knock that one off of the order list and I placed my order with Woodland Scenics now, as well. I did, though, order the MG740 USA Gothic White dry transfers that Jon mentioned in his build log. Now if I can just remember 5 years (or more) from now where I put them! 🤷♀️🤣 Carry on, sir! Doing well!
-
Yogeon Mini Black Hand Plane - Made in China - Purchased in 2021 on Amazon. Haven't used it in planking, but I have used it several times when shaping square dowels to a circle for masts. 👍
-
Great... another "ooooh, I gotta have THAT new tool now, too" thread. Thanks, guys! I'm such an easy target.... 🤷♀️🤣 I actually do have a nice little palm-sized plane. Need to look to see if it has a brand name on it. But keeping that Lee Valley website open "just in case"...
-
After you draw a line on the wood plank where the taper should run to, if it's a decent amount that you can trim an excess off carefully with an X-Acto blade, go for it. But for more precise tapering, I use and would recommend a sanding block and sandpaper. Maybe start with 180/220 grit paper. Good luck!
-
I have two fully-height-and-brightness-adjustable LED lamps on either end of my shipyard workspace that provide me with awesome light. The AmazLit Desk Lamp - AmazLit Desk Lamp, Desk Light with Clamp, Stepless Dimming & Adjustable Color Temperature Modern Eye-Caring Architect Lamp with Memory & Timing Function for Study, Work, Home, Office, 15W - Amazon.com and the Neatfi LED Desk Lamp - Neatfi XL 2,200 Lumens Adjustable LED Desk Lamp & Task Lamp - Bright, Dimmable Lighting for Office, Crafts, Nails & Hobbies with Clamp (Non-CCT, White) - Amazon.com I have had the combo light-and-magnifier type lamps previously and found that they did not hold position well and never really used the magnifier... I use my helping hands alligator clips with magnifier for that type of work.
-
Looks great, Peter! Well done!
-
Recommend Model Shipways kit to buy (with my new credit)
GGibson replied to palmerit's topic in Wood ship model kits
After working on two of the Model Expo Shipwright Series boats, I built the Ballahoo and then the Bluenose. The Bluenose was a fun ship for me to build and I learned a lot more about the build process (especially rigging) working on her. Highly recommend. Best wishes on whatever you choose! -
Hello Haiko! I will begin following your Constitution build with great interest, as I have this same Constitution kit up on my shelf, waiting for my completion of the Santa Maria build I am currently working on. I have been following the builds of @Der Alte Rentner, @JSGerson, and @mtbediz, among others, as Peter, Jon and Mustafa are all doing fantastic and I am learning so much watching each of their Constitution builds and the challenges each of them face (and conquer) in the process. Not entirely sure how far out I am in beginning my Constitution build but will definitely add your build to my list of projects to watch. Hope all goes well and look forward to watching! Thanks for allowing me to tag along!
- 233 replies
-
- 1
-
-
- Model Shipways
- constitution
- (and 5 more)
-
Help with depicting extra line on bitts
GGibson replied to usedtosail's topic in Masting, rigging and sails
I do like your single arm helping hand and its base, Tom! I've got the 4-arm model with the yellow base, but the single arm style would also have some practicality! Especially if it were a longer arm. -
Log to PDF Tool
GGibson replied to VTHokiEE's topic in Using the MSW forum - **NO MODELING CONTENT IN THIS SUB-FORUM**
Just used this tool to download a couple LARGE (40+/- internet pages) MSW threads I was interested in saving. Worked great! Thank you, sir! -
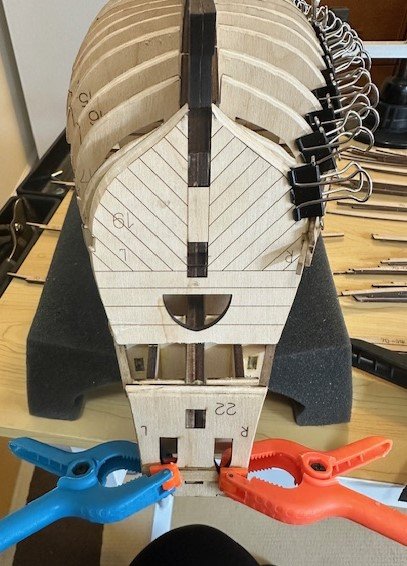
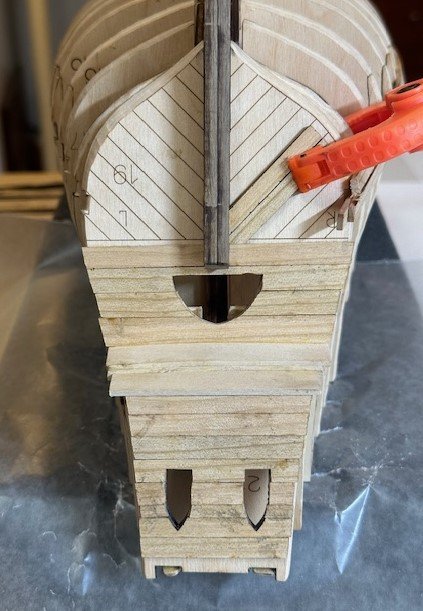
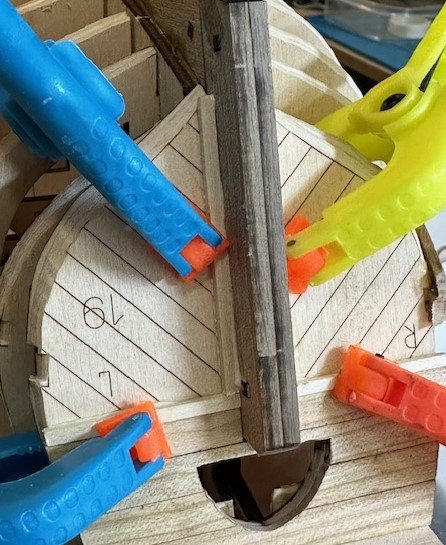
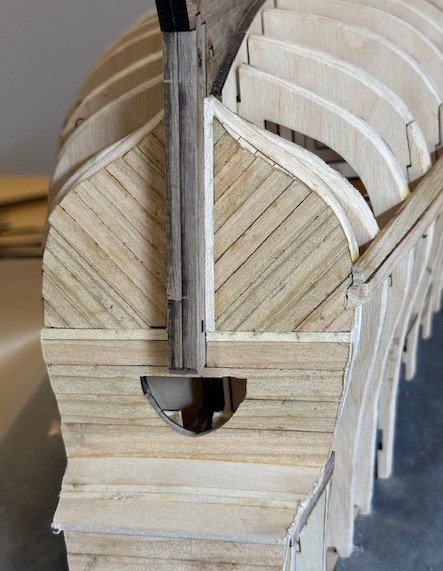
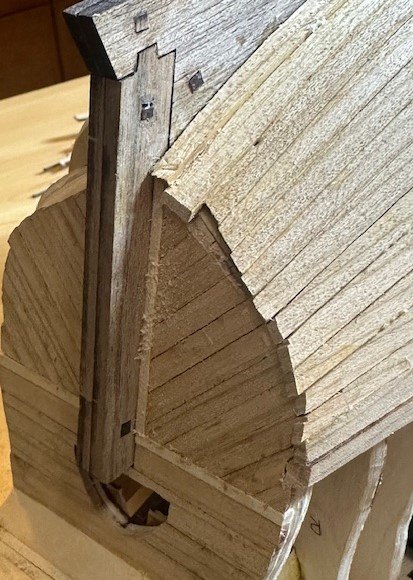
Began doing the stern and hull planking on this Santa Maria. I will remind viewers that this Pavel Nikitin Santa Maria kit comes with pre-shaped hull planks that are removed from the sheets provided. Here's what we begin with in order to plank the hull... I am beginning with the port side and the instructions have us placing the double-planked wale strips just below the deck line (in what they call position #14) on first and moving down to plank #1 at the keel. After the first couple planks, I realized that we should probably first place the planks on the stern section, as the hull planks will need to fit against the cedar stern planks. The stern planking went fairly smoothly until I discovered a problem with the diagonal planking that others working on this Pavel Nikitin kit and documenting on YouTube were having... all of the pre-cut diagonal planks on the transom were not long enough. To cure this, I added 3/32" square wood strips both vertically and horizontally to fill the gaps. There were still some of the planks that were still too short and those spaces will need to be filled with some wood filler during the sanding phase. The port side hull planking went fairly well. I did have to hold many of the planks under a stream of hot water to make the wood pliable enough to shape perfectly against the bulkheads. But the process worked quite well. There were a couple of the planks (#3 & #4 close to the keel) that were not quite long enough to meet the transom planking, but that will also be dealt with using some wood filler when we get to the sanding phase. Otherwise, edges of the planking at the stern will be sanded even with the transom. So, the port side lower planking is complete. I'll work on the lower starboard side next, then will work on the upper planking (Planks #15 and higher) on both sides. I will then sand and fill everything where needed. I haven't honestly become a big fan of this Pavel Nikitin kit. Definitely different with all of the pre-fabricated CNC pieces than what I have worked on previously and what I'll be doing in the future. But... I keep looking at what the finished product has a chance of looking like and continue moving forward. So, moving forward is what we shall do... Appreciate, as always, the follows, reads, likes, comments and criticisms.
- 58 replies
-
- 6
-
-
- Santa Maria
- Ships of Pavel Nikitin
- (and 1 more)
-
Help with depicting extra line on bitts
GGibson replied to usedtosail's topic in Masting, rigging and sails
I like the idea of some hooks or belaying pins on the bitts. Would be interesting if we could find some pictures showing how the rope is hung or set. Great question, Tom! -
Looks really nice, Peter! Definitely worthy of the time. 👍🏆
-
USS Constitution by mtbediz - 1:76
GGibson replied to mtbediz's topic in - Build logs for subjects built 1751 - 1800
Outstanding, Mustafa! Your work continues to impress. -
DANG IT, Model Shipways!!!! Here I was all prepared to just try and finish what I have waiting in my shipyard, and NOT buy any more kits, and today I get an email from Model Shipways advertising the Mayflower, explaining that Master @Chuck Passaro fashioned the prototype and wrote the 52-page set of instructions... Now I have to seriously consider adding another iconic ship kit to my shipyard, right?!? 🤷♀️🤣 Model Shipways MAYFLOWER, 1620, 5/32 SCALE (1:76) EDIT: As I was looking more here on MSW, I realized that this Model Shipways Mayflower has been around for a few years (my newbie mistake thinking initially this was new), but still.... I'm excited!
- 1 reply
-
- 5
-
-
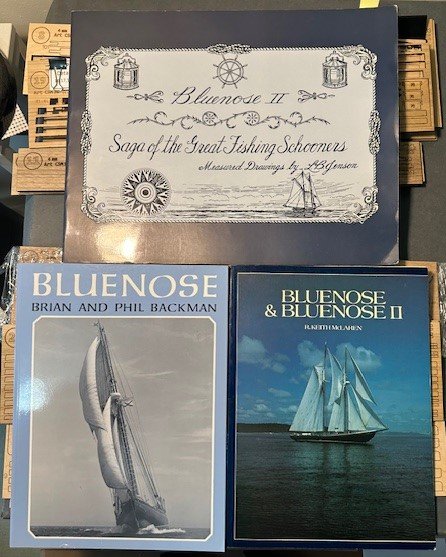
Welcome to Model Ship World, Joanie! As you have already found out, MSW is an awesome resource and there are a ton of talented and knowledgeable fellow modelers here who are happy to help, point you in the right direction, and offer their insights. You are in a good place! I just finished my Model Shipways 1:64 version of the 1921 Bluenose (finished it without sails). I had a local Kansas City-area modeler in our local club who loaned me three books that I thought were all very helpful in my build journey. Johnny mentioned the L.B. Jenson book, which I probably used the most out of the three for research and information. The other two books, however, were also helpful in providing a lot of history and information regarding construction, including pictures. The other two books are Bluenose by Brain & Phil Backman and Bluenose & Bluenose II by R. Keith McLaren. I would also highly encourage you, if you haven't done so already, to look at the MANY Bluenose build logs here on MSW. I simply could not have completed my Bluenose without the prior build logs here by folks like genericDave, John Ruy, Ed Ku20, and others. Best wishes on your Bluenose! Take your time and make it the best you can. Frustration will sometimes rear its head, but take a day's break and hit hard again tomorrow. I had to continue telling myself "It's not a race, but a journey." Have fun, Joanie, and again, welcome to Model Ship World!
-
USS Constitution by mtbediz - 1:76
GGibson replied to mtbediz's topic in - Build logs for subjects built 1751 - 1800
Another example of how I continue to learn from all three of you! Can't wait to start on my Constitution after seeing your collective works... 👍🏆 -
My Constitution is up on the shelf waiting its turn, as well, Hamilton. If we both get to this point in our builds at roughly the same time, help me remember where you bookmarked Unegawahya's tutorial... 🤷♀️🤣
-
Thanks for sharing your process on these canopy frames, Unegawahya! I will definitely refer to this when I get to this point on my Constitution... whenever that will be! 🤷♀️😄👍
-
DO YOU WANT US TO TALK LOUDER?!?!? 🤷♀️🤣 Hope the roof replacement project goes well!
-
Jon, do you think something like this square brass tube from K&S would work for you? With dimensions of 1/16" OD x 0.014" wall, even though it appears to be a square opening inside rather than round, if I'm doing calculations correctly, that would mean the interior hole would be slightly less than 1/32" square? Is that small enough for what you are needing? Square Brass Tube: 1/16" OD x 0.014" Wall x 12" Long (2 Pieces) – ksmetals
-
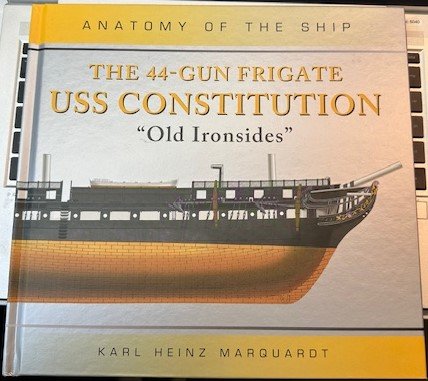
I had some recent surgery and a group of out-of-town relatives, knowing that I had the USS Constitution in my shipyard and would be working on it soon, purchased as a "get-well gift" Karl Heinz Marquardt's Anatomy of a Ship - The 44-Gun Frigate USS Constitution "Old Ironsides" book. Very nice of them!! Trouble is, I had already purchased the book several months ago in preparation of this build. So, I thanked them immensely for their kind gift and, rather than return it where they can see the return or selling it on any other social media where it can be seen, I thought I'd "secretly" sell it here on MSW, since I already have the book. I don't need two. It is currently selling on Amazon for $45. So, how about $30 OBO + a reasonable shipping cost if sent from the Kansas City area to another US address. Through PM, we can determine the best shipping option... USPS, UPS, FedEx, etc. If outside the US, we'll figure out best shipping options. Please PM me any interest in this book. Thanks!
- 1 reply
-
- 2
-

