HOLIDAY DONATION DRIVE - SUPPORT MSW - DO YOUR PART TO KEEP THIS GREAT FORUM GOING! (Only 20 donations so far - C'mon guys!)
×


Glen McGuire
-
Posts
1,957 -
Joined
-
Last visited
Content Type
Profiles
Forums
Gallery
Events
Everything posted by Glen McGuire
-
 Also while waiting for the water to dry (that sounds weird doesn't it?), I worked on the base which is supposed to look like a deck with a partial bulwark where the cannon barrel will protrude.
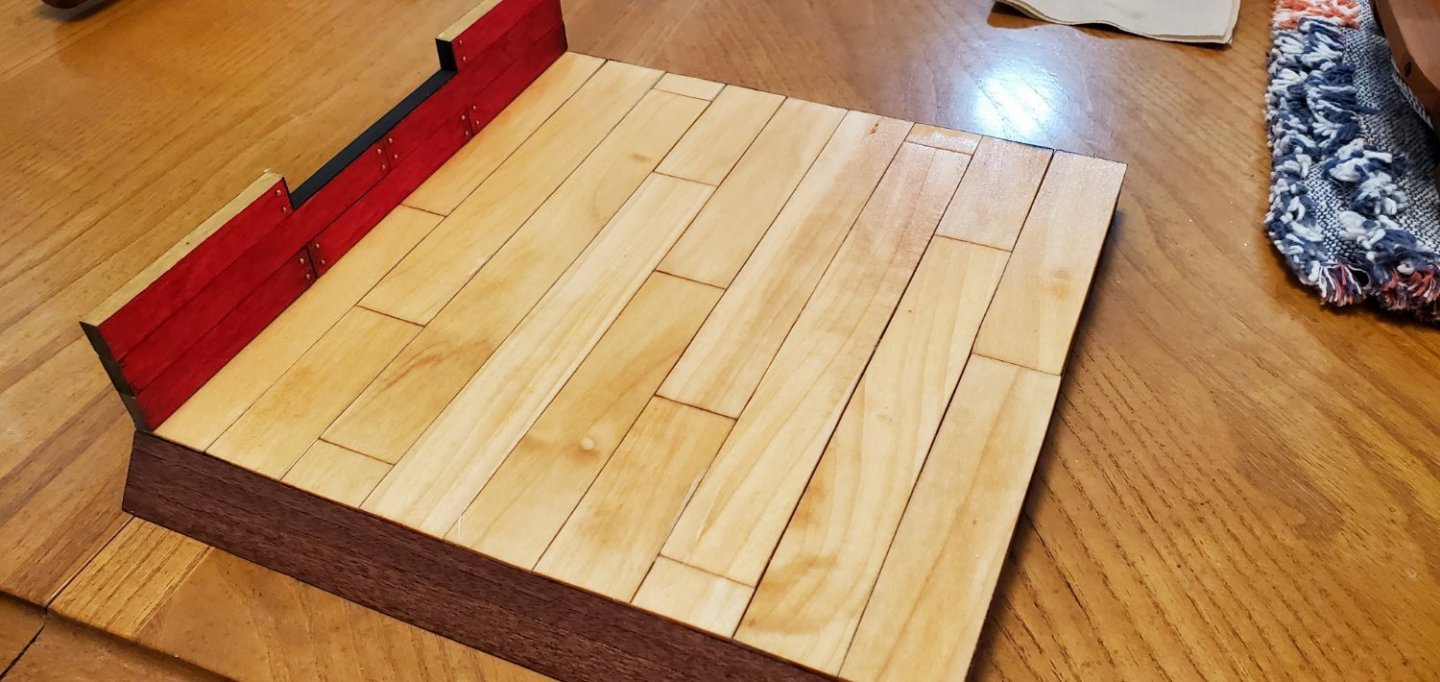

- 177 replies
-
- 8
-

-

-

-
- Independence
- bottle
- (and 1 more)
-
Oh my gosh, Keith. I am so sorry to hear this news. That is definitely not the way life is supposed to happen. I will be praying for you and your family. May your faith in God carry you through this unthinkable tragedy.
-
Hey Joe - this is the 2nd time I'm trying the epoxy resin. The 1st was the Aurora and I did not have any bubble problems. I have no idea why. I didn't do anything but pour it slowly and carefully into the bottle and let it sit for 4-5 days in a well-ventilated room (it takes a long time to get anything to dry inside the bottle). Looking at it right now, I don't see any bubbles with this one either. Maybe because it's really shallow or my surface area is pretty small? Or maybe just beginner's luck? Wish I had a secret method to share!
- 177 replies
-
- 2
-
-
- Independence
- bottle
- (and 1 more)
-
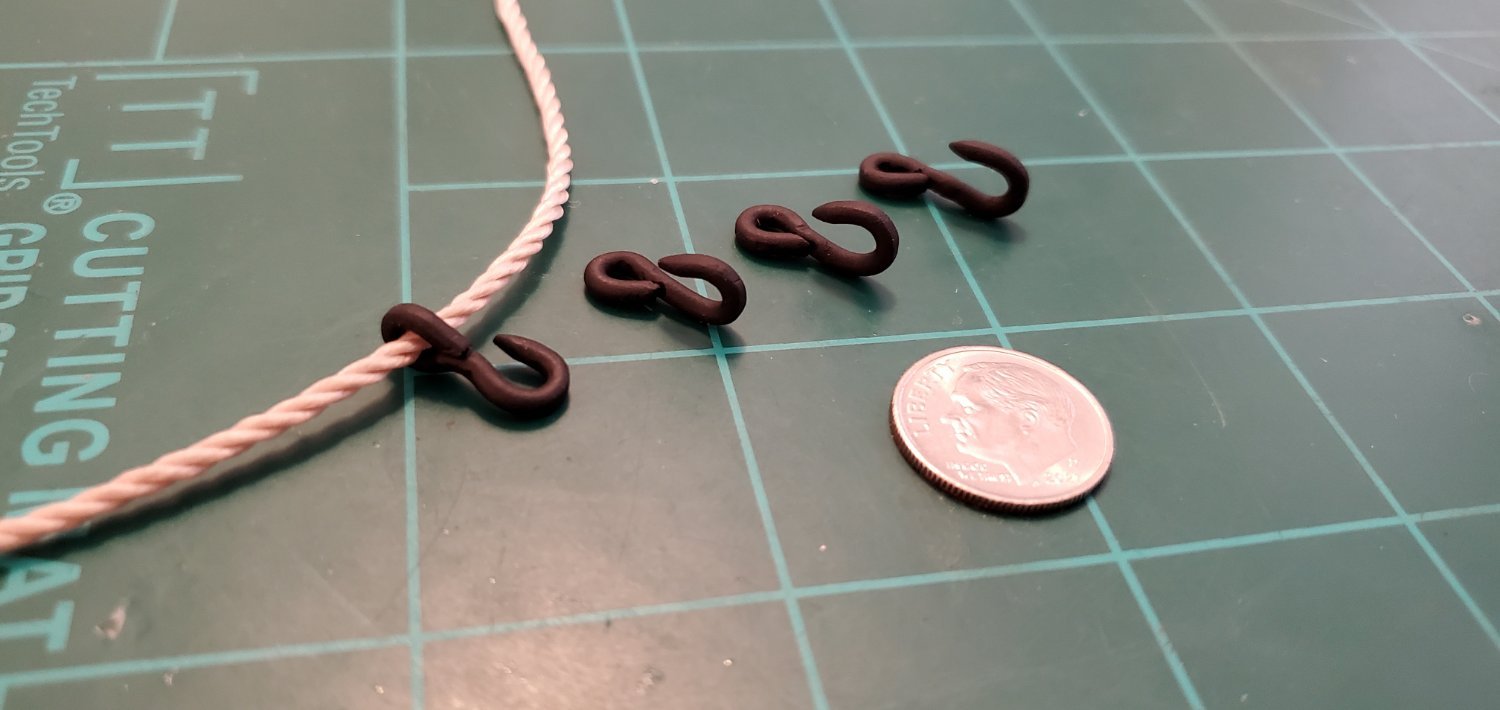
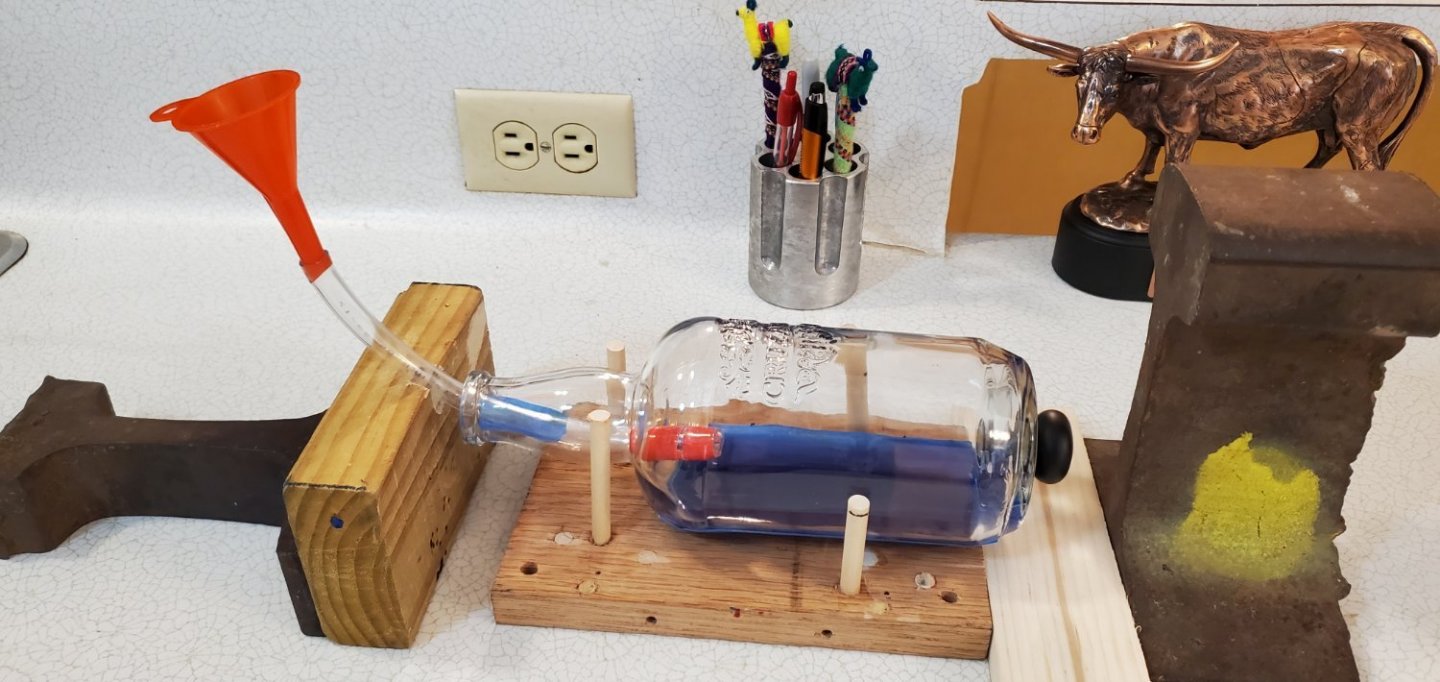
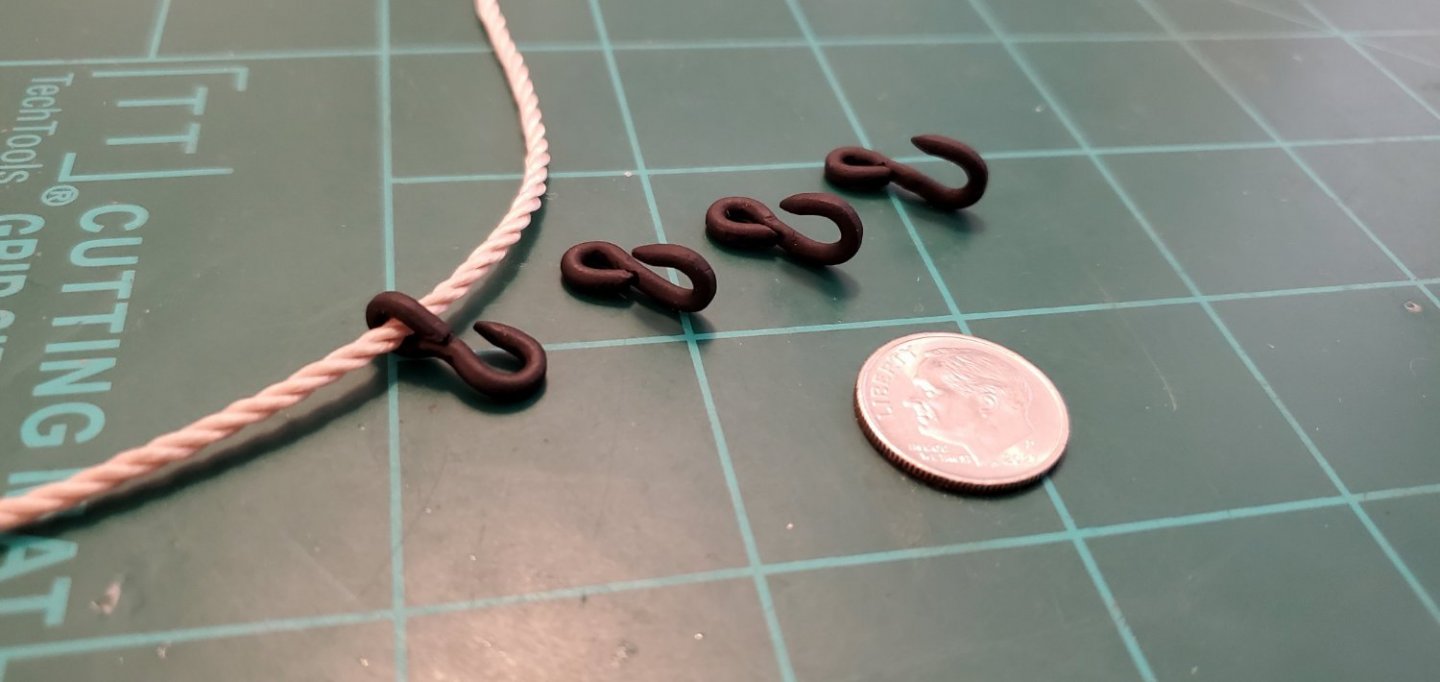
Got the epoxy resin water added to the bottle. I include the 1st picture below for just for @Joe100 since he said he also uses pieces of railroad rail to hold things in place. When the resin dries, I will try and add some texture to the flat water by swishing around a little bit of acrylic paint. Hopefully I can do that without making a big freakin mess inside the bottle. While waiting for the resin to dry I made some grappling hooks for the cannon carriage tackle. 12 gauge copper wire bent into shape and spray painted.
- 177 replies
-
- 10
-
-
- Independence
- bottle
- (and 1 more)
-
Hello from Kansas City (Kansas side)!
Glen McGuire replied to GGibson's topic in New member Introductions
Hey Gregg, a warm welcome from about 700 miles south on I35 from you. -
Hey Deep Diver, welcome to MSW!
-
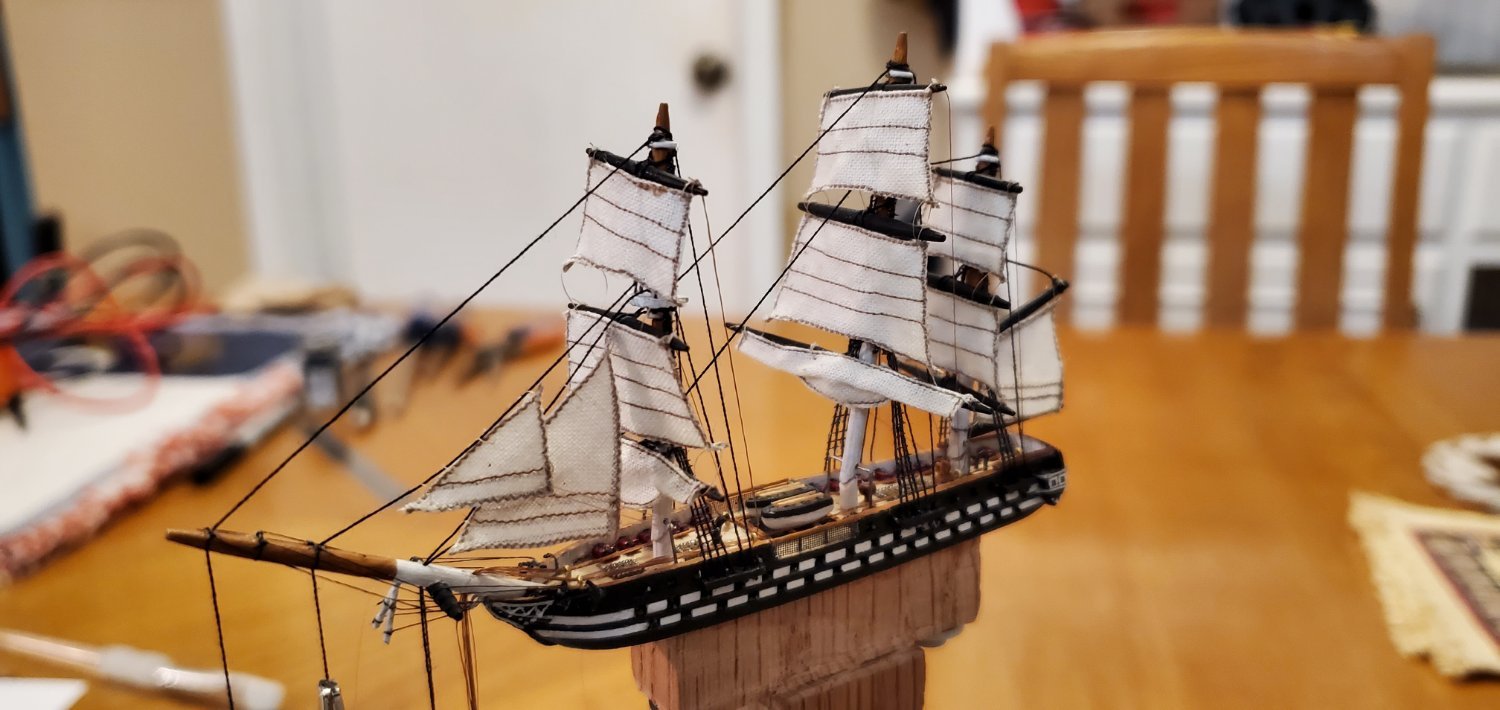
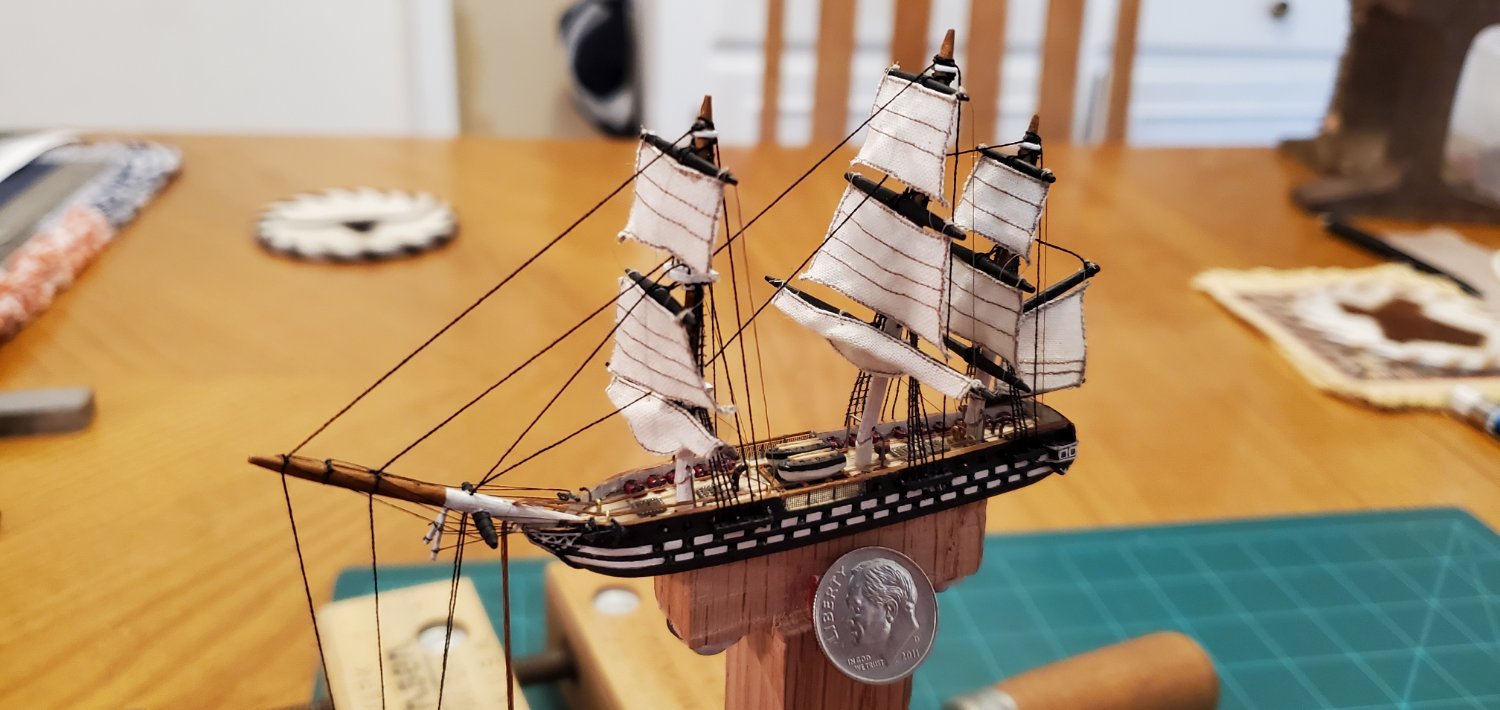
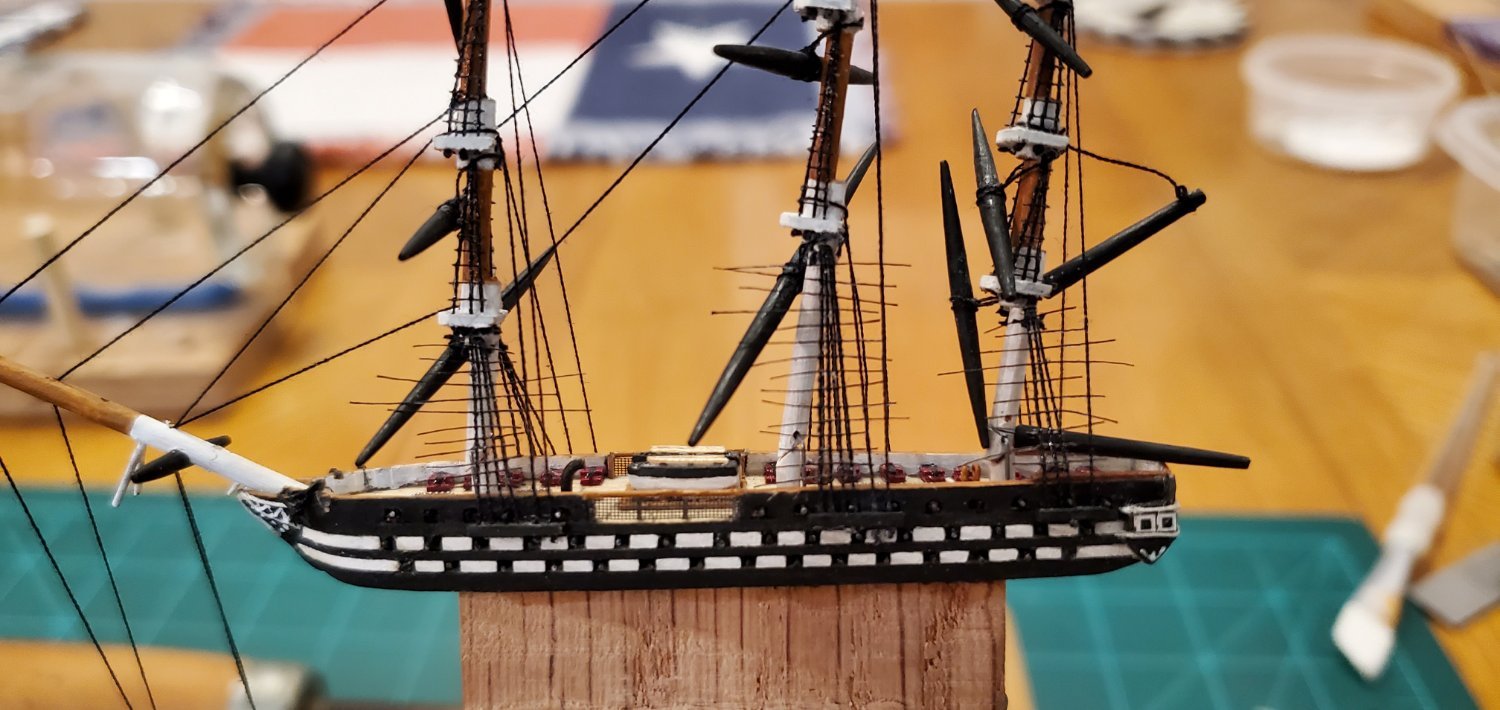
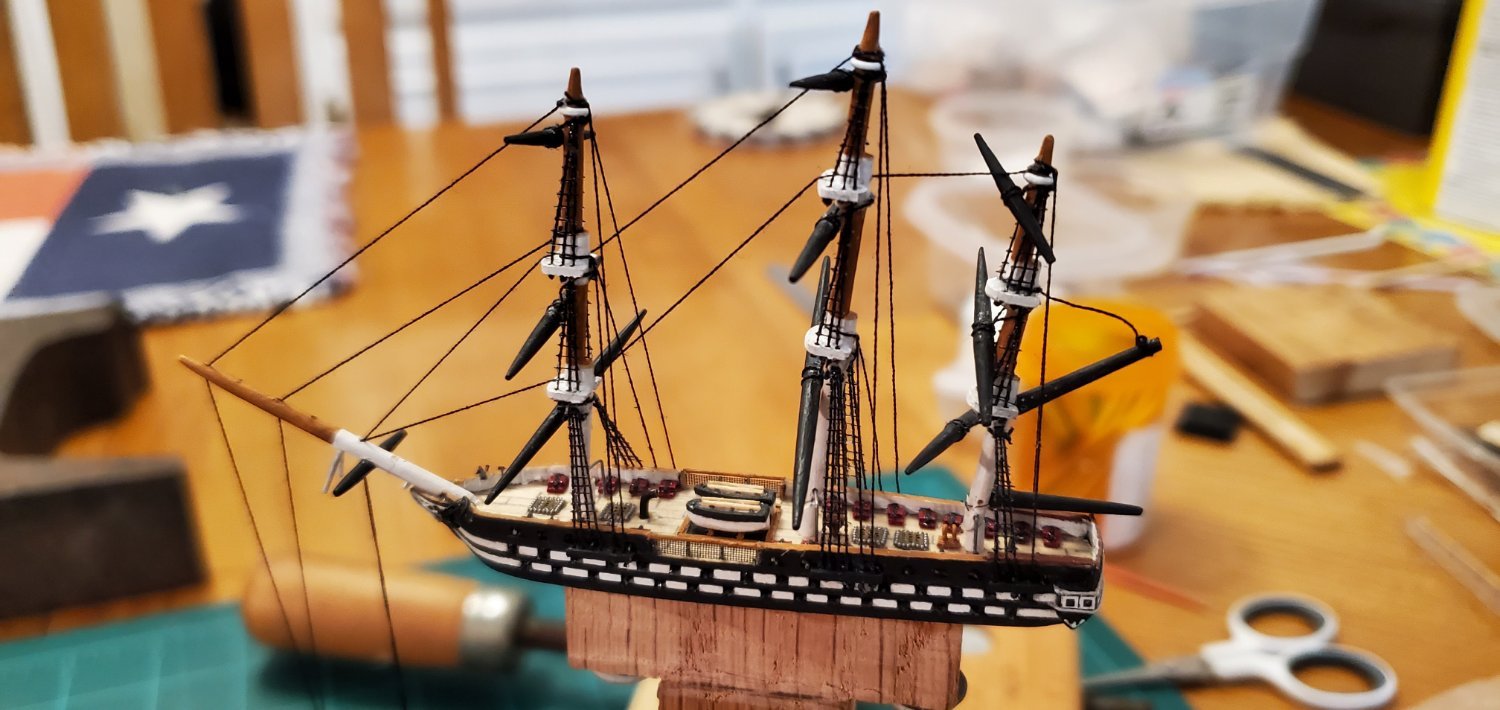
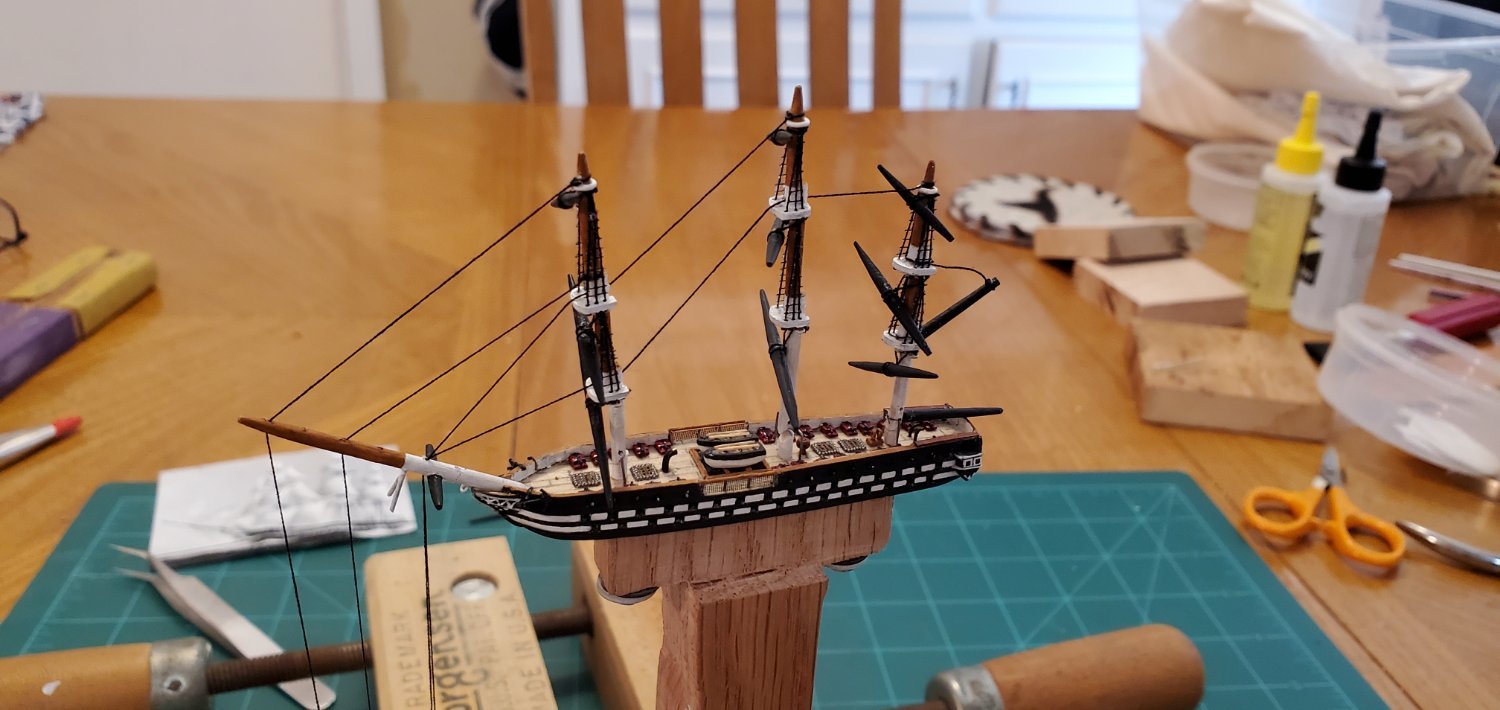
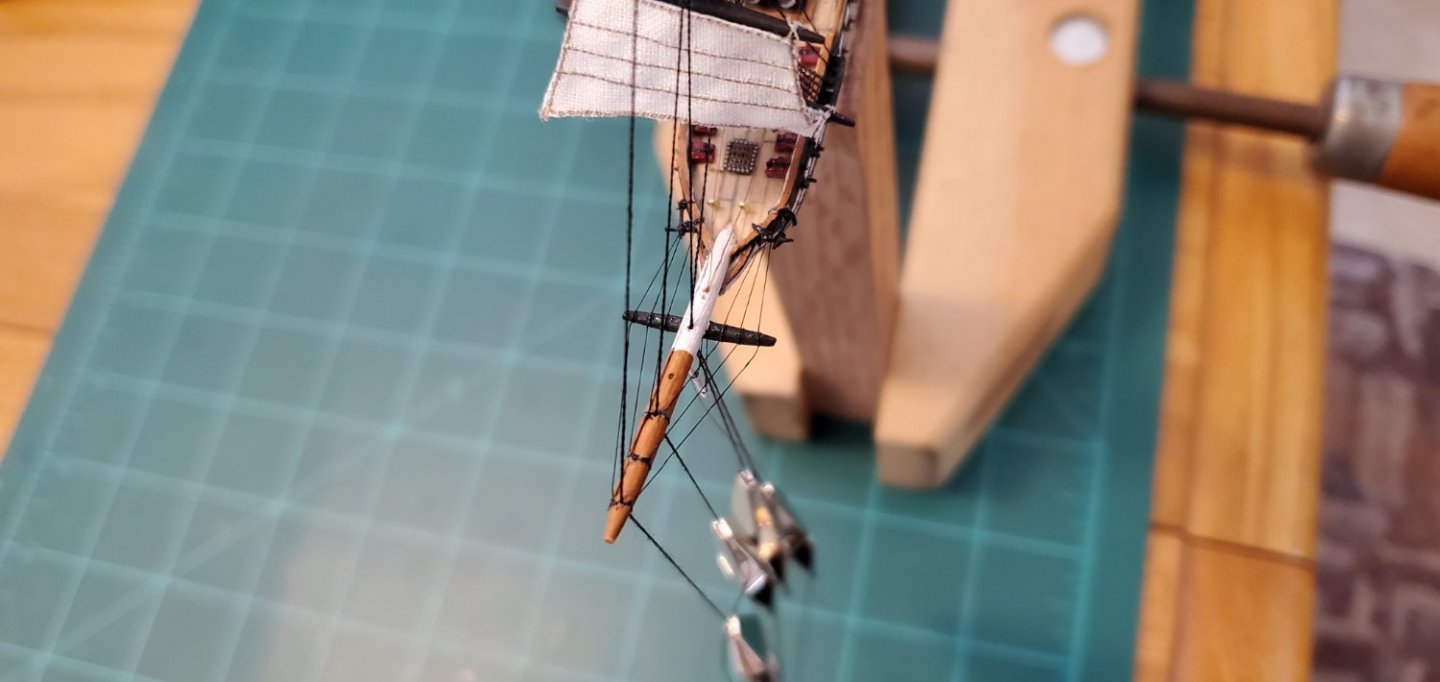
Well, when I posted above that the ship build was complete, that was fake news. Somehow, I forgot to attach the stay sails. I discovered them this morning, sitting in a small bin next to some misc scraps waiting to be discarded. Lucky I had not started any real cleanup yet. Anyway, they are in place now.

- 177 replies
-
- 8
-
-
- Independence
- bottle
- (and 1 more)
-
I hope that penguin has been on a diet, Keith!! As usual, it's going to be a very tight squeeze.
- 177 replies
-
- 2
-

-
- Independence
- bottle
- (and 1 more)
-
Since the last post, I added the bowsprit and split dolphin striker rigging. Next was attaching the all the sails to the yards (with my attempt at doing a semi-furl for the lower sails on the main and fore masts like the painting in post #112). And finally, I added all the braces and ran their lines thru the lowest hole in the bowsprit. That should allow me to adjust the yards/sails to their final positions once I raise the masts inside the bottle. So the ship build is now complete! WOOHOO! But that also means the always nerve-wracking moment of truth is near. I'll start work on the water inside the bottle next. Then do a test smash.

- 177 replies
-
- 8
-
-
-
- Independence
- bottle
- (and 1 more)
-
I appreciate that! And I appreciate all tips/suggestions/critiques/etc! I may not use every one of them but they all make me think of different approaches or techniques and that helps me get better at this stuff!
- 177 replies
-
- 3
-
-
- Independence
- bottle
- (and 1 more)
-
Thanks, Keith! For cutting the ratlines, I do have a pair of those diagonal wire cutters which I used to use. But I also read a while back about someone who was using cuticle trimmers for tiny, tight spaces. I got a pair, tried them, and found they work even better on the super-thin fly tying thread. They cut sharp and clean, even at the very tip, so they are easy to maneuver in the tiny spaces between the ratlines. I know my ratlines extend beyond the shrouds a hair, but that's my margin of error to make sure I don't screw up and snip the shrouds, which would lead to loud shouting/cursing/throwing things and probably a call from the neighbors!
- 177 replies
-
- 2
-
-
- Independence
- bottle
- (and 1 more)
-
OMG! That is funny! I'd hand carve a herd of .5mm penguins before I'd try to rig those deck cannons!!!
- 177 replies
-
- 4
-
-
- Independence
- bottle
- (and 1 more)
-
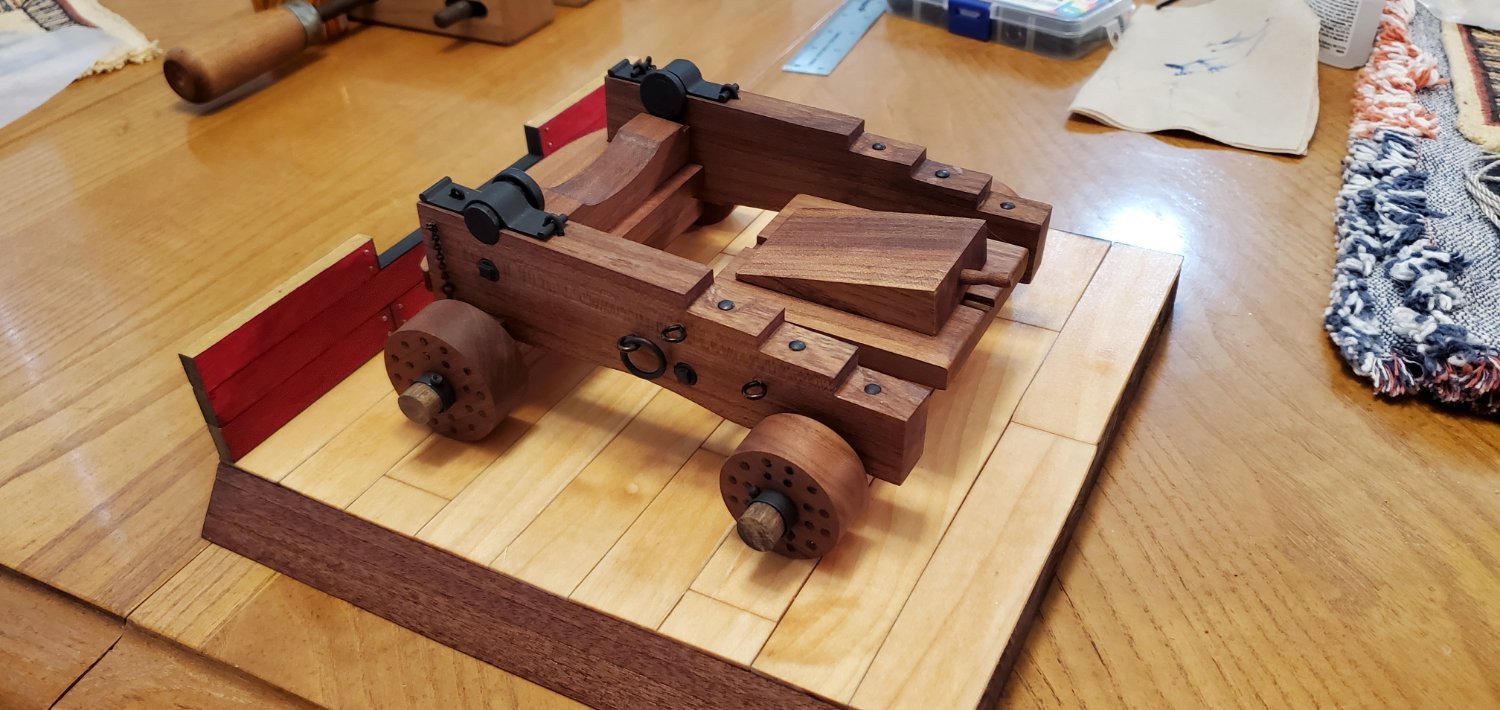
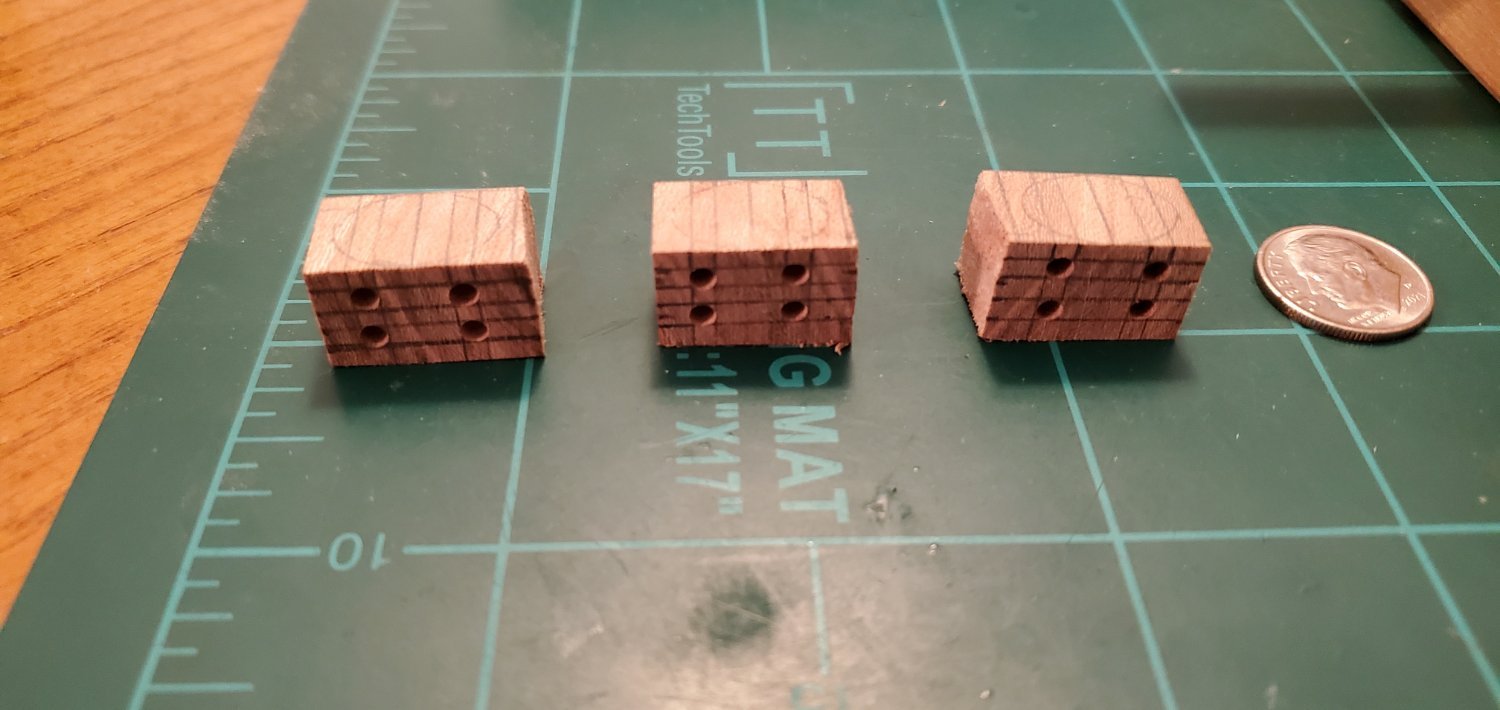
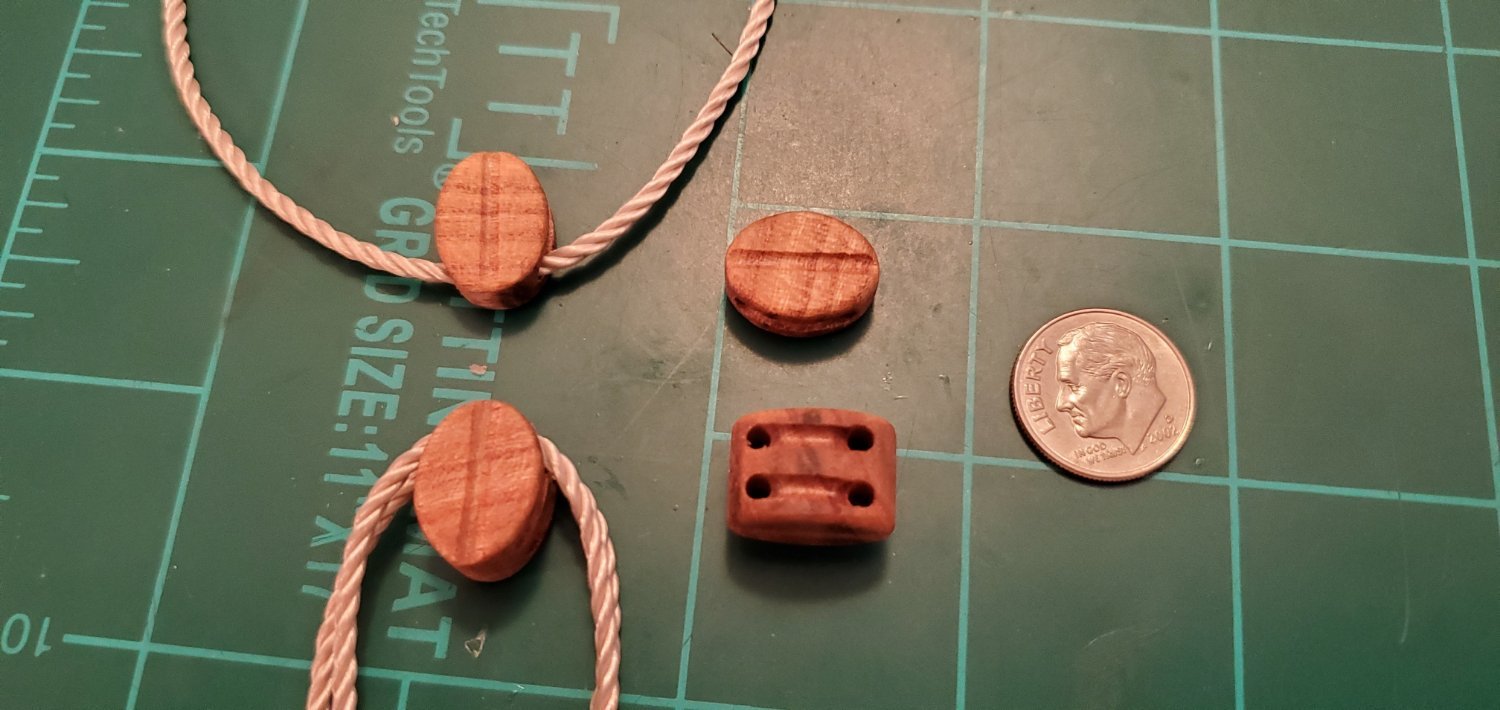
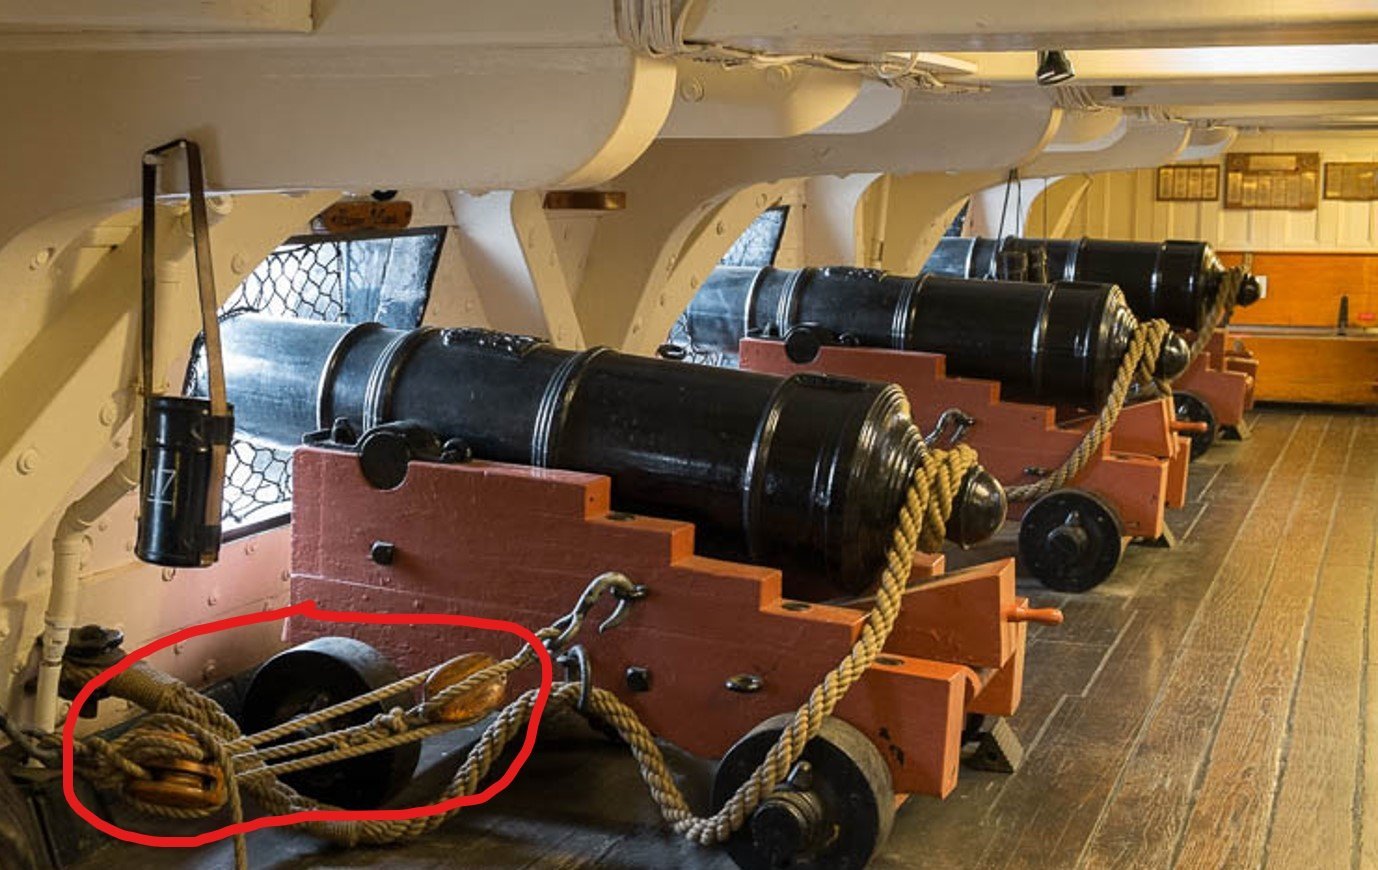
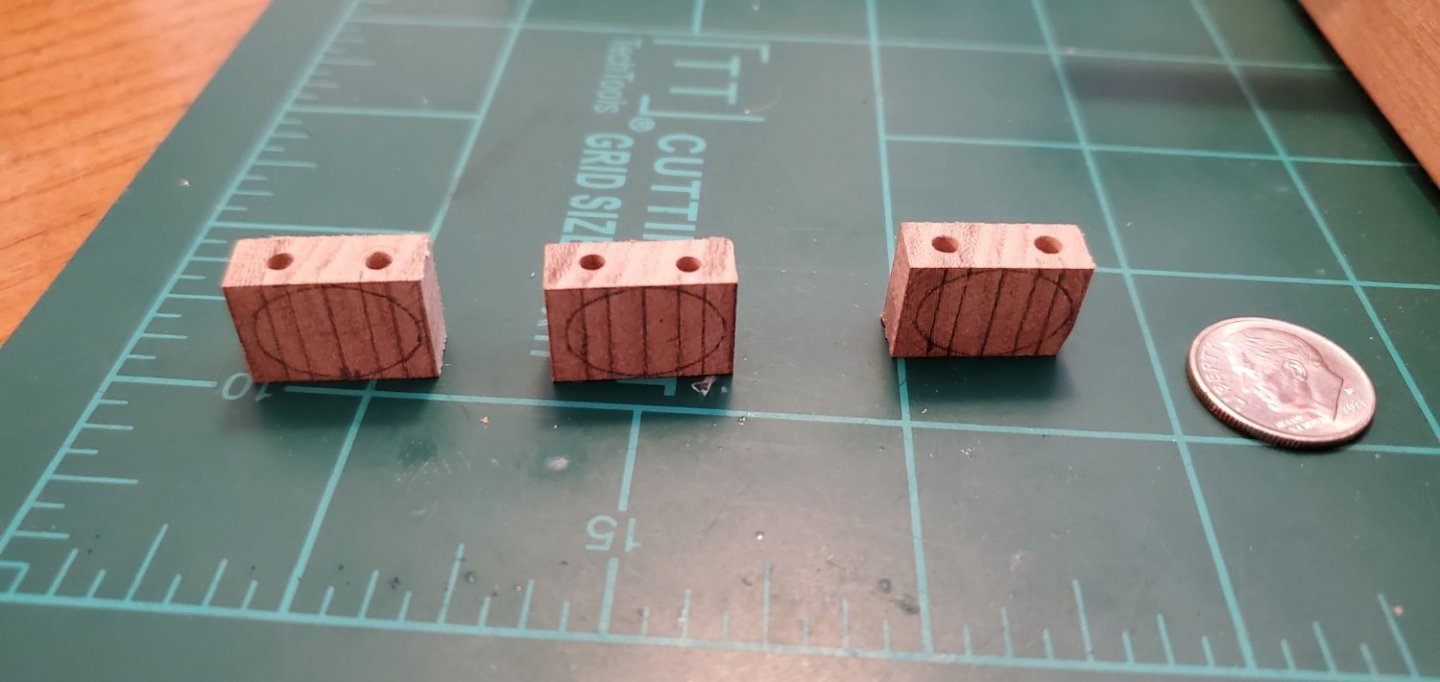
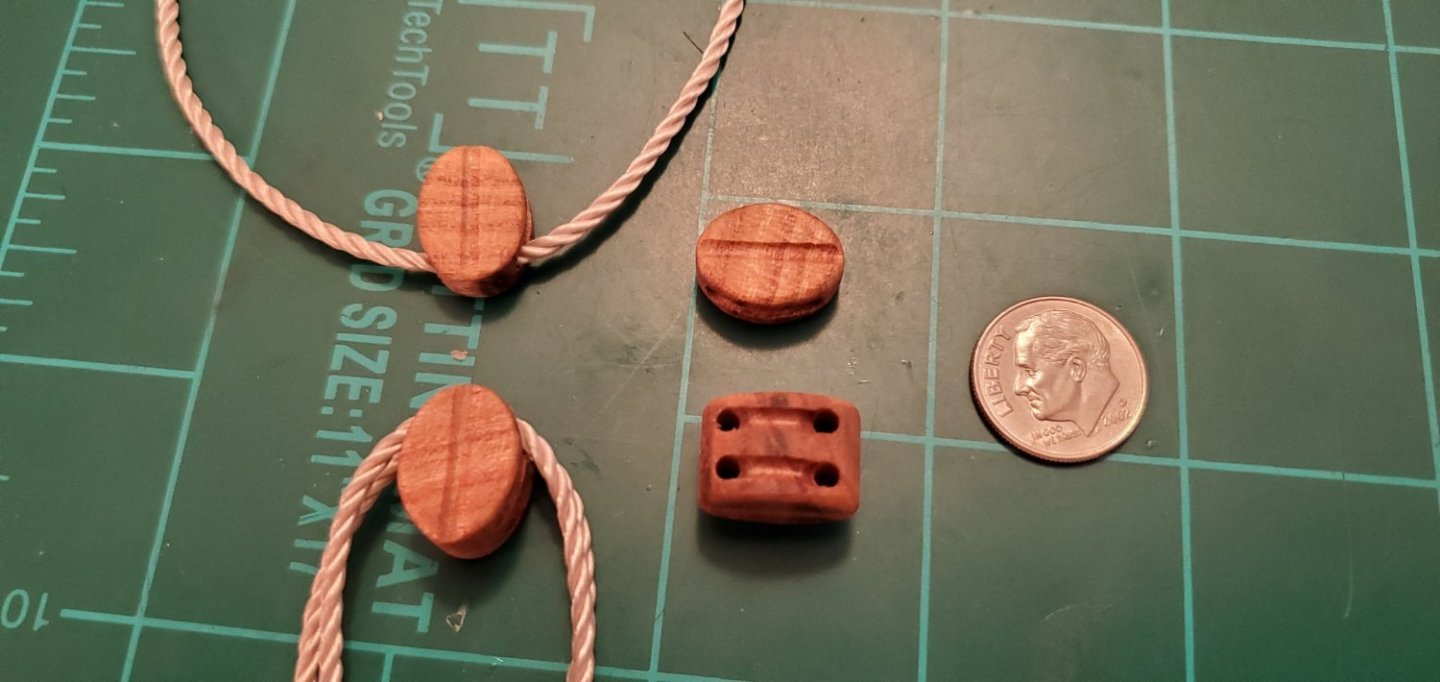
While impatiently waiting for the glue on the ratlines to dry, I went back to the cannon carriage and made a couple of single and double sheave blocks. I'm trying to replicate the blocks in the first pic.

- 177 replies
-
- 6
-
-
-
- Independence
- bottle
- (and 1 more)
-
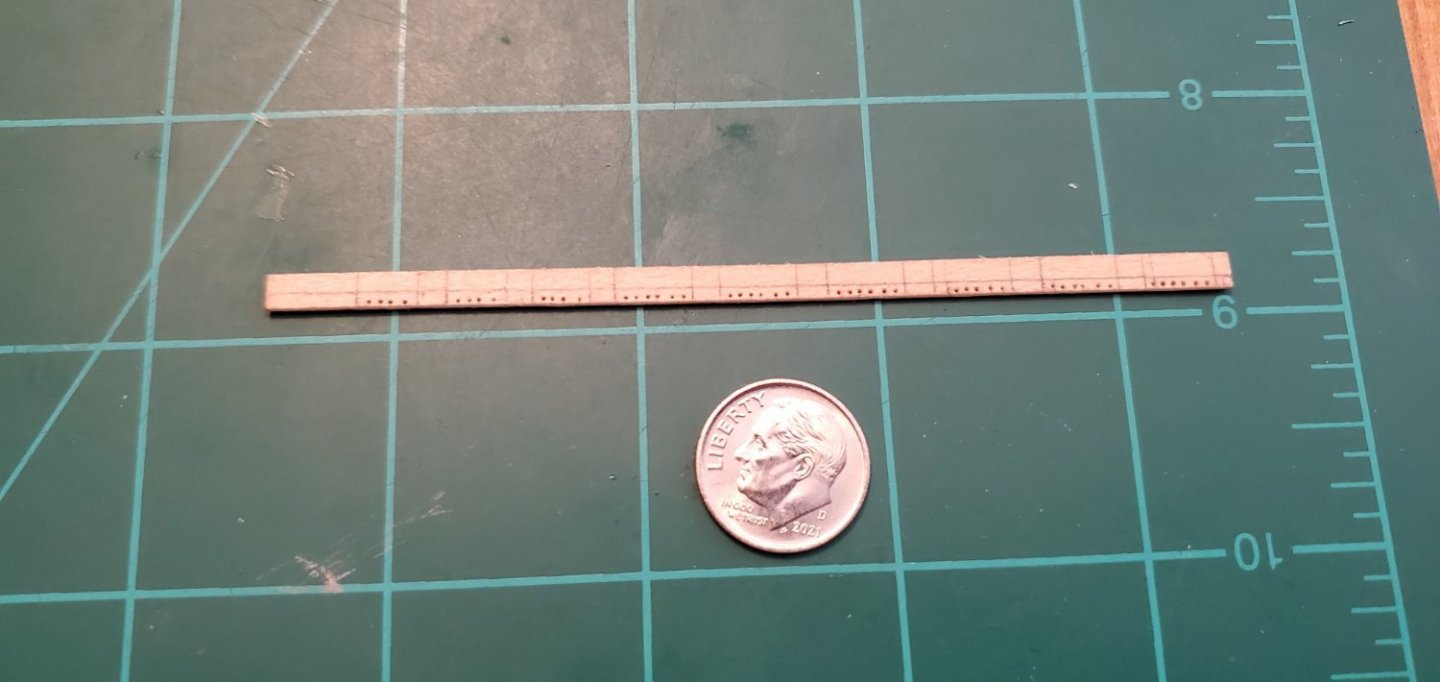
Spent the last few days making the channels, stringing the lower shrouds, and attaching the lower ratlines. Also, if you get close enough to your computer screen and squint hard enough, you can see 2 middle stanchions I added to the hammock netting on each side.


- 177 replies
-
- 6
-
-
-
- Independence
- bottle
- (and 1 more)
-
Seriously? Wow. I would have never imagined that. Based on the quality of the build, I assumed you had been doing this for many, many years. I was impressed before, now I am in awe!!
-
I think your simulated hull plates turned out very nice. Love the creative method of achieving that look!
-
HMCSS Victoria 1855 by BANYAN - 1:72
Glen McGuire replied to BANYAN's topic in - Build logs for subjects built 1851 - 1900
Nice soldering skills, Pat. Love the jigs you've made to hold things in place, which is something I always struggle with.- 1,005 replies
-
- 2
-
-
- gun dispatch vessel
- victoria
- (and 2 more)
-
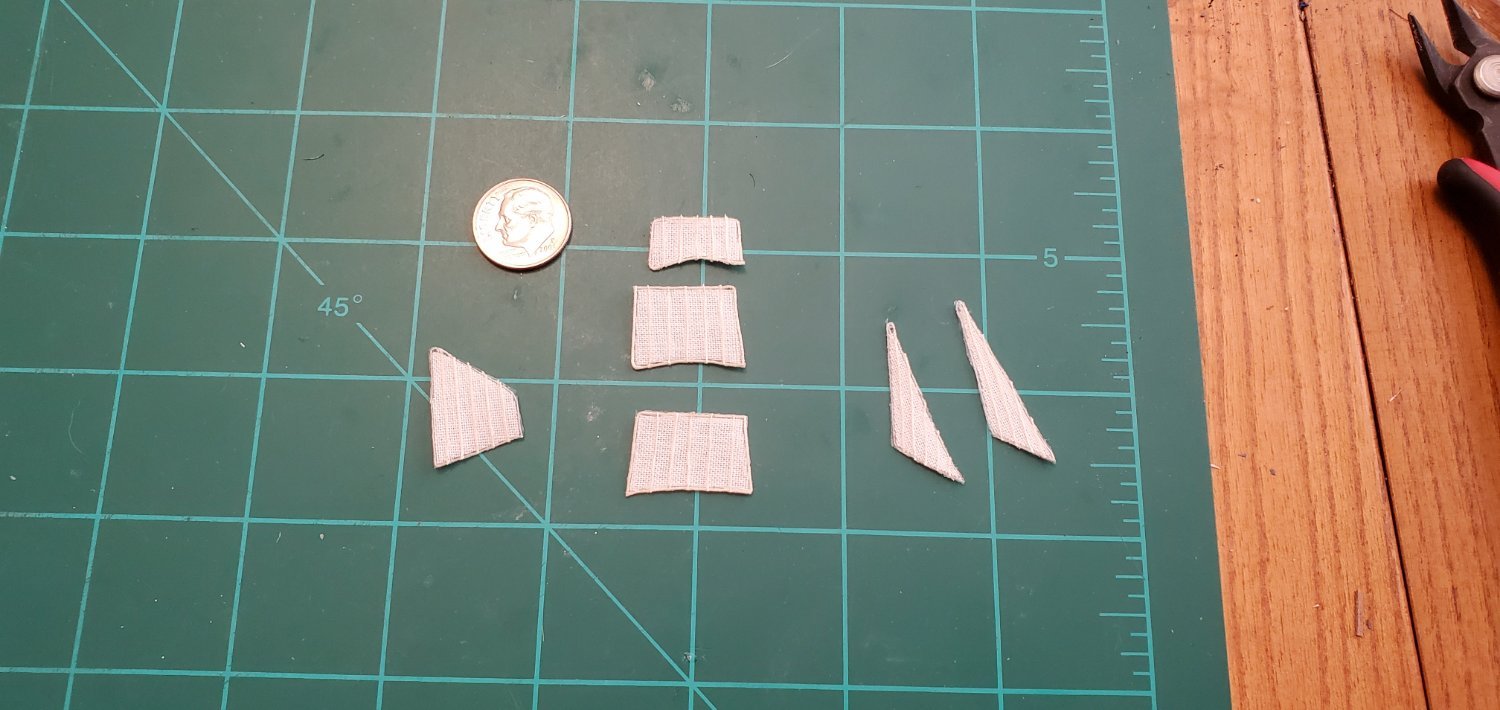
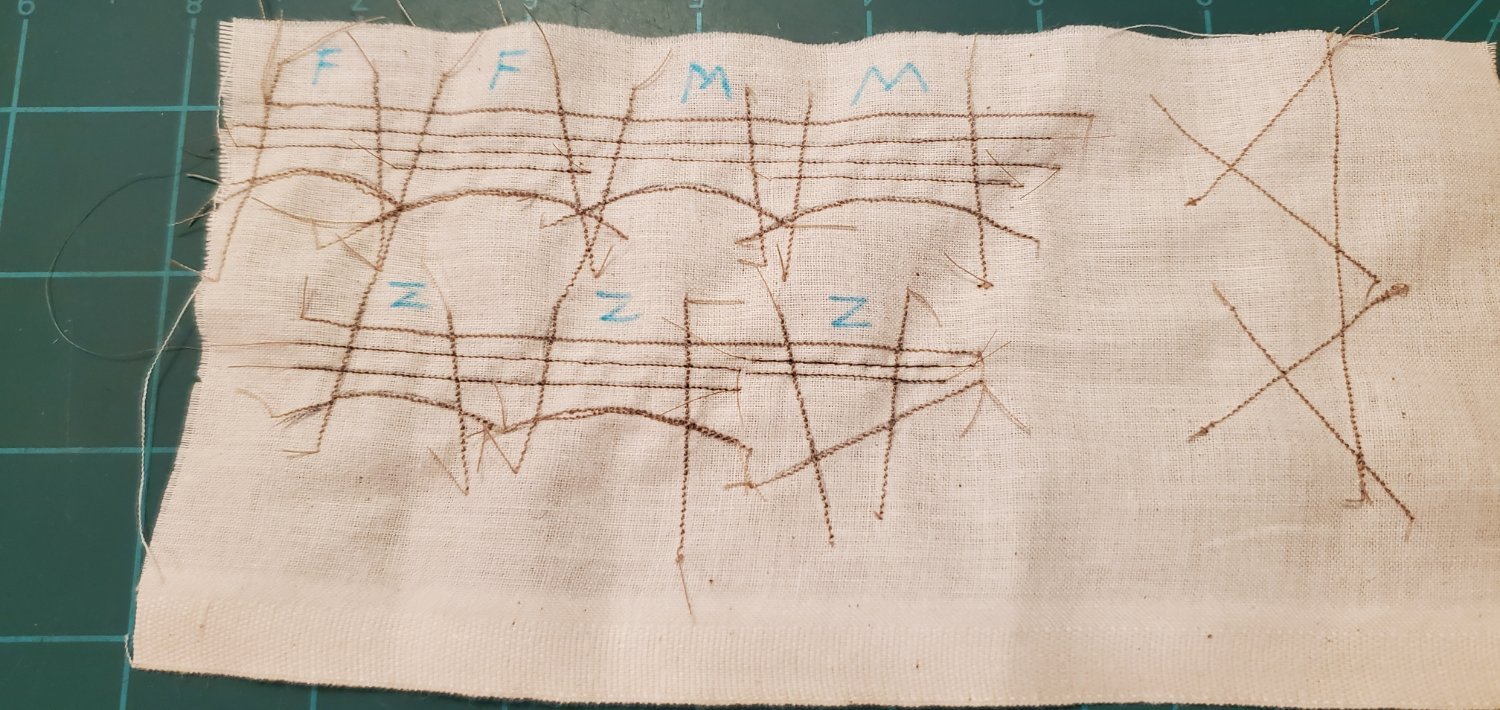
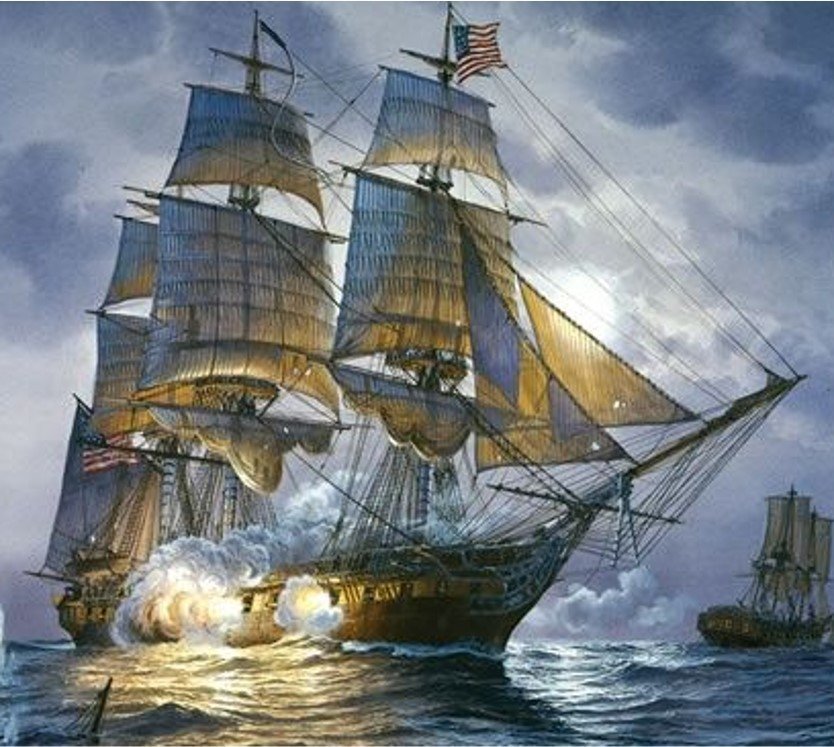
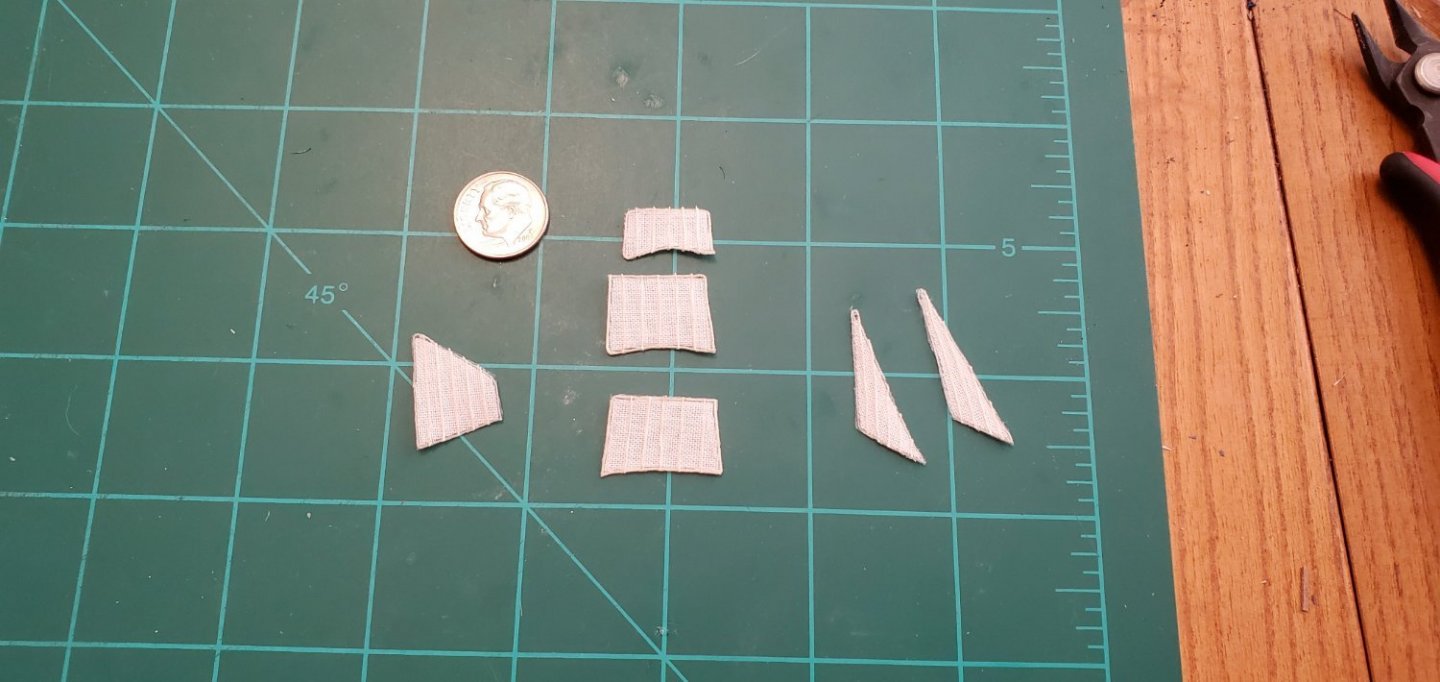
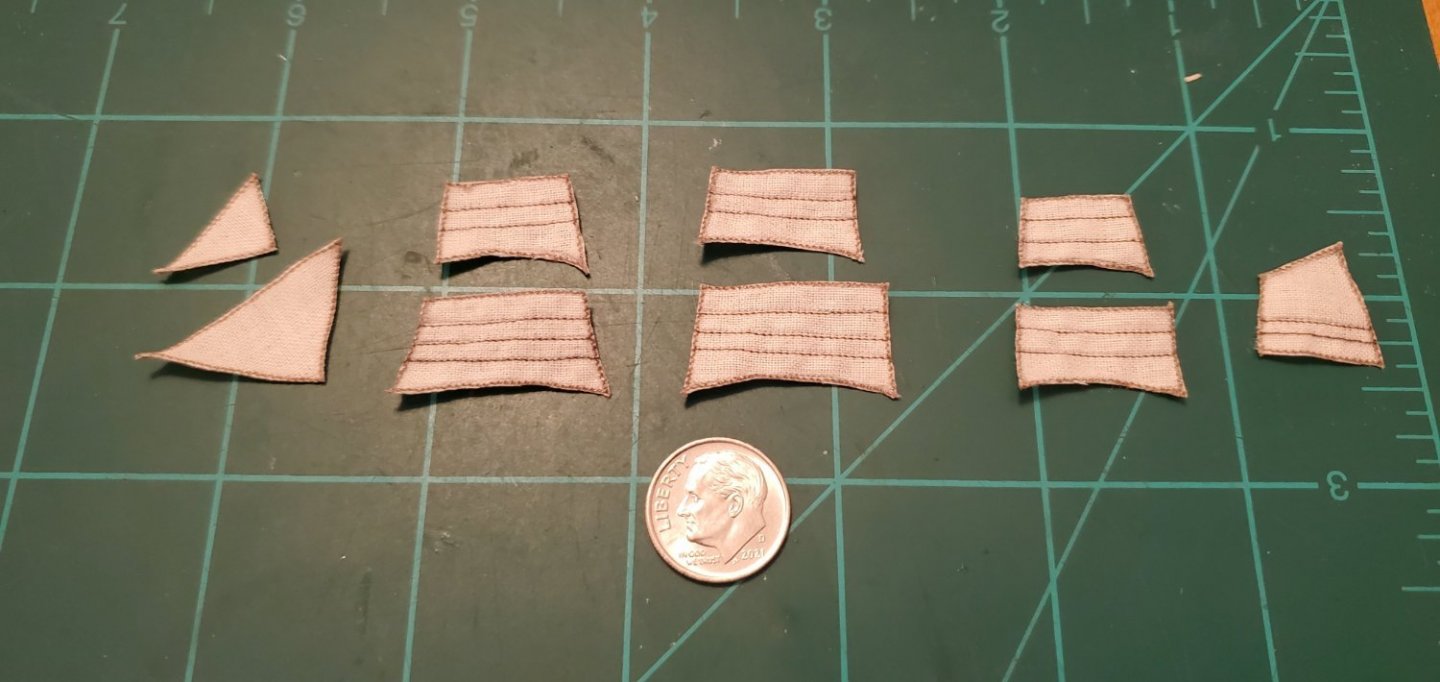
Here's my attempt at a new manufacturing technique for the sails. I wanted to get something resembling the first pic below, which is a painting of the razee version of the Independence. For the sails in my previous bottle builds, I cut the sails out of muslin and glued on thread for bolt ropes and panel seams (2nd pic). For this build, I wanted a better look for the bolt ropes. Also, instead of highlighting the panel seams, I wanted the reef bands to be more prominent like they are in the razee painting. Sooooo. I dug out the seldom used sewing machine from the bottom of the closet to see if I could overcome my pathetic sewing skills and make some better looking sails. I tried a bunch of different things and finally settled on regular thread and a very narrow zigzag stitch for the bolt ropes and a straight stitch with fly tying thread for the reef bands. I did ok at sewing straight lines but, as you can see, I had some difficulties turning a smooth curve in such a tight space for the bottom of the square sails. They did not come out perfect, but I like them better than the glue-on thing I was doing before.

- 177 replies
-
- 8
-
-
- Independence
- bottle
- (and 1 more)
-
Thank you, Grant and Keith, for the commiseration! Like the song says, some days are diamonds, some days are stones! But I'd say any day working on a model is a pretty good day regardless!
- 177 replies
-
- 4
-
-
- Independence
- bottle
- (and 1 more)
-
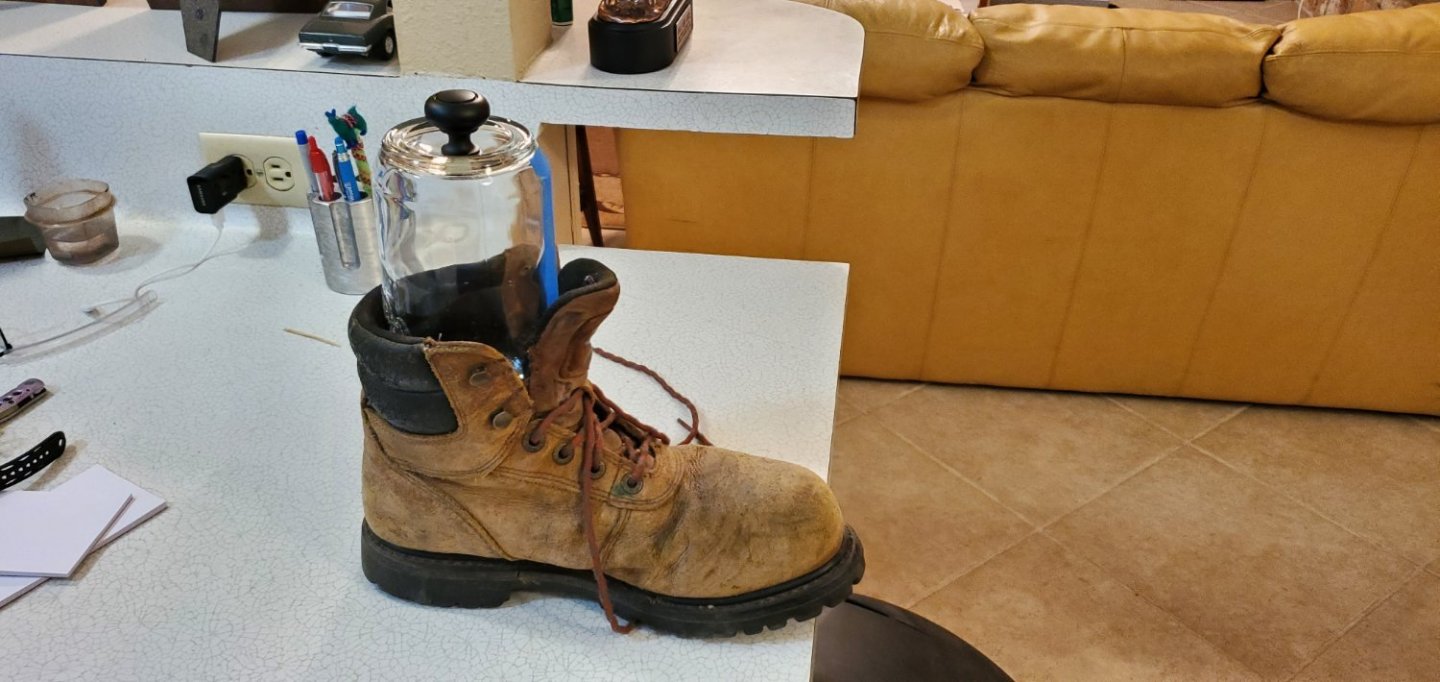
Y'all ever have those days where you just keep screwing things up? Stepping the masts and adding the yards should have been a relatively simple job. But no, I kept fumbling and stumbling and bumbling. First, I measured some of the yard lengths wrong and had to make new ones. Ugh. Then I put the main mast yards on the fore mast. Ugh. Then I mixed up the gaff and boom on the mizzen mast and had to pull them off and reattach. Ugh. Finally decided I had to do stop for a while and do something different. Something real simple - like put the button on the end of my cannon barrel (bottle). I found a cabinet pull at Home Depot for $3 that sort of resembles a cannon button. An old work boot was the perfect jig to hold bottle while the epoxy set. After that small victory, I was able to regroup and finish the masts, yards, and stays. Sails are up next. I'm going to try and do something different with them, so we will see how that turns out.

- 177 replies
-
- 7
-
-
- Independence
- bottle
- (and 1 more)
-
I'm thinking a smaller version of your Tennessee in a Tennessee whiskey bottle! That should be next on your list, Keith!
-
Thanks, Grant. But what I'm really excited about is the new listing under your "Current Builds". Heading over there now!!!
- 177 replies
-
- 2
-
-
- Independence
- bottle
- (and 1 more)
-
WOOHOO!!! I've been anxiously waiting on this build for months! Can't wait to follow along and see how you how you put this thing together. Looks like you are off to a great start. I like the way you used the brass pins for alignment.