Snug Harbor Johnny
-
Posts
1,505 -
Joined
-
Last visited
Content Type
Profiles
Forums
Gallery
Events
Everything posted by Snug Harbor Johnny
-
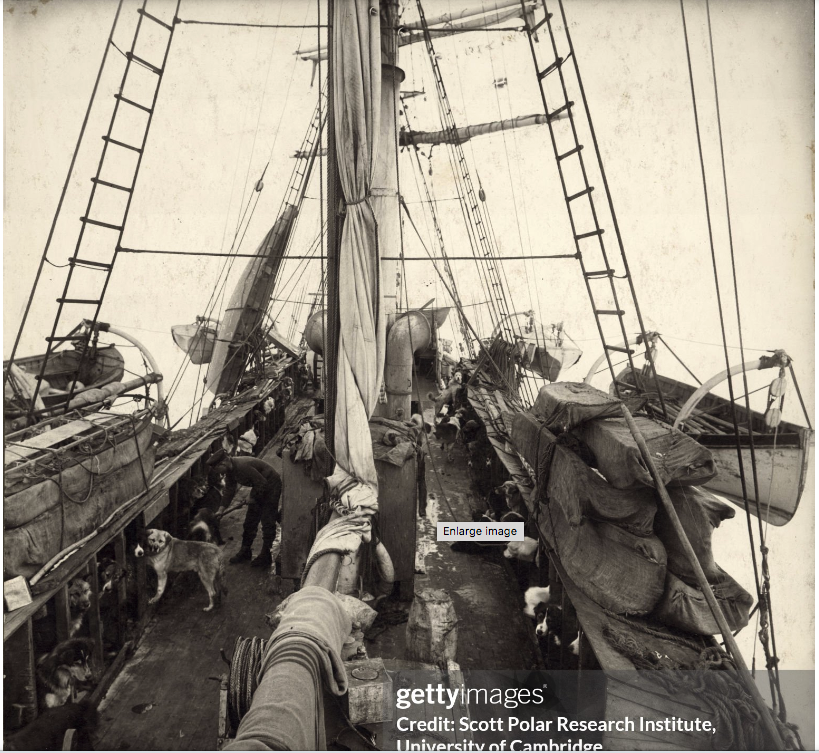
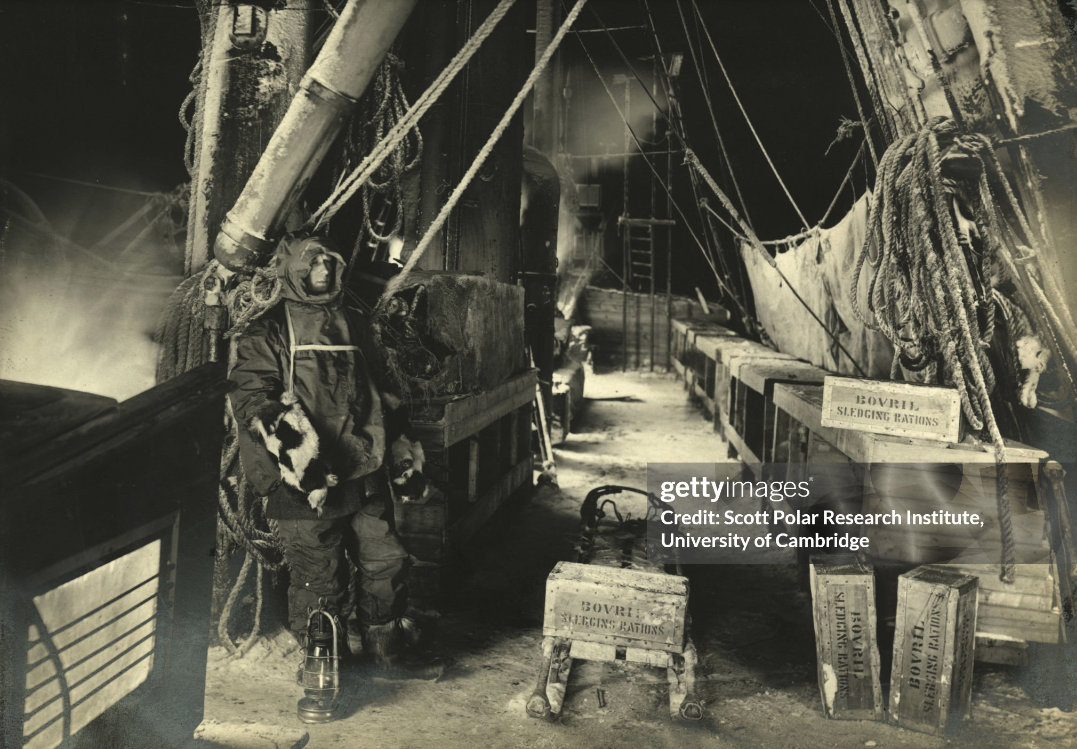
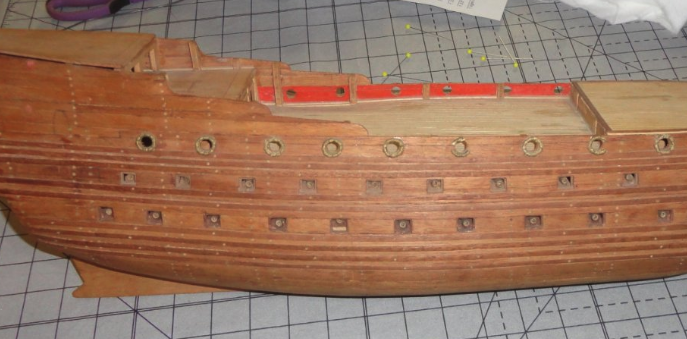
 Since the hull will be painted (ruddy red below waterline - anti fouling paint - and black above), you don't have to worry too much about "exact" planking other than the width to use. Thinner scale widths may be easier to work with anyway. A single coat of paint will let the planking lines and some of the wood grain 'telegraph' through - which is a good appearance. After all, its not a racing yacht that gets completely filled to a glossy smooth surface. The Endurance had several configurations: her prior life as Polaris; the initial modifications in England; the additional modifications in South America (the one she had before getting stuck in the ice); and the later modifications made after getting stuck. Note that there are pictures from all phases available on line, and it is not always clear which phase you're looking at. Prior to getting stuck, the steering mechanism was enclosed by a wooden shed (kit provided) to keep the gear from getting iced. This feature was one added in South America prior to departing for the Southern pole. (She did not have the steering shed in England, and the shed was later removed after getting stuck, and was used as a shed on the icepack.) Another key feature is that the deck amidships was completely planked over to the forward cabin in South America, to provide a greater enclosed space against the anticipated cold. This is why the inboard boat mounts were changed into having all the boats hung outboard on davits prior to heading southbound. A phot below shows the open space 'bridged' by the walkways (kit config.) setting out from England, contrasted with 2 other photos showing the polar configuration with extra decking amidships and boats hung outboard ... as well as the kennels added in South America. This can make the model easier to rig, since the pin rail around the main mast was moved (or another one added) higher up above the added decking - where it is more accessible to the modeler (rather than have to use long tweezers to attach lines down in a confined area).
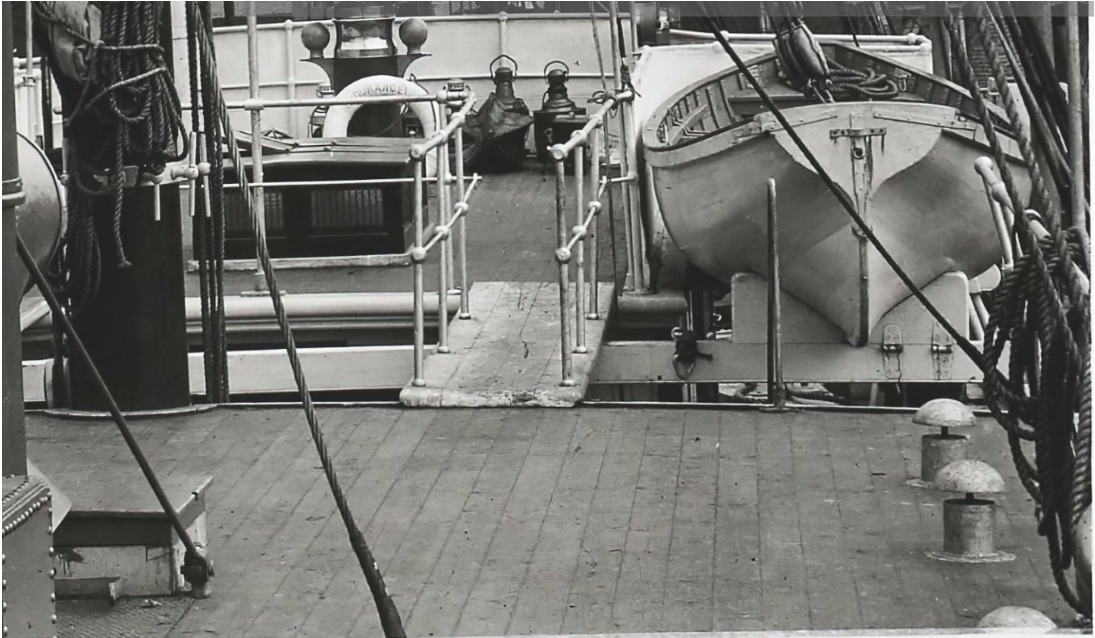
-
'Recently saw a builder doing amazing things with a Revell 1:96 Connie kit ... like it looks like an 'ultimate' kit bust ... link: https://modelshipworld.com/topic/31709-uss-constitution-by-dafi-revell-plastic-to-constitution-and-beyond/ And there is a nearly complete build of the Revell 1:96 Cutty Sark by Bruma that was something to drool over ... link: https://modelshipworld.com/topic/25323-cutty-sark-by-bruma-revell-196-plastic/ Whether just 'built out of the box' or enhanced to whatever degree, there's a lot one can do with plastic - or any medium whether wood, card or metal.
-
Kenny, the figurehead might do for the clipper Thermopylae - representing King Leonidas ... even closer if the sword arm were to point the weapon downward as documented elsewhere for the Thermie's figurehead.
-
Cena wrote "... And me here with the self-same Revell USS Constitution 1/96 you're likely envisioning ..." I'm no mind-reader, but I believe Chris was referring to were the very challenging large-scale wood kits of the Connie or Victory, and not the Revell 1:96 version of the USS Constitution. I built that great kit (and the Revell 1:96 Cutty Sark as well) before working in wood and having to model a ton of complexities in structure and rigging. Its like comparing apples with oranges. Do what interests you and see how far you can taker any project - learning as you go. Said Alice Walker, "Much of the satisfying work of life begins as an experiment, and no experiment is ever quite a failure."
-
Completed builds: Khufu Solar Barge - 1:72 Woody Joe Current project(s): Gorch Fock restoration 1:100; Billing Wasa (bust) - 1:100; Great Harry (bust) 1:88 ex. Sergal 1:65
-
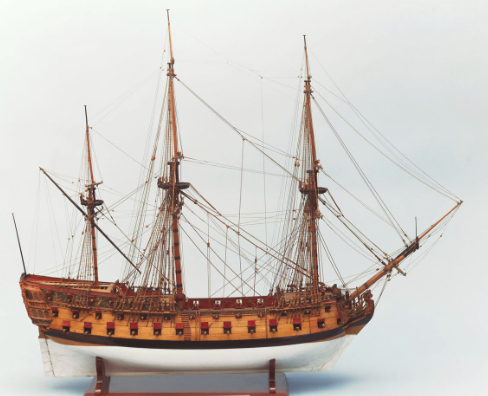
Here's a fine idea for 'one last worthy design ... HMS Centurion. My friend John Fitzhugh Millar, of Williamsburg, VA, built a fine admiralty model of her in the parlor of Newport House on South Henry Street - made primarily of balsa (yes it can be done in balsa and still look fine). The 1:48 hull model is a good 3' long and makes quite a statement (I'll see if they'll send me a photo), so 1:60 or 1:72 are options. No way would Centurion be mistaken for Victory, and the story behind the epic voyage is compelling. Anson's ship that went around the globe was the HMS Centurion, his flagship during a famous circumnavigation from 1740 to 1744, where it became the sole surviving vessel from his squadron and successfully captured a Spanish treasure galleon before returning to England with immense riches. Key Facts About the Voyage & Centurion The Mission: Commodore George Anson led a squadron to disrupt Spanish interests in the Pacific during the War of Jenkins' Ear. The Journey: The squadron, consisting of six ships including the 60-gun Centurion, sailed around Cape Horn, facing horrific storms, disease, and heavy losses, with Centurion being the only ship to complete the journey. The Prize: In 1743, the Centurion captured the Spanish treasure galleon Nuestra Señora de Covadonga, securing a massive haul of silver, which was a major success. Return to England: Anson returned in 1744, completing the circumnavigation aboard the Centurion, bringing back vast treasure and making him famous. Legacy: The voyage, detailed in A Voyage Round the World, became a bestseller, and the captured treasure significantly funded Britain's war effort. Images of the Centurion model at the Royal Museum in Greenwich, England are pasted below:

-
I sup[pose the 'best' way to finish wood is whatever way gets you the appearance you desire. There are many to choose from.
-
We awl make misteaks ... Hmmmm, I need a better spell Czech.
-
Ahoy, mate ! There's nothing 'wrong' with building a model "out of the box' ... no kit 'busting', no photo-etch or market enhancements. Do what you want, when you want, and how you want to do it ... or be an 'armchair modeler'. Its all up to you. Like that mesmerizing oil painter Bob Ross says ... "Its your world, you can do anything you want." (BTW good job on the Beagle.)
-
removing ca glued rigging
Snug Harbor Johnny replied to Lost and Confused's topic in Masting, rigging and sails
Test it on a sample off the model to see. Natural fibers should fare OK, but I don't know about polyester thread ... never tried it. Also, try it on a piece of plastic sprue form the kit. Just a minute ... You got me going, so I went into the shop, glued some of my own scale rope made of poly thread over on itself and to a piece of wood with thick CA. Then a dabbed a little accelerator on it for a quick cure. I did get a bit of CA on a fingertip, and the acetone loosened it after about 45 seconds. Then I applied acetone with a fine brush to the glued line, and it loosened in about a minute. Now there was a small blob of glue to work on, and it took another minute for the line to pull free of the wood it was glued to. No harm was done to the line, nor was there any harm to the plastic sprue I tried it on repeatedly. So you should be OK. Bear in mind that acetone will remove any oil from the surface of your skin, and can be absorbed through the skin as well (as can a lot of things). Breathing fumes isn't so good either. The de-bonder might do the job quicker, so it may be good to try -
I just love your model of the HMS Beagle ... The hull is the star, and what interests me the most. The style of build has many advantages, like easy to display - and occasional cleaning with compressed air is easy. My friend has a couple nice display models like yours, and an observer can get 'up close and personal'. Congratulations !
-
Ahoy, mate ... and welcome to MSW ! If you enjoyed the novel Moby Dick, you should read 'In the Heart of the Sea' - pasted below ... the REAL 'Moby Dick'. In the Heart of the Sea Book by Nathaniel Philbrick In the Heart of the Sea: The Tragedy of the Whaleship Essex by Nathaniel Philbrick is a 2000 National Book Award-winning nonfiction book detailing the 1820 sinking of the whaleship Essex by a sperm whale, leading to a harrowing 90-day ordeal at sea for the survivors, who faced starvation, dehydration, and cannibalism, and it inspired the 2015 film of the same name. Philbrick uses newly discovered documents, including the cabin boy's account, to create a gripping narrative about human endurance, leadership, and the brutal realities of 19th-century whaling. the true story of the Essex, which was rammed and sunk by a whale in the Pacific, forcing the crew into small boats to face the elements, with only a few surviving. And if you want to SEE how the men handled a whaler at sea, watch the thrilling movie by the same title ... I was truly 'blown away' by it. You can view the official trailer for In the Heart of the Sea on YouTube via the following short link: Official Final Trailer: https://www.youtube.com/watch?v=K-H35Mpj4uk

-
removing ca glued rigging
Snug Harbor Johnny replied to Lost and Confused's topic in Masting, rigging and sails
For ratlines, it may be better not to glue anything until all the ratlines on a given set of shrouds are done and adjusted (by nudging the clove hitches up or down. Using a cow hitch on the first and last shroud will direct the line inward, so trimming won't leave unsightly bits sticking out beyond the end shrouds. For un-doing CA'd rigging, acetone can be somewhat harsh, and an alternative designed for the purpose exists as copied below: A CA glue debonder (cyanoacrylate debonder) is a specialized solvent that breaks down the molecular structure of super glue (CA glue) to remove it from skin, tools, and surfaces, allowing for correction of mistakes, freeing stuck fingers, and cleaning up dried glue without damaging most materials. It works by softening the adhesive, making it non-tacky and wipeable, and comes in formulas that are often skin-safe and effective on cured glue, with some brands offering brush applicators for precision. EDIT: A user test of 'Goof Off' debonder did not seem to work ... so until I can test it myself, the acetone will have to do ********
-
Gosh, ... There should be 1 or 2 more bulkheads (some call them frames, you mention rib - but this type of model is a "plank on bulkhead", aka POB) between the stern bulkhead and the next one shown. That's a challenge with this particular kit (budget variety?). And yes, that next to last bulkhead projects too low. This is where modeling skills come in (or have to be developed) to correct kit deficiencies. Most wood kits are unlike those in plastic where everything can snap together ... there is often a need top carve, shape, sand, file and otherwise 'bodge' things together to make them fit. Hopefully, nothing is glued at this point and only "dry fitted" - a step often recommended just to see how things are going to look. If so, you can lay the planking meant to be glued to the keel and draw a pencil line around the top edge of the planking to mark on the keel where the bulkheads should go down to - but not beyond. Then the bulkheads can be trimmed to meet that line. If the pieces are already glued, then you'll have to trim the offending bulkhead 'in situ', a little at a time, and use the planking to be applied as a 'gauge' to see how the trimming/shaping is going. Doing a little at a time and trial fitting as you go will prevent taking to much off - its harder to 'put back' wood and have another go rather than do less aggressive material removal. Using a Dremel will be useful in this case, since there is a negative curve - but a light touch is needed if the Dremel is a high-speed only variety (many are). Variable speed rotary tools can be slowed down to more reasonable speeds. "Fairing" the bulkheads prior to planking will also be a trick, and between the last two stern frames might be filled-in with basswood or balsa blocks so you can carve/sand the shape of the hull in that area. Then the applied planking will be supported much better where the hull lines change quite q bit. Many put support blocks at the bow as well, where the bend of the planks is more severe. There are logs on MSW that cover all these techniques, as well as how to mark the edges of the bulkheads for planking and how to taper planks for a better look.
-
'Trying to recall which Vasa kit you're starting (I'm in love with this ship - partially because we have most of it preserved in Stockholm). Now if I had my 'druthers (after finishing as far as I intend on the old 1:100 Billings version), I'd get BOTH the Billings and Caldercraft present versions (both are effectively the same scale) and utilize the best parts (for the detail concerned) to make one ship model. Pricy, yes, but when 'bucket list' items are concerned ...
- 73 replies
-
- 5
-

-
- Steam Cutter
- Harriet Lane
- (and 2 more)
-
'Looks fantastic, mate ! This will be a gorgeous build.
-
'Another great model in your impressive collection ! Well done, mate !
- 261 replies
-
- 2
-

-
-
- Victory Models
- Pegasus
- (and 3 more)
-
You've made a gobsmacking display with exceptional work on this classic kit. Kudos !
-
New Shipwright Reporting for Duty
Snug Harbor Johnny replied to Roach Boi's topic in New member Introductions
'Glad to see you project, mate - and welcome aboard ! MSW can always use an extra hand. You'll find many build logs (among other resources) to learn from, and contribute ideas of your own. Fair sailing ! Johnny -
I've pondered the "hump" in the Oseberg deck at the mast fish, and figured that the weight of the earth piled on top of the buried ship either created or accentuated this over time - since the mast fish has (forward of the mast step) a massive vertical member. to resist downward pressure in that location. In the configuration after centuries of crushing, the amount of upward deck bulge would make rowing very difficult whether the rower was sitting on a bench OR a chest. I've rowed on a replica Knarr, and its work enough sitting on a level thwart. At the angle in the photos (duplicated on some models), the oar handle would hit the rower's knees if the oar were to be held in line with all the others. Raising the angle would put too much oar in the water unless the oar length was significantly shortened. These are functional considerations - and the difference is the choice of modeling the ship as it is now (but made with new wood) OR modeling the Oseberg how it was when first built - with a flat or nearly flat deck ('compromise' bulge ?). I did a query about the issue, and got the following answer: Yes, the Oseberg ship, including its central deck area (the keel and hull), suffered significant compression and warping, forming a bulge, primarily due to the immense weight of the burial mound pressing it into soft clay over centuries, though careful excavation and modern conservation have helped restore and stabilize it, notes the Viking Ship Museum. The wood absorbed moisture and lost its shape, requiring extensive treatment to prevent collapse, but the structure's core wood (oak) was remarkably resilient, says the Museum of Cultural History. How Burial Affected the Ship: Weight & Pressure: The large burial mound, constructed with turf and stone, acted like a heavy press, flattening the ship and pushing it deep into the clay, causing the deck and hull to distort. Waterlogging & Decay: Buried in wet clay, the wood became waterlogged, and over time, biological decay further weakened it. Compression & Bulging: As the wood lost its structural integrity, the pressure from the earth above caused the ship's timbers, especially the central hull/deck, to warp and create the characteristic bulge. So will Nitkin note two ways of treating the deck amidships (as-built v/s as stabilized after excavation)? Decades ago, U.S. Civil War re-enactors noted that original Confederate uniforms had yellowed thread used for sewing the pieces together. Thus units many units insisted that repro C.S. uniforms be sewn with light yellow thread. However, textile/fibre experts noted that old cotton 'yellows' with age - especially items that were worn - due to a variety of factors, and that the original thread was white in the 1860s (garment fabrics had also undergone color changes), prompting replacing uniforms by the mid 1980s to represent uniforms as they would have appeared when the War between the States was fought.
-
'Looks like there is the "OcCre Terror bulge" in the hull amidships .. an anomaly needing additional sanding in the two affected bulkheads as part of the pre-planking fairing process. Something similar got me too, in the old 1:100 Billings Wasa (ca. 1970) - so I just ignore it now. Once everything topside on Vasa is pimped, it'll look well enough.
-
Welcome aboard , mate ! You can get a lot of tips and work-arounds on that kit from the existing logs found in MSW. 'Always a good idea to see whats ahead before engagins 'all ahead full'. 'Lots to learn, so take your time.
-
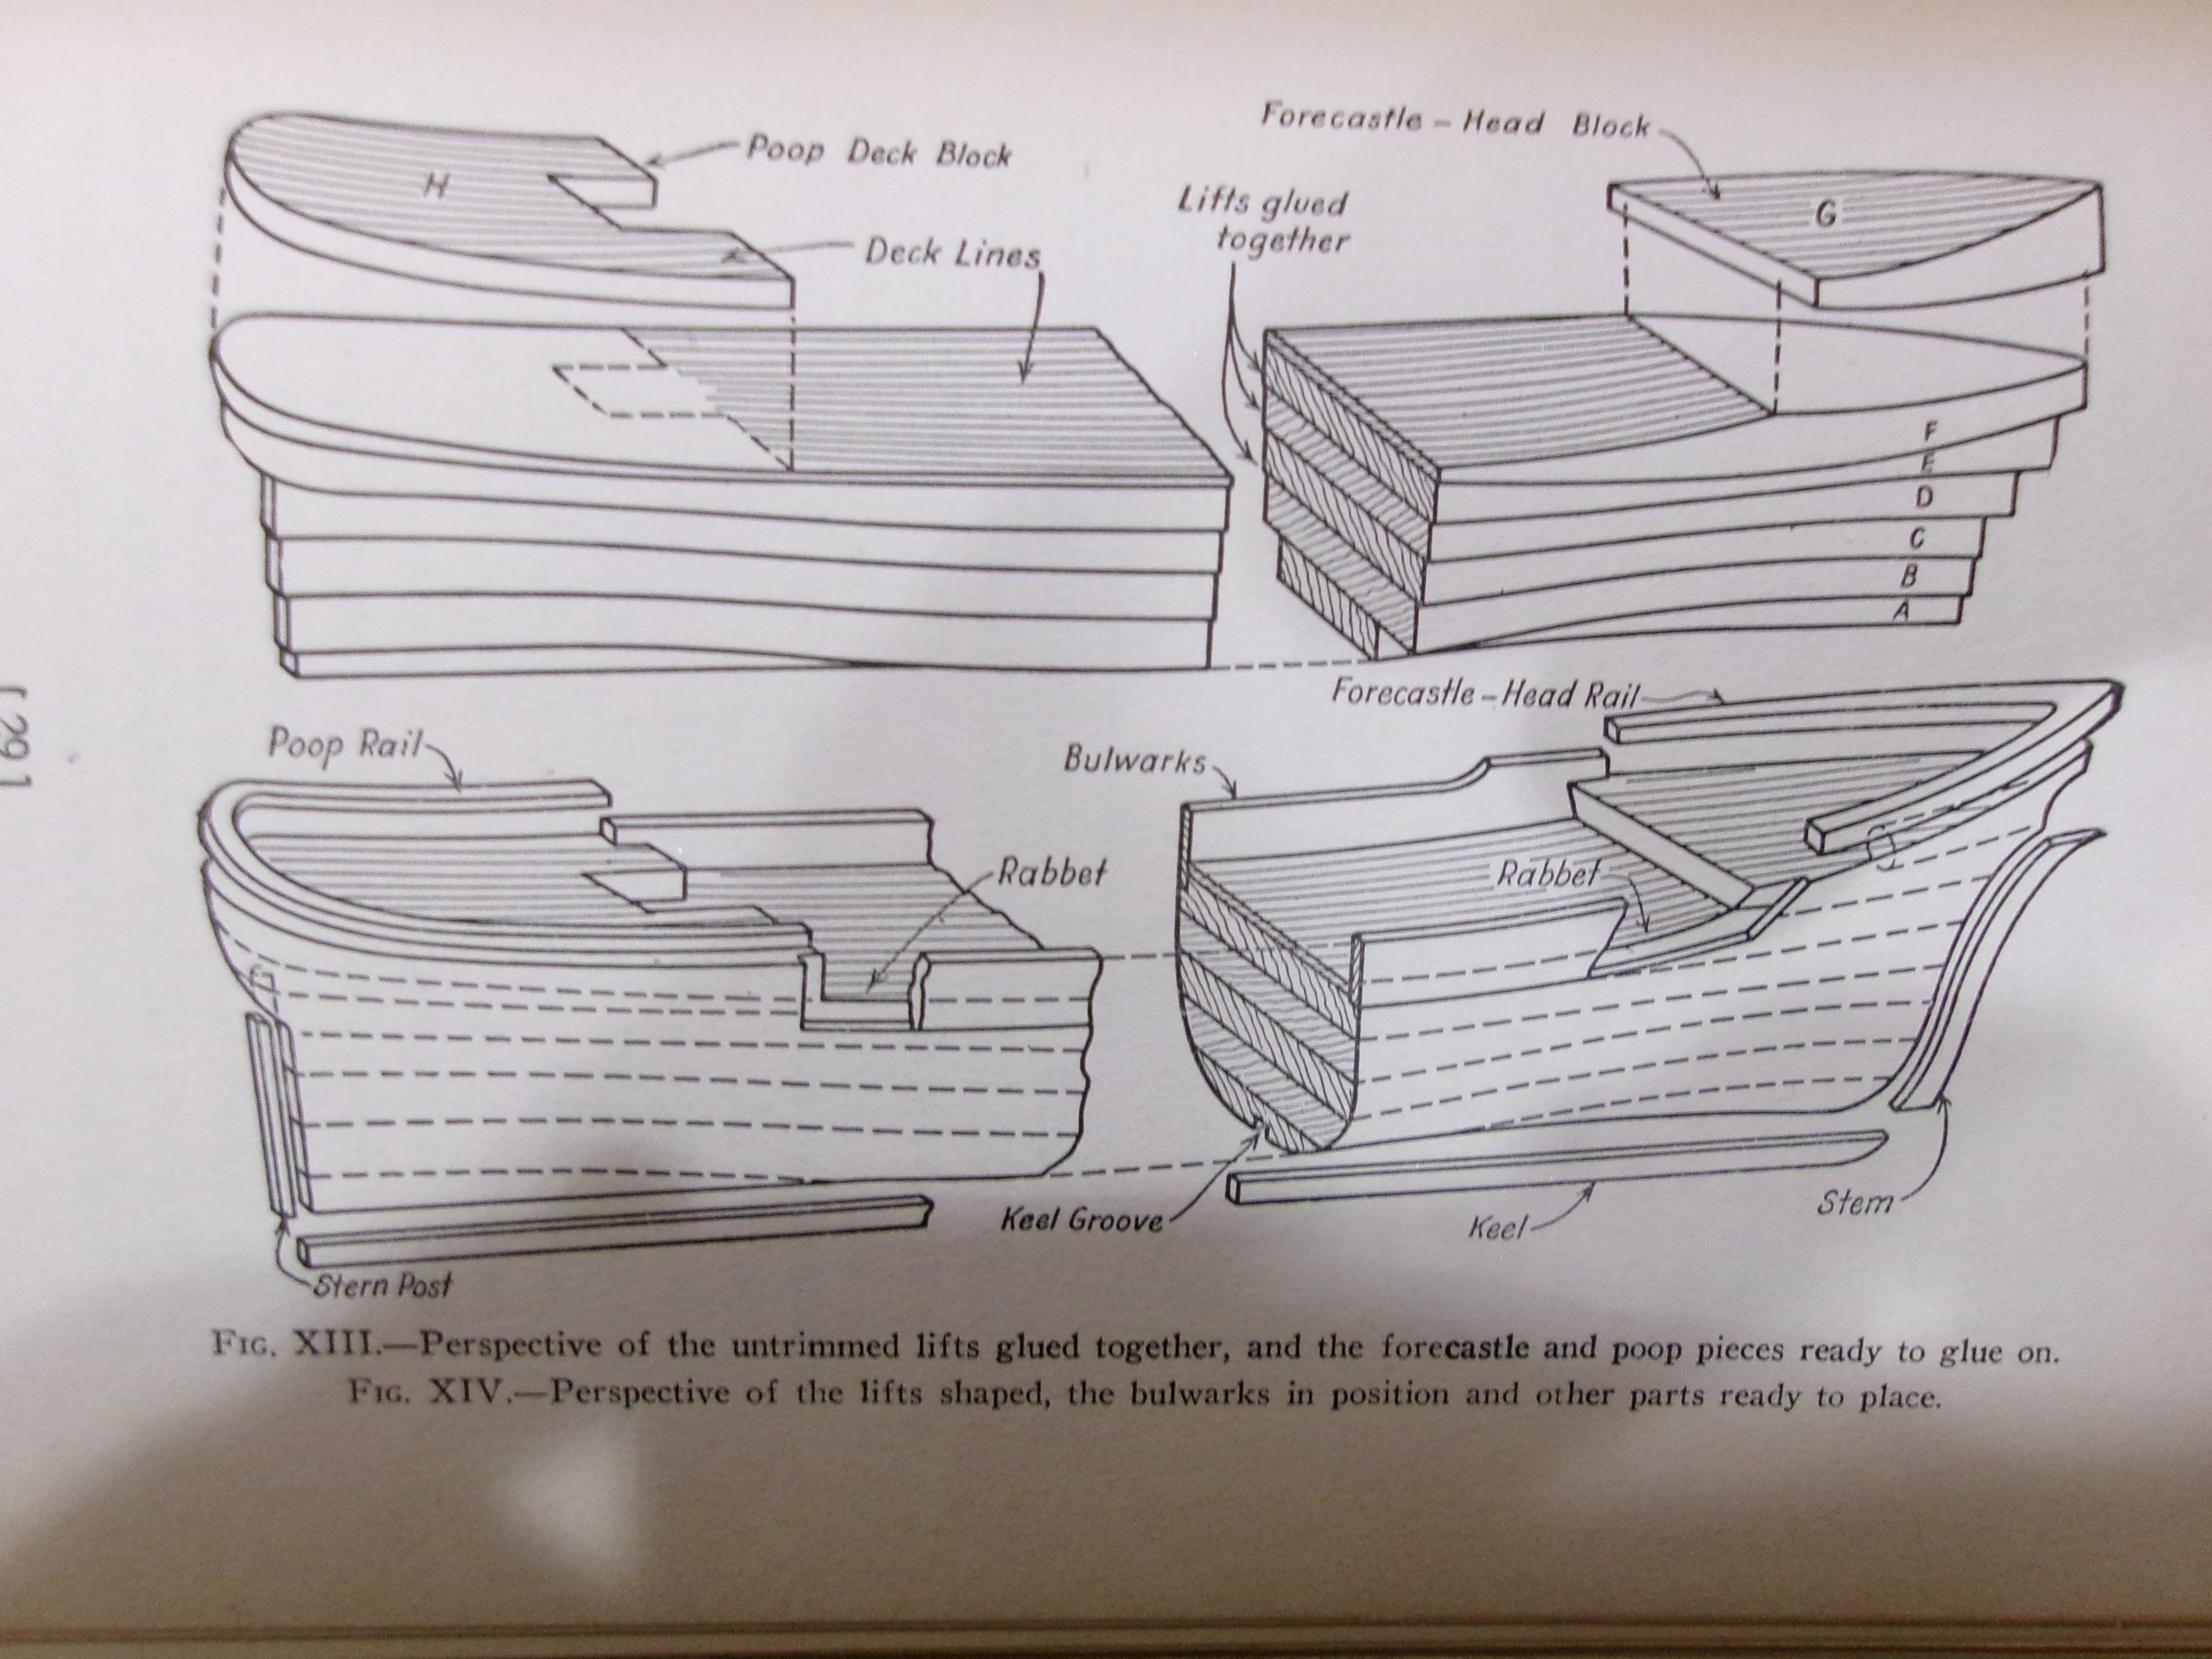
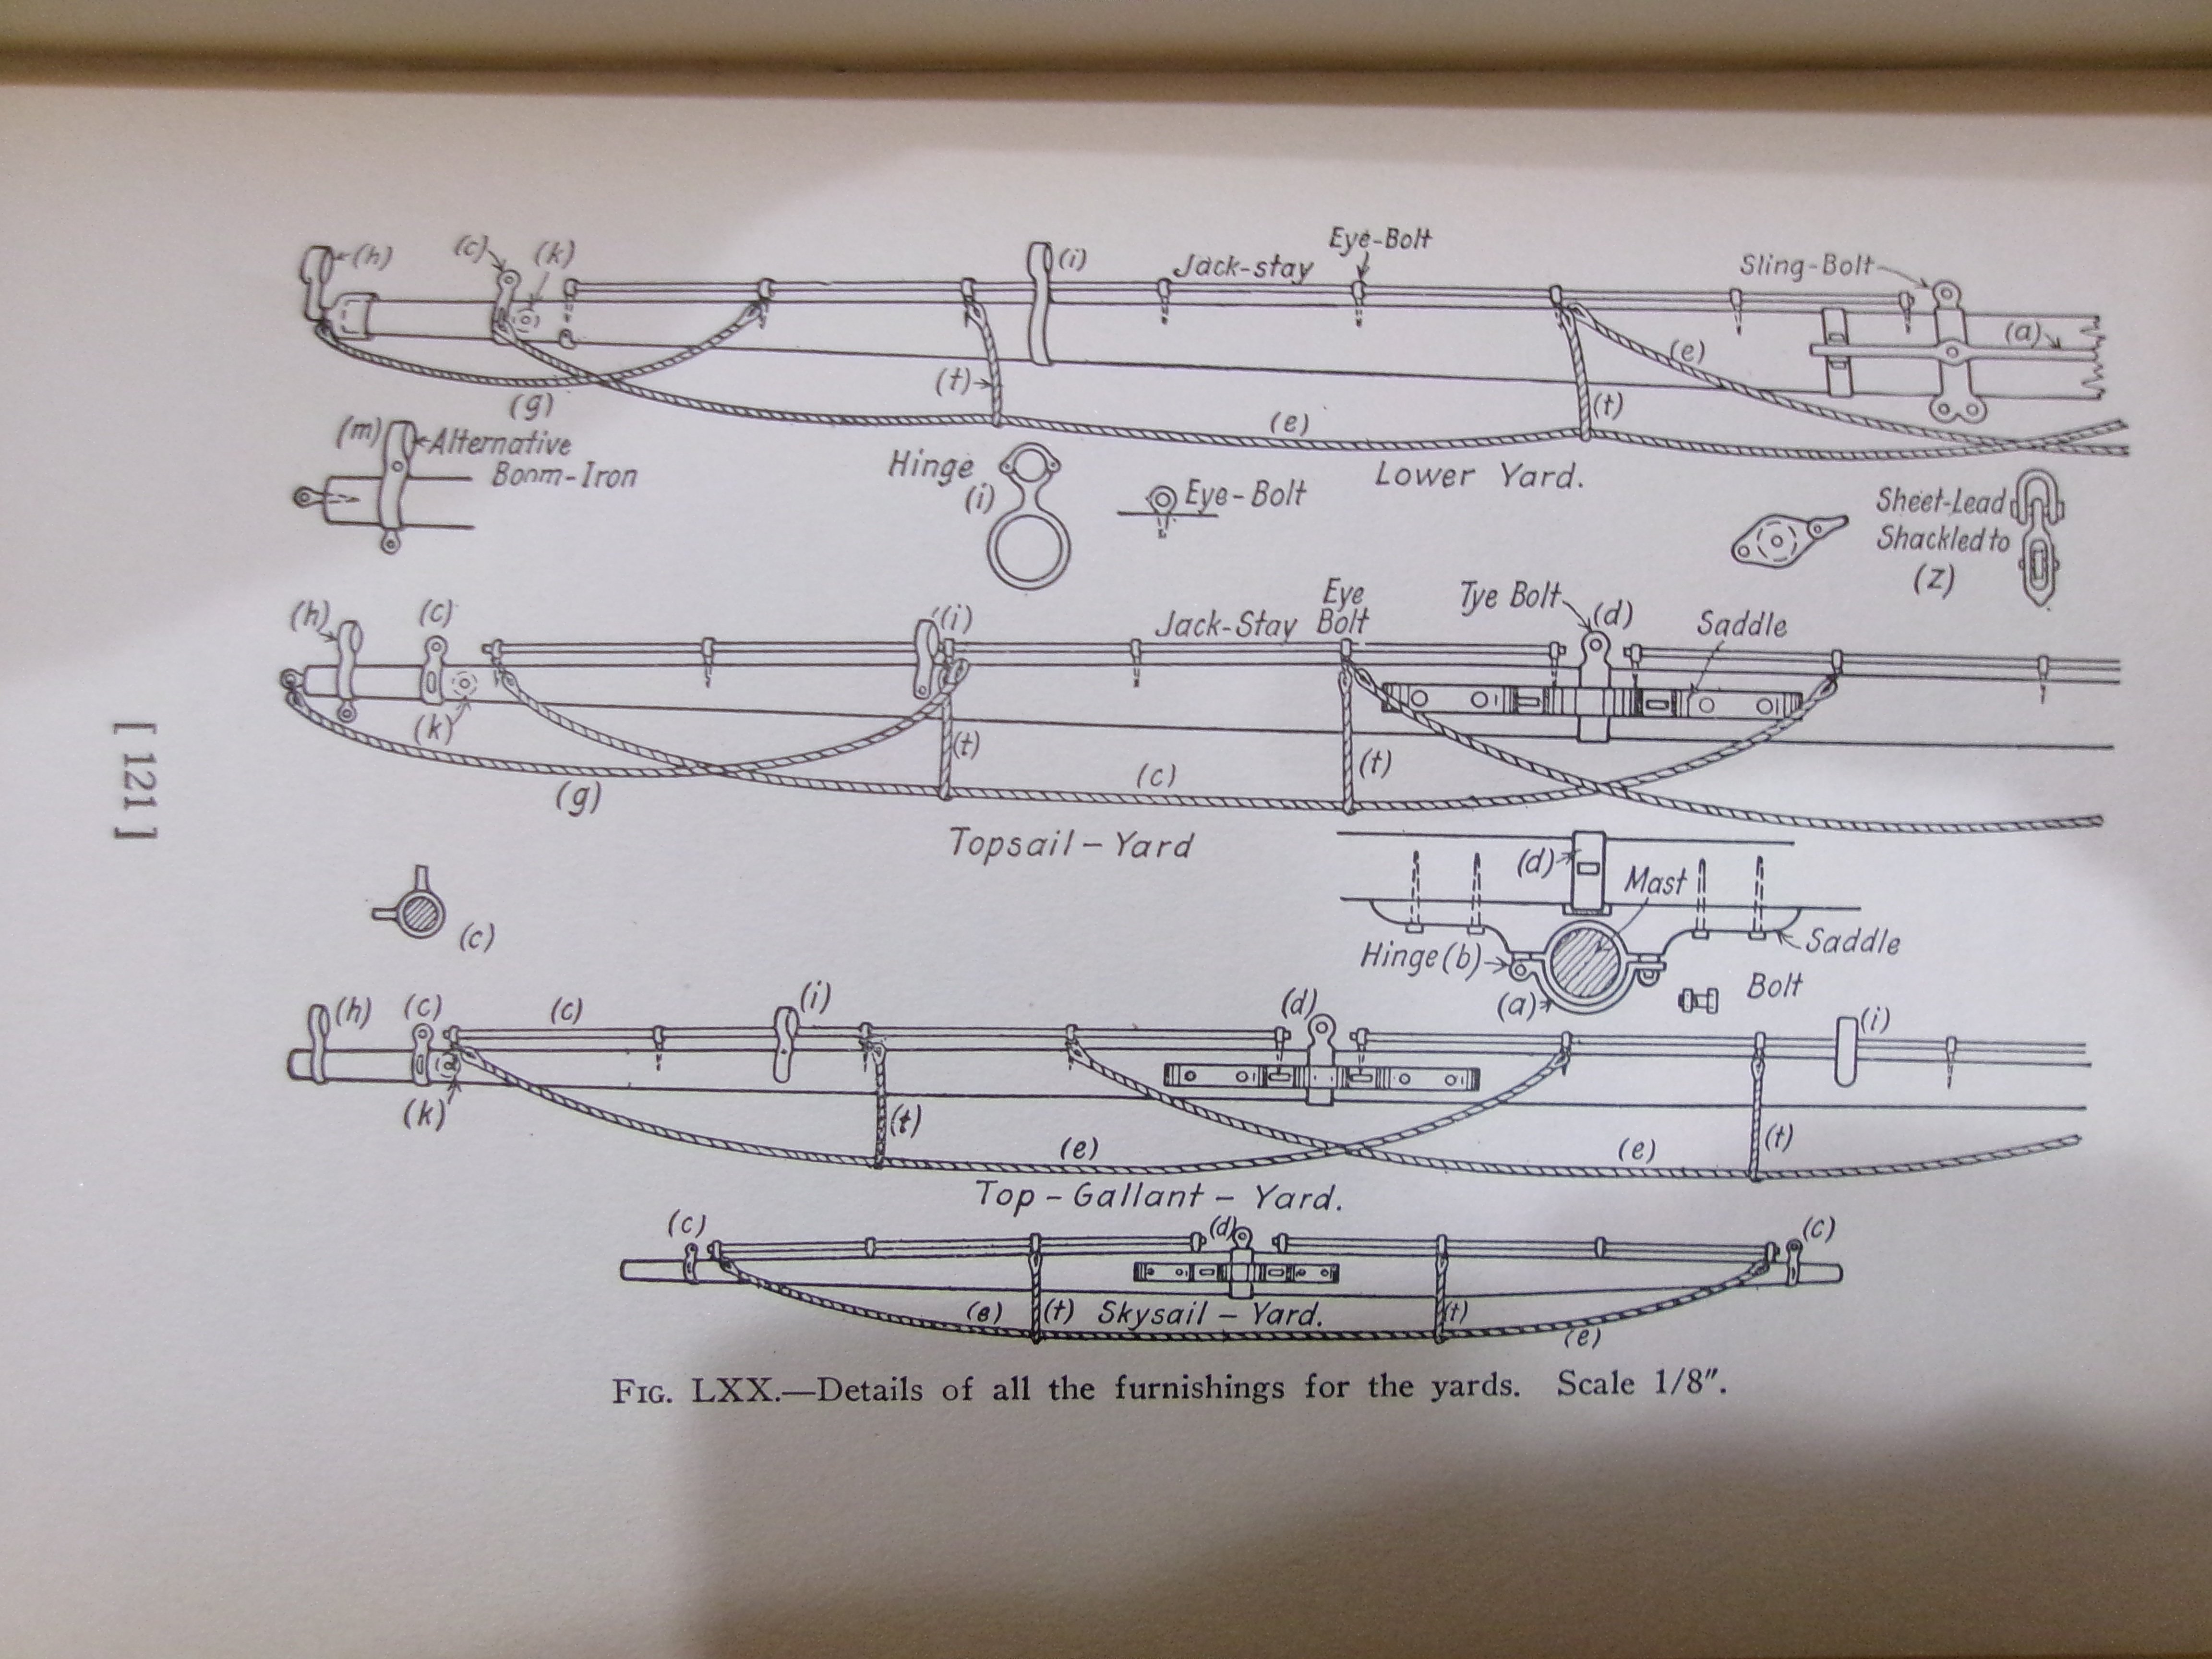
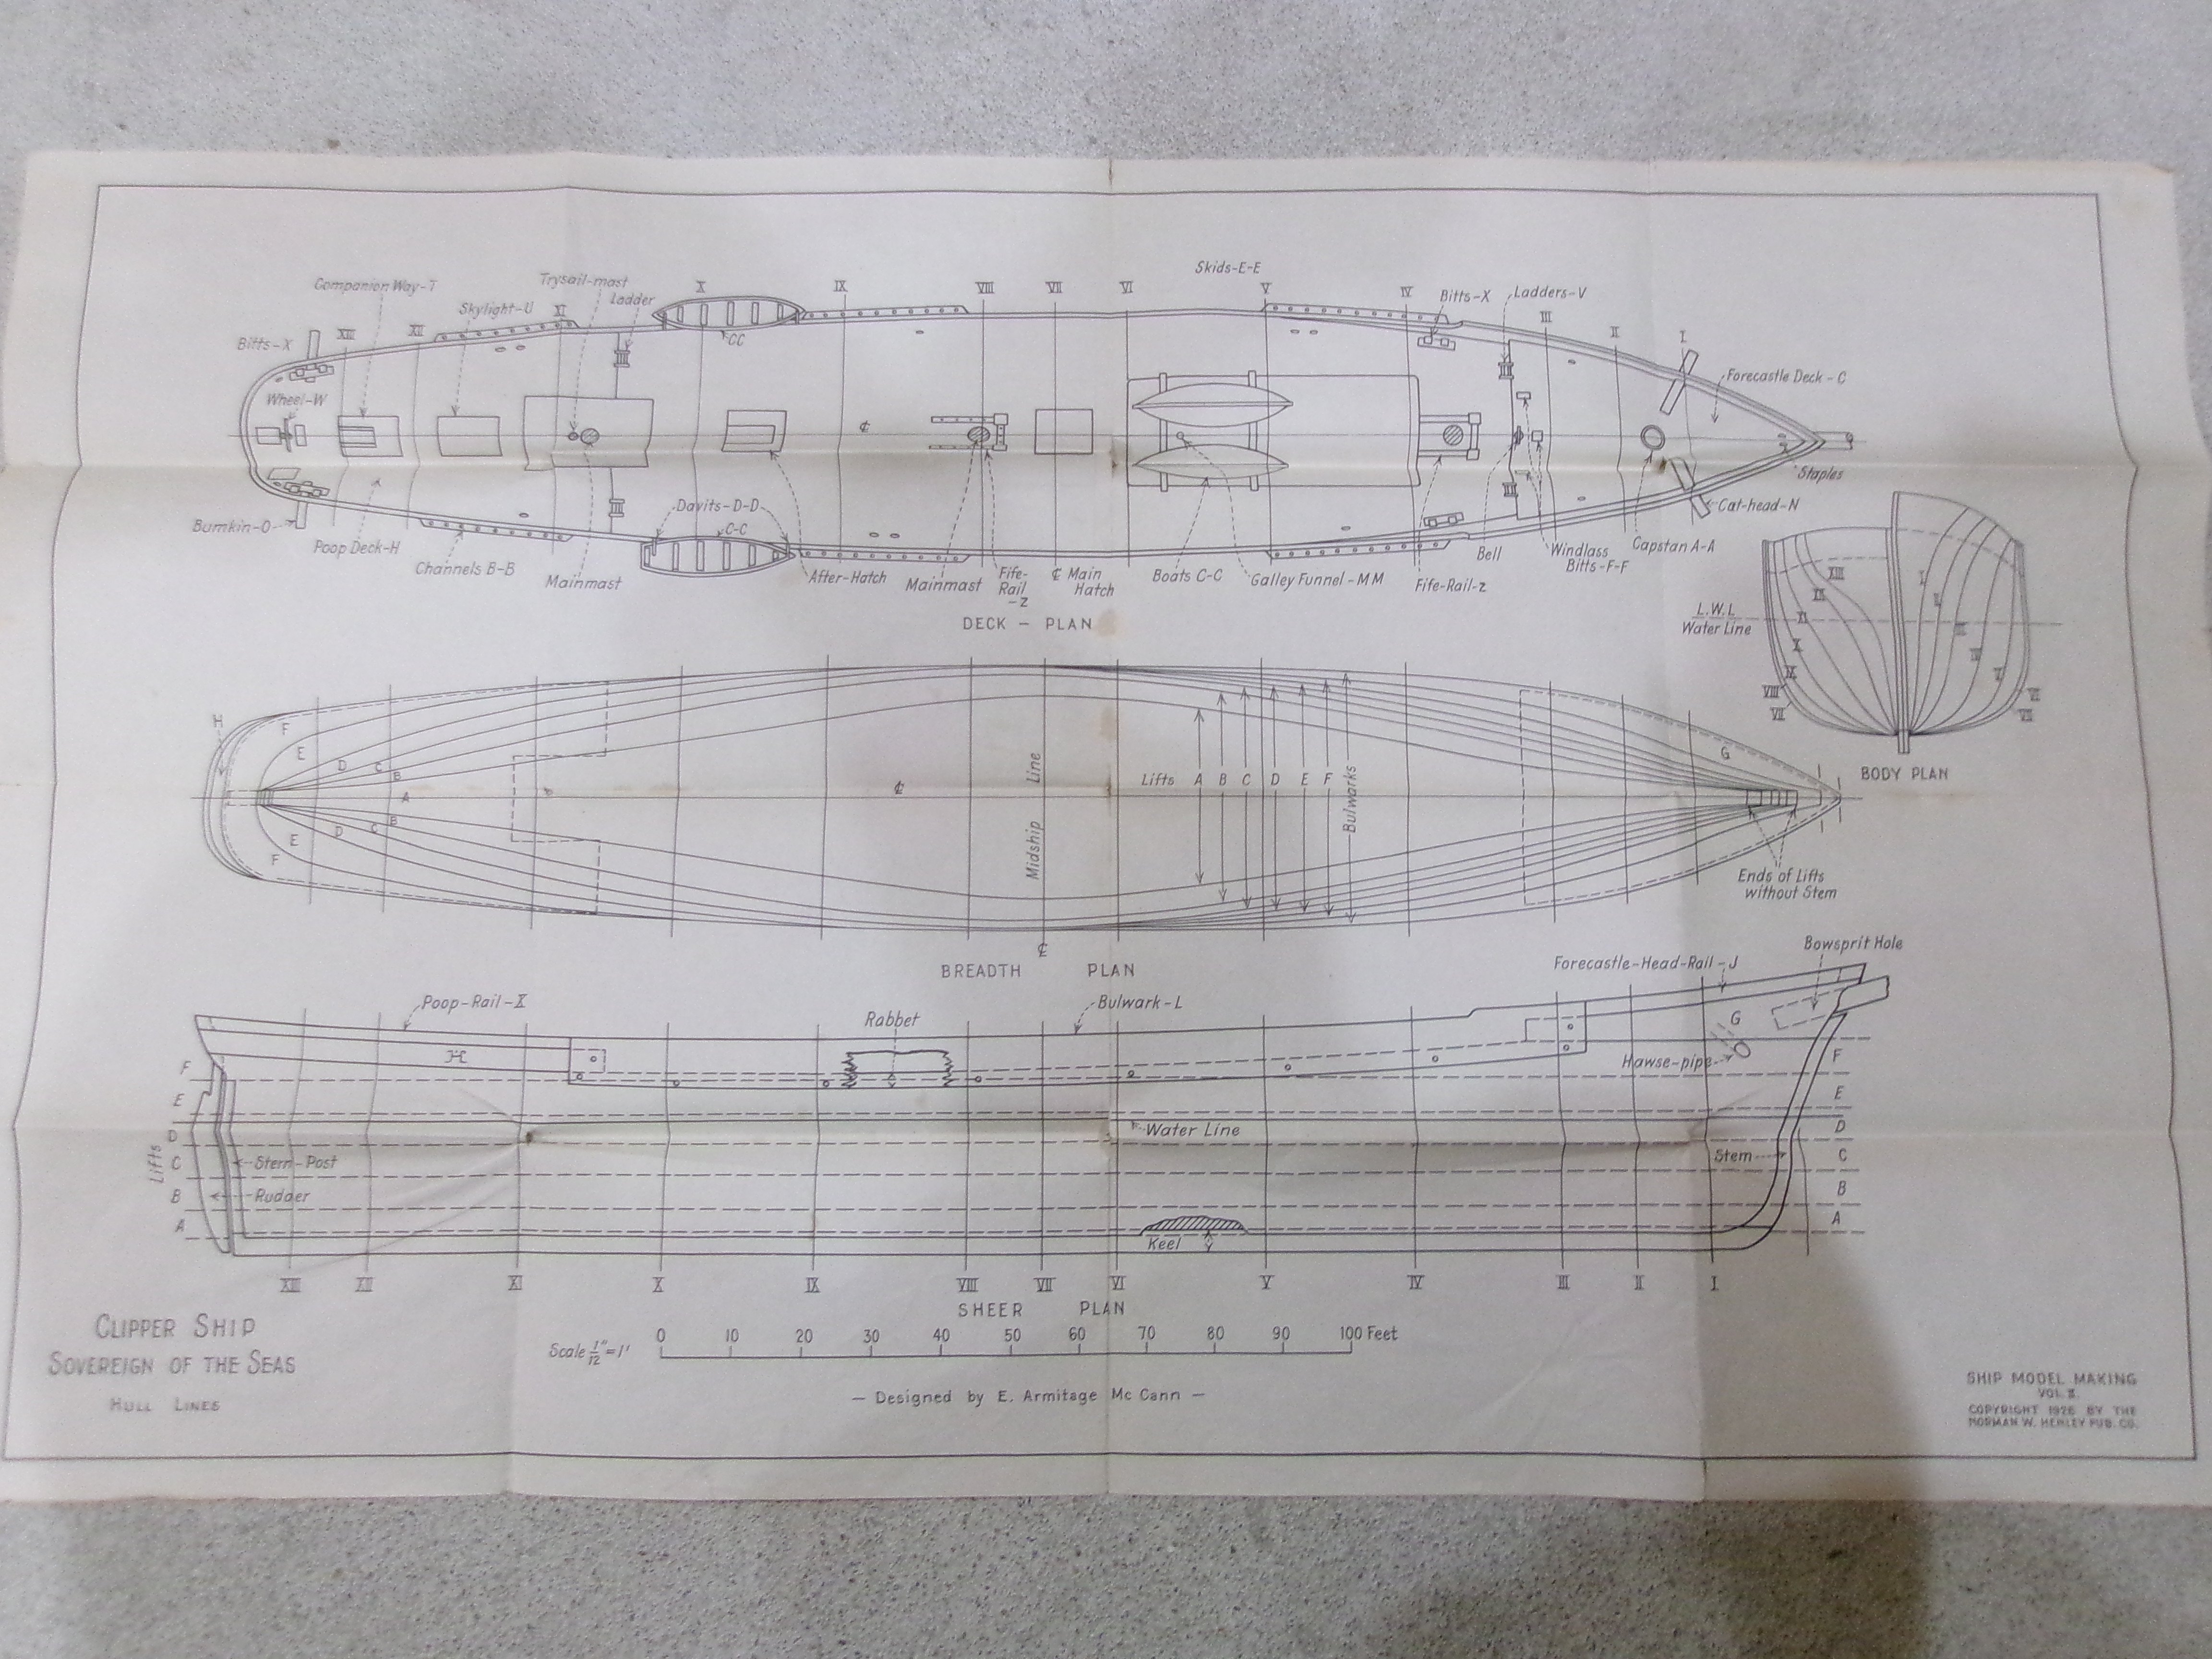
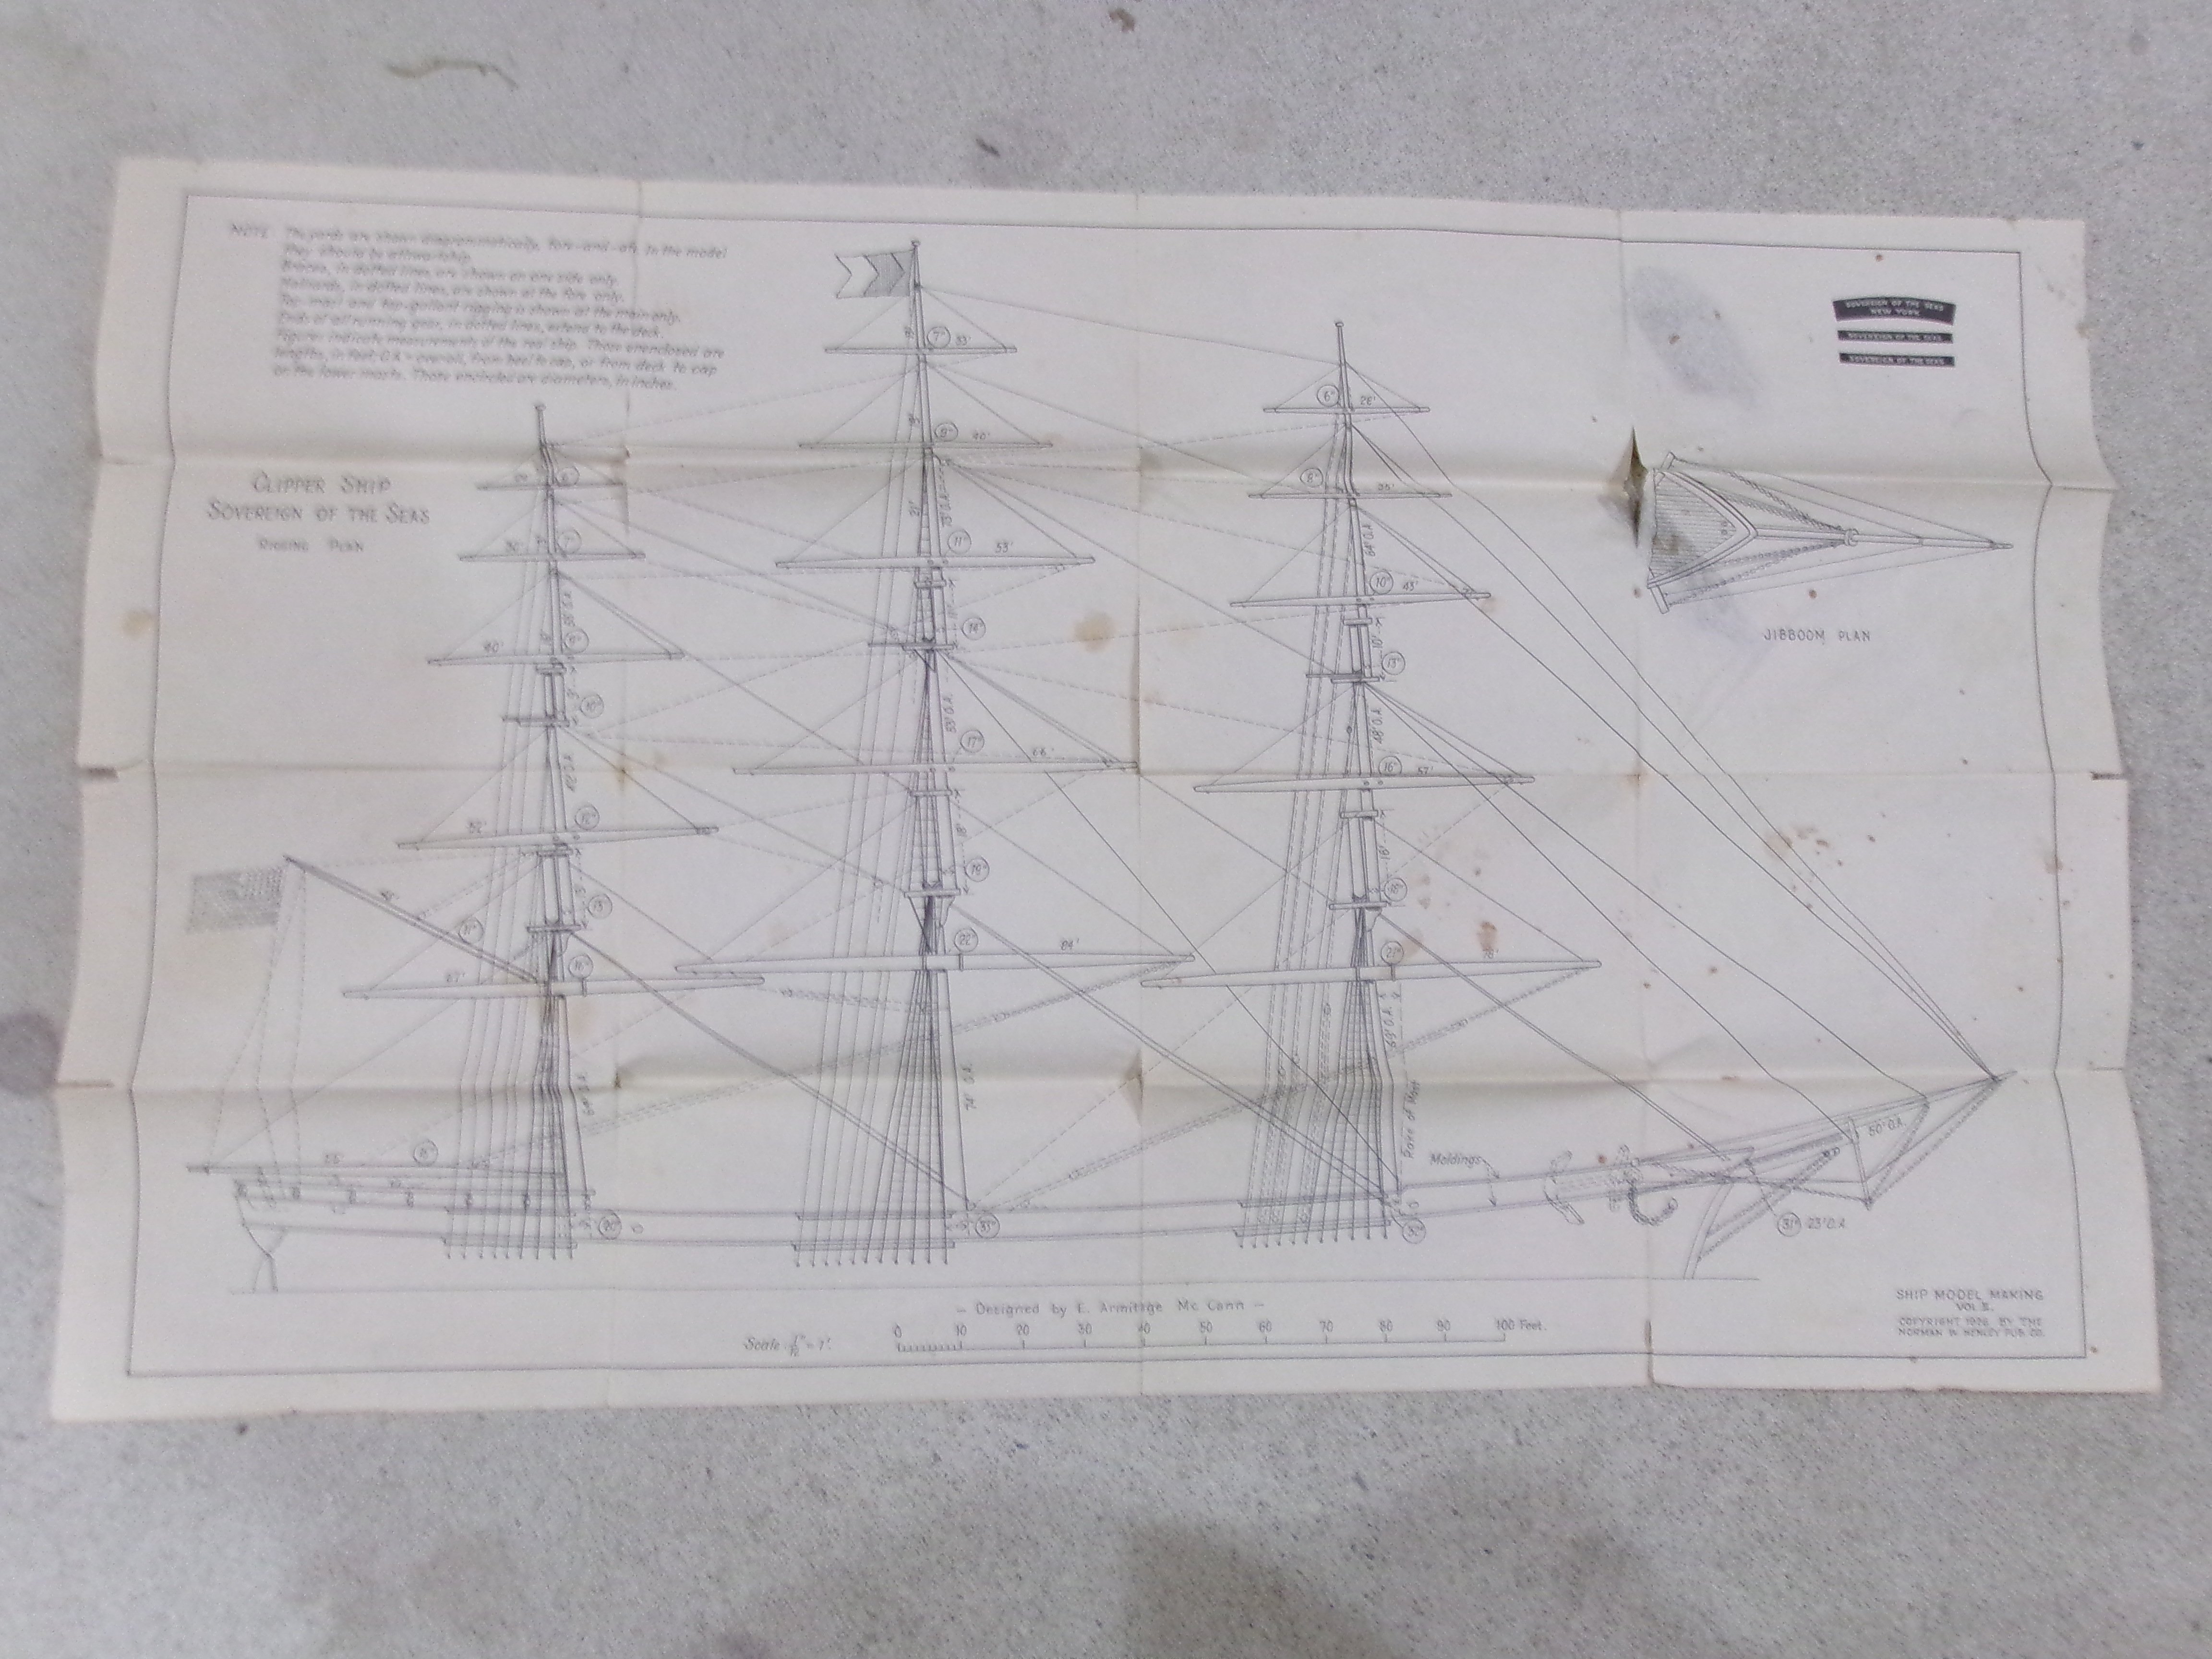
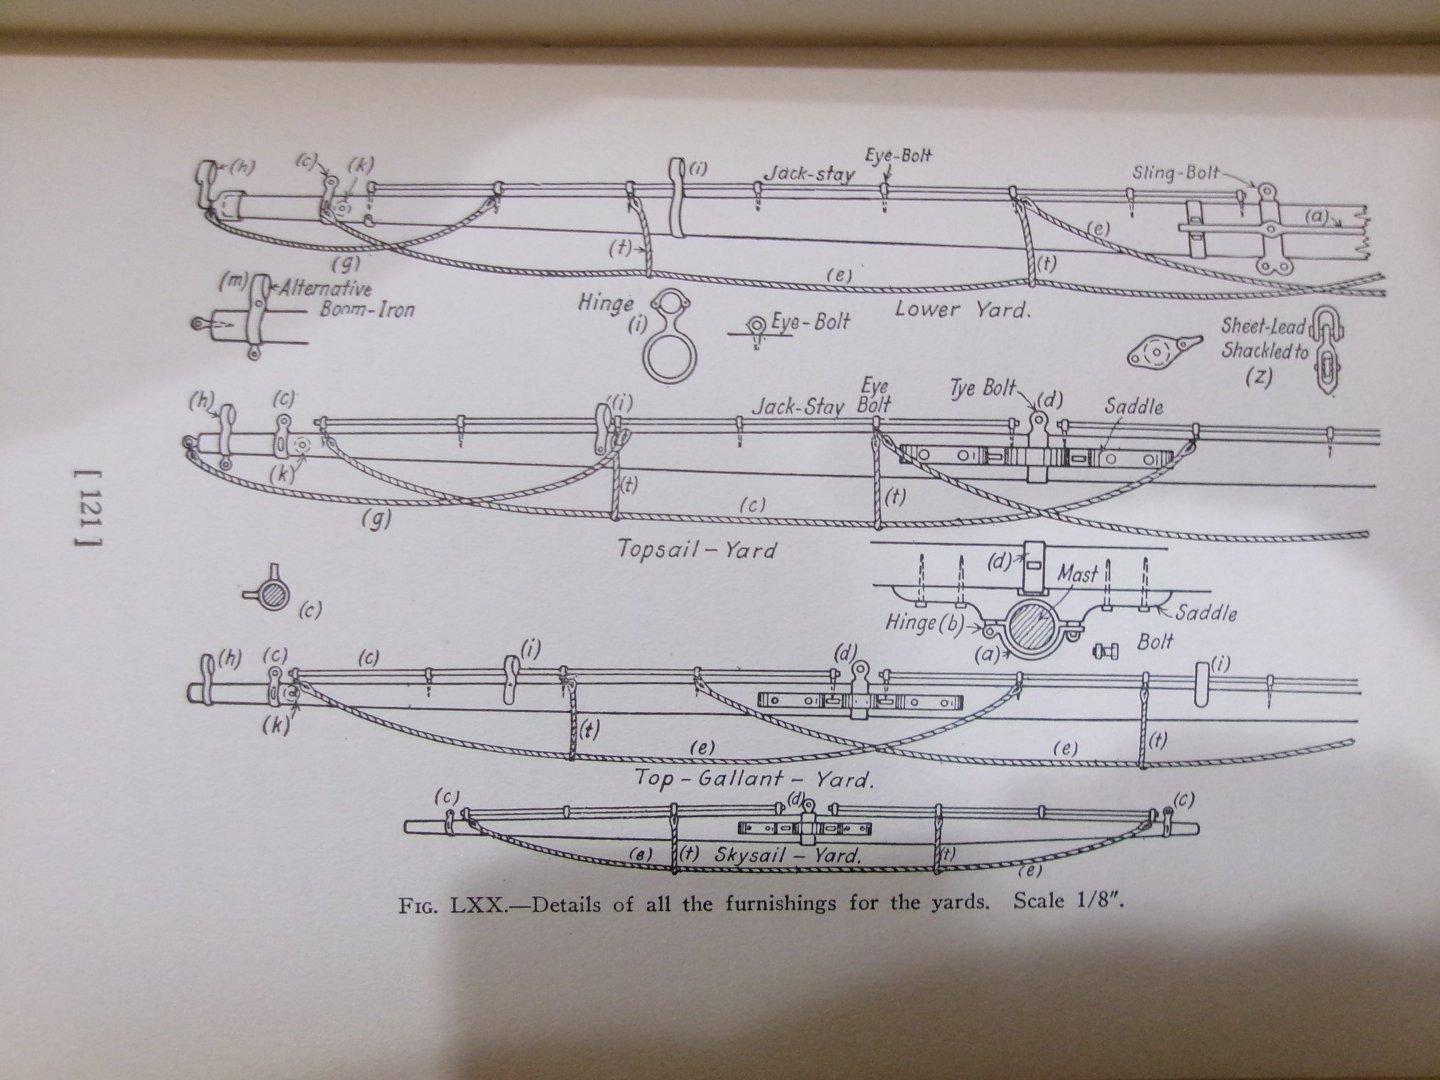
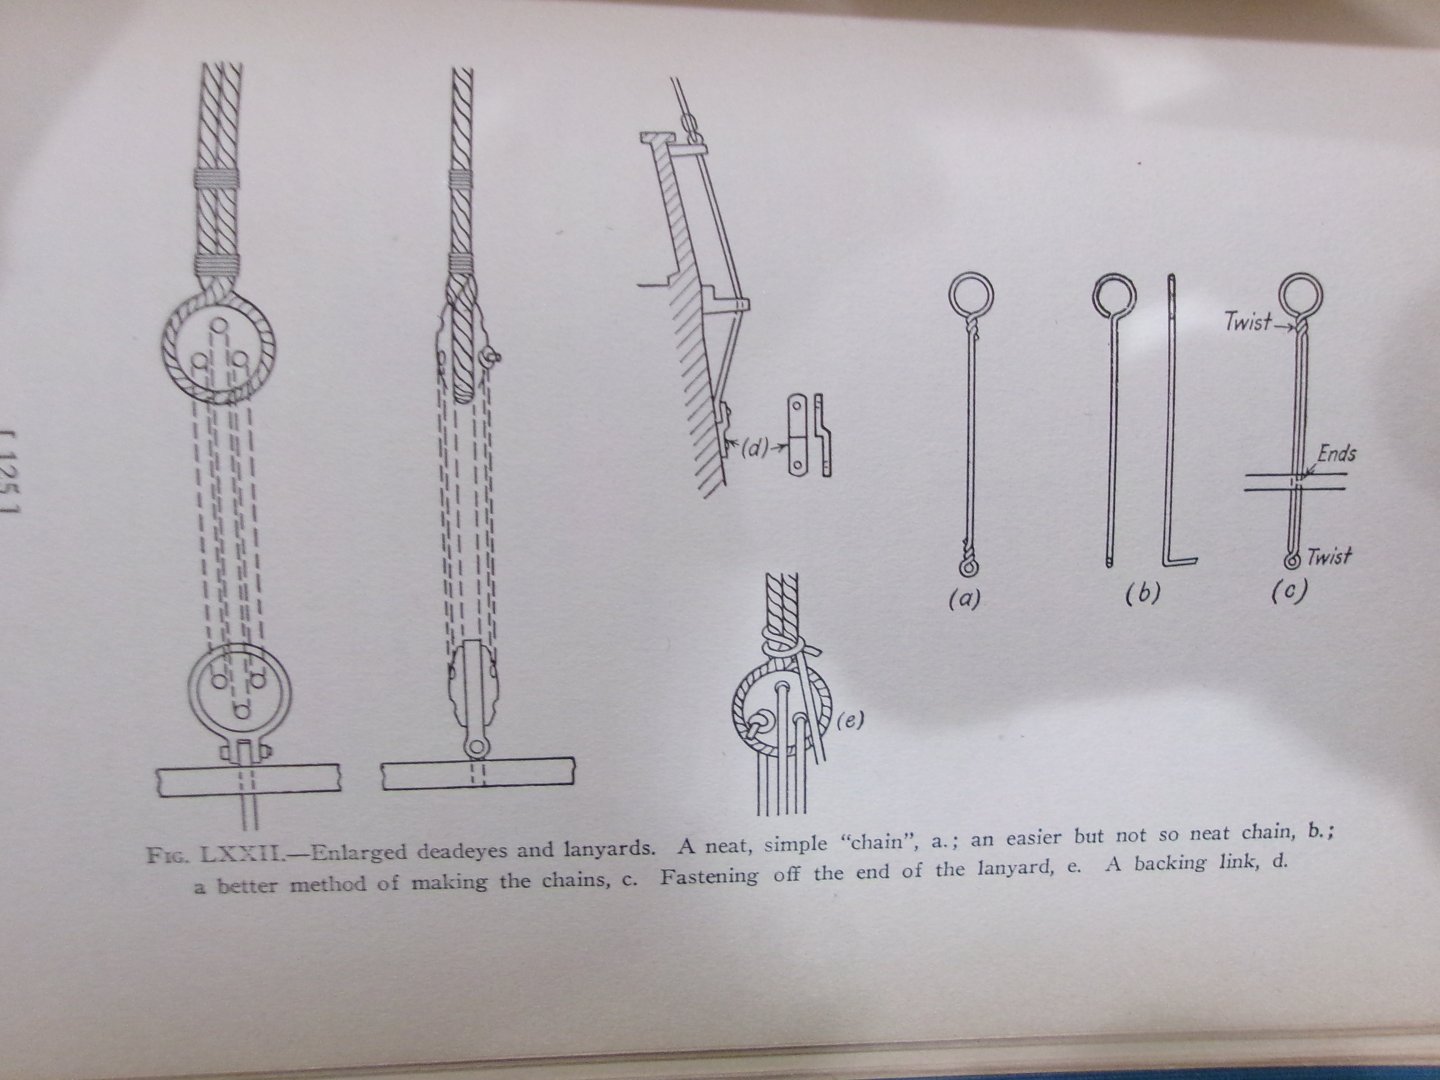
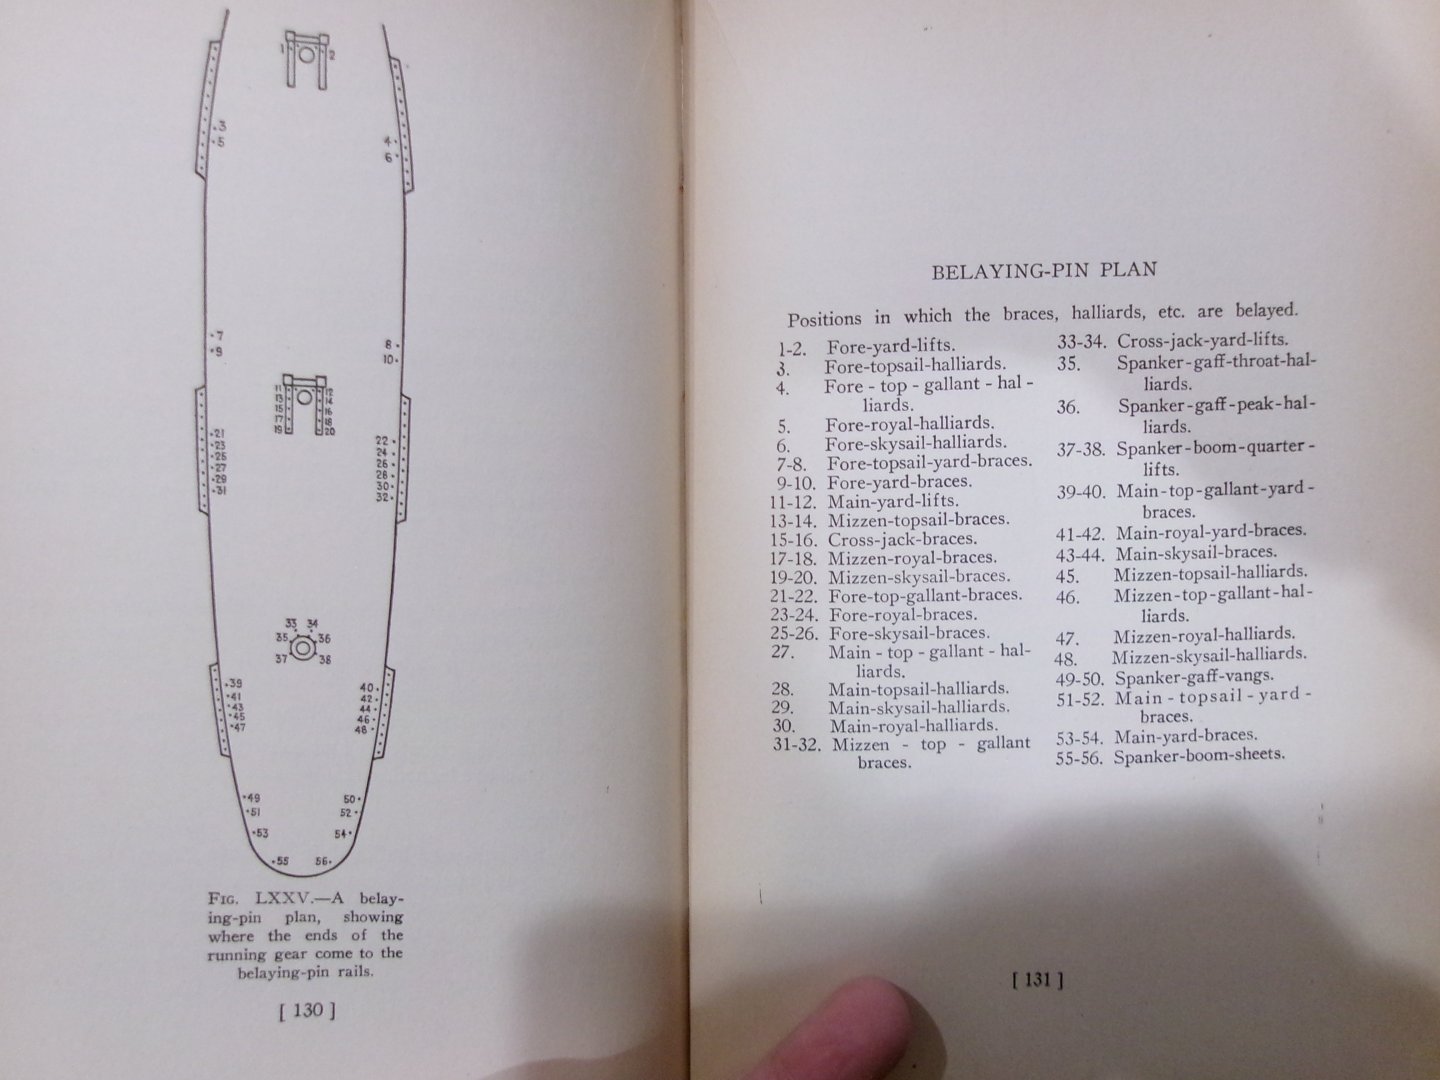
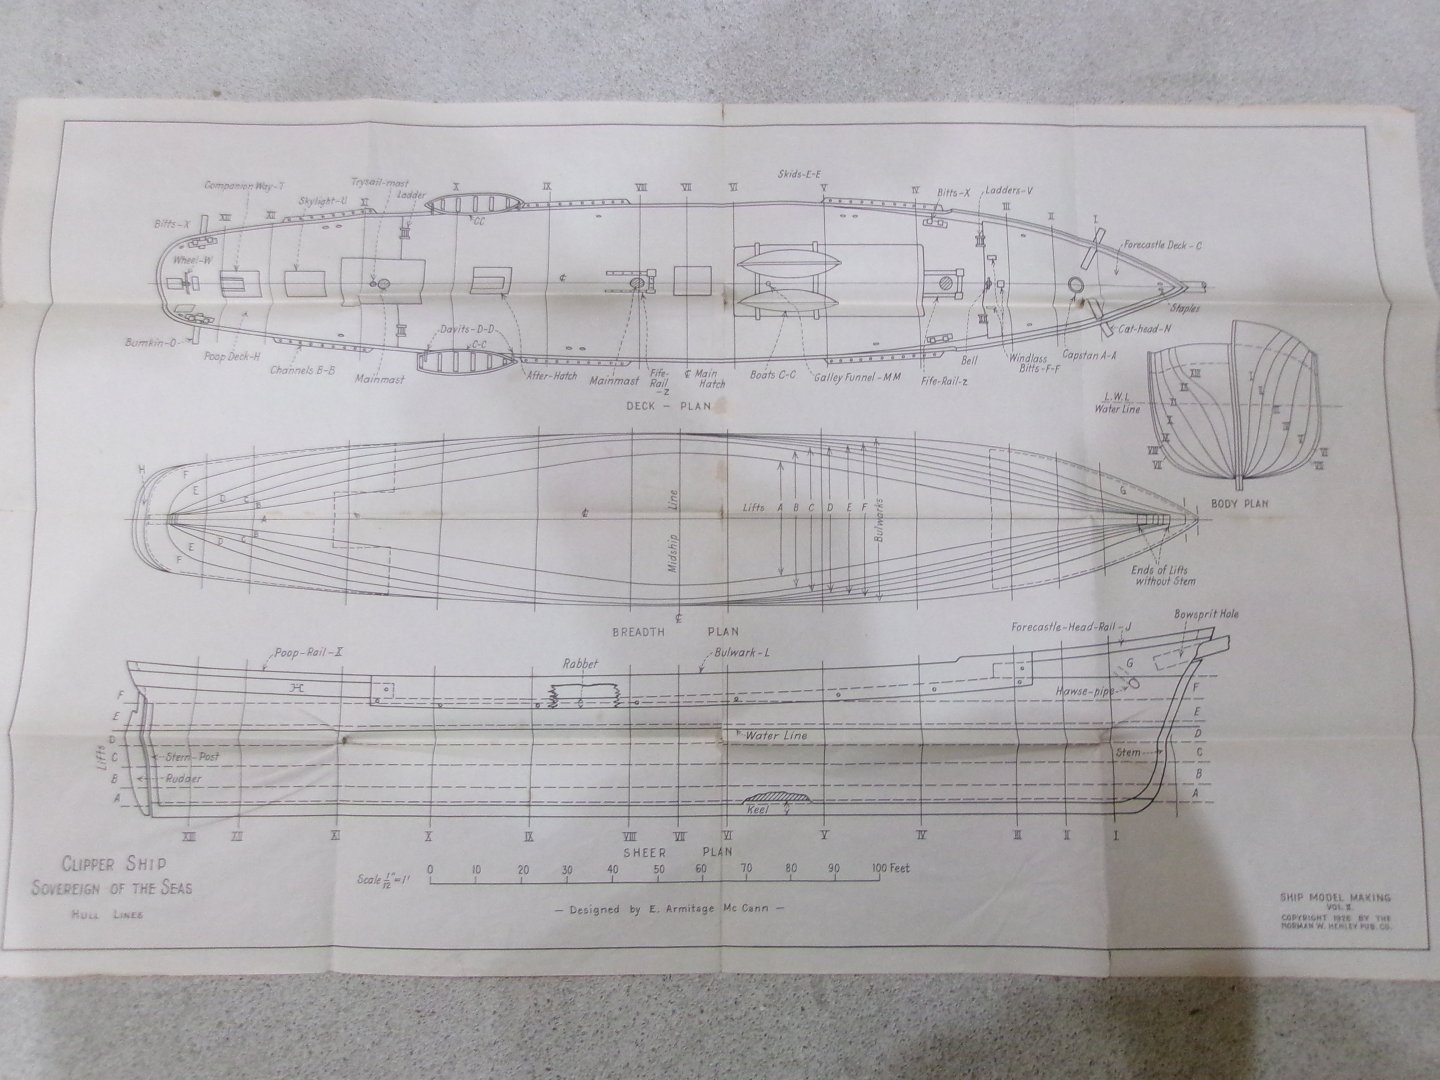
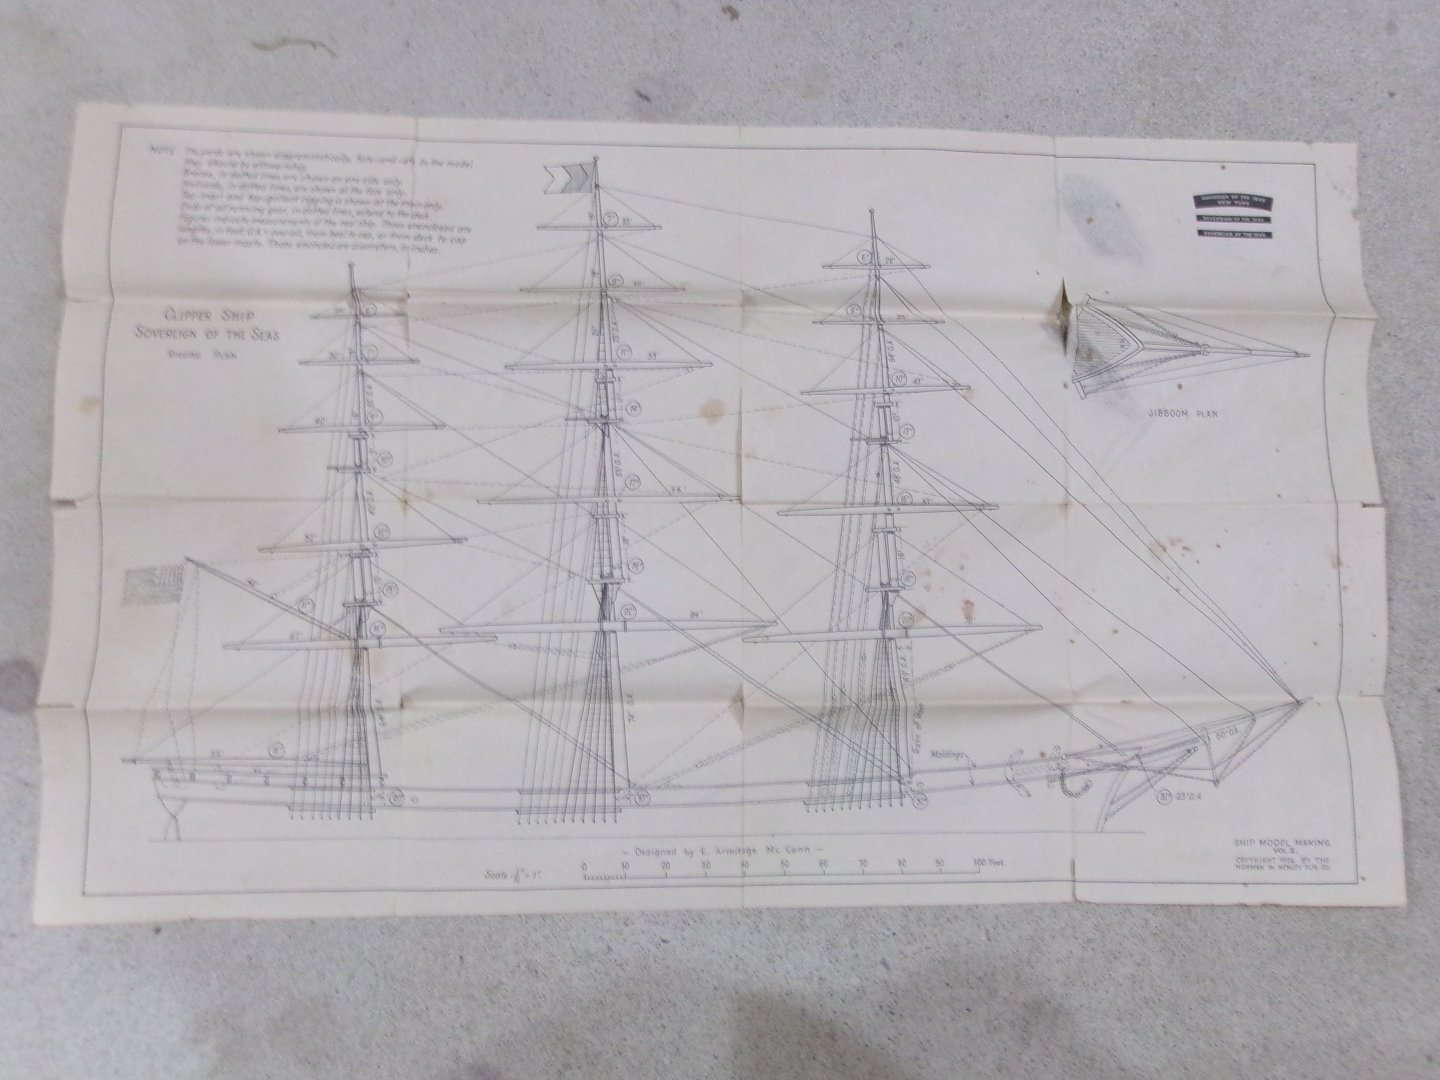
Good to start a new thread than to load up another log ... and I'm wondering if the title of the new one should be tweaked a little - rather than to search for the 'oldest' ship modeling book, maybe it could be a review of any pre-1950 'how-to' book (just a thought). Regardless, I just received an original 1926 copy of Ship Model Making (vol. 2 on the clipper Sovereign of the Seas) - a famous McKay ship) by E. Armitage McCann (through Abe Books on Amazon). I'm impressed at the amount of useful information in this book - not just for the 'scratch' builder it was intended for, but also for those getting into (or renewing) an interest in model shipbuilding today - with the advantages of the latest in ship kit technology. There a lot of 'nuts and bolts' talk about how to go about model ship making (for a clipper, at least, in this book - but transferrable as well) - including nautical terms and many illustrations/diagrams. A weakness may be a shortage of 'detailed' wood modeling techniques to actually craft many of the features illustrated ... but this was in 1926 when many 'handyman' skills were common (and expected) of boys and men. There are reasonable simplifications in the rigging, and a fairly clear layout (in comparison, the Cutty Sark rigging in the Airfix scale series of books can drive a modeler nuts, without a great deal of studying/interpretation and jumping around). There is a concise history of the subject ship herself, and a pair (checked in advance on my copy) of large folded plans in a pocket in the back hard cover ... very nice. Due to the date of printing, the paper is increasingly fragile due to the acid content of early 20th century publications - so care in handling is needed. There are Dover re-prints of this book (less the large plans ... 'not sure if they include reduced versions) ... but possibly subject to 'later' copyright of the Dover edition - an 'ah-ha' moment, as the 1926 book IS now in the public domain. Thus it can be copied by any means and used at will ! So I'll add just a few of the 1926 book illustrations as samples: I LOVE the 'layer cake' method of roughing a solid hull - its one I have done successfully myself not long ago on Thermopylae, although I found carving easier with more layers - and the thickness of the layers becomes thinner towards the keel area.


-
New To Model Ship Building
Snug Harbor Johnny replied to MaxnCookie's topic in New member Introductions
Greetings, mate ! You should have fun perusing all the great build logs on MSW.