HOLIDAY DONATION DRIVE - SUPPORT MSW - DO YOUR PART TO KEEP THIS GREAT FORUM GOING! (Only 20 donations so far - C'mon guys!)
×

.jpg.9708615112ed2d61af5236b908f9e60e.jpg)
Freezing Parrot
-
Posts
119 -
Joined
-
Last visited
Content Type
Profiles
Forums
Gallery
Events
Everything posted by Freezing Parrot
-
.thumb.jpg.51663d40cf48bd5949e06628da9d07ad.jpg) Thank you for your honest assessment and for not just saying, "Figure it out yourself." I'm glad to know that I was right to stop and make sure this is right instead of trying to force things, get frustrated, and quit. And I'm also glad to know that my understanding of determining the tapers, either with the planking fan or math, is correct. That narrows down the problem for me - measuring wrong, marking wrong, or barnacles. I'll erase my lines and repeat the process, watching more closely for those barnacles. 😁
Thank you for your honest assessment and for not just saying, "Figure it out yourself." I'm glad to know that I was right to stop and make sure this is right instead of trying to force things, get frustrated, and quit. And I'm also glad to know that my understanding of determining the tapers, either with the planking fan or math, is correct. That narrows down the problem for me - measuring wrong, marking wrong, or barnacles. I'll erase my lines and repeat the process, watching more closely for those barnacles. 😁 -
Thanks for being patient with me, Glenn. I followed all those steps, and my picture in post #49 shows the darker tick marks at six planks down. They stagger up and down in relation to each other, rather than flowing from one to the next. (You can see the rest of the tick marks along the edges of those planks) If I try to lay a plank to line up with the tick marks, it seems like it will hit some but not others along the untapered (top) edge of the plank. I'm sorry my explanations are making things more confusing. My "Mind Transfer Module" is still at the shop. Logical, coherent thoughts get all squirrely when they just go through my "Mouth Module".
-
That part I understand. My problem is the "divide into two bands" part. How do you determine where the dividing line goes? Do you just pick an arbitrary line about halfway down the longest bulkhead and then make it parallel to the keel/deck/waterline? Once I have the bands determined, then using the fan, making the tick marks, and tapering the planks is a breeze.
-
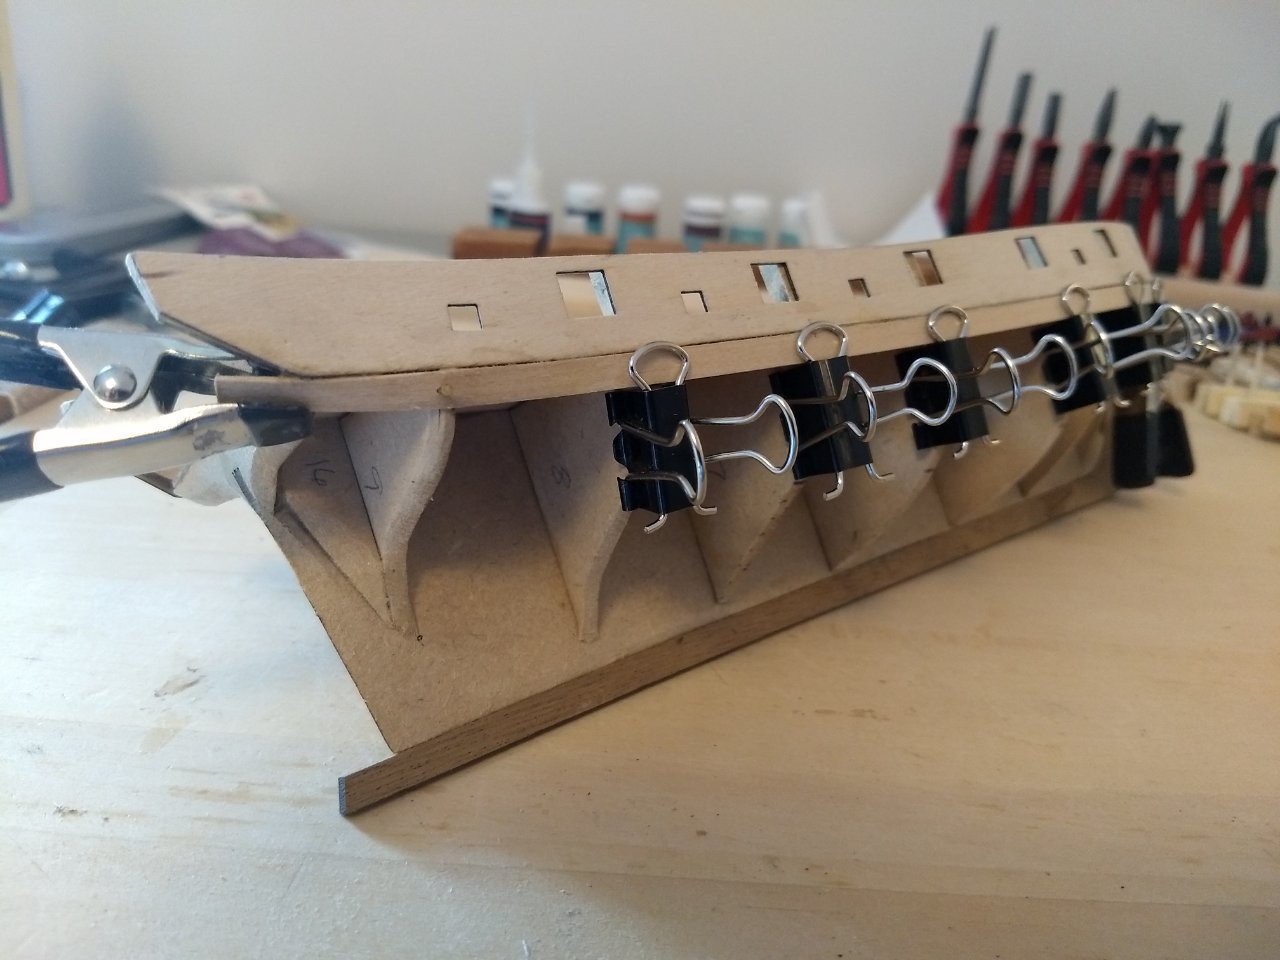
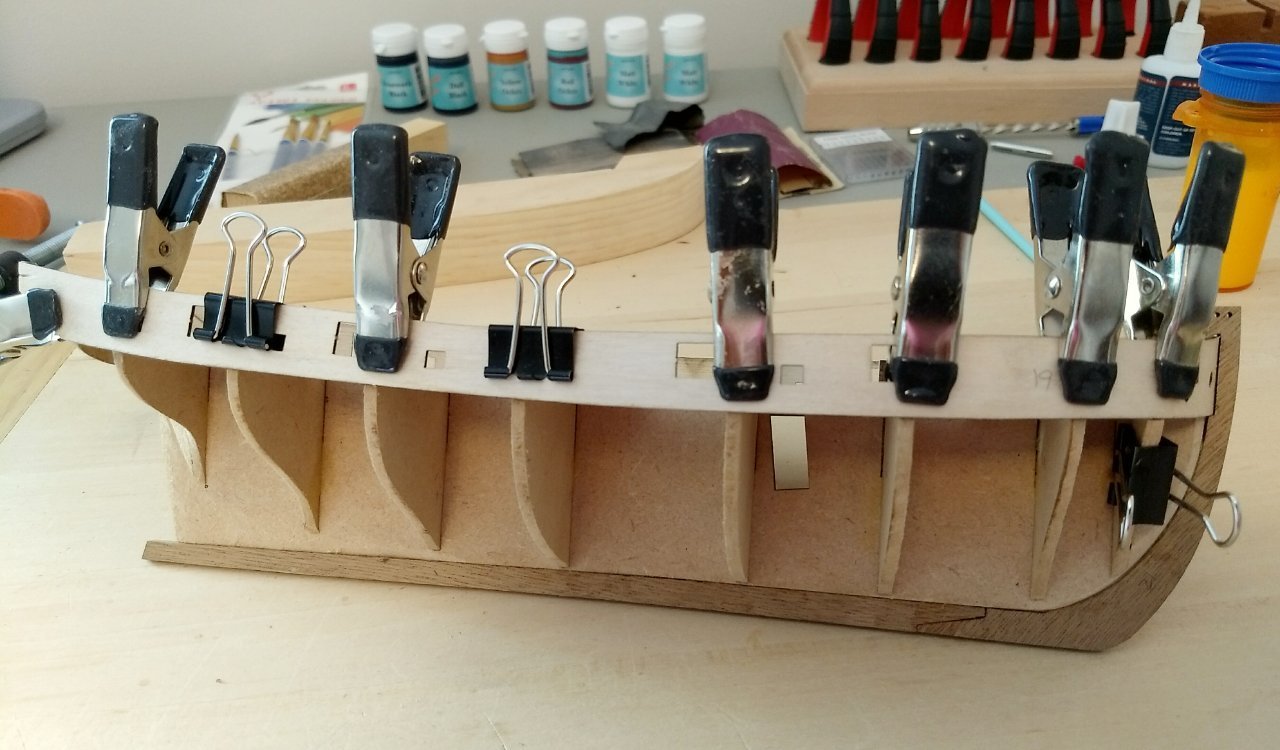
After rereading build logs, I decided to install a full width plank or two below the bulwark, and see if I could even out the lines. Part of the issue seems to be the dip that the bulwark takes in the middle. Others have pointed it out above the deck, but it also affects the hull planking. I sanded that area of the first plank to allow for that dip, at least partially. Using my new travel iron and Chuck Passaro's edge bending method, I bent the plank to fit well at the bow. It took a few tries to get it right, but I'll get better at it with practice. I then used my bulwark bending form to get the face of the plank to curve smoothly to the stem. I clamped the plank in place, then used my iron and a dab of water to get the twist at the stern onto bulwark 10. It seemed to work quite well, and the pic of the prebent plank is below. I decided to use Titebond for the first plank instead of CA, in case I have to redo it. The prebent plank sat in place nicely, and didn't require effort to get it tight to the bulwark and bulkheads. I edge glued it to the bottom edge of the bulkhead so they would stay aligned in between the bulkheads, even though it probably wasn't necessary. After the glue sets up, I'll redo the tick strips and see if lining off gets easier.

- 114 replies
-
- 2
-

-
- Lady Nelson
- amati
- (and 1 more)
-
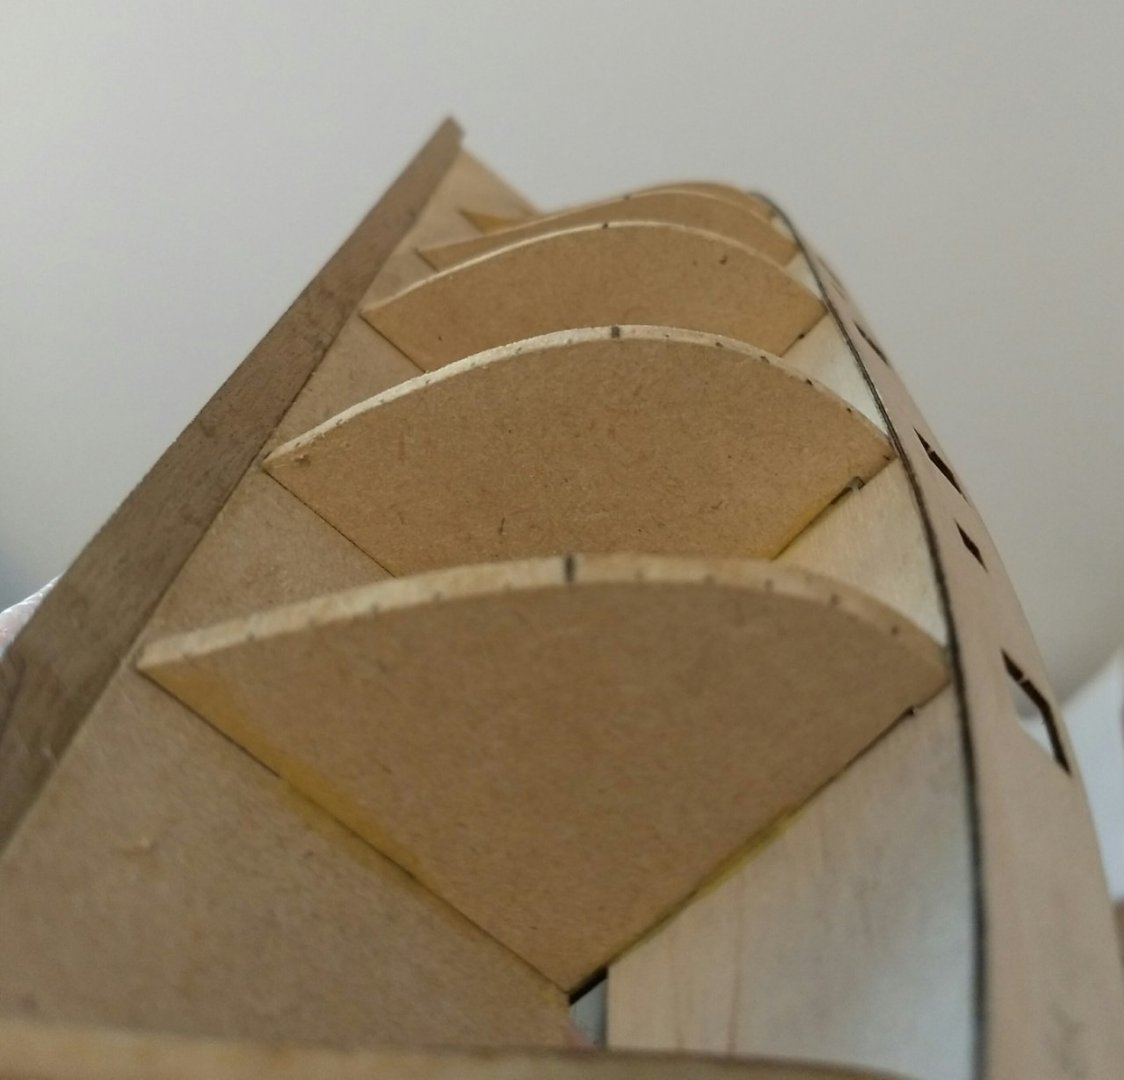
<insert puzzled look on my face> I am lining off my hull prior to first planking. I made tick strips for the center four bulkheads, using the planking fan I printed out. It works out to a total of 13 planks from bulwark to keel, so I figured 12 plus garboard plank. I marked a bolder line on the bulkheads 6 planks down, and was going to run thin tape or thread across them to project plank lines onto the fore and aft bulkheads. However, as you can see in the photo, the tick marks aren't anywhere near a smooth transition across all four. If I move any up or down to make a smooth transition, it will change the number of planks that bulkhead will require. I thought I had finally grasped the concept of running lines of tape or thread to divide the hull into sections for planking, but I must have missed something important. I'd appreciate advice. Meanwhile, I'll reread other LN build logs and see if I can figure out if and where I went wrong.
-
Very nice build! I appreciate your closeup shots of the details as you go along. Very helpful!
- 160 replies
-
- 1
-

-
- Alert
- vanguard models
- (and 1 more)
-
Your planking is looking very good already, Ron! At this rate you probably won't need a second planking, but having that ace up your sleeve is a good idea. It should reduce your stress level. 😊
- 18 replies
-
- 1
-
-
- constructo
- Albatros
- (and 1 more)
-
I plan to start planking this weekend. I learned a lot from building the Swift, but I want to focus more on enjoying each step rather than thinking in terms of getting to the end. Your patience is an inspiration. 😁
-
I bought that exact iron about an hour ago. 😁 I read about blackening the brass parts, but hadn't thought about using it on the cannons. I was just thinking about the shiny brass. I bet yours will come out better, since my paint job has likely obscured some detail. Good thinking to blacken everything at once.
-
That is a very impressive build!
-
That is a staggering level of craftsmanship! The slow pace may drive you crazy, but the planking looks amazing.
- 274 replies
-
- 1
-
-
- Cheerful
- Syren Ship Model Company
- (and 1 more)
-
Sehr gut!
-
Hmmm, I hope the Admiral doesn't need to hang laundry out tomorrow.
- 114 replies
-
- 2
-
-

-
- Lady Nelson
- amati
- (and 1 more)
-
Okay Glenn and John, you've made a believer of me. I do like how the carriages are turning out painted red. This is the Red Ochre from the Admiralty paint set from Caldercraft. I ended up getting the set for the brig Supply, since the one for the LN was sold out. The only difference is that I have an extra white jar. I second coated the cannons, and will still have to touch up the ends that are currently in the clothespin clamps. I have the carriages skewered on wooden toothpicks, and may have to touch up where the toothpicks block the paintbrush. How have other people painted their cannons? Any ingenious holding methods i should remember for next time? Tomorrow I plan on getting a travel iron and setting up my plank bending station based on Chuck's method. So this weekend should see some planking done. Or attempted, at least. 🙂
- 114 replies
-
- 4
-
-
- Lady Nelson
- amati
- (and 1 more)
-
Glenn, after looking at your Cheerful build (a thing of beauty), I see how nice they can look painted red. Thanks for the advice, I appreciate your suggestions. John, seeing yours in that thread helped me get a better mental image, thanks. I'm glad I read that whole thread, since now I'm forewarned. It's a bit annoying that the supplied cannons aren't the right ones, but since everyone's in the same boat situation (no bad puns today), I guess I'll roll with it. I am going to work with the ones I have, and tinker with them to get them lined up better.
- 114 replies
-
- 1
-
-
- Lady Nelson
- amati
- (and 1 more)
-
I’ll check that out, John, thanks.
-
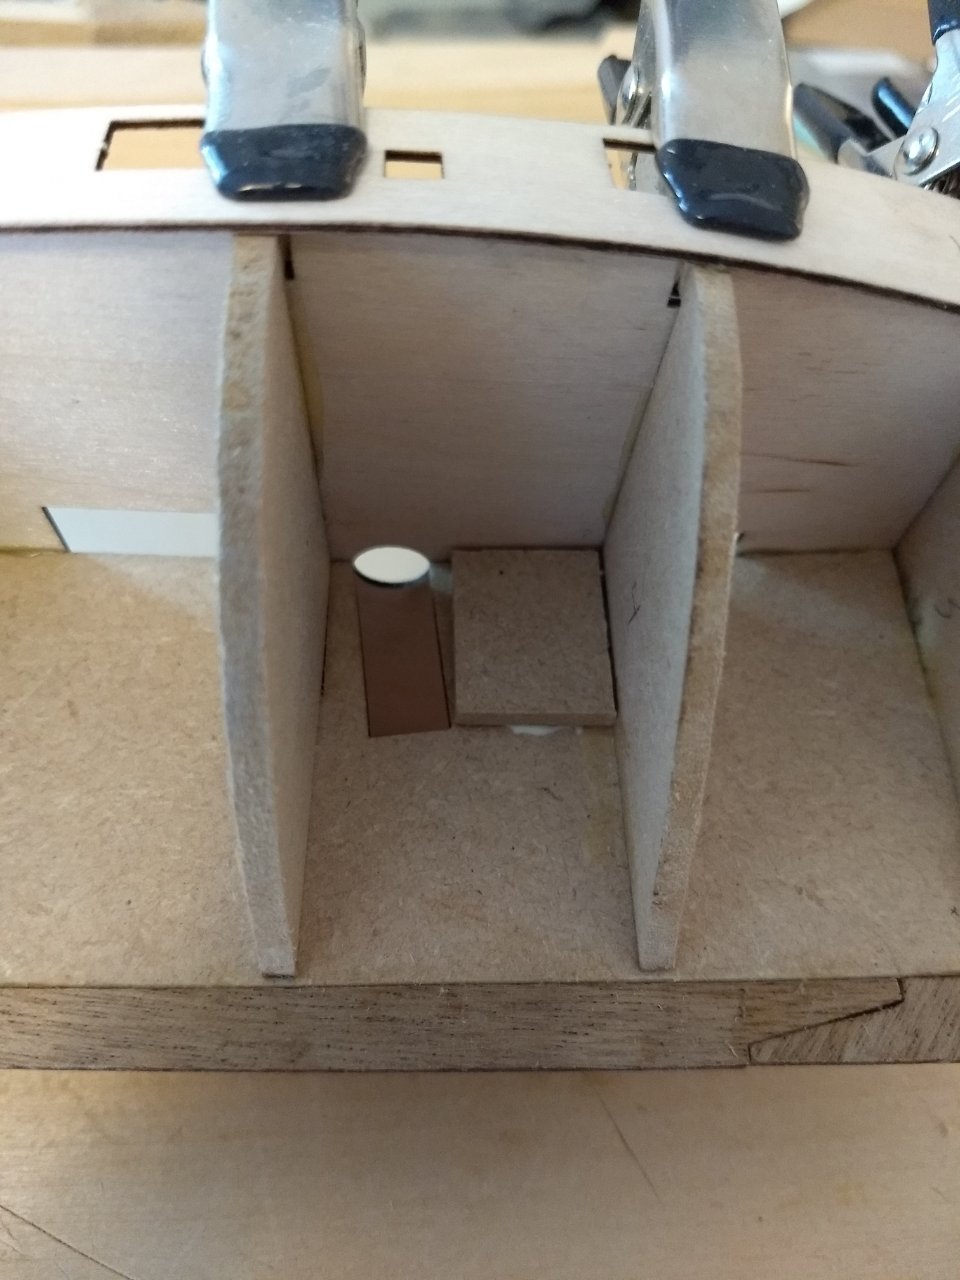
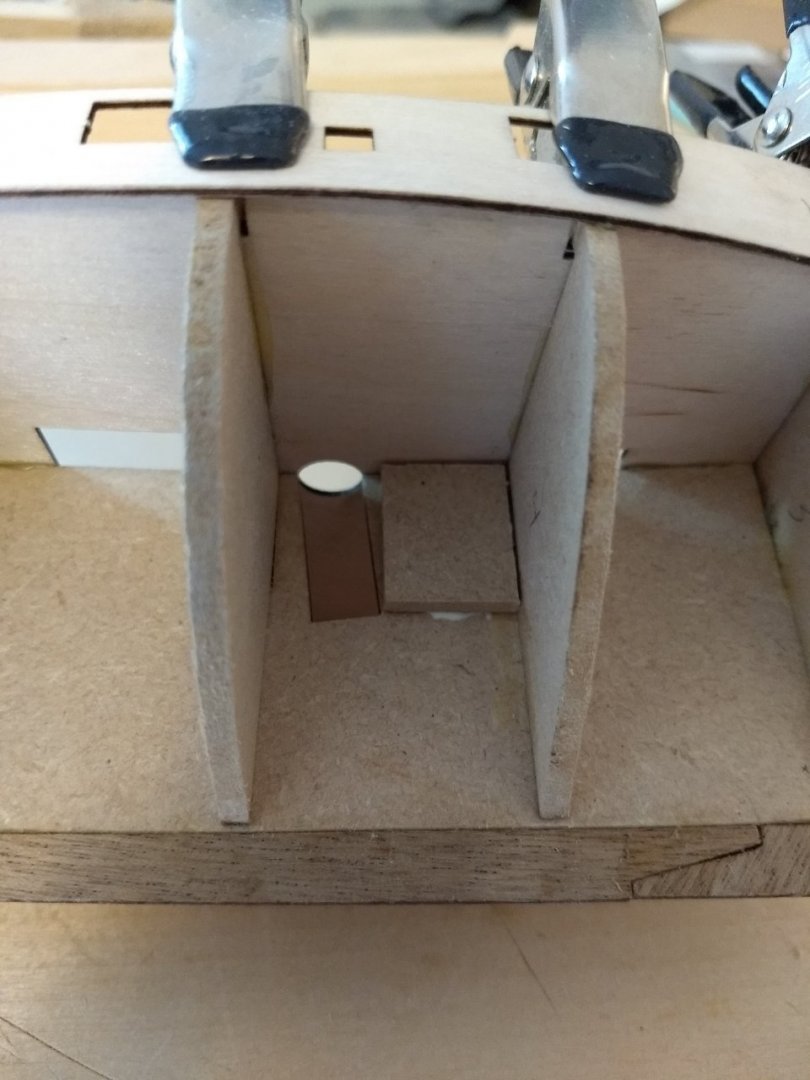
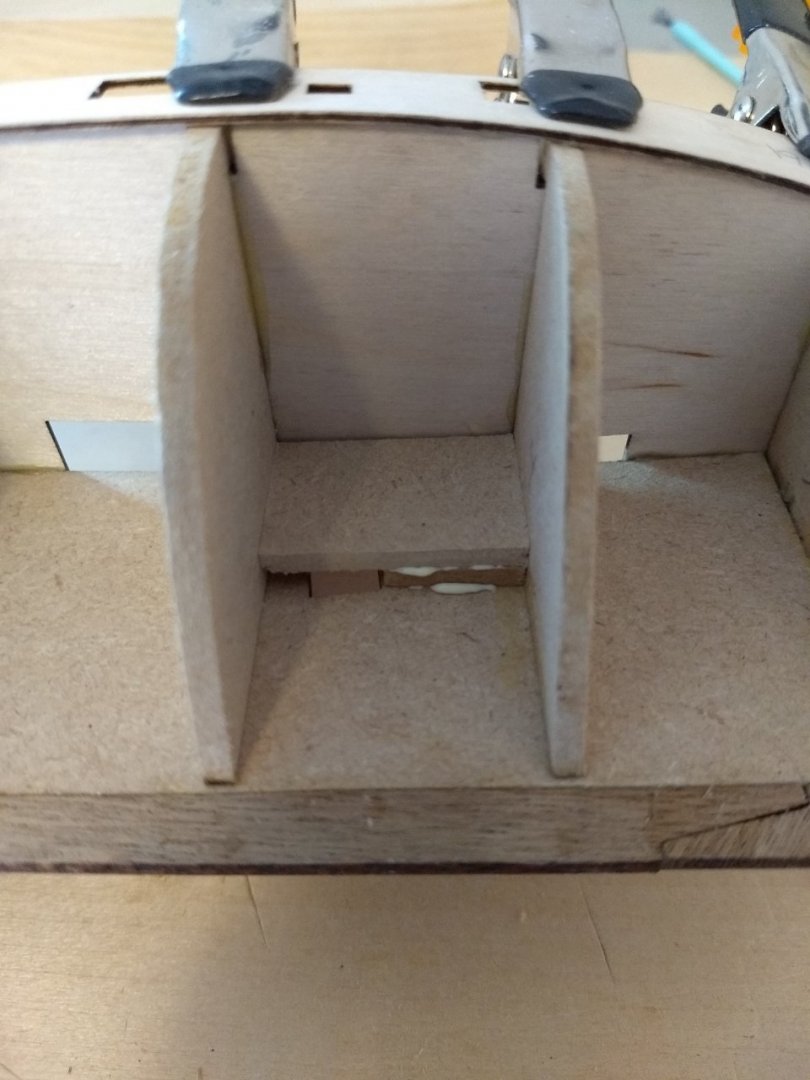
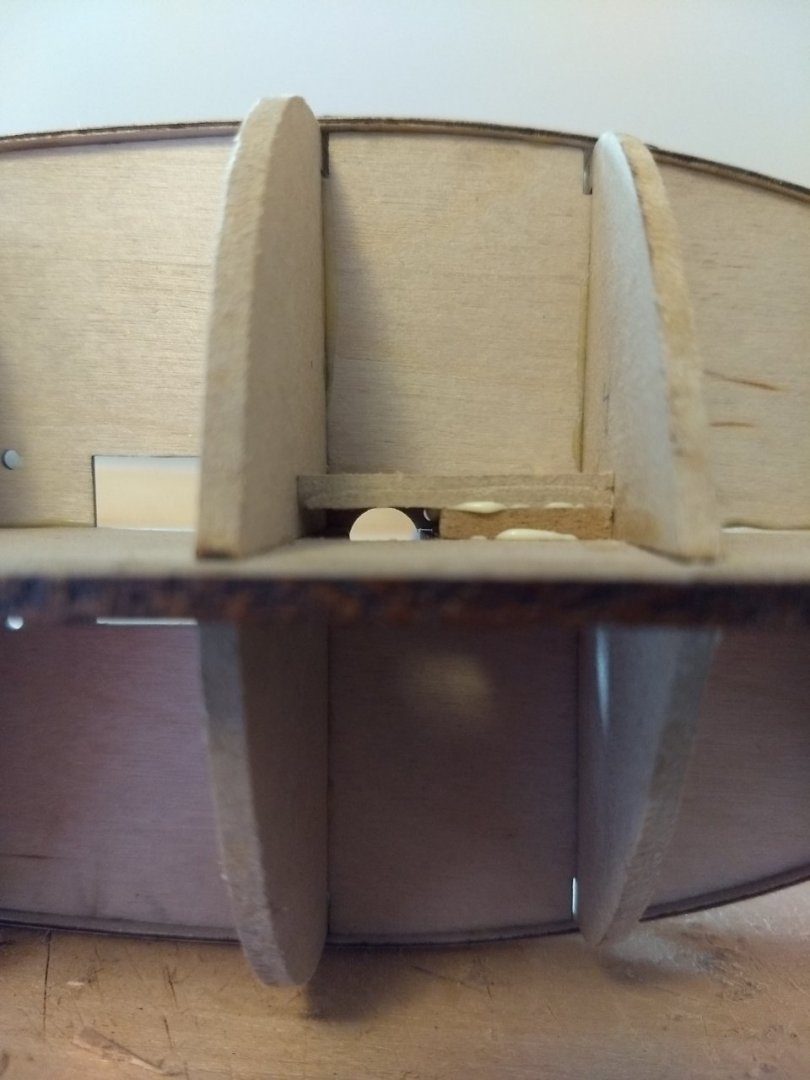
Here's my idea for giving the mast socket support on the sides. I cut pieces from the MDF sheet the hull structure came from, glued a small piece to the false keel beside the mast socket, then glued a bigger piece over it, going from bulkhead to bulkhead. It ends up aligning with the edge of the mast hole in the false deck. Did the same on the other side, and in theory I have mast support. Time will tell if it a) works, or b) was even necessary at all.
- 114 replies
-
- 2
-
-
- Lady Nelson
- amati
- (and 1 more)
-
Welcome to the harbor, Mike!
-
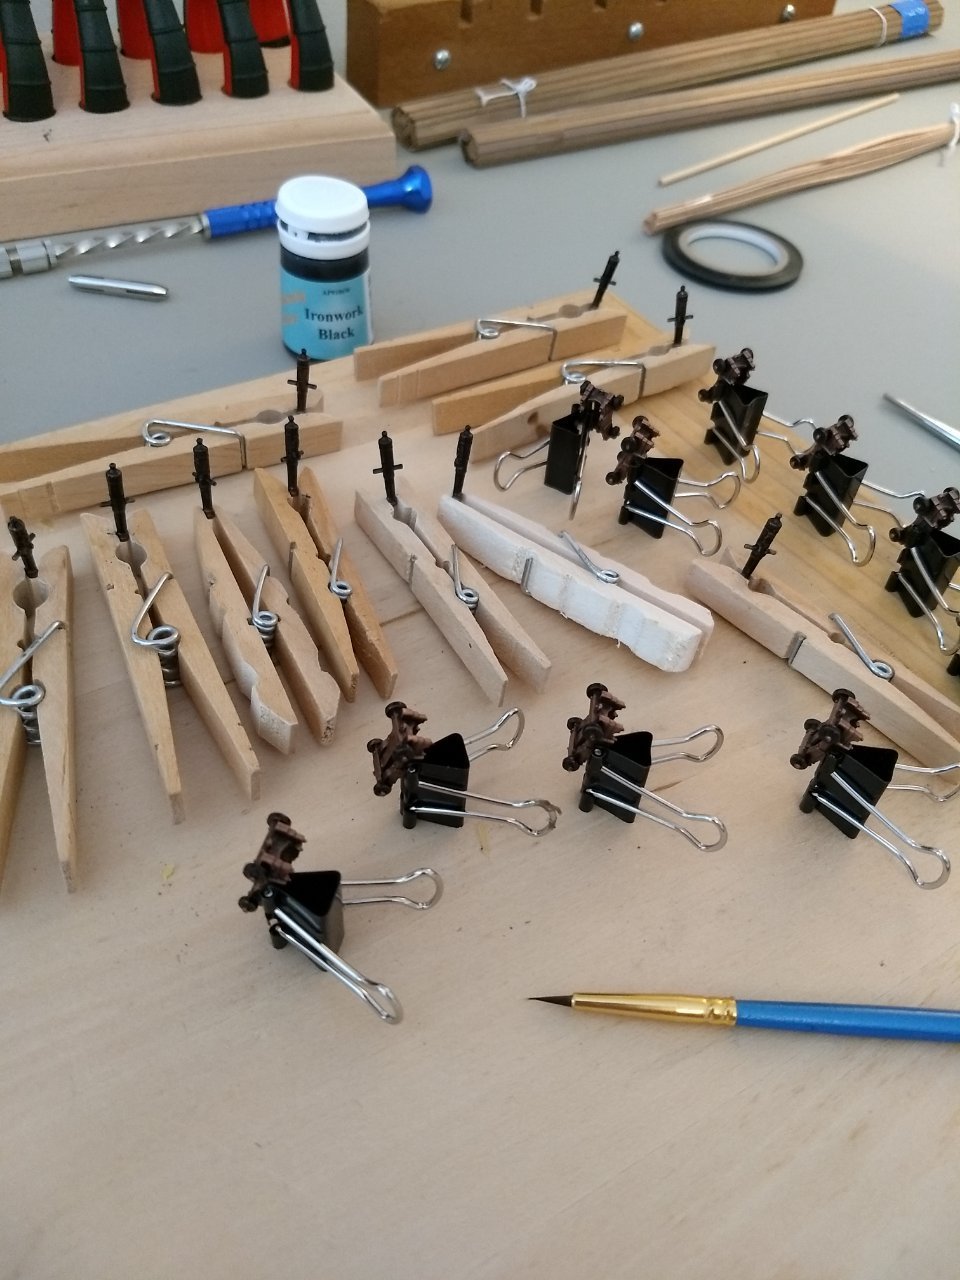
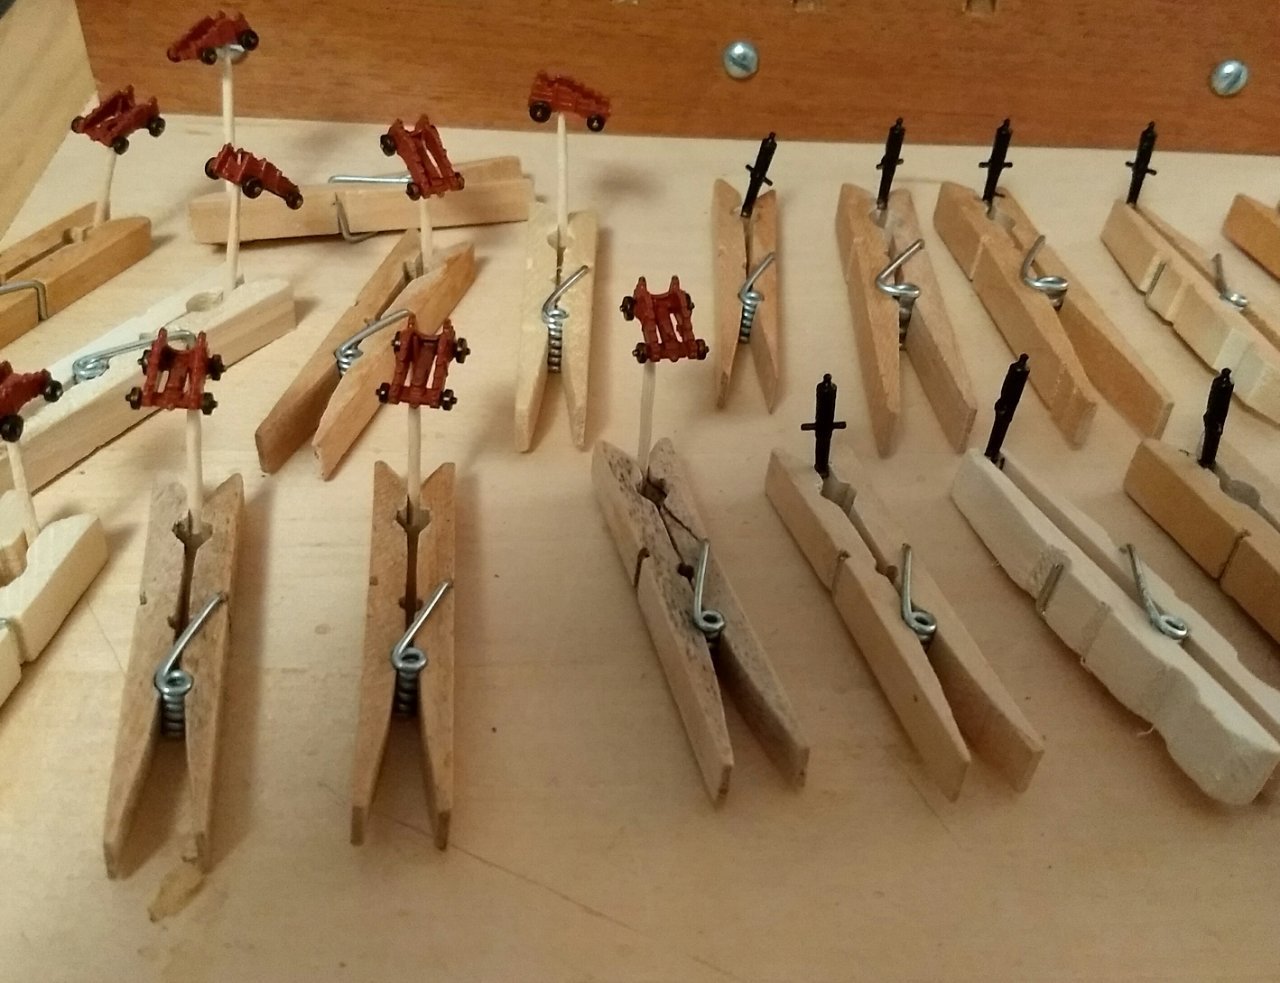
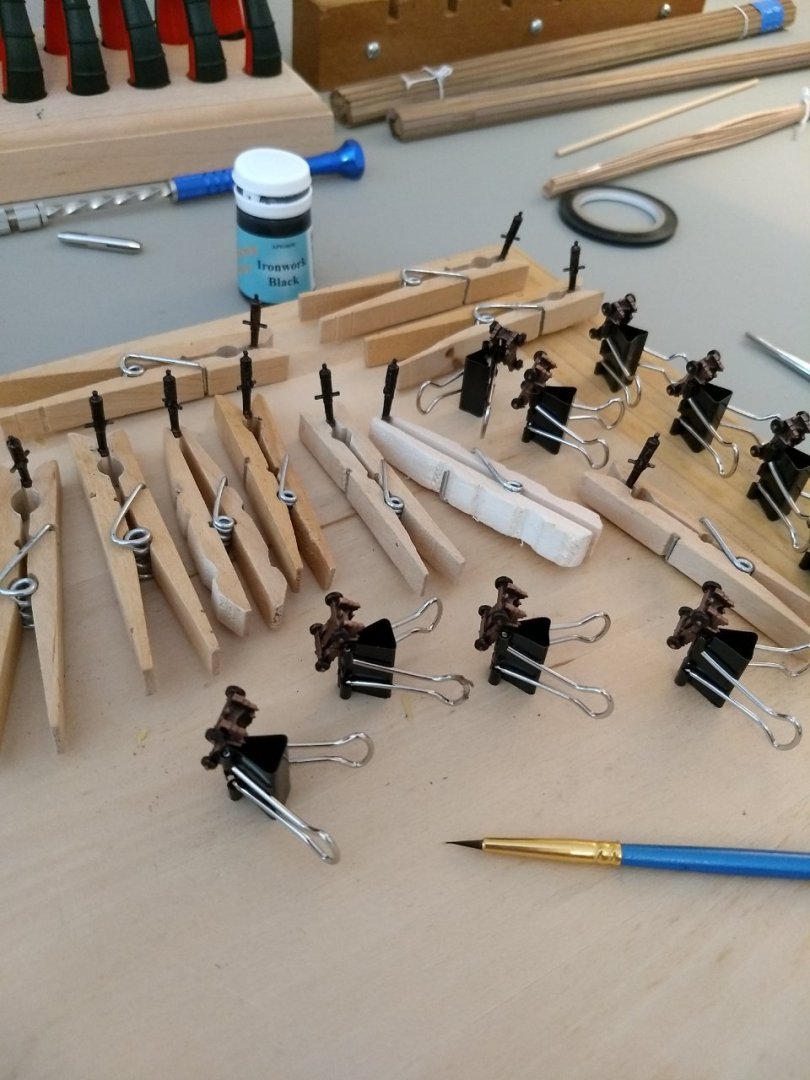
Since I had some time while glue was drying, I decided to paint the cannons. I think the instructions call for the carriages to be red, but I picture them more brown, so for now I just painted the wheels black. The metal they're made from is sort of a coppery brown anyway, so I'll see how it looks when the barrels are mated with the carriages. After a lot of head scratching as to how to hold those tiny pieces for painting, I came up with a workable solution. The carriages were clamped in binder clips, and I gripped the very end of the cannon barrels with clothespins. Once the barrels are in the carriages, those unpainted ends will be easily accessible for touchup. That's the theory at least.
- 114 replies
-
- 3
-
-
- Lady Nelson
- amati
- (and 1 more)
-
Thanks, John. I had missed Glenn's idea of the pin when I read his log. I think my eyes had glazed over when I saw all the rigging. I think I will add some sort of blocking down there anyway. I can see myself pulling too hard on shroud lines when threading the deadeyes later. I haven't found a good local source of chunks of balsa, so I'll probably knock something together from the scraps of the laser cut sheets. Glenn and Kirby, sorry for not remembering those ideas from your build logs. I should start a notebook of all the good ideas here, since my memory apparently isn't what it was.
-
I like the look of that new kit already!
-
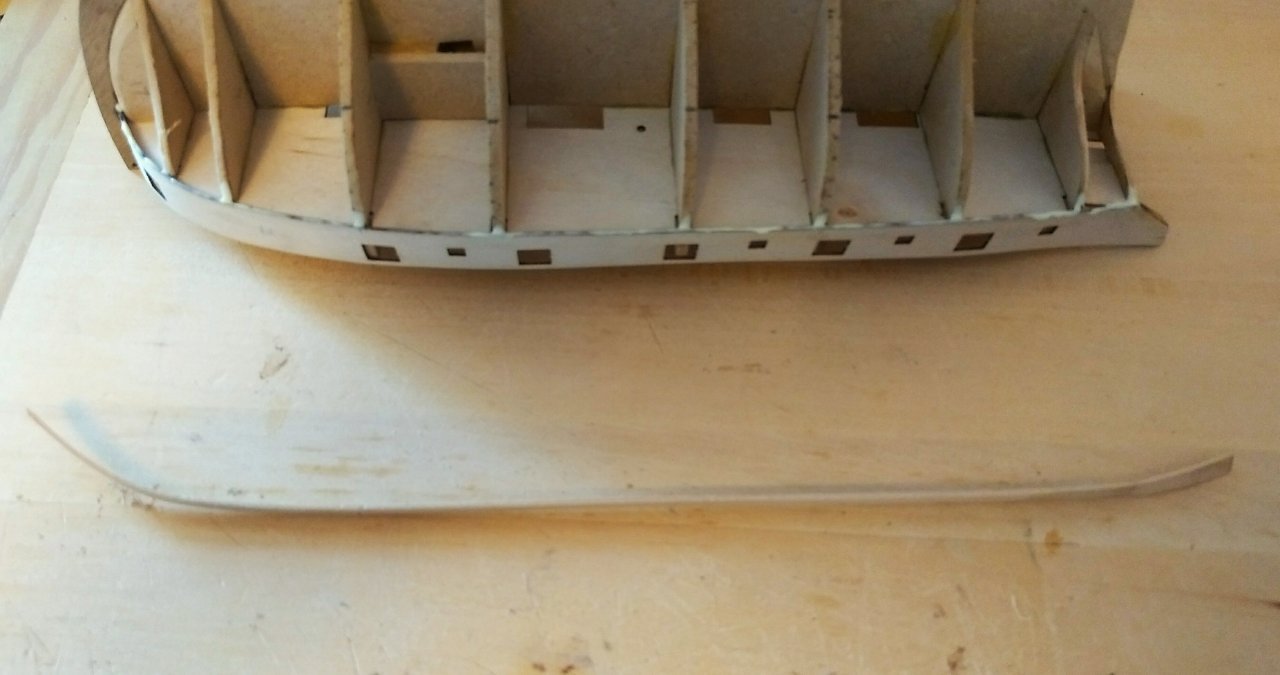
Last night I glued a small scrap of the MDF sheet onto the edge of port bulkhead 1, and today I cut and sanded it to make a smooth transition to the bulwark, allowing for the thickness of the first planking. It ended up being much easier than I thought, and I'm very glad I fixed it before moving on. Moving on to the starboard bulwark, it dry fit perfectly as well. Spending the time to make a bending form the shape of the deck was well worth it. Because I didn't have to force the bulwark into place, I was able to just apply glue to the edge of the deck, and didn't need any on the bulkhead stubs that will have to be removed later. I have the same problem with bulkhead one on this side, too, so I cut a sliver of MDF and glued it on, again using Titebond. The lesson I've learned is to visualize several steps ahead, to think about how later parts will meet up with or affect the piece I'm currently working on. While I have access to belowdecks, I'm thinking about reinforcing the mast socket. As it is now, there's no support port-to-starboard. Should I put some sort of blocking in now to provide that support, or will it be fine without?

- 114 replies
-
- 1
-
-
- Lady Nelson
- amati
- (and 1 more)
-
Thank you for the suggestions! Now I see what I was missing when I built the Swift without making a build log. Even though I read as many other build logs as I could find, I missed out on the encouragement and advice that would have made a big difference.
- 114 replies
-
- 2
-
-
- Lady Nelson
- amati
- (and 1 more)
-
But if you squint with your left eye and tilt your head to the right... perfect!
- 44 replies
-
- 1
-
-
- first build
- Artesian Latina
- (and 1 more)