
HOLIDAY DONATION DRIVE - SUPPORT MSW - DO YOUR PART TO KEEP THIS GREAT FORUM GOING! (Only 13 donations so far - C'mon guys!)
×


Dan Vadas
-
Posts
3,261 -
Joined
-
Last visited
Content Type
Profiles
Forums
Gallery
Events
Everything posted by Dan Vadas
-
Thanks for the suggestion John, but it's really not a problem. They are all CA'd in already and are quite easy to straighten out again. I've bent virtually every railing I've fitted to three ships and they've all finished up OK . EDIT - ah, you mean the piece I accidentally cut off. I might try your idea. Danny
-
I've nearly completed the Bridge Deck. This time I cut out the windows and "glazed" them with thin acrylic : The railings were a bit tricky . You may notice one has been cut a bit short (slip of the cutters ). It's more work to fix than it's worth, as it'll pretty well disappear when the mast etc goes on. Paint touch-ups will be done later : Danny
.thumb.JPG.1cda72c9536e7cb6069da21f58ef5b75.JPG)
.thumb.JPG.0eca50503db732a1178c39681d1f7ff6.JPG)
.thumb.JPG.bc945f080ab7244fd58e32ab2e33d0c5.JPG)
.thumb.JPG.c4e67e00a6f6c024bce943651e22bdfc.JPG)
.thumb.JPG.8636c1e573a214546643bdb3fbaa1c5b.JPG)
- 524 replies
-
- 10
-

-
I think I know where he is, on a Czech site . Probably easier in his native language, plus there are a lot of Czech paper modellers. If you open the link with Google Chrome you can get it translated into English. Danny
-
I've seen Martanek's Fuso, and he's also building (built?) Bismarck, Yamato, Scharnhorst, Tirpitz and Hood simultaneously. That guy's from another planet - unbelievable detail . He hasn't posted any updates on his build log in Papermodellers for quite a while now, I wonder why? Danny
-
Not true Carl, I've bent and straightened some of them at least 6 or 7 times without any sign of them snapping - YET. However, I don't want to push my luck any more than I have to . It might depend on the brand of PE, yours may be a bit more brittle. It's going to get a LOT busier yet Nils . Danny
-
Thanks for all the very kind comments guys, and also for all the "Likes". Much appreciated . If you notice any bent (or totally squashed ) railings - please ignore them. They bend at the slightest accidental touch, but are very easy to straighten out again. I'll be doing that at the end of the build, as I don't want to overstress them too much in case they break. I'll also touch them up at the same time. Danny
-
There wouldn't have been any gloss paint on the real ship, matt would be better but semi-gloss will have to do. Danny
-
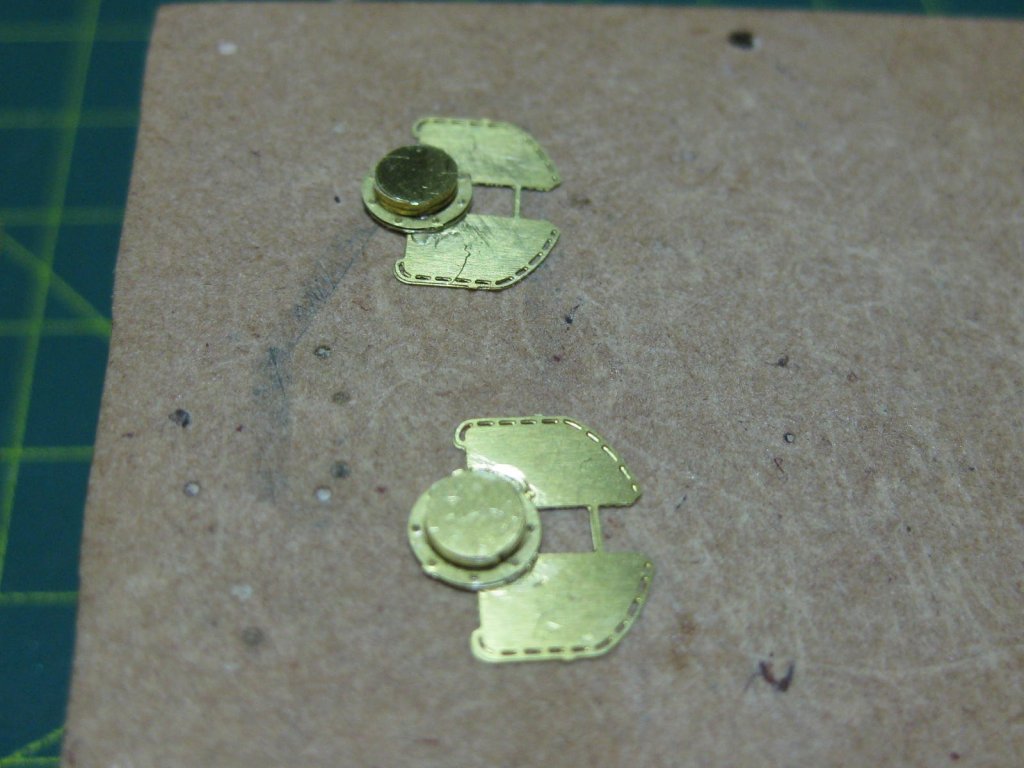
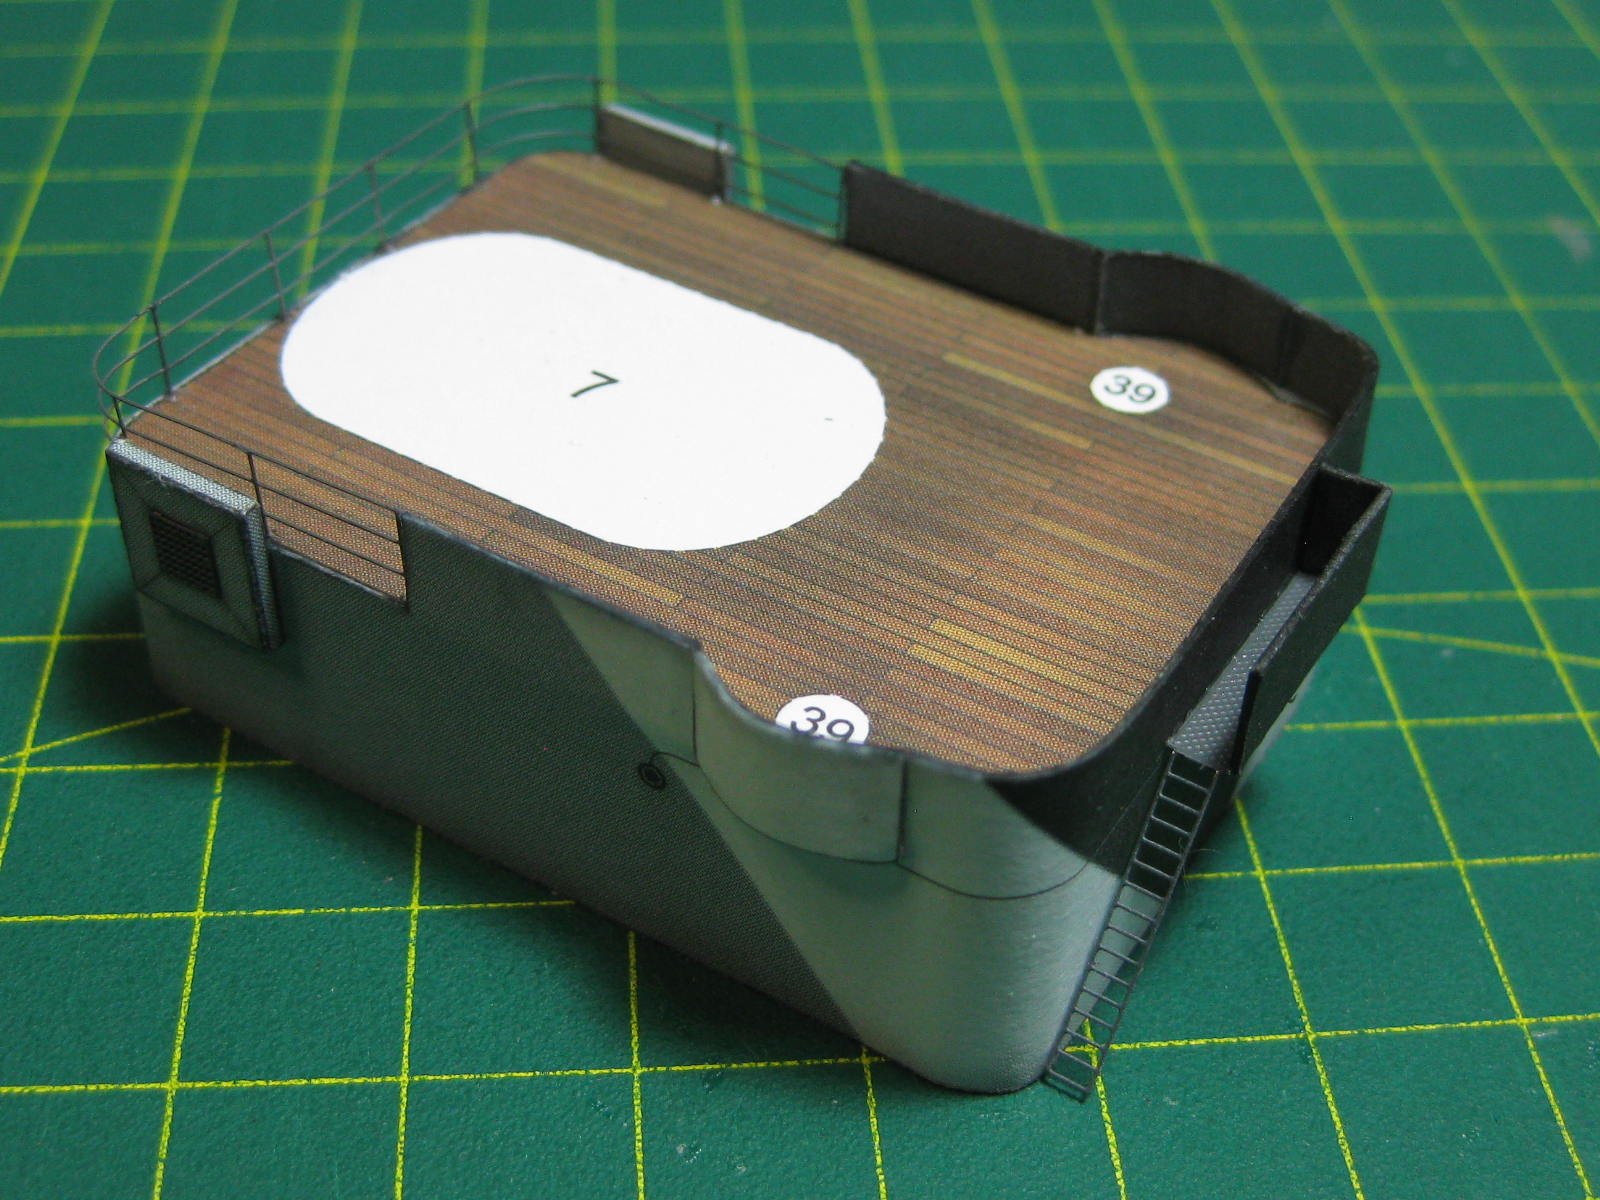
Thanks Carl, I'm starting to get the hang of working with PE . Speaking of PE, I've made the Main Battery Gun Control one. It's only two parts, but no instructions whatsoever of it's construction are in either the kit or the PE sheet. Luckily I have the 3D Bismarck book to fall back on. The PE is a reasonable facsimile : Painted and fitted. I've finished this sub-assembly as well : An overview of the forward superstructure up to this point : Danny
.thumb.JPG.95d957720e77583f91a657b79e6e051d.JPG)
.thumb.JPG.c7cfd4003a71dd8d8c07f27db770da0e.JPG)
.thumb.JPG.5ff16d2dfd81607ee51eb6f1c2f49570.JPG)
.thumb.JPG.73007db7201e125e54d90b15c65a3995.JPG)
- 524 replies
-
- 20
-
-
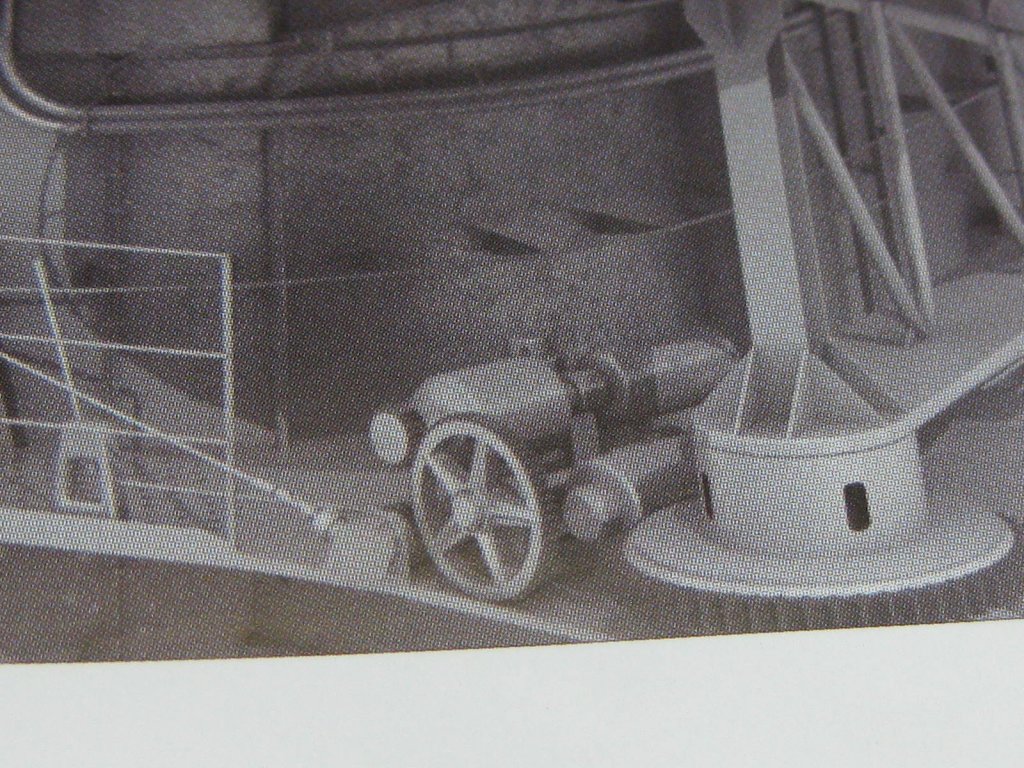
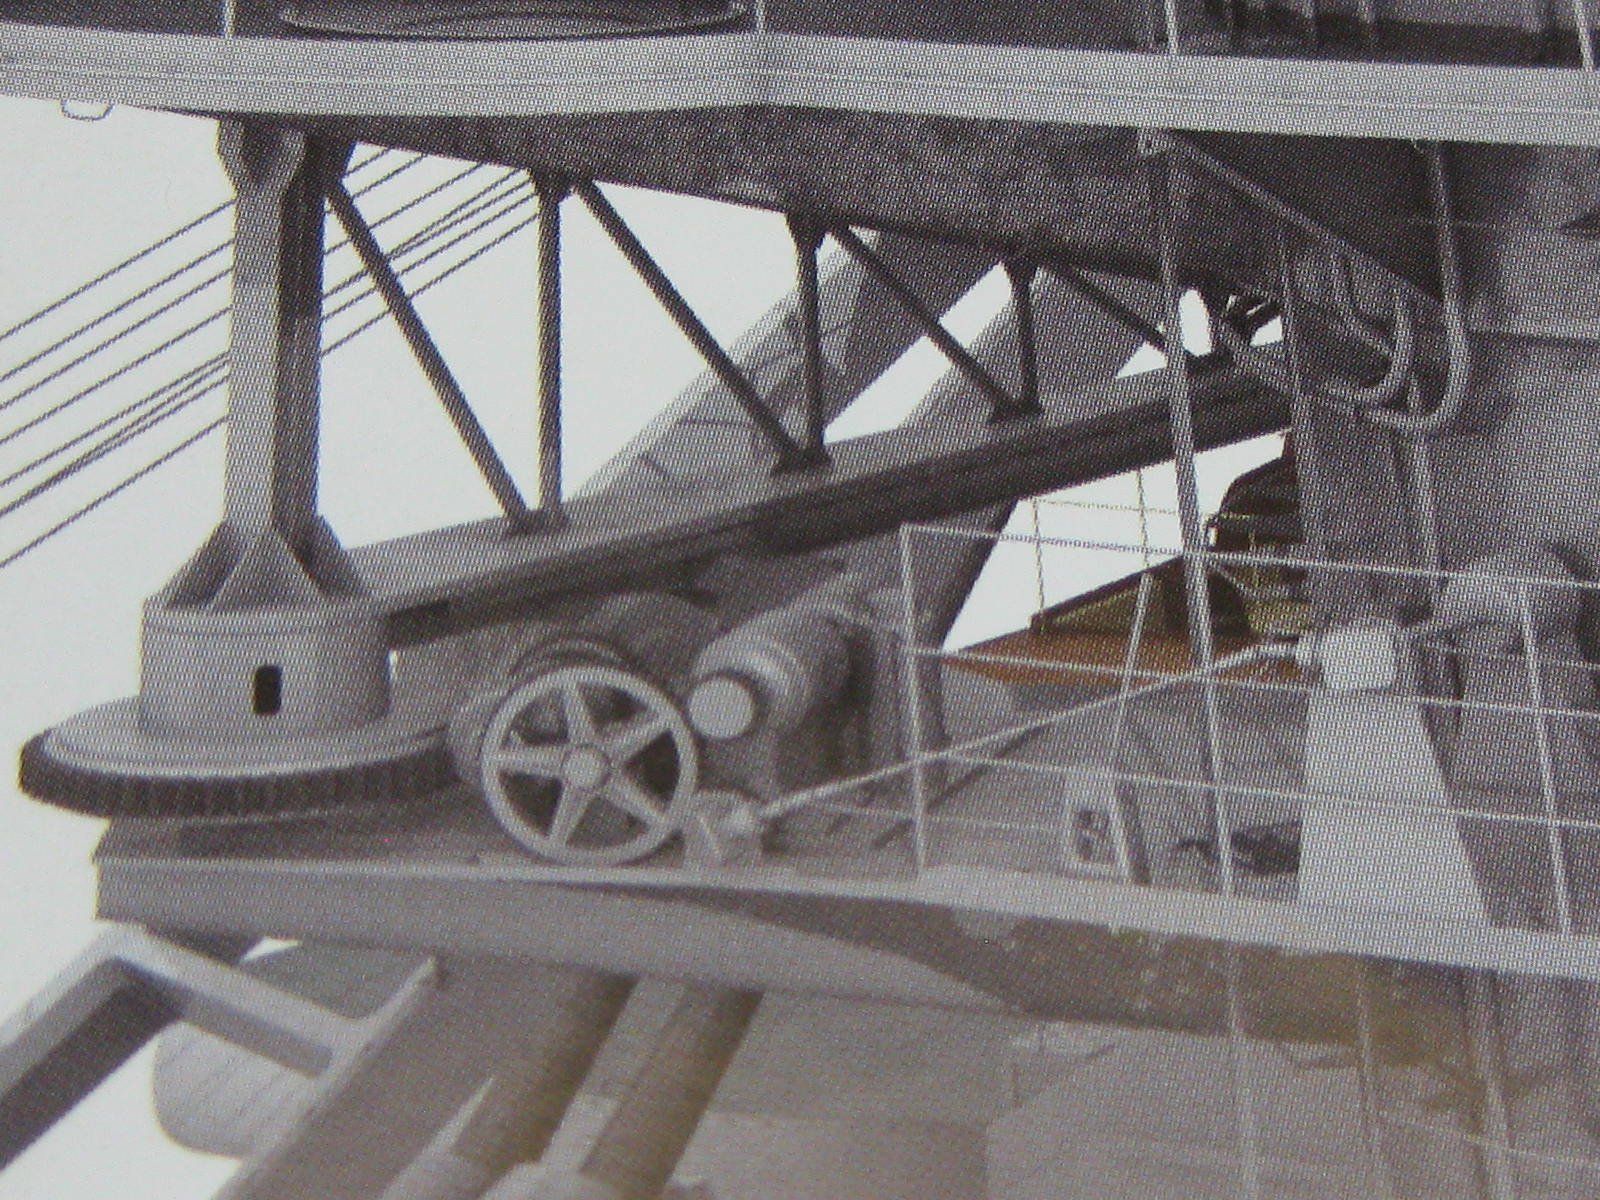
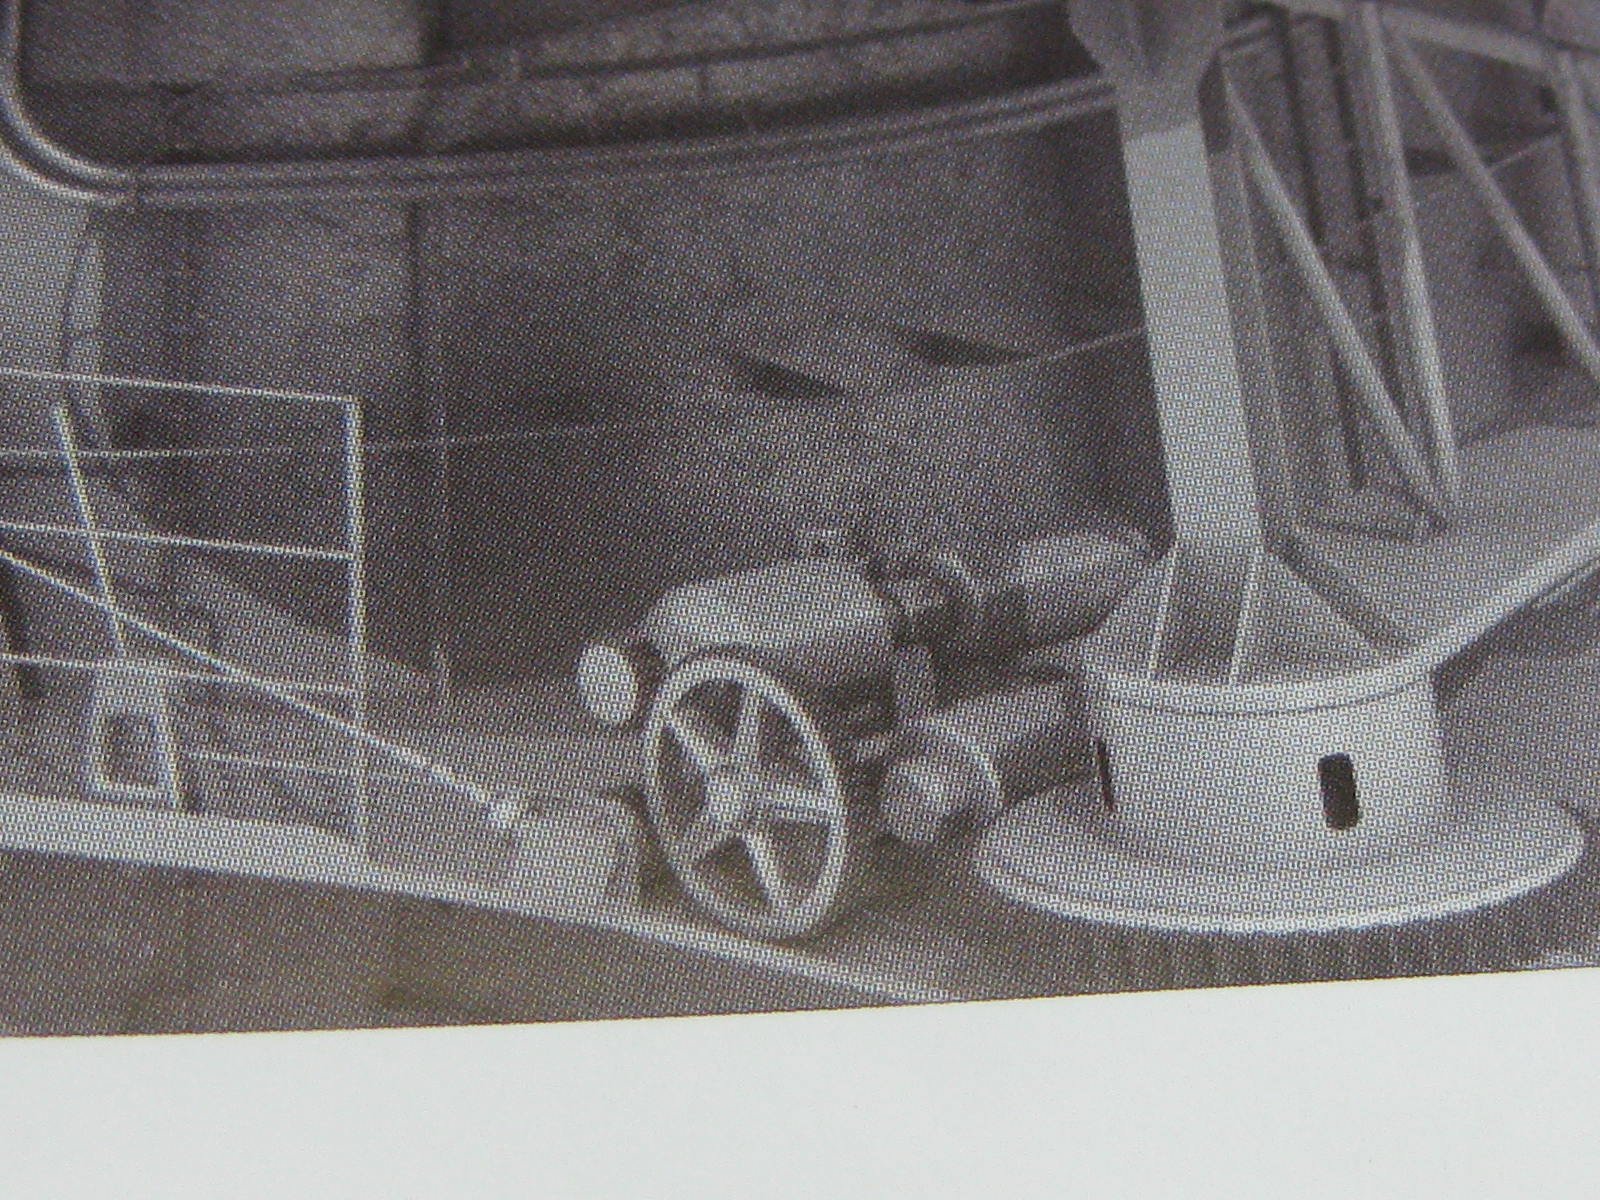
I think you glued the winches on too close to the crane. The inside of the winch should probably be closer to the funnel, according to my 3D Bismarck book. There's quite a bit of space to move it without hitting anything else, though it's most likely too late now : Danny

-
Thanks Carl and Popeye. I've finished the two 20mm guns needed for the 5th deck. These have turned out a LOT better than the ones I made a few weeks ago . Here are a few pics of progress on them. They are ready for paint : This time I assembled them the right way around, so I could fit the Spent Cartridge Baskets : Danny
.thumb.JPG.b226a12a8cffeff5eb4d002a9dd9f111.JPG)
.thumb.JPG.f97cf02374063ec2e815dda7eef88179.JPG)
.thumb.JPG.06832cd5bf2b0fc0fdda52a5ea66f377.JPG)
.thumb.JPG.b6f23945448d8dde9aa7fe258d9794c9.JPG)
.thumb.JPG.815999d6101610b6503105f8e0d6742d.JPG)
.thumb.JPG.a50d145e8e28f43c27dc232ca024074c.JPG)
.thumb.JPG.4a1552ff8593f4e4420402520b4e44df.JPG)
- 524 replies
-
- 23
-
-
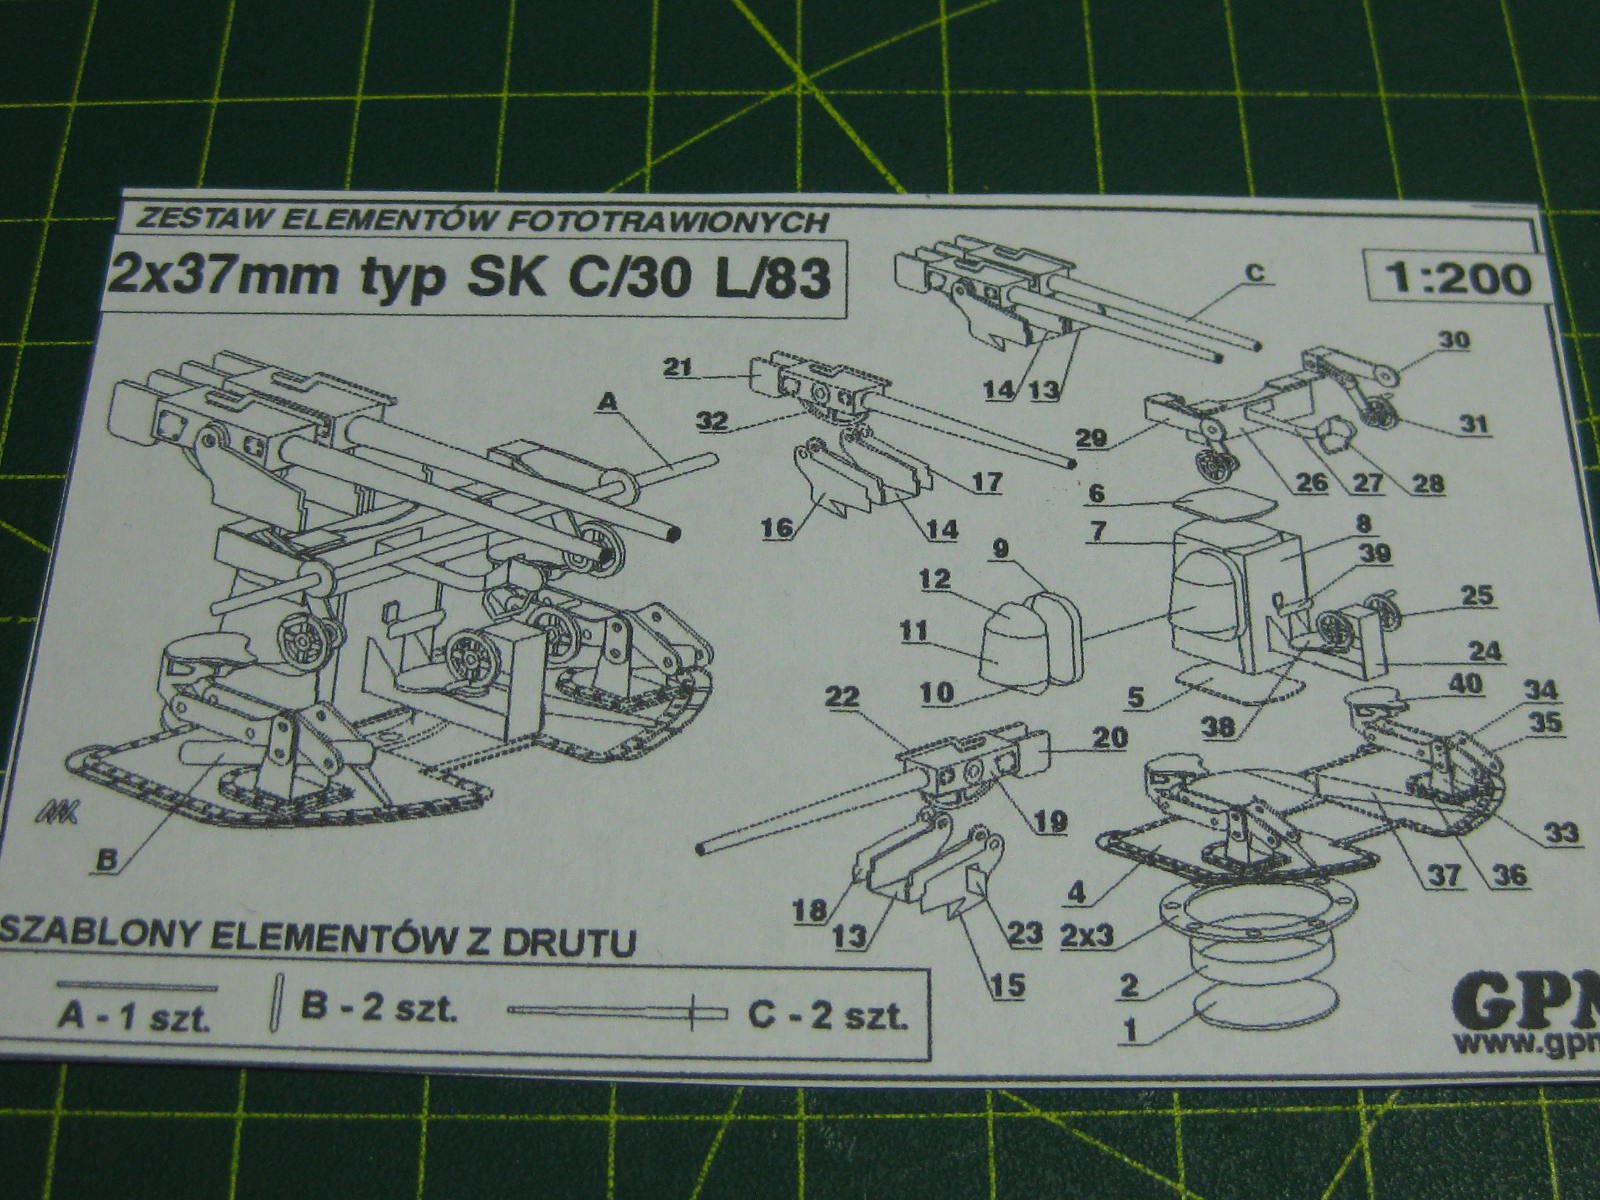
Thanks for the comments Carl, John, Pat and Mark. The 37mm guns continue. A tiny (1mm long) brackets on each side of the outer seat brackets : There is a Shock Absorber beneath each of the outer seats, made from 0.5mm wire : What I guess is a bracket that holds the elevation controls. There are 3 pieces to this, a central support and an arm that requires several bends at each end : I'm not sure what this piece is, maybe a gunsight? Getting near the end now, there are only the actual guns left to do. Folding the breech boxes was fairly straight-forward : The gun support brackets. I lined up the pivot holes with a piece of 0.2mm wire and CA'd them together : Two of the gun barrels. The one with the big "bulb" on the end is how they come. The other has been cut to length. Machining of these is excellent : I lined up the guns with the holes in the bracket with the same piece of wire, glued them in and trimmed the wire flush : Last few things were rather difficult to fit due to their very small size. Two flat "ears" at the back end of the breech and a recoil exhaust tube on top of the breech : The guns ready for paint. Only 6 more of these to go (as I need them). I now have to make two more 20mm guns, then I'll paint all four : Danny
.thumb.JPG.b23f36cd9ad5f98caee4cd898dbeedf8.JPG)
.thumb.JPG.13133e6c1b9108cae9170a220393956d.JPG)
.thumb.JPG.6c50302a8b88cc909ad6ef1c922cc354.JPG)
.thumb.JPG.63925ac455212bc12e12146cb1ff4a32.JPG)
.thumb.JPG.80a35cc3b82ebd38595c7ac31977c915.JPG)
.thumb.JPG.d0901a6e209bacb1c3da0e7d55bf51fb.JPG)
.thumb.JPG.5592fa585f3c786a1592001026b3e0cd.JPG)
.thumb.JPG.6cd3367e555a90ffc354f5c05f166742.JPG)
.thumb.JPG.2bf53c2deeffe68f97e4fe946ff92667.JPG)
.thumb.JPG.6c9833e5714dfe330d350fca45235602.JPG)
.thumb.JPG.3660d69981ff3149f2ca9867379feacb.JPG)
.thumb.JPG.5fcb5628ce50cbec5516fcf43426b9d6.JPG)
- 524 replies
-
- 18
-
-
Thanks Pav. I might wait another couple of months before making up my mind on what to build next. Maybe Halinski will do a re-print of Yamato by then (just in case they change anything). I still have a "bit" of work to do on Bismarck. Danny
-
Thank you Chris, Pav and Carl . I've redone one of the 37mm gun Pedestals, as I wasn't happy with the way it turned out. This time I used a piece of card with a 4mm hole punched into it to hold the pieces more stably : The central columns consist of 4 pieces - a main piece which is narrower at the top, two plates for top and bottom, and a U shaped piece that sits proud of the front end (not shown in the lower pic yet). The main column is etched on the back side to make bending easier, a good idea : There are two "bulges" on either side of the column, consisting of 4 pieces each. First thing is a narrow strip for the base, this is also etched on the back. It's wider at the bottom than the top : I glued the base strips to the column first. To ensure that I get small parts positioned properly I use one or more tiny spots of PVA, sit the piece roughly into position using tweezers or a moist toothpick for very small parts, position it properly with the toothpick or a scalpel, and after the PVA has set enough I wick some CA glue around it. The other 3 pieces needed rolling into shape. The top piece is narrower than the bottom, which also has a different shape top and bottom. The two pieces below are only 2mm wide at the widest point. These pieces were fitted next : I fitted the central piece next : And the bottom piece last. The tiny gaps virtually disappear as they get filled with glue. I later gave the unit a good filing with a diamond-coated needle file : Next I glued the column to the base. The rest of the build gets a bit fiddly, starting with a support for the central seat. I stood the MDF block on it's end for these steps so the piece didn't have to defy gravity until the PVA set. In the 3rd pic below the seat and backrest have also been fitted : This is the backrest, it's rather small : Final things for now are the Hand-wheels and the first pieces of the outer seat supports : Danny
.thumb.JPG.d1251fcb281b15908053a53759df5d12.JPG)
.thumb.JPG.6dab20b9716659856c152fd4f27ebb44.JPG)
.thumb.JPG.faa71ec619f5bbbf26ee1aa5737d6391.JPG)
.thumb.JPG.4433315793cbcc532707f1464c0e6e57.JPG)
.thumb.JPG.bc3c5bec830b43f83dab3d651d9413b6.JPG)
.thumb.JPG.6a792dce66a15bbd3aa79384a9cde6ce.JPG)
.thumb.JPG.a9b49b248278c10e97ab71ae1726d6a0.JPG)
.thumb.JPG.7e3007120db20aefa355873a748c8fbc.JPG)
.thumb.JPG.113493fe44752715daffe0d7087e6aa0.JPG)
.thumb.JPG.a4435280f9150e1683dc1cc7ea1d61e3.JPG)
.thumb.JPG.b98ec9f5fda3a5a615e7b692b9a18abf.JPG)
.thumb.JPG.9c6646ab5f7859d8b7a3f1d1d7da38f5.JPG)
.thumb.JPG.c5a4e9fb5527a6f4910b1ce439b2ded3.JPG)
.thumb.JPG.b050bbf8901150d621ccd4081cf577b0.JPG)
- 524 replies
-
- 18
-
-
Yes he is, I'll vouch for that . The model of Bismarck I bought from him was exactly as described, and Paul went out of his way to help me with buying the extras (PE, Gun Barrels etc) from GPM. Pity you don't have a Halinski Yamato or Hood in your collection Paul, or I'd have been straight on to them . Danny
-
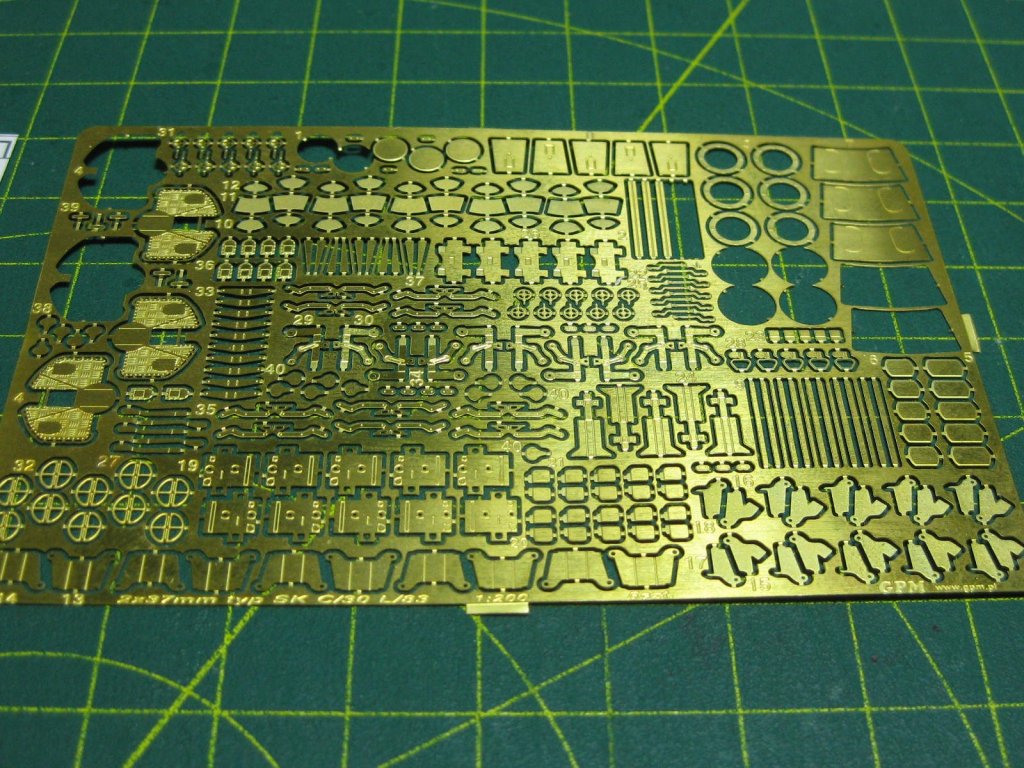
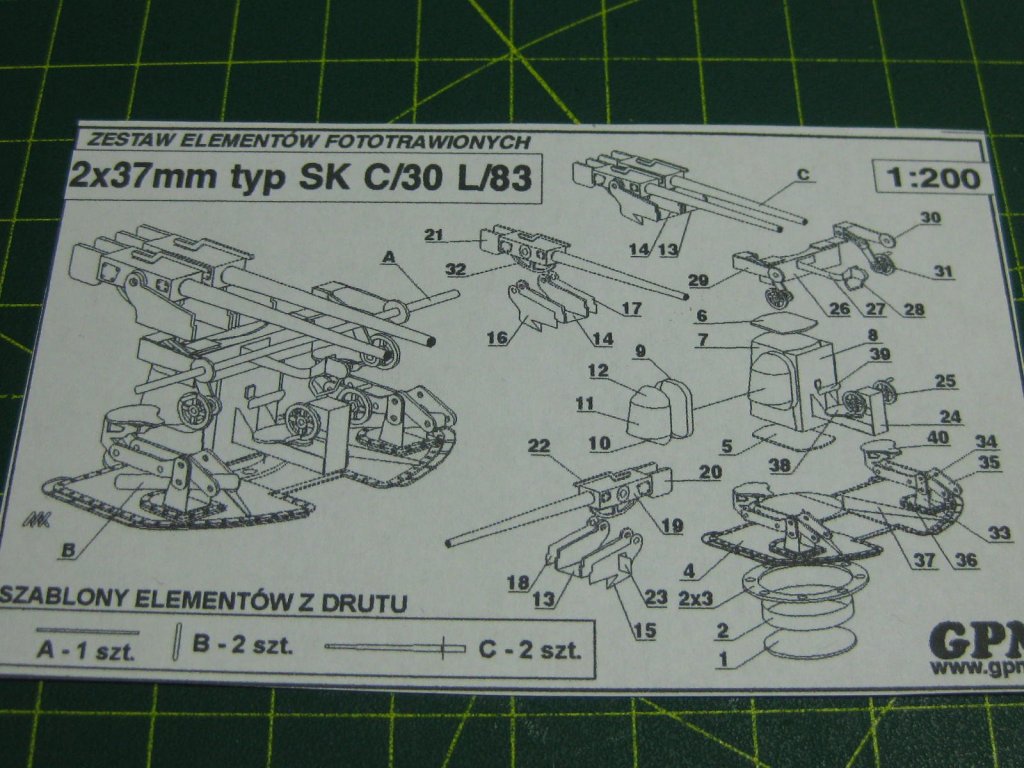
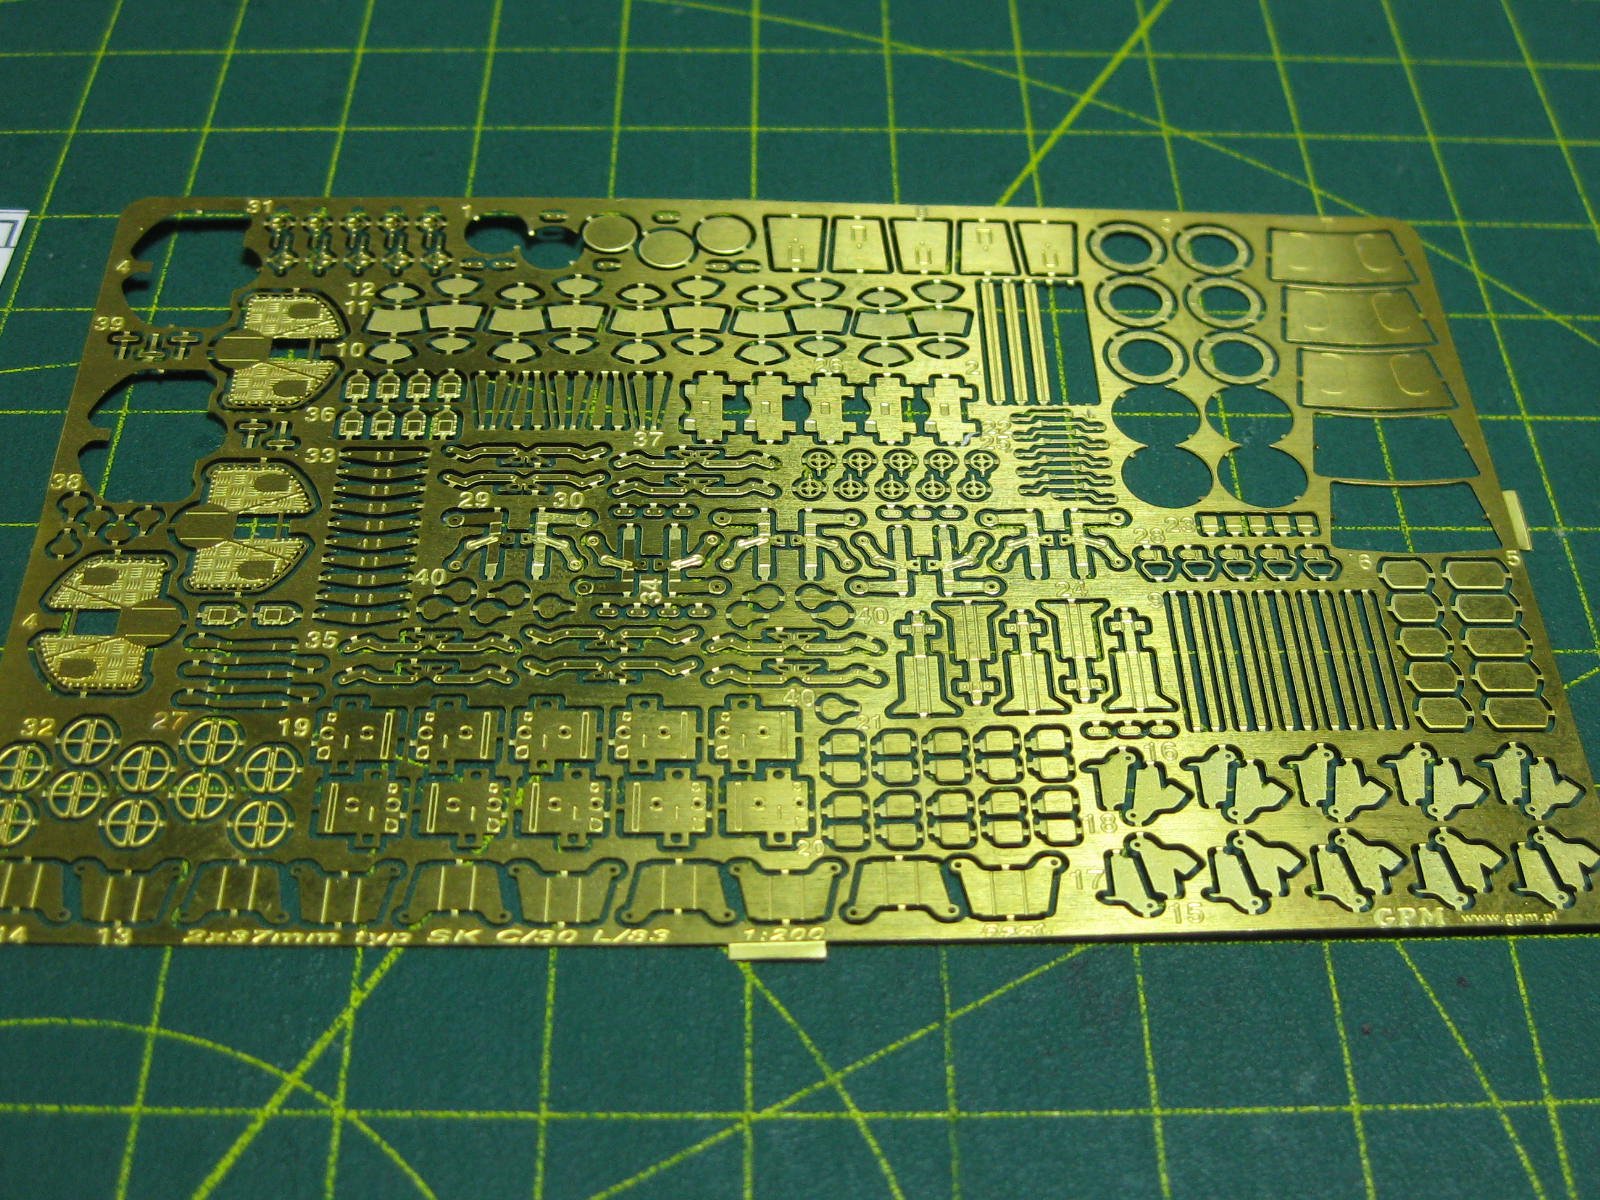
And thanks again Ken and Lou. All good info . I've made two more upper deck sections. Both were pretty straight-forward, and I've done all the detailing on them before fitting to the deck below : There are two 37mm guns on the rectangular deck, so it's back into the PE. I also have laser-cut sheets for these, but they aren't anywhere near as detailed so I won't be using them. This is the sheet for 5 guns : The instructions, as I mentioned numerous times before, are not particularly informative : And I've made a start on the bases for the guns : Danny

- 524 replies
-
- 16
-
-
When I have small PE to fit I use a drop of PVA to tack down the part first, then go over all of them with CA glue. This way you can manoeuvre the part into position more easily. I've had no problems with either glue not sticking. Danny
-
Thanks for that research Lou, it looks like I was only half wrong . It won't be the last time . Danny
-
Lou, the manufacturer doesn't list them as anything. This was just my assumption, which apparently is wrong according to Jan. Thanks for the clarification guys, I'll edit my post . Danny
-
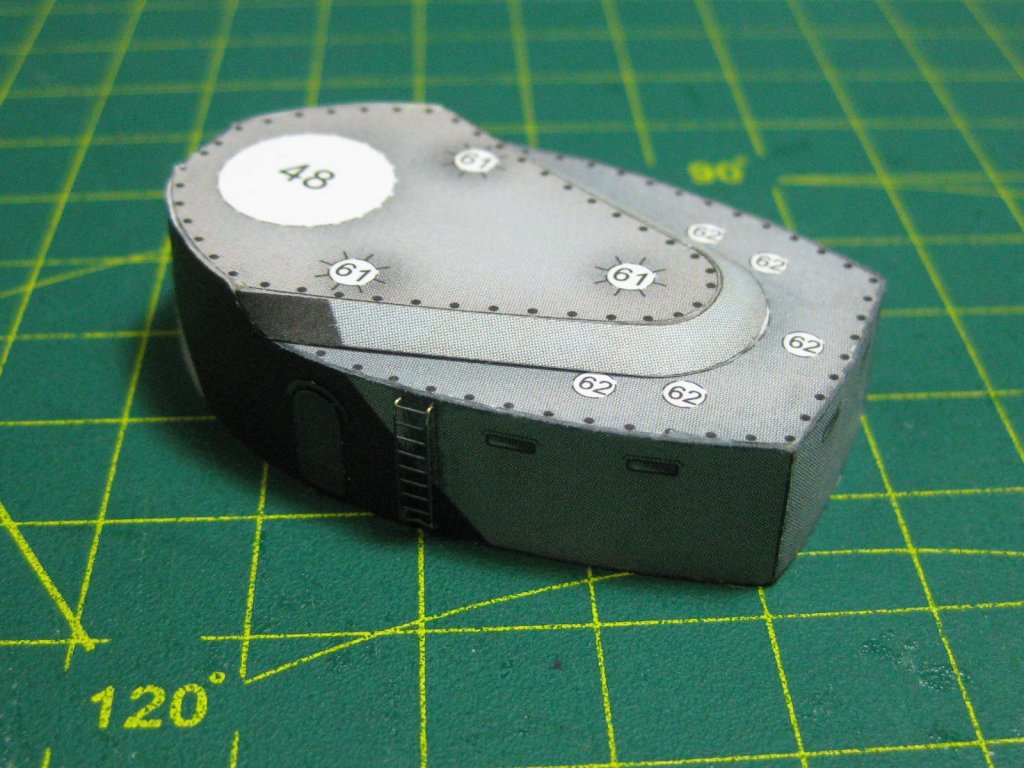
Thanks guys . There are two Radomes (EDIT - see note below) on the forward 2nd deck. The parts in the kit are pretty ordinary, but the laser-cut ones are pretty good. The laser cutting itself is excellent, and all the parts fitted well despite (as usual) some vague instructions. Just an exploded line drawing and another showing the finished article. There is no indication of which parts should wrap around a former or butt to it. Here are most of the parts for one radome, there are also 6 laser-cut circular formers for each which aren't shown in the pic : I built both of these at the same time on my MDF block. Most of the outer panels were slight cones, which I rolled with a tapered roller on a piece of high-density foam. The pics below show the sequence of construction : EDIT - I've discovered (thanks to Lou and Jan) that these are not Radomes, as radar wasn't invented at the time of Bismarck. They are in fact Fire Control Stations. Both of them finished, ready for paint. I had to use the lower part from the kit as it didn't come with the laser cut. The fit between them is OK. I'm leaving them off until I've installed the Railings to the 2nd deck : And I've now fitted those railings. These are turning out very well IMO. I'll touch up the chipped paint near the end of construction, as I'll most likely bend a few railings later on : Drilling the five stanchion holes under the boat rack was a lot of fun : Danny
.thumb.JPG.0af4b16c4d33d899b4d77ea486af0268.JPG)
.thumb.JPG.719eecb04d50a43c66dc2e013621306f.JPG)
.thumb.JPG.2f7bd124d4c72df3aacd4e8a0fd63ffa.JPG)
.thumb.JPG.5af33cc3b126bc57182225d757568cac.JPG)
.thumb.JPG.ccbbf7f9baf53a76be14535cb5322682.JPG)
.thumb.JPG.c2c5645e9711fff3cd90f4564e89b5e8.JPG)
.thumb.JPG.962d27960d24dcac6f456757cdec4f06.JPG)
.thumb.JPG.e7a09905935ff2f8fd2c8c56ca8b3fbd.JPG)
.thumb.JPG.d5742c8048ad916db251fffd6e82298b.JPG)
- 524 replies
-
- 21
-
-
All I can say is you're doing a damn good job of hiding it - I can't see any at all . Danny
-
The funnel is finally finished, and I've also finished the two aft searchlights. These are fitted, along with the two 20mm guns I made earlier : I also decided to add real louvres to the flat printed ones. They have a real sense of depth now . I made them from strips of 1mm wide card : Danny
.thumb.JPG.ab1a46534bc407b5429c56c206170fb4.JPG)
.thumb.JPG.9855ec54362e2eaa1c7f1728b7501cff.JPG)
.thumb.JPG.9b9b8083c8475a89cd8ad1ccdaaf25e0.JPG)
.thumb.JPG.3d1f891719908f94c51f672c0a50f4e0.JPG)
.thumb.JPG.91114108303d2233ef310804f8cece68.JPG)
.thumb.JPG.fa14df6eda53acee6af9487f115d6a31.JPG)
- 524 replies
-
- 23
-
-
No, although I'm very careful when removing the part from the tape. The 0.22mm thick laser-cut card seems to be very strong and I haven't had any problems with it delaminating. Danny
-
Thanks again for the kind comments Scott, John and John . You've got that right John. Ton of fun though . As I didn't take any pics of making the Searchlight Brackets and Supports I thought I'd slip a few in now to show you the steps involved in making them. The pics are in sequential order of how I make one of them, and are self-explanatory : Final step is to glue on the top and finish off the two rounded ends. The one on the right has been done : Making something like this is a lot easier on a separate block of MDF, using double-sided tape to hold a base piece to prevent movement, as I can turn it every which way instead of trying to reach over to the other side if it were fixed to my cutting board. Danny
.thumb.JPG.f068dc400df8f959dfcd56fce16c6760.JPG)
.thumb.JPG.d5b59935736aadfe874a1e890d72c2d4.JPG)
.thumb.JPG.307058dd2c35b6a139e19a8642be78b1.JPG)
.thumb.JPG.f4c0607b47a8192105e0a1269607e132.JPG)
.thumb.JPG.75d090ce409fd8da5405ece51c61499e.JPG)
.JPG.1af10156652bee0028cadeacc617fc47.JPG)
.JPG.c74e99971aa2814d387bf51a15e2e0b8.JPG)
.JPG.24f3337dbdd6dcf4a775304542b56528.JPG)
.JPG.8758e03cb45b5a59a586ec7c58071f26.JPG)
.JPG.e07ff9ac9c5ee3736aa100f445d9d66e.JPG)
.JPG.c8bb099e3bcd2b9566ae7409712fc983.JPG)
.JPG.a0a2ae3dedb15ba49fdd2d7f8831d8c9.JPG)
.JPG.5ebb3eddba3817114d55d98723f74d78.JPG)
.JPG.11576796d3befcb1f3e211085a9d963b.JPG)
.JPG.e0129db5c23bb230846cc1bd6db66db2.JPG)
.JPG.38b5474bf18ffd9d3a4edf5488d8f265.JPG)
.JPG.9e56b1d71a8a9ddc86865562dd7861e2.JPG)
.JPG.2d42ad01a3f5d08348a75cae96e90425.JPG)
.JPG.c8c8c9a59f43f00a0fb937c9eff5d19b.JPG)
.JPG.a2c2662b025f8f4c071bf13ed5f8fe1a.JPG)
.JPG.5d83992d360f40b9d035bc214991a9da.JPG)
.JPG.f298ee5950b4dc00a7a2e8460acd0959.JPG)
.JPG.e9511a1b43f044d13f257ff3f3bef16d.JPG)
.JPG.83259f9771f9b097b3a9fc6d31e493f4.JPG)
.JPG.45915c6cb2e156e1212d860ca76bef1b.JPG)
.JPG.bbf8091fdd2f4b3c4c0660faefb3713b.JPG)
.JPG.8bf591c8b2e2070c48f1816b10a6c963.JPG)
.JPG.bc6cf22d5fd529bbfff506604f036da4.JPG)
.JPG.d0c0e640b47fa7f69a30c98383a2d9ca.JPG)
.JPG.26b8fc1615157086bb873c81f03a4a75.JPG)
.JPG.6b79d058889b02d004aa76cd88e9fa0c.JPG)
.JPG.3ed605aef5bf373adcc156f6d19b0027.JPG)
.JPG.70970da0b63ff8753b7bbfd21f8cddf9.JPG)
.JPG.552310985223f6475e4031a80a415276.JPG)
.JPG.178ca80dce677fc10ee997c12db38ad5.JPG)
.JPG.22993dc7d6443cbd8970282f9a4e982d.JPG)
.JPG.1336ec7571170f2679cb9f8c4dbddb65.JPG)
.JPG.9e8303ae6f6d20e0fd03c461c3610a51.JPG)
.JPG.e6661c858c7c14b6266d22daf4f4b82e.JPG)
.JPG.bd3c50ab621aeed301c55c46d549ebf7.JPG)
.JPG.589316085f6d3bbc1dbf84702acaa7e2.JPG)
.JPG.a30449ecd4a53b29932ee25cfe9abb7b.JPG)
.JPG.0d931b66a05a6fc424e2c310d288bcc4.JPG)
.JPG.bc25dbed48378a2fafe92d7315cf357d.JPG)
.JPG.7273edb02030383e4a84d84dabce1087.JPG)
.JPG.5a87570b3254fd2d6365752cfbed9dcf.JPG)
.JPG.3a3fa3046bac92e9fa59b1f310644f25.JPG)


.JPG.4c01948f5465a1b055accbb59ff6cc94.JPG)
.JPG.6125e0fa29273a1968d8797a018e02d5.JPG)
.JPG.8539cc2f29ec5703eafb75b22b98b36f.JPG)
.JPG.b1e57d3ae03c376b877578bfc7c4c8f6.JPG)
.JPG.9ffeaddf753536c2816fe0e3af7fb5e2.JPG)
.JPG.e704e3f8ed045568d725016d31800346.JPG)
.JPG.0f3d27af51965fe010ca780606fabb00.JPG)
.JPG.c7b1267f219b39def69851610d0010cd.JPG)
.JPG.b38a6628d0733dc40a4a1e88d164cfe4.JPG)
.JPG.c229f5600dd3aa75c49093eb5ea12346.JPG)
.JPG.e160dc6b53e92a89805faa82252619f7.JPG)
.JPG.f09a8d69a4742b4dbc391dff09cfd663.JPG)
.JPG.12cbc9fb8cfcfd68073f8f88280992fe.JPG)
.JPG.de67219cf878ea1628b6d5693c262e3e.JPG)
.JPG.48b4cb5f865beeabfac556595a981574.JPG)
.JPG.995efbbf0f4dc2c389173e55a2a02c98.JPG)
.JPG.1769cc64c095aefabcc3aaab51f5c3f8.JPG)
.JPG.9daab65ec2b06461f1f611b5bcc6112c.JPG)
.JPG.0cde74bbcc3645a0cc801f446b8132d7.JPG)
.JPG.7e6ca254584b07d3f10ed911cddb75ad.JPG)