
HOLIDAY DONATION DRIVE - SUPPORT MSW - DO YOUR PART TO KEEP THIS GREAT FORUM GOING! (Only 13 donations so far - C'mon guys!)
×


Dan Vadas
-
Posts
3,261 -
Joined
-
Last visited
Content Type
Profiles
Forums
Gallery
Events
Everything posted by Dan Vadas
-
Thanks for the comments guys . It's been a long haul, but I'm finally down to the last Hull Skin. I've only been able to manage two skins per day until today where I fitted the last five, although they were a lot smaller and easier to cut, sand and glue. I had more than my share of problems fitting quite a few of them, mostly due to the poor design with the overlaps which I cut off. This meant that most of the skins didn't fall directly on a bulkhead and I had to add and sand extra card to nearly every one of them . As you can see from the pics I also had some major problems with the fitting of the grey skins. They finished up with some really bad creases, due in part to the cut-out Portholes and acrylic "glass" making the skins bend where I didn't want them to, and I've had to use a lot of Filler to get them out. The filler hasn't been final sanded yet, and there's still a little more to add in a few places. Here are two pics with the final one still to go on. I filled the whole last section with card and sanded it to shape to make sure I had something to glue the piece onto. It turned out to be a lot easier to fit than I was expecting : Apologies for the blurry pic : And the last skin fitted - yippeeee : Now to fill some small gaps and start mixing up the touch-up watercolour paint. Danny
.thumb.JPG.daf28bd72983d2073d8a0d3b9fe68a93.JPG)
.thumb.JPG.fc6af910068cdeea863c7d6834d22682.JPG)
.thumb.JPG.6c0e49ec5e6898e2e556adcdb426bdea.JPG)
- 524 replies
-
- 14
-

-
I'm guessing you're right Cliff. Back in the early 20th century to about 1980 in Australia we would have imported all our Stanley rules from England. You're dead right about the Lufkin rules - I accidentally bought one without checking it. It was indeed pine, and finished in the bin . I bought about 6 or 7 English Box rules from a used tool merchant. I still have a couple left. Good points re the Billboard from Tom. I'd agree with his thoughts. BTW - I left mine unpainted. Danny
-
I would DEFINITELY suggest you use at least Castello, preferably English Box, for the Deadeyes. By the time you get to the ones for the Mizzen Backstays they are LESS THAN HALF the size of the ones you just made (without losing any of the detail). If you thought Cherry wasn't up to the task for the first ones it certainly won't be for the smaller ones . See the last pic in THIS POST. If you don't already know, a good source of English Box is one of the old type folding Carpenter's rules. The newer ones were made of an inferior grade timber, you will need to source one from about pre-1980 or so from a Garage Sale or 2nd-hand tool merchant. One rule will be more than sufficient for all the deadeyes and blocks for a couple of models . EDIT - they are also on E-bay but I can't guarantee the timber used in any of them. This one at least LOOKS old enough . Ignore the exorbitant Postage quoted - that's to Australia if the link comes up the same as mine. The actual price is comparable with what I've paid for them in the past. Danny
-
You'll most likely lose a bit of paint when you bend them, but it can be touched up with a small paint brush when installed. Airbrushing them first would ensure you get coverage on all of it, as long as it won't affect gluing them together - CA won't stick very well to paint, or rather the paint would come off the brass. Danny
-
Hi Ed. I haven't actually seen one of your books yet . I assumed that the build log on here was a part of them. Never mind. I've also only had time to skim through a bit of this build log, as I said - "epic" . I'll get through the lot eventually . Danny
- 3,618 replies
-
- 3
-
-
- young america
- clipper
- (and 1 more)
-
Hi Ed. First, let me congratulate you on a truly great and epic build log/tutorial - your detailing of every step is beautifully written and very easy to understand. When I read the following quote from one of your posts I thought of something that would make the final Tutorial even more understandable when you publish it. My idea is to place a Reference in the plan drawings to the "Part (Step?)" number/s dealing with the drawing of the item to the written Part explanations, wherever possible. e.g. Alongside the drawing of the Foremast Cap in the plans the Part Number 227 would appear next to it, making it a bit easier to find in the Text description of it's construction. Forgive me if you've already thought of my idea . Danny
- 3,618 replies
-
- 6
-
-
- young america
- clipper
- (and 1 more)
-
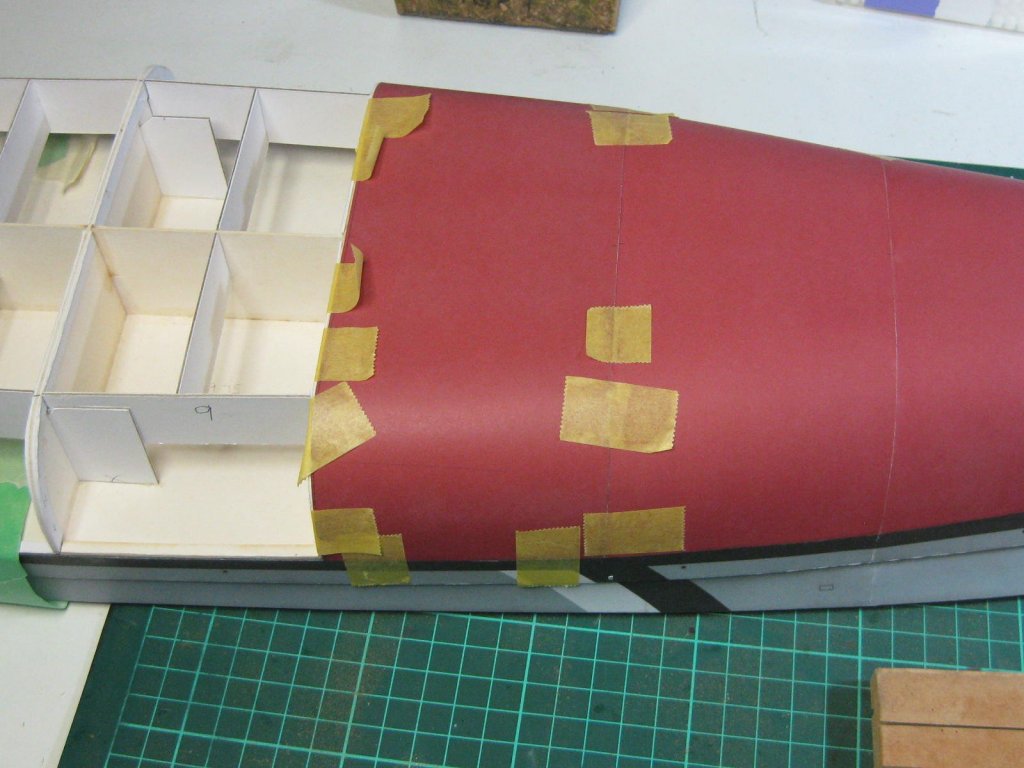
Thanks for the insight Slog, and for the kind comment OC . Here are some pics of my hull skinning progress. I've just fitted the "dreaded" Skin #8 without any dramas . I'm fairly happy with the way they have come out - not perfect, but nothing I can't fix with a bit of filler and touch-up paint on some of the joins. One thing I found out the hard way when building my first Card model, Cerberus, is NOT to put any glue on the extra bracing in the middle of a skin. Doing this can "pull" on the skin, causing "starving cow". I only glue the very edges of the skin, being careful not to touch it in the middle until it's thoroughly dry. I use a narrow piece of flat wood with the edges rounded off so it doesn't dig into the paper to push the skin down onto the glued bulkhead, instead of using my fingers which can tend to pull the skin slightly while the glue is still wet - the glue actually softens the card a bit, so care is needed here. BTW - I'm using Acid-free PVA Craft glue, fairly thick straight from my glue bottle. Another thing with gluing large panels - I glue the skins in three steps, the first up to where the skin flattens out, then the flat section, and finally the other rounded section. I tape the skin down with pieces of Tamiya tape as I go, and leave each section to dry for a few minutes before moving on to the next. This way I can easily keep up with the glue before it starts to go off. I've redone the extra bracing between the bulkheads. The longitudinal pieces are faired to fit hard under the skin, without needing any glue, to reduce the chances of accidentally crushing the skins. It goes without saying that there is a LOT of dry-fitting involved, especially on this model where the skins have overlaps designed into them. I'm cutting the overlaps off and butting the skins together, it takes a lot longer but the result is a lot better IMO. I really DON'T like the way this model has been designed - my next Card model will definitely be another Halinski. Here are the pics : This is Skin #5, the first one that I hadn't earlier cut to the lines. I've managed to "catch up" with the centres of the bulkheads by leaving part of the overlap on, resulting in the black line which I'll have to paint : Skin #8 : Danny
.thumb.JPG.f2400f9a1aa9a2a75aea37767b702993.JPG)
.thumb.JPG.738cd2073916c49fe7658aac585ff79a.JPG)
.thumb.JPG.47c3b05679c3db1b9a879f27309a98f7.JPG)
.thumb.JPG.716c2aa7884f605bf787245bc1d009b6.JPG)
- 524 replies
-
- 19
-
-
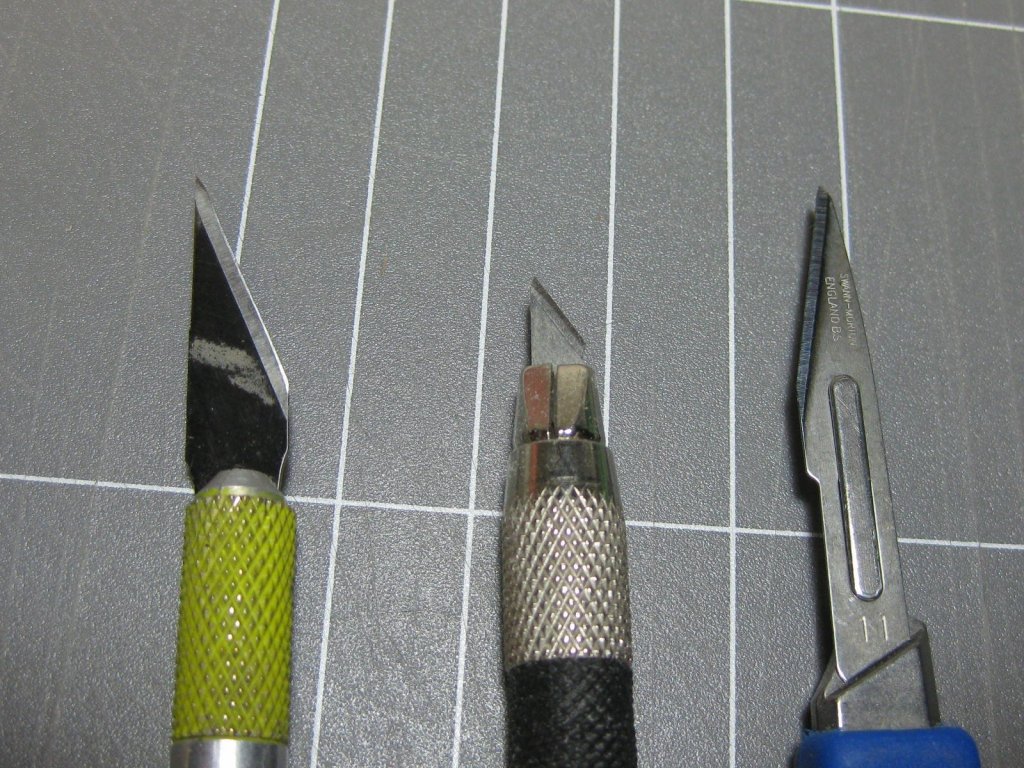
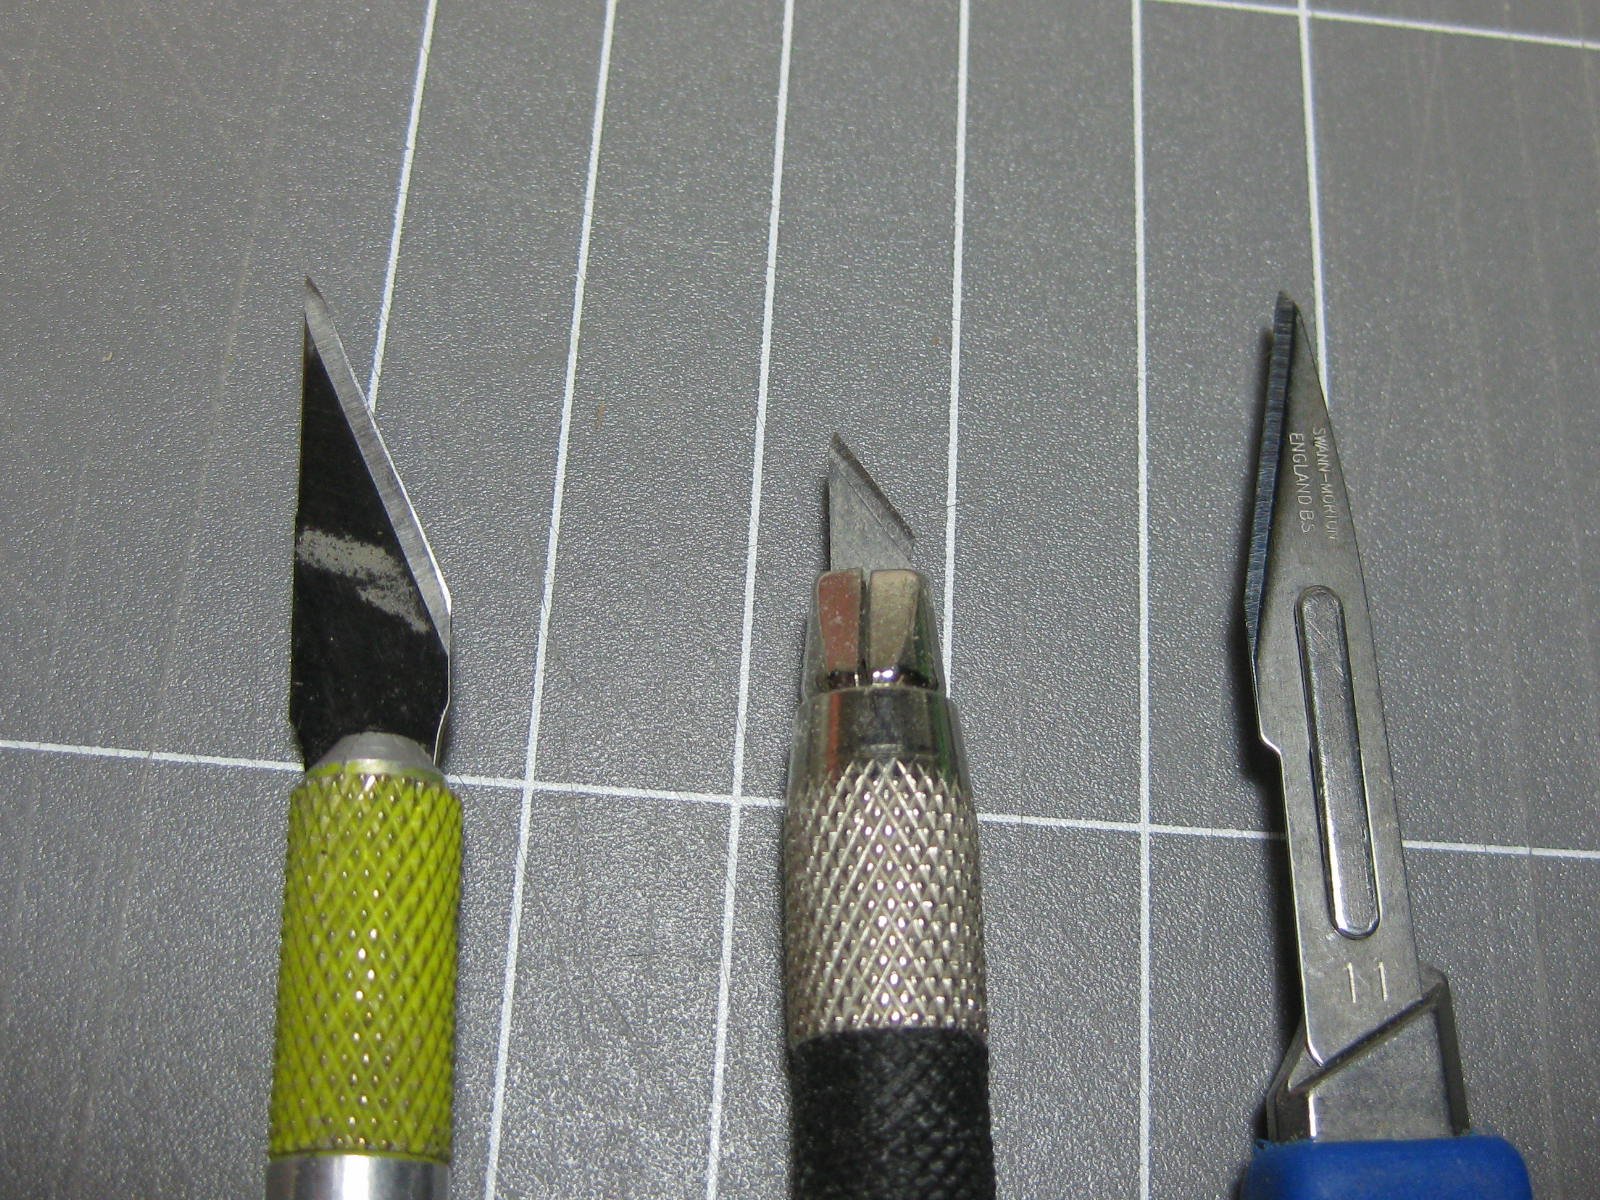
No problems with that, they were designed for the job . Another very useful cutting tool for PE is a short-blade knife. The blade doesn't flex when cutting PE. It's the one in the middle in the pic. On the left is a standard #11 Xacto, which I hardly use any more. The one on the right is a Swann-Morton Scalpel, much sharper than an Xacto and doesn't break the tip due to it's rounded design on the top edge. BTW - I use a block of MDF to cut PE on if I can't use the side-cutters for some reason. It works well . Here's a Link to some spare blades I bought for the short knife. It only seems to be available from this company, so I'd advise you to get plenty of spare blades from them if you buy the knife. Danny
-
I find these tools very useful when working with PE - PE Scissors, PE Bending Pliers . The scissors are a bit different to mine, same brand but mine are more like side-cutters - very sharp and accurate with thin blades that can get into the small areas of a PE card. I can't remember where I bought them, somewhere on Ebay no doubt. The Bending Pliers are specially made for PE. The long flat blades close evenly for their length, so you can do bends in quite long pieces. They also are very accurate. Neither are cheap (shop around if using Ebay, the prices vary greatly) but you get value for money. Danny
-
I deleted them from the post for you. If you don't want them to show you need to delete the actual Downloaded pics at the bottom of the Edit Box - there's a small "Garbage Can" in the bottom-right of each pic. It's a bit hard to see until you run your Mouse over it. I also fixed up the two upside-down pics . Very nice work on the PE detailing. I'll be referencing this Build Log when the time comes to add those details to my Card Bismarck . Keep up the great work. Danny
-
I've got a question for Slog. In your Bismarck Log you mentioned that you had a major disaster with the red hull skin Number 8. I'm currently up to skin 5, and I'd like to know what caused the problem with yours before I go too much further and run into the same thing. BTW - I'm not overlapping my skins as you did. However I made a mistake with the very first one in the bow, resulting in them all falling short of the bulkheads by a considerable margin. I had already cut the first four skins, so I couldn't do anything about it until now other than adding extra card to the forward sides of the next 5 bulkheads. Skin 5 is cut to the extreme outside of the panel, and I'll trim it to fit the middle of the next bulkhead to get back on track. I'll have to paint over the resulting black line, but at least the rest should go on correctly. In hindsight (I have 20-20 hindsight ) I should probably have started by gluing on skin 2 first, and then modifying the bow framing to suit skin 1. Ya live and ya learn . Thanks in advance, Danny
-
Swan class 3D model in progress
Dan Vadas replied to dvm27's topic in CAD and 3D Modelling/Drafting Plans with Software
No, she was a Porcupine class. Danny- 141 replies
-
- 3
-
-
- pof swan series
- swan
- (and 1 more)
-
I'm the opposite to Bob. One at a time, or things start getting confusing. If I'm getting a bit tired of tying ratlines, for example, I'll make the Longboat or the lanterns or something else. There's usually something on the same build that can be made. Danny
-
QUICK-FIND INDEXES to BUILD LOGS FOR KITS
Dan Vadas replied to Dan Vadas's topic in - Index of all kits by brand and subject
It's in the Small Craft Index. Your T37 has been noted and will be added soon. Danny -
QUICK-FIND INDEXES to BUILD LOGS FOR KITS
Dan Vadas replied to Dan Vadas's topic in - Index of all kits by brand and subject
It took me off working on my Bismarck for a whole week . From the looks of the above replies it all seems to work OK. Noted, Hamilton. I'll edit that in. Thanks for the "Thanks" guys . Danny -
Swan class 3D model in progress
Dan Vadas replied to dvm27's topic in CAD and 3D Modelling/Drafting Plans with Software
I wish mine did look like that . Yeah, I agree - they look a lot better than the fuzzy pics I took of my model. Danny- 141 replies
-
- 4
-
-
- pof swan series
- swan
- (and 1 more)
-
Quick-Find Indexes to Build Logs from Kits Up to 1500 Oct 2025.pdf1501-1750 Oct 2025.pdf 1751-1800 Oct 2025.pdf1801-1850 Oct 2025.pdf 1851-1900 Oct 2025.pdf1901-Present Oct 2025.pdf The Links above take you to a number of "Quick Find" Indexes to the Build Logs for vessels made from Kits on this Site. They are alphabetically entered by Ship Name and Builder, as well as showing the Kit Manufacturer and whether the model has reached completion. NOTE - these Indexes do not contain those models that are Scratch-built with the exception of "Ships in Bottles", "Radio Control Models" and "Restorations". The Indexes are grouped in the various Building Types we have on this site - Wooden Ships, Small Craft, Plastic Models, Card, Radio Control, etc so you can easily find the type of build you are looking for. They are in PDF files, so you will need to have a PDF Reader installed in your computer to open them. These are available as free Downloads from various sources on-line, such as Adobe Reader: https://get.adobe.com/uk/reader/ When you click on the Link to open your Index of choice you will be asked to Download the file. Select a Folder to download to (optional - the Default is your "Downloads" folder). Any time you open that file from this page it will overwrite the previous file, and paste the new one in. The Indexes will be updated as new Build Logs are started, usually within a few days of them appearing, so it's advisable to update your Indexes periodically. You can view the downloaded Indexes from your computer without having to download them every time, but new ones may have been added since then. In the Index Click on the blue Ship's Name for the Build Log you want to view and it will open the Log. If you want to return to this page there is a Link at the top of the Index marked "Return to Model Ship World" that will bring you back here. To find a particular model quickly in the PDF Index - Click on the Edit Menu and select "Search", which will drop down a Dialog Window. You can type in the ship's name or the Builder (or even the Kit Manufacturer) and it will go to the first one in the list. Keep pressing the "Next" button to find the one you want and then Click on the blue Ship's Name to open the Build Log. This feature is particularly useful in the larger Indexes which have many pages. The pages have a Scroll Bar on the right which you can also use, or if your Mouse has a wheel you can turn that to also go down quickly. Pressing the "Page Down" key on your keyboard also goes down a page at a time. _____________________________________________________________________________________________________________________
-
Swan class 3D model in progress
Dan Vadas replied to dvm27's topic in CAD and 3D Modelling/Drafting Plans with Software
Put me on the list for that one . It's like he climbed into my Vulture and started taking snaps - I wish . Danny- 141 replies
-
- 5
-
-
- pof swan series
- swan
- (and 1 more)
-
I think you're right Ron. I must be getting better then . When I finished skinning the hull of Amatsukaze I made and attached the permanent stand to it. I also tack glued a large sheet of balsa under the stand as a protection against bumping into the odd tool (or twenty ) on the bench. That all worked rather well . If you intend using that cradle, I'd suggest you cut largish 45 degree angles into the uprights - they look like they will restrict your reach somewhat. I can see bruised wrists coming up . Danny
.thumb.JPG.83d5dcf7d44ed8c8acc78a9151e820ab.JPG)
-
Just using a sharp 2H pencil would do the trick Jeff. You may have to experiment a bit with different Pencil Hardnesses. Danny
-
I certainly agree with all the above Ron, but Number 2 doesn't work for me (see pic ) : Danny
-
I thought about that Carl, but I'd have had bigger problems. To cut extra incisions you'd finish up with the points too short leaving a gap where they meet. If I'd have cut extra ones in ignoring the printed ones there would be a white line between them which would still need painting. Pre-forming the petals with a rounded stick before gluing the skin on helped a lot . Danny
-
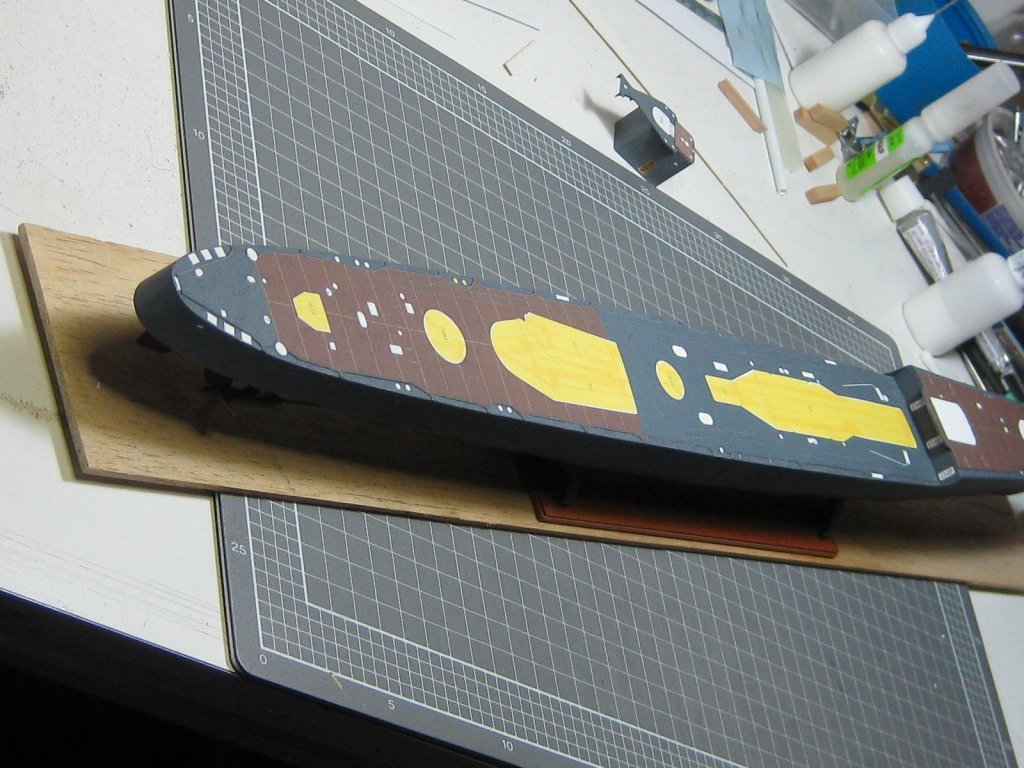
Here's the next update, the first of the lower hull skins. Hopefully this will be one of the hardest to fit, as it took me a few hours. The bottom of the bow bulges out, which made fitting the skin a lot harder than any of the others. GPM are rather stingy when it comes to designing the cut-outs for rounded areas - Halinski would have used at least twice the amount of cuts, which makes for a better "round". I pre-shaped the petals as best I could before fitting which made it somewhat easier. However there was still some trimming required before it would fit properly : It didn't turn out too bad, it'll look a whole lot better with a bit of filler and touch-up paint. Danny
.thumb.JPG.0820397a09d1f9b42b8f3b8e95ecb011.JPG)
.thumb.JPG.aa4d5142afcfc7779159905500bf75e1.JPG)
.thumb.JPG.9c724b2d6a97a65e2ec8dfce26b43e0f.JPG)
.thumb.JPG.ba9a3b01c0a36bb05ceaecc95de97ac5.JPG)
- 524 replies
-
- 19
-
-
Looking good Jeff . Will you be "caulking" the upper decks? I'll let you know the easy way of doing it if you are. Same for treenails. BTW - Lower decks weren't caulked with tar. Danny
.JPG.d2298a42b1279302b01387d32cf4797b.JPG)
.JPG.7cca30dfbd37d68cfbdc441fab11ad37.JPG)
.JPG.d19c292ec5b66a345ed37f7d3ddfeee9.JPG)

.JPG.d251169b3cb28a638b90baaf3268d170.JPG)
.JPG.acb7dc6a98a43efeeb5f2a36460fe0c1.JPG)
.JPG.e8dc2ff52abb73426726eda69ce9b86b.JPG)
.JPG.7d191c0f1db969c526bff678a64f0907.JPG)


.JPG.e5f1db28d2b6ccf737c92727f36a23b8.JPG)

.JPG.79b67d1c6c012e228dac13faa0b9ff6f.JPG)
.JPG.731111bcb6729dfedf792c4c1dbbe144.JPG)
.JPG.ec43521e195ab01651698386b24bcb84.JPG)
.JPG.a95f63932f349f261e542078729cd1d8.JPG)