


Dan Vadas
-
Posts
3,261 -
Joined
-
Last visited
Reputation Activity
-

 Dan Vadas got a reaction from CaptainSteve in HMS Vulture 1776 by Dan Vadas - FINISHED - 1:48 scale - 16-gun Swan-class sloop from TFFM plans
Steam Grating
I've made my first (and maybe ONLY) Grating - this goes over the stove. I'm a bit reluctant to make too many more (maybe some on the quarterdeck) as they hide too much detail beneath.
The grating stock is 0.79mm thick English Box, a fraction oversize (they should be 0.75mm) but I decided to make them the size of a 0.030" kerfed saw blade on the Byrnes saw using the Micrometer Stop.
My first job was to make a list of the spacings (i.e. the Micrometer stops) using a spreadsheet. This made it a lot easier to work out accurately than trying to remember and then calculate each one (especially if I'm interrupted ) :
Then I set up a piece of 2mm thick stock and started cutting 18 slots halfway through using the micrometer to set up each one (I made a couple of spares "just in case" - I needed them too ):
Then I cut each strip off against the fence, again using the micrometer stop. The measurements are identical to the previous cuts :
Assembly is the same as using kit gratings (fiddly, but at least they were cut more accurately than most kit ones). I dipped the grating into diluted PVA and let it dry :
After sanding the grating to size and gluing it into place I sanded the roundup in. I've also fitted the Cowl Base :
Danny
-
Dan Vadas got a reaction from CaptainSteve in HMS Vulture 1776 by Dan Vadas - FINISHED - 1:48 scale - 16-gun Swan-class sloop from TFFM plans
Thanks John and Ben, but "you ain't seen nuthin' yet " .
Cowl Baffle
There is a wire reinforcing ring around the rim of the cowl. This was silver soldered on and cleaned up.
A baffle is attached to the opening of the cowl to regulate air flow to the stove's firebox.
I cut a disc of 0.3mm sheet, drilled two 0.7mm holes through it and silver soldered the two sliding pins. I filed the protruding ends down to simulate a peened over end.
Next I fabricated two sleeves for the slides to travel in from 0.75mm ID tubing and a 0.5mm pin to locate them correctly. These were CA glued into the cowl - too much heat would have been needed to solder them in and I risked destroying my previous work.
Finally two wire handles were drilled into the cowl and CA'd in. The whole assembly was blackened in stages and polished.
Danny
-
 Dan Vadas got a reaction from harvey1847 in HMS Vulture 1776 by Dan Vadas - FINISHED - 1:48 scale - 16-gun Swan-class sloop from TFFM plans
Thanks John and Ben, but "you ain't seen nuthin' yet " .
Cowl Baffle
There is a wire reinforcing ring around the rim of the cowl. This was silver soldered on and cleaned up.
A baffle is attached to the opening of the cowl to regulate air flow to the stove's firebox.
I cut a disc of 0.3mm sheet, drilled two 0.7mm holes through it and silver soldered the two sliding pins. I filed the protruding ends down to simulate a peened over end.
Next I fabricated two sleeves for the slides to travel in from 0.75mm ID tubing and a 0.5mm pin to locate them correctly. These were CA glued into the cowl - too much heat would have been needed to solder them in and I risked destroying my previous work.
Finally two wire handles were drilled into the cowl and CA'd in. The whole assembly was blackened in stages and polished.
Danny
-
 Dan Vadas got a reaction from Wishmaster in HMS Vulture 1776 by Dan Vadas - FINISHED - 1:48 scale - 16-gun Swan-class sloop from TFFM plans
Thanks John and Ben, but "you ain't seen nuthin' yet " .
Cowl Baffle
There is a wire reinforcing ring around the rim of the cowl. This was silver soldered on and cleaned up.
A baffle is attached to the opening of the cowl to regulate air flow to the stove's firebox.
I cut a disc of 0.3mm sheet, drilled two 0.7mm holes through it and silver soldered the two sliding pins. I filed the protruding ends down to simulate a peened over end.
Next I fabricated two sleeves for the slides to travel in from 0.75mm ID tubing and a 0.5mm pin to locate them correctly. These were CA glued into the cowl - too much heat would have been needed to solder them in and I risked destroying my previous work.
Finally two wire handles were drilled into the cowl and CA'd in. The whole assembly was blackened in stages and polished.
Danny
-
Dan Vadas got a reaction from CaptainSteve in HMS Vulture 1776 by Dan Vadas - FINISHED - 1:48 scale - 16-gun Swan-class sloop from TFFM plans
Galley Cowl
Time for some more brass work. The Galley Cowl is 15" in diameter, which scales down to 8mm. The top piece is fitted at a slight angle upwards, about 95 degrees at the join.
I turned the outside diameter first from a piece of 10mm stock - the closest I had. Then I drilled the centre out to 7.5mm - in several steps starting with a 3mm pilot hole :
I made the piece about 5mm longer than needed to allow for a bit of final trimming. I cut the pipe using a fine hacksaw in a mitre box, and finessed the angle to 47.5 degrees on both pieces using my disc sander. I used a piece of scrap to hold the smaller piece - saves burning or sanding down fingers :
The finished article after silver soldering ready for some small details. The assembly will be blackened when it's complete :
Danny
-
Dan Vadas reacted to texxn5 in HMS Victory by gjdale - FINISHED - Mamoli - Scale 1:90
Grant, isn't that the truth. What an awesome site. I just almost did the same thing with Henry (popeye2sea) on the USS Constitution in Boston. Here I am from Texas meeting a guy from Boston and having the entire ship (a National Monument)to ourselves after hours and no one on board except us and the watch. What an event of a lifetime. And Henry was just like an old friend I'd known forever. Bringing people together with common interests from all walks of life and creating lasting friendships. How cool is that! All because of this forum and the wonderful people that are part of it! Next time maybe we can drag in Augie, and all the rest of the "Moose Crew" together and have a conventiion!!!! I am happy to hear you are enjoying your ventures also. Have fun.
John
-
 Dan Vadas got a reaction from SkerryAmp in HMS Vulture 1776 by Dan Vadas - FINISHED - 1:48 scale - 16-gun Swan-class sloop from TFFM plans
Thanks John and Ben, but "you ain't seen nuthin' yet " .
Cowl Baffle
There is a wire reinforcing ring around the rim of the cowl. This was silver soldered on and cleaned up.
A baffle is attached to the opening of the cowl to regulate air flow to the stove's firebox.
I cut a disc of 0.3mm sheet, drilled two 0.7mm holes through it and silver soldered the two sliding pins. I filed the protruding ends down to simulate a peened over end.
Next I fabricated two sleeves for the slides to travel in from 0.75mm ID tubing and a 0.5mm pin to locate them correctly. These were CA glued into the cowl - too much heat would have been needed to solder them in and I risked destroying my previous work.
Finally two wire handles were drilled into the cowl and CA'd in. The whole assembly was blackened in stages and polished.
Danny
-
 Dan Vadas got a reaction from riverboat in HMS Vulture 1776 by Dan Vadas - FINISHED - 1:48 scale - 16-gun Swan-class sloop from TFFM plans
Galley Cowl
Time for some more brass work. The Galley Cowl is 15" in diameter, which scales down to 8mm. The top piece is fitted at a slight angle upwards, about 95 degrees at the join.
I turned the outside diameter first from a piece of 10mm stock - the closest I had. Then I drilled the centre out to 7.5mm - in several steps starting with a 3mm pilot hole :
I made the piece about 5mm longer than needed to allow for a bit of final trimming. I cut the pipe using a fine hacksaw in a mitre box, and finessed the angle to 47.5 degrees on both pieces using my disc sander. I used a piece of scrap to hold the smaller piece - saves burning or sanding down fingers :
The finished article after silver soldering ready for some small details. The assembly will be blackened when it's complete :
Danny
-
 Dan Vadas got a reaction from rdsaplala in HMS Vulture 1776 by Dan Vadas - FINISHED - 1:48 scale - 16-gun Swan-class sloop from TFFM plans
Galley Cowl
Time for some more brass work. The Galley Cowl is 15" in diameter, which scales down to 8mm. The top piece is fitted at a slight angle upwards, about 95 degrees at the join.
I turned the outside diameter first from a piece of 10mm stock - the closest I had. Then I drilled the centre out to 7.5mm - in several steps starting with a 3mm pilot hole :
I made the piece about 5mm longer than needed to allow for a bit of final trimming. I cut the pipe using a fine hacksaw in a mitre box, and finessed the angle to 47.5 degrees on both pieces using my disc sander. I used a piece of scrap to hold the smaller piece - saves burning or sanding down fingers :
The finished article after silver soldering ready for some small details. The assembly will be blackened when it's complete :
Danny
-
Dan Vadas reacted to gjdale in HMS Victory by gjdale - FINISHED - Mamoli - Scale 1:90
OK, they got me!
I arrived at Chatham station (UK) to meet Mobbsie for our tour of Chatham Dockyard, and was delightfully surprised to be met by Sjors and Anja as well. What a wonderful surprise it was too. We all had a great day at Chatham Dockyard where Mobbsie had arranged a private viewing of the model collection. What a treat! We were like kids in a candy store! Then we all came back to Mobbsie's place where his Admiral (Christine) had prepared a delicious roast dinner. We all ate and drank and told tall tales and true, amid much laughter. Had the opportunity to inspect Mobbsie's work first hand - and I have to say it looks even better in the flesh than in the pictures he has posted.
Sjors has already posted a few pics, but here is one of all of us. I'm the one looking like Santa Claus minus the red suit!
What a great example of the power of this forum, to bring together people from all over the world, and on meeting for the first time it's like we have been lifelong friends.
Thanks Mobbsie for arranging it all, and thanks Anja and Sjors for making the effort to come over for the weekend. And of course, thanks to Admiral Christine (C-in-C Home Fleet) for your gracious hospitality.
-
 Dan Vadas got a reaction from Kevin in HMS Vulture 1776 by Dan Vadas - FINISHED - 1:48 scale - 16-gun Swan-class sloop from TFFM plans
Galley Cowl
Time for some more brass work. The Galley Cowl is 15" in diameter, which scales down to 8mm. The top piece is fitted at a slight angle upwards, about 95 degrees at the join.
I turned the outside diameter first from a piece of 10mm stock - the closest I had. Then I drilled the centre out to 7.5mm - in several steps starting with a 3mm pilot hole :
I made the piece about 5mm longer than needed to allow for a bit of final trimming. I cut the pipe using a fine hacksaw in a mitre box, and finessed the angle to 47.5 degrees on both pieces using my disc sander. I used a piece of scrap to hold the smaller piece - saves burning or sanding down fingers :
The finished article after silver soldering ready for some small details. The assembly will be blackened when it's complete :
Danny
-
Dan Vadas got a reaction from harvey1847 in HMS Vulture 1776 by Dan Vadas - FINISHED - 1:48 scale - 16-gun Swan-class sloop from TFFM plans
Steam Grating
I've made my first (and maybe ONLY) Grating - this goes over the stove. I'm a bit reluctant to make too many more (maybe some on the quarterdeck) as they hide too much detail beneath.
The grating stock is 0.79mm thick English Box, a fraction oversize (they should be 0.75mm) but I decided to make them the size of a 0.030" kerfed saw blade on the Byrnes saw using the Micrometer Stop.
My first job was to make a list of the spacings (i.e. the Micrometer stops) using a spreadsheet. This made it a lot easier to work out accurately than trying to remember and then calculate each one (especially if I'm interrupted ) :
Then I set up a piece of 2mm thick stock and started cutting 18 slots halfway through using the micrometer to set up each one (I made a couple of spares "just in case" - I needed them too ):
Then I cut each strip off against the fence, again using the micrometer stop. The measurements are identical to the previous cuts :
Assembly is the same as using kit gratings (fiddly, but at least they were cut more accurately than most kit ones). I dipped the grating into diluted PVA and let it dry :
After sanding the grating to size and gluing it into place I sanded the roundup in. I've also fitted the Cowl Base :
Danny
-
Dan Vadas got a reaction from Wishmaster in HMS Vulture 1776 by Dan Vadas - FINISHED - 1:48 scale - 16-gun Swan-class sloop from TFFM plans
Steam Grating
I've made my first (and maybe ONLY) Grating - this goes over the stove. I'm a bit reluctant to make too many more (maybe some on the quarterdeck) as they hide too much detail beneath.
The grating stock is 0.79mm thick English Box, a fraction oversize (they should be 0.75mm) but I decided to make them the size of a 0.030" kerfed saw blade on the Byrnes saw using the Micrometer Stop.
My first job was to make a list of the spacings (i.e. the Micrometer stops) using a spreadsheet. This made it a lot easier to work out accurately than trying to remember and then calculate each one (especially if I'm interrupted ) :
Then I set up a piece of 2mm thick stock and started cutting 18 slots halfway through using the micrometer to set up each one (I made a couple of spares "just in case" - I needed them too ):
Then I cut each strip off against the fence, again using the micrometer stop. The measurements are identical to the previous cuts :
Assembly is the same as using kit gratings (fiddly, but at least they were cut more accurately than most kit ones). I dipped the grating into diluted PVA and let it dry :
After sanding the grating to size and gluing it into place I sanded the roundup in. I've also fitted the Cowl Base :
Danny
-
Dan Vadas got a reaction from riverboat in HMS Vulture 1776 by Dan Vadas - FINISHED - 1:48 scale - 16-gun Swan-class sloop from TFFM plans
Steam Grating
I've made my first (and maybe ONLY) Grating - this goes over the stove. I'm a bit reluctant to make too many more (maybe some on the quarterdeck) as they hide too much detail beneath.
The grating stock is 0.79mm thick English Box, a fraction oversize (they should be 0.75mm) but I decided to make them the size of a 0.030" kerfed saw blade on the Byrnes saw using the Micrometer Stop.
My first job was to make a list of the spacings (i.e. the Micrometer stops) using a spreadsheet. This made it a lot easier to work out accurately than trying to remember and then calculate each one (especially if I'm interrupted ) :
Then I set up a piece of 2mm thick stock and started cutting 18 slots halfway through using the micrometer to set up each one (I made a couple of spares "just in case" - I needed them too ):
Then I cut each strip off against the fence, again using the micrometer stop. The measurements are identical to the previous cuts :
Assembly is the same as using kit gratings (fiddly, but at least they were cut more accurately than most kit ones). I dipped the grating into diluted PVA and let it dry :
After sanding the grating to size and gluing it into place I sanded the roundup in. I've also fitted the Cowl Base :
Danny
-
Dan Vadas got a reaction from rdsaplala in HMS Vulture 1776 by Dan Vadas - FINISHED - 1:48 scale - 16-gun Swan-class sloop from TFFM plans
Steam Grating
I've made my first (and maybe ONLY) Grating - this goes over the stove. I'm a bit reluctant to make too many more (maybe some on the quarterdeck) as they hide too much detail beneath.
The grating stock is 0.79mm thick English Box, a fraction oversize (they should be 0.75mm) but I decided to make them the size of a 0.030" kerfed saw blade on the Byrnes saw using the Micrometer Stop.
My first job was to make a list of the spacings (i.e. the Micrometer stops) using a spreadsheet. This made it a lot easier to work out accurately than trying to remember and then calculate each one (especially if I'm interrupted ) :
Then I set up a piece of 2mm thick stock and started cutting 18 slots halfway through using the micrometer to set up each one (I made a couple of spares "just in case" - I needed them too ):
Then I cut each strip off against the fence, again using the micrometer stop. The measurements are identical to the previous cuts :
Assembly is the same as using kit gratings (fiddly, but at least they were cut more accurately than most kit ones). I dipped the grating into diluted PVA and let it dry :
After sanding the grating to size and gluing it into place I sanded the roundup in. I've also fitted the Cowl Base :
Danny
-
 Dan Vadas got a reaction from sonicmcdude in HMS Vulture 1776 by Dan Vadas - FINISHED - 1:48 scale - 16-gun Swan-class sloop from TFFM plans
Steam Grating
I've made my first (and maybe ONLY) Grating - this goes over the stove. I'm a bit reluctant to make too many more (maybe some on the quarterdeck) as they hide too much detail beneath.
The grating stock is 0.79mm thick English Box, a fraction oversize (they should be 0.75mm) but I decided to make them the size of a 0.030" kerfed saw blade on the Byrnes saw using the Micrometer Stop.
My first job was to make a list of the spacings (i.e. the Micrometer stops) using a spreadsheet. This made it a lot easier to work out accurately than trying to remember and then calculate each one (especially if I'm interrupted ) :
Then I set up a piece of 2mm thick stock and started cutting 18 slots halfway through using the micrometer to set up each one (I made a couple of spares "just in case" - I needed them too ):
Then I cut each strip off against the fence, again using the micrometer stop. The measurements are identical to the previous cuts :
Assembly is the same as using kit gratings (fiddly, but at least they were cut more accurately than most kit ones). I dipped the grating into diluted PVA and let it dry :
After sanding the grating to size and gluing it into place I sanded the roundup in. I've also fitted the Cowl Base :
Danny
-
 Dan Vadas got a reaction from Adrieke in HMS Vulture 1776 by Dan Vadas - FINISHED - 1:48 scale - 16-gun Swan-class sloop from TFFM plans
Steam Grating
I've made my first (and maybe ONLY) Grating - this goes over the stove. I'm a bit reluctant to make too many more (maybe some on the quarterdeck) as they hide too much detail beneath.
The grating stock is 0.79mm thick English Box, a fraction oversize (they should be 0.75mm) but I decided to make them the size of a 0.030" kerfed saw blade on the Byrnes saw using the Micrometer Stop.
My first job was to make a list of the spacings (i.e. the Micrometer stops) using a spreadsheet. This made it a lot easier to work out accurately than trying to remember and then calculate each one (especially if I'm interrupted ) :
Then I set up a piece of 2mm thick stock and started cutting 18 slots halfway through using the micrometer to set up each one (I made a couple of spares "just in case" - I needed them too ):
Then I cut each strip off against the fence, again using the micrometer stop. The measurements are identical to the previous cuts :
Assembly is the same as using kit gratings (fiddly, but at least they were cut more accurately than most kit ones). I dipped the grating into diluted PVA and let it dry :
After sanding the grating to size and gluing it into place I sanded the roundup in. I've also fitted the Cowl Base :
Danny
-
 Dan Vadas got a reaction from egen in HMS Vulture 1776 by Dan Vadas - FINISHED - 1:48 scale - 16-gun Swan-class sloop from TFFM plans
Steam Grating
I've made my first (and maybe ONLY) Grating - this goes over the stove. I'm a bit reluctant to make too many more (maybe some on the quarterdeck) as they hide too much detail beneath.
The grating stock is 0.79mm thick English Box, a fraction oversize (they should be 0.75mm) but I decided to make them the size of a 0.030" kerfed saw blade on the Byrnes saw using the Micrometer Stop.
My first job was to make a list of the spacings (i.e. the Micrometer stops) using a spreadsheet. This made it a lot easier to work out accurately than trying to remember and then calculate each one (especially if I'm interrupted ) :
Then I set up a piece of 2mm thick stock and started cutting 18 slots halfway through using the micrometer to set up each one (I made a couple of spares "just in case" - I needed them too ):
Then I cut each strip off against the fence, again using the micrometer stop. The measurements are identical to the previous cuts :
Assembly is the same as using kit gratings (fiddly, but at least they were cut more accurately than most kit ones). I dipped the grating into diluted PVA and let it dry :
After sanding the grating to size and gluing it into place I sanded the roundup in. I've also fitted the Cowl Base :
Danny
-
 Dan Vadas got a reaction from BANYAN in HMS Vulture 1776 by Dan Vadas - FINISHED - 1:48 scale - 16-gun Swan-class sloop from TFFM plans
Steam Grating
I've made my first (and maybe ONLY) Grating - this goes over the stove. I'm a bit reluctant to make too many more (maybe some on the quarterdeck) as they hide too much detail beneath.
The grating stock is 0.79mm thick English Box, a fraction oversize (they should be 0.75mm) but I decided to make them the size of a 0.030" kerfed saw blade on the Byrnes saw using the Micrometer Stop.
My first job was to make a list of the spacings (i.e. the Micrometer stops) using a spreadsheet. This made it a lot easier to work out accurately than trying to remember and then calculate each one (especially if I'm interrupted ) :
Then I set up a piece of 2mm thick stock and started cutting 18 slots halfway through using the micrometer to set up each one (I made a couple of spares "just in case" - I needed them too ):
Then I cut each strip off against the fence, again using the micrometer stop. The measurements are identical to the previous cuts :
Assembly is the same as using kit gratings (fiddly, but at least they were cut more accurately than most kit ones). I dipped the grating into diluted PVA and let it dry :
After sanding the grating to size and gluing it into place I sanded the roundup in. I've also fitted the Cowl Base :
Danny
-
 Dan Vadas got a reaction from druxey in HMS Vulture 1776 by Dan Vadas - FINISHED - 1:48 scale - 16-gun Swan-class sloop from TFFM plans
Steam Grating
I've made my first (and maybe ONLY) Grating - this goes over the stove. I'm a bit reluctant to make too many more (maybe some on the quarterdeck) as they hide too much detail beneath.
The grating stock is 0.79mm thick English Box, a fraction oversize (they should be 0.75mm) but I decided to make them the size of a 0.030" kerfed saw blade on the Byrnes saw using the Micrometer Stop.
My first job was to make a list of the spacings (i.e. the Micrometer stops) using a spreadsheet. This made it a lot easier to work out accurately than trying to remember and then calculate each one (especially if I'm interrupted ) :
Then I set up a piece of 2mm thick stock and started cutting 18 slots halfway through using the micrometer to set up each one (I made a couple of spares "just in case" - I needed them too ):
Then I cut each strip off against the fence, again using the micrometer stop. The measurements are identical to the previous cuts :
Assembly is the same as using kit gratings (fiddly, but at least they were cut more accurately than most kit ones). I dipped the grating into diluted PVA and let it dry :
After sanding the grating to size and gluing it into place I sanded the roundup in. I've also fitted the Cowl Base :
Danny
-
 Dan Vadas got a reaction from Piet in HMS Vulture 1776 by Dan Vadas - FINISHED - 1:48 scale - 16-gun Swan-class sloop from TFFM plans
Steam Grating
I've made my first (and maybe ONLY) Grating - this goes over the stove. I'm a bit reluctant to make too many more (maybe some on the quarterdeck) as they hide too much detail beneath.
The grating stock is 0.79mm thick English Box, a fraction oversize (they should be 0.75mm) but I decided to make them the size of a 0.030" kerfed saw blade on the Byrnes saw using the Micrometer Stop.
My first job was to make a list of the spacings (i.e. the Micrometer stops) using a spreadsheet. This made it a lot easier to work out accurately than trying to remember and then calculate each one (especially if I'm interrupted ) :
Then I set up a piece of 2mm thick stock and started cutting 18 slots halfway through using the micrometer to set up each one (I made a couple of spares "just in case" - I needed them too ):
Then I cut each strip off against the fence, again using the micrometer stop. The measurements are identical to the previous cuts :
Assembly is the same as using kit gratings (fiddly, but at least they were cut more accurately than most kit ones). I dipped the grating into diluted PVA and let it dry :
After sanding the grating to size and gluing it into place I sanded the roundup in. I've also fitted the Cowl Base :
Danny
-
 Dan Vadas got a reaction from Padeen in HMS Vulture 1776 by Dan Vadas - FINISHED - 1:48 scale - 16-gun Swan-class sloop from TFFM plans
Steam Grating
I've made my first (and maybe ONLY) Grating - this goes over the stove. I'm a bit reluctant to make too many more (maybe some on the quarterdeck) as they hide too much detail beneath.
The grating stock is 0.79mm thick English Box, a fraction oversize (they should be 0.75mm) but I decided to make them the size of a 0.030" kerfed saw blade on the Byrnes saw using the Micrometer Stop.
My first job was to make a list of the spacings (i.e. the Micrometer stops) using a spreadsheet. This made it a lot easier to work out accurately than trying to remember and then calculate each one (especially if I'm interrupted ) :
Then I set up a piece of 2mm thick stock and started cutting 18 slots halfway through using the micrometer to set up each one (I made a couple of spares "just in case" - I needed them too ):
Then I cut each strip off against the fence, again using the micrometer stop. The measurements are identical to the previous cuts :
Assembly is the same as using kit gratings (fiddly, but at least they were cut more accurately than most kit ones). I dipped the grating into diluted PVA and let it dry :
After sanding the grating to size and gluing it into place I sanded the roundup in. I've also fitted the Cowl Base :
Danny
-
Dan Vadas got a reaction from rdsaplala in HMS Vulture 1776 by Dan Vadas - FINISHED - 1:48 scale - 16-gun Swan-class sloop from TFFM plans
Thanks Aldo, Kevin and Toni .
Steam Grating Coamings
There are two Steam Gratings and a Cowl Cover over the galley stove. These are shown in a different configuration to most of the other Swans, as Vulture's stove is facing the opposite way to them.
I constructed the coamings the same way I did all the previous ones, so there is no point showing that again. The only thing of note is the much larger "roundup" on the athwartships head ledges :
Danny
-
 Dan Vadas got a reaction from tlevine in HMS Vulture 1776 by Dan Vadas - FINISHED - 1:48 scale - 16-gun Swan-class sloop from TFFM plans
Thanks Aldo, Kevin and Toni .
Steam Grating Coamings
There are two Steam Gratings and a Cowl Cover over the galley stove. These are shown in a different configuration to most of the other Swans, as Vulture's stove is facing the opposite way to them.
I constructed the coamings the same way I did all the previous ones, so there is no point showing that again. The only thing of note is the much larger "roundup" on the athwartships head ledges :
Danny
-
 Dan Vadas got a reaction from Jorge Diaz O in HMS Vulture 1776 by Dan Vadas - FINISHED - 1:48 scale - 16-gun Swan-class sloop from TFFM plans
Catheads Fitted
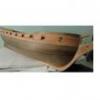
Both Catheads have now been fitted - only "dry" for the moment. I will cut the sheave holes and fit the sheaves off the ship before gluing them in. I also need to make the Cathead Caps, more about them shortly.
I surprised myself with how accurately they finished up - not even a fraction of a millimetre difference from the centre line or the baseboard :
The notch for beam #2, and the beam dry-fitted :
Danny