HOLIDAY DONATION DRIVE - SUPPORT MSW - DO YOUR PART TO KEEP THIS GREAT FORUM GOING! (Only 13 donations so far - C'mon guys!)
×

Richard Dunn
-
Posts
529 -
Joined
-
Last visited
Content Type
Profiles
Forums
Gallery
Events
Everything posted by Richard Dunn
-
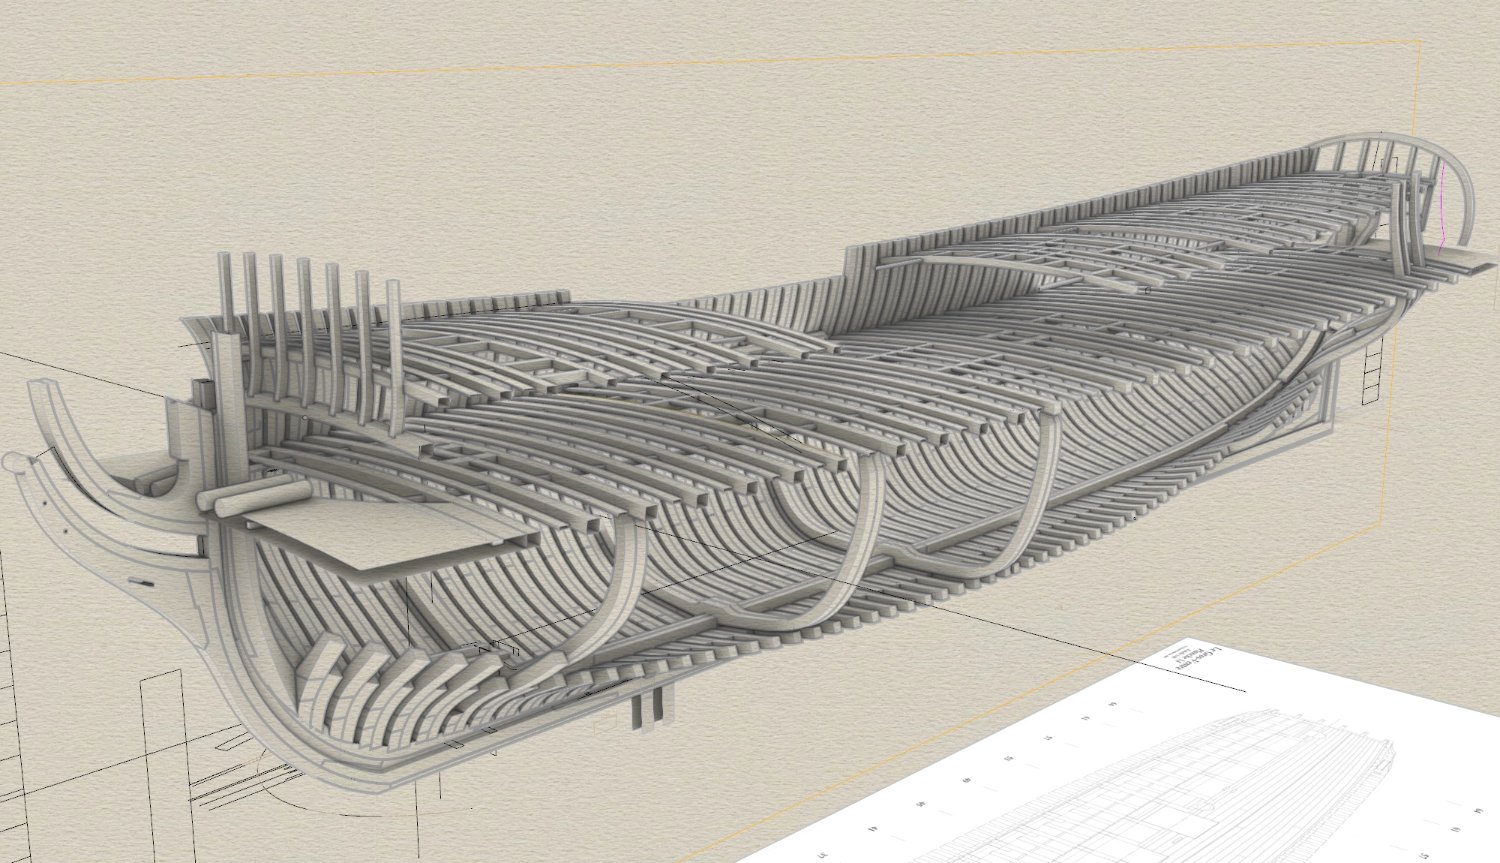
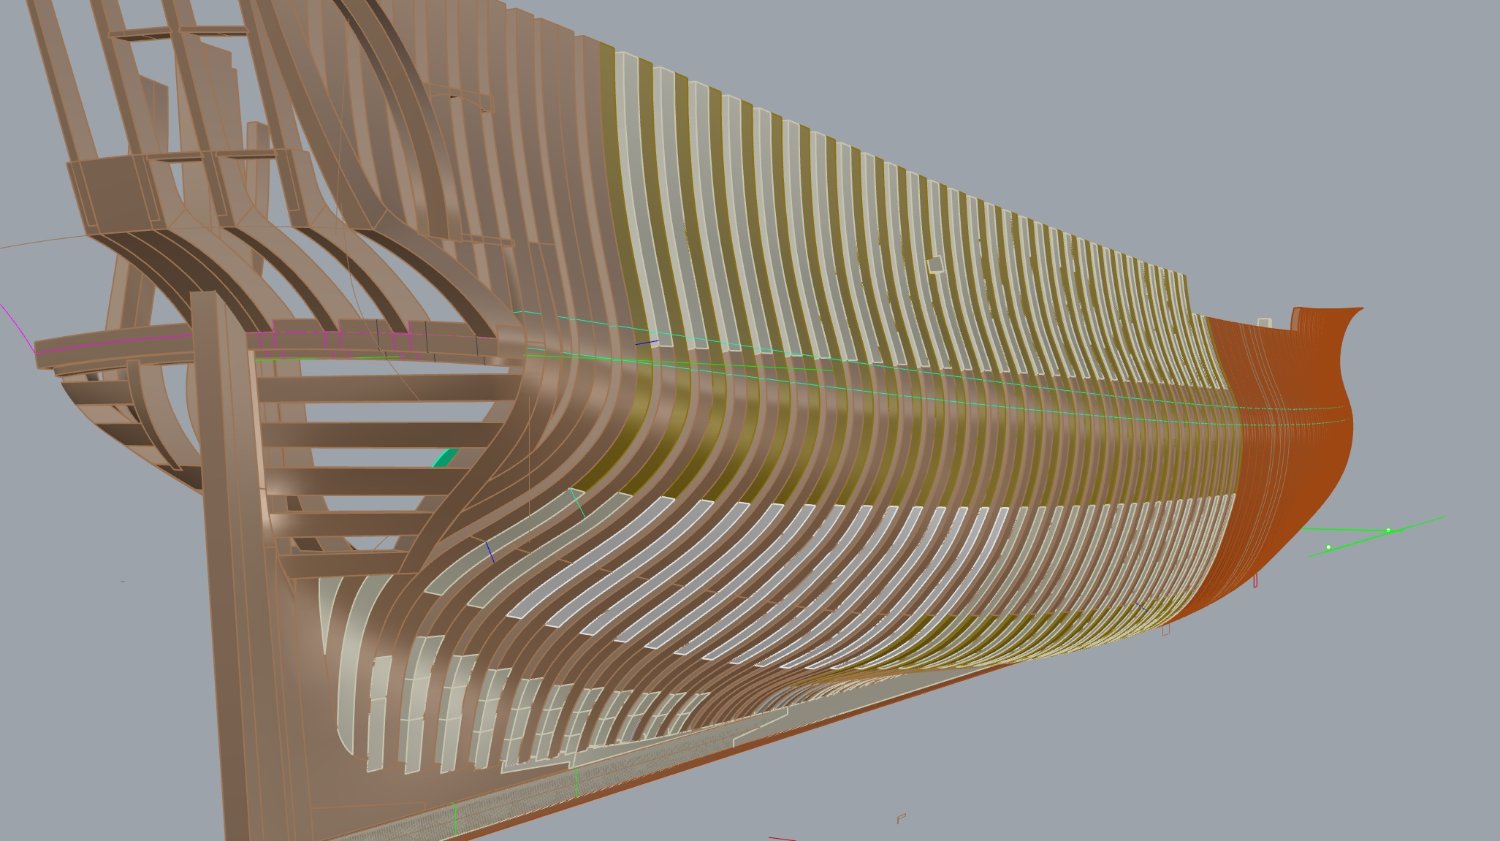
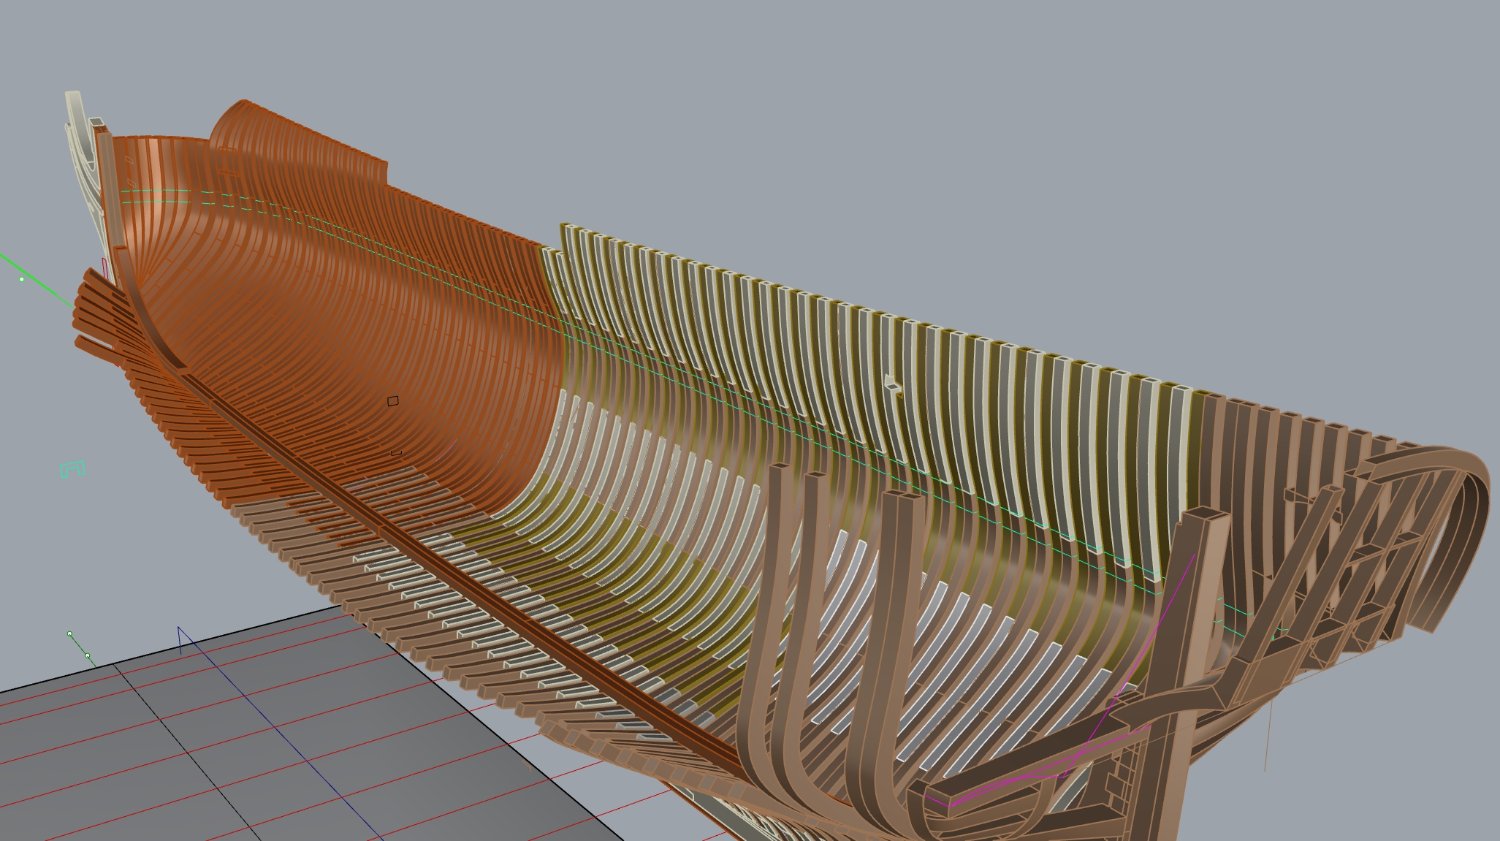
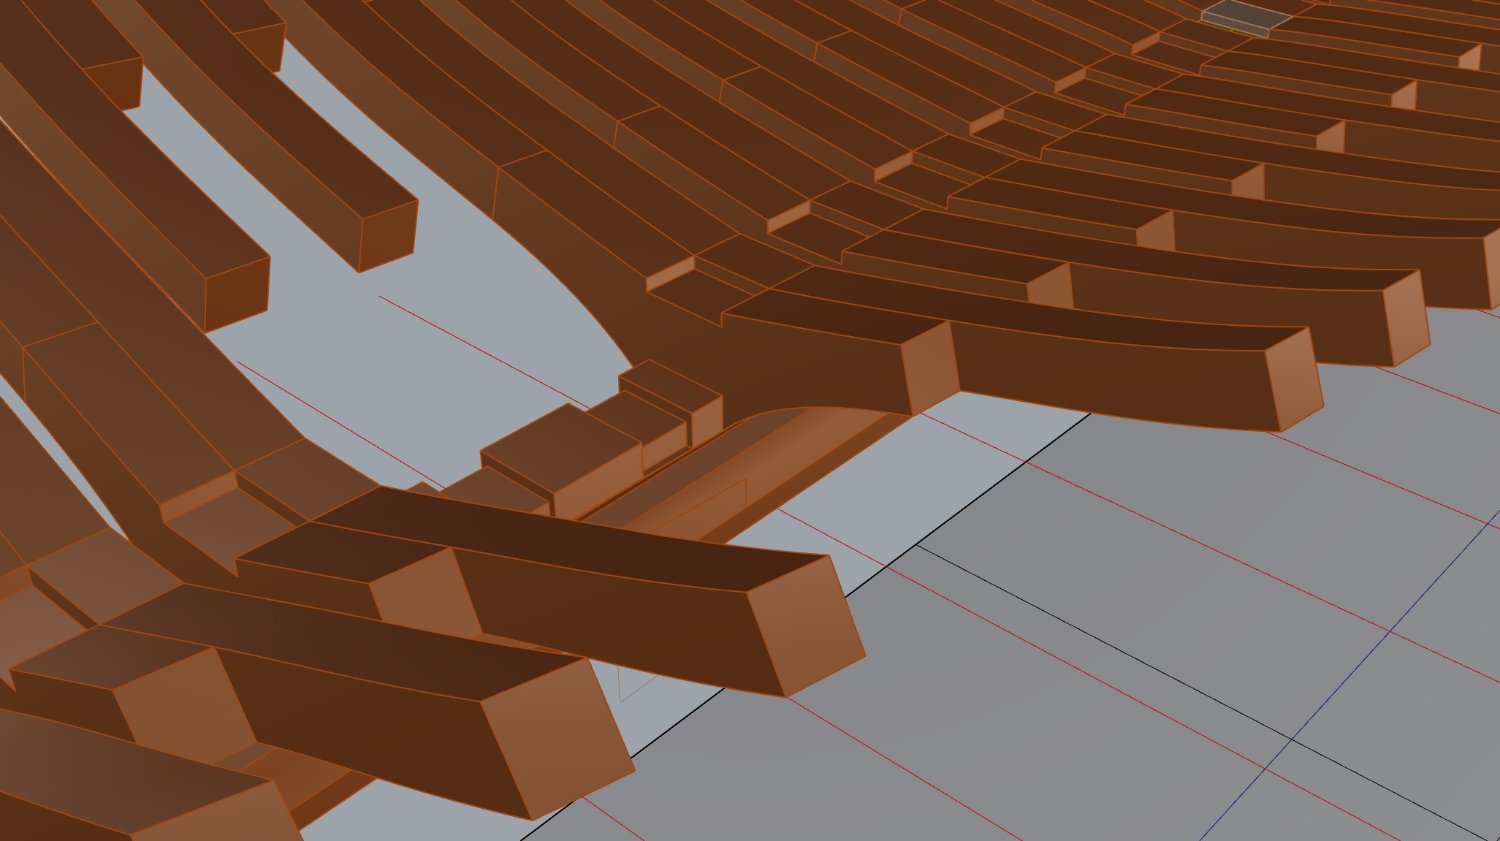
 A progress shot of framing in cad, just the waterways and clamps and the rest is pretty easy.
-
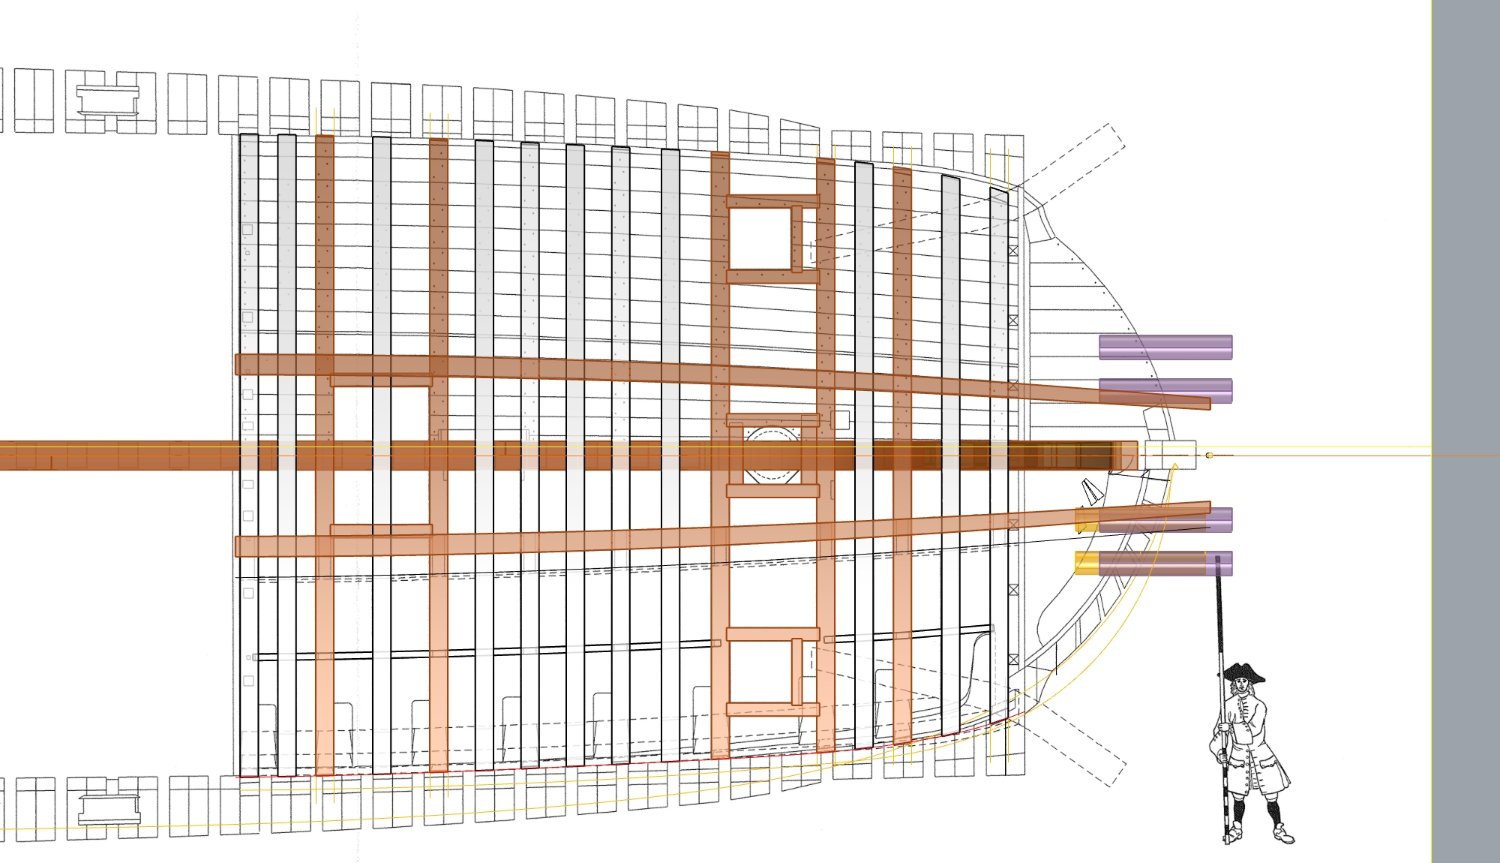
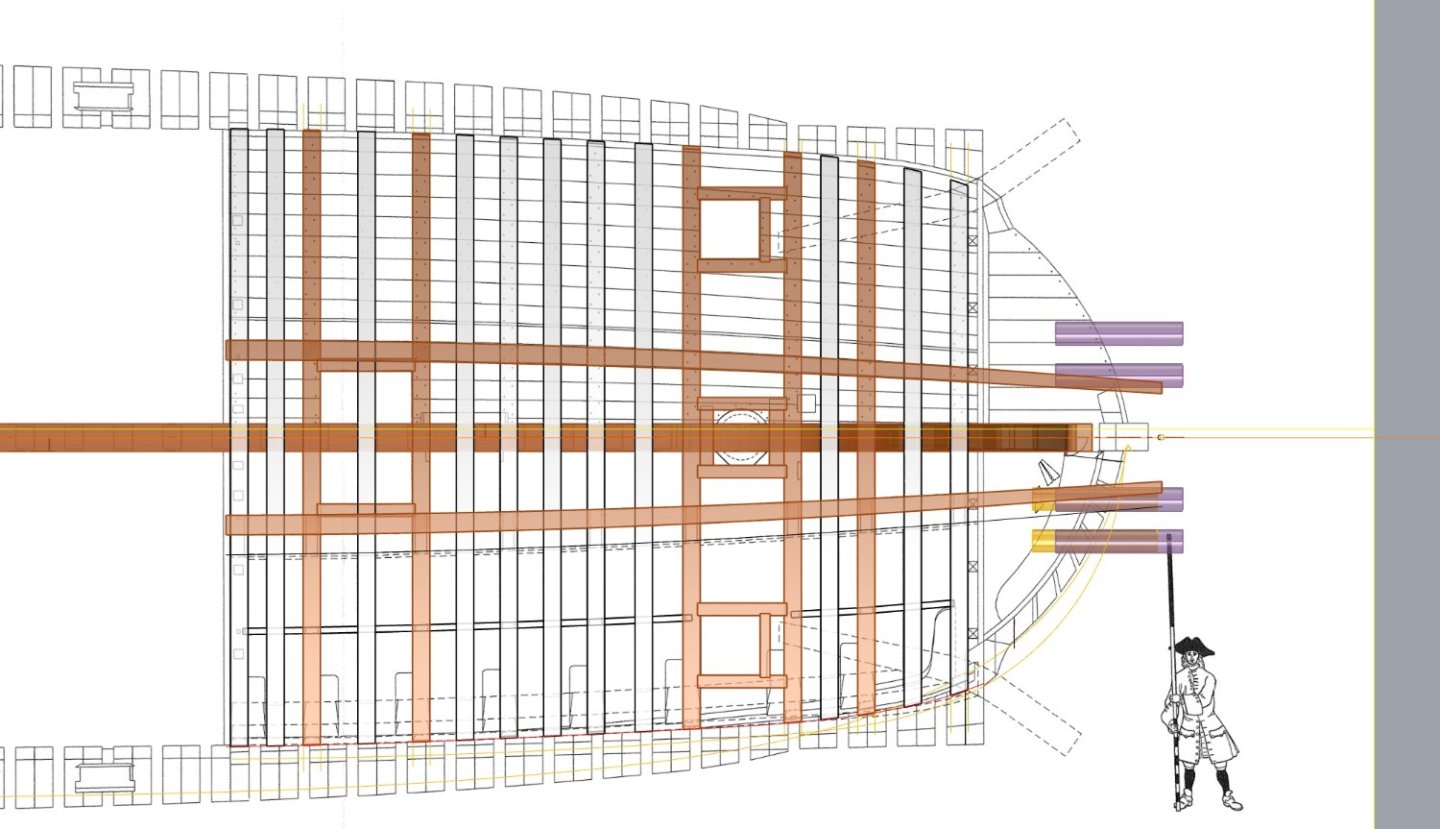
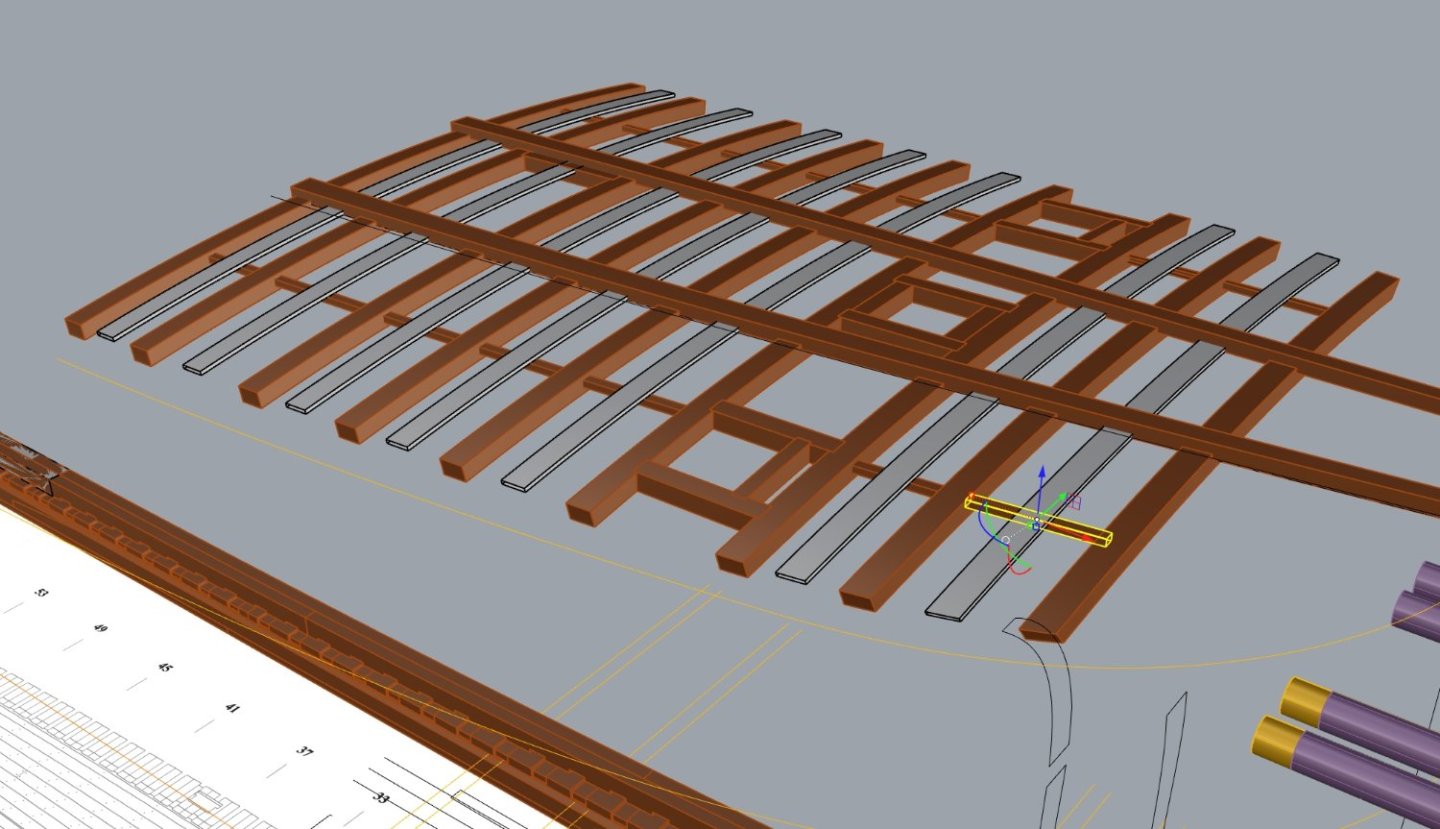
I have a question re the joint used for deck carlings into the main beams. Is it a tenon or a blind slot so they can be fitted from above?. Seen here highlighted yellow.
-
Beautiful work!, awesome alignment of the masts to. It always worries me that he topmasts will not stay straight either by tension or warping.
- 589 replies
-
- 2
-

-
- le gros ventre
- cargo
- (and 1 more)
-
Yeah it seems logical, even putting aside the obvious different practices of various countries at the end of the day there are only a couple of options really that present themselves to common sense. I doubt the builders of the day said" Oh we can't do that, that's the English way of doing it" they did what was effective, easiest and worked.
-
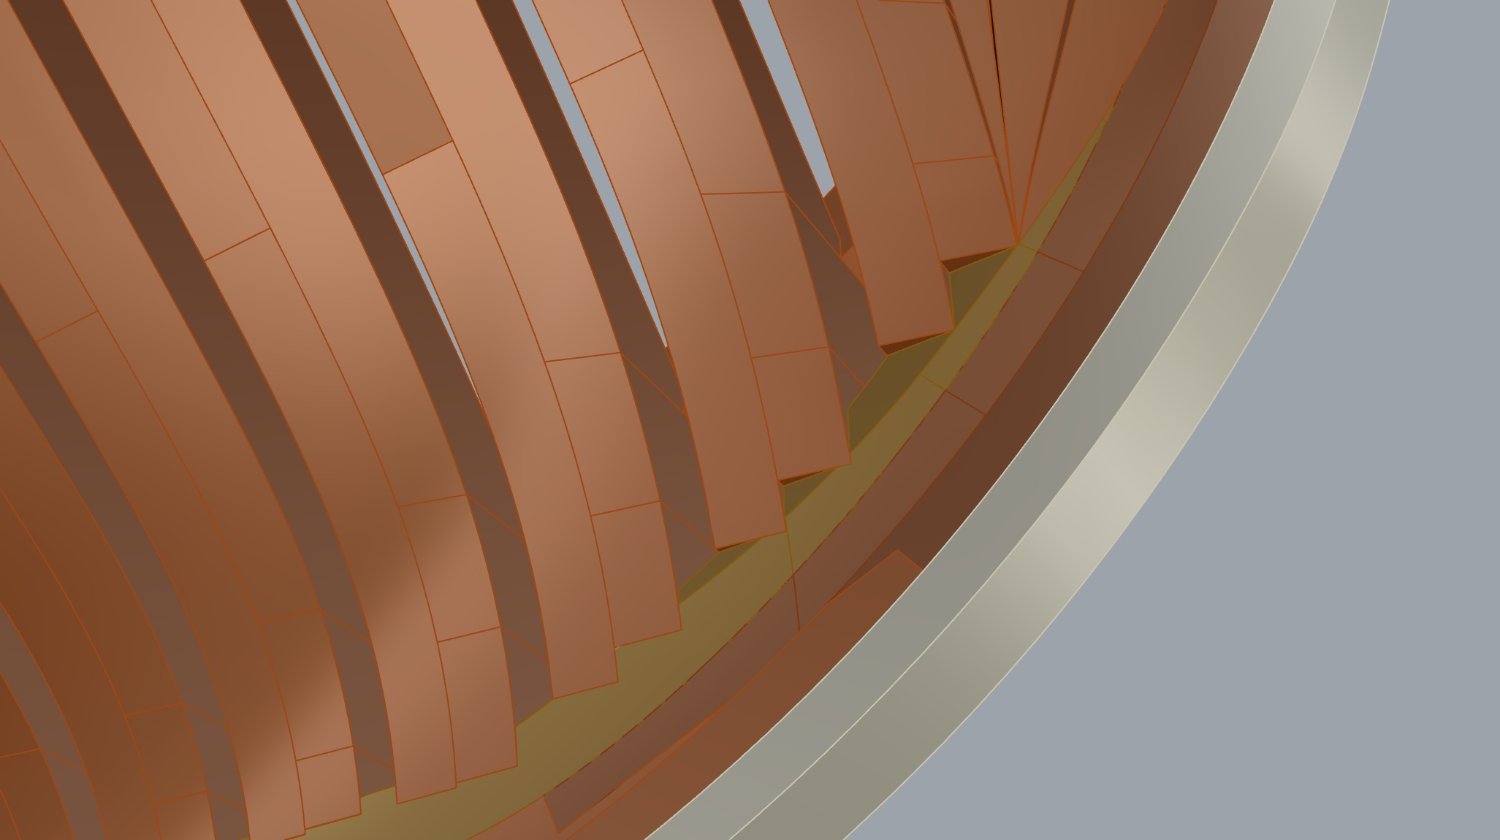
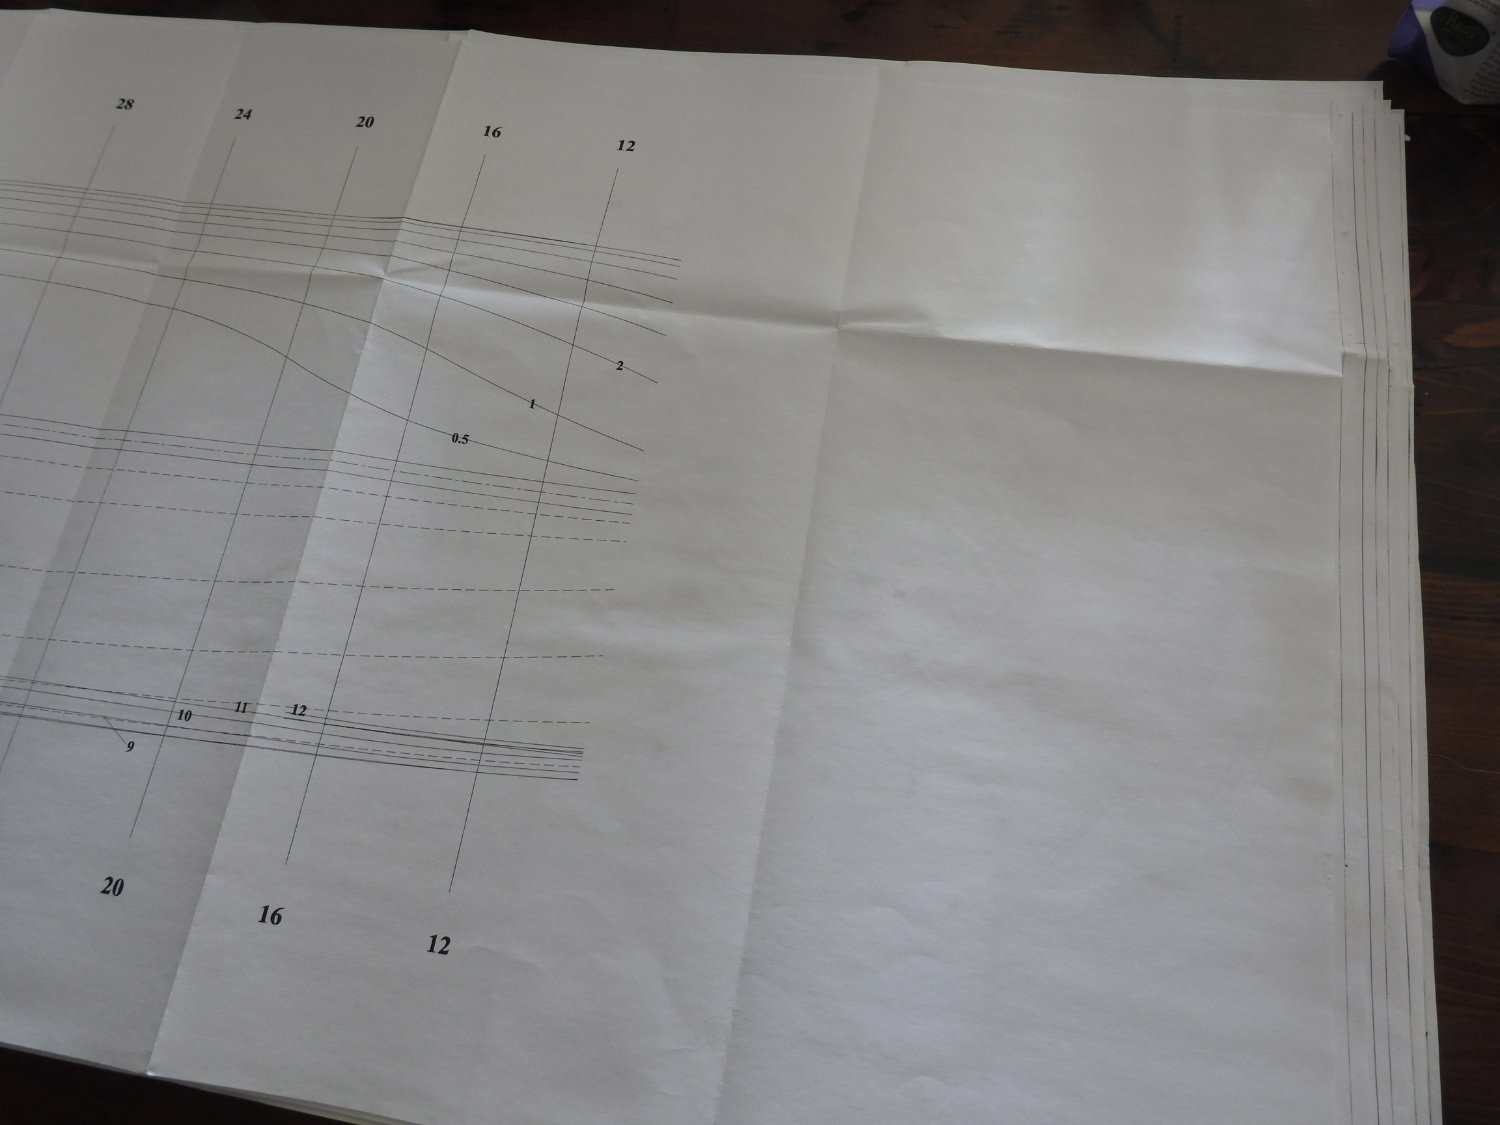
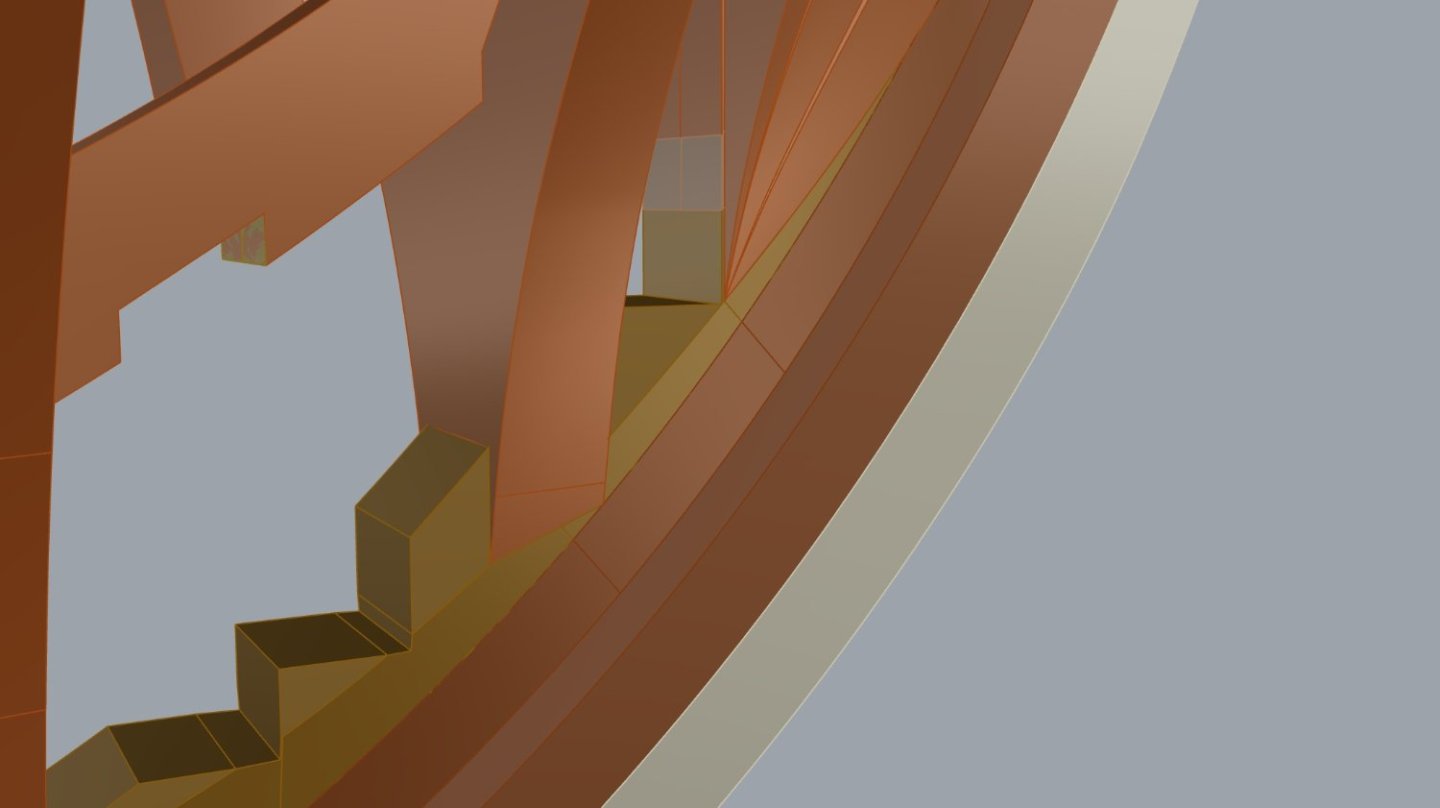
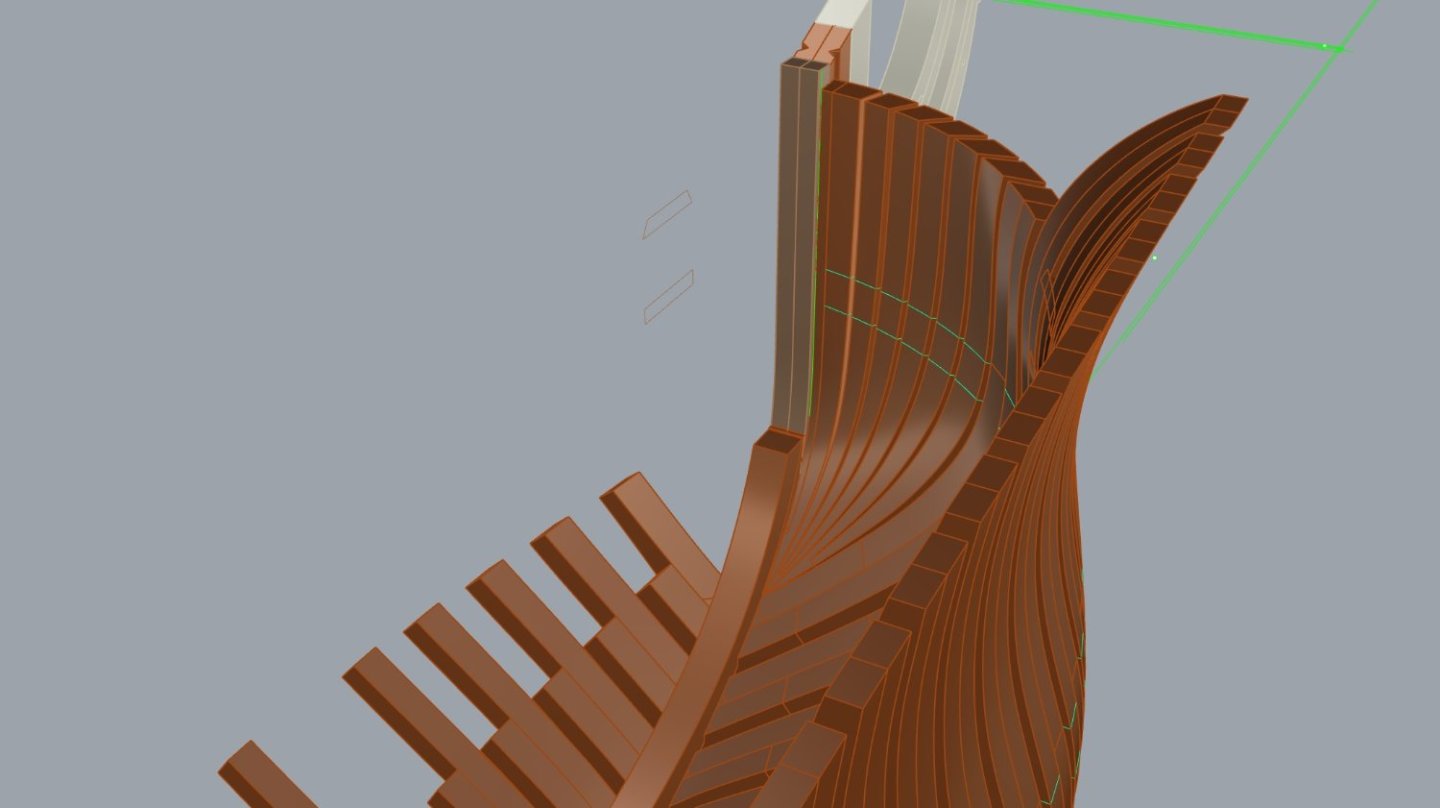
I am going to finally make a start today. I will get the building board done and I also need to change the way the forward half frames 1&2 connect to the deadwood after talking to Gerard. I want to be very clear about why I am doing this. I am not changing the plans for the sake of it but when I modelled the frames in 3d I found that the way its drawn in the Monograph when applied to my 3d model left a section of missing frame below where the frame heel is, some of you may have noticed this yourselves, it needs to extend down over the deadwood and terminate at the bearding line . because this would result in a taper to nothing it would not be done like this in reality as it would rot in the same way as scarphs are not left to run out but are nibbed, the only way this could be done is to rebate the frames into the sides of the deadwood as well, much like the main frames are on every second floor. I have spoken to Gerard about this and he is agreement that this is the most reasonable, consistent solution and is supported by some period drawings of the time. Models built at 1/48 and maybe even 1/36 may not even need to worry about this as the detail is so small and depending on your accuracy of the work it may or may not be obvious...if it's even seen in the final model. At 1/24 I feel it needs to be done as planks should never sit over voids in a frame for no reason, especially that low down in the hull, except limber holes of course. Some people may say this has happened because I have messed up in my model somewhere, I haven't....but even if I had the factors which contribute to this are the width of the deadwood which is known, the fineness of the lines in the forefoot which would need to be really off to make a difference and the last factor is the distance of the rebate line from the outer face of the keel and stem parts, which is also known, so it is very unlikely it's an error. The smallest athwartships distance on the wedge on the forward most frame is 2.5mm at 1/24. The resolution is to do a joint like this, this is just a 3D doodle not the final result but one I quickly did while talking to Gerard. The joint underneath is this but may need to be a bit deeper as I feel its still too thin on the extended portion.


-
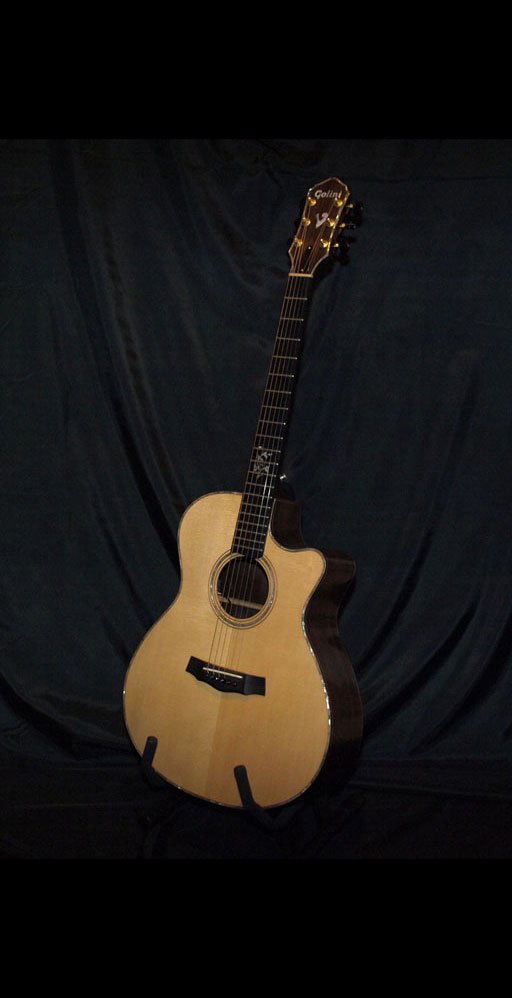
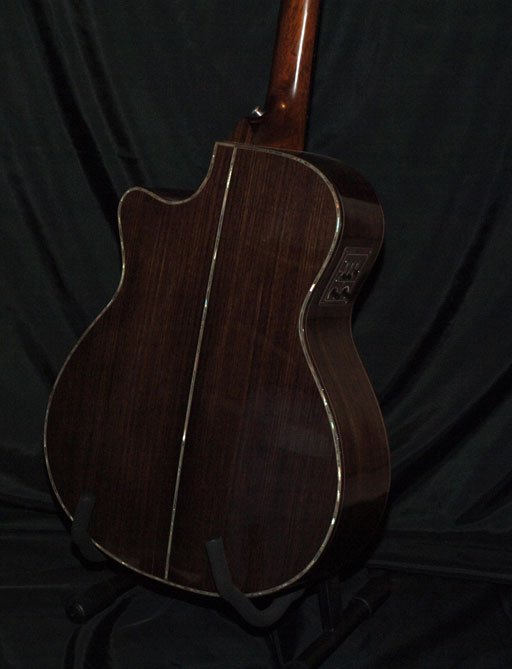
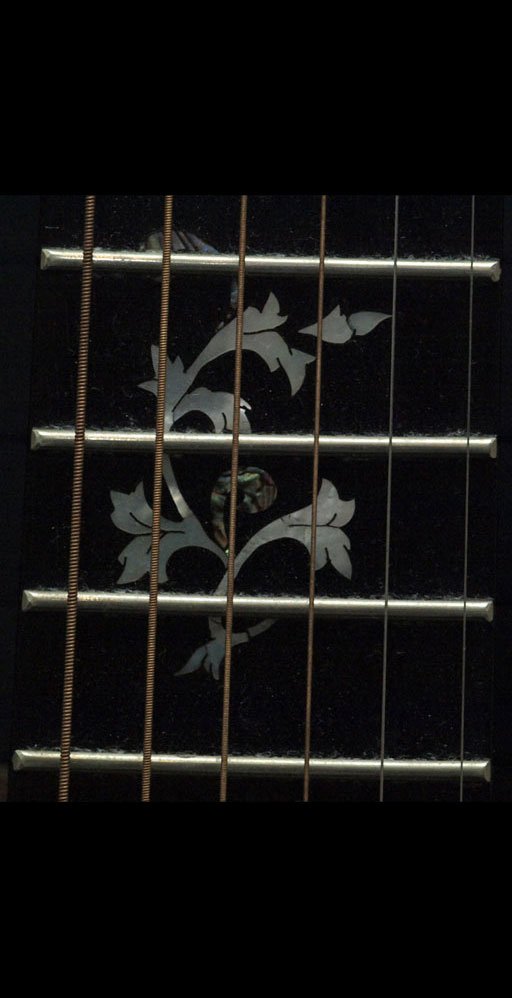
I Have chosen Cherry because of it's workability having built Queen Ann furniture from it in the past which also involves a fair bit of carving. Also because it has a fine grain and is very close to pear in appearance. The wood has about 8-10 % Sapwood white which is cream in colour and I am going to use this but not in frames, I don't like the checkerboard effect in frames where some futtocks are an extreme change. I will use varying shades of wood to accentuate the frames but use the sapwood for other things...if at all to be honest. In regards to grain the whole purpose of quarter sawn is to provide dimensional stability to the timber as it only shrinks in 1 direction and does so evenly and in a predictable way, Grain being parallel is true although it most important in wood that needs to be bent. In guitar building when we prepare wood for bracing the top of a guitar it is so important we don't have runout we split the wood off the stock with wedges and dress from there so the grain is as perfect and straight as it can be, easy with spruce and cedars but not so easy with harder woods, also very wasteful in comparison to careful selection. When you have to bend planks over a hot iron like when I bend guitar sides if you have any ( runout) in the grain it will start to delaminate from itself but when making guitar sides we bend 3mm thick hardwood as wide as 140mm around a 40mm radius and that's extreme, it takes a while to learn this so I have no problem with bending!. You learn this on easier woods like mahogany and maple but hardwoods like rosewood are harder to master, imaging trying to bend fiddleback maple which is effectively lines of end grain...it takes years to master it. I hate to think how much wood has been wasted learning this part of the craft. Of course bending model planks this way is something anyone can do at the sizes we deal with. Have a watch of this to understand what bending this way can accomplish and then look below at the tight curves done the exact same way. This is Indian Rosewood in the video and is a hard oily timber, the oil heats up and rubberises the wood and then resets when cool. I found this clip but it's not affiliated with me in any way. Here is some fine inlay work below, each tiny square of dyed veneer in these patterns is abou.6mm x .6mm square and made into the binding around the edge and the rosette Here you can see a tight bend in the 3mm Rosewood sides bent around a small radius, a lot of people think its laminated but proper luthiers bend them from solid. Mother of Pearl and Abalone inlay into Ebony, the width of that image is roughly 50mm in real world terms and are cut out with a jewellers fret saw. A couple of other shots

-
I plan on doing pretty much what you have done in regards to what's planked and what's not and fully rig the model. Although I will cross that bridge when it comes up,
-
Thanks Tobias, at least I know that I was looking at the right one now and not missing something.
-
Anybody know where the Ancre build forums is?, I can't see it anywhere, wondering if it's invite only or on another site or something Unless you mean this model at 1/24th scale by Alain. F. BERTRAND
-
Thanks Chris, I have been watching yours to, but I missed the Ancre forum, I have never seen a link to it on the site.
-
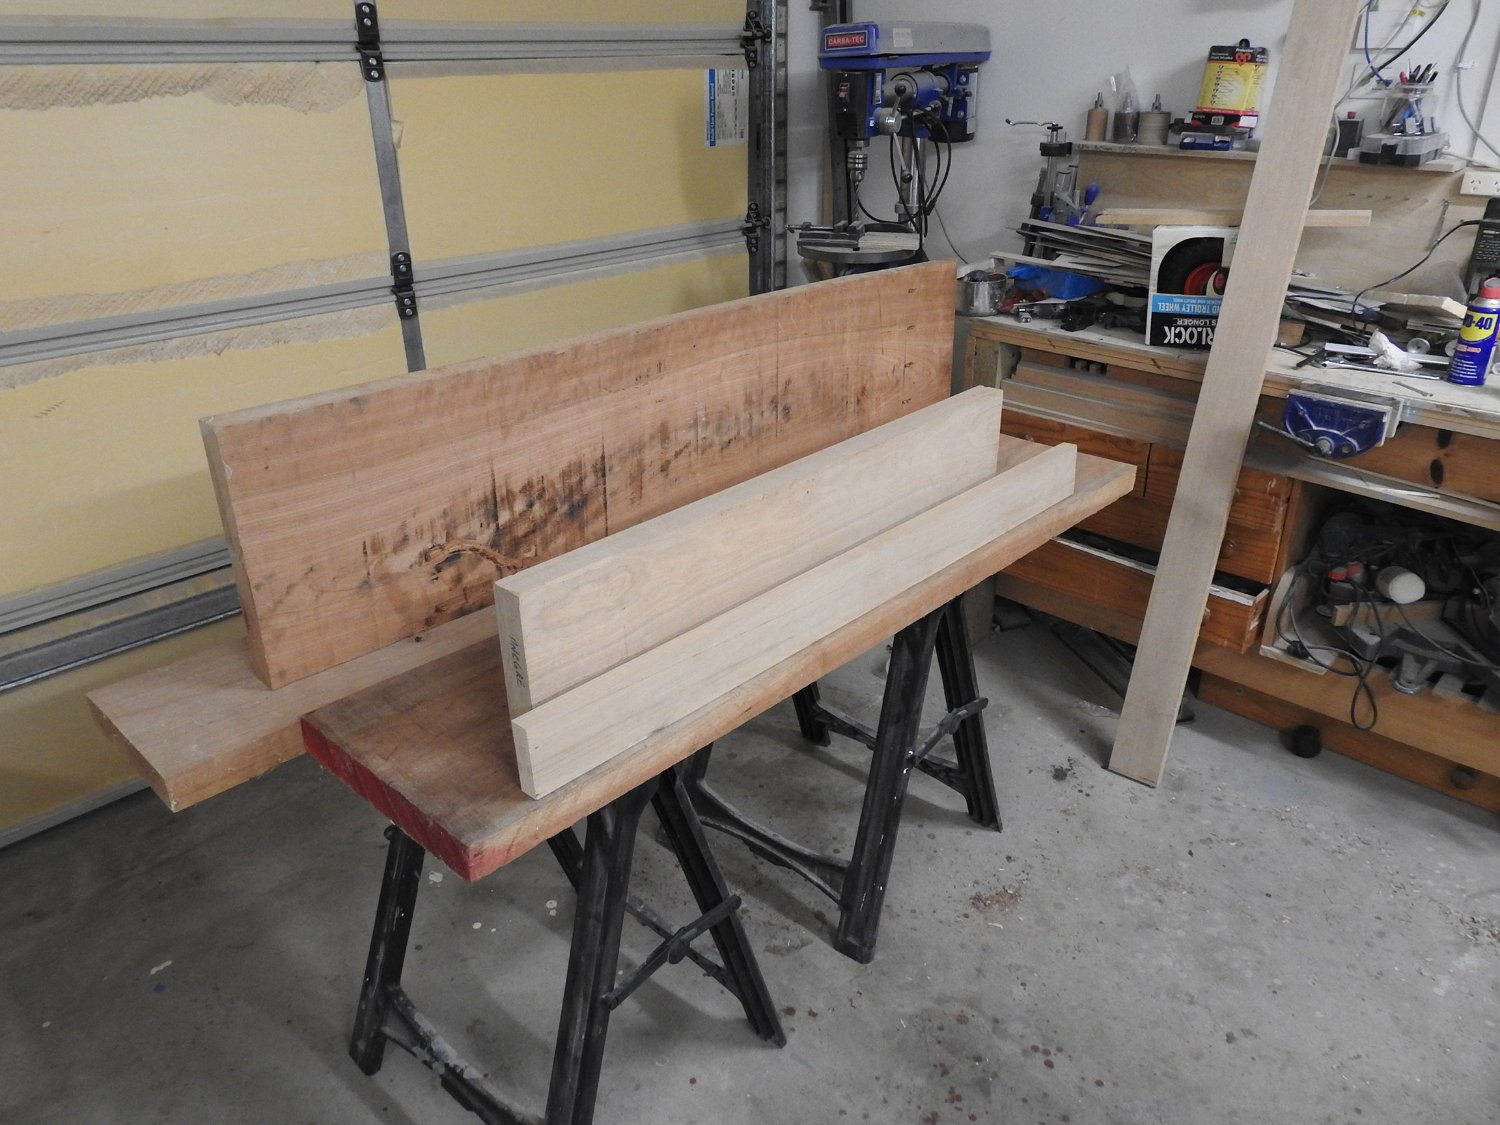
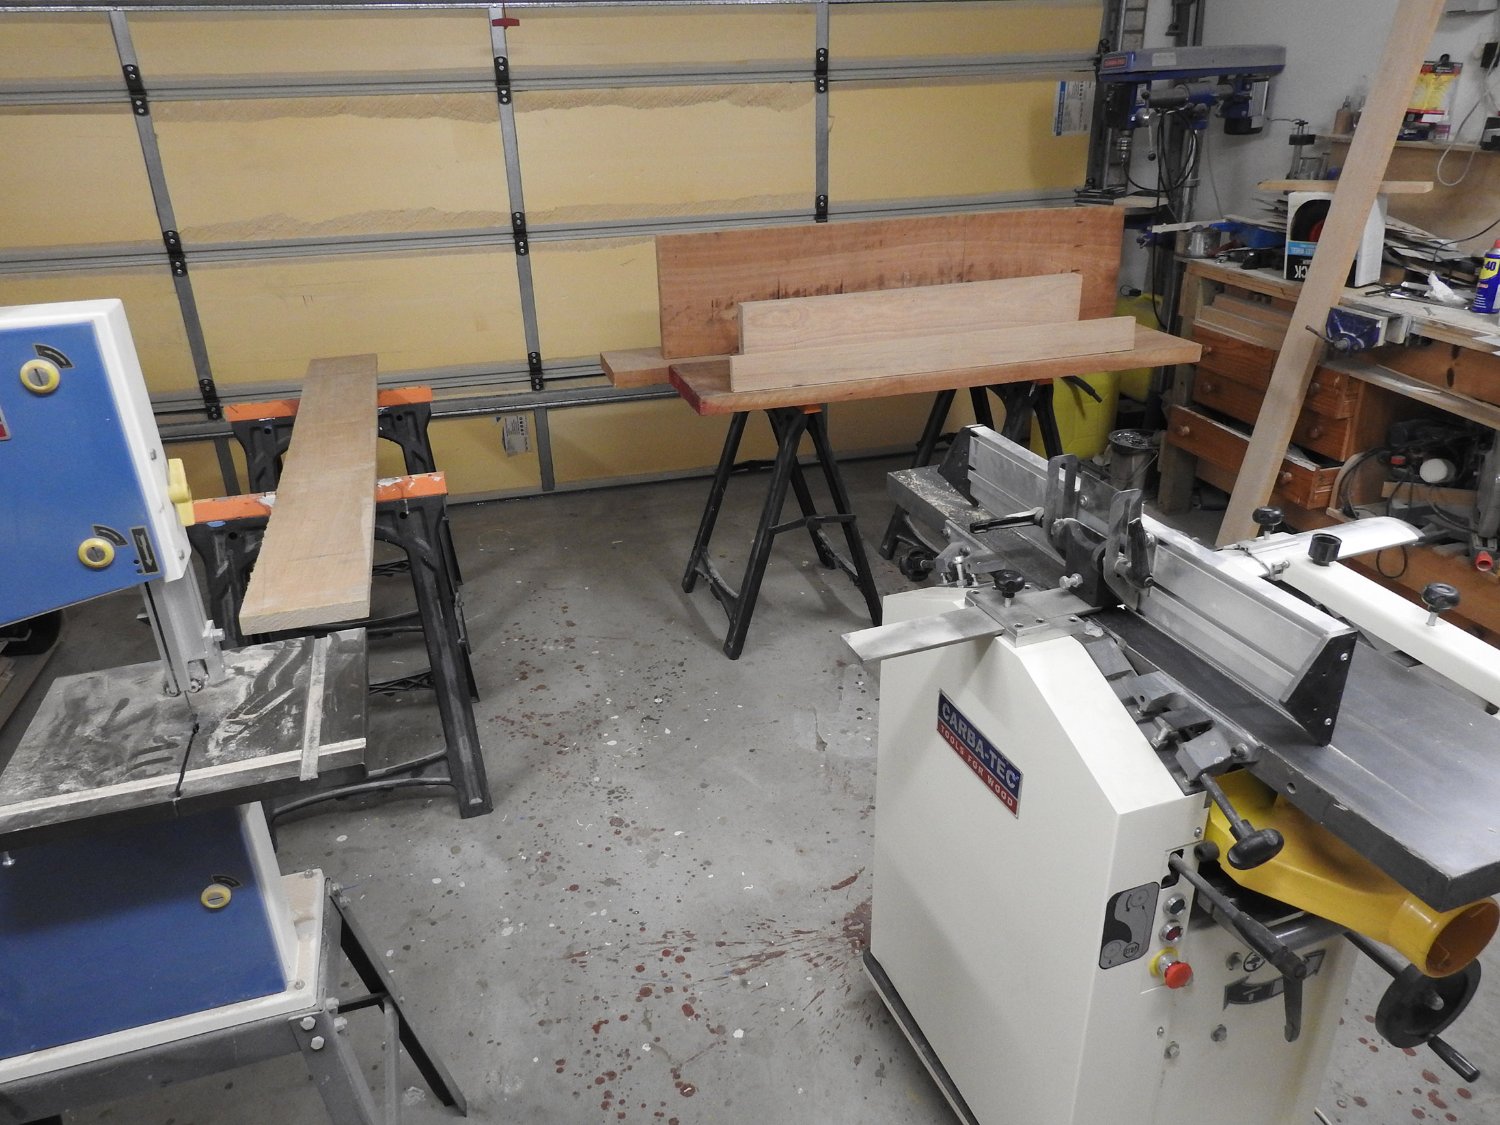
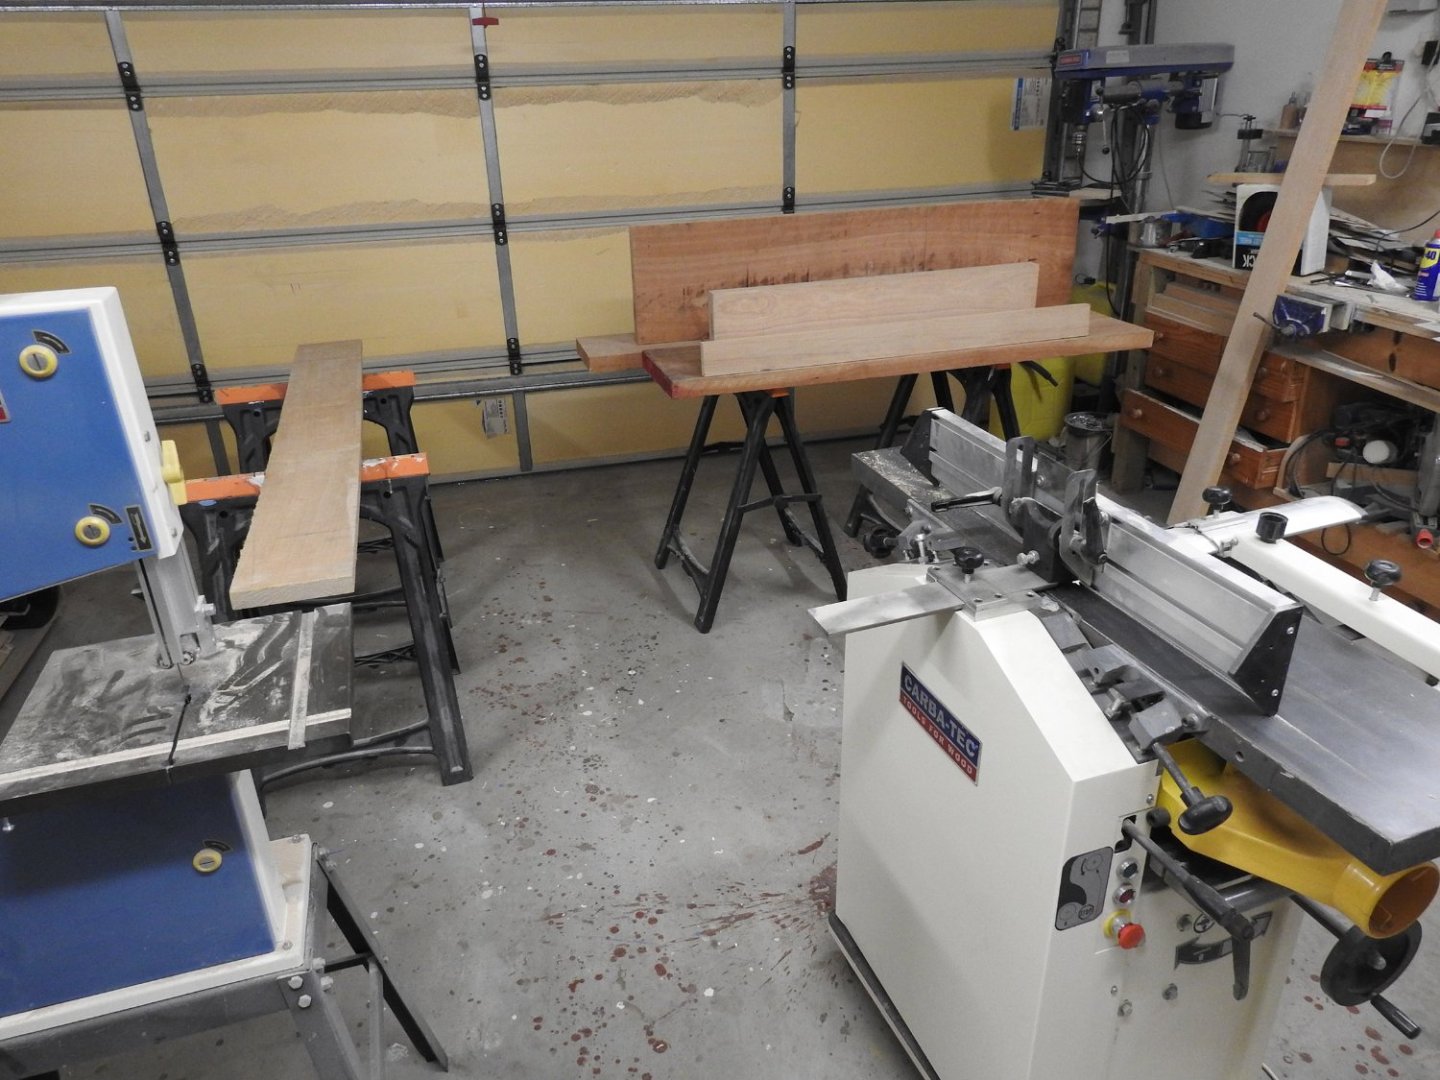
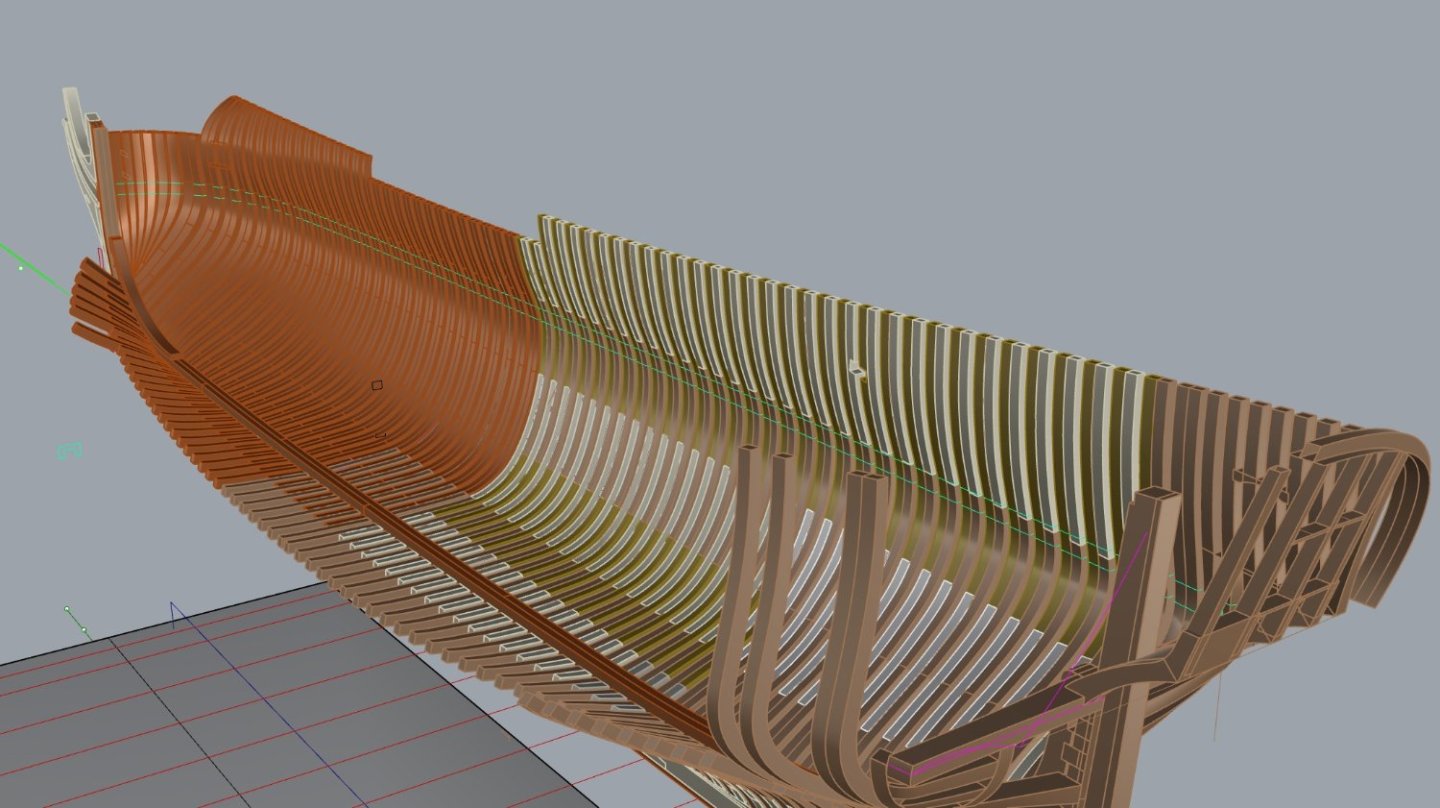
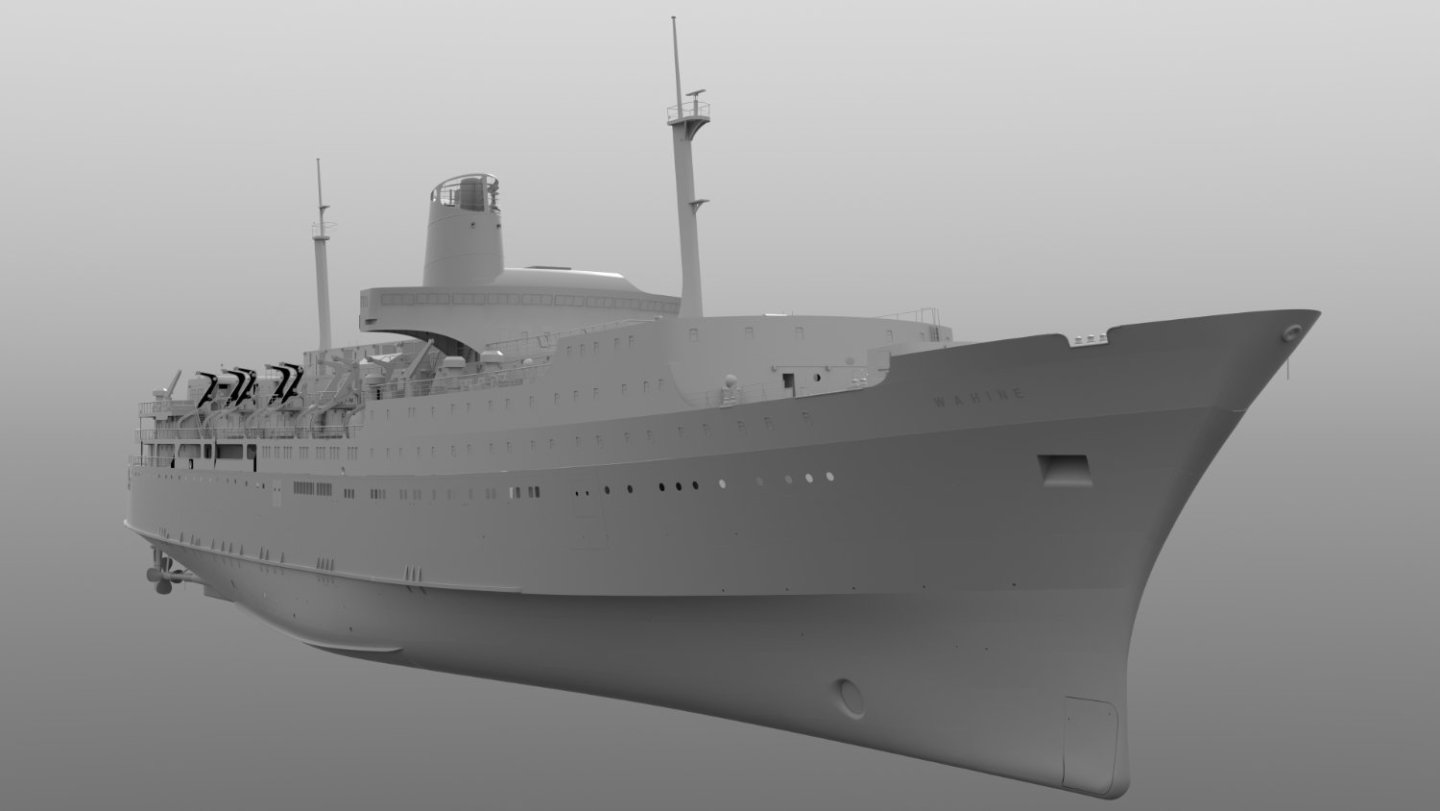
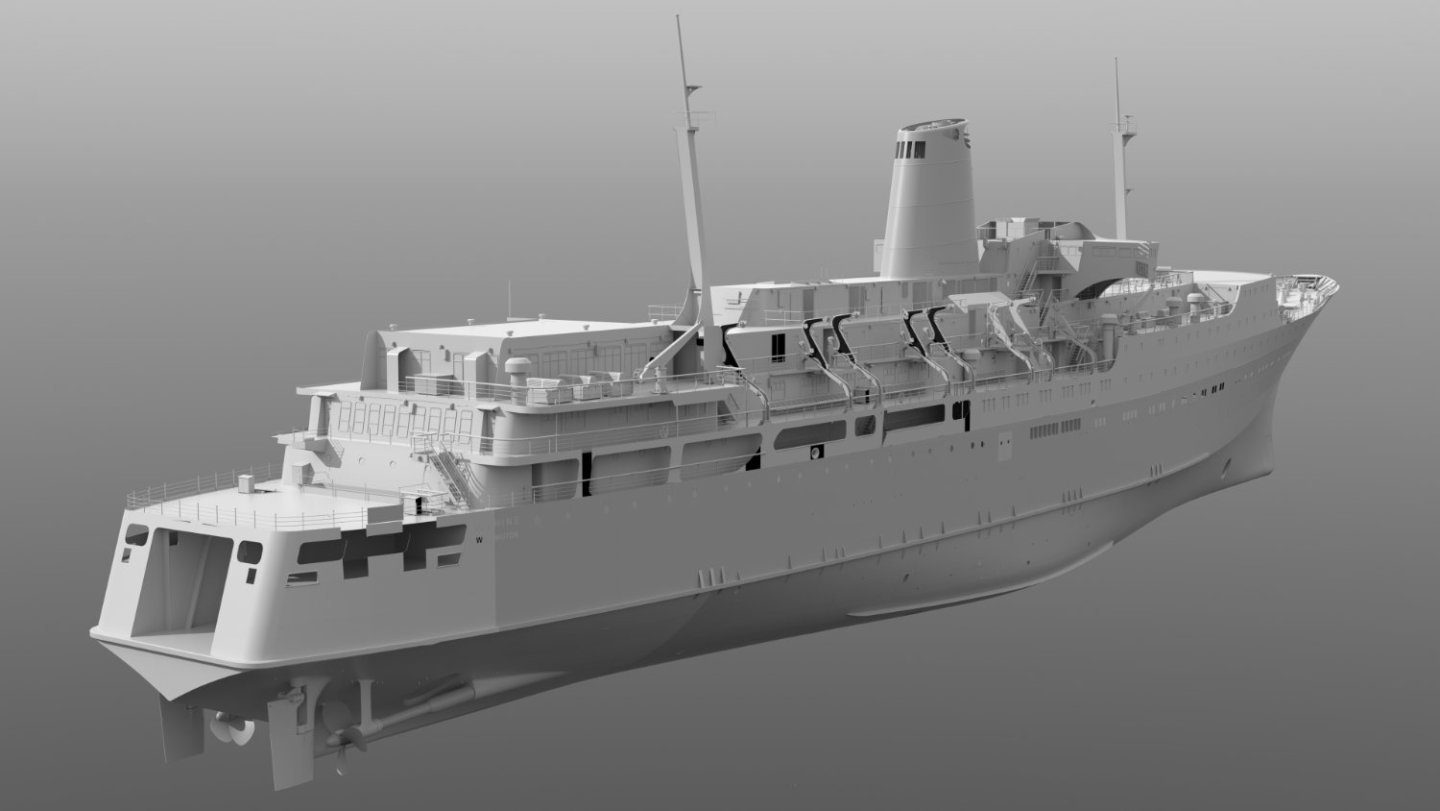
I have been waiting years to find the time to do a built up model that uses my trade skills a little more than my 1/35 Wahine and given the downtime I have with gluing and priming with that model I have decided to start this model now even though I still work full time. This is not going to be a fast build as I have to balance other things in my life but do want to get the frames and Axial structure done in a few months at least. I have opted to model the framework in 3D first to check the plans and also to give a more precise fit to parts due to the scale increase. I have approached Gerard Delcroix in regards to a couple of matters already and thank him very much for his help in regards to a few minor things I have found already. I will start with an overview of the model as it is now and the preparation of the timber, in this case American Cherry and Anigre as well as ebony for the deadeyes and any other small parts that look good in Black timber. My choice for scale is simple, my eyesight is not as good as it once was......that's it...... Oh and it looks wicked at that size, I like big in case anyone who has seen my other model has not noticed..:-) I will be making use of CNC at times, much like Marsalv's build which I have been heavily inspired by along with a few other builders of the Ancre Monograph ships. I will be cutting my futtocks individually though with CNC rather than the Harold Hahn method of cutting from a pre glued framed, I don't want to waste that much timber as it's not cheap!! Currently at about $1200 already for wood alone. Anyway Timber stock for a 1/24 model. I asked myself how much do I need and instead of trying to work it out I though about it from a weight point of view and having the model and volume of the model parts as cubic millimeters I have allowed for 60% waste and purchased double the result so should be fine. time will soon tell once frames are cut. If anyone sees a mistake in the 3d model PLEASE let me know I would rather get it right before cutting parts out, of course the 3D model will be built in parallel stages and will not be complete before I start on wood. These 3 planks of wide Cherry is only half, I went back and bought the same again... its very hard to picture the amount so went over. this is the wood after its been dressed to a more workable stock size, and to allow more further milling into quarter sawn blanks. I should also say I have picked some very knotty boards that will give natural crooks for stern knees and apron etc. Cherry Left and Anigre on right for contrasting colour parts and all deck planking. I did get a short print of a plan but waiting to hear back about a new one. That's reduced the planks down to something I can store so I will talk about the 3d aspect of the model soon but here are some images. I have to say having been a professional marine modeller these plans lines are fantastically fair for 2d work and all credit goes to Gerard for a job well done and the beautiful work, the only minor issue I had was on the frame toptimber line around frames 2-8 where the outward flare of the frames seems to be hard to grasp, but if you look at the arrangements in plan view the line becomes clear. Below the frames cut from a single fair hull surface inside and out can be seen as well as the separate futtocks The darker brown parts forward are final and ready for labelling and printing templates. Below is the new inner line of the forward filling frames I found were too low where they butt against frame 1 leaving a void between the top of the floors and ceiling planks, so I increased the height while fairing it into the line of the frame floor tops up to frame one and the breasthook Q where the line goes up the stem to leave a rebate for the ceiling planks. Thanks for the advise on this Gerard. Some details of the floor joints.


- 49 replies
-
- 17
-
-

-
Glad it helped.
-
I have been following this build for some time in preparation for my own 1/36 build. I also plan to use a CNC, a Stepcraft 800 for some of mine. Are you going to rig yours?
- 589 replies
-
- 2
-
-
- le gros ventre
- cargo
- (and 1 more)
-
Thanks guys, I will do some shopping.
-
Thankyou for that. Yes I will be looking for English publications that go into the in and outs of how the French did things, if any different to The normal I am used to like Serving, and worming etc, not to mention even rope making.
-
This question is for those doing any of the Monograph's by Ancre and what people think is the best resource for the rigging standards and techniques of these ships. What is the best rigging reference for French ships of the 1700's? My interest in particular is Le Gros Ventre, I have the Monograph but want to get some reference for the rigging side of it..
-
Hi Guys Been taking some time to recharge and work on some other projects around the house, landscaping etc. Should be back onto it very soon. Also going to be building a built up model as secondary project while glue dries, a lot of that coming up. I am going to do the Le Gros Ventre at 1/36 in American Cherry and Anigre. I have wanted to do one like this for my whole life but needed the time. I should probably start a new build for this but have had the wood for some time and have now got a Proxxon mill. I was able to get the last of the American Cherry in Australia so secured 3 beautiful knot free ish boards 2m long 300x50mm, should be enough I think.......... The knots it has are such that I can get accurate crooked grain around them for knees. I have not sawn it up yet. Really looking forward to getting my fine detail woodwork/guitar making skills back out of the closet and use them.
- 454 replies
-
- 5
-
-
- Union Steamship Company
- Stepcraft 840
- (and 3 more)
-
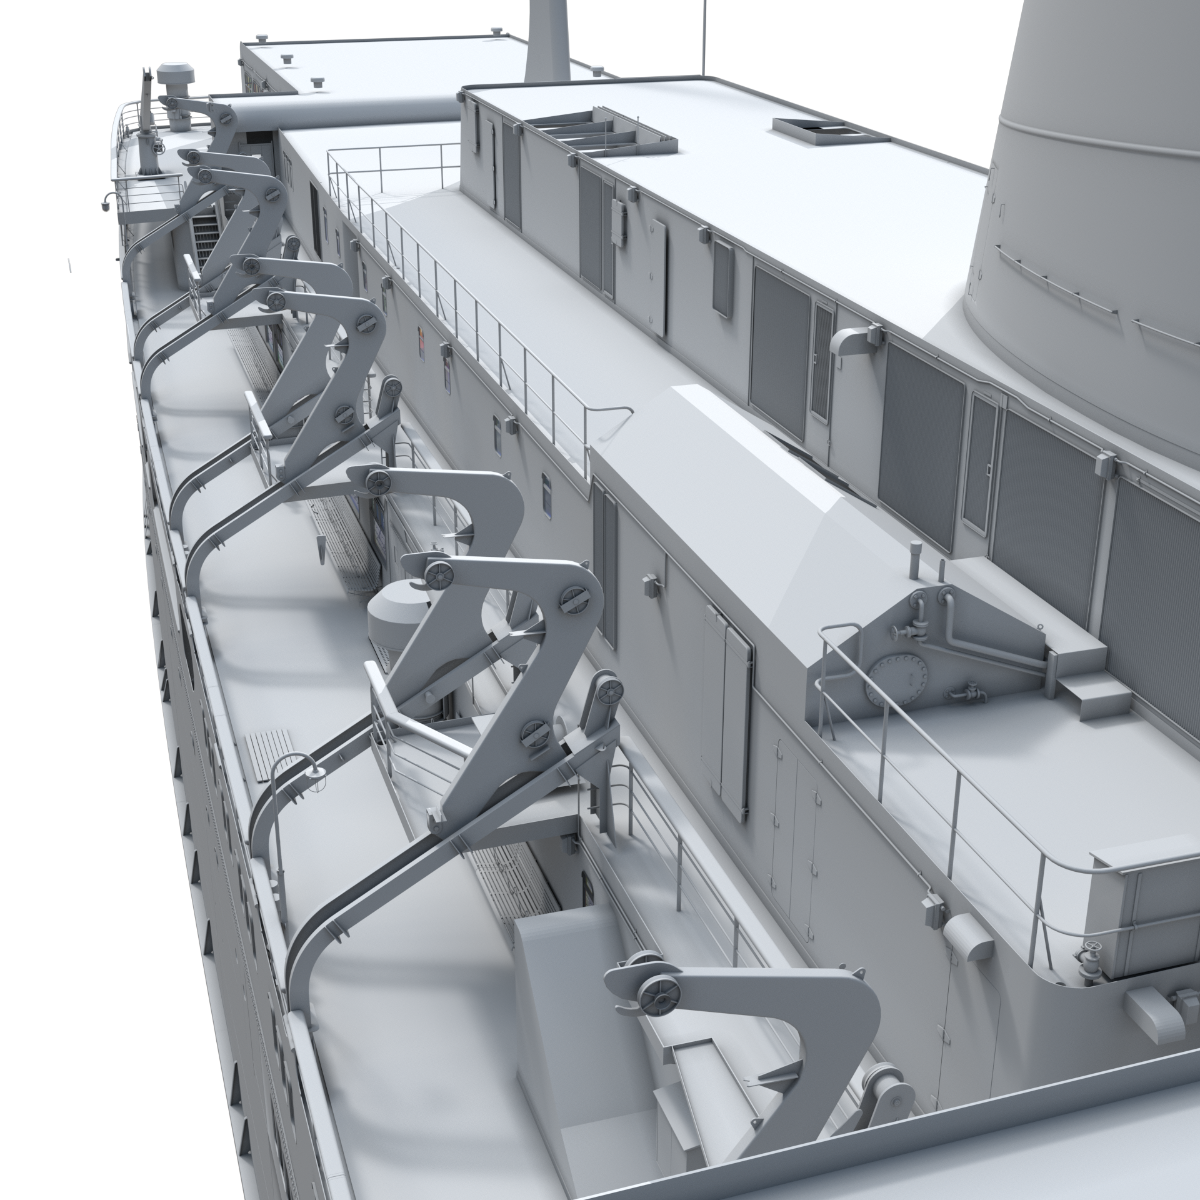
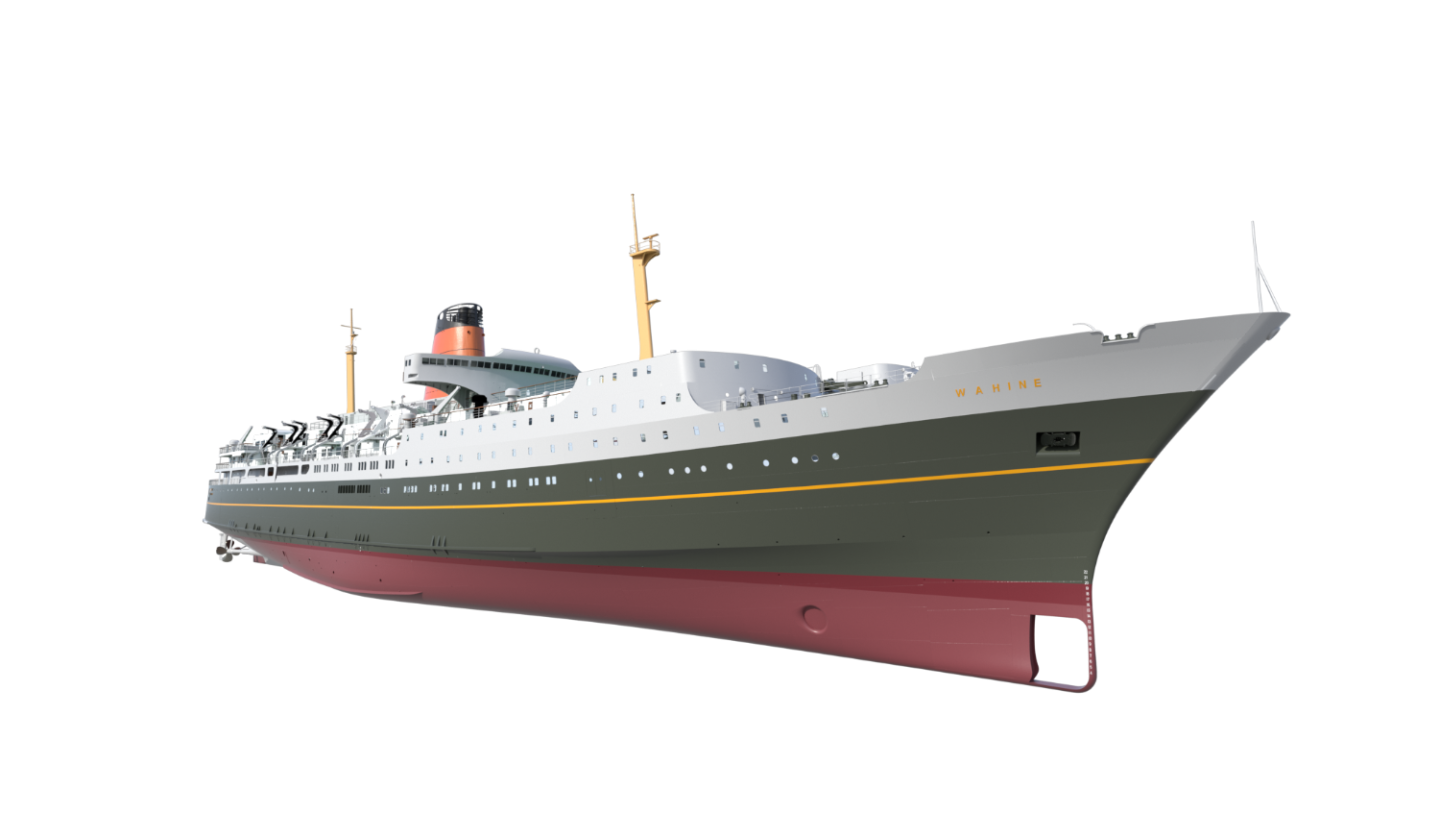
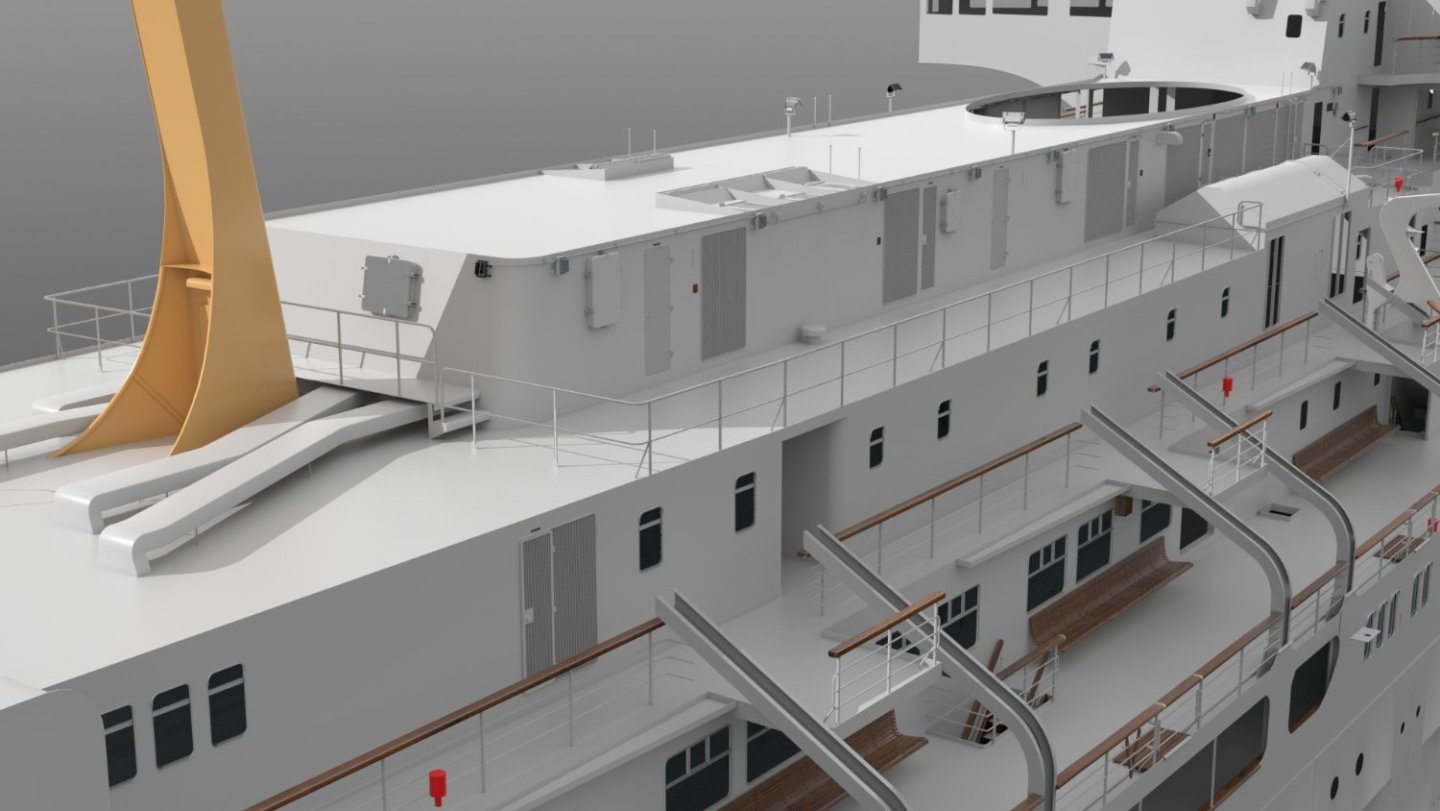
The images above give a good overall view of the fit out and details that have to be made. Building a vacuum form tool this weekend so I can start on carving the male plugs for the lifeboats. funnel-cap and bridge front roof screen and get them formed up.
- 454 replies
-
- 5
-
-
- Union Steamship Company
- Stepcraft 840
- (and 3 more)
-
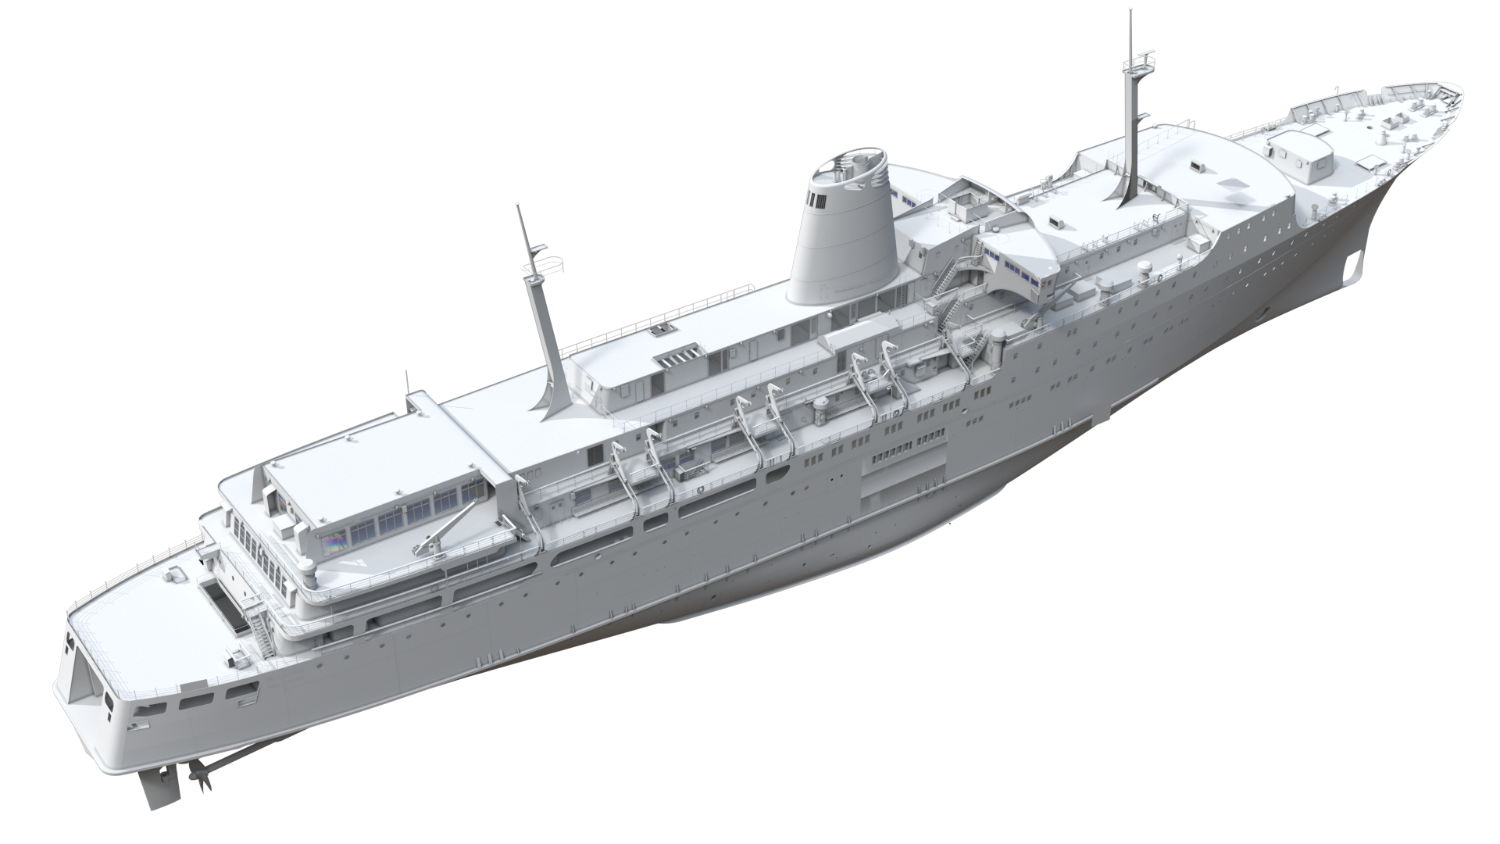
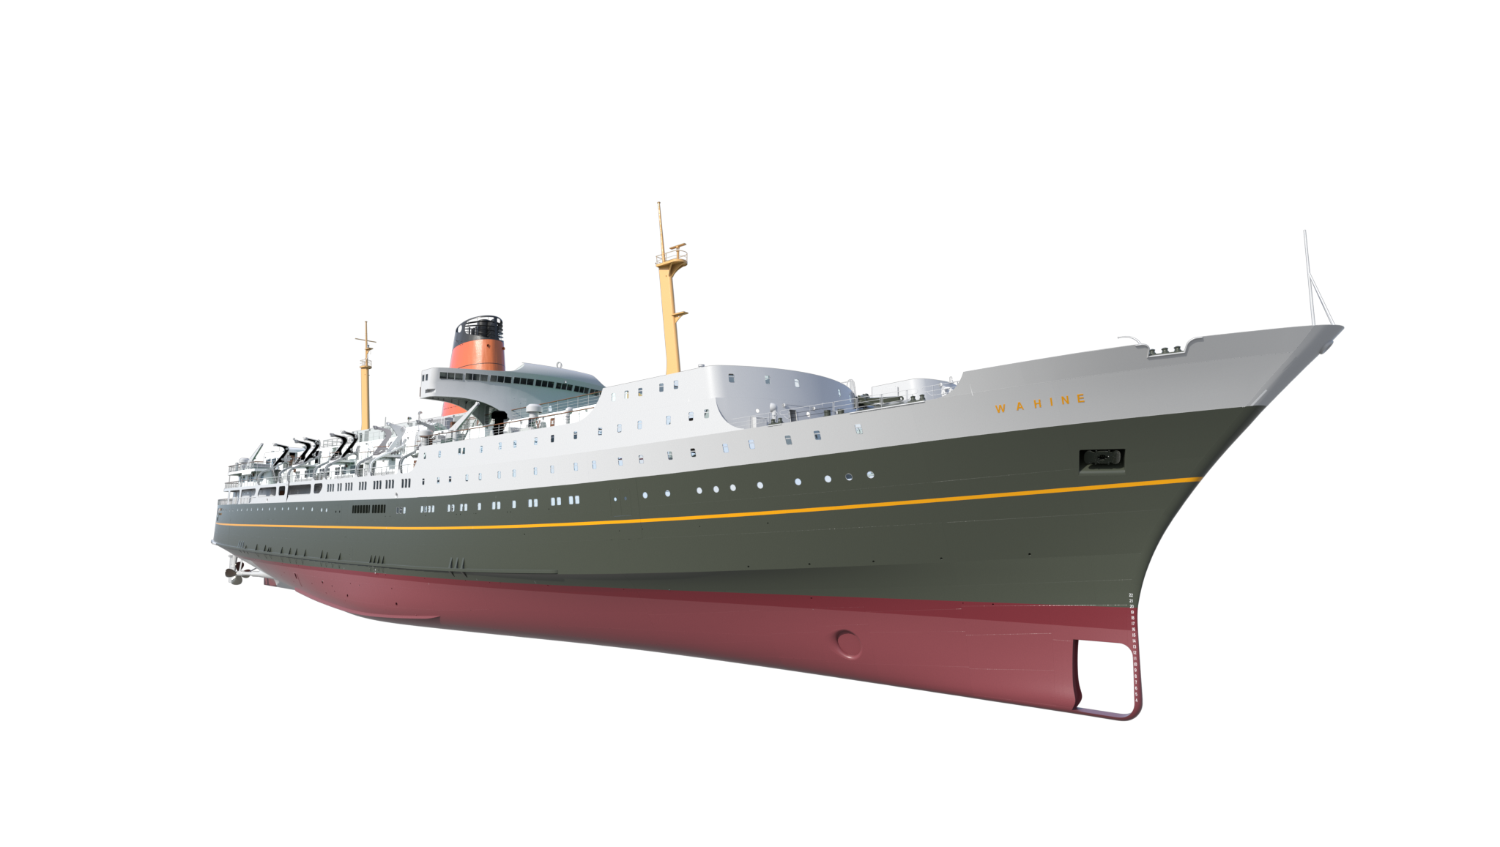
I should point out that these are the digital model images that I based my model off, all built from actual ship plans.


- 454 replies
-
- 6
-
-
- Union Steamship Company
- Stepcraft 840
- (and 3 more)
-
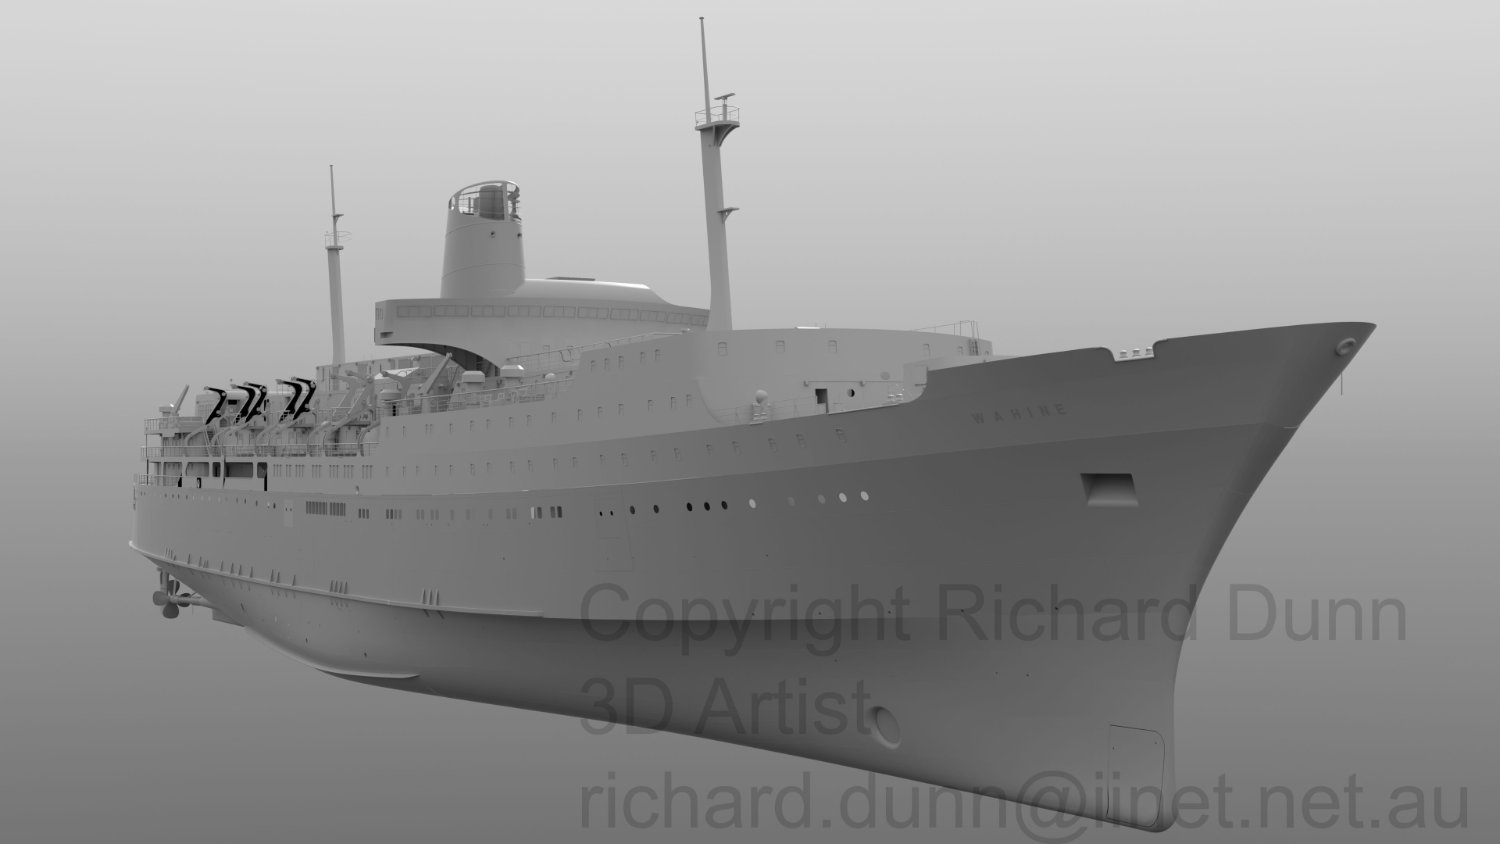
I saw one I think, and he was doing a Wahine one ,I know because he asked me for a side render of my digital cad model I did for a film that never happened, to use as a base to work over.
- 454 replies
-
- 3
-
-
- Union Steamship Company
- Stepcraft 840
- (and 3 more)
-
Thanks Lubber line, Yes I knew Murray for a few years and a lot of his material he passed on to me for my models, he did see the first attempt before he got sick thankfully.
- 454 replies
-
- 3
-
-
- Union Steamship Company
- Stepcraft 840
- (and 3 more)
-
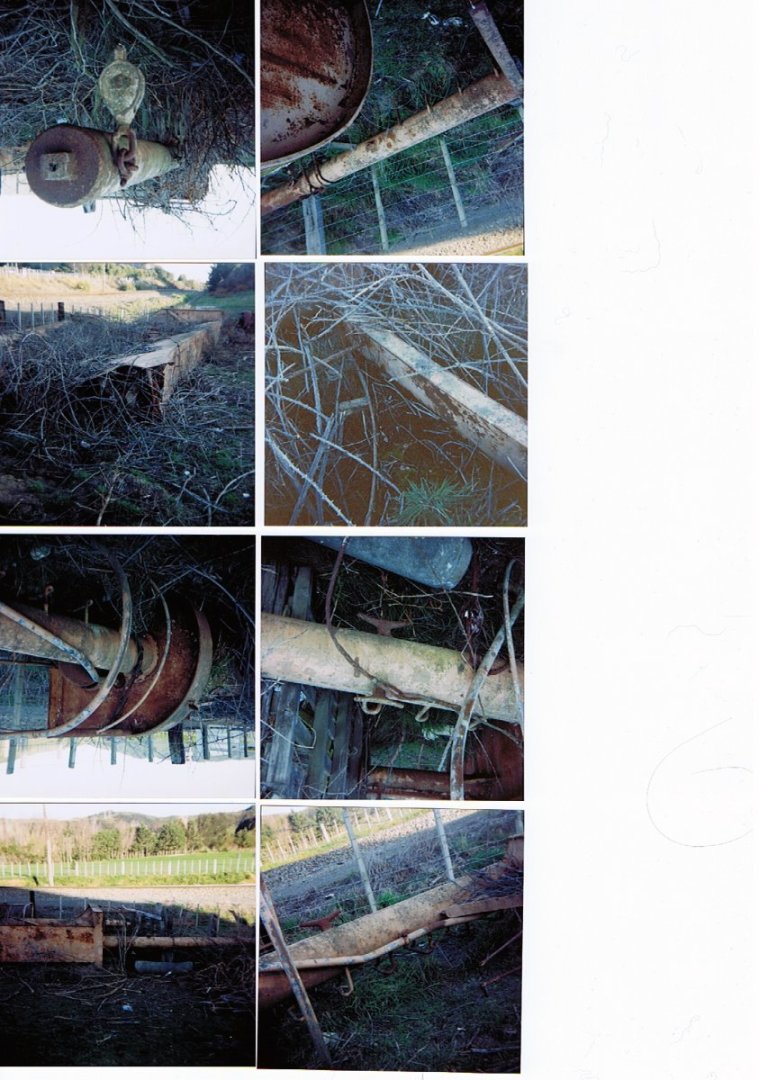
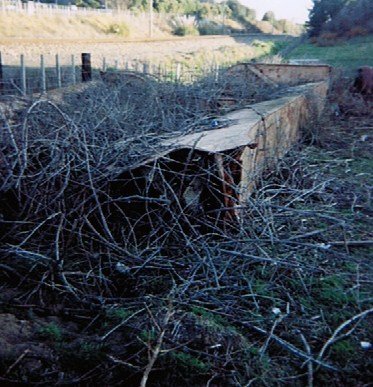
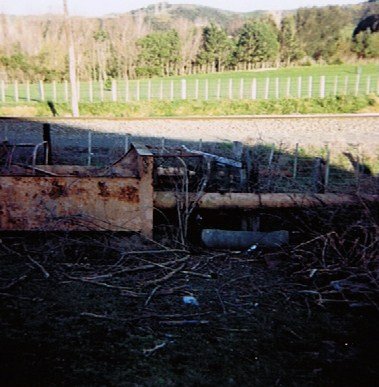
It kind of makes you realise how much research has gone into this when you start pulling out stuff 30 years old! this was 1984-5 where they were buried in blackberry and dirt.


- 454 replies
-
- 6
-
-
-
- Union Steamship Company
- Stepcraft 840
- (and 3 more)
-
Yep, it was I who found the masts buried in front of southwards in the 80's and suggested they be erected, the aft mast is the one in Frank Kits park and the foremast is the one at Eastbourne, its just a shame they didn't paint the right colour, I might email the councils about that.
- 454 replies
-
- 2
-
-
- Union Steamship Company
- Stepcraft 840
- (and 3 more)
-
About half done, the windows with paper on are done, it just needs to be cut away and prepainted styrene windows glued over
- 454 replies
-
- 1
-
-
- Union Steamship Company
- Stepcraft 840
- (and 3 more)