


DocRob
-
Posts
1,297 -
Joined
-
Last visited
Recent Profile Visitors
3,056 profile views


-
 DocRob reacted to a post in a topic:
HMS Surprise 1796 (prototype) by James H - Vanguard Models - 1:64
DocRob reacted to a post in a topic:
HMS Surprise 1796 (prototype) by James H - Vanguard Models - 1:64
-
DocRob reacted to a post in a topic:
HMS Surprise 1796 (prototype) by James H - Vanguard Models - 1:64
-
DocRob reacted to a post in a topic:
HMS Surprise 1796 (prototype) by James H - Vanguard Models - 1:64
-
DocRob reacted to a post in a topic:
HMS Surprise 1796 (prototype) by James H - Vanguard Models - 1:64
-
DocRob reacted to a post in a topic:
HMS Surprise 1796 (prototype) by James H - Vanguard Models - 1:64
-
 DocRob reacted to a post in a topic:
HMS Surprise 1796 (prototype) by James H - Vanguard Models - 1:64
DocRob reacted to a post in a topic:
HMS Surprise 1796 (prototype) by James H - Vanguard Models - 1:64
-
DocRob reacted to a post in a topic:
HMS Surprise 1796 (prototype) by James H - Vanguard Models - 1:64
-
DocRob reacted to a post in a topic:
Bentley Blower by RGL - FINISHED - Airfix - 1/12 - PLASTIC
-
DocRob reacted to a post in a topic:
Bentley Blower by RGL - FINISHED - Airfix - 1/12 - PLASTIC
-
DocRob reacted to a post in a topic:
Bentley Blower by RGL - FINISHED - Airfix - 1/12 - PLASTIC
-
Nirvana reacted to a post in a topic:
Nail pusher nightmare
-
Bomber_County reacted to a post in a topic:
Nail pusher nightmare
-
Landlubber Mike reacted to a post in a topic:
Nail pusher nightmare
-
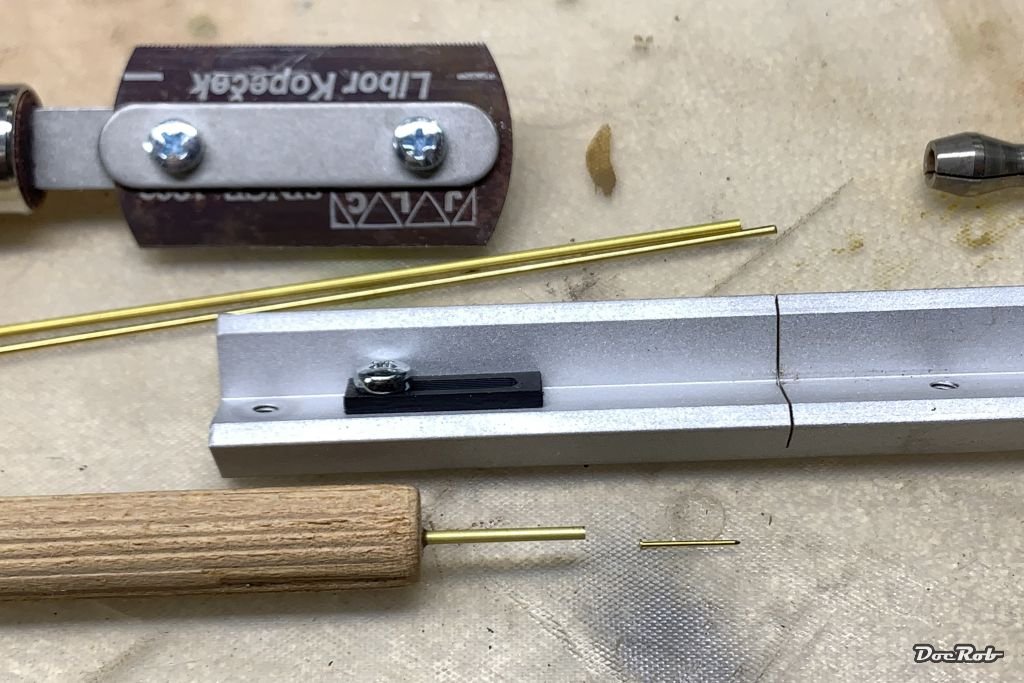
I use nails for the first planking as well, but couldn´t find the type of pliers, Mike suggested. I built my own pusher, which worked well enough. I used a wooden dowel, drilled a hole into the front, to accept a brass tube with an inserted brass rod for length adjustment. Cheers Rob
-
Rik Thistle reacted to a post in a topic:
1960 Corvette by gsdpic - MFH - 1/12 - Multimedia
-
GrandpaPhil reacted to a post in a topic:
1960 Corvette by gsdpic - MFH - 1/12 - Multimedia
-
Jack12477 reacted to a post in a topic:
1960 Corvette by gsdpic - MFH - 1/12 - Multimedia
-
king derelict reacted to a post in a topic:
1960 Corvette by gsdpic - MFH - 1/12 - Multimedia
-
Old Collingwood reacted to a post in a topic:
1960 Corvette by gsdpic - MFH - 1/12 - Multimedia
-
Canute reacted to a post in a topic:
1960 Corvette by gsdpic - MFH - 1/12 - Multimedia
-
yvesvidal reacted to a post in a topic:
1960 Corvette by gsdpic - MFH - 1/12 - Multimedia
-

1960 Corvette by gsdpic - MFH - 1/12 - Multimedia
DocRob replied to gsdpic's topic in Non-ship/categorised builds
I was in the same situation and tweaked my too small spray booth with a cheap Ikea plastic container. This was the original booth, way too small for a 1/32 TA 152: The plastic container, much bigger: Cut out the backside and used duct tape to mount it to the old booth. I also wrapped led strips around for better lighting: Cheers Rob


- 38 replies
-
- 10
-

-
-
1960 Corvette by gsdpic - MFH - 1/12 - Multimedia
DocRob replied to gsdpic's topic in Non-ship/categorised builds
Nice start Gary, I do more or less the same, using organizer boxes for the white metal parts, which helps a lot during the build. You are right about drilling holes, there are zillions. Make sure, you don´t forget to drill some, which may be hard or impossible to reach later. Check, if the parts, which fit into the holes really fit. I prefer HSS drill bits, because they are more forgiving and not as brittle as tungsten carbide ones, which also tend to eat into the material more aggressive than HSS bits. Make sure, that you drill adjoining parts together for better fit. The casted holes in resin or white metal are only guiding holes, which needed to be drilled with the correct diameter. Bummer that your engine proves troublesome with the fitting from resin to white metal, I haven´t experienced something like this during my MFH builds. Cheers Rob -
Current builds: Brabham BT45 by DocRob - Model Factory Hiro - 1/12 Duchess of Kingston - paused Finished builds: F4U-1A Corsair - Tamiya 1/32 USS Arizona 1/350 Eduard Caudron C.561 French Racing Plane 1/48 Nachtigall on Speed Arado 234 B-2N by DocRob - 1/32 - Fly Renault RE20 Turbo - Tamiya - 1/12 P-38J Wicked Woman - Tamiya - 1/48 AEG G.IV Creature of the Night - WNW - 1/32 "Big Tank" Crocker OHV motorcycle by DocRob - Model Factory Hiro - 1/9 MaschinenKrieger Friedrich by DocRob - Wave - 1/20 - PLASTIC - Another one bites the dust McLaren Mp4/6 - Ayrton Senna - Fujimi - 1/20 Shelby Cobra Coupe by DocRob - Model Factory Hiro - 1/12 Honda RC166 Mike Hailwood by DocRob - Tamiya - 1/12
-
I was not even a teenager, when this kit came out in `73, but even half a decade later, I couldn´t afford these type of kits from my pocket money, but pressed my nose flat against the shop window. I know the feeling though, gluing together fingers, brush paint everything with thick Humbrol colors,... Fond memories. For this build, I actually used a lot of CA, which I prefer for pre-painted parts. My personal development over the decades led to less adhesive caused accidents, luckily . Cheers Rob
-
Thank you Gentlemen, most of the build was a pleasure, but the end was a bit anticlimactic. I´m happy to have it done now, nonetheless because of your encouraging posts here. Cheers Rob
-
Thanks Gary, but I have to question your arithmetics . The Lotus 77 would be the logical follow up, which I indeed possess from MFH in 1/12. I don´t own a 78, but a 1/20 Tamiya 79. I have not decided, what to build next, but will travel for some weeks and decide afterwards. Cheers Rob
-
1960 Corvette by gsdpic - MFH - 1/12 - Multimedia
DocRob replied to gsdpic's topic in Non-ship/categorised builds
Nice choice of color, Gary. When I built the Cobra Coupe, I primed the body parts with Mr. Surfacer 1500 and airbrushed Number 5 paint on top. I found the adherence of paint and primer not too good, it was easy to chip off paint during sanding and polishing, not to speak about final assembly. With the Brabham BT45, I used the same combo, but slightly sanded the resin body parts before priming, much better. Cheers Rob -
I will let pictures speak, to spare you my swearing, during the unification of the Lotus two halves. Phew, finally it´s done. With it´s predecessor, the Lotus 48C in 1/20 scale: With the MFH Brabham BT45: Cheers Rob


- 70 replies
-
- 19
-
-
-
Thank you Alan, as you can see below, the repairs are done, but the end of the build was very frustrating, and I´m happy, the Lotus is finally done. Cheers Rob
-
1960 Corvette by gsdpic - MFH - 1/12 - Multimedia
DocRob replied to gsdpic's topic in Non-ship/categorised builds
You got me Gary, I´m in. Enjoy the cruise, it will not be easy at all times, but building MFH kits is very rewarding. Take your time and always check twice, specially where large components, like body or chassis are involved. You often have to browse through the whole manual, to see, where everything fits. Special care should be taken with doors, bonnet and trunk, moving parts, where a good fit is essential. Cheers Rob -
Resin ice effects
DocRob replied to JKC27's topic in Painting, finishing and weathering products and techniques
I have no experience with ice dios, but have one planned for a future project, similar to the one in the linked article. It´s 1/32, but the technique might be adaptable. I have the article, but as it´s not a free one, I can´t share it. AIR52 - Bandit at Five - AFV modeller Cheers Rob -
Thank you all for your support, Señores, it really helps to get out of a slump, to read your suggestions and supportive thoughts. Thanks Dan and Phil. I like the idea with the base board, but will first try, to get the Lotus halves united without one. Yesterday, I glued together the first snapped connection on the suspension with a big blob of CA. Poco a poco, step by step, I will reinforce all the sensitive connections with CA and then hopefully get the halves together. Cheers Rob
-
Your engine looks fantastic Martyn, the weathering blends in perfectly. Cheers Rob
-
Fantastic result, you achieved a little gem, Daniele. I especially like the slightly toned black and white shot. Cheers Rob
