


Stockholm tar
-
Posts
866 -
Joined
-
Last visited
Reputation Activity
-

 Stockholm tar got a reaction from paulsutcliffe in Sherbourne by Stockholm tar - Caldercraft - 1/64
I omitted to fit bow and stern blocks when framing, but this was mainly because I didn’t know of them back then (well, that’s my excuse). They may perhaps have helped, but I don’t recall any particular difficulties in planking the bow or stern as a consequence.
I really didn’t encounter that many problems with the first lime planking either and it seemed to go relatively smoothly, provided the individual planks were properly tapered. I had also never thought to cut a rabbet line for the garboard plank, however, thinking about it in retrospect, it would probably have been a good idea. (In passing, I have sometimes wondered why the kit manufacturers never think to pre-cut this, since its placing is somewhat critical, and I would imagine is something of a daunting prospect for the beginner.) A fore rabbet, up the stem, would also certainly have been advantageous since I encountered a problem with what I have termed ’plank creep’. This is where the first planking, and thus by association the second, comes rather nearer the bow than necessary – and is your own fault! It is not that noticeable now, but you can see it should you care to look closely (please don’t!) Anyway, I tried to ensure a close fit of the garboard plank, by sanding down the inner edge, and this seemed to make a good joint.
Next came the second walnut planking, and here I made a perhaps ’radical’ departure from the instructions (easy enough to do now, but in those distant days…) and clinker-plank the second layer. All that I had read about cutters told me that their hulls were so planked, and inherited from vessels of an earlier period, so I wondered why the Sherbourne was of carvel construction. However, having been designed by Thomas Slade (responsible for the design of the Victory two years later) and built in Woolwich Dockyard, the answer appeared obvious – they were more used to that kind with warship construction. I believe Chris Watton, the kit’s designer, has also said she was carvel. I imagine that the real Sherbourne would probably have been clinker planked, as was more usual, had she been constructed in a private yard. Moreover Peter Goodwin, in what had now become my ’bible’ (the Naval Cutter Alert), maintains that clinker construction remained in cutters until around 1810 – apart that is, from those constructed in the Dockyards. So, I persuaded myself I was on sort-of-safe ground for the project, and in any case I wanted to try the technique – so, clinker it was to be!
Planking of course had to commence at the garboard strake, since the planks above overlap onto those below. I overlaid my planks by about a third, which seemed about right, sanding down the top edge of each plank so that it formed a good joint with the one above. A thin bead of glue along the top of the strake below, plus a small amount along the reverse of each plank, ensured a good bond. I learnt early on not to use too much glue, as it tended to seep out onto the planking, which of course was not desirable! Provided the planks were sufficiently tapered at bow and stern, I don’t think I encountered many problems – or perhaps I have conveniently forgotten about them! A few small stealers were needed at the stern, but apart from that the planking went surprisingly well.
For both planking layers I opted to use scale length planks, staggering them as in full size practice. This was not only more historically correct, but I found that the shorter lengths made for easier positioning. I believe I planked about three strakes, on alternate sides, until the planking was done, and it was actually quite exciting to see it progress. At the time I was a member on the old Dry Dock Models site, and remember that posting a few pictures of my build encouraged at least one other member there to try clinker planking for himself. His results were pretty impressive too, so far as I remember.
Perhaps I should say a little about painting the waterline. Marking this was quite literally achieved by cutting a hull-shaped hole in a piece of hardboard, gradually enlarging it until I was satisfied the model was at the height I required, and then drawing a line with a pencil around the hull. Rather heath-robinson, but it seemed to work! The painting was a little tricky, especially at bow and stern, where the lie of the planks tended to interfere with a good line, but I think I managed it reasonably well. I opted to use an ivory shade rather than white, since it is a largish area and I felt that the white would be too harsh. It also has a somewhat old look to it. The planks from the waterline to the wale were left natural, although they were treated with beeswax.
The hull pictures are reproduced below:
Next, the bulwarks, stern and deck.
-
 Stockholm tar got a reaction from garyshipwright in Sherbourne by Stockholm tar - Caldercraft - 1/64
I omitted to fit bow and stern blocks when framing, but this was mainly because I didn’t know of them back then (well, that’s my excuse). They may perhaps have helped, but I don’t recall any particular difficulties in planking the bow or stern as a consequence.
I really didn’t encounter that many problems with the first lime planking either and it seemed to go relatively smoothly, provided the individual planks were properly tapered. I had also never thought to cut a rabbet line for the garboard plank, however, thinking about it in retrospect, it would probably have been a good idea. (In passing, I have sometimes wondered why the kit manufacturers never think to pre-cut this, since its placing is somewhat critical, and I would imagine is something of a daunting prospect for the beginner.) A fore rabbet, up the stem, would also certainly have been advantageous since I encountered a problem with what I have termed ’plank creep’. This is where the first planking, and thus by association the second, comes rather nearer the bow than necessary – and is your own fault! It is not that noticeable now, but you can see it should you care to look closely (please don’t!) Anyway, I tried to ensure a close fit of the garboard plank, by sanding down the inner edge, and this seemed to make a good joint.
Next came the second walnut planking, and here I made a perhaps ’radical’ departure from the instructions (easy enough to do now, but in those distant days…) and clinker-plank the second layer. All that I had read about cutters told me that their hulls were so planked, and inherited from vessels of an earlier period, so I wondered why the Sherbourne was of carvel construction. However, having been designed by Thomas Slade (responsible for the design of the Victory two years later) and built in Woolwich Dockyard, the answer appeared obvious – they were more used to that kind with warship construction. I believe Chris Watton, the kit’s designer, has also said she was carvel. I imagine that the real Sherbourne would probably have been clinker planked, as was more usual, had she been constructed in a private yard. Moreover Peter Goodwin, in what had now become my ’bible’ (the Naval Cutter Alert), maintains that clinker construction remained in cutters until around 1810 – apart that is, from those constructed in the Dockyards. So, I persuaded myself I was on sort-of-safe ground for the project, and in any case I wanted to try the technique – so, clinker it was to be!
Planking of course had to commence at the garboard strake, since the planks above overlap onto those below. I overlaid my planks by about a third, which seemed about right, sanding down the top edge of each plank so that it formed a good joint with the one above. A thin bead of glue along the top of the strake below, plus a small amount along the reverse of each plank, ensured a good bond. I learnt early on not to use too much glue, as it tended to seep out onto the planking, which of course was not desirable! Provided the planks were sufficiently tapered at bow and stern, I don’t think I encountered many problems – or perhaps I have conveniently forgotten about them! A few small stealers were needed at the stern, but apart from that the planking went surprisingly well.
For both planking layers I opted to use scale length planks, staggering them as in full size practice. This was not only more historically correct, but I found that the shorter lengths made for easier positioning. I believe I planked about three strakes, on alternate sides, until the planking was done, and it was actually quite exciting to see it progress. At the time I was a member on the old Dry Dock Models site, and remember that posting a few pictures of my build encouraged at least one other member there to try clinker planking for himself. His results were pretty impressive too, so far as I remember.
Perhaps I should say a little about painting the waterline. Marking this was quite literally achieved by cutting a hull-shaped hole in a piece of hardboard, gradually enlarging it until I was satisfied the model was at the height I required, and then drawing a line with a pencil around the hull. Rather heath-robinson, but it seemed to work! The painting was a little tricky, especially at bow and stern, where the lie of the planks tended to interfere with a good line, but I think I managed it reasonably well. I opted to use an ivory shade rather than white, since it is a largish area and I felt that the white would be too harsh. It also has a somewhat old look to it. The planks from the waterline to the wale were left natural, although they were treated with beeswax.
The hull pictures are reproduced below:
Next, the bulwarks, stern and deck.
-
 Stockholm tar got a reaction from Padeen in Sherbourne by Stockholm tar - Caldercraft - 1/64
Bigcreekdad,
I'm sure you're Sherbourne is just fine!
As to the cottage, although it's just inland from the coast north of Stockholm, no, I'm not a fisherman. We're reminded on occasion of the proximity of the Baltic, such as the other night which was somewhat misty inland, and we could hear the ship's fog signals. If the wind is in the right direction, we often hear the ship's engines. There is a small harbour not far from us, and often the mere sight of the yachts there makes one want to go sailing again!
A summer cottage is quite a usual thing in Sweden, my wife's father constructing it around 1960, overlooking a small lake. We now have a couple of neighbours. We've made a few improvements to it, such as giving it a new roof and chimney a few years ago, and we normally spend the summer months here. It is, mercifully, fairly quiet but it is getting noisier. There is a motorway to the north of us running between Stockholm and Kapellskär, which is the ferry port to Mariehamn in the Åland Islands, and when the ferries come in it seems to become a race track. It's worse when the wind blows from that direction! Unfortunately, there are plans to enlarge the port. We'll probably be here until late September or early October.
Adeline,
Not particularly a funny way, although I think it's perhaps more apt when referring to people. Not to worry though!
I'll do my best to recall my recollections, and I look forward to your Fly update.
-
 Stockholm tar got a reaction from tkay11 in Sherbourne by Stockholm tar - Caldercraft - 1/64
Since this log of the Sherbourne was started, rather belatedly, at the rigging stage rather than with the hull, I thought I should try and recall a few of the glitches that arose during earlier construction, that I remember. Hopefully, they may then become not be such a problem to current and future builders of this kit (although I am sure some have come across them already). These can lead to difficulties later in the build if one is not careful, but they can be avoided (or at least made good) with a little forethought. At the same time I shall mention where I altered, or made improvements, to the model.
The kit itself, by Caldercraft/Jotika, is a very suitable one for both the beginner and the more advanced modeller, and I can’t say that enough. At 1:64th scale, it is also a suitable size for the average home, and lends itself to further detailing if desired. I found two books very useful. The volume in the ’Anatomy of the Ship’ series, ’The Naval Cutter Alert, 1777’, by Peter Goodwin (former curator of the Victory) was a great help with the early construction, and is already proving to be so with the rigging. Lennarth Petersson’s book, ’Rigging Period Fore and Aft Craft’, has also been useful, although it should be pointed out that the rig he describes, and rather more uniquely draws, is that of a cutter of the 1780’s, rather than the markedly different one of the 1760’s (Sherbourne dates from 1763) so discretion is advised. There is also another volume available, entitled ’Super-detailing the Cutter Sherbourne: A Guide to Building the Caldercraft Kit’, by George Bandurek. I have read part of it and it looks interesting, particularly with the making of the furled sails, and it has many colour photographs. I do not have it – at least, not yet – but that may change!
Anyway, to begin. So far as I remember, the material was of a good quality: birch ply frames, with separate keel, bow and stern pieces, and two gun port strips; lime was used for the first planking, with walnut for the second, and there was a reasonable amount left over. The only real concern here was that the walnut strips had to be treated with care as they were somewhat brittle, and slivers tended to break off of them, particularly when being bent. The usual dowel rod was supplied for the masts and yards, but more of them later. The cast metal anchors were well made, with minimum flash, but the guns (both the 3pdrs and the swivels) needed rather more work with the file. A couple of them were also not so well cast, although I did use them since the damage was not that noticeable, particularly when painted. Tan and black thread for the rigging was included.
Fitting the frames to the keel was fairly straight forward and they were a good fit. Soaking and bending the gunport strips presented few problems, but the first real hurdle arose when I fitted that on the port side, the starboard one being fine. I have to say here that this was probably not the fault of the strip, but was entirely of my own doing in that I probably glued it a fraction too low, particularly at the stern. It didn’t look particularly noticeable, but it had an unfortunate knock-on effect further down the line, when the deck was laid, in that (and I am sure many will know what’s coming next) the two aftermost guns wouldn’t fit properly through the ports! I then spent some time in trying to make them do so by all the means I could think of – including filing the ports themselves, sanding the lower edge of the trucks, and lowering the holes for the trunnions – and all without making the guns appear ’odd’. At one stage, I was even thinking of having the aftermost gun run in to overcome the problem. Happily, the other measures were just about sufficient, and all the guns are now fully run out, even though the after pair are close to touching the top edge of the port. It is not particularly noticeable, but I hate to think of what would have happened on the actual cutter from the recoil, should these particular guns be fired! So the stricture here, for any building this kit, is obvious – make absolutely sure the strips are level fore-and-aft and glued in the correct position. You’ll save yourself a lot of heartache later on!
Next time, my clinker planking – and a few other problems.
-
 Stockholm tar got a reaction from Dubz in Sherbourne by Stockholm tar - Caldercraft - 1/64
Since this log of the Sherbourne was started, rather belatedly, at the rigging stage rather than with the hull, I thought I should try and recall a few of the glitches that arose during earlier construction, that I remember. Hopefully, they may then become not be such a problem to current and future builders of this kit (although I am sure some have come across them already). These can lead to difficulties later in the build if one is not careful, but they can be avoided (or at least made good) with a little forethought. At the same time I shall mention where I altered, or made improvements, to the model.
The kit itself, by Caldercraft/Jotika, is a very suitable one for both the beginner and the more advanced modeller, and I can’t say that enough. At 1:64th scale, it is also a suitable size for the average home, and lends itself to further detailing if desired. I found two books very useful. The volume in the ’Anatomy of the Ship’ series, ’The Naval Cutter Alert, 1777’, by Peter Goodwin (former curator of the Victory) was a great help with the early construction, and is already proving to be so with the rigging. Lennarth Petersson’s book, ’Rigging Period Fore and Aft Craft’, has also been useful, although it should be pointed out that the rig he describes, and rather more uniquely draws, is that of a cutter of the 1780’s, rather than the markedly different one of the 1760’s (Sherbourne dates from 1763) so discretion is advised. There is also another volume available, entitled ’Super-detailing the Cutter Sherbourne: A Guide to Building the Caldercraft Kit’, by George Bandurek. I have read part of it and it looks interesting, particularly with the making of the furled sails, and it has many colour photographs. I do not have it – at least, not yet – but that may change!
Anyway, to begin. So far as I remember, the material was of a good quality: birch ply frames, with separate keel, bow and stern pieces, and two gun port strips; lime was used for the first planking, with walnut for the second, and there was a reasonable amount left over. The only real concern here was that the walnut strips had to be treated with care as they were somewhat brittle, and slivers tended to break off of them, particularly when being bent. The usual dowel rod was supplied for the masts and yards, but more of them later. The cast metal anchors were well made, with minimum flash, but the guns (both the 3pdrs and the swivels) needed rather more work with the file. A couple of them were also not so well cast, although I did use them since the damage was not that noticeable, particularly when painted. Tan and black thread for the rigging was included.
Fitting the frames to the keel was fairly straight forward and they were a good fit. Soaking and bending the gunport strips presented few problems, but the first real hurdle arose when I fitted that on the port side, the starboard one being fine. I have to say here that this was probably not the fault of the strip, but was entirely of my own doing in that I probably glued it a fraction too low, particularly at the stern. It didn’t look particularly noticeable, but it had an unfortunate knock-on effect further down the line, when the deck was laid, in that (and I am sure many will know what’s coming next) the two aftermost guns wouldn’t fit properly through the ports! I then spent some time in trying to make them do so by all the means I could think of – including filing the ports themselves, sanding the lower edge of the trucks, and lowering the holes for the trunnions – and all without making the guns appear ’odd’. At one stage, I was even thinking of having the aftermost gun run in to overcome the problem. Happily, the other measures were just about sufficient, and all the guns are now fully run out, even though the after pair are close to touching the top edge of the port. It is not particularly noticeable, but I hate to think of what would have happened on the actual cutter from the recoil, should these particular guns be fired! So the stricture here, for any building this kit, is obvious – make absolutely sure the strips are level fore-and-aft and glued in the correct position. You’ll save yourself a lot of heartache later on!
Next time, my clinker planking – and a few other problems.
-
 Stockholm tar got a reaction from Papa in Sherbourne by Stockholm tar - Caldercraft - 1/64
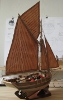
I thought you might like to see a few more pictures of the (slow) progress on my Sherbourne. The pictures were actually taken about a month ago, and my wife and I are now at our cottage, so work won't resume on her until the autumn.
I've now finished the shrouds apart from the ratlines, which I'm leaving off for access until later, and have in place some of the running rigging, including the burtons, top rope, boom topping lift, and throat and peak halliards for the mainsail. The latter is bent to the gaff and brailed into the mast:
-
 Stockholm tar got a reaction from dashi in Sherbourne by Stockholm tar - Caldercraft - 1/64
I thought you might like to see a few more pictures of the (slow) progress on my Sherbourne. The pictures were actually taken about a month ago, and my wife and I are now at our cottage, so work won't resume on her until the autumn.
I've now finished the shrouds apart from the ratlines, which I'm leaving off for access until later, and have in place some of the running rigging, including the burtons, top rope, boom topping lift, and throat and peak halliards for the mainsail. The latter is bent to the gaff and brailed into the mast:
-
Stockholm tar got a reaction from Dubz in Sherbourne by Stockholm tar - Caldercraft - 1/64
Dirk, Tony,
Thanks for your compliments, much appreciated. She's beginning to look something now, with the furled mainsail and some of the rigging.
Dirk, I'm pleased I spent some time on the details, as I think they add something to her – for instance the two stern lockers, one with the lid open to reveal in one half, the balls for the swivel guns, the other holding the lead line. In my mind there's a similar arrangement for the opposite side box, one half containing the balls for the swivels, the other the log line. The boat was quite literally made out of scrap pieces (the oars are orange sticks) and the sail is an old handkerchief, stained with tea. Threads were pulled out to represent the seams and, although difficult to see, there are reef points.
Russ, just seen your post. Yes, I suppose I could do that, even though she didn't have a log to start with.
-
 Stockholm tar got a reaction from Ian B in Sherbourne by Stockholm tar - Caldercraft - 1/64
I thought you might like to see a few more pictures of the (slow) progress on my Sherbourne. The pictures were actually taken about a month ago, and my wife and I are now at our cottage, so work won't resume on her until the autumn.
I've now finished the shrouds apart from the ratlines, which I'm leaving off for access until later, and have in place some of the running rigging, including the burtons, top rope, boom topping lift, and throat and peak halliards for the mainsail. The latter is bent to the gaff and brailed into the mast:
-
 Stockholm tar got a reaction from robin b in Sherbourne by Stockholm tar - Caldercraft - 1/64
I thought you might like to see a few more pictures of the (slow) progress on my Sherbourne. The pictures were actually taken about a month ago, and my wife and I are now at our cottage, so work won't resume on her until the autumn.
I've now finished the shrouds apart from the ratlines, which I'm leaving off for access until later, and have in place some of the running rigging, including the burtons, top rope, boom topping lift, and throat and peak halliards for the mainsail. The latter is bent to the gaff and brailed into the mast:
-
Stockholm tar got a reaction from tkay11 in Sherbourne by Stockholm tar - Caldercraft - 1/64
Dirk, Tony,
Thanks for your compliments, much appreciated. She's beginning to look something now, with the furled mainsail and some of the rigging.
Dirk, I'm pleased I spent some time on the details, as I think they add something to her – for instance the two stern lockers, one with the lid open to reveal in one half, the balls for the swivel guns, the other holding the lead line. In my mind there's a similar arrangement for the opposite side box, one half containing the balls for the swivels, the other the log line. The boat was quite literally made out of scrap pieces (the oars are orange sticks) and the sail is an old handkerchief, stained with tea. Threads were pulled out to represent the seams and, although difficult to see, there are reef points.
Russ, just seen your post. Yes, I suppose I could do that, even though she didn't have a log to start with.
-
 Stockholm tar got a reaction from CaptainSteve in Sherbourne by Stockholm tar - Caldercraft - 1/64
I thought you might like to see a few more pictures of the (slow) progress on my Sherbourne. The pictures were actually taken about a month ago, and my wife and I are now at our cottage, so work won't resume on her until the autumn.
I've now finished the shrouds apart from the ratlines, which I'm leaving off for access until later, and have in place some of the running rigging, including the burtons, top rope, boom topping lift, and throat and peak halliards for the mainsail. The latter is bent to the gaff and brailed into the mast:
-
 Stockholm tar got a reaction from JerseyCity Frankie in rope twisting
George,
The twist is usually inherant in the rope itself, but can be made worse by coiling in the wrong direction. One thing you can do is to cut the length you need for the job in hand, and pull it with one hand through the forefinger and thumb of the other, removing as much twist as possible. As has been suggested, you can also hang it by one end for a short while with a light weight attached, which should help in untwisting it. I'm not sure beeswax will help, but apply it after you have first tried to remove the twist by the other methods.
When you come to reeving the line through the blocks most of the twist should have disappeared, but there are ways to help the process further. Most rigging line is laid up or made right handed, which means the strands will run from bottom left to top right as you look at a length it. Therefore reeving it clockwise through the blocks, if possible, will help. Another tip is to try to prevent the blocks themselves from turning as much as possible, whilst reeving the line. It doesn't always work, but just occasionally you get a nice untwisted block and tackle!
Btw, you have a very nice looking model there.
-
Stockholm tar reacted to georgek in HMS Victory by georgek - Mantua - scale 1:98 - first build
more photos showing the progresss.....
-
Stockholm tar reacted to georgek in HMS Victory by georgek - Mantua - scale 1:98 - first build
hi,
i have been working on her four years by now. Ι am uploading more photos with the braces almost finished and i will be uploading new photos showing the progress.
-
Stockholm tar reacted to georgek in HMS Victory by georgek - Mantua - scale 1:98 - first build
hello to everyone,
I am learning from this forum for a long time by now. Since i begun the building of the Hms Victory i have been looking for help on this forum all the time and everytime i found what i have been looking for. WIthout this forum the buid of this ship will be very difficult (don't forget that i choose this model as a first build). i am posting some photos of my first build. The ship is almost completed. I will continue to upload photos of the ship until the comletion. The kit is Mantua Hms victory but as you will see i have made many additions and i am making the rigging following the Jotika plans and instructions. Now i am making the braces. As you can see i have furled the sails on the yards. I wanna ask for your opinion: should i put a furled sail on the driver boom also? As i can see the jotika plans does not have the nesseccary blocks for the buntlines and leechlines (if there are any) for this sail.
-
-
Stockholm tar reacted to realworkingsailor in HMS Pegasus by realworkingsailor - Amati/Victory Models - 1/64
This is not so much of an update, it's a nice sunny day, so before I go back to work tomorrow, I thought I'd head outside and try to take a few photos.
Andy
-
 Stockholm tar got a reaction from fnkershner in Ark Royal leaves for scrap yard - & views of other warships - moved by moderator
Floyd,
Well, thanks – but I like to think my life expectancy might have other things going for it than the fact that I might glow in the dark! (I don't.)
-
Stockholm tar got a reaction from fnkershner in Ark Royal leaves for scrap yard - & views of other warships - moved by moderator
I remember going aboard Savannah when she visited Southampton in the early sixties, although not a lot. She was a nice looking ship, even though she didn't have much of a funnel (it probably not being necessary).
Ps. I've felt strange ever since!
-
 Stockholm tar got a reaction from popeye the sailor in Half Moon by popeye the sailor - Billing Boats - 1:40 scale kit
A bottle of 5mm blocks? Sounds like meds for a ship modeller to me!
Which reminds me, I need some 5mm deadeyes to solve a 'headache'...
Btw, great idea.
-
 Stockholm tar got a reaction from mtaylor in Half Moon by popeye the sailor - Billing Boats - 1:40 scale kit
A bottle of 5mm blocks? Sounds like meds for a ship modeller to me!
Which reminds me, I need some 5mm deadeyes to solve a 'headache'...
Btw, great idea.
-
Stockholm tar reacted to ChrisLBren in USF Confederacy by ChrisLBren - FINISHED - 3/16 Scale
Hi Gang,
After a hiatus due to my wife and I having twins, she's dusted off and I'm hoping to recommence this build. I've attached some not so great photos from my iphone - the idea here is just to get a log started and motivate me to get back in the shipyard - for at least a few hours per week.
This build was started back in November of 2009 using Chucks plans that later were used in the Model Expo kit. The woods used were swiss pear from Hobby Mill for almost exclusively with the exception of boxwood for the decks and a little bit of ebony for the false keel and checkerboard flooring in the great cabin. Im a big fan of Fiebings dyed swiss pear and used this method for all black areas with the exceptions I just mentioned. I used three finishes, pure tung oil for the hull, Watcos Danish Oil for the deck fittings and beams, and diluted sanding sealer for the deck.
My goal is to at least get the 6 lb guns rigged and installed along with the ships wheel hopefully by the end of the month so i can begin the headrails this summer if the twins cooperate....
Thats it for now - by the way the photo posts looks a bit different than the old Modelship World - any tips on the best size to upload so they look more standard/fill the screen ?
Chris
-
Stockholm tar got a reaction from mtaylor in DKM Scharnhorst by Paul Salomone - 1:72nd Scale - German WW2 Battlecruiser
Paul,
I have to admit I'm not really into this period, although I find these big ships impressive. Certainly the German battleships of the Second World War were beautiful to look at, and I seem to remember reading that the crews of the RN ships which sank the Bismarck, for instance, as being first saddened by the number of German seamen that perished – and second, by the fact that they had to destroy such a beautiful ship.
I'm glad you have to begin again (!) – so that I can follow your build from the beginning.
-
 Stockholm tar got a reaction from Kevin in DKM Scharnhorst by Paul Salomone - 1:72nd Scale - German WW2 Battlecruiser
Paul,
I have to admit I'm not really into this period, although I find these big ships impressive. Certainly the German battleships of the Second World War were beautiful to look at, and I seem to remember reading that the crews of the RN ships which sank the Bismarck, for instance, as being first saddened by the number of German seamen that perished – and second, by the fact that they had to destroy such a beautiful ship.
I'm glad you have to begin again (!) – so that I can follow your build from the beginning.