-
Posts
2,540 -
Joined
-
Last visited
About Rustyj

- Birthday 01/10/1955
Contact Methods
-
MSN
rustyissi@aol.com
Profile Information
-
Gender
Male
-
Location
Chittenango, NY
Recent Profile Visitors
-
Thank you all for the kind words and likes. Light work is fine just no heavy sanding which there still is a bit of fairing to do. Feels good to be back at it. Glenn I'm sorry to hear you have had to have back surgery. As result of my misspent youth thinking I was indestructible, I'm not, I also went down that road. My best wishes to you for a speedy recovery.
-
 Rustyj reacted to a post in a topic:
Syren Ship Model Company News, Updates and Info.....(part 2)
-
 JpR62 reacted to a post in a topic:
HMS Portland 1770 by Rustyj - Portland Scale Ship Co. - 1:48 - 50 gun 4th rate
-
 JpR62 reacted to a post in a topic:
HMS Portland 1770 by Rustyj - Portland Scale Ship Co. - 1:48 - 50 gun 4th rate
-
 westwood reacted to a post in a topic:
HMS Portland 1770 by Rustyj - Portland Scale Ship Co. - 1:48 - 50 gun 4th rate
-
 davyboy reacted to a post in a topic:
HMS Portland 1770 by Rustyj - Portland Scale Ship Co. - 1:48 - 50 gun 4th rate
-
 VolkerB reacted to a post in a topic:
HMS Portland 1770 by Rustyj - Portland Scale Ship Co. - 1:48 - 50 gun 4th rate
-
 KARAVOKIRIS reacted to a post in a topic:
HMS Portland 1770 by Rustyj - Portland Scale Ship Co. - 1:48 - 50 gun 4th rate
-
 KARAVOKIRIS reacted to a post in a topic:
Sloop Speedwell 1752 by Rustyj - Syren Ship Model Company - 1:32 Scale - POF Sloop
-
 Chuck Seiler reacted to a post in a topic:
HMS Portland 1770 by Rustyj - Portland Scale Ship Co. - 1:48 - 50 gun 4th rate
-
 Chuck Seiler reacted to a post in a topic:
HMS Portland 1770 by Rustyj - Portland Scale Ship Co. - 1:48 - 50 gun 4th rate
-
 scrubbyj427 reacted to a post in a topic:
Sloop Speedwell 1752 by Rustyj - Syren Ship Model Company - 1:32 Scale - POF Sloop
-
Thank you all for your checking in and the kind words. This is another big build but is going to be a lot of fun. Here I've added the pear false keel and rabbet strip the bulkhead former. As you can tell she's big. Around 36" log at this point. With the stem and stern completed I estimate her to be over 42" long! These are the pieces of laser cut Alaskan Yellow Cedar (AYC) to make the knee as well as the template. All of the cuts are clean and precise. Very little adjust, if any, was needed for a good fit. The template worked very well in ensuring the proper curve was maintained. It fit to the bulkhead former with no issues. The knee was also tapered as per the instructions to fit the figurehead. I made the taper, but I'll have to finish later when I get the figurehead. And here is the attached to the former as well as keel and false keel. Like the knee they are all AYC. Next will be the setting of the frames.
-
 Rustyj reacted to a post in a topic:
Sloop Speedwell 1752 by Rustyj - Syren Ship Model Company - 1:32 Scale - POF Sloop
-
 Rustyj reacted to a post in a topic:
Sloop Speedwell 1752 by Rustyj - Syren Ship Model Company - 1:32 Scale - POF Sloop
-
 Rustyj reacted to a post in a topic:
Sloop Speedwell 1752 by Rustyj - Syren Ship Model Company - 1:32 Scale - POF Sloop
-
Hi all, Well it's been a long time since I last posted. The world and other things have intruded. I had a couple of projects I had to do for friends of the family, Vanguard Grecian and AL Virginia 1819. Then there's work. After turning 70 last year I told my boss it was time to cut back. So during the summer and fall I sent my time training my replacement. I've now taken the winter off and don't return until May and then only parttime! So I've been back at the Speedwell, finished the stern framing and that finishes chapter 2. I'm now on the mend from "trigger finger" hand surgery so no fine work or heavy sanding in the near future. I can however do milling of the AYC needed for chapters 3 & 4. It's break out the saw and make a lot of dust!
-
 Rustyj reacted to a post in a topic:
HMS Surprise 1796 (prototype) by James H - Vanguard Models - 1:64
-
 Rustyj reacted to a post in a topic:
HMS Winchelsea 1764 by Kusawa2000 (Mike Draper)
-
 Rustyj reacted to a post in a topic:
HMS Winchelsea 1764 by Kusawa2000 (Mike Draper)
-
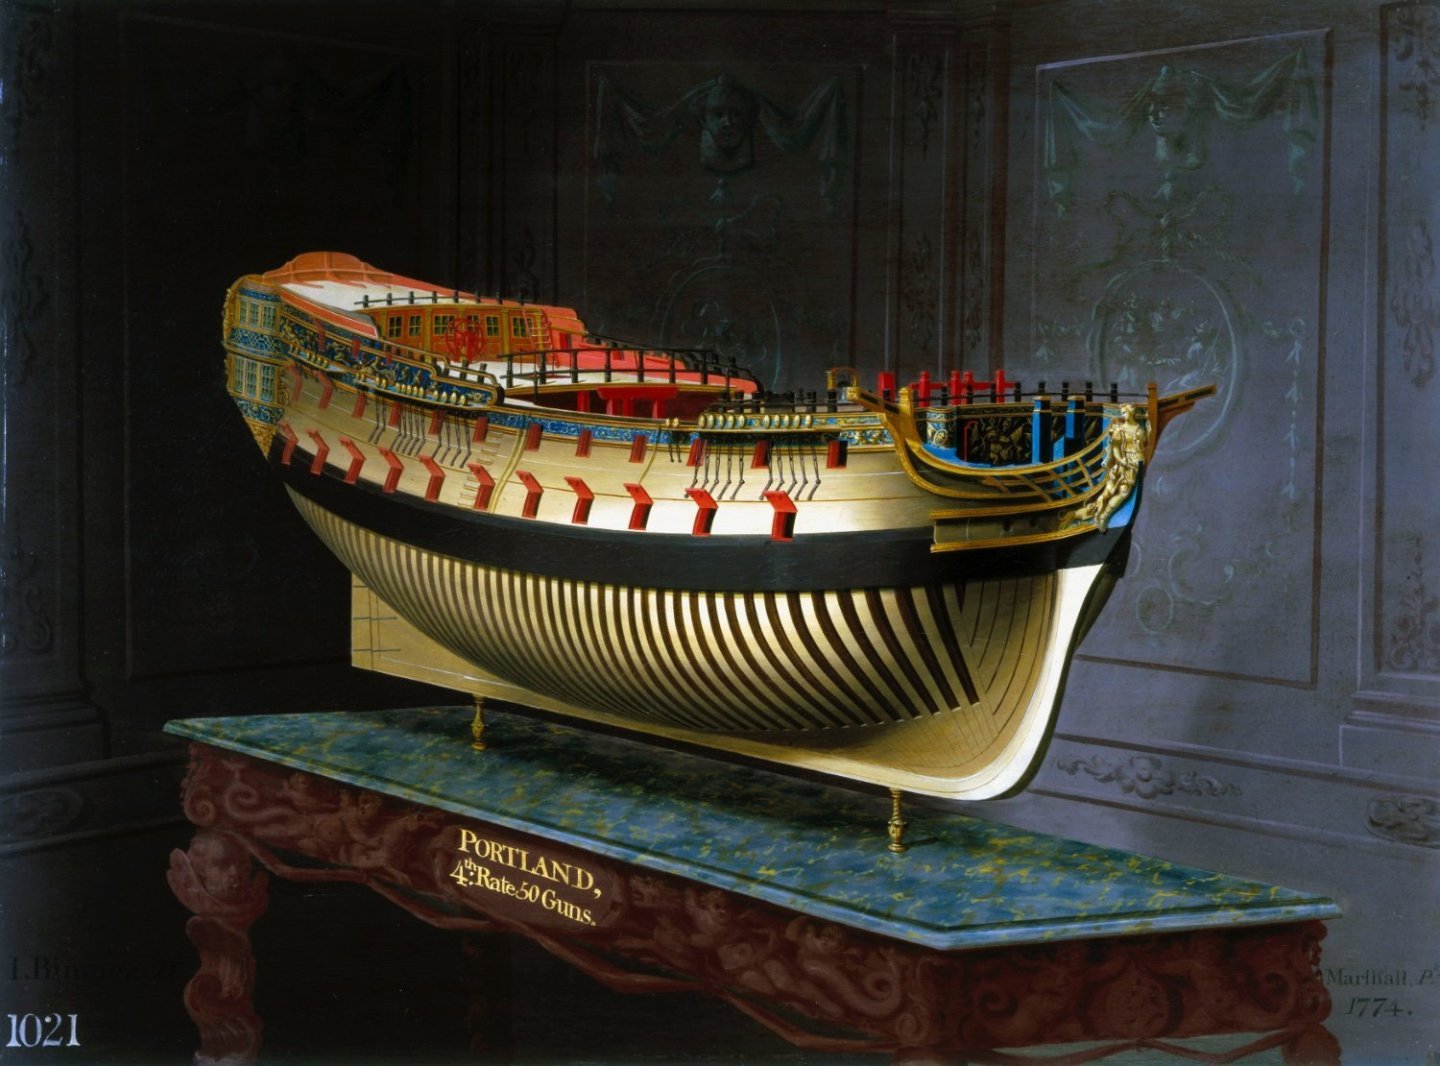
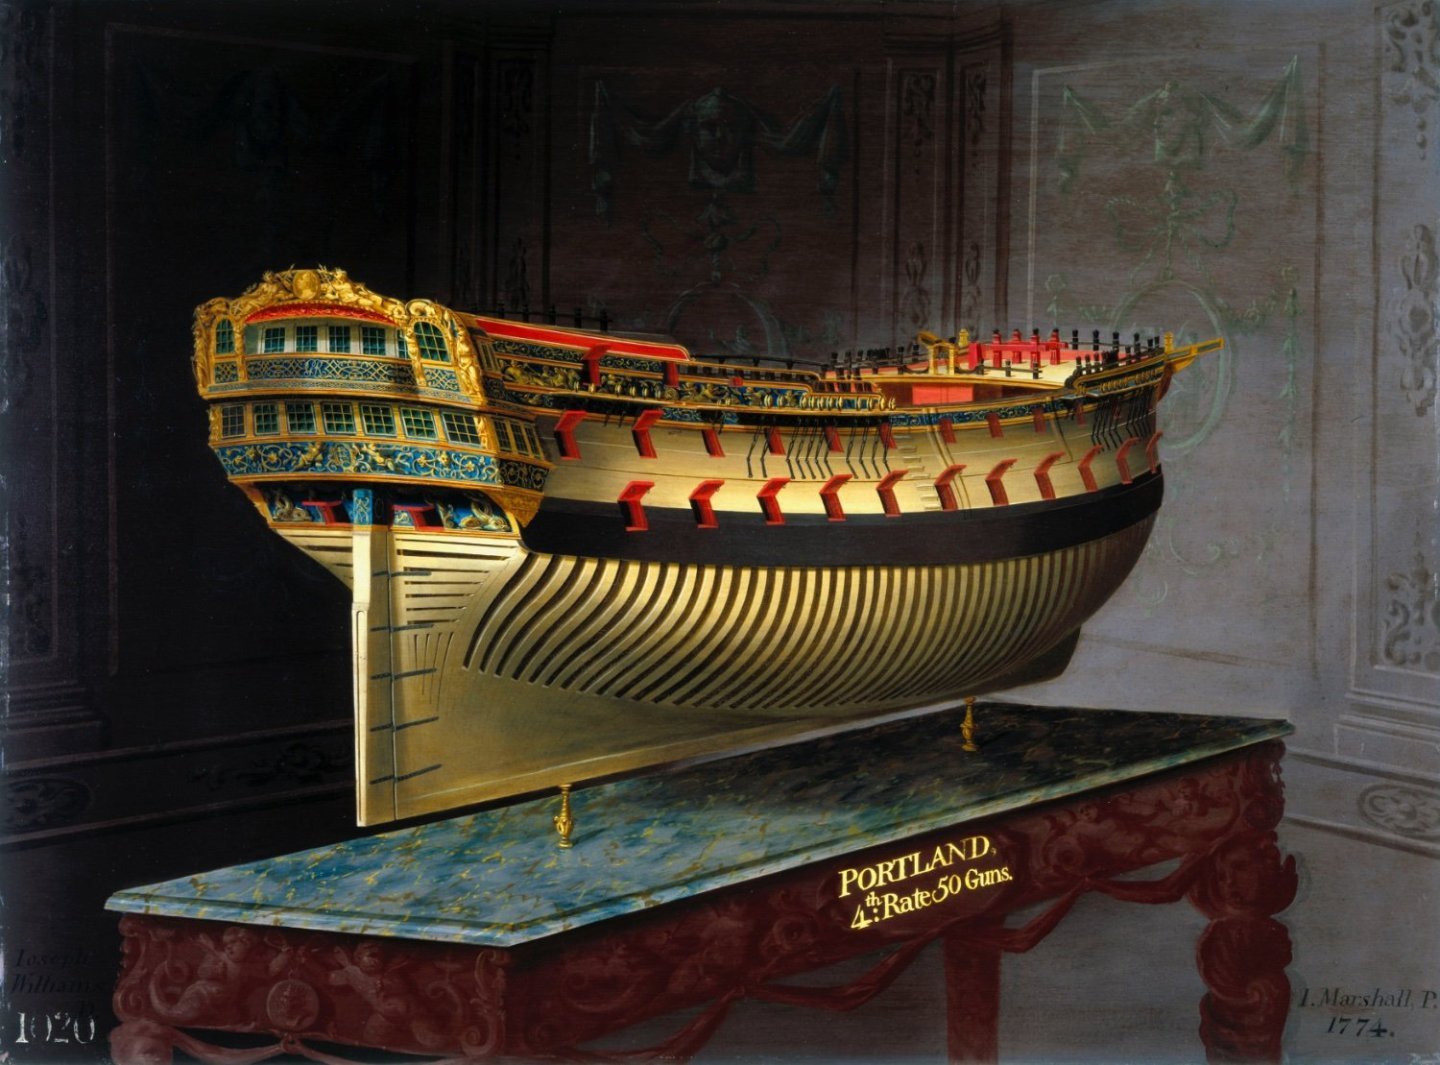
I have purchased the HMS Portland kit designed by The Portland Scale Ship Company. The is done in 1:48 scale. It will have Alaskan yellow cedar, Pear and Boxwood for select parts and MDF framing. The model is designed to represent the dockyard style model of Portland as depicted in the Joseph Marshal paintings of 1774, as seen below. I ordered the model on January 16th, and it arrived on the 21st. Chapters 1 & 2 were included in the box, and it weighed around 27 pounds (12.24 kg). The cover is laser etched as seen below. I'm going to figure out something to do with it as it's too nice to throw away when I've emptied the box. As I'm also currently deeply involved building the Speedwell so this build will progress rather slowly. But that is a good thing. And we are off and running, former and keel have started to be assembled.
-
Hi Glenn, I have the pleasure of having the Portland in storage under the work bench. After following the build logs and looking through the chapter1&2 materials and instructions I think you would really like building her! I know I will.
-
 Rustyj reacted to a post in a topic:
Chris Watton and Vanguard Models news and updates Volume 2
-
 Rustyj reacted to a post in a topic:
HMS Portland 1770 by scrubbyj427 - 1:48 - 4th rate 50-gun ship
-
Rustyj started following Chucks Prototype Double Capstan (3D print and laser cutting group)
-
Rustyj started following Project Build logs
About us
Modelshipworld - Advancing Ship Modeling through Research
SSL Secured
Your security is important for us so this Website is SSL-Secured
NRG Mailing Address
Nautical Research Guild
237 South Lincoln Street
Westmont IL, 60559-1917
Model Ship World ® and the MSW logo are Registered Trademarks, and belong to the Nautical Research Guild (United States Patent and Trademark Office: No. 6,929,264 & No. 6,929,274, registered Dec. 20, 2022)
Helpful Links
About the NRG
If you enjoy building ship models that are historically accurate as well as beautiful, then The Nautical Research Guild (NRG) is just right for you.
The Guild is a non-profit educational organization whose mission is to “Advance Ship Modeling Through Research”. We provide support to our members in their efforts to raise the quality of their model ships.
The Nautical Research Guild has published our world-renowned quarterly magazine, The Nautical Research Journal, since 1955. The pages of the Journal are full of articles by accomplished ship modelers who show you how they create those exquisite details on their models, and by maritime historians who show you the correct details to build. The Journal is available in both print and digital editions. Go to the NRG web site (www.thenrg.org) to download a complimentary digital copy of the Journal. The NRG also publishes plan sets, books and compilations of back issues of the Journal and the former Ships in Scale and Model Ship Builder magazines.


