HOLIDAY DONATION DRIVE - SUPPORT MSW - DO YOUR PART TO KEEP THIS GREAT FORUM GOING! (Only 68 donations so far out of 49,000 members - Can we at least get 100? C'mon guys!)
×


chris watton
-
Posts
2,317 -
Joined
-
Last visited
Content Type
Profiles
Forums
Gallery
Events
Everything posted by chris watton
-
 I think TomJonas may be referring to strips, wood strips? I do remember this method of building up the gun port inner surrounds and it was always a nightmare due to the lack of surface to glue the four sides to the inner edges of the planking. All I can suggest is patience, or leave them off if you think the end result may look worse with them on.
 -
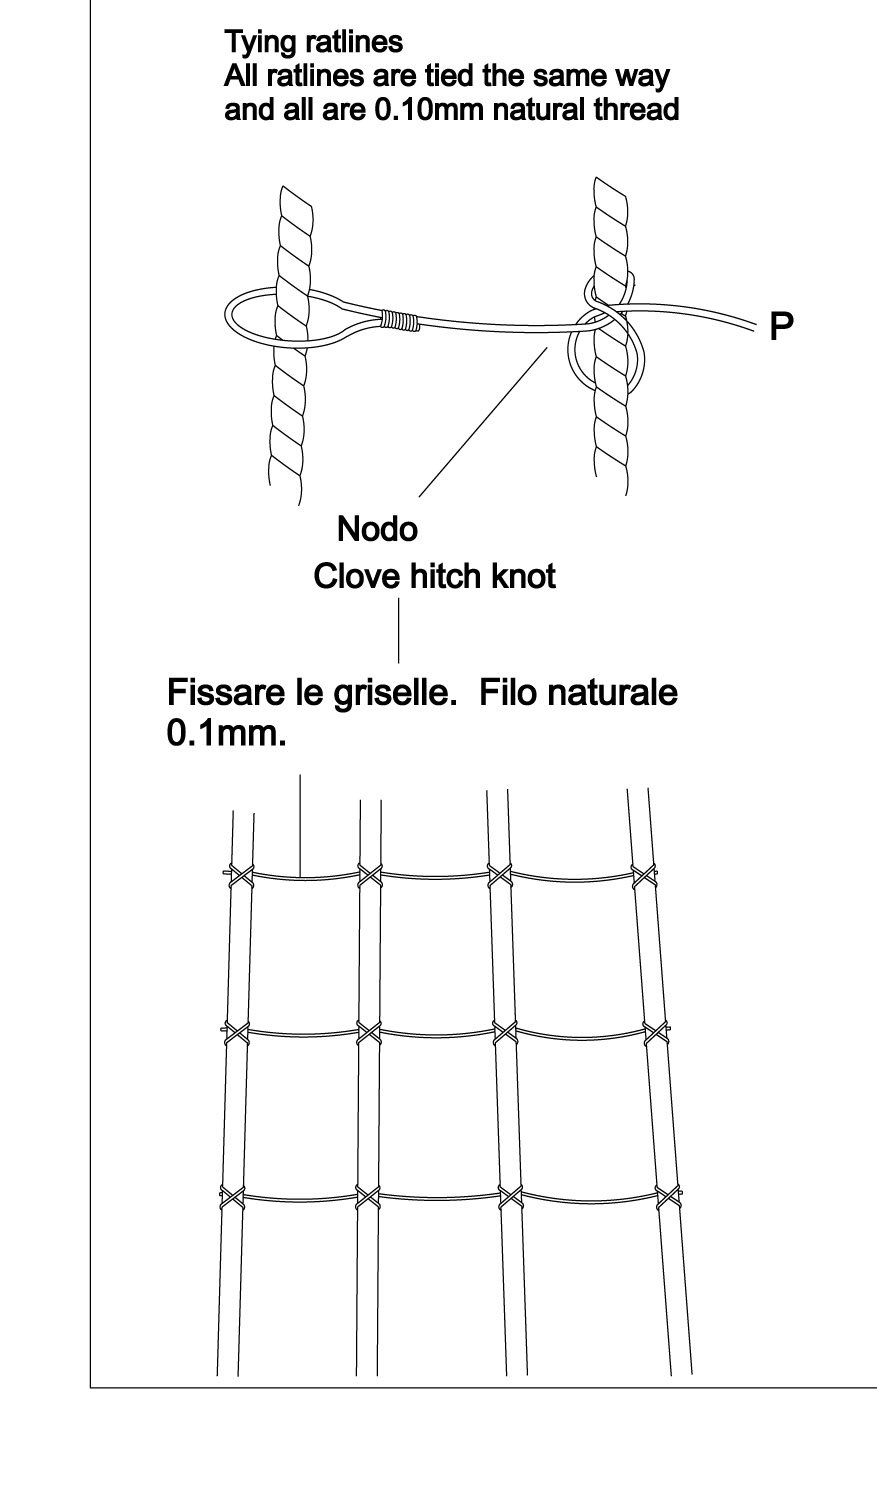
No, never use cyano for rigging. use watered down PVA wood glue and brush it onto the knots. Wait to cure and then trim the excess. Also, use clove hitch knots for the ratlines. But do not use super glue!

- 48 replies
-
- 11
-

-
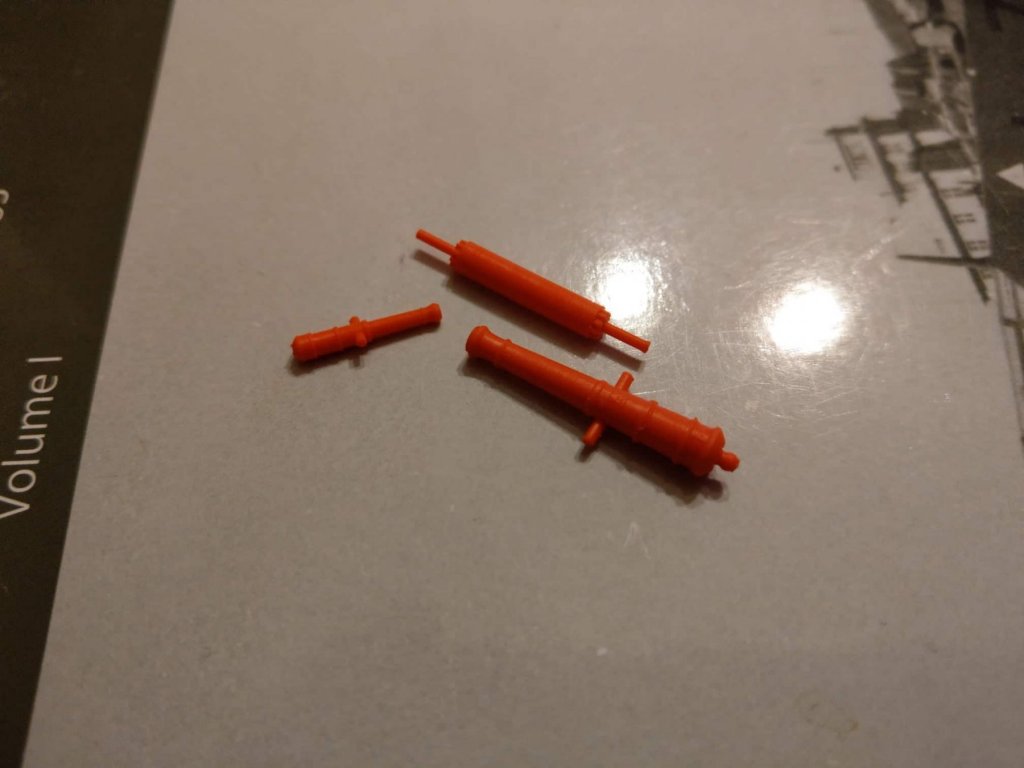
These are the 3-D printed parts I designed for Speedy which will be resin cast to keep the detail and proper size, 4-Pounder and half-Pounder barrels and small main bitt winch (There is a photo etched part that fits into the end of the smaller barrel):
-
Thank you Chuck. Good job we don't add in our own development time, otherwise the costs would be stratospheric! lol Thanks, that was my thinking behind the figures, too. After Bristol, I am torn between a 64th scale Bellona or the 'super frigate' Indefatigable, with the latter more appealing right now. I have been trying to find anything for the figurehead and stern decoration for Pellew's ship, but contemporary information is quite sparse. If anyone can unearth anything I could use for these parts (figurehead especially), that would be appreciated.
-
Thank you. I must stress that this is a pre-prototype (the gun port pattern is missing its hawse holes still - I use these to try ideas and see if any stick), and when drawing the details onto the pattern in CAD, I added the eyebolt holes in case I find a way to make these holes work. For example, I figured the second planking could go as high as the lower edges of the gun ports, then remove the bulkhead tabs above deck level, plank the inside, and then drill the holes from the outside in, and then finish off the outer planking. I will try this, and if it doesn't work, I will design some templates instead. It should work, though. As I mentioned, I do not much like gun port patterns so much, and much prefer the new method with longitudinal and vertical frames slotting together to make the port timbers - but the bulkhead tabs would have to be 2mm thick max to do this, and I suspect many builders would be frustrated with the fragility, and many tabs broken whilst planking. I do now include a nice slot in the bows to take the planking up to the planking lines as per the original plans, I tried this with Alert and worked really well, so I shall use that for all future kits. Oh, forgot to mention, I am having a 64th scale sculpture of Lord Cochrane made for Speedy (digital so I can change the scale if I want), what do you guys think about this, like having say, Pellew for Indefatigable and Nelson for Bristol (as he did serve on it). Not just generic sailor figures, but ones sculpted from actual paintings of the men, with the correct heights (Nelson was 5 foot 4 and Cochrane was over 6 feet tall)? I could do them in 72nd, 64th and 48th scale. ETA - Also forgot to say, Speedy will have a copper bottom..
-
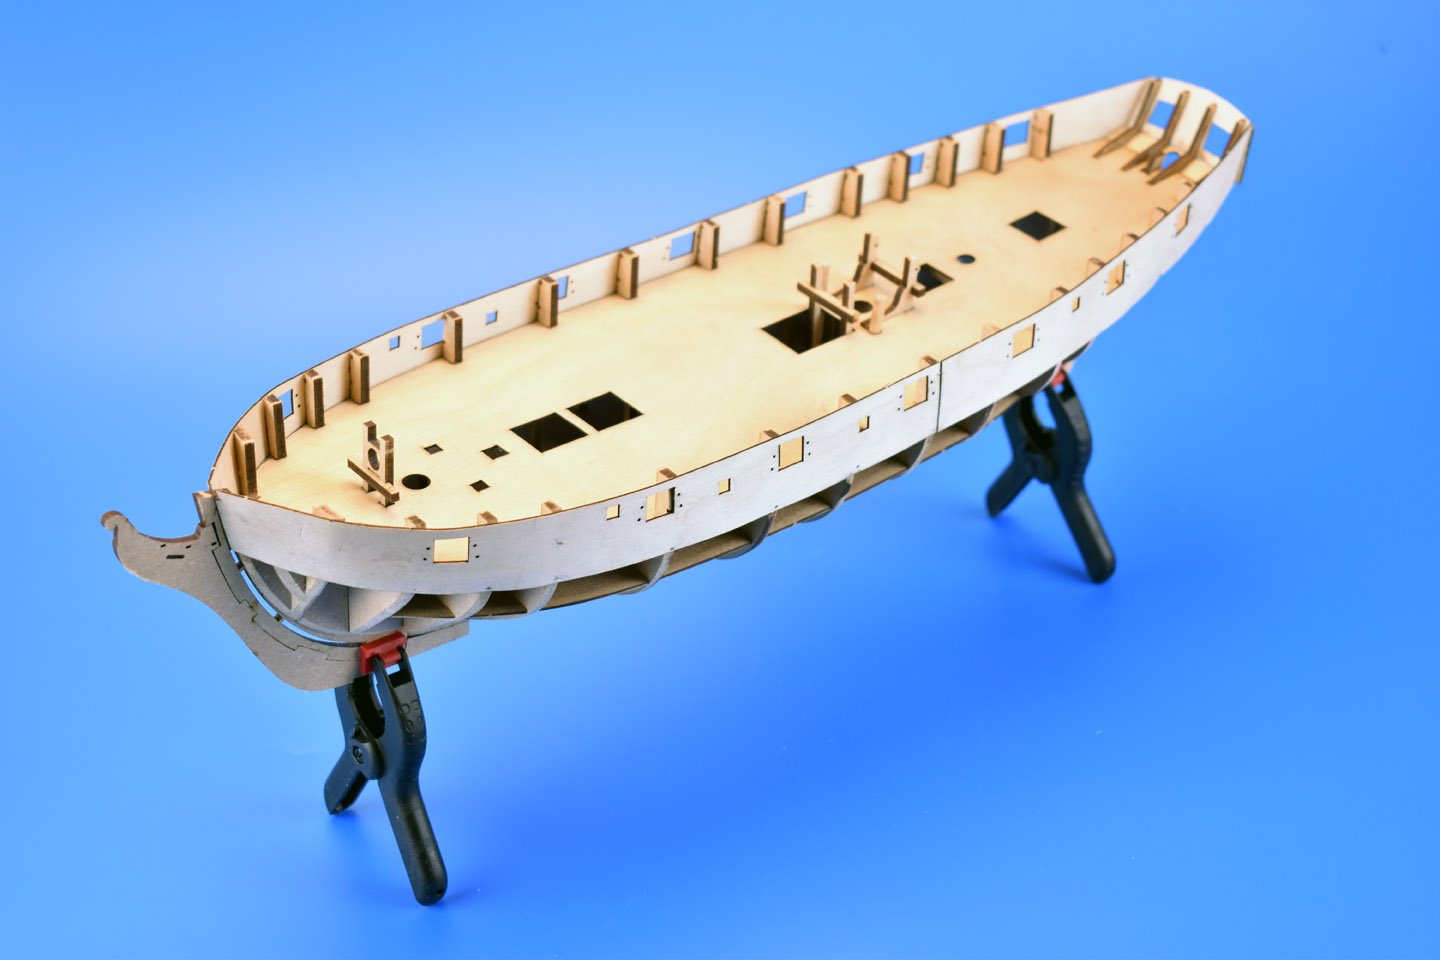
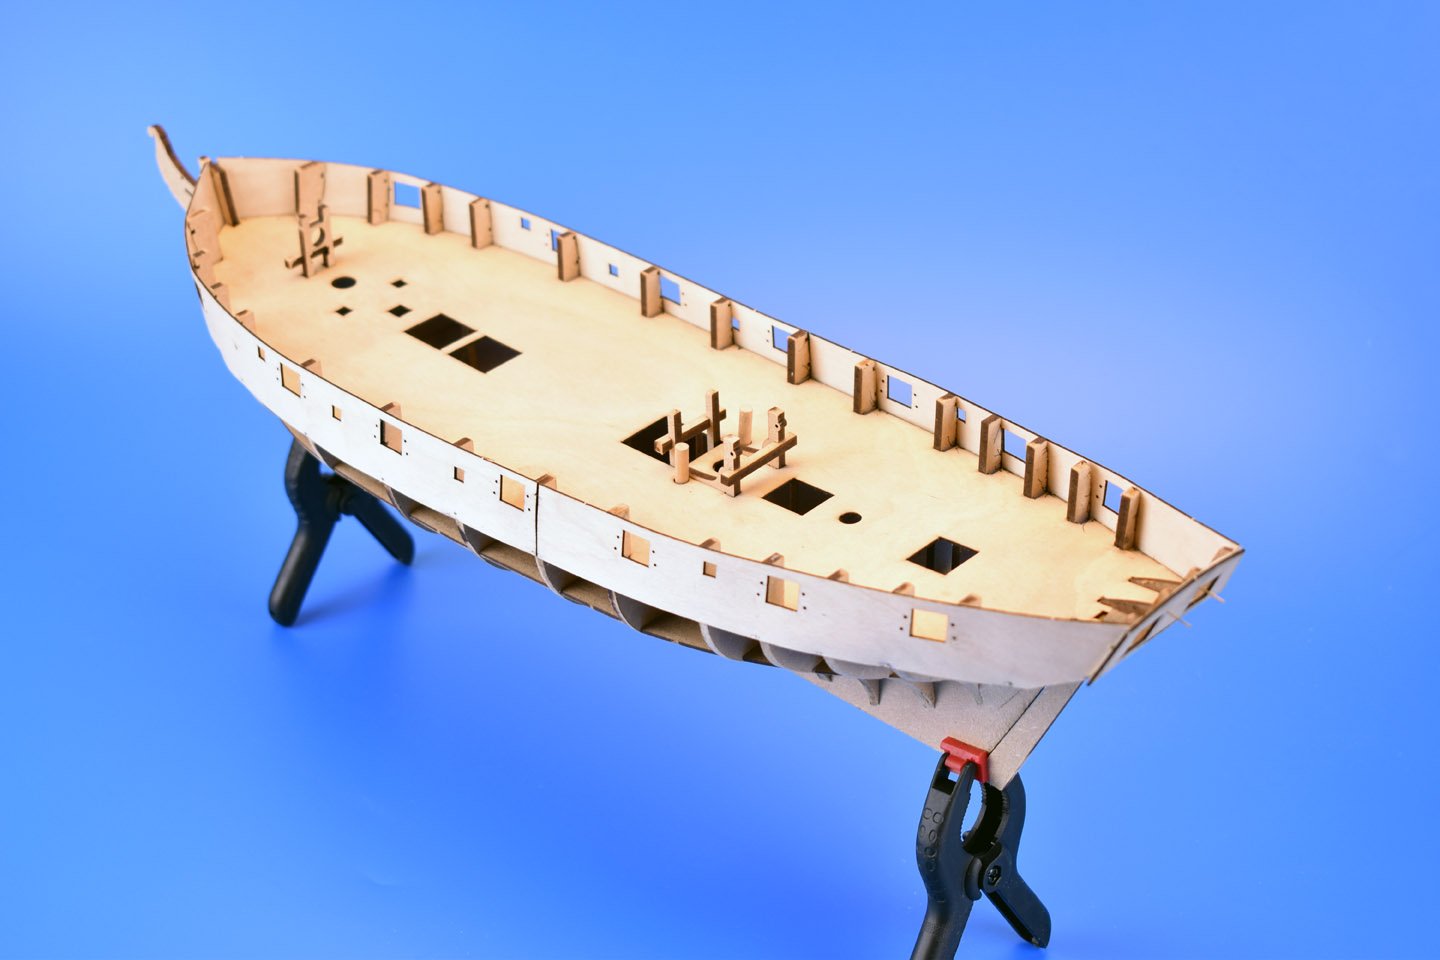
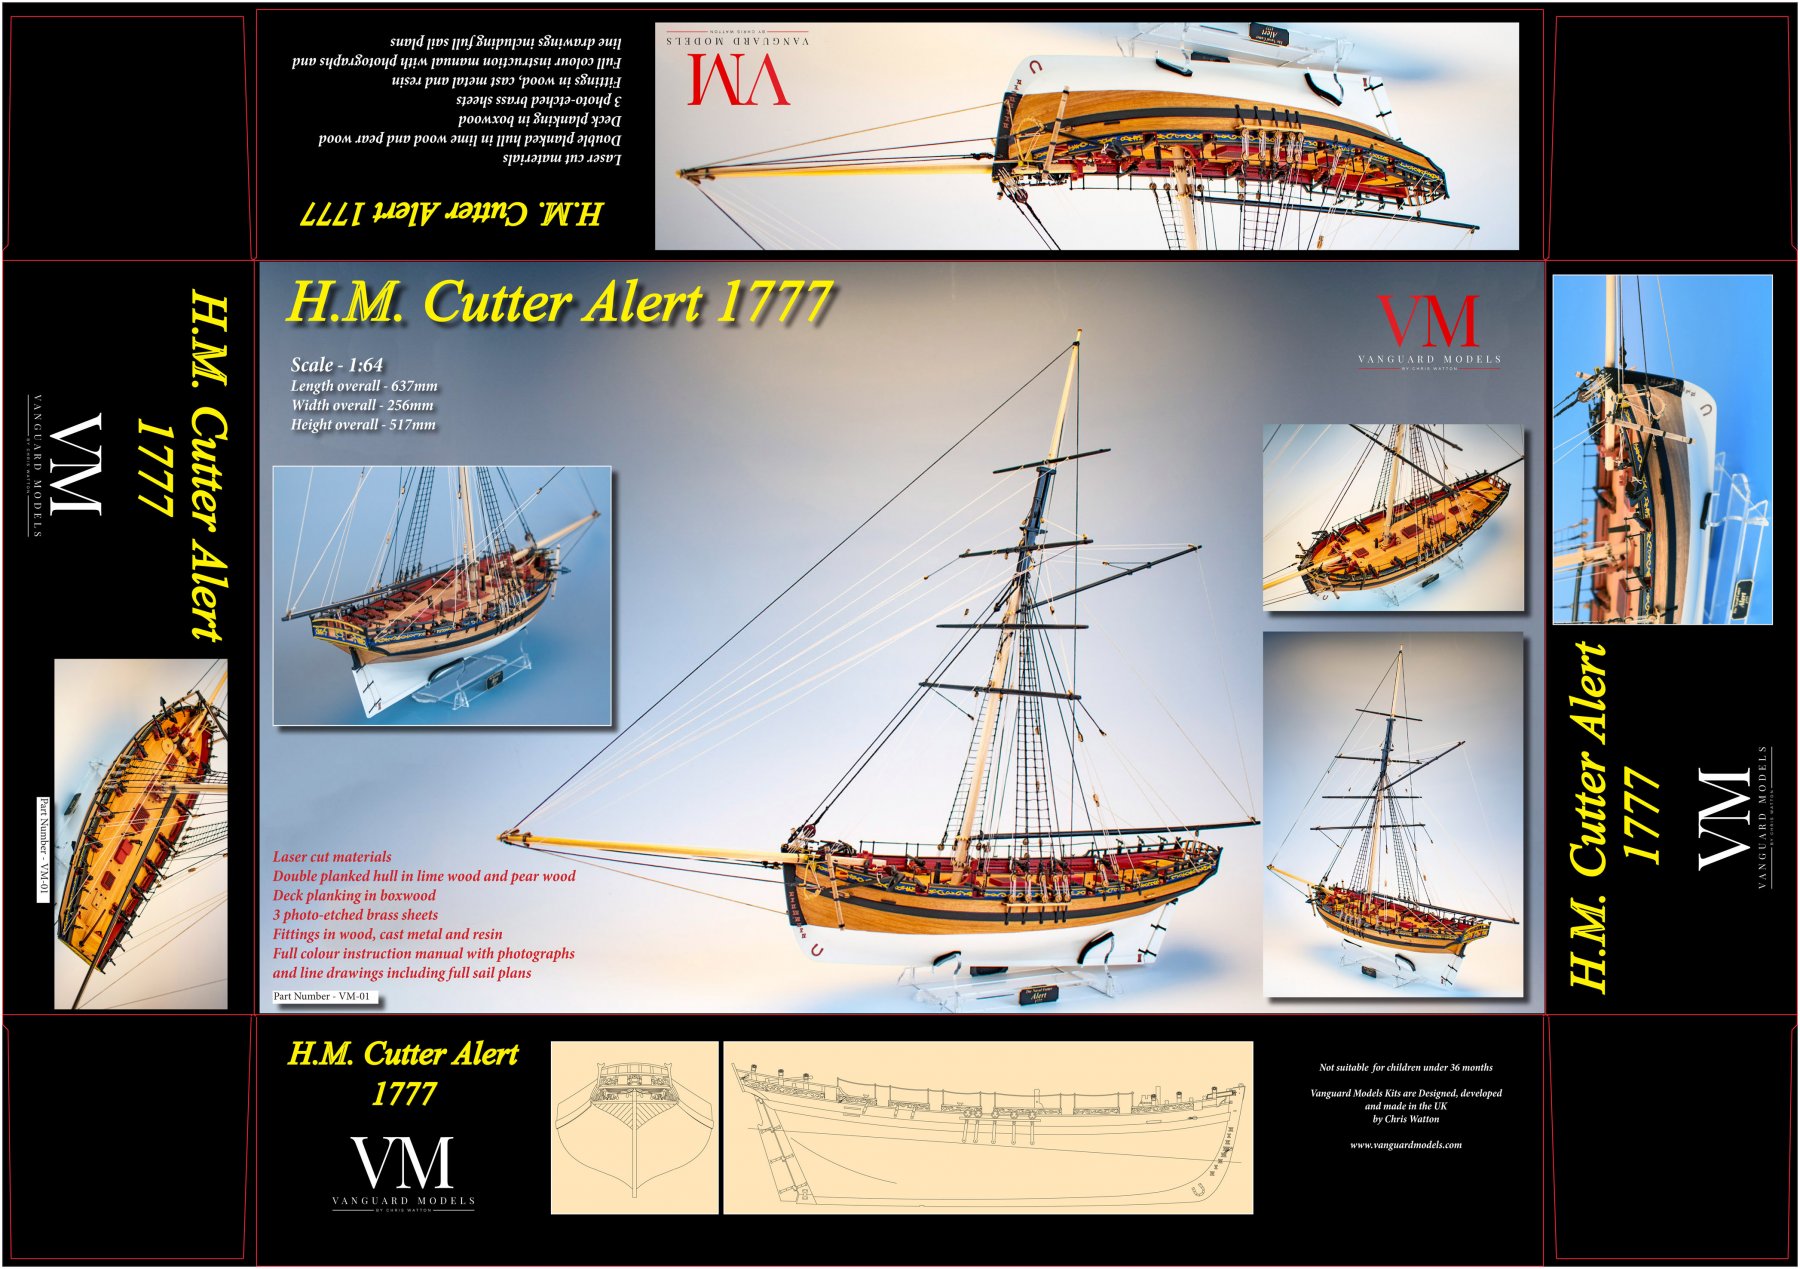
Hello, It has been a while but I promise I have been busy. It has not been easy developing new kits whilst holding down a full time job, but I am enjoying the experience and hope that one day, I can quit the day job and concentrate solely on the Vanguard Models range. OK, first to be released, which I am hoping will be in two or three weeks, is the Armed Cutter Alert. I am just waiting for everything to be delivered, so I can put the kits together in the boxes. I should have a final price soon, once I receive my final invoice for the laser cutting and photo etched parts. I have attached a pic of the box art that I did for Alert. The manual is being printed right now (56 A3 colour pages). I did start the designs for HMS Bristol, as this was to be my next kit. However, whilst reading one of my books during tea breaks at work, I learnt of the small 14 gun brig Speedy (1782), and her exploits when commanded by Lord Cochrane. I ordered the plans and decided to do this next. It seemed to make more sense, as I will be able to release this by the end of Summer (I hope). Because of the very fine lines, I have used a lot more bulkheads than is usual for this size of kit (15 bulkheads). After this, I will hopefully have some money come in instead of all going out, and will concentrate of Bristol, followed most probably with a heavy frigate. I will add a couple of pics of the Speedy prototype hull in a following update. I had the parts laser cut locally, as these are 'sacrificial' parts and used only to check fit and make sure the gun port pattern fits exactly as it should. I did intend to have the gun ports framed, as the Victory model, but realised the frames would have to be way too thin to achieve scale thickness of the bulwarks, once the inner and outer planking strips were factored in. This is the new website (still work in progress until I finalise costs of Alert: https://vanguardmodels.com/ And a big thank you to Steve Urwin, who has done all of that for me, which I appreciate very much. Also a big thank you to Jim Hatch, who has helped with contacts for boxes and resin casting suppliers. Without MSW, I would not have even started down this path, so thank you! Chris

-
I shall be off the forums for a while, as I will have no real news until I have finished what I am now doing, so need to concentrate on that. Once I do have more news, I shall start a new thread. Cheers, Chris Just to add, a big genuine thank you to all of you guys who have contributed, I can honestly say that if it wasn't for the input from many on this forum, I would not have even thought about starting to design new stuff again, so your input and help you have given me is and has been deeply appreciated.
-
I do not like the earlier Victory as like Wasa, it was a very flawed design, too top heavy. I have obtained a full set of plans for a mid 18th Century First Rate, but it's not Victory (although I do have the as built plans for that too, from my earlier designs of Amati's 64th scale Victory) The 1744 Victory wasn't a 4-decker, it just had four tiers of stern and side lights.
-
I would love to use octagonal dowel for the yards (so you just have to taper both ends and that's it), but never found any. If things ever take off, I may just try and get some produced by a supplier. Anything to make it easier for me too is good!
-
One more thing, the only thing that I have never liked about the masts is that really, you do need some sort of lathe to turn the topmasts and topgallant masts (You can easily use a plane and sanding block and file for most yards and lower masts). At Amati, we did try and get these parts pre made, but they always came back wrong - the samples were fine, but when we received the bulk of the masts and yards, they could not be used, they were that bad. It is a shame, as when building the hull (the more complex of the two stages of hull and masts and rig), my main tool is just my trusty Stanley Knife, but for the masts, I need a lathe! Although when I first started, I did used to put a full size electric drill in a bench vice and turn the wood using that - although that is clearly something I could not recommend!
-
Definitely not! If anything, I have always tried to make the kits easier (and more fun) to build. For me, it is not a willy waving contest about who is the most skilled at making something from a block a wood - there are plenty of plans and a vast selection of nice woods for people who are into that already. Very nice model, definitely one of Panart's best, and you have certainly done the kit justice. When I worked for Amati, we toyed with the idea of splitting the kits up to try and cut down the cost to the modeller. The problem was that most of the cost is in the hull and fittings. The masts, yards and rigging make up a much smaller cost to the overall kit.
-
Well, I think I have now had the whole spectrum of suggestions, from CNC'ing all carvings from exotic woods to just supplying a load of wood and a set of drawings and leaving the modeller to it! Both would be financially disastrous, I have no doubt (in the West, at least). As long as I (and others like me) can keep the people in the middle of the spectrum relatively happy, I'll be happy. This so much reminds me of buying my very first wooden kit, a Billings Bounty - this had exactly as you suggest (except for quality wood). Hell, it even had a large block of obechi, this was the ship's boat that you had to carve out yourself! I would like to think we have 'evolved' the kits a little more since then.
-
I am hoping it will be this year!
-
I have to admit, I think the larger models like that look just as good without the masts, yards and rig. I wonder if it would be worth doing two versions, with the one just hull only but with special mast holes for the large flag poles, and include those and the flags. I think that would look really nice.
-
The copies of the original NMM plans have all the decoration included, which is what attracted me to this ship, so I am hoping it will look more or less like those two bottom photographs when finished, but with a white hull below waterline, and either Tanganyika or Pear wood for the second planking - that will compliment the blues and reds perfectly.
-
I know that in Rif Winfield's book, Leopard is shown as she was in her later career, with gangways around the waist, Bristol has an open waist, so I thought I would just do one (nice looking) pinnace for the ships boat, resting on the spare spars. If I do Leopard at a later date, because that has boat beams, I would do the full compliment of boats. I figure one large decorative pinnace sitting along the waist for Bristol will suit the overall aesthetics of the finished model, as it does for Bellona.
-
Yes, 1767 class, the second of that class, Bristol. It should be a very nice looking model, and the best part for is the fact that I now get to keep the finished prototype models for myself! I guess I could do another in the future for Leopard, as that is sufficiently different to warrant it, if shown in its later builds.
-
I do understand the problem of space, but to be honest, there are already countless smaller kits on the market to choose from. I decided from the off to try and stick to 64th scale, as I feel this is the best for such models. I do have a couple of smaller vessels in the pipeline (Have already got all of the plans for the first 6 kits) - but I would like to do another heavy frigate, as the last one I did was the first I ever did. That was two decades ago. I did do a 72nd scale Surprise for Amati a few years' ago, but nothing ever came of it, don't know why.
-
Portland Class 50 gun two decker is the next kit after Alert I am quite sure that there are no other kits currently on the market for such a vessel. (HMS Bristol)
-
I know - but I have to make sure that what I choose, for the first few kits at least, have quite broad appeal. This will allow me to then do more developments, one of which is a 70 gun Restoration warship (cannot do that yet as it would take all of my investment money). I would also love to to do a US subject at some point, and if things work out, I most certainly will - but this is very early days, and I am saying all this assuming I sell what I have planned already. I will not be doing another Victory though, so that's a plus!
-
Cheers Ron. I am quite sure that my Bellona will not look like that. (although for such a small scale, it is a very nice kit) I guess it doesn't matter what I do, there will always be someone who would prefer something else! lol But I do like Bellona, it is a very good looking model, and I did say that I want to design stuff that I would like to build..
- 906 replies
-
- 11
-
-
Yes, but the problem is that most British 74's all look the same, many with the same dimensions even. Take Bellona, although a different class, has (virtually) the same configuration as the Vanguard, Elephant, Captain and countless others. The differences being mostly superficial. What sets Bellona off from the others is her decoration, both stern and sides (although in reality painted frieze on the sides). Plus I prefer the colour scheme, with varnished sides rather than painted fully. I really liked my first designs for Bellona, and would love to do it again from scratch (as original designs were flawed and were ironed out with the Victory prototype) I know Corel do a Bellona, but this is in a very small scale, isn't it?