chris watton
-
Posts
2,339 -
Joined
-
Last visited
Content Type
Profiles
Forums
Gallery
Events
Everything posted by chris watton
-
 Excellent work, very neat! I have always liked this kit, and from a period rarely covered.
- 593 replies
-
- 4
-

-
- royal william
- euromodels
- (and 1 more)
-
Thanks again, guys I am not sure if I have already posted these, but here are the new cast cannons I used for Victory. These are exactly the same that will go into every kit: And here are the 4 turned brass masters that I turned, making sure they fit as they should before posting them over to Amati, to be used as masters for the castings: Oh, and I absolutely love this large model of the Victory as built, which I took when visiting the Victory in Portsmouth to get loads of pictures of the real thing to help me with some of the the more fuzzy detail : I also took a lot of photos of the stern, and added them into my CAD program. I then scaled the pictures to 64th and traced around the decoration, so it should be as accurate as it can be, with all parts the correct sizes and shapes (at least, for the decoration on the stern on the Victory as she is now..)
- 906 replies
-
- 20
-
-
Me too! I have always said that I design the kits how I would like to build them, just from a modeller's perspective. Because of this, they do take longer to develop than bog standard 'block model' kits, but I hope are more fun to make. I admit that my favoured material for castings, especially for large stern and figurehead decoration, is resin - much easier to bend/manipulate and sand/file. The only castings that are on Victory are the figurehead parts, the stern and side galleries are pre-cut wood and photo-etched parts. I prefer this as I know that every photo etched part will be exactly the same as I used for the prototype, no shrinkage and nothing malformed like you can get with cast parts, plus I can draw the minutest detail for the etched decoration. I have mentioned before that even all of the gratings are PE so that I could make each grating the exact scale size, and not have the size of the 'off the shelf' gratings dictate the size of the hatch opening. The quarterdeck gratings have a slight taper, which is also reproduced in the etched gratings. Chris
- 906 replies
-
- 12
-
-
I actually turned the 4 sizes of cannon barrels myself, on my lathe from brass to fit the scale carriages. these will be cast metal in the kit and specific to the Victory kit. The blocks/deadeyes will be standard and are perfectly acceptable in my view. Higher quality wooden blocks made from boxwood by more specialist small companies are a) prohibitively expensive and no small scale manufacturer could produce the amount of blocks required for a kit like Victory. I have always used Amati thread for the rigging and have never found any problems with it. What you see on my prototype model of Victory are the cast cannons specific to the model, standard Amati blocks and deadeyes, and standard Amati rigging thread (as well as standard wood strip stock, the same that's used in all Amati kits). I have never used any 'special' materials or fittings when building the prototypes, but always standard stock. If no standard fittings will do, or I do not think will be good enough (whether slightly wrong in size or not enough detail), I will make brand new masters. That's the way it has always been.
- 906 replies
-
- 13
-
-
Hi Glenn, Ah, that little area. I am sure I did the same as you. With hindsight I should have added them as pre-cut parts, but the trouble with small curved parts like that, when pre-cut from thick natural wood is that they have a tendancy to break very easily. With that in mind, using a small length of scrap wood strip may be less of a headache. I usually pre-soak the strip and then manipulate the curve using my finger or pair of pliers. If it's stubbern I use heat (holding the bend over a gas hob) I think Revenge is out, and I am sure Victory will not be too long now - although that is a monster of a model... Nice work on your vanguard, by the way, very neat and very clean.
-
Hi Glenn, What curved rails do you mean? I know there is a curved capping for the end of the poop upper rail on the 5mm walnut sheet, but I am not sure where you mean for the others. Chris
-
Thank you - there was a time when I thought I'd never finish Victory, was beginning to give me nightmares! I did actually weigh the Victory model when at Amati. I believe it came in at around 8kg. I thought it would be heavier. This was the completed model, without the superfluous material (and plans and instructions) that comes with the kit, so perhaps the actual kit box would weigh well over 14kg.
-
Thanks Yes, I started working out in May 2014 after seeing a pic of myself! I was over 90kg (at 5'7"), and am now 72kg. The top part of my body is now wider than the bottom part! Buying a home gym and weights and permanent change in diet must be one of my best ever investments. Our dogs are fine, thank you, still make me laugh on a daily basis...
-
Thank you! Prince is 1:64 scale, same as Victory. I do not know when Victory will be released, but I do know that Amati are working on it right now There is a lot of English text to translate..
-
I have a couple of pics of Prince, the first is the hull structure before planking: And this is Prince waiting for the new decoration:
- 906 replies
-
- 37
-
-
Thank you guys (and girls) Here are a few studio shots of the completed Victory, with figurehead and flags..
- 906 replies
-
- 43
-
-
Hi! Sorry I haven't been on here for a while. In the day my time is take up working for Amati and in the evenings I am busy trying to keep fit, after deciding that I needed to lose weight a couple of years ago.. As Anja wrote, Victory is complete and took me longer to finish than I thought. It was new territory for me as I haven't designed anything this complex before, and the plans and instructions reflected this. (31 full size plan sheets and a 114 page instruction manual (A3 size) containing well over 1000 line drawings and photographs). It came to a point where I thought I'd never finish this. but I was very conscious of the fact that it was no good designing such a detailed and complex kit and not putting in the time to make the plans and instructions as thorough as they can be. I have just completed a little modeller's manual, which Amati asked me to do, which I submitted only a couple of weeks ago. I am now working on Prince after having re-designed it for a third time after the lessons learned designing Victory - I am awaiting the brand new carvings. And that's where I am up to. Thank you, Chris
- 906 replies
-
- 24
-
-
Hi Jan, I know for a fact that Amati are working hard to get Revenge released ASAP, so it shouldn't be too long. (Please rare in mind that I am almost 1000 miles away from Amati, so am not sure what goes on there day-to-day - I only know Revenge is imminent because of the last minute emails I recieve, asking for final clarification on some parts) keith, I think they got the scale wrong on Prince all those year's ago, I think it's really as simple as that. I used the drawings/lines taken off the original dockyard model, scaled them down from 48th to 64th and that's was the basis for the new Prince (And Van De Velde drawings for details of the actual Prince). Apart from size, almost everything was wrong with the original Amati model.
-
Prince is 64th scale, same as Victory, but being almost 100 year's older, it is somewhat smaller. In fact, it is almost identical in length to the old original Amati Prince (which was given a scale of 1:78...). So no larger than the kit that was available over 40 year's ago! (Just a little more accurate and, hopefully, a lot easier to build). Also, because of the spritsail topmast and no long mizzen boom protruding over the stern, it is a lot shorter than Victory. As for Victory, there are many kits available at smaller scales, but I think this is the first at 64th and to have full lower decks detail, complete with a full compliment of cannon and scale carriages.
-
It's been a while. I was working on Victory, but then I was sent my new designs for the Prince in laser cut and PE parts, so I figuered I'd build up the prince hull first, so that I can courier the hull over to Amati. They will then get a very good carver to make all new carvings for the model, have them cast, and then send me back the hull and loose catings. I can then continue, and finally finish the Prince! When the prince is with Amati, I shall complete the Victory drawings/plans/instructions, which should be no later than Summer. I know Amati are keen to finalise both Prince and Victory, and I am hoping Victory will be ready for release either late this year or very early next. I have attached a couple of pics of Prince in progress. I have just completed the first planking. I re-done the designs to include three more main bulkheads, (almost) full length decks from lover gun deck upwards, and the new gun port designs that are now intergeral to the hull, rather than the 1mm ply gun port patterns of the old design.

- 906 replies
-
- 35
-
-
Bellona will be released one day, I have no doubt. What I am saying it that it needs a re-design to make the hull assembly easier to assemble, and it needs to be stronger. As it is now, I have no doubt experienced model makers would have no trouble, but for the rest, it would be a nightmare for them (I can only imagine how many emails a day I would get forwarded by Amati from customers asking for help)! I just need to design out the fragility, and once that's done, it should be fine as the rest of the parts are fine. Bellona was designed to try out new ways of building the hull with much more internal detail. from that experience I was able to design Victory with full internal detail. This was part of the point of Bellona - a test-bed for new ideas. If I still had to design the same old boring block-type models, instead of trying out new stuff, I would have gone mad with boredom by now!
-
Prince is my favourite. I re-designed it to allow more lower deck detail - can't wait to start this one!
-
Cheers Jaxboat The wiener's (or sausage dogs, as we call them) do help in me keeping sane - they're usually up to something that makes me laugh out loud! Have no pics to post, as I have no models here at home at all right now - not one! (Apart from a lot of unopened plastic kits, which I never seem to have the time to start...) Will keep you updated on all the stuff I am doing, especially Victory. If I add less text to the instructions, the quicker the final stages of development are, due to less translating. I know Amati have invested a hell of a lot of money in the development of this model, so I cannot envisage them sitting on this once the plans/instructions/photo booklet have been finalised. Chris
-
The Revenge should be due for release this year, as I know Amati have been working on finalising the Italian translations of my text. They are still on their Summer holidays right now, though (whole of July and August!) Right now, I am working on the 64th scale Victory plans (masts and spars). I have about another three months (at least) of work for the booklets, plans and instructions, as the model is so detailed (although I am bound to make a mistake, which someone will be only too pleased to point out at some stage... lol) Bellona is a fine looking model, and I think would sell very well, but I need to re-design a lot of the parts, following the knowledge gained while designing Victory (which was an improvement of the Bellona designs) After Victory, I would like Amati to allow me to concentrate on the 64th scale Prince, as I have re designed that in-line with the new hull construction methods I use (like Victory) Not sure about an Admiralty-type model. As much as I would like to design one, I think the perceived complexity may put off all but the most experienced - and those that can would probably be experienced enough to build their own from plans anyway. Plus, of course, the edges of the exposed frames would be black, from the laser cutting....
-
Yes, it's probably down to what you're used to, I did used to smile when the people at Amati asked why I don't use any of their tools.... I am bull at a gate - the amount of times I have gone into something head first and made a mess/right cock-up, and then pray to God after the fact to please not have made that happen.. I guess I am good at covering up my own silly mistakes.
-
I started off using scalpel blades, as this was what all the books and magazines advised. but I always found them to be a little too flimsy at least for me, and they bent too easily, sometimes even breaking/snapping off, with the end of the blade flying all over the place - Perhaps it's more to do with my bull-at-a-gate style of modelling...
-
I hardly use any at all. Just have my trusty Stanley knife (craft knives aren't really strong enough..), steel rule, pair of small pliers (mainly for temporarily fixing pins into first planking), tweezers, drill and drill bitts, small plane, razor saw - and that's about it! On a personal level, I have never really seen the point of 'modelling' tools - but that may have something to do with not being able to afford them when I first started modelling, and just got used to using standard everyday tools.... As a main tool, I still find the Stanley knife hard to beat, even after 2 decades...
-
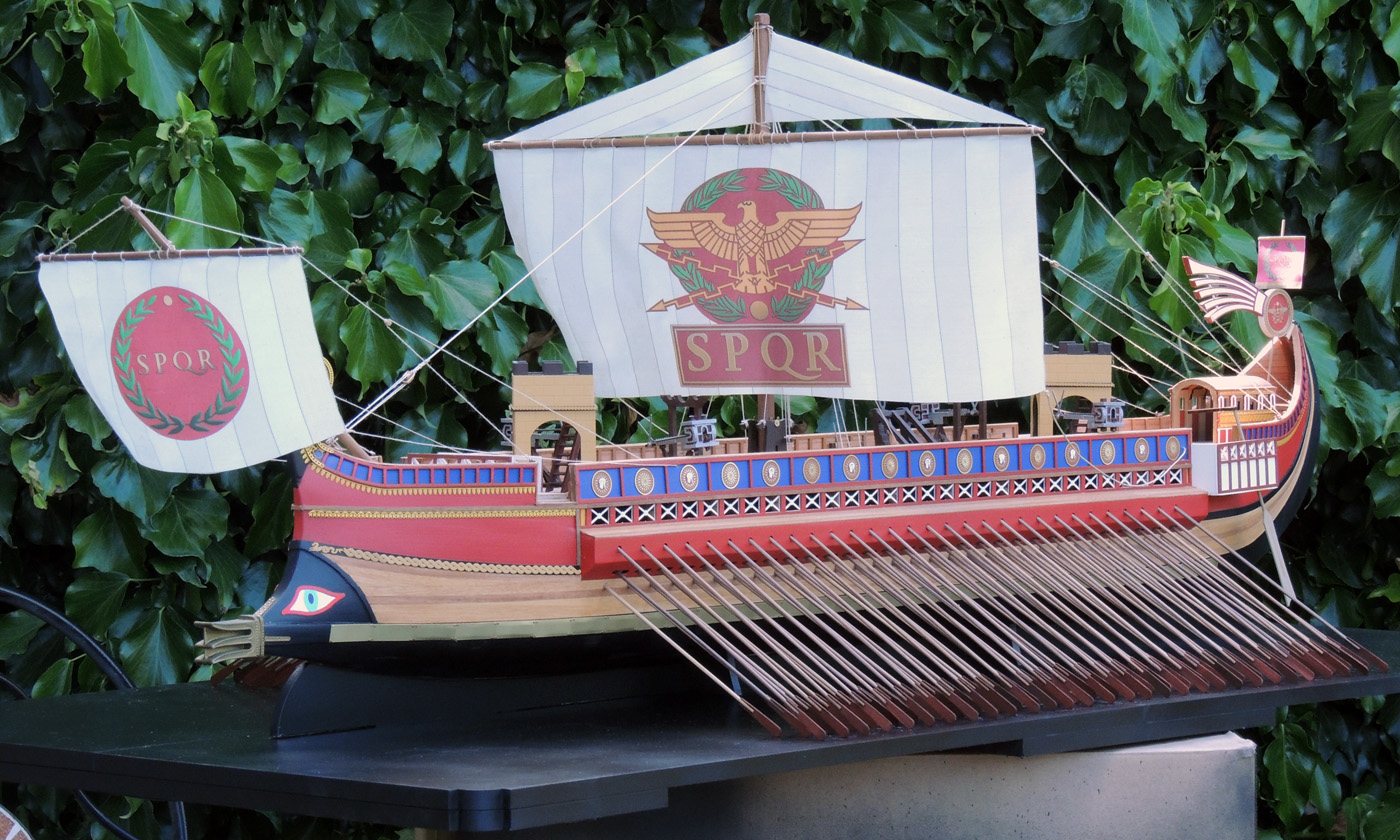
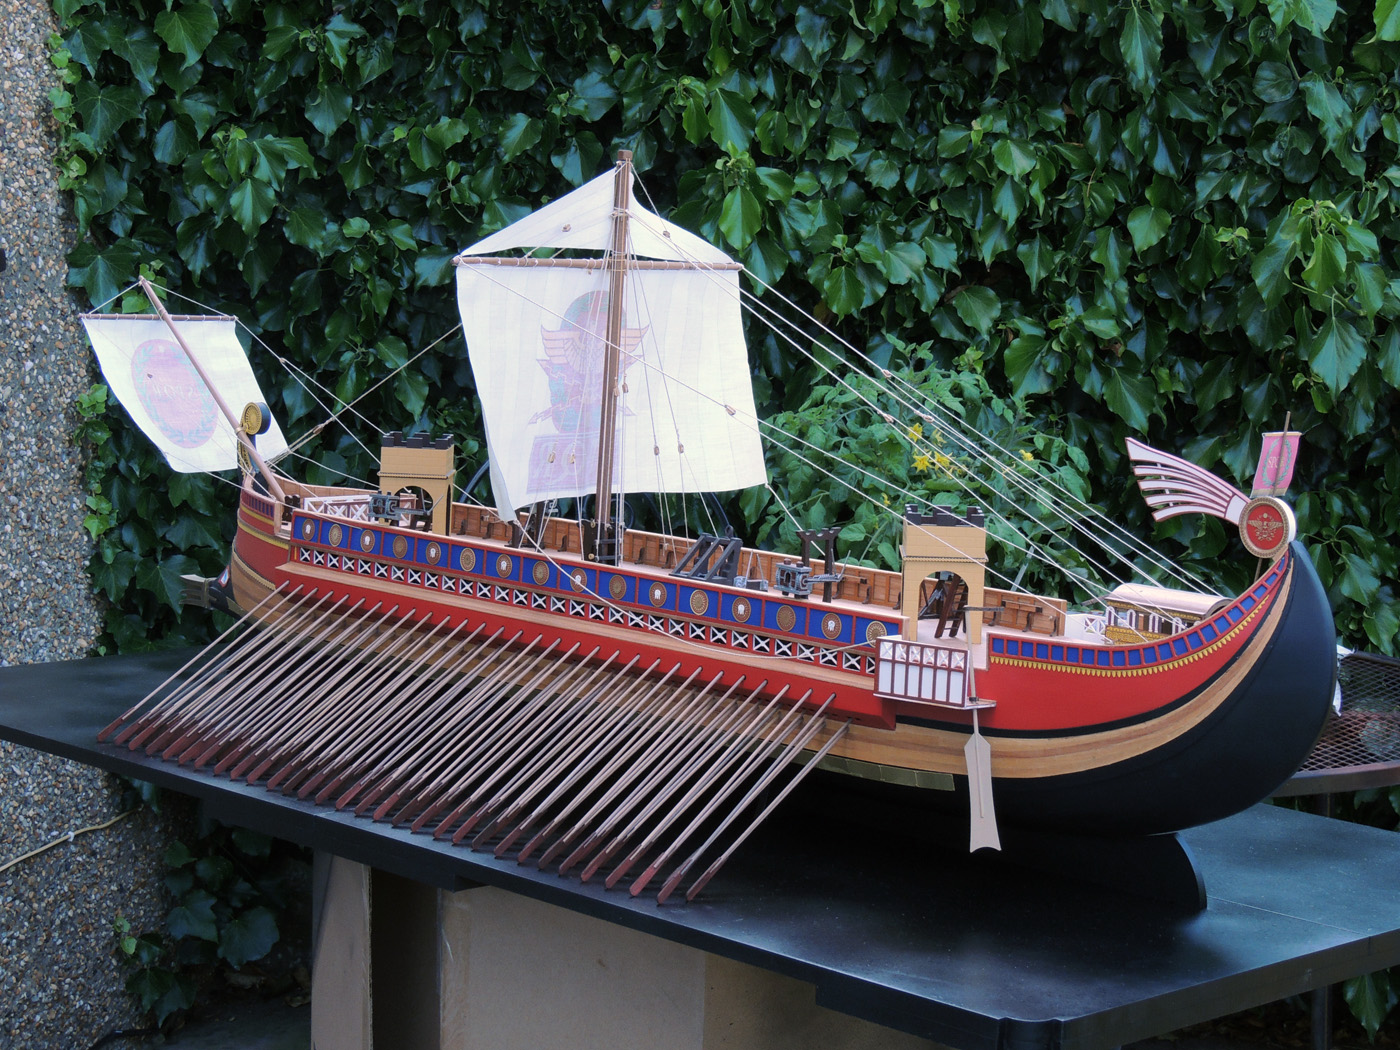
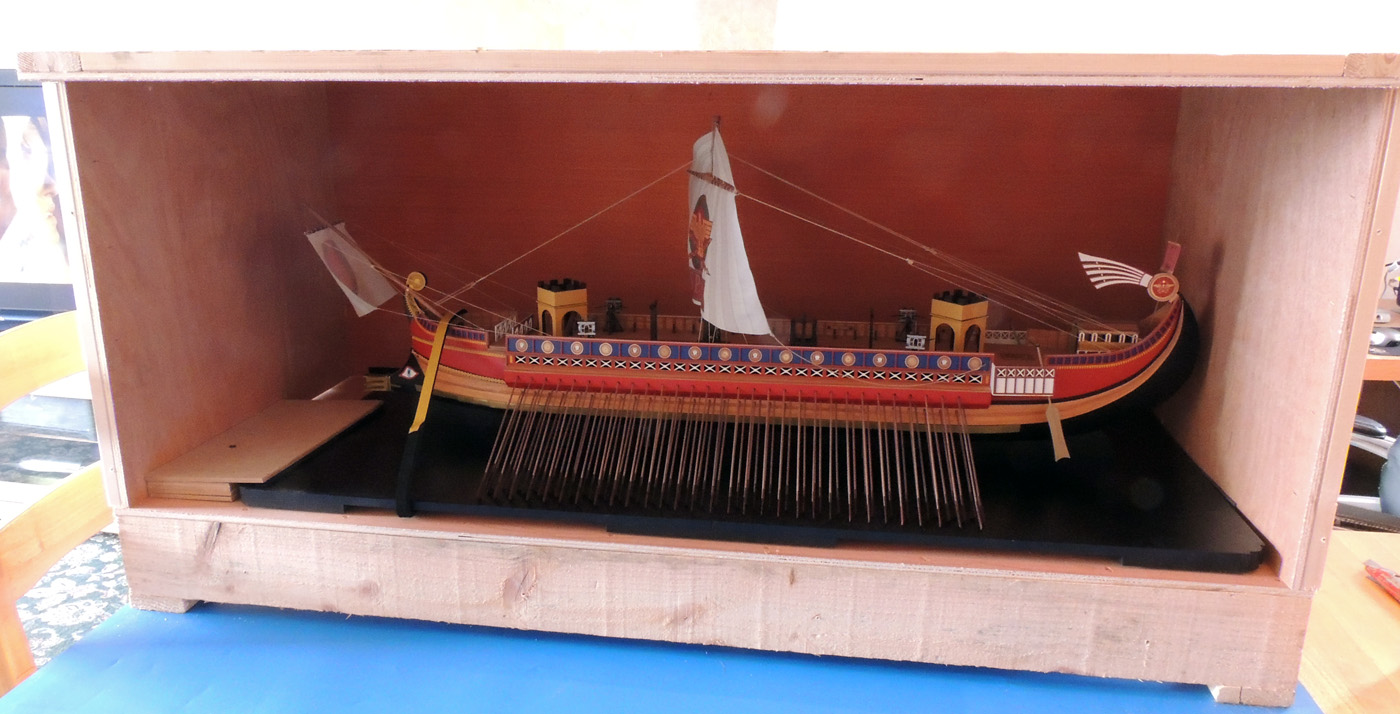
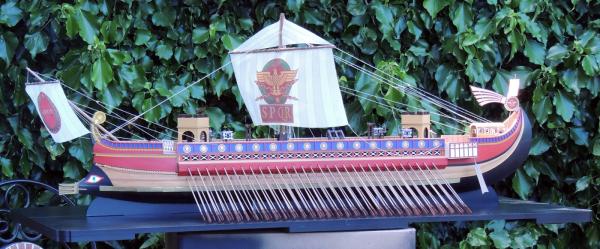
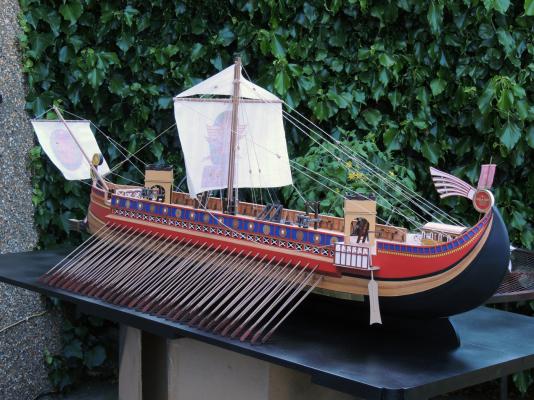
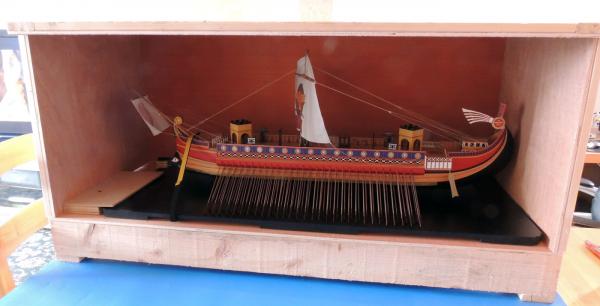
Cheers, I have contemplated to a 32nd scale Royal Caroline in the past - would make a great model... Today, the Roman Quinquereme was delivered to the couriers in Gloucester, to be shipped to Italy - our home is once again free of any models! I did design two versions, one for the Republican period (which is how the model is displayed), and an Imperial version (Augustan). I had to design quite a substantial display base for it, as the oars make the width half a metre!

- 906 replies
-
- 21
-
-
Ciao Graziano, PM sent (second time lucky - my internet browser no longer likes this site too much, it seems...)
-
It is 1:48 scale - I initially wanted it to be 1:32, but that would have made it way too big, unless I went for a much smaller vessel. The hull is just over a metre long, but it's not too tall.