

brunnels
-
Posts
337 -
Joined
Content Type
Profiles
Forums
Gallery
Events
Everything posted by brunnels
-

M3A1 Scout Car by brunnels - Tamiya - 1/35 - PLASTIC
brunnels replied to brunnels's topic in Non-ship/categorised builds
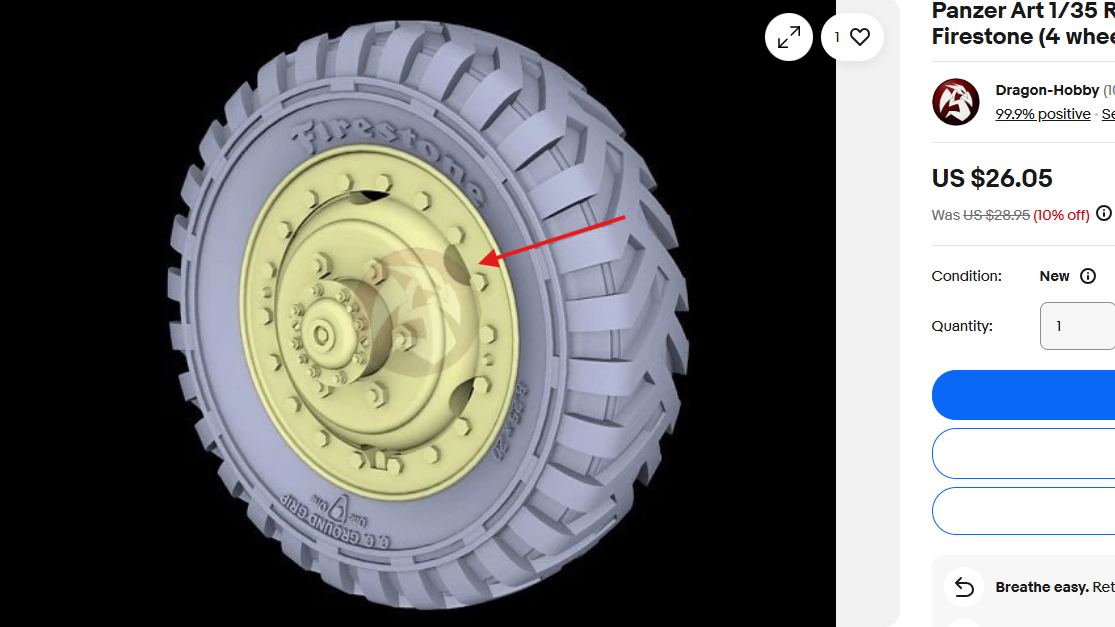
I saw those, but my only issue is they have bead locks where the ones in my grandfathers pic don't have beadlocks.
-
M3A1 Scout Car by brunnels - Tamiya - 1/35 - PLASTIC
brunnels replied to brunnels's topic in Non-ship/categorised builds
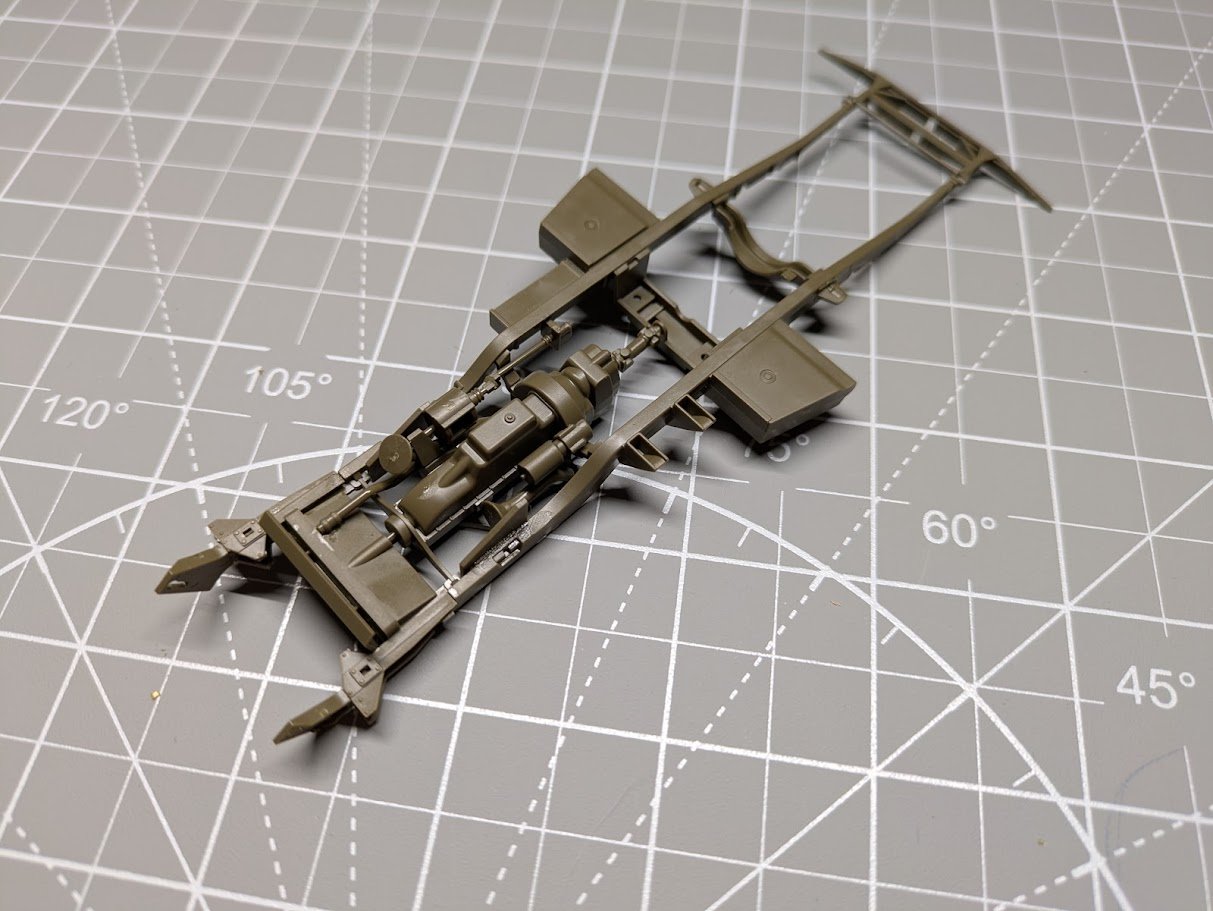
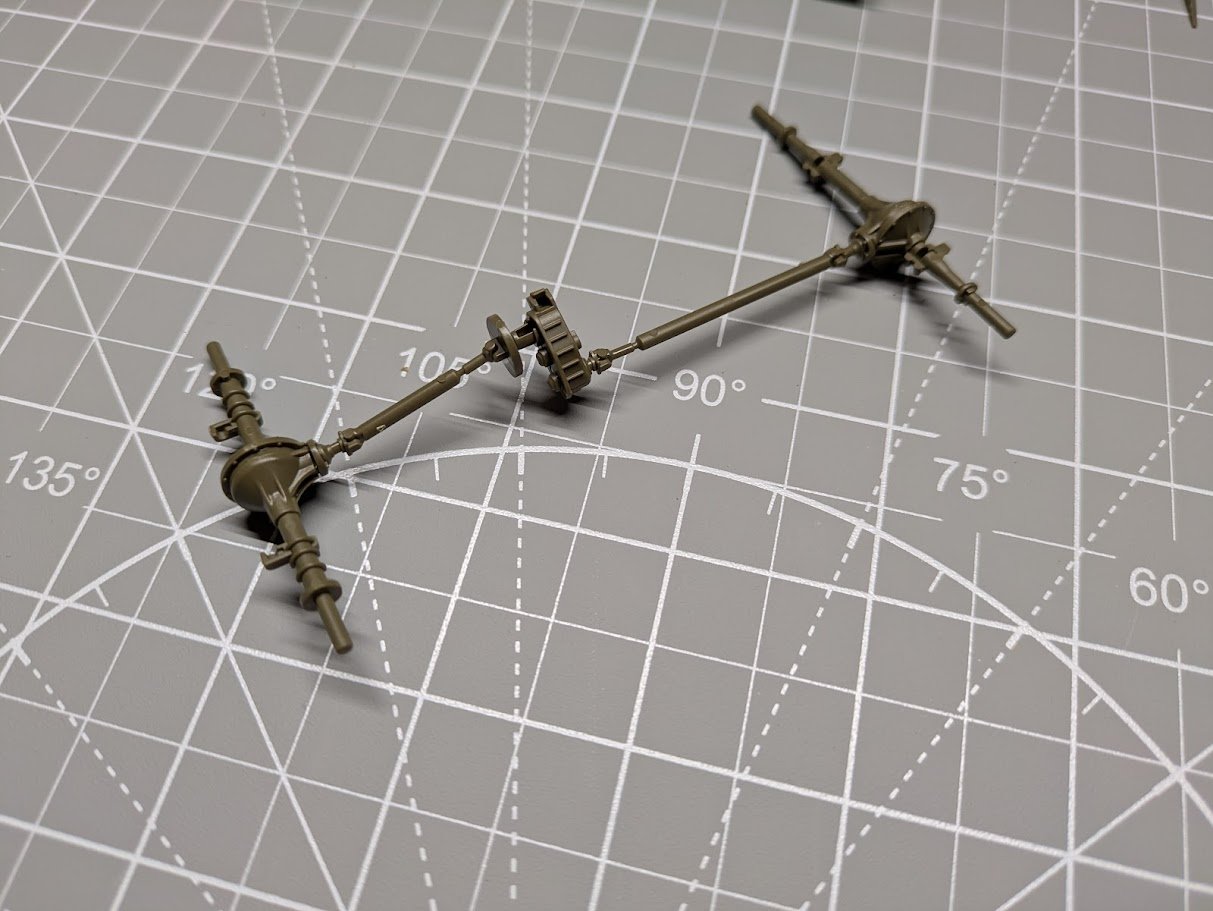
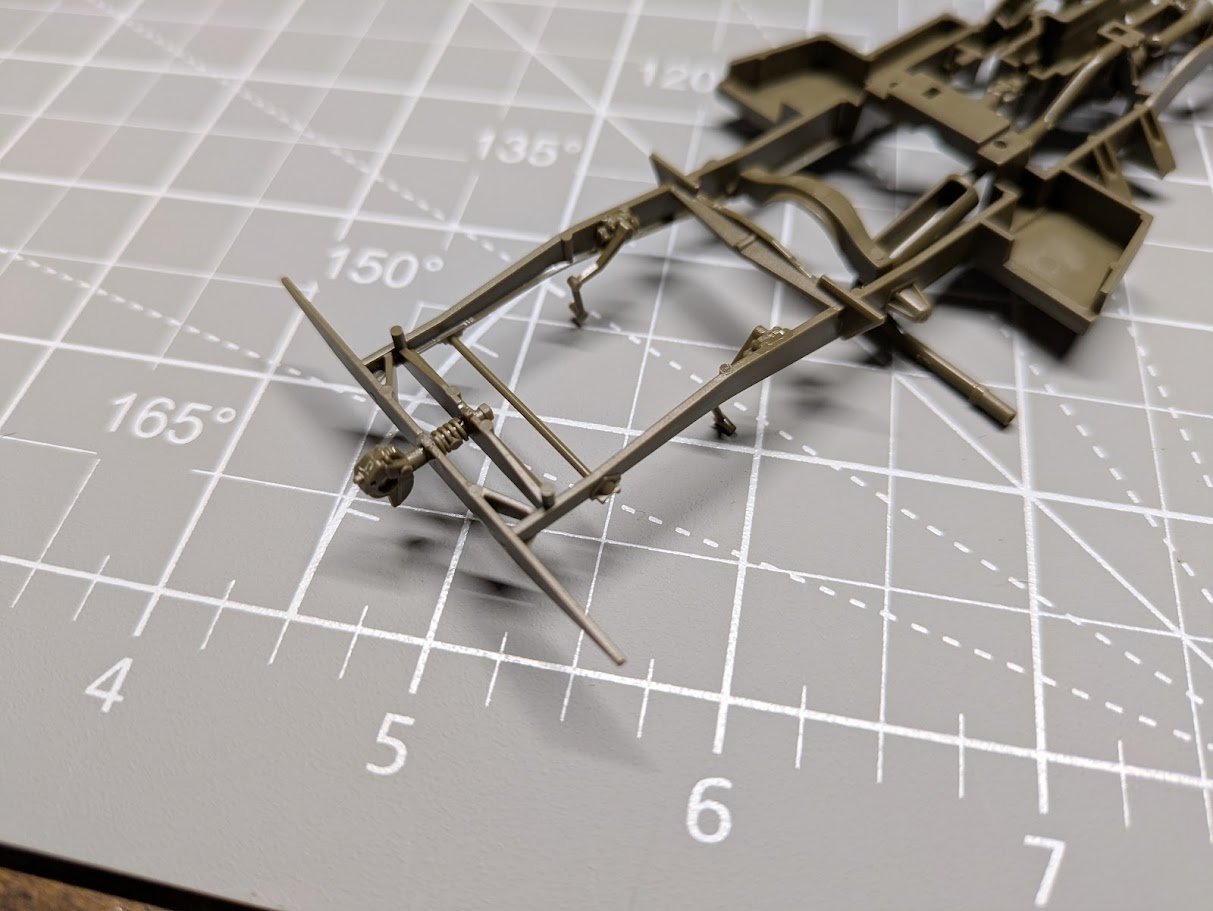
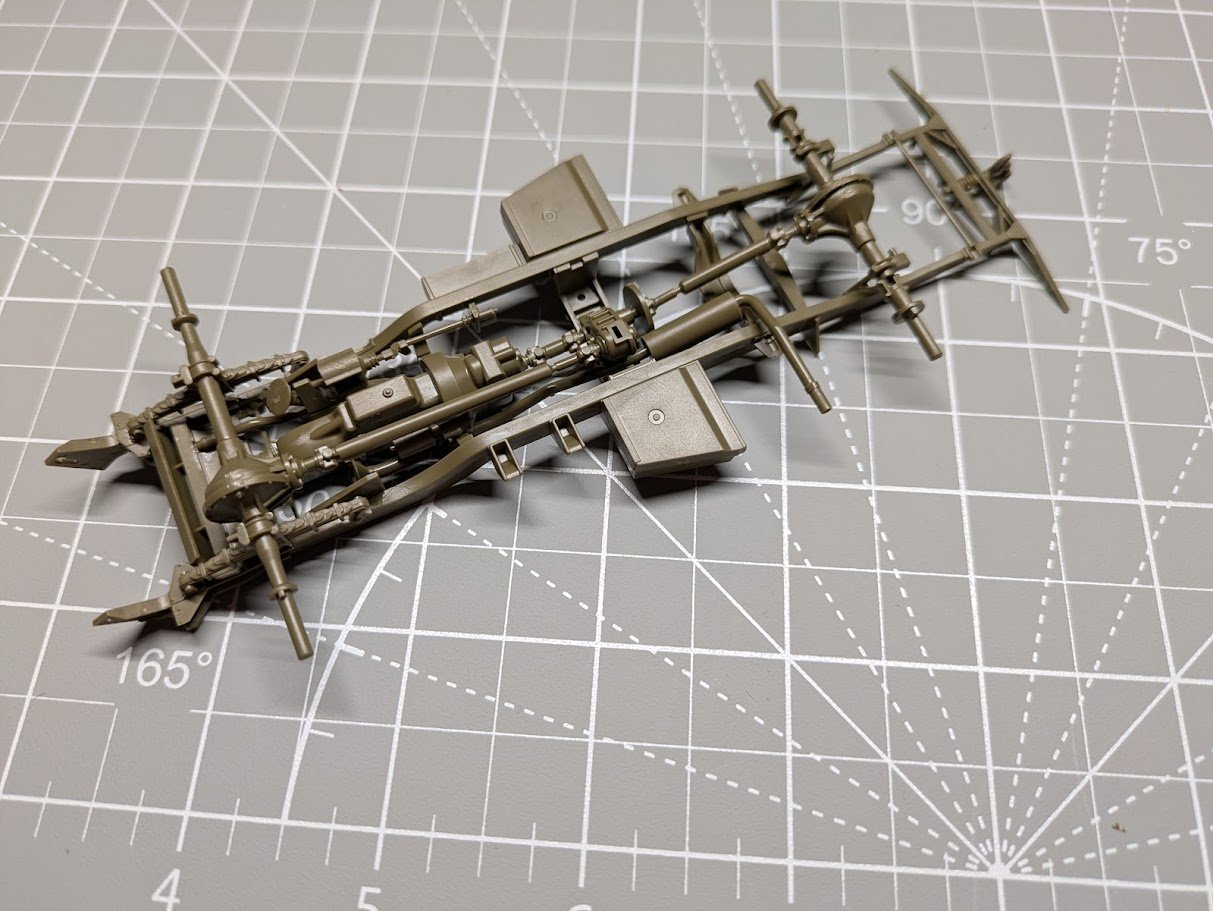
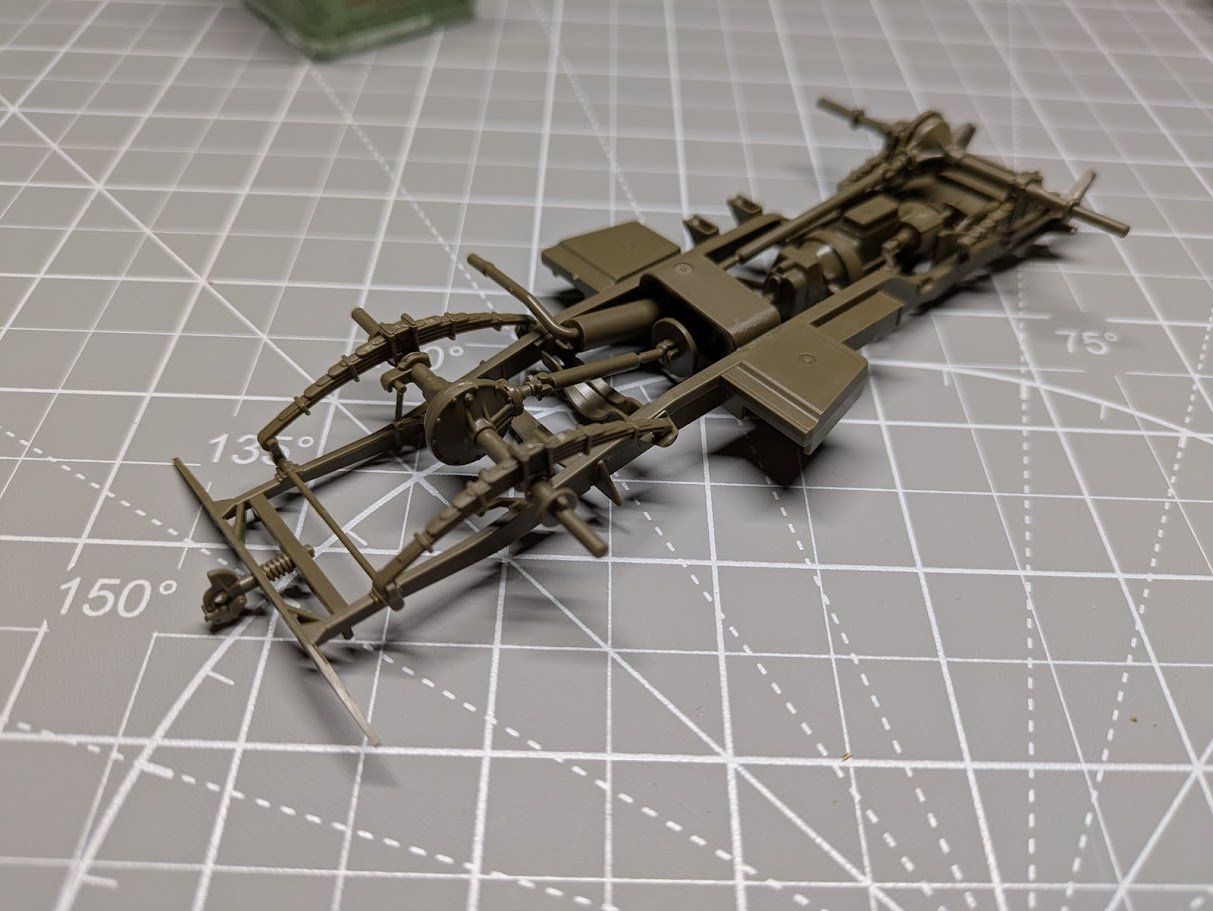
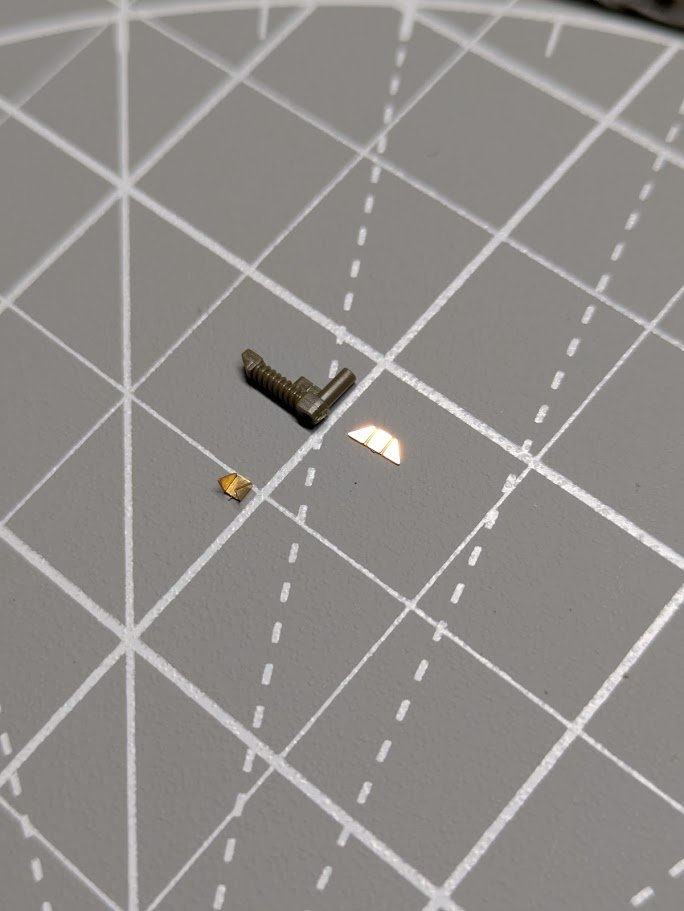
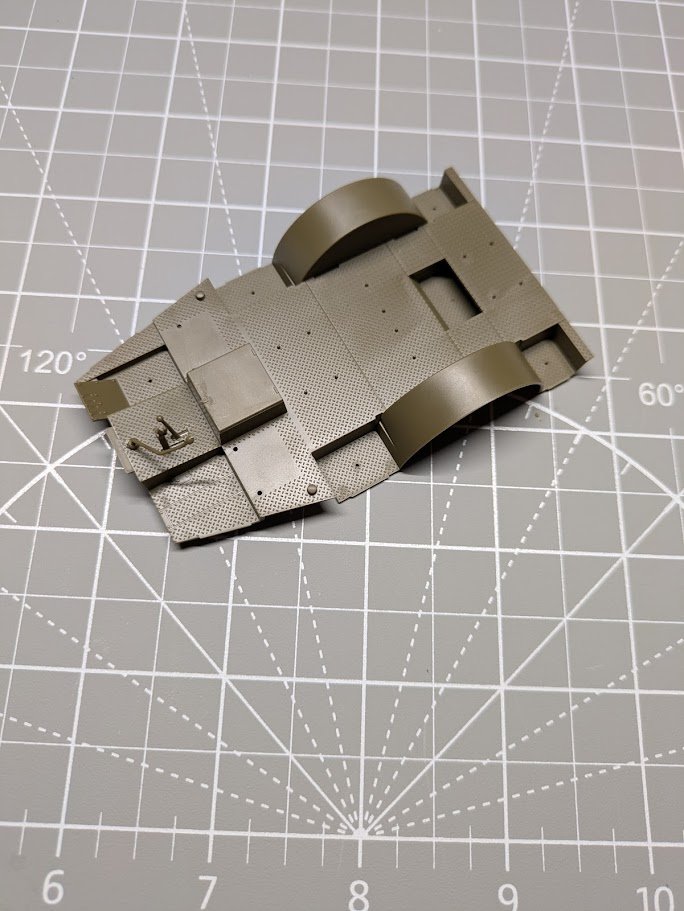
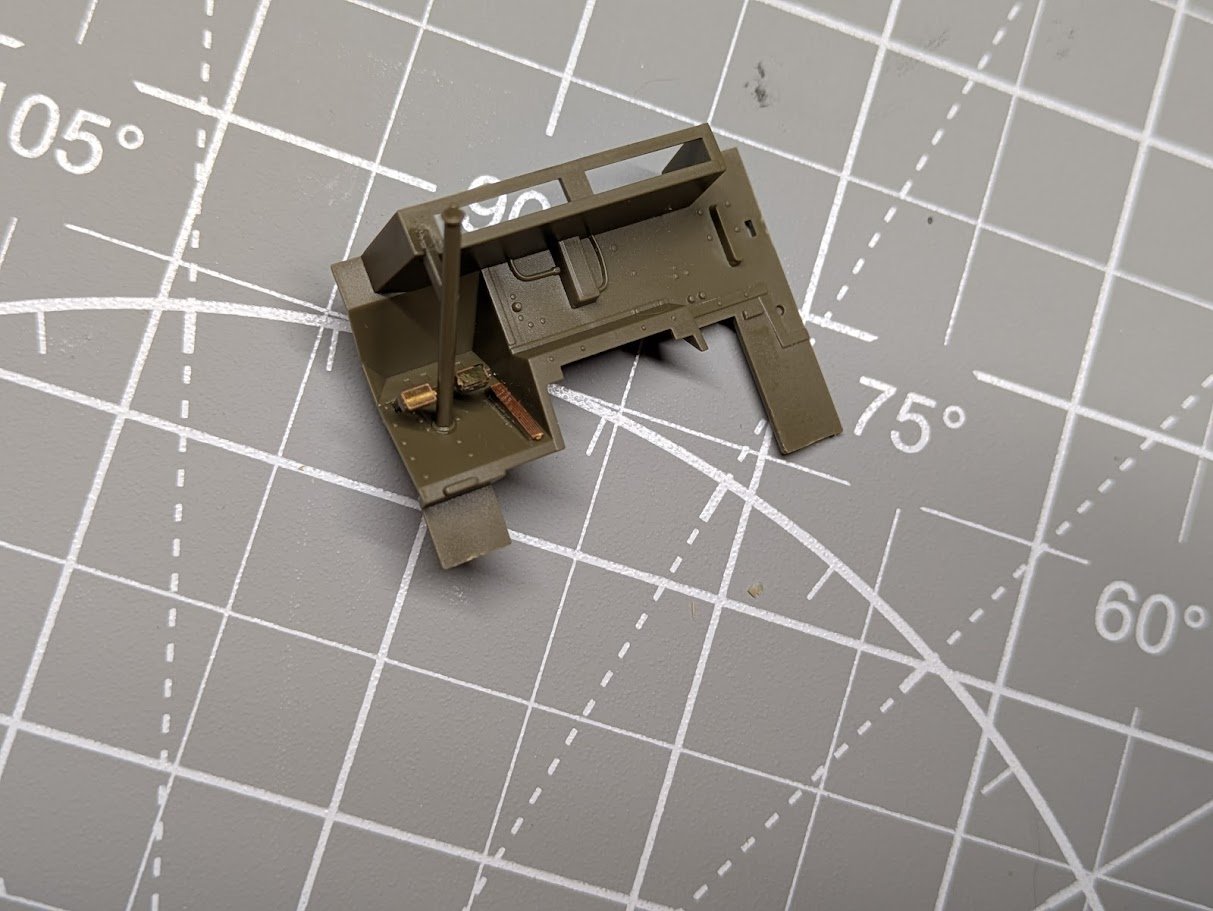
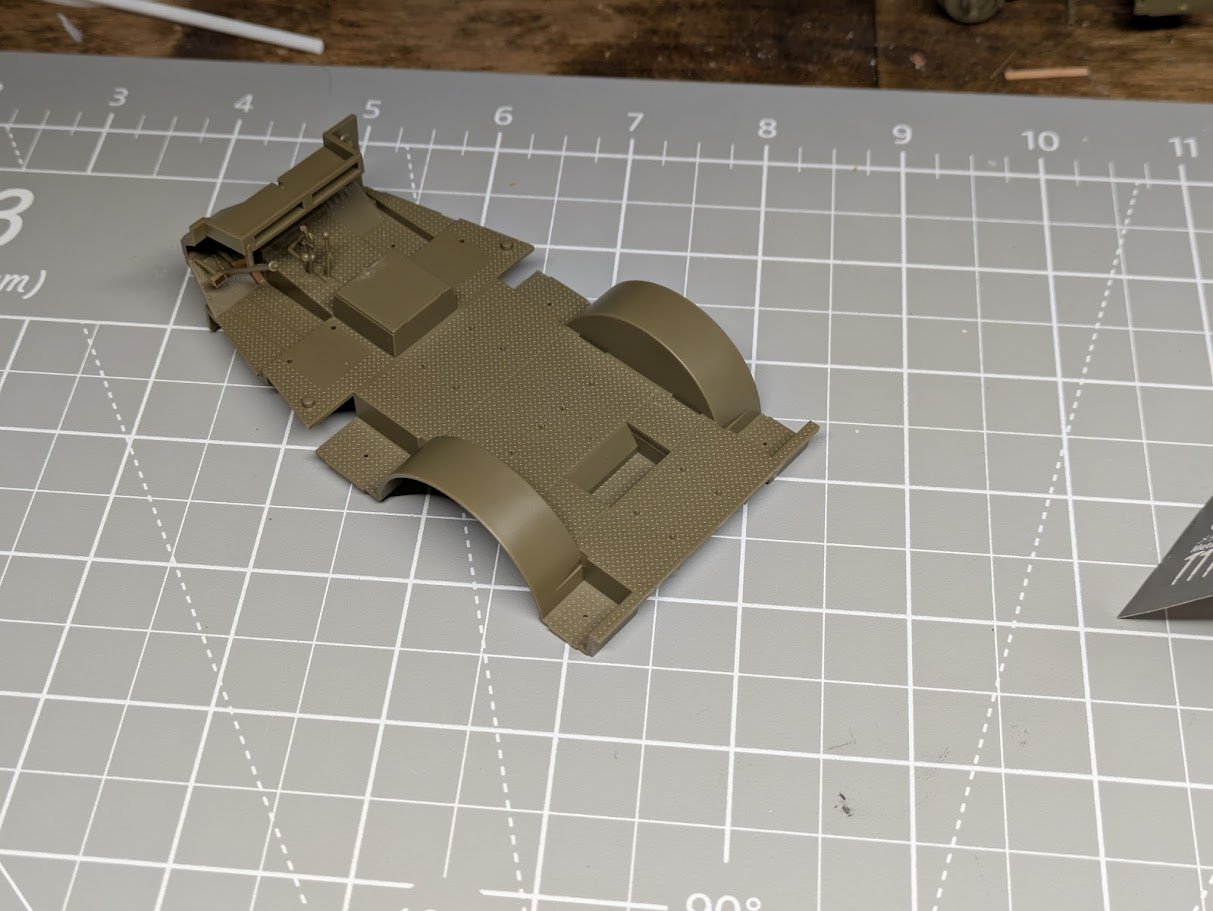
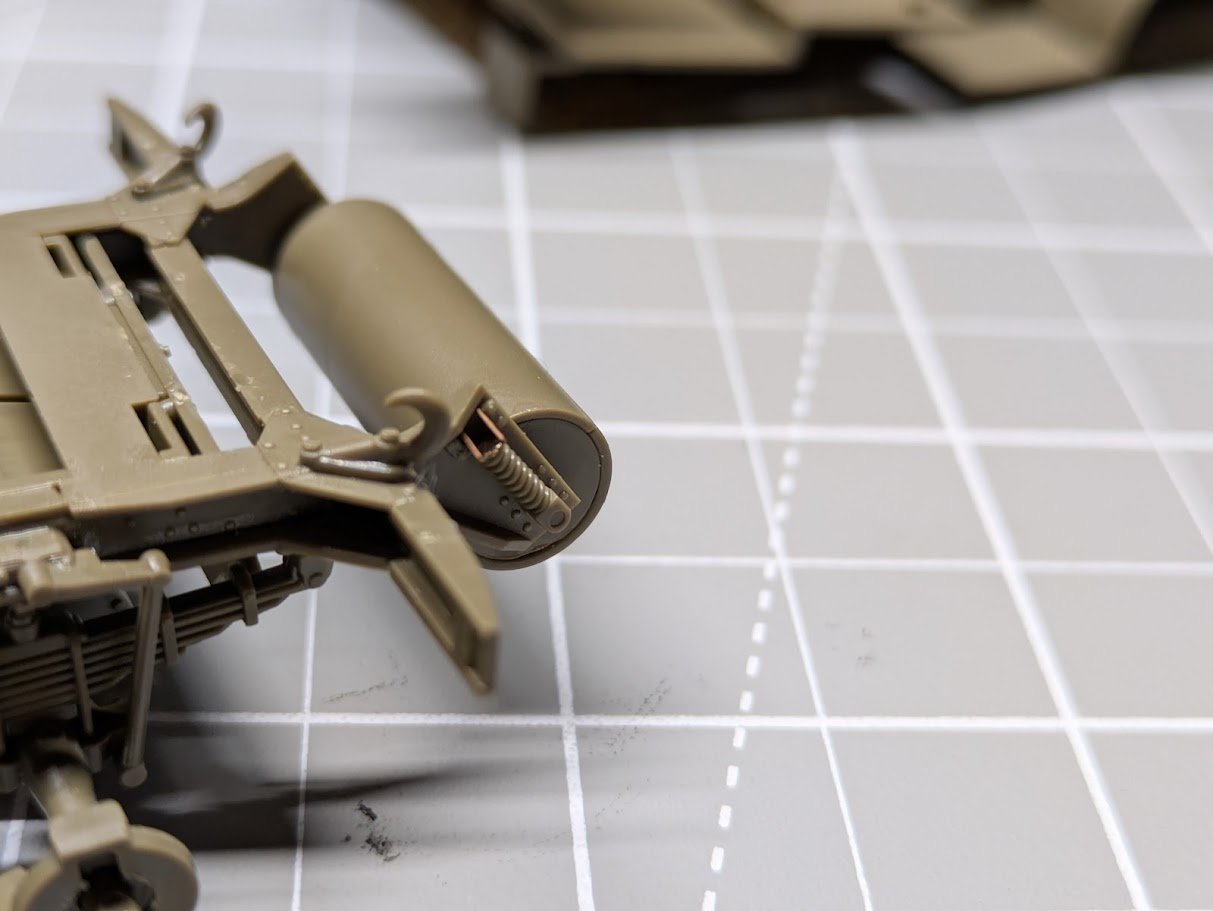
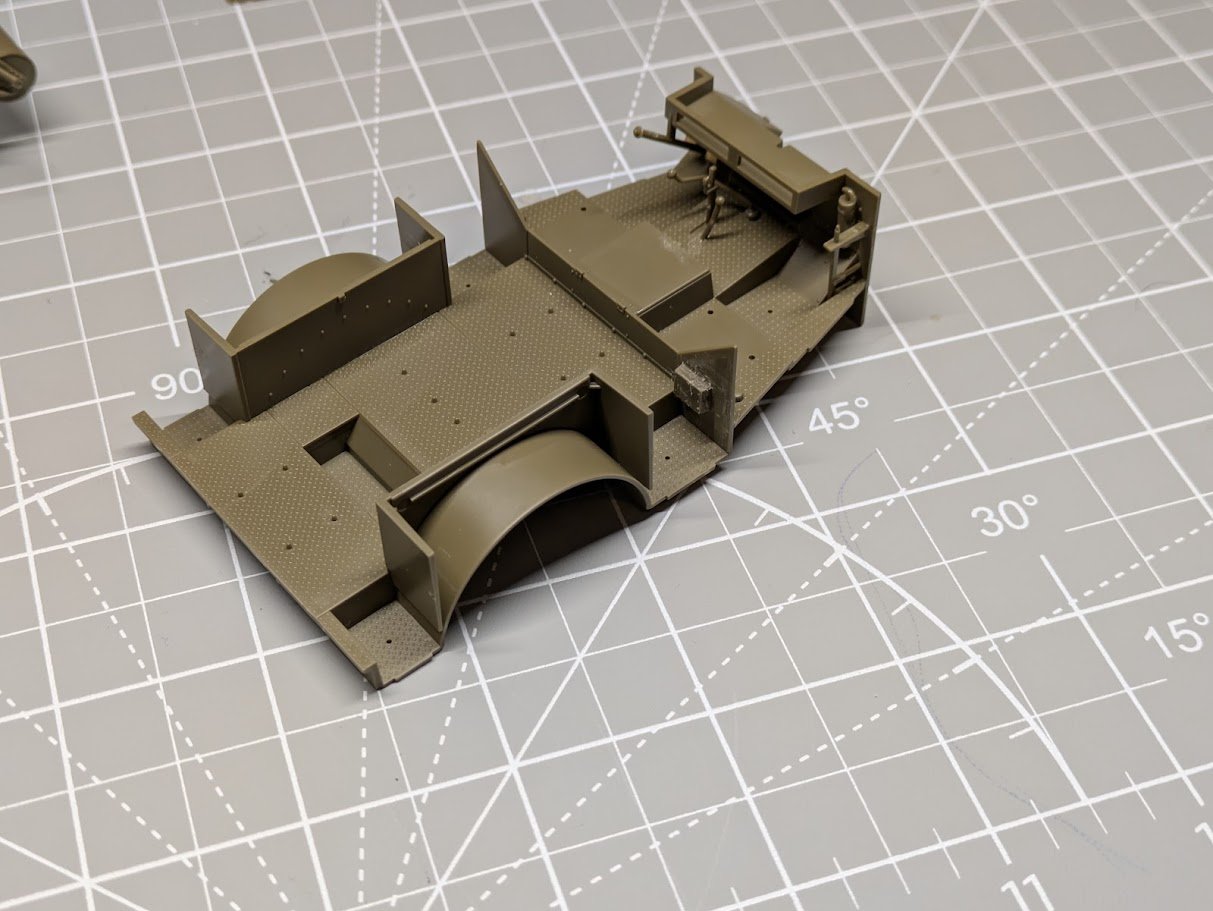
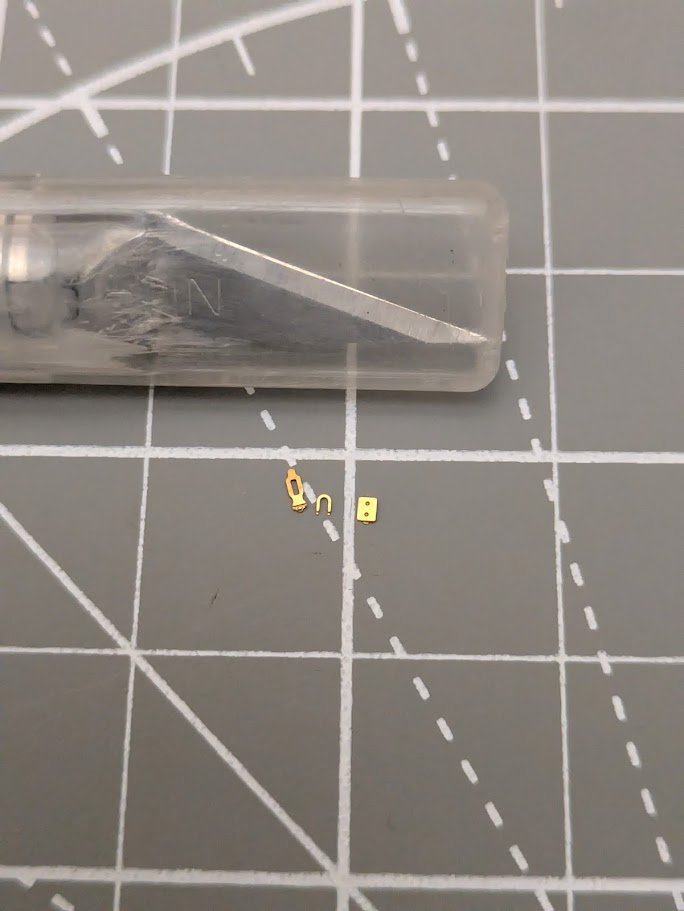
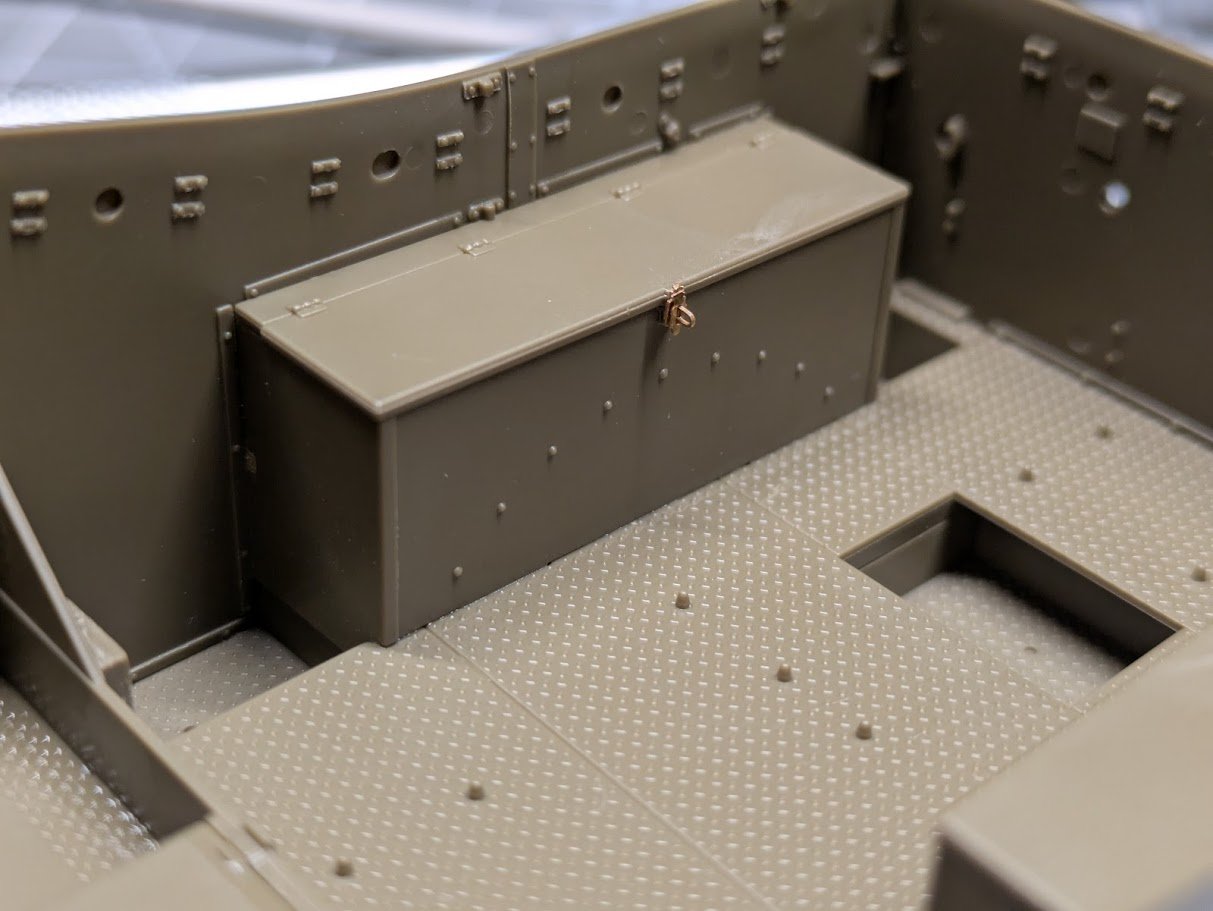
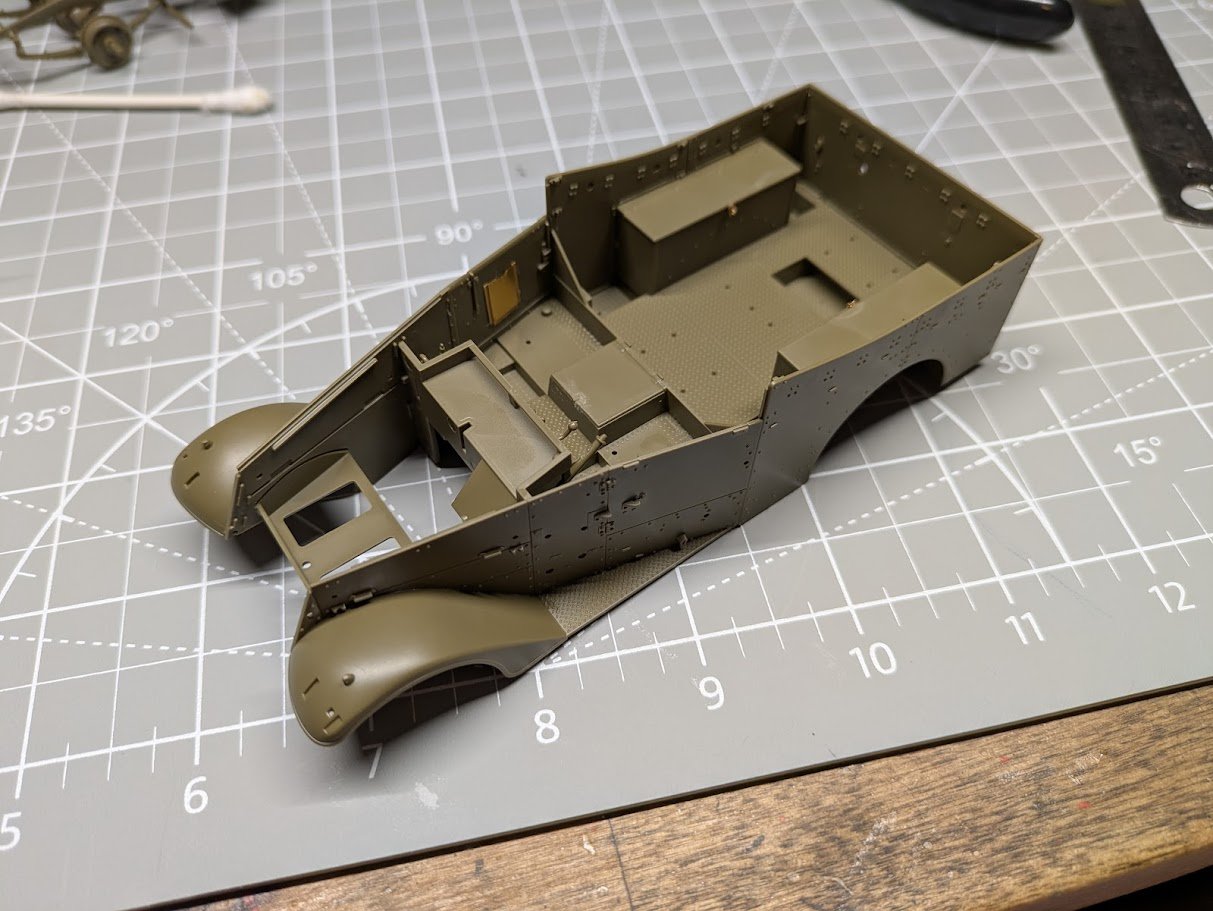
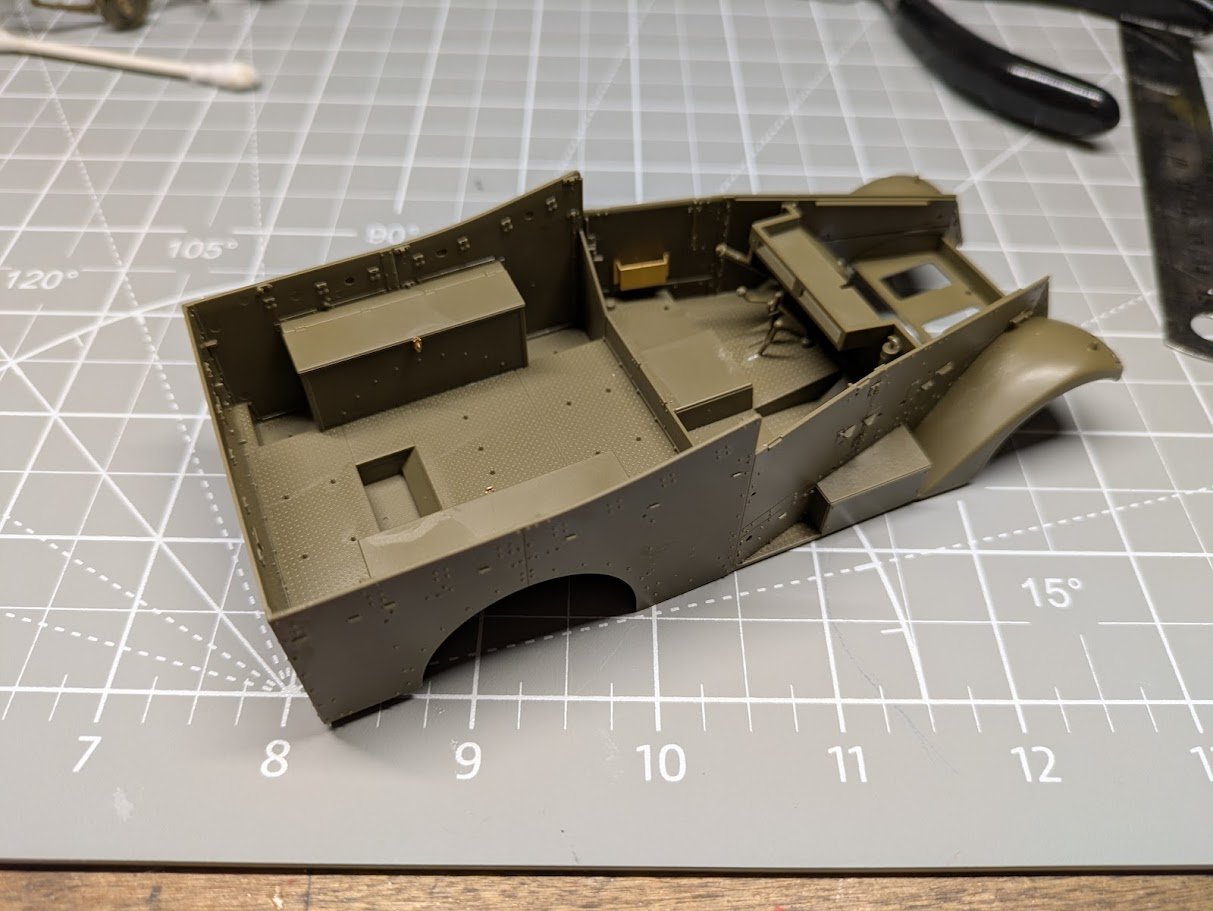
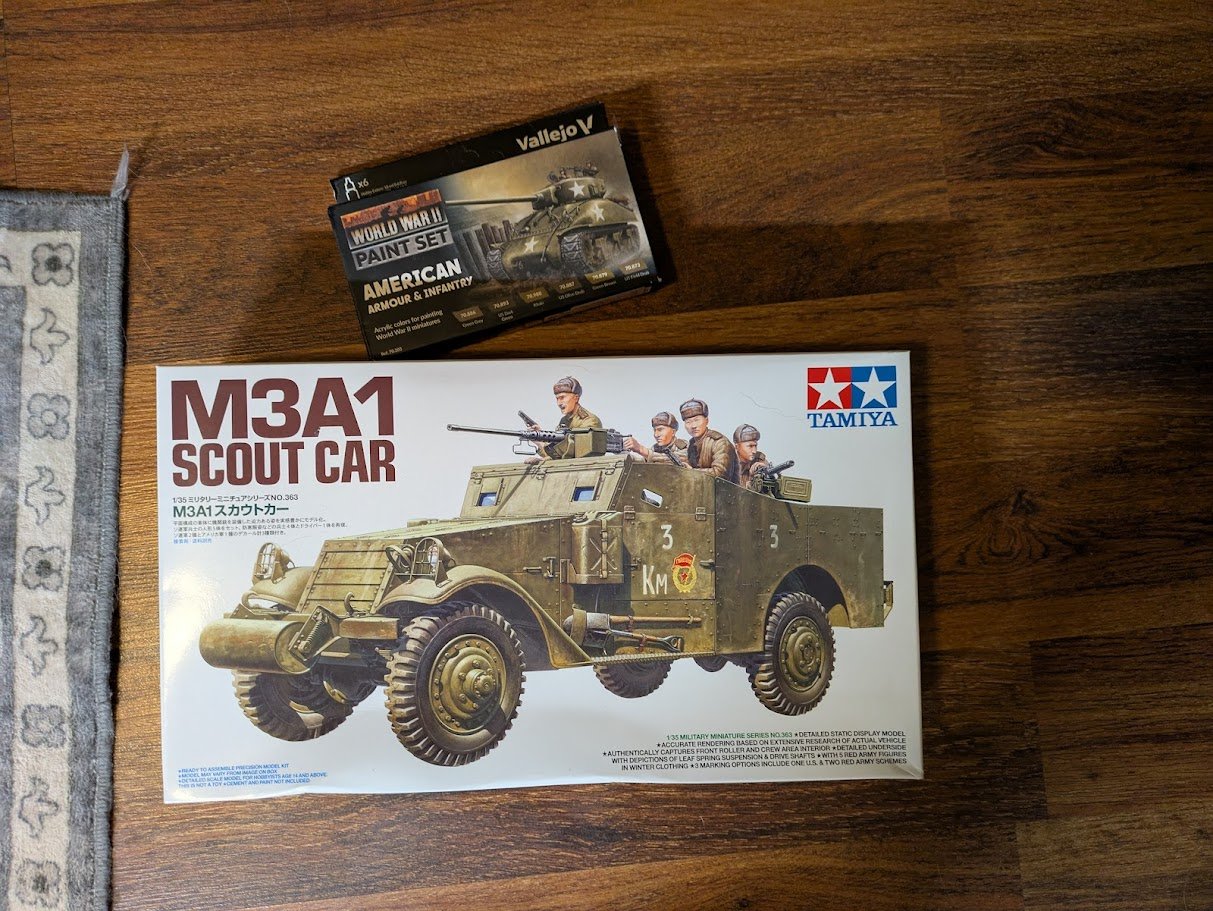
I looked around, but unfortunately the only places I can find that have these early wheels in stock won't ship to the USA at the moment. I'll keep looking but it looks like I may have to wait on the wheels. I recently finished up my Vanguard Speedy kit, plus the Photo Etch kit and reference book came in the mail. So it was go time to start the M3a1. The kit starts with building the under carriage. I am really impressed with the fit of the parts in this kit, the pieces slot together exactly as they should with minimal to no seams. I'm also impressed with the Tamiya Extra Thin Cement, I wish I knew about this stuff when I was into plastic scale models 20 years ago. I love that you just fit the piece where it should go and swipe the cement brush on the joint and the part is glued firm, my only complaint is the odor is very strong which makes it hard to use with a baby in the house. The start of the undercarriage. The first PE parts I use replaces the spring brackets on the roller on the front of the vehicle. Just cut off the top of the piece with a knife and fold the PE part and inset it in place. Here you can see the parts installed. The last step on the undercarriage is adding the wheels. I will leave those off until I know what I am doing for the wheels and they are painted. Next I started on the body of the vehicle. The brake, clutch, and gas pedals have a PE piece that adds a little detail to the pedals. Next were the storage containers that cover the rear wheel hubs. The PE kit came with some insanely small pieces to make up latches for the storage hatches. Some of the PE pieces don't seem to be a huge upgrade for how much work it takes to put these insanely small pieces together. But I though these added some really nice detail and were a great upgrade. I also added some PE pieces that look to be map compartments to the sides of the doors. And that is where I am currently at. I am loving how smoothly this kit goes together, the PE pieces are going to be a struggle as some are just insanely small, and the instructions take quite a bit of studying. But I am enjoying this kit so far, it's a nice break from wooden kits that take a good investment in time.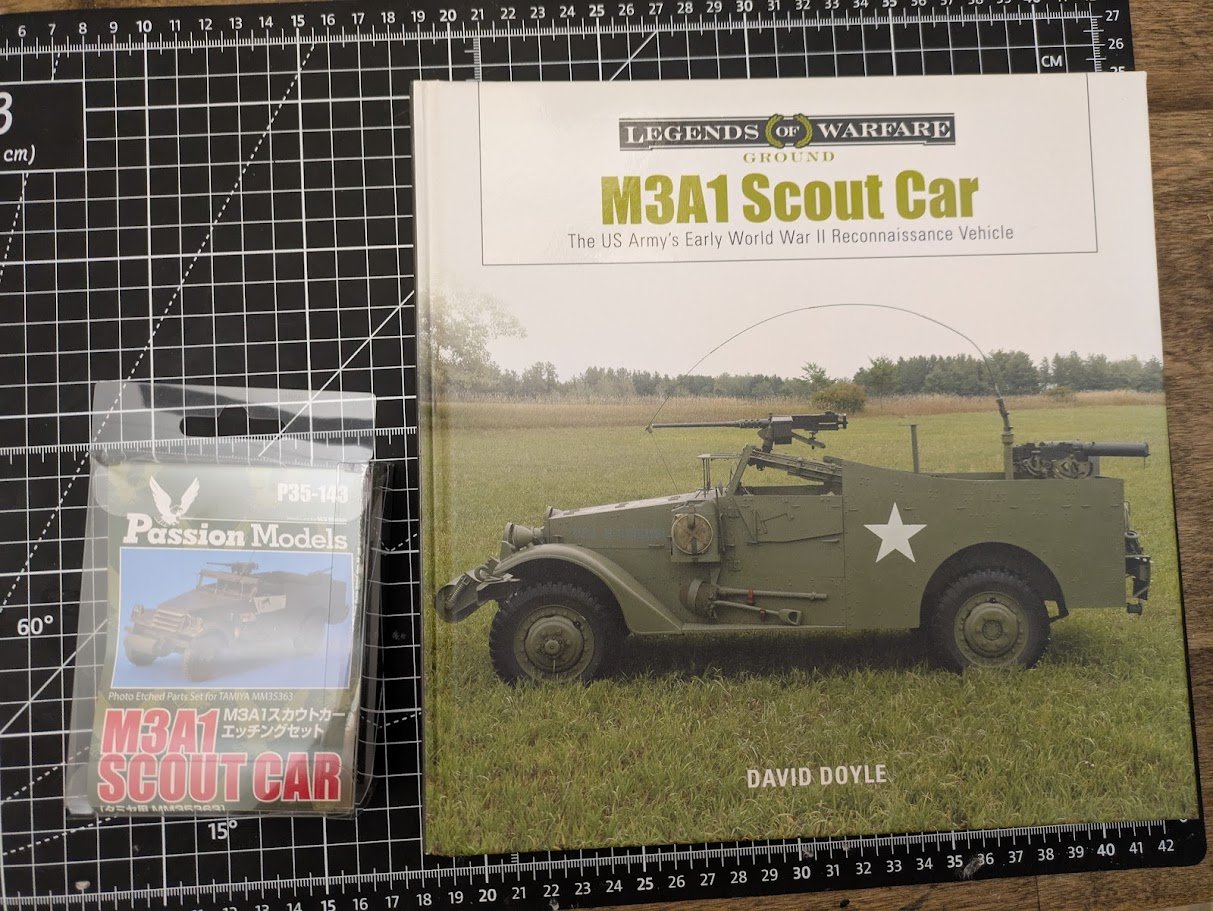


-
Does anyone have any resources or know the answer to what smaller vessels like brigs and cutters would use as ship lanterns during the age of sail? I would think they would need a light of the back of the ship for convoy purposes, larger vessels had the beautiful stern lanterns but what would smaller vessels do? Also would they hang lanterns over the deck to give the crew light? If so where would they hang them? For context I am finishing up my HMS Speedy rigging and thought it would be fun to test my 3d modeling and printing skills to design and print a few basic lanterns to liven up the deck.
-
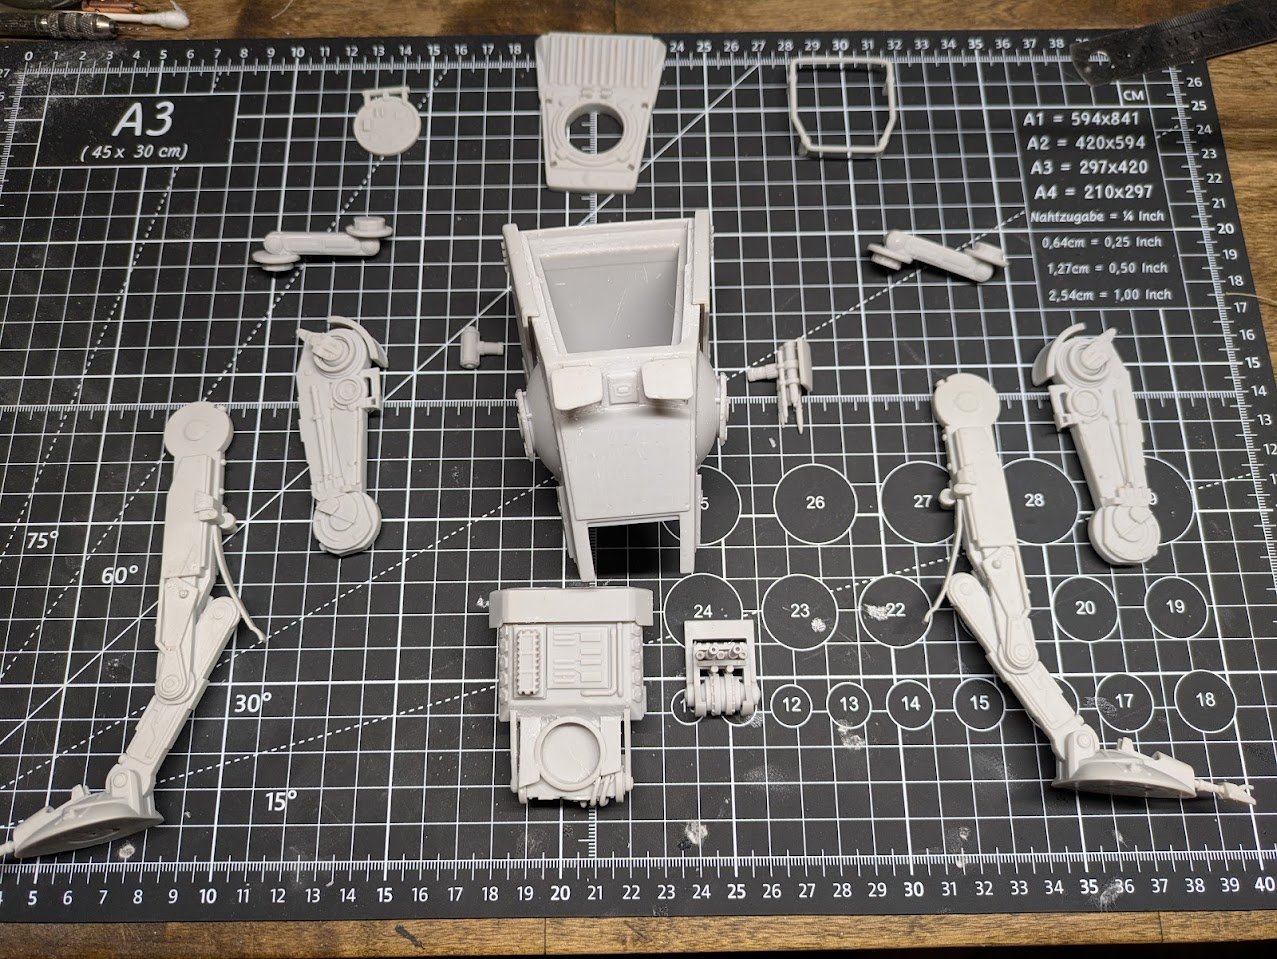
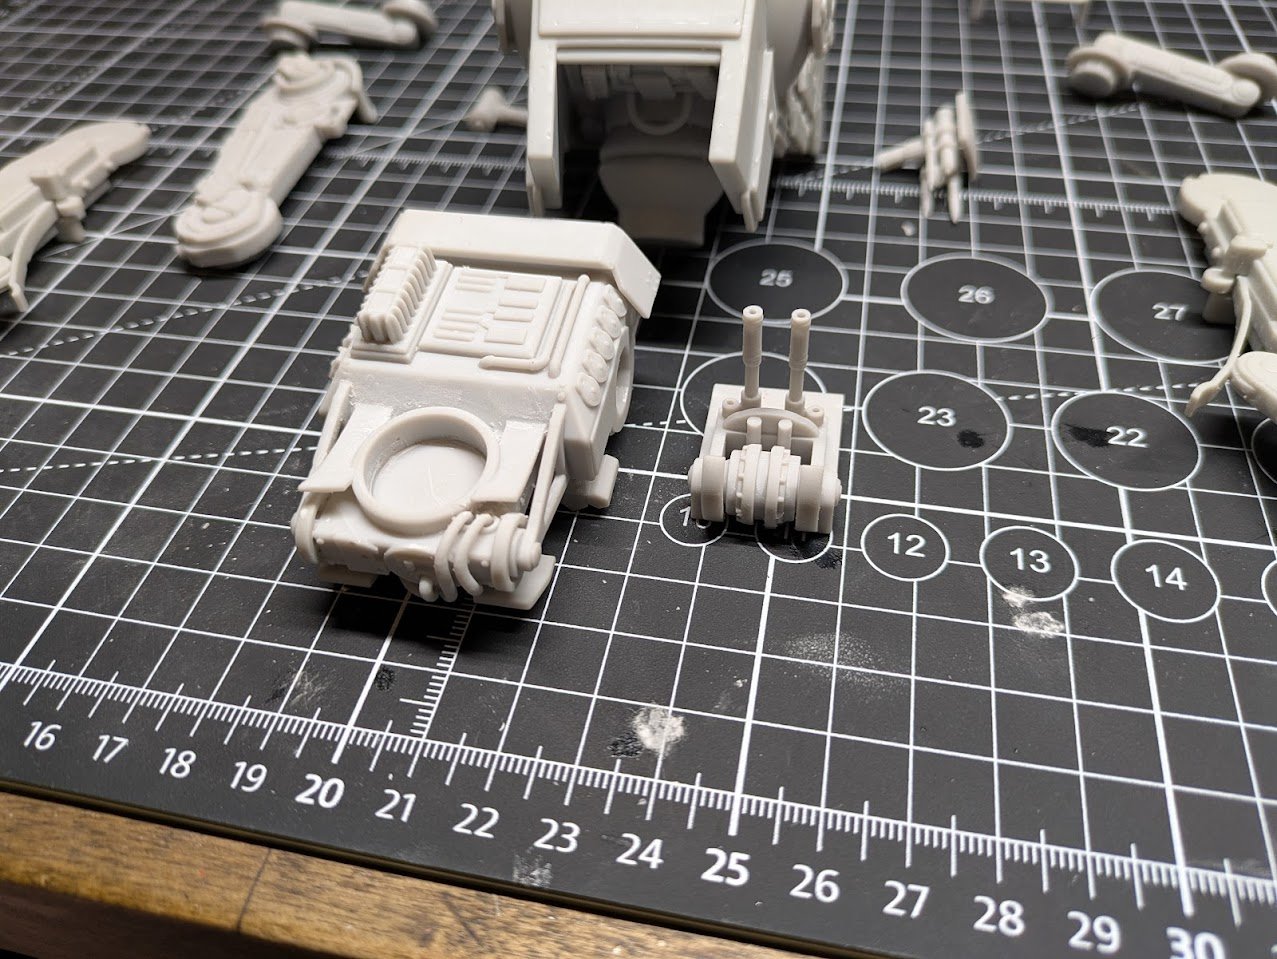
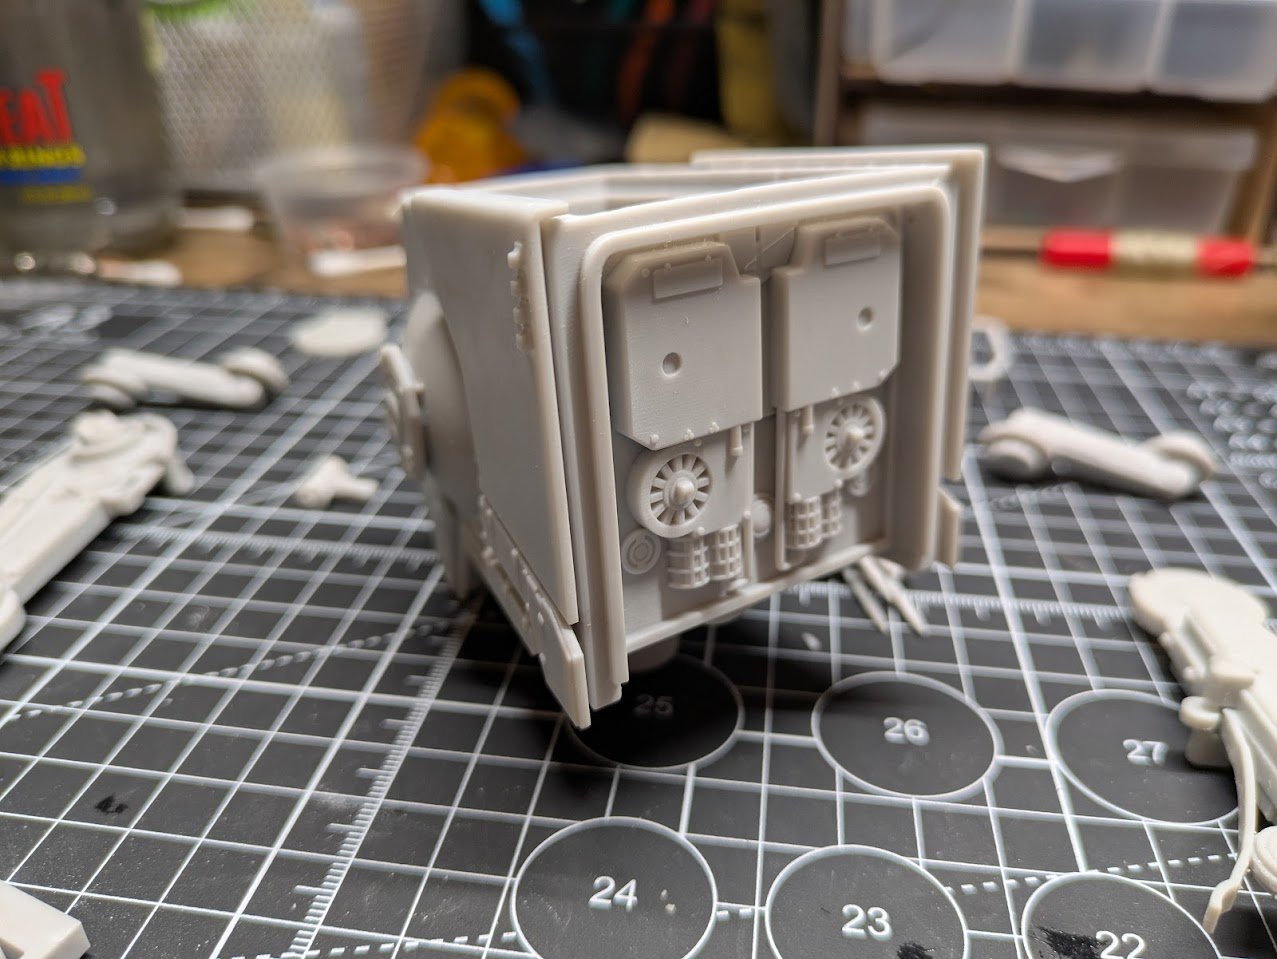
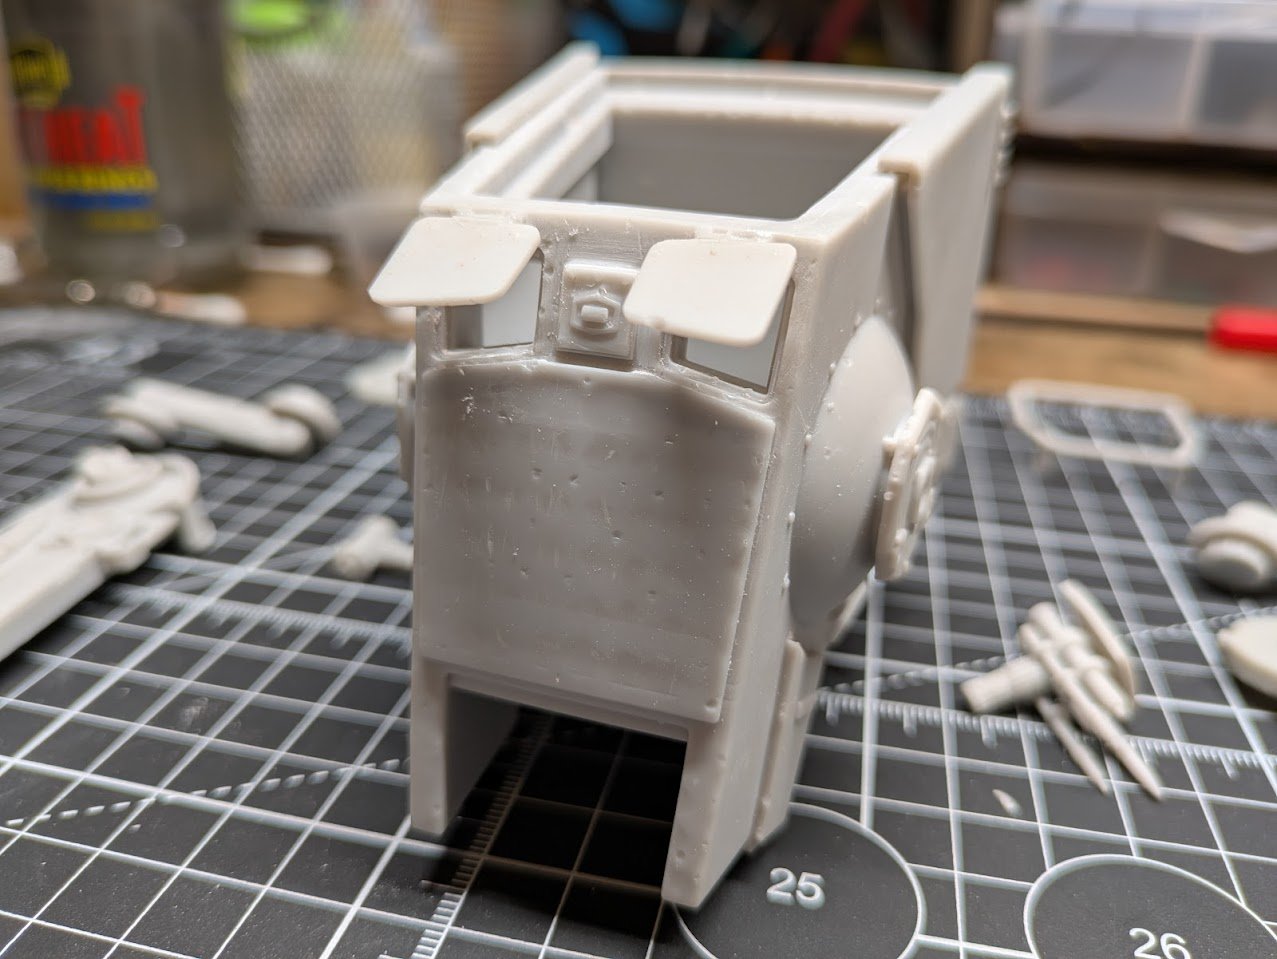
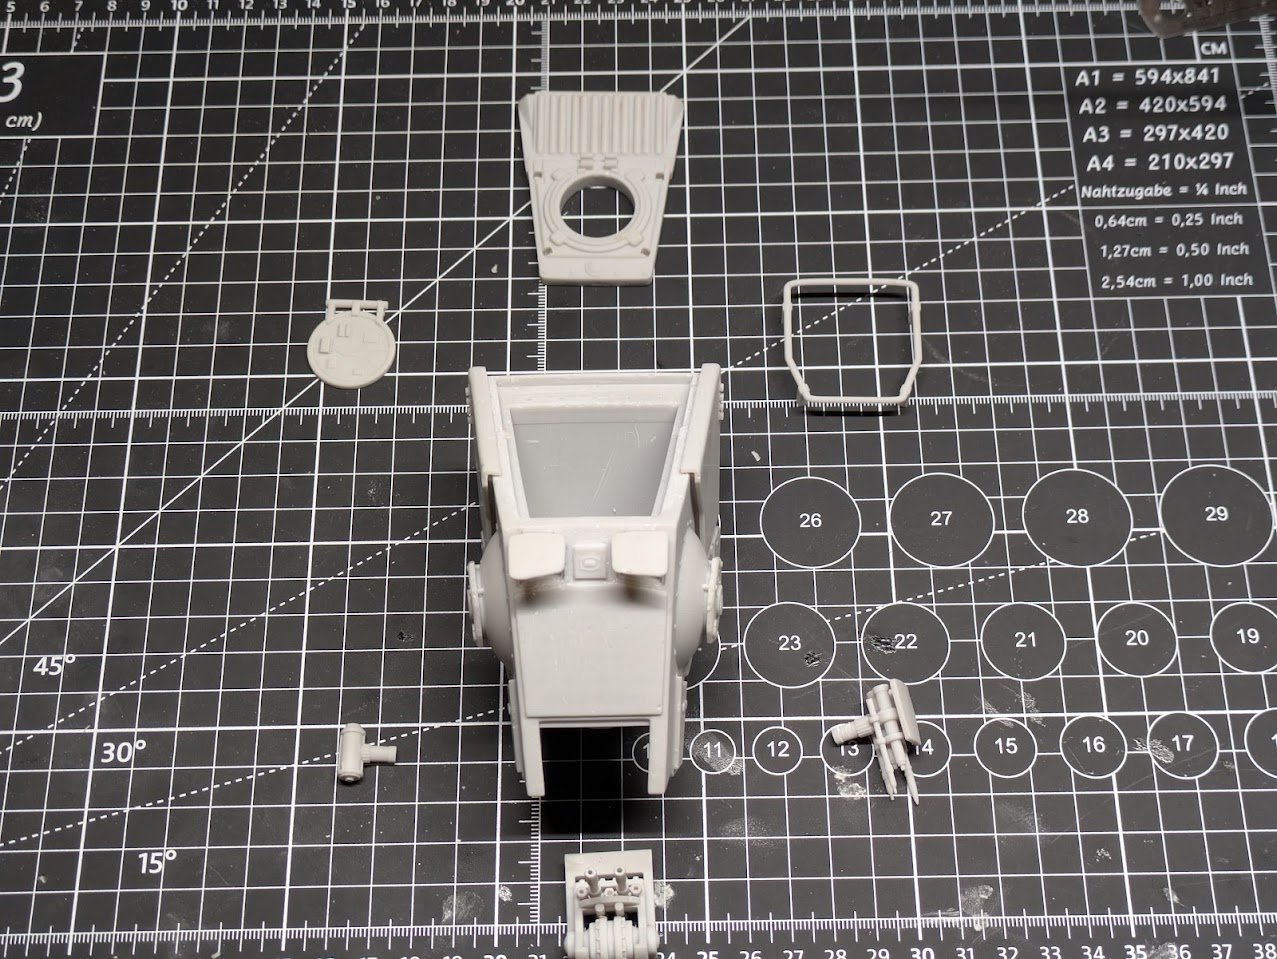
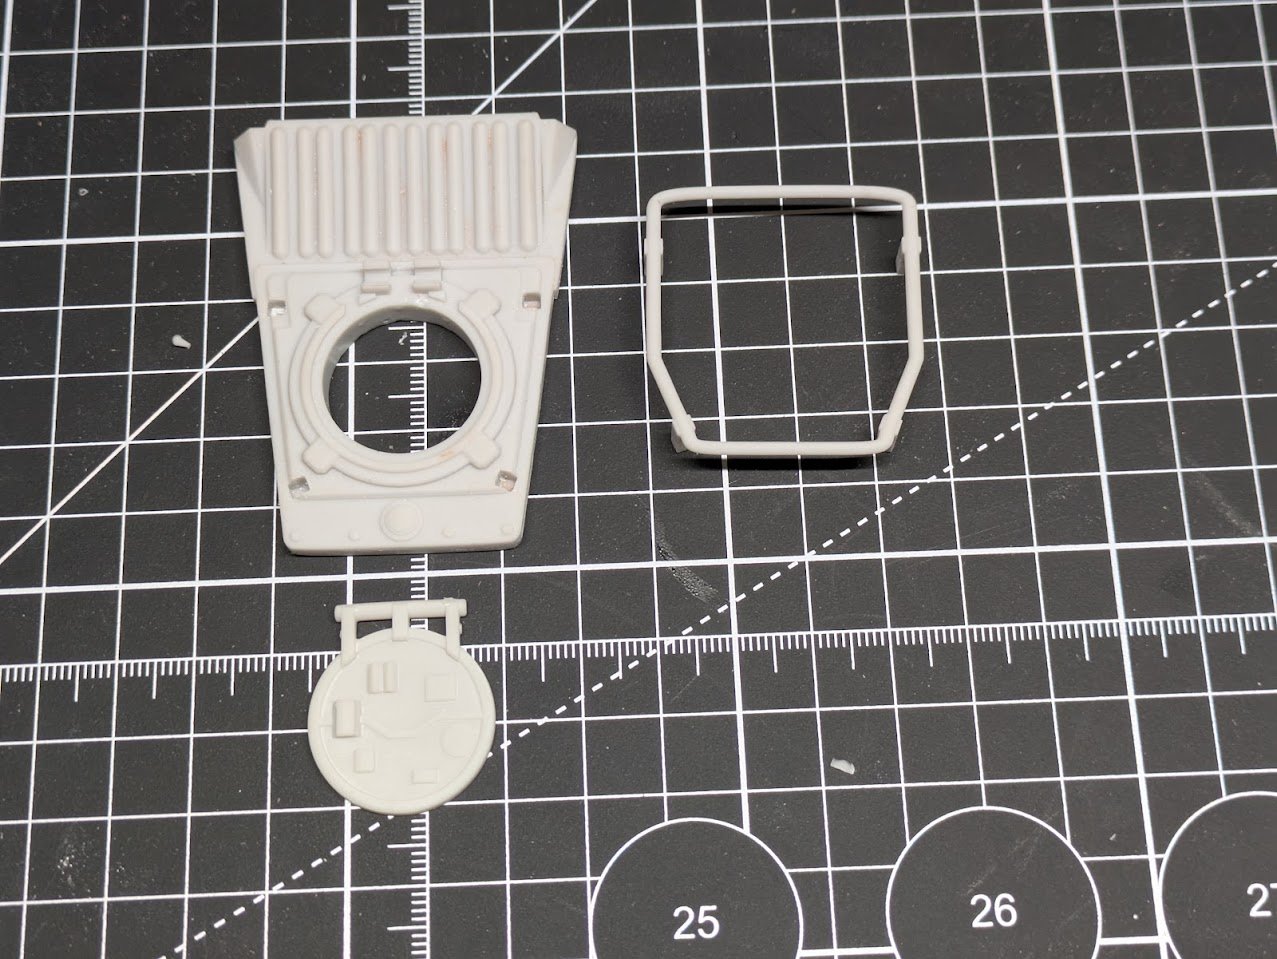
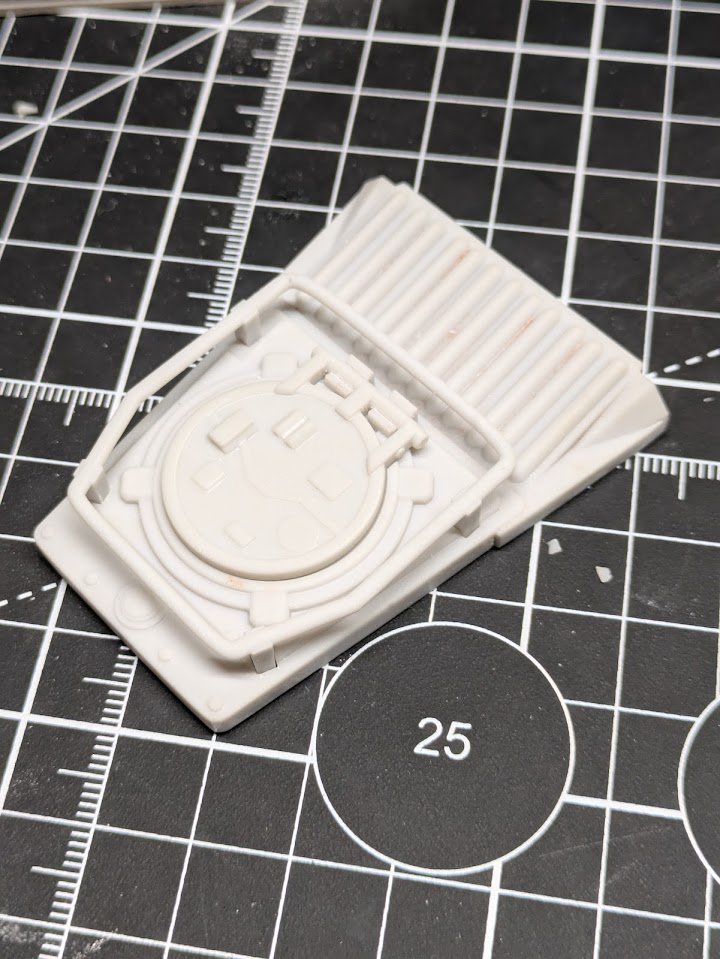
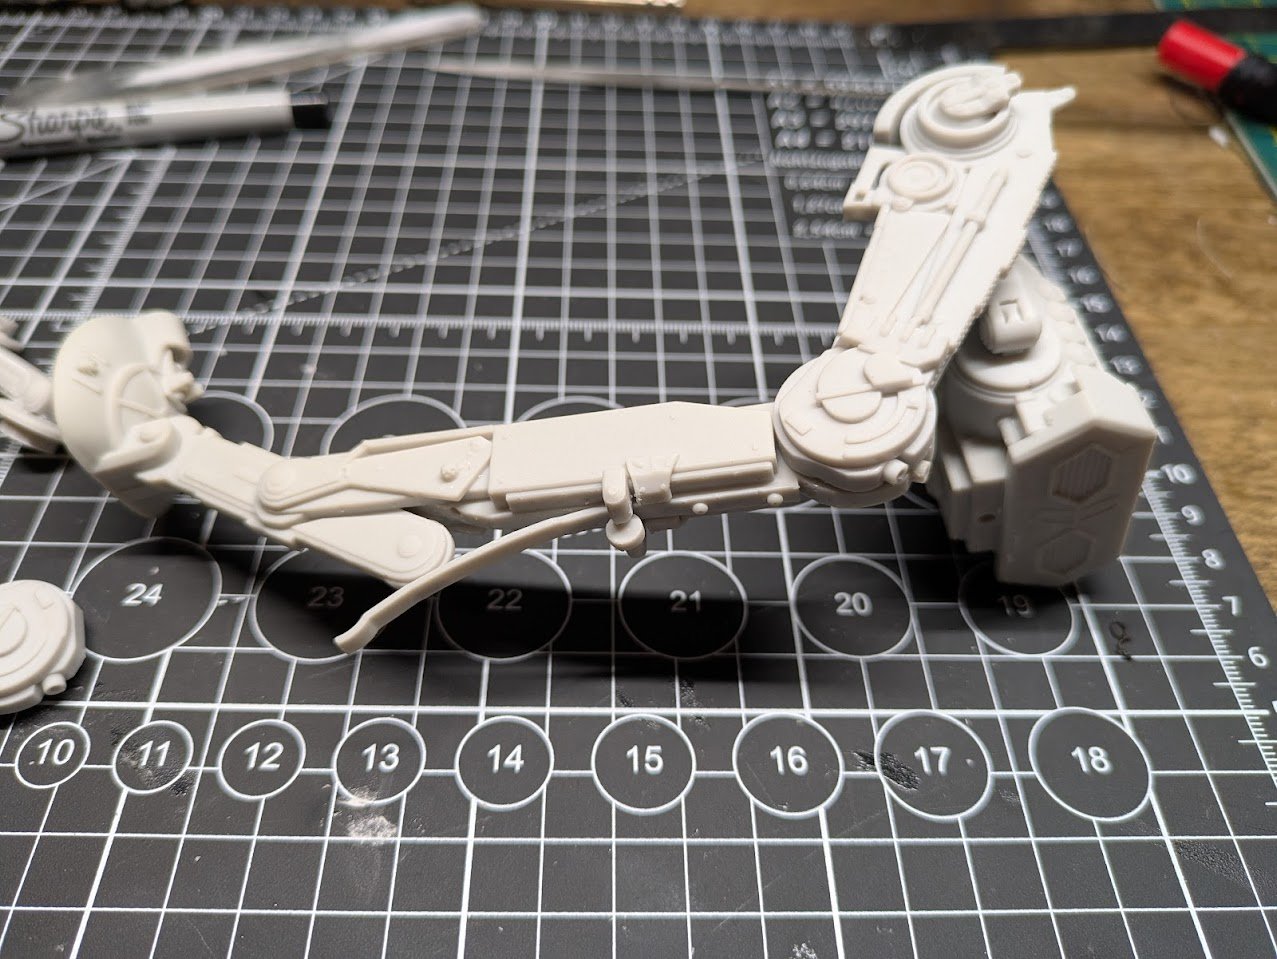
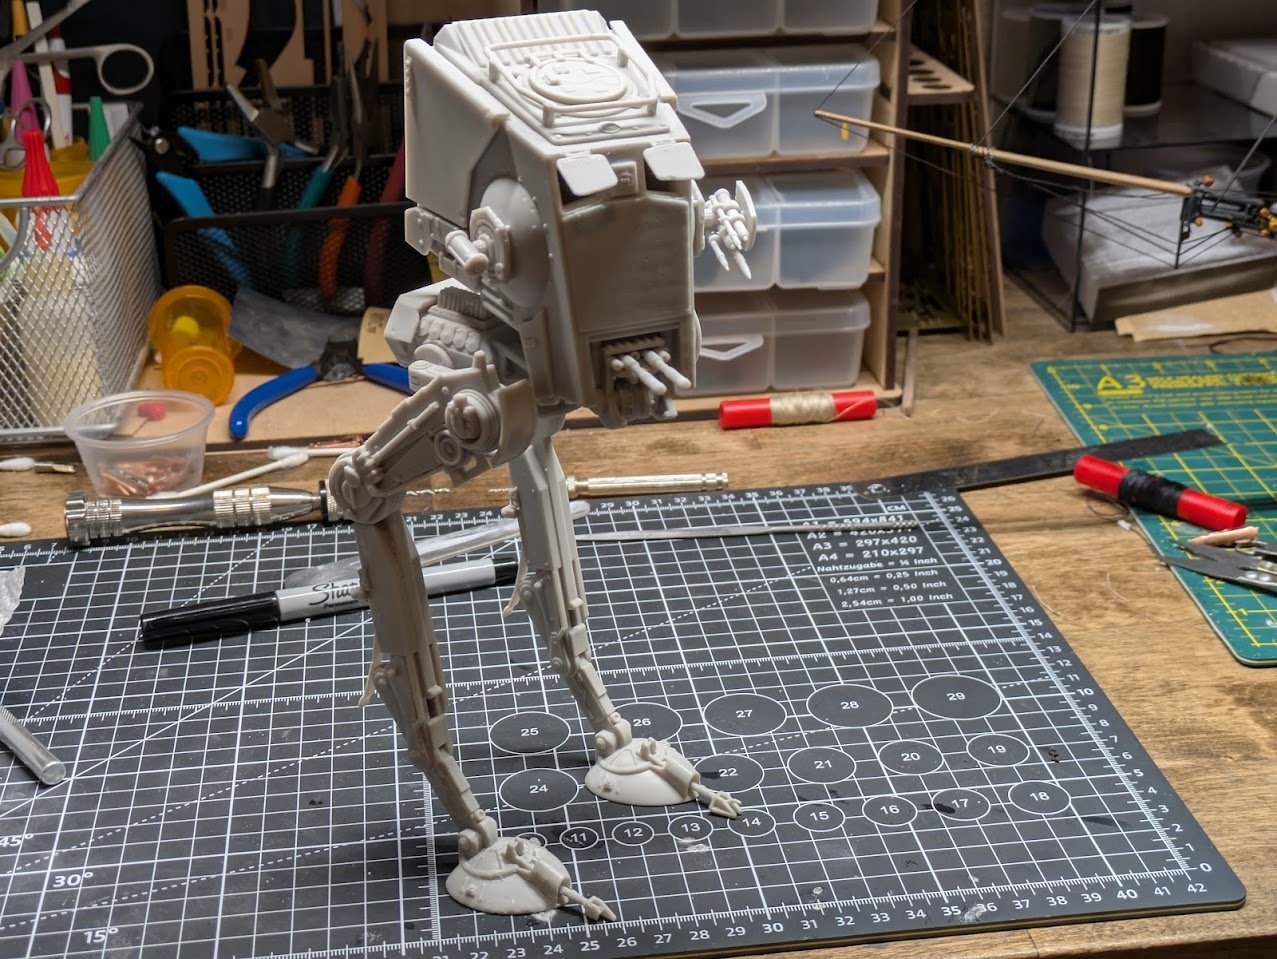
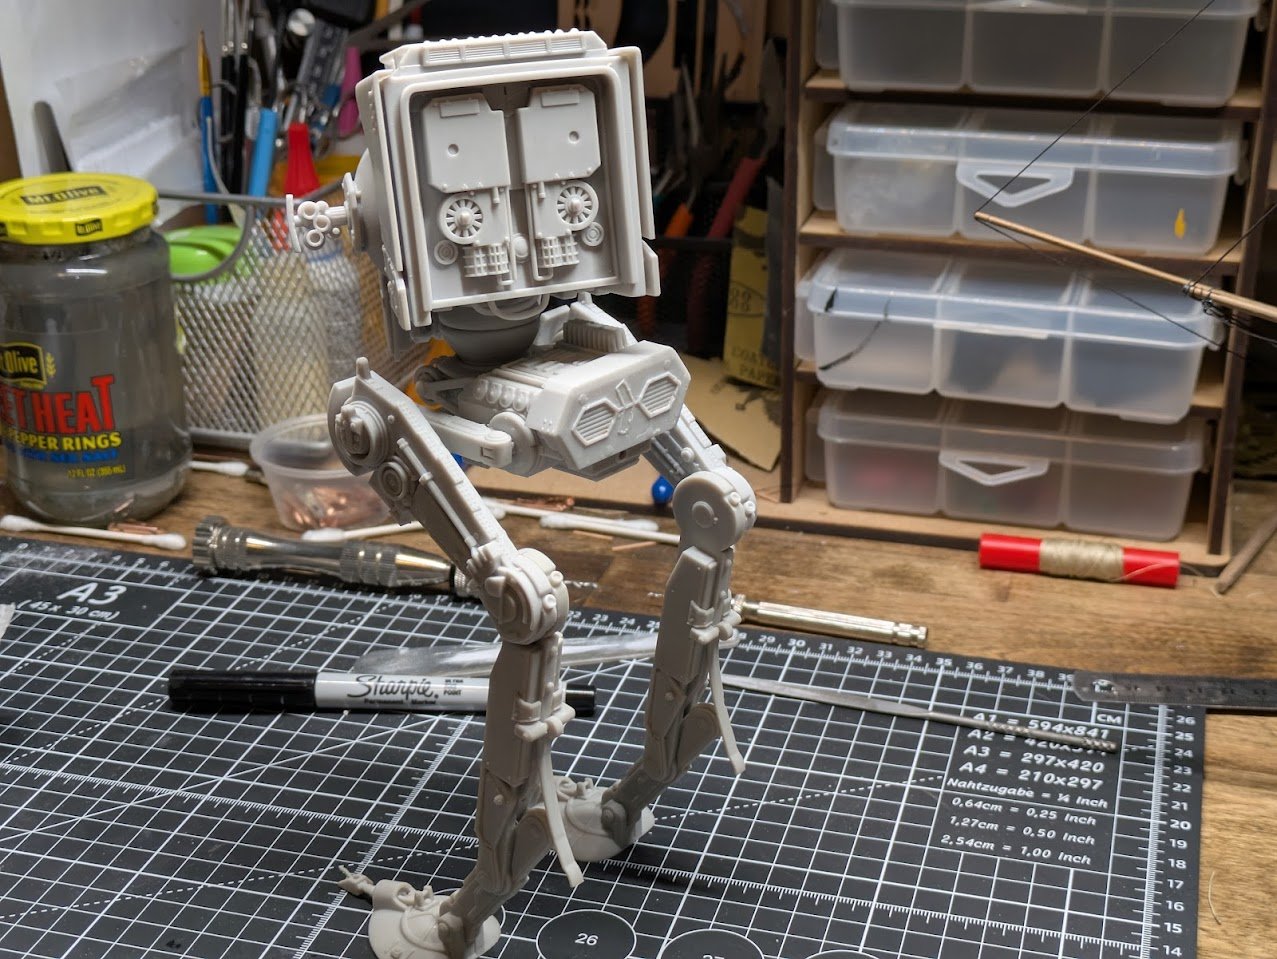
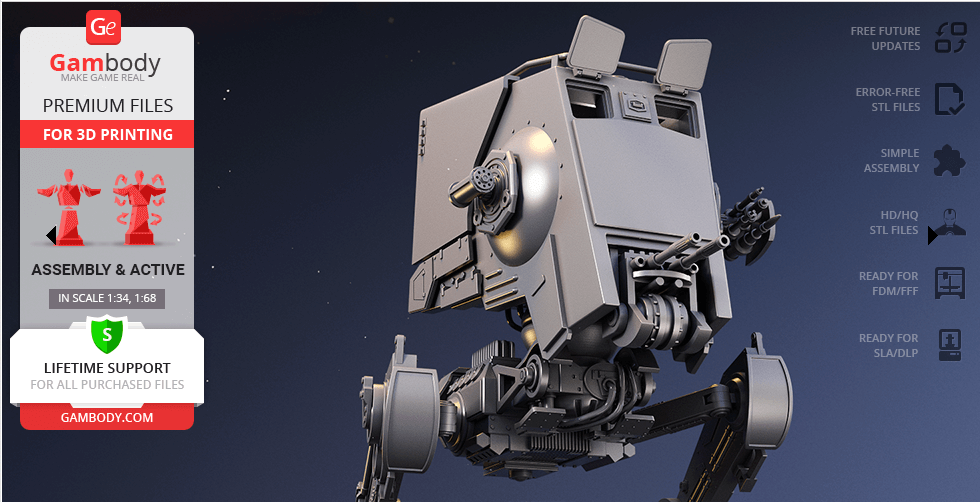
I recently got a Elegoo Saturn 4 Ultra resin printer, as I have been really impressed with how far 3d printing tech has come. My first foray into 3d printing was about 10 years ago with a standard FDM printer and at the time the printers had a learning curve to use them and there just wasn't much out there that was interesting to print other than trinkets that didn't look all that great. The technology on both FDM and DLM/SLA (Resin) printers is amazing now, the machines are almost out of the box ready to use, they are fairly inexpensive, and the 3d models that people are designing now are really good. After I got my exposure settings somewhat dialed in, I wanted to test the printer on something bigger that I would also enjoy as a model. I love Star Wars and the Gambody website has a ton of really good quality models that you can buy. I decided to get the AT-ST, I always loved the walkers in Star Wars and the AT-ST is a great medium sized model at 1:35 scale. Gambody AT-ST I started off with the prints in Elegoo White Smoke color, this will be painted over anyways, but I think it would actually be a great base color for many Star Wars ships. The prints took me about a week to print, I had a few failures here and there as I was still learning the printer and dialing in the exposure settings of the resin. There are 14 pieces for the SLA version, but the FDM version has many more parts and much more adjustability in movement. I think if I ever print this again I will print out using the FDM files as I would have like a little more movement in the legs to pose it walking. As you can see there is no shortage of details that can all be printed as one piece. Head Assembly The head is probably the roughest looking part I had printed, most of the small details of the head assembly are on the bottom and back, so I put the print supports on the front and top. I accidently used an old print profile I still had open so the print exposure settings were a tad higher than I wanted and the supports came off a little uglier than I would have liked. While this looks pretty rough in macro, it really is smoother than it looks and will be easily sanded and covered up with the primer coat. I may actually deepen some of the divots to make some battle scars, the great thing about Star Wars modelling is imperfections are actually part of the look of the universe. I also decided to make a modification to the window hatches. On Gambodys model the window hatches print attached to the body and are in a close to straight up position which isn't really how any of them are in the films. I carefully cut them off with a knife and glued them in a lower position with some CA glue. As you can see on their model, the window hatches pointed nearly straight up. The head assembly is 7 parts. The assembly is very straight forward with the guns sliding smoothly into their slots. On the body top assembly, there is a hatch and a utility rack. I did file the hatch connections down a tad because i felt the fit was a little snug and I didn't want to crack the hatch. The rack slid right into the 4 squarish slots with a little pressure. Leg Assembly Next are the legs. These are very straightforward, just plug in each of the three leg parts to the other and attach to the lower body assembly. The hardest part about this was just trying to get all the legs angled to look correct. These types of legs must have been a pain to film for stop motion, as the movements is more complicated than it looks. Final Assembly Once the legs are on the lower body, the head just pops right on and the walkers assembly is complete. I was surprised how well it balance on its own. Next up is painting. If anyone has any recommendations please feel free to share, I have to do some research on what color grey to use, I know there are some paint sets out there specifically made for Star Wars colors, but they looked pretty expensive. This next weekend I will head over to my local hobby store to see what they have in their Vallejo/Tamiya selections.


-
- 9
-

-

-
Howdy, welcome to the forum.
-
M3A1 Scout Car by brunnels - Tamiya - 1/35 - PLASTIC
brunnels replied to brunnels's topic in Non-ship/categorised builds
Browsing that site for M3A1 parts, I am amazed by how much stuff there is available for plastic kits nowadays. I will have to do some research on how to tell early vs late models. -
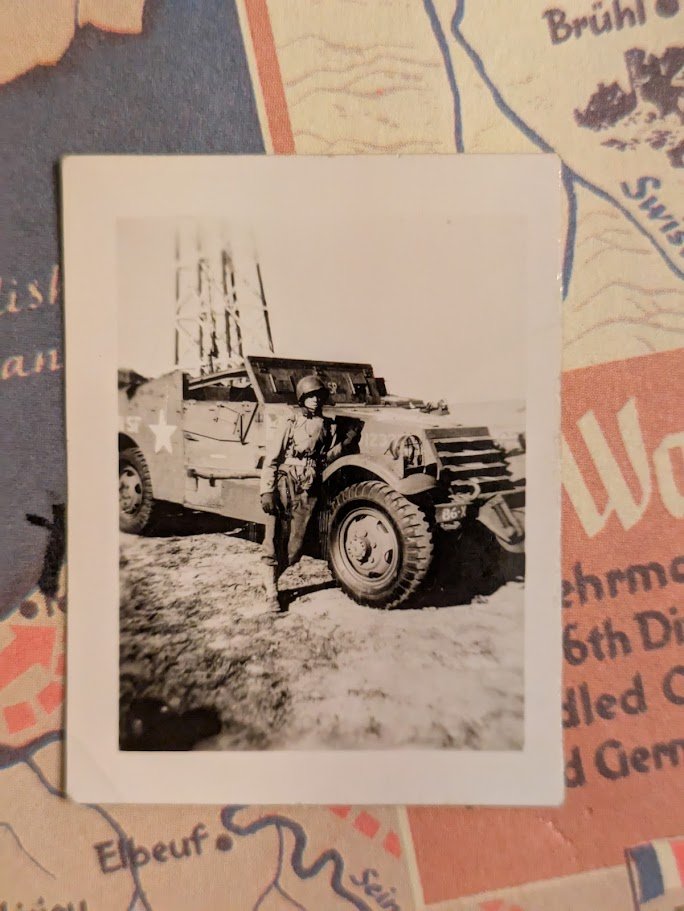
I haven't built a plastic model kit in 25 years, so this build log will start off as a bit slow as I will be doing some research on new techniques and tools used in plastic scale modelling, and also doing some research on the M3A1. My grandfather served in the US Army during the Second World War with the 86th Cavalry Reconnaissance Troop who were attached to the 6th Armored division. When I was youngster in the 90's, he would often pick me up and take me to museums which really kick started my life long interest in military history. He never talked much about his time in the war, so I never really new much about his time in the service other than he served as a radio operator in a light armored vehicle, but I never knew what kind of vehicle that was. Recently we were cleaning my late grandmothers house out and we came across some photos from the War, one of the photos was a very small photo of him next to an M3A1. I decided instantly that I was going to have to build a scale model of the M3A1. Photo of my grandfather I did a little research and the consensus online seemed to be that the Tamiya kit was hard to beat. I also ordered a Vallejo US Army paint kit as I don't have many paints for this era. I also have on order a Photo Etch detail set made by Passion Models, and a book on the M3A1 to use as a reference. I will probably look for either a US Armor decal or stencil kit, as the Tamiya kit has mainly Soviet decals with a few US Army Italian campaign decals which might work with a little cutting. Also not sure if I should purchase an airbrush, I don't use one on my ship modelling, but I remember back in my scale model plane days that it was a great tool to have.
- 12 replies
-
- 15
-
-
-
I watched the new 4K release of Master and Commander last night, now these images..... The wait for release is getting tough to bear lol.
-
I love seeing stuff like this, thank you for sharing.
-
Howdy all, recently I have been thinking a 3d Resin printer would be a fun hobby and tool that would benefit ship model building. I have some experience in 3d printing about 10 years ago I had a Crealty 3d Printer, but it was a more traditional 3d printer with the spools of material. I eventually gave it up do to time and that printer had several issues that I could never quite work out. I know printers have come a long way since then, and the Resin printers have really impressed me. I do have a few newbie questions regarding the Resin printers. I will mainly be printing smallish stuff to compliment our models (blocks, cannons, decorations, small figures) stuff like that. 1. Can I get a decent hobby setup for under $500? 2. Do the resin printers give off any toxic fumes? I have a 4 month old daughter, so this is a big concern of mine. 3. If I can't keep the printer indoors, I will put it on my workbench in the garage. In Oklahoma temperatures can easily reach greater than 100F/38c in summers with plenty of humidity, and below freezing in the winters. Would the printer have any issues being used in my garage in these temperatures?
-
I really like the method that @tedrobinson2000 used with modeling clay. It looks much better at scale than any result I was able to achieve using cloth, and they are pretty easy to make.
-
Fantastic job, what blue are you using? I really like the shade of it.
-
I was scratching my head on those as well, I ended up tying them around the bitt in front of the main mast.
- 426 replies
-
- 1
-
-
- Vanguard Models
- Sphinx
- (and 1 more)
-
Fantastic build, one day I can hopefully do half as good on that kit.
- 443 replies
-
- 3
-
-
- Indefatigable
- Vanguard Models
- (and 1 more)
-
Is a long narrow hull like this easier or harder to plank in your experience so far?
-
I'm currently building the Vanguard Speedy kit and its a great kit, instructions are very good and the materials are fantastic. I have the Syren kit in my stash, the instructions look really good and I could probably learn a lot by just reading through them, but I was somewhat let down by the quality of materials in the kit.
-
I am very impressed with your wood color painting, that is a skill I still have yet to grasp.
- 443 replies
-
- 1
-
-
- Indefatigable
- Vanguard Models
- (and 1 more)
-
I'm going to have to remember this technique, sounds much easier than using the nails.
- 332 replies
-
- 5
-
-
- Harpy
- Vanguard Models
- (and 1 more)
-
Looks great, I wish I had done the same with my Beagle, I'm not a fan of that top layer of super thin planking that Occre likes to use in their kits.
-
I had to add a little filler to mine.
-
I can see how that would be a pain to work with, especially the cutaway side, but your end result looks very nice.
-
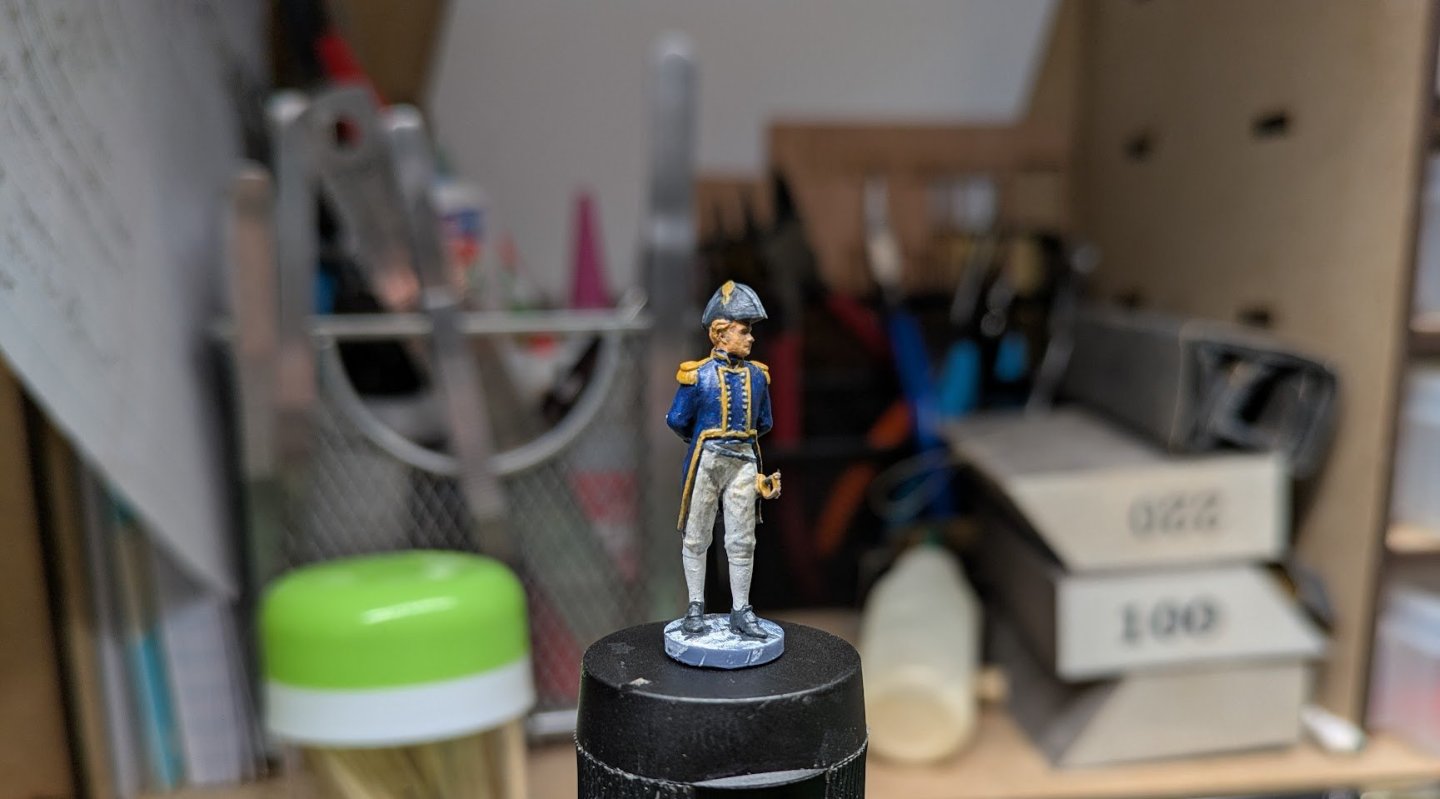
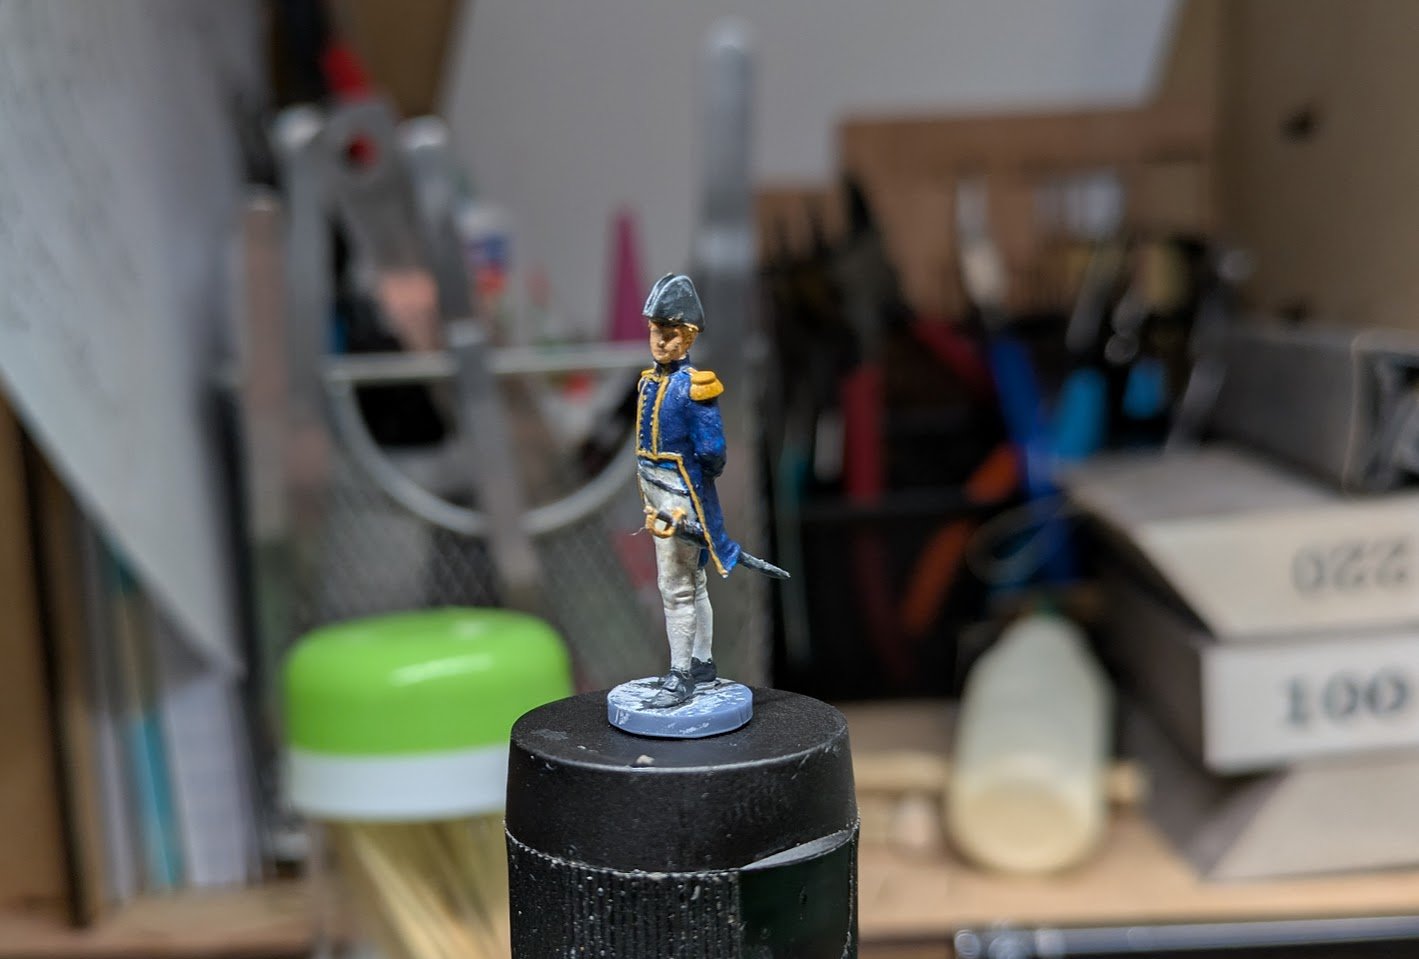
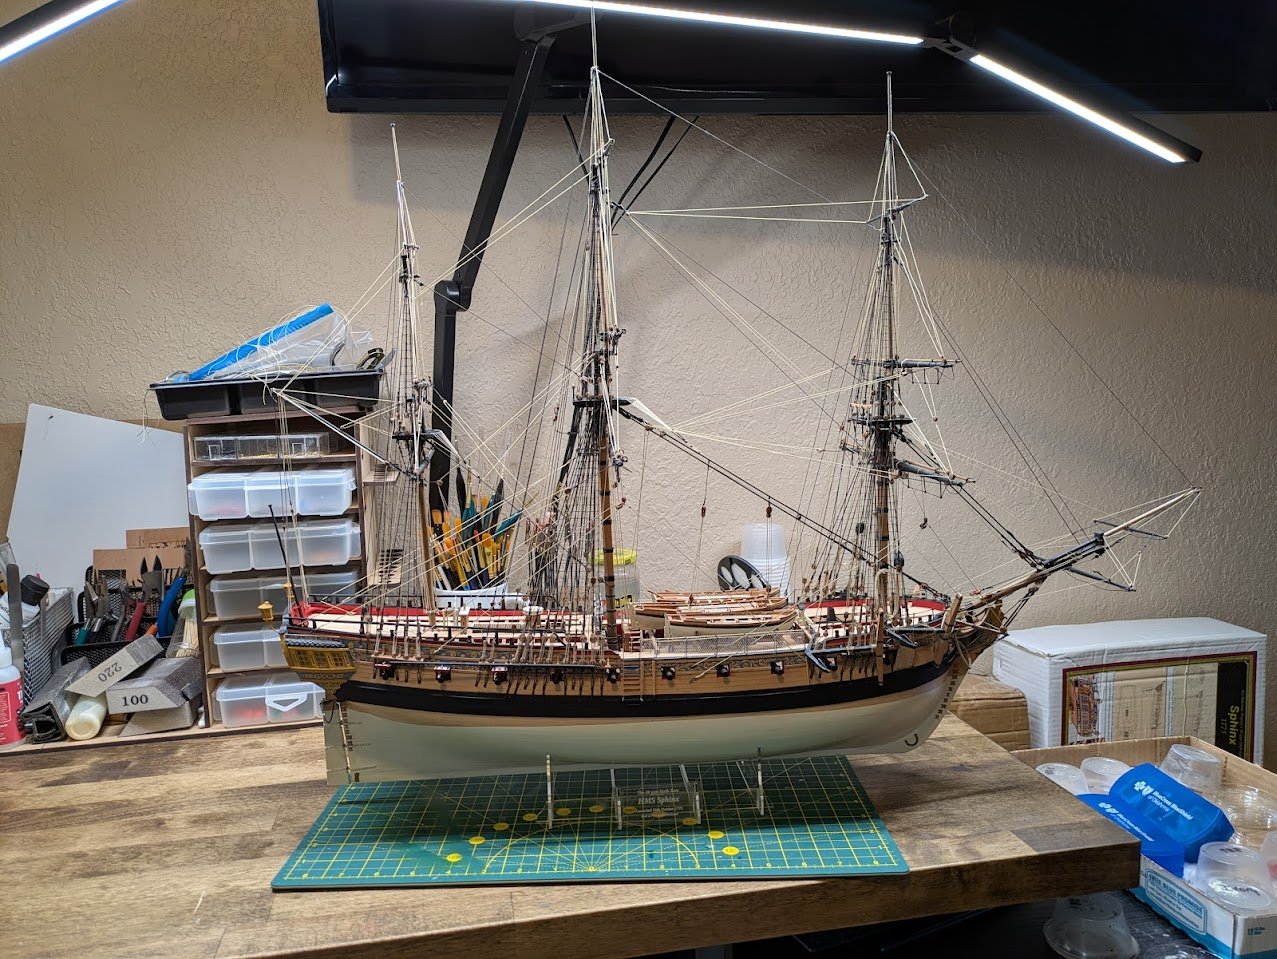
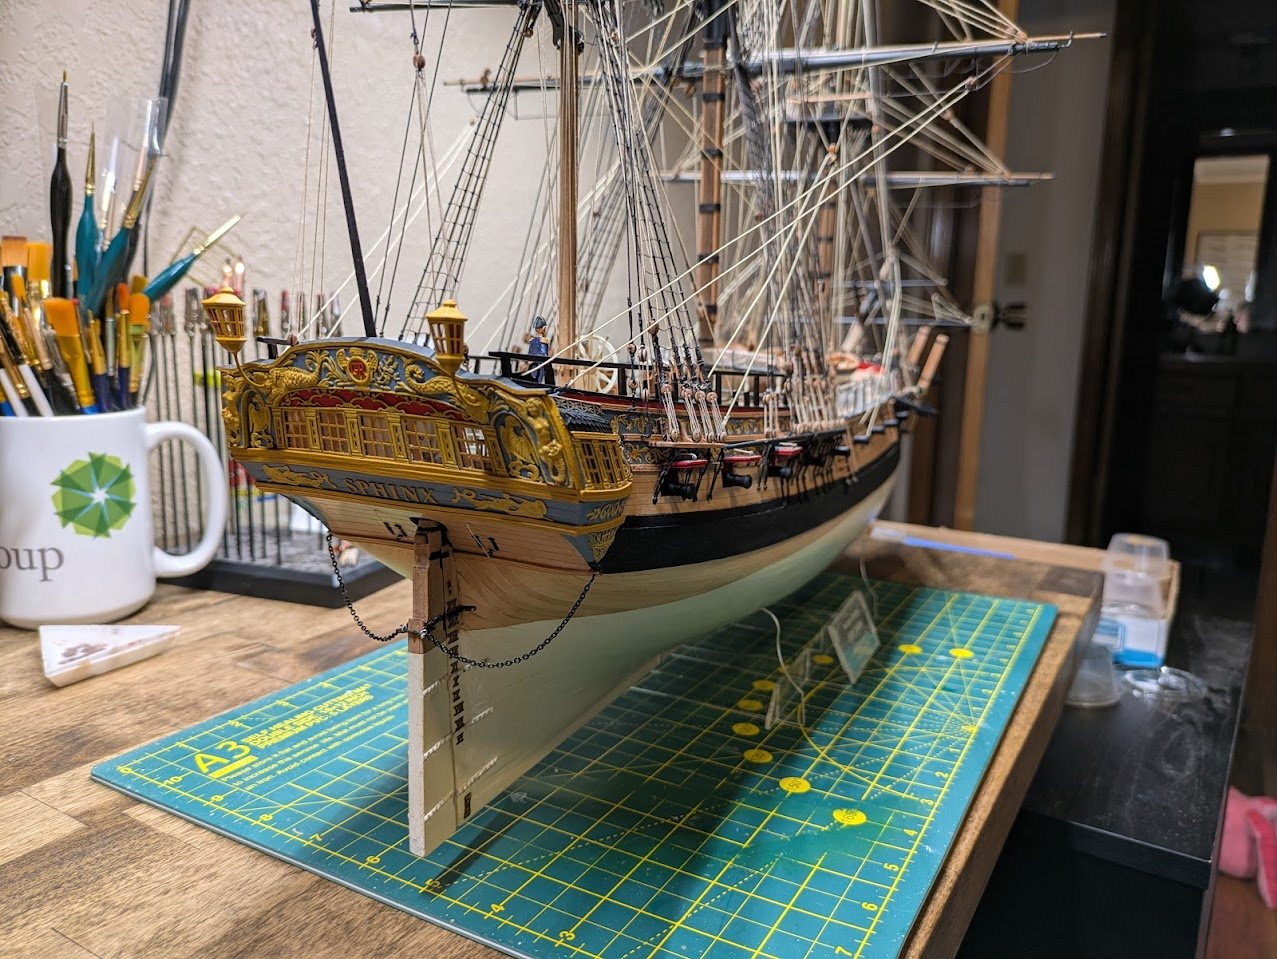
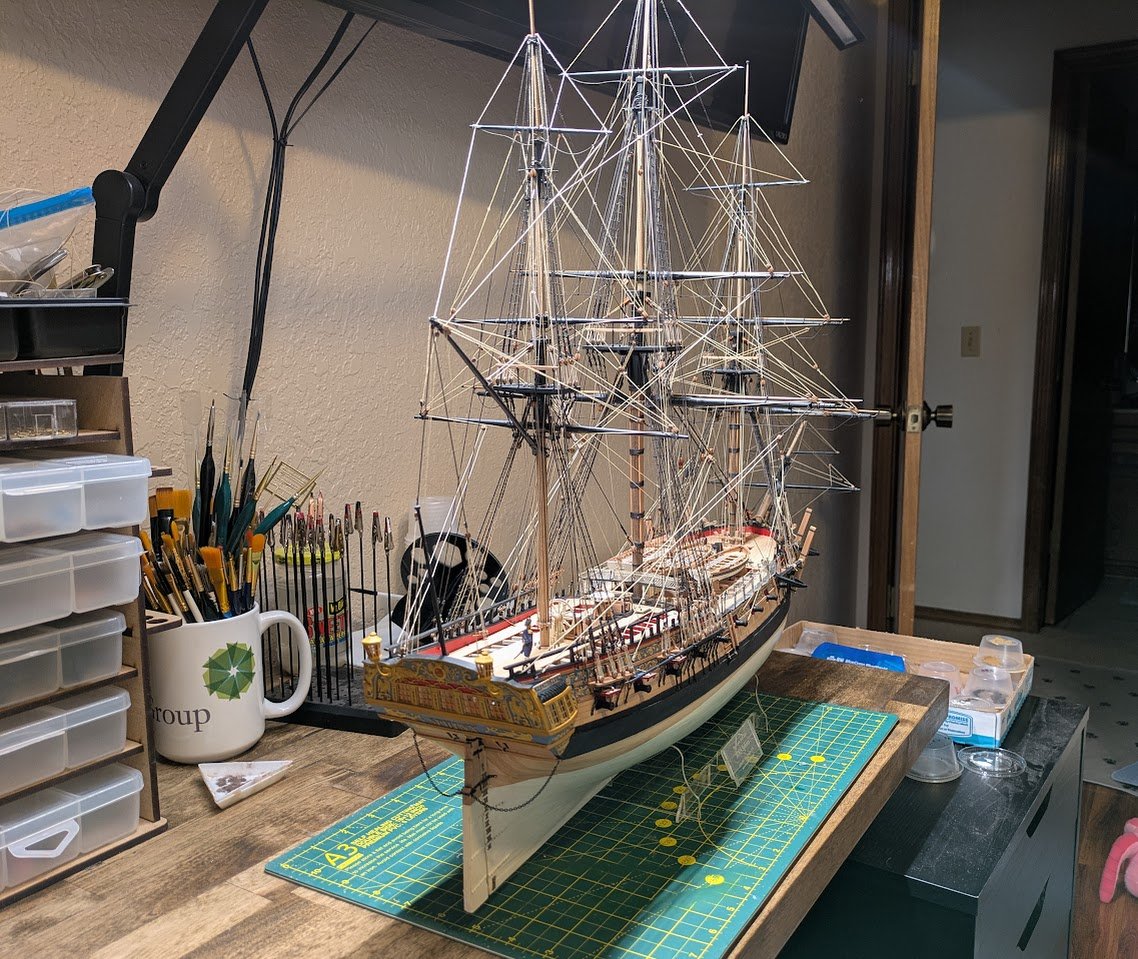
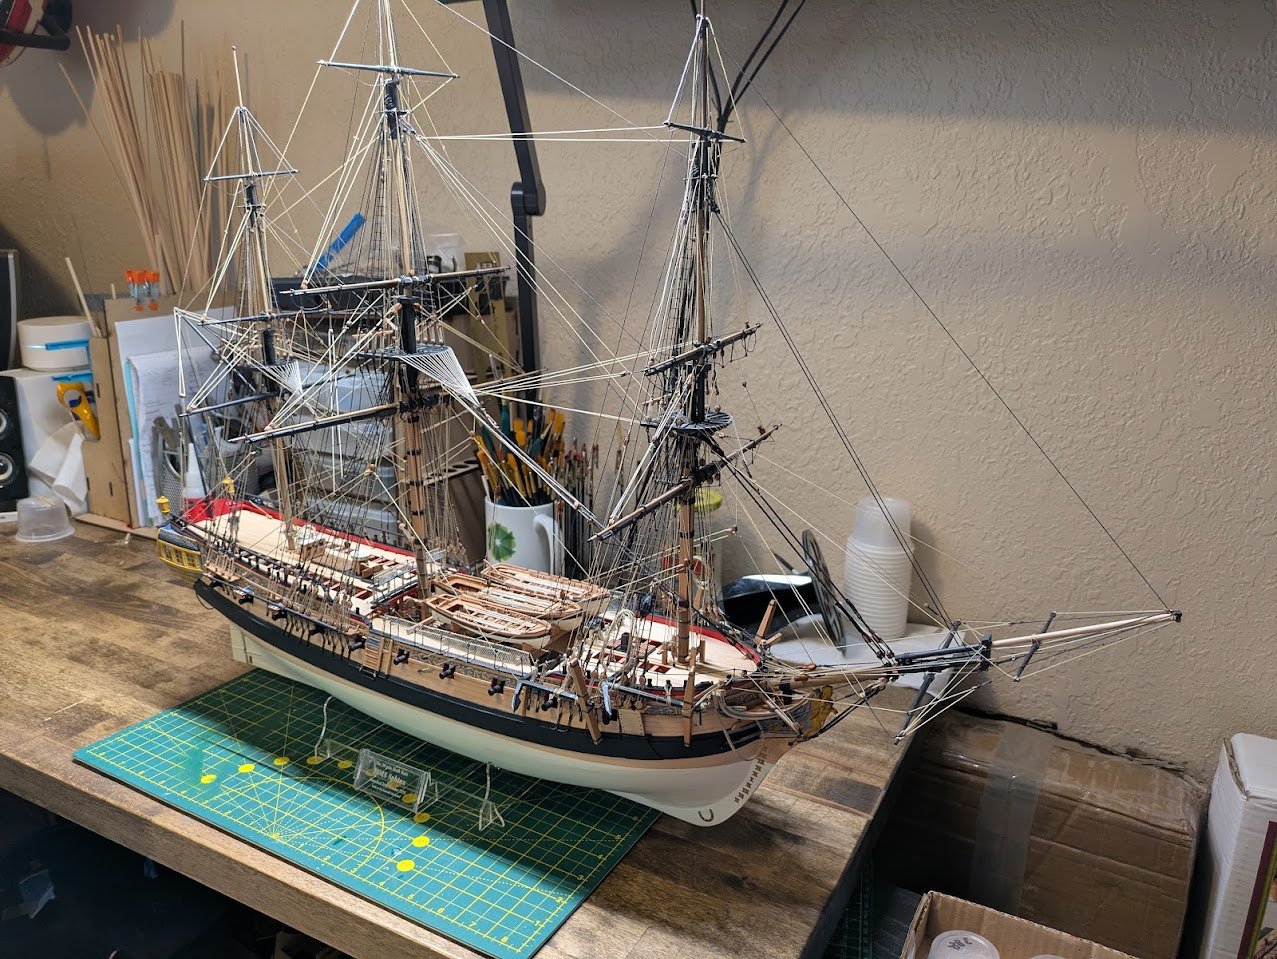
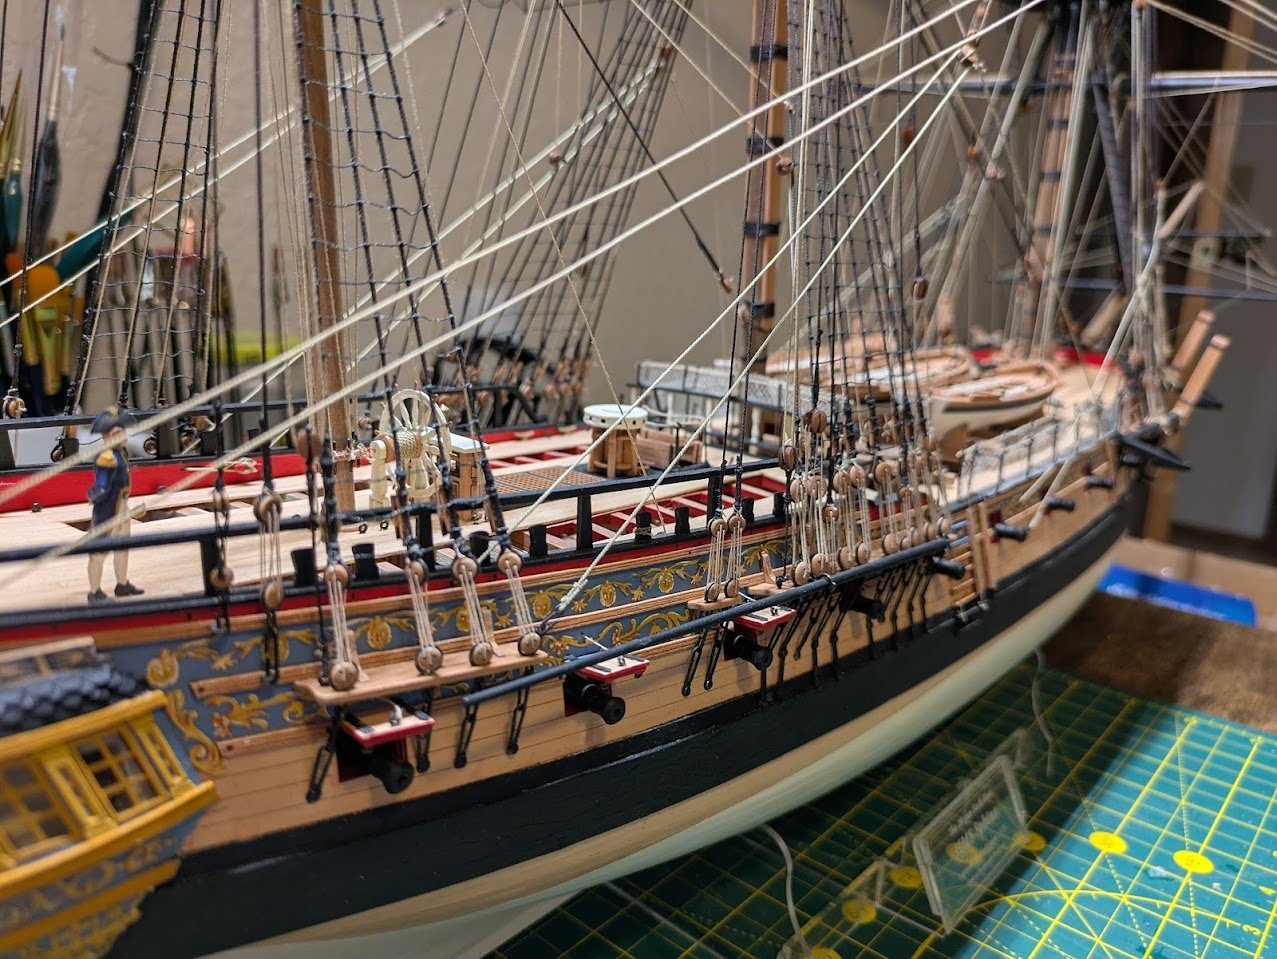
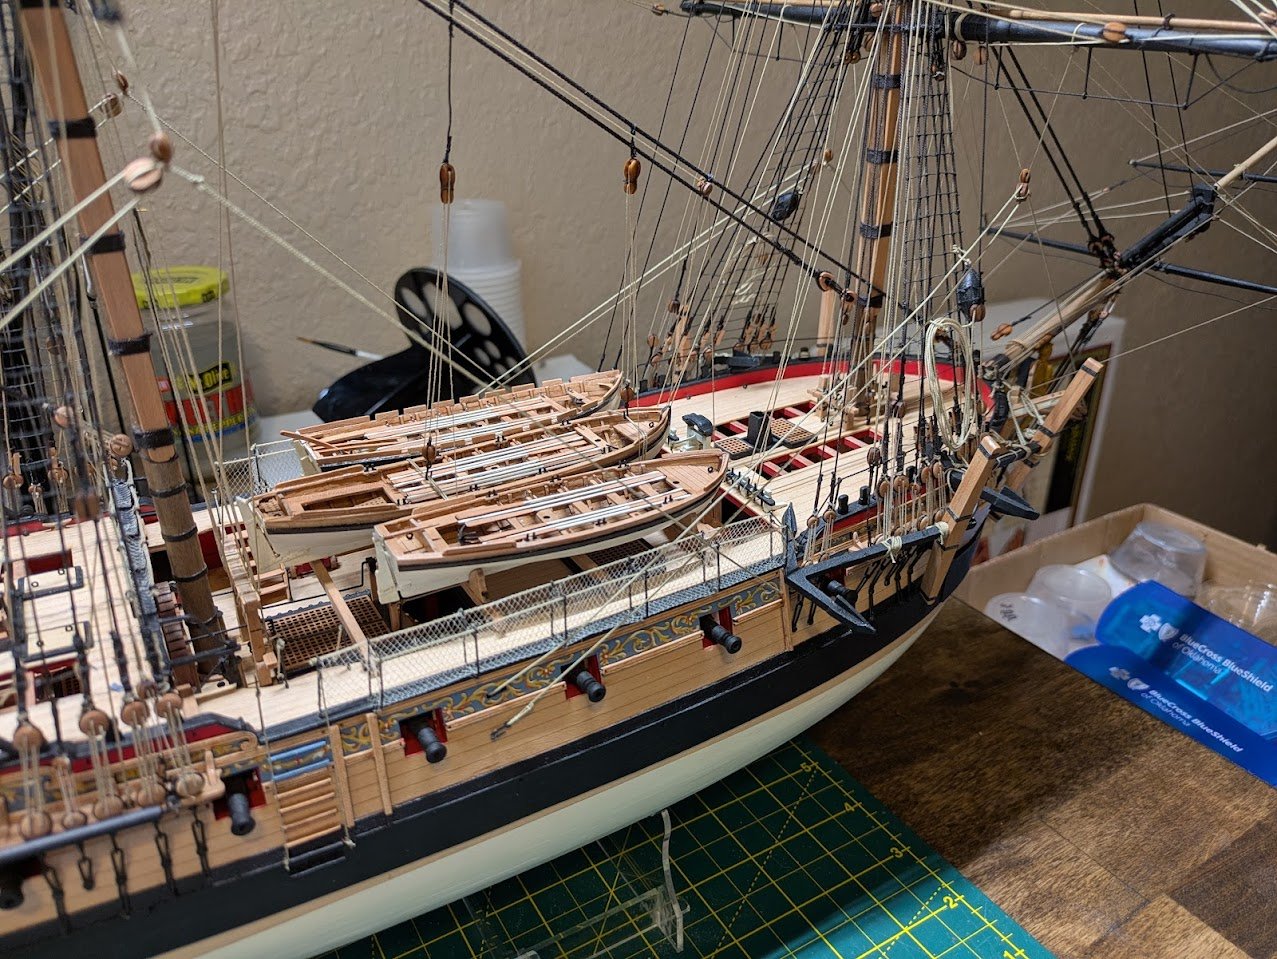
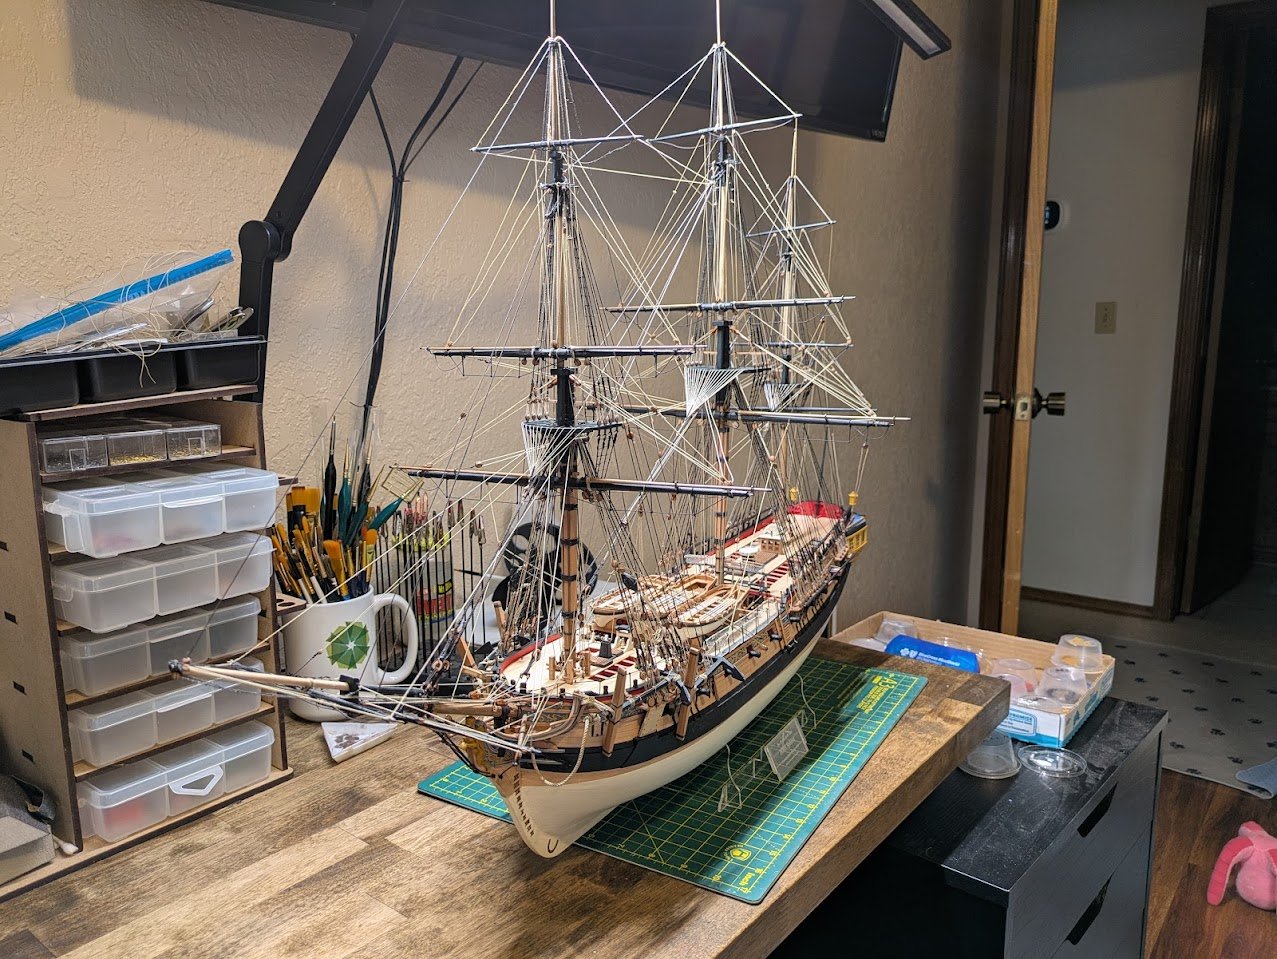
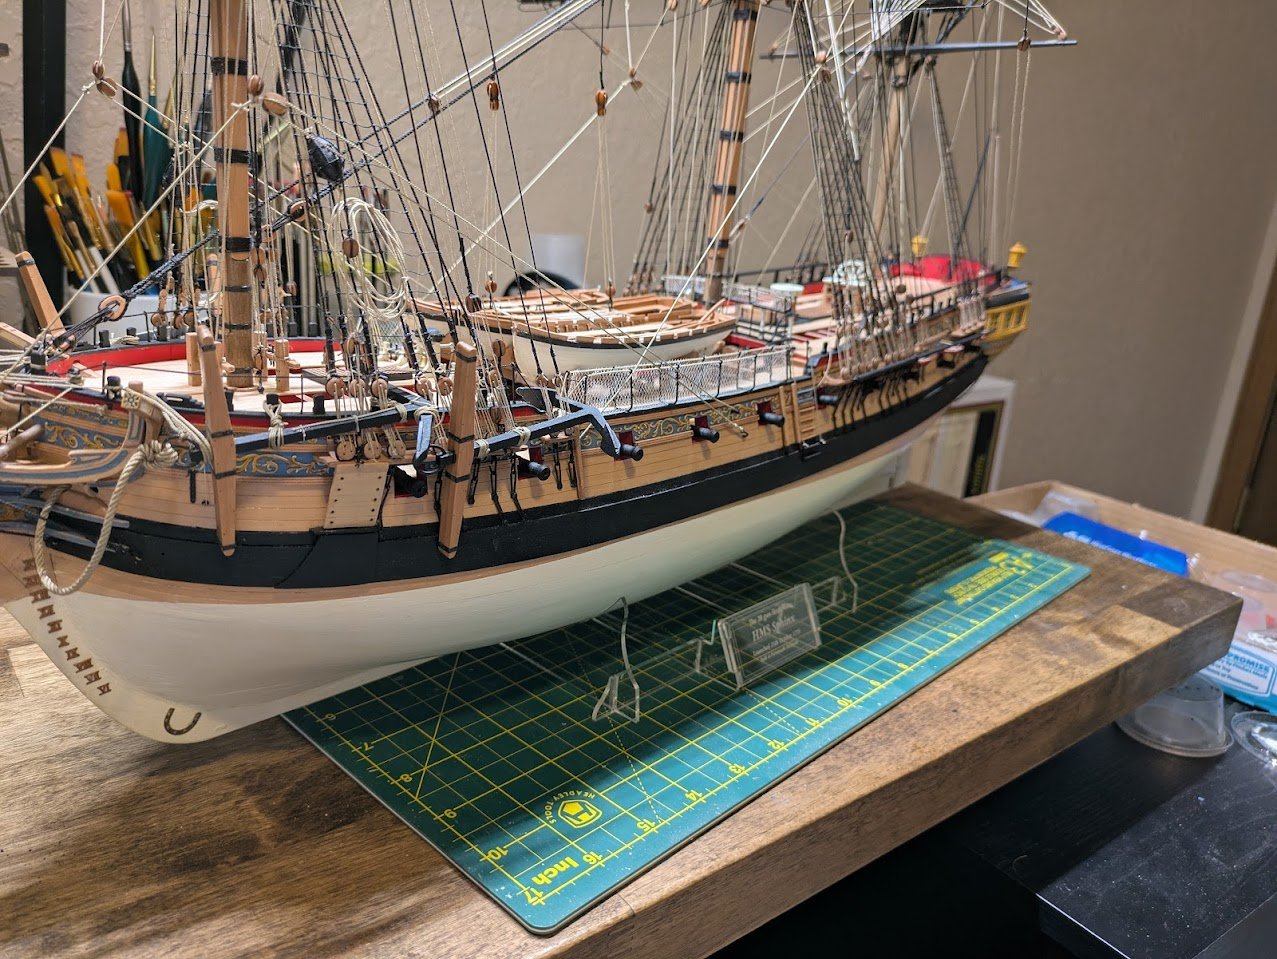
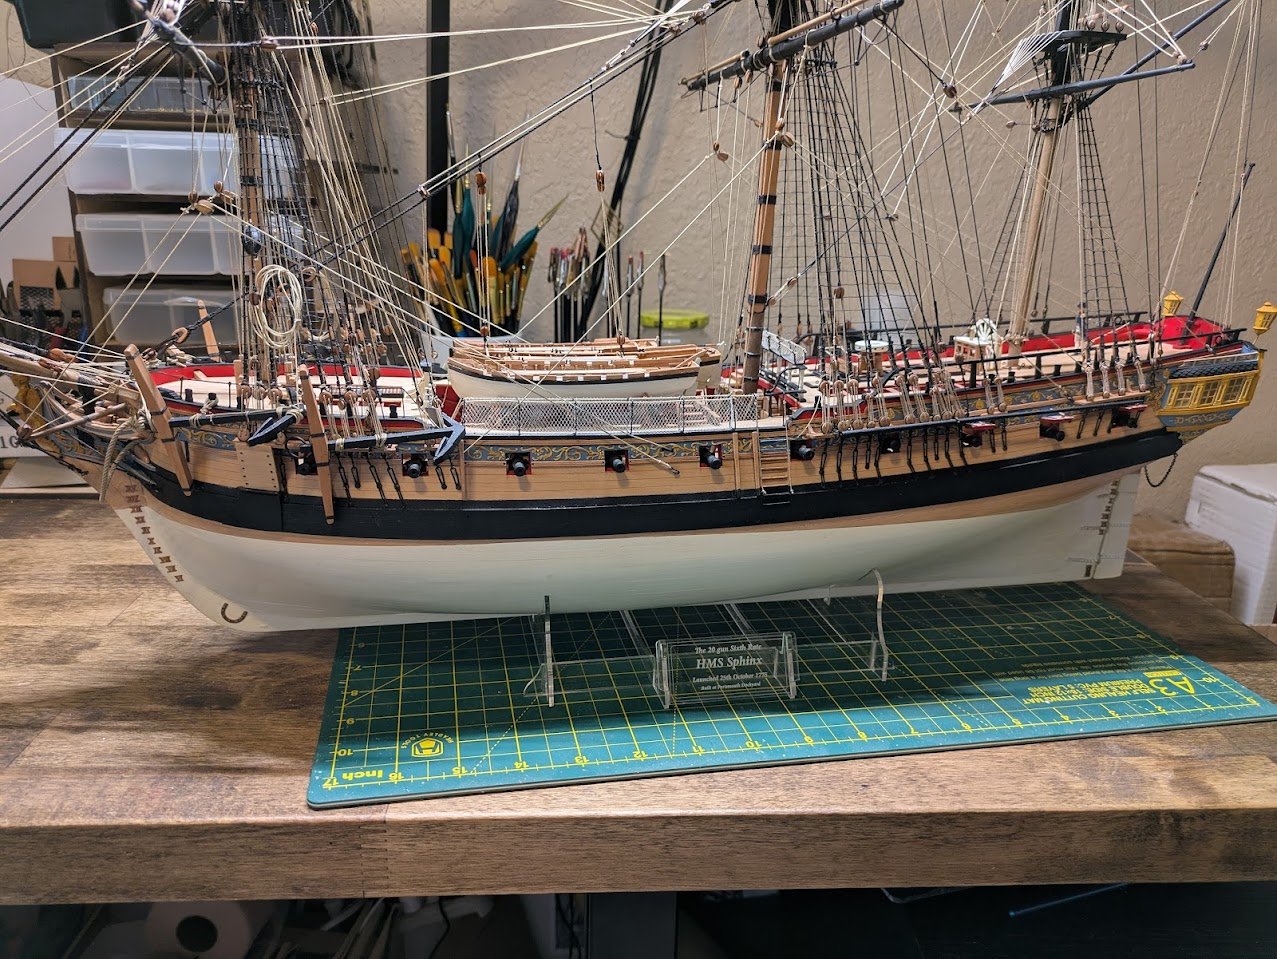
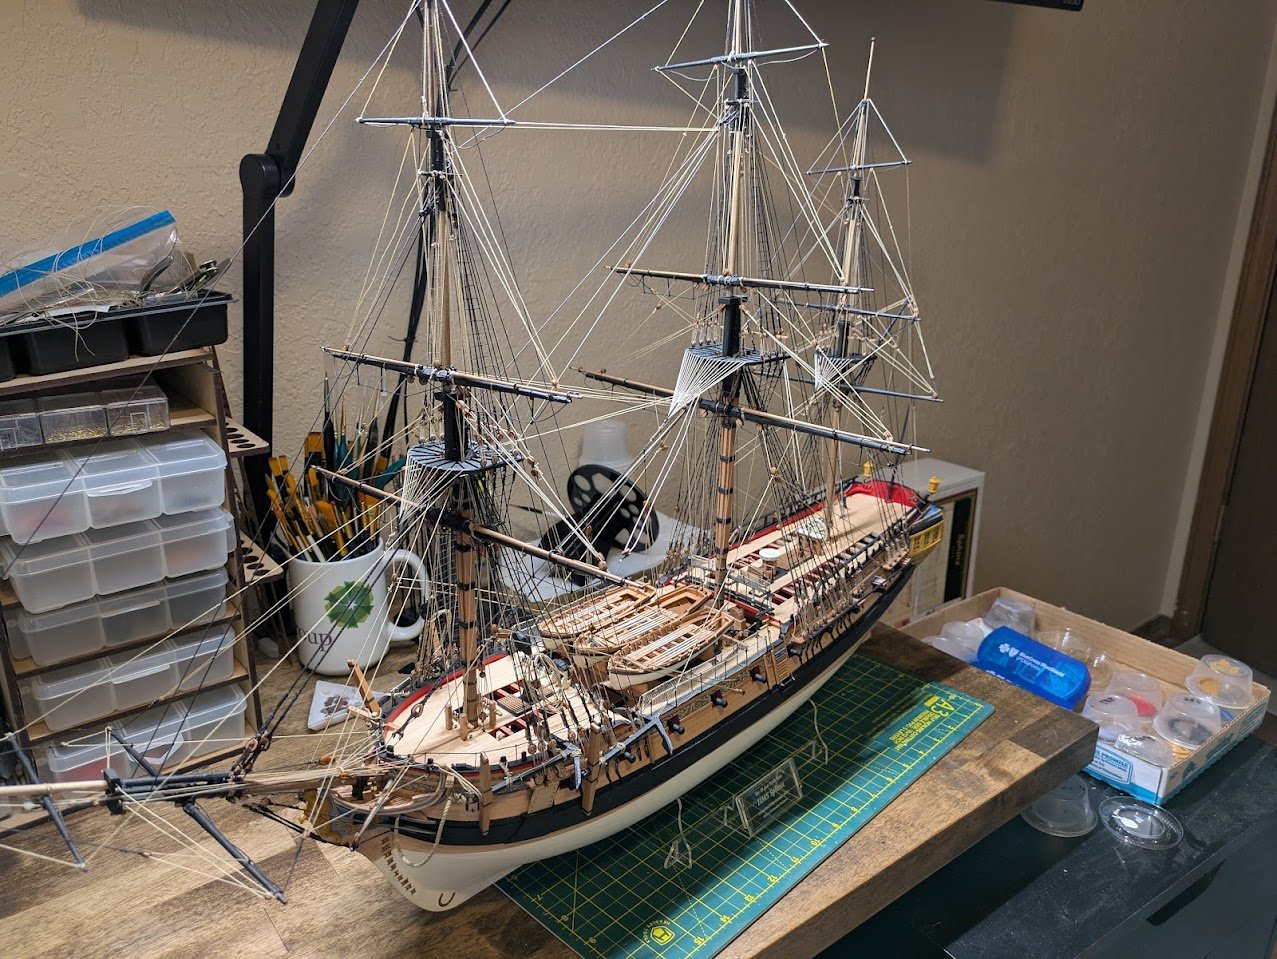
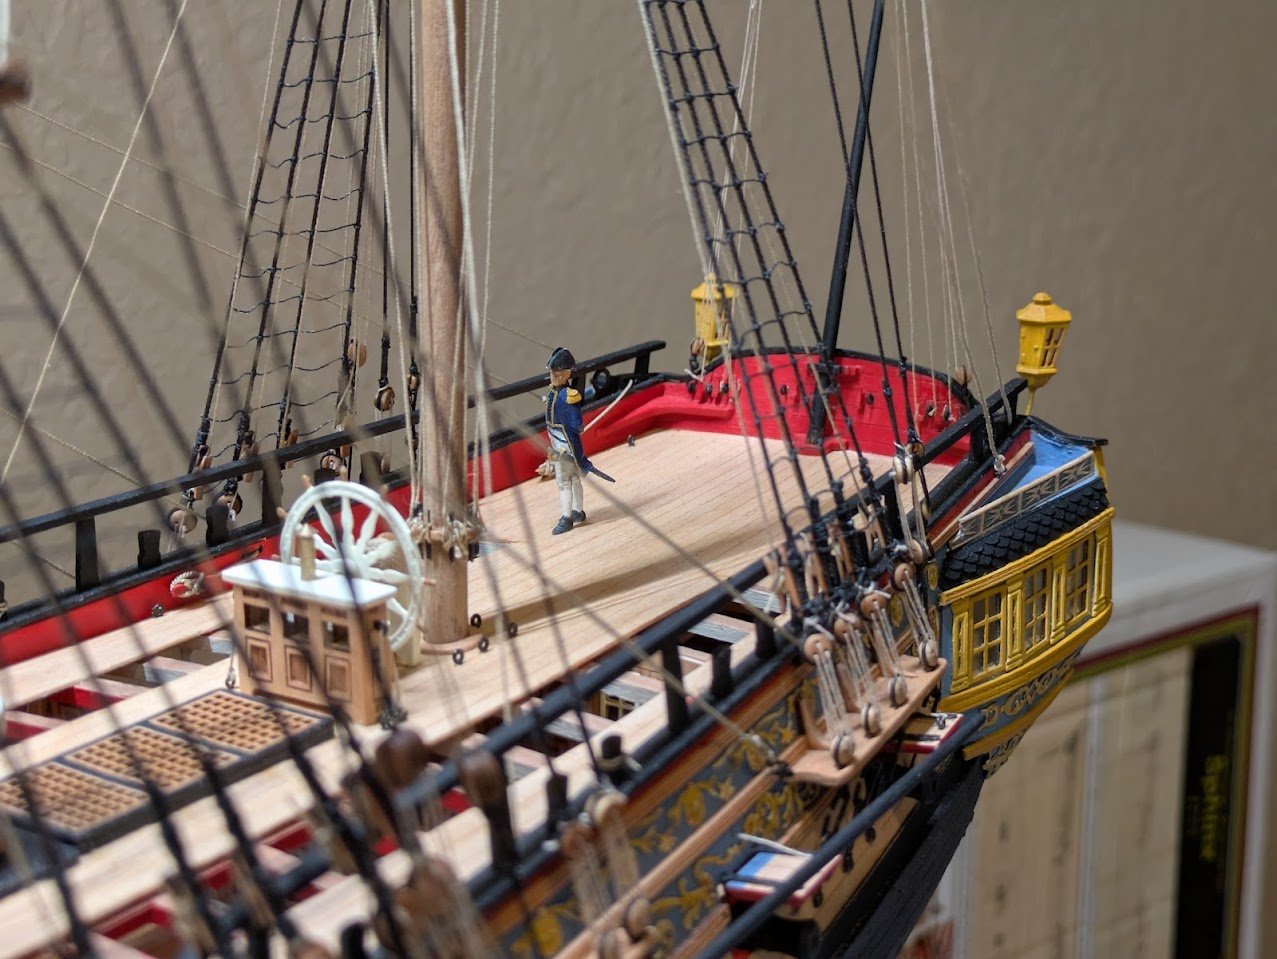
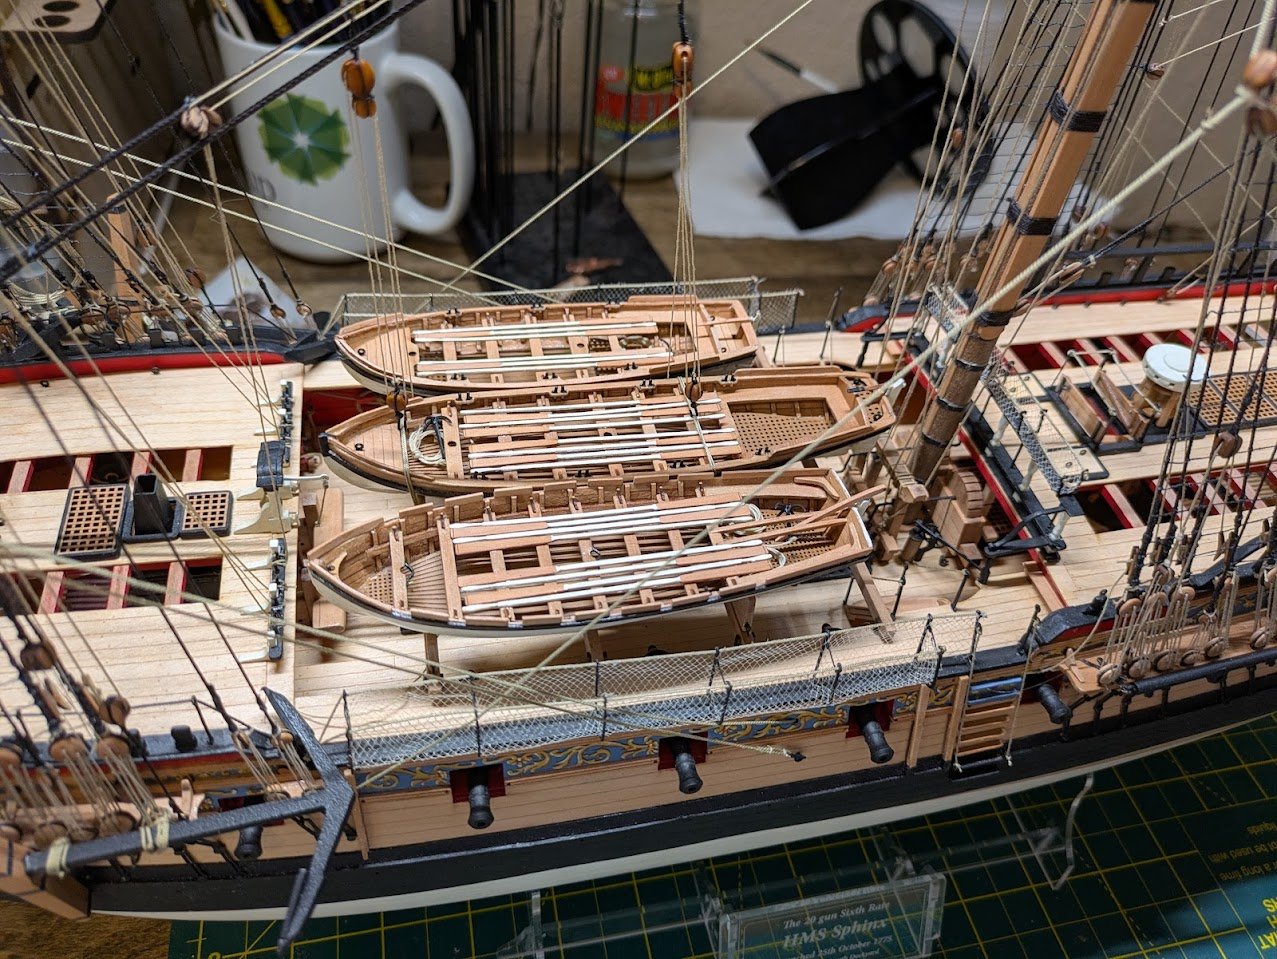
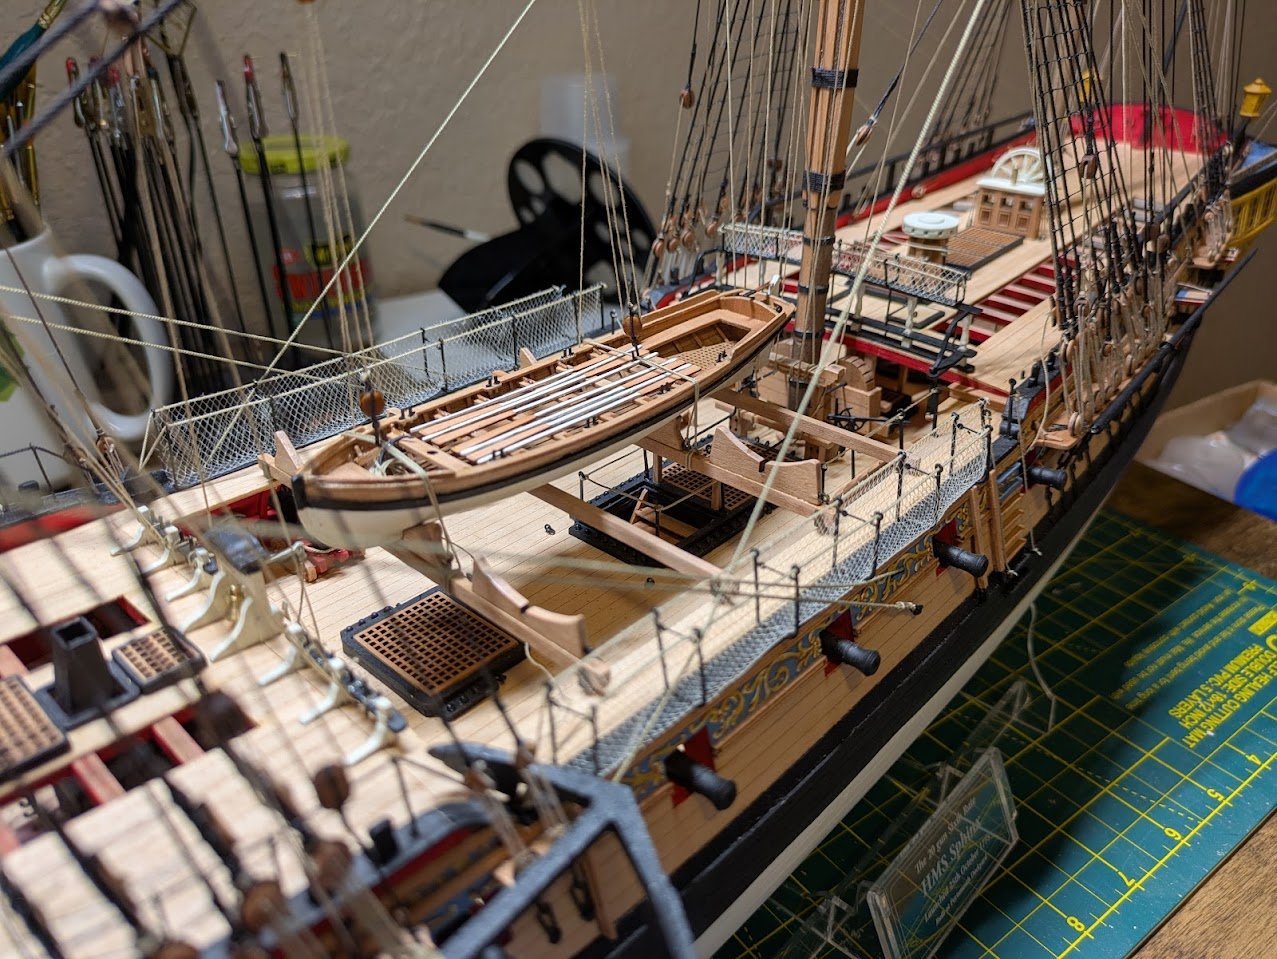
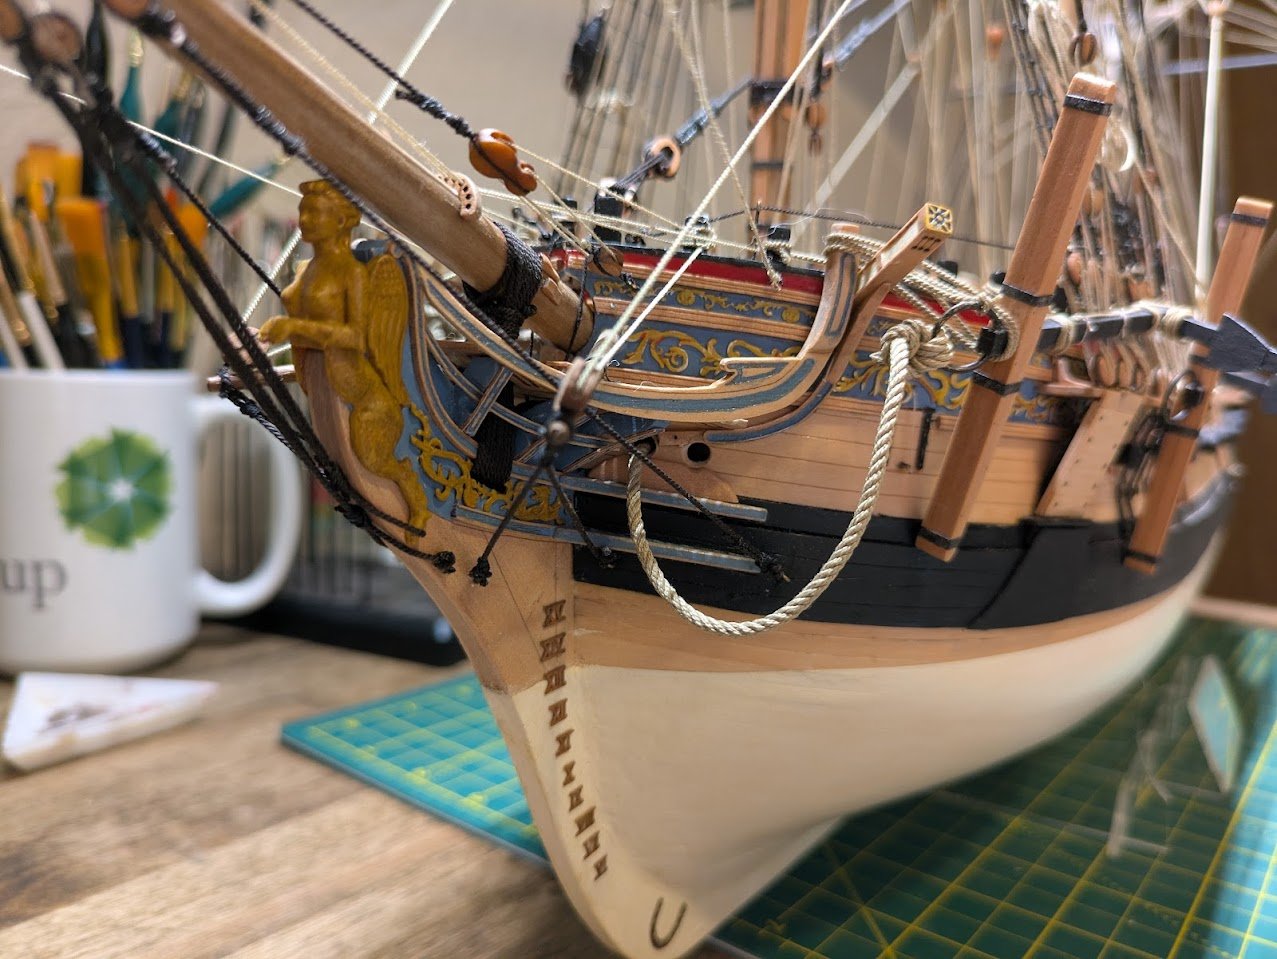
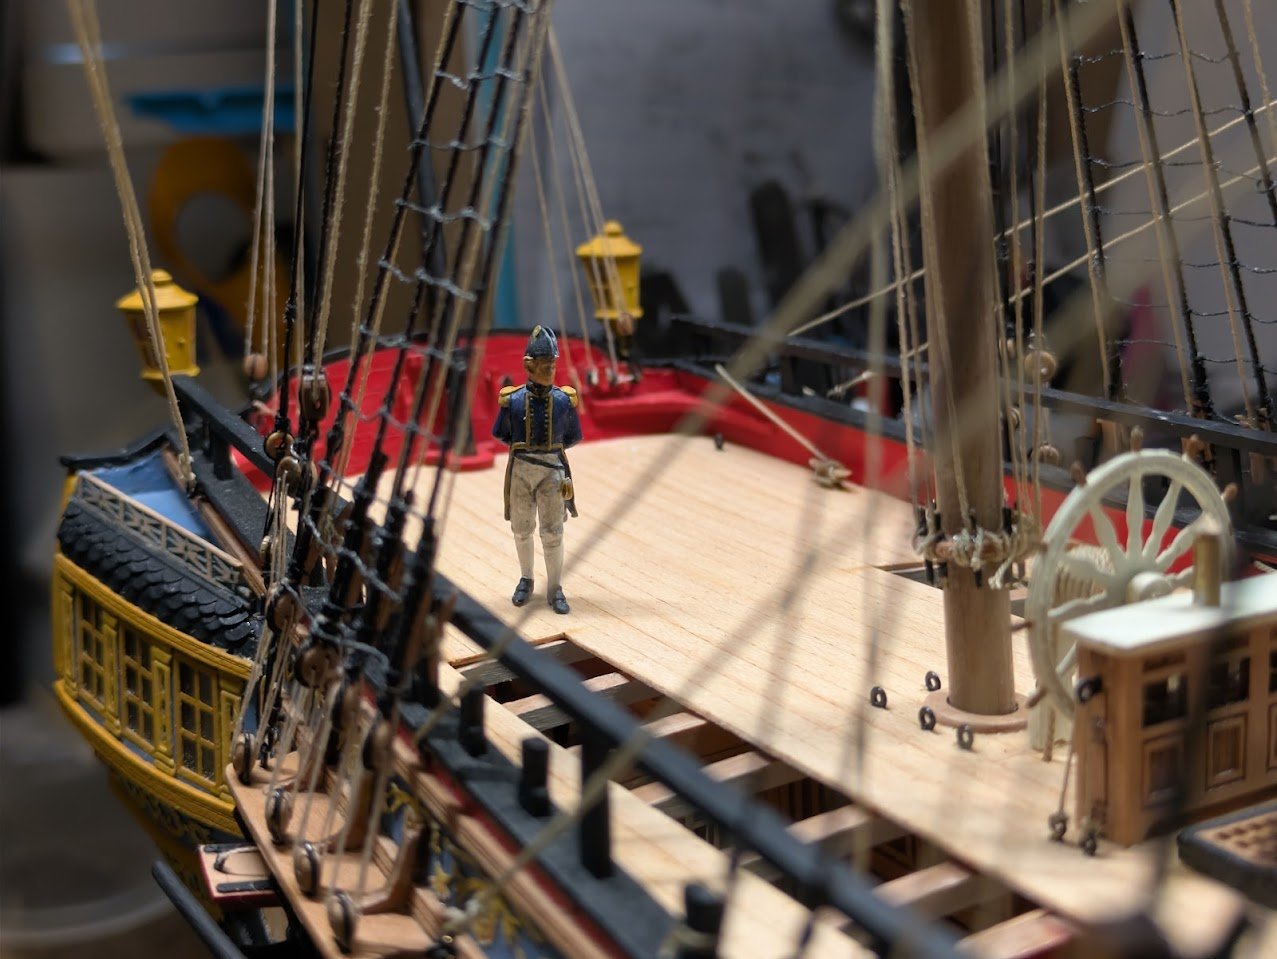
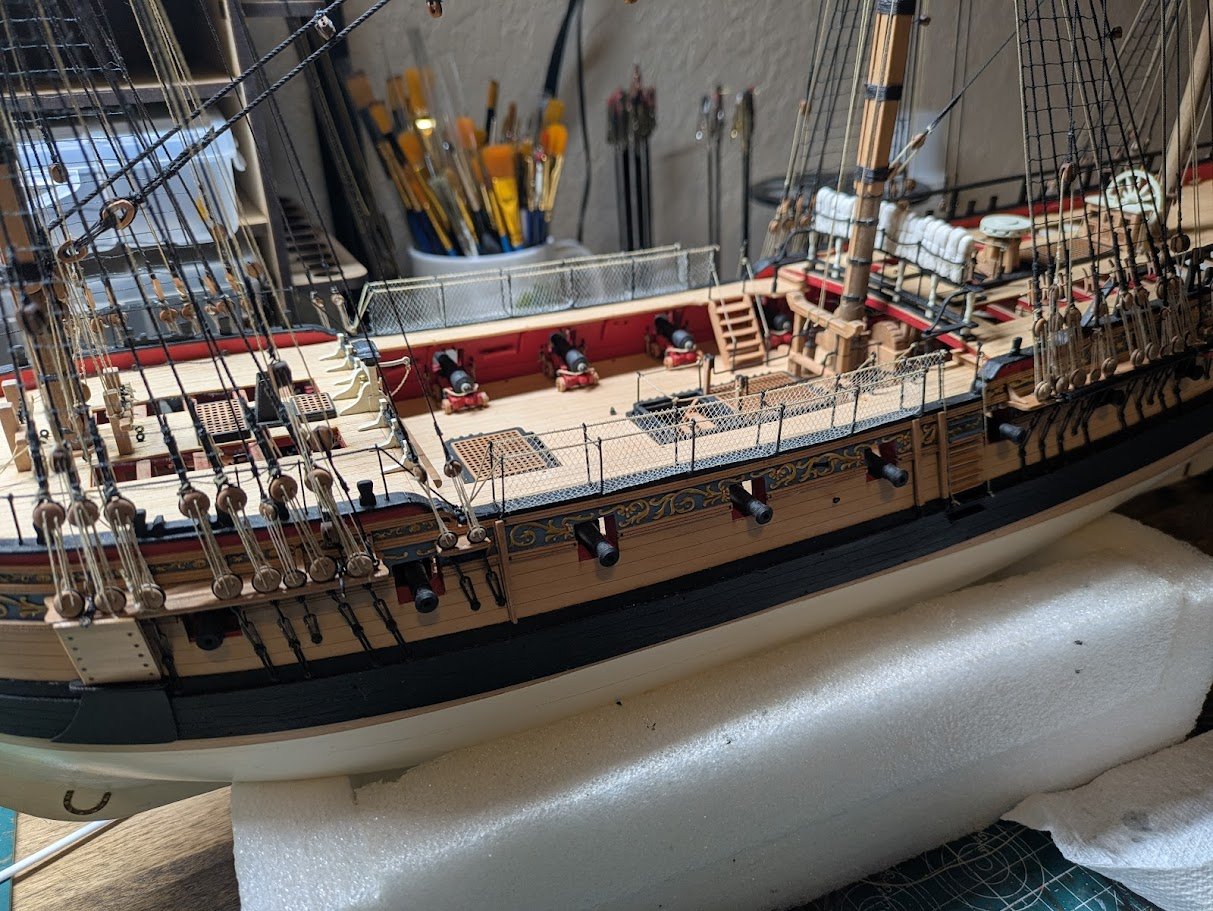
Over the weekend I was able to finish off the running rigging, and start attaching all the external pieces that were prone to be knocked off during rigging such as the anchors, lanterns, port lids, Captain figure, ships boats etc. Captain Figure This is the first miniature figure I have ever painted, while I have modeled off an on since I was a child, my model subjects were always vehicles. This was a first for me and I enjoyed it a bit more than I expected I would, while it isn't something I want to do a ton of, I do feel more comfortable painting figures in the future. The only tip I had received beforehand about painting mini figs, was to paint them in the order that they would be dressed. So I did a flat flesh for the skin tone, I then painted the socks and pants in Vallejo Off White, then the jacket in Prussian Blue with Ochre Brown trim, then the hat and shoes in grey black. I then went over the pants with a light wash. I basically have little clue if this is the best way to paint these, but I am happy with the result for my first time. Once the model was complete I cut away the base and slowly sanded away the remainder until the fleet were flat enough to be glued to the deck. Completed Model!!! My Second ship kit the Sphinx is 99% complete, the 1% left to do is rope coils but I probably won't get to those immediately as we are having a our first child, a little girl, at the end of April, plus I could use a change of subject from the Sphinx. Here are some photos of the 99% complete ship, I may try to setup a light booth to get some more professional looking photos as I think it deserves it after a year of work. I decided to only lash down the middle boat so I can display more of the gun deck if I wanted in the future. Overall I am very happy with my model, it turned out much better than I was expecting mainly due to Vanguard just making an excellent kit that goes together so smoothly, plus it really helps when you have excellent database of knowledge on this site and excellent build logs to copy from such as @Blue Ensign, @hollowneck, @Moonbug's Pegasus and numerous others which I have taken Ideas from. There are a few sore spots like the decorations above the Quarter galleys roof that I goofed up, but maybe one day I will have the means to make something to replace that parts. Thank you to everyone who helped and followed along the way. The Sphinx was a fantastic model kit and I highly recommend Vanguard models to anyone looking for a kit. My next kit will be to squeeze in the Speedy 2023 version before the Surprise kit releases, but I am undecided if there will be a build log or not with the baby coming, plus I'm not sure I can really offer much other Speedy log's haven't already covered.
-
Yes, this is the thread.
- 1 reply
-
- 1
-
-
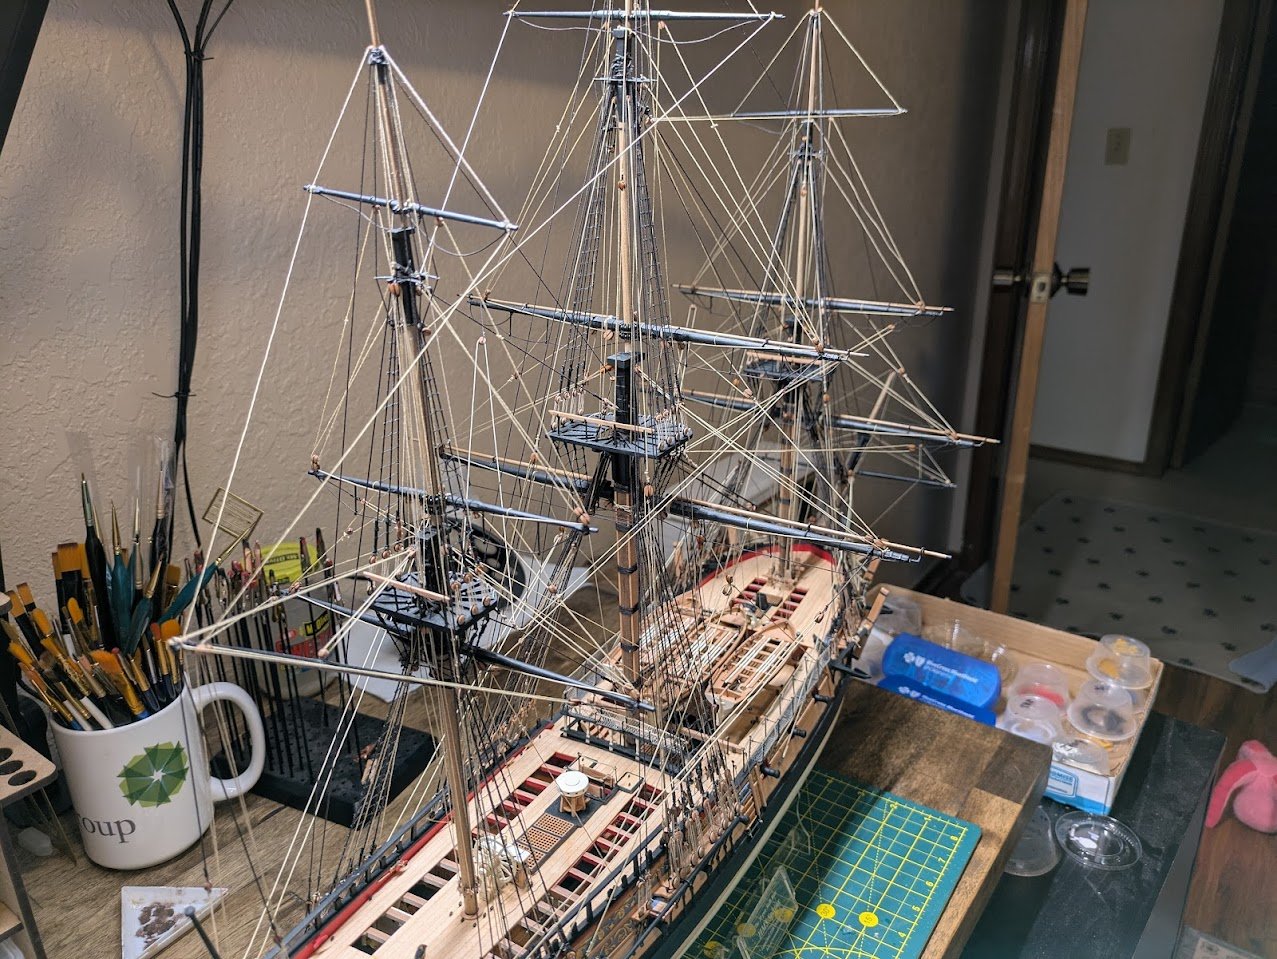
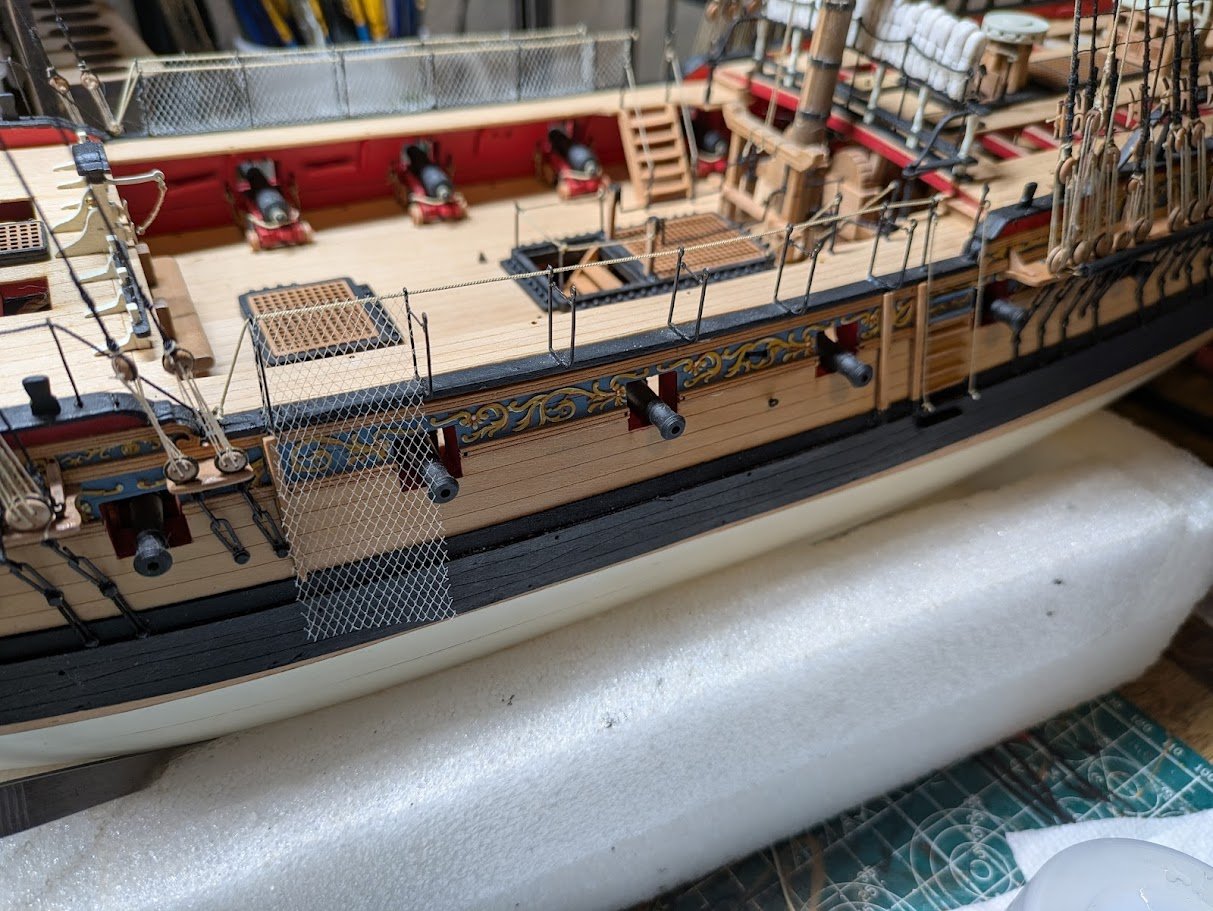
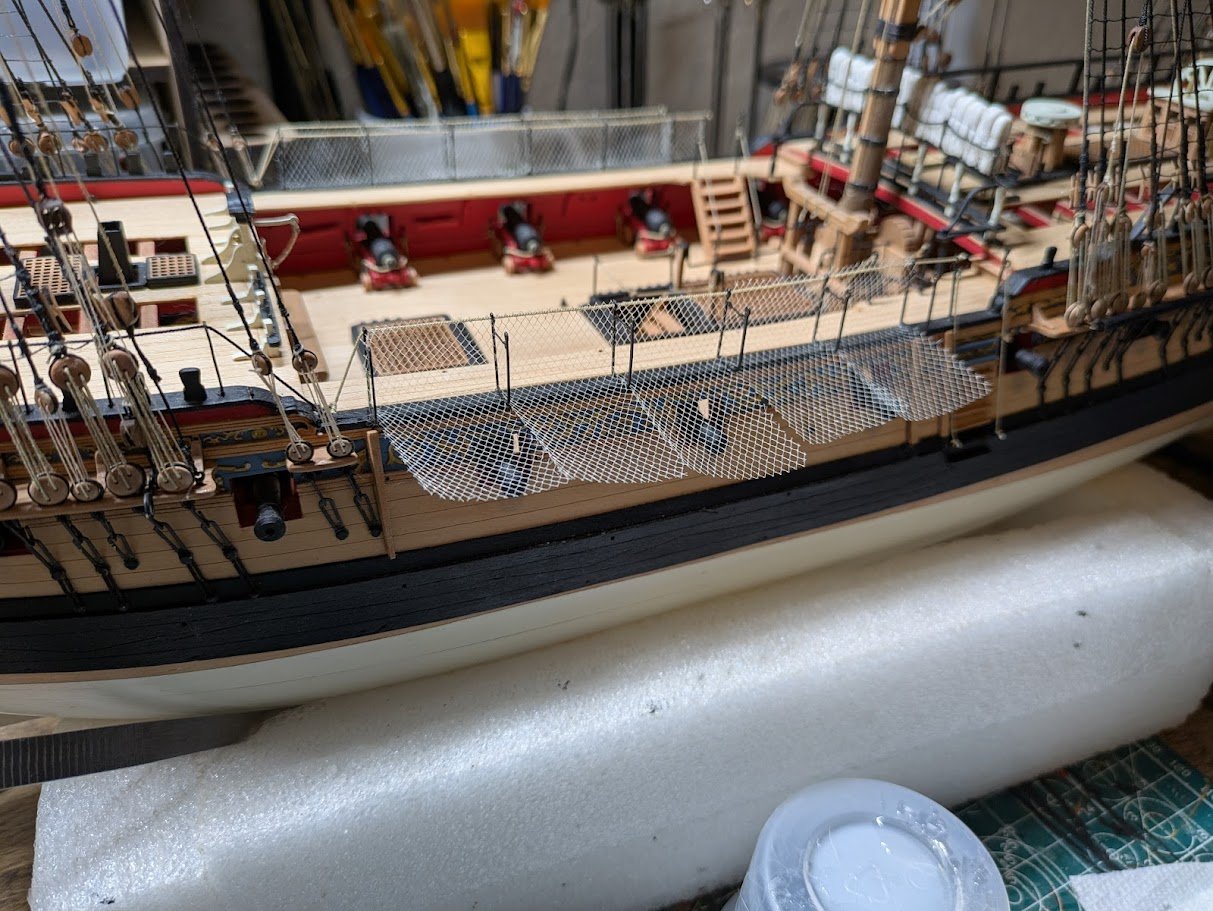
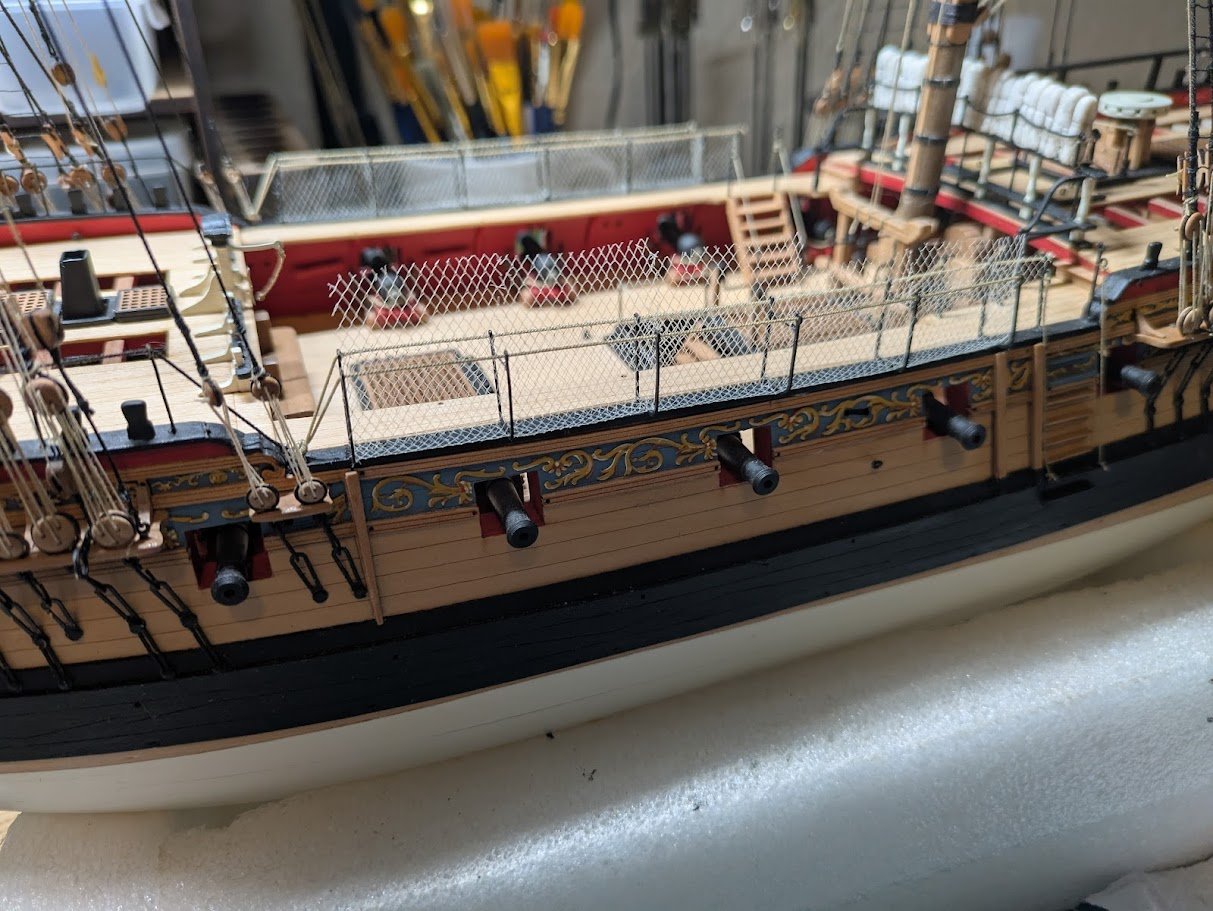
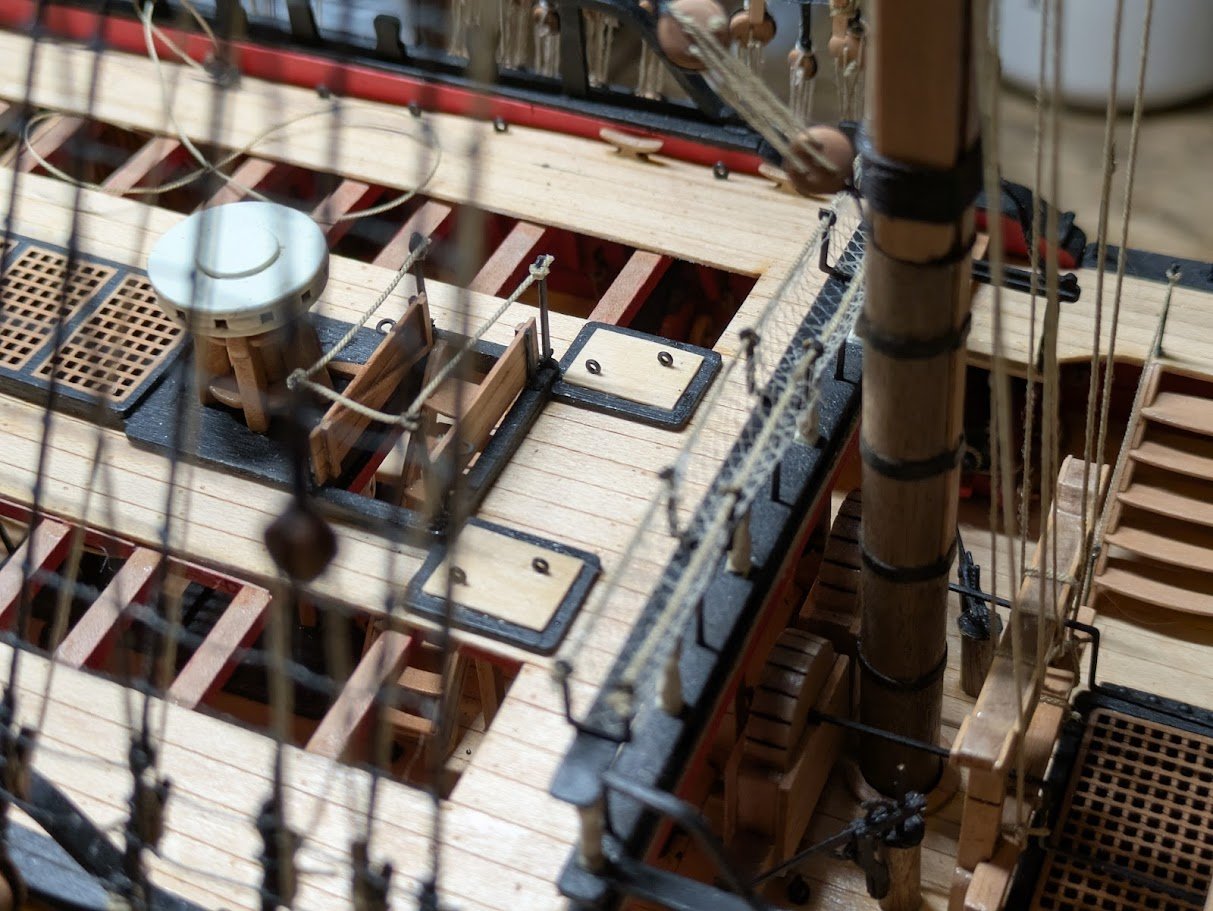
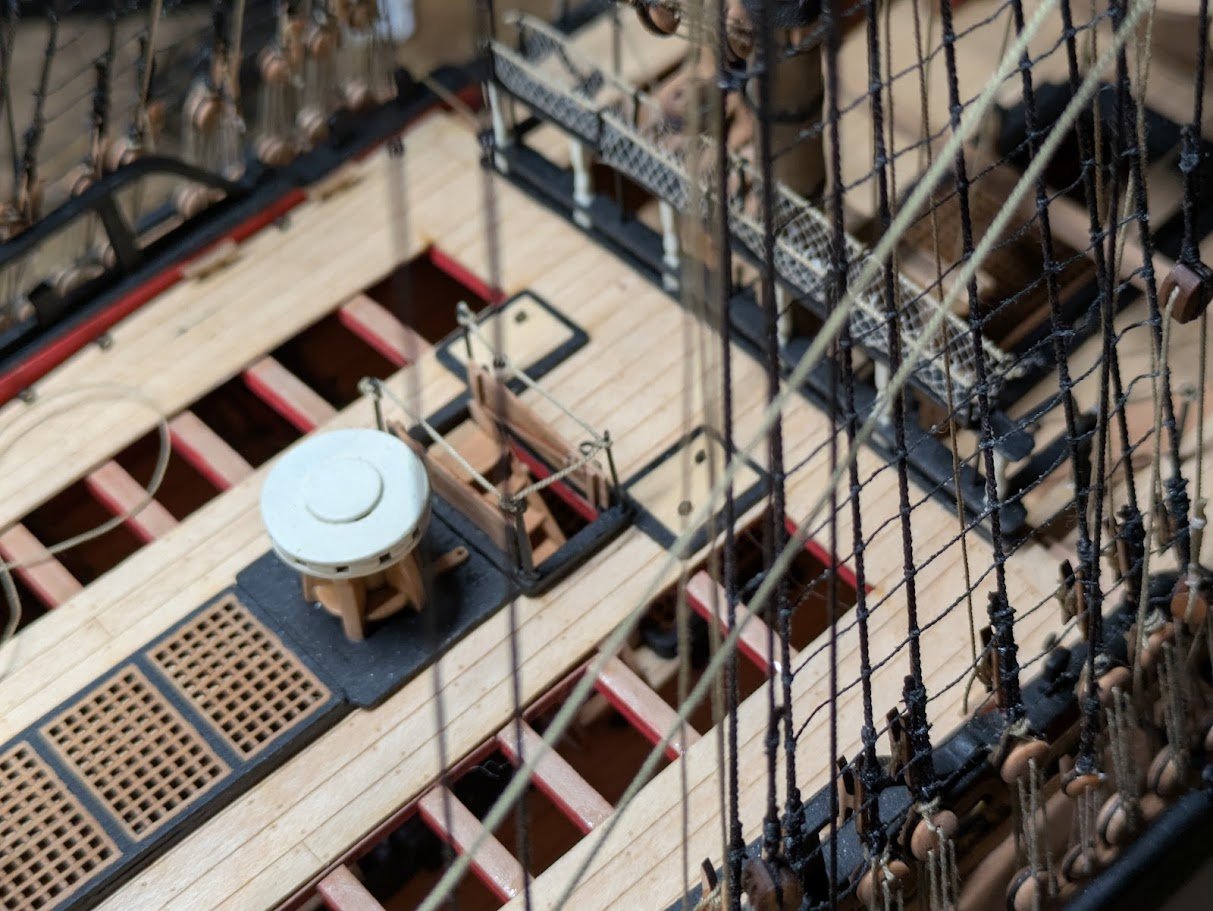
Small update, I have been working hard on the running rigging and should be able to complete the rigging by the end of the week. I took a few breaks in the rigging to check a few more tasks off of my build list. Quarter Deck Cable port lids - Not sure the correct term for these, they are the openings right in front of the Quarter deck companionway intended to run cables up to the capstan. The kit does not offer anything to cover these up, and I felt the openings just looked off, so I fashioned up a couple quick easy lids out of some spare wood. Nothing special but they satisfied the captain. Hammock Crane netting- I was at the point in the rigging where I needed to put the netting in the hammock cranes at the waist. I am using some tannish color toule for the netting. When I put the netting in on the Quarter deck rail, I used on piece length wise and it was super fiddely and frustrating to work with the netting just caught on everything. This time i followed what @hollowneck did on his Camilla, and cut the toule into smaller vertical strips, I found about 25mm wide is just about perfect. I start by attaching one end of the net to the inboard crane rope. I experimented with several types of glue, but CA glue ended up being the winner as I needed something that set really quick. I go down the line attaching all the pieces before moving to the next step. Once all the pieces are glued on the inboard rope I then brush Matt Acrylic (Vallejo) over the netting where it meets the deck, this will secure the bottom of the netting, this makes the netting hold place securely while I lift up the other end for gluing on the next step. Next I add the outboard rope to the hammock cranes, and then glue the other end of the netting to the outboard rope again using CA glue. Lastly I trim the tops of the netting with some cuticle clippers and the netting is finished. As you can see in my very top photos I also decided to redo the netting and remove the hammocks from the quarter deck hammock cranes. My initial plan was to outfit the Sphinx's hammock rails with hammocks, but after I finished the waist netting I experimented with hammocks and realized they almost completely blocked what little view of the gun deck I had visible underneath the ships boats. I slept on it, and the next day decided on going with no hammocks as I didn't want to hide the gundeck, I also decided to remove the QD hammocks and also redo the netting as I wasn't completely happy with my first attempt.
-
One of the first things I noticed, I really like the new design. Do you know what ships boats will come with the kit yet? Also do you plan on using photo etch or 3d print for the toasted cheese?


