
Supplies of the Ship Modeler's Handbook are running out. Get your copy NOW before they are gone! Click on photo to order.
×


marktiedens
-
Posts
1,737 -
Joined
-
Last visited
Reputation Activity
-

 marktiedens got a reaction from NMBROOK in Royal William by marktiedens - FINISHED - Euromodel - scale 1:72
A small update - decided I might as well mount the stern lanterns,so I made some side braces from some .8mm brass rod & glued them all in place. Next ,I cut & shaped all the stunsail yards. The stunsail irons were made from some brass & copper tubing & they were fitted on the stunsail yard with .8mm brass rod. I made caps for the end of the yard out of thin copper strip. They were attached at a 45 degree angle from the center of the yard I only have the fore topsail yard completed,so 3 more to go. The irons around the yard was made from black card stock.
Mark
-
marktiedens got a reaction from NMBROOK in Royal William by marktiedens - FINISHED - Euromodel - scale 1:72
Another update - the main mast was built identical to the fore mast,except larger. Hard to get a good picture of it since the height is about 770mm above deck level.
Mark
-
marktiedens got a reaction from NMBROOK in Royal William by marktiedens - FINISHED - Euromodel - scale 1:72
Update - after a lot of cutting,shaping,filing,& sanding the foremast has been assembled & painted.
Mark
For some reason,all the pictures are in reverse order.
-
marktiedens reacted to Mirabell61 in SS Kaiser Wilhelm der Grosse 1897 by Mirabell61 - FINISHED - scale 1:144 - POF - first German four stacker of the Norddeutscher Lloyd line
small update:
the upper brass profiles on the railing are carrying base for the mahagoni handrails (glue on with CA)
Nils
the U-type brass mini- profiles give stable strength to the fragile upper railing wire
like here on the aft ship railing
-
marktiedens got a reaction from NMBROOK in Royal William by marktiedens - FINISHED - Euromodel - scale 1:72
Well,after spending the better part of the day applying a wash to all those gold decorations,I think there is a real improvement to them. The first picture is before & the next three are after applying the wash. They actually look better in person than my cheapo camera shows.
Mark
-
-
marktiedens reacted to Blue Ensign in HMS Pegasus by Blue Ensign - FINISHED - Amati/Victory Models - 1:64 scale
Thank you Chuck, Nils, and Michael, and to all those who have re-visited the log and hit the 'like' button multiple times.
Scuppers
One of tidy up items to do is the Scuppers for the Manger.
I had much earlier in the build attended to the other six scuppers required along the hull and this is the last one.
These are 'false' scuppers in the sense that they are drilled from outside and do not connect to the scupper outlets in the waterway, a much too fraught exercise to consider.
The lead flanges are made from thin slivers of aluminium tubing bashed flat on my anvil and painted with a flat lead grey colour.
The run of seven scuppers along the hull.
With Pegasus out of her cover I took the opportunity to take some general shots.
I keep spotting things that require attention or that I have overlooked, I think this process could take a while.
B.E.
-
marktiedens reacted to Blue Ensign in HMS Pegasus by Blue Ensign - FINISHED - Amati/Victory Models - 1:64 scale
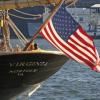
Hoisting the Ensign
This is a schematic of how I attach the Ensign to the Staff.
Incidentally this is Blue Ensign made for my Victory build, using the tissue/printing method.
I had made the Ensign and Jack Staffs some time back in the build.
The Ensign is raised.
The Jack before tweaking...............
.........and after.
Almost there folks, some tidying up now to do, and a base to make.
This post marks the seven day task of rebuilding this log, I think I've got it all in the correct order.
B.E.
11 March 2017.
-
 marktiedens got a reaction from Kevin in Royal William by marktiedens - FINISHED - Euromodel - scale 1:72
Well,after spending the better part of the day applying a wash to all those gold decorations,I think there is a real improvement to them. The first picture is before & the next three are after applying the wash. They actually look better in person than my cheapo camera shows.
Mark
-
 marktiedens got a reaction from reklein in Royal William by marktiedens - FINISHED - Euromodel - scale 1:72
Well,after spending the better part of the day applying a wash to all those gold decorations,I think there is a real improvement to them. The first picture is before & the next three are after applying the wash. They actually look better in person than my cheapo camera shows.
Mark
-
 marktiedens got a reaction from Jörgen in Royal William by marktiedens - FINISHED - Euromodel - scale 1:72
Well,after spending the better part of the day applying a wash to all those gold decorations,I think there is a real improvement to them. The first picture is before & the next three are after applying the wash. They actually look better in person than my cheapo camera shows.
Mark
-
marktiedens reacted to md1400cs in Wasa by md1400cs - FINISHED - Corel - 1:75
Hi mates,
Anton T, and costeo - You are so kind –thanks so much for your thoughts
=======================
Almost back-to-back updates, this one is small but there was a lot of needed learning. This small bit took almost four hours to figure out and execute. Hmmmm.
Decided, rather than removing the already attached Futtock shrouds (used Chuck’s .018s his .012s would have been too thin.
--------------------------------------
So did the following
1-2) unspooled the center futtock shroud at the stave. Wrapped it around the stave separating the three “threads, then re spooled them between the shroud to add a bit of glue at the joint.
3) removed the third ply from the shroud and attached one to each side of the shroud at the ratline.
4-5-6) did the same for the other two end shrouds also removing one strand. After wrapping around the shroud scale “looked” ok.
7-8-9) secured the mizzen backstay.
10-11) Now onto the lower mainmast shrouds, BUT the dilemma starts. Looked at the 1/1 for guidance, for the mizzen shrouds, then noticed the 1/10th where the work looked much neater then “finally saw” the difference. Hmmm?
12-13) went back to my picture bible (what I have been modeling so far. Then read/looked at Anderson – either way it seems is “ok”.
Certainly the 1/10th method would be so much less work, but having already done all the topmasts, the bowsprit area, and the mizzen on one side the Peterson way – I will probably need to continue with the extra work for all of the lower shrouds.
PS: I’m not even totally comfortable with the work that I have done tying off the ropes around the shrouds - so dilemma indeed. I assume that ALL “finishing off” as Anderson calls it should be the same for the entire ship?
PS: Part of the problem is that I used lines that are probably too large for this area. Though the museum 1/1 seems to use a “thick” rope. Again hmmm
As always thanks for your kind thoughts and visits,
Cheers,
-
marktiedens reacted to *Hans* in Need to improve square gun port cutouts
We can start a nice discussion about this - as a parallelogram shaped gun port where the turning axle of the hinges are not in the same line simply cannot be opened. Two hinges beside each other need the same axle line to function properly. And if you mount the hinges under a specific angle so there turning lines are the same then the form of the port gives trouble to open.
The vertical sides of a gun port were vertical - that's correct, but regarding the horizontal lines: the lower one could follow the deck (but this was surely not always the case), but the upper one was always under a 90º angle with the vertical sides. So a square gun port is very original.
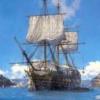
Attached a photo of the Vasa (Wasa) which is the excisting proof of how it was done (this is the original ship from 1628 - same time as the Batavia). Due to the back light the form of the gun ports is clearly visible.
-
marktiedens reacted to Keith_W in Royal William by marktiedens - FINISHED - Euromodel - scale 1:72
Greg, dry brush picks up raised areas, so it is used for highlights. Therefore it should be a light colour. Washes sink into recessed areas. They are for shadows, therefore it should be a dark colour. Personally I would mix some gold in with black and make a wash with that. I have found that a straight black wash onto a light coloured surface tends to leave water droplet marks as it dries.
-
 marktiedens got a reaction from Shipyard sid in Royal William by marktiedens - FINISHED - Euromodel - scale 1:72
I haven`t posted for a while - been planking. The first planking from the main deck down to the keel is now done & sanded. No filler was needed . I was careful to add small shims & file a little as I planked. next will be cutting out the gunports & adding the mounting blocks for the cannon barrels. I will probably not be adding guns to the ports that are blocked by the bulkheads.
Mark
-
marktiedens reacted to md1400cs in Wasa by md1400cs - FINISHED - Corel - 1:75
Mates.
More FYI
Also the very cold, blackish, very low levels of damaging ultraviolet light, and low salt content of the waters of the Baltic Sea within Stockholm Harbor minimized the amounts of sea life that would normally consume the ship.
Over the centuries the silt kept rising around and protectively covering the ship as well. And the heavily polluted 17th century water also prevented an infestation of wood-eating “shipworm” parasites.
Ironically enough the Vasa is today facing a potential “second death”. It is very slowly decaying inside the museum.
Copied/pasted:
In 2000, signs of deterioration sprang up on the ship’s surface. A new study published July 6 in Biomacromolecules shows that the ship’s wooden hull has significantly weakened, due to decay of the wood’s structural fibers. The Vasa wood is about 40 percent weaker than regular oak wood, and has become very acidic.
“We found a very clear connection between low pH, high degradation, and a large decrease in mechanical strength,” said study co-author Ingela Bjurhager, a mechanical engineer at Sweden’s University of Uppsala.
More copied/pasted:
In 2004, the museum upgraded its climate-control system to keep the relative humidity stable, as fluctuating humidity could lead to changes in the shape and weight of the ship. Efforts are also underway to replace the corroding steel bolts that were inserted in the ship during the 1960s with improved stainless steel ones.
The Vasa does not have an immediate risk of structural failure, the researchers concluded. Still, the ship deforms a few millimeters every year. Given the extent of the wood atrophy, “It’s sort of a little bit too late to do anything,” said Bjurhager, who is focusing instead on preventing further deformation. Her team is currently working on a computer model of the ship so they can design a new support structure.
-
marktiedens got a reaction from NMBROOK in Royal William by marktiedens - FINISHED - Euromodel - scale 1:72
Well,I decided I didn`t like them either,so I pulled them off & painted the panes black. A ship in port with no sails set would probably not have the lanterns lit anyway. The liquid glass I used never did dry right & looked a bit foggy.
Mark
-
 marktiedens got a reaction from piratepete007 in Royal William by marktiedens - FINISHED - Euromodel - scale 1:72
Keith - I am still tweaking things,so a black wash is not out of the question - it can be applied at any time.
Pete - my reason for using gloss black is that glass is very reflective. I may tone it down with a coat of clear semi-gloss to see how that looks.
Mark
-
 marktiedens got a reaction from zoly99sask in Royal William by marktiedens - FINISHED - Euromodel - scale 1:72
Well,I decided I didn`t like them either,so I pulled them off & painted the panes black. A ship in port with no sails set would probably not have the lanterns lit anyway. The liquid glass I used never did dry right & looked a bit foggy.
Mark
-
 marktiedens got a reaction from md1400cs in Royal William by marktiedens - FINISHED - Euromodel - scale 1:72
Keith - I am still tweaking things,so a black wash is not out of the question - it can be applied at any time.
Pete - my reason for using gloss black is that glass is very reflective. I may tone it down with a coat of clear semi-gloss to see how that looks.
Mark
-
 marktiedens got a reaction from VACorsair in Royal William by marktiedens - FINISHED - Euromodel - scale 1:72
Well,I decided I didn`t like them either,so I pulled them off & painted the panes black. A ship in port with no sails set would probably not have the lanterns lit anyway. The liquid glass I used never did dry right & looked a bit foggy.
Mark
-
marktiedens reacted to piratepete007 in Royal William by marktiedens - FINISHED - Euromodel - scale 1:72
Tried a black wash over the gold and it works a treat ! I have seen many lanterns with the glass areas painted blue to represent a reflection from the sky but they tend to look artificial. Mark, what you have done with the black creates a sense of depth into the lantern and I like it but suspect a matt black would be even better ?
Pete
-
marktiedens reacted to Keith_W in Royal William by marktiedens - FINISHED - Euromodel - scale 1:72
Mark, when it comes time for me to do my stern, I am planning to use a plastic modeller's trick and apply a thin black wash to the carvings. This creates an illusion of depth in modelling scales. Have you considered this?
-
 marktiedens got a reaction from coxswain in Royal William by marktiedens - FINISHED - Euromodel - scale 1:72
Well,I decided I didn`t like them either,so I pulled them off & painted the panes black. A ship in port with no sails set would probably not have the lanterns lit anyway. The liquid glass I used never did dry right & looked a bit foggy.
Mark
-
 marktiedens got a reaction from petervisser in Royal William by marktiedens - FINISHED - Euromodel - scale 1:72
Well,I decided I didn`t like them either,so I pulled them off & painted the panes black. A ship in port with no sails set would probably not have the lanterns lit anyway. The liquid glass I used never did dry right & looked a bit foggy.
Mark