
Supplies of the Ship Modeler's Handbook are running out. Get your copy NOW before they are gone! Click on photo to order.
×


marktiedens
-
Posts
1,737 -
Joined
-
Last visited
Reputation Activity
-
 marktiedens reacted to fmodajr in Wasa by fmodajr - FINISHED - Corel - 1:75
Hello!
I was able to finish up some more rigging between the foremast and mainmast.
Main topgallant sail bowlines
Main topsail bowlines
Main lower sail bowlines (middle of picture on far side of sail)
Fore topgallant yard braces
Fore top yard braces
Fore lower yard braces
Lines finding their way to the deck railings
Overview of work between the foremast and mainmast.
One thing I am having a lot of trouble with is in trying to minimize the distortion of the main stays
due to all the lines and blocks being attached to them.
My next step is to finish up the bowlines on all 3 foremast sails!
Thanks again for visiting and for all the "likes"
Frank
-
marktiedens reacted to Mirabell61 in HMS Pegasus 1776 by Mirabell61 - FINISHED - scale 1:64 - 16-gun sloop
Build log part 90
Hello fellow builders,
my last pics concerning the HMS Pegasus are from August 2015, now that the KWdG build is enjoying a break in the moment, I am sorting out where I`m standing with the "Swan Class" sloop. It is somewhere in the rigging, have to groove myself in again.
Meantime here some pics of the ship`s boat, which is now ready for taking on board, although it has set on some dust over the months (black areas)
Nils
-
marktiedens reacted to DenPink in HMS Revenge by Denis R - Victory Models (Amati) - Scale 1:64
Hi All
Looking at the kit again, the gratings are brass looking.
Sorry I did not like them that much, so ordered some new wooden ones.
I think they will look a lot better than the brass ones.
I did order them over size so will cut them back a bit to fit.
Denis.
-
marktiedens reacted to DenPink in Royal William by Denis R - Euromodel - Scale 1:72
Hi Mark
Wait till you do the second planking :) .
Denis.
-
 marktiedens got a reaction from DenPink in Royal William by Denis R - Euromodel - Scale 1:72
Looks great so far - I`m still working on the first planking,which is also taking a long time.
Mark
-
marktiedens reacted to Mirabell61 in SS Kaiser Wilhelm der Grosse 1897 by Mirabell61 - FINISHED - scale 1:144 - POF - first German four stacker of the Norddeutscher Lloyd line
Update on stern decoration....
Thats about what I can do (decoration), it`s also getting too fiddely now, more would be too much...
Early next week the stb-side can be done
Nils
the twisted wire chord left / right are fastened each with 7 pinpoints
-
 marktiedens got a reaction from mtaylor in Royal William by Denis R - Euromodel - Scale 1:72
Looks great so far - I`m still working on the first planking,which is also taking a long time.
Mark
-
 marktiedens got a reaction from medic in Royal William by marktiedens - FINISHED - Euromodel - scale 1:72
A little update - before starting on the planking I thought it would be a good time to make the hole for the bowsprit. Planked down from the main deck to just below the lower gun deck. After triple checking the gun port positions vertically & horizontally I drilled pilot holes for marking & cutting the gun ports out, I am trying to decide whether to cut out the gun ports now or finish planking down to the keel & sand the hull first. I`m thinking it may be easier to plank the lower part of the hull first so I don`t snag the sandpaper on all the holes.
Mark
-
marktiedens reacted to skipper1947 in Poor instructions?
Sometimes the drawings are not any good either.
I struggled with one where most parts supplied were larger than the dimensions listed on the plan (or too large for the hull), one sheet of the plans did not agree with a second sheet, the rigging in the photos did not agree with the rigging on the rigging sheet, and the keel supplied in the kit was not designed the same as that shown in the instructions. I think that about covers the issues, it has been a while..
Skip
-
marktiedens reacted to JanV in Wasa 1628 by JanV - Corel - scale 1:75 - Vasa
Noted that I missed some latest postings.
I expect to continue during the X-mas holiday period (14 days off from work )
in the meantime a smal project in between
the Golden Yacht, a ship in a bottle
-
marktiedens reacted to DenPink in Royal William by Denis R - Euromodel - Scale 1:72
Hi all
Sorry I have not posted for some time but I have been working on the second planking.
I have got to say it is taking a very long time and only 1/3rd done.
I thought I would give part of it a bit of a sand to see what it will look like.
Denis.
-
marktiedens reacted to Mirabell61 in SS Kaiser Wilhelm der Grosse 1897 by Mirabell61 - FINISHED - scale 1:144 - POF - first German four stacker of the Norddeutscher Lloyd line
Good morning Denis,
I saw that you took quite an extensive look into the build when catching up, and thanks for all the likes. After putting on the Stern decoration I`ll make a break though, so that my HMS Pegasus may be completed first. Stern name and depth-markings are on, but the golden colored decorations and the home-port`s name (Bremen) are still to be fitted, here some impressions of the "dry-dock" views.... I`m so pleased with the experience with the borderline (Black / red) painting, after Dirk`s suggestion, and in combination with masking, that I can only recommend this further on to fellow modelers
Nils
depth markings
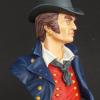
relation, figurine in scale 1:144
aft name in 3mm high etched brass letters
-
marktiedens reacted to fmodajr in Wasa by fmodajr - FINISHED - Corel - 1:75
Continuing to make some progress on the model!
I finished up all the standing rigging by installing the lines from the bowsprit to the lower foremast stay.
That should do it for the standing rigging.
I also finished working on and installing the last sail. The lower spritsail.
As with all the other furled sails, I took off 1/3 of the sail height in order to make the furling easier. Then I attached the sail to the yard.
I liked the way this furled sail turned out. (Better than the topsail!)
Pre-rigging of blocks and lines to back and front
I fixed the sail to the bowsprit and finished most of the rigging.
I left some of the rigging dangling until I rig the bowlines from the foresails. (It will be easier getting the bowlines in place before the rest of the lines are installed)
Overview of the model at its current state
Next, I will go back to finishing the rigging lines from the foresails and the bowlines from the main sails. (Basically, work on the lines between the foremast and mainmast)
Frank
-
marktiedens reacted to Jeronimo in THE 74-GUN SHIP by Jeronimo
Hello friends,
many thanks to all for your kind comments and Likes.
Built gun ports and jamb walls.
Karl
T e i l 6
-
 marktiedens got a reaction from ken thomson in Micro Drills, Revisited.
The best small drill bits I have found are made by Walthers. Sizes are always spot on.& they are nice & sharp. My local hobby shop carries them. They are not that expensive either - about $3.00 for a package of 2 bits.
Mark
-
marktiedens reacted to md1400cs in Wasa by md1400cs - FINISHED - Corel - 1:75
Hi mates,
Thanks for dropping in. Mark thanks as well for your supper compliment SO appreciated. Yes four more (bowsprit done) Hmmm
Though the next ones should be easier. Learned a few things with this lower foremast plate, as well as having a grasp on how to fashion the needed parts.
-------------------------
Continuing, I started to fashion the deadeye “chains” using 20 gauge black wire (pic 1) not correct, but such a small almost hidden detail once the plate gets busy with ropes everywhere.
I then realized that the lower ring braces were extending outward too far (see pic 2, 3, 4) and the chain would not hang properly outside of the lower already attached ring
So removed the ring and Dremeled down the braces (see pic 5)
--------------------------
I then took some leftover bits that I had purchased to use as chains for the hull, but then decided against it. So those bits will now become (after blackening them) the way to attach deadeye/chains to the ropes below the mast cap. See pic 6.
The last three pics show the “fix” my favorite word with this very very slow build. (:-)
So, the next caps will have a bit larger flat ring and or cap floor will be a bit smaller.
Thanks for still following along at this snails pace,
Regards,
Michael
-
 marktiedens got a reaction from GuntherMT in Armed Virginia Sloop by GuntherMT - FINISHED - Model Shipways - scale 1:48
Outstanding work!
Mark
-
 marktiedens got a reaction from Canute in Armed Virginia Sloop by GuntherMT - FINISHED - Model Shipways - scale 1:48
Outstanding work!
Mark
-
 marktiedens got a reaction from GLakie in Armed Virginia Sloop by GuntherMT - FINISHED - Model Shipways - scale 1:48
Outstanding work!
Mark
-
marktiedens reacted to GuntherMT in Armed Virginia Sloop by GuntherMT - FINISHED - Model Shipways - scale 1:48
The day has come. I spent a lot of time messing with the anchors, but I simply couldn't find a position where they looked decent to me when lashed to the timberheads, so I chose to display them hanging from the catheads. I then spent far more time than I probably should have messing with the anchor buoys, and in the end was just unhappy with how they looked when properly attached to the anchors, so I decided to display the ship without them. I may make a couple of rope coils and place them on the empty timberheads where the buoys would be hung and belayed, but other than that, and some inspection and touch-up painting/matting, the Serenity is done.
I need to re-do my lighting arrangement (which means rearranging the room I take these in) as I'm not real happy with the way these photo's turned out (from a lighting perspective), so I will probably do a full 'finished' photo-shoot sometime later this week.
Image dump (bigger than usual - 1600x on the long side)...
-
marktiedens reacted to mar3kl in Vasa by mar3kl - Billing Boats - scale 1:75
And finally the mizzen stay. Here is a closeup of the collar and deadeyes. I fabricated a six-hole lower deadeye to match the upper one because at the time Fred hadn't responded with his information about how to correctly route the lanyards to a four-hole lower deadeye.
One thing to be careful of here - the collar needs to have a bit of length on it because if the deadeye is too close to the mainmast, the yard lift tackle will foul on it. I'm hoping the tackle falls will be able to run on each side of the collar without too much trouble.
And the stay in place.
Now it's time to start the ratlines. I suspect that until clove hitches get wired into my brain this will be slow going, so likely no updates for a while. I'm using Syren 0.3mm diameter rope, which scales out to a bit under one inch in diameter. I thought about thinner diameter rope but I'm concerned that it will be so light that getting it to hang properly will be difficult.
-
 marktiedens got a reaction from canoe21 in Royal William by marktiedens - FINISHED - Euromodel - scale 1:72
A little update - before starting on the planking I thought it would be a good time to make the hole for the bowsprit. Planked down from the main deck to just below the lower gun deck. After triple checking the gun port positions vertically & horizontally I drilled pilot holes for marking & cutting the gun ports out, I am trying to decide whether to cut out the gun ports now or finish planking down to the keel & sand the hull first. I`m thinking it may be easier to plank the lower part of the hull first so I don`t snag the sandpaper on all the holes.
Mark
-
 marktiedens got a reaction from avsjerome2003 in Royal William by marktiedens - FINISHED - Euromodel - scale 1:72
A little update - before starting on the planking I thought it would be a good time to make the hole for the bowsprit. Planked down from the main deck to just below the lower gun deck. After triple checking the gun port positions vertically & horizontally I drilled pilot holes for marking & cutting the gun ports out, I am trying to decide whether to cut out the gun ports now or finish planking down to the keel & sand the hull first. I`m thinking it may be easier to plank the lower part of the hull first so I don`t snag the sandpaper on all the holes.
Mark
-
 marktiedens got a reaction from NMBROOK in Royal William by marktiedens - FINISHED - Euromodel - scale 1:72
A little update - before starting on the planking I thought it would be a good time to make the hole for the bowsprit. Planked down from the main deck to just below the lower gun deck. After triple checking the gun port positions vertically & horizontally I drilled pilot holes for marking & cutting the gun ports out, I am trying to decide whether to cut out the gun ports now or finish planking down to the keel & sand the hull first. I`m thinking it may be easier to plank the lower part of the hull first so I don`t snag the sandpaper on all the holes.
Mark
-
 marktiedens got a reaction from maggsl_01 in Royal William by marktiedens - FINISHED - Euromodel - scale 1:72
A little update - before starting on the planking I thought it would be a good time to make the hole for the bowsprit. Planked down from the main deck to just below the lower gun deck. After triple checking the gun port positions vertically & horizontally I drilled pilot holes for marking & cutting the gun ports out, I am trying to decide whether to cut out the gun ports now or finish planking down to the keel & sand the hull first. I`m thinking it may be easier to plank the lower part of the hull first so I don`t snag the sandpaper on all the holes.
Mark