HOLIDAY DONATION DRIVE - SUPPORT MSW - DO YOUR PART TO KEEP THIS GREAT FORUM GOING! (Only 20 donations so far - C'mon guys!)
×


Scottish Guy
-
Posts
382 -
Joined
-
Last visited
Content Type
Profiles
Forums
Gallery
Events
Everything posted by Scottish Guy
-
 Really nice work and very accurate. Love it and gives me the vibes to one day do a Constellation as well, is a really nice ship, I just don´t like cannons, I prefer merchant ships (like the Cutty Sark). Looking forward to the rest of your build. Micha
 -
Use of “other power tools”
Scottish Guy replied to kgstakes's topic in Modeling tools and Workshop Equipment
What are the dimensions of the blade? Does it have issues with curves or can you only do straight lines and 90 degree corners? Would be an interesting device if it can do curves as well. When it only can do 90 degree angles and straight lines it wouldn´t be any use for me at least. Unfortunately my wife would kill me to by a laser cutter right now (the second 3D printer took already really hard work to convince her) but the Cricut is much cheaper than a laser cutter and therefore more considerable atm. Micha -
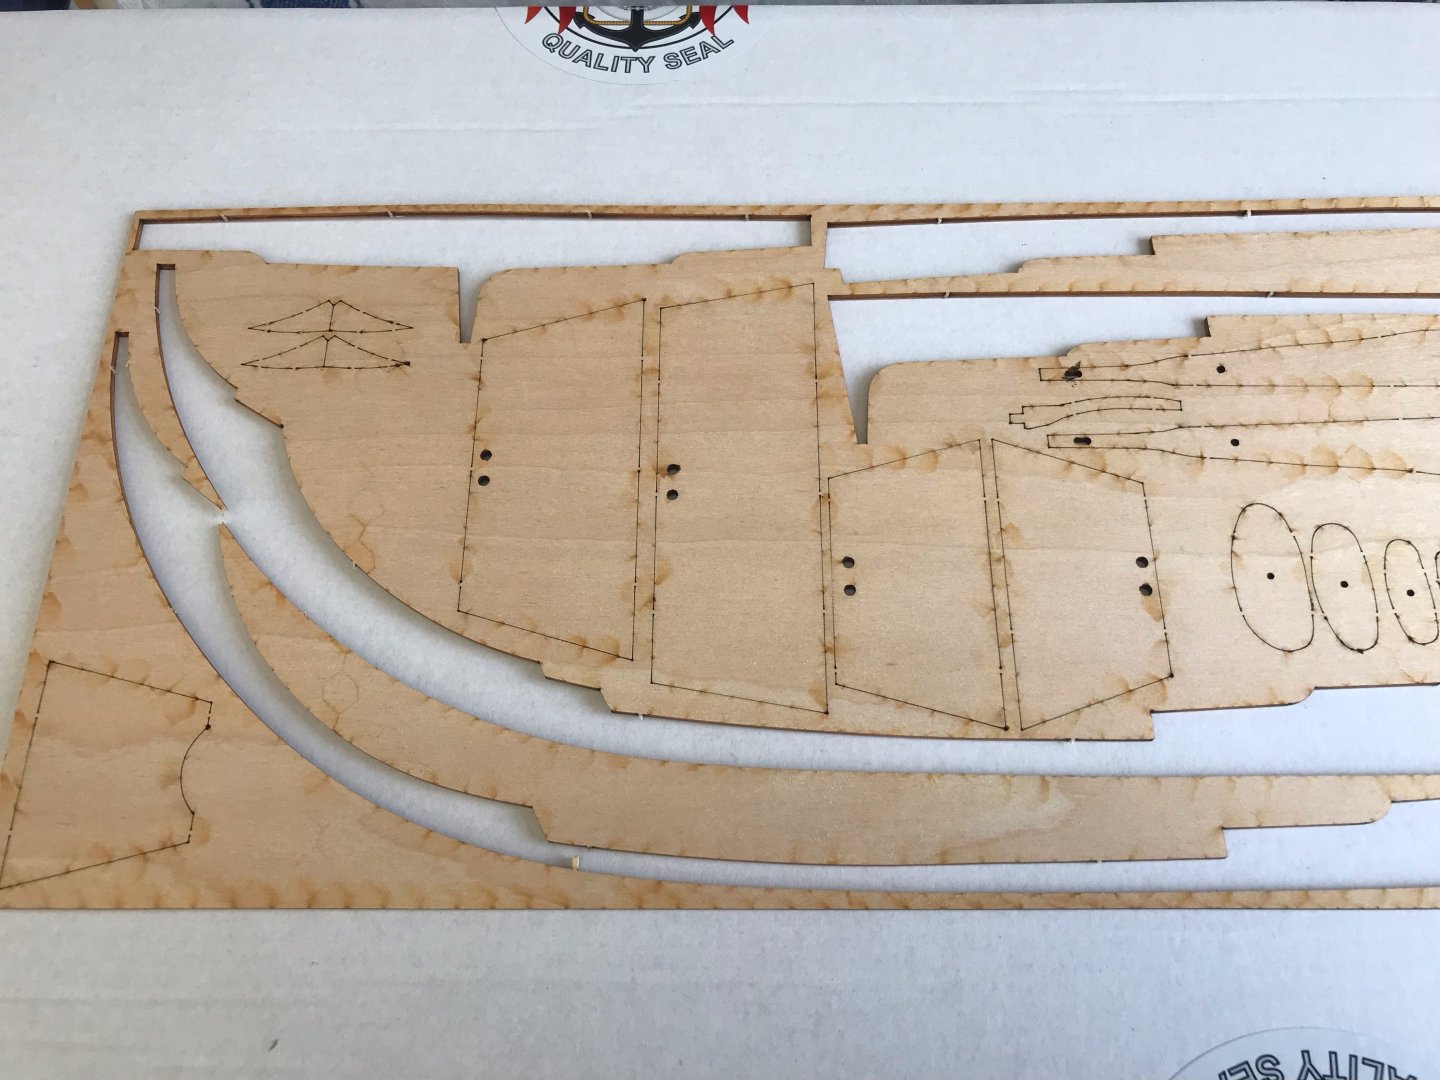
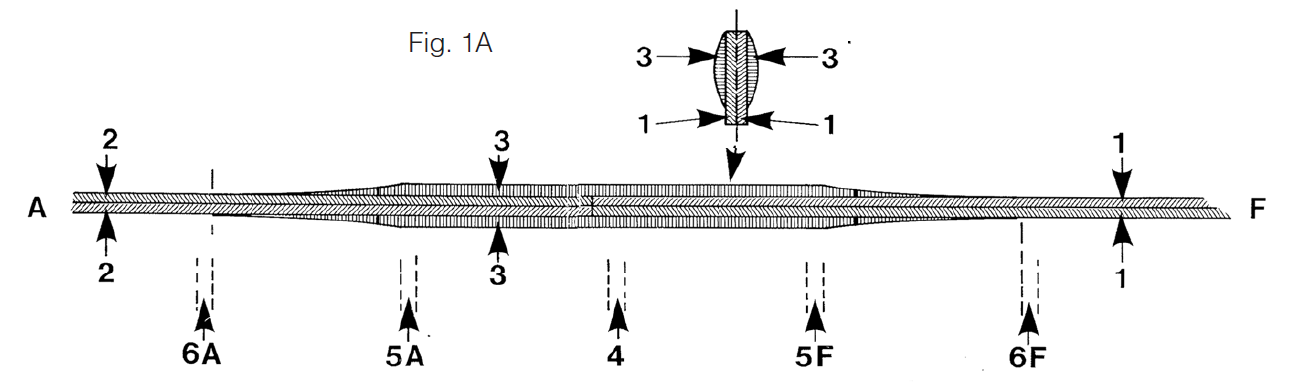
Is it just me or are some of the instructions / plans are just more than crap? Taking in account that I noticed in the poll that Billing Boats is quiet... let me be blunt... rubbish about material quality but also about the quality of their instructions. If the instruction lacks of some steps (not everyone was born a master) that is one thing, but when putting step 2 before step 1 and you start doing it the wrong way around... especially after the flimsy parts broke by trying to get them out of the stencils / sheets, then it becomes frustrating. Like I stated in my LOG already, I accepted the challenge but it comes to a point that you think, give me proper blueprints / plans and I build the Skuldelev from scratch, might be easier than the so praised "beginner friendly" Billing Boats kit. Not having a rant here but when the instructions make out you have to glue all parts of the keel together (after one of the parts just broke because it got stuck in the flimsy and woobly sheet) and then, in the next step just tells you to cut out the picture 1 and 1a to glue them onto a building board to glue each side of the keel (I was wondering why they use four parts to create ONE keel) and then stick on the bulkheads on each side. Unfortunately when they are all glued together (what the figure 1 makes out) it`s much harder to stick the bulkheads on (also separated in two parts - one for each side). Now I´m in the dilemma that my keel is completely glued (already to support the broken part) and then it tells me to cut out the figures 1 and 1a to glue them onto the buiding board? I´m really coming to the point to remake the four pieces (or even only one keel) and build a jig to place the bulkheads. Sorry, rant over... but for what they deliver I think Billing Boats are way to expensive, just my humble opinion and they are definitely NOT beginners friendly. Micha
-
* Chapter Two * The New Beginning A wee update, the 6 mm plywood sheet just arrived and the MDF board for the plan to pin down is ready to go. So I will start today with building the frame (pictures will follow) but also remake the keel from the new 2x1 ft plywood sheet. Will show the progress here as well, maybe even start a wee YouTube Channel to show the progress there as video as well. If someone knows a source where to get accurate blueprints for the Skuldelev 3 / viking knarr ships I would really appreciate that hint. The Roar Ege plans are not that accurate and correct like the origin would have been built. I did read alot about the Skuldelev ships, also how they were built but not really accurate plans which I could use as a pattern to cut all my parts from scratch. Have to keep an eye on the garden as well since we get a wee stormy night here... Micha

- 146 replies
-
- 2
-

-
- Roar Ege
- Billing Boats
- (and 2 more)
-
Sounds like a plan Johnny, unfortunately I don´t have any walnut veneer in stock, just walnut boards (12 mm) and sheets (3 mm) as some cherrytree boards (12 mm / 18 mm) and sheets (3 mm / 6 mm). But yeah, I will try to remake the parts and try to fit them, when everything works out fine I might remake a second version of the cherry. I´m even considering if I not try to rebuild a Skuldelev from scratch, more likely to the original ship since the Billing models are not 1:1 copies of the origin, more a bit modified so it`s "easier" and fits more the budget... unfortunately I can´t find proper blueprints that give some specific measurements for the parts, I have a list of the materials used for the original ships / later rebuilds, was even considering to use the original woods for the parts (like oak for the keel and frame etc.) and pine for the mast. Micha
- 146 replies
-
- 1
-
-
- Roar Ege
- Billing Boats
- (and 2 more)
-
Hi Keith, was a no brainer after checking out the NRG homepage and some of the great ideas, messages and thoughts I got here form the forum already. I think it´s a place to make some new friends and fellows to step further down the road of scale models. So it´s worth supporting it for sure... Micha
-
I know it´s a wee bit late but I think they never fitted them in Greenwich because they know she never again will have salt water under the keel... hope you guys get the meaning of it. There is no need for such "safety" measures anymore since she never will see rough seas, therefore no one ever will go overboard. I followed these LOG now for a while and soak in all the informations since I love the Cutty Sark and will build my own one day (when more experienced - right now I challenge my Roar Ege / Skuldelev) but what I noticed is all these conversations about what is accurate and what not. When you read the logs about the Cutty Sark you notice that many things have changed over the time she was in use and under different ownerships. Therefore when WE build "our" Cutty Sark we only can represent the Cutty Sark of one of the eras not all of them (which definitely wouldn´t be accurate). Therefore I would suggest to state the era / timeslot used for the build. But that`s just my humble opinion on it... Micha
- 399 replies
-
- 1
-
-
- cutty sark
- revell
- (and 2 more)
-
That´s ok @Richard Dunn, we all have a life and that often sucks the life or energy out of us and much more often it has priorities that are more important than others. So don´t apologise for your life, it keeps you going. Looking forward to see the progress. I sent you a pm about the project. Micha
-
Thank you for your confidence about my building skills ^^, but I agree, I hope it will turn out well. For accepting the challenge, yes I do accept the challenge, it´s just confusing to realise that folks advised me Billing models as "beginner friendly". I don´t think that this flimsy and woobly laser cut sheets are beginner friendly. The parts get stuck way to easy and brake by getting them off the sheets. Also I don´t understand why they do the two layer stuff? Why not use one piece for the keel, maybe two (one for the stem and one for the stern) but four pieces (two identical in a layer) just to support those with two additional parts on each side... but might be the keeping it cheap ideology, 3 mm plywood sheets are cheaper than a 6 mm sheet. But yeah, I´m looking forward to it... Micha
- 146 replies
-
- 4
-
-
- Roar Ege
- Billing Boats
- (and 2 more)
-
Thank you Johnny, somehow you are right, I just should post both builds in here. Also might be easier than dealing with two different postsings and LOGs. Micha
- 146 replies
-
- 2
-
-
- Roar Ege
- Billing Boats
- (and 2 more)
-
Was a bit surprised about that mself @ccoyle but we have to accept it. I hope Richard gets some pictures out and I´m still interested in it, even in the 1:40 scale (have to empty my garage for it somehow) but I would really love it. Micha
-
* Chapter Two * Change of Plans Since reading through the forum while waiting for some materials I also found the poll about manufacturers and their material and plans etc. I couldn´t forbear that Billing Boats (which have been advised to me as beginners stuff) gets a huge slap into the face. There used materials as also the plans itself are not of the best quality at all. Unfortunately I have to admit that this is correct. Tbh it`s not a slap into the face, it`s more likely a smash with a fence post into the face. The flimsy sheets to cut out, the unsual double layer frame for the keel (why not use a 6 mm playwood sheet from the beginning instead of 2 layers of 3 mm each), the often not easy to read / understand instruction "leaflet" (to call it instructions or manual would be extravagant at its best). Therefore I came to the conclusion that I will do some tweaks to my build. I did my research on the knarr models (like the Skuldeleve 3 - which is the origin of the Roar Ege). My conlusion lead me to the thoughts to do "two" models of it. I use 3 mm and 6 mm plywood for the remodelling (using the original shapes as stencil) to do new parts. I also will try it with thin sheets of cherry (I have quiet a lot of cherry wood here). I know this will make the build taking much longer but the outcome might be much nicer. I also will try to get hold of blueprints of the knarr / Skuldelev 3 to build it more accurate and authentic. Beside this I will still build the Billing model so I will have somehow two models when I´m done. Not sure if I will / should open a new LOG for the new build, we will see how it goes. I will here definietely finish the Billing build. Thank you all for following me on this funny journey but some folks told me, it can be frustrating to have a "failure" when starting with model building, but my inner me just is not frustrated but accepts the challenge. Micha
- 146 replies
-
- 3
-
-
- Roar Ege
- Billing Boats
- (and 2 more)
-
Thank you RIchard, this is already two voices for the use of the "misalignment" pieces. Will give it a go, will sand it down and do a dry fit, if it`s acceptable I just will use it. If it comes to become unacceptable I will cut out a new one, the 2x1ft sheet of 6 mm plywood is comeing anyway. I thought it would be advisable for every glue but I understand that it isn´t especially not when there is a danger of misaligning them by doing so. Unfortunately I have to accept that I caused the misalignment by doing so and because of the wrap I couldn´t even see it or I could have corrected it before the drama happened. Micha
- 146 replies
-
- 2
-
-
- Roar Ege
- Billing Boats
- (and 2 more)
-
I agree to that Phil, some of the answers here helped me a lot already. ALso gave me a lot of inspiration and ideas to solve some of my issues. And yes, it`s always nice to meet folks from around the world Micha
-
cheers for that
-
It would be more helpful if the poll (or the results of it) would be visible on top of the thread? Unfortunately I can´t see any results of this poll...
-
🖖Welcome John to the Model Ship World from the bonny wee Scotland Micha
-
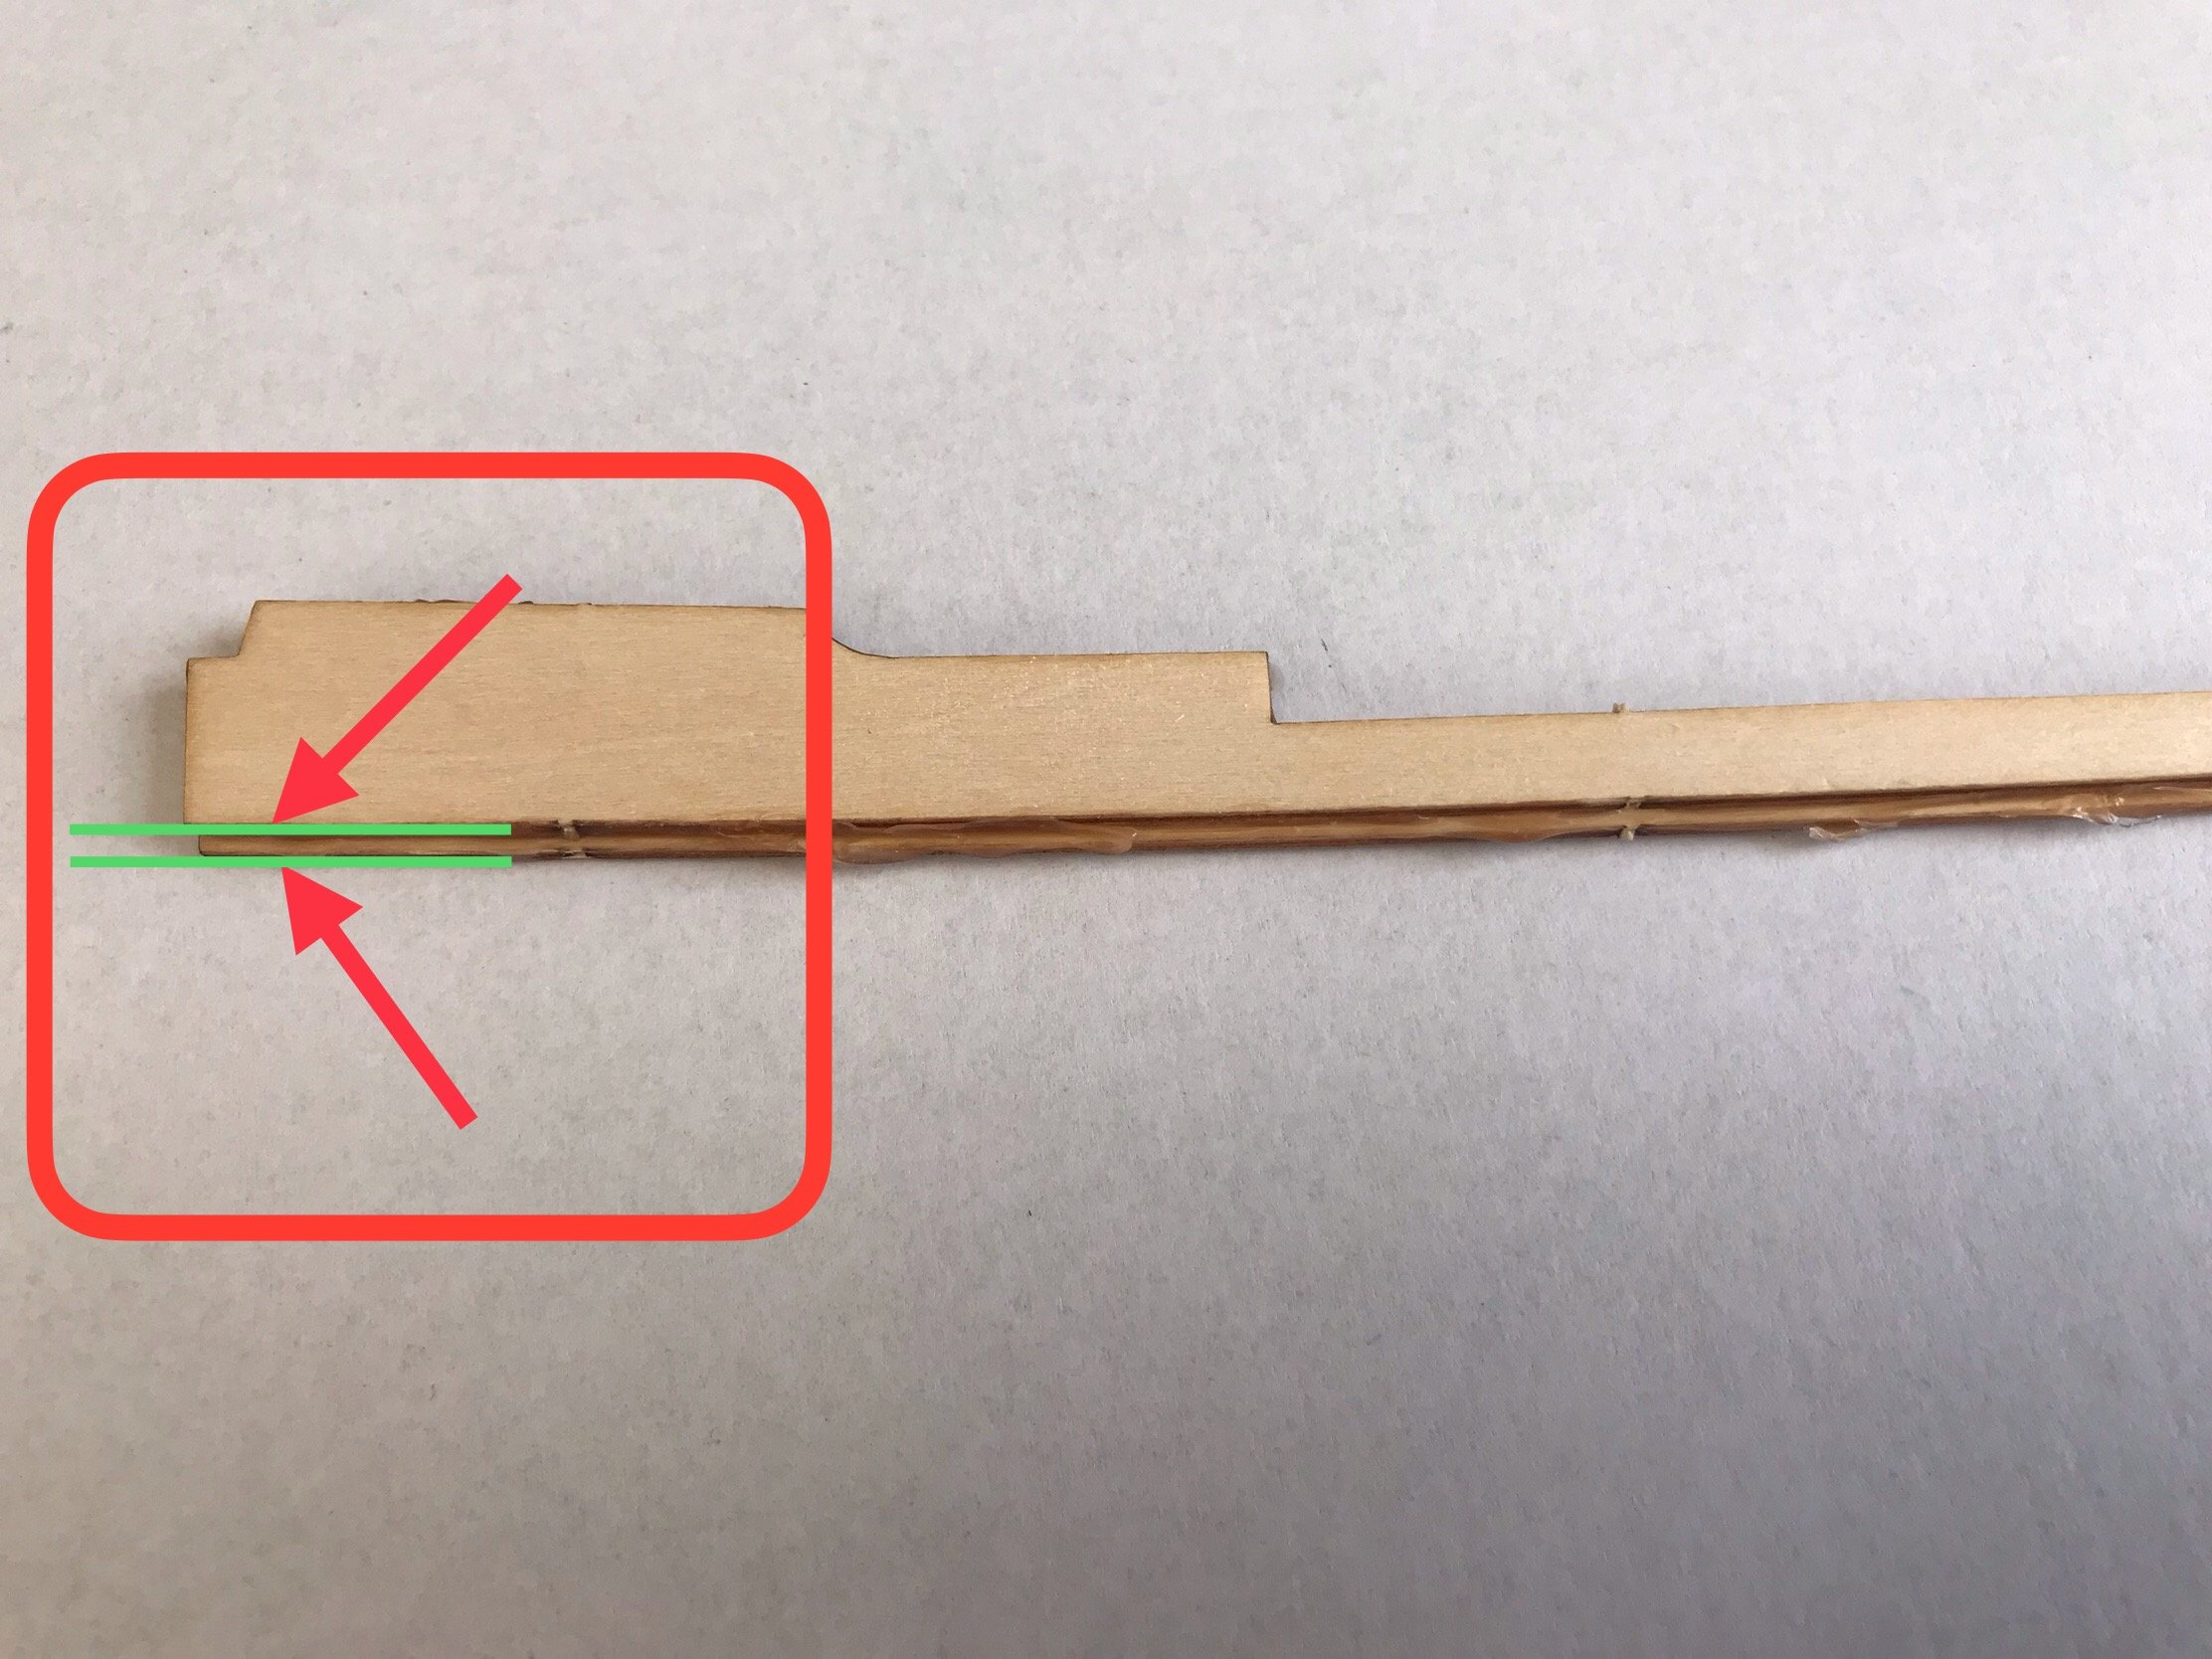
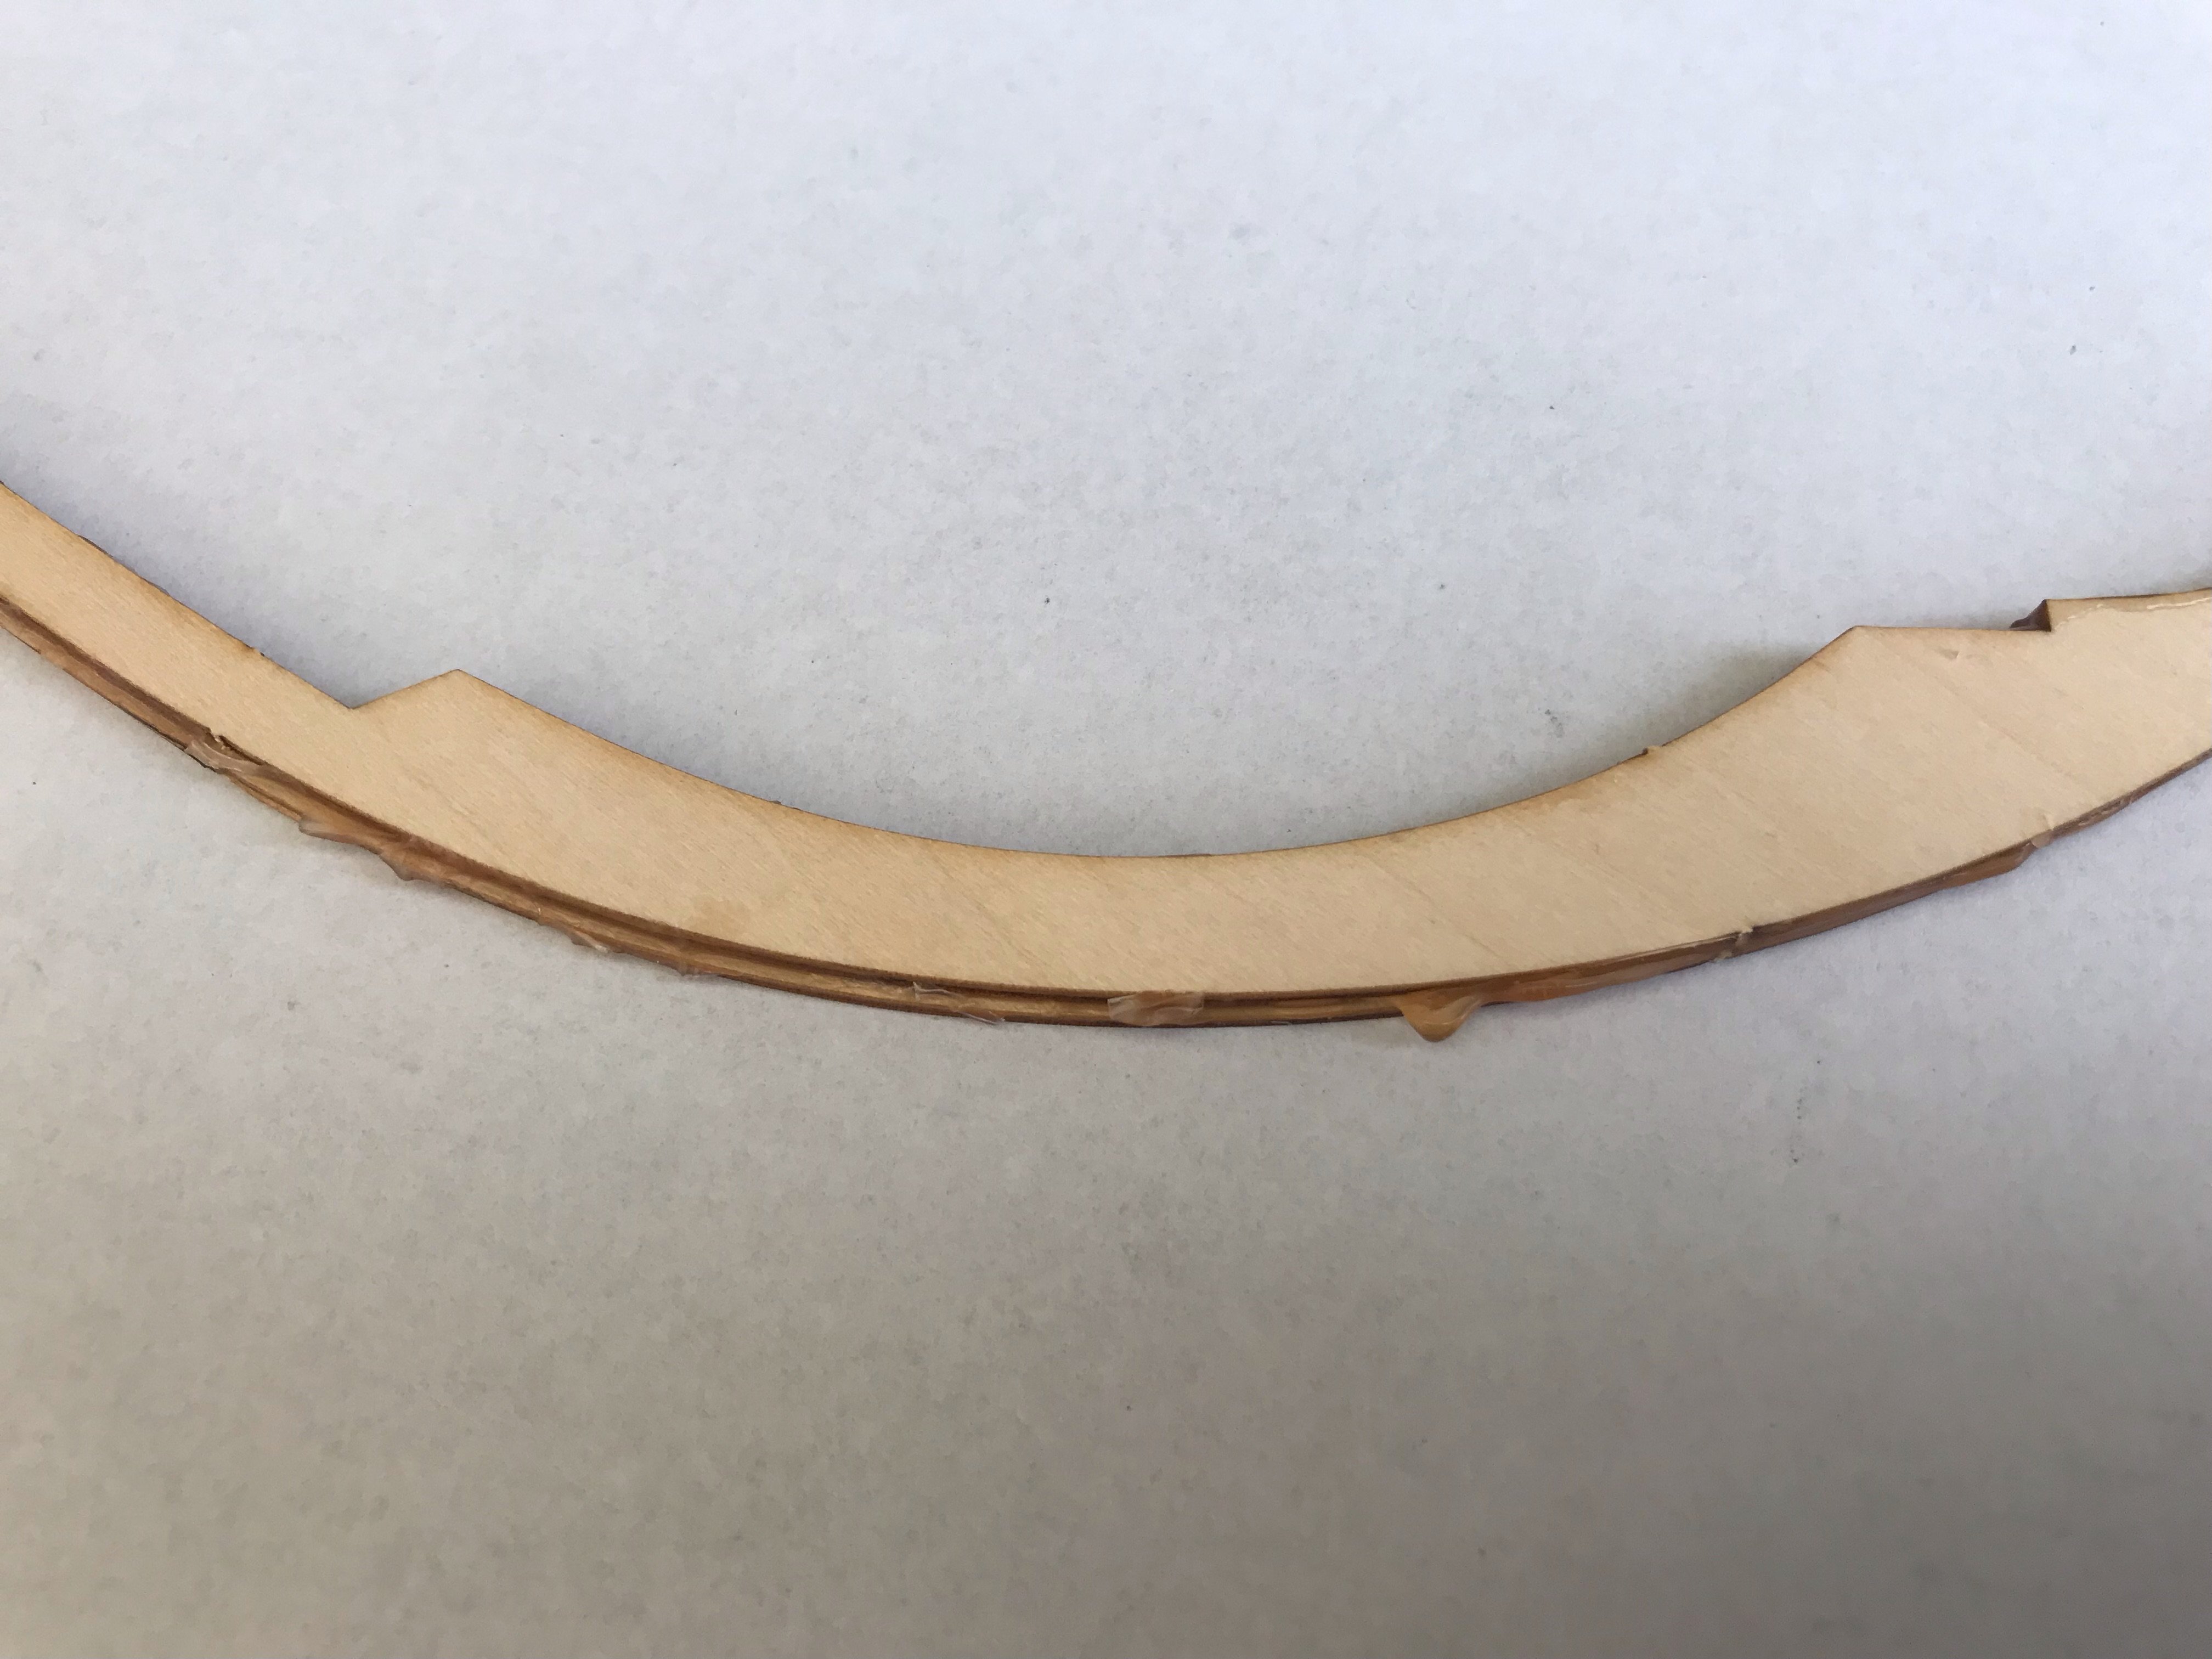
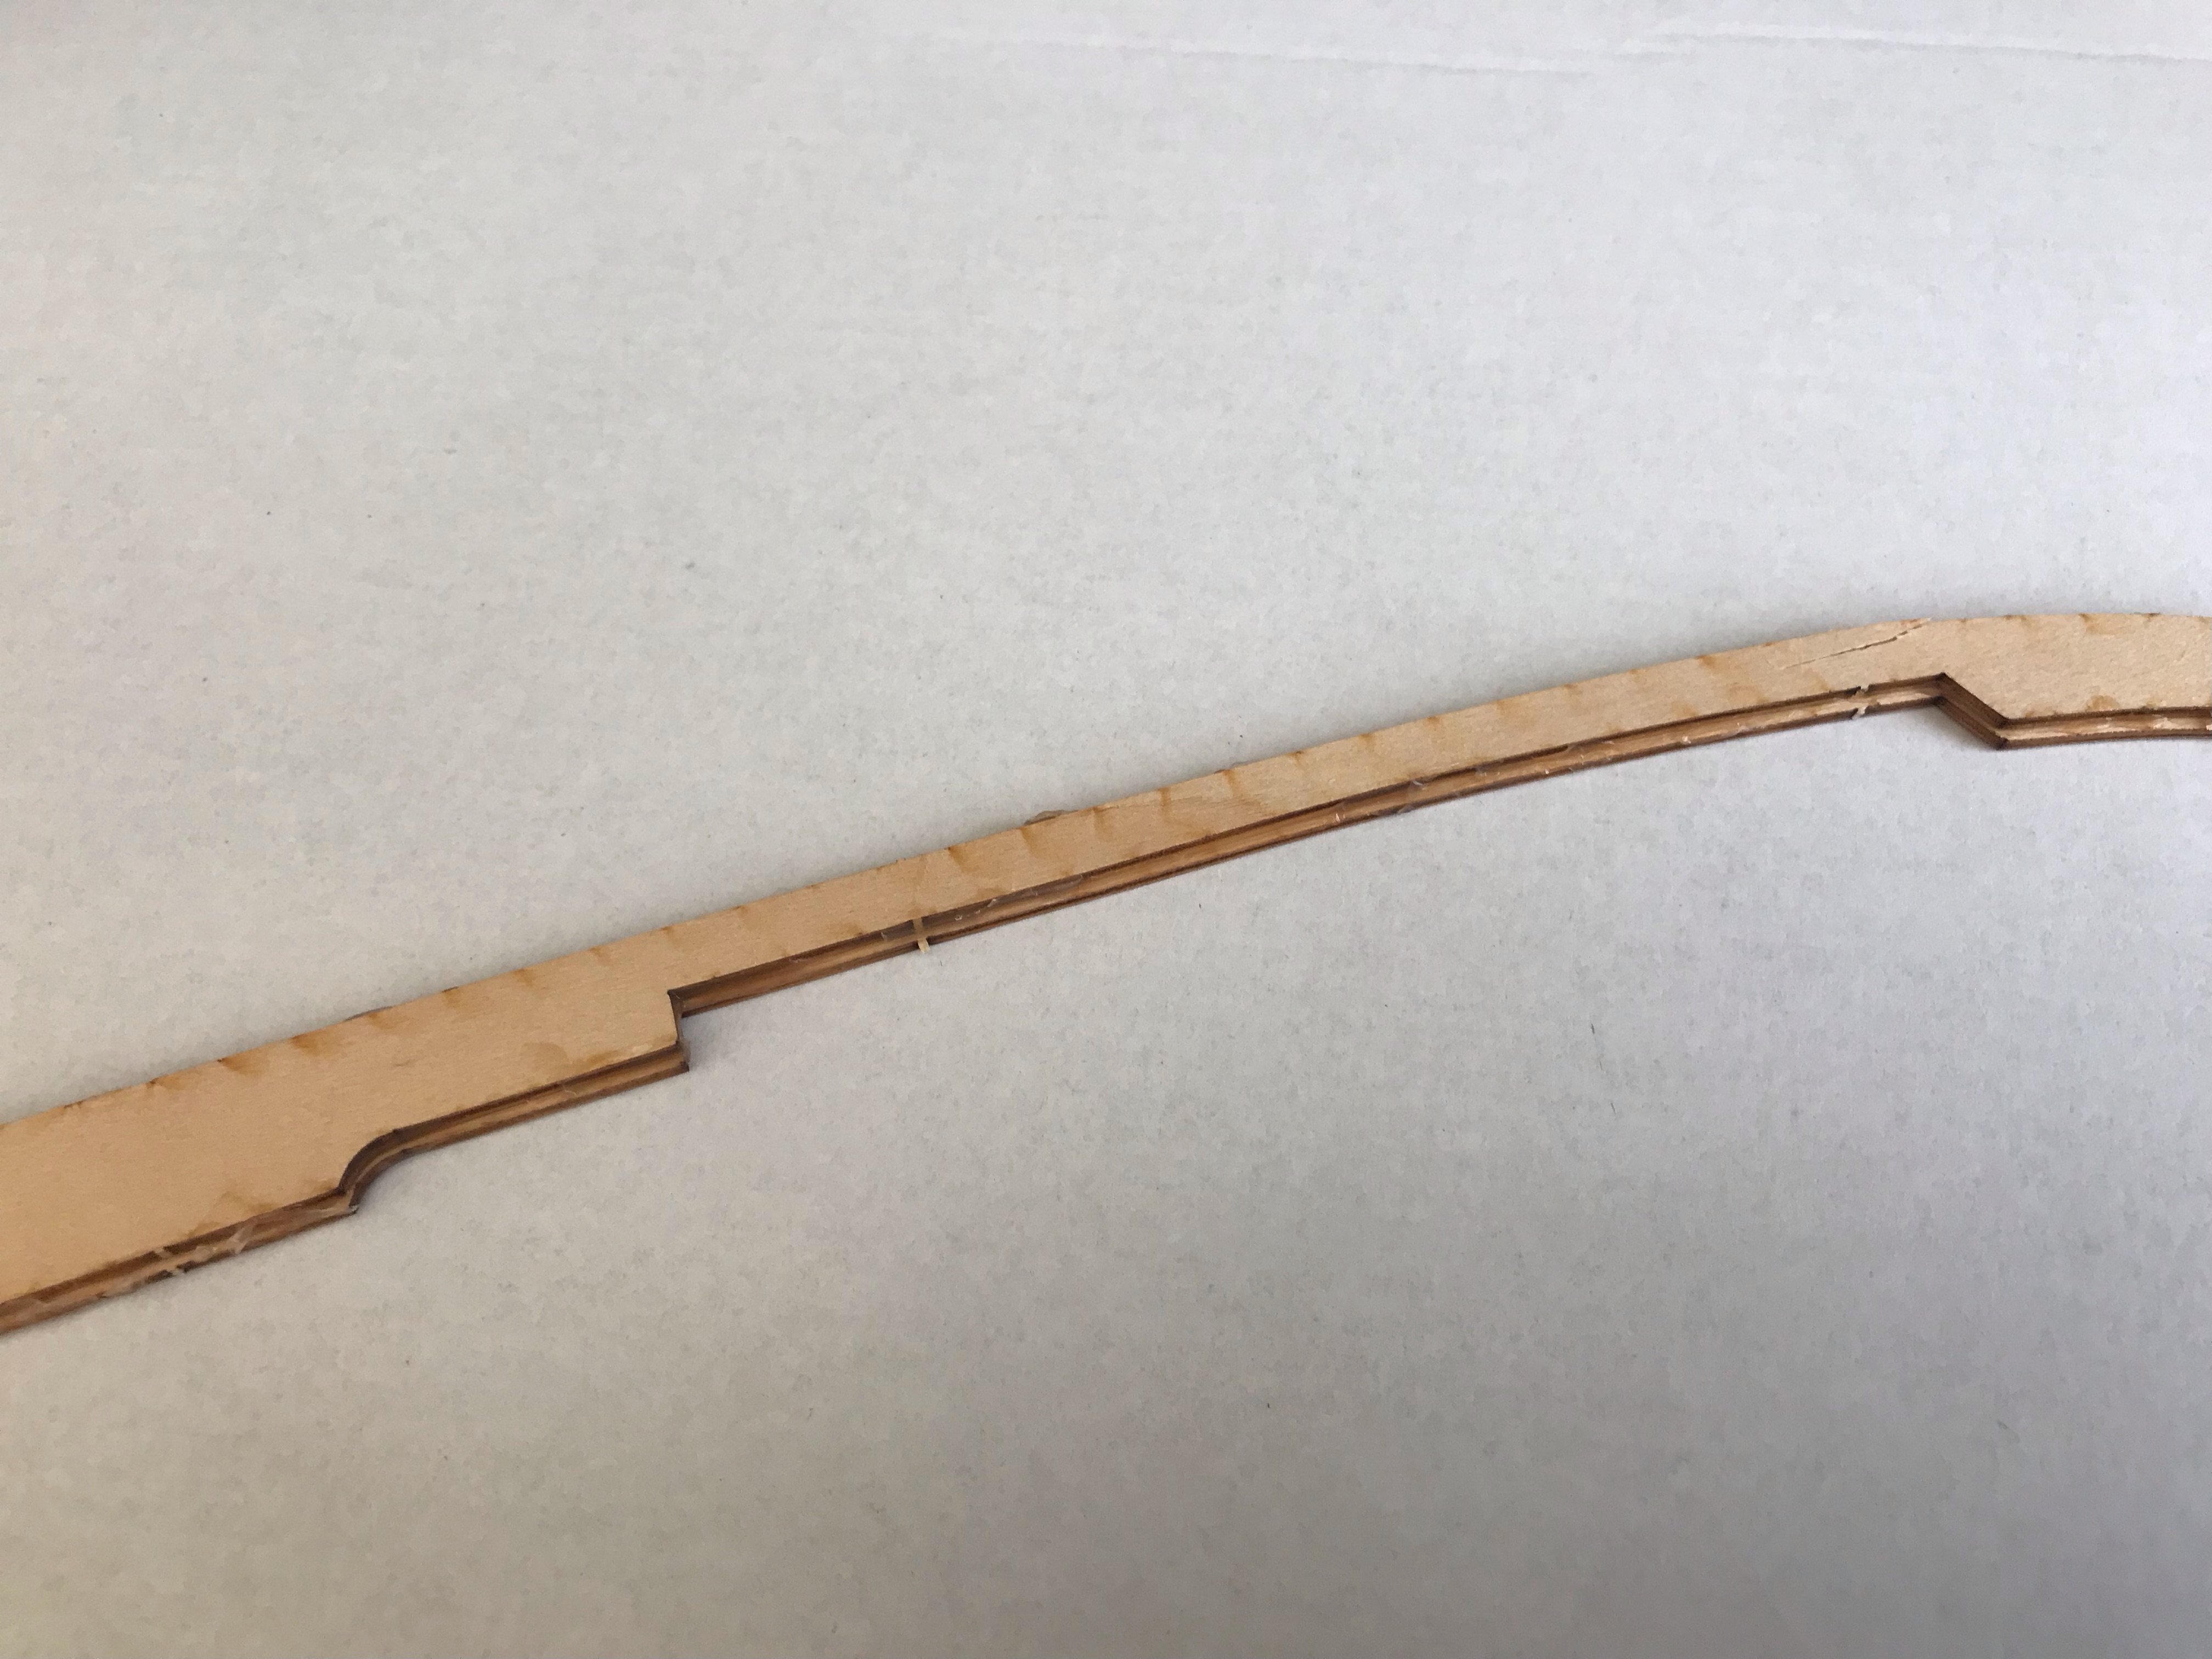
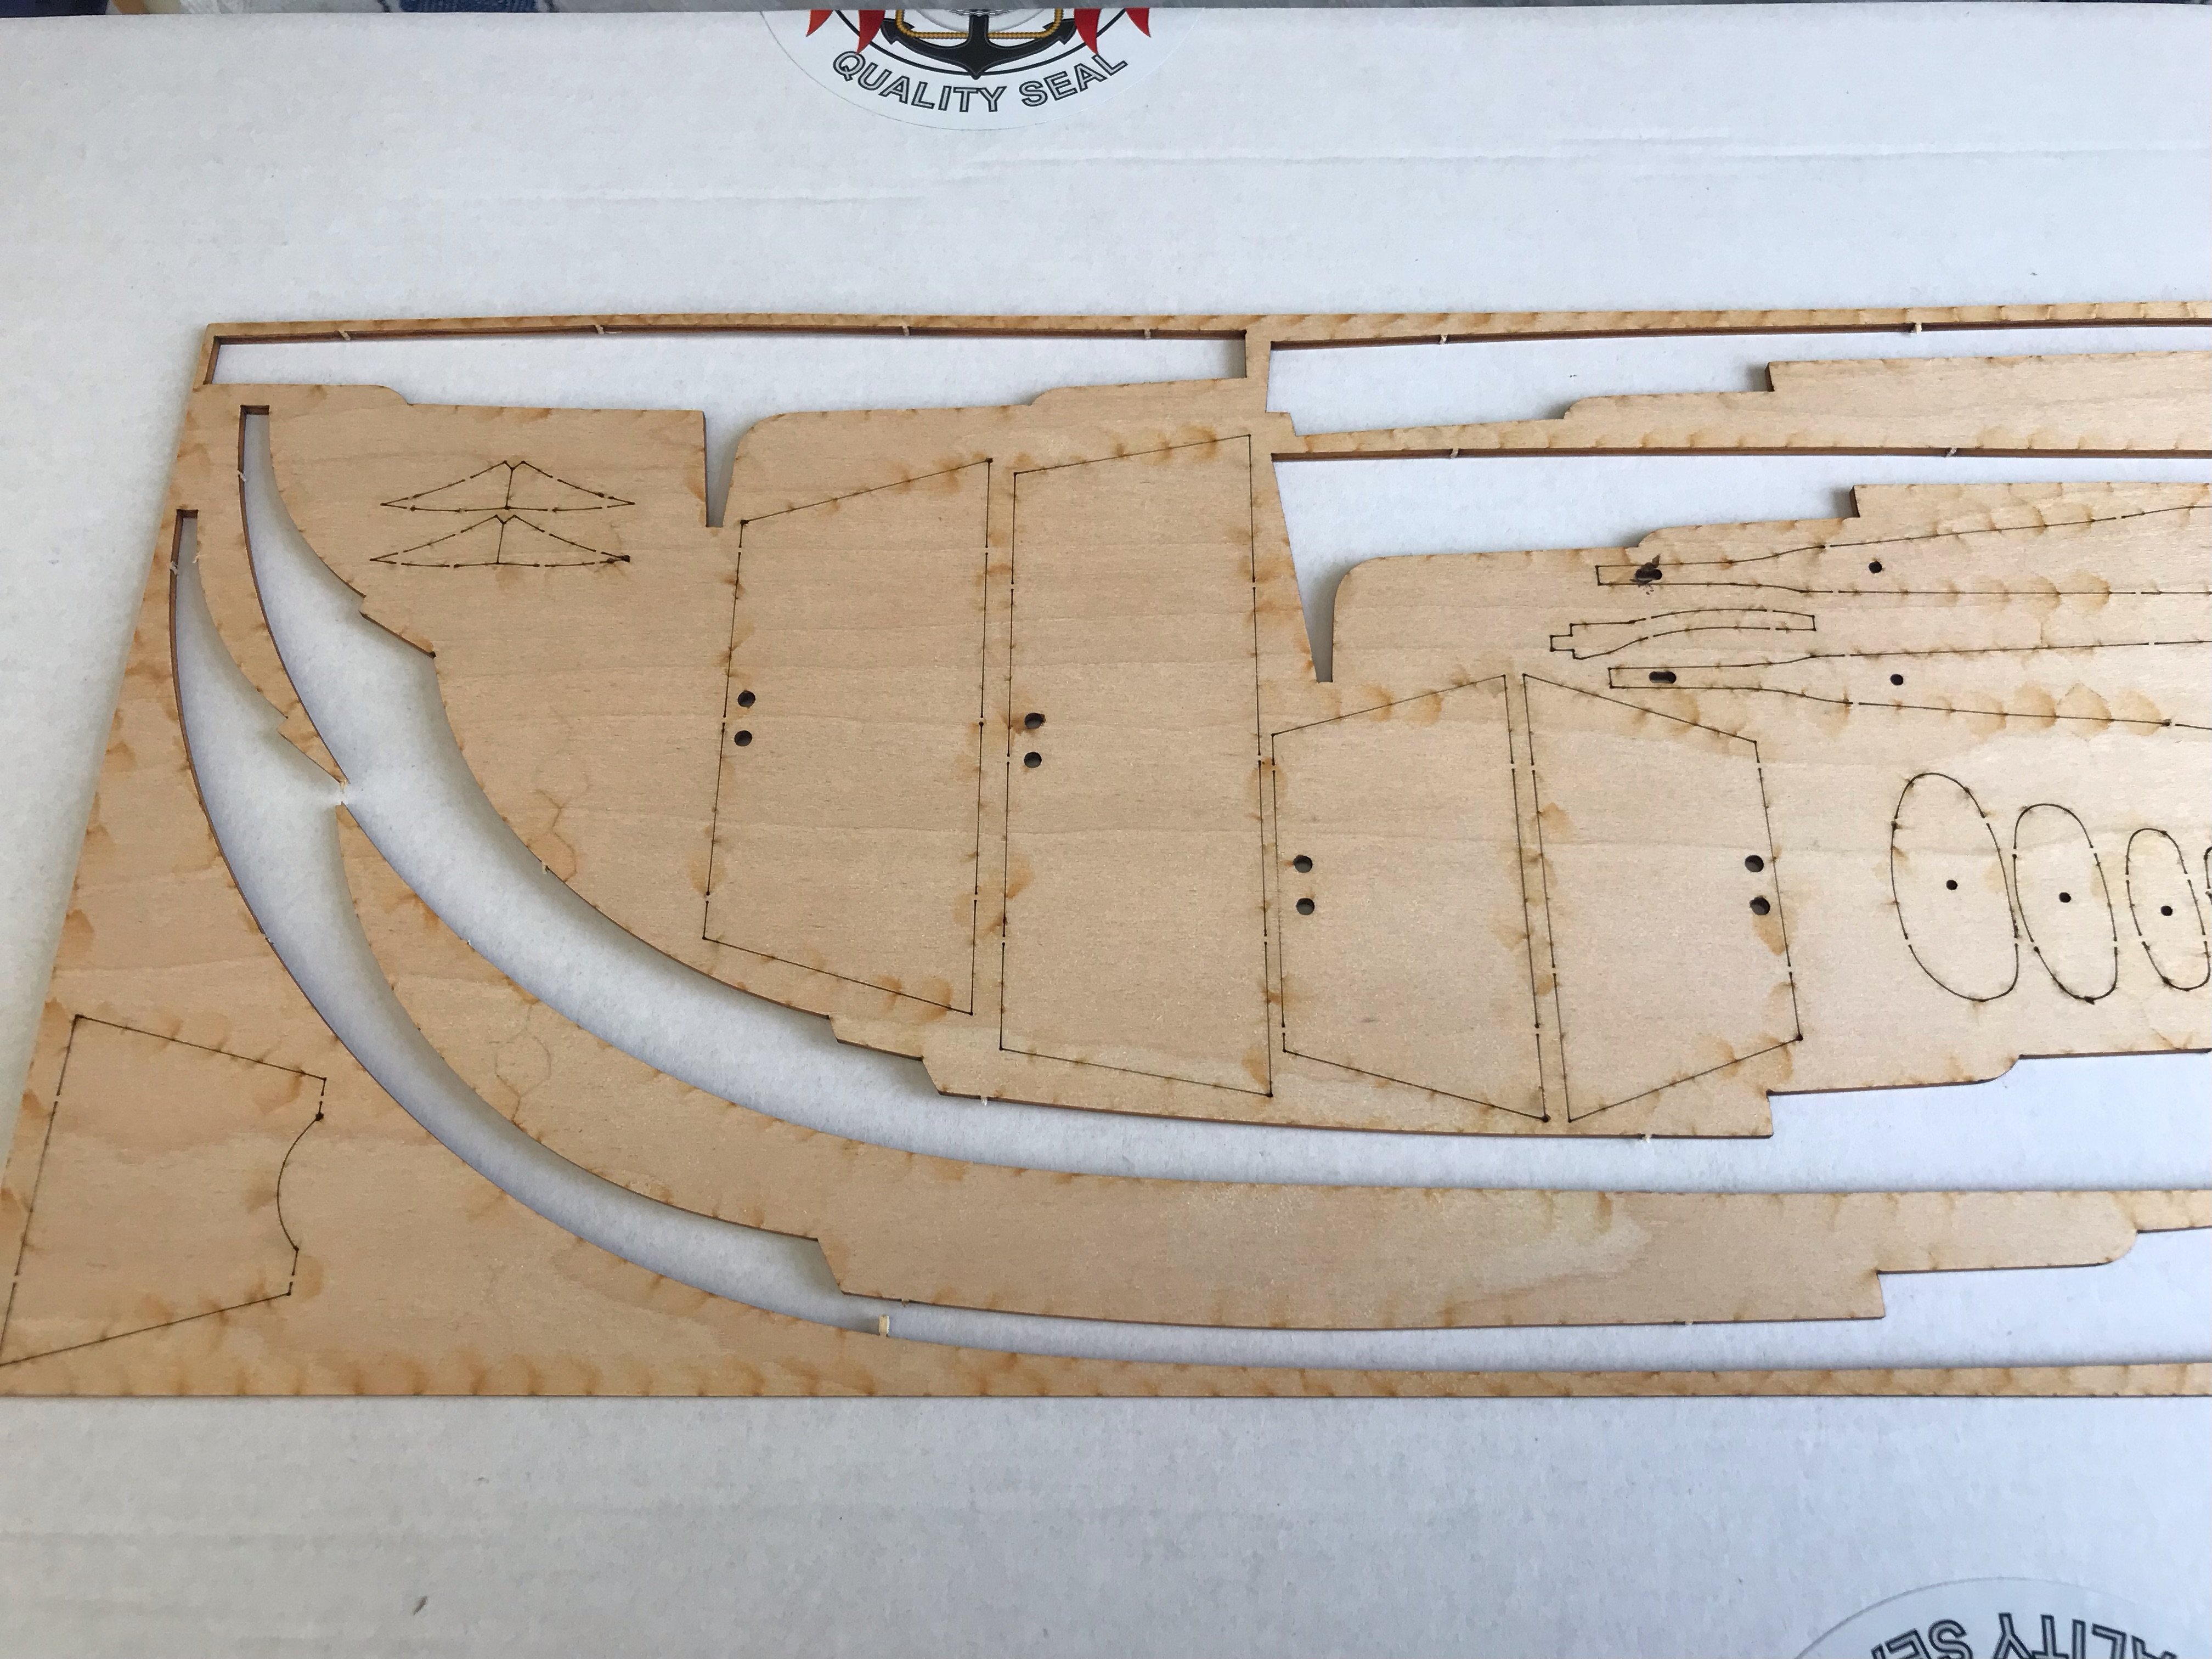
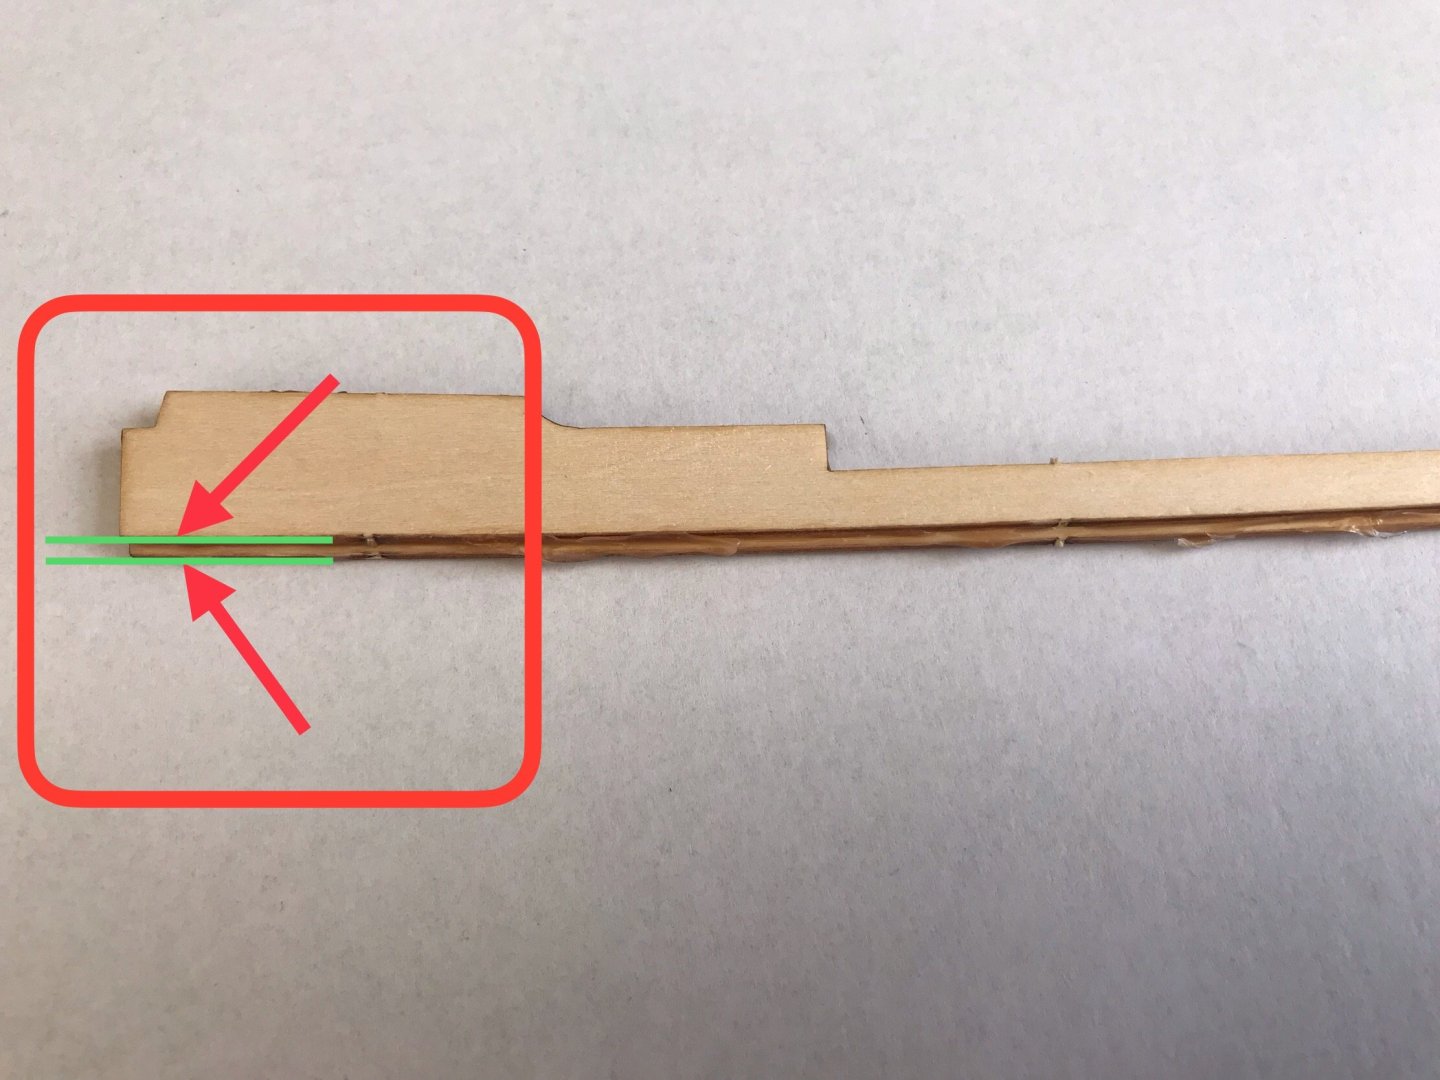
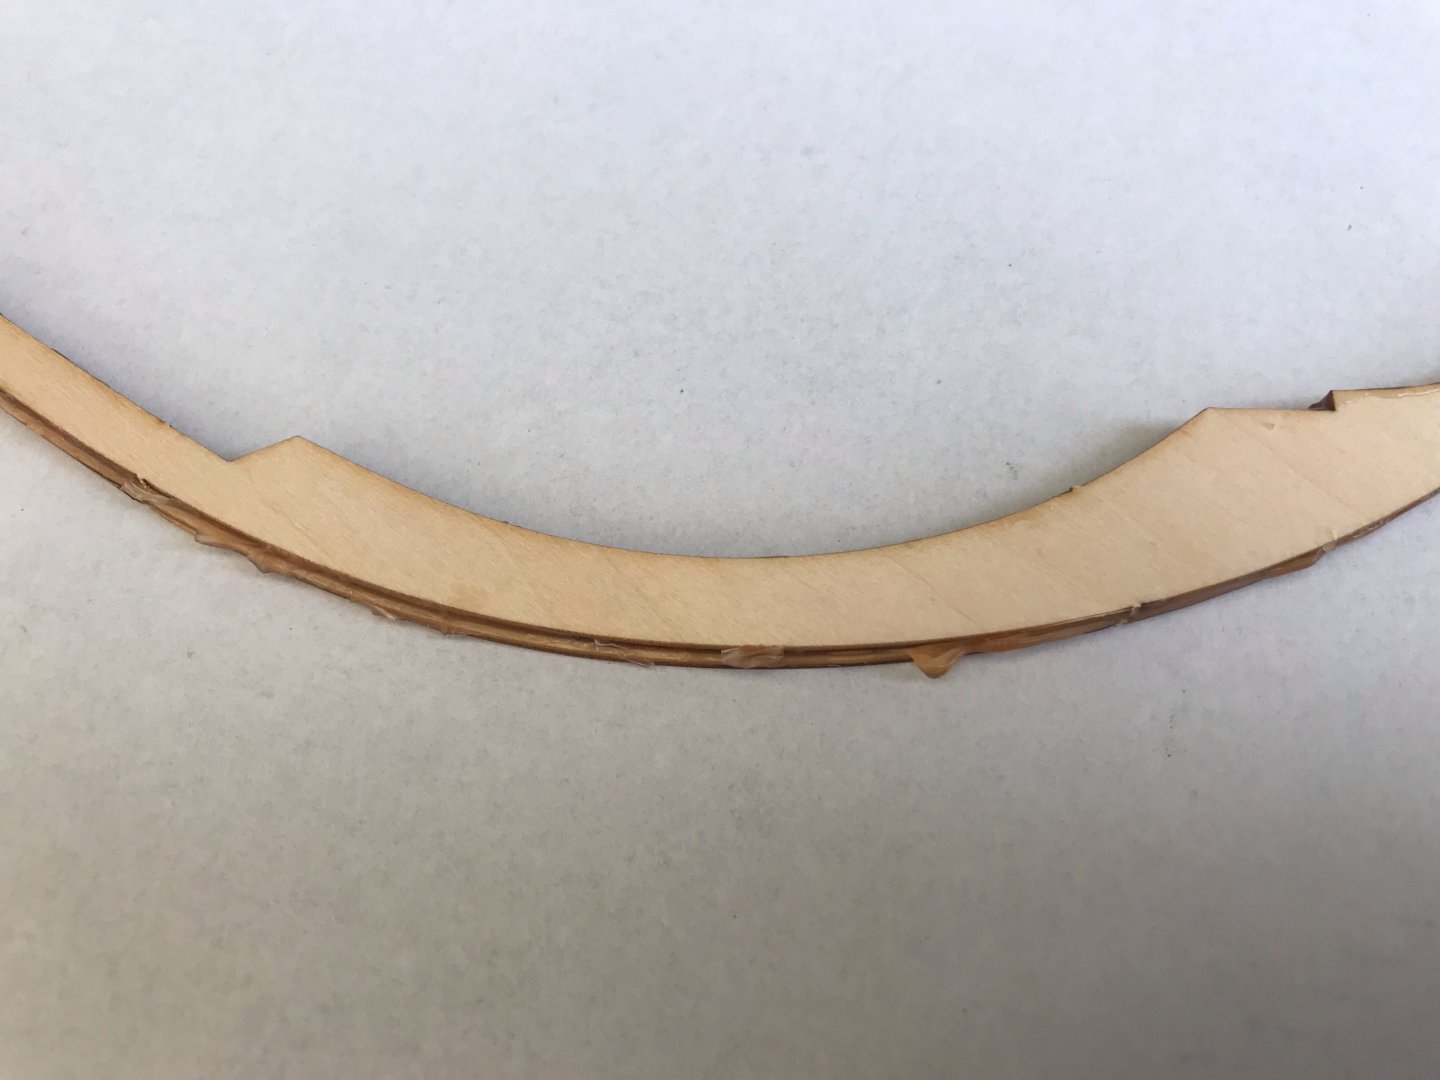
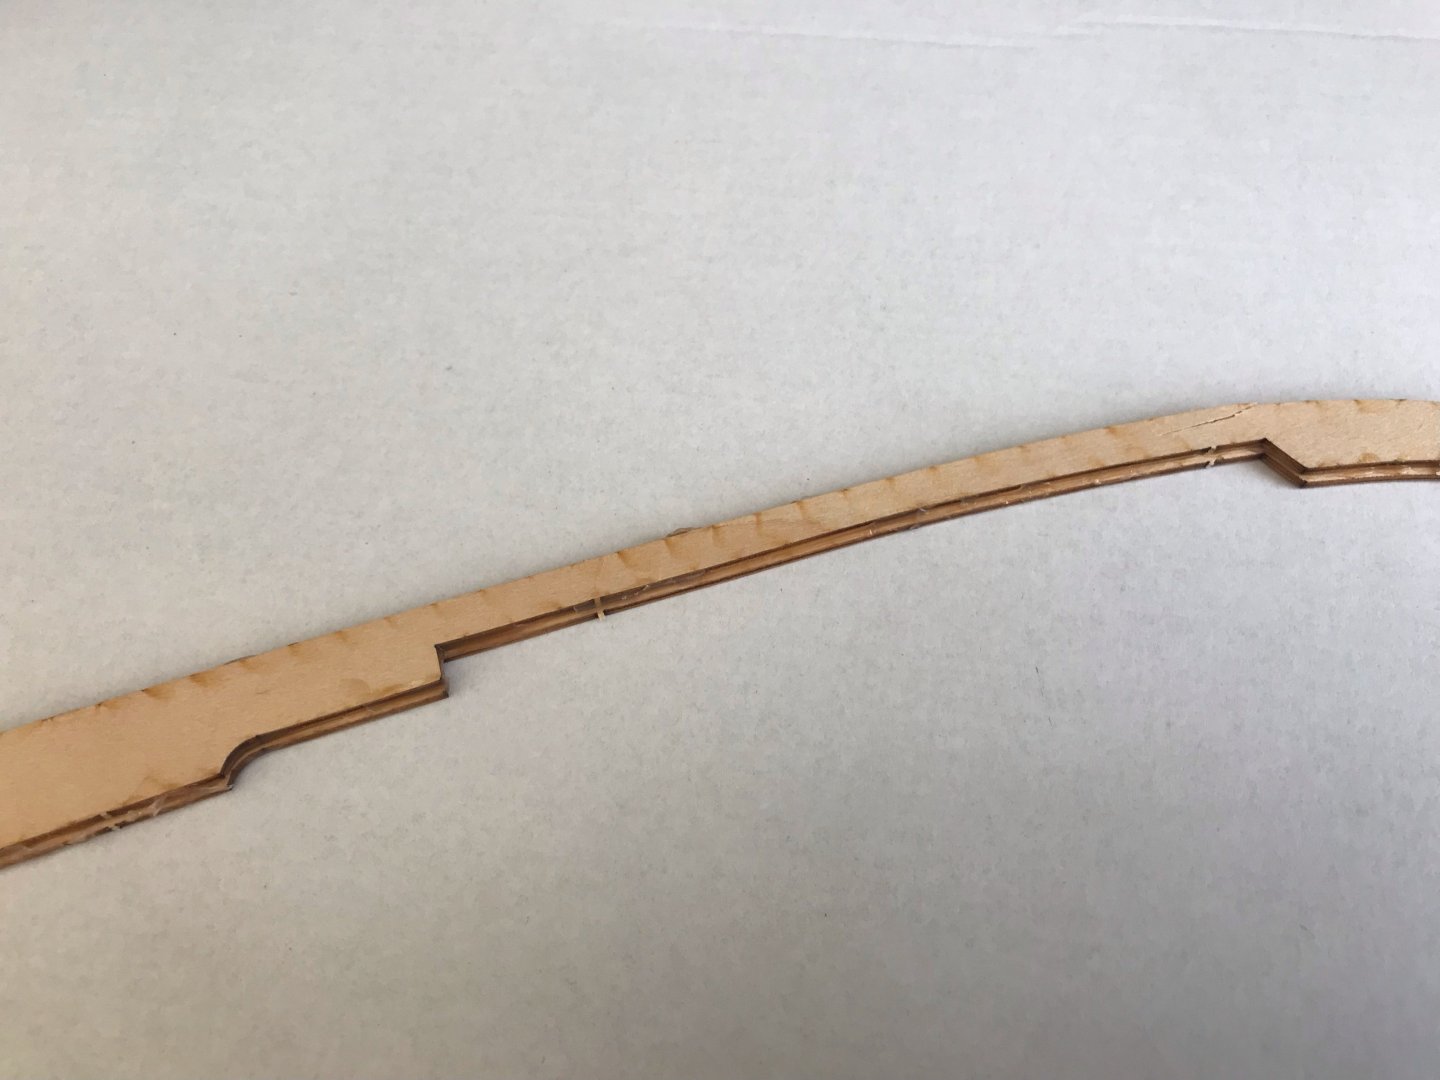
* Chapter One * Repairs Part Two I checked today my repairs. They look somewhat good but by checking on them I noticed that Part 2A is set off after glueing it. The strange thing is that the offset is different on the front and the end, like the double Part 2A twisted off as I put the clamps on. Unfortunately I didn´t notice it because of the cling film I used to wrap it in. The repair of Part 1F which broke by cutting it out of the sheet went well, also the double sits good on the damaged Part 1F. Now I´m considering to use the laser cut sheet to reproduce / copy the keel from a 2x1ft sheet of plywood with 6 mm thickness (which means I wouldn´t have to glue two identical parts onto each other (since the two parts are each 3 mm thick). Also I would cut the entire keel out of the plywood sheet, so the keel would be one piece instead glued out of four pieces (2x 1F and 2x 2A). Would be interesting to get your opinion folks. Is it worth all of this work or should I just use the parts and sand them to a proper look? I think for stability reasons it would be advised anyway to have the keel in one piece as in four pieces glued together. The keel seems a bit flimsy and woobly. I still will glue on Part 3A / 3F to support the keel in the middle where the four parts are connected. Micha
- 146 replies
-
- 3
-
-
- Roar Ege
- Billing Boats
- (and 2 more)
-
Hope I don´t step on someones toes now but I don´t like the Artisania Latina Models, also not their scales. Micha
-
Hi Richard, maybe a bit late but just joined the forum a week ago. I would be interested even if the size would be a bit hard to chew for me (would have to build a model of this size in the garage or garden under a gazebo. But in a smaller size like 1:75 I definitely would volunteer for a trial. I love the Cutty Sark and there is a nice model (with wrong hull design I guess) in 1:75, also the Revell 1:96 is a great size but I don´t really like the plastic kit, but there should be a wooden kit available somewhere though. Micha
-
Thank you Keith, that would be a more suitable scale also for me. The Cutty Sark is great but 1:40 is way to big for my house ^^, would have to build it in the garden or so which wouldn´t be appreciated. Therefore, if there would be offers for smaller sizes I would be interested. I think the biggest scale I could manage would be 1:75 / 1:72. Micha
-
I hope everyone accepts my apologies to ask that blunt question, but what is the benefit of being a NRG member? Is it more likely a benefit if you are more interested in older ships or also modern ships? Is it even a benefit for non Americans? Sorry for all those questions, I just want to find out what are the benefits for me as European, most likely interested in modern (1980+) sail yachts and ships even if there is s slight interest in ancient greek / egyptian / viking ships. Micha
-
An interesting point here, as far as I´m aware some rights on intellectual content are not lasting endless. The different time spans that I´m aware of are... 70 yrs for written content (dramatic, musical or artistic) after death of author 70 yrs for films / movies after death of director, screenplay author and composer 70 yrs for recorded work (music / sound) after publishing 1st time 50 yrs for bradcasts after the 1st broadcasting 25 yrs for layout of published editions of written, dramatic or musical work after 1st time of publishing 20 yrs for patents (must be applied for and being granted) most boat designs don´t fall under the patent rights because they don´t meet the required uniqueness and conditions. A patent only protects technical Inventions / functions but not designs. After 20 yrs the patent becomes public domain. 14 yrs for design patents (must be applied for and being granted), protects only original aspects of the appearance, not the functional aspects of the construction. The design becomes public domain after 14 yrs. 10 yrs by the Vessel Design Protection Act (USA - not EU as far as I know). Registration must be applied for and being granted. You can only use either the VDPA or a Design Patent for the hull, not both. Covers the hull and deck if sufficiently unique. Also only currently on sale and designed hulls are protected / published made available to the public (after 28th October 1998). After the 10 yrs period the design becomes public domain. Therefore some of the older models and plans don´t fall under an protection at all (when my understanding of those regulations and laws is correct. Please correct me when I´m wrong. It also is not helpful that the regulations and laws differ between the USA and Europe / Asia. Even the Smithonian Institute sells plans of ancient ships with the only legal statement saying that they don´t take any responsibility for the outcome what you are building from this plans ^^ Unfortunately some European countries (like the UK) don´t have any protective regulations for boat / ship designs since they don´t count as intellectual content that is protective since the designs and shapes way to equal. That again is a difference between the USA and Europe, we don´t have the V(essel) D(esign) P(rotection) A(ct) here. Micha
-
Hi Chris, are we allowed to create folders for the build in progress as well or only for the finished models? Since I upload them to the thread about the build I think this would be ok, don´t think it would be neccessary to upload them into a gallery as well (just takes space on the HDD / server). Micha